


Latest & Greatest

Chocolate Avocado Mousse Delightfully Rich Dessert
Are you ready to indulge in a dessert that’s both delicious and healthy? This Chocolate Avocado Mousse will surprise you
Read more…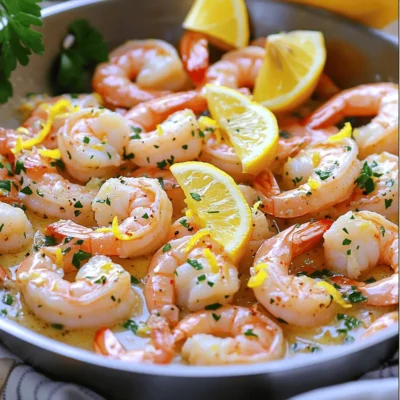
Lemon Garlic Butter Shrimp Delightful and Easy Meal
Craving a meal that’s both easy and delicious? Look no further than Lemon Garlic Butter Shrimp! This dish is simple
Read more…
Almond Joy Energy Bites Tasty and Simple Snack
Looking for a quick and tasty pick-me-up? Try my Almond Joy Energy Bites! They blend chocolate, coconut, and almonds into
Read more…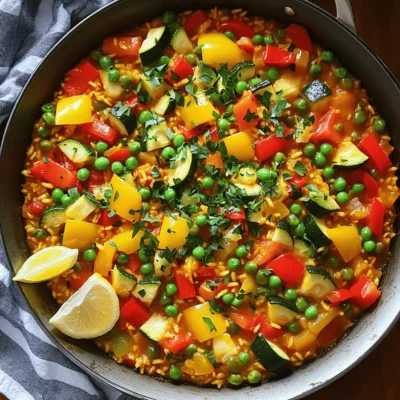
Vegetable Paella Flavorful Feast for All Occasions
Welcome to your next favorite dish: Vegetable Paella! This feast is colorful, tasty, and perfect for any event. With simple
Read more…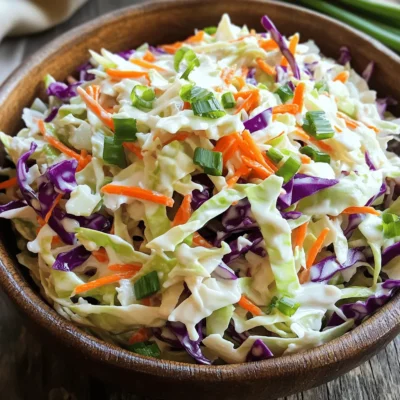
Classic Coleslaw Crunchy and Refreshing Side Dish
Looking for a perfect side dish that’s both crunchy and refreshing? This classic coleslaw recipe hits the mark! Packed with
Read more…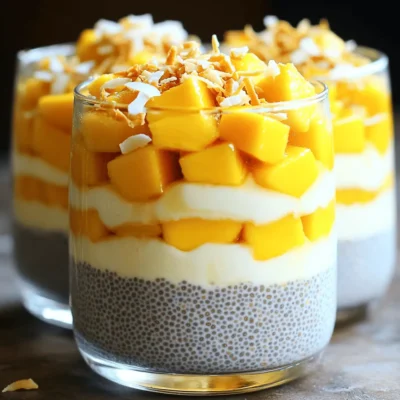
Mango Coconut Chia Pudding Delightful Healthy Treat
Craving a delicious and healthy treat? Try my Mango Coconut Chia Pudding! This simple recipe combines creamy coconut milk, sweet
Read more…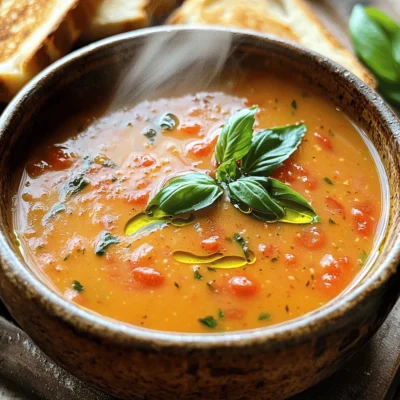
Creamy Tomato Basil Soup Flavorful and Easy Recipe
Looking for a comforting dish that packs a punch of flavor? This Creamy Tomato Basil Soup is not only easy
Read more…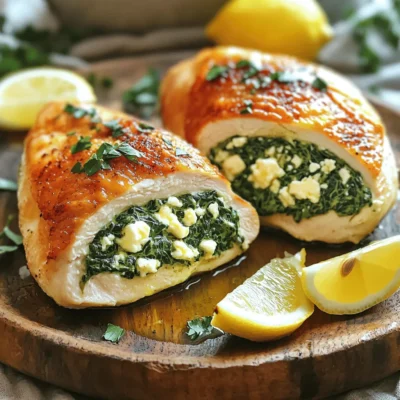
Spinach Feta Stuffed Chicken Savory and Juicy Delight
Looking for a dish that’s both savory and juicy? You’ll love Spinach Feta Stuffed Chicken! This tasty recipe is simple
Read more…browse recipes


![- 1 lb boneless chicken breast, cut into bite-sized pieces - 1 tablespoon coconut oil - 1 medium onion, diced - 3 cloves garlic, minced - 1 tablespoon fresh ginger, grated - 1 can (14 oz) coconut milk - 1 cup chicken broth - 1 bell pepper, sliced - 1 medium zucchini, sliced - 1 cup snap peas The chicken breast forms the heart of this dish. It absorbs the rich flavors and cooks perfectly when diced small. I love using coconut oil for its light taste and high smoke point. Onions, garlic, and ginger create a base that fills your kitchen with amazing aromas. Fresh vegetables add color and crunch. I prefer bell peppers, zucchini, and snap peas for their vibrant look and taste. These vegetables cook quickly, keeping their shape and nutrients. - 2 tablespoons red curry paste - 2 tablespoons fish sauce - 1 tablespoon brown sugar - Juice of 1 lime Red curry paste brings warmth and depth. It combines chili, garlic, lemongrass, and spices, making each bite exciting. Fish sauce adds a savory note, balancing the dish well. Brown sugar gives a hint of sweetness, while lime juice brightens everything up. - Fresh cilantro, chopped - Cooked jasmine rice Cilantro adds freshness and a pop of green. I always sprinkle it on top before serving. Jasmine rice is the perfect side. Its fluffy texture soaks up the curry, making every bite satisfying. For the full recipe, check out the [Full Recipe]. 1. Start by heating coconut oil in a large skillet over medium heat. 2. Add the diced onion and sauté for about 2-3 minutes until it turns soft and clear. 3. Next, stir in the minced garlic and grated ginger. Cook for one more minute until you smell the spices. 1. Now, add the chicken pieces into the skillet. Cook them until they are no longer pink, which takes about 5-7 minutes. 2. Once the chicken is cooked, stir in the red curry paste. Mix it well with the chicken and onions. This step builds a strong flavor base. 1. Pour in the coconut milk and chicken broth. Stir everything together until well combined. 2. Bring this mixture to a gentle simmer. Then, add the sliced bell pepper, zucchini, and snap peas. 3. Let it simmer for 5-7 more minutes until the veggies are tender but still bright. 4. Finally, stir in the fish sauce, brown sugar, and lime juice. Taste and adjust the seasoning if needed. This simple yet flavorful process brings out the best in Thai Coconut Curry Chicken. For the full recipe, check the earlier section. Adjusting spice levels To make your curry just right, taste as you cook. Start with a small amount of red curry paste. You can always add more if you want extra heat. If it gets too spicy, add more coconut milk to cool it down. Ensuring tender chicken Cook the chicken pieces until they are no longer pink. This usually takes about 5-7 minutes. Overcooking can make the chicken tough. Always check the chicken’s internal temp; it should reach 165°F (75°C) for safety. Best sides to serve with Serve your curry with jasmine rice. The rice soaks up all the tasty sauce. You can also add a side of cucumber salad for a fresh crunch. Alternative garnishing ideas Fresh cilantro adds a nice touch. You can also use lime wedges for a tangy kick. If you want more color, try adding sliced red chili on top. Overcooking veggies Cook veggies until they are tender but still bright. This keeps them crisp and colorful. Overcooked veggies can turn mushy and lose their flavor. Not balancing flavors Taste your curry before serving. If it’s too salty, add a pinch of sugar. If it’s too sweet, a squeeze of lime can help. Finding the right balance makes the dish shine. For a detailed guide, check the Full Recipe. {{image_2}} You can switch up the protein in this dish. If you want to use shrimp, add it in the last few minutes of cooking. Shrimp cooks fast and will stay juicy. For a plant-based option, try tofu. Cut firm tofu into cubes. Sauté it until golden before adding it to the curry. If you prefer beef, you can substitute chicken with thinly sliced beef. Cook it first until it's browned. Then, follow the same steps as you would with chicken. You can make this dish even better by adding more veggies. Seasonal vegetables work great. Try carrots, broccoli, or bell peppers for color and crunch. You can also add zucchini for a nice texture. Incorporating leafy greens like spinach or bok choy adds nutrition. Just toss them in at the end of cooking. They will wilt quickly and retain their bright color. For a gluten-free version, substitute fish sauce with soy sauce or tamari. This will keep the salty flavor without gluten. To make a fully plant-based version, leave out the chicken and fish sauce. Add more vegetables or beans for protein. You can also use vegetable broth instead of chicken broth. This way, you keep all the flavor and make it suitable for vegans. For the complete recipe, check the [Full Recipe]. Thai Coconut Curry Chicken stays fresh for about 3-4 days in the fridge. Make sure to cool the dish to room temperature before storing it. Use an airtight container to keep the flavors intact. This way, you can enjoy the rich taste later in the week. You can freeze Thai Coconut Curry Chicken for up to 3 months. Portion it into meal prep containers for easy meals. To freeze, let the dish cool completely. Then, cover it tightly with plastic wrap or foil before sealing it in a freezer bag. When you’re ready to eat, thaw it overnight in the fridge. This keeps the texture nice. You can also use the microwave for a quicker option, but I recommend the fridge for best results. To reheat, use the stove for best flavor and texture. Warm it gently over medium heat until hot. Stir often to prevent sticking. You can also microwave it, but be careful not to overcook it. This dish tastes best when it’s just heated through. Enjoy it over fresh jasmine rice for a delightful meal. For the complete recipe, check out the Full Recipe. If you want a non-dairy option, almond milk works well. Use unsweetened almond milk to keep the flavor in check. You can also use cashew milk or soy milk. For a thicker texture, blend soaked cashews with water. For low-fat options, try using light coconut milk. This still gives a nice coconut flavor but with less fat. Another option is to mix chicken broth with a splash of coconut extract. This keeps some flavor without the creaminess. The spice level can vary based on the curry paste used. Some pastes are mild, while others pack a punch. You can adjust the heat by adding less curry paste. Start with one tablespoon and taste as you go. If you want more heat, add chili flakes or fresh chilies. Remember, you can always add more spice, but it’s hard to take it away. So, go slow to find your perfect heat level. Yes, you can make this dish ahead. I recommend cooking it and then cooling it down before storage. Store it in an airtight container in the fridge for up to three days. For meal prepping, cook the chicken and sauce first. Then, add fresh veggies later to keep them crisp. This helps the flavors meld together nicely. Reheat gently to avoid overcooking the chicken or veggies. You can also freeze the curry. Just let it cool, then transfer it to a freezer-safe container. It will stay fresh for up to three months. When ready to eat, thaw in the fridge overnight and reheat on the stove or microwave. Thai Coconut Curry Chicken is a flavorful dish packed with fresh ingredients. We explored key components like chicken, coconut oil, and vegetables, along with essential spices such as red curry paste and fish sauce. I shared step-by-step cooking instructions to ensure you achieve the perfect curry. Remember to adjust spice levels based on your taste. With tips for different proteins and storage advice, this dish is versatile and easy to enjoy. Use these ideas to create a delicious meal that fits your needs. Cooking Thai coconut curry at home can be both fun and rewarding.](https://foodishtalk.com/wp-content/uploads/2025/06/fb555cd1-bbb9-42b7-9087-7639f6ec817e.webp)
Thai Coconut Curry Chicken Flavorful Weeknight Meal
Looking for a quick and tasty dinner option? Thai Coconut Curry Chicken is the answer! This dish packs a punch of flavor and is…
My Latest Desserts

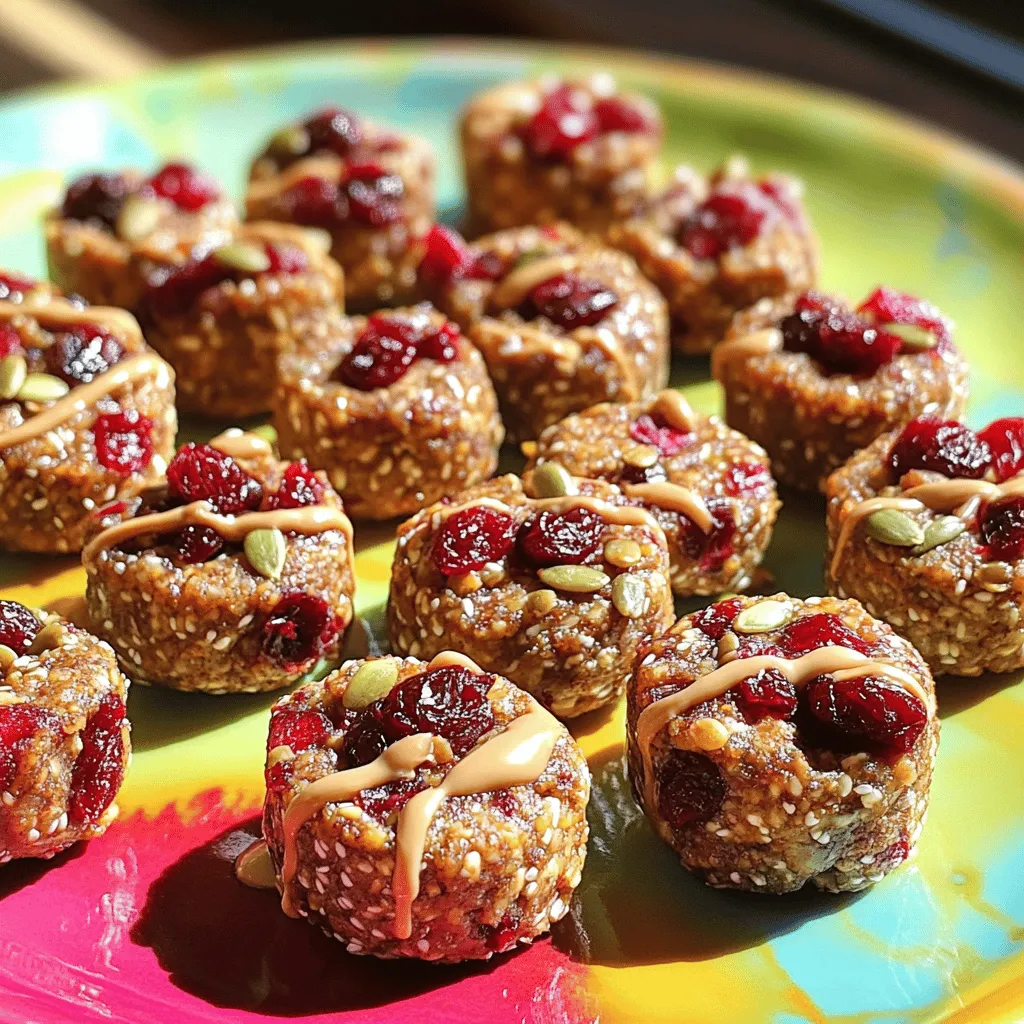
Cherry Tahini Energy Bites Healthy Snack Recipe
Looking for a quick, healthy snack? Let me introduce you to Cherry Tahini Energy Bites! Packed with flavor and nutrition, Read Full Recipe-
Root Beer Cream Bars Irresistible and Simple Treat
If you love the sweet nostalgia of root beer, you’re in for a treat! Root Beer Cream Bars combine creamy Read Full Recipe -
Cherry Chocolate Lava Mug Cake Delightful Recipe
Craving something sweet and quick? You’re in for a treat with my Cherry Chocolate Lava Mug Cake! This recipe packs Read Full Recipe -
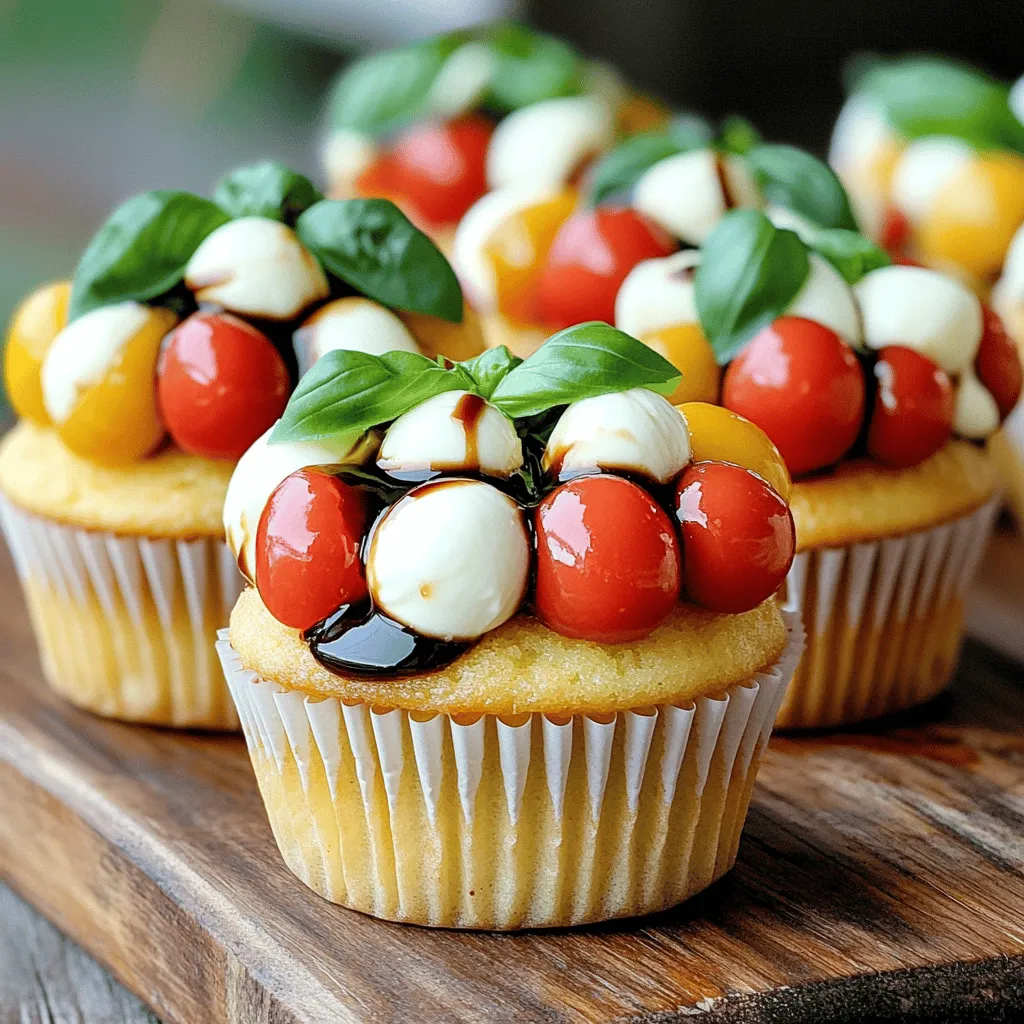
Caprese Stuffed Cupcakes Flavorful and Unique Treat
Are you ready to treat your taste buds to something new? Caprese Stuffed Cupcakes mix fresh flavors and fun in Read Full Recipe -
Mango Tajin Cake Pops Tasty and Fun Treats
Craving a unique treat? Try my Mango Tajin Cake Pops! These fun bites blend sweet mango with the zesty kick Read Full Recipe -
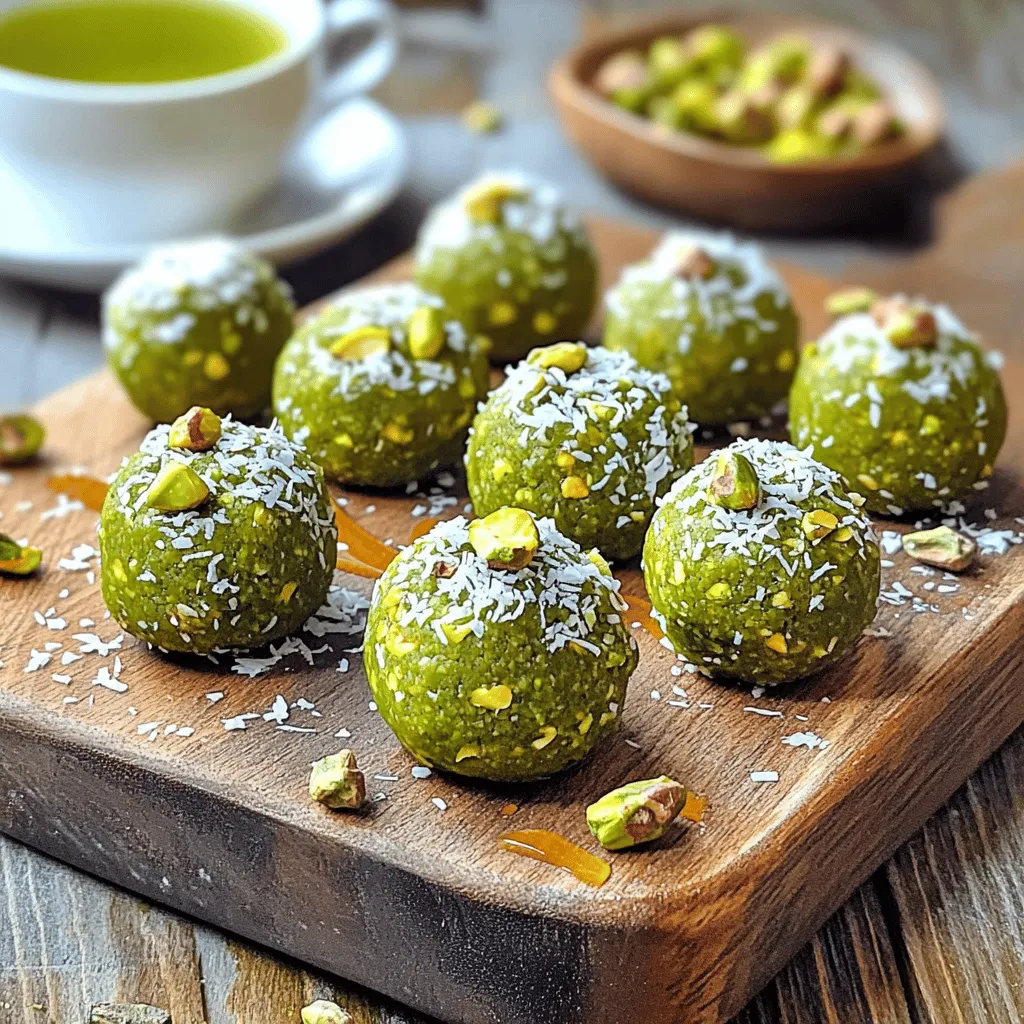
Matcha Pistachio Energy Bites Nourishing Snack Option
Looking for a tasty and healthy snack? Let me introduce you to Matcha Pistachio Energy Bites! Packed with oats, nuts, Read Full Recipe -
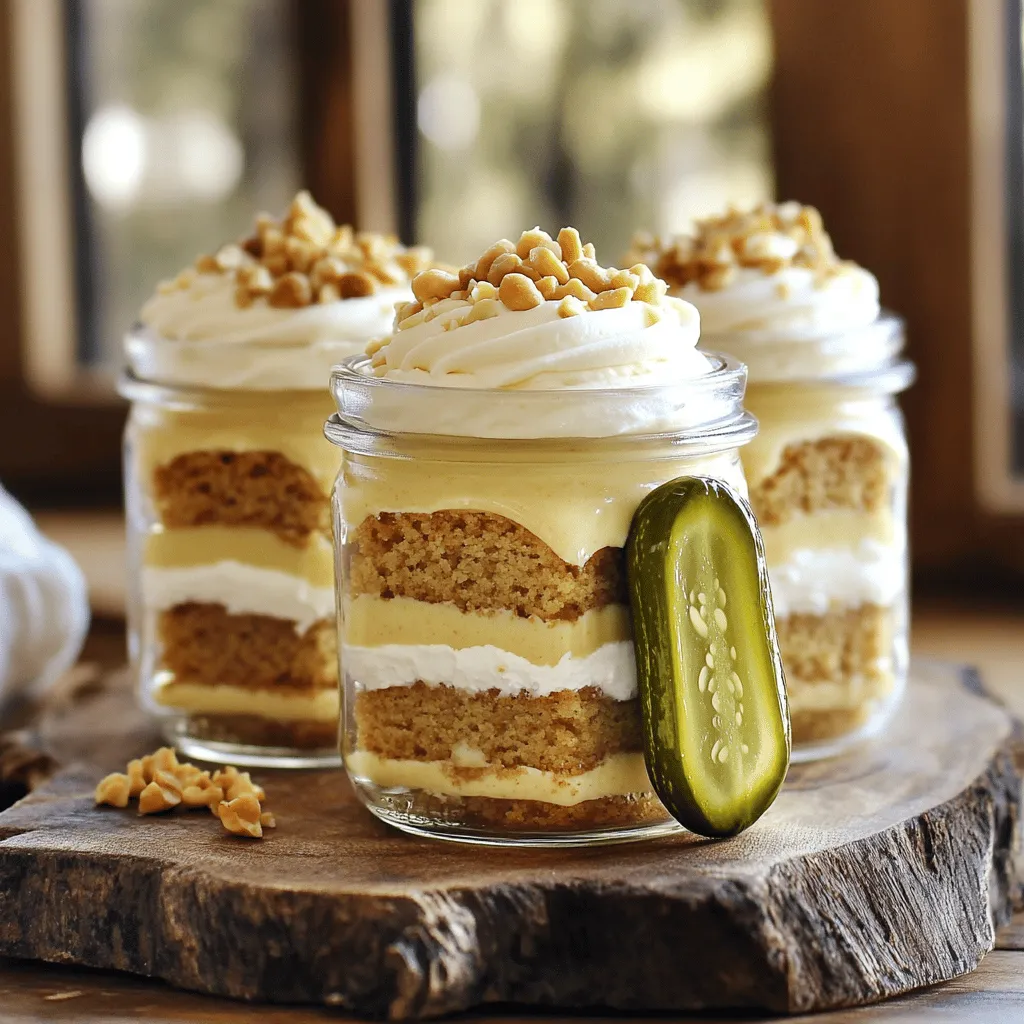
Peanut Butter Pickle Cake Jars Delightful and Unique Treat
Are you ready to try something truly different? Peanut Butter Pickle Cake Jars combine sweet and tangy flavors in a Read Full Recipe -
Healthy Banana Oat Muffins Nutrient-Packed Recipe
Looking for a tasty snack that’s packed with nutrients? You’re in the right place! My Healthy Banana Oat Muffins recipe Read Full Recipe -
No-Bake Chocolate Oat Bars Simple and Tasty Treat
Looking for a quick, tasty treat? You’re in the right place! My No-Bake Chocolate Oat Bars are simple to make Read Full Recipe -
No-Bake Chocolate Oatmeal Bars Simple and Tasty Treat
Looking for a simple and tasty treat that’s also healthy? You’ve found it! My No-Bake Chocolate Oatmeal Bars are a Read Full Recipe


hey,
i’m !
I’m so happy you’re here!
I pour heart and skill into every recipe I create. I know you’ll taste the difference now let’s enjoy this flavorful adventure together.

![- 1 medium zucchini, grated - 1 cup fresh blueberries (or frozen) - 1 cup all-purpose flour - 1 cup whole wheat flour - 1 teaspoon baking powder - 1/2 teaspoon baking soda - 1/2 teaspoon salt - 1 teaspoon ground cinnamon - 1/2 cup vegetable oil - 1 cup granulated sugar - 2 large eggs - Zest of 1 lemon - 2 tablespoons lemon juice - 1 teaspoon vanilla extract To make Lemon Blueberry Zucchini Bread, gather these key ingredients. The zucchini gives moisture. Blueberries add sweetness and flavor. The mix of all-purpose and whole wheat flours provides a nice texture. Baking powder and baking soda help it rise. Salt and cinnamon enhance the taste. Vegetable oil keeps it moist. Sugar adds sweetness, while eggs bind everything together. The lemon zest and juice brighten the flavor. Finally, vanilla gives a lovely aroma. - Nuts (walnuts, pecans) - Seeds (chia, flaxseed) - Spices (nutmeg, ginger) - Glazes (lemon glaze, cream cheese frosting) - Toppings (powdered sugar, lemon zest) You can elevate your bread with optional ingredients. Adding nuts or seeds boosts nutrition. They also add crunch. Spices like nutmeg or ginger can bring warmth. A lemon glaze or cream cheese frosting can make it sweeter and richer. Toppings like powdered sugar or extra lemon zest make it look fancy. - 1 cup = 240 mL - 1 teaspoon = 5 mL - 1 tablespoon = 15 mL When measuring, you can convert to metric units. This helps if you're using different measuring tools. For example, 1 cup equals 240 mL. If you need more or less, adjust the amounts. Use these conversions to keep your baking accurate. 1. First, preheat your oven to 350°F (175°C). This helps the bread bake evenly. 2. Prepare a 9x5 inch loaf pan. You can grease it with butter or use parchment paper for easy removal. 3. In a medium bowl, mix the all-purpose flour and whole wheat flour. Add baking powder, baking soda, salt, and cinnamon. Stir well and set aside. 1. In a large bowl, whisk together vegetable oil and sugar. Make sure they blend well. 2. Next, add the eggs, lemon zest, lemon juice, and vanilla extract. Whisk until smooth. 3. Now, fold in the grated zucchini gently. Add the blueberries, being careful not to burst them. 4. Gradually mix the dry ingredients into the wet ingredients. Stir until just combined. Avoid overmixing for a light bread. 1. Pour the batter into your prepared loaf pan. Spread it evenly with a spatula. 2. Bake in the preheated oven for 55-60 minutes. Check with a toothpick; it should come out clean when done. 3. When baked, remove the bread from the oven. Let it cool in the pan for 10 minutes. Transfer it to a wire rack to cool completely. This Lemon Blueberry Zucchini Bread is simple and full of flavor! For the full recipe, check out the details above. Enjoy your baking! To make great lemon blueberry zucchini bread, avoid overmixing your batter. When you mix too much, the bread can turn tough. Stir just until combined. This keeps the texture light and fluffy. Moisture is key for this bread. Grated zucchini adds moisture naturally. Make sure to squeeze out excess water after grating. Too much water can make the bread soggy. Adjusting sweetness is easy. If you like it sweeter, add more sugar. If you prefer less sweetness, cut back. Taste the batter before baking to find your perfect balance. Using fresh blueberries is best, but frozen blueberries work too. If you use frozen, do not thaw them. Adding them straight from the freezer helps keep the bread from turning blue. If your bread sinks in the middle, it could be underbaked. Always check with a toothpick. If it comes out clean, your bread is done. To prevent burning, keep an eye on your oven temperature. If the top browns too fast, cover it with foil. This protects the bread while it finishes baking. For the full recipe, check the section above. {{image_2}} You can make this lemon blueberry zucchini bread your own with fun add-ins. - Nuts: Add walnuts or pecans for extra crunch. They bring a nice flavor too. - Other fruits: Try cranberries or raspberries for a twist. These fruits add more color and taste. You can easily adjust this recipe for special diets. - Gluten-free versions: Use gluten-free flour instead of regular flour. This change keeps the bread light and tasty. - Low-sugar alternatives: Substitute granulated sugar with a sugar alternative. Stevia or monk fruit work well, making it sweeter without extra calories. Feel free to change the flavors to match your taste. - Citrus blends: Mix in some orange or lime zest. This adds a fresh burst of flavor. - Spice variations: Consider adding nutmeg or ginger. These spices give warmth and depth to your bread. These variations let you customize your lemon blueberry zucchini bread. You can find the full recipe [Full Recipe] for the base to start experimenting! To keep your Lemon Blueberry Zucchini Bread fresh, store it properly. You have two options: room temperature or refrigeration. - Room Temperature Storage: Place the bread in an airtight container. It stays good for about 2-3 days at room temperature. Make sure it's cool before sealing. This keeps it moist. - Refrigeration Tips: If you want to keep it longer, put it in the fridge. Wrap it in plastic wrap or foil first. It will last for about a week. Just remember, refrigeration can change the texture a bit. If you want to enjoy this bread later, freezing is a great option. Here’s how to do it right. - Proper Wrapping Techniques: Wrap the cooled bread tightly in plastic wrap. Then, put it in a freezer bag or an airtight container. This helps prevent freezer burn. - Thawing Instructions: When you’re ready to eat it, take it out of the freezer. Leave it in the fridge overnight or let it sit at room temperature for a few hours. It will taste just as good as fresh. You want to enjoy your bread, not eat spoiled food. Here are some signs to look for. - Recognizing Mold and Off Odors: Check for any mold on the surface. If you see any, toss the bread. Also, if it smells sour or strange, that’s a red flag. - Best Before Dates: Always keep track of how long it's been stored. If it’s past a week in the fridge or a few months in the freezer, it’s safer to throw it away. To keep your Lemon Blueberry Zucchini Bread moist, follow these tips: - Use fresh zucchini. Grate it and squeeze out some water but not all. - Add a little extra oil. This helps add moisture. - Don’t overbake your bread. Check for doneness early. - Let the bread cool in the pan. This traps moisture. These steps help make sure your bread stays tender and delicious. Yes, you can use frozen zucchini. Here are some pros and cons: Pros: - It saves time. No need to grate fresh zucchini. - It can be more convenient. Frozen zucchini is often cheaper. Cons: - It may have more water. Drain it well before using. - Texture might be softer. This can change the final look of your bread. Using frozen zucchini can work well if you prepare it right. Yes, you can make this bread vegan. Here are some substitutes: - Use flax eggs. Mix 1 tablespoon of flaxseed meal with 2.5 tablespoons of water. - Swap vegetable oil for coconut oil or applesauce. This keeps it moist. - Replace regular sugar with coconut sugar or maple syrup. These changes help you enjoy the same tasty bread without animal products. To check if your bread is done, use a toothpick. Here’s how: - Insert a toothpick into the center of the bread. - If it comes out clean, your bread is ready. - Look for a golden color and a firm top. These signs tell you your Lemon Blueberry Zucchini Bread is perfectly baked. This blog post covered everything you need for Lemon Blueberry Zucchini Bread. We talked about essential and optional ingredients. You learned handy measurement conversions, step-by-step instructions, and baking tips. I shared variations and storage info, plus answers to common questions. Baking this bread can be fun and tasty. Don't hesitate to experiment with different ingredients or flavors. Enjoy your baking journey and the delicious results!](https://foodishtalk.com/wp-content/uploads/2025/06/5c64a64b-122f-4dcb-90c8-ccde213430b7-300x300.webp)


Chicken Enchilada Skillet Flavor-Packed Comfort Meal
If you’re craving a meal that’s both comforting and bursting with flavor, look no further! This Chicken Enchilada Skillet is an easy one-pan dish…
![To make a Chicken Enchilada Skillet, you need: - 1 lb (450g) boneless, skinless chicken breasts, cut into bite-sized pieces - 1 tablespoon olive oil - 1 small onion, diced - 2 cloves garlic, minced - 1 bell pepper (red or green), diced - 1 can (15 oz) black beans, rinsed and drained - 1 can (10 oz) enchilada sauce - 1 cup corn (fresh or frozen) - 1 teaspoon ground cumin - 1 teaspoon chili powder - Salt and pepper to taste - 1 ½ cups shredded Mexican cheese blend - Fresh cilantro, chopped (for garnish) - Sliced jalapeños (optional, for garnish) If you have dietary needs, you can swap some ingredients: - Use turkey instead of chicken for a leaner option. - Try quinoa or lentils instead of black beans for a plant-based meal. - Use dairy-free cheese for a vegan option. - Fresh vegetables are great, but canned veggies can save time. To cook this dish, you’ll need: - A large skillet that can hold all the ingredients. - A sharp knife for chopping. - A cutting board for prep work. - A spatula for mixing. For the skillet, I recommend a non-stick or cast iron skillet. These help the food cook evenly and make cleanup easy. To make Chicken Enchilada Skillet, start by gathering your ingredients. You will need: - 1 lb boneless, skinless chicken breasts, cut into bite-sized pieces - 1 tablespoon olive oil - 1 small onion, diced - 2 cloves garlic, minced - 1 bell pepper, diced - 1 can black beans, rinsed and drained - 1 can enchilada sauce - 1 cup corn - 1 teaspoon ground cumin - 1 teaspoon chili powder - Salt and pepper to taste - 1 ½ cups shredded Mexican cheese blend - Fresh cilantro, chopped, for garnish - Sliced jalapeños, for garnish Before you start cooking, wash and chop all your veggies. This helps keep your kitchen organized. Use a sharp knife for quicker prep. You can also measure out your spices ahead of time. This saves time when you cook. Heat the olive oil in a large skillet over medium heat. Add the diced onion and bell pepper. Cook them until they soften, about 4-5 minutes. Stir in the minced garlic and cook for one more minute. This brings out the garlic's aroma. Next, add the chicken pieces to the skillet. Cook them until they turn golden brown, about 6-7 minutes. Season the chicken with cumin, chili powder, salt, and pepper. This adds depth to your dish. Once the chicken is cooked, mix in the black beans, corn, and enchilada sauce. Stir everything together well. Heat it until warm, about 2-3 minutes. Now for the best part—melt the cheese! Sprinkle the shredded cheese evenly over the top of your skillet. Cover the skillet with a lid. Let it cook for 2-3 minutes. This melts the cheese just right. Once the cheese is bubbly and gooey, remove the skillet from heat. Garnish with chopped cilantro and sliced jalapeños if you want some heat. The colors will make your dish pop! For the full recipe, check the details above. Enjoy your flavorful Chicken Enchilada Skillet! To ensure the chicken remains tender and juicy, don't overcook it. Cook the pieces until they are golden brown and no longer pink inside. Use a meat thermometer to check for doneness; it should reach 165°F. To prevent the dish from getting too watery, avoid adding extra liquid. Use just the right amount of enchilada sauce. You want the sauce to coat the chicken and veggies, not drown them. To maximize flavor, use fresh spices. Ground cumin and chili powder are key ingredients in this dish. Toasting them in the skillet for a minute brings out their best taste. Layer flavors by adding ingredients step by step. Start with onions and peppers, then add garlic, and finally the chicken. This builds a great base for your enchiladas. Serve the chicken enchilada skillet hot. It pairs well with sides like Mexican rice or a fresh salad. For portion sizes, serve about one and a half cups per person. This gives everyone a good amount without leftovers. Top with fresh cilantro and sliced jalapeños for a nice touch. For the full recipe, check out the detailed steps above. {{image_2}} You can easily switch things up based on your needs. For a vegetarian or vegan option, replace the chicken with mushrooms or sautéed zucchini. Use black beans or lentils for added protein. This keeps the dish full of flavor without meat. If you prefer different types of meat, ground turkey or beef works great. You can also use shredded rotisserie chicken for a quick fix. Each choice brings its own taste, making the meal fun and versatile. Want some extra kick? Add jalapeños or cayenne pepper to your skillet. For a sweeter touch, try adding corn or a splash of honey. These spices change the dish's vibe and make it exciting. You can also swap out the enchilada sauce. Try green sauce or salsa verde for a fresh twist. Experiment with different cheese types, like pepper jack or cheddar, to enhance flavor and meltiness. Plating can make a meal feel special. For a family-style look, serve the skillet right from the pan. This keeps it casual and fun. If you want to impress, plate individual portions. Use a scoop of the enchilada mix, top with cheese, and add fresh cilantro. You can garnish with avocado slices or lime wedges for color. Each method adds a personal touch to your meal. For the full recipe and more ideas, check out the [Full Recipe]. Storing leftovers correctly is key to keeping them fresh. Once your chicken enchilada skillet cools, place it in an airtight container. This helps seal in flavor and moisture. The dish will last up to three to four days in the fridge. Always check for any changes in smell or color before eating leftovers. To freeze the chicken enchilada skillet, let it cool completely first. Then, transfer it to a freezer-safe container. Make sure to leave some space at the top for expansion. Seal it well to prevent freezer burn. It can stay fresh for up to three months in the freezer. When you’re ready to eat, thaw it overnight in the fridge. Reheat in a skillet over medium heat. Stir occasionally until heated through, about 10-15 minutes. Planning ahead is smart for busy weeknights. You can chop vegetables and cook the chicken in advance. Store these in the fridge for easy access. Another great tip is to batch cook. Make multiple servings of the chicken enchilada skillet and freeze them. This way, you have quick meals ready to go any night. To make your Chicken Enchilada Skillet spicier, you have a few options: - Use extra chili powder. - Add diced jalapeños or serrano peppers. - Include a dash of hot sauce. - Try spicier enchilada sauce. Start with small amounts, then taste as you go. This way, you control the heat. Yes, you can use frozen chicken. - Simply thaw it first in the fridge overnight. - If you're in a rush, you can cook the chicken from frozen. Just add a few extra minutes to your cooking time. Cut the chicken into pieces for even cooking. Pair your Chicken Enchilada Skillet with some tasty sides: - Rice or quinoa for a filling meal. - A fresh salad with lime dressing. - Tortilla chips with salsa for crunch. - Guacamole adds a creamy touch. These sides complement the flavors well. To reheat leftovers, follow these tips: - Use the microwave for quick reheating. - Cover the dish to keep the moisture in. - Heat in short bursts, stirring in between. For the stovetop, use medium heat in a skillet. Add a splash of water to keep it moist. This preserves the flavor and texture. In this article, we explored how to make a delicious chicken enchilada skillet. You learned about the key ingredients you need, along with handy substitutions for dietary needs. We covered step-by-step instructions for prepping and cooking, along with cooking tips to keep your chicken tender. We also discussed flavor and presentation variations, plus smart storage methods. Now, you can enjoy creating your unique twist on this dish. Remember, cooking is about having fun and sharing good food with others.](https://foodishtalk.com/wp-content/uploads/2025/06/bcd20096-75b2-4c30-96ff-d874cbd8959f.webp)
