Skip to content
DisclaimerTerms Of UseGDPR PolicyCookie Policy

Foodish Talk

  • Home
  • Drinks
  • Appetizers
  • Dinner
  • Dessert
  • About
  • Contact
  • Privacy Policy
DisclaimerTerms Of UseGDPR PolicyCookie Policy

NO-ING-IMG

To create the best Caramel Apple Cinnamon Roll Bake, gather these simple ingredients. Each one adds to the sweet magic of this dish. - 2 cans of refrigerated cinnamon rolls with icing - 2 large apples, peeled, cored, and diced (preferably Granny Smith) - 1/2 cup brown sugar - 1 teaspoon ground cinnamon - 1/4 teaspoon nutmeg - 1/4 cup chopped pecans (optional) - 1/2 cup caramel sauce (store-bought or homemade) - 1 tablespoon butter, melted - A pinch of salt - Whipped cream (for serving, optional) These ingredients come together to create a warm, gooey treat. The cinnamon rolls give a soft base, while the apples add a fresh crunch. The spices, especially cinnamon and nutmeg, bring warmth and flavor. The caramel sauce creates a sweet drizzle that ties all the flavors together. You can also add pecans for a nutty touch. If you want to make it even more special, top it with whipped cream! This list means you can whip up this delightful dish in no time. Grab your ingredients, and let’s get cooking! Start by preheating your oven to 375°F (190°C). This step is vital for even baking. Next, take a 9x13-inch baking dish and grease it well. You can use non-stick cooking spray or a bit of butter. Greasing the dish helps keep the bake from sticking. In a large mixing bowl, combine two diced apples with half a cup of brown sugar. I prefer Granny Smith apples for their tartness. Add one teaspoon of ground cinnamon, a quarter teaspoon of nutmeg, and a pinch of salt. Toss everything well until the apples are fully coated. This mixture brings a sweet and spicy flavor that pairs perfectly with the rolls. Open two cans of refrigerated cinnamon rolls. Separate each roll and cut them into quarters. Layer half of these pieces in the bottom of the greased dish. Spread half of the apple mixture over the cinnamon rolls. If you want, sprinkle a quarter cup of chopped pecans on top. Then, add the rest of the quartered cinnamon rolls, followed by the remaining apple mixture and pecans. Drizzle melted butter and half a cup of caramel sauce over the entire dish. This adds a rich, gooey texture. Place the dish in the preheated oven and bake for 25-30 minutes. Keep an eye on it. The rolls should be golden brown and cooked through. You might cover the dish with foil for the first 15 minutes to stop over-browning. Once done, take it out and let it cool for about 10 minutes. Finally, drizzle the icing from the cinnamon rolls over the top. Serve warm, and for a special treat, add whipped cream if you like. To get the best cinnamon rolls, use fresh rolls. Check the expiration date. When you cut them, keep the pieces even. This helps them bake evenly. Layer them gently in your dish. Don't press down too hard. This keeps them fluffy and light. Granny Smith apples work great for this bake. They are tart, which balances the sweet caramel. If you prefer, you can use Honeycrisp for a sweeter taste. Make sure to peel and core the apples. Dice them into small pieces for the best texture. This helps them cook well and blend with the rolls. Serve your caramel apple cinnamon roll bake warm. Drizzle some icing from the rolls on top. You can add whipped cream for extra creaminess. Sprinkle some chopped pecans on top for a nice crunch. Place it on a bright plate to make it pop. Enjoy this treat with friends or family for a cozy dessert. {{image_2}} You can swap apples for other fruits. Pears work great in this recipe. They add a sweet and juicy bite. You might also try berries, like blueberries or raspberries. These fruits bring a lovely color and tartness. If you use frozen fruits, make sure to thaw and drain them first. This keeps the bake from getting too watery. If you need a nut-free version, just leave out the pecans. You can also use seeds instead. Sunflower seeds add a nice crunch without the nuts. They give a similar texture. Or, you can skip the crunch altogether for a soft treat. Frosting can change the taste. Instead of the icing that comes with the rolls, try cream cheese frosting. It adds a rich and tangy flavor. You can mix in some cinnamon for extra spice. Another idea is to use a simple glaze. Just mix powdered sugar with a little milk until smooth. Drizzle it over the warm bake for a sweet finish. After enjoying your caramel apple cinnamon roll bake, you may have some left. To store it, let it cool completely. Then, cover the dish tightly with plastic wrap or aluminum foil. You can also place it in an airtight container. This will keep it fresh for up to three days in the fridge. When you're ready to enjoy the leftovers, preheat your oven to 350°F (175°C). Place the bake in an oven-safe dish. Cover it with foil to prevent it from drying out. Heat for about 10-15 minutes. You can also microwave individual portions for 30-60 seconds. Just make sure to check that it's warm throughout. If you want to save some for later, you can freeze it. First, let the bake cool completely. Cut it into portions and wrap each piece in plastic wrap. Then, place the wrapped pieces in a freezer-safe bag. Label it with the date. This way, it can last for up to three months in the freezer. When ready to eat, thaw in the fridge overnight and reheat as mentioned. Yes, you can use homemade cinnamon rolls. Make your dough from scratch or use a favorite recipe. Just ensure the dough is soft and easy to cut into pieces. Homemade rolls add a personal touch and can boost flavor. You’ll want to bake them until they turn golden brown. This will help them mix well with apples and caramel. To make this recipe gluten-free, use gluten-free cinnamon rolls. Many brands offer pre-made options at stores. Check labels to ensure they are safe for your diet. Also, ensure the caramel sauce is gluten-free. You can make it at home if needed. This way, everyone can enjoy the treat! The best way to serve leftovers is warm. You can reheat them in the microwave or oven. If using the microwave, warm them for about 20-30 seconds. To reheat in the oven, set it to 350°F (175°C) and bake for 10 minutes. This keeps the rolls soft and tasty. Consider adding a drizzle of caramel sauce or whipped cream for extra flavor. You learned how to make a tasty apple cinnamon roll bake. We covered ingredients, steps, and tips for the best results. I shared fun variations and how to store leftovers. This dish is easy and fun. You can mix flavors and make it your own. Enjoy sharing this treat with friends and family; they’ll love it!

Caramel Apple Cinnamon Roll Bake Delightful Treat

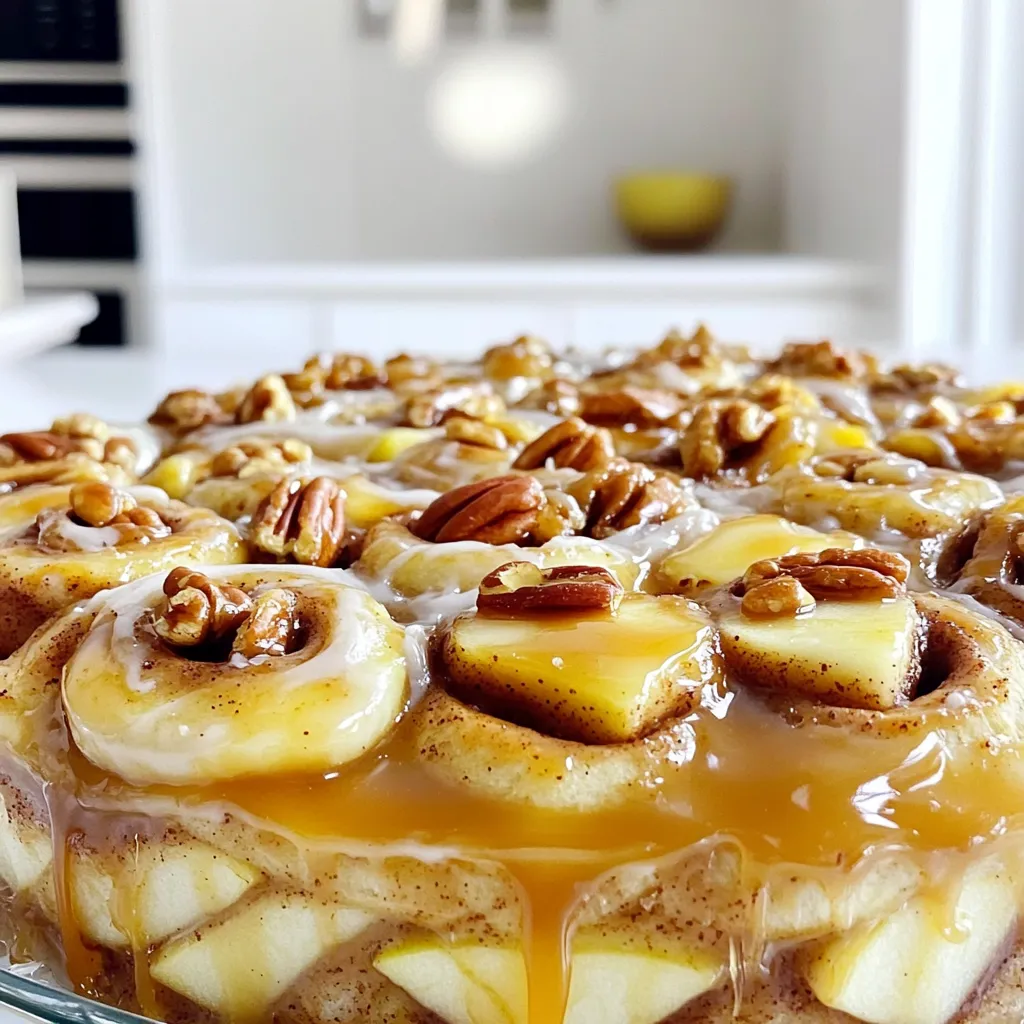
If you crave a warm and gooey dessert, you’ll love my Caramel Apple Cinnamon Roll Bake! This easy recipe combines

- 1 pound flank steak, sliced into thin strips - 2 bell peppers (any color), sliced - 1 medium onion, sliced - 4 tablespoons unsalted butter - 4 cloves garlic, minced The flank steak is the star here. It is tender and full of flavor. Slice it thinly against the grain for the best texture. Any color bell peppers work well. They add sweetness and color to your dish. The onion adds a nice bite and caramelizes beautifully in the oven. The garlic butter mixture, made with butter and minced garlic, gives these fajitas their rich, savory base. - 2 teaspoons chili powder - 1 teaspoon cumin - 1 teaspoon smoked paprika - 1 lime, juiced - Salt and pepper to taste - Fresh cilantro, chopped (for garnish) Chili powder and cumin bring warmth and depth to your fajitas. Smoked paprika adds a hint of smokiness, enhancing the overall flavor. Fresh lime juice brightens the dish and balances the richness of the butter. Don’t forget to season well with salt and pepper. Finally, a sprinkle of fresh cilantro adds a burst of freshness, tying everything together. First, I preheat the oven to 425°F (220°C). This high heat helps to give a great sear to the steak and veggies. I line a baking sheet with parchment paper for easy cleanup. Next, I melt 4 tablespoons of unsalted butter in a small saucepan over medium heat. Once the butter is melted, I add 4 cloves of minced garlic. I sauté it for about 1 minute until fragrant. Then, I take it off the heat and stir in the lime juice, chili powder, cumin, smoked paprika, salt, and pepper. This garlic butter mix is key to adding bold flavor to the fajitas. Now, I spread the sliced flank steak, bell peppers, and onion on the lined baking sheet. I make sure to arrange them evenly. This helps everything cook at the same rate. Next, I drizzle the garlic butter mixture over the steak and veggies. I toss everything together with my hands until the steak and vegetables are well-coated. This step ensures each bite bursts with flavor. I place the baking sheet in the preheated oven and bake for 15-20 minutes. Halfway through, I stir the mixture to cook evenly. I check for doneness by ensuring the steak is cooked through and the veggies are tender. After baking, I let everything rest for a few minutes. This resting time helps the juices settle in. Now, the fajitas are ready to serve! - Garlic sautéing tips: Always use fresh garlic for the best taste. I recommend mincing it finely. This helps release more flavor. Sauté it in melted butter for just one minute. You want it fragrant but not burnt. If it burns, it turns bitter. - Adjusting spice levels: Start with the base amounts of chili powder, cumin, and smoked paprika. If you prefer more heat, add more chili powder. For a milder taste, cut back on the spices. Always taste as you go. This way, you can find your perfect balance. - Choosing the right cut of steak: Flank steak works great for fajitas. It’s tender and holds flavor well. You can also use skirt steak if you like. Just make sure it’s fresh and high quality for the best results. - Tips for slicing the meat: Slice the steak against the grain. This means cutting it crosswise rather than with the grain. This makes the pieces more tender and easier to chew. Aim for thin strips for better flavor absorption. - Plating suggestions: Use a large platter for serving. Spread the fajitas out in a colorful way. This makes the dish look more inviting. Add some tortillas on the side for easy access. - Garnishing ideas: Fresh cilantro adds a nice touch. Sprinkle it on top before serving. You can also add lime wedges for an extra burst of flavor. These simple touches make your dish pop and taste even better. {{image_2}} For a fun twist, swap the flank steak for chicken. Chicken fajitas are just as tasty. Use sliced chicken breast or thighs. Cook them the same way as the steak. You can also try shrimp for a lighter option. Shrimp cooks fast, so keep an eye on them. If you want a vegetarian version, try using portobello mushrooms or tofu. Both soak up flavor well. You can use the same garlic butter mix. Add more veggies like zucchini or corn for extra color and taste. To boost the flavor, think about adding citrus. A splash of orange juice works wonders. It adds a sweet and tangy note. You can also mix in lime zest for a fresh kick. Experiment with different spices to change the taste. Try adding oregano or coriander for a new depth. Smoked paprika gives a nice smoky flavor. A pinch of cayenne can add heat if you like spice. Serve your fajitas with sides for a complete meal. Rice or beans go well with fajitas. They fill you up and balance the flavors. A fresh salad can add crunch and brightness. Don’t forget the toppings! Sour cream, guacamole, or salsa make great additions. Fresh cilantro or diced tomatoes add color and freshness. Build your own fajita bar for a fun dining experience. To store leftovers, let the fajitas cool first. Place them in an airtight container. You can keep them in the fridge for up to three days. For best results, separate the meat from the veggies. This keeps everything fresh and tasty. When reheating, use a pan over medium heat. Add a splash of water or broth to keep the moisture. Stir gently until heated through. You can also microwave them if you prefer. Just cover the dish to avoid drying out. To freeze fajitas for later, ensure they are completely cool first. Place them in freezer-safe bags, removing as much air as possible. You can freeze them for up to two months. For thawing, move them to the fridge overnight. This allows them to defrost safely. To reheat frozen fajitas, use a pan over medium heat. Add a little olive oil or water to help them warm up evenly. Stir often until heated through. To make steak fajitas tender, you can start with a marinade. A simple mix of lime juice, olive oil, and spices works well. Let the steak sit in this mix for about 30 minutes. The acid in the lime helps break down tough fibers. When cooking, avoid overcooking the steak. Cook until it reaches medium rare for the best texture. Also, let the meat rest after cooking. This helps the juices stay inside, keeping the steak juicy and tender. Yes, you can use different cuts. Skirt steak is a great option. It has a similar flavor and cooks well. Other cuts to consider are sirloin or ribeye. These cuts are also tender and flavorful. If you choose a tougher cut, like chuck, marinating becomes even more important. It helps improve tenderness and flavor. To make this meal prep-friendly, chop your veggies and slice the steak in advance. Store them in airtight containers in the fridge. You can even make the garlic butter mix ahead of time. Just keep it in the fridge until you are ready to cook. When it comes to storing, keep leftovers in a sealed container in the fridge. They should last for 3-4 days. For reheating, warm them in a pan over low heat or in the microwave. This keeps the flavors fresh and tasty. You learned how to make tasty steak fajitas using flank steak, peppers, and some great spices. I shared tips for cooking tender steak and enhancing the flavor with garlic butter. You can also switch up the protein or add citrus for a twist. Remember to store leftovers safely for later. Enjoy your fajitas with fresh cilantro and your favorite sides. With these steps, you’ll impress everyone around the table. Happy cooking!

Sheet-Pan Garlic Butter Steak Fajitas Flavor Boost

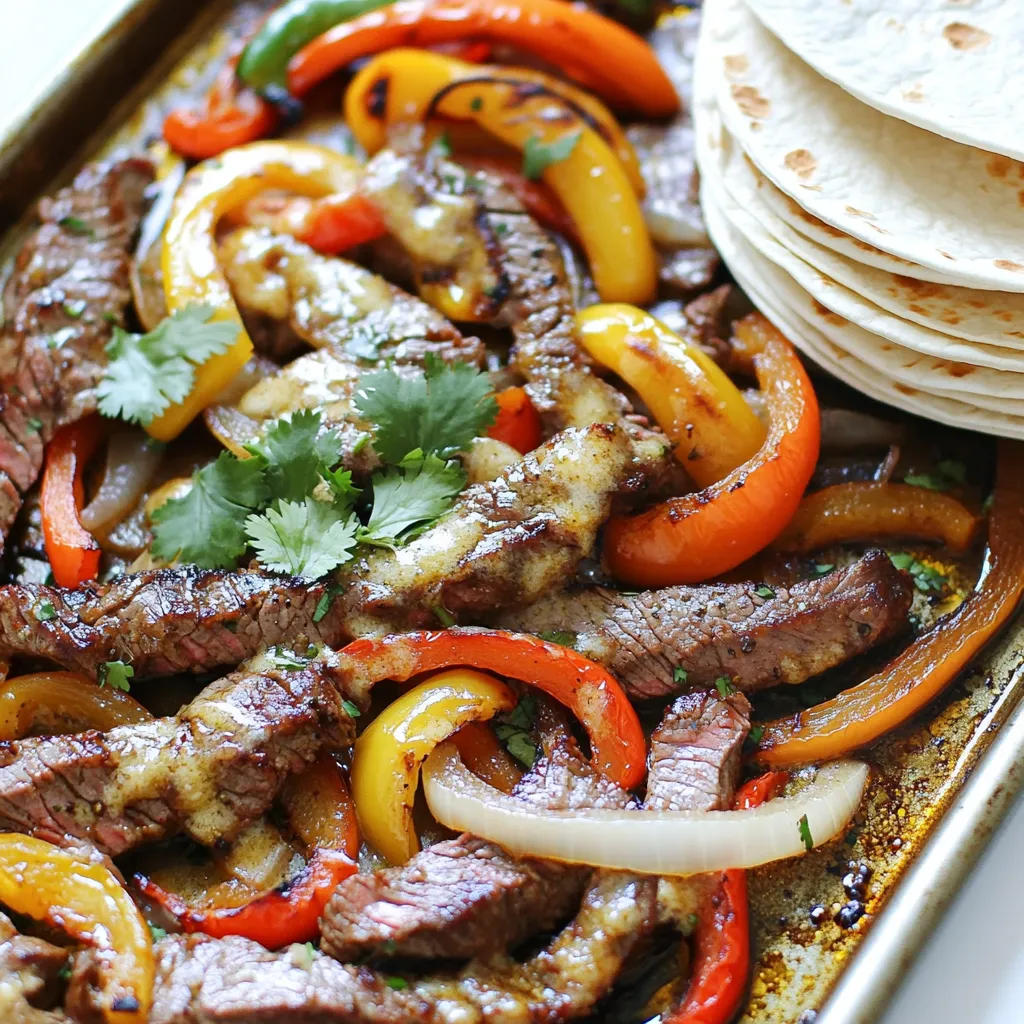
Get ready to elevate your dinner plans with my Sheet-Pan Garlic Butter Steak Fajitas! This tasty dish is packed with

- 2 pounds chicken wings - 1/4 cup honey - 1/4 cup low sodium soy sauce - 4 cloves garlic, minced - 1 tablespoon fresh ginger, grated - 1 teaspoon sesame oil - 1/2 teaspoon black pepper - 1/4 teaspoon red pepper flakes (optional) - 2 tablespoons green onions, chopped - Sesame seeds To start, gather your ingredients. You need honey, soy sauce, garlic, ginger, sesame oil, black pepper, and red pepper flakes. In a bowl, whisk together 1/4 cup of honey and 1/4 cup of low-sodium soy sauce. Add 4 minced garlic cloves and 1 tablespoon of grated ginger. Next, pour in 1 teaspoon of sesame oil, 1/2 teaspoon of black pepper, and the red pepper flakes if you want some heat. Mix until everything is well combined. This marinade will give your chicken wings a sweet and savory flavor. Now, it’s time to marinate the chicken wings. Take 2 pounds of chicken wings and place them in a large resealable plastic bag or a bowl. Pour the marinade over the wings, making sure they are all coated. Seal the bag or cover the bowl tightly. Refrigerate the wings for at least 30 minutes, but 1 to 2 hours is best for more flavor. The longer they sit, the better they taste. After marinating, preheat your air fryer to 380°F (193°C) for about 5 minutes. Take the wings out of the marinade, but keep the marinade for later. Place the wings in the air fryer basket in a single layer. Do not overcrowd; if you have too many wings, cook them in batches. Air fry the wings for 25 to 30 minutes. Flip them halfway through to ensure they cook evenly. When they turn golden brown and crispy, they are ready. While the wings cook, pour the reserved marinade into a small saucepan. Bring it to a boil, then reduce the heat and let it simmer for a few minutes until it thickens slightly. Once the wings are done, toss them in the thickened sauce to coat them evenly. Now, they are ready to serve! To get wings that are nice and crispy, start by drying them. Pat the wings dry with paper towels before marinating. This helps remove excess moisture. A dry wing will crisp up better in the air fryer. Also, do not overcrowd the basket. Give each wing space to cook evenly. Cook in batches if needed. This will help each wing turn out golden and crispy. For the best flavor, I suggest marinating the wings for 1-2 hours. If you are short on time, 30 minutes will still add some taste. The longer the wings sit in the marinade, the more flavor they will absorb. Always refrigerate the wings while they marinate. This keeps them fresh and safe to eat. Flipping the wings is key for even cooking. I recommend flipping them halfway through the cooking time. This ensures both sides become crispy and golden. Use tongs to flip them gently to avoid breaking the skin. Once they are done, toss them in the thickened sauce for the perfect finish. Enjoy your tasty, crispy wings! {{image_2}} You can easily add heat to your honey garlic wings. Just mix in some red pepper flakes. Start with 1/4 teaspoon for a mild kick. If you love spice, add more! You can also use hot sauce. Blend it into the marinade. Sriracha or cayenne pepper are great choices. They will make your wings pop with flavor! Not feeling the honey garlic vibe? You can swap sauces! Try a tangy barbecue sauce. Mix it with honey for a sweet twist. Another option is teriyaki sauce. It adds a nice umami flavor. You could even go for a lemon pepper sauce. Just toss the cooked wings in your sauce of choice for a new taste. When choosing wings, you can go with bone-in or boneless. Bone-in wings have more flavor. They stay juicy and tender when cooked. Boneless wings are easier to eat. They cook faster and are great for kids. Choose what you like best for your meal! After enjoying your honey garlic chicken wings, store any leftovers in an airtight container. This keeps them fresh and tasty. Let the wings cool down to room temperature first. Place them in the fridge for up to three days. I often separate the wings from the sauce to keep them crispy. To reheat the wings, use your air fryer again for the best results. Preheat the air fryer to 375°F (190°C). Place the wings in a single layer in the basket. Heat them for about 5 to 10 minutes, flipping halfway through. This makes them hot and crispy again. You can also use an oven. Set it to 350°F (175°C) and bake the wings for 10-15 minutes. If you want to save your wings for later, freezing is a great option. First, let the wings cool completely. Place them in a freezer-safe bag or container. Try to remove as much air as possible before sealing. Label the bag with the date. For best taste, use them within three months. When ready to eat, thaw them overnight in the fridge before reheating. It takes about 25 to 30 minutes to cook chicken wings in an air fryer. You want them crispy and golden brown. Make sure to flip them halfway through the cooking time. This helps them cook evenly and get that perfect crunch. Yes, you can use frozen chicken wings! However, you need to adjust the cooking time. Cook them for about 5 to 10 extra minutes. Make sure to check that they are cooked through. If they are not thawed, they may not get as crispy. Honey garlic chicken wings pair well with many sides. Some great options include: - Celery sticks - Carrot sticks - Ranch dressing or blue cheese dip - French fries - Rice or quinoa These sides add crunch and balance the sweet flavor of the wings. Enjoy! To make honey garlic chicken wings, you need the right ingredients. Start with chicken wings and a tasty marinade. Follow steps to marinate and air fry them. Use tips for crispiness and variations to meet your taste. Store leftovers and know how to reheat them. In summary, enjoy tasty wings tailored just for you. Try out these tips and make your next meal a hit!

Air Fryer Honey Garlic Chicken Wings Tasty Delight

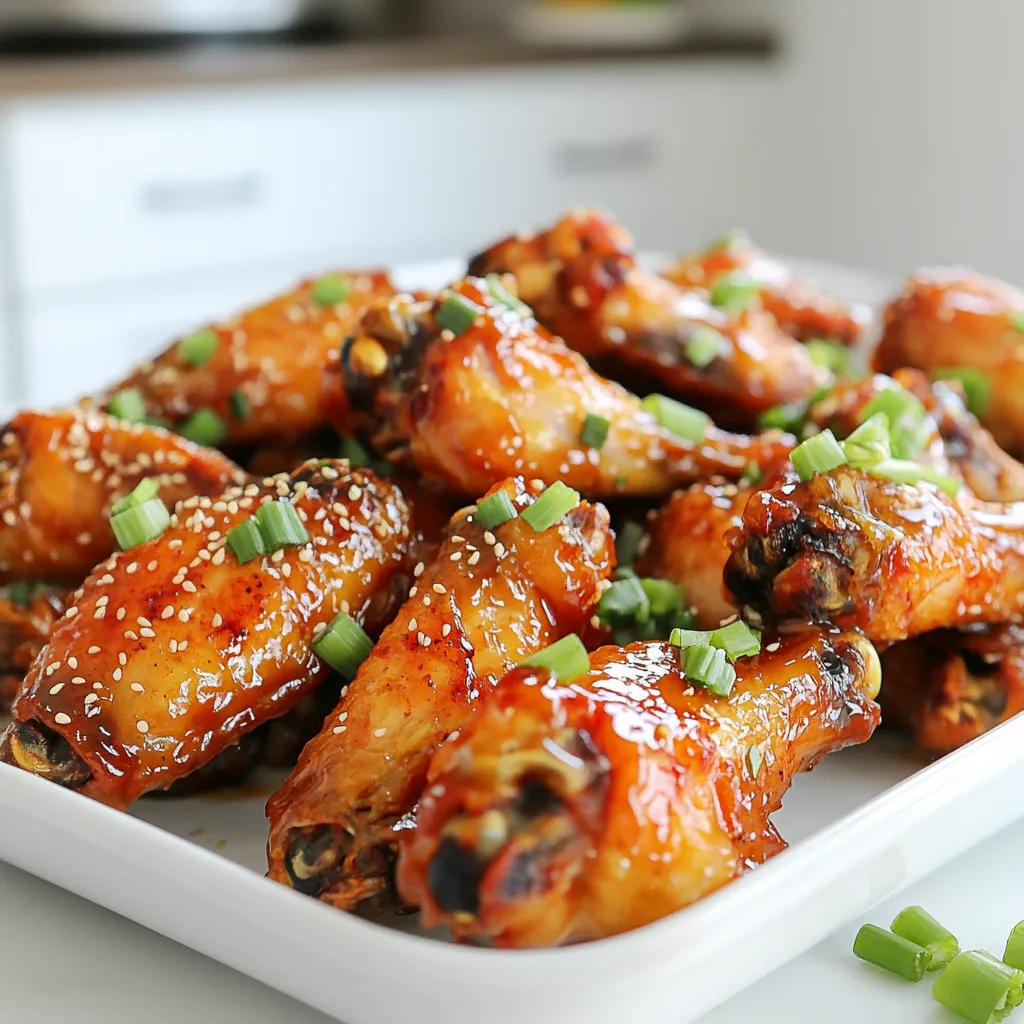
Get ready to impress your taste buds with my Air Fryer Honey Garlic Chicken Wings! These wings are crispy, sweet,

Here’s what you need for a delicious One-Pan Creamy Sun-Dried Tomato Gnocchi Bake: - 1 pound (450g) potato gnocchi - 1 cup sun-dried tomatoes in oil, drained and roughly chopped - 2 cups fresh spinach, roughly chopped - 1 cup heavy cream - 1 cup fresh mozzarella cheese, diced - 1/2 cup grated Parmesan cheese - 2 cloves garlic, minced - 1 teaspoon Italian seasoning - Salt and pepper to taste - 2 tablespoons olive oil - Fresh basil for garnish (optional) You may not have all the ingredients. Here are some smart swaps: - Potato gnocchi: Try using ricotta gnocchi or even pasta shells. - Sun-dried tomatoes: Use fresh tomatoes or roasted red peppers for a different flavor. - Heavy cream: Swap it with half-and-half or coconut cream for a lighter dish. - Fresh mozzarella: You can use shredded mozzarella or even feta for a tangy kick. - Spinach: Kale or arugula works well if you want a different green. Using fresh ingredients makes a big difference. Here are my tips: - Choose ripe, firm tomatoes. They add flavor and color to your dish. - Look for bright green spinach. It should feel crisp and not wilted. - Get high-quality olive oil. It enhances the overall taste of your bake. - Check the mozzarella for freshness. It should smell mild and creamy. - Always check expiration dates on dairy products. Freshness matters! These tips help you pick the best ingredients for your One-Pan Creamy Sun-Dried Tomato Gnocchi Bake. Enjoy your cooking! To make this dish, first, gather your ingredients. You will need potato gnocchi, sun-dried tomatoes, spinach, heavy cream, mozzarella cheese, Parmesan cheese, garlic, Italian seasoning, salt, and pepper. 1. Preheat your oven to 400°F (200°C). 2. Take a large oven-safe skillet and heat the olive oil over medium heat. 3. Add minced garlic and sauté it for about 1 minute. You want it to smell nice. 4. Next, add the sun-dried tomatoes and Italian seasoning. Stir for 2 minutes. 5. Now, pour in the heavy cream. Add the chopped spinach and cook for 2-3 minutes. Wait until the spinach wilts. 6. Add the gnocchi to the skillet and mix gently. Make sure all gnocchi gets coated in the cream. 7. Fold in the diced mozzarella. Season with salt and pepper according to your taste. 8. Spread the mixture evenly across the skillet. 9. Generously sprinkle grated Parmesan cheese on top. 10. Place the skillet in the oven and bake for 20-25 minutes. Look for a bubbly and golden top. Using an oven-safe skillet makes this dish easier. Here are some tips: - Check if your skillet is labeled oven-safe. Cast iron and stainless steel work well. - Avoid using non-stick skillets if they have plastic handles. They may melt. - Always use oven mitts when handling hot skillets. Safety first! Baking this dish is simple: - After mixing everything in your skillet, place it in the preheated oven. - Bake for 20-25 minutes. Keep an eye on it towards the end. - The top should look bubbly and golden brown. - Once baked, remove it from the oven. Let it cool for a few minutes before serving. This allows the flavors to settle. To boost the flavor, use fresh herbs. Fresh basil or parsley adds a nice touch. You can also add a pinch of red pepper flakes for some heat. Another great trick is to let the sun-dried tomatoes sit in the olive oil longer. This helps them soak up more flavor. A splash of lemon juice can brighten the dish, too. A common mistake is not draining the sun-dried tomatoes well. If they are too oily, the dish can become greasy. Another mistake is overcooking the gnocchi. It should be tender but not mushy. Be mindful of seasoning; taste as you go. Too much salt can overpower the dish. Lastly, don’t skip the baking step. It creates a nice golden top and enhances the flavor. This dish is perfect on its own, but you can add sides for more variety. A simple green salad pairs well. A crusty bread is great for dipping, too. If you want to make it fancy, add some grilled chicken or shrimp on top. For a cozy feel, serve it with a glass of white wine. Enjoy it hot, and don’t forget to garnish with fresh basil! {{image_2}} You can easily make this dish vegetarian. Simply skip any meat and focus on fresh veggies. Add mushrooms or bell peppers for extra flavor and texture. You can also use vegetable broth instead of heavy cream for a lighter sauce. This keeps the dish creamy while making it veggie-friendly. If you want to add protein, chicken or sausage works well. For chicken, use cooked, diced pieces and fold them into the bake. If you prefer sausage, cook it first, then slice it up and mix it in. This adds heartiness to the dish, making it even more fulfilling. To make this dish gluten-free, look for gluten-free gnocchi. Many brands offer tasty options made from rice or potatoes. The rest of the recipe stays the same. You still get that creamy, dreamy taste without the gluten. Enjoy your meal without worry! To keep your One-Pan Creamy Sun-Dried Tomato Gnocchi Bake fresh, store it in an airtight container. Allow the dish to cool before sealing it. This helps maintain its creamy texture. Place the container in the fridge if you plan to eat it within a few days. It should be good for up to three days. When you want to enjoy leftovers, preheat your oven to 350°F (175°C). Transfer the gnocchi bake to an oven-safe dish if needed. Cover it with foil to prevent drying out. Heat it for about 20 minutes or until it’s warm all the way through. You can also microwave it for a quicker option. Just heat in 30-second intervals until it’s hot. You can freeze this dish if you want to save it for later. Allow the gnocchi bake to cool completely. Then, place it in a freezer-safe container. Make sure to seal it tightly to avoid freezer burn. It can last up to three months. To enjoy, thaw it in the fridge overnight before reheating. Yes, you can use frozen gnocchi. Just add them straight to the pan without thawing. They will cook well in the creamy sauce. You may need to increase the cooking time by a few minutes. Keep an eye on them to ensure they heat through. If you want a lighter option, you can use half-and-half or whole milk. You can also use coconut cream for a dairy-free choice. For a thicker sauce, add a bit of cornstarch to your substitute. This will help achieve that creamy texture you love. The gnocchi bake is done when it is bubbly and golden on top. Look for a nice brown crust from the Parmesan cheese. You can also check if the gnocchi are soft. A fork should easily pierce them. If everything looks good, it’s time to enjoy your dish! This blog post covered all about making a delicious gnocchi bake. We explored key ingredients and their substitutes, along with tips for keeping them fresh. You learned step-by-step instructions for preparing and baking the dish perfectly. I also shared tips to enhance flavor and avoid common mistakes. You can try variations like vegetarian options or adding proteins. Lastly, we discussed how to store and reheat leftovers for future meals. Enjoy your cooking and make this gnocchi bake a new favorite!

One-Pan Creamy Sun-Dried Tomato Gnocchi Bake Delight

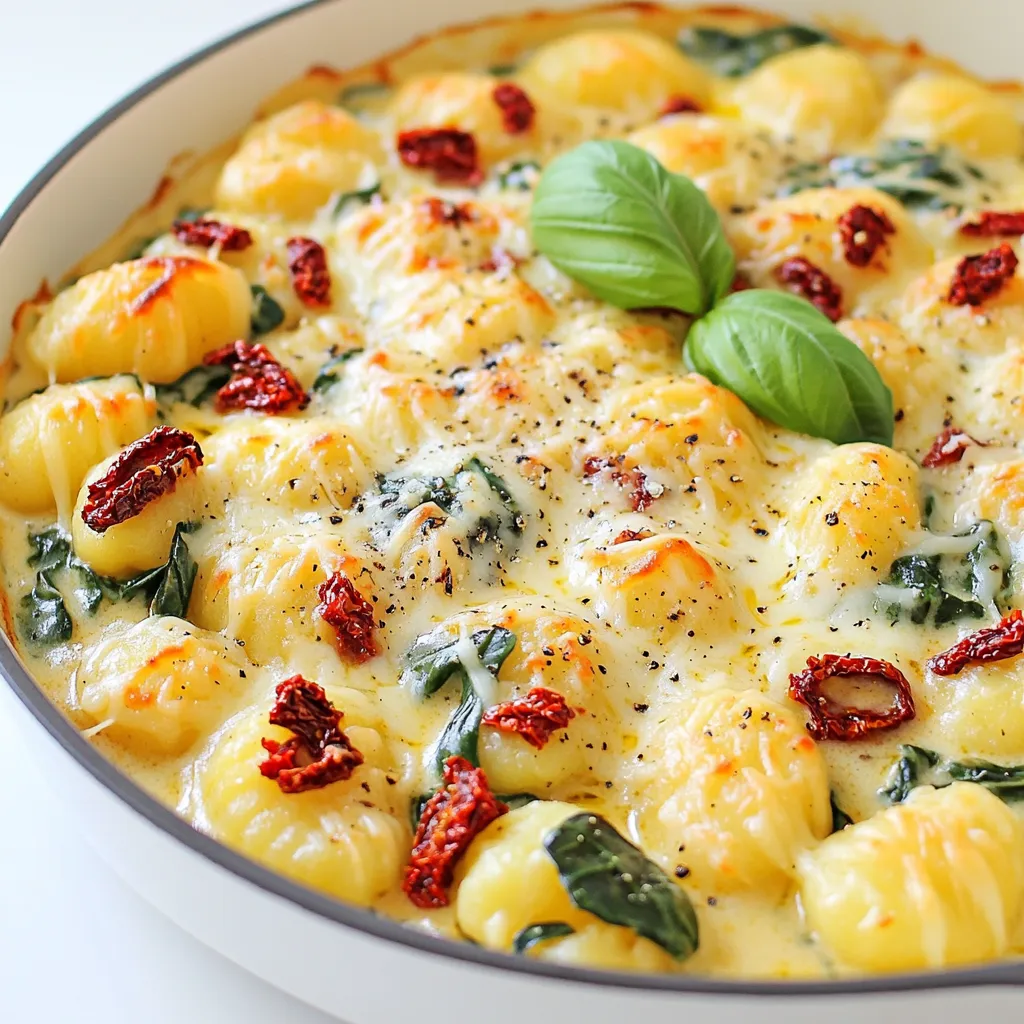
Are you ready to try a dish that’s both creamy and full of flavor? My One-Pan Creamy Sun-Dried Tomato Gnocchi

To make the Cozy Pumpkin Pie Smoothie Bowl, you will need a few simple ingredients. Each one adds to the creamy, warm flavors that remind us of fall. Here’s what you need: - 1 cup pumpkin puree (canned or freshly made) - 1 frozen banana - 1/2 cup Greek yogurt (or a dairy-free alternative) - 1/2 cup almond milk (or any milk you like) - 1 teaspoon vanilla extract - 1 teaspoon pumpkin pie spice - 1 tablespoon maple syrup (or honey) For toppings, you can choose from: - Granola - Sliced bananas - Chia seeds - Toasted pecans - A sprinkle of cinnamon - Coconut whipped cream (if you want) These ingredients come together to create a delightful blend. Pumpkin puree gives a rich base. The frozen banana adds creaminess and sweetness. Greek yogurt makes it thick, while almond milk keeps it smooth. Vanilla extract and pumpkin pie spice bring warmth and flavor. Finally, maple syrup adds a hint of sweetness. Feel free to mix and match the toppings! They add texture and extra flavor. Enjoy your cozy creation! To start, gather all your ingredients. You will need pumpkin puree, a frozen banana, Greek yogurt, almond milk, vanilla extract, pumpkin pie spice, and maple syrup. Place them all in a blender. Next, blend on high until the mixture is creamy and smooth. It should have no lumps. If it seems too thick, add a bit more almond milk. Blend again until you reach the perfect consistency. Once your smoothie base is ready, pour it into a bowl. Use a spatula to scrape the sides of the blender. This ensures you get every tasty bit. Now, let’s make it pretty! Start by adding a layer of granola in the center of the bowl. This adds crunch and texture. Next, arrange the sliced bananas, chia seeds, and toasted pecans around the granola. Be creative! You can make it look like a work of art. For some extra magic, sprinkle a bit of cinnamon on top. If you like, add a dollop of coconut whipped cream in the middle. Serve your smoothie bowl right away. Grab a spoon and dig in! This bowl is not just pretty; it’s a tasty treat too. For the best experience, enjoy it fresh and share it with friends. They will love this cozy fall delight. To get a smooth and creamy mix, start with a powerful blender. This tool helps blend everything evenly. Cut your banana into smaller pieces; this makes it easier to blend. If your smoothie is too thick, add a bit more almond milk. Blend again until it reaches your desired creaminess. If it’s too thin, you can add a little more pumpkin puree or Greek yogurt. This will help thicken your bowl. You can boost the taste of your smoothie bowl in many ways. Instead of Greek yogurt, try a coconut yogurt for a tropical twist. You can also swap almond milk for oat or soy milk. For sweetness, maple syrup works great, but honey or agave are good choices too. If you want a kick, add some ginger or nutmeg. These spices will add warmth and depth. The way you present your smoothie bowl can make it even more fun to eat. Start with a base layer of granola in the center; this adds crunch. Arrange sliced bananas, chia seeds, and toasted pecans around the granola in a circular pattern. For a pop of color, sprinkle cinnamon on top. If you use coconut whipped cream, place it in the middle for a nice touch. This makes your bowl look inviting and delicious! {{image_2}} If you want a dairy-free or vegan bowl, just swap the Greek yogurt. Use a thick dairy-free yogurt. Coconut yogurt works great and adds a nice flavor. For the milk, almond milk is a good choice. You can also try oat milk or soy milk. Each option gives a different taste and texture. You can add other fruits to your smoothie bowl. Try using mango or apple for a fresh twist. Frozen berries can add a burst of flavor too. For nuts or seeds, consider walnuts or sunflower seeds. They add crunch and extra nutrients. You can mix and match for fun textures and tastes. Want to spice things up? Add a pinch of cayenne pepper for heat. You can also mix in some cocoa powder for a chocolate flavor. This makes the smoothie bowl rich and delightful. Consider adding a dash of nutmeg for warmth. Each twist gives you a new way to enjoy your cozy pumpkin pie smoothie bowl! You can store your cozy pumpkin pie smoothie bowl in the fridge for up to three days. Keep it in an airtight container to keep it fresh. Before serving, give it a good stir. If it looks a bit thick, add a splash of almond milk to loosen it up. To freeze your smoothie bowl, pour it into a freezer-safe container. Leave some space at the top, as it will expand when frozen. It can last up to a month in the freezer. When you're ready to enjoy it, take it out and let it thaw in the fridge overnight. For a quick thaw, you can leave it on the counter for about 30 minutes. Blend it again if it needs a smoother texture. Yes, you can use fresh pumpkin. Fresh pumpkin gives a bright, pure flavor. However, it requires more prep time. You need to cook and puree the pumpkin. Canned pumpkin is easier and quicker. It is also consistent in texture and flavor. If you want to save time, stick with canned pumpkin. If you love fresh ingredients, use fresh pumpkin. To make your smoothie bowl thicker, use less liquid. Try adding more frozen banana or yogurt. You can also use less almond milk. Blend the ingredients less to keep them thick. If you want an even creamier texture, add avocado. It blends well and adds healthy fats. Play around with these tips to find your perfect thickness. If you want a different sweetener, try honey or agave syrup. Both give a nice sweetness. You can also use coconut sugar for a caramel flavor. If you prefer no sugar, try ripe dates. Just blend them in with the other ingredients. Each sweetener changes the flavor a bit, so choose what you like best. This cozy pumpkin pie smoothie bowl blends easy steps and tasty ingredients. You start with pumpkin, banana, and yogurt, mixing them until smooth. Next, pour the mix into a bowl and add your favorite toppings. Remember to adjust thickness and try different flavors for variety. You can store leftovers in the fridge or freeze them for later. Overall, this recipe is great for any season. Enjoy it for breakfast or a snack. You can customize it to match your taste. I hope you feel inspired to make this smoothie bowl a regular treat!

Cozy Pumpkin Pie Smoothie Bowl Creamy Fall Delight

As the leaves turn and the air gets crisp, it’s the perfect time for a cozy treat. Enter the Cozy

- 1 cup rolled oats - 1/2 cup natural peanut butter - 1/4 cup honey or maple syrup - 1/2 cup dark chocolate chips - 1/4 cup milk (dairy or non-dairy) - 1/2 teaspoon vanilla extract - Pinch of salt - Optional toppings: crushed peanuts, shredded coconut, or mini chocolate chips To make No-Bake Chocolate Peanut Butter Oat Squares, gather these ingredients. Start with rolled oats for a hearty base. Use natural peanut butter for creaminess and rich flavor. Choose honey or maple syrup as your sweetener, depending on your taste. Dark chocolate chips give a sweet and rich touch. For the liquid, pick milk, whether dairy or non-dairy. Vanilla extract adds a warm note, while a pinch of salt enhances all the flavors. You can also add toppings like crushed peanuts or shredded coconut for a fun twist. These ingredients come together to create a treat that is both simple and delicious. - In a medium bowl, combine: - 1 cup rolled oats - 1/2 cup natural peanut butter - 1/4 cup honey or maple syrup - A pinch of salt Start mixing these ingredients well. You want a thick paste that sticks together. This step is key. If it feels too dry, add a touch of honey. If it’s too sticky, a few more oats help. - In a small saucepan over low heat, melt: - 1/2 cup dark chocolate chips - 1/4 cup milk (dairy or non-dairy) Stir continuously until the chocolate is smooth. Be careful not to burn it. Once melted, remove it from heat and stir in: - 1/2 teaspoon vanilla extract This chocolate mixture adds rich flavor. The vanilla gives it a nice touch. - Pour the melted chocolate mixture over the oat mixture. Stir until everything is well combined. The mixture will be thick and creamy. - Line an 8x8 inch baking dish with parchment paper. Leave some paper hanging over the sides. This helps lift the squares out later. - Transfer the mixture into the baking dish. Press it down evenly with your hands or a spatula. Make sure it’s tightly packed. - Optional: Top with crushed peanuts, shredded coconut, or mini chocolate chips, pressing them in slightly. These toppings add extra crunch and sweetness. Refrigerate for at least 2 hours or until firm. Once set, use the parchment paper to lift out the mixture. Cut it into squares or bars. Enjoy your tasty treat! To make these squares great, you need a thick paste. This thick paste helps you handle it better. If it’s too runny, the squares won’t hold their shape. When mixing the oats, peanut butter, honey, and salt, make sure to stir well. You want every bite to be tasty. Melting chocolate can be tricky. Here are my tips for melting chocolate smoothly: - Use low heat to avoid burning. - Stir constantly until it’s shiny and smooth. - Add milk slowly to help it melt evenly. Presentation matters! Here are some fun ways to serve your squares: - Place them on a colorful plate to catch the eye. - Dust them lightly with cocoa powder for a fancy touch. - Add a few extra chocolate chips or crushed peanuts on top. You can also change the toppings. Try crushed peanuts, shredded coconut, or mini chocolate chips. Each topping gives a new flavor and look. A few mistakes can ruin your squares. First, don’t overmix the oat mixture. It can make the squares tough. Just mix until combined. Another mistake is not chilling long enough. Make sure to refrigerate for at least 2 hours. The longer they chill, the firmer they get. Enjoy the delicious results! {{image_2}} You can easily swap out peanut butter if you want. Almond butter works great and tastes yummy. Sunflower seed butter is another good choice, especially for nut-free diets. For sweeteners, if you don't have honey, try agave syrup. Brown sugar also adds a nice touch and sweetness. Adding nuts or dried fruits can boost texture. Chopped walnuts or almonds bring a nice crunch. Dried cranberries or raisins add a sweet chewiness. You can also infuse flavors. A dash of cinnamon gives warmth, while a pinch of sea salt enhances sweetness. Both are simple ways to make your squares even tastier. If you need a gluten-free option, use certified gluten-free oats. They taste just as good! For vegan versions, choose dairy-free milk and sweeteners like maple syrup. This way, everyone can enjoy these tasty treats. To keep your No-Bake Chocolate Peanut Butter Oat Squares fresh, use an airtight container. A glass or plastic container works well. Place a piece of parchment paper between layers if you stack them. This helps avoid sticking. Store the squares in the fridge for maximum freshness. They will stay good for several days. If you want to keep the squares longer, freezing is a great option. Wrap each square in plastic wrap. Then, place them in a freezer-safe bag or container. This keeps them from getting freezer burn. When you’re ready to enjoy them, take out what you need. Let the squares thaw in the fridge for a few hours. You can also eat them straight from the freezer for a cool treat. In the fridge, these squares last about one week. If you freeze them, they can stay fresh for up to three months. Just remember to check for any signs of spoilage before eating. Keeping them stored properly ensures you enjoy their rich flavors longer. Yes, you can skip the sweetener. However, the squares will taste less sweet. This change affects the overall flavor and balance of the dish. Without the sweetener, the chocolate may taste too rich. You can use ripe bananas or unsweetened applesauce as substitutes. Both options add natural sweetness and moisture. Adjust the amount to your taste. These squares stay fresh for about one week in the fridge. Store them in an airtight container to keep them from drying out. If you want to enjoy them longer, you can freeze them. They can last up to three months in the freezer. Just remember to wrap them well to prevent freezer burn. Yes, you can make them nut-free. Use sunflower seed butter or soy nut butter instead of peanut butter. Both options work well as a binding agent. For sweetness, maple syrup or agave syrup can replace honey. Always check labels to avoid cross-contamination if allergies are severe. This blog covers how to create tasty oat and peanut butter squares. We discussed the key ingredients, like oats and chocolate, and how to mix them properly. I shared tips for serving and common mistakes to avoid. You can also explore variations with different flavors and dietary needs. Remember, these squares are easy to store and freeze. You can enjoy them fresh or save them for later. Now it’s your turn to try this fun recipe and make it your own!

No-Bake Chocolate Peanut Butter Oat Squares Delight

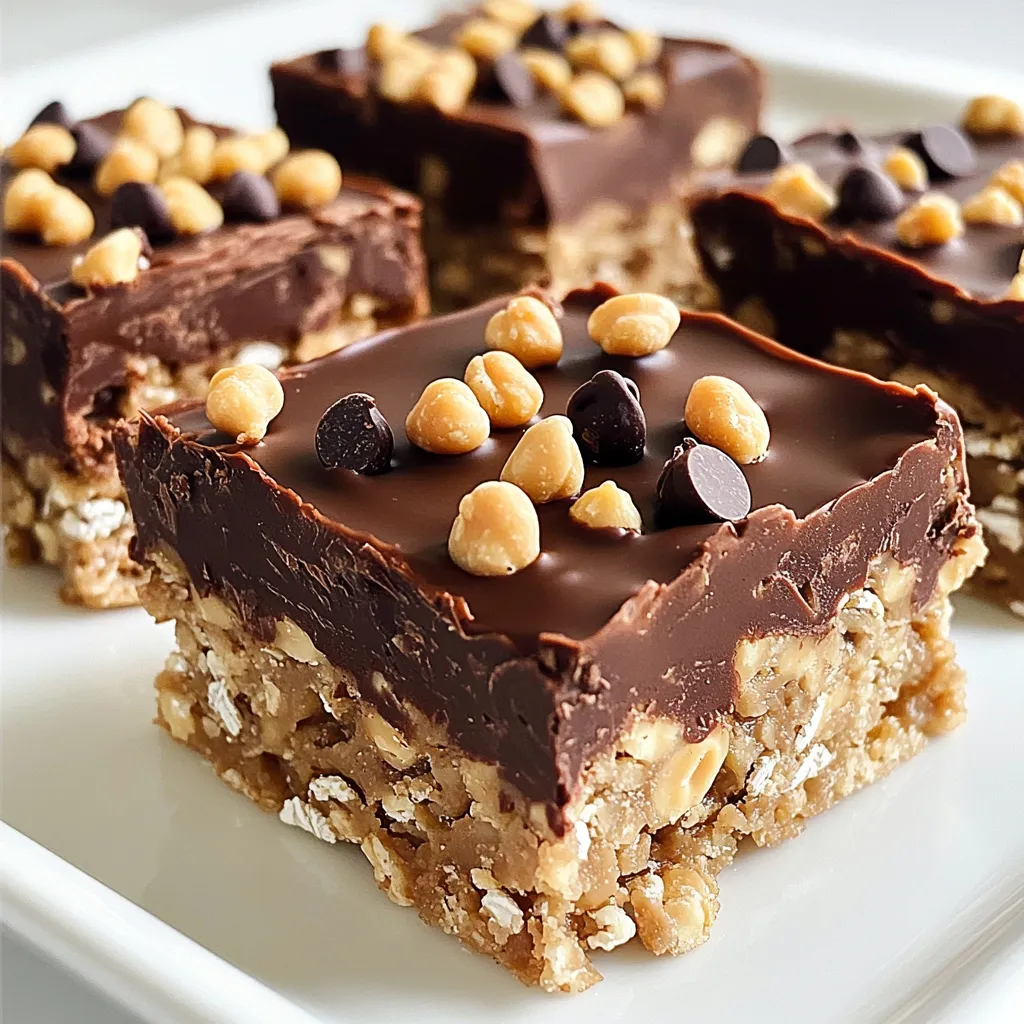
Are you craving a sweet treat that’s easy to make? Look no further than these delicious No-Bake Chocolate Peanut Butter

- Cauliflower - All-purpose flour - Seasonings (garlic powder, onion powder, paprika, salt, black pepper) - Liquid (water or plant-based milk) - Sweet chili sauce - Soy sauce - Sesame oil To create Sweet Chili Cauliflower Bites, you need a few key ingredients. First, take one medium head of cauliflower. Cut it into bite-sized florets. This will ensure each piece cooks evenly. Next, gather your dry ingredients. You will need one cup of all-purpose flour. It acts as the base for your batter. Then, add one teaspoon of garlic powder and one teaspoon of onion powder for flavor. A half teaspoon of paprika gives a nice color. Lastly, add a half teaspoon of salt and a quarter teaspoon of black pepper to season. For the wet part of the batter, choose between one cup of water or plant-based milk. The milk adds extra flavor. Now, we get to the sweet part! You will need half a cup of sweet chili sauce. This will make your bites sticky and delicious. Add one tablespoon of soy sauce for umami depth. Lastly, include one tablespoon of sesame oil for a nutty touch. These ingredients will create a burst of flavor. They work together to give you crunchy, sweet, and spicy bites that everyone will love. 1. Preheat the air fryer to 400°F (200°C). Let it heat for about 5 minutes. 2. Cut the medium head of cauliflower into small, bite-sized florets. 1. In a large bowl, mix the all-purpose flour, garlic powder, onion powder, paprika, salt, and black pepper. 2. Whisk in 1 cup of water or plant-based milk until the mix is smooth. 1. Dip each cauliflower floret into the batter. Make sure it is well-coated. 2. Place the coated florets in the air fryer basket. Arrange them in a single layer. 3. Lightly spray the florets with cooking oil to help them crisp up. 4. Air fry the cauliflower for 12-15 minutes. Shake the basket halfway through for even cooking. Look for a golden and crispy finish. 1. While the cauliflower cooks, mix the sweet chili sauce with 1 tablespoon of soy sauce and 1 tablespoon of sesame oil in a bowl. 2. Once the cauliflower is done, transfer it to the bowl with the glaze. Toss to coat all the pieces evenly. 3. Return the glazed cauliflower to the air fryer for an extra 2-3 minutes to set the sauce. To get a great coating, start with the batter. Mix flour, garlic powder, onion powder, paprika, salt, and black pepper in a bowl. Gradually add water or plant-based milk. Whisk until the batter is smooth. If it’s too thick, add a little more liquid. This helps the batter coat the cauliflower evenly. When you dip the florets, make sure they are fully covered. Shake off any excess batter. This step helps avoid soggy bites during cooking. Using cooking spray is key to getting that crispy texture. Lightly spray the battered cauliflower before air frying. This helps it crisp up nicely. Adjust the air fry time based on how crispy you want your bites. For softer bites, cook for about 12 minutes. If you want them extra crispy, go for 15 minutes. Always shake the basket halfway through to ensure even cooking. These sweet chili cauliflower bites pair well with dips. Try them with a creamy ranch or tangy soy sauce. You can also serve them as a side dish with rice or a fresh salad. For presentation, arrange the cauliflower on a nice platter. Drizzle some extra sweet chili sauce over the top. You can sprinkle sesame seeds or chopped green onions for a pop of color. These small touches make your dish look gourmet! {{image_2}} You can make your Sweet Chili Cauliflower Bites even healthier. Consider using gluten-free flour. Almond flour or chickpea flour works well. You can also find low-sugar sweet chili sauce. This option reduces sugar without losing flavor. Want some heat? Add chili flakes to the batter. You can also mix in hot sauce for extra kick. For a sweet and spicy twist, try blending sweet chili sauce with sriracha. It adds depth to the taste. Feel free to get creative with your cauliflower bites. Add other vegetables like bell peppers or broccoli for color. You can also mix in proteins like tofu or chicken. Experiment with marinades or glazes for more flavor. Try teriyaki sauce or a ginger-soy mix for a tasty change. After you enjoy your sweet chili cauliflower bites, store any leftovers in the fridge. Place them in an airtight container. This keeps them fresh for up to three days. If you want to keep them longer, consider freezing. Place the cooled bites on a baking sheet, freeze until solid, and then transfer to a freezer bag. They can last for about three months in the freezer. To bring your cauliflower bites back to life, use the air fryer. Set it to 350°F (175°C) and heat them for about 5-7 minutes. This keeps them crispy. You can also reheat them in a conventional oven at the same temperature. Just place them on a baking sheet and heat for about 10 minutes. Avoid using the microwave, as it can make them soggy. Enjoy your tasty bites again! Yes, you can use frozen cauliflower. Just thaw it first and pat it dry. This helps remove excess moisture. It may take a bit longer to cook, so check for crispness. To make this recipe vegan, use plant-based milk instead of water. Choose a vegan sweet chili sauce and skip the soy sauce if it contains animal products. This way, you enjoy the same great taste. The best dipping sauce is sweet chili sauce itself. You can also try soy sauce mixed with lime juice. This adds a nice tang and balances the sweetness. Your cauliflower is done when it turns golden brown and feels crispy. Use a fork to test it. If it pierces easily, it’s ready to enjoy! Yes, you can bake the cauliflower instead. Preheat the oven to 425°F (220°C). Spread the cauliflower on a baking sheet and bake for 20-25 minutes. Flip halfway through for even cooking. This blog post covered how to make delicious sweet chili cauliflower bites. We started with the main ingredients, which include cauliflower and seasonings. I shared clear steps for preparing, cooking, and glazing, ensuring each bite is tasty. Tips helped with coating and achieving crispiness. Variations let you customize the dish to your taste. Lastly, we discussed storage and reheating methods to keep leftovers fresh. Enjoy trying this simple recipe, and remember, creativity can make it even better!

Sweet Chili Cauliflower Bites Air Fryer Delight

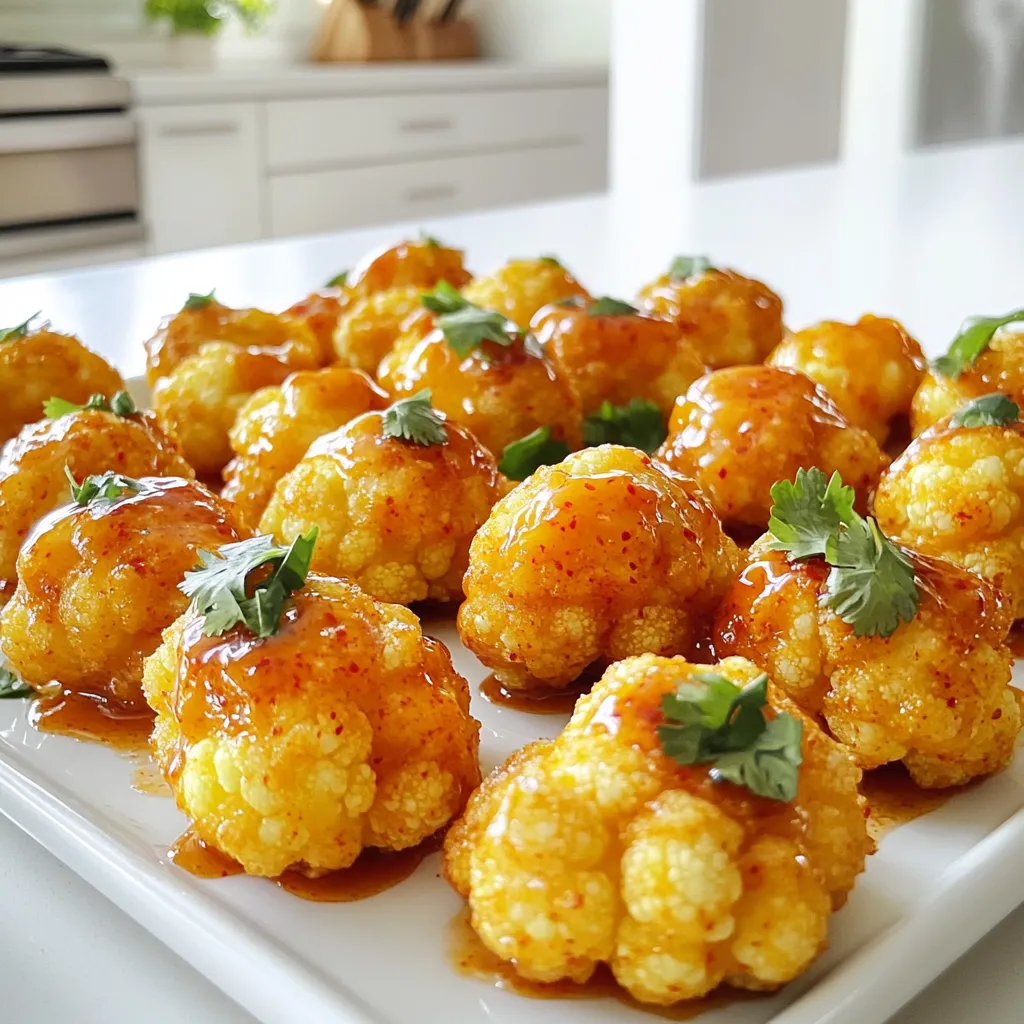
Craving a snack that’s both tasty and easy to make? Look no further! My Sweet Chili Cauliflower Bites made in

- 8 ounces rice noodles - 2 tablespoons vegetable oil - 3 cloves garlic, minced - 1 cup cooked shrimp (or chicken/tofu if preferred) - 2 eggs, lightly beaten - 1 cup bean sprouts - 4 green onions, chopped - 1/4 cup crushed peanuts - 1/4 cup fresh cilantro, chopped - 3 tablespoons soy sauce - 1 tablespoon tamarind paste (or lime juice) - 1 tablespoon brown sugar - 1 teaspoon red pepper flakes (adjust to taste) - Salt to taste - Lime wedges for serving You can switch up proteins to suit your needs. Use chicken, tofu, or shrimp. If you want it vegan, use tofu instead of shrimp or chicken. For gluten-free Pad Thai, choose rice noodles made without wheat. If you can't find tamarind paste, use lime juice for a similar tang. Fresh ingredients are key for great taste. Look for rice noodles at Asian markets or online. Choose noodles that are thin and pliable. For proteins, buy shrimp or chicken from a reliable source. Always check for freshness. Look for firm shrimp and vibrant green onions. Fresh cilantro adds life to your meal. To start, soak the rice noodles in hot water for 30 minutes. This helps soften them. If the package says a different time, follow that. After they are soft, drain them in a colander and set them aside. In a large skillet or wok, heat 2 tablespoons of vegetable oil over medium-high heat. Add 3 cloves of minced garlic and sauté for 30 seconds. This makes the kitchen smell great! Next, add 1 cup of cooked shrimp (or chicken/tofu if you like). Stir-fry for 2-3 minutes until they are warm. Now, push the shrimp to one side of the pan. Pour 2 lightly beaten eggs into the other side. Scramble the eggs until they are fully cooked. Once done, mix the eggs with the shrimp. Now it’s time to add flavor! Add the soaked rice noodles to the pan. Pour in 3 tablespoons of soy sauce, 1 tablespoon of tamarind paste (or lime juice), 1 tablespoon of brown sugar, and 1 teaspoon of red pepper flakes. Toss everything well. You want the noodles to soak up all the sauce. Next, stir in 1 cup of bean sprouts and half of the chopped green onions. Cook for 2 more minutes until everything is hot. Taste your dish. If it needs more flavor, add a pinch of salt or some soy sauce. Once it’s ready, take it off the heat. Garnish with 1/4 cup of crushed peanuts, 1/4 cup of fresh cilantro, and the rest of the green onions. Serve your Pad Thai right away with lime wedges on the side for a zesty kick! To make your Pad Thai taste like it came from a restaurant, focus on these key points: - Use fresh ingredients. Fresh garlic, herbs, and proteins bring great taste. - Tamarind paste is essential. It gives Pad Thai its tangy flavor. If you can't find it, lime juice works too. - Balance sweet and salty. Use brown sugar and soy sauce to create depth in flavor. These steps will make your dish stand out. The right mix of flavors creates a dish that sings. When cooking Pad Thai, the right technique matters. Here are essential tips: - Wok vs. Skillet: A wok allows for high heat and quick cooking. Use a skillet if you don't have one, but adjust the heat carefully. - Heat levels: Start at medium-high heat. This helps ingredients cook fast without burning. - Timing is key: Don’t overcook your shrimp or veggies. They should be tender yet crisp. By mastering these techniques, your Pad Thai will shine. Avoid these common mistakes that can ruin your Pad Thai: - Overcooking ingredients: This makes them mushy. Keep your shrimp and veggies crisp. - Imbalance of flavors: Too much soy sauce can make it salty. Taste as you go. - Skipping garnishes: Peanuts and cilantro add flavor and texture. Don't leave them out! Steering clear of these errors will help you create a perfect dish every time. {{image_2}} You can easily make a plant-based Pad Thai. Start by swapping shrimp or chicken for tofu. Firm tofu works best. Press it to remove excess water, then cut it into cubes. Sauté the tofu until golden brown. Use soy sauce and tamarind paste for flavor. For a fresh twist, add more veggies like bell peppers or mushrooms. Flip in extra bean sprouts and chopped carrots for crunch. This keeps your meal colorful and healthy. Pad Thai works with many proteins. You can use shrimp, chicken, or tofu. If you choose shrimp, cook them until pink. For chicken, slice it thin and stir-fry until cooked. Tofu is great for a vegan option. It soaks up flavors well. You can also mix proteins, like using shrimp and chicken together. This adds layers of taste and texture. Adjust the heat to fit your taste. Start with one teaspoon of red pepper flakes. If you want it spicier, add more. You can also try fresh chili peppers for a kick. A touch of sriracha sauce can enhance the flavor too. Balance the spice with lime juice, which adds brightness. This lets you create a Pad Thai that's just right for you. To keep your Pad Thai fresh, store leftovers in an airtight container. Place it in the fridge within two hours of cooking. If you want to keep it longer, freeze it. Make sure to use a freezer-safe container. When you freeze Pad Thai, it stays good for up to three months. For the best texture and flavor, reheat Pad Thai in a skillet. Add a splash of water or oil to keep it moist. Heat over medium-low, stirring often. This method helps prevent the noodles from becoming too hard or sticky. You can also use the microwave. Heat it in short bursts, stirring in between to ensure even warming. Leftover Pad Thai can last in the fridge for about three to four days. Always check for any off smells or changes in texture before eating. If you freeze it, just remember to label your container. This way, you can keep track of when you made it. Yes, you can make Pad Thai ahead of time. If you plan to meal prep, cook your noodles and protein first. Store them separately. This keeps them from getting soggy. When ready to eat, just heat them up. Add the sauce and fresh veggies right before serving. This way, your Pad Thai stays fresh and tasty. Tamarind paste is a thick, tangy paste made from tamarind fruit. It adds a unique sweet and sour flavor to Pad Thai. If you don’t have tamarind paste, you can use lime juice. Lime juice gives a bright, zesty taste. You might also try a mix of brown sugar and vinegar for a similar effect. Each option will change the flavor a bit, but they can work well. To make Pad Thai gluten-free, use gluten-free soy sauce. Look for brands made from rice or tamari. You also need to check your rice noodles. Most are gluten-free, but always read labels. If you want a twist, try zucchini noodles. They add a fun texture and keep it light. Enjoy your gluten-free Pad Thai without worry! This blog post guides you through making great Pad Thai at home. We covered key ingredients, cooking methods, and tips for authentic flavors. We also discussed variations, storage, and common questions. As you cook, remember that practice makes perfect. Don’t hesitate to adjust flavors to match your taste. Enjoy creating your own delicious version of this classic dish. Happy cooking!

Better Than Takeout Pad Thai Simple and Flavorful Meal

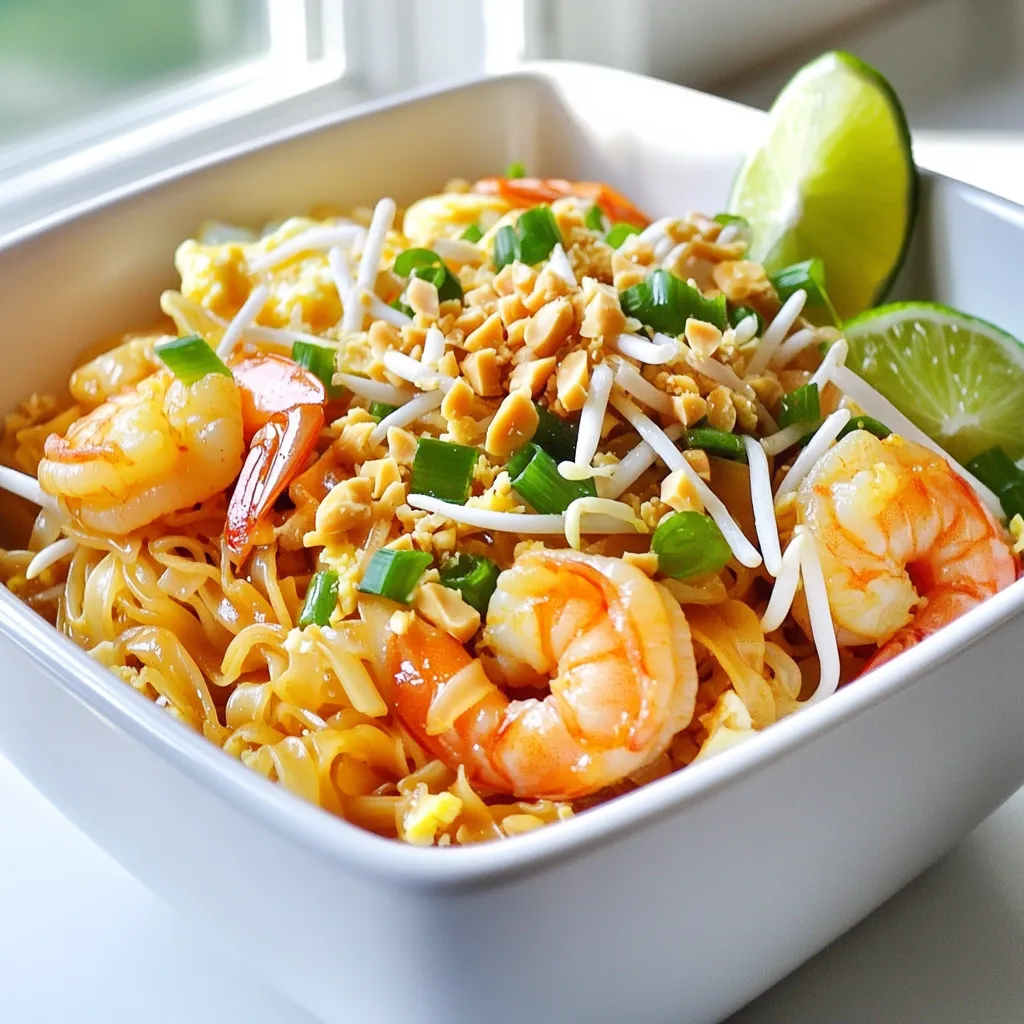
Craving something delicious yet easy to make? You’re in the right place! This Better Than Takeout Pad Thai recipe delivers

- 1 pound large shrimp, peeled and deveined - 4 tablespoons unsalted butter, melted - 4 cloves garlic, minced - 1 teaspoon smoked paprika - 1 teaspoon chili powder - Salt and pepper to taste - 8 small corn tortillas - 1 cup shredded cabbage - 1 avocado, sliced - ¼ cup fresh cilantro, chopped - Lime wedges for serving When making Garlic Butter Shrimp Tacos, fresh ingredients shine. You want to start with large shrimp. They cook fast and stay juicy. I love using shrimp that is peeled and deveined. This saves time and effort. Next, the butter adds richness. I prefer unsalted butter because it allows me to control the salt. Garlic is a must! Minced garlic adds an amazing aroma and flavor. For the spice mix, smoked paprika gives a nice depth. Chili powder adds warmth. I usually sprinkle in salt and pepper to taste. This combo really makes the shrimp pop. Moving on to taco essentials, corn tortillas are my favorite. They are soft and have great flavor. Shredded cabbage adds crunch and freshness. Don't skip the avocado! Its creaminess balances the dish. Fresh cilantro brings in brightness. Lastly, lime wedges are perfect for a zesty finish. Gather these ingredients, and you are ready to create a taco feast! - Preheat your oven to 400°F (200°C). - In a large bowl, mix melted butter, minced garlic, smoked paprika, chili powder, salt, and pepper. - Toss the shrimp in the garlic butter mixture until all are coated. - Spread the shrimp evenly on a parchment-lined sheet pan. - Bake the shrimp in the preheated oven for 8-10 minutes, until they turn pink. - While the shrimp bake, warm the corn tortillas in a dry skillet over medium heat. Heat them for about 30 seconds on each side until they are soft. - Once the shrimp are cooked, take them out of the oven. - Place a handful of shredded cabbage on each tortilla, then add a few shrimp. - Top with avocado slices and chopped cilantro. - Squeeze fresh lime juice over each taco right before serving. - Ensure shrimp are evenly coated. This helps in getting a rich flavor. - Check shrimp for doneness. They should be fully pink. Under-cooked shrimp can be unsafe. - Use fresh ingredients for the best flavor. Fresh produce makes a big difference. - Serve hot with lime wedges. The lime adds a nice zing to each bite. - Use parchment paper for easy cleanup. It keeps the pan clean and saves time. {{image_2}} You can change the filling in your tacos for different tastes. If you don’t like shrimp, try chicken or tofu. Both options taste great with garlic butter. You can also add fun toppings. Try jalapeños for some heat. Salsa adds a fresh twist. To make your tacos even better, play with spices and herbs. Add cumin or oregano for a new flavor. You can also try cheese or sour cream. These can make your tacos creamy and rich. Get creative with how you serve your dish. Instead of tacos, turn it into a burrito bowl. Just add the shrimp and toppings over rice. You can also serve it with beans for a filling meal. Enjoy your garlic butter shrimp in many ways! Store any leftovers in an airtight container. This keeps the shrimp fresh. You can enjoy them for up to 2 days. Just make sure to seal it well to avoid any odors. If you want to save your tacos longer, freeze them. Pack the assembled tacos in freezer bags. They can last up to a month in the freezer. This way, you can enjoy a quick meal anytime. To reheat the shrimp, set your oven to 350°F (175°C). Place the shrimp on a baking tray. Heat them for about 10 minutes, until warm. For the tortillas, warm them in a skillet. Just a minute on each side will restore their soft texture. This keeps your tacos tasty and fresh! Cooked shrimp turn pink and opaque. They also curl up slightly. When you see these signs, your shrimp are ready to eat. It’s best not to overcook them, as they can become tough. Yes, you can use frozen shrimp. Just ensure they are thawed before cooking. To thaw, place them in the fridge overnight or run them under cold water for a quick thaw. This keeps them fresh and tasty. Popular toppings include shredded lettuce, diced tomatoes, and hot sauce. You can also add avocado or mango for extra flavor. Feel free to mix and match based on your taste. They can be healthy when made with fresh ingredients and consumed in moderation. The shrimp provide protein, and using fresh vegetables boosts nutrition. Just watch the butter and tortillas if you’re counting calories. This blog post gives you a simple way to make garlic butter shrimp tacos. You start with fresh shrimp and spices, then cook everything just right. Remember to keep your shrimp pink and juicy for the best taste. Feel free to change up the ingredients to suit your style or add your favorite toppings. With these easy tips, you can enjoy tasty tacos at home. Now, gather your ingredients and get ready to cook something delicious!

Garlic Butter Shrimp Tacos Sheet Pan Delight

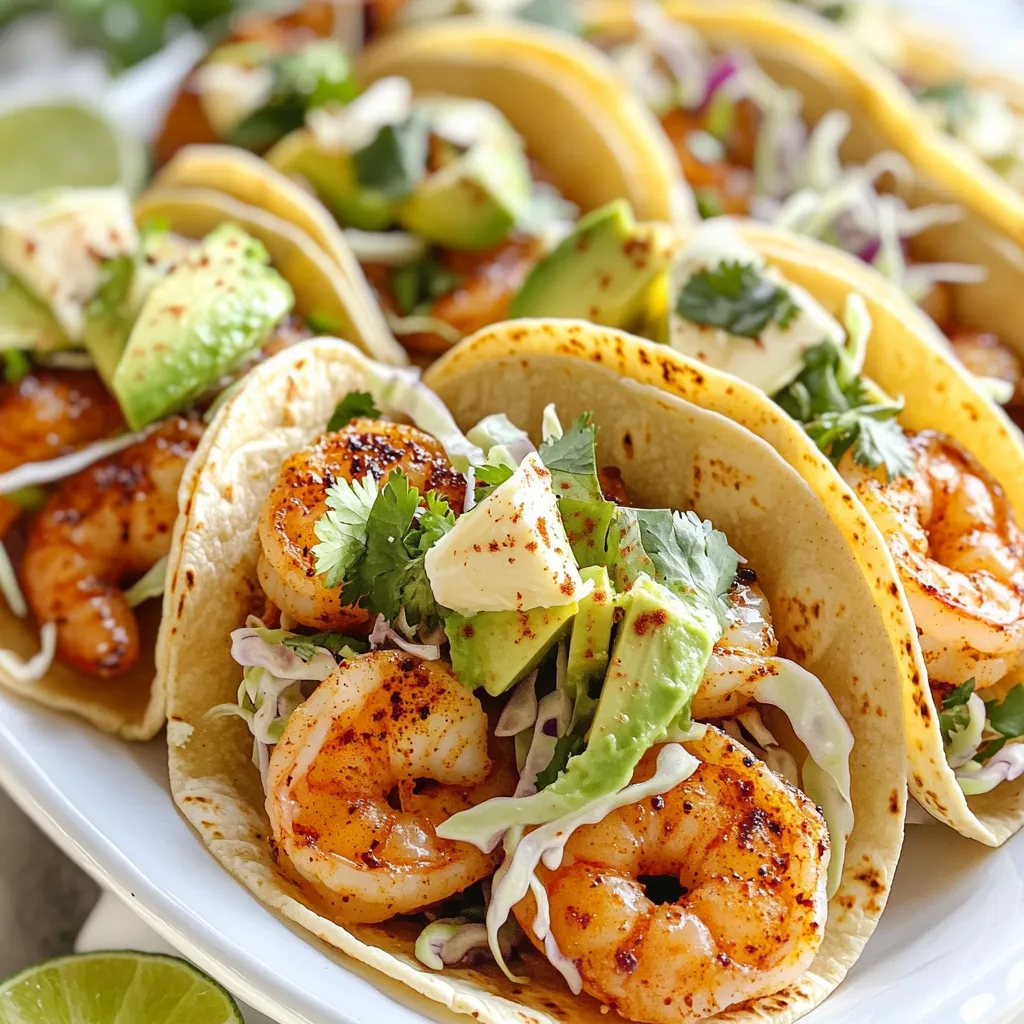
Get ready for an easy and delicious dinner with my Garlic Butter Shrimp Tacos Sheet Pan Delight! You can make

When making pumpkin cream cheese brownies, having the right ingredients is key. Here’s what you need: - 1 cup pumpkin puree - 1 cup granulated sugar - 1/2 cup brown sugar - 1/2 cup vegetable oil - 2 large eggs - 1 teaspoon vanilla extract - 1 cup all-purpose flour - 1/2 cup unsweetened cocoa powder - 1 teaspoon baking powder - 1/2 teaspoon baking soda - 1/2 teaspoon salt - 1 teaspoon cinnamon - 1/2 teaspoon nutmeg - 8 oz cream cheese, softened - 1/4 cup powdered sugar - 1/2 teaspoon vanilla extract These ingredients create a rich and moist brownie. The pumpkin puree adds a wonderful flavor and texture. The sugars sweeten the mix, while the cocoa powder gives it that deep chocolate taste. The cream cheese adds a soft, creamy layer that makes every bite special. Each spice, like cinnamon and nutmeg, brings warmth and a hint of fall. Make sure you measure everything carefully. Fresh pumpkin puree works great, but canned is fine, too. The oils and fats in this recipe keep the brownies moist and soft. With these ingredients, you can create a dessert that impresses everyone. - Prepping the Oven and Baking Pan Start by preheating your oven to 350°F (175°C). Grease an 8x8 inch baking pan or line it with parchment paper. This makes it easier to lift the brownies out later. - Mixing the Wet Ingredients In a large bowl, mix the pumpkin puree, granulated sugar, brown sugar, vegetable oil, eggs, and vanilla extract. Stir until the mixture is smooth and well combined. This helps create a rich, moist base. - Combining Dry Ingredients In another bowl, whisk together the flour, cocoa powder, baking powder, baking soda, salt, cinnamon, and nutmeg. This step ensures even distribution of the dry ingredients. - Incorporating the Dry Ingredients Gradually add the dry mix to the pumpkin mixture. Stir gently with a spatula until just combined. Be careful not to overmix; you want the brownies to stay light and fluffy. - Preparing the Cream Cheese Layer In a separate bowl, beat the softened cream cheese with powdered sugar and half a teaspoon of vanilla extract. Mix until it becomes creamy and smooth. This layer adds a delicious tang. - Creating the Marble Effect Pour half of the brownie batter into the prepared pan. Spread it evenly. Then, drop spoonfuls of the cream cheese mixture on top. Use a knife or skewer to swirl the cream cheese into the brownie batter gently. Pour the remaining batter on top and repeat the swirling. - Baking Time and Temperature Place the pan in the preheated oven. Bake for 30 to 35 minutes. Check with a toothpick; it should come out with a few moist crumbs, not wet batter. - Cooling Process After baking, let the brownies cool in the pan for about 15 minutes. This helps them set and makes them easier to handle. Lift the brownies out using the parchment paper and place them on a wire rack to cool completely. - Cutting the Brownies Once cooled, use a sharp knife to cut the brownies into squares. Enjoy the rich flavor and creamy texture! How to Avoid Overmixing To keep your brownies soft, mix until just combined. Overmixing can make them tough. Stir gently when adding dry ingredients. This helps keep air in the batter for the best texture. Choosing the Right Baking Pan Use an 8x8 inch pan for this recipe. It gives the brownies the right thickness. Greasing the pan or lining it with parchment paper makes for easy removal. This will keep your brownies intact when you cut them. Best Ways to Serve Serve these brownies warm or at room temperature. They taste great on their own or with a scoop of ice cream. You can also serve them on a nice plate for a special touch. Topping Suggestions Top with whipped cream, chocolate drizzle, or nuts. A dusting of powdered sugar adds a nice look. Fresh mint leaves can make a pretty garnish too. Adding Spices For extra flavor, add a pinch of ginger or cloves. These spices pair well with pumpkin. You can also try adding a splash of maple syrup for a sweet twist. Chocolate Variations Want more chocolate? Fold in chocolate chips to the batter. You can also swirl in some melted chocolate with the cream cheese layer. This gives you a rich, chocolatey surprise in every bite. {{image_2}} You can easily make these brownies gluten-free. Just swap the all-purpose flour for a gluten-free blend. Make sure the blend contains xanthan gum for the best texture. This way, everyone can enjoy the rich taste. To make these brownies vegan, replace eggs with flax eggs. Mix 1 tablespoon of ground flaxseed with 2.5 tablespoons of water, and let it sit for a few minutes. Also, use a plant-based cream cheese and substitute vegetable oil with coconut oil for a nice flavor. For a delightful twist, try adding chocolate chips. Fold in about half a cup of dark chocolate chips into the brownie batter. This adds a rich chocolate flavor and extra sweetness. If you love nuts, chop up some walnuts or pecans. Mix in about half a cup to the batter for added crunch. Nuts enhance the texture and add a nice depth to the flavor. You can switch pumpkin for other fruits, like mashed bananas or applesauce. This change gives a new twist to the brownies while keeping them moist and delicious. For a holiday flair, add spices like ginger or cloves. You can even decorate the brownies with festive sprinkles or a drizzle of white chocolate. This makes them perfect for any festive gathering. Best Ways to Store Brownies To keep your pumpkin cream cheese brownies fresh, store them in an airtight container. Place parchment paper between layers to avoid sticking. You can keep them at room temperature for up to three days. If you want to store them longer, use the fridge. The cool air helps keep them fresh for about a week. How to Freeze Brownies Freezing brownies is easy. First, let them cool completely. Then cut them into squares. Wrap each square in plastic wrap or foil. Place the wrapped brownies in a freezer bag. You can freeze them for up to three months. When you want to eat them, just thaw in the fridge overnight. Recommended Storage Duration When stored at room temperature, pumpkin cream cheese brownies last about three days. If stored in the fridge, they can last up to a week. For longer storage, freezing is best. Just remember, freezing may change the texture slightly, but they will still taste great. How to Warm Brownies for Optimal Taste To enjoy your brownies warm, preheat your oven to 350°F (175°C). Place the brownies on a baking sheet, and cover them with foil. Heat for about 10 minutes. This method warms them evenly without drying them out. You can also microwave a single square for about 15-20 seconds. This makes them soft and gooey, just like fresh! What can I substitute for pumpkin puree? You can use applesauce or mashed bananas. Both options add moisture and sweetness. If you want a similar taste, use butternut squash puree. How do I know when the brownies are done? The brownies are done when a toothpick comes out with a few moist crumbs. They should not be wet. Check around 30 minutes, but they may need up to 35 minutes. Can I make these brownies ahead of time? Yes, you can make them a day ahead. Just store them in an airtight container. This helps the flavors blend together nicely. Is it normal for cream cheese to melt into the brownies? Yes, that is normal! The cream cheese will melt and create a rich, creamy layer. It adds a nice swirl and flavor to each bite. These pumpkin brownies combine rich flavors and simple steps for a tasty treat. You gathered the right ingredients, mixed them well, and created a beautiful marble effect. Remember to avoid overmixing and choose the right pan for the best results. Feel free to explore variations, like gluten-free options or adding chocolate chips. Store them properly for freshness and enjoy them warm for the best flavor. Keep experimenting, and these brownies will surely impress at any gathering. Happy baking!

Pumpkin Cream Cheese Brownies Delicious and Easy Recipe

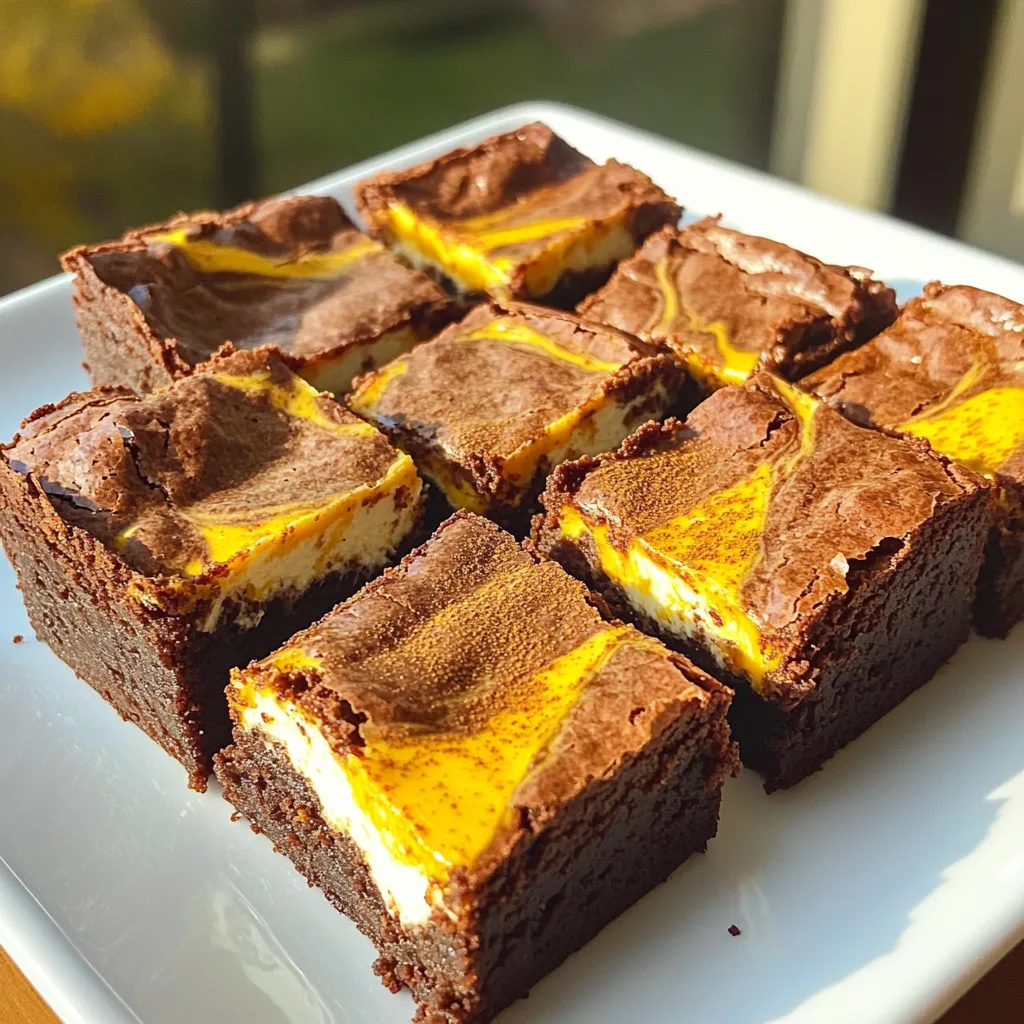
Get ready to indulge in the ultimate fall treat: Pumpkin Cream Cheese Brownies! This easy and delicious recipe combines the

Older posts
Newer posts
← Previous Page1 … Page6 Page7 Page8 … Page84 Next →

dsad

© 2026 Foodish Talk • Built with GeneratePress

Our Policies

  • Copyright Policy
  • Cookie Policy
  • GDPR Policy
  • Privacy Policy
  • Disclaimer
  • Terms Of Use

More Information

  • Home
  • About
  • Contact
  • Appetizers
  • Dessert
  • Dinner
  • Drinks
©2026, Foodish Talk About Back To Top