Skip to content
DisclaimerTerms Of UseGDPR PolicyCookie Policy

Foodish Talk

  • Home
  • Drinks
  • Appetizers
  • Dinner
  • Dessert
  • About
  • Contact
  • Privacy Policy
DisclaimerTerms Of UseGDPR PolicyCookie Policy

NO-ING-IMG

- 1 cup pumpkin puree - 1/2 cup granulated sugar - 1/2 cup brown sugar, packed - 1/2 cup vegetable oil - 2 large eggs - 1 teaspoon vanilla extract - 2 cups all-purpose flour - 1 teaspoon baking powder - 1/2 teaspoon baking soda - 1/2 teaspoon salt - 1 teaspoon ground cinnamon - 1/2 teaspoon ground nutmeg - 1/4 teaspoon ground ginger - 1/4 teaspoon ground cloves - 1/2 cup chopped walnuts or pecans (optional) - 1/2 cup chocolate chips (optional) To make pumpkin pie bread, you need simple ingredients. Start with good pumpkin puree. It gives flavor and moisture to the bread. Then, use both granulated and brown sugars. This mix makes the bread sweet and rich. Next, grab vegetable oil for a soft texture. The oil keeps the bread moist. Don’t forget the eggs; they help bind everything together. Vanilla extract adds a lovely aroma and taste. For the dry mix, you’ll need all-purpose flour. This flour gives the bread structure. Baking powder and baking soda are key for rising. Salt enhances all the flavors, while spices like cinnamon, nutmeg, ginger, and cloves bring warmth and depth. You can add nuts like walnuts or pecans for crunch. Chocolate chips also work well for a sweet touch. Both options add fun to your bread. With these ingredients, you will create a delightful pumpkin pie bread. Each bite will be tasty and satisfying. First, set your oven to 350°F (175°C). This is the best heat for baking. Next, take a 9x5 inch loaf pan. You can grease it well or line it with parchment paper. This makes it easier to remove the bread later. Grab a large mixing bowl. In it, combine 1 cup of pumpkin puree, 1/2 cup of granulated sugar, and 1/2 cup of brown sugar. Add 1/2 cup of vegetable oil, 2 large eggs, and 1 teaspoon of vanilla extract. Use a whisk to mix until everything is smooth. Take another bowl and sift together the dry ingredients. You need 2 cups of all-purpose flour, 1 teaspoon of baking powder, 1/2 teaspoon of baking soda, and 1/2 teaspoon of salt. Then add 1 teaspoon of ground cinnamon, 1/2 teaspoon of ground nutmeg, 1/4 teaspoon of ground ginger, and 1/4 teaspoon of ground cloves. This mix gives your bread great flavor. Now, slowly add the dry mix into the wet mix. Use a spatula to stir. Do this gently until just combined. Be careful not to overmix; this keeps your bread soft and tender. Fold in 1/2 cup of chopped walnuts or pecans and 1/2 cup of chocolate chips if you want. Then pour the batter into your prepared pan. Smooth the top with a spatula. Bake for 55 to 65 minutes. Check doneness by inserting a toothpick in the center. It should come out clean. Once baked, let the bread cool in the pan for about 10 minutes. After that, transfer it to a wire rack. Let it cool completely before you slice. This cooling step is key for the best texture. To get the right texture, use pure pumpkin puree. Avoid pumpkin pie filling, as it has extra spices and sugar. Mix the wet ingredients well until smooth. This helps everything blend nicely. When adding dry ingredients, stir gently. Overmixing can make your bread tough. Keep a light hand for a soft, tender loaf. Check your bread at 55 minutes. Insert a toothpick into the middle. If it comes out clean, your bread is ready. If it has batter on it, bake for another 5-10 minutes. Make sure to let it cool in the pan for 10 minutes. This helps it set and makes it easier to remove. Use a 9x5 inch loaf pan for best results. A non-stick pan or parchment paper makes removal easy. Have measuring cups and spoons handy. A whisk will help mix wet ingredients well. Use a spatula to fold in nuts or chips gently. Slice the bread evenly for nice servings. Arrange the slices on a wooden board for a rustic look. Add a dollop of whipped cream on the side. A drizzle of maple syrup adds a sweet touch. This makes your bread look more appealing. Want to boost flavors? Add chocolate chips or nuts for crunch. You can also mix in dried fruit like raisins. For a spice kick, try adding a bit more cinnamon or nutmeg. This makes every bite exciting and full of flavor. {{image_2}} To make gluten-free pumpkin pie bread, swap out all-purpose flour for a gluten-free blend. Look for a blend that contains xanthan gum. This helps give the bread a nice texture. Use the same amount of gluten-free flour as regular flour. To make this bread dairy-free, replace the vegetable oil with melted coconut oil. You can also use almond or soy milk instead of eggs. This keeps the bread moist and tasty while being dairy-free. Add fun ingredients to make your bread unique. Try mixing in dried cranberries, raisins, or even apple chunks. You can also sprinkle in some pumpkin seeds for a crunchy texture. These add-ins bring out seasonal flavors and make each bite special. For mini loaves or muffins, adjust your baking time. Fill mini loaf pans or muffin tins with batter. Bake mini loaves for 25-30 minutes and muffins for 18-20 minutes. These are perfect for sharing or gift-giving. To create a swirl or marble effect, divide the batter in half. Mix in some cocoa powder or nut butter in one half. Layer the two batters in your loaf pan. Use a knife to swirl them together gently. This adds a fun twist to the classic recipe! Store leftover pumpkin pie bread in an airtight container. This keeps it fresh and moist. It can last about 3 to 5 days at room temperature. For longer storage, place it in the fridge. This can extend its shelf life for up to a week. If you want to keep it even longer, freezing is your best option. To freeze your pumpkin pie bread, first let it cool completely. Once cooled, wrap it tightly in plastic wrap. Then, place it in a freezer-safe bag or container. This helps prevent freezer burn. It can last up to 3 months in the freezer. When you're ready to enjoy it, just thaw it in the fridge overnight. To reheat your pumpkin pie bread, slice it first. Place the slices in the microwave for about 15 to 20 seconds. You can also use an oven. Preheat it to 350°F (175°C) and bake the slices for about 10 minutes. This method helps keep the bread moist and warm. Enjoy it with a bit of butter or whipped cream for a tasty treat! Pumpkin pie bread lasts about 3 to 5 days at room temperature. Store it in an airtight container to keep it fresh. If you want it to last longer, place it in the fridge for up to a week. For best flavor, let it come to room temperature before serving. Yes, you can use fresh pumpkin! Just cook and puree it until smooth. Make sure to drain any excess water to avoid a soggy bread. Fresh pumpkin gives a bright flavor and adds a lovely texture. You can use several options to replace eggs. Here are some ideas: - 1/4 cup unsweetened applesauce - 1/4 cup mashed banana - 1 tablespoon ground flaxseed mixed with 3 tablespoons water (let it sit for 5 minutes) These substitutes work well and keep the bread moist. Yes, you can make this bread vegan. Replace the eggs with one of the substitutes listed above. Use a plant-based oil and ensure your sugars are vegan. This way, you keep the flavor and texture without using animal products. To check if the bread is done, insert a toothpick into the center. If it comes out clean, the bread is ready. If it has batter on it, bake for a few more minutes. The edges should be golden, and the top should spring back when gently pressed. To make pumpkin pie bread, gather these fresh ingredients: - 1 cup pumpkin puree - 1/2 cup granulated sugar - 1/2 cup brown sugar, packed - 1/2 cup vegetable oil - 2 large eggs - 1 teaspoon vanilla extract - 2 cups all-purpose flour - 1 teaspoon baking powder - 1/2 teaspoon baking soda - 1/2 teaspoon salt - 1 teaspoon ground cinnamon - 1/2 teaspoon ground nutmeg - 1/4 teaspoon ground ginger - 1/4 teaspoon ground cloves - 1/2 cup chopped walnuts or pecans (optional) - 1/2 cup chocolate chips (optional) Now, let’s dive into the steps: 1. Start by preheating your oven to 350°F (175°C). Grease a 9x5 inch loaf pan well. You can line it with parchment paper too. This makes it easier to remove the bread later. 2. In a large bowl, mix the pumpkin puree, granulated sugar, brown sugar, vegetable oil, eggs, and vanilla extract. Use a whisk to blend everything until it looks smooth. 3. In another bowl, sift together the all-purpose flour, baking powder, baking soda, salt, ground cinnamon, ground nutmeg, ground ginger, and ground cloves. This step adds air and helps the bread rise. 4. Slowly add the dry mix to the wet mix. Stir gently with a spatula. Do not overmix; you want the bread to stay soft and tender. 5. If you like nuts or chocolate, fold in the chopped walnuts or pecans and chocolate chips now. 6. Pour the batter into your prepared loaf pan. Use a spatula to smooth the top. 7. Bake your bread for about 55 to 65 minutes. Check with a toothpick. If it comes out clean, your bread is ready. 8. Let the bread cool in the pan for about 10 minutes. Then, move it to a wire rack to cool completely. This recipe makes about 8 slices. Enjoy your pumpkin pie bread with a dollop of whipped cream or a drizzle of maple syrup to make it even more special! This article covered the ingredients, steps, tips, and variations for making pumpkin pie bread. You learned about the essential ingredients and how to mix them for the best flavor. I shared tips for perfect texture and storage methods to keep your bread fresh. Lastly, the FAQ section answered common concerns. Pumpkin pie bread is fun to make and enjoy. You can customize it with different flavors. With practice, you’ll master this delicious recipe. Happy baking!

Pumpkin Pie Bread Delightful and Simple Recipe Tips

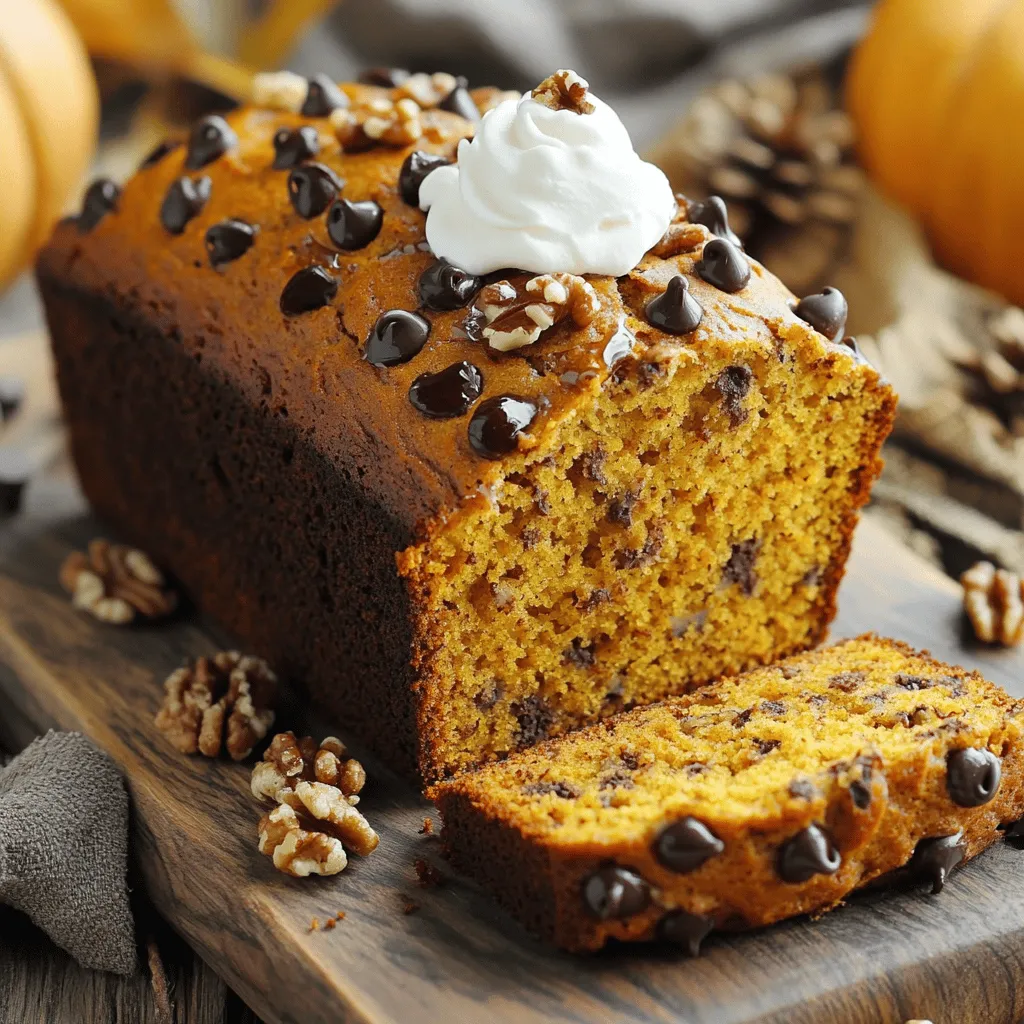
Are you ready to bake a delicious treat that captures the spirit of fall? This Pumpkin Pie Bread combines warm

- 1 medium head of green cabbage, chopped - 1 pound ground beef or turkey - 1 cup uncooked rice (white or brown) - 1 can (15 oz) diced tomatoes, undrained - 1 can (15 oz) tomato sauce - 1 small onion, chopped - 2 cloves garlic, minced - 1 tablespoon olive oil - 2 teaspoons paprika - 1 teaspoon dried oregano - Salt and pepper to taste - 1 cup shredded mozzarella cheese - Fresh parsley, chopped (for garnish) Gather these items before you start cooking. Having everything ready makes the process easier. I find that prepping helps me stay organized and enjoy the cooking experience. You can add other ingredients to make this dish your own. Here are some ideas: - Substitute ground turkey for ground beef or use a mix of both. - Add bell peppers or mushrooms for extra flavor. - Use brown rice for a heartier texture. - Try different cheeses like cheddar or Monterey Jack. Feel free to experiment! Cooking is about personal taste, and these options can add a fun twist. This dish is filling and nutritious. Here’s a quick breakdown per serving (based on 6 servings): - Calories: 360 - Protein: 22g - Carbohydrates: 34g - Fat: 15g - Fiber: 4g Cabbage Roll Casserole provides a good mix of protein and carbs. It also offers dietary fiber, making it a balanced meal choice. Enjoy knowing you’re fueling your body with wholesome ingredients! First, gather your ingredients. You will need a medium head of green cabbage, ground beef or turkey, rice, diced tomatoes, tomato sauce, onion, garlic, olive oil, and spices. Chop the cabbage and onion, and mince the garlic. This prep will make cooking easier and faster. Start by preheating your oven to 375°F (190°C). In a large skillet, heat olive oil over medium heat. Add your chopped onion and garlic. Cook them until soft and fragrant, about 3 to 4 minutes. Then, add the ground beef or turkey to the skillet. Cook until it turns brown, breaking it apart with a spatula. Drain any excess fat. Next, stir in the uncooked rice, diced tomatoes (with juice), and tomato sauce. Add the paprika, oregano, salt, and pepper. Mix it all well and let it simmer for about 5 minutes. Meanwhile, bring a large pot of salted water to a boil. Blanch the chopped cabbage for 3 to 4 minutes until it becomes slightly tender. Drain it and set it aside. In a greased 9x13 inch baking dish, layer half of the blanched cabbage on the bottom. Pour half of your meat and rice mixture over the cabbage. Repeat this process with the remaining cabbage and meat mixture. Cover the dish with aluminum foil and bake in the preheated oven for 30 minutes. After 30 minutes, remove the foil. Sprinkle the shredded mozzarella cheese on top. Bake uncovered for another 15 minutes, or until the cheese is melted and bubbly. Once done, let it cool slightly before serving. Don’t forget to garnish with fresh chopped parsley for a pop of color! To make the best cabbage roll casserole, follow these tips: - Choose fresh cabbage. Look for a medium head that feels heavy and firm. - Cook the rice slightly. A little undercooking helps it absorb flavors while baking. - Layer with care. Alternate layers of cabbage and meat for even cooking. - Use quality cheese. Fresh mozzarella melts better and adds great flavor. - Let it rest. Allow the casserole to cool for 10 minutes after baking. This helps it set and makes serving easier. Watch out for these common mistakes: - Skipping the blanching step. This step softens the cabbage and enhances the taste. - Not draining excess fat. Leaving fat in the meat can make it greasy. - Overcooking the rice. If you cook it fully before adding, it may turn mushy. - Covering too long. Remove the foil for the last 15 minutes to brown the cheese. - Not seasoning enough. Taste your mixture before you layer it, and adjust as needed. Here’s what you need: - Large skillet for browning the meat and cooking the onions. - 9x13 inch baking dish to hold the casserole layers. - Large pot for blanching the cabbage. - Spatula for mixing and breaking up the meat. - Aluminum foil to cover the dish while it bakes. These tips and tricks will help you create a delicious, hearty cabbage roll casserole that everyone will love! {{image_2}} If you want a meatless version, I have great ideas! You can use lentils or mushrooms instead of meat. Lentils cook well and add protein. Mushrooms give a nice, earthy flavor. You might also try chickpeas for a different texture. Replace the beef or turkey with these tasty options to keep it filling. Switching up the meat can change the whole dish. Ground turkey is a lighter choice. You can also try ground pork for extra flavor. If you want something bold, use spicy sausage. Each meat brings its own taste, making the casserole fun to customize. Rice is a classic choice, but you can explore others! Quinoa adds a nutty flavor and is packed with nutrients. Barley gives a chewy texture that’s really nice. If you want a low-carb option, try cauliflower rice. Each grain adds its own twist to this hearty meal. To store leftovers, let the casserole cool first. Once cool, place it in an airtight container. This keeps the flavors fresh. Store it in the fridge for up to four days. You can also cover it tightly with plastic wrap or aluminum foil. This way, it won’t dry out. When reheating, I suggest using the oven for the best results. Preheat the oven to 350°F (175°C). Place the casserole in an oven-safe dish and cover it with foil. Heat for about 20-25 minutes, or until hot. You can also use the microwave. Just heat it in short bursts, stirring in between to avoid hot spots. If you want to freeze the casserole, do it before baking. Prepare the layers as directed, then cover the dish tightly with plastic wrap. You can also use aluminum foil. Freeze for up to three months. When ready to eat, thaw it overnight in the fridge. Bake it straight in the oven at 375°F (190°C) for about 45 minutes. Enjoy your meal later! Yes, you can prepare Cabbage Roll Casserole in advance. Just follow these steps. Cook the meat and rice mixture as directed. Blanch the cabbage and layer it in the dish. Cover the dish and store it in the fridge. You can do this for up to two days. When you're ready to bake, remove it from the fridge. Let it sit at room temperature for about 30 minutes. Then, bake as the recipe states. This way, you save time on a busy night. Cabbage Roll Casserole is hearty on its own. However, you can add tasty sides to complete the meal. Here are some great options: - A fresh garden salad with vinaigrette. - Garlic bread or crusty rolls. - Steamed vegetables like broccoli or green beans. - A dollop of sour cream for added creaminess. These sides add color and flavor to your meal. They also bring balance to the dish. You can easily make Cabbage Roll Casserole fit different diets. Here are some ideas: - For gluten-free, use a gluten-free rice blend. - Use ground turkey or chicken for a lighter meat option. - If you want it vegetarian, swap the meat with lentils or mushrooms. - Use cauliflower rice instead of regular rice for a low-carb option. - For dairy-free, skip the cheese or use a plant-based cheese. These swaps ensure everyone can enjoy this dish. Just remember to adjust cooking times as needed. We explored the key steps to create a delicious Cabbage Roll Casserole. You learned about the ingredients you need, how to prepare and cook it, and tips to perfect your dish. We also discussed ways to customize your recipe and store leftovers. Remember, making it ahead of time can save you effort. Don’t hesitate to try different meats or grains for variety. With these insights, you can enjoy this dish any way you like!

Cabbage Roll Casserole Hearty and Homestyle Meal

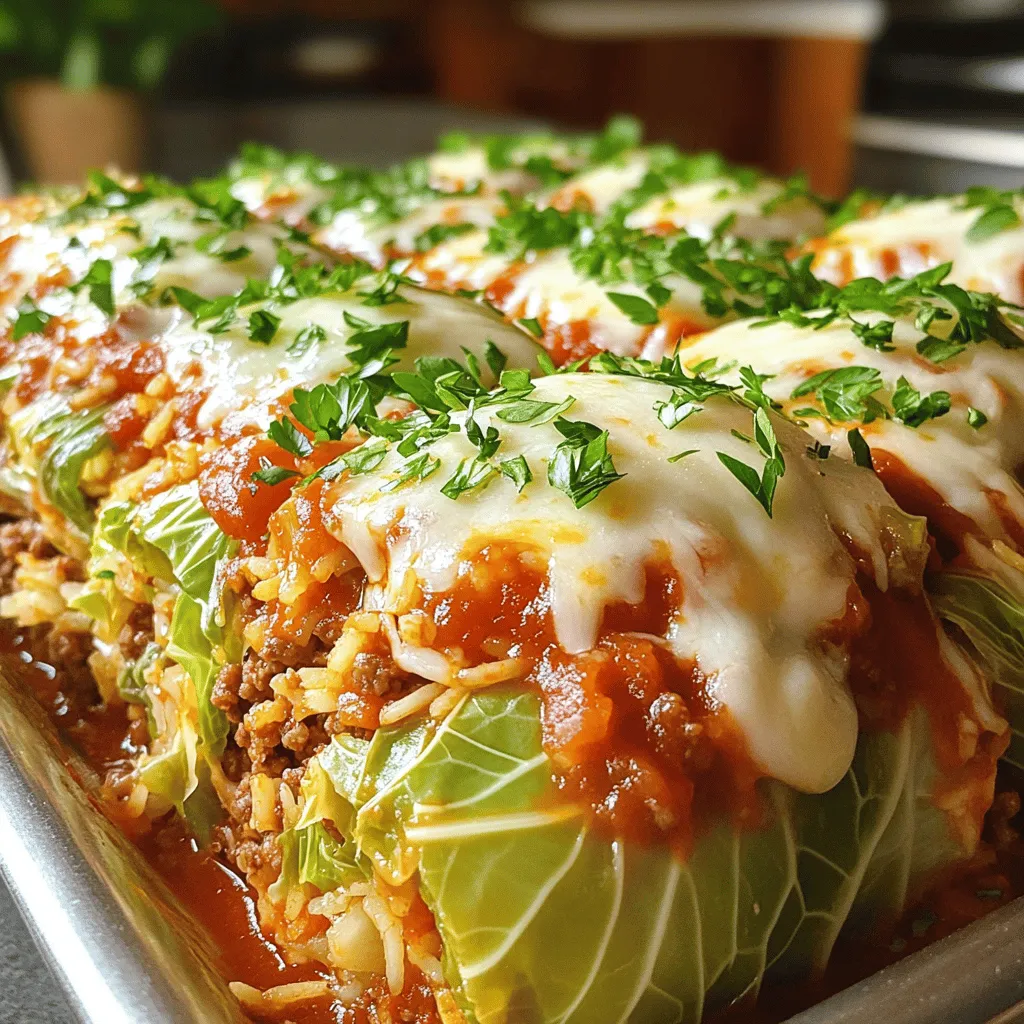
Imagine a warm, hearty meal that feels like a cozy hug on a plate. That’s the magic of Cabbage Roll

To make these tasty pizza chips, you'll need just a few key items: - 1 large whole wheat pita bread - 1/2 cup marinara sauce - 1/2 cup shredded mozzarella cheese These ingredients are the base for your chips. The whole wheat pita adds a nice crunch. Marinara sauce gives a classic pizza flavor. Shredded mozzarella melts beautifully and binds everything together. You can make your pizza chips even better with these toppings: - 1/4 cup sliced pepperoni - 1/4 cup black olives, sliced - 1/4 cup bell peppers, diced (any color) These toppings add texture and taste. Pepperoni brings a savory kick. Black olives add a nice saltiness. Bell peppers give color and sweetness, making your chips look and taste amazing. To enhance the flavor, use these seasonings: - 1/4 teaspoon dried oregano - 1/4 teaspoon garlic powder - Olive oil spray Dried oregano gives that Italian touch. Garlic powder adds depth and warmth. Olive oil spray helps the chips crisp up nicely in the oven. These seasonings make a big difference in taste and aroma. 1. Preheat the oven: Start by preheating your oven to 375°F (190°C). This ensures your chips bake evenly and get that perfect crunch. 2. Cut pita bread into triangles: Take a large whole wheat pita bread and slice it into quarters. Each quarter will become a delicious pizza chip. 1. Arrange on baking sheet: Place the pita triangles on a baking sheet lined with parchment paper. Make sure they do not overlap. This helps them crisp up nicely. 2. Spray with olive oil: Lightly spray the tops of the pita chips with olive oil spray. This adds flavor and helps them turn golden brown while baking. 1. Spread marinara sauce: Once the chips are baked for 5-7 minutes and start to brown, take them out. Carefully spread a layer of marinara sauce over each chip. 2. Add cheese and other toppings: Sprinkle shredded mozzarella cheese on top of the sauce. Then, add your favorite toppings like pepperoni slices, black olives, and diced bell peppers. The combination of flavors makes these chips great for sharing or snacking alone. To get the best crunch, watch your baking times. Bake the chips at 375°F (190°C). Start with 5-7 minutes. Look for a golden brown color. If they start to brown too fast, take them out. You do not want burnt chips. Always check them after the first few minutes. If you want to change the cheese, try different types. Cheddar brings a sharp taste. Provolone adds a smooth flavor. For a cheesy twist, use goat cheese. If you're vegan, opt for a plant-based cheese. Nutritional yeast is also a great choice. It gives a cheesy flavor without dairy. Make your pizza chips look great before serving. Use fresh basil leaves to garnish. They add color and flavor. You can also sprinkle some extra cheese on top for flair. Serve them on a nice plate or in a fun bowl. Pair them with extra marinara sauce for dipping. {{image_2}} You can change up the taste of your pizza chips easily. Instead of marinara, try BBQ sauce for a smoky flavor. Pesto sauce adds a fresh, herby touch. For cheese, mix mozzarella with cheddar or gouda for richness. Experiment with feta for a tangy kick. Each combination brings a new twist to your snack. If you're looking for healthier choices, swap out high-calorie toppings. Use turkey pepperoni or veggie toppings like zucchini. Choose low-fat cheese to cut down on calories. You can even use gluten-free pita bread. This way, everyone can enjoy the chips, no matter their diet. Make cooking fun for kids by using cookie cutters. Cut pita into fun shapes like stars or hearts. Let kids add their favorite toppings. This makes cooking a fun activity and dinner a family event. Colorful bell peppers can also attract kids to try something new. To keep your pizza chips fresh, store them in the fridge. Use an airtight container. A glass or plastic container works well. You can also use a resealable bag. Just make sure to squeeze out the air. This way, your chips stay crispy longer. You can reheat your pizza chips in a few ways. The oven is best for keeping them crunchy. Set your oven to 350°F (175°C) and bake for about 5 minutes. If you use a microwave, place them on a paper towel. Heat them for 15-20 seconds. But, they may lose some crunch. If you want to save some for later, freezing is a great choice. Let the chips cool completely first. Then, place them in a freezer bag. Make sure to remove as much air as possible. For thawing, take them out of the freezer and leave them at room temperature. This helps them stay crispy. Enjoy your tasty pizza chips anytime! Yes, you can use other types of bread. Try naan or flatbread for a fun twist. Sourdough also adds a rich flavor. You could even try gluten-free bread if you need a gluten-free option. Each type gives a different taste and texture. To add spice, use spicy pepperoni or add jalapeños. You can sprinkle red pepper flakes on top. Hot sauce is another great option. Mix it into the marinara for a fiery kick. Experiment with different toppings to find your favorite heat level. Yes, some brands offer ready-made pizza chips. Look for brands like Snack Factory or Pringles for pizza-flavored snacks. They are convenient for quick snacking. If you prefer store-bought alternatives, check your local grocery store for pizza-flavored crackers or chips. Homemade pizza chips are healthier than many store-bought options. Each serving has about 200 calories. It contains around 10 grams of fat. Store-bought chips can have more preservatives and unhealthy fats. Always check labels when buying snacks. Ingredient Pizza Chips are a fun and tasty snack. We explored essential ingredients like whole wheat pita, marinara sauce, and mozzarella. Adding toppings like pepperoni and veggies makes it even better. I shared tips for perfecting the crunch and fun variations to try. Storing leftovers and reheating them can keep your pizza chips fresh. With easy steps and creative ideas, you can make a delightful treat, even with kids' help. Enjoy your baking journey!

Ingredient Pizza Chips Savory and Crunchy Snack

If you’re craving a snack that’s both savory and crunchy, look no further! Ingredient Pizza Chips are the perfect mix

- 2 cups all-purpose flour - 2 teaspoons baking powder - 1 teaspoon baking soda - 1 teaspoon cinnamon - ½ teaspoon nutmeg - ½ teaspoon salt - ¾ cup granulated sugar - ½ cup brown sugar, packed - ½ cup unsalted butter, softened - 2 large eggs - 1 teaspoon vanilla extract - 1 cup buttermilk - 2 cups apples, peeled and diced - 1 tablespoon lemon juice - ½ cup powdered sugar - 2 tablespoons milk Choosing the best apples is key to this cake. Look for tart apples like Granny Smith. They add a nice zing. Sweet apples like Fuji or Honeycrisp also work well. Fresh spices make a huge difference in flavor. Use ground spices, not old jars. Fresh spices boost taste and aroma. If you need gluten-free options, use almond flour or gluten-free all-purpose flour. Both can give you great results. For a dairy-free version, try almond milk or oat milk instead of buttermilk. You can add a splash of vinegar to mimic buttermilk's tang. This way, everyone can enjoy this cake! Start by preheating your oven to 350°F (175°C). Grease a 9-inch round cake pan with butter or cooking spray. This step helps the cake come out easily after baking. Measuring your ingredients is key for great results. Use a scale or measuring cups for accuracy. This ensures the right texture and flavor in your cake. In a large bowl, mix the dry ingredients. Whisk together 2 cups of flour, 2 teaspoons of baking powder, 1 teaspoon of baking soda, 1 teaspoon of cinnamon, ½ teaspoon of nutmeg, and ½ teaspoon of salt. In another bowl, beat ½ cup of softened butter with ¾ cup of granulated sugar and ½ cup of brown sugar until creamy. Then, add 2 large eggs one at a time and mix in 1 teaspoon of vanilla extract. Next, slowly combine the dry mix with the wet mix. Alternate adding the dry ingredients with 1 cup of buttermilk. Start with dry, mix a bit, then add buttermilk, and repeat. Be careful not to overmix; stop when just combined. Gently fold in 2 cups of diced apples. Pour the batter into the prepared pan, smoothing the top. Bake for 40 to 45 minutes. Check doneness by inserting a toothpick into the center. It should come out clean when the cake is ready. While the cake cools, make the glaze. In a small bowl, whisk together ½ cup of powdered sugar and 2 tablespoons of milk. Mix until smooth. If the glaze is too thick, add a bit more milk. Once the cake cools for 10 minutes, transfer it to a wire rack. Drizzle the glaze over the top of the cake evenly. This adds a sweet finish that complements the apples perfectly. How to avoid overmixing To keep your cake soft, mix just enough. When you add the dry mix to the butter, combine them gently. Stop mixing when you see no dry flour. This keeps the cake light and fluffy. Tips for evenly distributing apples in the batter Toss the diced apples in a bit of flour before adding them to the batter. This helps them stay suspended and not sink. Gently fold them in last, ensuring they spread evenly throughout the cake. Best practices for cooling the cake After baking, let the cake cool in the pan for about 10 minutes. Then, transfer it to a wire rack. This helps air circulate around the cake, keeping it from getting soggy. Presentation ideas for serving Serve slices on rustic plates. Add a sprinkle of cinnamon on top. You can also place a few thin apple slices nearby for a nice look. This makes the dessert even more inviting. Overbaking and underbaking Keep an eye on the clock. Check the cake at 40 minutes. Insert a toothpick into the center. If it comes out clean, the cake is ready. If it’s wet, bake a bit longer. Using the wrong type of apples Choose apples that bake well, like Granny Smith or Honeycrisp. Avoid soft apples that turn mushy, like Red Delicious. The right apples add flavor and texture to your cake. {{image_2}} You can change the flavor of your apple fritter cake easily. Adding nuts or dried fruits can bring texture. Try chopped walnuts or pecans for a nice crunch. Dried cranberries or raisins also add sweetness. You can also play with spices. Cardamom adds a warm, unique taste. Ginger brings a spicy kick that complements the apples. Just a pinch can make a big difference in flavor. If you want a vegan version, replace the eggs with flax eggs. Mix one tablespoon of flaxseed meal with three tablespoons of water. Let it sit for a few minutes before adding it to the batter. Use plant-based butter instead of regular butter for a rich taste. For low-sugar options, you can cut down the sugar amount. Use natural sweeteners like applesauce or mashed bananas. These options keep the cake moist and add flavor too. Serving your apple fritter cake can be fun and creative. Try using rustic plates for a cozy feel. You can also sprinkle cinnamon on top for a nice touch. Thin apple slices can be a great garnish too. Experiment with different glazes. A caramel glaze can add a sweet twist. You could also use a maple glaze for a fall vibe. Drizzling the glaze in a zigzag pattern adds visual flair to your cake. Store your Apple Fritter Cake at room temperature for up to two days. If you want it to last longer, place it in the fridge. Use an airtight container to keep it fresh. This helps lock in the cake's moisture and flavor. To freeze the cake, first, let it cool completely. Wrap it tightly in plastic wrap, then in aluminum foil. This double wrapping helps prevent freezer burn. When you want to enjoy it, take it out of the freezer. Let it thaw in the fridge overnight. You can gently reheat it in the oven at 350°F (175°C) for about 10 minutes to restore its texture. In an airtight container at room temperature, the cake lasts about two days. In the fridge, it can stay good for up to a week. If frozen, it keeps for about three months. Always check for any signs of spoilage before eating. Apple fritter cake is a moist and sweet dessert. It blends cake and apple fritters into one. The cake has a rich flavor from apples, cinnamon, and nutmeg. You taste warm spices in every bite. You can enjoy it warm or at room temperature. The cake often has a sweet glaze on top. This dessert is great for sharing or as a special treat. Yes, you can make this cake ahead of time. I suggest baking the cake a day before serving. Let it cool completely and wrap it tightly in plastic wrap. This keeps it fresh. You can glaze it just before serving. This way, the cake stays moist and the glaze remains nice. The best apples for baking are sweet and tart. I recommend using Granny Smith or Honeycrisp apples. Granny Smith offers a tart flavor that balances the sweetness. Honeycrisp gives a nice crunch and sweetness. You can mix different apples for more depth in flavor. Yes, you can use store-bought glaze. However, it may change the taste and texture. Homemade glaze is easy and fresh. If you use store-bought, look for a glaze that is not too runny. This ensures it sticks well to the cake. You can serve this cake with whipped cream or vanilla ice cream. A scoop of ice cream adds creaminess and contrast. Fresh fruit or caramel sauce also pairs well with the cake. You can even sprinkle some cinnamon on top for extra flair. To check if your cake is done, use a toothpick. Insert it into the center of the cake. If it comes out clean or with a few crumbs, the cake is ready. If the toothpick has wet batter, bake it a few more minutes. Always check around the 40-minute mark to avoid overbaking. We covered all you need to make a great Apple Fritter Cake. From key ingredients to step-by-step instructions, every detail is crucial. Remember to choose quality apples and measure ingredients carefully. Avoid common mistakes to ensure your cake shines. Feel free to try different flavors and variations. Store your leftovers properly for the best taste. With these tips, you’ll enjoy a perfect cake every time. Happy baking!

Apple Fritter Cake Delectable Dessert to Savor

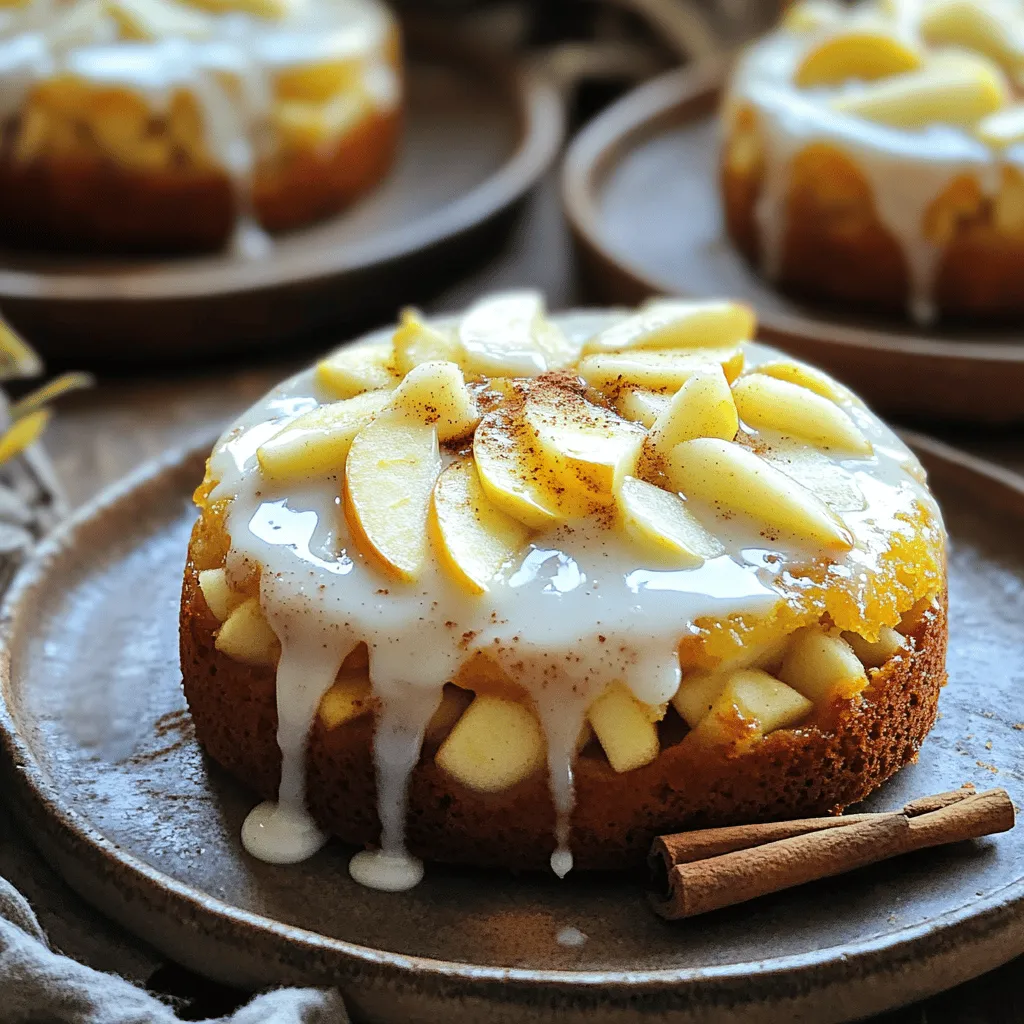
If you love warm, sweet treats, you’ll adore Apple Fritter Cake! This dessert brings the classic flavor of apple fritters

- 1 cup unsalted butter, melted - 1 cup light brown sugar, packed - 1 cup granulated sugar - 1 cup corn syrup - 4 large eggs - 1 teaspoon vanilla extract - 1 cup chopped pecans - 1 box yellow cake mix (15.25 oz) - 1 cup water - 1 cup sweetened shredded coconut (optional) - Whipped cream for serving (optional) To make Southern Pecan Pie Dump Cake, gather these simple ingredients. Each one plays a key role in the cake's rich flavor and texture. The unsalted butter adds a creamy base. You will melt it first to blend well with the sugars. Light brown sugar brings a warm, caramel taste. Granulated sugar adds sweetness. Corn syrup helps create the gooey filling we love in pecan pie. Next are the eggs. They help bind the cake together. Vanilla extract adds a nice aroma. Chopped pecans give crunch and nutty flavor. The yellow cake mix forms the main layer. You will combine it with water to get a light cake texture. If you want a twist, add sweetened shredded coconut. It gives a tropical flair. Lastly, whipped cream is optional but makes a perfect topping. This simple list creates a delightful treat that is hard to resist. 1. Preheating the oven Start by preheating your oven to 350°F (175°C). This step is key to baking. 2. Greasing the baking dish Next, take a 9x13-inch baking dish. Grease it with cooking spray or butter. This helps the cake not stick. 3. Mixing the wet ingredients In a large bowl, whisk together: - 1 cup unsalted butter, melted - 1 cup light brown sugar, packed - 1 cup granulated sugar - 1 cup corn syrup - 4 large eggs - 1 teaspoon vanilla extract Mix well until everything is combined. 4. Incorporating pecans and coconut Now, fold in: - 1 cup chopped pecans - 1 cup sweetened shredded coconut (optional) Gently stir until the nuts and coconut are evenly mixed in. 1. Pouring the mixture into the dish Pour the pecan mixture into your greased baking dish. Spread it evenly across the bottom. 2. Adding the cake mix and water Next, sprinkle 1 box of yellow cake mix evenly over the top. Then, carefully pour 1 cup of water over the cake mix. Do not stir! 3. Baking time and temperature Place the dish in your preheated oven. Bake for about 45-50 minutes. Look for a golden top and bubbly filling. 1. Letting it cool When done, take it out of the oven. Allow it to cool for about 10-15 minutes. This helps it set. 2. Serving suggestions with whipped cream Serve warm with a dollop of whipped cream on top. It adds a nice touch to this sweet treat! - Overmixing the batter: Mix your ingredients just until they combine. Too much mixing makes the cake tough. - Skipping the cooling time: Let the cake cool for 10-15 minutes. This helps it set and enhances flavor. - Choosing the right pecans: Use fresh, high-quality pecans. They add crunch and great flavor. Toast them lightly for an even richer taste. - Alternatives for sweeteners: You can swap light brown sugar for coconut sugar. This gives a deeper flavor. Honey or maple syrup can also work in place of corn syrup. - Adding spices like cinnamon or nutmeg: A pinch of these spices can brighten your cake. They add warmth that pairs well with pecans. - Using flavored extracts: Try almond or maple extract instead of vanilla. This gives your cake a unique twist. {{image_2}} One fun twist is the chocolate pecan pie dump cake. You can add chocolate chips to the batter. This makes a rich, sweet treat that many will love. For a nut-free version, simply skip the pecans. You can replace them with more coconut or use crushed cookies for crunch. These options keep your dessert tasty and enjoyable for everyone. If you need a gluten-free cake, look for a gluten-free cake mix. Many brands offer tasty options that work great in this recipe. For vegan adaptations, swap the eggs with flax eggs or applesauce. Use a plant-based butter substitute, and choose a vegan cake mix. These changes help you enjoy the same great taste while meeting your dietary needs. You can easily add festive spices for the holidays. Try cinnamon, nutmeg, or ginger to warm up the flavors. In fall, consider adding pumpkin puree for a fun twist. In summer, you can incorporate seasonal fruits like blueberries or peaches. These fruits add a fresh touch and enhance the sweetness of your cake. To keep your Southern pecan pie dump cake fresh, follow these steps: - Refrigeration methods: Allow the cake to cool completely. Cover it tightly with plastic wrap or foil. You can also place it in an airtight container. Store it in the fridge for up to five days. - Freezing tips: If you want to freeze it, slice the cake first. Wrap each piece in plastic wrap and then in foil. Place the wrapped slices in a freezer bag. This way, you can take out only what you need. The cake will last for up to three months in the freezer. When you’re ready to enjoy your leftover cake, reheating is key: - Best methods for maintaining texture: The microwave is quick. Heat a slice for about 15-20 seconds. If you prefer the oven, preheat it to 350°F (175°C). Place the slice on a baking sheet and heat for about 10 minutes. This keeps the cake soft and warm. - Recommended serving temperature: Enjoy your cake warm. This brings out the flavors and makes it even more delightful. Knowing how long your cake lasts is important: - How long it lasts in the fridge: Properly stored, the cake will stay fresh in the fridge for about five days. - Signs of spoilage: If you see mold or notice an off smell, it's best to toss it. Always trust your senses when checking for freshness. A dump cake is a simple dessert that needs little prep. You "dump" ingredients into a dish, layer them, and bake. For Southern Pecan Pie Dump Cake, you mix butter, sugars, corn syrup, and eggs. Then, you add pecans and cake mix. Lastly, you pour water on top. This method makes it easy and fun to create a tasty treat. Yes, you can prepare this cake ahead of time. Mix the wet ingredients and pecans, then store in the fridge. You can also layer the cake mix on top. When ready to bake, add water and bake it. This method saves time for busy days. Just remember to adjust baking time if cold from the fridge. Look for a golden brown top; this shows it is ready. You can also test if it is done. Insert a toothpick in the center. If it comes out clean, it is done. The filling should be bubbly around the edges. Let it cool a bit before serving, and enjoy the sweet aroma! Southern pecan pie dump cake is simple and delicious. We covered the key ingredients, easy steps, and helpful tips. Remember to avoid overmixing and let it cool before serving. You can try fun variations and store leftovers properly for later enjoyment. With these ideas, you can impress your friends and family. Enjoy this wonderful dessert, and make it your own with unique flavors and adjustments. Happy baking!

Southern Pecan Pie Dump Cake Delightfully Simple Treat

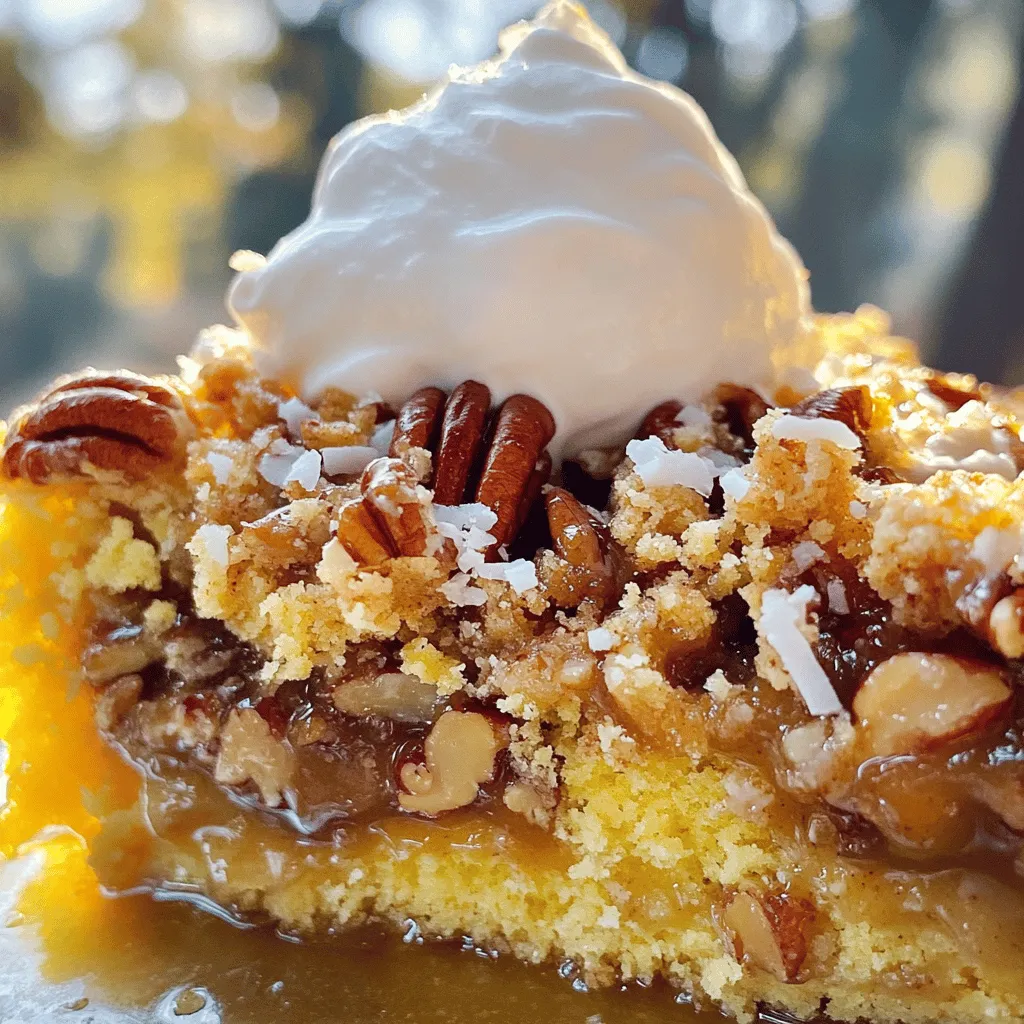
If you’re craving a sweet, nutty treat with minimal fuss, you’ve found it! This Southern Pecan Pie Dump Cake is

- 2 large apples (Granny Smith or Honeycrisp) - 1 teaspoon lemon juice - 2 cups all-purpose flour - 1 cup granulated sugar - 1 tablespoon baking powder - 1 teaspoon ground cinnamon - ½ teaspoon salt - ½ cup unsalted butter, softened - 2 large eggs - 1 teaspoon vanilla extract - ½ cup whole milk - 1 cup rolled oats - 1 teaspoon ground ginger (optional) When I make Cinnamon Apple Crumb Cake, I like to use Granny Smith or Honeycrisp apples. They bring the right mix of sweet and tart. A splash of lemon juice keeps the apples fresh and bright. You will need a mix of common pantry items. Start with two cups of all-purpose flour and one cup of granulated sugar. These form the cake base. Baking powder helps the cake rise. The ground cinnamon adds that warm, cozy flavor we all love. Just half a teaspoon of salt balances the sweetness. For the rich texture, use half a cup of softened unsalted butter. You will also need two large eggs, one teaspoon of vanilla extract, and half a cup of whole milk to bind it all. The rolled oats create a lovely crumb topping. I like to add ground ginger for extra warmth, but it’s not a must. If you want to try different fruits, you can swap the apples. Pears or peaches work well too. For a dairy-free option, use almond milk or oat milk in place of whole milk. If you're looking to cut sugar, coconut sugar or agave syrup can be great alternatives. Each change can give your cake a unique twist! First, preheat your oven to 350°F (175°C). This step ensures your cake bakes evenly. Next, prepare a 9x13 inch baking pan. You can grease it or line it with parchment paper. This makes it easy to remove the cake later. Now, let’s work on the apples. Take 2 large apples, like Granny Smith or Honeycrisp. Peel them and dice them into small pieces. Toss the diced apples in a small bowl with 1 teaspoon of lemon juice. This keeps them fresh and bright. In a large mixing bowl, combine the dry ingredients. Add 2 cups of all-purpose flour, 1 cup of granulated sugar, 1 tablespoon of baking powder, and 1 teaspoon of ground cinnamon. If you like, you can also add ½ teaspoon of salt and 1 teaspoon of ground ginger for extra warmth. Mix everything well until it’s evenly combined. Now, it’s time for the wet ingredients. In another bowl, mix together 2 large eggs, 1 teaspoon of vanilla extract, and ½ cup of whole milk. Beat these ingredients until they are well blended. This mixture adds moisture to your cake. Pour the egg mixture into the bowl with the dry ingredients. Mix them gently until just combined. Be careful not to over-mix, as this can make your cake tough. Now, gently fold in the diced apples. Make sure they are evenly distributed in the batter. Pour the batter into your prepared baking pan. Spread it evenly so it bakes nicely. Now, let’s make the crumb topping. Take the reserved crumb mixture from the dry ingredients and add 1 cup of rolled oats. Sprinkle this mixture evenly over the batter in the pan. This topping gives a nice crunch. Place the pan in the oven and bake for 30-35 minutes. To check if it’s done, insert a toothpick into the center of the cake. If it comes out clean, your cake is ready! Once baked, let the cake cool for at least 10 minutes before slicing. Enjoy this delightful treat! Mixing your cake batter is key. If you mix too much, your cake can become tough. You want the batter just blended. This keeps the cake light and fluffy. Remember to fold in the apples gently. This helps keep their shape and gives the cake great texture. Not all apples are the same for baking. I recommend using Granny Smith or Honeycrisp. They hold their shape well and add a nice tartness. This balance of sweet and tart makes your cake pop with flavor. You can also try Fuji or Braeburn for a sweeter taste. Want to mix things up? Add nuts or dried fruits to the cake. Walnuts or pecans add a nice crunch. Dried cranberries or raisins bring a sweet chewiness. These additions give your cake extra layers of flavor. Feel free to experiment with what you love! Serving your cake warm makes it even better. A dollop of whipped cream on top adds a creamy touch. Vanilla ice cream is another great choice. The cold ice cream melts into the warm cake, making it extra special. Dust with powdered sugar for a nice finish. Enjoy! {{image_2}} You can make this cake gluten-free. Use gluten-free flour blends. Look for blends made from brown rice flour, almond flour, or oat flour. They work well in this recipe and keep the texture light. To make this cake vegan, skip the eggs and dairy. Replace eggs with flaxseed meal. Mix one tablespoon of flaxseed meal with three tablespoons of water, let it sit for five minutes, and use it as an egg. For milk, choose almond milk or oat milk. These options keep the cake moist and delicious. Want to spice things up? Add nutmeg or allspice to the mix. Just a pinch can give your cake a warm, cozy flavor. Try one teaspoon of nutmeg or allspice for a delightful twist. You can even mix different spices for more depth. To store leftover cake, let it cool to room temperature. Then, cover it with plastic wrap or foil. You can also place it in an airtight container. This way, the cake stays moist for up to three days. Keep it on the counter for easy access. For long-term storage, freeze the cake. First, slice it into pieces. Wrap each slice in plastic wrap, then place them in a freezer bag. Press out extra air to prevent freezer burn. The cake can last for up to three months in the freezer. To reheat, take a slice and let it thaw in the fridge overnight. You can warm it in the microwave for 15-20 seconds before serving. Cinnamon apple crumb cake stays fresh for a few days at room temperature. To keep it tasting great, avoid direct sunlight and heat. If you notice any mold or strange smells, it’s best to toss it. Enjoy your cake while it's fresh for the best flavor and texture. Yes, you can use frozen apples. They work well in this cake. Just thaw them first. Drain any extra liquid to keep the cake from getting soggy. Frozen apples bring great flavor and sweetness, too. Check for doneness by using a toothpick. Insert it in the center of the cake. If it comes out clean, the cake is ready. Another sign is a golden-brown top. The edges may also pull away from the pan slightly. To reheat the cake, use the oven. Preheat it to 350°F (175°C). Place the cake in for about 10 minutes. This warms it up without drying it out. You can also microwave it. Heat in short bursts of 10-15 seconds to avoid overcooking. Yes, you can make the crumb topping in advance. Just store it in an airtight container. Keep it in the fridge for up to 3 days. When you are ready, sprinkle it on the batter before baking. It will still have that nice crunch! For the complete recipe with details, [click here](#). In this blog post, we covered how to make a delicious Cinnamon Apple Crumb Cake. We explored the best ingredients, provided step-by-step mixing and baking instructions, and shared tips for perfecting your cake. We also looked at variations, storage tips, and answered common questions. Enjoying this cake is simple, whether you bake it gluten-free or vegan. Remember, using the right apples and not overmixing will help you create a tasty treat. Now, it's time to gather your ingredients and get baking!

Cinnamon Apple Crumb Cake Delightful and Easy Recipe

Craving a sweet treat that’s easy to make? Look no further! This Cinnamon Apple Crumb Cake recipe offers a delightful

- 4 ears of fresh corn, husked - 1/2 cup mayonnaise - 1/4 cup sour cream - 1 teaspoon chili powder (plus more for garnish) - 1/2 cup cotija cheese, crumbled (or feta cheese as a substitute) - 2 tablespoons lime juice - Fresh cilantro, chopped for garnish - Salt, to taste When making authentic Mexican street corn, you need fresh corn. The corn should be sweet and juicy. The mayonnaise and sour cream create a creamy base. Add chili powder for a little kick. Cotija cheese gives a nice salty flavor and crumbly texture. You can swap cotija for feta if needed. Lime juice adds brightness to the dish. Don't forget salt; it enhances all the flavors. - Fresh cilantro, chopped - Lime wedges for serving To make your corn even better, you can add fresh cilantro. It gives a pop of color and flavor. Lime wedges are great to serve on the side. A squeeze of lime juice adds a tangy taste that makes the corn shine. - Cotija cheese vs. feta cheese - Different chili powder variations If you can't find cotija cheese, feta works well. It has a similar taste and texture. For the chili powder, you can use smoked chili powder for a deep flavor. You can also try chipotle powder for a spicy twist. Each choice adds a unique touch to your street corn. Feel free to explore these options to make the dish your own! To start, you need to husk the corn. Grab each ear of corn and pull down the green leaves. Remove the silk threads as well. Rinse the corn under cool water to clean it. This step makes sure your corn is fresh and ready for grilling. Next, preheat your grill to medium-high heat. Place the husked corn directly on the grill. Cook the corn for about 10 to 12 minutes. Turn the corn every few minutes. You want it to char a bit on all sides. This gives it a great smoky flavor. While the corn cooks, prepare the creamy topping. In a mixing bowl, combine 1/2 cup of mayonnaise and 1/4 cup of sour cream. Add 1 teaspoon of chili powder, 2 tablespoons of lime juice, and salt to taste. Mix everything until it's smooth. This creamy topping is what makes your corn special. Once the corn is grilled, take it off the heat and let it cool for a minute. Use a brush or spoon to coat the corn with the creamy mix. Make sure every side is covered. After that, sprinkle 1/2 cup of crumbled cotija cheese over the corn. For the final touch, add some extra chili powder and chopped cilantro. Serve your elote right away with lime wedges for a zesty kick. Enjoy! To get those perfect grill marks, start with a hot grill. Heat it to medium-high. Place the fresh corn directly on the grill. Leave it alone for a few minutes. This helps the corn char nicely. Turn the corn every few minutes for even cooking. Aim for about 10-12 minutes total. Look for deep brown spots. They show that the corn is done. If you want your topping to be extra creamy, adjust the mayo and sour cream. Use more mayonnaise for a thicker mix. Add a bit more sour cream for a lighter texture. Mix them well in a bowl. Make sure there are no lumps. This will help the creamy mix stick to the corn better. Serve your street corn with lime wedges on the side. The zesty lime juice adds a nice kick. Pair the corn with grilled meats like chicken or steak. It also goes well with fresh salads. Adding some guacamole can make it a full meal. Enjoy the mix of flavors to make every bite special. {{image_2}} You can make your elote spicy. Just add jalapeños or hot sauce. This gives a nice kick. Chop fresh jalapeños and mix them into the creamy sauce. If you like it hotter, drizzle some hot sauce on top. This twist will excite your taste buds. If you want a vegan version, it's simple. Replace mayonnaise with vegan mayo. Use plant-based cheese instead of cotija. You can find many great options at the store. This way, you keep all the flavor while making it plant-friendly. You can change the flavor of your elote easily. Try adding fresh herbs like basil or cilantro. A sprinkle of smoked paprika can add warmth. Experiment with spices like cumin or garlic powder for a unique twist. Each variation can give you a new taste adventure! To store leftover elote, let it cool first. Place the corn in an airtight container. This helps keep it fresh. Store it in the fridge for up to three days. If you notice any moisture, add a paper towel inside. This will absorb any extra water. When reheating, I suggest using the grill or an oven. These methods help restore the corn's flavor and texture. Set your grill or oven to medium heat. Heat the corn for about 5-7 minutes. Make sure to turn it often. This way, it warms evenly and gets a nice char. Yes, you can freeze Mexican street corn! First, let it cool completely. Wrap each ear in plastic wrap or foil. Then, place them in a freezer-safe bag. It can stay good for up to three months. When you're ready to eat, thaw it in the fridge overnight. Then, reheat and enjoy! Authentic Mexican street corn is called elote. It is a popular street food in Mexico. Vendors grill fresh corn on the cob, then cover it with creamy toppings. Elote often features mayonnaise, sour cream, and cheese. It is a tasty mix of flavors and textures. This dish represents Mexican culture and traditions. People enjoy elote at fairs, festivals, and street corners. It brings people together and adds fun to any gathering. Yes, you can prepare some parts of the recipe ahead. Husk the corn and mix the creamy topping early. Store the topping in the fridge until you grill the corn. You can grill the corn just before serving. This keeps the corn fresh and warm. Make sure to coat it with the topping right after grilling. This way, you get the best taste and texture. Elote pairs well with many dishes. Here are some tasty options to serve with it: - Grilled chicken or steak - Tacos with various fillings - Fresh salads with lime dressing - Rice and beans for a hearty side - Mexican-style quesadillas These dishes create a full meal and enhance your elote experience. Enjoy mixing flavors and sharing with friends and family! In this post, we explored the key ingredients for making elote, including fresh corn, creamy toppings, and optional garnishes. I shared step-by-step instructions for prepping, grilling, and assembling the dish. You learned tips for achieving perfect grill marks and creative variations, like the spicy elote and vegan options. Finally, we discussed storing leftovers and reheating tips. Elote is not just food; it’s an experience. Try these methods today and enjoy a delicious taste of Mexico at home.

Authentic Mexican Street Corn Flavorful and Easy Recipe

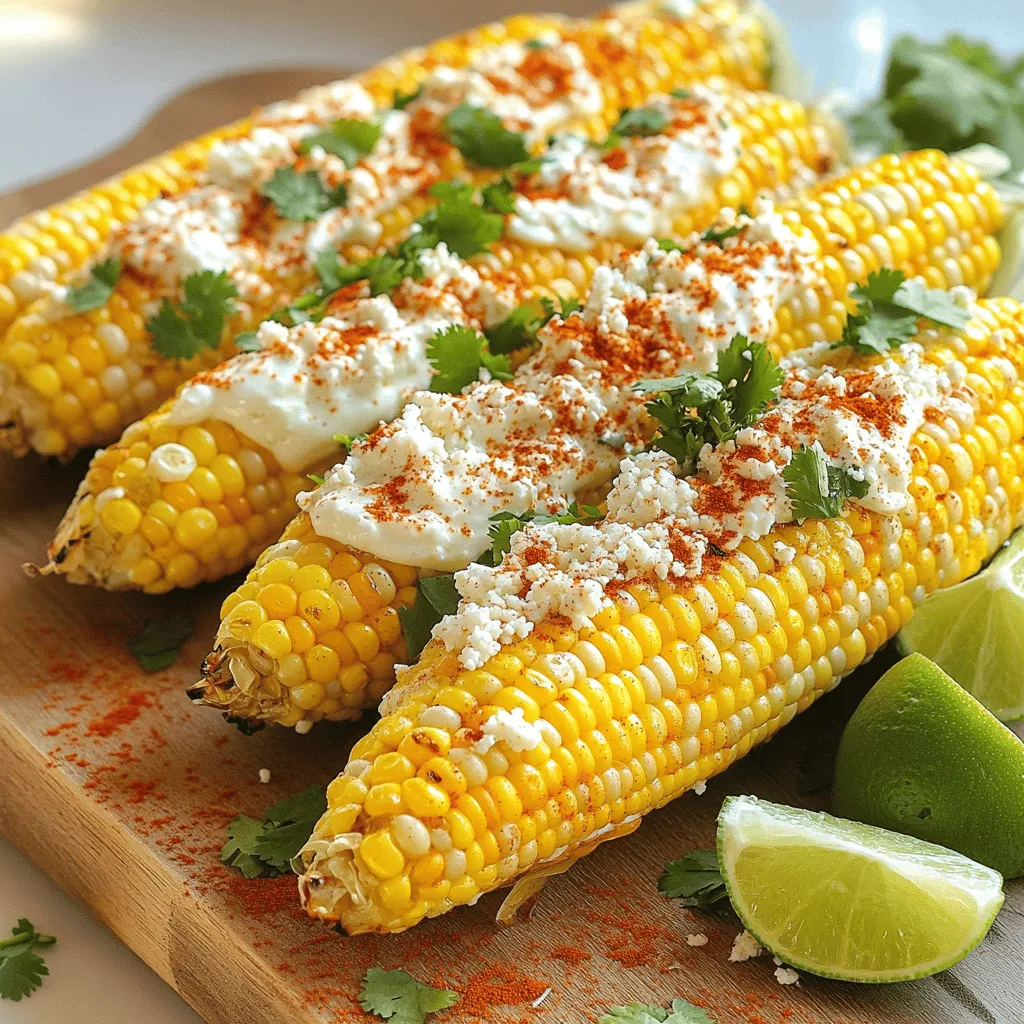
Are you ready to enjoy a bite of Mexico? Authentic Mexican street corn, or elote, is a delicious treat that

- 2 cups all-purpose flour - 1/4 cup sugar - 1 tablespoon baking powder - 1/2 teaspoon salt - 1/2 cup unsalted butter, softened - 2/3 cup milk - 1 large egg - 1 teaspoon vanilla extract - 2 cups apples, peeled and diced (preferably Granny Smith) - 1 teaspoon cinnamon - 1/2 cup cream cheese, softened - 1/4 cup powdered sugar - 1/2 teaspoon lemon juice - 1/4 cup rolled oats - 1/4 cup brown sugar - 1 tablespoon butter, melted The ingredients for Apple Cheesecake Crumble Buns are simple yet key to the flavor. Dry ingredients form the base. The all-purpose flour gives structure. Sugar adds sweetness. Baking powder helps the buns rise. Salt balances flavors. Wet ingredients bring everything together. The unsalted butter adds richness. Milk keeps the dough moist. The egg binds it all, while the vanilla extract gives a lovely aroma. Filling ingredients add the star flavors. Fresh, diced apples provide crunch and sweetness. Cinnamon brings warmth. Cream cheese adds creaminess, while powdered sugar and lemon juice enhance the filling's taste. Crumble topping ingredients create a sweet crunch. Rolled oats provide texture. Brown sugar adds depth, and melted butter ties it all together. Each ingredient plays a crucial role in making these buns a delightful treat. Preheat your oven to 350°F (175°C). This step is key for baking. While the oven warms, prepare a muffin tin. Grease each cup or use paper liners. This helps the buns come out easily. In a large bowl, mix the dry ingredients first. Combine 2 cups flour, 1/4 cup sugar, 1 tablespoon baking powder, and 1/2 teaspoon salt. In another bowl, whisk 1/2 cup softened butter with 2/3 cup milk, 1 egg, and 1 teaspoon vanilla extract. Pour the wet mix into the dry mix. Stir gently until just combined. Avoid over-mixing; this keeps the dough light. Toss 2 cups diced apples in a bowl with 1 teaspoon cinnamon. Set this aside for flavor. In another bowl, mix 1/2 cup softened cream cheese, 1/4 cup powdered sugar, and 1/2 teaspoon lemon juice until smooth. For the crumble topping, combine 1/4 cup rolled oats, 1/4 cup brown sugar, and 1 tablespoon melted butter. Mix until crumbly. Scoop about a tablespoon of dough into each muffin cup. Press it down to form a base. Add a spoonful of the cream cheese mixture on top. Next, spoon in some of the cinnamon apple filling. Cover with another tablespoon of dough to seal the bun. Place the muffin tin in the oven. Bake for 20-25 minutes. Check for doneness by inserting a toothpick into the center. If it comes out clean, the buns are ready. Enjoy the warm scent of apples and spices as they bake! To get the best dough, focus on the texture. The dough should be soft but not sticky. Mix the butter well with the dry ingredients. If it feels too dry, add a splash of milk. For a sticky dough, add a little more flour. If your dough doesn’t rise, check your baking powder. It should be fresh and active. If your dough is too crumbly, mix in a bit more milk slowly. This helps bind the dough together nicely. Spices can add a lot to your buns. Try adding a pinch of nutmeg or a dash of vanilla extract. These flavors blend well with the apples. For apples, I love using Granny Smith. They are tart and hold their shape well during baking. You can also mix them with Honeycrisp for a sweet twist. Serve your buns warm for the best taste. A drizzle of caramel sauce on top works great. You can also add a scoop of vanilla ice cream. For a nice look, dust the buns with powdered sugar before serving. Arrange them on a colorful plate for fun. This makes them more appealing and perfect for sharing! {{image_2}} You can add a fun twist to your apple cheesecake crumble buns. Try mixing in nuts like walnuts or pecans for a crunchy texture. Chocolate chips can also bring a sweet surprise. They blend well with the apple and cream cheese. You can switch up the fruit too. Instead of apples, use pears or berries for a new taste. Each fruit gives a different flavor. Experimenting can lead to fun results! For those who need gluten-free options, use gluten-free flour in place of all-purpose flour. Many brands have great choices that work well in baking. If you want a dairy-free version, swap the cream cheese for a dairy-free cream cheese alternative. You can also use almond or coconut milk in place of regular milk. These changes keep the recipe tasty and friendly for various diets. You can make mini buns instead of regular-sized ones. Mini buns are perfect for snacks or parties. Just adjust the baking time to about 15-20 minutes. If you prefer, use a baking dish instead of a muffin tin. Spread the dough in the dish and layer the fillings. Cut the baked dish into squares for easy serving. This method is great if you're serving a crowd! To keep your Apple Cheesecake Crumble Buns fresh, store them in an airtight container. This method helps to keep them moist and tasty. Place the container in the fridge. They can last up to three days this way. If you want to enjoy them later, freezing is a great option. You can freeze these buns both before and after baking. To freeze before baking, assemble the buns in the muffin tin and cover them well. Once they are ready, place the tin in the freezer. You can bake them straight from the freezer, just add a few extra minutes to the baking time. If you have baked the buns, let them cool completely. Then, wrap each bun in plastic wrap and place them in a freezer bag. They will be good for about three months. When you want one, just thaw it in the fridge overnight. When reheating, the best method is to use an oven. Preheat it to 350°F (175°C). Place the buns on a baking sheet and heat for about 10 minutes. This method helps to keep the buns from drying out. You can also reheat them in the microwave. Just cover them with a damp paper towel to keep moisture in. Heat for about 20-30 seconds. Enjoy your warm, tasty treat! To stop the buns from sticking, grease the muffin tin well with butter. You can also use non-stick spray for easy release. If you prefer, line each cup with paper liners. This makes cleanup easy and helps with the buns' removal. Yes, you can use other cheeses! Mascarpone is a great choice for a rich taste. Ricotta works well, too, for a lighter filling. Just make sure to adjust the sugar based on the cheese's sweetness. Granny Smith apples are my top choice. They bring a nice tartness and hold their shape well. Honeycrisp apples add sweetness and crispness. You can mix varieties for an extra flavor boost. Look for golden tops and a toothpick test. Insert a toothpick into the center of a bun. If it comes out clean, they are done. The buns should feel firm and spring back when gently pressed. Absolutely! You can prepare the dough and fillings a day in advance. Store them in the fridge. Just assemble and bake when you are ready. They taste best fresh, but you can also freeze them before baking for later enjoyment. You learned how to make delicious apple cream cheese buns with a simple recipe. We covered each step, from mixing dough to baking. I shared tips for perfecting flavor and texture, as well as variations to try. These buns are fun to make and tasty to eat. Enjoy experimenting with different flavors or serving sizes. Keep these tips in mind, and you’ll have a delightful treat to share anytime!

Apple Cheesecake Crumble Buns Delightful and Easy Treat

Are you ready to indulge in a warm, sweet treat? These Apple Cheesecake Crumble Buns are perfect for any occasion.

- Apples (2 cups, peeled, cored, and diced) - Brown sugar (1/2 cup) - Cinnamon (1 tsp) - Nutmeg (1/4 tsp) - Lemon juice (1 tbsp) - Cornstarch (1 tbsp) - Egg roll wrappers (12) - Oil for frying (vegetable or canola) - Powdered sugar for dusting To make the best Apple Pie Egg Rolls, you need fresh apples. I like to use Granny Smith apples for their tartness. They balance well with the sweet brown sugar. The spices, cinnamon and nutmeg, add warmth and depth. Lemon juice is key to keeping the apples bright. It also adds a hint of citrus that lifts the flavor. Cornstarch helps thicken the filling too. It makes the filling nice and gooey. Egg roll wrappers are the stars of this dish. They are easy to handle and create the perfect crunch when fried. For frying, use vegetable or canola oil. These oils have a high smoke point, making them ideal for frying. Finally, powdered sugar is a simple touch. It adds sweetness and makes the egg rolls look pretty. Now, gather these ingredients and get ready to create a tasty dessert! To make the apple filling, start by combining the following in a medium saucepan: - 2 cups apples, peeled, cored, and diced - 1/2 cup brown sugar - 1 tsp cinnamon - 1/4 tsp nutmeg - 1 tbsp lemon juice - 1 tbsp cornstarch Cook this mixture over medium heat for about 5-7 minutes. Stir it often. You want the apples to soften and the sugar to turn into a syrup. Once it thickens, remove it from the heat and let it cool for a bit. Now, let’s fold the egg rolls. Lay one wrapper flat on a clean surface. The bottom corner should point toward you. Spoon about 2 tablespoons of the apple filling into the center of the wrapper. Next, fold the bottom corner up over the filling. Fold in the sides to tuck them in. Now, roll it up tightly. Moisten the top corner with a little water to seal the egg roll. Repeat these steps with the rest of the wrappers and filling. For cooking, heat about 2 inches of oil in a deep frying pan over medium-high heat. The oil should be hot, around 350°F (175°C). Carefully place a few egg rolls in the oil. Fry them until they turn golden brown and crispy, which takes about 3-4 minutes. Use a slotted spoon to take them out. Place the cooked egg rolls on paper towels to drain any extra oil. Before serving, dust them with powdered sugar for a sweet touch. Enjoy! - Maintaining oil temperature while frying: Use a deep frying thermometer. Heat the oil to 350°F (175°C). If the oil is too hot, the egg rolls will burn. If too cool, they will soak up oil. Fry in small batches to keep the temperature steady. - Preventing egg rolls from leaking during frying: Make sure to seal the egg rolls tightly. Use water to moisten the edges before sealing. This helps keep the filling inside during frying. If any filling spills out, it can cause the oil to splatter. - Best pairings: Serve your apple pie egg rolls warm. A scoop of vanilla ice cream on the side adds a nice touch. Drizzle some caramel sauce over the top for extra sweetness. - Creative presentation ideas: Arrange the egg rolls on a plate in a fan shape. Dust them with powdered sugar. You can also add a sprinkle of cinnamon for a pop of color. - Basic nutritional breakdown per serving: Each serving contains about 150 calories. This includes 5 grams of fat, 25 grams of carbs, and 1 gram of protein. - Healthier alternatives for some ingredients: Swap brown sugar for coconut sugar for a lower glycemic index. You can use whole wheat egg roll wrappers for more fiber. {{image_2}} You can make your apple pie egg rolls even better by adding more flavors. Try mixing in 1 teaspoon of vanilla extract for a sweet twist. You could also add a pinch of ginger or cloves for warmth. These spices enhance the apple filling and give it a cozy feel. Not a fan of apples? You can use pears or berries instead. They work great in egg rolls, too! If you want a gluten-free option, use rice paper wrappers or gluten-free egg roll wrappers. These choices keep your dessert tasty for everyone. If you prefer a healthier option, you can bake the egg rolls. To do this, preheat your oven to 400°F (200°C). Place the egg rolls on a baking sheet lined with parchment paper. Brush them lightly with oil and bake for 15-20 minutes until golden. For a quick option, use an air fryer! Set it to 375°F (190°C) and cook the egg rolls for about 10-12 minutes, shaking halfway through. This method gives you a crispy finish without deep frying. To keep your apple pie egg rolls fresh, follow these tips. For the best taste, store leftovers in the fridge within two hours of cooking. Place them in an airtight container. They will stay good for about three to four days. If you want to keep them longer, freezing is a great option. To freeze, wrap each egg roll in plastic wrap. Then, place them in a freezer-safe bag. They can last for up to three months in the freezer. When you’re ready to eat them, you can thaw them in the fridge overnight. Reheating apple pie egg rolls can be simple. For the oven, preheat it to 350°F (175°C). Place the egg rolls on a baking sheet. Bake for about 10-15 minutes. This keeps them crispy. If you're using a microwave, place the egg rolls on a microwave-safe plate. Heat them for about 30 seconds to one minute. To avoid sogginess, place a paper towel under the rolls. This helps soak up extra moisture. Enjoy your tasty treats warm! Apple Pie Egg Rolls last about 3 to 5 days in the fridge. To keep them fresh, store them in an airtight container. This will help prevent them from getting soggy. When you’re ready to eat, just reheat them in the oven for crispness. Yes, you can make the filling ahead of time. Store it in the fridge for up to 3 days. Make sure it cools down before you put it in a container. This way, you can save time when you are ready to assemble and fry. I recommend a few tasty options. Caramel sauce adds a sweet touch. Vanilla ice cream gives a nice creaminess. You can also try a warm chocolate sauce for a rich flavor. These sauces will make your dessert even more enjoyable. Yes, these egg rolls freeze well. You can freeze them before or after frying. If freezing before, wrap them tightly in plastic wrap. For fried egg rolls, let them cool first, then store in a freezer bag. They last up to 2 months. In this post, I shared a simple recipe for delicious apple pie egg rolls. We explored ingredients, cooking steps, tips, and storage advice. Whether you fry or bake, these treats are easy to make and fun to enjoy. Get creative with flavors and serve them with tasty dips. Remember, you can store leftovers for later or have them fresh out of the oil. Cooking should be fun, so dive in and make these egg rolls your own! Happy cooking!

Apple Pie Egg Rolls Tasty Dessert Treat Recipe

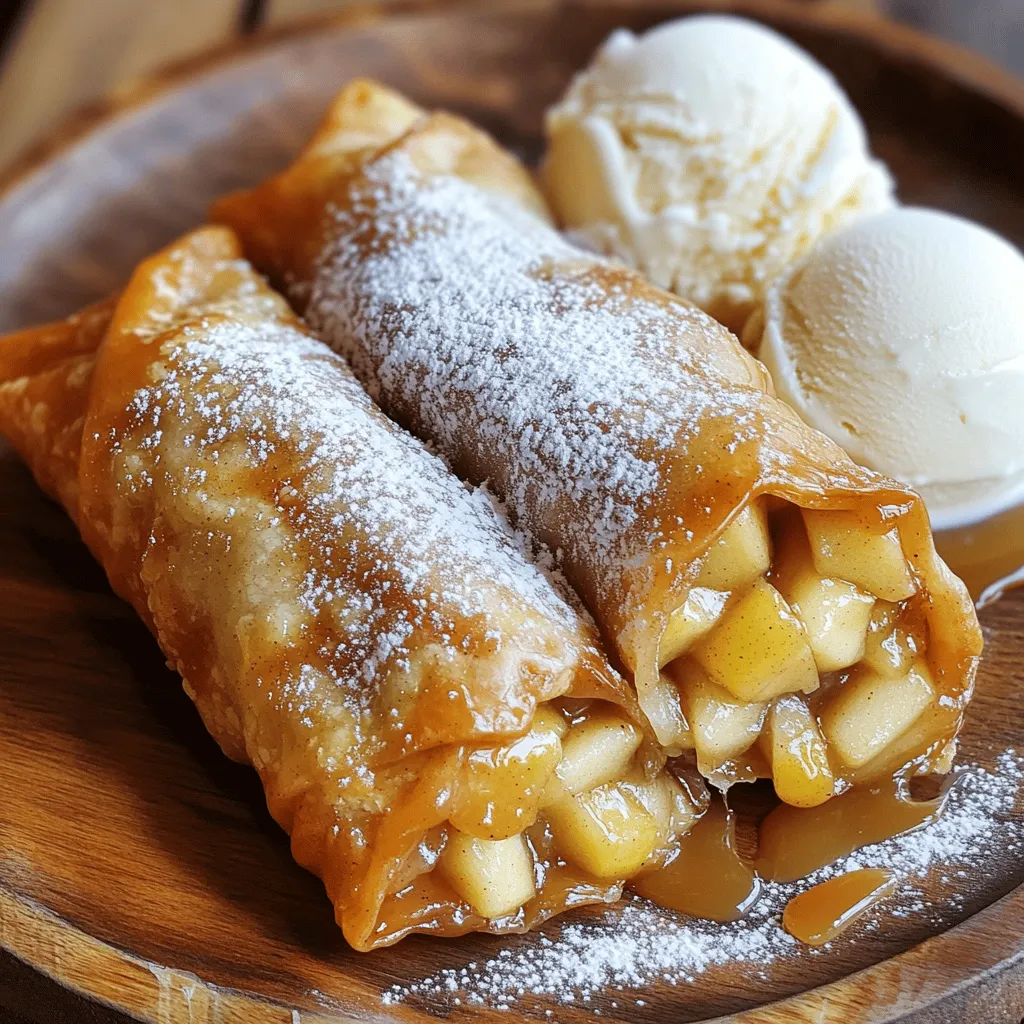
If you love apple pie, you’ll adore Apple Pie Egg Rolls! This easy recipe combines sweet apples, warm spices, and

- 1 cup frozen chopped spinach, thawed and drained - 1 cup canned artichoke hearts, drained and chopped - 1 cup cream cheese, softened - 1/2 cup sour cream - 1 cup shredded mozzarella cheese - 1/2 cup grated Parmesan cheese - 1 clove garlic, minced - 1 teaspoon onion powder - 1/2 teaspoon garlic powder - Salt and pepper to taste - Tortilla chips and veggie sticks for serving - Frozen chopped spinach: Use one cup, thawed and drained well. - Canned artichoke hearts: One cup, drained and chopped into small pieces. - Cream cheese: One cup, make sure it is softened for easy mixing. - Sour cream: Half a cup adds creaminess and tang. - Shredded mozzarella cheese: One cup gives a nice melt and stretch. - Grated Parmesan cheese: Half a cup adds a sharp flavor. - Garlic: One clove, minced for that tasty garlic punch. - Onion powder: One teaspoon enhances the dip’s flavor. - Garlic powder: Half a teaspoon for more garlic goodness. - Salt and pepper: Add to taste for perfect seasoning. - Tortilla chips and veggie sticks: Use for serving and dipping. - Frozen chopped spinach: You can use fresh spinach, but chop and cook it first. - Canned artichoke hearts: Fresh artichokes work too, just prepare them well. - Cream cheese: Neufchâtel cheese is a lighter option. - Sour cream: Greek yogurt gives a tangy flavor and thick texture. - Mozzarella cheese: Any melty cheese can work, like cheddar or gouda. - Parmesan cheese: Pecorino Romano is a great substitute. - Garlic: Garlic powder can replace fresh garlic if needed. - Onion powder: Fresh onions can be used if finely chopped. - Salt and pepper: Use seasoning blends for added flavor. This mix of ingredients creates a creamy, cheesy dip that everyone loves! {{ingredient_image_1}} First, let’s gather our ingredients. You will need: - 1 cup frozen chopped spinach, thawed and drained - 1 cup canned artichoke hearts, drained and chopped - 1 cup cream cheese, softened - 1/2 cup sour cream - 1 cup shredded mozzarella cheese - 1/2 cup grated Parmesan cheese - 1 clove garlic, minced - 1 teaspoon onion powder - 1/2 teaspoon garlic powder - Salt and pepper to taste - Tortilla chips and veggie sticks for serving Now, preheat your oven to 350°F (175°C). This is important for getting a nice bake. In a large mixing bowl, combine the softened cream cheese, sour cream, mozzarella cheese, and Parmesan cheese. Mix until it’s smooth. You want a nice, creamy base. Next, stir in the chopped spinach, artichoke hearts, minced garlic, onion powder, garlic powder, salt, and pepper. Make sure everything is well blended. After mixing, spread the mixture evenly into an 8x8 inch baking dish. This size helps the dip cook evenly. Now, place the dish in the preheated oven. Bake for about 25 to 30 minutes. You want the dip to be bubbly and the top lightly golden brown. Once it's done, remove the dip from the oven. Let it cool for a few minutes before serving. This helps avoid any burns. Serve the dip warm. It pairs great with tortilla chips and fresh veggie sticks like carrots and cucumbers. Arrange the veggie sticks around the dip for a nice touch. This dip is a crowd-pleaser! You’ll love how easy it is to make and how good it tastes. Enjoy your cheesy spinach artichoke dip! To get the best texture, use softened cream cheese. This helps mix easier and makes the dip smooth. Drain the spinach and artichokes well to avoid extra water. Too much moisture makes the dip runny. Bake until the top is golden and bubbly. This gives a nice crust and keeps it creamy inside. You need a few simple tools to make this dip. A mixing bowl is a must for combining ingredients. Use a spatula for smooth mixing. An 8x8 inch baking dish works best for even cooking. A measuring cup and spoons help you get the right amounts. Finally, a garlic press makes mincing garlic easy and quick. You can prepare this dip ahead for parties. Mix all the ingredients and store them in the fridge. Cover the bowl with plastic wrap to keep it fresh. When you're ready, spread it in the baking dish and bake. You can also bake it fully and cool it down. Store it in the fridge, then reheat before serving. Pro Tips Thaw and Drain Thoroughly: Make sure to fully thaw and drain the spinach to avoid excess moisture in your dip, which can make it watery. Mix it Up: Feel free to add extra spices or herbs like crushed red pepper flakes or fresh parsley to elevate the flavor profile. Cheese Variations: Experiment with different cheeses such as cheddar or pepper jack for an extra kick or a different flavor dimension. Serving Suggestions: Serve with a variety of dippers, not just chips; try pita bread, toasted baguette slices, or even pretzel bites for a unique twist. {{image_2}} You can easily switch up the cheese in your dip. Try using cheddar for a sharper taste. You can also mix in some cream cheese for a creamier texture. A bit of gouda adds a nice smokiness. Remember, each cheese brings its own flavor. This keeps your dip fresh and fun. Want to kick it up a notch? Add some heat! You can mix in chopped jalapeños for a spicy kick. Red pepper flakes also work well. If you like it extra hot, try a dash of hot sauce. These additions give your dip a whole new layer of flavor. Just be careful; you can always add more, but you can't take it out! If you're looking for vegetarian or vegan options, you can swap out the cream cheese. Try using cashew cream or vegan cream cheese instead. For the cheese, there are great plant-based options available. You can also use nutritional yeast for a cheesy flavor without dairy. This way, everyone can enjoy the dip, no matter their diet! To store Cheesy Spinach Artichoke Dip, let it cool first. Place it in an airtight container. This keeps it fresh for up to three days in the fridge. Make sure to cover the dip tightly. This helps prevent drying out or picking up other flavors. When you're ready to eat the dip again, preheat your oven to 350°F. Place the dip in a baking dish. Heat for about 15-20 minutes until it's warm and bubbly. You can also microwave it. Use a microwave-safe bowl. Heat it in 30-second bursts, stirring in between. This keeps the dip from getting too hot in some spots. You can freeze Cheesy Spinach Artichoke Dip for up to three months. Use a freezer-safe container and leave some space for it to expand. When you want to use it, move it to the fridge to thaw overnight. Reheat it as mentioned above. This way, it tastes just as good as fresh! You can store Cheesy Spinach Artichoke Dip in the fridge for about three days. Make sure to place it in an airtight container. This helps keep it fresh and tasty. If you want to keep it longer, consider freezing it. Yes, you can make this dip ahead of time. Prepare the dip, but do not bake it right away. Cover it and place it in the fridge. When you are ready to serve, just bake it as directed. This saves time and makes hosting easier. You can serve this dip with tortilla chips for crunch. Fresh veggie sticks like carrots and cucumbers add color and nutrition. You can also try pita chips or bread slices. All these options pair well with the creamy dip. In this article, we covered every aspect of making Cheesy Spinach Artichoke Dip. We listed all the ingredients, measurements, and substitutions to fit your needs. I also guided you through step-by-step instructions, including baking and serving tips. You learned how to get the best texture and some handy tools. We explored variations and important storage tips. With this knowledge, you can create a delicious dip that impresses. Enjoy your cooking and sharing this tasty treat!

Cheesy Spinach Artichoke Dip Tasty and Easy Recipe

If you’re craving a warm, creamy treat, look no further! This Cheesy Spinach Artichoke Dip is tasty and super easy

Older posts
Newer posts
← Previous Page1 … Page40 Page41 Page42 … Page84 Next →

dsad

© 2026 Foodish Talk • Built with GeneratePress

Our Policies

  • Copyright Policy
  • Cookie Policy
  • GDPR Policy
  • Privacy Policy
  • Disclaimer
  • Terms Of Use

More Information

  • Home
  • About
  • Contact
  • Appetizers
  • Dessert
  • Dinner
  • Drinks
©2026, Foodish Talk About Back To Top