

Latest & Greatest

Mango Avocado Salsa Fresh and Flavorful Dip Recipe
Are you ready to elevate your dip game? This Mango Avocado Salsa is fresh, vibrant, and bursting with flavor! It
Read more…
Pineapple Fried Rice Flavorful and Easy Meal Recipe
Craving a meal that’s both tasty and simple? Pineapple Fried Rice is your answer! This vibrant dish bursts with sweet
Read more…
Cinnamon Roll Casserole Tasty Breakfast Delight
Are you craving a warm, sweet breakfast that’s easy to make? Meet the Cinnamon Roll Casserole! This tasty dish combines
Read more…
Vegetable Stir-Fry with Tofu Flavorful and Simple Meal
Looking for a healthy and tasty meal that’s quick and easy? You’ve just found it! This Vegetable Stir-Fry with Tofu
Read more…
Savory Sweet Potato Hash Flavorful Breakfast Delight
Are you ready to elevate your breakfast game? My Savory Sweet Potato Hash is the perfect mix of flavors and
Read more…
Spicy Shrimp Tacos with Mango Salsa Delight
Are you ready to spice up your taco night? In this post, I’ll show you how to make Spicy Shrimp
Read more…
Sheet Pan Chicken Fajitas Flavorful and Easy Dish
If you’re craving a hassle-free, mouthwatering meal, look no further than Sheet Pan Chicken Fajitas! With just a handful of
Read more…
Honey Garlic Roasted Carrots Flavorful and Simple Dish
Are you ready to elevate your side dish game? Honey Garlic Roasted Carrots are a tasty and easy way to
Read more…browse recipes


![- 1 package (15.25 oz) Oreo cookies - 1/2 cup (1 stick) unsalted butter, melted - 1 package (8 oz) cream cheese, softened - 1 package (16 oz) powdered sugar - 1 tub (16 oz) Cool Whip, thawed - 1 package (3.9 oz) chocolate instant pudding mix - 2 cups milk - Optional decorations: gummy worms, fresh mint leaves Oreo cookies are the star of this dessert. Their crunchy texture adds a great base. I use unsalted butter to bind the cookie crumbs. This helps create a rich crust that is simple yet delightful. Cream cheese gives a creamy layer that balances the sweet cookie crust. Mixing it with powdered sugar makes it extra sweet. Cool Whip makes the filling light and fluffy, which contrasts with the dense pudding layer. Chocolate pudding mix is key for that classic "dirt" flavor. Mixing it with milk thickens it and adds creaminess. If you want to jazz it up, add gummy worms on top. Fresh mint leaves can add color and freshness to the dish. For the full recipe, be sure to check out the details above. This dessert is easy to make and fun for all ages! First, take your Oreo cookies and blend them into fine crumbs. I love using a food processor for this task. It works fast and gives you a great texture. Next, in a mixing bowl, combine these crumbs with melted butter. Stir until the crumbs are fully coated. Now, you need to press this mix into the bottom of a 9x13 inch baking dish. This forms a solid crust for the dirt cake. In a separate bowl, beat the softened cream cheese until smooth. This step is key for a creamy filling. Gradually add the powdered sugar and mix until it blends well. Then, gently fold in the thawed Cool Whip. This adds a light and fluffy texture to your filling. The cream cheese mixture is now ready to layer. In another bowl, whisk together the chocolate pudding mix and milk. Do this for about two minutes until the pudding thickens. Let it sit for five minutes to set. Now, spread the cream cheese mixture evenly over the crust. Then, layer the thick chocolate pudding on top of the cream cheese. Spread it out evenly for a nice finish. Cover the dirt cake with plastic wrap and chill it in the fridge. Let it sit for at least four hours, or better yet, overnight. This helps all the flavors come together. Before serving, decorate the top with gummy worms and fresh mint leaves. This adds a fun touch to your dessert. For the full recipe, check the section above. Chilling time is key for a great Oreo dirt cake. Let it sit in the fridge for at least 4 hours. For best results, chill it overnight. This helps all the flavors mix well. The cake also firms up nicely, making it easier to serve. You want to achieve the right crumb consistency. For the crust, crush the Oreo cookies finely. A food processor works best for this. Mix the crumbs with melted butter until it sticks together. This will give you a sturdy base. To make your dessert shine, use clear glass dishes. This lets everyone see the beautiful layers. You can also serve the cake in individual cups. It makes for a fun and easy serving option. Top each cup with a gummy worm for extra flair! Beverages can enhance your dessert experience. Try serving Oreo dirt cake with cold milk or a sweet soda. Both pair well with the rich flavors. For a snack, consider chocolate-covered pretzels. Their crunch adds a nice contrast to the creamy cake. {{image_2}} You can easily make this dessert gluten-free. Just swap regular Oreo cookies for gluten-free ones. Brands like Glutino or K-toos offer tasty options. They provide a similar crunch and flavor. This change keeps the dessert fun for everyone. Want to switch up the flavor? Try using different pudding mixes. Vanilla pudding gives a light taste. Strawberry pudding adds a fruity twist. Both can bring a new life to your dirt cake. Just mix them the same way as the chocolate pudding. Each flavor will give a unique spin on the classic dessert. If you're looking for vegan options, you can make simple swaps. Use vegan cream cheese and non-dairy whipped topping. For the pudding, choose a plant-based mix. These changes keep the cake creamy and delicious without any animal products. You still get that rich taste everyone loves! Check out the [Full Recipe] for more details on creating your perfect OREO DIRT CAKE. To keep your Oreo dirt cake fresh, cover it tightly with plastic wrap. Make sure no air can get in. This will help the cake stay moist and tasty. You can also use an airtight container. Store it in the fridge. If you want to save some for later, you can freeze Oreo dirt cake. Cut it into pieces and wrap each piece in plastic wrap. Then, place the wrapped pieces in a freezer bag. Be sure to remove as much air as possible. When you want to enjoy it, let it thaw in the fridge overnight before serving. Oreo dirt cake lasts about 3 to 4 days in the fridge. After that, it may lose its flavor and texture. If you freeze it, the cake can last up to 2 months. Just remember, the sooner you eat it, the better it will taste! Oreo dirt cake lasts about 3 to 5 days in the fridge. The cool temperature helps keep it fresh. However, the longer it sits, the softer the crust may become. So, eat it while it’s still firm and tasty! Yes, you can make Oreo dirt cake a day or two ahead. Just cover it well with plastic wrap. This lets the flavors blend and creates a richer taste. It's perfect for parties, potlucks, or family gatherings. If you want to skip Cool Whip, you can use whipped cream. You could also whip together heavy cream and sugar. Another option is Greek yogurt for a healthier twist. Each choice will change the flavor a little, but they all work well. Absolutely! You can add layers of fruit or different cookies. Consider using crushed chocolate bars or candy on top. You can also switch up the pudding flavor. The more layers, the more fun it looks and tastes! Oreo dirt cake is a fun and easy dessert. You learned how to make it in simple steps. We covered the main ingredients, from Oreo cookies to cool decorations. I shared tips on perfecting the texture and serving ideas. Variations help you cater to different diets. Proper storage keeps leftovers fresh. With this guide, you can create a delicious treat that everyone will enjoy. Dive in and make your own Oreo dirt cake today!](https://foodishtalk.com/wp-content/uploads/2025/04/1e8b2722-c179-41cb-9c03-ccab4994c084.webp)
OREO DIRT CAKE Tempting Dessert for All Occasions
If you’re craving a dessert that combines creamy and crunchy in one bite, you’ve come to the right place! The OREO Dirt Cake is…
My Latest Desserts

Cherry Tahini Energy Bites Healthy Snack Recipe
Looking for a quick, healthy snack? Let me introduce you to Cherry Tahini Energy Bites! Packed with flavor and nutrition, Read Full Recipe-
Root Beer Cream Bars Irresistible and Simple Treat
If you love the sweet nostalgia of root beer, you’re in for a treat! Root Beer Cream Bars combine creamy Read Full Recipe -
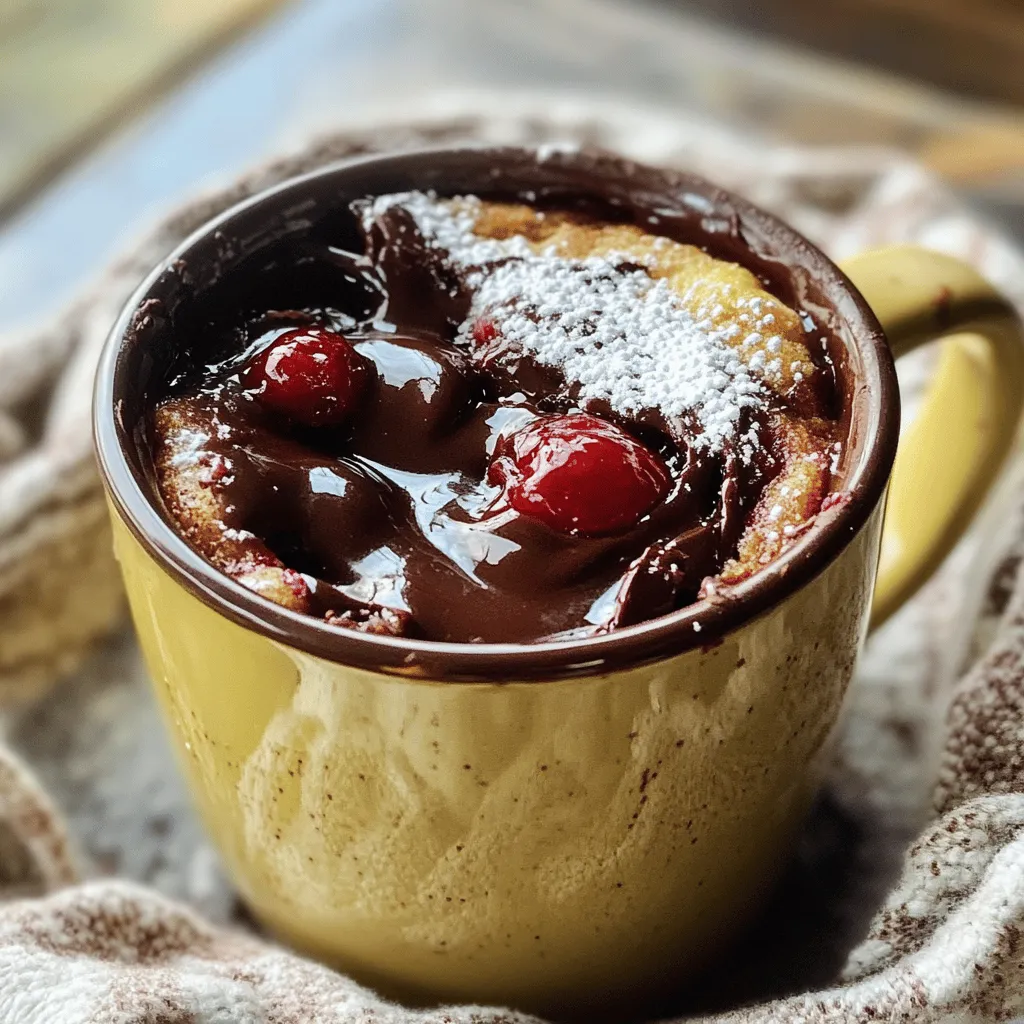
Cherry Chocolate Lava Mug Cake Delightful Recipe
Craving something sweet and quick? You’re in for a treat with my Cherry Chocolate Lava Mug Cake! This recipe packs Read Full Recipe -
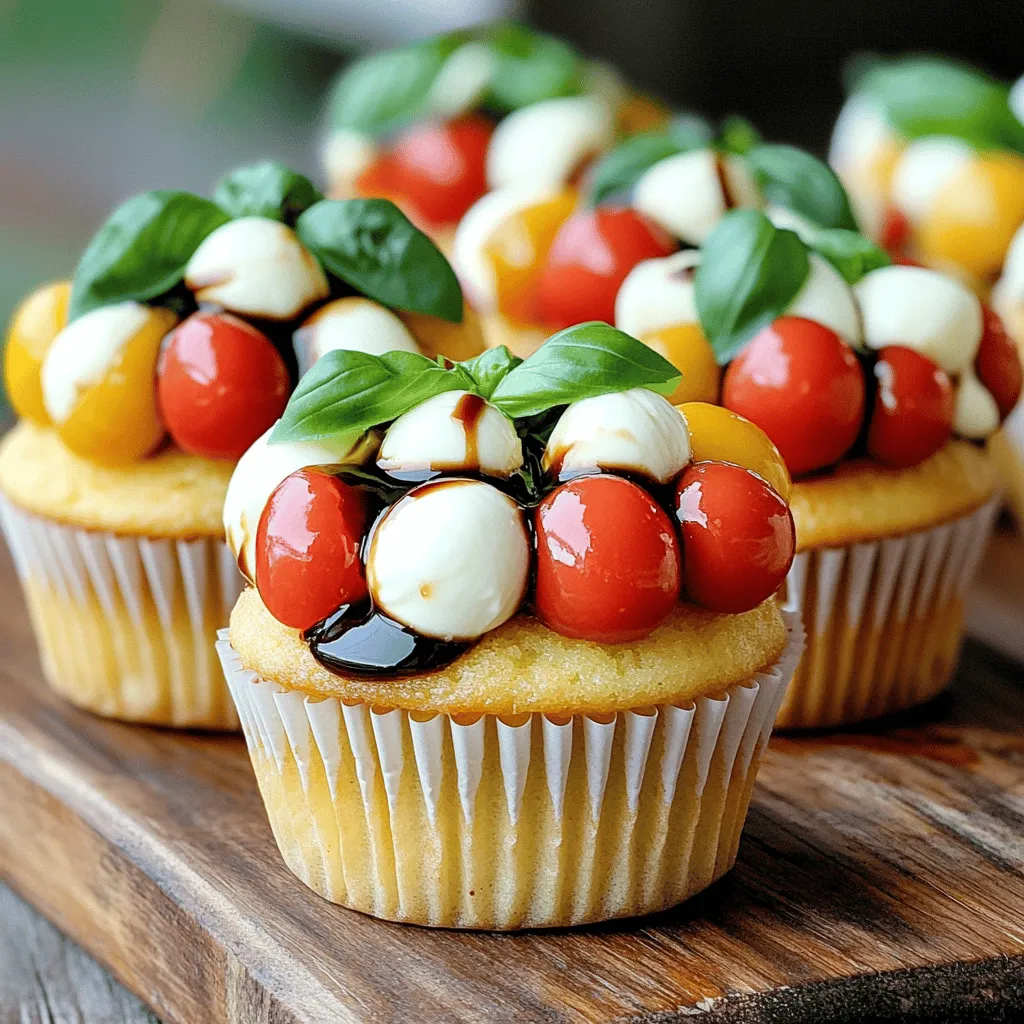
Caprese Stuffed Cupcakes Flavorful and Unique Treat
Are you ready to treat your taste buds to something new? Caprese Stuffed Cupcakes mix fresh flavors and fun in Read Full Recipe -
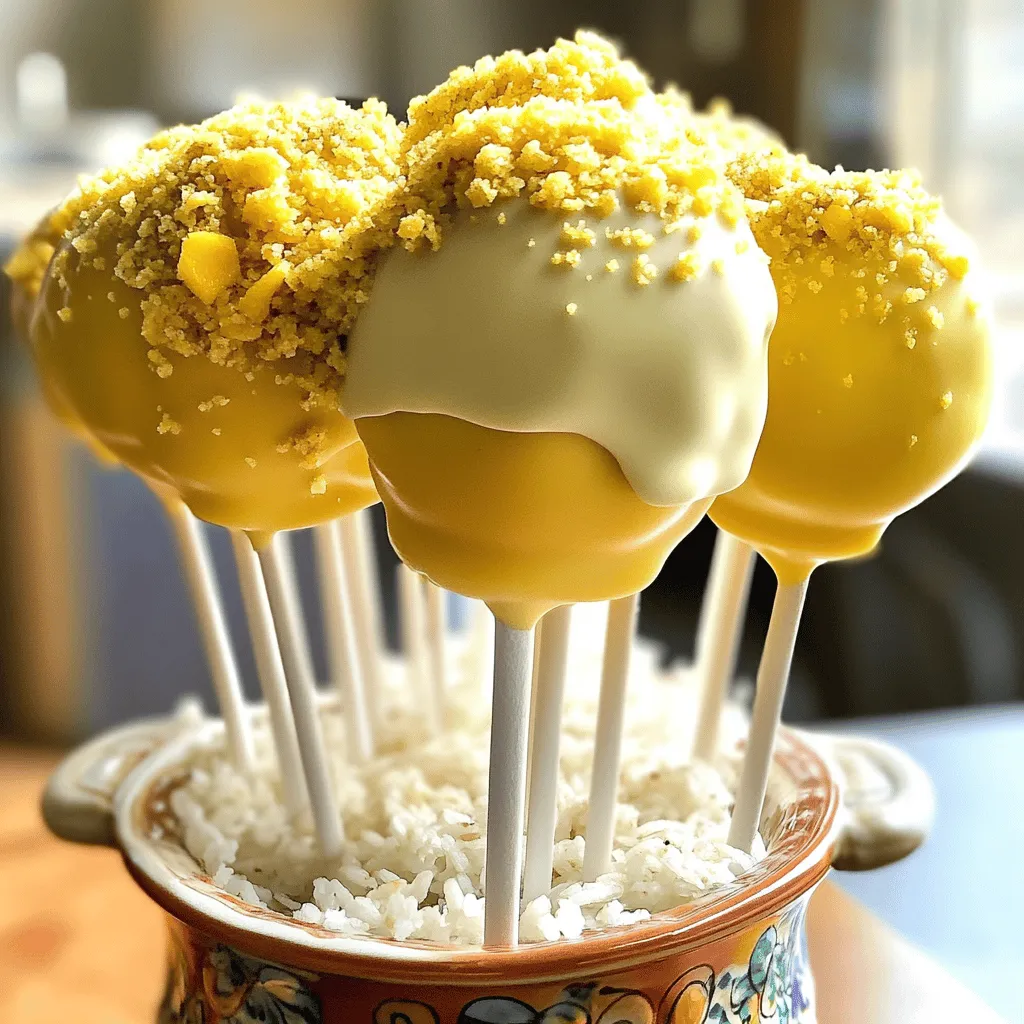
Mango Tajin Cake Pops Tasty and Fun Treats
Craving a unique treat? Try my Mango Tajin Cake Pops! These fun bites blend sweet mango with the zesty kick Read Full Recipe -
Matcha Pistachio Energy Bites Nourishing Snack Option
Looking for a tasty and healthy snack? Let me introduce you to Matcha Pistachio Energy Bites! Packed with oats, nuts, Read Full Recipe -
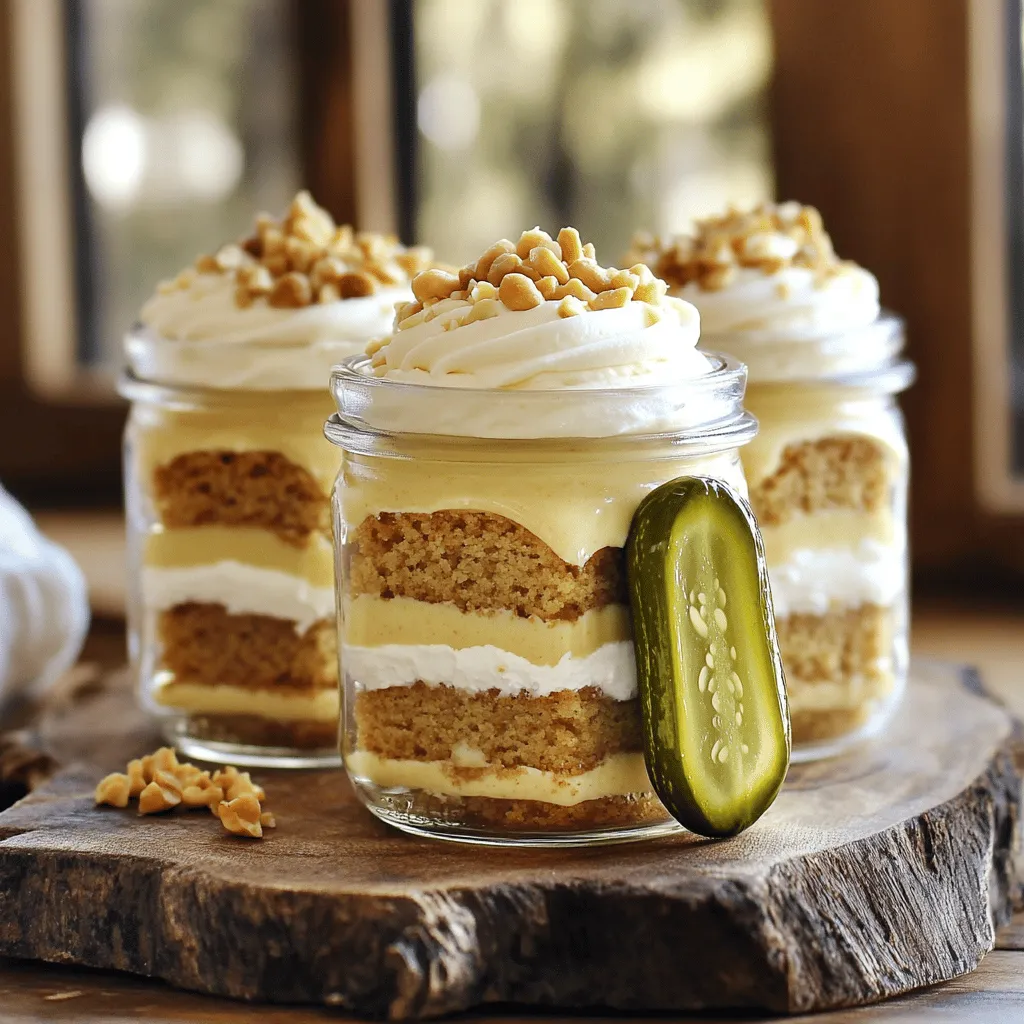
Peanut Butter Pickle Cake Jars Delightful and Unique Treat
Are you ready to try something truly different? Peanut Butter Pickle Cake Jars combine sweet and tangy flavors in a Read Full Recipe -
Healthy Banana Oat Muffins Nutrient-Packed Recipe
Looking for a tasty snack that’s packed with nutrients? You’re in the right place! My Healthy Banana Oat Muffins recipe Read Full Recipe -
No-Bake Chocolate Oat Bars Simple and Tasty Treat
Looking for a quick, tasty treat? You’re in the right place! My No-Bake Chocolate Oat Bars are simple to make Read Full Recipe -
No-Bake Chocolate Oatmeal Bars Simple and Tasty Treat
Looking for a simple and tasty treat that’s also healthy? You’ve found it! My No-Bake Chocolate Oatmeal Bars are a Read Full Recipe


hey,
i’m !
I’m so happy you’re here!
I pour heart and skill into every recipe I create. I know you’ll taste the difference now let’s enjoy this flavorful adventure together.
![You will need the following for your Cheesy Broccoli Rice Casserole: - 1 cup uncooked brown rice - 2 cups vegetable broth - 2 cups broccoli florets (fresh or frozen) - 1 cup shredded cheddar cheese - 1 cup cream of mushroom soup (canned or homemade) - 1/2 cup grated Parmesan cheese - 1 teaspoon garlic powder - 1/2 teaspoon onion powder - Salt and pepper to taste - 1/2 cup breadcrumbs - 2 tablespoons olive oil - Fresh parsley for garnish Using fresh or organic ingredients can boost the flavor of your casserole. Choose vibrant broccoli florets for the best taste and texture. If you opt for frozen broccoli, ensure it is high-quality and without added sauces or spices. For the cheese, select a good cheddar. Aged cheddar can add a sharper taste. When using cream of mushroom soup, pick a brand with wholesome ingredients or make your own for a fresher flavor. You can easily customize this dish. Instead of brown rice, white rice also works well. If you prefer a lighter option, use quinoa. For a dairy-free version, swap the cheeses for vegan cheese and use coconut milk for the soup. If you don't have breadcrumbs, crushed crackers or panko can add a nice crunch. You can also add cooked chicken or tofu for extra protein. Check the [Full Recipe] for more ideas! Start by cooking the rice. Bring vegetable broth to a boil in a medium pot. Once boiling, add the uncooked brown rice. Reduce the heat to low and cover the pot. Let it simmer for about 45 minutes. The rice will absorb all the broth and become tender. Next, grab a large mixing bowl. In this bowl, combine the cooked rice with broccoli florets, cheddar cheese, and cream of mushroom soup. Add garlic powder, onion powder, salt, and pepper. Mix everything well. You want each bite to have a bit of everything. Now, transfer the mixture to a greased 9x13 inch casserole dish. Spread it out evenly. In a small bowl, mix breadcrumbs with olive oil until they are coated. Sprinkle the breadcrumbs over the casserole. Finish with grated Parmesan cheese on top. Bake in your preheated oven at 350°F for 25-30 minutes. You want it hot, bubbly, and golden brown. After baking, let it cool for a few minutes. Garnish with freshly chopped parsley before serving. For the full recipe, check the earlier section. To get the best texture, cook your rice fully. This will help it absorb flavors. Mixing the rice with the other ingredients while hot makes a big difference. It helps everything blend well. If your mixture seems too dry, add a splash of broth or cream. This simple step keeps your casserole creamy and smooth. If you prefer not to use mushrooms, don't worry! You can swap in cream of celery soup or cream of chicken soup. Both options add great creaminess and flavor. You can also use a homemade white sauce if you want to keep it fresh. Just mix butter, flour, milk, and seasonings for a tasty base. Cheddar cheese is a classic choice, but you can mix it up! Try adding mozzarella for extra stretchiness. Pepper jack gives a nice kick if you enjoy spice. Feta adds a tangy touch that pairs well with broccoli. Mixing different cheeses can create a unique flavor that makes your casserole stand out. For the full recipe, check out the details above. {{image_2}} You can easily make this dish vegetarian. Just stick to the recipe. The ingredients are already meat-free. Use vegetable broth, cream of mushroom soup, and cheese for great flavor. You can add more veggies too. Carrots or bell peppers work well. This makes the casserole colorful and tasty. If you need a gluten-free dish, make a few swaps. Use gluten-free breadcrumbs for topping. Check the cream of mushroom soup too. Some brands offer gluten-free options. I love using brown rice because it’s naturally gluten-free. With these changes, you will still enjoy a creamy and cheesy casserole. Want to boost protein? You can add chicken or tofu. For chicken, cook and shred it first. Mix it in with the rice and broccoli. If you prefer tofu, use firm or extra-firm tofu. Press it to remove extra water, then cube it. Sauté it lightly before adding to the casserole. This makes your dish hearty and filling. For more details, check the Full Recipe. After enjoying your cheesy broccoli rice casserole, let it cool. Place leftovers in an airtight container. Store them in the fridge for up to three days. Label the container with the date. This way, you know when to eat it. To reheat, use the oven for the best taste. Preheat the oven to 350°F (175°C). Place the casserole in an oven-safe dish. Cover it with foil to keep it moist. Heat for about 20 minutes or until hot throughout. You can also use the microwave. Place a single serving in a microwave-safe dish and cover it. Heat for 1-2 minutes, checking often. If you want to save the casserole for later, freezing is a great option. First, cool the casserole completely. Cut it into portions for easy thawing. Wrap each portion tightly in plastic wrap, then in foil. Place the wrapped portions in a freezer-safe bag. Label it with the date and contents. You can freeze it for up to three months. To eat, thaw it overnight in the fridge before reheating. For a quick meal, you can bake it straight from the freezer. Just add extra time to the baking process. For the full recipe, check above. Yes, you can use frozen broccoli. It saves time and works well. Just add it to the mix without thawing. This keeps it fresh and tasty. The cooking time may be a bit shorter. Check that it heats through when baking. You can prepare this dish ahead of time. Cook the rice and mix it with the other ingredients. Then, cover it and store it in the fridge. When ready to bake, simply preheat the oven and bake as usual. This makes it easy for busy days. Cheesy Broccoli Rice Casserole pairs well with many dishes. You can serve it with grilled chicken for protein. A simple salad can add freshness. You may also enjoy it alongside roasted vegetables. This dish is versatile and complements many meals. For the complete recipe, check out the Full Recipe section. In this post, we explored how to make a delicious Cheesy Broccoli Rice Casserole. We covered key ingredients, shared step-by-step cooking instructions, and offered tips for the best results. Variations for dietary needs were also included, along with storage tips. This dish is simple to adapt and great for any meal. With the right ingredients and techniques, you can enjoy a tasty, cheesy casserole any time. I hope you try it yourself!](https://foodishtalk.com/wp-content/uploads/2025/06/ef68a54b-56a6-4042-9eb6-20eea6716866-300x300.webp)


Savory Tuscan Salmon Flavorful and Easy Dinner Choice
Looking for a quick and tasty dinner idea? Savory Tuscan Salmon is your answer! With fresh salmon, zesty lemon, and vibrant cherry tomatoes, this…