Latest & Greatest
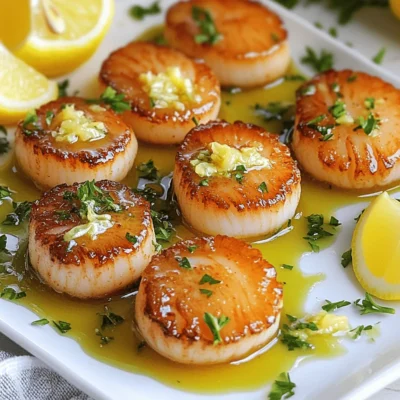
Perfect Seared Scallops Flavorful and Easy Recipe
Are you ready to impress your guests with perfectly seared scallops? In this easy recipe, you’ll learn how to create
Read more…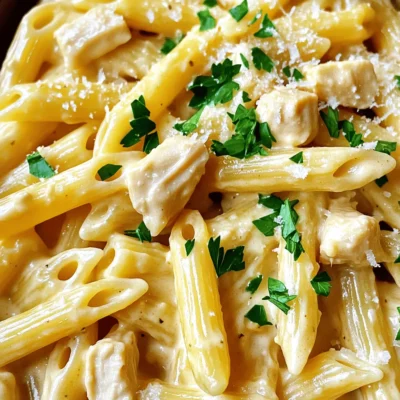
Creamy Garlic Chicken Penne Hearty and Flavorful Meal
Are you ready to make a meal that’s both hearty and full of flavor? Creamy Garlic Chicken Penne brings comfort
Read more…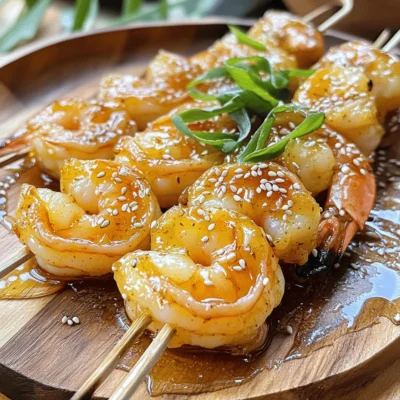
Honey Garlic Shrimp Skewers Flavorful Grilled Delight
Ready to take your grilling game up a notch? Honey Garlic Shrimp Skewers are not just tasty; they’re easy to
Read more…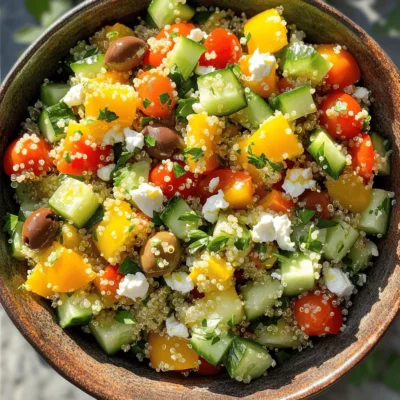
Mediterranean Quinoa Salad Refreshing and Healthy Dish
Looking for a dish that’s both refreshing and healthy? Look no further! This Mediterranean Quinoa Salad bursts with flavor and
Read more…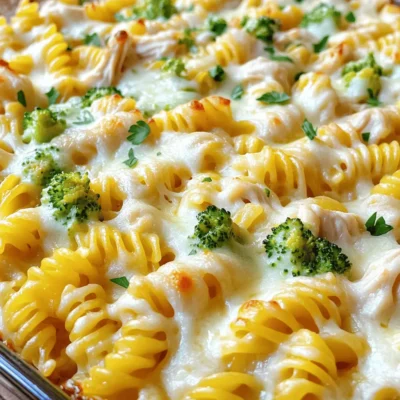
Easy Chicken Alfredo Bake for a Quick Dinner Solution
Are you looking for a quick dinner that’s tasty and easy to make? You’re in luck! This Easy Chicken Alfredo
Read more…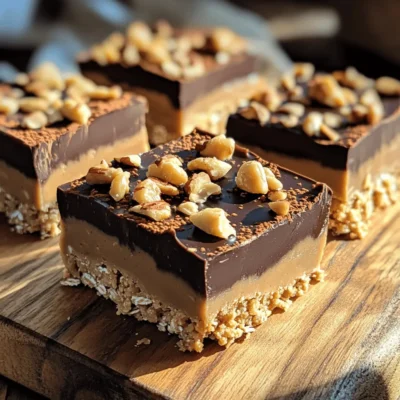
No-Bake Chocolate Peanut Butter Bars Simple Treat
Looking for a sweet treat that’s quick and easy? These No-Bake Chocolate Peanut Butter Bars are the answer! With just
Read more…
Creamy Avocado Pasta Delightfully Easy Recipe
Looking for a quick and tasty meal? Try my Creamy Avocado Pasta! This easy recipe uses fresh ingredients and simple
Read more…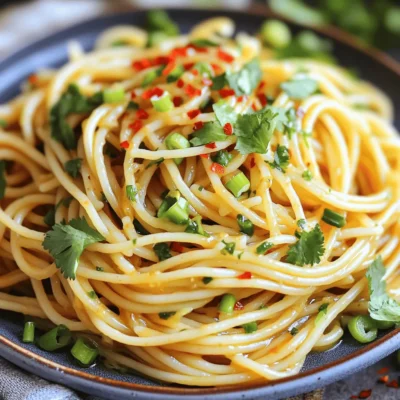
Spicy Garlic Noodles Flavorful and Quick Meal Idea
Looking for a meal that’s quick, bold, and packed with flavor? Spicy Garlic Noodles might be your new favorite dish!
Read more…browse recipes


Blueberry Cheesecake Cookies Delightful and Easy Recipe
If you love the sweet and tangy combo of blueberry cheesecake, you’re in for a treat! I’ll show you how to make Blueberry Cheesecake…
My Latest Desserts

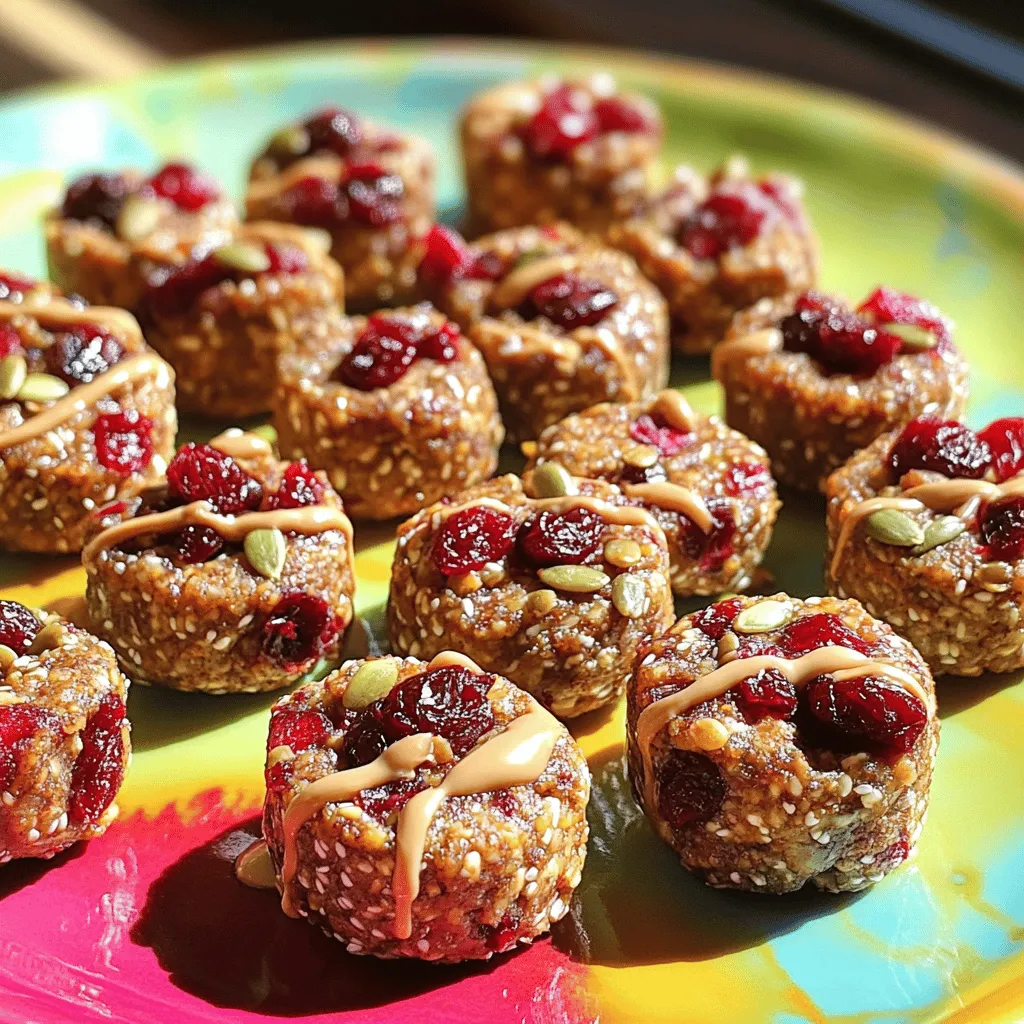
Cherry Tahini Energy Bites Healthy Snack Recipe
Looking for a quick, healthy snack? Let me introduce you to Cherry Tahini Energy Bites! Packed with flavor and nutrition, Read Full Recipe-
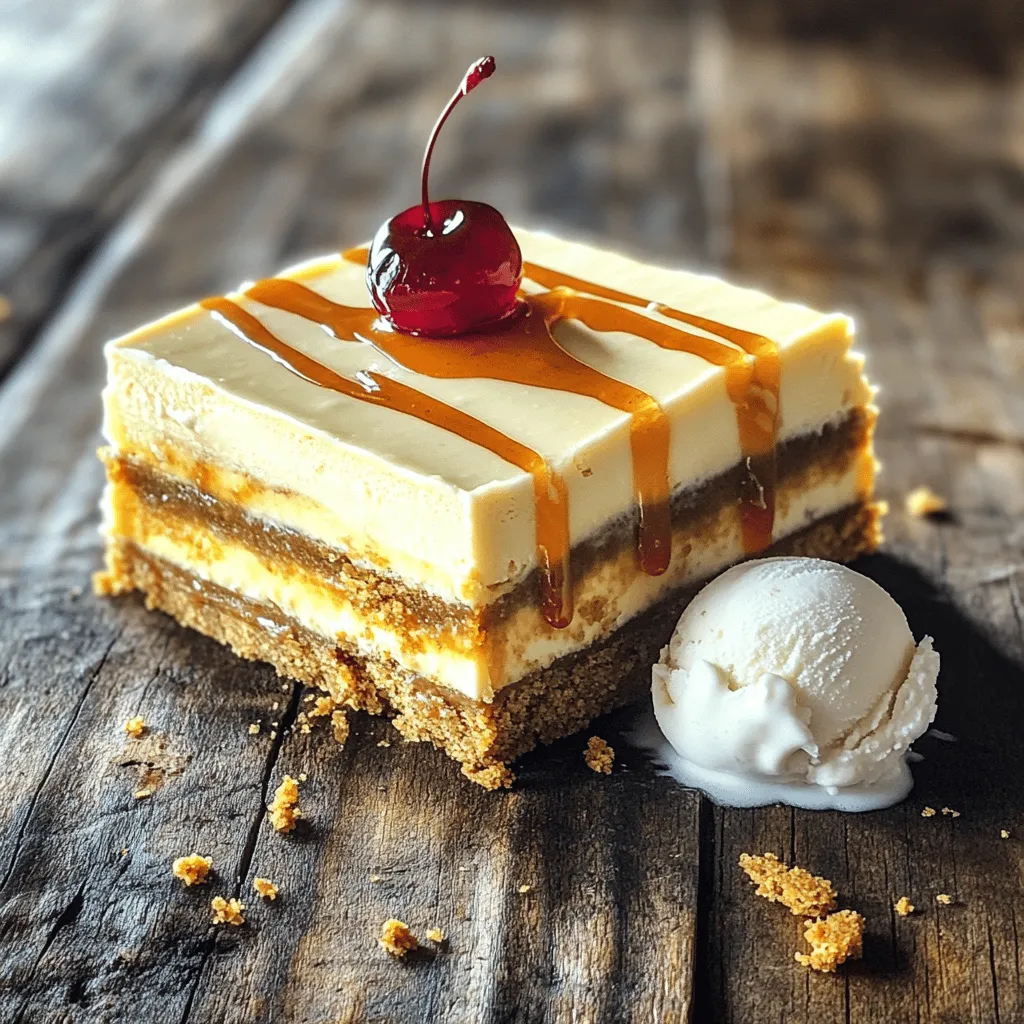
Root Beer Cream Bars Irresistible and Simple Treat
If you love the sweet nostalgia of root beer, you’re in for a treat! Root Beer Cream Bars combine creamy Read Full Recipe -
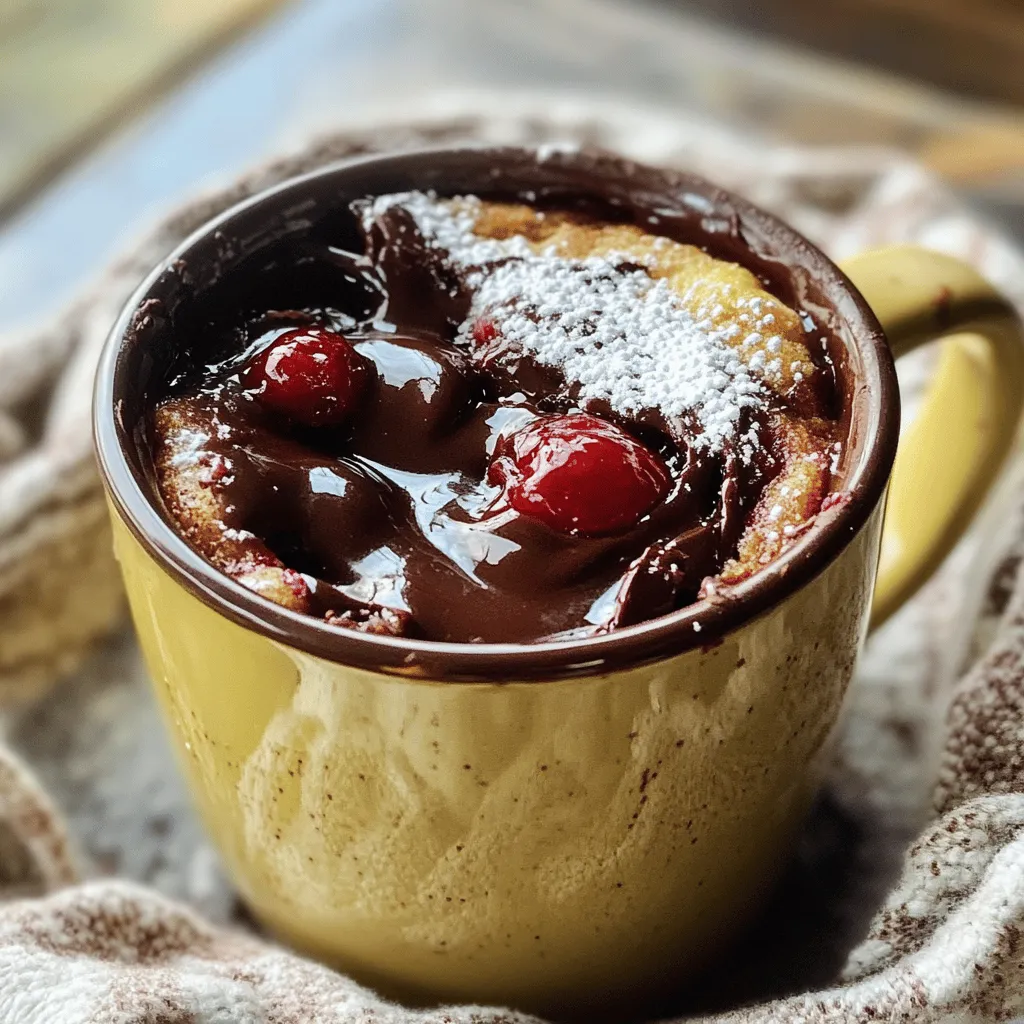
Cherry Chocolate Lava Mug Cake Delightful Recipe
Craving something sweet and quick? You’re in for a treat with my Cherry Chocolate Lava Mug Cake! This recipe packs Read Full Recipe -
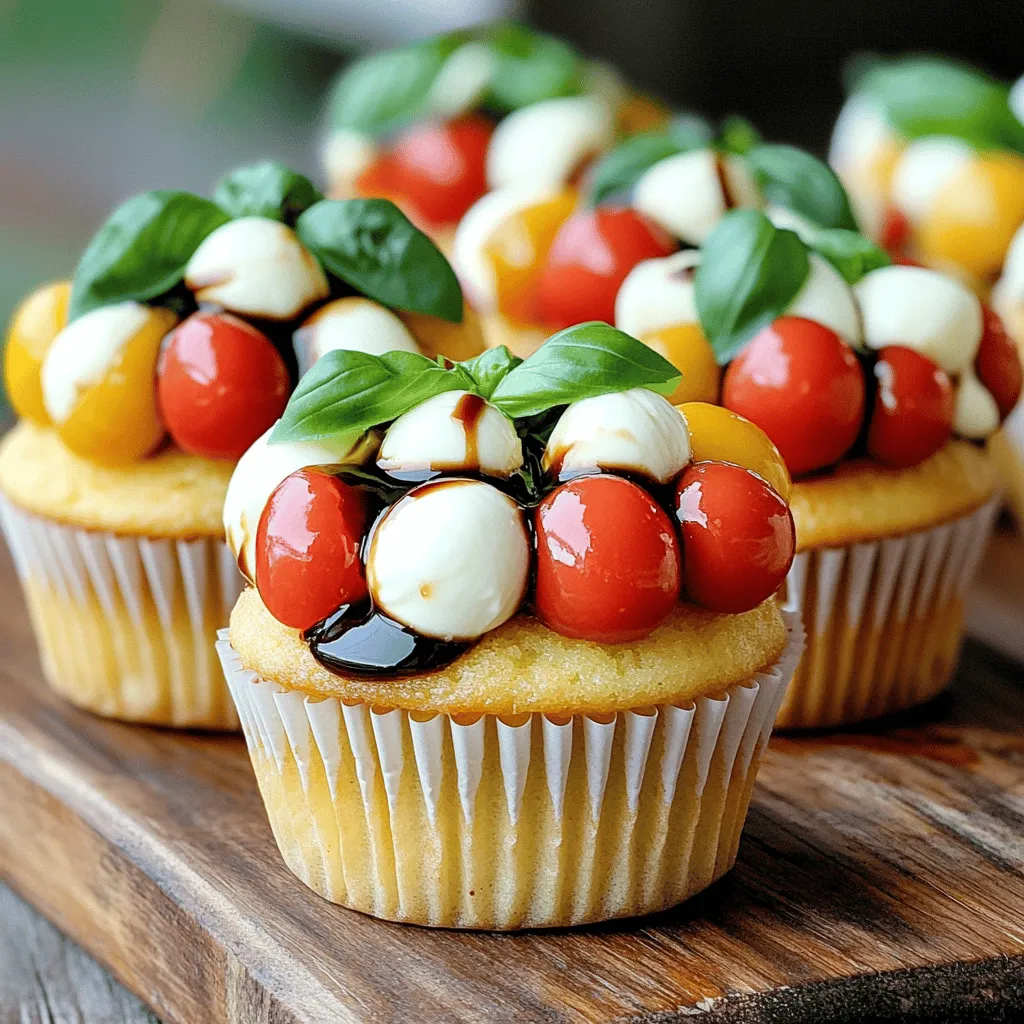
Caprese Stuffed Cupcakes Flavorful and Unique Treat
Are you ready to treat your taste buds to something new? Caprese Stuffed Cupcakes mix fresh flavors and fun in Read Full Recipe -
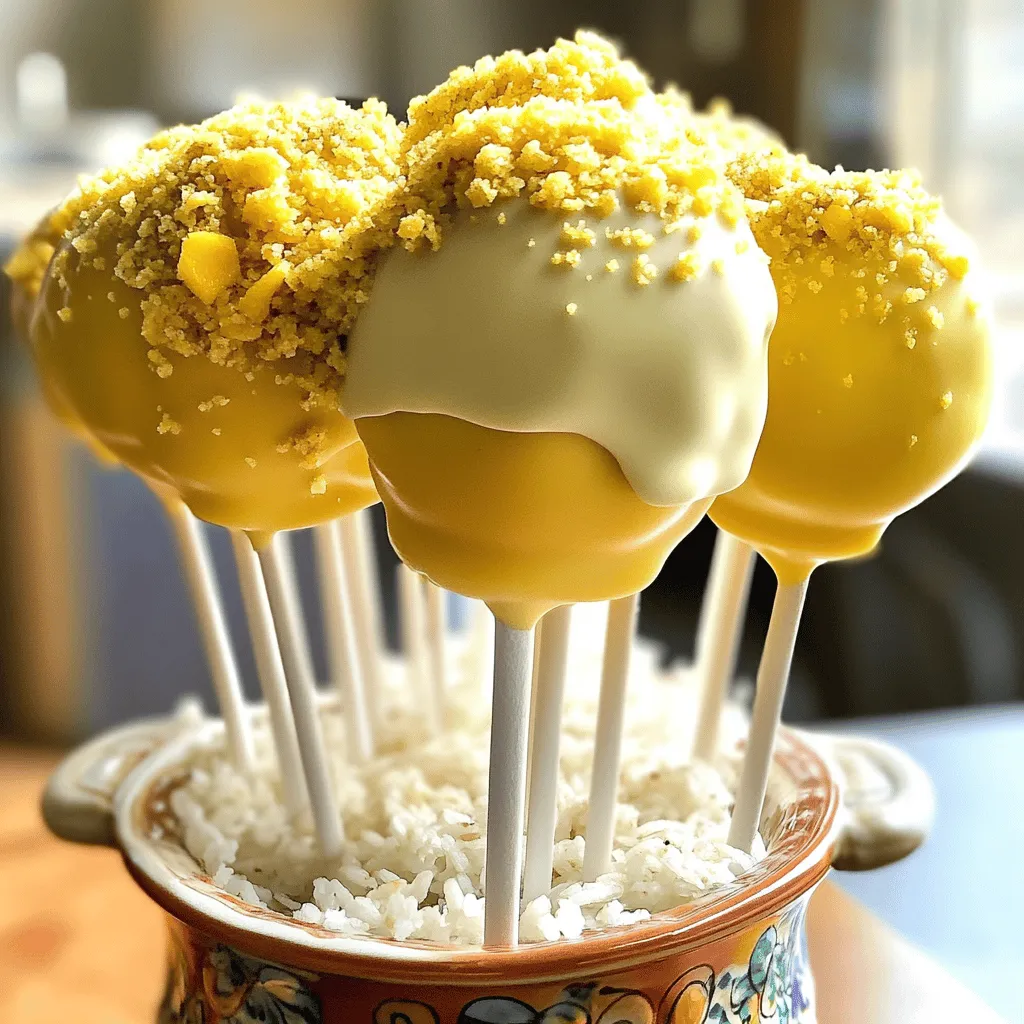
Mango Tajin Cake Pops Tasty and Fun Treats
Craving a unique treat? Try my Mango Tajin Cake Pops! These fun bites blend sweet mango with the zesty kick Read Full Recipe -
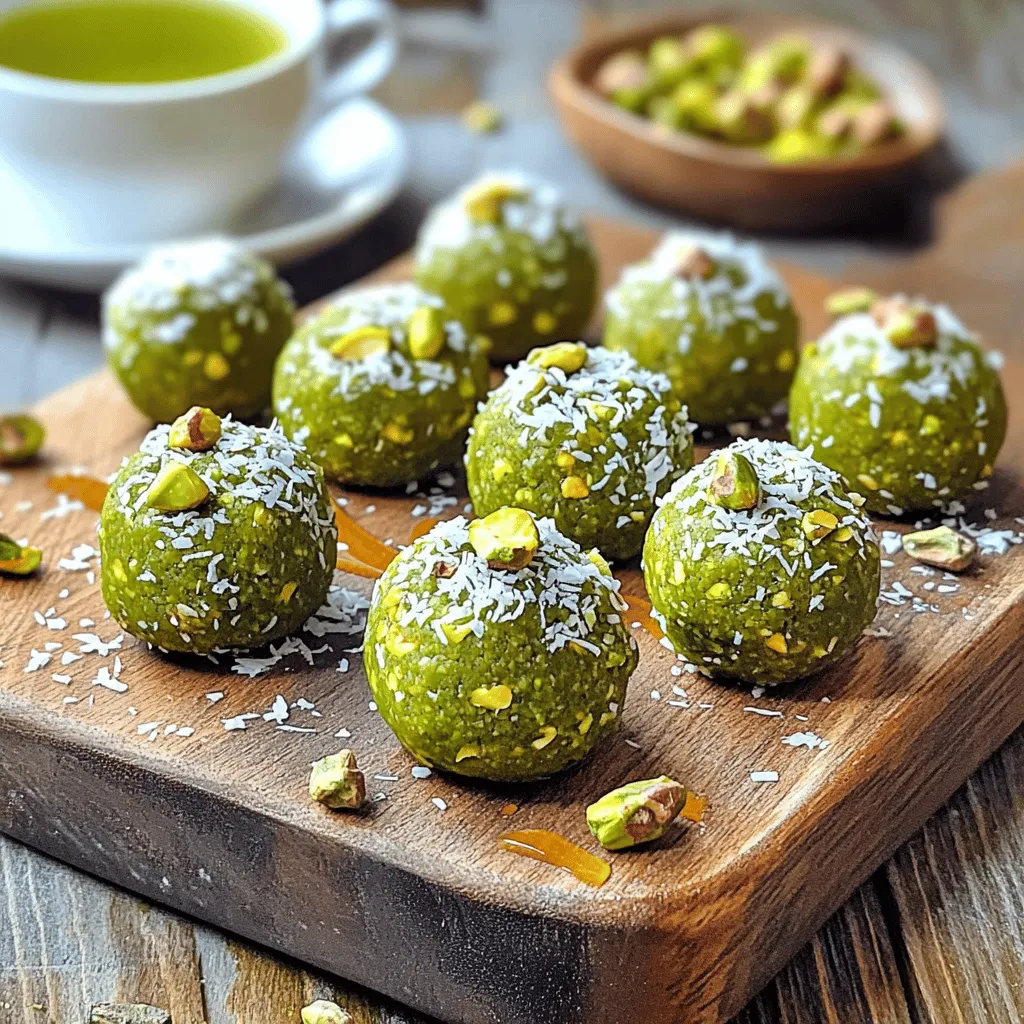
Matcha Pistachio Energy Bites Nourishing Snack Option
Looking for a tasty and healthy snack? Let me introduce you to Matcha Pistachio Energy Bites! Packed with oats, nuts, Read Full Recipe -
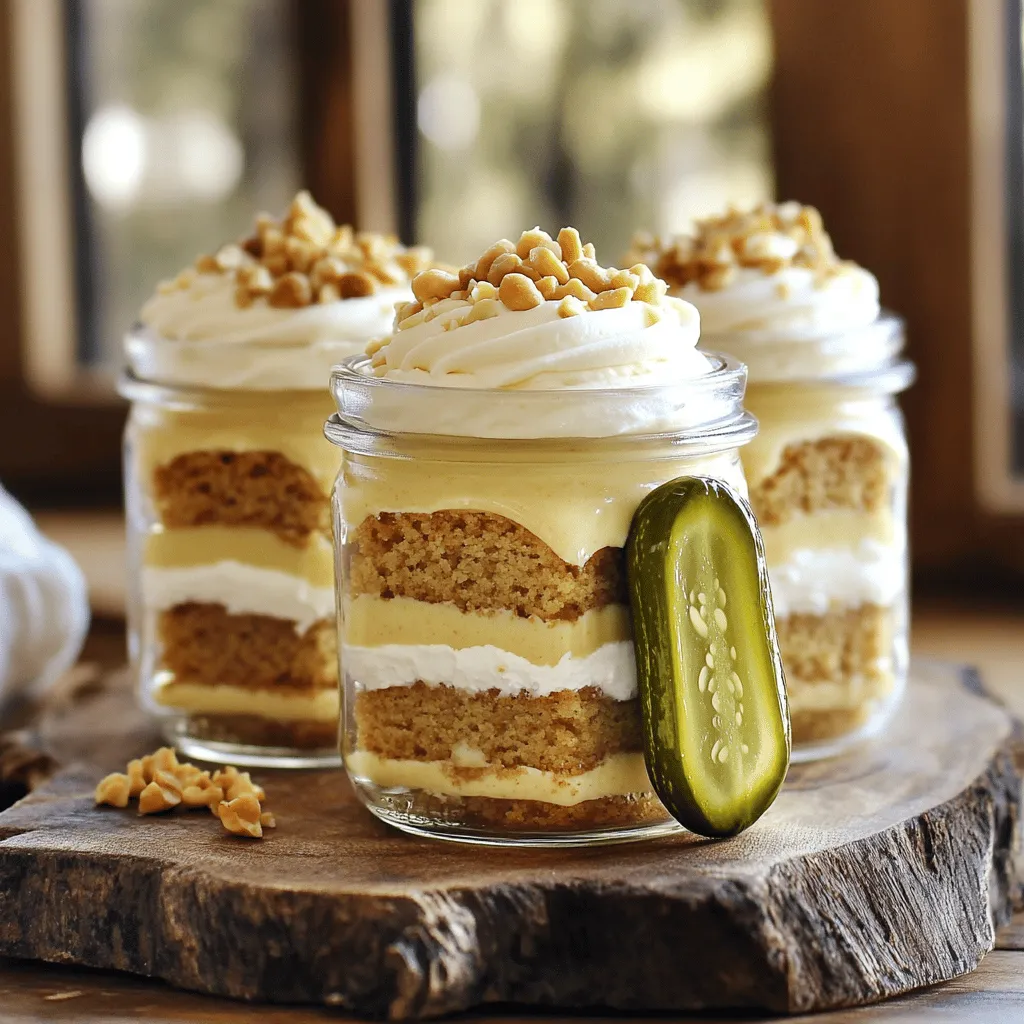
Peanut Butter Pickle Cake Jars Delightful and Unique Treat
Are you ready to try something truly different? Peanut Butter Pickle Cake Jars combine sweet and tangy flavors in a Read Full Recipe -
Healthy Banana Oat Muffins Nutrient-Packed Recipe
Looking for a tasty snack that’s packed with nutrients? You’re in the right place! My Healthy Banana Oat Muffins recipe Read Full Recipe -
No-Bake Chocolate Oat Bars Simple and Tasty Treat
Looking for a quick, tasty treat? You’re in the right place! My No-Bake Chocolate Oat Bars are simple to make Read Full Recipe -
No-Bake Chocolate Oatmeal Bars Simple and Tasty Treat
Looking for a simple and tasty treat that’s also healthy? You’ve found it! My No-Bake Chocolate Oatmeal Bars are a Read Full Recipe


hey,
i’m !
I’m so happy you’re here!
I pour heart and skill into every recipe I create. I know you’ll taste the difference now let’s enjoy this flavorful adventure together.


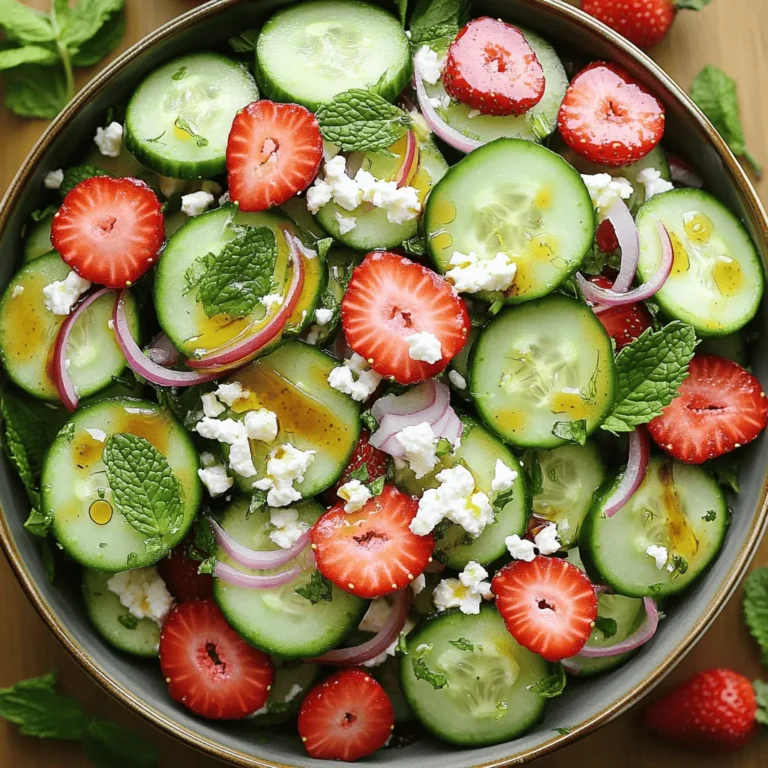
![- 1 cup quinoa, rinsed - 2 cups vegetable broth or water - 1 cup cherry tomatoes, halved - 1 cucumber, diced - 1 bell pepper (any color), diced - 1/2 red onion, finely chopped - 1/2 cup Kalamata olives, pitted and halved - 1/2 cup feta cheese, crumbled (optional for a dairy-free version) - 1/4 cup fresh parsley, chopped - 1/4 cup fresh mint, chopped The main ingredients bring life to the Mediterranean quinoa salad. Quinoa is the star here. It is a great source of protein and fiber. Rinsing the quinoa removes any bitterness. The fresh vegetables add color and crunch. Cherry tomatoes bring sweetness. Cucumbers and bell peppers give a nice crisp bite. Red onions add a mild sharpness. Kalamata olives introduce a briny flavor. Lastly, feta cheese is an optional touch that adds creaminess. - 3 tablespoons olive oil - 2 tablespoons lemon juice - 1 teaspoon dried oregano - Salt and pepper to taste The dressing ties everything together. Olive oil gives richness and a smooth texture. Lemon juice adds brightness and zing. Dried oregano enhances the Mediterranean flavor profile. Season with salt and pepper to your liking. - Approximately 200 calories per serving - Rich in protein, fiber, vitamins, and minerals This salad is not just tasty; it is also healthy. Each serving has around 200 calories. You will find protein and fiber from quinoa. Fresh vegetables provide vitamins. The olives and olive oil offer healthy fats. Enjoy this dish as a light meal or a side, and savor the goodness of every bite. For the complete recipe, check the Full Recipe section. 1. Rinse and Boil Start by rinsing 1 cup of quinoa under cold water. This removes any bitterness. In a medium saucepan, bring 2 cups of vegetable broth or water to a boil. Once boiling, add the rinsed quinoa. 2. Simmering and Fluffing Reduce the heat to a simmer. Cover the pot and cook for about 15 minutes. The quinoa will absorb all the liquid. After 15 minutes, remove the pot from heat. Let it sit, covered, for 5 more minutes. Then, fluff the quinoa with a fork and let it cool. 1. Chopping Vegetables While the quinoa cools, chop your fresh veggies. Dice 1 cucumber, 1 bell pepper, and finely chop 1/2 of a red onion. Cut 1 cup of cherry tomatoes in half. 2. Combining Ingredients In a large mixing bowl, add the chopped vegetables. Also, add 1/2 cup of Kalamata olives (pitted and halved), 1/2 cup of crumbled feta cheese (if using), 1/4 cup of fresh parsley, and 1/4 cup of fresh mint. 1. Whisking Together In a small bowl, whisk together 3 tablespoons of olive oil, 2 tablespoons of lemon juice, 1 teaspoon of dried oregano, and some salt and pepper. This dressing adds a bright flavor to the salad. 1. Mixing Salad and Dressing Once the quinoa is cool, add it to the large bowl of vegetables. Pour the dressing over the top. Gently toss everything together until well combined. 2. Adjusting Seasoning Taste your salad and adjust the seasoning with extra salt and pepper if needed. You can now serve your Mediterranean quinoa salad chilled or at room temperature. For the complete recipe, check out the [Full Recipe]. Quinoa comes in different types. The most common types are white, red, and black. White quinoa tastes milder and is light and fluffy. Red quinoa has a nutty flavor and stays firmer when cooked. Black quinoa adds a lovely color and a slightly sweet taste. To cook quinoa perfectly, rinse it well. Rinsing removes bitter saponins, giving a better taste. Use a ratio of two cups of liquid for every cup of quinoa. Bring the liquid to a boil, then add the rinsed quinoa. Turn the heat down and cover it. Let it simmer for about 15 minutes. Once the liquid is gone, let it sit for five minutes. Fluff it with a fork for a light texture. You can prepare Mediterranean quinoa salad in advance. Cook the quinoa and let it cool. Chop the veggies and store them in the fridge. Keep the dressing in a separate container. This way, the flavors stay fresh. To store your salad, use an airtight container. It stays fresh for up to three days in the fridge. If you want to enjoy it later, keep the dressing separate until serving to avoid sogginess. Serve your quinoa salad with grilled chicken or fish for a full meal. You can also pair it with pita bread or hummus for a tasty snack. For a beautiful presentation, use a large bowl or a platter. Arrange the salad in the center and sprinkle some fresh herbs on top. This adds color and makes it look appetizing. You can find the full recipe for this refreshing dish and more ideas in the Mediterranean Quinoa Salad section. {{image_2}} To make this salad vegan, you can swap out the feta cheese. Some great substitutes are: - Nutritional yeast: Adds a cheesy flavor without dairy. - Tofu feta: Crumbled tofu marinated in lemon juice, garlic, and herbs gives a nice texture. - Avocado: Creamy and rich, it adds healthy fats. These swaps keep the salad fresh and tasty. You can boost this salad's nutrition by adding more ingredients. Consider these options: - Chickpeas: They add protein and fiber. - Grilled chicken: This makes it heartier and adds flavor. - Seasonal vegetables: Try bell peppers in summer or roasted squash in fall. Adding these ingredients makes the salad filling and fun. Get creative with dressings and herbs to change the flavor. Here are some ideas: - Different dressings: Try a balsamic vinaigrette or tahini dressing for a new taste. - Herbs and spices: Experiment with basil, dill, or cumin to enhance flavor. These twists make each bite exciting and unique. For the full recipe, check out the Mediterranean Quinoa Salad section above. You can serve Mediterranean quinoa salad cold. It tastes great straight from the fridge. If you prefer it warm, heat it gently. Use a microwave for about 30 seconds. Stir it well to heat evenly. This salad lasts for about 3 to 5 days in the refrigerator. Keep it in an airtight container. This helps keep it fresh and tasty. The flavors may get better over time as they meld together. Yes, you can freeze Mediterranean quinoa salad, but with care. It does well without the dressing. Package the salad in a freezer-safe container. Leave some space at the top for expansion. When ready to eat, thaw overnight in the fridge. Add the dressing fresh once it is thawed. This keeps the salad crisp and delicious. To make Mediterranean Quinoa Salad, start by cooking the quinoa. Bring vegetable broth or water to a boil. Add rinsed quinoa, then lower the heat and simmer for about 15 minutes. After cooking, let it sit for 5 minutes. Fluff it with a fork and let it cool. Next, chop the fresh vegetables: cherry tomatoes, cucumber, bell pepper, and red onion. Combine these in a large bowl with olives, feta cheese, parsley, and mint. In a small bowl, whisk together olive oil, lemon juice, oregano, salt, and pepper. Pour this dressing over the salad and mix gently. This simple process results in a fresh, vibrant dish. You can find the full recipe in the article. Yes, you can use different grains if you prefer. Some good options are: - Brown rice: This grain adds a nutty flavor. - Farro: A chewy grain with a great texture. - Bulgur: It cooks quickly and has a mild taste. These grains can change the salad's texture and flavor. Just remember to adjust cooking times based on the grain you choose. Yes, Mediterranean Quinoa Salad is gluten-free. Quinoa is naturally gluten-free, making it perfect for those with gluten sensitivities. Just ensure that any other ingredients you use, like dressings or additional items, are also gluten-free. This salad is a great option for everyone! Mediterranean Quinoa Salad offers many health benefits. Here are some highlights: - High in protein: Quinoa is a complete protein, meaning it has all essential amino acids. - Rich in fiber: This salad helps with digestion and keeps you full. - Packed with vitamins: Fresh vegetables provide vitamins A and C. - Healthy fats: Olive oil and olives give good fats that support heart health. These benefits make this salad a nutritious choice for any meal. This Mediterranean Quinoa Salad combines tasty ingredients and simple steps. You learned how to cook quinoa, chop fresh veggies, and create a light dressing. I shared tips on choosing quinoa and preparing the salad ahead of time. You can even customize it with extra proteins or flavors. This salad is healthy, easy to make, and can fit your diet. Enjoy it now or store it for later. Dive in and make your own version today!](https://foodishtalk.com/wp-content/uploads/2025/06/9e619972-e662-464d-800b-9aaf48f0bbce-300x300.webp)
Chicken Bacon Ranch Casserole Flavor-Packed Delight
Are you ready to dive into a flavor-packed delight? This Chicken Bacon Ranch Casserole is the ultimate comfort food, combining tender chicken, crispy bacon,…