Skip to content
DisclaimerTerms Of UseGDPR PolicyCookie Policy

Foodish Talk

  • Home
  • Drinks
  • Appetizers
  • Dinner
  • Dessert
  • About
  • Contact
  • Privacy Policy
DisclaimerTerms Of UseGDPR PolicyCookie Policy

NO-ING-IMG

- Zucchini and Cheese Components - 4 medium zucchinis, sliced thinly - 1 cup cherry tomatoes, halved - 1 cup shredded mozzarella cheese - 1/2 cup grated Parmesan cheese - 2 large eggs - 1/2 cup breadcrumbs (preferably whole grain) The zucchinis are the star of this dish. They add a fresh taste and a nice texture. The mozzarella and Parmesan bring a creamy richness that makes every bite enjoyable. - Additional Seasonings and Fillers - 3 cloves garlic, minced - 1 teaspoon dried oregano - 1 teaspoon dried basil - Salt and pepper to taste - 1 tablespoon olive oil Garlic adds a punch of flavor, while oregano and basil give a nice herbal touch. Salt and pepper enhance all the tastes, making the dish more vibrant. - Optional Garnishes - Fresh basil leaves for garnish Fresh basil leaves not only look great, but they also add a burst of flavor. You can sprinkle them on top just before serving for a touch of color and taste. For the full recipe, check the details above. This is a simple yet rich dish that is sure to become a favorite in your home. How to Slice Zucchini Properly To slice zucchini, start by washing them well. Cut off both ends. Use a sharp knife to slice them thinly, about 1/4 inch thick. Thin slices cook evenly and soak up flavors better. Place the slices in a bowl and sprinkle with salt. Let them sit for about 10 minutes. This helps remove extra moisture. Preparing the Baking Dish Grab a 9x13 inch baking dish. Use olive oil to grease the bottom and sides. This will help prevent sticking. You can also use cooking spray if you prefer. Prepping the dish ensures a smooth serving after baking. Combining the Zucchini and Seasonings In a large bowl, mix the sliced zucchini with halved cherry tomatoes. Add the minced garlic, dried oregano, dried basil, salt, and pepper. Stir these together until everything is well coated. This mixture gives a fresh taste to the dish. Preparing the Cheesy Mixture In another bowl, crack two large eggs. Beat them until mixed well. Add the shredded mozzarella cheese, grated Parmesan cheese, and breadcrumbs. Stir until you have a uniform mixture. This cheesy blend adds richness to the bake. Pouring Mixtures into the Baking Dish Combine the zucchini mixture with the cheesy mixture. Stir until the zucchini is well coated. Pour the entire mixture into the greased baking dish. Spread it out evenly to ensure even cooking. Timing and Temperature for Perfect Results Preheat your oven to 375°F (190°C). Place the baking dish in the oven and bake for 30 to 35 minutes. You know it's done when the top is golden brown and the zucchini feels tender. Remove it from the oven and let it cool for a few minutes. Garnish with fresh basil leaves before serving for a pop of color and flavor. For the full recipe, check the instructions above. How to Prevent Soggy Zucchini To keep your zucchini crispy, slice them thin. Aim for even thickness. Salt the slices before cooking. This helps draw out moisture. Let them sit for 10 minutes, then pat dry. This step is key to a perfect bake. Ensuring even cheese distribution Mix your cheese blend well with the eggs. This helps spread the flavor. When you add it to the zucchini, stir gently but thoroughly. Make sure every zucchini slice gets coated. This way, you enjoy cheesy goodness in every bite. Complementary Side Dishes Pair your cheesy zucchini bake with a fresh salad. A simple green salad works great. You can also serve it with crusty bread. This adds a nice crunch to your meal. For a heartier option, consider roasted chicken or fish. Appropriate Serving Utensils Use a spatula to serve this dish. A large spoon works too. Cut into squares for easy serving. This makes it fun and simple for everyone at the table. Caloric Breakdown One serving of cheesy zucchini bake has about 200 calories. This makes it a filling yet light dish. The cheese adds protein, while zucchini gives fiber. Health Benefits of Ingredients Zucchini is low in calories and high in water. It keeps you hydrated and full. Mozzarella offers calcium, while Parmesan adds flavor and protein. These ingredients work together for a nutritious meal. Enjoy this dish as a tasty way to eat healthy! {{image_2}} If you want to change things up, consider low-carb or gluten-free options. Use almond flour instead of breadcrumbs for a gluten-free version. You can also try using spiralized zucchini for a lighter base. For the cheese, you can mix it up. Use cheddar for a sharper taste or feta for a tangy twist. Goat cheese adds a creamy texture. Mixing different cheeses can make your dish unique. Adding herbs and spices can boost the dish's flavor. Try a pinch of red pepper flakes for heat. A sprinkle of smoked paprika can add smoky depth. Fresh herbs like parsley or thyme can brighten the dish. If you want to add protein, consider cooked chicken or turkey. Adding crumbled sausage also works well. These options can make it a heartier meal. You can add more vegetables for extra nutrition. Bell peppers, spinach, or mushrooms work great. Just chop them up, and mix them in with the zucchini. When adding vegetables, consider cooking times. Dense veggies like carrots need longer cooking. They should be pre-cooked or thinly sliced to blend well. Lighter vegetables, like spinach, can go in raw. They will cook perfectly in the oven. For the full recipe, refer to the earlier sections. To keep your cheesy zucchini bake fresh, store it in the fridge. Place it in an airtight container. This way, it will stay tasty for up to 3 days. If you have more leftovers, freezing is a great option. Cut the bake into portions and wrap each piece tightly in plastic wrap. Then, place them in a freezer-safe bag or container. When stored this way, it can last for about 2 months. When you're ready to enjoy your zucchini bake again, reheating is simple. The best method is to use the oven. Preheat your oven to 350°F (175°C). Place the bake in an oven-safe dish. Cover it with foil to keep it moist. Heat for about 20-25 minutes, or until it's hot throughout. You can also use a microwave. If you go this route, heat it in 30-second intervals until warm. This method is faster, but the oven gives you a better texture. How long does it last in the fridge? Cheesy zucchini bake lasts about three to four days in the fridge. Make sure to store it in an airtight container. This keeps it fresh and tasty for later meals. Can I prepare it ahead of time? Yes, you can prepare it ahead of time. Just mix the zucchinis and seasonings and store them in the fridge. You can also mix the cheesy egg part separately. Bake it when you’re ready to eat. What’s the best way to know when it’s done? The best way to know if it’s done is by checking the top. It should be golden brown and firm to touch. You can also insert a fork; it should go through the zucchini easily. Can I substitute eggs in the recipe? Yes, you can substitute eggs. Use a flaxseed meal mix or applesauce. For each egg, mix one tablespoon of flaxseed meal with three tablespoons of water. Let it sit for a few minutes to thicken. What to pair it with? Cheesy zucchini bake pairs well with a fresh salad or grilled chicken. You can also serve it with rice or a side of crusty bread for a complete meal. Is it good for meal prep? Absolutely! This dish is great for meal prep. It reheats well and tastes even better the next day. Just portion it out and enjoy it throughout the week. For the complete cooking guide, check the Full Recipe. This blog post covers how to make a delicious cheesy zucchini bake. We walked through the key ingredients, step-by-step instructions, and helpful tips. You learned about variations to fit your taste and how to store leftovers. In closing, this dish is easy and fun to make. It's healthy, tasty, and packed with options. Enjoy your cooking adventure with this recipe!

Cheesy Zucchini Bake Rich and Flavorful Delight

Are you ready to enjoy a cheesy delight that’s easy to make and packed with flavor? My Cheesy Zucchini Bake

- Grated zucchini specifics: Use 2 cups of grated zucchini, which is about 2 medium zucchinis. Choose firm zucchinis and grate them with the skin on for added nutrients. Wring out excess moisture using a clean cloth to avoid a soggy bread. - Sweeteners and oils used: This recipe calls for 1 cup of granulated sugar and 1 cup of packed brown sugar. These sweeteners give a rich taste. You will also need 1 cup of vegetable oil, which keeps the bread moist. - Essential dry ingredients: You will need 3 cups of all-purpose flour, 1 teaspoon of baking soda, 1 teaspoon of baking powder, 1 teaspoon of ground cinnamon, 1/2 teaspoon of ground nutmeg, and 1/2 teaspoon of salt. These ingredients form the base of your bread, providing structure and flavor. - Nuts and dried fruits: You can add 1 cup of chopped walnuts or 1/2 cup of raisins for texture. Walnuts add crunch, while raisins bring sweetness. If you love a chewy bite, these add-ins work great. - Chocolate chips variations: For a fun twist, use chocolate chips instead of raisins. Try 1/2 cup of semi-sweet or dark chocolate chips. This option makes the bread feel like a treat! - Mixing bowls and measuring cups: You will need large mixing bowls for combining your ingredients. Measuring cups will help you get the amounts just right. Accurate measurements make a big difference in baking. - Loaf pans and baking equipment: Grab two 9x5 inch loaf pans. You can grease them or line them with parchment paper for easy removal. A toothpick will help check if the bread is done. First, let's prepare the zucchini. Start by washing it well. Then, grate the zucchinis using a box grater or a food processor. You'll need about 2 cups of grated zucchini, which comes from about 2 medium zucchinis. Don't squeeze out the moisture. It helps keep the bread soft. Next, measure all your dry and wet ingredients accurately. In one bowl, gather the granulated sugar, brown sugar, and vegetable oil. In another bowl, collect the all-purpose flour, baking soda, baking powder, cinnamon, nutmeg, and salt. This will help you mix them correctly later. Now it's time to mix the wet ingredients. In the bowl with sugars and oil, add the grated zucchini. Mix everything until it's well combined. Beat in the eggs, one at a time, making sure each one blends in fully. Then, add the vanilla extract. This adds a lovely flavor! In your separate bowl of dry ingredients, whisk well. This step ensures the baking soda and baking powder spread evenly. After that, slowly add the dry mix to your wet zucchini mix. Stir gently until just combined. Be careful! Overmixing can make the bread tough. If you want, fold in some chopped walnuts, raisins, or chocolate chips for extra flavor and texture. This is where you can get creative! Preheat your oven to 350°F (175°C). Grease two 9x5 inch loaf pans or line them with parchment paper. Pour your batter evenly into the pans. Bake for 50-60 minutes. Keep checking! Insert a toothpick into the center. If it comes out clean, the bread is ready. After baking, let the bread cool in the pans for about 10 minutes. Then transfer the loaves to a wire rack to cool completely. This cooling step is important for the best texture and flavor. Enjoy your Retro Zucchini Bread! For complete details, check the Full Recipe. To get the best texture, avoid overmixing. When you mix too much, the bread can become tough. Mix your wet and dry ingredients until just combined. This keeps the bread light and fluffy. When adding nuts or fruits, fold them in gently. Use a spatula and scoop from the bottom up. This helps keep the batter airy and gives you even bites of flavor. To boost that classic taste, try adding spices like cinnamon and nutmeg. These warm flavors give your bread a cozy, vintage feel. You can also add a pinch of ground ginger for an extra kick. If you want to switch up the oils, try using coconut oil or even apple sauce. These can add subtle flavors and moisture. For sweeteners, consider using honey or maple syrup. They can add depth and a hint of richness to your bread. Serve your Retro Zucchini Bread warm. A pat of butter on top is a classic choice. You can also try it with cream cheese for a rich taste. Pair it with coffee or tea for a cozy snack. It also goes well with fresh fruit or yogurt. This makes for a balanced breakfast or a delightful afternoon treat. For a fun touch, slice the bread and wrap it in a colorful vintage napkin. It adds charm and makes it perfect for sharing. If you're ready to bake, check out the Full Recipe to get started! {{image_2}} You can make Retro Zucchini Bread even better for you. Here are a few simple swaps: - Substituting whole wheat flour: This swap adds fiber and nutrients. Replace all-purpose flour with whole wheat flour. It gives a nice texture and a nutty taste. Start with half whole wheat and half all-purpose to see how you like it. - Reducing sugar content: You can cut the sugar without losing flavor. Try using just one type of sugar or reduce the total amount by a third. You can also add applesauce or mashed bananas for natural sweetness. Want to mix things up? Here are some fun ways to add flavor: - Adding citrus zest: A little lemon or orange zest can brighten your bread. The zest adds a fresh taste that pairs well with zucchini. - Using different nuts or dried fruits: Try swapping walnuts for pecans or almonds. You can also add dried cranberries, figs, or apricots for extra sweetness and chewiness. Making smaller breads can be fun and easy: - Making mini loaves or muffins: Use a mini loaf pan or muffin tin. This way, you can bake smaller portions. They are perfect for snacks or sharing. - Creative baking pans to use: Try using unique shapes like bundt pans or heart-shaped molds. This adds a special touch and makes your bread stand out. Explore all these variations to find what you love best! You can enjoy the full recipe for Retro Zucchini Bread to get started. To keep your retro zucchini bread fresh, wrap it in plastic wrap. This helps seal in moisture. You can also place it in an airtight container. This method protects the bread from air and keeps it soft. For best results, store the bread at room temperature. A cool, dark spot is ideal. Avoid direct sunlight, as it can dry out the bread. If you want to enjoy this bread later, freezing is a great option. Start by slicing the bread into pieces. Wrap each slice tightly in plastic wrap. This keeps the bread safe from freezer burn. Then, place the slices in a freezer bag. Make sure to remove as much air as possible before sealing. When you’re ready to eat, take out a slice. Thaw it at room temperature for about an hour. You can also warm it in the microwave for a quick treat. When stored properly, your retro zucchini bread lasts about 3 to 5 days at room temperature. If you see any mold or notice a sour smell, it’s time to toss it. Always check for these signs to ensure the bread is fresh before enjoying. Yes, you can use frozen zucchini. Thaw it first. Place the frozen zucchini in a bowl. Let it sit at room temperature for about an hour. Once thawed, drain any extra water. Squeeze it gently with a paper towel to remove more moisture. This step ensures your bread won't be too wet. If you want to make this recipe vegan, I have some great options. You can use flaxseed meal. Mix one tablespoon of flaxseed with three tablespoons of water. Let it sit for five minutes until it thickens. Another option is unsweetened applesauce. Use 1/4 cup for each egg you replace. Mashed bananas also work well. Use 1/4 cup of mashed banana per egg. Each substitute keeps the bread moist and tasty. Retro zucchini bread is a treat that has good nutrition. A typical slice has about 180 calories. It has 6 grams of fat, 28 grams of carbs, and 2 grams of protein. This bread also offers fiber from the zucchini. Each slice has about 1 gram of fiber, which is good for digestion. Adding nuts or raisins will change these numbers slightly. To make gluten-free zucchini bread, swap out regular flour for gluten-free flour. Look for blends that are made for baking. They work well and keep the bread soft. You can also use almond flour or coconut flour. Both are good choices but may need extra liquid. To keep the bread moist, add a little more oil or applesauce. This way, your gluten-free bread stays delicious. In this article, we explored the magic of retro zucchini bread. We covered key ingredients, step-by-step instructions, and tips for the perfect loaf. I shared ways to enhance flavors and introduced fun variations. You learned how to store your bread and answered common questions about substitutions and nutrition. After all this, I hope you feel ready to bake. Enjoy the process, taste the nostalgia, and share your creations with others. Happy baking!

Retro Zucchini Bread Healthy and Flavorful Delight

Are you ready to bake a delicious, healthy treat? Retro Zucchini Bread is packed with flavor and goodness. This simple

- 2 pounds fresh figs, stems removed and chopped - 2 cups granulated sugar - 1/4 cup lemon juice - 1 teaspoon vanilla extract - 1/4 teaspoon ground cinnamon - 1/4 teaspoon ground nutmeg You can use several options if you want to swap ingredients. - Alternative sweeteners: Use honey or maple syrup. Adjust amounts, since they are sweeter than sugar. - Non-citrus acid options: Try apple cider vinegar or white vinegar. These can help balance flavors. - Flavoring variations: Add spices like cardamom or ginger for a unique taste. You can also mix in other fruits, such as pears. This simple fig jam recipe relies on fresh, ripe figs. These ingredients work together to create a sweet and tangy spread perfect for toast or cheese. Feel free to explore substitutions to make it your own! For the complete process, check the Full Recipe. First, gather your figs, sugar, and lemon juice. I love using fresh figs for this recipe. They have a sweet taste that shines through. Chop the figs and put them in a large, non-reactive pot. Add the sugar and lemon juice to the pot. This combination is key to making a tasty jam. Next, let the mixture rest for about 30 minutes. This waiting time helps the figs release their juices. You will notice the mixture becoming syrupy. It’s a crucial step for a rich flavor. Now, place the pot over medium heat. Stir the mixture gently until the sugar dissolves. This process takes only a few minutes. Once the sugar is gone, raise the heat to medium-high. Bring the mixture to a boil, stirring often. This stirring stops the jam from sticking to the pot. After it starts to boil, reduce the heat to medium. Let it simmer for about 30 to 40 minutes. Keep stirring often. You want to watch as the jam thickens. It can take some time, but don’t rush it. To check if your jam is ready, use the spoon test. Take a spoonful of the jam and place it on a chilled plate. Run your finger through the jam. If it holds its shape, it’s done! If not, let it cook a little longer. If the jam is too thick, add a bit of water. Stir well and test again. You want a perfect spreadable jam. Once it’s just right, pour it into sterilized jars. Leave a little space at the top of each jar. Seal them tightly and let them cool. Your fig jam is ready to enjoy! - Choosing ripe figs: Select figs that are soft and fragrant. Ripe figs have a deep color and feel slightly tender. This ensures the best flavor and texture for your jam. - Ensuring proper sterilization of jars: Clean your jars well. You can boil them in water for ten minutes. This prevents bacteria from ruining your jam. - Overcooking the jam: Cooking too long makes the jam thick and sticky. Stir often and watch closely. It should be thick but still spreadable. - Not stirring enough: Stir your mixture often. This helps the sugar dissolve and prevents burning. A good stir keeps the jam smooth and prevents lumps. - Using fresh herbs: Try adding a sprig of rosemary or thyme while cooking. These herbs add a nice, fresh taste to your fig jam. Just remember to remove them before canning. - Infusing additional spices: You can boost flavor with spices like ginger or cloves. A pinch can add warmth and depth, making your jam unique and delightful. For the complete recipe, check out the [Full Recipe]. {{image_2}} You can easily change the taste of your fig jam. Try adding other fruits like apples or pears. These fruits mix well with figs and give a fresh flavor. You can also add spices such as cardamom or ginger. These spices add warmth and depth to the jam. Experimenting with these options can make your jam unique and delicious. If you want a low-sugar version, you can still make fig jam. Use less sugar than the recipe calls for. You can also try alternative sweeteners like honey or stevia. These sweeteners can give you a tasty jam without too much sugar. Just remember, using less sugar may change the texture a bit. Savory fig jam is a fun twist on the classic recipe. For this, you can add ingredients like balsamic vinegar and a pinch of salt. These flavors balance the sweetness. You might also try mixing in herbs like thyme or rosemary for added depth. This jam pairs well with meats and cheeses, making it a great addition to your next charcuterie board. Store your fig jam in a cool, dark place. A pantry or cupboard works well. Keep it away from heat or direct sunlight. Always use clean jars to avoid spoilage. When you fill jars, leave about 1/4 inch of headspace at the top. This space helps the jam expand when it cools and seals properly. Homemade fig jam lasts about one year when stored correctly. Once opened, keep it in the fridge. It’s good for about three weeks after opening. Fig jam is not just for toast. Use it in yogurt, on pancakes, or in desserts. It’s also great with cheese or in sauces for meats. For safe canning, use a water bath method. This method keeps bacteria out and seals jars tight. Use sterilized jars and lids to keep your jam fresh. A large pot, jar lifter, and funnel will help you can safely. Always check seals after cooling. A good seal means your jam is safe to store. You know fig jam is ready when it thickens. To test this, place a spoonful on a chilled plate. Run your finger through it; if it holds its shape, it’s done. The jam should coat the back of a spoon and not drip quickly. Cooking time is usually 30-40 minutes, but watch closely. Yes, you can use dried figs. However, they need more liquid. Soak them in warm water for about 30 minutes before using. This helps rehydrate them and brings back their flavor. The taste will be different, but it can still be tasty. Jam is made from crushed fruit and has a smooth texture. Preserves contain whole fruit pieces or larger chunks, giving them a chunkier feel. Both spread well, but if you like bits of fruit, go for preserves. If you prefer a smoother spread, stick with jam. Yes, you can freeze fig jam. Use airtight containers or freezer bags. Leave some space at the top for expansion. This helps keep the jam fresh. It can last up to a year in the freezer. Just thaw it in the fridge when you want to use it. Fig jam pairs well with many foods. Here are some ideas: - Cheese: Try it with brie or goat cheese for a sweet-salty treat. - Meats: Serve it with prosciutto or roasted meats for a savory twist. - Bread: Spread it on toasted bread or croissants for breakfast. - Desserts: Use it as a topping for vanilla ice cream or yogurt. For a full recipe, check out the ingredients and instructions above. Enjoy your fig jam! Making fig jam is straightforward and rewarding. You learned about the key ingredients, like fresh figs and sugar. I shared steps, from prep to cooking, to ensure your jam is perfect. Remember, using ripe figs and sterilizing jars is key. You can even explore different flavors or make it savory! Stay creative and enjoy the process. Your homemade fig jam can be delicious on so many dishes!

Classic Fig Jam Simple and Delicious Recipe

Are you ready to savor the sweet taste of summer year-round? Making classic fig jam is simple and rewarding. With

- 6 large eggs - 1/4 cup milk - 1 cup bell peppers, diced - 1 cup spinach, chopped - 1 small zucchini, diced - 1/2 cup red onion, diced - 1/2 cup shredded cheese (cheddar or feta) - 2 tablespoons olive oil - Salt and pepper to taste - Fresh herbs for garnish These ingredients create a delicious vegetable frittata. The mix of eggs, milk, and fresh veggies makes for a healthy meal. You can use any bell peppers you like: red, yellow, or green. Spinach adds a nice touch of flavor and color. Zucchini gives it a tender bite. Red onion complements the other veggies well, adding sweetness. The cheese brings creaminess to the dish. I recommend using cheddar for a sharper taste or feta for a saltier kick. Olive oil is great for cooking the veggies, adding richness. Don’t forget salt and pepper; they enhance all the flavors. Finally, fresh herbs like parsley or basil add brightness and a pop of color. The frittata is packed with nutrients. Each serving has about 200 calories. You get around 12 grams of protein, making it filling. The fat content comes mainly from the eggs and cheese, offering healthy fats. Carbs are low, thanks to the veggies. Eating this frittata has many health benefits. Bell peppers are high in vitamin C, good for your skin. Spinach is rich in iron, helping your blood. Zucchini adds fiber, which aids digestion. Overall, this dish is nutritious and tasty, perfect for any meal of the day. For the full recipe, you can check the Sunshine Veggie Frittata. - Preheat your oven to 375°F (190°C). - In a large mixing bowl, whisk together 6 large eggs and 1/4 cup milk. - Add a pinch of salt and pepper to taste. - In a large oven-safe skillet, heat 2 tablespoons of olive oil over medium heat. - Add 1/2 cup diced red onion and 1 cup diced bell peppers. Cook for 3-4 minutes until soft. - Stir in 1 small diced zucchini and 1 cup chopped spinach. Cook for another 2-3 minutes until the spinach wilts. - Spread the vegetable mixture evenly in the skillet. - Pour the egg mixture over the vegetables, covering them well. - Sprinkle 1/2 cup shredded cheese on top. - Cook on the stovetop for 2-3 minutes until the edges start to set. - Transfer the skillet to the preheated oven. Bake for 15-20 minutes until the eggs are fully set and the top is lightly golden. - Once done, let it cool for a few minutes. Slice into wedges and serve warm. For a fresh touch, add herbs for garnish. For the full recipe, refer to the Sunshine Veggie Frittata. - How to achieve the perfect texture To get a fluffy frittata, beat the eggs well. Mix the eggs with milk until smooth. This adds air and makes it light. Don't overcook it on the stove. The edges should set while the center remains soft. - Time-saving techniques Chop your veggies ahead of time. You can prep them the night before. Use pre-cut vegetables from the store if you’re in a hurry. This cuts down on your cooking time. - Recommended tools Use a large oven-safe skillet. A non-stick skillet works best for easy removal. Have a whisk and a spatula handy. These tools make mixing and serving simple. - Best sides to pair with the frittata Serve your frittata with a fresh salad. A side of toast also complements it well. You can add some fruit for a sweet touch. This makes for a balanced meal. - Presentation ideas Cut the frittata into wedges for easy serving. Garnish with fresh herbs like parsley or basil. This adds color and flavor. For a fancy touch, arrange the wedges on a platter. This makes it look inviting and delicious. {{image_2}} You can make your frittata special by adding different veggies. Here are some great options: - Mushrooms: They add a nice earthy flavor. - Tomatoes: Fresh or sun-dried, they bring sweetness. - Kale: This adds a hearty texture and more nutrients. - Broccoli: A tasty way to get more greens. You can also switch up the cheese. Try: - Goat cheese: It adds a tangy taste. - Mozzarella: For a creamy, mild flavor. - Parmesan: This brings a nutty touch. Want to make your frittata gluten-free? You’re in luck! The base is naturally gluten-free, so just use fresh ingredients and no bread. If you follow a vegan diet, you can still enjoy this dish. Use egg substitutes like: - Silken tofu: Blend it until smooth as a base. - Chickpea flour: Mix with water to create a batter. With these tips, you can enjoy a tasty frittata that fits your needs. For the full recipe, check out the Sunshine Veggie Frittata. To keep your frittata fresh, let it cool first. Once cool, slice it into wedges. Place the slices in an airtight container. You can use glass or plastic containers. Make sure they seal well. This keeps air out and helps prevent drying. Store the frittata in the fridge for up to four days. If you want to keep it longer, you can freeze it. Wrap each slice in plastic wrap, then place them in a freezer bag. This helps to keep the frittata tasty for up to two months. To reheat, you have two main options: the oven or the microwave. The oven gives better results. Preheat it to 350°F (175°C). Place the frittata on a baking sheet. Heat for about 10-15 minutes. This method keeps it fluffy. If you use the microwave, heat it in short bursts. Start with 30 seconds, check, then continue. Use a lower power setting to avoid overcooking. Enjoy it warm to keep the flavors fresh. How do I know when the frittata is done? You can tell if the frittata is done when the edges are set and the center is firm. A toothpick inserted in the middle should come out clean. The top will look lightly golden. Can I prepare frittata ahead of time? Yes, you can make a frittata ahead of time. Cook it fully, let it cool, then store it in the fridge. It tastes great cold or warmed up. What is the difference between a frittata and an omelet? A frittata is cooked slowly and often baked, while an omelet is folded and cooked quickly. Frittatas usually have more filling and can be made in larger batches. Is it possible to freeze a frittata? Yes, you can freeze a frittata. Just slice it into wedges and wrap each piece tightly with plastic wrap. Store them in a freezer bag. What other herbs can be used for garnish? You can use many herbs for garnish, like chives, cilantro, or dill. Each adds a unique flavor to your frittata. Try mixing them for a fresh twist! Want to explore more? Check out the Full Recipe for detailed steps and tips! This frittata recipe is simple and full of flavor. You learned about the key ingredients, step-by-step cooking, and how to store leftovers. You also explored variations and tips for perfect results. Frittatas are flexible and can fit your taste, making them an easy option for any meal. Enjoy creating your perfect dish, and share it with friends and family!

Easy Vegetable Frittata Quick and Healthy Recipe

Looking for a quick and healthy meal? This Easy Vegetable Frittata is your answer! Packed with colorful veggies and protein,

- 2 large cucumbers, thinly sliced - 1 cup roasted peanuts, roughly chopped - 1 red bell pepper, diced - 1 small red onion, thinly sliced - 1/4 cup fresh cilantro, chopped - 1 tablespoon sesame oil - 3 tablespoons soy sauce (low-sodium) - 1 tablespoon rice vinegar - 1 tablespoon honey or agave syrup - 1 teaspoon grated ginger - 1-2 teaspoons sriracha sauce (optional) - Additional vegetables (e.g., carrots or radishes) - Fruits (e.g., oranges or mango) - Spices for extra flavor The key to a great cucumber peanut salad is its fresh and crunchy ingredients. You start with fresh cucumbers, which give a nice crispness. I love using large cucumbers and slicing them thin. The red bell pepper adds a sweet twist, while the red onion brings a bit of sharpness. Roasted peanuts are a must. They add a nutty taste and crunch. Fresh cilantro ties all these flavors together with its bright notes. For the dressing, I mix sesame oil, low-sodium soy sauce, and rice vinegar. Honey or agave syrup balances the salty and tangy flavors. Grated ginger gives it a spicy kick, and sriracha can add more heat if you like. You can also add more veggies or fruits. Carrots add sweetness, while oranges or mango bring a juicy surprise. This salad is flexible. You can make it your own. You can find the full recipe to make this salad easily at home. Enjoy experimenting with different ingredients and flavors! Start by prepping your veggies. Slice the cucumbers thinly. Next, dice the red bell pepper into small pieces. Then, take your red onion and slice it thinly. Now, chop the fresh cilantro and roughly chop the roasted peanuts. This will add a nice crunch to your salad. In a small bowl, whisk together the dressing ingredients. Combine sesame oil, soy sauce, rice vinegar, honey or agave syrup, and grated ginger. If you like some heat, add sriracha sauce to the mix. Take a large bowl and toss in your salad ingredients. Add the sliced cucumbers, diced bell pepper, red onion, chopped cilantro, and roasted peanuts. Pour the dressing over everything and gently toss it all together. Let the salad sit for about 10-15 minutes. This helps the flavors mix and meld together. Before serving, taste the salad. Adjust the seasoning with salt and pepper if needed. Enjoy this crunchy and flavorful delight! For the complete recipe, check out the Full Recipe. To make the best cucumber peanut salad, use fresh cucumbers. They will give you a crunchier texture. Look for ones that feel firm and have shiny skin. Also, wash and dry your herbs before chopping. This step helps them stay fresh and flavorful. For deeper flavor, consider marinating the salad longer. Letting it sit allows all the ingredients to blend well. Adjust the acidity by adding more vinegar if needed. A splash more can brighten the taste and make it pop. Serve the salad chilled for the best taste. It pairs well with grilled meats or barbecue. You can also add a sprinkle of extra peanuts or cilantro on top for a nice finish. This little touch makes your dish look even better. Enjoy this crunchy and flavorful delight! For the complete recipe, check out the Full Recipe. {{image_2}} You can easily make this cucumber peanut salad vegan. Just swap honey for agave syrup. This keeps the sweetness without using animal products. Agave gives a nice touch to the dressing. If you need a nut-free salad, try replacing peanuts with sunflower seeds. Sunflower seeds add a crunchy texture. They also give a nice, nutty flavor without the allergens. For a gluten-free version, use tamari instead of soy sauce. Tamari is a great soy sauce alternative that is gluten-free. It adds the same umami taste to your dressing without the gluten. Feel free to explore these variations to suit your diet while enjoying the full recipe! Store leftovers in an airtight container. This keeps the salad fresh and crunchy. Make sure to seal it tightly. If you leave it open, it can get mushy. Always cool it down before storing. Consume within 2-3 days for the best flavor and freshness. After that, the veggies may lose their crispness. If you notice any off smells or changes, it’s best to throw it out. Enjoy your salad while it’s at its peak! Not recommended to reheat; best enjoyed cold. Heating can make the vegetables soggy. This salad shines when it’s fresh and chilled. Enjoy it straight from the fridge for a crisp, refreshing taste. You can find the full recipe above to whip up a fresh batch anytime! Yes, but it’s best served fresh. If you make it ahead, store the dressing separately. This way, the salad stays crisp and tasty. Mixing everything right before serving keeps the veggies crunchy. You can use almonds, cashews, or seeds for a different flavor and texture. Each option brings its own crunch and taste. Almonds are mild, while cashews add creaminess. Seeds give a nice nutty flavor. Yes, it’s low in calories and packed with nutrients. Fresh veggies provide vitamins, while peanuts add healthy fats. This salad is a great choice for a light meal or side dish. It's filling without being heavy. Enjoy it guilt-free! This cucumber peanut salad is fresh, tasty, and simple to make. You start by prepping your main ingredients, then mix a flavorful dressing. Add optional veggies or fruits to make it your own. Remember, freshness matters for the best crunch. Enjoy this salad chilled, and it pairs well with grilled foods. It’s healthy, low in calories, and full of nutrients. Try different add-ins and enjoy your creative spin on a classic dish!

Cucumber Peanut Salad Crunchy and Flavorful Delight

Looking for a fresh and crunchy salad that bursts with flavor? My Cucumber Peanut Salad is just what you need!

- 4 cups fresh peaches - 1/4 cup granulated sugar - 1 teaspoon vanilla extract - 1 cup all-purpose flour - 1 tablespoon baking powder - 1/2 teaspoon salt - 1 teaspoon ground cinnamon - 1/4 cup brown sugar - 1 cup milk - 1/2 cup unsalted butter - 1 tablespoon lemon juice I love using fresh peaches for this cobbler. They give a sweet and juicy flavor. Choose ripe peaches for the best taste. You need about four cups of sliced peaches. A little sugar helps bring out their natural sweetness. The vanilla adds a nice touch. Next, we have the dry ingredients. All-purpose flour forms the base for the batter. Baking powder helps it rise and become fluffy. Salt brings out the flavors, while cinnamon adds warmth. Brown sugar gives a rich depth to the taste. Don’t forget the essentials! Milk makes the batter creamy. Unsalted butter adds richness and flavor. A splash of lemon juice brightens the dish and balances the sweetness. If you want the full recipe, check out the Sunny Peach Bliss Cobbler . It is straightforward and fun to make! Begin by peeling and slicing 4 cups of fresh peaches. Place them in a large bowl. Add 1/4 cup of granulated sugar, 1 teaspoon of vanilla extract, and 1 tablespoon of lemon juice. Toss the peaches gently. This lets the flavors mix well and draws out the peach juices. In another bowl, combine 1 cup of all-purpose flour, 1 tablespoon of baking powder, 1/2 teaspoon of salt, 1 teaspoon of ground cinnamon, and 1/4 cup of brown sugar. Whisk these dry ingredients together well. Then, stir in 1 cup of milk. Mix until the batter is smooth and thick. Pour 1/2 cup of melted unsalted butter into a 9x13 inch baking dish. Make sure the bottom is well coated. Next, pour the batter over the melted butter. Do not mix. Spoon the peach mixture evenly over the top of the batter. Again, do not stir. This will help create that delicious layer when it bakes. Preheat your oven to 375°F (190°C). Bake the cobbler for 35-40 minutes. Look for a golden brown top. To check if it’s done, insert a toothpick into the batter. If it comes out clean, your cobbler is ready. Let it cool for about 10 minutes before you serve it. Enjoy! When choosing peaches, look for firm fruit that has a nice color. The best peaches have a sweet aroma. Avoid any that feel too soft or have dark spots. These signs show overripeness. If the skin has a slight give, it’s likely perfect for your cobbler. Fresh, ripe peaches will give your dish a bright flavor. I love serving fresh peach cobbler warm from the oven. A scoop of vanilla ice cream on top is perfect. The cold ice cream melts into the warm cobbler. Whipped cream is another great choice. You can also sprinkle a bit of cinnamon on top for extra flavor. These toppings make the dish feel special. To avoid a soggy bottom crust, follow a few tips. First, make sure to pour the batter over the melted butter without mixing. This helps create a crispy crust. Second, don’t stir the peaches into the batter. Let the layers remain separate as they bake. Lastly, bake until the top is golden brown. This gives you a nice, firm texture. Enjoy every bite of your sunny peach bliss! For the complete recipe, check out the Full Recipe section. {{image_2}} You can swap out peaches for other fruits. Nectarines work well since they taste similar. Berries, like blueberries or raspberries, also make a great choice. Each fruit gives a new spin on the classic cobbler. Mixing fruits can add fun flavors, too. Try using a combo of peaches and berries for a colorful twist. Adding extra flavors can elevate your cobbler. Chopped nuts, like pecans or almonds, add crunch. A dash of nutmeg can add warmth. You might want to try a splash of almond extract for a unique taste. Each add-in can change the flavor and texture. Feel free to get creative with what you enjoy! If you need a gluten-free version, don’t worry. You can use almond flour or a gluten-free baking mix instead of regular flour. These swaps can keep the cobbler light and delicious. Just follow the same steps in the Full Recipe. Your friends and family won’t even know it’s gluten-free! To keep your peach cobbler fresh in the fridge, let it cool first. Once cool, cover it tightly with plastic wrap or aluminum foil. You can also use an airtight container. This keeps the cobbler from drying out. It will stay good for about 3 to 4 days in the fridge. If you want to enjoy it later, freezing is a great option. Freezing is easy and keeps your cobbler tasty. First, let it cool completely. Then, cut it into portions. Wrap each piece in plastic wrap, then place them in a freezer-safe bag. Make sure to press out any air before sealing. When you want to eat it, thaw it in the fridge overnight. Reheat in the oven at 350°F (175°C) for about 20 minutes. This will help restore its warmth and texture. For short-term storage, use glass or plastic containers with tight lids. They keep moisture in and flavors fresh. For long-term storage, opt for freezer-safe bags or containers. These prevent freezer burn and keep the cobbler safe. Always label your containers with the date so you know when to enjoy them. Yes, you can use canned peaches. They save time and are easy to find. However, fresh peaches have a better taste and texture. Canned peaches can be mushy and too sweet. If you choose canned, look for ones in juice, not syrup. Drain them well before using to avoid excess liquid in your cobbler. Your cobbler is done when it is golden brown on top. You can also check with a toothpick. Insert it into the batter; if it comes out clean, your cobbler is ready. The edges will also pull away from the dish. Let it cool for a few minutes before serving. Fresh peach cobbler tastes great with vanilla ice cream. You can also serve it with whipped cream for a lighter touch. Other options include yogurt or a dollop of crème fraîche. Pair it with a cup of coffee or tea for a delightful dessert experience. This blog post showed how to make a delicious peach cobbler. We covered key ingredients, from fresh peaches to dry components and essential items. I shared step-by-step instructions to guide your process. Also, we explored tips for choosing ripe peaches and ways to serve and store your cobbler. Remember, you can customize this dessert with different fruits or adapt it for gluten-free diets. Enjoy making this treat and share it with friends and family; they will love it!

Fresh Peach Cobbler Flavorful and Easy Recipe Guide

Craving a sweet treat that showcases the juicy goodness of fresh peaches? You’re in the right place! In this guide,

- 4 medium zucchinis, sliced into 1/4-inch rounds - 4 cloves of garlic, minced - 1/2 cup grated Parmesan cheese - 3 tablespoons olive oil - 1 teaspoon dried oregano - 1 teaspoon garlic powder - Salt and pepper to taste - Fresh parsley, chopped for garnish (optional) - Choosing fresh zucchinis: Look for zucchinis that are firm and shiny. They should feel heavy for their size. Avoid any that have soft spots or wrinkles. - Types of Parmesan cheese to use: Use freshly grated Parmesan for the best flavor. Pre-grated cheese can lack richness. - Options for olive oil: Extra virgin olive oil adds great flavor. If you want a milder taste, you can use regular olive oil. When you gather these ingredients, make sure they are fresh. Fresh zucchinis will give your dish a crisp texture. Quality Parmesan cheese enhances the savory flavor. Good olive oil ties everything together beautifully. For the best results, follow the full recipe to ensure a tasty side dish. - Preheat your oven to 425°F (220°C). - Line a baking sheet with parchment paper. - In a large bowl, combine the sliced zucchini, minced garlic, and olive oil. - Add oregano, garlic powder, salt, and pepper. - Mix everything until the zucchini is fully coated. - Spread the zucchini mix evenly on the baking sheet. - Bake for about 15 minutes, until tender and slightly brown. - Remove from the oven and sprinkle the grated Parmesan cheese on top. - Return to the oven and bake for an extra 5-7 minutes until the cheese is golden and bubbly. - Serve the zucchini warm as a tasty side dish. - It pairs well with grilled chicken or fish. - You can also enjoy it in a salad for added flavor. For the full recipe, check out the detailed instructions above! To get the best flavor and texture, roast at 425°F (220°C). This high heat helps caramelize the zucchini. Aim for about 15 minutes for the first bake. This softens the zucchini without making it mushy. To avoid soggy zucchini, cut them into 1/4-inch rounds. This size allows even cooking and helps them crisp up. Spread them out on the baking sheet in a single layer. Avoid stacking them, as this traps steam and adds moisture. To mix things up, try adding spices and herbs. Basil or thyme can add a fresh twist. You could also sprinkle some chili flakes for a bit of heat. If you want a different cheese, try Pecorino Romano or Asiago. Both add a unique flavor and still melt beautifully. When serving, arrange the zucchini in a circular pattern on a plate. This makes it look inviting. For garnishing, sprinkle fresh parsley on top. It adds a pop of color and freshness. You can also drizzle a little balsamic glaze for an extra touch of flavor. For the complete recipe, check out the Full Recipe section. {{image_2}} For a vegan version, use nutritional yeast instead of Parmesan. Nutritional yeast adds a cheesy flavor without dairy. It is packed with nutrients too. For gluten-free options, ensure that the seasonings you use are gluten-free. Most spices are safe, but always check the labels. You can add tomatoes or bell peppers to the mix. They add color and flavor. If you prefer a spicy kick, sprinkle in some red pepper flakes. This will give your dish a nice heat without overpowering it. During summer, try using different types of squash. Yellow squash or pattypan squash can work well. They have similar textures and flavors. Incorporating seasonal herbs can also enhance your dish. Fresh basil or thyme can boost the taste. For more ideas, check out the Full Recipe to explore different combinations! Once you finish your Roasted Garlic Parmesan Zucchini, allow it to cool down. Place any leftovers in the fridge within two hours. Store the zucchini in an airtight container. This keeps it fresh for up to three days. Try not to stack the zucchini too high to avoid squishing. To reheat the zucchini, the oven is your best friend. Preheat it to 350°F (175°C). Place the zucchini on a baking sheet and heat for about 10 minutes. This method helps keep the zucchini's texture. If you use a microwave, heat in short bursts. This prevents it from becoming mushy. You can freeze Roasted Garlic Parmesan Zucchini, but it’s best to do it before reheating. First, let the dish cool completely. Then, place it in a freezer-safe bag or container. Be sure to remove as much air as possible. It can last up to two months in the freezer. When ready to eat, thaw it in the fridge overnight. Reheat it in the oven for the best results. Enjoy every bite! How long does Roasted Garlic Parmesan Zucchini last in the fridge? Roasted Garlic Parmesan Zucchini can last about 3 to 5 days in the fridge. Store it in an airtight container. This keeps the flavors fresh. Reheating it gently can restore some of its charm. Can I use frozen zucchini for this recipe? Using frozen zucchini isn't the best choice. Frozen zucchini tends to get mushy when cooked. Fresh zucchini retains its crunch and flavor. If you only have frozen, squeeze out excess water before using. Is it better to bake or grill zucchini? Baking is usually easier and more consistent. Grilling adds a nice smoky flavor. Both methods work well, but baking can be more forgiving. You can control the heat and timing better in the oven. What’s the best way to cut zucchini for roasting? Slice zucchini into 1/4-inch rounds for even cooking. This size helps them roast well without becoming mushy. You can also cut them into half-moons for a different look. Just keep the size consistent. Can I add protein to this dish? Yes, you can easily add protein! Grilled chicken or shrimp pairs well with zucchini. You can also mix in cooked sausage or chickpeas for a hearty touch. Just be sure to adjust seasonings to balance flavors. How can I make this recipe spicier? To spice it up, add red pepper flakes to the seasoning mix. You can also use a spicy cheese like pepper jack. Another option is to drizzle some hot sauce on top before serving. You learned how to make roasted garlic Parmesan zucchini, a tasty and easy dish. We covered the ingredients, preparation, cooking, and serving tips. I shared ways to enhance flavors and offered variations for different diets. Also, I gave storage and reheating advice to keep leftovers fresh. Try this dish to impress family and friends. It’s simple, flavorful, and works well with many meals. Enjoy your cooking!

Roasted Garlic Parmesan Zucchini Tasty Side Dish

Are you looking for a simple yet delicious side dish? Look no further! Roasted Garlic Parmesan Zucchini is packed with

To make the best dill pickled okra, you need fresh okra. Aim for about 1 pound of okra. Make sure the stems are trimmed, and the pods are firm and bright green. You will also need 1 cup of distilled white vinegar and 1 cup of water. The vinegar gives a tangy flavor that is key to pickling. Flavor is what makes your pickled okra stand out. You will need: - 2 tablespoons kosher salt - 2 tablespoons sugar - 4 cloves garlic, smashed - 1 tablespoon dill seeds - 1 tablespoon black peppercorns - 1 teaspoon red pepper flakes (optional) - 2 sprigs fresh dill These flavors blend perfectly to create a delicious balance. You will need a few tools to make this recipe easy: - 1 quart-sized jar with a lid - A saucepan for the brine - A clean cloth to wipe the jar rim - A cutting board and knife for prepping the okra This simple setup helps streamline the process, so you can enjoy your pickling adventure! For the full recipe, check out the detailed steps in the next section. First, rinse the fresh okra under cold water. This step cleans off any dirt. After that, trim the stem ends. Be careful not to cut into the pods. Once you have trimmed the okra, set it aside. This prep is key for a good pickle. Next, we make the pickling brine. In a saucepan, combine the distilled white vinegar, water, kosher salt, and sugar. Stir these ingredients well. Heat the mixture over medium-high heat until it boils. Keep stirring until the salt and sugar dissolve. Once dissolved, remove the pan from heat. Let the brine cool slightly. This brine will give the okra its great flavor. Now it’s time to pack the jar. Start with a clean, sterilized quart jar. Place the smashed garlic, dill seeds, black peppercorns, and red pepper flakes at the bottom. If you enjoy some heat, add the red pepper flakes. Then, carefully pack the okra upright in the jar. Pour the warm brine over the okra. Make sure the pods are fully submerged. Leave about half an inch of space at the top of the jar. Wipe the rim with a clean cloth to remove any residue. Seal the jar tightly with the lid. Let it cool to room temperature. This step is essential for the pickling process. For the full recipe, check the Dill Pickled Okra section. When choosing fresh okra, look for firm pods. They should be bright green and smooth. Avoid any that are dull or have dark spots. Smaller pods are usually more tender. Larger ones can be tough and less enjoyable. Always buy okra from reliable sources, like local farms or farmers' markets. To change the taste of your pickled okra, adjust the salt and sugar. If you want a saltier pickle, add more kosher salt. You can add a teaspoon at a time to test the flavor. For a sweeter taste, increase the sugar. Start with one extra tablespoon and taste as you go. Keep in mind that too much sugar can mask the unique flavor of okra. You can make your pickled okra even better. Try adding spices like mustard seeds or coriander seeds for extra flavor. You might also enjoy adding sliced jalapeños for a spicy kick. If you love garlic, add more smashed cloves for a bolder taste. Fresh herbs like thyme or basil can also bring new flavors to your pickling brine. With a few tweaks, you can make this recipe your own and enjoy new tastes. For the full recipe, check the details above. {{image_2}} To make spicy dill pickled okra, add more heat. Start with the basic recipe. Use the same ingredients but add more red pepper flakes. You can also include sliced jalapeños for a kick. The heat level depends on your taste, so adjust as needed. This spicy version adds a fun twist. Pair it with sandwiches or enjoy it as a snack. For a sweet and spicy version, mix sweet and heat. Use the basic recipe but add more sugar. Try using a mix of sugar and honey for extra flavor. You can also add sliced bell peppers for a sweet crunch. This version is great for those who love a balance of flavors. It pairs well with barbecue dishes or as a unique snack. Want to add more depth? Try herb-infused dill pickled okra. Use the basic recipe and add fresh herbs. Good options include thyme, basil, or even a bit of oregano. Herbs can change the flavor profile and make it special. Just remember to keep the dill as the star. This variation shines in salads or as a gourmet appetizer. For more details and a complete guide, check out the Full Recipe! To store your dill pickled okra, keep the jar in the refrigerator. Make sure the lid is tight to keep out air. Always use clean utensils when taking out okra. This keeps it safe and fresh. Homemade dill pickled okra lasts about 2 to 3 months in the fridge. The flavor gets better as it sits. However, it's best to eat it within the first month for the best taste. Check for these signs of spoilage: - Off smell: If it smells bad, throw it away. - Mold: Any mold on the surface means it's not safe. - Discoloration: If the okra turns dark or mushy, discard it. Following these tips will help you enjoy your dill pickled okra safely. For the full recipe, check out the earlier section. It takes about 48 hours to pickle okra. During this time, the flavors blend well. After two days, the okra will taste great. You can eat it sooner, but longer pickling gives better taste. I do not recommend using frozen okra for pickling. Frozen okra becomes soft after thawing. Fresh okra stays crunchy and firm when pickled. For the best texture, opt for fresh okra. Pickled okra has many health benefits. It is low in calories and rich in fiber. The fiber helps digestion and keeps you full. Okra is also high in vitamins A and C. It may boost your immune system, too. You can find dill pickled okra at many grocery stores. Look in the pickle aisle or near the canned goods. Some farmers' markets sell homemade pickles, too. If you prefer, you can make your own with the full recipe. Yes, you can use other types of vinegar for pickling. Apple cider vinegar gives a fruity taste. Rice vinegar adds a mild flavor. Make sure to choose a vinegar with 5% acidity for safe pickling. This blog post covered everything you need to create delicious dill pickled okra. We discussed the key ingredients and tools, step-by-step instructions, and essential tips. You learned about different pickling variations and how to store your pickled okra correctly. In summary, making dill pickled okra is simple and fun. You now have the knowledge to get started and try new flavors. Enjoy your pickling journey!

Dill Pickled Okra Flavorful and Easy Recipe Guide

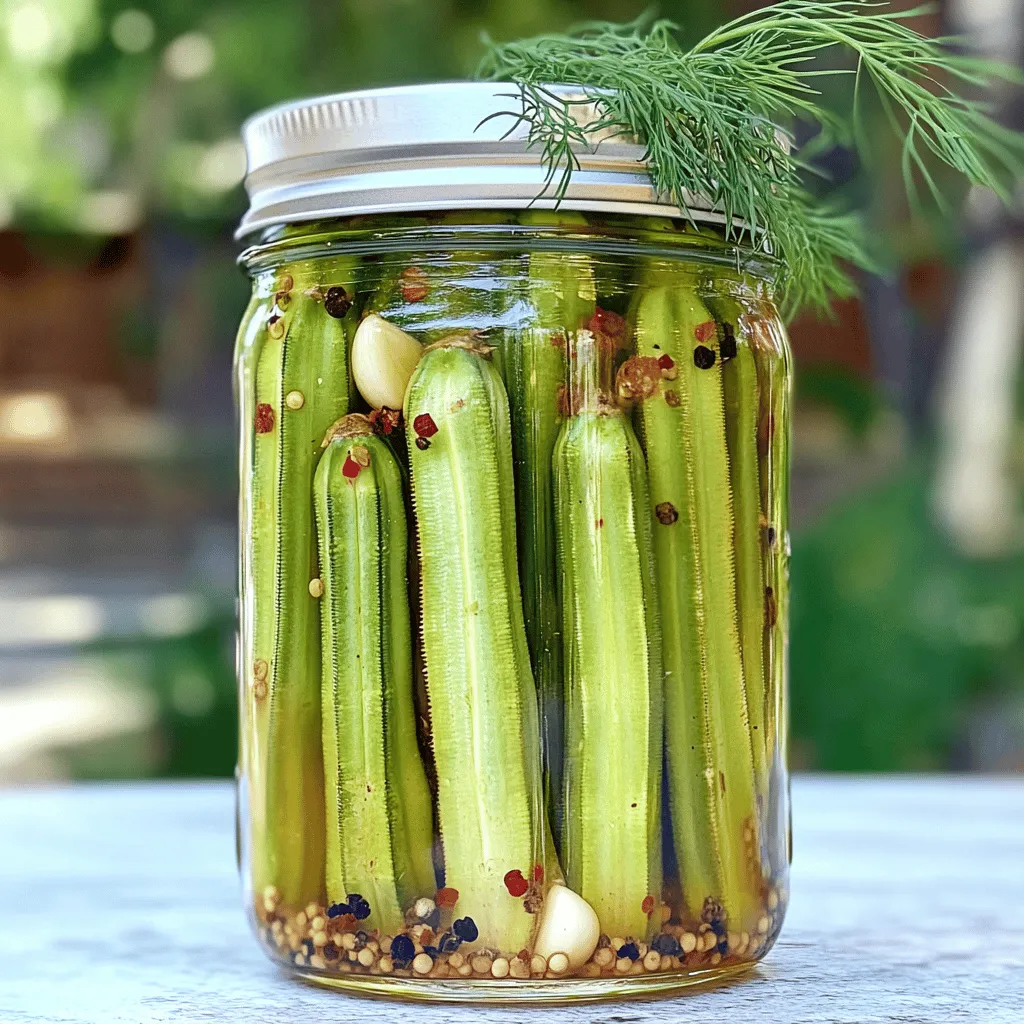
Are you ready to add a zesty kick to your meals? Dill Pickled Okra is not just tasty; it’s also

- Dried figs: 1 cup, chopped - Fresh cherries: 1 cup, pitted and halved - Fresh ginger: 1 tablespoon, grated - Brown sugar: 1/2 cup - Water: 1 cup - Lemon juice: 1 tablespoon - Cinnamon: 1/2 teaspoon - Salt: A pinch The key to making a great Ginger Fig Cherry Compote is using the right ingredients. Each item plays a big role in the taste and texture of the dish. Dried figs bring a natural sweetness and a chewy texture that balances well with tart cherries. Fresh cherries add brightness and color. Grated ginger gives a warm, spicy kick that makes this compote special. For sweetness, I use brown sugar. It adds a deep flavor that works well with the fruits. Water helps to cook the fruits down and create a nice sauce. Lemon juice brightens all the flavors and adds a touch of acidity. Cinnamon adds warmth and a hint of spice, while a pinch of salt rounds out the flavors. You can find the full recipe to see how these ingredients come together to create a delightful dish. To start, you need to combine the chopped dried figs and water in a medium saucepan. This step is important to soften the figs. Next, bring the mixture to a gentle boil over medium heat. Once it boils, reduce the heat to a simmer. Cook for about 10 minutes, stirring occasionally. The figs should soften and absorb some of the water during this time. Now it’s time to add the fun flavors. Incorporate the halved cherries, grated ginger, and brown sugar into the saucepan. Mix these ingredients well. Then, add the lemon juice, cinnamon, and a pinch of salt. Stir everything until it’s well combined. The fresh ginger adds a nice kick, while the cherries bring sweetness. Let the mixture simmer uncovered for another 15-20 minutes. Stir occasionally during this time. You want it to thicken to a syrupy consistency. Once it reaches that point, remove it from heat. Allow it to cool slightly before you transfer it to a jar or bowl. Keep in mind, the compote will thicken further as it cools. This tasty treat is perfect on toast or as a dessert topping. For the full recipe, check out the [Full Recipe]. To make your Ginger Fig Cherry Compote shine, fresh ginger is key. It adds a lively kick and brightens the overall flavor. If you want it sweeter, feel free to adjust the brown sugar. Start with the amount in the recipe and taste as you go. This way, you’ll find the perfect balance for your palate. When cooking the compote, control the heat. Start with medium heat to bring it to a gentle boil. Once it boils, reduce to low heat. This prevents burning and helps the flavors blend well. As it cooks, check the consistency. You want it thick but still syrupy. It should coat the back of a spoon nicely. This compote is versatile! Pair it with cheese for a savory snack. It goes well with creamy cheeses like brie or goat cheese. You can also serve it over desserts like yogurt or ice cream. Enjoy it warm for a cozy treat or chilled for a refreshing topping. Either way, it brings a burst of flavor to your meal. For the full recipe, check out the earlier section! {{image_2}} You can change the dried fruits in this compote. Dried apricots or raisins work well. They add their own unique taste. You can also try using seasonal fruits. Fresh peaches or plums can be great in summer. In fall, use apples or pears. This way, you can enjoy different flavors all year. Spices can change the whole taste of your compote. Try adding nutmeg or cloves for warmth. These spices give a cozy feeling, perfect for chilly days. If you want a sweeter taste, use vanilla extract. It adds a lovely undertone that makes the compote special. You don’t have to use brown sugar. Maple syrup or honey can be great options. They are natural and bring a different sweetness. Adjust the sugar to fit your diet. Use less if you prefer a tart compote. This allows everyone to enjoy it, no matter their taste. For the full recipe, check out the [Full Recipe]. To store your Ginger Fig Cherry Compote in the fridge, first let it cool. Transfer it to an airtight container. This keeps the flavors fresh and prevents spills. The compote will last about one week in the fridge. You can also use a glass jar with a tight lid. This method helps retain its rich taste and texture. Freezing is a great option if you want to save some compote for later. Pour the cooled compote into freezer-safe containers. Leave some space at the top for expansion. You can also use ice cube trays for smaller portions. To thaw, place it in the fridge overnight. If you're in a hurry, you can use the microwave on low for a few minutes. When it’s time to enjoy your compote again, reheat it gently. Use a saucepan over low heat. Stir it often to keep it from sticking. If it seems too thick, add a splash of water. This will help maintain its delicious flavor and smooth texture. Enjoy it warm on toast or as a dessert topping! To make Ginger Fig Cherry Compote, follow these simple steps: 1. Start by chopping 1 cup of dried figs. Place them in a medium saucepan with 1 cup of water. 2. Bring the mixture to a gentle boil over medium heat. Then, reduce the heat and let it simmer. 3. Cook for about 10 minutes. Stir occasionally until the figs soften and soak up some water. 4. Next, add 1 cup of fresh cherries, which should be pitted and halved. Then, mix in 1 tablespoon of grated ginger, 1/2 cup of brown sugar, 1 tablespoon of lemon juice, 1/2 teaspoon of cinnamon, and a pinch of salt. 5. Stir everything well to combine. 6. Let the compote simmer uncovered for 15 to 20 minutes. This allows it to thicken into a syrupy texture. Stir occasionally to avoid sticking. 7. Once done, remove it from heat and let it cool a bit. Transfer it to a jar or bowl. The compote will thicken more as it cools. 8. Serve it warm or chill it in the fridge for a refreshing topping on toast or desserts. This recipe is quick and easy, perfect for beginner cooks looking to impress. Yes, you can use frozen cherries for this recipe. Frozen cherries will still give you a tasty compote. However, they may change the texture a bit. Frozen fruit often has more water, so the compote might be a little runnier. To fix this, cook it a bit longer to help it thicken. The flavor will still shine through, making it a great option when fresh cherries aren't available. Ginger Fig Cherry Compote pairs well with many dishes. Here are some ideas for you: - Spread it on toast or bagels for a tasty breakfast. - Use it as a topping for pancakes or waffles. - Add it to yogurt or oatmeal for a sweet kick. - Serve it with cheese for a delightful snack. - Use it as a sauce for grilled meats or roasted vegetables. This compote brings a burst of flavor to many meals. Enjoy exploring different ways to use it! In this blog post, we explored the delicious Ginger Fig Cherry Compote. We covered the main ingredients, step-by-step instructions, and helpful tips. I shared variations and storage advice to help you enjoy this treat longer. This compote can enhance many dishes and is quite easy to make. I hope you feel inspired to try this recipe and customize it to your taste. With these simple methods, you can create a delightful flavor experience right in your kitchen.

Ginger Fig Cherry Compote Flavorful and Easy Recipe

Are you ready to explore a dish that bursts with flavor? This Ginger Fig Cherry Compote is not only easy

- 1 medium spaghetti squash - 1 tablespoon coconut oil - 1 yellow onion, diced - 2 cloves garlic, minced - 1 tablespoon fresh ginger, grated - 2 tablespoons yellow curry powder - 1 can (400ml) coconut milk - 1 cup vegetable broth - 1 red bell pepper, sliced - 1 cup sugar snap peas - 1 tablespoon soy sauce (or tamari for gluten-free) - Salt and pepper, to taste - Fresh cilantro, for garnish I love using spaghetti squash because it offers a fun, low-carb base for meals. The first step is to roast the squash. This brings out its natural sweetness. The coconut oil adds a rich flavor while sautéing the onion, garlic, and ginger. These three ingredients form a great flavor base for your curry. The yellow curry powder is key. It adds warmth and depth to the dish. I always use fresh coconut milk for a creamy texture. It pairs perfectly with the vegetable broth, making a smooth sauce. The red bell pepper and sugar snap peas add color and crunch. They cook quickly, keeping their vibrant look. For seasoning, I use soy sauce or tamari. This gives it a savory kick. Finally, fresh cilantro brightens the dish and adds a pop of color. You can find the full recipe in the earlier section. - Preheat oven to 400°F (200°C). - Cut the spaghetti squash in half and scoop out seeds. - Drizzle with olive oil and sprinkle with salt and pepper. - Place cut side down on a lined baking sheet and roast. Roasting the squash takes about 40 minutes. You want it soft enough to shred easily. Once it’s done, let it cool a bit before you scrape out the strands. This squash will be your pasta base! - Heat coconut oil in a skillet over medium heat. - Sauté diced onion until translucent. - Add garlic and ginger; cook until fragrant. - Stir in yellow curry powder; toast slightly. This step builds the flavor. I love how the onion softens and mingles with garlic and ginger. It smells fantastic! The yellow curry powder gives the dish its warm color and rich taste. - Pour in coconut milk and vegetable broth. - Simmer the mixture. - Add bell pepper and sugar snap peas; cook until tender. - Stir in soy sauce and season with salt and pepper. Bring it all to a gentle simmer. The coconut milk makes it creamy while the broth adds depth. Toss in your veggies and let them soften while keeping their bright colors. - Scrape roasted squash into spaghetti-like strands. - Ladle curry sauce over strands. - Garnish with fresh cilantro. This is where it comes together! The squash strands act like noodles. Pour that delicious curry sauce over the top, and finish with fresh cilantro. It’s a feast for the eyes and the taste buds! For the full recipe, check out the section above. - Ensure the squash is tender before removing from the oven. - Adjust the spice level by varying the curry powder amount. - Use fresh vegetables for vibrant color and flavor. I find that a fork is your best friend when checking the squash. When it feels soft, it’s ready. If you like more heat, add extra curry powder. Start with a little, then taste before adding more. Fresh vegetables not only taste better but also make your dish look bright. Use colorful bell peppers or peas for the best results. - Serve with rice or quinoa for added texture. - Top with roasted peanuts or cashews for crunch. - Pair with a side salad for a complete meal. I love to serve my yellow curry spaghetti squash with fluffy rice. It gives a nice bite that balances the soft squash. Roasted nuts add a satisfying crunch that makes each bite special. A fresh salad on the side makes the meal light and fresh. You can even drizzle a little lime juice on the salad for a zing! For the full recipe, don’t forget to check the detailed steps above! {{image_2}} You can make this dish vegetarian easily. Substitute vegetable broth with chickpea or lentil broth. This adds protein and flavor. You can also add more veggies. Carrots or zucchini work well. They add color and crunch. Want to add more protein? Incorporate cooked chicken, tofu, or shrimp. These options make the dish heartier. Adjust cooking times as needed. You want the protein cooked through but not overdone. To change the flavor, try different types of curry paste. Each type offers a unique taste. For a citrus twist, add lime juice or zest. This brightens the dish and enhances the curry flavor. After enjoying your yellow curry spaghetti squash, store any leftovers in an airtight container. This keeps them fresh for up to 3 days in the fridge. When you're ready to eat again, reheat the curry gently on the stove or in the microwave. This helps retain its flavor and texture. If you want to save some for later, freeze the curry sauce separately. It stays good for up to 2 months. Just make sure to let it cool before freezing. Avoid freezing the spaghetti squash, as its texture may change when thawed. This can make it mushy and less enjoyable. Enjoy the fresh taste when you can! You can find the full recipe above to recreate this dish anytime. Yes, by using tamari instead of soy sauce. Tamari is a great gluten-free option. It has a similar taste and works well in this recipe. The flesh should be tender and easily shredded with a fork. You want it to have a nice, soft texture. If it feels hard, give it more time in the oven. Yes, but cooking times may vary based on the squash type. Acorn or butternut squash can work. Just check for doneness by testing with a fork. Each serving has about 250 calories. It contains 10 grams of fat and 35 grams of carbs. This dish is filling and healthy, with many vitamins from the veggies. Yellow curry comes from Thailand. It blends spices like turmeric, cumin, and coriander. Each region adds its twist, making it unique and diverse. You can find variations in many Asian cuisines. This recipe showcases a simple, tasty dish using spaghetti squash and curry sauce. You learned how to prepare and combine fresh ingredients for a healthy meal. Remember to adjust spices to fit your taste and explore variations for more flair. You can store leftovers in the fridge or freeze the sauce for later. Cooking can be fun and creative, so don’t be afraid to experiment with your ingredients. Enjoy your time in the kitchen making this delightful dish!

Yellow Curry Spaghetti Squash Delicious and Nutritious

Looking for a dish that’s both tasty and healthy? My Yellow Curry Spaghetti Squash is your answer! This vibrant recipe

Older posts
Newer posts
← Previous Page1 … Page56 Page57 Page58 … Page84 Next →

dsad

© 2026 Foodish Talk • Built with GeneratePress

Our Policies

  • Copyright Policy
  • Cookie Policy
  • GDPR Policy
  • Privacy Policy
  • Disclaimer
  • Terms Of Use

More Information

  • Home
  • About
  • Contact
  • Appetizers
  • Dessert
  • Dinner
  • Drinks
©2026, Foodish Talk About Back To Top