Skip to content
DisclaimerTerms Of UseGDPR PolicyCookie Policy

Foodish Talk

  • Home
  • Drinks
  • Appetizers
  • Dinner
  • Dessert
  • About
  • Contact
  • Privacy Policy
DisclaimerTerms Of UseGDPR PolicyCookie Policy

NO-ING-IMG

- 1 lb ground chicken - 1/2 cup panko breadcrumbs - 1/4 cup green onions, finely chopped - 1/4 cup mayonnaise - 1 tablespoon sriracha - 1 tablespoon honey - 1 clove garlic, minced - 1 teaspoon ginger, grated - 1 tablespoon soy sauce - 1 tablespoon sesame oil - Salt and pepper to taste - 12 slider buns - 1 cup shredded lettuce - 1/2 cup sliced cucumbers The main ingredients set the stage for these sliders. The ground chicken provides protein and a mild flavor. Panko breadcrumbs add a nice crunch. Green onions give a fresh taste. The combination of mayonnaise, sriracha, and honey makes the Bang Bang sauce sweet and spicy. For seasoning, garlic and ginger bring warmth and depth. Soy sauce and sesame oil enhance the umami flavor. Salt and pepper round out the taste. The slider components complete the dish. The slider buns hold everything together. Shredded lettuce adds crunch and freshness. Sliced cucumbers offer a cool contrast to the spicy sauce. These ingredients work together to create a tasty and simple treat. You can find the complete recipe for Bang Bang Chicken Sliders here. In a large mixing bowl, I start by combining the ground chicken, panko breadcrumbs, chopped green onions, minced garlic, grated ginger, soy sauce, sesame oil, salt, and pepper. I mix it all well until everything is nicely blended. This mix will give the sliders a great taste and texture. Next, I form the mixture into small patties. Each patty should be about the size of your slider buns. I heat a large skillet over medium heat and add a little olive oil. I cook the chicken patties for about 4-5 minutes on each side. I know they are ready when they turn golden brown and are fully cooked. Once the patties are cooked, it’s time to assemble the sliders. I place one patty on each slider bun. Then, I add shredded lettuce and sliced cucumbers on top. Finally, I drizzle the Bang Bang sauce generously over each slider. I close the buns and serve. Enjoy this tasty treat! - Use a non-stick skillet for easier flipping. This makes it simple to turn the patties without sticking. - Cook patties to an internal temperature of 165°F. This ensures they are safe to eat and juicy. - Adjust sriracha for desired spice level. If you prefer it mild, use less. - Experiment with additional flavorings like lime juice. This adds a zesty kick to your sauce. - Serve on a platter lined with parchment paper. It keeps things neat and adds a touch of class. - Garnish with green onions or sesame seeds. This makes your sliders look appealing and fresh. {{image_2}} You can easily swap ground chicken for turkey or pork. Both meats work well in this dish. If you want a lighter sauce, try using Greek yogurt instead of mayonnaise. This adds creaminess without extra calories. Toppings can change the whole vibe of your sliders. You can add sliced avocado for a creamy texture. Pickled jalapeños bring a spicy kick that many enjoy. You might also try different greens like arugula or spinach. These add freshness and color to your meal. For a fun twist, use corn tortillas instead of slider buns. This gives a tasty fusion feel. If you're watching carbs, you can convert the sliders to lettuce wraps. This keeps all the flavors while being lighter and refreshing. You should store leftover sliders in an airtight container in the fridge. This keeps them fresh. They are best consumed within 2-3 days. After that, the taste may not be as good. If you want to save time, freeze uncooked patties for later use. This way, you can enjoy them anytime. You can also reheat cooked sliders in the oven or air fryer for a quick meal. To keep sliders crispy, reheat them in the oven. Use low heat to avoid drying out the patties. This helps maintain their yummy texture. Enjoy your Bang Bang Chicken Sliders even after a few days! Yes, you can prepare patties in advance and refrigerate or freeze them. This makes meal prep easy. You can cook them fresh whenever you are ready to eat. Serve with sweet potato fries, coleslaw, or a simple salad. These sides add crunch and freshness. They also balance the flavors of the sliders well. Use less sriracha or add a pinch of sugar to balance the heat. This way, you can customize the sliders to your taste. It’s easy to make them milder or spicier! Each slider contains about 200 calories, depending on toppings. This is a great option for a filling meal. You can enjoy them without feeling guilty. Yes, they're great for meal prepping due to their easy assembly and storage! You can make a batch, store them, and have quick meals ready for busy days. For the complete instructions and ingredient list, refer to the Full Recipe for Bang Bang Chicken Sliders. This will guide you through making these tasty treats! This blog explored tasty Bang Bang Chicken Sliders. We covered main ingredients, seasoning, and cooking steps. You can customize sliders with different toppings or sauces. Don’t forget to store leftovers properly. These sliders are great for meal prep and perfect for gatherings. With simple tweaks, you can make these your own. Enjoy cooking and sharing this fun dish with family and friends!

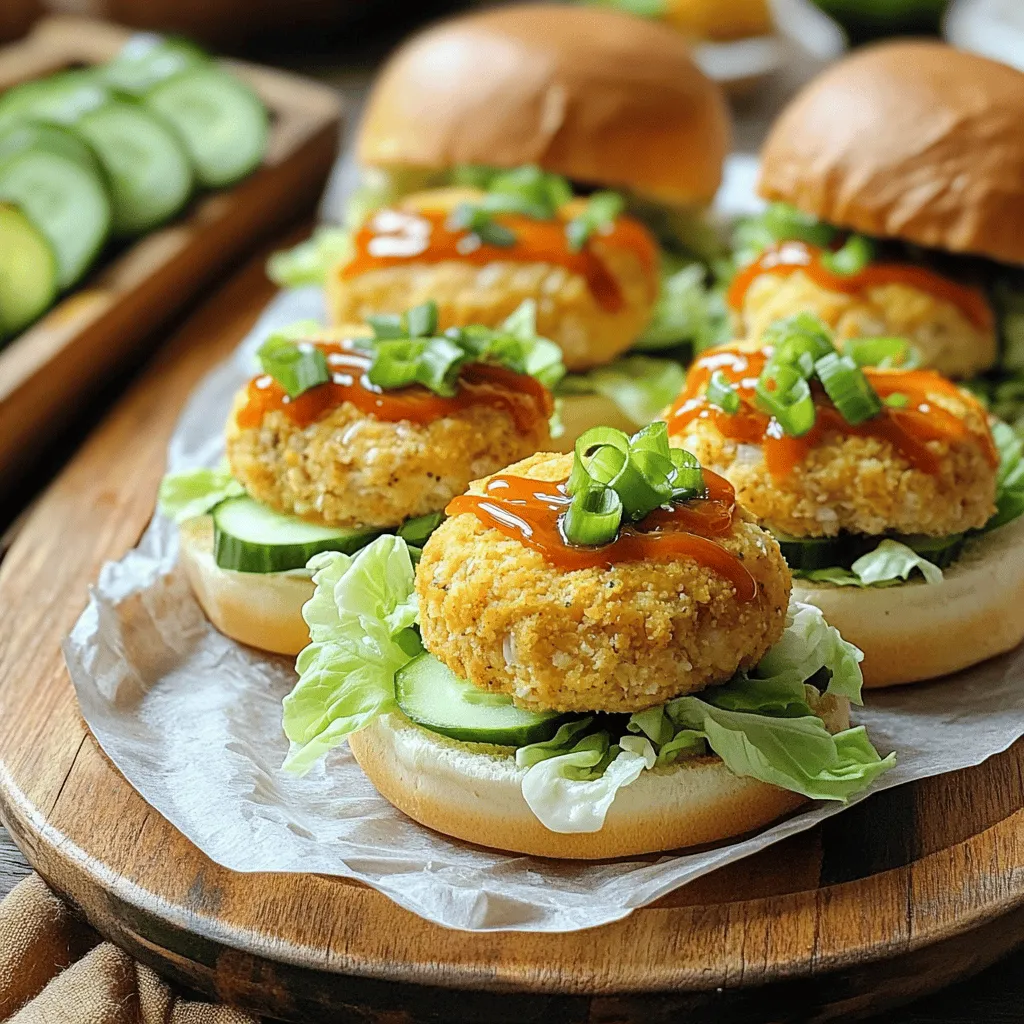
Bang Bang Chicken Sliders Tasty and Simple Treat

Are you ready to make a dinner that delights? Bang Bang Chicken Sliders are a tasty and simple treat everyone

To make this tasty meal, you will need: - 4 boneless, skinless chicken thighs - 1 cup long-grain rice, rinsed - 4 cups low-sodium chicken broth - 1 cup frozen mixed vegetables (carrots, peas, corn) - 1 onion, finely chopped - 3 cloves garlic, minced - 1 teaspoon dried thyme - 1 teaspoon paprika - Salt and pepper to taste - 2 tablespoons olive oil - Fresh parsley, chopped (for garnish) Using fresh and good-quality ingredients makes this dish better. I always choose organic chicken when I can. It tastes richer and is healthier. Rinsing the rice removes excess starch, giving a fluffier texture. Low-sodium broth adds flavor without too much salt. Frozen veggies are convenient and keep their nutrients, making them a great choice. You can change some ingredients based on what you have. Here are a few ideas: - Chicken: Use chicken breast instead of thighs for a leaner option. - Rice: Brown rice works well but may need longer cooking time. - Vegetables: Use fresh veggies like bell peppers or zucchini if you prefer. - Herbs: If you don’t have thyme, try oregano or rosemary for a different flavor. - Broth: Vegetable broth is a good choice for a vegetarian version. Feel free to mix and match to suit your taste! For the full recipe, check out the detailed steps. First, gather all your ingredients. Here’s what you need: - 4 boneless, skinless chicken thighs - 1 cup long-grain rice, rinsed - 4 cups low-sodium chicken broth - 1 cup frozen mixed vegetables (carrots, peas, corn) - 1 onion, finely chopped - 3 cloves garlic, minced - 1 teaspoon dried thyme - 1 teaspoon paprika - Salt and pepper to taste - 2 tablespoons olive oil - Fresh parsley, chopped (for garnish) Next, chop your onion and mince the garlic. Rinse the rice under cold water until the water runs clear. This step helps remove excess starch. Keep everything nearby for easy access. Start by heating the olive oil in a skillet over medium heat. Add the chopped onion and minced garlic. Sauté for about 3-4 minutes until they soften and smell great. Now, season the chicken thighs with salt, pepper, thyme, and paprika. Place them in the skillet and sear them for 2-3 minutes on each side. This step is optional, but it builds flavor. In your crockpot, combine the rinsed rice, frozen mixed vegetables, and chicken broth. Stir well to mix everything. Now, place the seared chicken thighs on top of this rice mixture. Cover the crockpot and set it to low for 6-7 hours or high for 4-5 hours. When cooking time is up, the chicken will be tender. Remove it from the pot and shred it using two forks. Add the shredded chicken back into the pot. Stir everything to combine well. Taste your dish and adjust the seasoning with more salt and pepper if needed. Most crockpots cook at different speeds. If you have a newer model, it may cook faster, so check your dish earlier. If you use a slow cooker, it may take longer. Always ensure the chicken is fully cooked. Using a meat thermometer can help. The chicken should reach 165°F (75°C). This step ensures both safety and taste. Enjoy this comforting meal with family or friends! To get the best flavor in your Crock Pot chicken and rice, start with good ingredients. Use fresh garlic and onions. Searing the chicken adds a nice touch, but it's not a must. Cook the rice with low-sodium broth for depth. Adding dried herbs, like thyme, enhances the taste. If you love spice, try adding a pinch of cayenne. This brings warmth without too much heat. Many people skip rinsing the rice before cooking. Rinsing removes extra starch, making the dish less sticky. Another mistake is not adjusting the seasoning. Always taste your dish before serving and add more salt or pepper if needed. Lastly, avoid opening the lid too often. Each time you peek, heat escapes, and cooking time increases. Garnishing can make your meal look beautiful. Fresh parsley adds a pop of color and flavor. You can also add lemon zest for a fresh twist. Serve the dish warm in bowls. Pair it with a green salad or crusty bread for a full meal. If you want to add some crunch, serve with toasted nuts on top. For the full recipe, check out the details above. {{image_2}} You can boost your meal by adding extra protein. Try sausage or shrimp for fun twists. For sausage, use sliced smoked or Italian sausage. Simply add it to the crockpot with the chicken. If you prefer shrimp, add it during the last 30 minutes of cooking. This helps keep the shrimp tender and juicy. To make this dish vegetarian or vegan, swap chicken for chickpeas or tofu. Use vegetable broth instead of chicken broth for flavor. You can also add more vegetables. Bell peppers, zucchini, or mushrooms work great. Just toss in your favorites during cooking to create a hearty meal. Don’t hesitate to experiment with herbs and spices for more flavor. For a fresh twist, add basil, oregano, or rosemary. If you love heat, try red pepper flakes or cayenne pepper. You can also mix in a splash of soy sauce or lemon juice for brightness. Each change brings a new taste to the dish, making it fun to explore different flavors. For the full recipe, check out Crock Pot Comfort Chicken & Rice. To store leftovers, let the dish cool first. Then, place it in an airtight container. I like to divide it into smaller portions. This way, I can grab a quick meal later. Store the container in the fridge. It will last for about 3 to 4 days. If you want to freeze it, use freezer-safe containers. Make sure to leave some space at the top. The dish will expand as it freezes. It’s best to freeze it within two hours of cooking. You can keep it in the freezer for up to three months. To reheat, you can use the microwave or stovetop. If using the microwave, heat in short bursts. Stir between each burst to warm evenly. If using the stovetop, add a splash of chicken broth. This helps avoid dryness. Heat over medium-low until warm. Enjoy your meal again! For the full recipe, check the earlier section. Yes, you can use brown rice in this recipe. Brown rice takes longer to cook than white rice. If you choose brown rice, add about 30 extra minutes to the cooking time. This change makes the dish heartier and adds fiber. To check if the chicken is fully cooked, use a meat thermometer. The chicken should reach an internal temperature of 165°F (75°C). If you don’t have a thermometer, check that the meat is no longer pink inside. It should be tender and easy to shred. You can serve this dish with a side salad or steamed green beans. A warm piece of crusty bread also pairs well. If you want something lighter, try a fresh cucumber salad. Each option adds balance to the meal and enhances the flavors. This blog post shared all you need for Crock Pot Chicken and Rice. We covered ingredients, cooking steps, and tips for the best meal. Remember, ingredient quality matters, and small flavor changes can boost your dish. Don't forget to avoid common mistakes to get it just right. You can store leftovers easily, too. Embrace your creativity with variations and try new things! This dish is simple, tasty, and perfect for any meal. Enjoy making it your own.

Crock Pot Chicken and Rice Simple Comfort Meal

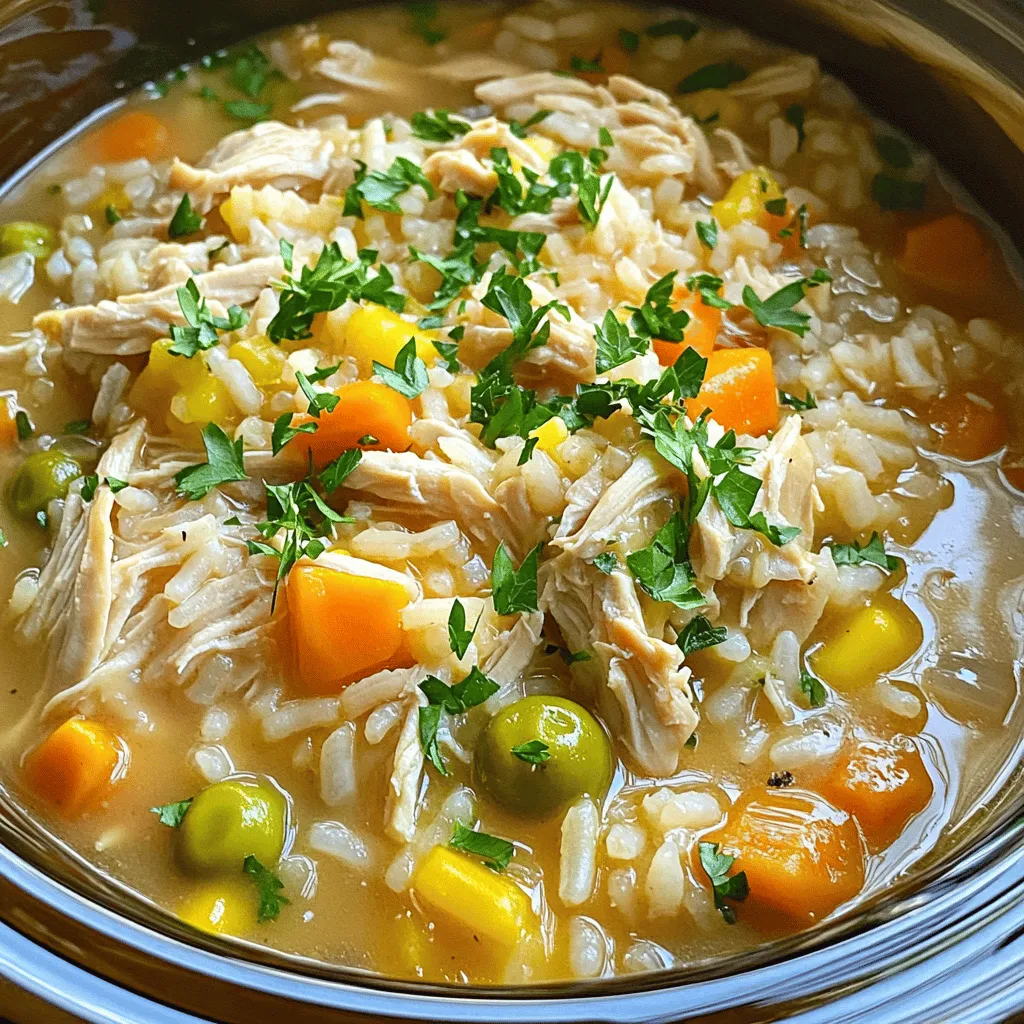
Looking for a meal that’s easy, tasty, and comforting? Crock Pot Chicken and Rice is the answer. With just a

- 1 pound ground beef - 1 cup breadcrumbs - 1/2 cup grated Parmesan cheese - 1/4 cup fresh parsley, chopped - 1 egg, lightly beaten - 1/2 cup sweet chili sauce - 1/4 cup soy sauce (or tamari for gluten-free) - 2 tablespoons honey - 1 tablespoon apple cider vinegar - 1 teaspoon sriracha (optional for added heat) - Ground turkey for a lighter option - Gluten-free breadcrumbs for dietary restrictions When making Sweet Chili Crockpot Meatballs, you need the right ingredients. First, let's look at the main ingredients. Ground beef forms the base of the meatballs. It gives them great taste and texture. Breadcrumbs help hold the meatballs together. They also add a nice bite. Parmesan cheese brings a salty flavor that pairs well with sweet sauce. Fresh parsley adds color and a hint of freshness. The egg helps bind everything, making the meatballs stay firm. Next, we have the sauce ingredients. Sweet chili sauce gives the meatballs their sweet and spicy kick. Soy sauce adds umami and depth. Honey enhances sweetness while apple cider vinegar adds a tangy note. If you like heat, sriracha is an excellent option. It makes the dish even more exciting. You may want to make some changes. If you prefer a lighter meatball, swap ground beef for ground turkey. You can also use gluten-free breadcrumbs if needed. This combination of ingredients makes for a fantastic dish. For the full recipe, check out the recipe section. In a large bowl, combine all meatball ingredients. You will need: - 1 pound ground beef - 1 cup breadcrumbs - 1/2 cup grated Parmesan cheese - 1/4 cup fresh parsley, chopped - 1 egg, lightly beaten - 1 teaspoon garlic powder - Salt and pepper to taste Mix these items until just combined. This step helps keep the meatballs tender. If you mix too much, they can become tough. Next, shape the mixture into small meatballs, about 1 inch wide. This size cooks evenly and stays juicy. While you shape them, preheat your crockpot on low. After shaping, place the meatballs on a baking sheet. This makes it easy to transfer them to the pot later. In a separate bowl, whisk together the sauce ingredients until well combined. You need: - 1/2 cup sweet chili sauce - 1/4 cup soy sauce (or tamari for gluten-free) - 2 tablespoons honey - 1 tablespoon apple cider vinegar - 1 teaspoon sriracha (optional for added heat) Once mixed, gently pour the sauce over the meatballs in the crockpot. Make sure all the meatballs are well coated. This sauce gives them a sweet and tangy flavor. For the full recipe, refer to the instructions above! To get the best meatballs, I have some key tips. First, use cold ingredients. This helps keep the meatballs firm and juicy. If you use warm ingredients, they may turn out dense. Second, don’t overmix the meat. Just mix until combined. This keeps your meatballs tender and light. Adjusting the cooking time can make a big difference. If your meatballs are larger, cook them longer. For smaller meatballs, reduce the time. Always keep the lid on while cooking. This helps trap heat and moisture, ensuring even cooking and flavor. Garnish your meatballs with fresh parsley right before serving. This adds color and a fresh taste. For easy eating, serve them with toothpicks. You can also serve the meatballs over rice. This makes a full meal and soaks up the tasty sauce. For the full recipe, check out the details above. {{image_2}} You can switch up the sauce for fun flavors. Try using teriyaki or barbecue sauce instead of sweet chili sauce. This change adds a new taste. For a more complex flavor, add ginger or garlic. These ingredients will make your dish more vibrant and tasty. Feel free to play with the meat you use. You can use ground chicken or pork instead of beef. This change can make the dish lighter. You can also add finely chopped vegetables, like onions or bell peppers. This adds nutrition and flavor to each meatball. If you need a gluten-free option, use gluten-free breadcrumbs and sauces. This keeps the dish safe for those with gluten issues. For a low-carb meal, swap breadcrumbs with almond flour. This keeps the meatballs tasty while reducing carbs. For more ideas and tips, check the Full Recipe for Sweet Chili Crockpot Meatballs! Store your cooked meatballs in an airtight container. They last up to 3 days in the fridge. This keeps them fresh and ready for your next meal. You can freeze the cooked meatballs in sauce. They stay good for up to 3 months. To use them, thaw overnight in the fridge. This makes reheating easy and keeps them tasty. For the best results, reheat the meatballs in the crockpot on low. This method warms them gently and keeps them moist. If you use a microwave, do it in short intervals. Cover the dish to keep the moisture in. This way, your meatballs stay juicy and delicious. You can cook these meatballs on low for 4 hours or high for 2 hours. Both methods yield tasty results. Using low heat helps the flavors meld together, while high heat speeds up the process. I prefer low heat for that rich flavor. Yes, you can prepare and freeze the meatballs for later use. Just shape them and place them in a freezer-safe bag. When you are ready to cook, thaw them overnight in the fridge. This method saves time and keeps dinner easy. You can pair these meatballs with rice, pasta, or serve them as an appetizer during parties. They also taste great in sub sandwiches or on toothpicks for easy snacking. The sweet and spicy sauce adds a nice kick to any dish. For the full recipe, check the earlier section. You now know how to make delicious Sweet Chili Crockpot Meatballs. Start with ground beef, breadcrumbs, and spices to create tasty meatballs. Mix and shape them, then cook in a slow cooker with a sweet sauce. Feel free to swap ingredients for fun flavors or dietary needs. These meatballs are easy to store and reheat, making them great for meals or parties. Enjoy making this simple dish that everyone will love!

Sweet Chili Crockpot Meatballs Simple and Tasty Dish

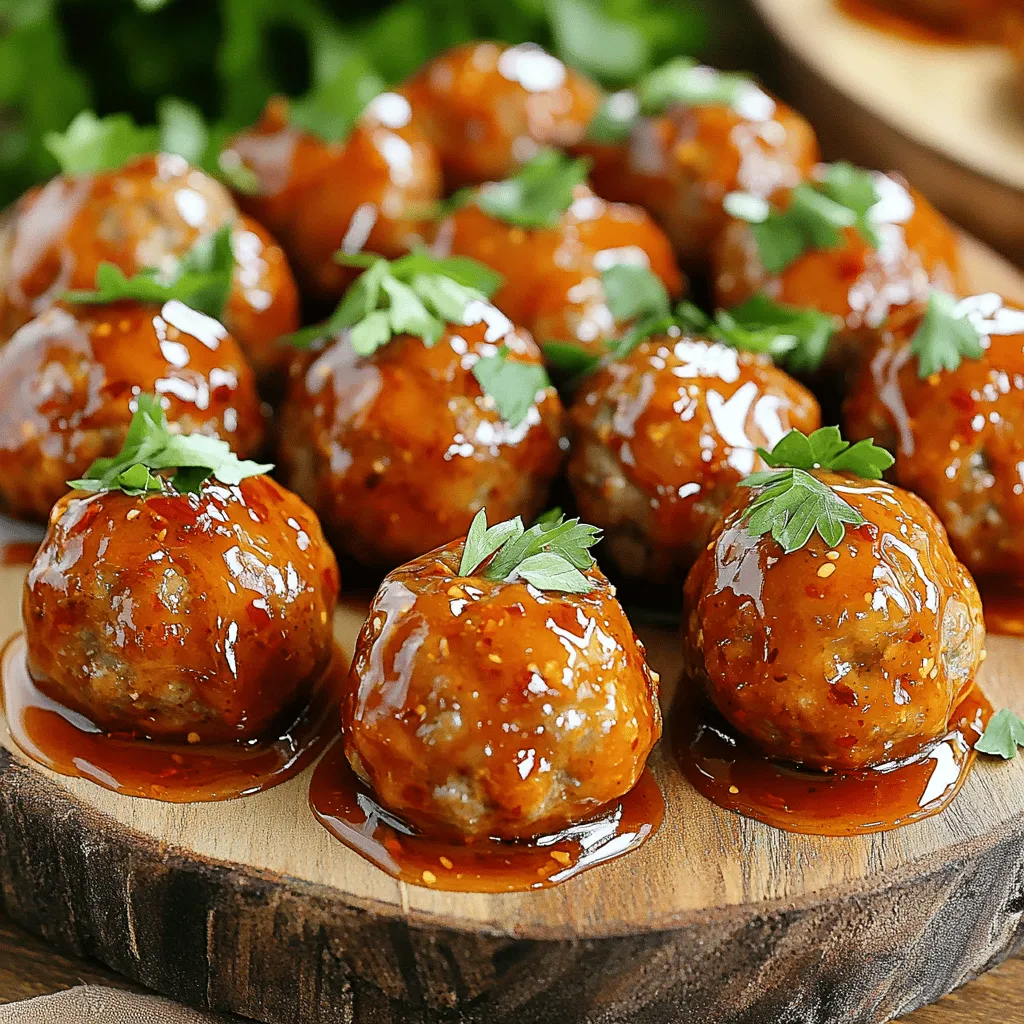
Looking for a simple yet delicious dish to impress friends and family? Try these Sweet Chili Crockpot Meatballs! Packed with

To make these tasty Crockpot Parmesan potatoes, you will need: - 2 pounds baby potatoes, halved - 1 cup grated Parmesan cheese - 1/2 cup unsalted butter, melted - 1 teaspoon garlic powder - 1 teaspoon onion powder - 1 teaspoon Italian seasoning - Salt and pepper to taste - Fresh parsley, chopped, for garnish These main ingredients create a rich, cheesy flavor that pairs well with the soft potatoes. You can add a few optional ingredients to enhance the taste: - Crushed red pepper flakes for heat - Fresh herbs like thyme or rosemary - Sour cream or cream cheese for creaminess Feel free to get creative. These options can add a unique twist to your dish. Using quality ingredients makes a big difference. Here are some tips: - Choose fresh baby potatoes. They should be firm and smooth. - Go for a good brand of Parmesan cheese. Freshly grated cheese melts better. - Use unsalted butter to control the saltiness. This helps balance flavors. With these tips, your Crockpot Parmesan potatoes will shine. For the full recipe, check the details above. To start, wash the baby potatoes and dry them well. Next, cut each potato in half. This helps them cook evenly. In a large bowl, mix the melted butter, grated Parmesan cheese, garlic powder, onion powder, Italian seasoning, salt, and pepper. Stir until everything blends together smoothly. Then, add the halved potatoes to the bowl. Toss them gently in the cheese mixture. Make sure each potato gets a nice coating. Now, transfer the coated potatoes into the crockpot. Spread them out evenly inside. This helps them cook well. Cover the crockpot with its lid. Cook on low for 4-5 hours or on high for 2-3 hours. You want them to be fork-tender when done. After the cooking time, give the potatoes a gentle stir. This ensures they are coated in the buttery Parmesan sauce. Before serving, sprinkle freshly chopped parsley on top. This adds a pop of color and freshness. Serve the potatoes hot, straight from the crockpot. For a delightful touch, add more Parmesan and parsley on top. Everyone will love this easy comfort food delight! You can find the full recipe in the article for more detailed steps. When making Crockpot Parmesan Potatoes, avoid these common mistakes. First, do not skip washing the potatoes. Dirt can ruin the taste. Next, make sure to cut the potatoes in half evenly. This helps them cook at the same rate. Lastly, be careful with the seasoning. Too much salt can overpower the dish. To get perfectly cooked potatoes, keep a few tips in mind. Use small, evenly-sized baby potatoes. They cook faster and taste better. Set your crockpot to low for a longer cook time. This makes the potatoes tender and flavorful. If you’re in a hurry, cook on high, but check them often. Stir the potatoes halfway through cooking for even flavor. For this recipe, you need some basic tools. A good-quality crockpot is key. Look for one with adjustable heat settings. A large bowl helps mix all the ingredients well. Use a cutting board and a sharp knife for cutting the potatoes. Finally, have a serving spoon ready to dish out those delicious potatoes. For the full recipe, check out the detailed instructions! {{image_2}} You can easily change the flavor of your Crockpot Parmesan Potatoes. Try adding fresh herbs like rosemary or thyme for a nice twist. You can also swap Parmesan for cheddar or gouda. Mixing different cheeses adds depth to the dish. If you enjoy a bit of heat, consider adding some red pepper flakes. For a zesty touch, a squeeze of lemon juice will brighten the flavors. Get creative with your spice cabinet! You can make these potatoes gluten-free with no effort. All the ingredients are naturally gluten-free. If you want a vegan version, substitute the butter with olive oil and use vegan cheese. Coconut cream can also replace butter for a rich, creamy texture. These swaps ensure everyone can enjoy this dish, no matter their diet! Crockpot Parmesan Potatoes pair well with many meals. Serve them alongside grilled chicken or steak for a hearty dinner. They also shine next to roasted vegetables or a fresh salad. You can even enjoy them as a main dish with a dollop of sour cream or Greek yogurt on top. These potatoes are perfect for potlucks or family gatherings. Everyone will love this easy comfort food delight! For the full recipe, check out the instructions above! To store your leftover Crockpot Parmesan Potatoes, let them cool down first. Place the potatoes in an airtight container. Make sure to seal it tightly to keep the moisture in. You can store them in the fridge for up to three days. This keeps them fresh and ready for your next meal. When you’re ready to enjoy your leftovers, you have a few good options. You can reheat them in the microwave for quick meals. Just place them in a bowl and cover it with a lid. Heat in 30-second bursts, stirring in between, until hot. If you want a crispy texture, try using an oven. Spread the potatoes on a baking sheet and heat at 350°F for about 15 minutes. If you want to keep your Crockpot Parmesan Potatoes longer, freezing is a great option. Cool the potatoes completely before freezing. Use a freezer-safe container or freezer bag. Try to remove as much air as possible to prevent freezer burn. Label the bag with the date. You can freeze them for up to three months. When ready to eat, thaw them overnight in the fridge before reheating. Enjoy your tasty comfort food whenever you want! For the full recipe, check the details above. Yes, you can use other potatoes. Yukon Gold or red potatoes work well. They have a nice creaminess. I suggest cutting them into similar sizes. This helps them cook evenly. You can even try sweet potatoes for a twist! Leftovers last about three to four days in the fridge. Make sure to store them in an airtight container. This keeps them fresh and tasty. If you want to eat them later, check for any off smells. If they smell fine, they should be good to enjoy! Crockpot Parmesan Potatoes pair well with many dishes. Serve them with grilled chicken or fish. They also go great with a fresh salad. You can even enjoy them with steak for a hearty meal. Don't forget to add some veggies on the side for color and nutrition! You can find the full recipe for Crockpot Parmesan Potatoes at the top of the article. It includes all the ingredients and steps. This way, you can easily follow along and make your own batch of this comfort food delight! Crockpot Parmesan potatoes are simple and delicious. We covered essential ingredients and step-by-step cooking. You learned tips to avoid mistakes and how to get perfect results. We also explore fun variations and how to store your leftovers. With these details, you can enjoy making this dish anytime. Now, gather your ingredients and let the crockpot do the work. Happy cooking!

Crockpot Parmesan Potatoes Easy Comfort Food Delight

If you’re looking for an easy, tasty dish to enjoy, Crockpot Parmesan Potatoes are perfect! This creamy, cheesy delight cooks

- 1 lb flank steak - 1/4 cup soy sauce - 2 tablespoons sesame oil - 2 tablespoons honey - 3 cloves garlic, minced - 1 inch piece ginger, grated - 2 green onions, chopped - 2 cups cooked jasmine rice - 1 cup cooked edamame (shelled) - 1 cup shredded carrots - 1 cucumber, thinly sliced - 1 avocado, sliced - Sriracha or gochujang (optional, for heat) When I make Korean BBQ steak bowls, I focus on fresh and vibrant ingredients. Each item plays a key role in the dish. The flank steak is rich and juicy, perfect for grilling. The soy sauce adds saltiness, while sesame oil gives a nutty flavor. Honey adds a touch of sweetness, balancing the taste. Garlic and ginger bring warmth and depth to the marinade. Green onions add freshness and a mild bite, which brightens each bite. Jasmine rice serves as a fluffy base that soaks up all the tasty juices. Edamame adds protein and a nice pop of color. Shredded carrots and cucumber bring crunch and freshness. Lastly, avocado adds creaminess, making the bowl rich and satisfying. I often sprinkle sesame seeds on top for extra crunch. If you love heat, drizzle on some sriracha or gochujang. This mix of flavors makes Korean BBQ steak bowls a fun and exciting meal. For a full recipe, check out the details above! To start, mix together the soy sauce, sesame oil, honey, minced garlic, grated ginger, and chopped green onions in a bowl. This combination gives the steak a rich flavor. You want to coat the steak well, so it soaks up all the good stuff. The marinating time is key. Letting the steak sit in the marinade for at least 30 minutes helps the flavors sink in. For even better taste, try to marinate for up to 4 hours. This longer time really makes a difference. Next, preheat your grill or grill pan to medium-high heat. This step ensures that the steak cooks evenly. Remove the steak from the marinade and let any extra marinade drip off. Discard the marinade to keep things safe. Now, grill the steak for about 5-7 minutes on each side. Check for doneness by using a meat thermometer. You want it to reach 135°F for medium-rare. Once done, let it rest for 5 minutes before slicing. This resting time keeps the juices locked in. Now, it’s time to put everything together. Start with a base layer of cooked jasmine rice in each bowl. This soft rice will soak up all the great flavors. Then, layer the sliced steak on top. Add in cooked edamame, shredded carrots, thinly sliced cucumber, and avocado. Finish it off by sprinkling sesame seeds over each bowl. If you like a little heat, drizzle some Sriracha or gochujang on top. Your Korean BBQ steak bowls are now ready to enjoy! For the full recipe, check out the details above. For your marinade, you might want to swap soy sauce with tamari or coconut aminos. These options are great for those who need gluten-free choices. If you don’t have honey, try using maple syrup or brown sugar. They will add a nice sweetness, too. To make the flavors pop, add spices like black pepper, chili flakes, or sesame seeds. Garlic powder or onion powder also boosts the taste. Mix these spices into your marinade for a tasty kick. When grilling, I recommend using a gas or charcoal grill. Both types bring out great flavor. Make sure your grill is hot before adding the steak. This helps create those perfect grill marks that everyone loves. Control the heat by adjusting the grill to medium-high. This way, you get a nice sear without burning the meat. If the flames flare up, move the steak to a cooler part of the grill for even cooking. Serving your Korean BBQ steak bowls is where you can get creative! Use colorful bowls to make your meal eye-catching. Start with a layer of jasmine rice, then add the sliced steak and veggies on top. For garnish, sprinkle sesame seeds and chopped green onions over the bowls. You can also add a slice of avocado and a few edamame for bright color. This not only makes the bowls look great but also adds fresh taste. Check out the Full Recipe for more details on assembling your meal! {{image_2}} You can switch up your protein in Korean BBQ steak bowls. If you want something other than flank steak, try chicken, tofu, or pork. Each option brings its unique taste. Just remember, the cooking time might change. For chicken, marinate for about 30 minutes and grill until cooked through. For tofu, press it to remove water. Then, marinate and grill for a nice char. For pork, a shoulder or tenderloin works well. Adjust the marination time to suit these proteins. If you prefer plant-based meals, you have great choices. Substituting meat with ingredients like tempeh or chickpeas can be delicious. Tempeh has a nutty flavor and absorbs marinades well. Just slice it, marinate, and grill it like steak. Chickpeas add protein and a nice texture. You can roast them with spices for extra crunch. These swaps keep the meal tasty and satisfying. Feel free to get creative with sauces. If you want a twist, try teriyaki or peanut sauce. These sauces can change the entire flavor. Just drizzle them over the steak or veggies for a new taste. Also, don’t forget to add seasonal vegetables. Fresh bell peppers, zucchini, or asparagus can brighten your bowl. Mix and match to find your favorite combinations. To keep your Korean BBQ Steak Bowls fresh, store leftovers in an airtight container. Place them in the refrigerator. They will stay good for up to three days. Make sure the rice and steak cool down before sealing the container. This helps avoid sogginess and keeps flavors intact. You can freeze assembled bowls for up to three months. To do this, layer the ingredients in freezer-safe containers. Leave out fresh toppings like avocado and cucumber. They do not freeze well. When ready to eat, let the bowls thaw overnight in the fridge. For reheating, you have two main options: the microwave or the stovetop. If you use the microwave, heat in short bursts. Stir between each burst to avoid hot spots. For stovetop reheating, place the bowl over low heat. Add a splash of water to keep it moist. Heat until everything is warm without losing texture. Enjoy your meal just like the first time! You can add heat in a few ways. First, use more Sriracha or gochujang in your bowls. Both sauces bring flavor and spice. Second, add chopped fresh chili peppers or red pepper flakes to the marinade. This method will add heat to the steak. Lastly, try using spicy sesame oil if you want an extra kick. Yes, you can easily prep this dish ahead. Marinate the steak the night before and store it in the fridge. This lets the flavors soak in well. You can also cook the rice and veggies ahead of time. Just keep them in separate containers in the fridge. Assemble the bowls when you are ready to eat. This makes it quick for busy days. You can find these ingredients at Asian grocery stores near you. Look for stores that specialize in Korean food. They usually stock soy sauce, sesame oil, and gochujang. If you can't find a local store, check online retailers like Amazon or specialty food sites. They often have a good selection of Korean BBQ products. If you want a change from jasmine rice, try using brown rice for more fiber. Quinoa is a great option too, as it adds protein. For a fun twist, use rice noodles or even cauliflower rice for a low-carb choice. Each option brings its own unique flavor and texture to your bowl. In this blog post, we explored the tasty world of Korean BBQ steak bowls. We covered the key ingredients, from flank steak to fresh veggies. I shared step-by-step instructions for marinating and grilling. You learned tips to enhance flavor and presentation. We also discussed variations with different proteins and storage tips. These bowls are not just delicious; they’re also fun and easy to make. Enjoy experimenting with your ingredients and enjoy every bite!

Korean BBQ Steak Bowls Flavorful and Fun Meal Idea

Looking for a fun and tasty meal idea? Try my Korean BBQ Steak Bowls! This dish is packed with flavors

To make tasty Bisquick sausage balls, you need simple ingredients. Here’s what you’ll need: - 1 pound breakfast sausage (spicy or mild, as preferred) - 2 cups Bisquick mix - 1 cup shredded sharp cheddar cheese - 1/2 cup grated Parmesan cheese - 1/4 cup milk - 1 tablespoon Dijon mustard - 1 teaspoon garlic powder - 1 teaspoon onion powder - 1/2 teaspoon black pepper - 1/2 teaspoon red pepper flakes (optional, for extra kick) - Fresh parsley, chopped (for garnish) These ingredients work together to create a rich and satisfying snack. The sausage gives it a savory base, while the cheese adds creaminess and flavor. If you want to spice things up, try adding extras. Here are some ideas: - 1/2 cup chopped green onions for a fresh taste - 1/4 teaspoon cayenne pepper for heat - A dash of Worcestershire sauce for depth These optional ingredients can take your sausage balls to the next level. You can mix and match to find your favorite flavor combo. The cheese you choose matters. Sharp cheddar gives a bold taste. Here are some other great options: - Pepper jack for a spicy kick - Mozzarella for a milder, gooey texture - Gouda for a rich, smoky flavor Try different cheeses to find what you love. Mixing cheeses can also create a unique blend that enhances the dish further. For the full recipe, check out [Full Recipe]. Start by gathering all your ingredients. This makes cooking easier and more fun. Preheat your oven to 375°F (190°C). Line a baking sheet with parchment paper. This helps keep the sausage balls from sticking. In a large bowl, mix the breakfast sausage, Bisquick mix, and both cheeses. Use your hands or a spatula to combine everything well. In another bowl, whisk together the milk, Dijon mustard, garlic powder, onion powder, black pepper, and red pepper flakes if you want some heat. Pour this mixture over the sausage mix. Knead it gently until it forms a soft dough. Don’t overmix, as this can make the texture tough. Now, scoop out the dough with a tablespoon. Roll each portion into a 1-inch ball. Place the balls spaced apart on the baking sheet. This allows them to bake evenly. Bake for 20 to 25 minutes. You want them to turn golden brown. Check the internal temperature with a meat thermometer; it should reach 160°F (71°C). Once done, remove them from the oven and let them cool slightly. This helps the flavors settle. To get the best texture, don't overwork the dough. Mix until it's just combined. If you like a softer ball, add a bit more milk, but not too much! For a crispy outer layer, bake them a bit longer. You can also broil them for the last 2 minutes for extra crunch. Lastly, let them rest for a few minutes after baking. This lets the sausage balls firm up a little, making them easier to serve. For the full recipe, refer back to the ingredients section. Enjoy your tasty snack! When making Bisquick sausage balls, avoid overmixing the dough. This can lead to tough balls. Combine the ingredients just until they form a soft dough. Also, don’t skip the parchment paper. It helps prevent sticking and makes cleanup easy. Lastly, ensure your oven is preheated. This helps the sausage balls cook evenly. To boost flavor, choose quality sausage. Spicy sausage adds a nice kick, while mild sausage is great for kids. Use sharp cheddar cheese for a stronger taste. Adding fresh herbs like parsley can brighten up the dish. You can also experiment with spices. A pinch of cayenne or smoked paprika adds depth. Serve these sausage balls warm for the best taste. They pair well with a dip, like ranch or mustard. You can also serve them on a platter with toothpicks for easy snacking. They make a great appetizer for parties or game days. Be sure to check out the Full Recipe for more ways to enjoy them! {{image_2}} You can easily change the flavor of your sausage balls. For a spicy twist, use hot sausage. Add red pepper flakes for more heat. If you like sweet, mix in a bit of honey or maple syrup. These flavors create a fun contrast with the savory sausage. If you need a gluten-free option, use a gluten-free Bisquick mix. The taste remains yummy and satisfying. You can also check labels for sausage that is gluten-free. This way, everyone can enjoy these tasty snacks without worry. Get creative by adding veggies to your sausage balls. Finely chopped onions or bell peppers add a nice crunch. You can even mix in spinach for a health boost. Just remember to keep the veggie pieces small. This helps the balls cook evenly and stay tasty. For a cheesy extra, try adding different cheese varieties. Consider pepper jack for heat or mozzarella for a mild flavor. You can find the full recipe [here]. To store leftover sausage balls, let them cool down first. Place them in an airtight container. You can keep them in the fridge for up to three days. If you want to keep them longer, freezing is a great option. Just make sure to seal them well to avoid freezer burn. When reheating sausage balls, the oven works best. Preheat your oven to 350°F (175°C). Place the sausage balls on a baking sheet and heat for about 10-15 minutes. This method keeps them crispy. You can also use a microwave for quick reheating. Just heat them for 30 seconds to 1 minute, but they may lose some crispness. To freeze sausage balls, first, let them cool completely. Then, place them in a single layer on a baking sheet. Freeze them for about an hour. Once frozen, transfer them to a freezer bag or container. They can last up to three months in the freezer. When you’re ready to eat, you can bake them straight from the freezer. Just add a few extra minutes to the baking time. This way, you’ll have delicious snacks ready whenever you want! I recommend using breakfast sausage for the best flavor. You can choose spicy or mild based on your taste. Spicy sausage adds a nice kick, while mild sausage offers a more neutral flavor. You can even mix both types for a balanced taste. Yes, you can make these sausage balls ahead of time. You can prepare the dough and store it in the fridge for up to 24 hours. If you want to make them even earlier, you can freeze the uncooked balls. Just remember to thaw them before baking. This makes snacking easy when you need something quick. Check the color and texture. The sausage balls should be golden brown on the outside. You can also use a meat thermometer. The internal temperature should reach 160°F (71°C). This ensures they are safe to eat and fully cooked. Enjoy your tasty treats right out of the oven! In this post, we explored the easy recipe for Bisquick sausage balls. We covered key ingredients, step-by-step baking instructions, and tips for best results. You learned about tasty variations and how to store any leftovers properly. Keep these tips in mind to make your next batch a hit. Bisquick sausage balls are versatile and fun to customize. Enjoy these bites at your next gathering or snack time! Embrace your creativity and try new flavors. Happy cooking!

Bisquick Sausage Balls Easy Recipe for Snacking

Looking for a quick and tasty snack? Let me share my easy Bisquick Sausage Balls recipe! They’re perfect for parties,

- 2 large carrots, julienned - 1 medium cucumber, thinly sliced - 1 red bell pepper, thinly sliced - 1/4 cup red onion, thinly sliced - 1/4 cup fresh cilantro, chopped - 3 tablespoons rice vinegar - 2 tablespoons sesame oil - 1 tablespoon honey or maple syrup - 1 teaspoon grated fresh ginger - Salt and pepper to taste - Toasted sesame seeds In this fresh and flavorful carrot cucumber salad, you will need simple, bright ingredients. Fresh vegetables keep the dish light and vibrant. Start with the carrots; julienne them to create thin, matchstick pieces. This way, they mix well with other veggies. Then, take a medium cucumber, slice it thinly, and cut those slices into half-moons. This adds a fun shape and crunch to your salad. Next, slice a red bell pepper into thin strips. Its sweetness pairs perfectly with the other flavors. Add a quarter cup of red onion, sliced thin, for a bit of bite. The last fresh item is cilantro. Chop up a quarter cup to bring in a fresh, herbal note. Now for the dressing, which ties everything together. Grab three tablespoons of rice vinegar. It adds a tangy flavor that brightens your salad. Next, add two tablespoons of sesame oil for a nutty, rich taste. For sweetness, toss in a tablespoon of honey or maple syrup. A teaspoon of grated fresh ginger gives it a spicy kick. Finally, season with salt and pepper to taste. To finish, sprinkle toasted sesame seeds on top. These seeds add a lovely crunch. This salad is refreshing and perfect for warm days. For the complete recipe, check out the Full Recipe section. To start, peel the carrots. Then, julienne them into thin strips. Next, grab your cucumber. Slice it into thin rounds and cut those slices in half to create half-moons. Now, take the red bell pepper and slice it thinly. Lastly, thinly slice the red onion. These fresh veggies will give your salad a great crunch and flavor. In a large mixing bowl, combine the julienned carrots, cucumber, bell pepper, red onion, and chopped cilantro. The colors will look vibrant and inviting! Now, let's make the dressing. In a small bowl, whisk together the rice vinegar, sesame oil, honey or maple syrup, and grated ginger. Mix until everything is well combined. This dressing adds a sweet and tangy taste to the salad. Pour the dressing over the salad mix. Gently toss the salad to coat all the vegetables evenly. Be careful not to crush them; you want to keep that crunch! Taste the salad and season it with salt and pepper to your liking. Let it sit for about 10 minutes. This resting time helps the flavors meld together and makes the salad even tastier. Just before serving, sprinkle toasted sesame seeds on top for an extra crunch. Enjoy your fresh and flavorful carrot cucumber salad! For the full recipe, check out the details provided above. To make your carrot cucumber salad really shine, let it rest for a bit. This helps the flavors mix well. I suggest waiting about 10 minutes before serving. You can also tweak the dressing to fit your taste. If you like it sweeter, add more honey or syrup. If you prefer it tangy, increase the rice vinegar. How you present your salad matters. Use colorful bowls to make your dish pop. Clear bowls show off the bright colors of the carrots and cucumbers. You can also layer the salad in jars for a fun look. It’s a great way to serve at parties or picnics. Having the right tools makes prep easier and faster. A good knife is key for cutting. But if you want to save time, a mandoline is your best friend. It slices veggies evenly and quickly. This tool helps you get perfect, thin slices of cucumber and carrots. {{image_2}} You can make this salad heartier by adding protein. Grilled chicken works well, offering great flavor and texture. If you prefer a vegetarian option, try adding tofu. Simply cube the tofu and sauté it until golden brown. This adds a nice crunch and extra protein to your meal. While the original dressing is tasty, you can switch it up. Try tahini for a rich, nutty flavor. Yogurt also makes for a creamy dressing that pairs well with the crunch of the salad. Consider adding garlic or lemon juice for a refreshing twist. Mixing different flavors can enhance your salad experience. Seasonal changes can inspire new flavors. In summer, add fresh corn or cherry tomatoes for sweetness. In fall, try adding apples or pears for a juicy crunch. You can also swap in other crunchy vegetables like radishes or bell peppers. This keeps the salad fresh and exciting all year long. To keep your carrot cucumber salad fresh, store it in an airtight container. Glass or plastic containers work well. Make sure to remove as much air as possible before sealing the lid. This helps keep the salad crisp and tasty. If you can, store the dressing separately. Add it just before you eat to maintain the crunchiness of the veggies. You can keep the salad in the fridge for about 2 to 3 days. After that, the veggies may lose their crunch and flavor. Signs of spoilage include a mushy texture, off smell, or discoloration. If you notice these signs, it’s best to toss the salad. Freezing is not the best choice for this salad. If you want to freeze components, do it separately. You can freeze grated carrots but avoid freezing cucumbers. Cucumbers hold a lot of water and become mushy when thawed. Instead, prepare fresh cucumbers when you're ready to enjoy your salad again. Yes, you can make this salad ahead of time. Here are some tips: - Prep veggies early: Cut the carrots and cucumber a few hours before serving. - Store separately: Keep the dressing in a jar until you are ready to mix. - Chill for freshness: Refrigerate the salad and dressing for the best taste. - Mix before serving: Combine everything just before you eat for maximum crunch. Carrots and cucumbers pack a nutritious punch. Here are some highlights: - Carrots: High in vitamin A, great for vision and skin. They also have fiber, which helps digestion. - Cucumbers: Low in calories and high in water, keeping you hydrated. They provide vitamin K, important for bone health. - Combined benefits: Together, they give you a refreshing, crunchy snack that supports a healthy diet. Absolutely! This salad is very flexible. Here are some ideas: - Add protein: Toss in grilled chicken or chickpeas for a hearty meal. - Mix in herbs: Try mint or parsley for different flavors. - Change the dressing: Use yogurt, tahini, or a zesty lime dressing for a twist. - Seasonal veggies: Swap in bell peppers or radishes based on what’s fresh. Remember, you can find the full recipe to guide you through these variations. This salad combines fresh veggies, a tasty dressing, and easy steps. You learned how to prepare the ingredients, mix everything, and add proteins or different dressings. Remember, letting it sit boosts the flavor. Store leftovers well to keep them fresh. Feel free to change ingredients based on what's in season. With these tips, creating a vibrant salad is simple. Enjoy your healthy dish and make it your own!

Carrot Cucumber Salad Fresh and Flavorful Recipe

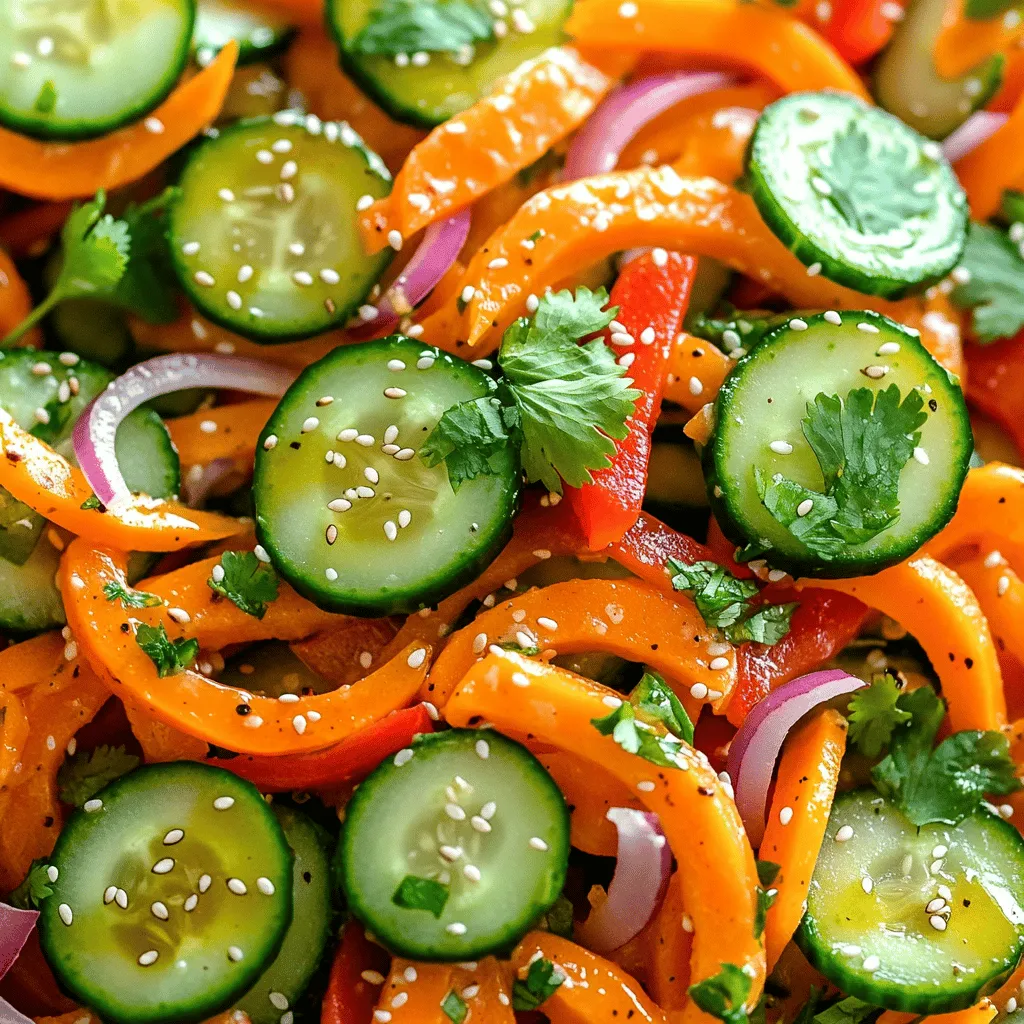
Looking for a fresh side dish that’s packed with flavor? You’ll love this Carrot Cucumber Salad! It’s easy to make

- Brown Butter: Use unsalted butter for this recipe. Unsalted butter allows you to control the salt level in your cookies. Browning the butter adds a rich, nutty flavor that elevates the cookies. It creates a deep taste that complements the chocolate. - Sugars: You need both brown sugar and granulated sugar. Brown sugar adds moisture and chewiness to the cookies. It also enhances the caramel notes from the brown butter. Granulated sugar helps the cookies spread and gives them a slight crispiness. - Additional Ingredients: - Eggs: Two large eggs keep the cookies moist and bind everything together. - Flour: Use 2 1/4 cups of all-purpose flour for the right texture. It helps form the cookie structure. - Baking Soda: One teaspoon of baking soda acts as a leavening agent. It helps the cookies rise and become fluffy. - Salt: Half a teaspoon of salt balances the sweetness and enhances the flavors. - Chocolate Chips: One cup of semi-sweet chocolate chips adds sweetness and richness. Fold them gently into the dough. - Optional Walnuts: If you like nuts, add half a cup of chopped walnuts. They provide a nice crunch and contrast to the soft cookie. Using high-quality ingredients makes a big difference. For the full recipe, check out the [Full Recipe]. To start, you need to brown the butter. In a saucepan, melt 1 cup of unsalted butter over medium heat. Watch closely as it melts. Stir often to keep it from burning. After about 5-7 minutes, the butter will turn a golden brown color. It will also give off a nutty smell. This smell is a sign that it is ready. Remove it from the heat and let it cool slightly before using it in your cookie mix. Next, we mix the sugars with the browned butter. In a large bowl, combine the browned butter with 1 cup of packed brown sugar and 1/2 cup of granulated sugar. Whisk the mixture until it becomes smooth and creamy. This step is key for a rich flavor and soft texture. The sugars dissolve better in the warm butter, making your cookies delightfully chewy. Now, let's add the dry ingredients. In another bowl, whisk together 2 1/4 cups of all-purpose flour, 1 teaspoon of baking soda, and 1/2 teaspoon of salt. Gradually add this flour mixture to the wet ingredients. Stir gently until everything just comes together. Avoid over-mixing, as this can make the cookies tough. The dough should be thick and slightly sticky. Chilling the dough is important. Cover the bowl with plastic wrap and place it in the fridge for at least 30 minutes. This helps the flavors blend and improves the texture. While the dough chills, preheat your oven to 350°F (175°C). Line two baking sheets with parchment paper. Once chilled, use a cookie scoop or tablespoon to drop dough onto the sheets. Leave about 2 inches between each cookie. Bake for 10-12 minutes. Watch for the edges to turn golden while the centers stay soft. Let the cookies cool slightly on the sheets before moving them to a wire rack to cool completely. For the full recipe, you can check the section above. Enjoy these delightful cookies! To know when cookies are perfectly baked, look for golden edges. The center should be set but soft. Gently press the cookie with your finger. If it springs back, it’s done! Remember, cookies continue to bake a bit after you take them out. Using high-quality chocolate is key. Choose semi-sweet or dark chocolate chips for rich taste. You can also add a pinch of sea salt on top. It will boost the sweet flavor. If you like nuts, toss in chopped walnuts for a nice crunch. They pair well with the brown butter. Having the right tools makes baking easier. Use a sturdy mixing bowl for combining ingredients. A good silicone spatula helps fold in chocolate chips. An ice cream scoop works great for shaping cookies. Lastly, use parchment paper on your baking sheets. It prevents sticking and ensures even baking. For the best results, check out the Full Recipe for more tips! {{image_2}} If you want to skip nuts in your cookies, that's easy! You can replace walnuts with more chocolate chips. This adds extra sweetness and richness. You could also use seeds, like pumpkin or sunflower seeds, for a crunch without nuts. Both options keep the flavor fun and tasty! Chocolate chips come in many flavors. You can use dark chocolate for a rich taste. Milk chocolate gives a sweeter bite. You could even mix in white chocolate chips for a creamy twist. For a fun flavor, try adding a little espresso powder. This will enhance the chocolate taste without being too strong. To make these cookies a bit healthier, swap out white sugar for coconut sugar. This gives a nice caramel taste. You can also try whole wheat flour instead of all-purpose flour. It adds fiber and a nutty flavor. If you want fewer carbs, use almond flour. It works well, too! For sweetness, consider using honey or maple syrup. These options can cut down on refined sugars while adding unique flavors. For the full recipe, check out the [Full Recipe]. To keep your brown butter chocolate chip cookies fresh, store them in an airtight container. This helps to keep moisture in and air out. Place a slice of bread in the container too. This trick helps maintain softness. Keep the container in a cool, dry place. Avoid sunlight and heat to maintain flavor. For best taste, eat them within a week. Freezing cookies is easy and a great way to save some for later. First, let the baked cookies cool completely. Then, place them in a single layer on a baking sheet. Freeze them for about an hour until firm. Once frozen, transfer the cookies to a freezer bag. Make sure to remove as much air as possible. You can freeze cookie dough too! Scoop the dough onto a baking sheet, freeze, then store in a bag. Just thaw before baking. To enjoy warm cookies again, reheat them in the oven. Preheat the oven to 350°F (175°C). Place the cookies on a baking sheet. Heat for about 5 minutes, or until warm. You can also use a microwave for quick reheating. Heat for 10-15 seconds. This will help restore their softness. Enjoy your cookies with a glass of milk for the best experience! Brown butter has a rich, nutty flavor. This flavor comes from cooking the butter until it turns golden brown. It adds depth to your cookies that regular butter can’t match. The slight caramel notes enhance the sweetness of chocolate chips. Using brown butter in your cookies makes them taste gourmet, elevating a simple treat into something magical. You can use margarine, but it changes the taste. Margarine lacks the rich flavor of butter. This can make your cookies taste flat. If you must use margarine, choose one that is high in fat for better results. However, for the best flavor, nothing beats real butter, especially when browned. To check if your cookies are done, look for golden edges. The centers should look set but slightly soft. When you press them lightly, they should spring back. Let them cool on the baking sheet for a few minutes. They will continue to bake from the heat of the pan. This keeps them soft and chewy, just the way we love them! This blog highlighted key ingredients and steps to make perfect cookies. We learned about brown butter and sugars, which add flavor and texture. Chilling the dough improves results. Tips for choosing chocolate and tools ensure great cookies every time. Variations let you get creative, while proper storage keeps them fresh. Baking cookies is fun and rewarding. Trust these methods for tasty treats every time you bake. Enjoy your baking journey!

Brown Butter Chocolate Chip Cookies Irresistible Treat

If you love cookies, get ready to be amazed! In this post, I reveal the secret to making Brown Butter

- 2 medium zucchinis - 1 cup breadcrumbs (preferably whole wheat) - 1/2 cup grated Parmesan cheese - 1 teaspoon garlic powder - 1 teaspoon onion powder - 1 teaspoon Italian seasoning - 2 large eggs - Salt and pepper to taste - Cooking spray To make Air Fryer Parmesan Zucchini Fries, you need fresh zucchinis. Look for medium-sized ones. They should feel firm; this means they are fresh. Whole wheat breadcrumbs offer great flavor and texture. Grated Parmesan cheese adds a rich, savory touch. The seasonings are key to elevating the fries. Garlic powder gives a nice punch, while onion powder adds depth. Italian seasoning brings warmth and balance. You will also need eggs to help the breadcrumbs stick. Make sure to have salt and pepper on hand to season the mixture. Lastly, cooking spray helps achieve that crispy finish as the fries cook in the air fryer. For the full recipe, check out the detailed instructions and tips. Enjoy the process! Start by washing the zucchinis. Cut them into fry-like strips, about 1/4 inch thick. This size helps them cook evenly. Next, pat the strips dry with a paper towel. Removing moisture is key for crispiness. Grab two shallow bowls. In the first bowl, whisk the eggs until they are well beaten. In the second bowl, mix the breadcrumbs, grated Parmesan cheese, garlic powder, onion powder, Italian seasoning, salt, and pepper. This mixture gives your fries flavor and crunch. Now, take each zucchini strip and dip it into the egg mixture. Let any excess egg drip off. After that, coat the strip in the breadcrumb mixture. Press gently to help it stick. Place each coated strip on a plate as you finish. Preheat your air fryer to 400°F (200°C) for about 5 minutes. This step is important. A hot air fryer helps achieve that crispy texture we all love. Lightly spray the basket of the air fryer with cooking spray. Arrange the zucchini fries in a single layer. Don’t overcrowd them, as they need space to cook. Spray the tops lightly with cooking spray for extra crispiness. Cook the fries for 10-12 minutes, turning them halfway through. They should turn golden brown and crispy. Once cooked, carefully remove the zucchini fries from the air fryer. Serve them warm for the best taste. These fries go great with marinara or garlic aioli for dipping. Enjoy your crispy treat! For the full recipe, check out the information above. When making zucchini fries, choose firm zucchinis. Look for ones that feel heavy for their size. Avoid any with soft spots or wrinkles. Fresh zucchinis taste better and hold their shape better when cooked. To ensure your fries are crispy, remove excess moisture. After cutting the zucchini, pat them dry with a paper towel. This step is key for crispiness. Spraying the fries lightly with cooking spray helps too. It gives them a nice golden color and crunch. You can prepare these fries in advance. Cut and bread the zucchini strips a few hours before cooking. Place them on a baking sheet, cover, and refrigerate. This way, you can just pop them in the air fryer when you're ready. It's a great time-saver for busy days. For the full recipe, check out the link. {{image_2}} Want some heat? Add cayenne pepper or red pepper flakes to the breadcrumbs. This will give your zucchini fries a spicy kick. Start with half a teaspoon and adjust to your taste. You can mix it directly into the breadcrumb mixture. This simple change makes every bite exciting. Add fresh herbs to the breadcrumb mix for a burst of flavor. Try parsley, basil, or oregano. Chop about a tablespoon of your chosen herb and stir it in. This twist adds freshness and enhances the taste. You can also mix dried herbs if fresh ones aren't available. Get creative with cheese! Experiment with different types like cheddar or mozzarella. Each cheese brings a unique flavor and texture. For a sharper taste, use aged cheddar. If you want a gooey texture, try mozzarella. Just remember to adjust the amount based on the type. This keeps your zucchini fries fun and tasty. For the full recipe, check out the detailed instructions above. To keep your Air Fryer Parmesan Zucchini Fries fresh, store them in the fridge. Place the fries in an airtight container. Make sure to separate layers with parchment paper to prevent sticking. The fries will stay good for about 3 days in the refrigerator. To reheat and keep them crispy, use your air fryer. Set it to 350°F (175°C) and cook for about 5 minutes. You can also use an oven. Preheat it to 350°F (175°C), then bake for 10 minutes. Avoid using the microwave, as it will make the fries soggy. You can freeze zucchini fries before or after cooking. If freezing before cooking, flash freeze them first. Place the coated fries on a baking sheet and freeze for 1 hour. Then, transfer them to a freezer bag. They will last for about 3 months. If freezing after cooking, let them cool completely first. Use an airtight container or freezer bag. When ready to eat, reheat them straight from the freezer using the methods above. Enjoy your delicious snack! Yes, you can! If you don’t have an air fryer, try baking them in the oven. Preheat your oven to 425°F (220°C). Arrange the coated zucchini fries on a baking sheet lined with parchment paper. Bake for about 20-25 minutes, flipping halfway through. They will still get crispy, but you may need to adjust the time based on your oven. To make gluten-free zucchini fries, swap regular breadcrumbs for gluten-free breadcrumbs. You can also use ground almonds or crushed cornflakes as a tasty alternative. Just ensure that all ingredients, like Parmesan cheese, are gluten-free. This way, you can enjoy a crispy treat without gluten. These zucchini fries pair well with various dips and meals. Consider serving them with marinara sauce, ranch dressing, or garlic aioli. They also make a great side dish for burgers, sandwiches, or grilled chicken. Feel free to get creative and mix and match your favorite flavors! Zucchini fries are a tasty, healthy snack. We covered the best ingredients, tips, and cooking steps. You learned how to prepare, coat, and cook zucchini for crispiness. Consider variations to suit your taste, like spicy or herb-infused fries. Final thoughts: these fries are easy to make and fun to share. Enjoy them with your favorite dips for a delicious treat!

Air Fryer Parmesan Zucchini Fries Crispy and Tasty Treat

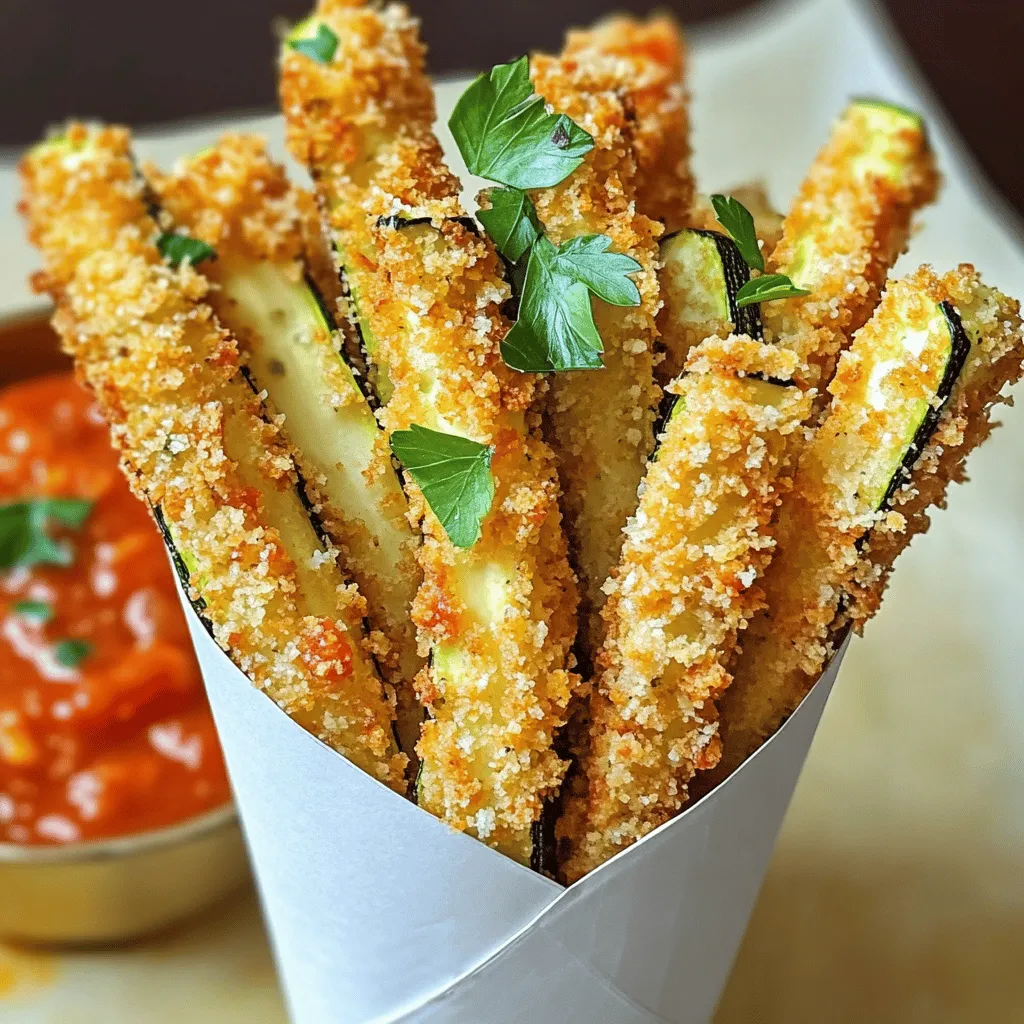
Are you ready to enjoy a guilt-free snack that’s packed with flavor? My Air Fryer Parmesan Zucchini Fries are crispy,

- Chicken and Marinade Components - 4 boneless, skinless chicken breasts - Juice and zest of 2 lemons - Aromatics and Seasonings - 4 tablespoons unsalted butter - 2 tablespoons olive oil - 4 cloves garlic, minced - 1 teaspoon dried oregano - 1 teaspoon dried thyme - Salt and pepper to taste - 1 cup chicken broth - Optional Garnishes and Serving Suggestions - 1 cup cherry tomatoes, halved - Fresh parsley, chopped (for garnish) This dish shines with simple yet bold flavors. The chicken breasts soak in the bright lemon juice, making them juicy and tender. The butter and olive oil create a rich base. Garlic adds a warm aroma, while oregano and thyme provide depth. Each ingredient plays a key role in creating a mouth-watering harmony. For a pop of color, I add cherry tomatoes. They burst with sweetness as they cook. Fresh parsley on top adds a lovely finish. You can serve this dish with rice or mashed potatoes, soaking up all the delicious lemon butter sauce. You can find the [Full Recipe](#) to guide you through making this delightful meal. Enjoy the simple yet satisfying process of cooking! - Prepping the Chicken Start with four chicken breasts. Trim any fat. Pat them dry with paper towels. This step helps the chicken brown nicely when you cook it. - Searing the Chicken Breasts Heat two tablespoons of olive oil and two tablespoons of butter in a large skillet. Get it hot, but not smoking. Season the chicken with salt and pepper. Place the chicken in the pan. Sear for five to seven minutes on each side until golden. This gives great flavor and a nice crust. - Cooking the Garlic Remove the chicken from the pan. In the same skillet, add four minced garlic cloves. Cook for about thirty seconds. You want it fragrant but not burnt. - Deglazing with Chicken Broth Pour in one cup of chicken broth. This helps lift the tasty bits stuck to the pan. Add the juice and zest of two lemons. Stir to mix well. - Adding Lemon Juice and Herbs Toss in one teaspoon of dried oregano and one teaspoon of dried thyme. Bring this mixture to a gentle simmer. It will smell amazing! - Combining Tomatoes and Chicken Add one cup of halved cherry tomatoes to the skillet. Stir gently. Return the chicken to the pan, nestling it among the tomatoes. - Adding Final Butter and Seasoning Turn the heat to low. Cover the skillet and let it cook for ten to fifteen minutes. Make sure the chicken reaches 165°F (75°C). When done, stir in the remaining two tablespoons of butter. This adds richness. Adjust the salt and pepper to taste. Once you follow these steps, you will have a dish bursting with flavor. For the complete recipe, check the full recipe section. To ensure juiciness and flavor, start with quality chicken. I recommend using boneless, skinless chicken breasts. They cook evenly and stay moist. Season them well with salt and pepper. This simple step makes a big difference. For cooking time and temperature, aim for 5-7 minutes on each side. This gives you a nice golden crust. Once you sear the chicken, check the inside temperature. It should reach 165°F (75°C) to be safe to eat. Use a meat thermometer for best results. You can add more flavor with extra seasonings. Consider using herbs like rosemary or basil. A dash of paprika can also add a nice kick. Fresh or dried herbs both work well in this dish. For presentation, serve the chicken and sauce over fluffy rice or creamy mashed potatoes. This adds a nice base. Drizzle the lemon butter sauce on top. Garnish with lemon wedges and fresh parsley for color. This makes your dish look as good as it tastes. {{image_2}} Gluten-Free Modifications You can easily make this dish gluten-free. Simply use gluten-free chicken broth. Check labels to ensure the broth has no hidden gluten. The rest of the recipe is already gluten-free. Dairy-Free Options For a dairy-free version, swap the butter with vegan butter or olive oil. This keeps the dish rich and tasty without dairy. You can also use coconut cream for a creamy feel. Adding Spices like Paprika or Chili Flakes Want to spice things up? Add paprika for a smoky twist. Chili flakes give a nice kick. Start with a small amount, then adjust to your taste. These spices work well with the lemon flavor. Substituting Different Vegetables You can change the vegetables to suit your taste. Try zucchini, bell peppers, or spinach. These add color and nutrients. Just remember to cook them until soft. Each veggie brings its own flavor to the dish. For the full recipe, visit the One-Pan Lemon Butter Chicken section. To keep your leftovers fresh, start by cooling them. Let the One-Pan Lemon Butter Chicken cool at room temperature for about 30 minutes. This step helps prevent moisture buildup in your storage container. Once cool, place the chicken in an airtight container. You can refrigerate it for up to three days. For longer storage, you can freeze it. Wrap the chicken tightly in plastic wrap. Then place it in a freezer-safe bag or container. This method helps to keep the flavors intact. You can store it for up to three months in the freezer. When it's time to enjoy your leftovers, choose the right reheating method. The best way to reheat is on the stove. Place the chicken in a skillet over low heat. Add a splash of chicken broth or water to keep it moist. Cover the pan to help heat evenly. If you're short on time, you can use the microwave. Place the chicken on a microwave-safe plate. Cover it with a damp paper towel to maintain moisture. Heat in short bursts of one minute, checking often. To keep the flavor and texture, avoid high heat. High heat can dry out the chicken. Instead, take your time and reheat gently. This way, your One-Pan Lemon Butter Chicken will taste just as good as when it was fresh. How do I know when the chicken is fully cooked? You can check the chicken by using a meat thermometer. The chicken should reach 165°F (75°C). If you don’t have a thermometer, cut into the thickest part. The meat should be white, and the juices should run clear. Can I use bone-in chicken pieces instead? Yes, you can use bone-in chicken pieces. Just adjust the cooking time. Bone-in chicken takes longer to cook. Aim for about 20-25 minutes on low heat after searing. What can I pair with this dish for a complete meal? This dish pairs well with rice or mashed potatoes. You can also serve it with a fresh salad or roasted vegetables. The lemon butter sauce adds a nice flavor to any side. Can I make this recipe in advance? Yes, you can prepare the chicken and sauce ahead of time. Cook the dish, then cool it before storing. Keep it in the fridge for up to two days. What are some good side dishes to serve? You can serve this dish with steamed broccoli, garlic bread, or a light salad. These sides complement the lemon flavor well. How can I store the lemon butter sauce? Store the sauce in an airtight container. It will last for about three days in the fridge. You can also freeze it for longer storage. Just thaw and reheat before using. You now have a complete guide to making One-Pan Lemon Butter Chicken. We covered every step, from ingredients to cooking tips. You learned how to prepare juicy chicken and build a rich sauce. You also discovered variations to suit different diets and flavor preferences. Remember to store leftovers properly so you can enjoy the dish later. This recipe is simple yet full of flavor, and it's perfect for any meal. Happy cooking, and enjoy your delicious creation!

One-Pan Lemon Butter Chicken Flavor-Packed Delight

Looking for a quick and tasty dinner? Try my One-Pan Lemon Butter Chicken! This dish is juicy, zesty, and full

Older posts
Newer posts
← Previous Page1 … Page45 Page46 Page47 … Page84 Next →

dsad

© 2026 Foodish Talk • Built with GeneratePress

Our Policies

  • Copyright Policy
  • Cookie Policy
  • GDPR Policy
  • Privacy Policy
  • Disclaimer
  • Terms Of Use

More Information

  • Home
  • About
  • Contact
  • Appetizers
  • Dessert
  • Dinner
  • Drinks
©2026, Foodish Talk About Back To Top