Skip to content
DisclaimerTerms Of UseGDPR PolicyCookie Policy

Foodish Talk

  • Home
  • Drinks
  • Appetizers
  • Dinner
  • Dessert
  • About
  • Contact
  • Privacy Policy
DisclaimerTerms Of UseGDPR PolicyCookie Policy

NO-ING-IMG

To make No-Bake Christmas Oreo Lasagna, gather these ingredients: - 2 packages of Oreo cookies (single or double stuffed) - ½ cup unsalted butter, melted - 2 cups cream cheese, softened - 1 cup powdered sugar - 2 cups whipped topping (like Cool Whip) - 1 teaspoon vanilla extract - 1 cup peppermint candy canes, crushed - 2 cups vanilla pudding mix (prepared with milk) - ¼ cup chocolate syrup - Additional crushed Oreos and mint leaves for garnish These ingredients create layers of yummy flavors and textures. The Oreos provide a crunchy base, while the cream cheese adds a rich creaminess. The whipped topping makes it light, and the peppermint gives a fresh taste. Don't forget to crush those candy canes for a festive touch! {{ingredient_image_1}} - First, take 1.5 packages of Oreo cookies. - Crush the cookies in a food processor until they turn into fine crumbs. - In a bowl, mix the crumbs with ½ cup melted butter. - Stir well until you see a thick, moist mix. - Next, press the mixture evenly into the bottom of a 9x13 inch dish. - Place the dish in the fridge to set while you prepare the next layers. - In a medium bowl, whip 2 cups of softened cream cheese until smooth. - Add 1 cup of powdered sugar and 1 teaspoon of vanilla extract. - Mix until everything combines well. - Gently fold in 2 cups of whipped topping. - Make sure it stays light and fluffy. - Spread the cream cheese mixture evenly over the crust. - Prepare 2 cups of vanilla pudding with milk as per the package directions. - Once set, spread the pudding over the cream cheese layer. - Sprinkle half of the crushed candy canes on top of the pudding. - Finally, spread the remaining whipped topping over the pudding layer. - Drizzle ¼ cup of chocolate syrup over the whipped topping. - Add extra crushed Oreos and more candy canes for a festive look. - Cover the dish with plastic wrap and chill for at least 4 hours. - For best taste, let it chill overnight before serving. To get the best cream cheese layer, ensure the cream cheese is very soft. I suggest letting it sit out for 30 minutes before you start. This helps it mix better. When making the pudding, follow the package instructions closely. Use cold milk for a smooth texture. Stir it well to avoid lumps. This makes every bite creamy. Chill your lasagna for at least four hours. If you can, let it sit overnight. This helps the flavors blend well. It's best served cold. For slicing, use a sharp knife. Dip it in warm water for clean cuts. This keeps the layers pretty and neat. To make your lasagna look festive, drizzle extra chocolate syrup on top. You can also add more crushed Oreos for a nice crunch. Seasonal garnishes can make it pop. Try adding fresh mint leaves or small holiday sprinkles. You can even use red and green candies for a cheerful touch. Pro Tips Use room temperature ingredients: Make sure your cream cheese is at room temperature for a smoother mixture that blends easily with the other ingredients. Chill for best flavor: Allow the lasagna to chill overnight for the flavors to meld together, resulting in a richer taste. Customize your toppings: Feel free to get creative with toppings! Consider adding mini chocolate chips or different kinds of crushed candies for a unique twist. Make it ahead of time: This dessert can be made a day or two in advance, making it a perfect choice for holiday gatherings. {{image_2}} You can have fun with flavors by using different Oreo cookies. Think about using mint, peanut butter, or even birthday cake Oreos. Each flavor adds a unique twist. If you want to skip peppermint candy canes, try crushed chocolate or toffee bits. You can also use sprinkles for a fun touch. For gluten-free options, use gluten-free Oreo cookies. They taste just as good! If you need a dairy-free dessert, replace cream cheese with a dairy-free option. Use coconut cream or cashew cream instead. You can also choose a dairy-free whipped topping. This lasagna isn’t just for Christmas. You can tweak it for other holidays. For Halloween, add orange and black sprinkles. For birthdays, use colorful sprinkles and cake-flavored Oreos. You can make it festive for any event by changing the toppings. Just think about your theme and get creative! To keep your No-Bake Christmas Oreo Lasagna fresh, store it in the fridge. Place it in an airtight container. If you don't have a container, cover it tightly with plastic wrap. This prevents drying out and keeps flavors intact. In the refrigerator, your lasagna stays good for about 3 to 5 days. If you want to freeze it, wrap individual slices well in plastic wrap. This way, you can enjoy it later. Frozen lasagna lasts up to 2 months. Just remember to thaw it in the fridge before serving. Check for signs of spoilage before eating. If you see any mold or an off smell, it's time to toss it. Also, if the texture feels slimy or grainy, that means it has gone bad. Always trust your senses to keep safe while enjoying this dessert. The prep time for this dessert is about 30 minutes. You will need to gather your ingredients and prepare each layer. Yes, you can make this dessert ahead of time. It actually tastes better when it sits for a while. You should chill the lasagna for at least 4 hours. For the best flavor, chill it overnight. Yes, you can use regular whipped cream. Just make sure it is whipped to soft peaks. Yes, you can adjust the recipe. Simply cut the ingredients in half for a smaller portion or double them for a larger one. This blog post covered how to make a No-Bake Christmas Oreo Lasagna. We discussed the key ingredients, detailed step-by-step instructions, and provided tips for perfect layers. I shared helpful storage info and variations for all tastes. In the end, this dessert is fun and easy to make. You can enjoy it during the holidays or at any gathering. With a bit of creativity, you can make it your own. Now, gather your ingredients and start creating!

No-Bake Christmas Oreo Lasagna Easy Holiday Treat

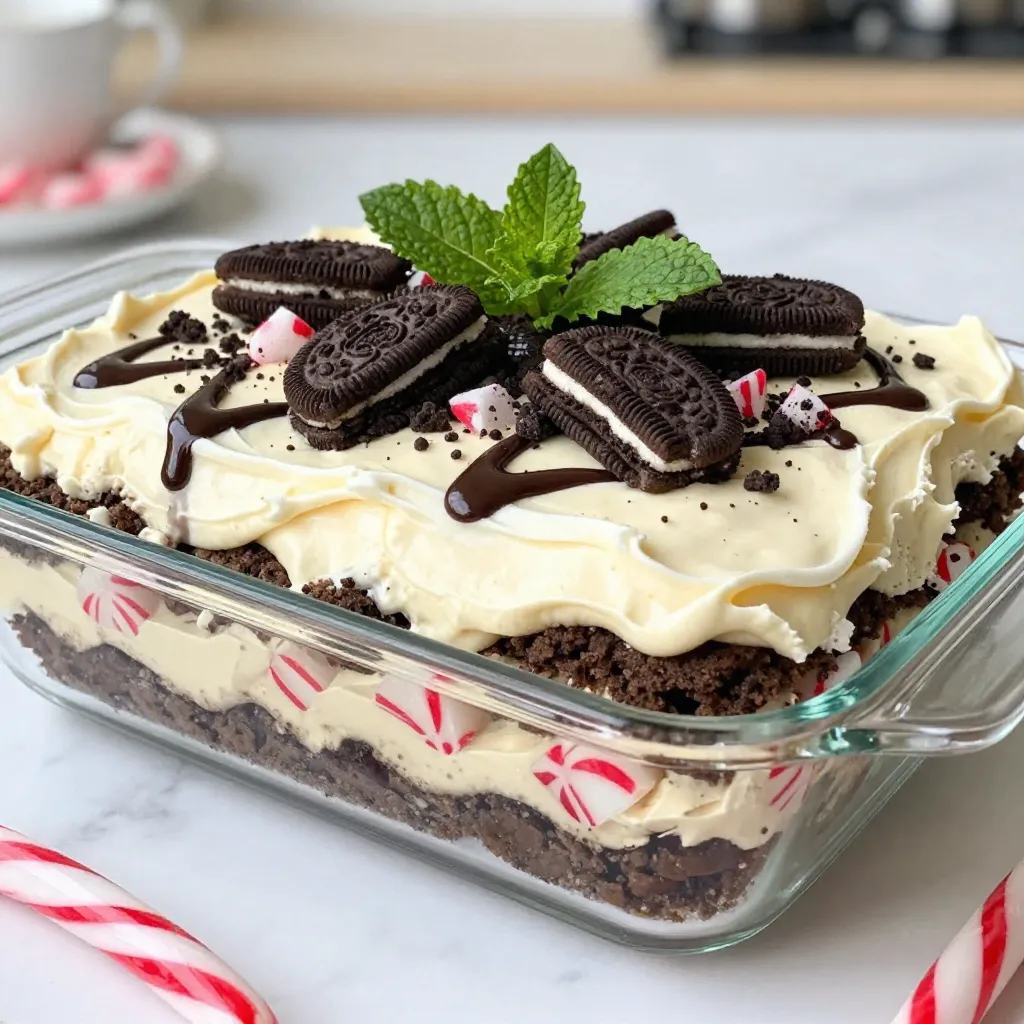
Get ready to impress your family with the ultimate festive treat: No-Bake Christmas Oreo Lasagna! This easy holiday dessert combines

To make caramel apple cheesecake bars, you need a few simple ingredients. This list makes it easy to gather what you need. Each item plays a key role in creating the perfect balance of flavors and textures. - 1 ¾ cups graham cracker crumbs - ½ cup unsalted butter, melted - 2 tablespoons granulated sugar - 2 large apples, peeled, cored, and diced (preferably Granny Smith) - 1 teaspoon cinnamon - 1 tablespoon lemon juice - 16 oz cream cheese, softened - ½ cup brown sugar - ½ cup granulated sugar - 3 large eggs - 2 teaspoons vanilla extract - 1 cup sour cream - ½ cup caramel sauce (plus extra for drizzling) These ingredients combine for a rich dessert. The graham cracker crumbs form a sweet and crunchy crust. The apples add a fresh, tart flavor. Cream cheese gives the filling its creamy texture. Caramel sauce ties everything together with its sweet richness. Each ingredient is important for a well-balanced treat. 1. Preheat the oven and prepare baking dish Start by preheating your oven to 325°F (160°C). Grease a 9x13-inch baking dish. Line it with parchment paper, leaving some paper hanging over the edges. This makes it easy to lift the bars out later. 2. Make the graham cracker crust In a medium bowl, mix together 1 ¾ cups of graham cracker crumbs, ½ cup of melted unsalted butter, and 2 tablespoons of granulated sugar. Stir until it looks like wet sand. Press this mixture firmly into the bottom of your baking dish. Bake it for about 10 minutes, then let it cool slightly. 3. Prepare the apple mixture Take 2 large apples, peel, core, and dice them. Toss the diced apples in a bowl with 1 teaspoon of cinnamon and 1 tablespoon of lemon juice. Set this mixture aside. 4. Beat the cream cheese mixture In a large mixing bowl, beat 16 oz of softened cream cheese with ½ cup of brown sugar and ½ cup of granulated sugar. Mix it until it is smooth and creamy. 5. Combine apple mixture with cheesecake batter Add 3 large eggs to the cream cheese mixture, one at a time. Beat well after each egg. Then, stir in 2 teaspoons of vanilla extract and 1 cup of sour cream. Mix until everything is smooth. Gently fold in the apple mixture. 6. Assemble and swirl the caramel Pour the cheesecake batter over the cooled graham cracker crust. Spread it out evenly. Drizzle ½ cup of caramel sauce over the top. Use a knife or toothpick to swirl the caramel into the batter. 1. Bake the cheesecake bars Place the baking dish in the oven. Bake for 40-45 minutes. The edges should be set, and the center should have a slight jiggle when done. 2. Cooling and chilling process Once baked, take it out and let it cool to room temperature. After that, refrigerate the bars for at least 4 hours, or even overnight for best results. 1. How to cut the bars Once chilled, lift the cheesecake out of the dish using the parchment paper. Place it on a cutting board and cut it into squares or rectangles. 2. Presentation tips with garnishing Arrange the bars on a nice serving platter. Drizzle extra caramel sauce on top. You can also add apple slices for a fresh look. Enjoy your delicious caramel apple cheesecake bars! For a smooth cheesecake texture, use softened cream cheese. This helps mix it easily. Blend the cream cheese with sugars until creamy. Avoid lumps for a silky finish. To bake evenly, preheat your oven fully. Place the pan in the center of the oven. This ensures heat circulates well. Check for doneness by looking for set edges and a jiggly center. Garnish your bars with apple slices and a drizzle of caramel. This adds flair and flavor. You can also dust with cinnamon for a warm touch. For drinks, pair these bars with hot cider or coffee. The flavors complement each other nicely. You can even serve with vanilla ice cream for extra creaminess. One common mistake is overmixing the batter. This can add too much air and create cracks. Mix just until combined for the best texture. Another mistake is not cooling correctly. Let the cheesecake cool at room temperature first. After that, chill it in the fridge for at least four hours. This helps set the bars perfectly. {{image_2}} To add some crunch, sprinkle in nuts or caramel bits. Nuts like walnuts or pecans work great. They give a nice texture and taste. You can also try different spices, like nutmeg or allspice. These spices add warmth and depth to the bars. A little goes a long way, so start with a small amount. If you need a gluten-free option, swap the graham cracker crumbs for gluten-free ones. You can find these at most stores. For a vegan cheesecake, replace cream cheese with a plant-based version. Use almond or coconut milk in place of sour cream. This way, everyone can enjoy these tasty treats. Feel free to mix up the fruit! In fall, you can use pears or figs. In summer, try berries like strawberries or blueberries. Each fruit will give the bars a new flavor. This keeps the recipe fresh all year round and fun to make! To keep your caramel apple cheesecake bars fresh, place them in an airtight container. This will help prevent them from drying out. You can also cover the bars with plastic wrap if you don’t have a container. Store them in the fridge for the best taste. You can freeze cheesecake bars for later enjoyment. First, cut them into squares and let them cool completely. Then, wrap each piece in plastic wrap. Place the wrapped bars in a freezer bag. Make sure to remove as much air as you can. For thawing, take them out and put them in the fridge overnight. This keeps them from getting soggy. In the fridge, these bars last about 5 days. If you freeze them, they can last up to 2 months. Just remember to label your container or bag with the date. This way, you know when to enjoy them! Can I use other types of apples? Yes, you can use other apples. I love using Granny Smith apples for their tartness. However, you can also try Honeycrisp or Fuji apples for a sweeter taste. How can I make this recipe ahead of time? You can make these bars a day in advance. Just bake and chill them overnight. This helps the flavors blend well. What can I substitute for cream cheese? If you need a substitute, try using Greek yogurt or a dairy-free cream cheese. They both give a nice texture, but the taste may change a bit. How do I know when the cheesecake bars are done baking? The edges will look set, and the center should jiggle slightly. A toothpick inserted should come out mostly clean. What's the best way to make caramel sauce from scratch? To make caramel, melt sugar over medium heat until golden brown. Stir in butter and cream, and let it cool. It’s easy and so tasty! How to make cheesecake without eggs? You can use silken tofu or unsweetened applesauce instead of eggs. These will help bind the cheesecake while keeping it creamy. Can I make this into a pie instead of bars? Yes, you can! Just pour the cheesecake filling into a pie crust and bake. Adjust the baking time as needed. You can create delicious caramel apple cheesecake bars with simple steps and ingredients. This treat starts with a buttery graham cracker crust and a rich, creamy filling with tart apples. You learned key techniques for a smooth texture and tasty variations, including gluten-free and vegan options. Remember to store your bars properly to extend their life. With these tips, you’ll impress everyone with your baking. Enjoy making this delightful dessert in your kitchen!

Caramel Apple Cheesecake Bars Simple and Delicious Treat

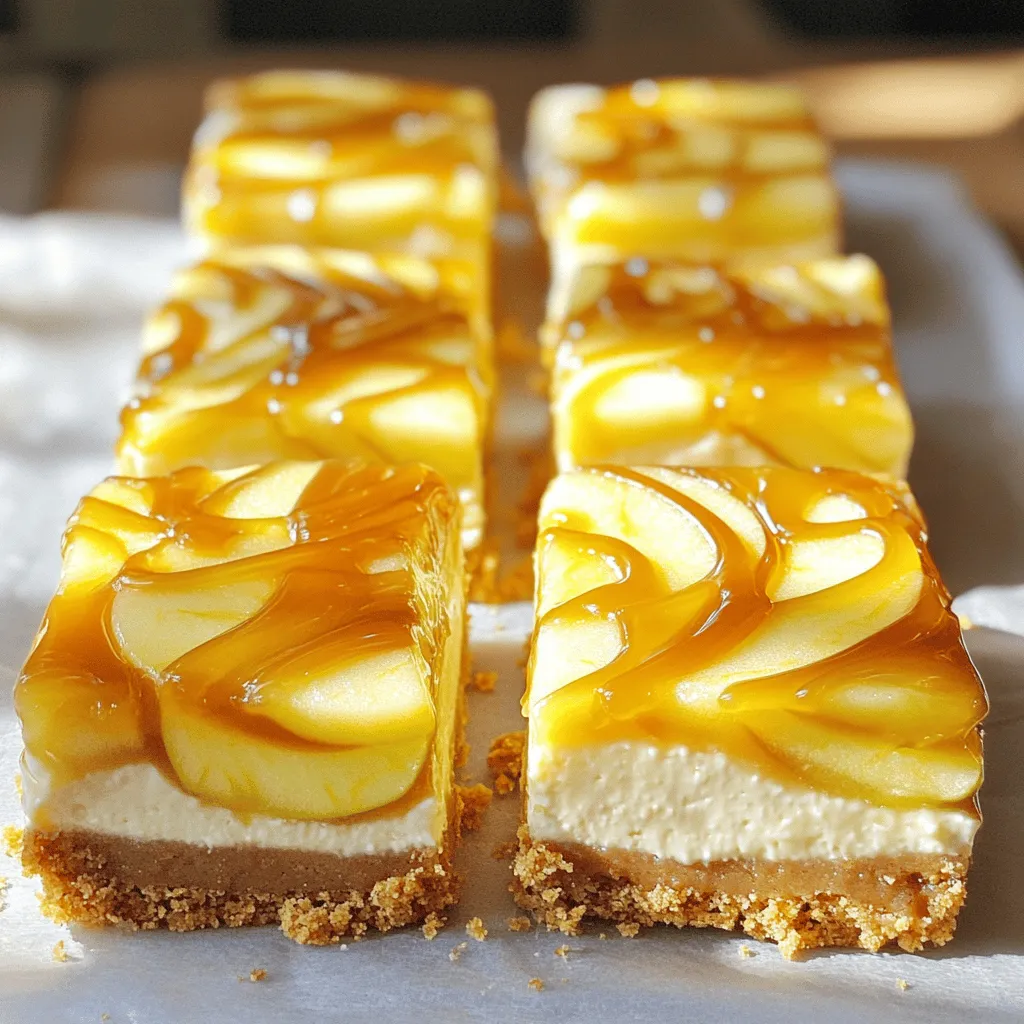
Craving a sweet treat that combines tangy apples and creamy cheesecake? You’re in for a delightful ride with my Caramel

- 1 block (14 oz) firm tofu, pressed and cubed - 2 tablespoons sesame oil - 1 red bell pepper, sliced - 1 cup snap peas - 1 cup broccoli florets - 2 carrots, julienned - 3 green onions, chopped - 3 cloves garlic, minced - 1 teaspoon fresh ginger, grated - 1/4 cup honey - 2 tablespoons soy sauce (or tamari for gluten-free) - 1 tablespoon sesame seeds - Salt and pepper to taste - Cooked jasmine rice or quinoa, for serving The main ingredients in this dish are simple yet full of flavor. The firm tofu acts as a great protein base. It absorbs the honey and soy sauce very well. The veggies add both crunch and color. Red bell pepper, snap peas, broccoli, and carrots bring a nice balance to the meal. - Additional Vegetables - Protein Alternatives - Garnishes You can customize this stir-fry easily. Want more veggies? Try adding mushrooms or zucchini. If you want to switch up the protein, use tempeh or chicken instead of tofu. For a garnish, sprinkle extra sesame seeds on top. You can also add lime wedges for a fresh kick. This flexibility makes the dish fun and allows you to cater to your taste! Pressing the Tofu First, you need to press the tofu. This step removes extra water, making it firmer. Wrap the block of tofu in a clean towel. Place a plate on top, then add weight, like a can. Let it sit for 15-20 minutes. Marinating the Tofu Next, cut the pressed tofu into cubes. In a bowl, mix honey, soy sauce, and a little salt and pepper. Add the tofu cubes to the bowl. Make sure they are well-coated. Let them soak for about 15 minutes. This adds great flavor. Cooking the Tofu Heat a large skillet over medium-high heat. Add 1 tablespoon of sesame oil. Once hot, add the marinated tofu cubes. Cook them for about 8-10 minutes, turning to brown all sides. When done, take them out and set aside. Sautéing Vegetables In the same skillet, add the other tablespoon of sesame oil. Toss in minced garlic and grated ginger. Sauté for about 30 seconds until you smell the aroma. This step really enhances the dish. Combining Components Now, add the sliced bell pepper, snap peas, broccoli, and carrots to the skillet. Stir-fry these veggies for about 5-7 minutes. You want them to stay tender-crisp. After that, return the tofu to the skillet. Drizzle any leftover marinade over the stir-fry. Toss everything together for 2-3 more minutes. Finally, sprinkle chopped green onions and sesame seeds on top. Serve the stir-fry over jasmine rice or quinoa for a complete meal. Perfectly Pressed Tofu Tofu needs to be pressed well. This step removes water. Less water means a better texture. Press your tofu for 15-20 minutes. Use a clean towel or a tofu press. After pressing, cut it into 1-inch cubes. This size helps it cook evenly. Ensuring Vegetables are Crisp Crisp vegetables make the dish fresh. Stir-fry them quickly over high heat. This keeps them bright and crunchy. Use fresh vegetables like bell peppers, snap peas, and broccoli. Cut them into similar sizes. This ensures even cooking. Balancing Sweetness and Savory Notes The honey adds sweetness. Pair it with soy sauce for saltiness. This balance makes the dish tasty. Taste your sauce before adding it to the tofu. Adjust with more honey or soy sauce if needed. Best Practices for Marinating Marinating tofu is key. It helps the tofu soak up flavors. Mix honey, soy sauce, and a pinch of salt. Let the tofu sit in this mix for about 15 minutes. This short time adds great taste without being too salty. {{image_2}} Gluten-Free Adjustments To make this dish gluten-free, swap regular soy sauce with tamari. Tamari tastes great and keeps the dish safe for those with gluten issues. Always check the labels on your ingredients. Some brands may add gluten in unexpected places. Vegan Options This recipe is already vegan, thanks to tofu and plant-based ingredients. You can replace honey with agave syrup or maple syrup for a vegan sweetener. This keeps the dish sweet while sticking to vegan rules. Alternative Sauces If you want to change the flavor, try using hoisin sauce or teriyaki sauce instead of honey. Hoisin sauce adds a sweet and salty touch. Teriyaki brings a unique flavor that changes the dish. Mix and match sauces to find your favorite. Spice Level Adjustments To spice things up, add red pepper flakes or sriracha. Just a little can bring heat without overpowering the dish. If you like milder flavors, skip the spice or use less. Adjust to your own taste! - Store leftovers in an airtight container. - Keep the tofu stir-fry in the fridge. - Use it within 3-4 days for best taste. - Do not freeze; it changes the tofu's texture. - Let the dish cool before sealing it. - Label the container with the date. - Keep leftover rice or quinoa separate. - Mix everything before serving. - Use glass containers for easy reheating. - Choose BPA-free plastic containers if needed. - Ensure the container is large enough to fit. - Look for containers that seal tightly. - Use a microwave for quick reheating. - Heat in 30-second intervals, stirring in between. - For stovetop reheating, use medium heat. - Add a splash of water to keep it from drying. - Microwaving: Place in a bowl, cover, and heat. - Stovetop: Warm in a skillet, stirring gently. - Oven: Cover with foil and heat at 350°F for 10-15 minutes. - Add fresh green onions for crunch. - Sprinkle more sesame seeds for flavor. - Serve with lime wedges for a zesty touch. - Drizzle a bit of honey for extra sweetness. Can I use other types of tofu? Yes, you can use soft or silken tofu, but they will change the dish's texture. Firm tofu holds up well during cooking. Extra-firm tofu gives the best results for stir-fries. How do I make this dish spicier? To add heat, you can include crushed red pepper flakes or sliced fresh chili peppers. Add them when you stir-fry the vegetables to let the heat blend in. What can I serve with Honey Sesame Tofu Stir-Fry? This stir-fry pairs well with cooked jasmine rice or quinoa. You can also serve it with a side salad for some freshness. How long will leftovers last? Leftovers can last in the fridge for about 3-4 days. Store them in an airtight container to keep them fresh. Can I prepare this dish in advance? Yes, you can prep the tofu and chop the veggies ahead of time. Marinate the tofu and store it in the fridge until you are ready to cook. What are the best vegetables for stir-frying? Great options include bell peppers, snap peas, broccoli, carrots, and zucchini. Use any veggies you enjoy or have on hand for variety. This blog post covered all the key parts of making a great Honey Sesame Tofu Stir-Fry. We explored the main ingredients, preparation steps, and cooking tips. Remember, using firm tofu and fresh veggies gives you the best texture and taste. Try different sauces or proteins to suit your taste. Always store leftovers properly to keep them fresh. With practice, you can make a dish that's both tasty and satisfying. Enjoy your cooking journey and get creative with your meals!

Honey Sesame Tofu Stir-Fry Flavorful and Easy Meal

Looking for a quick and tasty meal? You’ll love this Honey Sesame Tofu Stir-Fry! With just a few simple ingredients,

To make No-Bake Nutella Oreo Cheesecake Cups, you need: - 18 Oreo cookies, crushed - 4 tablespoons unsalted butter, melted - 8 oz cream cheese, softened - 1 cup powdered sugar - 1 cup Nutella - 1 teaspoon vanilla extract - 1 cup whipped cream (store-bought or homemade) - Additional Oreos for topping - Chopped hazelnuts for garnish (optional) I recommend using name-brand Oreo cookies for the best flavor. Brands like Philadelphia are great for cream cheese. For Nutella, stick with the classic version. You can also try dark chocolate or salted caramel variants if you want a twist. For whipped cream, a good store-bought option works well, but homemade is even better! If you want to swap ingredients, here are some ideas: - Use gluten-free Oreos for a gluten-free option. - You can replace Nutella with any chocolate hazelnut spread. - For a dairy-free version, try vegan cream cheese and a plant-based whipped cream. - If you don’t have powdered sugar, regular sugar works but blend it first for a smooth texture. These options keep your cheesecake cups tasty and fun, no matter your dietary needs! Start by crushing 18 Oreo cookies in a bowl. You want the pieces to be small. Next, melt 4 tablespoons of butter in a microwave. Pour the melted butter over the crushed cookies. Mix them well until all the crumbs are coated. Now, take about 2 tablespoons of this Oreo mix and place it in each cup. Press it down firmly to form a crust. Make sure it is even and compact. In a clean bowl, add 8 ounces of softened cream cheese. Beat it with an electric mixer until smooth. Slowly add 1 cup of powdered sugar while mixing at low speed. Once mixed well, add 1 cup of Nutella and 1 teaspoon of vanilla extract. Continue to mix until it is creamy and smooth. Carefully fold in 1 cup of whipped cream until just combined. This keeps the filling light and fluffy. Spoon the Nutella filling into each cup over the Oreo crust. Use a spatula to smooth the tops. Once filled, place the cups in the fridge for at least 2 hours. This helps the filling set nicely. Before serving, crush some extra Oreos and sprinkle them on top. For a crunchy touch, add chopped hazelnuts if you like. Serve these cups cold for a delicious treat! One common mistake is not crushing the Oreos enough. Make sure they are fine crumbs. This helps the crust hold together. Another mistake is overmixing the cream cheese. If you mix too much, the filling can become too soft. Lastly, don’t skip the chilling time. The cups must set in the fridge for at least 2 hours. To get a smooth filling, start with softened cream cheese. Beat it until creamy before adding other ingredients. When you fold in the whipped cream, do it gently. This keeps the mixture light and fluffy. If you want a richer taste, use less whipped cream. This will give a denser cheesecake. For a stunning presentation, serve the cups on a nice platter. Add a small spoon or fork with each cup. Top each cheesecake cup with crushed Oreos and hazelnuts. This adds extra texture and color. Use clear cups to show off the layers. It makes the dessert look even more inviting. {{image_2}} You can mix it up with flavors. Instead of Nutella, use peanut butter. It gives a nice twist. For chocolate lovers, add melted dark chocolate to the cream cheese mix. You can also try fruit flavors. Strawberry or raspberry puree can add a fruity touch. Just mix the puree with the cream cheese. These small changes can create a new dessert experience. To make this dessert vegan, swap the cream cheese for a dairy-free version. Use cashew cream or coconut cream as a base. For the sweetener, use coconut sugar instead of powdered sugar. Use vegan whipped cream for the topping. Instead of Nutella, try a vegan chocolate spread. This way, everyone can enjoy this treat. To make these cheesecake cups gluten-free, choose gluten-free Oreo cookies. They taste just as good! Ensure all other ingredients are gluten-free too. Most cream cheeses and chocolate spreads are safe, but double-check labels. These small changes let gluten-free eaters enjoy the same rich taste. To store your leftover cheesecake cups, place them in an airtight container. Make sure to keep them in the fridge. This way, they stay fresh and tasty. Cover each cup with plastic wrap if you have no container. Enjoy them within a few days for the best flavor. You can freeze these cheesecake cups for later enjoyment. First, let them chill in the fridge for at least two hours. Then, wrap each cup in plastic wrap. After wrapping, place them in a freezer-safe bag. These cups can last about one month in the freezer. Thaw them in the fridge before serving. These cheesecake cups can last in the fridge for about three to five days. The cream cheese and whipped cream will stay fresh during this time. If you see any changes in texture or smell, it is best to throw them away. Always check your food to ensure it is safe to eat. Yes, you can use other cookies. Graham crackers or chocolate wafers work well. Just crush them and mix with melted butter. The flavor will change, but it can still be tasty. These cheesecake cups last about 3 to 5 days in the fridge. Keep them in an airtight container. This will help keep them fresh and delicious. Absolutely! You can make these cups a day or two ahead of time. Just store them in the fridge until you are ready to serve. It saves time and makes for easy entertaining. If you want a change, use other spreads. Peanut butter or chocolate spread can be great alternatives. You can also try a fruit spread for a different flavor. Making homemade whipped cream is easy! Just whip heavy cream with a mixer until it forms soft peaks. Add a bit of sugar and vanilla for flavor. It’s easy and tastes fresh! This blog post has covered the key steps to make delicious cheesecake cups. You learned about the best ingredients and brand options. We also discussed helpful tips for preparing, assembling, and presenting your treats. You can even explore various flavors and dietary adjustments. In the end, making cheesecake cups can be fun and easy. Follow these steps and enjoy your tasty creation!

No-Bake Nutella Oreo Cheesecake Cups Delight

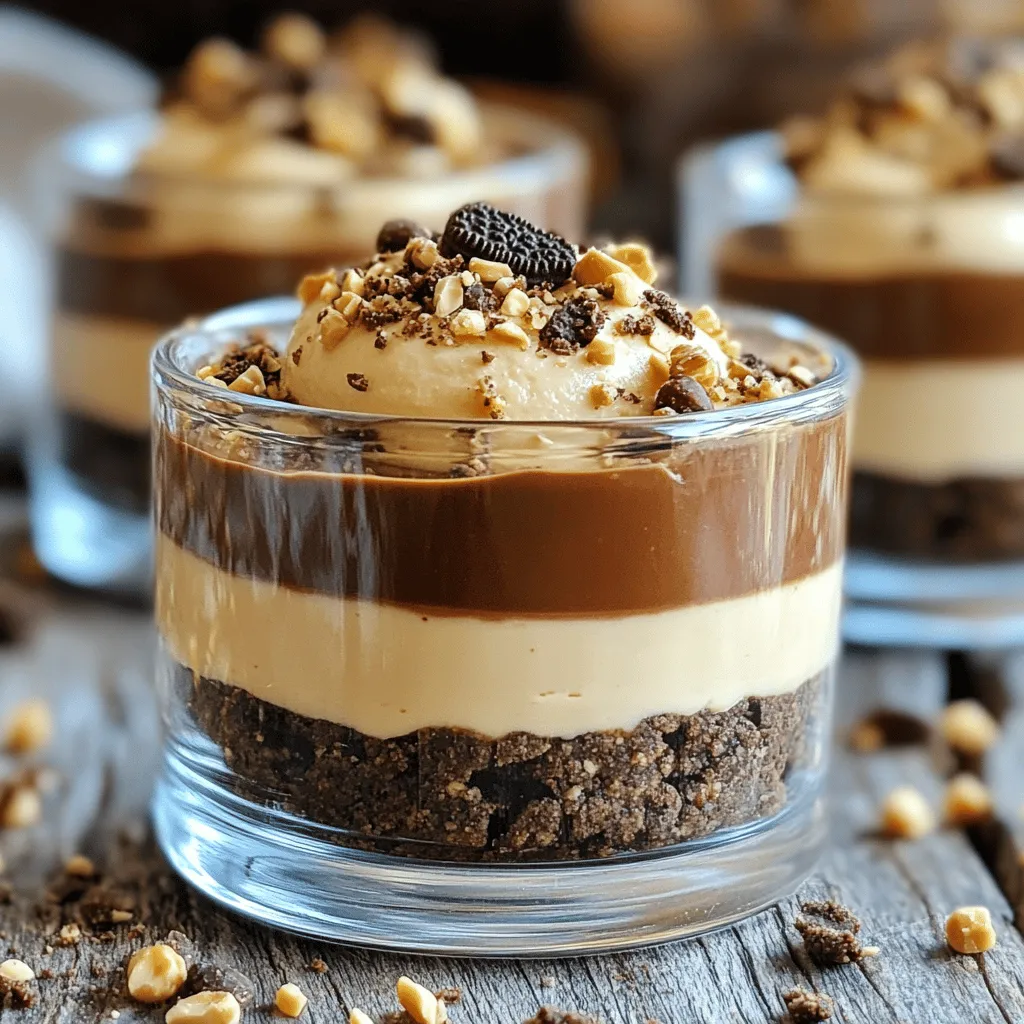
Are you ready to indulge in a sweet treat without turning on the oven? My No-Bake Nutella Oreo Cheesecake Cups

- 2 cups all-purpose flour - 1 cup granulated sugar - 1 tablespoon baking powder - 1/2 teaspoon salt - 1 teaspoon ground cinnamon - 1/2 cup unsalted butter, softened - 2 large eggs - 1 teaspoon vanilla extract - 1 cup milk - 1/2 cup brown sugar - 1 tablespoon additional cinnamon (for topping) - 1/4 cup chopped walnuts or pecans (optional) You need simple ingredients to make this cake. Most are things you may already have. Flour gives the cake body. Granulated sugar adds sweetness. Baking powder helps it rise. Salt enhances the flavors. Ground cinnamon is key for that warm taste. Softened butter makes the cake moist. Eggs bind everything together. Vanilla extract adds a nice aroma. Milk keeps the cake tender. Brown sugar brings a hint of caramel. The topping mix of cinnamon and nuts adds a lovely crunch. - Suggestions for flavored extracts: Almond or maple extract can add a new twist. - Types of nuts to use: Pecans give a rich taste, while walnuts add a nice bite. - Alternative sweeteners: Honey or agave can replace granulated sugar if desired. Feel free to play with these options! Adding different extracts or nuts can change the flavor. Using alternative sweeteners can also make it a bit healthier. Choose what you love and enjoy! 1. First, preheat your oven to 350°F (175°C). This will help the cake bake evenly. 2. Grease a 9-inch round cake pan or a square baking dish to prevent sticking. 3. In a large bowl, whisk together the dry ingredients: - 2 cups all-purpose flour - 1 cup granulated sugar - 1 tablespoon baking powder - 1/2 teaspoon salt - 1 teaspoon ground cinnamon 4. In another bowl, cream together the softened butter and brown sugar until light. 5. Add 2 large eggs, one at a time, mixing well after each. Then add 1 teaspoon of vanilla extract. 6. Gradually mix the dry ingredients with the wet ones, adding 1 cup of milk. Stir until just combined. 1. Pour half of the batter into your prepared pan. Smooth it out gently. 2. In a small bowl, mix: - 1 tablespoon additional cinnamon - 1/4 cup chopped walnuts or pecans (if using) - A little of the remaining batter (about 1/4 cup) This will create a crumbly topping. 3. Sprinkle the cinnamon topping evenly over the first layer of batter. 4. Pour the rest of the cake batter over the topping, smoothing the surface. 1. Bake in the preheated oven for 30-35 minutes. 2. Check doneness with a toothpick. If it comes out clean, your cake is done. 3. Let the cake cool in the pan for 10 minutes before transferring it to a wire rack. This simple process makes a moist, delightful coffee cake. Enjoy the sweet, warm aroma filling your kitchen! To achieve a light and fluffy texture in your cinnamon sugar coffee cake, start by creaming the butter and brown sugar well. This process adds air into the mix, making it light. Use room-temperature butter for best results. It blends easily and helps create that fluffy cake. Ingredient temperature is very important. Eggs and milk should also be at room temperature. Cold ingredients can make the batter dense. For a better rise, take them out of the fridge about 30 minutes before you bake. Serve this coffee cake warm for the best flavor. Slice it into squares or wedges. A dusting of powdered sugar on top makes it look fancy. You can even add a scoop of whipped cream for an extra treat. Pair your coffee cake with a hot cup of coffee or tea. The flavors blend well together. You might also enjoy it with a glass of milk or a sweet iced latte. One common mistake is overmixing the batter. Mix until just combined, then stop. Overmixing can lead to a tough cake. Another mistake is not measuring ingredients accurately. Use a kitchen scale or measuring cups for precision. Too much flour can dry out your cake. Always level off the measuring cup for the best results. {{image_2}} You can easily make this cake your own. Try adding chocolate chips for a sweet twist. Dried fruit, like raisins or cranberries, adds a nice chew and flavor. You can also experiment with spices. Swap cinnamon for nutmeg or cardamom. Each spice brings a unique taste to the cake. If you need a gluten-free option, use a gluten-free flour blend. Many brands work well in baking. If you want a dairy-free cake, substitute butter with coconut oil. Almond or oat milk can replace regular milk. Both options keep the cake moist and tasty. You can make mini coffee cakes or muffins for easy serving. Use a muffin tin and adjust the baking time to about 20 minutes. For a bundt cake, pour the batter into the pan and bake it for 40-45 minutes. Bundt cakes look beautiful and are fun to share. To keep your cinnamon sugar coffee cake fresh, store it at room temperature. Use an airtight container or wrap it tightly in plastic wrap. This method helps keep the moisture in. If you want to refrigerate it, place the cake in a container. It can last up to a week in the fridge. However, refrigeration may change its texture. If you want to enjoy your cake later, freezing is a great option. Wrap the cooled cake tightly in plastic wrap. Then, place it in a freezer-safe bag. It can stay fresh for up to three months in the freezer. When you are ready to eat it, thaw the cake overnight in the fridge. For reheating, warm it in the oven at 350°F for about 10-15 minutes. Under room temperature, your cake lasts about 3-4 days. In the fridge, it can stay good for a week. If frozen, it can last up to three months. Keep an eye on any signs of spoilage before eating. Enjoy your cake fresh for the best taste! Can I use self-rising flour instead? Yes, you can use self-rising flour. Just skip the baking powder and salt. This option will make your cake rise well, but the taste may change slightly. How do I know when my coffee cake is done baking? Your cake is done when a toothpick comes out clean from the center. The edges may pull away from the pan a bit, too. Keep an eye on it after 30 minutes. Can I make this recipe ahead of time? Yes, you can make it ahead. Bake the cake and store it in an airtight container. It stays fresh for a few days at room temperature. What to do if the cake is too dense? If your cake is too dense, try mixing less next time. Overmixing can lead to a heavy cake. Also, check if your baking powder is fresh. Fixing dry or crumbly coffee cake If your coffee cake is dry, it may have baked too long. You can add a little milk to the batter next time. A moist cake is always better. What beverages go well with cinnamon sugar coffee cake? Coffee is the classic choice. Tea or warm milk also pair nicely with the sweet flavors. You can even try some spiced chai for a fun twist. How to modify serving sizes for larger gatherings? For larger gatherings, simply double the recipe. Use a bigger pan and adjust baking time. Cut into larger pieces if needed, so everyone gets a slice. This blog post covered everything you need to bake a delicious coffee cake. We listed essential ingredients, optional add-ons, and detailed step-by-step instructions. You learned important tips to avoid common mistakes and explore tasty variations. I hope this guide helps you create a perfect coffee cake that delights everyone. Baking is fun, so enjoy the process and share your creation with loved ones. Remember, practice makes perfect!

Cinnamon Sugar Coffee Cake Tasty and Simple Delight

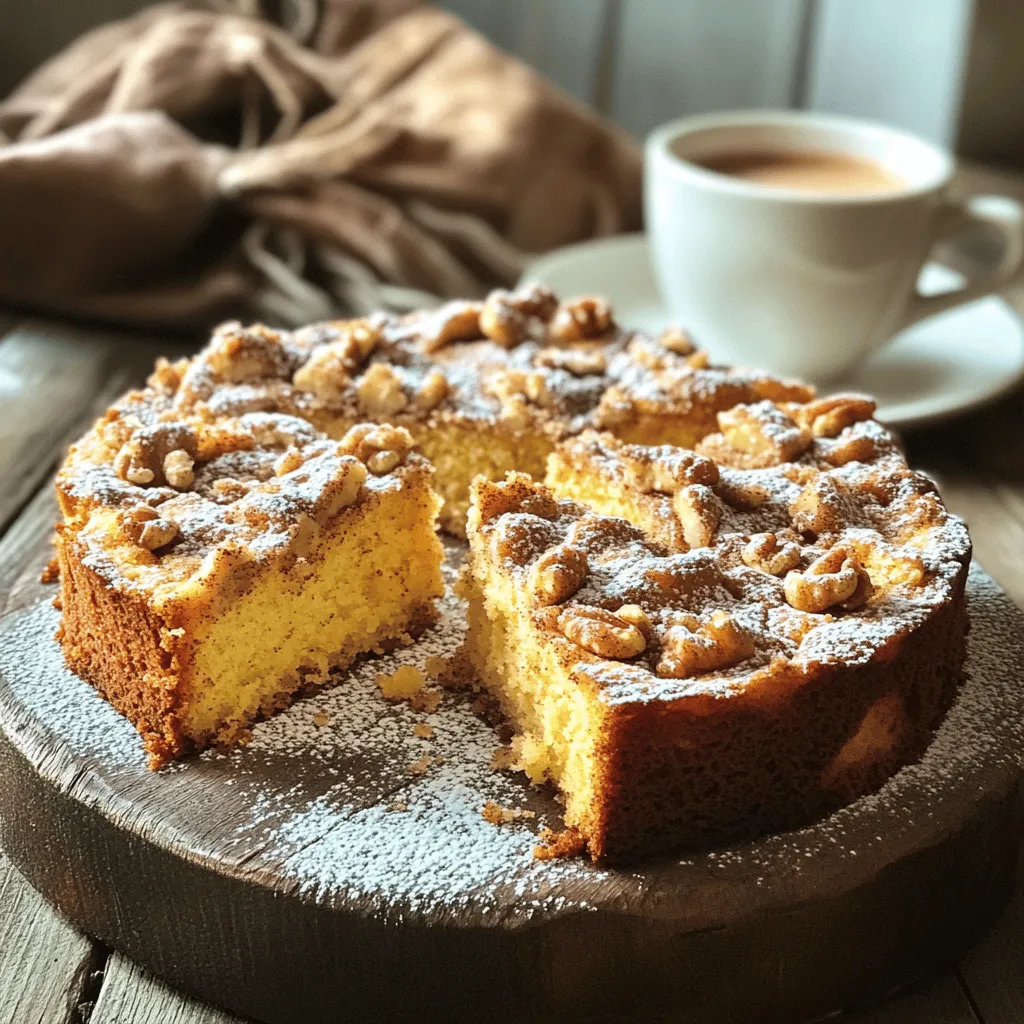
Are you ready to indulge in a warm, sweet treat that brightens your day? My Cinnamon Sugar Coffee Cake is

To make Air Fryer Jalapeño Popper Chicken, you need the following ingredients: - 2 boneless, skinless chicken breasts - 1/2 cup cream cheese, softened - 1/2 cup shredded cheddar cheese - 2 fresh jalapeños, seeded and finely chopped - 1/4 cup breadcrumbs (panko recommended for extra crunch) - 1 tsp garlic powder - 1 tsp onion powder - 1/2 tsp smoked paprika - Salt and pepper to taste - Olive oil spray You can swap the cream cheese for Greek yogurt if you like. For extra spice, use more jalapeños or add a dash of hot sauce to the filling. To prepare this dish, you will need a few essential tools: - Mixing bowl - Measuring cups - Air fryer - Sharp knife - Cutting board - Plate for breadcrumbs Optional tools that can enhance your cooking experience include a food thermometer. It helps ensure your chicken is cooked through to 165°F. First, preheat your air fryer to 375°F (190°C). This step is key for even cooking. While it warms up, gather your ingredients. In a medium bowl, mix 1/2 cup of softened cream cheese, 1/2 cup of shredded cheddar cheese, and 2 finely chopped jalapeños. Add 1 teaspoon of garlic powder, 1 teaspoon of onion powder, 1/2 teaspoon of smoked paprika, and sprinkle in some salt and pepper. Mix until smooth. Next, take your two boneless, skinless chicken breasts. Carefully slice a pocket into the side of each chicken breast. Make sure not to cut all the way through. This pocket will hold your tasty filling. Stuff each chicken breast pocket with the cheese mixture. Make sure it is filled well and sealed tightly. Now, let’s move to breading the chicken. Place 1/4 cup of breadcrumbs on a plate. Lightly spray the stuffed chicken breasts with olive oil. Then, coat them in the breadcrumbs, pressing gently to make them stick. This gives a nice crunch when cooked. Place the coated chicken breasts in the air fryer basket in a single layer. Lightly spray the tops with olive oil again. Air fry for 15-18 minutes, flipping halfway through the cooking time. The chicken is done when it reaches an internal temperature of 165°F and the coating is golden brown and crispy. Once cooked, remove the chicken from the air fryer. Let it rest for about 5 minutes. This helps keep it juicy. For serving, slice the stuffed chicken breasts diagonally. Arrange them on a platter for a nice look. You can garnish with chopped cilantro or extra jalapeño slices for color. Serve with a side of ranch dressing for dipping. Enjoy your tasty Air Fryer Jalapeño Popper Chicken! To achieve crispy breadcrumbs, use panko breadcrumbs. They give a great crunch. Lightly spray the chicken with olive oil before coating. This helps the breadcrumbs stick better. To check chicken doneness, use a meat thermometer. The inside should reach 165°F. If you don’t have one, cut into the chicken. It should be white, not pink. For extra flavor, add spices like cayenne pepper or chili powder. A sprinkle of smoked cheese can also enhance taste. If you want more heat, add more jalapeños. You can also leave some seeds for extra spice. If your chicken is overcooked, it may be dry. Cook at a lower temperature next time. Flip the chicken halfway to avoid burning. If it’s undercooked, return it to the air fryer for a few more minutes. To prevent filling leakage, seal the chicken well after stuffing. Use toothpicks if needed. If some filling leaks out, it’s okay! Just serve it with a side of ranch dressing for dipping. {{image_2}} You can easily switch the proteins in this dish. Ground turkey works great and stays juicy. If you want a meatless option, try using jackfruit or tofu. Both will soak up the flavors well. For those avoiding dairy, using vegan cream cheese and cheese gives a tasty dairy-free version. Look for brands that melt nicely for the best results. Want to mix things up? You can infuse different flavors into the dish. Try buffalo sauce for a spicy kick or barbecue sauce for a sweet twist. Both will give your chicken a new vibe. Adding fresh herbs like cilantro or parsley can brighten the flavors. You can also toss in some chopped spinach or bell peppers for extra texture and color. If you follow a low-carb or keto diet, skip the breadcrumbs. You can use crushed pork rinds for a crunchy topping instead. They add great flavor and keep it low-carb. For those needing gluten-free options, look for gluten-free breadcrumbs. They work just as well and keep the dish safe for everyone at your table. After cooking, place your Air Fryer Jalapeño Popper Chicken in an airtight container. This keeps it fresh and tasty. You can store it in the fridge for up to three days. Always let the chicken cool before sealing it. This helps prevent moisture buildup. To freeze your chicken, wrap each piece tightly in plastic wrap. Then, place them in a freezer bag. You can freeze the chicken for up to three months. When you are ready to eat, take it out and thaw in the fridge overnight. To reheat, use the air fryer at 350°F for about 10 minutes. This keeps it crispy and warm. You can prepare the filling a day ahead. Just store it in the fridge. This makes it easier to stuff the chicken when you’re ready to cook. You can also cook several chicken breasts at once. This way, you’ll have meals ready for the week. Just follow the storage tips for the best results. What temperature should chicken be cooked to for safety? Chicken must reach an internal temperature of 165°F (75°C) to be safe to eat. Use a food thermometer to check. This helps kill harmful bacteria. Always check the thickest part of the chicken. Can I use frozen chicken for this recipe? I recommend using fresh chicken for the best results. If you use frozen chicken, thaw it first. This ensures even cooking and flavor. If you cook it frozen, it may take much longer and won’t be as tender. Can I substitute cream cheese with other cheeses? Yes, you can use other soft cheeses. Options like ricotta or goat cheese work well. They add different flavors. Just keep the texture similar to cream cheese for good results. How can I make the dish spicier? To add more heat, use more jalapeños. You can also add hot sauce to the cheese mixture. Another option is to sprinkle crushed red pepper flakes on top before cooking. This will give your dish a spicy kick. How does an air fryer compare to traditional frying? Air fryers use hot air to cook food. They need less oil than traditional frying. This means less fat and fewer calories. Food cooked in an air fryer also gets crispy without deep frying. Do I need to preheat my air fryer every time? Preheating is not always necessary, but it helps. It ensures even cooking and better texture. If your air fryer has a preheat setting, use it for best results. We covered everything you need to make Air Fryer Jalapeño Popper Chicken. You learned about ingredients, tools, and step-by-step instructions. I shared tips for perfecting your dish and suggested fun variations to suit your taste. Remember, this meal suits many diets with easy swaps. Store leftovers properly to enjoy later. Dive into your cooking adventure and impress others with this tasty dish! You'll have fun making it and eating it too.

Air Fryer Jalapeño Popper Chicken Flavorful and Easy

Get ready to impress your taste buds with Air Fryer Jalapeño Popper Chicken! This dish combines spicy jalapeños, creamy cheese,

To make Slow Cooker Loaded Potato Soup, you need the right mix of fresh ingredients. Here is what you will need: - 6 medium russet potatoes, peeled and diced - 1 medium onion, finely chopped - 3 cloves garlic, minced - 4 cups vegetable broth - 1 cup heavy cream or coconut cream for a dairy-free option - 1 cup shredded sharp cheddar cheese (plus extra for topping) - 1 cup cooked bacon bits (or tempeh bacon for a vegetarian option) - Seasonings: thyme, onion powder, garlic powder, salt, pepper - Optional toppings: chopped green onions, sour cream These ingredients come together to create a rich and creamy soup. The russet potatoes give it a hearty base, while the onion and garlic add depth. The cream provides a velvety texture. Cheese and bacon bits bring extra flavor and warmth. You can easily adjust the toppings to suit your taste. Enjoy this cozy dish that warms you from the inside out! To start, gather all your ingredients. You will need six medium russet potatoes, one medium onion, three cloves of garlic, and four cups of vegetable broth. Add these to your slow cooker. Next, include one teaspoon each of dried thyme, onion powder, garlic powder, salt, and pepper. Stir everything well to combine. Now, cover the slow cooker. Set it to cook on low for seven to eight hours or on high for four to five hours. This cooking time helps the potatoes become tender and flavorful. Cooking on low allows for a gentle heat, which makes the potatoes soft and creamy. If you're pressed for time, using the high setting works well. Both methods yield tasty soup, but the low setting creates a richer flavor. To achieve your desired texture, use a potato masher or an immersion blender. You can mash a portion of the soup while leaving some chunks intact. This gives the soup a nice, hearty feel. After your potatoes are cooked, it’s time for the creamy goodness. Stir in one cup of heavy cream or coconut cream. Add one cup of shredded sharp cheddar cheese for that delicious cheesy flavor. Mix until everything melts and blends together. Just before serving, stir in one cup of cooked bacon bits or tempeh bacon if you want a vegetarian option. Let it heat for about ten minutes. This adds a savory touch that's hard to resist. Now, your soup is ready to serve! Choosing the right potato makes a big difference. I love using russet potatoes for this soup. They are starchy and create a creamy texture. For even cooking, cut the potatoes into similar-sized pieces. This helps them cook at the same rate. If you want a dairy-free version, try using coconut cream instead of heavy cream. It adds a nice, rich flavor. For a vegetarian twist, use tempeh bacon. It gives you that smoky taste without the meat. To boost the flavor, add more seasoning. Try a pinch of smoked paprika or cayenne pepper for heat. Fresh herbs like parsley or chives can add a fresh taste. Just chop them and sprinkle them on top before serving. {{image_2}} You can change your loaded potato soup by adding new veggies. Carrots and celery bring crunch and color. They add flavor and more nutrients. Just chop them up and toss them in with the potatoes. You can also add spices for heat. A pinch of cayenne or chili powder gives a nice kick. Adjust the amount to your liking. Pairing this soup with bread or salad makes it a full meal. A crusty bread or a fresh garden salad balances the creaminess. For a special touch, serve soup in bread bowls. It looks fun and tastes great! You can also add toppings like crispy bacon bits or a sprinkle of cheese. You can turn this soup into a loaded potato casserole. After cooking, pour it into a baking dish. Top it with cheese, bacon, and breadcrumbs. Bake it at 350°F for about 20 minutes. This adds a golden crust and makes it even more delicious. Serve it hot for a cozy meal! To store leftovers, let the soup cool first. Then, scoop it into containers. Use airtight containers for the best results. Glass jars or BPA-free plastic containers work well. Make sure to leave some space at the top. This allows for any expansion when freezing. To freeze the soup, follow these steps: First, let it cool completely. Next, pour it into freezer-safe bags or containers. Flatten bags for easy stacking. Label them with the date. When ready to eat, thaw it in the fridge overnight. For reheating, warm it in a pot on low heat. Stir often to avoid burning. In the fridge, the soup lasts about three to four days. If you freeze it, it can last up to three months. For the best taste, eat it sooner rather than later. How long does it take to cook in a slow cooker? Cooking this soup in a slow cooker takes about 7-8 hours on low. If you are short on time, you can cook it on high for 4-5 hours. The goal is to make sure the potatoes are nice and soft for the best flavor. Can I use pre-cooked potatoes? Yes, you can use pre-cooked potatoes to save time. Just add them in the last hour of cooking. This helps keep their texture and flavor without turning mushy. Is this soup gluten-free? Yes, this soup can be gluten-free! All the ingredients listed, like vegetable broth and potatoes, are naturally gluten-free. Just check your broth for any hidden gluten. Caloric content per serving Each serving of this loaded potato soup has about 400 calories. The exact number may vary based on the toppings and ingredients you use. Health benefits of key ingredients - Potatoes: They are rich in vitamins and minerals. They also provide fiber, which helps digestion. - Onion and garlic: Both have immune-boosting properties. They add flavor and health benefits. - Cheese: Offers calcium and protein, making the soup more filling. - Bacon or tempeh: Provides protein and adds a savory kick. Best practices for preparing soup ahead of time To prepare this soup ahead of time, chop all your veggies the night before. Store them in the fridge in an airtight container. You can also measure out the spices and keep them ready. This way, you just need to combine everything in the slow cooker. How to reheat without losing texture When reheating, add a splash of broth or cream. This will keep the soup creamy and smooth. Heat it gently on the stove or in the microwave. Stir often to avoid any lumps. You now have a simple yet tasty recipe for creamy potato soup. We covered every aspect, from ingredients to preparation. You learned useful tips for cooking and flavoring, along with variations to try. Don’t forget about storage to keep your soup fresh. Whether you want a cozy dinner or a fun dish, this soup can do it all. Enjoy making it your own and sharing it with friends and family. The warmth and comfort of this soup make it a winner any time.

Slow Cooker Loaded Potato Soup Cozy and Heartwarming Dish

Looking for a cozy, heartwarming dish that fills your kitchen with warmth? My Slow Cooker Loaded Potato Soup is the

- 4 boneless skinless chicken breasts - 2 cups baby potatoes, halved - 1 cup bell peppers, chopped (a mix of red, yellow, and green) - 1 cup zucchini, sliced - 1 cup cherry tomatoes The main ingredients for this dish are simple yet flavorful. The chicken breasts provide lean protein. The baby potatoes add heartiness. Mixing bell peppers gives vibrant colors. Zucchini brings a nice crunch. Cherry tomatoes offer sweetness and freshness. - 4 cloves garlic, minced - 3 tablespoons olive oil - 2 teaspoons dried oregano - 2 teaspoons dried thyme - 1 teaspoon paprika - Salt and pepper to taste For the marinade, garlic is key. It adds depth and aroma. Olive oil helps coat the chicken and veggies. Dried oregano and thyme give a classic flavor. Paprika adds a subtle smokiness. Salt and pepper enhance all the tastes. - Fresh parsley Fresh parsley is a great garnish. It adds a pop of color. Plus, it brings a fresh taste to the dish. You can sprinkle it on right before serving. This small touch makes a big difference in presentation. - Preheat your oven to 400°F (200°C). - Line the sheet pan with parchment paper. This helps with easy cleanup later. - In a bowl, combine 3 tablespoons of olive oil, 4 cloves of minced garlic, 2 teaspoons of dried oregano, 2 teaspoons of dried thyme, 1 teaspoon of paprika, and salt and pepper to taste. - Mix well to create a tasty marinade. - Add the 4 boneless, skinless chicken breasts to the bowl. Coat them in the marinade. Let them sit for 10-15 minutes. This helps the chicken soak up all the flavors. - Place 2 cups of halved baby potatoes on one side of the sheet pan. Season them with a drizzle of olive oil, salt, and pepper. Toss to coat well. - After marinating, position the chicken breasts in the center of the sheet pan. - On the other side of the pan, add 1 cup of chopped bell peppers, 1 cup of sliced zucchini, and 1 cup of cherry tomatoes. Drizzle with any leftover marinade, olive oil, salt, and pepper, then toss to coat. - Bake everything in the preheated oven for 25-30 minutes. The chicken should reach an internal temperature of 165°F (74°C). The potatoes should be tender. - Once done, remove the pan from the oven. Let the chicken rest for a few minutes before slicing. This keeps it juicy. Garnish with fresh chopped parsley for a nice touch! To keep your chicken juicy, marinate it for at least 10–15 minutes. This helps lock in flavor and moisture. Make sure to coat the chicken well with the olive oil and herbs. If you have time, let it sit longer in the fridge. This gives it a deeper flavor. For even cooking of the veggies, cut them into similar sizes. This way, they will cook at the same rate. Spread them out on the sheet pan. Overcrowding can lead to steaming instead of roasting. For a pretty presentation, serve the dish right from the pan. Drizzle extra olive oil on top and sprinkle fresh parsley for color. If you want a more formal look, use a large platter. Arrange the chicken and veggies nicely for a feast for the eyes. You can also serve this dish family-style. Let everyone help themselves. This makes it fun and relaxed. You could even add a side of crusty bread to soak up the juices. To boost flavors, try adding fresh herbs like rosemary or basil. These can add a new twist. You can also sprinkle some red pepper flakes for a hint of spice. If you have time, marinate the chicken longer. A few hours or even overnight can enhance the taste. Just be careful not to over-marinate, as it can make the chicken too soft. {{image_2}} You can switch up the veggies based on the season. Try these options: - Asparagus in spring - Brussels sprouts in fall - Carrots and green beans year-round For colorful additions, consider: - Purple cabbage for crunch - Butternut squash for sweetness - Broccoli for a hearty bite These swaps make your meal vibrant and tasty. If you want to swap chicken, fish or tofu work great. - For fish, use salmon or tilapia. Bake for about 15-20 minutes. - For tofu, press it first. Cut it into cubes and bake for 25-30 minutes. These options keep the dish fun and new. To make a plant-based dish, use these ingredients: - Replace chicken with firm tofu or chickpeas. - Add extra veggies like spinach or kale. - Use a blend of olive oil, lemon juice, and herbs for flavor. This vegan version is hearty and packed with nutrients. To store leftovers, place them in an airtight container. This keeps the chicken and veggies fresh. You can store them in the fridge for up to three days. For the best taste, eat them within two days. You can freeze this dish for later use. Let it cool down first, then put it in a freezer-safe container. It should last up to three months in the freezer. When you want to eat it, thaw it overnight in the fridge. To reheat, bake in the oven at 350°F (175°C) until hot. This usually takes about 20-25 minutes. Transform your leftovers into new meals. Chop the chicken and toss it with pasta or salad. You can also make a hearty soup by adding broth and some extra veggies. This way, you can enjoy the flavors again in a fun new way! Yes, you can prepare this dish ahead. To do this, marinate the chicken and chop the veggies a day before. Store them in the fridge. When you’re ready, just spread everything on the pan and bake. This saves time and makes the chicken even tastier. This dish pairs well with many sides. Consider serving it with: - Rice or quinoa - A fresh green salad - Crusty bread - Steamed broccoli or green beans These sides balance the meal and add different textures. To check if your chicken is done, use a meat thermometer. The internal temperature should reach 165°F (74°C). If you don’t have a thermometer, cut into the thickest part. The meat should be white and juices should run clear. Avoid pink meat, as this means it is not safe to eat. Yes, reheating leftovers is safe if done properly. Store the leftovers in the fridge. When you reheat, ensure the chicken reaches at least 165°F (74°C) again. Use the microwave or oven for even heating. Avoid leaving food out for more than two hours after cooking. This blog post covered delicious sheet-pan herb chicken with veggies. We explored main ingredients like chicken, potatoes, and bell peppers. We made a tasty marinade and learned the steps to bake perfectly juicy chicken. Remember to store leftovers well and consider variations to keep meals exciting. Whether you adjust ingredients or try different flavors, this recipe is simple and flexible. You can enjoy a healthy meal while saving time and effort. Happy cooking!

Sheet-Pan Herb Chicken & Veggies Easy Dinner Recipe

Are you searching for a simple, delicious dinner that’s ready in no time? Look no further! This Sheet-Pan Herb Chicken

To make Salted Caramel Pretzel Brownie Bars, you need these simple ingredients: - 1 cup unsalted butter (2 sticks) - 2 cups granulated sugar - 4 large eggs - 1 teaspoon vanilla extract - 1 cup all-purpose flour - 1 cup unsweetened cocoa powder - 1/2 teaspoon salt - 1 cup semi-sweet chocolate chips - 1 1/2 cups mini pretzels, crushed - 1 cup homemade or store-bought salted caramel sauce - Sea salt for garnish Each ingredient plays an important role. The unsalted butter gives a rich taste. Granulated sugar adds sweetness and helps with the texture. Large eggs bind the ingredients together. Vanilla extract adds a warm flavor that enhances the chocolate. All-purpose flour and cocoa powder create the brownie base. The salt balances the sweetness. Semi-sweet chocolate chips add extra chocolatey goodness. Mini pretzels bring a crunchy texture and a salty bite. The salted caramel sauce makes these bars special and delicious. Finally, a sprinkle of sea salt on top gives a finishing touch. When gathering these ingredients, I recommend using high-quality chocolate. It can truly elevate your brownie bars. Make sure to crush the pretzels well for an even distribution throughout the batter. This mix of sweet and salty will make your taste buds dance with joy! 1. Preheat your oven to 350°F (175°C). This step is key for even baking. 2. Grease a 9x13 inch baking dish with cooking spray. You can also use parchment paper for easy removal. 1. In a medium saucepan, melt 1 cup of unsalted butter over low heat. 2. Once melted, remove it from heat and stir in 2 cups of granulated sugar until mixed well. 3. Add 4 large eggs one at a time. Mix well after each egg, then stir in 1 teaspoon of vanilla extract. 1. In a separate bowl, sift together 1 cup of all-purpose flour, 1 cup of unsweetened cocoa powder, and 1/2 teaspoon of salt. 2. Gradually mix these dry ingredients into the wet mixture until just combined. Be careful not to overmix. 1. Fold in 1 cup of semi-sweet chocolate chips and 1 1/2 cups of crushed mini pretzels until evenly mixed. 2. Pour about half of the brownie batter into the greased baking dish, smoothing it into an even layer. 3. Drizzle half of the salted caramel sauce over the brownie layer. Use a knife to swirl it in for a marbled look. 4. Pour the remaining brownie batter on top, spreading it evenly. Drizzle the rest of the caramel sauce and swirl again. 5. Sprinkle a pinch of sea salt on top for that perfect salty-sweet balance. Now you're ready to bake! - Checking doneness with a toothpick: Insert a toothpick into the center of the brownies. If it comes out with moist crumbs, they're done. This is key to a gooey texture. - Cooling recommendations: Let the brownie bars cool completely in the dish. This makes cutting easier and keeps them from falling apart. - Serving suggestions: Serve the brownie bars on a nice platter. A drizzle of extra salted caramel on top adds a special touch. Add crushed pretzels for extra crunch. - Garnishing ideas: Fresh mint sprigs can brighten up your dish. They add color and a hint of flavor that contrasts well with the sweet bars. - Overmixing the batter: Mix just until combined. Overmixing makes the brownies tough. You want them chewy and soft. - Not measuring ingredients accurately: Use proper measuring cups. Too much flour or cocoa can ruin the texture. Accurate measuring is crucial for great results. {{image_2}} To make your salted caramel pretzel brownie bars even better, try adding nuts. Chopped pecans or walnuts boost the flavor and add crunch. You can also use different types of chocolate. For a richer taste, mix in dark chocolate chips or use white chocolate for a sweet twist. For those who need gluten-free options, swap all-purpose flour with a gluten-free blend. This keeps the texture creamy and soft. If you want vegan modifications, replace eggs with flaxseed meal mixed with water. Use vegan butter and dairy-free chocolate chips for a delicious result. These brownie bars pair great with ice cream. Vanilla or salted caramel ice cream adds a creamy touch. For parties, serve mini versions. Cut the bars into smaller squares. This way, guests can enjoy a bite-sized treat without too much guilt. To keep your salted caramel pretzel brownie bars fresh, store them in an airtight container. Place a piece of wax paper between layers to avoid sticking. If you want to refrigerate them, they will stay good for about a week. Just remember to let them cool completely before you store them. If you have leftovers, freezing is a great option. Cut the bars into squares and wrap each one in plastic wrap. Place them in a freezer bag. They can last up to three months in the freezer. When you are ready to eat, let them thaw in the fridge overnight. These brownie bars stay fresh for about a week when stored correctly. You will know they are still good if they look moist and smell sweet. If you see any mold or if they smell off, it is best to toss them. Always check for any signs of spoilage, like a dry crust or hard texture. Enjoy your treats while they are at their best! Yes, you can use margarine. But, the taste may change. Margarine has more water than butter. This may make your brownie bars less rich. The texture might be a bit softer, too. If you use margarine, pick a high-quality brand. This will help keep the flavor close to butter. If you need a caramel alternative, try butterscotch sauce. It has a similar sweet flavor. You can also use chocolate sauce for a twist. For a healthier choice, try date caramel. It is made from blended dates and has a nice sweetness. Each option will change the taste, so choose what you like best. To check doneness, use a toothpick. Insert it into the center of the bars. If it comes out with moist crumbs, they are done. If it has wet batter, bake a bit longer. Look for a shiny top and firm edges, too. These signs mean your brownie bars are ready to cool. This blog post walked you through making delicious brownie bars. You learned about key ingredients like butter, chocolate chips, and mini pretzels. The step-by-step guide ensured your baking success, covering everything from prep to serving. I shared tips to avoid common mistakes, storage advice, and variations for everyone’s taste. Try these brownie bars for a fun treat. They’re sure to impress your friends and family. Happy baking!

Salted Caramel Pretzel Brownie Bars Delightful Treat

Are you ready to indulge in a treat that combines sweet and salty perfection? My Salted Caramel Pretzel Brownie Bars

To make honey pistachio baklava twists, gather these ingredients: - 1 package of phyllo dough (16 oz), thawed - 1 cup unsalted pistachios, finely chopped - 1 cup walnuts, finely chopped - 1/2 cup granulated sugar - 1 teaspoon ground cinnamon - 1/2 cup unsalted butter, melted - 1 cup honey - 1/2 cup water - 1 teaspoon vanilla extract - 1/4 cup orange blossom water (optional) - Powdered sugar for dusting You can swap some ingredients if needed. Use pecans instead of walnuts for a different flavor. Almonds also work well in place of pistachios. If you want less sugar, try using honey alone. For a vegan version, replace butter with coconut oil. You can also skip the orange blossom water if you can't find it. Fresh ingredients make your baklava taste great. Choose phyllo dough that is not torn or dry. Check the date on the package. For nuts, pick ones that are firm and smell fresh, not rancid. If you can, buy nuts from a bulk bin. This way, you can ensure they are fresh. Honey should be pure and thick, not overly runny. If possible, look for local honey for the best flavor. First, preheat your oven to 350°F (175°C). This step is key for crisp baklava twists. While the oven warms, tidy up your kitchen. Gather all your tools and ingredients. This will help you work smoothly. In a mixing bowl, combine these ingredients: - 1 cup unsalted pistachios, finely chopped - 1 cup walnuts, finely chopped - 1/2 cup granulated sugar - 1 teaspoon ground cinnamon Mix them well and set the bowl aside. This nut filling brings great flavor and crunch. Unroll your phyllo dough carefully. Cover it with a damp cloth to keep it moist. Lay one sheet down on your clean work surface. Brush it lightly with melted butter. Add another sheet and repeat this step. Aim for 6 to 8 layers. Now, sprinkle a handful of the nut mixture along one edge of the phyllo. Lift the edge with the nuts and roll it tightly. Twist the log gently to create a spiral shape. Place each twist on a greased baking tray. Repeat until you use all the phyllo and nut mix. Brush the tops of your twists with melted butter. Bake them in the preheated oven for 25 to 30 minutes. Look for a golden brown color. While baking, you can make the syrup. In a small saucepan, mix: - 1 cup honey - 1/2 cup water - 1 teaspoon vanilla extract - 1/4 cup orange blossom water (optional) Bring this to a boil. Then, reduce the heat and simmer for about 10 minutes. Let it cool once it thickens. When the baklava twists finish baking, pour the cooled syrup over them. Make sure to cover each twist well. Let them cool completely so they soak up the syrup. Before serving, dust the twists with powdered sugar. Enjoy your delicious baklava twists! Handling phyllo dough can be tricky. Keep it moist to avoid tears. Use a damp cloth to cover unused sheets. This helps keep them soft. Always work on a clean, dry surface. When layering, brush melted butter between each sheet. This adds flavor and helps hold them together. For the best crispy texture, bake the twists until golden brown. An oven at 350°F (175°C) is perfect. Brush the top with melted butter before baking. This adds a nice shine and crunch. Baking for 25-30 minutes ensures they are crispy, not soggy. To make your baklava twists even better, add flavors to the nuts. Try adding a pinch of cardamom or nutmeg to the filling. For a floral touch, use orange blossom water in the syrup. It adds a lovely aroma. You can even drizzle some melted chocolate on top for a sweet twist. {{image_2}} You can change the nuts in this recipe. Almonds and pecans work well. Hazelnuts add a nice crunch too. Mix and match to find your favorite combo. Each nut brings a unique flavor. Try using only one type of nut for a simpler twist. Just remember to chop them finely for the best texture. Honey is a classic choice, but you can try maple syrup or agave. These sweeteners give a different taste. If you want less sugar, use stevia or monk fruit. Adjust the amount based on your taste. Always check the sweetness of your chosen sweetener before adding it to the syrup. Add more flavor to your baklava twists! You can mix in spices like cardamom or nutmeg. Citrus zest, like lemon or orange, brightens the dish. For a floral note, consider adding rose water. Just a few drops can change the entire flavor profile. Experiment with these options to create a baklava twist that’s uniquely yours. To keep your honey pistachio baklava twists fresh, store them in an airtight container. Place parchment paper between layers to avoid sticking. Keep the container at room temperature for up to five days. If you want to keep them longer, refrigeration is an option, but it may change the texture slightly. You can freeze baklava twists for later enjoyment. First, let them cool completely. Wrap each twist in plastic wrap, then place them in a freezer-safe bag. This way, they can last for up to three months. When you are ready to eat, take them out and let them thaw in the fridge overnight. To reheat baklava twists, preheat your oven to 350°F (175°C). Place the twists on a baking sheet. Heat for about 10-15 minutes, or until they are warm and crispy again. Avoid the microwave, as it may make them soggy. Enjoy your baklava twists fresh and warm! Baklava has roots in the Middle East and Mediterranean. Its history goes back centuries. Many cultures, like the Greeks and Ottomans, claim it as their own. The exact origin is hard to pinpoint. However, the blend of nuts and honey is a common theme. Traditionally, baklava represents celebration and hospitality. People enjoy it during holidays and special events. Yes, you can make baklava twists ahead of time. Prepare the twists and store them in the fridge. Cover them tightly with plastic wrap. When you are ready to bake, just pop them in the oven. If you want to prepare the syrup, do that too. Keep it in the fridge until you bake the twists. Homemade baklava lasts about a week at room temperature. Make sure to store it in an airtight container. If you want it to last longer, you can freeze it. Frozen baklava can last up to three months. Just let it thaw at room temperature before serving. Yes, you can make baklava twists gluten-free. Use gluten-free phyllo dough. Many brands offer this option. The taste and texture will still be great. Just check if the other ingredients are gluten-free as well. Baklava twists pair well with many drinks. Serve them with a strong tea or coffee. A scoop of vanilla ice cream is also a great choice. For a fun twist, add fresh fruits like berries. These options enhance the sweet taste of baklava. In this blog post, we covered the essential ingredients and step-by-step instructions for making baklava twists. We explored substitution options and shared tips for selecting the freshest ingredients. You learned how to handle phyllo dough for crispy results and discovered various flavor enhancements. Remember to store your baklava properly and enjoy it fresh or frozen. This treat is not just delicious; it also carries a rich history. Now, go ahead and impress your friends and family with your new baklava skills!

Honey Pistachio Baklava Twists Delightfully Sweet Treat

Are you ready for a sweet treat that will wow your friends and family? Honey Pistachio Baklava Twists are simple

Older posts
Newer posts
← Previous Page1 … Page30 Page31 Page32 … Page84 Next →

dsad

© 2026 Foodish Talk • Built with GeneratePress

Our Policies

  • Copyright Policy
  • Cookie Policy
  • GDPR Policy
  • Privacy Policy
  • Disclaimer
  • Terms Of Use

More Information

  • Home
  • About
  • Contact
  • Appetizers
  • Dessert
  • Dinner
  • Drinks
©2026, Foodish Talk About Back To Top