Skip to content
DisclaimerTerms Of UseGDPR PolicyCookie Policy

Foodish Talk

  • Home
  • Drinks
  • Appetizers
  • Dinner
  • Dessert
  • About
  • Contact
  • Privacy Policy
DisclaimerTerms Of UseGDPR PolicyCookie Policy

NO-ING-IMG

To make Minute Shrimp Fried Rice, you need these key ingredients: - 2 cups cooked jasmine rice (day-old is best) - 1 cup shrimp, peeled and deveined - 1 cup mixed vegetables (peas, carrots, corn) - 2 green onions, chopped - 2 cloves garlic, minced - 2 tablespoons soy sauce - 1 tablespoon sesame oil - 1 tablespoon vegetable oil - 1 teaspoon ginger, grated - Salt and pepper to taste - Optional: sesame seeds for garnish You can swap some ingredients based on what you have. Use brown rice if you want more fiber. Frozen shrimp is fine if you don’t have fresh. You can also replace mixed vegetables with whatever you like, such as bell peppers or broccoli. If you want a gluten-free version, use tamari instead of soy sauce. Pick shrimp that look fresh and have a mild smell. They should be firm, not slimy. If you can, buy shrimp that are wild-caught. They often taste better and are more sustainable. Check for the size; larger shrimp make a great visual impact in your dish. Start by gathering all your ingredients. You need 2 cups of cooked jasmine rice. Day-old rice works best since it is dry and fluffy. Next, take 1 cup of shrimp and make sure they are peeled and deveined. Chop your green onions and any other vegetables you want to use. I like to use a mix of peas, carrots, and corn for color and taste. Heat 1 tablespoon of vegetable oil in a large skillet or wok over medium-high heat. Once the oil is hot, add the shrimp. Stir-fry them for about 2-3 minutes. They will change color and look pink and opaque when done. Remove the shrimp and set them aside. In the same skillet, add another tablespoon of oil. Toss in the minced garlic and grated ginger. Cook this for about 30 seconds, and your kitchen will smell amazing! Now, add the mixed vegetables. Stir-fry them for 3-4 minutes until they are tender-crisp. Time to bring it all together! Add the cooked rice to your skillet. Break up any clumps with a spatula. Then, stir in the cooked shrimp. Mix everything well so that the shrimp and veggies are evenly spread throughout the rice. Now we add some flavor! Pour 2 tablespoons of soy sauce and 1 tablespoon of sesame oil over your rice mixture. Stir everything together to coat all the ingredients. Season with salt and pepper to taste. Let it cook for another 2-3 minutes to let the flavors blend. Finally, add the chopped green onions and give it one last mix. Remove the skillet from heat. If you want, sprinkle some sesame seeds on top for extra crunch and flavor. Serve your Minute Shrimp Fried Rice hot and enjoy! To get great fried rice, use day-old jasmine rice. Fresh rice can be too sticky. Cool the rice completely before using. You can spread it out on a plate to help cool it faster. This way, the grains stay separate when you fry them. Add ginger and garlic for a tasty kick. Sauté them in oil before adding other ingredients. Use soy sauce and sesame oil to bring depth to your dish. Mix them well, so every bite has flavor. Don’t forget fresh green onions; they add a nice crunch and color. Don’t overcrowd the pan. This can steam the rice instead of frying it. Make sure your skillet is hot before adding ingredients. Also, avoid overcooking the shrimp. They should be pink and opaque but not rubbery. Lastly, always taste as you go to balance flavors. {{image_2}} If you want a vegetarian version, skip the shrimp. Use extra vegetables instead. You can try tofu, tempeh, or mushrooms. These options add protein and flavor. You can switch shrimp for chicken, beef, or pork. Just cut the meat into small pieces. Cook it the same way as shrimp. For a quick meal, use cooked rotisserie chicken. You can also use canned tuna for a twist. Feel free to add any vegetables you like. Bell peppers, broccoli, and snap peas work well. Chop them into small pieces for even cooking. This way, you can use up leftovers and add colors to your dish. The more veggies, the better! To keep your Minute Shrimp Fried Rice fresh, store it in an airtight container. Let the dish cool down first, then cover it tightly. This will help keep the flavors and moisture in. You can store it in the fridge for up to three days. If you notice any odd smell or color, it’s best to toss it out. When you want to reheat your fried rice, use a skillet or a microwave. If using a skillet, add a splash of water or oil to keep it moist. Heat it on medium until hot, stirring often. If you prefer the microwave, place the rice in a bowl and cover it with a damp paper towel. Heat for one to two minutes, checking halfway through to stir. You can freeze Minute Shrimp Fried Rice for future meals. Pack the cooled rice in a freezer-safe bag or container. Try to remove as much air as you can to prevent freezer burn. It will stay good for up to three months. To thaw, place it in the fridge overnight before reheating. This keeps the texture better than thawing in the microwave. Yes, you can use fresh shrimp. Just peel and devein them first. Fresh shrimp adds a nice flavor to your dish. Make sure to cook them until they turn pink and opaque. This will take about 2-3 minutes in your skillet. Jasmine rice is the best choice. It has a lovely aroma and a fluffy texture. Day-old rice works even better. This rice is less sticky after cooling. If you don’t have jasmine, long-grain rice is a good alternative. Leftover shrimp fried rice stays good for about 3-4 days in the fridge. Store it in an airtight container to keep it fresh. Always check for any off smells before eating. If it looks or smells strange, it’s best to throw it away. Yes, you can make shrimp fried rice ahead. It’s great for meal prep! Just cook it and let it cool before storing. Keep it in the fridge or freezer. Reheat it well before serving. We covered the key steps to make shrimp fried rice. Remember to choose quality shrimp, cook rice properly, and avoid common mistakes. You can customize the dish to fit your taste or even go vegetarian. Store leftovers well and reheat them properly for another meal. Use this guide to create a delicious shrimp fried rice dish that your friends and family will love. Enjoy your cooking and discover new flavors!

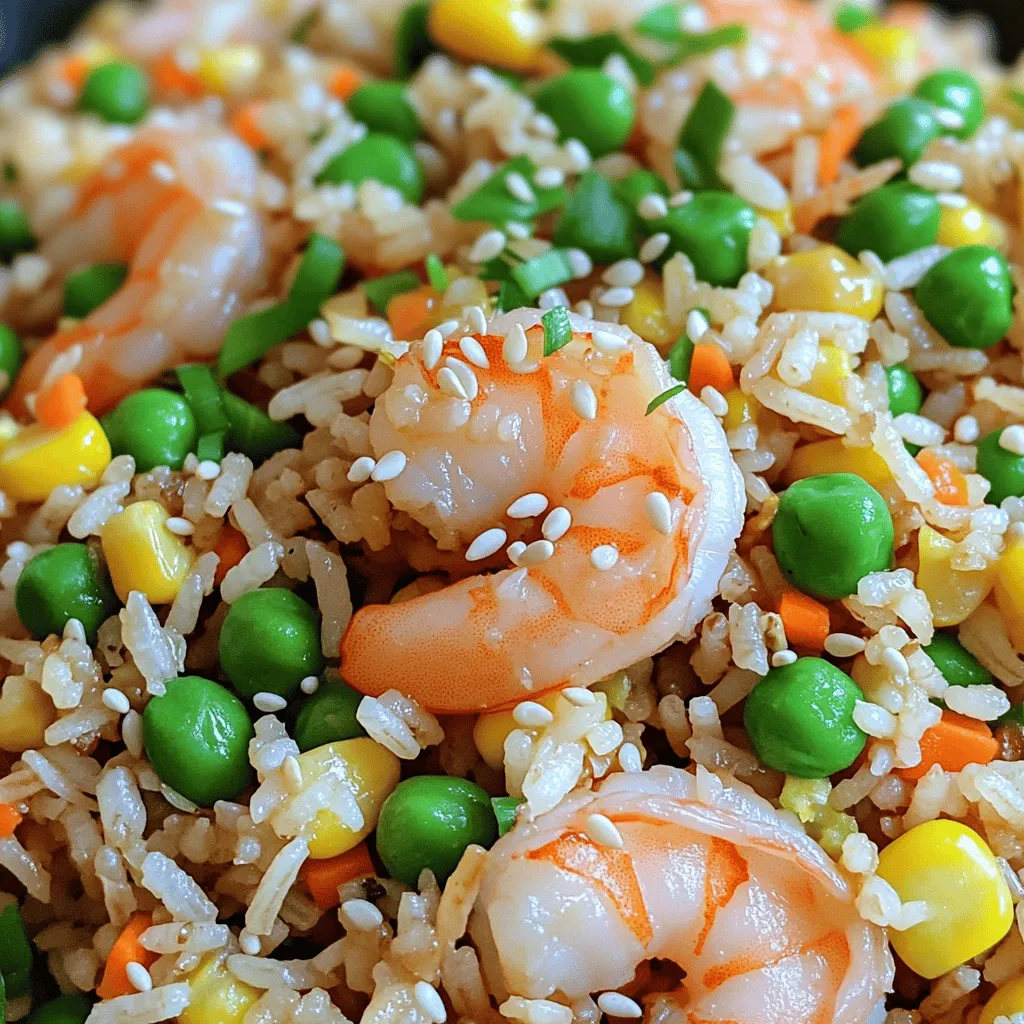
Minute Shrimp Fried Rice Quick and Easy Recipe

Do you need a quick and tasty meal? This Minute Shrimp Fried Rice recipe is perfect for you! In just

- 1 cup canned chickpeas, drained and rinsed - 1 large roasted red pepper (store-bought or homemade) - 2 tablespoons tahini - 2 tablespoons olive oil - 2 tablespoons lemon juice - 1 clove garlic, minced - ½ teaspoon ground cumin - Salt and pepper to taste - 2 tablespoons water (adjust for consistency) Chickpeas are the star of this dish. They give hummus its creamy texture and protein. Roasted red peppers add a sweet, smoky flavor. You can buy them ready-made or roast your own. Tahini, made from sesame seeds, gives richness. Olive oil adds smoothness and flavor. - Paprika - Fresh parsley These garnishes bring color and a touch of spice. Paprika adds warmth, while parsley adds freshness. - Food processor - Baking sheet A food processor makes blending easy. A baking sheet is needed for roasting the peppers. These tools help create a smooth and tasty hummus. - Preheating the Oven First, set your oven to 450°F (230°C). This high heat helps the peppers roast well. - Cutting and Roasting Cut one large red pepper in half. Remove all the seeds and white parts. Place the halves on a baking sheet. Drizzle them with a little olive oil. Roast for 25-30 minutes. The skin should blister and char. After roasting, let them cool. Then, peel off the skin. This step adds great flavor to your hummus. - Combining Ingredients in Food Processor In a food processor, add 1 cup of drained chickpeas. Next, add the roasted red pepper, 2 tablespoons of tahini, 2 tablespoons of olive oil, and 2 tablespoons of lemon juice. Don't forget the minced garlic and ½ teaspoon of ground cumin. - Achieving Desired Consistency Blend all the ingredients until smooth. If the mix is too thick, add water. Use 1 tablespoon at a time until it’s creamy. - Seasoning to Taste Taste your hummus. Add salt and pepper as needed. Blend again to mix in the seasoning. - Garnishing for Presentation Transfer the hummus to a bowl. Drizzle with more olive oil. Sprinkle paprika on top and add fresh parsley for a pop of color. Enjoy your tasty roasted red pepper hummus! When making hummus, start with great chickpeas. Use canned chickpeas for ease. Look for brands that use simple ingredients. Check for no added sugars or preservatives. If you want, you can cook dried chickpeas. This may take longer but can add more flavor. Next, choose your roasted red peppers. You can buy them in jars or roast them yourself. Store-bought peppers are quick and tasty. If you roast your own, choose fresh, ripe peppers. This gives a sweeter taste. Fresh tahini is key for depth. Aim for a brand that uses only sesame seeds. This ensures a rich flavor. Avoid tahini with added oils or preservatives. A good tahini can make your hummus shine. To get that smooth texture, water is your friend. Start with two tablespoons of water. If your hummus is too thick, add more water. Do this one tablespoon at a time. Blend well after each addition. Using a strong food processor helps too. Blend for longer to break down ingredients fully. If you notice lumps, keep blending until smooth. Patience is key here for the best result. Hummus pairs well with many snacks. Serve it with pita chips or fresh veggies. Carrot sticks, cucumber slices, and bell pepper strips are great. They offer a nice crunch and fresh taste. For something different, use hummus as a spread. Try it on sandwiches or wraps for extra flavor. You can also use it as a dip for grilled meats. It adds a nice twist to your meal. Garnish your hummus for a beautiful look. Drizzle olive oil on top, sprinkle paprika, and add parsley. This makes your dish pop and look inviting. {{image_2}} To make your hummus spicy, add hot peppers or chili flakes. You can mix in diced jalapeños or a sprinkle of crushed red pepper. Start with a small amount. Taste as you go. The heat can change the flavor, so adjust it to your liking. This variation adds a fun kick! Fresh herbs can bring new life to your hummus. Try adding basil or cilantro for a fresh taste. Chop the herbs finely before mixing them in. You can also blend them directly into the hummus. This not only adds flavor but also brightens up the color. Experiment with different herbs to find your favorite! If you want to skip tahini, there are great substitutes. Use sunflower seed butter or pumpkin seed butter instead. They offer a creamy texture without nuts. You can also use extra olive oil or yogurt for added creaminess. These options keep your hummus smooth and tasty while being nut-free. To keep your roasted red pepper hummus fresh, store it in an airtight container. Place a layer of plastic wrap over the hummus before sealing the lid. This helps to prevent air from reaching the hummus. For refrigeration, keep it in the fridge right after serving. If you want to save hummus for a long time, freezing is a good option. Pour the hummus into a freezer-safe container. Leave some space at the top, as it will expand when frozen. You can freeze hummus for up to three months. How long can hummus last in the fridge? Homemade roasted red pepper hummus can last about five to seven days. Always check for any off smells or changes in texture before eating. If it looks or smells funny, it’s best to throw it away. Best practices for thawing and serving hummus involve moving it from the freezer to the fridge a day before you plan to eat it. This slow thaw keeps its texture nice. Once thawed, stir the hummus well. You can add a bit of olive oil or water to restore creaminess. Serve with fresh veggies or pita bread for a tasty snack! Roasted red pepper hummus is a tasty dip made from chickpeas and roasted red peppers. It has a smooth texture and a bright flavor. The main ingredients include: - 1 cup canned chickpeas, drained and rinsed - 1 large roasted red pepper - 2 tablespoons tahini - 2 tablespoons olive oil - 2 tablespoons lemon juice - 1 clove garlic, minced - ½ teaspoon ground cumin - Salt and pepper to taste - 2 tablespoons water This hummus is not just good for dipping. You can spread it on sandwiches or use it in salads. It adds flavor and nutrition to any meal. Yes, you can make hummus without tahini. Some tasty alternatives include: - Sunflower seed butter - Greek yogurt - Cashew butter These substitutes will change the taste a bit but can still be delicious. If you skip tahini, you may want to add a little more oil for creaminess. To make hummus creamier, try these tips: - Add water slowly until you reach the right thickness. - Use a high-speed blender or food processor for a smooth blend. - Blend longer to incorporate more air. You can also chill the hummus in the fridge before serving. This helps it to thicken and improves the flavor. This blog post covers how to make roasted red pepper hummus. You learned about key ingredients like chickpeas, roasted red peppers, tahini, and olive oil. I shared tips for achieving the right creaminess and storing your hummus properly. You can get creative with variations and garnishes to suit your taste. Making hummus at home is fun and easy. Enjoy your delicious creation with friends or family!

Roasted Red Pepper Hummus Simple and Tasty Recipe

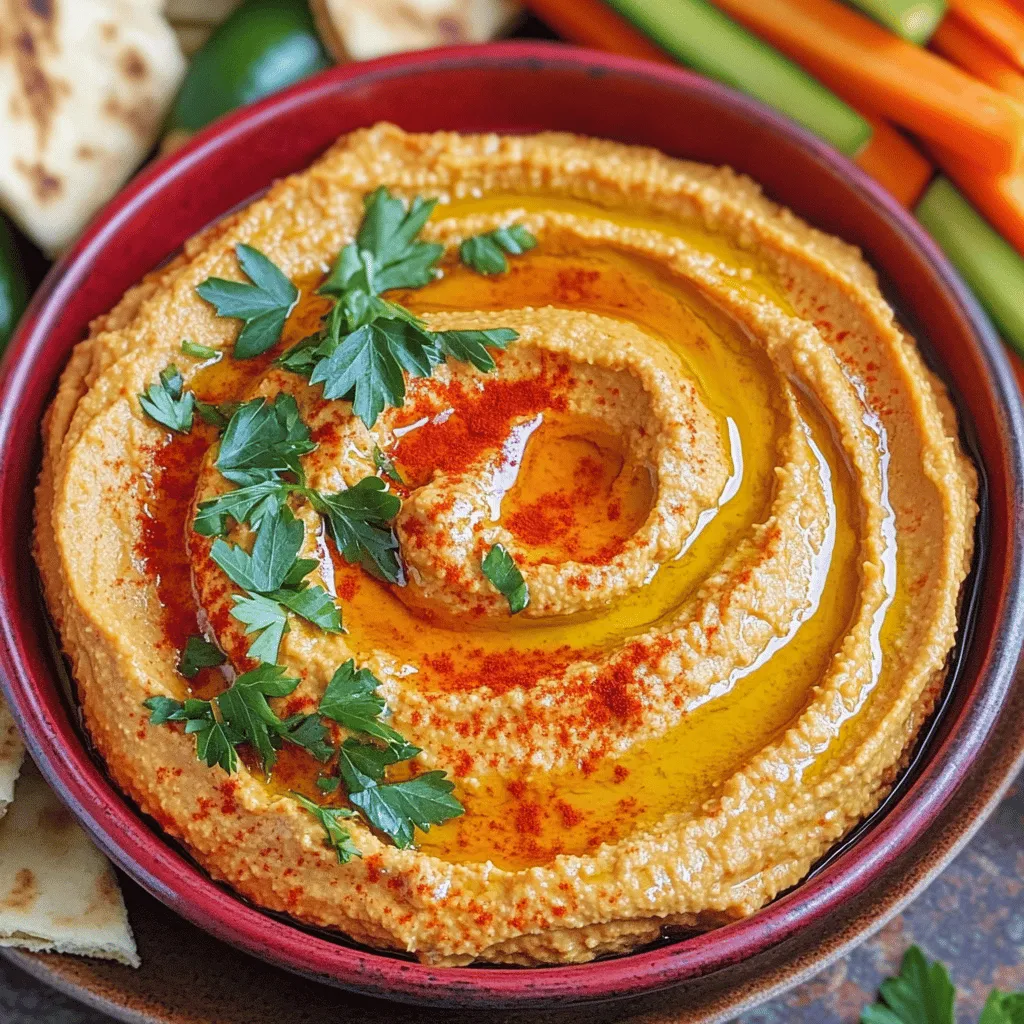
Looking for a delicious dip? Try my easy Roasted Red Pepper Hummus recipe! This creamy, flavorful spread combines chickpeas, roasted

To make delicious almond croissant muffins, gather these simple ingredients: - 1 cup almond flour - 1 cup all-purpose flour - 1/2 cup granulated sugar - 1 tablespoon baking powder - 1/2 teaspoon salt - 1/2 cup unsalted butter, melted - 1 cup milk - 2 large eggs - 1 teaspoon almond extract - 1/2 cup sliced almonds - 1/4 cup powdered sugar (for dusting) Each ingredient plays a key role. Almond flour gives a nutty taste and moist texture. All-purpose flour helps bind the muffins. Granulated sugar adds sweetness, while baking powder makes them rise. Salt enhances all the flavors perfectly. Unsalted butter brings richness. Milk keeps the muffins tender. Eggs provide structure and moisture. Almond extract boosts the almond flavor, and sliced almonds give a delightful crunch. Finally, powdered sugar on top adds a sweet finish. These ingredients blend to create a tasty treat you will love. Start by preheating your oven to 350°F (175°C). This step is key for even baking. Next, line your muffin tin with paper liners. This keeps the muffins from sticking and makes cleanup easy. In a large bowl, combine the almond flour, all-purpose flour, granulated sugar, baking powder, and salt. Use a whisk to blend everything well. This helps mix the dry ingredients evenly, ensuring each muffin has good flavor. In another bowl, mix the melted butter, milk, eggs, and almond extract. Stir until all the wet ingredients are well combined. This mixture adds moisture and flavor to your muffins. Pour the wet mixture into the bowl with the dry ingredients. Stir gently until the batter is just combined. Don’t worry if there are a few lumps; overmixing can lead to tough muffins. Next, fold in the sliced almonds carefully. This adds a nice crunch to each bite. Divide the batter evenly among the muffin cups. Fill each cup about 3/4 full. This gives the muffins room to rise. Bake in the oven for 20 to 25 minutes. Check for doneness by inserting a toothpick in the center. If it comes out clean, your muffins are ready! Once baked, remove the muffins from the oven. Let them cool in the pan for about 5 minutes. Then, transfer them to a wire rack to cool completely. For a lovely finish, dust the muffins with powdered sugar before serving. This adds a sweet touch and makes them look fancy! To get the right texture, mix your dry and wet ingredients gently. Overmixing can make your muffins tough. Aim for a batter with small lumps. This keeps the muffins soft and fluffy. Make sure your oven is at 350°F (175°C) before baking. Check that your muffins are evenly spaced in the tin. This helps them bake properly. Rotate the muffin tin halfway through baking for even heat. - Importance of fresh ingredients: Fresh ingredients are key for great flavor. Use fresh almond flour and eggs. Check the dates on your baking powder and sugar, too. Fresh ingredients make a big difference in taste and texture. {{image_2}} Want a sweet twist? You can add chocolate! Use mini chocolate chips instead of sliced almonds. Mix them in the batter like you would with almonds. The chocolate melts and gives a rich flavor. These muffins will be soft and sweet. They make a great treat for any time of day! You can make these muffins vegan easily. Replace the eggs with flax eggs. To make a flax egg, mix one tablespoon of flaxseed meal with three tablespoons of water. Let it sit for five minutes. Use almond milk instead of regular milk. This keeps the almond taste while making it vegan-friendly! Want to go gluten-free? Swap the all-purpose flour with a gluten-free blend. Make sure it has a good mix of flours for the best texture. You can still use almond flour, which adds flavor. Also, check that your baking powder is gluten-free. These muffins will taste just as good and be safe for everyone! Store your almond croissant muffins in an airtight container. This keeps them fresh. You can place them at room temperature for a few days. If you want to keep them longer, refrigerate them. However, the fridge can dry them out, so be careful. You can freeze these muffins easily. First, let them cool completely. Then, wrap each muffin in plastic wrap. After that, put them in a freezer bag. They will stay fresh for up to three months. When you want to enjoy one, just take it out and let it thaw. To reheat, you can use an oven or a microwave. If using an oven, preheat it to 350°F (175°C). Place the muffin on a baking sheet and heat for about 5-10 minutes. If using a microwave, heat for about 15-20 seconds. This warming will help keep the muffin soft and tasty. Yes, you can make almond croissant muffins ahead of time. You can bake them and store them in an airtight container. They stay fresh for about three days at room temperature. For longer storage, freeze them. Just thaw and reheat before serving. If you need a substitute for almond flour, use equal parts of all-purpose flour. You can also try oat flour or coconut flour. Each will change the taste and texture slightly, so choose what you like best. These muffins last up to three days when stored in an airtight container. If you decide to freeze them, they can last for about three months. Just remember to thaw them overnight in the fridge before warming them up. Absolutely! You can add chocolate chips, dried fruit, or fresh berries. Just fold them into the batter before baking. You can also top the muffins with a drizzle of chocolate or a sprinkle of cinnamon for extra flavor. Yes, this recipe is perfect for beginners. The steps are simple, and the ingredients are easy to find. You only need to mix the dry and wet ingredients and bake. You will create tasty muffins without much fuss. Enjoy the process! In this post, I covered how to make almond croissant muffins. We explored the essential ingredients, gave step-by-step instructions, and shared tips for perfect texture. I also discussed exciting variations and storage methods. These muffins are easy to make and delicious. Whether you stick to the classic recipe or try new twists, you will impress everyone. Enjoy baking and sharing these treats, knowing you have the skills to make them just right.

Almond Croissant Muffins Delightful and Easy Recipe

Are you ready to brighten your mornings with a tasty treat? Almond Croissant Muffins combine the best of both worlds:

- 1 cup all-purpose flour - 1/2 cup granulated sugar - 2 teaspoons baking powder - 1/2 teaspoon salt - 1 teaspoon ground cinnamon - 1/4 cup unsalted butter, melted - 1/2 cup milk - 1 large egg - 1 teaspoon vanilla extract - 1/4 cup granulated sugar (for rolling) - 1 tablespoon ground cinnamon (for rolling) To make Air Fryer Cinnamon Churro Donut Holes, you need simple ingredients. Start with the dry ingredients first. This mix gives your donut holes structure and sweetness. I choose all-purpose flour for a soft texture. The granulated sugar adds just the right amount of sweetness. Baking powder helps the donut holes rise. Salt balances the flavors, while cinnamon gives that warm, cozy taste. Next, gather your wet ingredients. The melted butter adds richness and moisture. Milk keeps the dough soft. The egg binds it together, and vanilla adds a lovely aroma. This mix brings everything to life. Finally, for the coating, you’ll need more sugar and cinnamon. This gives the outside of the donut holes that classic churro flavor. It's what makes them irresistible! By following these steps and using the right ingredients, you will create delightful donut holes that everyone will love. - Mix dry ingredients in a bowl: In a large bowl, whisk together 1 cup of all-purpose flour, 1/2 cup of granulated sugar, 2 teaspoons of baking powder, 1/2 teaspoon of salt, and 1 teaspoon of ground cinnamon. This mix will make a sweet base for your donut holes. - Combine wet ingredients in a separate bowl: In another bowl, mix 1/4 cup of melted unsalted butter, 1/2 cup of milk, 1 large egg, and 1 teaspoon of vanilla extract. This will add moisture and flavor. - Gently combine wet and dry mixtures: Slowly pour the wet mix into the dry mix. Stir gently until just combined. Don't overmix! The dough should feel slightly sticky. - Preheat air fryer to 350°F (175°C): Set your air fryer to preheat for about five minutes. This step is key for even cooking. - Shape dough into balls and place in air fryer basket: Lightly grease your hands. Scoop small amounts of dough and roll them into balls, about the size of a golf ball. Place them in the basket, giving them space to puff. - Cook for 8-10 minutes, shaking halfway: Cook the donut holes for 8 to 10 minutes. Halfway through, shake the basket to help them cook evenly. - Prepare cinnamon sugar mixture: While the donut holes cook, mix 1/4 cup of granulated sugar with 1 tablespoon of ground cinnamon in a bowl. This will give a sweet and spicy crunch. - Roll cooked donut holes in the mixture: Once the donut holes are golden, remove them from the air fryer. Roll each one in the cinnamon sugar mix right away. Make sure they are fully coated! - Allow to cool slightly before serving: Let the churro donut holes sit for a few minutes. This helps them set and cool, making them perfect for enjoying. To get the best texture, do not overmix the batter. When you mix the wet and dry ingredients, stir gently. You want the dough to be slightly sticky. Overmixing can make your donut holes tough. Also, ensure even cooking by shaking the basket halfway through. This helps all the donut holes cook well and turn golden brown. For a great look, serve your churro donut holes in a bowl lined with parchment paper. This adds a nice touch. You can also sprinkle some extra cinnamon sugar on top for extra flavor. For a fun twist, add a small bowl of chocolate sauce for dipping. This makes every bite even more delicious! If you want to prepare ahead, make the dough and roll it into balls. You can store them in the fridge for a few hours. Just cook them when you are ready. For the best taste, serve the donut holes warm. This keeps them soft and tasty. Enjoy! {{image_2}} You can add fun flavors to your donut holes. Try mixing in chocolate chips to the dough. The melted chocolate will create a sweet surprise in every bite. You can also play with spices. Instead of just cinnamon, try nutmeg or cardamom for a twist. Each spice brings its own warmth and depth. If you need a gluten-free option, use almond or coconut flour. Almond flour gives a nutty flavor, while coconut flour adds a hint of sweetness. Just remember, these flours absorb more liquid. You might need to adjust the milk or butter to keep your dough moist. Switch up the coating for a new taste. Use powdered sugar instead of granulated sugar for a sweeter touch. You can also add flavor to your sugar coating. Mix in some cocoa powder or vanilla to create a unique flavor. This small change can make a big difference in taste. To keep your churro donut holes fresh, store them in an airtight container. You can use a glass or plastic container with a tight lid. Place a paper towel at the bottom to absorb extra moisture. This method keeps them soft and tasty for a few days. You can easily reheat donut holes in the air fryer. Set your air fryer to 350°F (175°C). Heat for about 3-5 minutes. This method keeps them crispy and warm. If you don’t have an air fryer, use the oven. Preheat it to 350°F. Place the donut holes on a baking sheet and heat for the same time. To freeze your churro donut holes, let them cool completely first. Then, place them in a single layer on a baking sheet and freeze. Once frozen, transfer them to a freezer-safe bag or container. Seal tightly to prevent freezer burn. When you want to eat them, thaw in the fridge overnight, then reheat as mentioned above. Yes, you can use whole wheat flour. It will change the taste and texture. Whole wheat makes the donut holes denser and gives a nuttier flavor. You may need to add a bit more milk for the right dough consistency. Look for a golden brown color. The donut holes should feel firm to the touch. You can also insert a toothpick to check. If it comes out clean, they are ready! I recommend using a basket-style air fryer. They cook evenly and are easy to use. Look for models with adjustable temperature settings. Brands like Ninja and Philips make great air fryers for this recipe. In this post, we explored making easy churro donut holes in your air fryer. We covered essential ingredients, step-by-step instructions, and tips for the perfect texture. You learned how to coat your treat for an extra sweet bite and discovered variations to match your taste. Remember, a few simple changes can elevate this recipe. You can mix up flavors or even change how you coat them. Enjoy your tasty creations, and don't forget to share them with friends and family!

Air Fryer Cinnamon Churro Donut Holes Delight

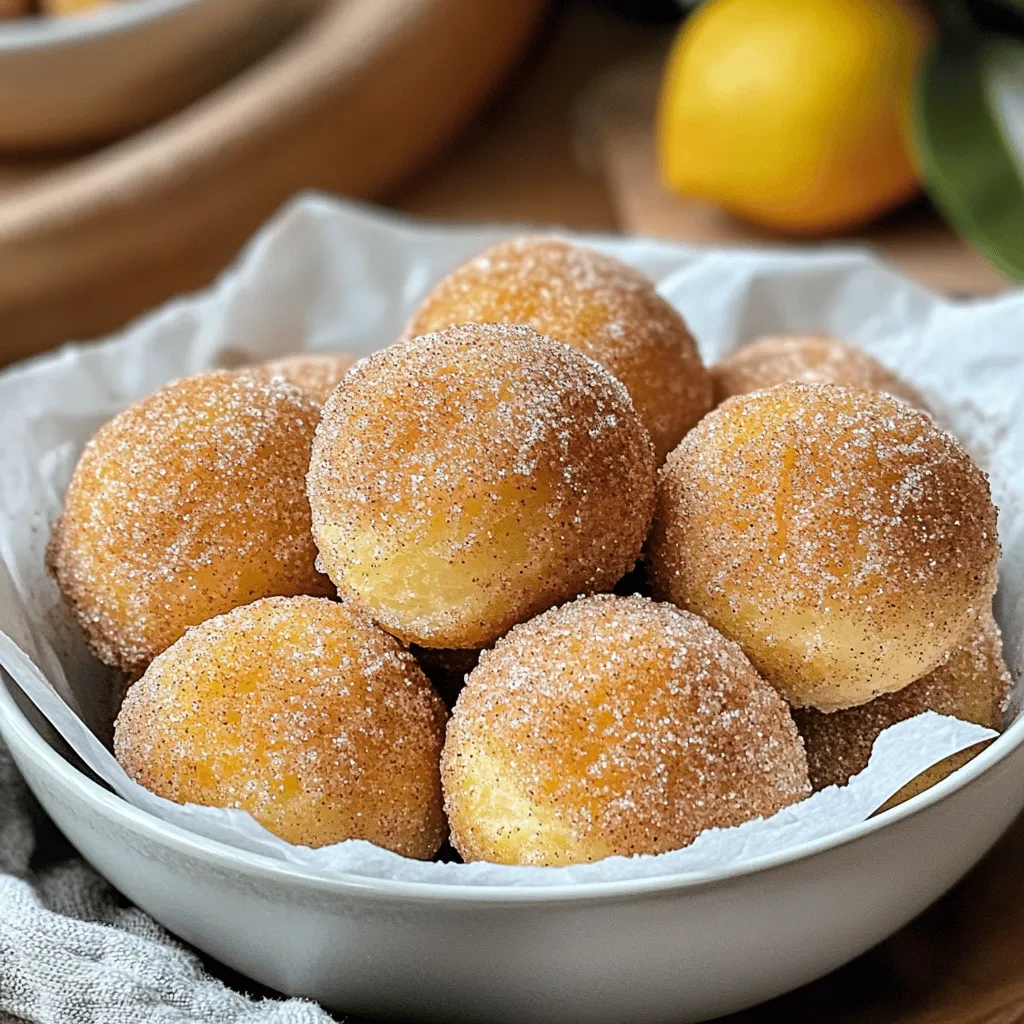
Treat yourself to a sweet delight with my Air Fryer Cinnamon Churro Donut Holes! These bite-sized treats are fluffy on

To make these tasty donut holes, you will need: - 2 cups all-purpose flour - 1 cup apple cider - 1 cup granulated sugar - 2 teaspoons baking powder - 1/2 teaspoon baking soda - 1 teaspoon ground cinnamon - 1/2 teaspoon ground nutmeg - 1/2 teaspoon salt - 1/4 cup unsalted butter, melted - 1 large egg - 1 teaspoon vanilla extract These ingredients come together to create a soft, flavorful donut hole that tastes like fall in every bite. For the sweet glaze, gather these items: - 1/2 cup powdered sugar - 2 tablespoons apple cider The glaze adds a touch of sweetness and enhances the apple flavor. You can make this recipe your own! Here are some easy swaps: - Use whole wheat flour for a healthier option. - Swap granulated sugar with brown sugar for a richer taste. - Try maple syrup instead of apple cider in the glaze for a unique twist. These substitutions keep the spirit of the recipe while adding your personal touch. First, gather your ingredients. You will need 2 cups of flour, 1 cup of apple cider, and 1 cup of granulated sugar. Also, grab 2 teaspoons of baking powder, 1/2 teaspoon of baking soda, 1 teaspoon of ground cinnamon, 1/2 teaspoon of ground nutmeg, and 1/2 teaspoon of salt. Don’t forget 1/4 cup of melted unsalted butter, 1 large egg, and 1 teaspoon of vanilla extract. Start by preheating your oven to 350°F (175°C). Grease a mini muffin tin or a donut hole pan. In a large bowl, whisk together the dry ingredients: flour, sugar, baking powder, baking soda, cinnamon, nutmeg, and salt. Mix until everything blends well. In another bowl, combine the wet ingredients. Mix the apple cider, melted butter, egg, and vanilla extract until they are smooth. Pour this wet mixture into the dry ingredients. Stir gently until just combined. Be careful not to overmix, as this can make the donut holes tough. Now, fill each compartment of your greased tin about 2/3 full with the batter. This helps them rise without spilling over. Bake in the preheated oven for about 10-12 minutes. You will know they are ready when the tops turn golden brown and a toothpick comes out clean when inserted in the center. Once done, remove the pan from the oven. Let the donut holes cool in the pan for about 5 minutes. After that, transfer them to a wire rack to cool completely. This step is key for texture. While the donut holes cool, prepare the glaze. In a small bowl, whisk together 1/2 cup of powdered sugar and 2 tablespoons of apple cider. Mix until the glaze is smooth. If it is too thick, add a little more cider. If it is too thin, add more powdered sugar. Once your donut holes are completely cool, dip each one into the glaze. Let the excess glaze drip off. Place them back on the wire rack and wait for the glaze to set. This will give your donut holes a beautiful and tasty finish. To get the best texture, do not overmix. When you combine wet and dry ingredients, mix just until you see no dry flour. This helps keep your donut holes light and fluffy. Make sure your oven is at 350°F (175°C) for even baking. Also, use a mini muffin tin or a donut hole pan for the best shape. Apple cider gives these donut holes a great taste, but you can add more flavor. Try adding a pinch of allspice or cloves for warmth. A bit of lemon zest can add a nice twist, too. If you like a sweeter glaze, add a touch more powdered sugar to your glaze mix. One common mistake is not greasing the pan enough. This can make it hard to remove the donut holes later. Also, avoid baking them too long. Keep an eye on them after 10 minutes. If they get too dark, they can taste dry. Lastly, let them cool completely before glazing; otherwise, the glaze will just melt off. {{image_2}} You can change the flavor of your donut holes with spices. Try adding ginger or allspice for a warm kick. You can also use cardamom for a unique taste. Just a pinch can make a big difference. Don’t be afraid to mix and match spices to find your favorite blend. If you have dietary restrictions, you can swap some ingredients. Use gluten-free flour instead of all-purpose flour. For a dairy-free option, use coconut oil instead of butter. You can also use a flax egg in place of a regular egg. These swaps can help you enjoy the treat without worry. Get creative with flavors! Try adding chocolate chips or nuts for extra texture. You can also mix in dried fruit, like cranberries or raisins. For a fun twist, add a splash of maple syrup to the batter. Each mix creates a new and exciting donut hole experience. To keep your glazed apple cider donut holes fresh, store them in an airtight container. This helps prevent them from becoming dry. If you plan to eat them in a few days, keep them at room temperature. For longer storage, keep them in the fridge. Just remember, the glaze may soften in the fridge. These donut holes can last for about 3 days at room temperature. If you keep them in the fridge, they can stay good for about a week. However, the best flavor and texture are within the first few days. After that, they may lose their charm and taste. You can freeze these delicious donut holes for up to three months. Let them cool completely before freezing. Place them in a single layer on a baking sheet to freeze. Once frozen, transfer them to a freezer bag. When you're ready to eat, thaw them in the fridge overnight. You can reheat them in the oven for a few minutes to restore the texture. Enjoy them fresh even after freezing! Yes, you can use store-bought apple cider. It saves time and still tastes great. Look for a brand with no added sugars for the best flavor. Fresh cider works well too if you can find it. To make the donut holes denser, add a bit more flour. You can also reduce the amount of apple cider slightly. Mixing the batter less will help too. Just fold until combined, not overmixing. The best glazed apple cider donut holes are often found at local bakeries. Farmers’ markets sometimes have them in the fall. Many towns have bakeries known for seasonal treats. Ask locals for their favorites! Serve glazed donut holes warm for the best taste. A nice touch is to dust them with extra powdered sugar. Pair them with coffee or hot cider. These treats are perfect for fall gatherings or cozy brunches. You learned about the key ingredients, steps, and tips for making glazed apple cider donut holes. Remember to adjust flavors and try new spices. Storage can keep your treats fresh longer. You can easily customize this recipe to fit your needs. Now, you are ready to make delicious donut holes. Enjoy sharing your tasty creation with friends and family. Happy baking!

Glazed Apple Cider Donut Holes Delicious and Easy Recipe

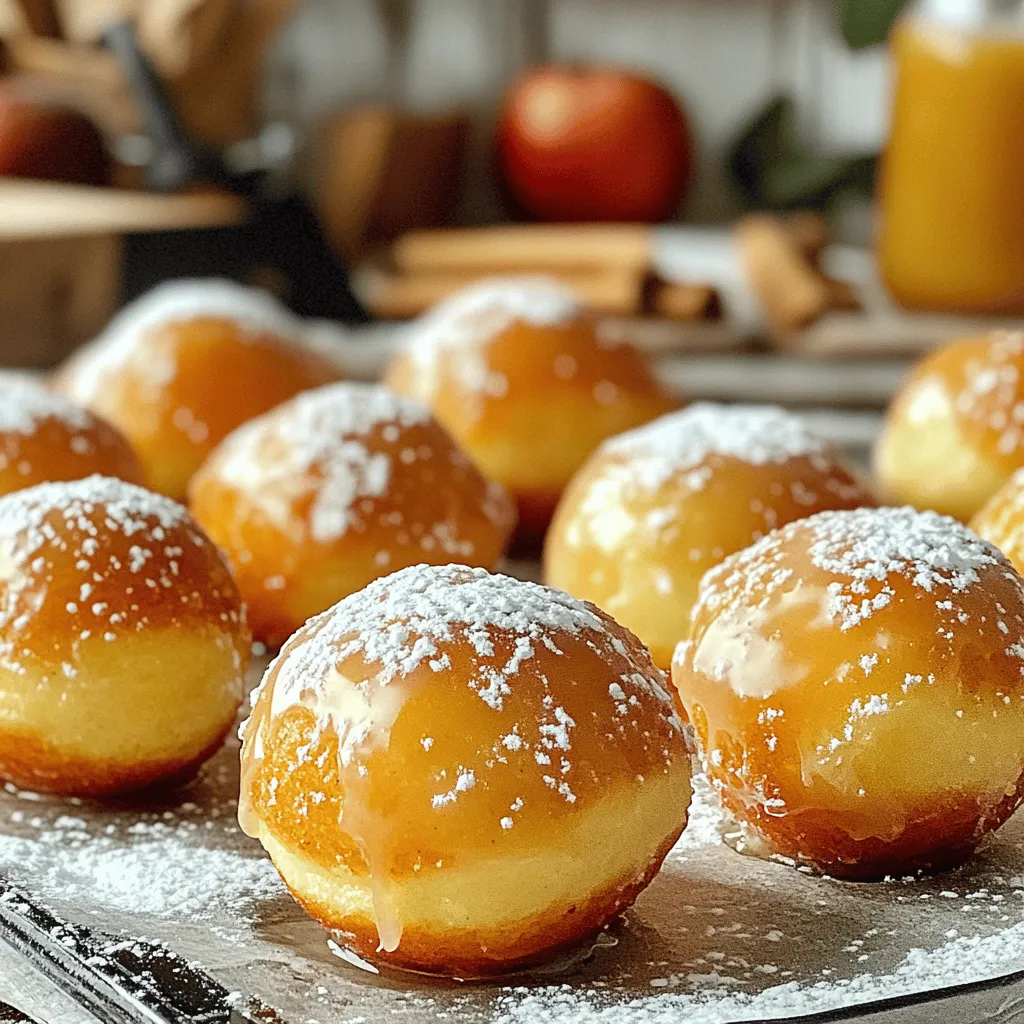
Craving a treat that captures fall’s essence? Discover how to make Glazed Apple Cider Donut Holes! This easy recipe combines

- 1 can (14.75 oz) salmon, drained and flaked - 1/2 cup breadcrumbs (preferably panko for extra crunch) - 1/4 cup finely chopped onion - 1/4 cup chopped fresh parsley The main ingredients create a solid base for your patties. Canned salmon gives you rich flavor without the fuss. Panko breadcrumbs add the perfect crunch. Onion and parsley bring freshness and texture. - 1 large egg - 1 tablespoon Dijon mustard - 1 teaspoon garlic powder - 1 teaspoon onion powder These agents help hold the patties together. The egg binds everything well. Dijon mustard adds a nice kick. Garlic and onion powders boost the overall taste without being too strong. - Salt and pepper - Olive oil spray Seasoning is key to flavor. A pinch of salt and pepper enhances all the other tastes. Olive oil spray helps achieve that crispy finish in the air fryer. When you gather these ingredients, you set yourself up for a tasty meal. Each item plays a role in making your salmon patties delicious and satisfying. - First, take a large bowl. Combine the flaked salmon, breadcrumbs, chopped onion, and parsley. Mix these well. This step makes sure the flavors blend together. - In another bowl, whisk the egg, Dijon mustard, garlic powder, onion powder, salt, and pepper. This is your binder mixture. It helps hold the patties together. - Now, form the mixture into patties. Each should be about 2-3 inches wide. You should get around six patties from this mix. - Preheat your air fryer to 375°F (190°C). This step is key for cooking the patties evenly. - Place the salmon patties in the air fryer basket. Make sure they are not touching. This helps them cook better. - Air fry the patties for 10-12 minutes. Flip them halfway through for even cooking. Look for a golden brown color. This means they are crispy and ready to eat. To get the best crunch, always use panko breadcrumbs. Panko gives a light and airy texture. Regular breadcrumbs may not yield the same crispiness. Another key tip is to use olive oil spray. A light coat adds flavor and helps with browning. Just a few sprays will do. One common mistake is overcrowding the air fryer. If you pack in too many patties, they won’t cook evenly. Always leave space for air to flow. Another mistake is not mixing the ingredients well. You want every bite to be flavorful. Take time to blend everything before shaping the patties. These salmon patties shine with dipping sauces. Try tartar sauce or a spicy mayo for a kick. You can also serve them with a side salad or roasted veggies. A light salad pairs well and adds color to your plate. Enjoy your meal with a side of crispy fries for a treat! {{image_2}} You can swap canned salmon for fresh salmon. Fresh salmon gives a richer taste. Just cook it first and then flake it. If you want crunch, use panko breadcrumbs. They make a big difference! You can also try crushed crackers or cornmeal. Adding spices can really amp up the flavor. Try cayenne pepper for some heat. A little goes a long way! You can also mix in different herbs. Dill or cilantro can add a fresh twist to your patties. Baking is a great alternative to air frying. Preheat your oven to 400°F (200°C) and bake for about 15-20 minutes. Pan-frying gives a nice crispy outside. Heat some oil in a pan and fry for 4-5 minutes per side. Enjoy the different textures! To store leftovers in the fridge, let the salmon patties cool first. Place them in an airtight container. This keeps them fresh and tasty. You can keep them in the fridge for up to three days. When you are ready to eat, you can enjoy them cold or warm them up. For best results, freeze the patties before cooking them. First, shape the patties and place them on a baking sheet. Freeze them for about an hour until firm. After that, transfer them to a freezer bag. Squeeze out the air and seal tightly. You can freeze them for up to three months. When you want to eat them, thaw in the fridge overnight. Cook them straight from the freezer for 12-15 minutes in the air fryer. In the fridge, the salmon patties stay good for three days. In the freezer, they last for three months. This way, you can enjoy delicious salmon patties anytime! Yes, you can use fresh salmon. Fresh salmon has a richer taste. It also offers a firmer texture. However, canned salmon is easier and quicker to use. Fresh salmon needs cooking before mixing. If you choose fresh, bake or grill it first. Then flake it just like canned salmon. Look for a golden brown color on the patties. They should feel firm to the touch. The edges will also get crispy. If you prefer, use a food thermometer. The inside should reach 145°F (63°C) for safety. Once cooked, let them rest a minute before serving. Absolutely! For gluten-free patties, use gluten-free breadcrumbs. Almond flour or crushed rice cakes work well too. You can also try ground oats. These options help bind without gluten. Just ensure they are labeled gluten-free for safety. In this post, I shared a simple recipe for salmon patties. We explored the main ingredients, binding agents, and how to season for great flavor. I provided step-by-step instructions and tips for a crispy texture. Variations let you swap ingredients and try new spices. Proper storage helps keep your leftovers fresh. Salmon patties are easy to make and delicious. I hope you enjoy making them!

Air Fryer Crispy Salmon Patties Quick and Tasty Meal

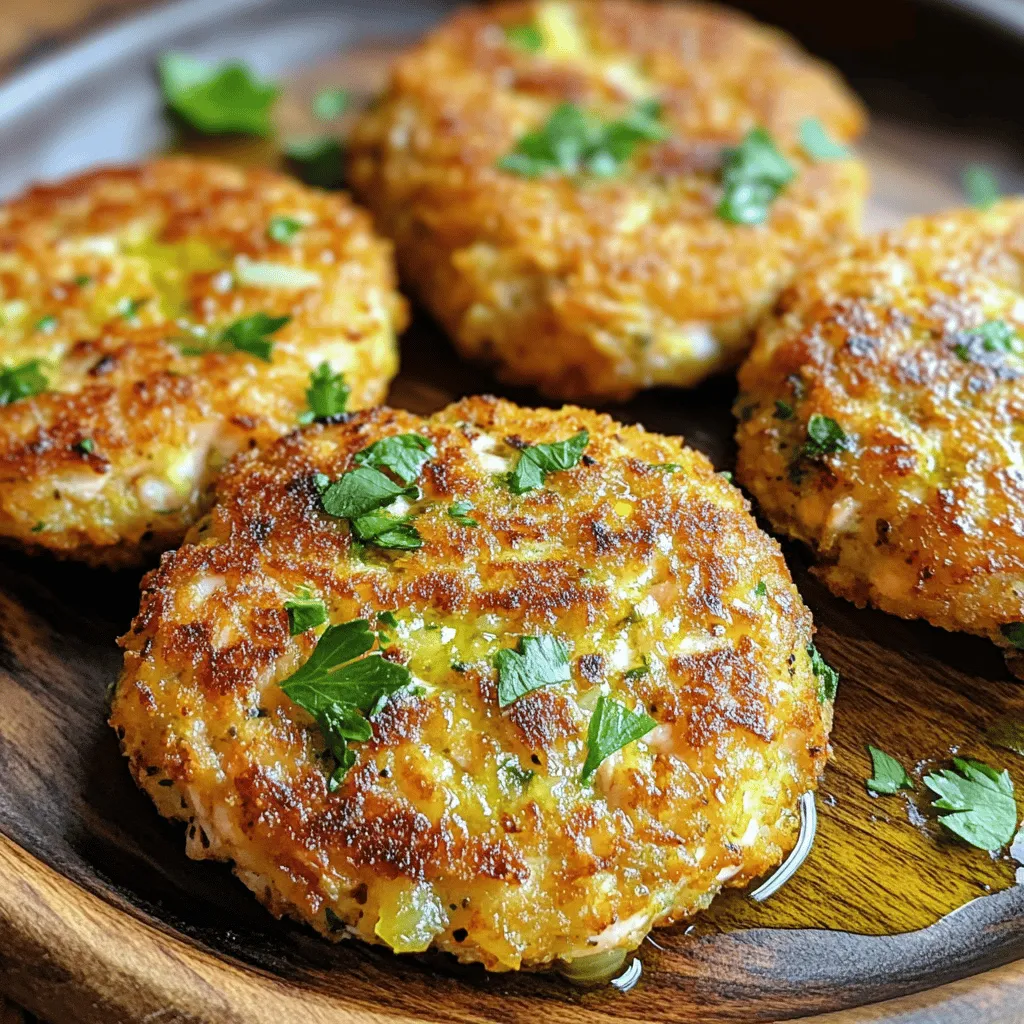
Looking for a quick meal that packs flavor and crunch? Try these Air Fryer Crispy Salmon Patties! As a fan

To make your caramel pumpkin spice latte, gather these simple ingredients: - 2 cups milk (any variety - whole, almond, oat, etc.) - 1/2 cup strong brewed coffee or espresso - 1/4 cup canned pumpkin purée - 2 tablespoons caramel sauce, plus extra for drizzling - 1 teaspoon pumpkin spice blend (cinnamon, nutmeg, ginger, clove) - 1 tablespoon sugar (adjust to taste) - Whipped cream (for topping) - A sprinkle of cinnamon (for garnish) These ingredients create a warm, cozy drink that tastes like fall. Each item plays a key role in flavor and texture. The pumpkin adds a rich taste, while the caramel brings sweetness. Feel free to customize your drink with these add-ins or substitutes: - Use flavored syrups like vanilla or hazelnut for extra depth. - Swap sugar for honey or maple syrup for a natural sweetener. - Add a splash of vanilla extract for a lovely twist. These options let you make the latte your own. Experimenting with add-ins can lead to delightful surprises! Choosing the right milk can enhance your latte. Here are some options: - Whole milk gives a creamy texture and rich flavor. - Almond milk is a lighter choice with a nutty taste. - Oat milk froths well and adds a hint of sweetness. Each milk type offers a different experience. Try different varieties to find your favorite! To make the pumpkin milk mixture, grab a small saucepan. Pour in 2 cups of milk and add 1/4 cup of canned pumpkin purée. Next, add 2 tablespoons of caramel sauce and 1 teaspoon of pumpkin spice blend. I like to use a mix of cinnamon, nutmeg, ginger, and clove. Stir in 1 tablespoon of sugar to sweeten it up. Heat the mixture over medium heat. Keep stirring until it’s warm. Watch closely! You don't want it to boil. While the milk mixture heats, it's time to brew your coffee or espresso. Use 1/2 cup of strong brewed coffee or espresso. You can adjust the strength to your taste. If you like a bold flavor, go for espresso. If you prefer something lighter, regular coffee works well too. Brew it to your liking and set it aside. When the milk mixture is warm, froth it until it’s light and airy. You can use a frother or a whisk to do this. In two mugs, pour the brewed coffee or espresso first. Then, add the pumpkin milk mixture on top. Fill the mugs about three-quarters full. Next, top each latte with a generous dollop of whipped cream. Drizzle extra caramel sauce over the cream and sprinkle a bit of cinnamon on top. Now, your homemade caramel pumpkin spice latte is ready to enjoy! Frothing milk is key to a great latte. Use any milk you like. Whole milk gives a rich froth. Almond or oat milk works too. 1. Heat your milk mixture until warm, but don’t boil it. 2. Use a frother or a whisk. Whisking by hand takes more time but works well. 3. Froth until the milk is light and airy. Aim for a nice foam layer on top. You can change the sweetness and spice to fit your taste. If you like it sweeter, add more sugar or caramel sauce. Start with one tablespoon of sugar and taste it. For spice, add more pumpkin spice blend. Just a pinch can make a big difference. Serve your latte in a warm mug. Top it with a big dollop of whipped cream. Drizzle extra caramel sauce over the cream. Sprinkle a little cinnamon on top for a nice touch. Pair your latte with a warm scone or cookie. Enjoy your special drink! {{image_2}} You can easily make a dairy-free caramel pumpkin spice latte. Use almond milk, oat milk, or coconut milk instead of regular milk. These options work well and keep the latte creamy. Almond milk is light, while oat milk adds a rich taste. Coconut milk gives a tropical twist. Just remember to adjust the sweetness to your liking. An iced version is perfect for warm days. To make it, brew your coffee and let it cool. Then, mix the pumpkin milk in a shaker with ice. Pour the cold mixture over ice in a glass. Top it with whipped cream, caramel drizzle, and a sprinkle of cinnamon. This drink is refreshing and still packed with flavor. You can add fun flavors to your latte. Try a splash of vanilla extract for sweetness. A pinch of sea salt can add a nice contrast to the caramel. For a chocolate twist, stir in some cocoa powder. If you love a kick, add a hint of cayenne pepper. These enhancements make your latte unique and exciting. To store any leftover pumpkin mixture, let it cool first. Then, pour it into an airtight container. Keep it in the fridge for up to three days. Always label the container with the date, so you remember when you made it. When you're ready to enjoy the leftover mixture, pour it into a small pot. Heat it on low. Stir it gently until it warms up. Do not let it boil, as it can change the texture. You can also use a microwave. Heat in short bursts, stirring in between to ensure it warms evenly. The pumpkin mixture lasts about three days in the fridge. If you want it to last longer, consider freezing it. Pour the mixture into ice cube trays for easy use later. Transfer the cubes into a freezer bag. They can stay good for up to three months. When you want a latte, just thaw the cubes and reheat! Yes, you can! If you don't have espresso, use strong brewed coffee instead. It will still taste great. Just brew your favorite coffee and use the same amount as the espresso. The pumpkin milk mix will add rich flavor. Absolutely! To make a low-calorie version, use skim milk or a low-calorie milk alternative. You can also reduce the sugar or use a sugar substitute. For the caramel sauce, try a lower-calorie version or skip it altogether. Enjoy the flavors without the extra calories! Many coffee shops sell ready-made caramel pumpkin spice lattes in the fall. You can find them at well-known chains or local cafes. Some grocery stores even offer bottled versions. Check the refrigerated section next time you shop. You now know how to make a delicious Caramel Pumpkin Spice Latte at home. We discussed the main ingredients, optional add-ins, and the best milk varieties to use. I shared step-by-step instructions to prepare the pumpkin milk, brew the coffee, and assemble your latte. You also learned tips for perfect froth and sweetness levels. Finally, we explored variations, storage tips, and answered common questions. Enjoy your cozy drink! It’s a great treat anytime you crave something warm and spiced. Happy brewing!

Caramel Pumpkin Spice Latte Simple and Tasty Recipe

Fall is here, and it’s time for a cozy treat! You’ll love this simple and tasty Caramel Pumpkin Spice Latte

- 2 medium sweet potatoes, peeled and diced - 1 can (15 oz) black beans, drained and rinsed - 1 can (14 oz) diced tomatoes, with juice - 1 medium onion, chopped - 2 cloves garlic, minced - 1 bell pepper (red or yellow), chopped Sweet potatoes serve as a star in this chili. They bring a natural sweetness and a creamy texture. Black beans add protein and fiber, making the dish filling. Diced tomatoes add juiciness and acidity to balance the sweetness. Onion and garlic give depth and flavor, while bell pepper adds crunch. - 1 tablespoon chili powder - 1 teaspoon ground cumin - 1/2 teaspoon smoked paprika - 1/4 teaspoon cayenne pepper (optional, for heat) - Salt and pepper to taste Spices make this chili sing. Chili powder brings warmth, while cumin adds an earthy note. Smoked paprika introduces a hint of smokiness, enhancing the flavor. Cayenne pepper is optional but great if you like heat. Always adjust salt and pepper to suit your taste. - Fresh cilantro, for garnish - Avocado slices, for topping Garnishes add the finishing touch. Fresh cilantro brings brightness and a pop of color. Avocado slices add creaminess and balance the spices. Together, they make the chili more inviting and delicious. Enjoy every bite of this cozy meal! First, heat one tablespoon of olive oil in a medium skillet over medium heat. Once the oil is hot, add the chopped onion and bell pepper. Cook them for about five minutes. They should become soft and fragrant. Next, add two cloves of minced garlic. Sauté for another minute. This step adds depth to the dish. Now, transfer the sautéed vegetables to your slow cooker. It's time to add more ingredients. Dice two medium sweet potatoes and drain one can of black beans. Add those to the cooker. Next, pour in one can of diced tomatoes along with its juice. Then, add one cup of vegetable broth. Sprinkle in one tablespoon of chili powder, one teaspoon of ground cumin, and half a teaspoon of smoked paprika. If you like heat, add a quarter teaspoon of cayenne pepper. Finally, season with salt and pepper to taste. Stir until everything is combined. Cover the slow cooker with its lid. Set it to low for six to eight hours or high for three to four hours. The sweet potatoes should be tender when it’s done. The chili should smell amazing and be thick. After cooking, taste the chili. Adjust the flavors if needed. You can add more salt, pepper, or spices to suit your taste. If the chili is too thick for your liking, add more vegetable broth to make it thinner. Ladle the chili into bowls for serving. Top each bowl with fresh cilantro and avocado slices. This adds creaminess and flavor, making your dish even more delicious. Enjoy your cozy meal! When picking sweet potatoes, look for ones that feel firm. A firm potato means it is fresh. Check for smooth skin, too. Avoid any with soft spots or blemishes. The color should be bright, with no dark patches. Orange-fleshed varieties are great for this chili. They add sweetness and creaminess. To make your chili even better, add extra spices. Try 1 teaspoon of oregano for a warm taste. A pinch of cinnamon can bring depth, too. Fresh herbs are also a great choice. Chopped cilantro adds brightness at the end. You can even add fresh lime juice for zing! To control heat, adjust the cayenne pepper. Start with a pinch if you want it mild. You can always add more later. If you prefer a spicy kick, try using jalapeños or serranos. These peppers bring both heat and flavor. You can also swap chili powder for chipotle powder for a smoky taste. {{image_2}} You can boost the protein in your sweet potato black bean chili in a few ways. If you want a plant-based option, try adding lentils or quinoa. Both add great texture and nutrition. You can also toss in some tofu for extra protein. If you prefer meat, ground turkey or chicken work well. Just brown the meat before adding it to the slow cooker. This adds flavor and makes the chili heartier. Feel free to mix in more veggies. Zucchini, corn, or carrots add color and flavor. Spinach or kale can also be good choices. They cook down and blend well in the chili. Seasonal veggies can enhance your chili too. In fall, try adding pumpkin or butternut squash. In summer, fresh tomatoes and bell peppers shine. Each season brings a new twist to your dish. While the slow cooker is perfect for this chili, there are other ways to cook it. You can use a stovetop method. Just simmer the chili in a large pot for about 30 minutes. Stir often to prevent sticking. Another method is the Instant Pot. Set it to high pressure for 10 minutes. This cooks the chili quickly while keeping the flavors intact. Just make sure to let the pressure release naturally for best results. Store your leftover chili in proper storage containers. Use airtight containers to keep it fresh. The chili lasts in the fridge for about 4 to 5 days. Make sure to cool it down to room temperature before sealing. If you want to save it for later, freezing works well. Use freezer-safe containers or heavy-duty bags. Leave some space in the container for expansion. The chili keeps well for up to 3 months. To thaw, move it to the fridge overnight. You can also use the microwave for a quick thaw. For the best taste, reheat on the stove. Just add a splash of broth or water to keep it moist. Stir it often to prevent sticking. You can also use a microwave, heating in short bursts. Serve with fresh cilantro and avocado slices for a tasty boost. Enjoy your warm, cozy meal! Yes, you can make this chili ahead of time. Prepping in advance saves you time and stress. It allows the flavors to blend beautifully. You can store it in the fridge for up to five days. Just reheat it on the stove or in the microwave. If you prefer, freeze it for up to three months. This way, you always have a cozy meal ready to go. Yes, this chili is gluten-free. All the ingredients used are safe for a gluten-free diet. Sweet potatoes, black beans, and spices are naturally gluten-free. Just be sure to check the labels on canned goods. Sometimes, cross-contamination can happen. Using certified gluten-free products adds extra security. You can easily make this chili vegan. The main ingredients are already plant-based. For a creamy topping, skip sour cream and use avocado slices instead. You can also add vegan cheese if you like. Fresh cilantro serves as a bright finish without dairy. This ensures everyone can enjoy the dish. There are many great sides for this chili. You can serve it with cornbread for a classic pairing. A simple green salad adds freshness. Tortilla chips provide a nice crunch. Consider adding a dollop of yogurt or sour cream if you want. Avocado slices and fresh cilantro are perfect toppings too. You can easily adjust the spice level. If you want it mild, skip the cayenne pepper. For more heat, add extra cayenne or some diced jalapeños. Another option is to add hot sauce when serving. Always taste as you go. This way, you make it just right for your taste buds. This blog post covered how to make a hearty Sweet Potato Black Bean Chili. We discussed main ingredients, tasty spices, and easy steps. You learned about cooking methods, storage tips, and ways to make it suit your taste. Remember, you can customize this chili with protein or veggies. Follow these tips to create your perfect bowl. Enjoy exploring flavors and sharing this dish with others.

Sweet Potato Black Bean Chili Cozy Slow Cooker Meal

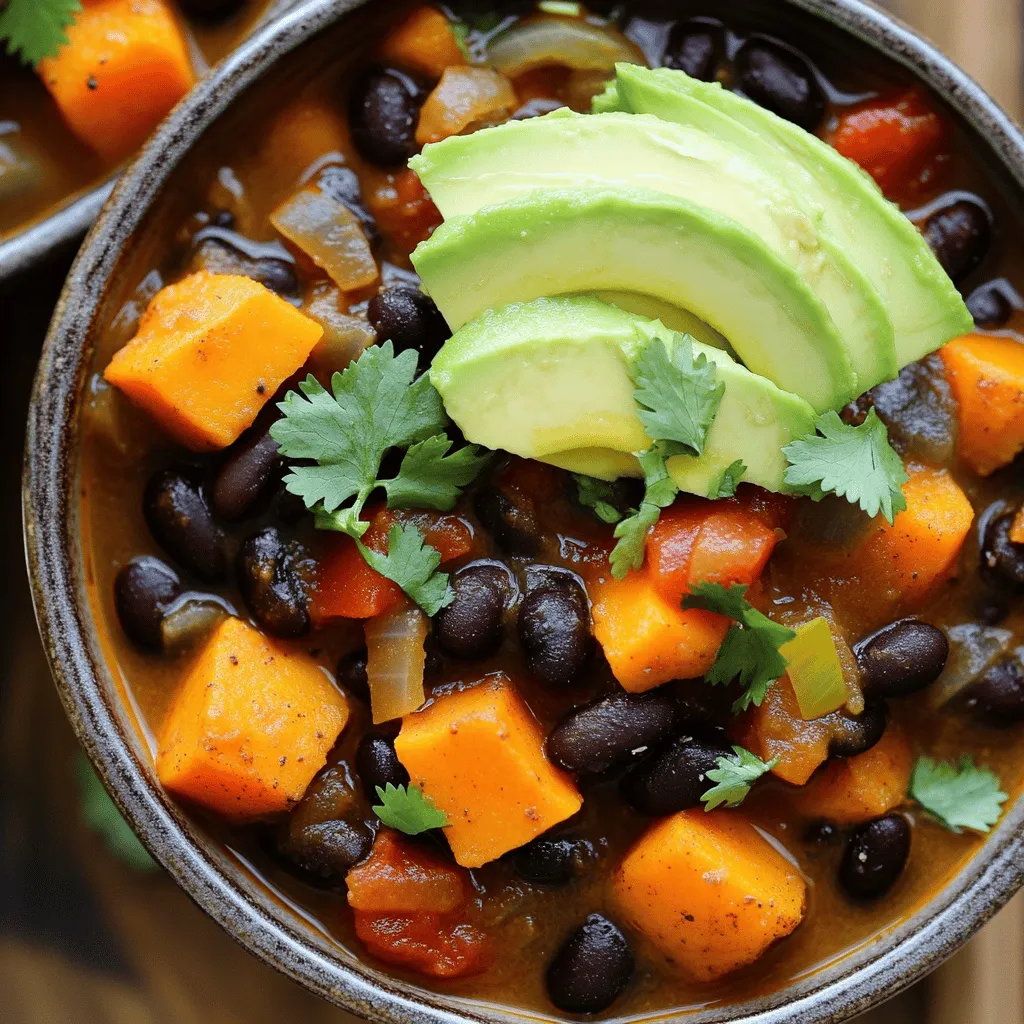
Looking for a cozy meal that warms your heart and fills your belly? This Sweet Potato Black Bean Chili is

To make a delicious butternut squash sage risotto, you will need: - 1 cup Arborio rice - 2 cups butternut squash, diced - 4 cups vegetable broth - 1 small onion, finely chopped - 2 cloves garlic, minced - 1/2 cup grated Parmesan cheese (or nutritional yeast for a vegan option) - 2 tablespoons olive oil - 1 tablespoon fresh sage, chopped (or 1 teaspoon dried sage) - Salt and pepper to taste - 1 tablespoon butter (or plant-based butter for a vegan option) - Optional: pumpkin seeds for garnish When choosing butternut squash, look for ones that are firm and heavy for their size. The skin should be smooth and free of blemishes. A rich, orange color indicates ripeness. If it feels soft or has dark spots, it might not taste great. If you want a vegan version, replace the Parmesan cheese with nutritional yeast. For a dairy-free option, use plant-based butter. To make the dish gluten-free, ensure your broth is labeled gluten-free. This way, everyone can enjoy this creamy risotto! First, grab a medium saucepan. Pour in 4 cups of vegetable broth. Heat it over medium heat until it simmers. This keeps the broth warm for the risotto. Keeping it hot helps the rice cook evenly and absorb flavor. Next, take a large skillet and add 2 tablespoons of olive oil. Heat it over medium heat. Toss in 1 small chopped onion. Cook it for about 3-4 minutes until it turns soft and clear. Then, add 2 minced garlic cloves and 2 cups of diced butternut squash. Cook these for about 5 minutes. Stir often to prevent sticking. The squash should start to soften and smell great. Now, it's time for the rice. Add 1 cup of Arborio rice to the skillet. Stir it well, coating the rice with oil. Toast it for about 2 minutes until it looks slightly clear. Start adding the warm vegetable broth. Use one ladle at a time while stirring. Wait until most of the broth is absorbed before adding more. This process will take about 20-25 minutes. Keep stirring the rice as you go. It helps create that creamy texture we love. When the rice is creamy and just firm, remove the skillet from heat. Stir in 1/2 cup of grated Parmesan cheese. If you want a vegan option, use nutritional yeast instead. Add 1 tablespoon of butter or plant-based butter for richness. Mix until everything is melted and smooth. Taste the risotto and season with salt and pepper. You can also add more sage if you like. Serve it warm, and consider adding pumpkin seeds for a nice crunch. To get that creamy texture, use Arborio rice. This rice has more starch, which helps create creaminess. Stir often as you cook. This helps release the starch and makes the risotto smooth. Always add warm broth slowly. This gives the rice time to absorb the liquid. Keep an eye on the rice as it cooks. Stir frequently and check for doneness. The rice should be al dente, meaning it should have a little bite. If you cook it too long, it can turn mushy. Remove it from the heat as soon as it reaches your desired texture. You can add more flavor with herbs and spices. Try adding thyme or rosemary for a different taste. A sprinkle of nutmeg can add warmth, too. For a kick, consider a pinch of red pepper flakes. Taste as you go, and adjust the flavors to your liking. {{image_2}} You can switch butternut squash for other veggies. Seasonal options include pumpkin, sweet potatoes, or peas. Each brings its own taste and texture. For instance, pumpkin adds sweetness while peas add a fresh crunch. Just remember to adjust cooking times based on the vegetable you choose. To make risotto heartier, add a protein. Cooked chicken, shrimp, or even tofu works great. If using chicken or shrimp, add them in the last five minutes of cooking. For plant-based options, use chickpeas or lentils. This boosts flavor and makes the dish more filling. If you're looking for vegan options, swap out cheese and butter. Use nutritional yeast for a cheesy taste without dairy. Replace butter with plant-based butter or olive oil. The creamy texture will still shine through. This way, everyone can enjoy this comforting dish! To keep your butternut squash sage risotto fresh, store it in an airtight container. Let it cool down to room temperature. Then, place it in the fridge. It will last for about 3 to 5 days. If you have a lot left, portion it out. This makes for easy meals later. When you’re ready to eat the risotto, add a splash of broth or water. This helps bring back the creamy texture. Heat it in a saucepan over medium heat. Stir it often to avoid sticking. You can also use a microwave. Just cover it with a damp paper towel and heat in short bursts, stirring in between. If you want to freeze your risotto, use a freezer-safe container. Make sure to leave some space at the top, as it will expand. It can be frozen for up to 3 months. To thaw, move it to the fridge overnight. Reheat it gently on the stove or in the microwave. Add a bit of broth to restore creaminess. It takes about 35 minutes to cook butternut squash risotto. You first heat the broth, then sauté the veggies, and finally add the rice. Stirring is key during this time. The rice absorbs the broth slowly, creating a creamy texture. You can make risotto ahead of time, but it may not be as creamy when reheated. If you choose to do this, undercook the rice slightly. This way, it will not turn mushy when you reheat it. The best rice for risotto is Arborio rice. It has a high starch content, which helps create that creamy texture we all love. Other good options include Carnaroli or Vialone Nano, but Arborio is the most common. Yes, you can use chicken broth instead of vegetable broth. This will add extra flavor to your risotto. Just make sure to adjust the seasoning to fit your taste. You might need less salt if the broth is salty. Butternut squash risotto is a tasty dish that’s easy to make. We covered key ingredients and tips for selecting fresh squash. I shared how to prepare the broth, sauté veggies, and achieve that creamy texture. You can also switch up the recipe with different veggies or proteins to fit your diet. Storing and reheating leftovers is simple, making it convenient for busy days. With these steps, you can enjoy a delicious risotto anytime. Embrace creativity and make this dish your own!

Butternut Squash Sage Risotto Comforting and Creamy Dish

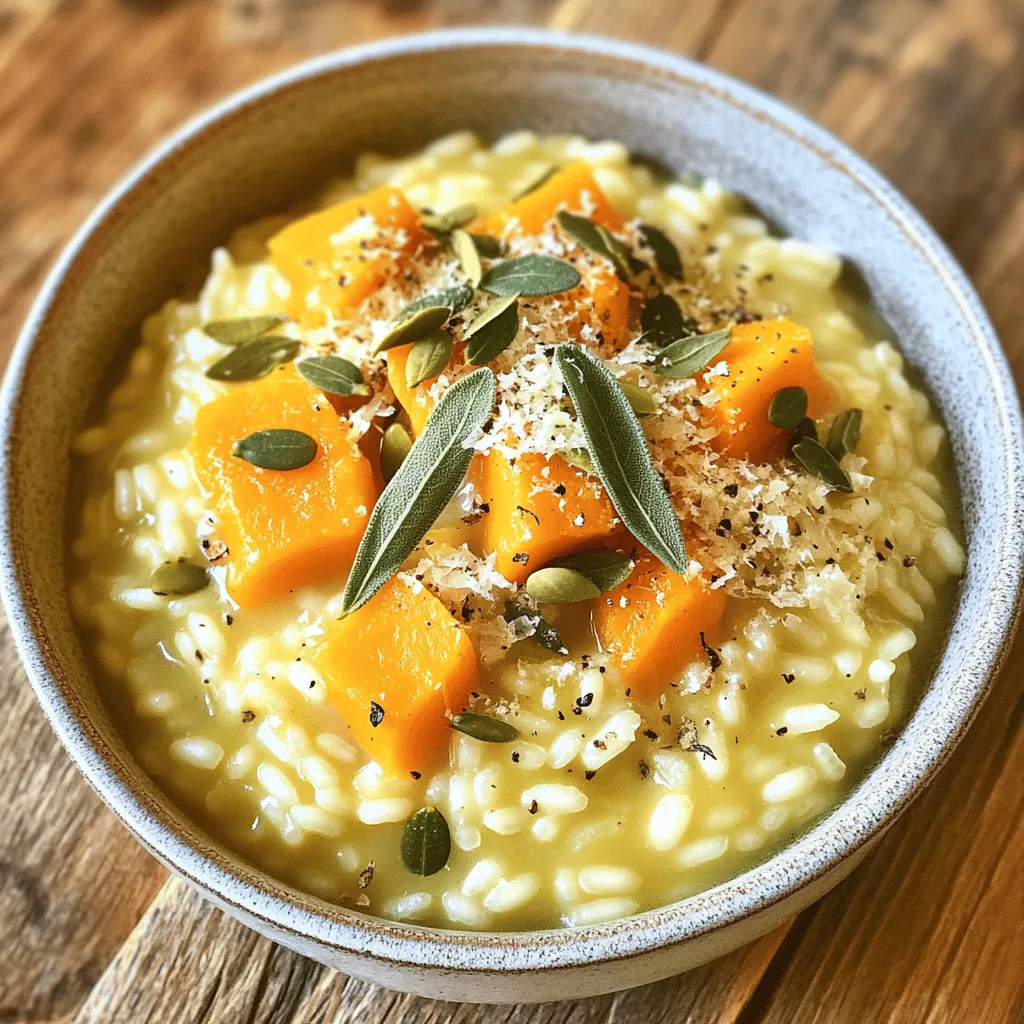
Ready for a warm bowl of comfort? Butternut Squash Sage Risotto is a creamy delight. I’ll show you how to

- 2 cups all-purpose flour - 1 cup granulated sugar - 1 tablespoon baking powder - 1 teaspoon ground cinnamon - 1/2 teaspoon salt - 1/2 cup unsalted butter, softened - 2 large eggs - 1 teaspoon vanilla extract - 1/2 cup milk - 2 cups apples, peeled and diced - 1/4 cup brown sugar - 1 teaspoon ground cinnamon (for the swirl) - 1/2 cup rolled oats - 1/4 cup chopped nuts - Pinch of salt To make this delicious bread, gather these simple ingredients. Use fresh apples for the best flavor. I love using Granny Smith or Honeycrisp apples. They add a nice tartness and sweetness. The cinnamon gives warmth and spice, making this treat perfect for fall. The oats and nuts on top add a nice crunch. You can use walnuts or pecans based on your taste. The butter makes the bread rich and moist. Don't skip the vanilla; it brings out the flavor of the apples. Make sure to measure your flour and sugar carefully. Too much flour can make the bread dry. Use a scale if you have one for the best accuracy. This bread is not just tasty; it fills your home with a lovely aroma while baking. Now you're ready to start your cinnamon swirl apple crumble bread. Gather your ingredients and get excited for a warm, comforting treat! - Preheat your oven to 350°F (175°C). Grease a 9x5 inch loaf pan and set it aside. - In a large bowl, combine 2 cups of flour, 1 cup of sugar, 1 tablespoon of baking powder, 1 teaspoon of cinnamon, and 1/2 teaspoon of salt. Mix well. - In another bowl, cream 1/2 cup of softened butter until light. Add 2 large eggs one at a time. Mix well after each egg. Stir in 1 teaspoon of vanilla and 1/2 cup of milk. - Gradually mix the wet ingredients into the dry ingredients. Be careful not to overmix; it’s okay to have a few lumps. - Gently fold in 2 cups of diced apples into the batter. - In a small bowl, mix 1/4 cup of brown sugar and 1 teaspoon of cinnamon for the swirl. - Pour half of the batter into the loaf pan. Sprinkle half of the cinnamon mixture over it. Pour the rest of the batter on top. Finish with the remaining cinnamon mixture. - Use a knife to swirl the layers together. This creates a nice marbled effect. - In a separate bowl, mix 1/2 cup of rolled oats, 1/4 cup of chopped nuts, and a pinch of salt. Sprinkle this topping evenly over the batter. - Bake in the preheated oven for 60-70 minutes. Check if a toothpick comes out clean from the center. - Once baked, let the loaf cool in the pan for about 10 minutes. Then transfer it to a wire rack to cool completely. - Avoid overmixing the batter. This helps keep your bread light and fluffy. - Ensure apples are evenly distributed. This gives each bite a tasty apple flavor. - Serve with whipped cream or ice cream. This adds a creamy touch to your bread. - Dust with powdered sugar before serving. It makes the bread look extra special. {{image_2}} You can change up the apples in this recipe. Try sweet Honeycrisp or tart Granny Smith apples. Each type gives a unique taste. If you prefer, swap nuts with seeds like pumpkin or sunflower. Chocolate chips can also add a sweet twist. To make this bread dairy-free, use almond or oat milk instead of regular milk. You can also replace butter with coconut oil or a dairy-free spread. For a healthier option, try whole wheat flour instead of all-purpose flour. This swap adds fiber and nutrients without losing flavor. To keep your Cinnamon Swirl Apple Crumble Bread fresh, use an airtight container. This method helps keep the bread moist. You can store it at room temperature for up to three days. If you want it to last longer, refrigerate it. This will help it stay fresh for about a week. Freezing is a great option if you want to save some for later. First, let the bread cool completely. Then, wrap it tightly in plastic wrap. Next, place it in a freezer bag. Label the bag with the date. This way, you’ll know how old it is. When you’re ready to eat it, take it out. Let it thaw in the fridge overnight or on the counter for a few hours. You can also warm it in the oven for a few minutes before serving. Enjoy each slice as if it were fresh! Can I use gluten-free flour? Yes, you can use gluten-free flour. Make sure to choose a blend that works for baking. The texture may change slightly, but it will still be tasty! How do I know when it’s done baking? Check with a toothpick. Insert it into the center. If it comes out clean, the bread is done. The top should be golden brown and spring back when touched. Can I make this recipe in advance? Yes! You can make the batter a day ahead. Store it in the fridge, then bake it fresh the next day for best results. What types of apples are best for baking? Use firm apples like Granny Smith or Honeycrisp. They hold their shape and add a nice tart flavor. You can mix varieties for a fun taste! How to reheat leftover bread? Reheat slices in the microwave for 10-15 seconds. For a crispier crust, place them in a toaster. You can also warm slices in the oven at 350°F for about 5-10 minutes. Best way to slice without crumbling? Use a serrated knife. Make sure the bread is fully cooled. It helps to slice slowly and gently to keep it intact. This blog post shared a detailed recipe for a delicious apple cinnamon bread. You learned about the ingredients, step-by-step instructions, and helpful tips for perfecting your loaf. Remember, you can swap ingredients to fit your taste and dietary needs. Store leftovers properly for lasting freshness. With the right techniques, your baking will shine. Enjoy the warm, sweet flavors of your homemade bread! I hope you create a delightful treat that brings joy to your kitchen.

Cinnamon Swirl Apple Crumble Bread Perfect for Fall

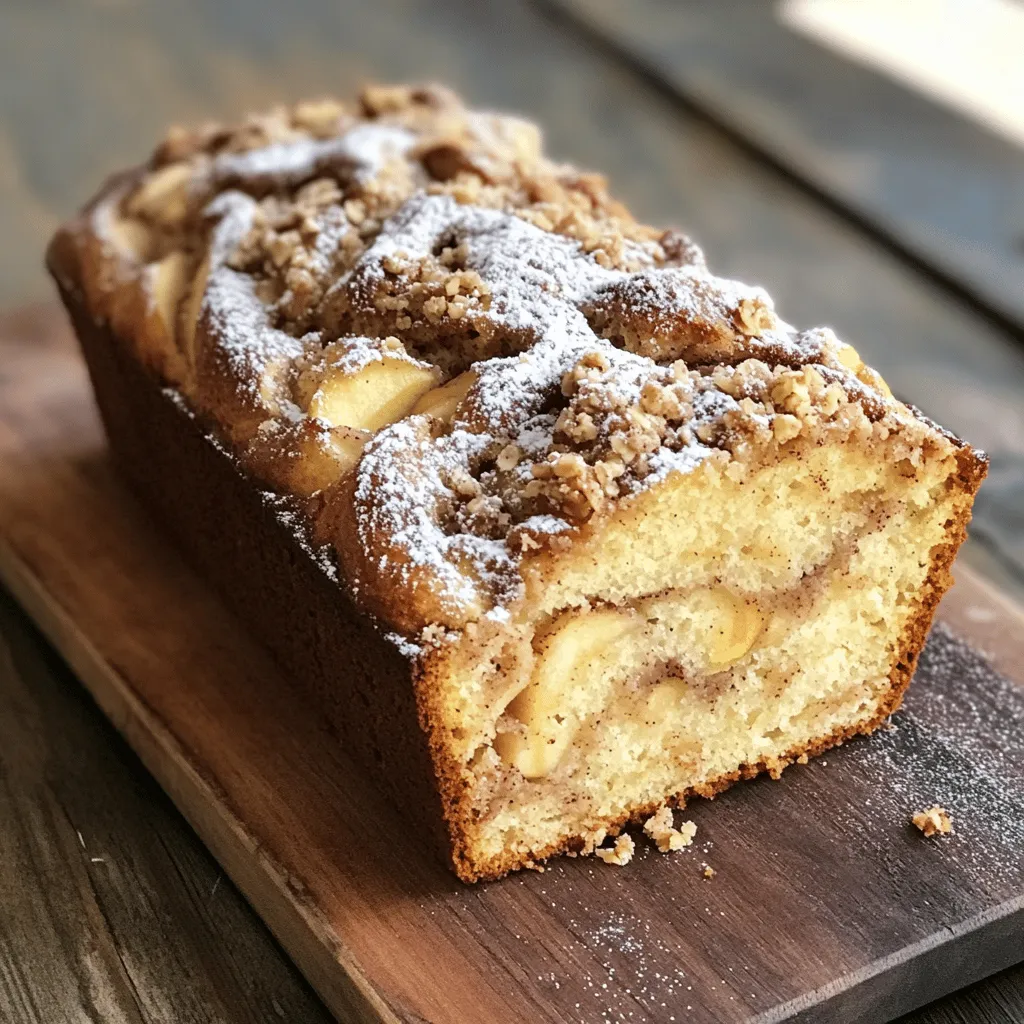
Get ready for a cozy fall treat! This Cinnamon Swirl Apple Crumble Bread blends warm spices and sweet apples, creating

Older posts
Newer posts
← Previous Page1 … Page19 Page20 Page21 … Page84 Next →

dsad

© 2026 Foodish Talk • Built with GeneratePress

Our Policies

  • Copyright Policy
  • Cookie Policy
  • GDPR Policy
  • Privacy Policy
  • Disclaimer
  • Terms Of Use

More Information

  • Home
  • About
  • Contact
  • Appetizers
  • Dessert
  • Dinner
  • Drinks
©2026, Foodish Talk About Back To Top