Skip to content
DisclaimerTerms Of UseGDPR PolicyCookie Policy

Foodish Talk

  • Home
  • Drinks
  • Appetizers
  • Dinner
  • Dessert
  • About
  • Contact
  • Privacy Policy
DisclaimerTerms Of UseGDPR PolicyCookie Policy

NO-ING-IMG

To make these tasty donut holes, gather these items: - 1 cup all-purpose flour - 1/4 cup granulated sugar - 1 1/2 teaspoons baking powder - 1/4 teaspoon baking soda - 1/4 teaspoon salt - 1/2 teaspoon ground cinnamon (plus extra for topping) - 1/2 cup buttermilk - 1 large egg - 2 tablespoons melted butter - 1/2 teaspoon vanilla extract For the sweet topping, you will need: - 1/4 cup granulated sugar (for coating) - 1 teaspoon ground cinnamon (for coating) If you need to substitute, here are some ideas: - All-purpose flour: Use gluten-free flour for a gluten-free version. - Buttermilk: Mix 1/2 cup milk with 1/2 tablespoon vinegar or lemon juice to make a quick buttermilk substitute. - Granulated sugar: You can use coconut sugar or a sugar substitute. - Egg: Use 1/4 cup of unsweetened applesauce for an egg-free option. These simple ingredients make it easy to whip up delicious donut holes in your air fryer. Enjoy experimenting with the flavors! To start, gather your ingredients. In a mixing bowl, whisk together: - 1 cup all-purpose flour - 1/4 cup granulated sugar - 1 1/2 teaspoons baking powder - 1/4 teaspoon baking soda - 1/4 teaspoon salt - 1/2 teaspoon ground cinnamon In another bowl, mix the wet ingredients. Combine: - 1/2 cup buttermilk - 1 large egg - 2 tablespoons melted butter - 1/2 teaspoon vanilla extract Stir until everything blends well. Now, pour the wet mix into the dry mix. Gently combine them. Make sure not to overmix. A few lumps are just fine. While your dough rests, preheat your air fryer to 350°F (175°C). This step is crucial for even cooking. While it heats, prepare your scoop or spoon for shaping the donut holes. Lightly grease the air fryer basket with cooking spray. This helps the donut holes release easily once cooked. Next, scoop small portions of the dough. Shape them into balls, about 1 inch wide. Place them in the air fryer basket, leaving space between each one. Cook the donut holes for 8-10 minutes. They should turn golden brown. Check with a toothpick; it should come out clean. You may need to work in batches depending on your air fryer size. While they cook, mix together 1/4 cup sugar and 1 teaspoon cinnamon in a bowl. Once the donut holes are ready, let them cool for a few minutes. Toss them in the cinnamon-sugar mixture until well coated. Enjoy the warm, sweet flavor of your air fryer cinnamon sugar donut holes! To make your donut holes round, use a small cookie scoop. This tool helps you grab equal amounts of dough. Gently roll each scoop in your hands to form a ball. Avoid pressing too hard; the dough must stay light and airy. Set your air fryer to 350°F (175°C). This temperature gives you a nice golden color. Cook the donut holes for 8 to 10 minutes. Check them at 8 minutes; they should look golden and fluffy. Always use a toothpick to check if they are done. If it comes out clean, they are ready! One mistake is overmixing the batter. This can lead to tough donut holes. Mix until just combined, and don’t worry about lumps. Another mistake is overcrowding the air fryer. Leave space between each donut hole so air can circulate. Lastly, don’t skip the cinnamon-sugar coating. It adds the perfect sweet touch! {{image_2}} You can easily change the flavor of your donut holes. Here are some ideas: - Chocolate Chip: Add 1/2 cup of mini chocolate chips to the batter for a sweet twist. - Lemon Zest: Mix in 1 tablespoon of lemon zest for a bright, fresh taste. - Pumpkin Spice: Replace some flour with 1/2 cup of pumpkin puree and add pumpkin pie spice. - Nutmeg: Swap out some cinnamon for nutmeg for a warm, spicy flavor. Experimenting with these variations can make each batch unique and exciting! While cinnamon sugar is classic, you can try different coatings and toppings: - Chocolate Glaze: Dip the warm donut holes in melted chocolate for a rich treat. - Powdered Sugar: Roll the donut holes in powdered sugar for a sweet, fluffy finish. - Maple Syrup: Drizzle warm donut holes with maple syrup for a breakfast twist. - Sprinkles: Add colorful sprinkles on top of any glaze for a fun touch. These options can change up your donut holes and make them perfect for any occasion! Making gluten-free donut holes is simple. Here’s how: - Flour Swap: Use 1 cup of gluten-free all-purpose flour instead of regular flour. Make sure it includes xanthan gum for binding. - Baking Powder: Confirm that your baking powder is gluten-free. - Check Ingredients: Ensure all other ingredients, like vanilla extract and buttermilk, are gluten-free. This way, everyone can enjoy these tasty treats without worry! To store leftover donut holes, let them cool completely. Place them in an airtight container. This keeps them fresh for up to three days. If you want them to last longer, consider freezing them. To reheat donut holes, use your air fryer. Preheat it to 350°F (175°C). Place the donut holes in the basket for about 3-5 minutes. This method keeps them warm and crispy, just like fresh. To freeze donut holes, first, let them cool. Then, place them in a single layer on a baking sheet. Freeze until solid, about an hour. After that, transfer them to an airtight container or freezer bag. They can be frozen for up to three months. When you want to enjoy them, just reheat as mentioned above. Yes, you can make these donut holes in a regular oven. Preheat your oven to 350°F (175°C). Shape the donut hole batter as usual and place them on a baking sheet lined with parchment paper. Bake for about 10-12 minutes. Keep an eye on them. They should be golden brown and a toothpick should come out clean. If you don't have buttermilk, you can make a quick substitute. Mix 1/2 cup of milk with 1/2 tablespoon of vinegar or lemon juice. Let it sit for about 5 minutes. This will give you a similar tangy flavor and acidity needed for the recipe. Check for a golden brown color on the donut holes. Insert a toothpick into the center of one. If it comes out clean, they are done. If there is batter on the toothpick, cook them for another minute or two. In this post, we covered how to make Air Fryer Cinnamon Sugar Donut Holes. You learned about the ingredients, easy steps, and tips for perfect results. I shared variations, storage tips, and answered common questions. Making these tasty treats is simple and fun. You can customize them to fit your taste. Enjoy your homemade donut holes fresh, or store them for later. With practice, you’ll master this recipe quickly and amaze your friends and family. Happy cooking!

Air Fryer Cinnamon Sugar Donut Holes Simple Treat

Craving a sweet treat that’s quick and easy? You’re in the right spot! Air Fryer Cinnamon Sugar Donut Holes are

- 1 pre-made graham cracker crust - 1 cup semi-sweet chocolate chips - 1 cup heavy whipping cream - 1/2 cup sweetened shredded coconut - 1/2 cup chopped pecans - 1/2 cup granulated sugar - 1/4 cup unsweetened cocoa powder - 1 teaspoon vanilla extract - Pinch of salt You can swap the graham cracker crust for a cookie crust if you like. An Oreo crust adds a great flavor twist. If you want to avoid nuts, leave out the pecans. You can also replace them with more coconut. For a lighter touch, try using coconut cream instead of heavy cream. The semi-sweet chocolate chips give the pie its rich chocolate flavor. They melt down easily and mix well with cream. Heavy whipping cream makes the filling light and fluffy. It whips to soft peaks, which creates a nice texture. Sweetened shredded coconut adds a chewy bite and sweetness. Chopped pecans give crunch and a nutty taste. Cocoa powder deepens the chocolate flavor and adds richness. Finally, vanilla extract brings warmth and enhances all the flavors. {{ingredient_image_1}} First, grab a microwave-safe bowl. Add 1 cup of semi-sweet chocolate chips to it. Heat the chocolate in the microwave for 30 seconds. Take it out and stir. If it isn't smooth, heat it again for 15 seconds. Repeat until the chocolate melts completely. Let it cool for a bit. This step is key for a creamy filling. Next, take another bowl. Pour in 1 cup of heavy whipping cream. Use an electric mixer to whip the cream. Keep mixing until soft peaks start to form. Then, add 1/2 cup of granulated sugar, 1/4 cup of unsweetened cocoa powder, 1 teaspoon of vanilla extract, and a pinch of salt. Keep whipping until you see stiff peaks. This makes your filling light and fluffy. Now it's time to mix! Gently fold the melted chocolate into the whipped cream. Be careful not to deflate the cream. Once blended, add 1/2 cup of sweetened shredded coconut and 1/2 cup of chopped pecans. Fold them in lightly. Next, spoon the mixture into your pre-made graham cracker crust. Spread it evenly. Cover the pie with plastic wrap and place it in the fridge for at least 4 hours. This helps it set perfectly. Enjoy the process; you’re making a pie that everyone will love! To make whipped cream that stands tall, use cold heavy cream. Start with an electric mixer and beat it on medium speed. Watch for soft peaks first. Then, slowly add granulated sugar, cocoa powder, vanilla extract, and a pinch of salt. Keep mixing until you see stiff peaks. This means the cream holds its shape and won’t fall. If you over-mix, it may turn into butter. So, stop once you see those perfect peaks. Folding is key to keeping your mixture light. Use a rubber spatula for this task. Start by adding a small amount of the chocolate mix to the whipped cream. Gently stir it in to lighten the cream. Then, add the rest of the chocolate. Use a sweeping motion to combine, but be careful not to deflate the whipped cream. When you add coconut and pecans, fold them in gently. This keeps the texture airy and fluffy. After filling your graham cracker crust, cover it well with plastic wrap. Refrigerate the pie for at least 4 hours. This waiting time helps the filling set properly. If you want a firmer pie, let it chill overnight. The longer it cools, the better the flavors blend. Before serving, check that it holds its shape. If it feels too soft, let it chill a bit longer. Enjoy the sweet reward of your patience! Pro Tips Chocolate Tempering: Ensure the melted chocolate is slightly cooled before folding it into the whipped cream. This helps maintain the lightness of the whipped cream and prevents it from collapsing. Whipping Cream: For the best results, use cold heavy cream and chill your mixing bowl and beaters beforehand. This can help achieve a better volume and stability in your whipped cream. Setting Time: Allow the pie to set in the refrigerator for at least 4 hours, or overnight if possible. This ensures a firmer texture and makes it easier to slice. Garnishing: For a decorative touch, add extra whipped cream, toasted coconut, and pecans on top just before serving. This enhances both the visual appeal and the flavor of the pie. {{image_2}} You can change the crust for a new twist. An Oreo crust adds a rich, chocolatey flavor. Just crush the Oreos and mix them with melted butter. You can also try an almond crust. It gives a nutty taste. Blend almond flour with butter and press it into a pie dish. Both options make the pie unique. A little twist in flavor can make this pie even better. Try adding a splash of coffee. It enhances the chocolate flavor and adds depth. You can also use different nuts. Walnuts work well if you want a stronger taste. Just chop them up and fold them in like pecans. How you serve the pie can impress your guests. Garnish with whipped cream on top. A sprinkle of coconut makes it look pretty. Adding extra chopped nuts can also be nice. Use a chocolate drizzle for a fancy touch. These small details make your no-bake German chocolate pie stand out. To keep your No-Bake German Chocolate Pie fresh, store it in the fridge. Wrap the pie in plastic wrap to avoid drying out. If you have slices left, place them in an airtight container. This helps keep the pie moist and tasty. You can freeze this pie if you want to save it for later. First, wrap it tightly in plastic wrap. Then, place it in a freezer-safe container. This way, it stays fresh for up to three months. When you're ready to eat it, thaw the pie in the fridge overnight. In the fridge, your No-Bake German Chocolate Pie will last for about five days. After that, it may lose its flavor and texture. Always check for any signs of spoilage before enjoying it again. Yes, you can make this pie ahead of time. This pie actually tastes better if you let it chill overnight. Just cover it well with plastic wrap or foil. It stays fresh in the fridge for up to three days. This makes it perfect for parties or family gatherings! You will know the pie is set when it feels firm to the touch. After chilling for at least four hours, check the center. If it holds its shape without sinking, it is ready to serve. You can also gently shake the pie; if the filling jiggles slightly, it needs more time. If you don't have heavy cream, you can use coconut cream instead. Just chill a can of coconut milk overnight, then scoop out the cream. Another option is to use a mixture of milk and butter. For every cup of heavy cream, mix 3/4 cup of milk with 1/4 cup of melted butter. This gives a similar richness. This blog post covered all the essential steps for making your pie. We explored the key ingredients and how to melt chocolate and whip cream. I shared tips for achieving the best texture and ways to present your dessert beautifully. Remember, you can always make fun variations to suit your taste. Store leftovers properly to enjoy later. With these tips, you can create a delicious pie that impresses everyone. Dive in and bake with confidence!

No-Bake German Chocolate Pie Delightful Dessert Recipe

Are you ready to impress your friends and family with an easy dessert? This No-Bake German Chocolate Pie is your

- 2 cups rolled oats - 1/2 cup brown sugar, packed - 1 teaspoon baking powder - 1/2 teaspoon salt - 1 teaspoon ground cinnamon - 2 cups milk (dairy or non-dairy) - 1/4 cup pure maple syrup - 2 large eggs - 1 teaspoon vanilla extract - 1/4 cup chopped walnuts (optional) - 1/2 cup fresh berries (blueberries, raspberries, or sliced strawberries) To make Maple Brown Sugar Baked Oatmeal, gather all these ingredients. Rolled oats are the base. They give the dish its hearty texture. Brown sugar adds sweetness and richness. Baking powder helps the oatmeal rise, while salt enhances the flavors. Ground cinnamon brings warmth and spice. Next, choose your milk. You can use dairy or a non-dairy option like almond milk. Maple syrup gives a lovely, sweet flavor. The eggs bind everything together and add moisture. Vanilla extract adds a hint of sweetness. If you love nuts, add chopped walnuts for crunch. Fresh berries brighten the dish and add natural sweetness. This combination creates a delicious breakfast treat. Each bite is warm and comforting. With simple ingredients, you can enjoy a delightful start to your day. 1. Preheat the oven and prepare the baking dish. Start by setting your oven to 350°F (175°C). Grease a 9x9 inch baking dish with butter or oil. This step helps the oatmeal not stick. 2. Combine dry ingredients in a mixing bowl. In a large mixing bowl, add 2 cups of rolled oats, 1/2 cup of packed brown sugar, 1 teaspoon of baking powder, 1/2 teaspoon of salt, and 1 teaspoon of ground cinnamon. Mix these well so the flavors blend. 3. Whisk together the wet ingredients separately. In another bowl, whisk together 2 cups of milk (you can use dairy or a non-dairy option), 1/4 cup of pure maple syrup, 2 large eggs, and 1 teaspoon of vanilla extract. Make sure these ingredients combine well for a smooth mix. 4. Mix the wet and dry ingredients. Pour the wet mixture into the bowl with the dry ingredients. Stir until everything is combined. This step creates a thick and tasty oatmeal base. 5. Fold in optional ingredients like walnuts and berries. If you want extra crunch, gently fold in 1/4 cup of chopped walnuts and 1/2 cup of fresh berries (like blueberries or raspberries). This adds flavor and texture. 6. Bake the oatmeal mixture and check for doneness. Pour the oatmeal mix into the prepared baking dish and spread it evenly. Bake in your preheated oven for 30-35 minutes. Check if the top is golden brown and the oatmeal has set. Following these steps will give you a delicious Maple Brown Sugar Baked Oatmeal that everyone will love! - Use fresh ingredients for the best flavor. Fresh oats, eggs, and milk make a big difference. They enhance the taste and texture. - Adjust sweetness with additional maple syrup or brown sugar. If you like it sweeter, add more syrup or sugar. Taste as you go to find the right balance. - Ensure even baking and texture by spreading the mixture evenly. When you pour the oatmeal mix into the baking dish, smooth it out. This helps it bake nicely and evenly. - Serve warm with maple syrup drizzle. A warm slice topped with syrup is hard to resist. It adds sweetness and a lovely shine. - Garnish with additional berries and yogurt. Fresh berries on top add color and flavor. A dollop of yogurt gives creaminess and makes it look fancy. {{image_2}} You can switch things up with your baked oatmeal. Here are some fun ideas: - Steel-Cut Oats: Use steel-cut oats instead of rolled oats. This gives a chewier texture. - Nuts and Seeds: Try different nuts like pecans or almonds. Seeds like chia or sunflower seeds work too. - Fruits: Add fruits like bananas, apples, or peaches. Each fruit adds a new flavor twist. If you have special diet needs, you can easily adapt this recipe: - Dairy-Free: Use non-dairy milk, like almond or oat milk, to make it vegan. - Gluten-Free: Choose certified gluten-free oats to ensure it’s safe for those with gluten issues. These variations make your Maple Brown Sugar Baked Oatmeal a fun and flexible dish! Each choice adds a new taste and texture. After baking your oatmeal, let it cool first. Once cool, slice it into squares. Place the squares in an airtight container. This keeps the oatmeal fresh. Store it in the fridge. It lasts about five days. If you want to keep it longer, consider freezing it. To reheat, you have a few options. The microwave works well. Place a square on a plate, cover it with a damp paper towel, and heat for one minute. You can also use the oven. Preheat it to 350°F (175°C). Put the squares in a baking dish, cover with foil, and heat for about ten minutes. This warms it evenly. Add a splash of milk if it seems dry. Enjoy your warm, tasty breakfast! Can I make this recipe vegan? Yes, you can make this recipe vegan. Use almond milk or oat milk in place of dairy milk. Replace eggs with flax eggs or applesauce. This way, you keep the flavor and texture. How do I make it ahead of time? To make this dish ahead, follow the recipe up to baking. Cover the mixture and store it in the fridge overnight. When you’re ready, bake it in the morning. This saves time and still tastes great. What’s the best way to store leftovers? Store leftovers in an airtight container in the fridge. They last about five days. You can also keep individual servings for easy breakfast later. Can I freeze baked oatmeal? Yes, baked oatmeal freezes well. Cut it into squares and wrap them tightly. Store the squares in a freezer bag. They can last for up to three months. Just thaw them overnight before reheating. What are some serving suggestions? Serve warm with a drizzle of maple syrup on top. Add fresh berries for a colorful touch. You can also top it with yogurt for a creamy bite. Enjoy your meal! This blog post covered a tasty recipe for Maple Brown Sugar Baked Oatmeal. You learned about key ingredients, easy steps, and handy tips for perfecting your dish. Don’t forget to explore various options to mix things up. For a vegan twist, choose dairy-free ingredients and different fruits. Keep your leftovers fresh, and reheat them well for the best taste. This recipe is simple, fun, and perfect for breakfast any day. Enjoy making this warm, comforting meal that you can share with family or friends.

Maple Brown Sugar Baked Oatmeal Delightful Breakfast Treat

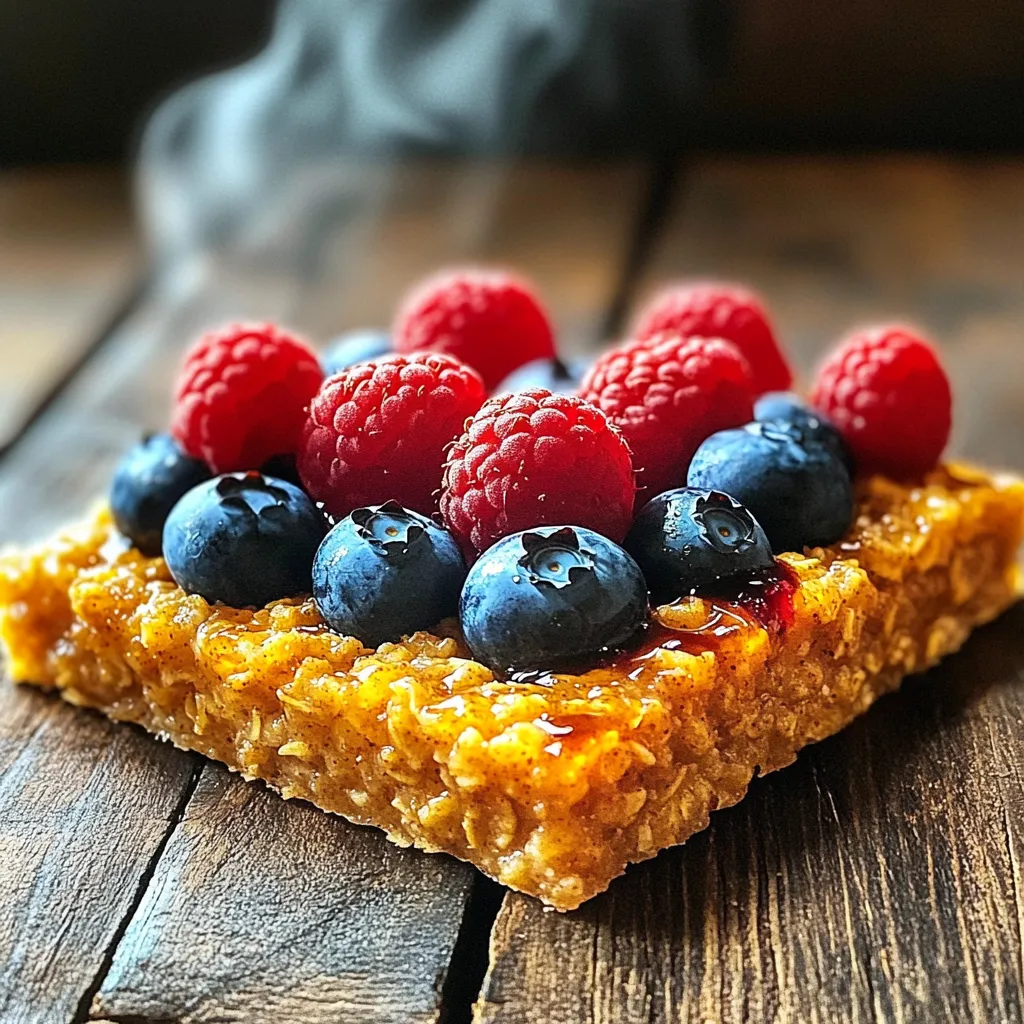
Looking for a breakfast that’s warm, sweet, and satisfying? Maple Brown Sugar Baked Oatmeal is just what you need! This

Cooking One-Pot Creamy Cajun Chicken Pasta is easy. Gather these key ingredients for a tasty meal. - Chicken and Seasonings - 2 boneless, skinless chicken breasts, diced - 2 tablespoons Cajun seasoning - 1 tablespoon olive oil - Vegetables - 1 small onion, chopped - 3 garlic cloves, minced - 1 bell pepper (red or yellow), chopped - 1 cup cherry tomatoes, halved - Pasta and Dairy Components - 4 cups chicken broth - 8 ounces penne pasta - 1 cup heavy cream - 1 cup grated Parmesan cheese - Additional Seasoning and Garnish - Salt and pepper to taste - Fresh parsley for garnish Each ingredient plays a role in flavor and texture. The chicken provides protein, while the Cajun seasoning adds a spicy kick. The vegetables bring freshness and color, and the creamy sauce makes the dish rich and satisfying. Don’t forget to add salt and pepper to enhance the overall taste. Fresh parsley adds a nice touch at the end! Start by heating the olive oil in a large pot over medium heat. While the oil heats, season your diced chicken with Cajun seasoning. This spice blend adds a warm kick to the dish. Once the oil shimmers, add the chicken to the pot. Cook it for about 5-7 minutes, turning until it’s browned on all sides. When done, remove the chicken from the pot and set it aside for later. In the same pot, add the chopped onion and bell pepper. Sauté these for 3-4 minutes until they soften. This step builds a tasty base for your pasta. Next, stir in the minced garlic and halved cherry tomatoes. Cook these for an additional 2 minutes until your kitchen smells amazing. The tomatoes will burst and mix with the other flavors. Now it's time to bring it all together. Pour in the chicken broth and bring it to a boil. Once boiling, add the penne pasta, stirring it into the broth. Cover the pot and reduce the heat to a simmer. Cook the pasta for about 10-12 minutes or until it's al dente. After the pasta is cooked, stir in the heavy cream and add the cooked chicken back into the pot. Heat it for another 2 minutes. Finally, mix in the grated Parmesan cheese until it melts and blends into a creamy sauce. Don't forget to season with salt and pepper to taste. To serve, grab some deep bowls. Spoon the creamy Cajun chicken pasta into each bowl. For a pop of color, garnish with chopped parsley and a sprinkle of extra Parmesan cheese. For an added treat, serve this dish with a slice of crusty garlic bread on the side. It’s not just a meal; it’s a delight! To cook pasta just right, follow these steps: - Use a large pot with plenty of water. - Add a generous pinch of salt. This helps flavor the pasta. - Bring the water to a rolling boil before adding the pasta. - Stir the pasta right after you add it. This keeps it from sticking. - Cook until it’s al dente, which means firm to the bite. - Save a cup of pasta water before draining. You can use it later to adjust sauce thickness. If you want to change the spice level, consider these ideas: - Use less Cajun seasoning for a milder dish. - Mix in some cream to tone down the heat. - Add a touch of sugar to balance strong spices. - For more heat, try adding cayenne pepper or red pepper flakes. - Always taste your dish as you go. This helps you find the perfect balance. Here are tools that can make your cooking easier: - A large pot or Dutch oven for cooking the pasta and sauce. - A sharp knife for chopping vegetables and chicken. - A cutting board to keep your workspace tidy. - A measuring cup for accurate liquid measurements. - A wooden spoon or spatula for stirring. - A cheese grater for fresh Parmesan. Using the right tools can make your cooking faster and more fun! {{image_2}} You can easily make this dish vegetarian. Simply swap the chicken for diced mushrooms or zucchini. These veggies add great texture and soak up the Cajun flavors. You can also use firm tofu for added protein. Just make sure to season it well with Cajun seasoning for a punch of flavor. Want to kick up the taste? Consider adding cooked sausage or shrimp. These proteins pair well with the Cajun spice. You can also toss in some spinach or kale for a burst of color and nutrition. Fresh herbs like basil or thyme can enhance the taste even more. While penne works great, feel free to use other pasta shapes. Fusilli or farfalle can add fun shapes to your meal. If you prefer whole grain, try whole wheat penne for a healthier option. For a gluten-free choice, use rice or quinoa pasta. Each type brings its own twist to this creamy dish. To store your creamy Cajun chicken pasta, let it cool first. Transfer the pasta to an airtight container. It will stay fresh in the fridge for up to three days. Make sure to cover it well to keep it from drying out. When you're ready to enjoy the leftovers, use a microwave or a pot. If using a microwave, heat it in short bursts. Stir between each burst to heat evenly. If using a pot, add a splash of chicken broth to keep it creamy. Heat over low until warm, stirring often. You can freeze this dish if you want to save it for later. Place the cooled pasta in a freezer-safe container. Make sure to remove as much air as possible. It will last in the freezer for about two months. To eat, thaw it in the fridge overnight, then reheat. Yes, you can! This dish works well with shrimp or turkey. You can even try sausage for a smoky flavor. Just adjust the cooking time. Cook shrimp until pink, or turkey until browned. If you want a lighter option, use half-and-half. You can also mix milk with cornstarch for thickness. Coconut cream is a great dairy-free choice too. Just remember, these swaps may change the dish's taste. To go gluten-free, choose gluten-free penne pasta. Many brands offer great options. Just check the label to ensure it’s certified gluten-free. The rest of the ingredients are naturally gluten-free. Absolutely! You can make it a day ahead. Just store it in the fridge. When you’re ready to eat, reheat on the stove. Add a splash of broth to keep it creamy. This blog post covered the key ingredients, step-by-step cooking methods, and useful tips for making a delicious dish. It included variations and how to store leftovers. Remember, you can always tweak the recipe to suit your taste. Whether you want it spicy or prefer a vegetarian option, it's all possible. Don't hesitate to experiment with different ingredients and enjoy your cooking journey. With these steps, you can impress anyone at your dinner table.

One-Pot Creamy Cajun Chicken Pasta Simple and Tasty

Welcome to your new favorite weeknight dinner! This One-Pot Creamy Cajun Chicken Pasta is simple, tasty, and perfect for busy

To make these yummy cinnamon apple scones, you need the following ingredients: - 2 cups all-purpose flour - 1/2 cup granulated sugar - 1 tablespoon baking powder - 1 teaspoon ground cinnamon - 1/2 teaspoon salt - 1/2 cup unsalted butter, cold and cubed - 1 cup peeled and diced apples (about 1 large apple) - 1/2 cup heavy cream - 1 large egg - 1 teaspoon vanilla extract - Additional cinnamon sugar for topping (2 tablespoons sugar mixed with 1 teaspoon cinnamon) When baking, measuring your ingredients is key. You can use cups or a scale. A scale gives you more accuracy. This helps with the texture of your scones. If you use cups, make sure to level them off. For flour, spoon it into the cup and then level it. Avoid packing the flour down. This can lead to dry scones. If you don’t have an ingredient, you can still make these scones. Here are some swaps you can try: - Use whole wheat flour for a nutty flavor. - Try brown sugar instead of granulated sugar for more depth. - Swap heavy cream with milk or a non-dairy milk for a lighter scone. - Use any apple you like; tart apples add extra zing. These substitutions keep your scones tasty and fun! First, gather all your ingredients. This makes the process smooth and fun. Start by preheating your oven to 400°F (200°C). Line a baking sheet with parchment paper to prevent sticking. In a large bowl, whisk together 2 cups of flour, ½ cup of sugar, 1 tablespoon of baking powder, 1 teaspoon of cinnamon, and ½ teaspoon of salt. This mix creates a sweet and spicy base for your scones. Next, add ½ cup of cold, cubed butter into the dry mix. Use your fingers or a pastry cutter to blend the butter until it looks like coarse crumbs. This step is key for flaky scones. Now, fold in 1 cup of peeled and diced apples. The apple pieces add moisture and flavor to the scones. In a separate bowl, whisk together ½ cup of heavy cream, 1 large egg, and 1 teaspoon of vanilla extract. Pour this wet mix into your flour mixture. Stir gently until just combined. The dough should be slightly sticky but not too wet. If you over-mix, the scones can become tough. Turn the dough onto a lightly floured surface. Gently knead it a couple of times to bring it together. Pat the dough into a circle about 1 inch thick. Cut the circle into 8 wedges and place them on the prepared baking sheet. Brush the tops with a little more cream and sprinkle the cinnamon sugar mix on top. Now it's time to bake! Place the baking sheet in your preheated oven. Bake for 15 to 20 minutes. Keep an eye on them to avoid burning. The scones should turn a lovely golden brown. To check if your scones are done, take a toothpick and insert it into the center of a scone. If it comes out clean, they are ready. If not, give them a few more minutes. Let the scones cool on the baking sheet for 5 minutes. After that, transfer them to a wire rack to cool completely. Enjoy the warm, fresh aroma filling your kitchen! To get the best texture in your scones, use cold butter. Cold butter makes the scones flaky. Cubing the butter helps mix it into the flour. This creates small pockets of butter, which turn golden when baked. Mix the dry ingredients well first. This helps spread the baking powder and cinnamon evenly. When you fold in the apples, do it gently. You want them to stay intact for juicy bites. For extra flavor, add a pinch of nutmeg. It pairs well with cinnamon and apples. If you like sweetness, sprinkle a little extra sugar on top before baking. A common mistake is over-mixing the dough. This makes the scones tough. Mix just until combined; it's okay if some dry flour remains. Another issue is using warm butter. Warm butter does not create the right texture. Always work with butter from the fridge. Lastly, don’t skip the cinnamon sugar topping. It adds a lovely crunch and sweetness. These scones taste best warm. Serve them fresh from the oven with butter or jam. They pair nicely with tea or coffee. For a fun twist, try adding a thin slice of apple on top. This adds color and flavor. You can also dust them with powdered sugar for a sweeter look. Enjoy your Cinnamon Apple Scones with friends or family for a delightful treat! {{image_2}} You can make your cinnamon apple scones even more exciting by adding extra flavors. Nuts, like walnuts or pecans, give a nice crunch. Dried fruits, such as raisins or cranberries, add sweetness. Try mixing in a handful of your favorite nuts or fruits when you fold in the apples. This will create a fun twist on the classic scone. If you need a gluten-free version, you can easily swap the all-purpose flour. Use a gluten-free flour blend instead. Make sure it contains xanthan gum, as it helps with texture. This change keeps your scones light and fluffy, just like the original. You might need to adjust the liquid slightly, so add a bit more cream if the dough feels too dry. For a vegan version, replace the butter with coconut oil or a vegan butter. Use plant-based milk instead of heavy cream. A flax egg works well too! To make a flax egg, mix one tablespoon of ground flaxseed with three tablespoons of water. Let it sit for five minutes to thicken. This will bind your ingredients together without using eggs. Enjoy your scones without any animal products! To keep your scones fresh, place them in an airtight container. This helps seal in moisture and flavor. You can leave them at room temperature for up to two days. If you want to store them longer, the fridge is a great option. Just make sure they are well-wrapped to avoid drying out. Freezing scones is simple and a great way to save some for later. Wrap each scone tightly in plastic wrap. Then, place the wrapped scones in a freezer-safe bag or container. They can stay frozen for up to three months. When you’re ready to enjoy them, just thaw them in the fridge overnight. To reheat your scones, preheat your oven to 350°F (175°C). Place the scones on a baking sheet and warm them for about 10 minutes. This brings back their fresh-baked taste and texture. If you prefer a microwave, heat them for about 15-20 seconds. However, the oven is best for keeping them crisp on the outside. You can tell the scones are done when they turn golden brown. A toothpick should come out clean when you poke the center. If it has dough on it, bake for a few more minutes. Keep an eye on them. The smell will also be a good hint that they are ready. Yes, you can! Make the dough a few hours before baking. Just cover it with plastic wrap and keep it in the fridge. This allows the flavors to blend well. When you are ready, take it out and cut your scones. Bake them as usual. For scones, I love using Granny Smith apples. They add a nice tartness. Honeycrisp apples also work well for their sweetness and crunch. Avoid soft apples like Red Delicious, as they can make the scones mushy. Choose apples that hold their shape for the best results. In this article, we covered all you need to know about baking scones. You learned about the key ingredients, the step-by-step process, and tips to avoid mistakes. We also explored variations, storage methods, and answered common questions. Now you can bake scones with confidence. Use this guide to enjoy tasty treats. Happy baking!

Cinnamon Apple Scones Delightfully Fresh and Easy

Are you ready to bake something delightful? My Cinnamon Apple Scones are fresh, easy, and filled with flavor. You’ll enjoy

To make these tasty bars, you need: - 1 cup rolled oats - 1 cup creamy peanut butter - 1/2 cup honey or maple syrup - 1/2 cup dark chocolate chips - 1/4 cup chia seeds (optional for extra nutrition) - 1/2 cup shredded coconut (unsweetened) - 1/4 teaspoon salt - 1 teaspoon vanilla extract These ingredients work together to create a rich, chewy treat. If you want to boost the nutrition, add: - Chia seeds: Full of fiber and omega-3s. - Flaxseeds: Great for heart health. - Dried fruits: Raisins or cranberries can add sweetness. These extras make your bars even better for you! You can swap some ingredients if needed: - Almond butter instead of peanut butter for a nutty flavor. - Agave syrup instead of honey for a vegan option. - Milk chocolate chips if you prefer a sweeter taste. These substitutions keep the recipe flexible and fun! First, grab a large mixing bowl. Add 1 cup of rolled oats. If you want extra nutrition, add 1/4 cup of chia seeds. Next, include 1/2 cup of shredded coconut and 1/4 teaspoon of salt. Mix these dry ingredients well with a spoon. Make sure everything is combined evenly. This step sets the base for your bars. Now, take a small saucepan. Add 1 cup of creamy peanut butter and 1/2 cup of honey or maple syrup. Heat this mixture on low for about 2-3 minutes. Stir gently until it’s smooth and easy to mix. Once heated, remove it from heat. Stir in 1 teaspoon of vanilla extract until it’s all well blended. This mixture adds richness to your bars. Pour the warm peanut butter mixture over your dry ingredients in the bowl. Use a spatula or wooden spoon to mix everything. Make sure all the oats and coconut are coated. While it’s still warm, fold in 1/2 cup of dark chocolate chips. They will slightly melt and mix in nicely. This step brings a sweet and chocolatey flavor. Line an 8x8 inch baking dish with parchment paper. Transfer your mixture into the dish. Press it down firmly with your hands or a flat spatula. You want an even layer. Refrigerate the bars for at least 2 hours. Once they are firm, lift them out using the parchment paper. Cut into squares or rectangles, and enjoy your tasty treats! Mixing well is key to a great bar. Start with the dry ingredients. Combine the rolled oats, chia seeds, shredded coconut, and salt in a large bowl. Use a spoon or spatula to mix until evenly blended. Next, warm the peanut butter and honey. Stir them together until smooth. Pour the warm mix into the dry ingredients. This helps everything stick together. Make sure to mix until no dry bits remain. Proper mixing ensures every bite is tasty. You can easily change this recipe to fit your needs. For nut allergies, try sunflower seed butter instead of peanut butter. If you want it vegan, use maple syrup instead of honey. You can leave out the chocolate chips or use dairy-free ones for a vegan option. If you want to add protein, consider adding protein powder to the dry mix. These small changes can make the bars fit various diets. Presentation can make your bars look even better. Cut the bars into squares or rectangles using a sharp knife. Arrange them on a colorful platter. For a special touch, dust the top with cocoa powder or additional shredded coconut. You can also drizzle melted dark chocolate on top for a fancy look. These simple steps make your bars appealing, turning a quick snack into a treat everyone will enjoy. {{image_2}} You can make these bars even better by adding nuts or seeds. Try chopped almonds, walnuts, or cashews. Each type adds a new crunch and flavor. You can also use seeds like sunflower or pumpkin seeds. They add great texture and healthy fats. Just mix them in with the oats and coconut. Adjust the amount based on your taste. Swapping peanut butter for almond butter changes the flavor profile. Almond butter gives a nutty taste that pairs well with chocolate. You can also try cashew butter or sun butter for a different twist. Each nut butter has unique flavors. Experiment to find your favorite mix. Remember, the key is to keep the same amount for the best results. Adding dried fruits can make these bars more exciting. Raisins, cranberries, or chopped dates add sweetness and chewiness. Mix them in after combining the dry ingredients. You can also try adding mini marshmallows for a fun touch. Just be sure to adjust the honey or syrup if you add a lot of sweet items. This helps keep the texture just right. To keep your no-bake chocolate peanut butter oat bars fresh, store them in an airtight container. This helps prevent the bars from drying out. You can also wrap them in plastic wrap before placing them in the container. For extra flavor, add a slice of bread to the container. The bread keeps the bars soft and moist. These tasty bars stay fresh in the fridge for about one week. I recommend checking them for any signs of spoilage before eating. If they look or smell off, it's best to toss them. You can also mark the container with the date you made them. This way, you’ll know how long they have been stored. If you want to keep the bars longer, freezing is a great option. Cut them into squares first, then wrap each piece in plastic wrap. Place the wrapped bars in a freezer-safe bag or container. When stored this way, they can last for up to three months. To enjoy, just take them out and let them thaw in the fridge or at room temperature. Yes, you can use almond butter or sunflower seed butter. These options work well. They will give a similar taste and texture. Just make sure the nut or seed butter is creamy. This helps the bars hold together. If you use a different type, check for allergies too. To make these bars vegan, swap honey for maple syrup. Use a vegan chocolate option as well. Most dark chocolate is vegan, but check the label. Everything else in the recipe is plant-based. This way, you keep the taste and texture without using animal products. The best way to cut these bars is after chilling them. Use a sharp knife for clean cuts. You can score the top lightly before chilling. This helps you cut easier later. If the bars stick, warm the knife slightly. This makes cutting smoother and tidier. Yes, you can replace honey with maple syrup or agave nectar. Both options add sweetness and stickiness. They also work well in recipes like this. Just remember that the flavor may change a bit, but they will still taste great. You learned how to make tasty and healthy bars. We covered key ingredients, handy tips, and creative variations. You can mix and match to fit your diet and taste. Remember to store them well for longer freshness. Making these bars is fun and easy, and you can customize them. Enjoy your tasty treats and share them with friends!

No-Bake Chocolate Peanut Butter Oat Bars Delight

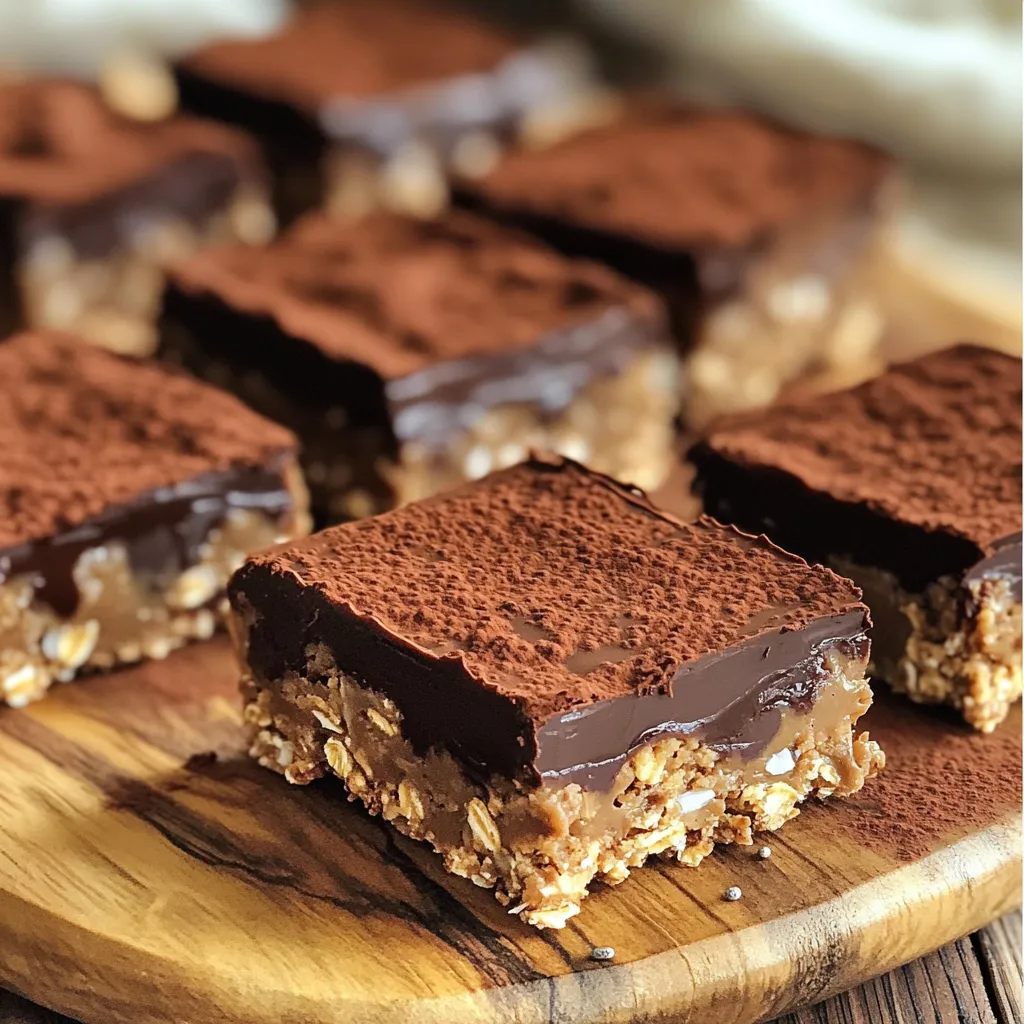
Craving a sweet treat without the oven? You’re in the right place! These No-Bake Chocolate Peanut Butter Oat Bars are

- 1 pound sirloin steak, cut into bite-sized cubes - 4 tablespoons unsalted butter - 4 cloves garlic, minced - 1 tablespoon fresh rosemary, chopped - 1 tablespoon fresh thyme, chopped - 1 tablespoon soy sauce for added umami - Fresh parsley, chopped for garnish - Salt and pepper to taste The main star of this dish is the sirloin steak. It cooks fast and gets tender. I always choose fresh, high-quality steak for the best flavor. The unsalted butter adds richness, while the minced garlic gives it a strong aroma. Fresh rosemary and thyme add depth. If you want to boost the flavor, add a touch of soy sauce. It gives a nice umami kick. Fresh parsley is optional but makes a pretty garnish. You can also add salt and pepper to suit your taste. These ingredients work together to create a dish that is both simple and delicious. First, you need to dry the steak cubes. Use paper towels to pat them dry. This helps the steak get a nice sear. Next, season the steak with salt and pepper. If you want a deeper flavor, drizzle soy sauce over the cubes. Toss them well to ensure even coating. Now, it's time to cook. In a large skillet, melt 2 tablespoons of butter over medium-high heat. Wait until the butter starts to foam. Add the steak cubes in a single layer. Be sure not to overcrowd the pan. Sear each side for about 2-3 minutes. You want them browned and cooked to your liking. For medium-rare, aim for 130°F to 135°F. Once done, remove the steak and set it aside. In the same skillet, lower the heat to medium. Add the remaining 2 tablespoons of butter. Once melted, stir in 4 cloves of minced garlic, 1 tablespoon of chopped rosemary, and 1 tablespoon of chopped thyme. Cook for 1-2 minutes until fragrant. Be careful not to burn the garlic. After that, toss the cooked steak bites back into the skillet. Mix everything well in the garlic butter sauce. Heat for an additional minute to let the flavors blend. For garlic butter steak bites, sirloin is a top choice. It’s tender and flavorful. You can also use ribeye for extra richness. Filet mignon works, too, but it can be pricey. Keep your cuts to about one-inch cubes. This size cooks well and stays juicy. Cooking times help you nail your steak's doneness. For medium-rare, aim for 2-3 minutes on each side. Check the internal temp; it should hit 130°F to 135°F. If you prefer medium, cook for about 3-4 minutes per side. Always let the steak rest for a few minutes after cooking. This lets the juices settle and keeps it moist. While garlic and herbs shine in this dish, you can add more spice. Try a pinch of chili flakes for heat. A splash of Worcestershire sauce boosts umami. Fresh lemon juice adds brightness. Don’t be afraid to mix flavors! Taste as you go, and adjust to your liking. {{image_2}} You can switch things up by using chicken or shrimp instead of steak. For chicken, use boneless thighs or breasts. Cut them into bite-sized pieces. Cook them the same way as steak bites. For shrimp, choose large shrimp. Clean and devein them. Cook for about 2-3 minutes until they turn pink. This keeps your meal fun and fresh! Want to add some heat? Consider adding chili flakes. A pinch can make a big difference. You can also try different herbs for new tastes. Basil or oregano can bring a nice twist. Experimenting with flavors can help you find your favorite! Pair your steak bites with sides like vegetables or rice. Roasted veggies add color and crunch. A fluffy rice dish can soak up the garlic butter. You could even serve them in a shallow bowl. This makes it easy to share and enjoy with friends or family. Don't forget toothpicks for a fun touch! To store leftover steak bites, let them cool first. Place them in an airtight container. They will stay fresh for about three days in the fridge. Make sure to label your container with the date. This helps you keep track of how long they’ve been stored. When you want to enjoy the steak bites again, reheating them properly is key. I recommend using a skillet. Heat a bit of butter or oil over medium heat. Add the steak bites and cook for about two minutes. This method keeps the flavor intact and the meat tender. You can also use a microwave, but it may dry out the steak. If you choose this method, cover the bites with a damp paper towel to keep moisture. Yes, you can freeze cooked steak bites! Let them cool completely before freezing. Place the bites in a freezer bag, pressing out as much air as possible. They can stay good for up to three months in the freezer. When you’re ready to eat, thaw them overnight in the fridge before reheating. This keeps the texture and taste just right. Garlic Butter Steak Bites stay fresh for up to three days in the fridge. Store them in an airtight container to keep them tasty. If you want to keep them longer, consider freezing them. Yes, you can prepare the steak bites ahead of time. Cook the steak and make the garlic butter sauce. Let both cool before you store them. When you’re ready, just reheat and combine them for a quick meal. These steak bites pair well with many sides. Here are some popular options: - Garlic mashed potatoes - Steamed broccoli - Creamy coleslaw - Fresh salad with vinaigrette - Rice or quinoa for a hearty meal Feel free to mix and match based on your taste! This blog post covered how to make delicious garlic butter steak bites. I shared key ingredients like sirloin, butter, and fresh herbs. You learned step-by-step instructions for cooking and making the sauce. There were tips to choose the right steak and enhance its flavor. I also gave ideas for variations and storage tips. Try this recipe and enjoy your tasty bites. They are easy to make and perfect for any meal. Cook them your way and share them with friends!

Minute Garlic Butter Steak Bites Quick and Easy Meal

Craving a quick and tasty dinner? Let me introduce you to Minute Garlic Butter Steak Bites! This simple recipe showcases

- 6 medium russet potatoes, peeled and diced - 1 large onion, chopped - 4 cloves garlic, minced - 4 cups vegetable broth - 1 cup heavy cream - 1 cup shredded sharp cheddar cheese - 1 cup cooked bacon bits - Chopped green onions for garnish - Sour cream for topping - 1 tablespoon olive oil - 2 teaspoons dried thyme - 2 teaspoons paprika - Salt and pepper to taste When making loaded potato soup, the right ingredients are key. You start with 6 medium russet potatoes. These potatoes give the soup its hearty base. Peel and dice them for even cooking. Next, grab a large onion and chop it finely. The onion adds depth and sweetness to the soup. Now, let’s not forget garlic! You need 4 cloves, minced well. Garlic brings in a punch of flavor. For the broth, use 4 cups of vegetable broth. This makes the soup rich and satisfying. To make it creamy, add 1 cup of heavy cream. It gives the soup a smooth texture. For that cheesy goodness, you need 1 cup of shredded sharp cheddar cheese. This cheese melts beautifully into the soup. If you want to take it up a notch, consider adding 1 cup of cooked bacon bits. They add a nice crunch and flavor. Green onions make a great garnish. They add color and a fresh taste. Don't forget sour cream for topping; it gives a nice tang. For the seasonings, start with 1 tablespoon of olive oil. It helps sauté the onion and garlic. Use 2 teaspoons of dried thyme and 2 teaspoons of paprika for warmth. Finally, add salt and pepper to taste. Adjust these to make your soup perfect for you. With these ingredients, you’re on your way to a cozy bowl of loaded potato soup. - Sautéing the onion and garlic Start by heating 1 tablespoon of olive oil in a large skillet over medium heat. Add 1 large chopped onion and cook for about 5 minutes. This makes the onion soft and sweet. Next, add 4 minced garlic cloves. Cook for an extra 1 to 2 minutes until you smell that lovely garlic aroma. - Preparing the potatoes and broth mixture In your slow cooker, add the sautéed onion and garlic. Then, toss in 6 peeled and diced russet potatoes. Pour in 4 cups of vegetable broth, along with 2 teaspoons of dried thyme and 2 teaspoons of paprika. Don’t forget to season with salt and pepper to taste. Stir everything together well. - Cooking times and temperature settings Cover your slow cooker and set it on low for 6 to 8 hours. If you're in a hurry, you can set it on high for 4 hours. The potatoes should become nice and tender during this time. - Mashing and finishing the soup Once the cooking time is done, use a potato masher to mash the potatoes. You can leave some chunks for texture if you like. Stir in 1 cup of heavy cream and 1 cup of shredded sharp cheddar cheese. If you want, add 1 cup of cooked bacon bits for extra flavor. Stir everything until well mixed. Let it cook on low for 15 to 30 more minutes to heat through. - Presentation ideas Serve the soup hot in bowls. It looks great with a swirl of cream on top for a fancy touch. - Best garnishes and toppings Top each bowl with a dollop of sour cream and a sprinkle of chopped green onions. These add a nice crunch and color to your dish. Enjoy your cozy bowl of loaded potato soup! - Choosing the right potatoes: I love using medium russet potatoes. They are starchy and create a creamy texture. Avoid waxy potatoes as they do not break down well in soups. - Adjusting creaminess and thickness: If you want a thicker soup, mash more potatoes. For a creamier soup, add more heavy cream. You can also stir in some sour cream for extra richness. - Overcooking the potatoes: Set your slow cooker to low for 6-8 hours. If you cook too long, the potatoes may turn to mush. Keep an eye on the time! - Skipping the seasoning adjustments: Taste your soup near the end of cooking. You may need to add more salt or pepper for flavor. Always adjust to your taste. - Adding herbs or spices: Fresh herbs like parsley or chives can brighten the soup. Thyme and paprika add warmth. Feel free to experiment with your favorites! - Cheese alternatives and variations: If you want to switch things up, try different cheeses. Gouda or Monterey Jack will work well. You can also use vegan cheese for a dairy-free option. {{image_2}} You can easily make this soup vegetarian or vegan. For dairy, use plant-based milk or cream. Almond milk or coconut cream work well. For the cheese, try vegan cheese shreds. If you want to skip bacon, add smoked paprika for that smoky flavor. Feel free to add more veggies! Carrots, celery, or even spinach can boost nutrition. Just chop them up and toss them in with the potatoes. Want to mix things up? Add spices! Cumin gives a warm touch. Chili powder adds heat. Just sprinkle in a teaspoon or two while cooking. You can also mix in other vegetables. Corn or bell peppers add sweetness. Just make sure they are chopped small. This way, they cook evenly in the soup. Pair your soup with some tasty sides. A fresh salad adds crunch and color. Try a Caesar or garden salad for balance. Warm bread also complements this soup well. A crusty baguette or garlic bread will soak up the flavors. Your meal will feel complete and cozy! For storing your leftover soup, use airtight containers. Glass or plastic containers work well. Make sure the soup cools down before sealing. This helps to keep it fresh. Store it in the fridge for up to 3 days. If you want to keep it longer, freezing is a great option. To reheat your soup, the microwave is quick and easy. Pour the soup into a bowl and heat it for 1-2 minutes. Stir halfway through for even heating. If you prefer, you can reheat it on the stove over medium heat. Stir often to avoid sticking. If the soup is too thick, add a splash of broth or cream. This will help adjust the consistency. To freeze the soup, let it cool completely first. Pour it into freezer-safe bags or containers. Make sure to leave some space for expansion. Label the containers with the date. The soup can last in the freezer for up to 3 months. To thaw, move it to the fridge overnight. You can reheat it on the stove or in the microwave, just like before. Slow Cooker Loaded Potato Soup will last about 3 to 5 days in the fridge. Store it in an airtight container. For best flavor, eat it within this time frame. Make sure to cool the soup before placing it in the fridge. Yes, you can make this soup spicier! Add red pepper flakes or a dash of hot sauce. You can also mix in diced jalapeños for a fresh kick. Start with a small amount and taste. Adjust until you find the heat you like. Yes, you can use frozen potatoes. Just add them directly to the slow cooker. Cooking time may be a bit longer, so check for tenderness. Frozen potatoes can soften well and still give you that creamy texture. To thicken your potato soup, mash some of the potatoes. You can also add cornstarch mixed with water. Another option is to blend a portion of the soup. This method gives it a smooth, thick texture without losing flavor. Yes, you can cook this soup on the stove! Sauté the onions and garlic in a pot, then add the rest of the ingredients. Bring it to a boil, then lower the heat and simmer. Cook until the potatoes are tender, about 20 to 30 minutes. This slow cooker loaded potato soup uses simple ingredients for great flavor. You now know the key steps, tips, and variations to create the perfect dish. Remember to sauté your onions and garlic for a tasty base. Don’t forget to adjust your seasonings for the best taste. Whether you choose the classic recipe or a unique twist, this soup warms any day. Enjoy leftovers with easy storage methods, too. Dive into this comforting meal and share it with those you love. Your cooking skills will shine through with this recipe!

Slow Cooker Loaded Potato Soup Flavorful and Simple Recipe

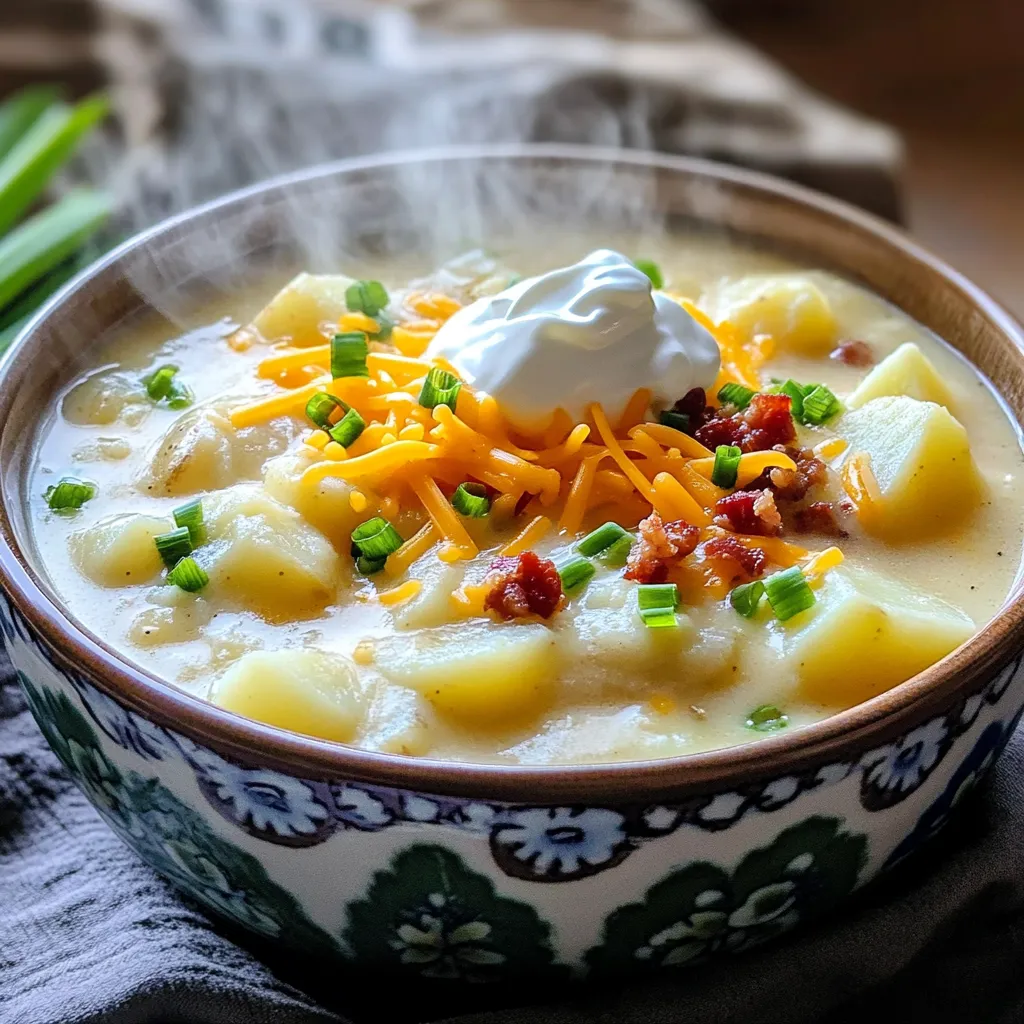
Are you ready to enjoy a warm and hearty meal? My Slow Cooker Loaded Potato Soup is flavorful, simple, and

- 1 lb boneless chicken thighs - 1/4 cup soy sauce - 2 tablespoons honey - 1 tablespoon sesame oil - 2 tablespoons rice vinegar - 2 garlic cloves, minced - 1 teaspoon fresh ginger, grated - 1/4 teaspoon black pepper - 1 tablespoon cornstarch - Wooden skewers, soaked in water for 30 minutes - Sesame seeds for garnish - Chopped green onions for garnish - Air fryer - Mixing bowl - Saucepan The main ingredients for Air Fryer Teriyaki Chicken Skewers start with one pound of boneless chicken thighs. I love using chicken thighs because they stay juicy and tender. You need to cube the chicken into one-inch pieces. Next, you mix soy sauce, honey, sesame oil, rice vinegar, garlic, and ginger. This mixture creates a rich teriyaki flavor. The soy sauce adds saltiness, while honey gives it sweetness. Sesame oil adds a nutty taste, and rice vinegar brings balance. Don’t forget the black pepper for a little kick! The cornstarch helps the chicken get crispy when cooked. Soak your wooden skewers in water for 30 minutes. This step keeps them from burning in the air fryer. For garnish, you can use sesame seeds and chopped green onions. They add a nice touch to your dish and make it look appealing. Gather your air fryer, mixing bowl, and saucepan to get started. You’ll want to have everything ready before you start cooking. This way, you can focus on making delicious skewers! To start, I make the teriyaki marinade. In a large bowl, I whisk together: - 1/4 cup soy sauce - 2 tablespoons honey - 1 tablespoon sesame oil - 2 tablespoons rice vinegar - 2 minced garlic cloves - 1 teaspoon grated ginger - 1/4 teaspoon black pepper This mix brings great flavor. Next, I add 1 pound of boneless chicken thighs cut into 1-inch cubes. I ensure the chicken is well-coated in the marinade. After covering the bowl, I let it sit in the fridge for at least 30 minutes, or up to 2 hours for more flavor. First, I preheat my air fryer to 400°F (200°C). While it heats, I take the marinated chicken out of the fridge. I toss the chicken cubes in 1 tablespoon of cornstarch. This gives them a nice crisp texture when cooked. Next, I thread the coated chicken onto soaked wooden skewers. I leave a little space between each piece for even cooking. After that, I place the skewers in the air fryer basket in a single layer, making sure not to overcrowd them. I cook them for about 10-12 minutes, flipping halfway through. The goal is juicy chicken with a golden color. When the skewers finish cooking, I let them rest for a few minutes. I garnish them with sesame seeds and chopped green onions for a fresh look. I also pour any remaining marinade into a small saucepan. I simmer it over medium heat until it thickens. This makes a great dipping sauce. These steps make the dish not only tasty but also a feast for the eyes! To get that perfect crispy chicken, cornstarch is key. It helps create a crunchy outer layer. Before cooking, coat your chicken pieces in cornstarch. This coat traps moisture and gives a great texture. Set your air fryer to 400°F (200°C). This high heat ensures the chicken cooks fast and gets crispy. Flip the skewers halfway through cooking. This helps them brown evenly. Marinating adds deep flavor to your chicken. Mix your soy sauce, honey, sesame oil, rice vinegar, garlic, ginger, and black pepper. Whisk these together well. For best results, marinate for at least 30 minutes. If you have time, let it sit for up to 2 hours. This longer time really helps the chicken soak up those tasty flavors. You need a few tools for making these skewers. A mixing bowl is essential for your marinade. An air fryer will cook the chicken quickly and evenly. Don’t forget wooden skewers! Soak them in water for 30 minutes. This step stops them from burning in the air fryer. Make sure to leave space on the skewers for even cooking. {{image_2}} You can easily switch chicken for beef or shrimp. Beef adds a rich flavor. Shrimp cooks faster, so adjust your cooking time. For beef skewers, cook for about 12-15 minutes. For shrimp, aim for 8-10 minutes. Always check for doneness to ensure safety. If you want a meat-free meal, use tofu or fresh vegetables. Tofu absorbs the teriyaki sauce well. For veggies, bell peppers, zucchini, and mushrooms work great. Adjust the marinade by adding a little more soy sauce and honey for extra flavor. Marinate for at least 30 minutes. You can add spices like red pepper flakes for heat. Try using different sauces, like sriracha or hoisin. Experiment with garnishes too! Fresh cilantro or lime zest can add a bright touch. Mix and match to find your favorite flavor combination! To store leftover chicken skewers, place them in an airtight container. This keeps them fresh for up to three days. If you made extra marinade, you can store it too. Pour it into a sealed jar and store it in the fridge for a week. To reheat chicken skewers, use the air fryer. Set it to 350°F (175°C) and heat for about 5-7 minutes. This method helps retain moisture. If you don’t have an air fryer, use a skillet. Heat it on low and cover the pan. This keeps the chicken from drying out. You can freeze chicken skewers for later use. Place them on a baking sheet and freeze until solid. Then, transfer them to a freezer bag. They can last up to three months. When ready to cook, thaw them in the fridge overnight. Cook them straight from frozen for about 15 minutes in the air fryer. Yes, you can prepare these skewers ahead. Marinate the chicken cubes the night before. This will deepen the flavors. After marinating, thread the chicken onto skewers. Store them in the fridge until you are ready to cook. This makes dinner quick and easy. Teriyaki chicken skewers pair well with many sides. Here are some tasty options: - Steamed rice - Fried rice - Stir-fried vegetables - Asian slaw - Cucumber salad These sides balance the sweet and savory flavors of the chicken. To check if the chicken is done, use a meat thermometer. Insert it into the thickest part of the chicken. The internal temperature should reach 165°F (74°C). If you don’t have a thermometer, cut a piece open. The meat should be white, with no pink inside. Cooking times may vary, so always check for doneness. In this blog post, we explored a simple and tasty teriyaki chicken skewer recipe. We covered ingredients, marinating, cooking in an air fryer, and serving. You learned tips for crispy chicken and variations using other meats or vegetables. Proper storage and reheating methods help keep your dish fresh. Enjoy making these skewers. With your new skills, impress your friends and family!

Air Fryer Teriyaki Chicken Skewers Tasty Dinner Ideas

Looking for a quick and tasty dinner idea? Let’s dive into making Air Fryer Teriyaki Chicken Skewers! With juicy chicken

To make No-Bake Salted Caramel Pretzel Bites, gather these simple items: - 2 cups mini pretzel twists - 1 cup creamy peanut butter - 1/2 cup powdered sugar - 1/2 cup caramel sauce - 1/4 teaspoon sea salt - 1/2 cup milk chocolate chips - 1 teaspoon coconut oil You can swap ingredients as needed. For the peanut butter, almond butter works well. If you want a lower sugar option, use a sugar substitute in place of powdered sugar. For caramel sauce, look for a dairy-free version if you prefer. You can use dark chocolate chips instead of milk chocolate for a richer flavor. When choosing pretzels, pick brands that use simple ingredients. Look for creamy peanut butter with no added sugars or oils. For chocolate, select a brand with high cocoa content for best results. Always check the quality of the caramel sauce; it should be smooth and rich. Lastly, sea salt should be flaky and bright for a great finish. Start by grabbing a mixing bowl. Add one cup of creamy peanut butter and half a cup of powdered sugar. Stir these together until they form a smooth and thick mix. You want it to be easy to scoop. This mix is the heart of our pretzel bites. Now, take a mini pretzel twist. Scoop about a teaspoon of the peanut butter mix and press it into the center of the pretzel. Top it with another pretzel twist to make a sandwich. Repeat this with all the pretzels until they are filled. Place the pretzel sandwiches on a baking sheet lined with parchment paper. In a microwave-safe bowl, add half a cup of milk chocolate chips and one teaspoon of coconut oil. Heat this mixture in the microwave in 20-second intervals. Stir it after each interval until smooth and melted. Now, dip each pretzel bite halfway into the melted chocolate, letting the extra drip off. Place them back on the parchment-lined sheet. Once done, put the baking sheet in the fridge for about 30 minutes. This helps the chocolate set nicely. To get a great chocolate coating, start by melting the chocolate and coconut oil. Use a microwave-safe bowl and heat in short bursts. Stir the mixture every 20 seconds. This helps it melt evenly. When the chocolate is smooth, dip each pretzel bite halfway in. Let the extra chocolate drip off before placing them back on the sheet. This method gives an even, shiny coat. Store your pretzel bites in an airtight container. Layer them with parchment paper to keep them from sticking. They stay fresh at room temperature for about three days. If you want them to last longer, put them in the fridge. They can last up to a week when chilled. For long-term storage, you can freeze them. Just remember to wrap them well before putting them in the freezer. If your chocolate is too thick, add a bit more coconut oil. This will help it coat better. If your pretzel bites fall apart, make sure the peanut butter mixture is thick enough. If they still fall apart, try pressing the pretzels a bit harder when making the sandwiches. Lastly, if your caramel sauce is too runny, chill it slightly before drizzling. This will help it stick better to the pretzels. {{image_2}} You can boost the flavor of your pretzel bites in many ways. Try adding crushed nuts like pecans or almonds. A sprinkle of mini chocolate chips adds sweetness. You might also mix in a splash of vanilla extract for a nice aroma. For a fruity twist, add dried fruit like cranberries or cherries. Each addition brings a new taste to this treat. Feel free to get creative with your favorites. If you want a different look or taste, switch up the chocolate. White chocolate adds a sweet, creamy layer. Dark chocolate gives a rich flavor and pairs well with the salt. You can use both types for a fun half-and-half look. Just melt them the same way as the milk chocolate. Each coating changes the overall taste and appearance in a tasty way. You can swap ingredients for a fun twist. Use almond butter instead of peanut butter for a nutty flavor. Try using pretzel sticks instead of twists for a unique shape. If you want a salty kick, add crushed pretzels on top. For a caramel boost, drizzle extra caramel sauce over the bites before chilling. These swaps let you customize your no-bake salted caramel pretzel bites to your taste. To keep your pretzel bites fresh, store them in an airtight container. Line the container with parchment paper to avoid sticking. Keep them in a cool, dry place or in the fridge for longer shelf life. This helps maintain their texture and flavor. In the fridge, your pretzel bites will stay fresh for about one week. If you freeze them, they can last up to three months. Just make sure to wrap them well in plastic wrap before placing them in a freezer bag. If you want to enjoy them warm, heat them in the microwave for about 10-15 seconds. This will soften the chocolate and make them delicious again. Avoid heating them too long, as that can change their texture. Yes, you can make these pretzel bites ahead of time. They keep well in the fridge. I suggest making them a day in advance. This gives the flavors time to blend. Once made, store them in an airtight container. They will stay fresh and tasty for up to a week. If you want to freeze them, wrap each bite in plastic wrap. They can last about a month in the freezer. These pretzel bites are not nut-free because of the peanut butter. If you need a nut-free option, use sun butter or soy nut butter. Both options work well in this recipe. They give a similar taste and texture. Always check labels to ensure no cross-contamination occurs with allergens. To serve these bites at a party, place them on a nice plate. A tiered stand looks great and saves space. Drizzle extra caramel on top for a fancy touch. You can also sprinkle more sea salt for a pop of flavor. For added fun, offer small plates so guests can take a few. These bites are easy to enjoy and perfect for sharing! This blog post covered everything you need for delicious pretzel bites. We explored the best ingredients, tips for making them, and how to store them well. I shared how to melt chocolate and coat your bites perfectly. Remember, you can add fun flavors or swap ingredients to make each batch new. Keep your pretzel bites fresh with proper storage methods. Enjoy these tasty treats for any occasion. With these tips, you’ll impress your family and friends with your skills. Happy snacking!

No-Bake Salted Caramel Pretzel Bites Delightful Treat

Are you ready for a sweet treat that’s easy to make and oh-so-delicious? No-Bake Salted Caramel Pretzel Bites are the

Older posts
Newer posts
← Previous Page1 … Page9 Page10 Page11 … Page84 Next →

dsad

© 2026 Foodish Talk • Built with GeneratePress

Our Policies

  • Copyright Policy
  • Cookie Policy
  • GDPR Policy
  • Privacy Policy
  • Disclaimer
  • Terms Of Use

More Information

  • Home
  • About
  • Contact
  • Appetizers
  • Dessert
  • Dinner
  • Drinks
©2026, Foodish Talk About Back To Top