

Latest & Greatest
Crispy Garlic Parmesan Brussels Sprouts Tasty Side Dish
If you’re looking for a tasty side dish that steals the show, you’ve found it! Crispy Garlic Parmesan Brussels sprouts
Read more…
Mango Coconut Chia Pudding Simple and Tasty Delight
Looking for a quick, tasty treat? Mango Coconut Chia Pudding is the answer! This simple recipe combines the bright flavors
Read more…
Pulled Chicken Tacos with Slaw Fresh Flavor Delight
Get ready for a flavor explosion with my Pulled Chicken Tacos with Slaw! These mouthwatering tacos are not only easy
Read more…
Raspberry Lemonade Bars Delightful Summer Treat
Summer is here, and it’s time to cool off with a sweet treat that truly shines. Raspberry Lemonade Bars are
Read more…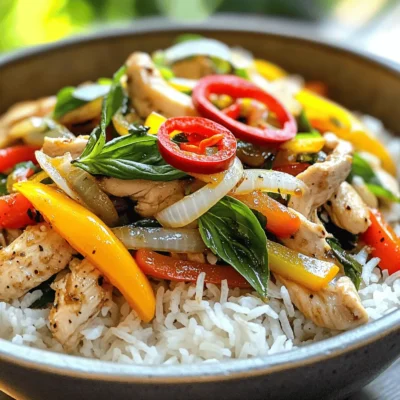
Thai Basil Chicken Stir-Fry Flavorful Dinner Delight
If you’re craving a burst of flavor in your dinner, Thai Basil Chicken Stir-Fry is the answer. This dish is
Read more…
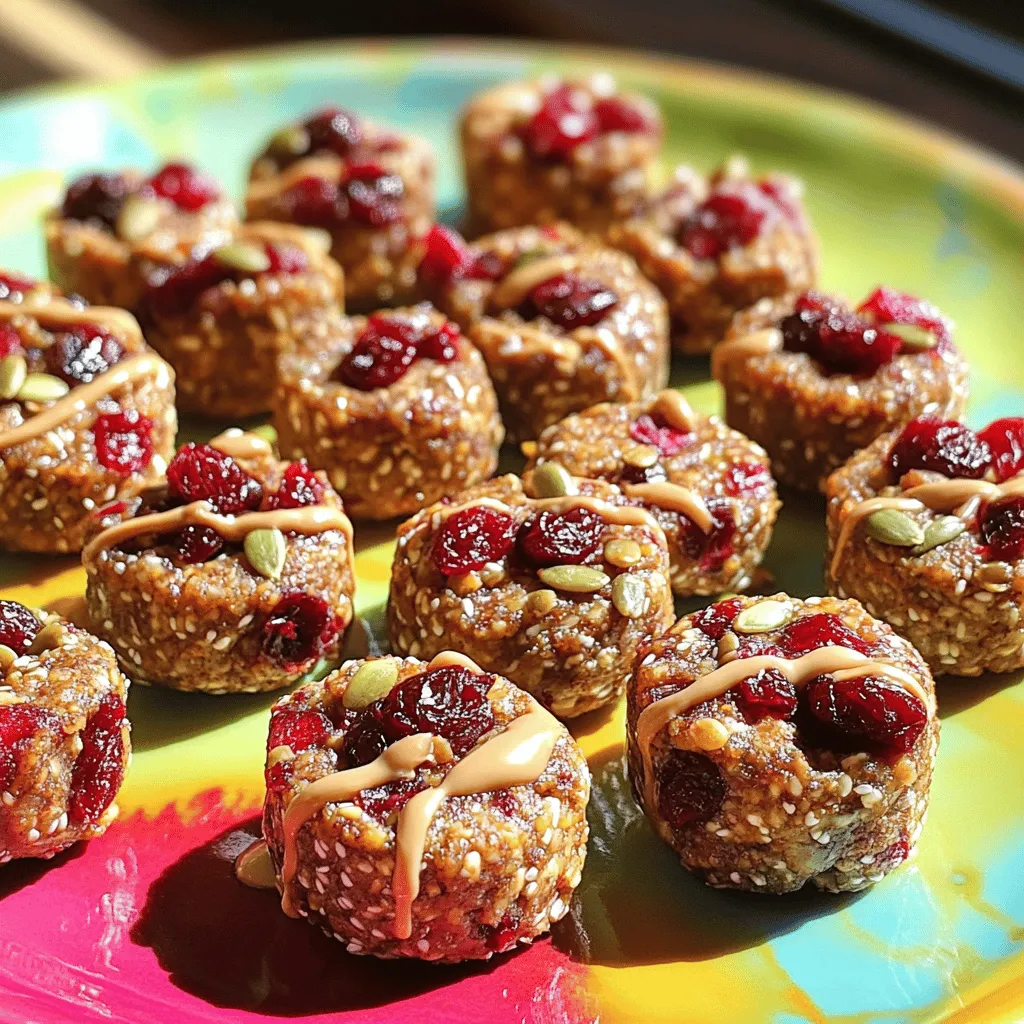
Almond Joy Energy Bites Simple and Nutritious Snack
Looking for a tasty and healthy snack? You’ll love Almond Joy Energy Bites! These no-bake treats combine coconut, almond butter,
Read more…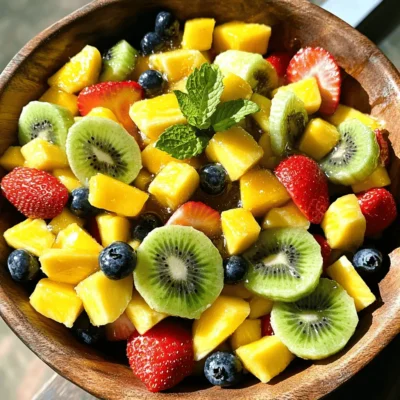
Tropical Fruit Salad with Honey Lime Dressing Delight
Get ready to brighten your day with a Tropical Fruit Salad drizzled in honey lime dressing! This refreshing treat is
Read more…
Cinnamon Roll Casserole Simple and Tasty Delight
Are you craving a warm, sweet treat that’s both easy to make and delicious? Look no further than this Cinnamon
Read more…browse recipes


![- 4 boneless, skinless chicken breasts: Choose breasts that are about the same size. This helps them cook evenly. Look for fresh chicken to get the best taste. - 1 cup fresh spinach, chopped: Use fresh spinach for a bright flavor. Wash it well and chop it finely to mix easily with other ingredients. - 1/2 cup feta cheese, crumbled: Feta adds a creamy and salty taste. You can use plain or herbed feta. Crumble it well so it mixes nicely with the spinach. - 1/4 cup cream cheese, softened: Cream cheese helps the filling stay moist. Make sure it's soft so it blends well with the spinach and feta. - 2 cloves garlic, minced: Garlic gives a strong flavor. Use fresh garlic for the best taste. Mince it finely to release all its oils. - 1/2 teaspoon dried oregano: Oregano adds a nice herb flavor. It works well with the chicken and cheese. - 1/2 teaspoon black pepper: Black pepper adds a bit of heat. You can adjust the amount based on your taste. - 1/2 teaspoon salt: Salt enhances all the flavors. Keep in mind that feta cheese is salty too, so don’t overdo it. - 1 tablespoon olive oil: Olive oil helps to sear the chicken. It also adds a bit of healthy fat. - 1/2 cup cherry tomatoes, halved (for garnish): Cherry tomatoes add color and freshness. They give a nice sweet contrast to the dish. - Fresh basil leaves (for garnish): Basil adds a fresh touch. It brightens the dish and makes it look nice. These ingredients work together to create a tasty meal. Each one plays a role in the flavor and texture of the dish. For the complete recipe, check out the [Full Recipe]. Start by preheating your oven to 375°F (190°C). This step is key for even cooking. Next, prepare your stuffing mixture. In a medium bowl, combine: - 1 cup fresh spinach, chopped - 1/2 cup feta cheese, crumbled - 1/4 cup cream cheese, softened - 2 cloves garlic, minced - 1/2 teaspoon dried oregano - 1/2 teaspoon black pepper - 1/2 teaspoon salt Mix these ingredients until they blend well. This mix brings a creamy and savory flavor that pairs perfectly with chicken. Now, let’s move on to the chicken. Pat the chicken breasts dry with paper towels. Carefully cut a pocket into each chicken breast. Slice horizontally, but be careful not to cut through the other side. This pocket is where you will stuff your mixture. Stuff each chicken breast with the spinach and feta mixture. Make sure to divide it evenly among the breasts. If needed, secure the openings with toothpicks. Next, heat 1 tablespoon of olive oil in a large oven-safe skillet over medium-high heat. Once the oil is hot, place the stuffed chicken in the skillet. Sear each side for about 3-4 minutes until they turn golden brown. Once seared, transfer the skillet to your preheated oven. Bake for an additional 20-25 minutes. The chicken is ready when it is cooked through and no longer pink in the center. After baking, remove the skillet from the oven. Let the chicken rest for a few minutes. This resting time helps keep the chicken juicy. Before serving, garnish the stuffed chicken with 1/2 cup of halved cherry tomatoes and some fresh basil leaves. These add a fresh touch and a pop of color. For the full recipe, check out the complete guide. Enjoy your flavorful family meal! The best way to cook chicken is to hit the right internal temperature. For stuffed chicken, aim for 165°F (75°C). This ensures the chicken is safe to eat and juicy. To avoid overcooking, use a meat thermometer. Insert it into the thickest part of the chicken breast. If you don’t have one, look for the juices. They should run clear. If they are pink, cook a bit longer. Another tip is to let the chicken rest after baking. This keeps the juices inside. If you skip this, the chicken can dry out. If you want to boost the flavor, try adding more herbs. Thyme, dill, or parsley work well with spinach and feta. A pinch of red pepper flakes can add a nice kick, too. If you don't have feta cheese, you can use goat cheese or ricotta. Both give a creamy texture and taste great. You can also mix in some mozzarella for a stretchier cheese experience. For more tasty ideas and the complete recipe, check out the Full Recipe. {{image_2}} You can change the stuffing to make your dish unique. Try adding other vegetables like sun-dried tomatoes or artichokes. These add great flavor and texture. You can also use mushrooms for an earthy taste. Just chop them finely before mixing. Another fun option is to switch up the cheese. While feta is a star, you can try goat cheese or mozzarella. Both will give your chicken a different taste. Goat cheese adds tanginess, while mozzarella brings creaminess. Mix and match to find what you love. Cooking methods can vary too. You can grill the chicken for a smoky flavor. Just preheat your grill and cook each side for about 6-8 minutes. Make sure the chicken is cooked through and has nice grill marks. If you prefer low and slow, use a slow cooker. This method makes the chicken tender and juicy. Simply place the stuffed chicken in the slow cooker. Add a splash of chicken broth for more flavor. Cook on low for 4-6 hours or on high for 2-3 hours. This is a great way to prepare meals ahead of time. For the full recipe, check out the details above. To keep your Feta Spinach Stuffed Chicken fresh, follow these steps: - Refrigerating Leftovers: Let the chicken cool down to room temperature. Place the stuffed chicken in an airtight container. It will stay good in the fridge for about 3-4 days. Always label your container with the date for easy reference. - Freezing Instructions: You can freeze the stuffed chicken for later use. Wrap each piece tightly in plastic wrap and then place them in a freezer bag. This helps prevent freezer burn. Properly stored, they can last for 3 months. Remember to label the bag with the date and contents. To enjoy your delicious leftovers, reheating properly is key. - Reheating Without Losing Moisture: Preheat your oven to 350°F (175°C). Place the stuffed chicken in an oven-safe dish. Add a splash of chicken broth or water to the dish. Cover it with aluminum foil to trap moisture. Heat for about 20-25 minutes, checking to ensure it warms through. - Best Methods for Reheating Stuffed Chicken: You can also use a microwave for quick reheating. Place the chicken on a microwave-safe plate. Cover it with a damp paper towel to keep it moist. Heat on medium power for 2-3 minutes, checking halfway through. If you prefer crisp skin, use the oven method instead. By following these storage and reheating tips, you can enjoy your Feta Spinach Stuffed Chicken to the fullest. For the full recipe, refer back to the ingredients and instructions above. Can I make Feta Spinach Stuffed Chicken ahead of time? Yes, you can prep the stuffed chicken in advance. Prepare the filling and stuff the chicken. Wrap it tightly and store it in the fridge. You can keep it fresh for up to 24 hours. When ready to cook, just sear and bake it as per the full recipe. What can I serve with Feta Spinach Stuffed Chicken? This dish pairs well with several sides. Try roasted vegetables, rice, or a fresh salad. You can also serve it with mashed potatoes for a comforting meal. The bright flavors of the chicken complement many sides. Is this recipe suitable for meal prepping? Absolutely! Feta Spinach Stuffed Chicken is great for meal prep. You can cook a batch for the week. Store portions in airtight containers in the fridge. Reheat them for quick, healthy meals that are full of flavor. Nutritional information overview This chicken dish is rich in protein and healthy fats. Each serving provides essential vitamins from spinach. Feta adds calcium and flavor without too many calories. It’s a balanced meal when paired with wholesome sides. How to adjust for dietary restrictions If you need to make changes, you can use dairy-free cheese. Substitute with a plant-based cream cheese if you are lactose intolerant. For gluten-free options, ensure your chicken broth and any sides are gluten-free. You can still enjoy the same great taste! In this blog post, I shared a detailed guide on making Feta Spinach Stuffed Chicken. We covered essential ingredients, step-by-step cooking instructions, and helpful tips. You learned how to enhance flavors and explore variations. Remember to store your leftovers properly and reheat them right. Cooking can be fun and rewarding. With this recipe, you'll impress yourself and others. Enjoy your meal and keep experimenting in the kitchen!](https://foodishtalk.com/wp-content/uploads/2025/06/c4c3f88f-eb92-443e-9f75-0ea5ed1e2eea.webp)
Feta Spinach Stuffed Chicken Flavorful Family Meal
Are you ready to impress your family with a meal that’s both delicious and easy to make? This Feta Spinach Stuffed Chicken is bursting…
My Latest Desserts

Cherry Tahini Energy Bites Healthy Snack Recipe
Looking for a quick, healthy snack? Let me introduce you to Cherry Tahini Energy Bites! Packed with flavor and nutrition, Read Full Recipe-
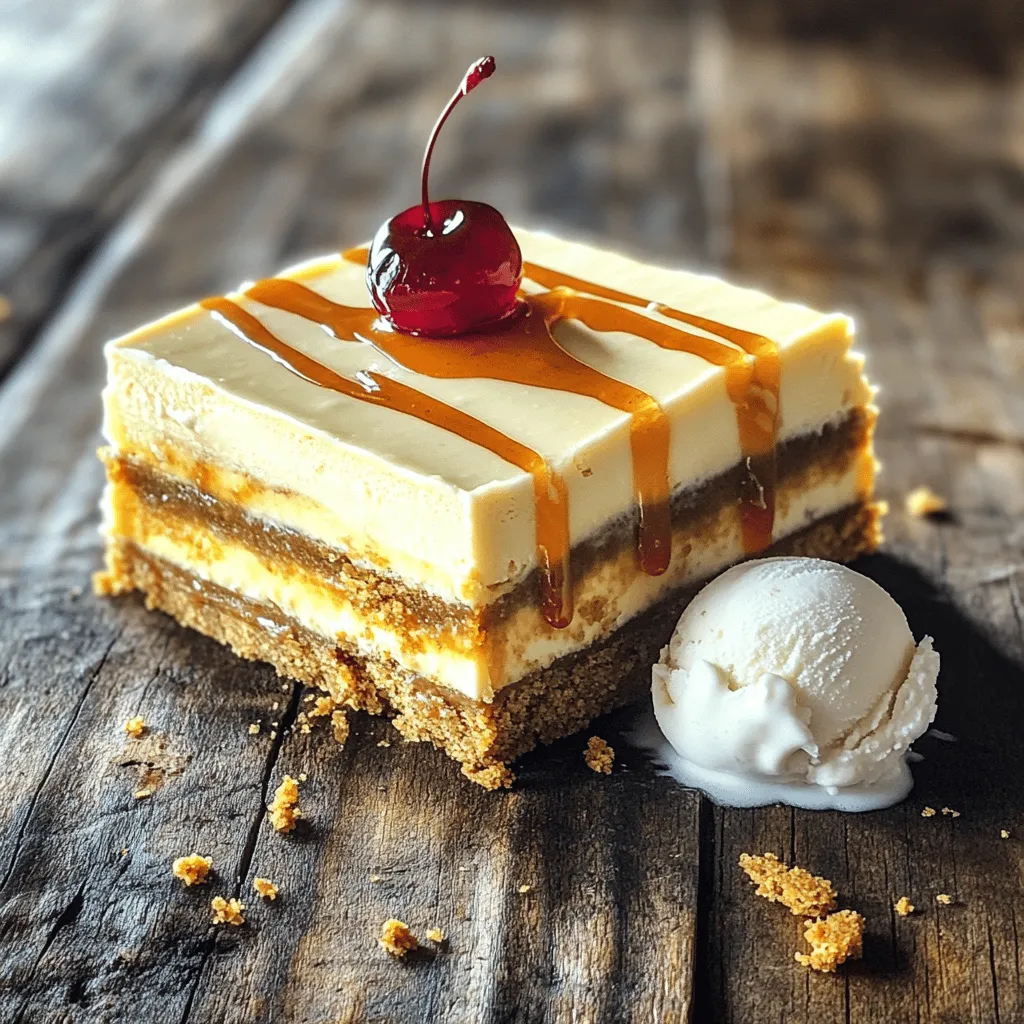
Root Beer Cream Bars Irresistible and Simple Treat
If you love the sweet nostalgia of root beer, you’re in for a treat! Root Beer Cream Bars combine creamy Read Full Recipe -
Cherry Chocolate Lava Mug Cake Delightful Recipe
Craving something sweet and quick? You’re in for a treat with my Cherry Chocolate Lava Mug Cake! This recipe packs Read Full Recipe -
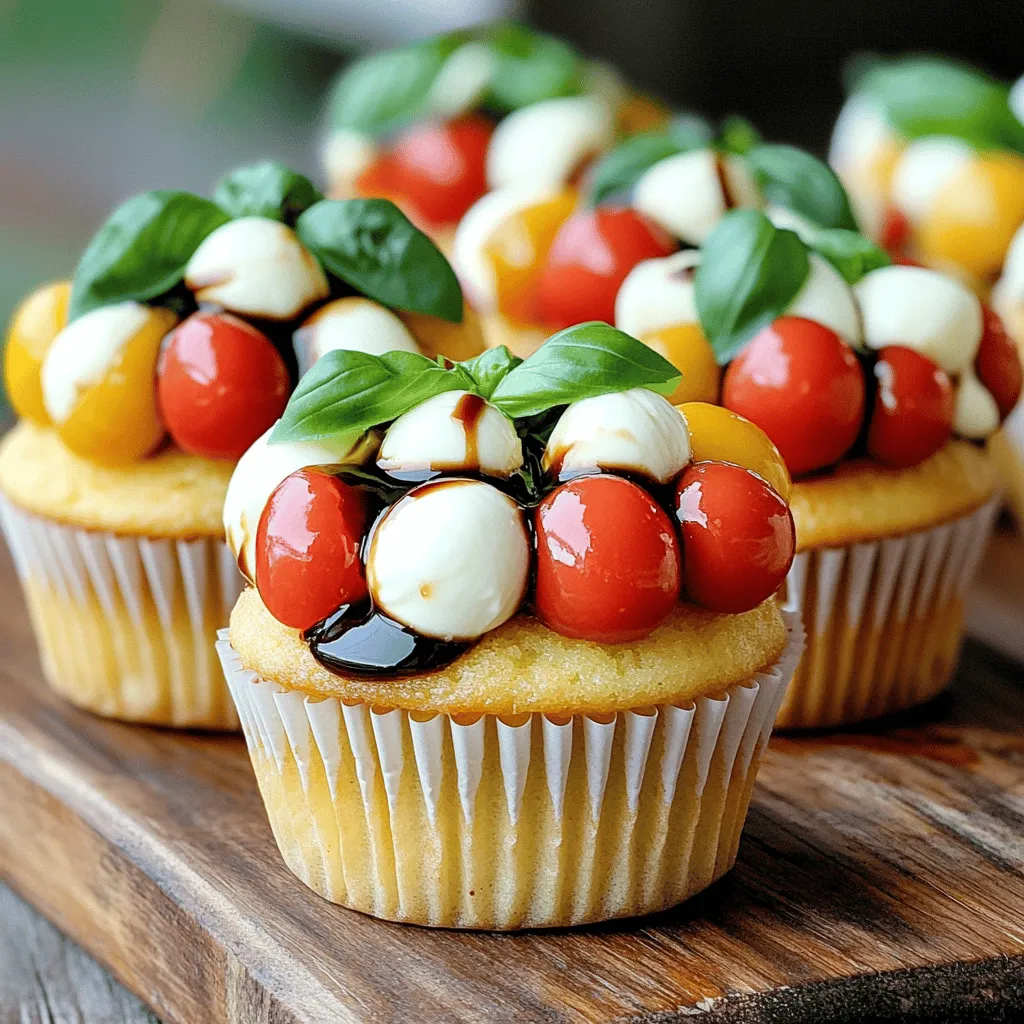
Caprese Stuffed Cupcakes Flavorful and Unique Treat
Are you ready to treat your taste buds to something new? Caprese Stuffed Cupcakes mix fresh flavors and fun in Read Full Recipe -
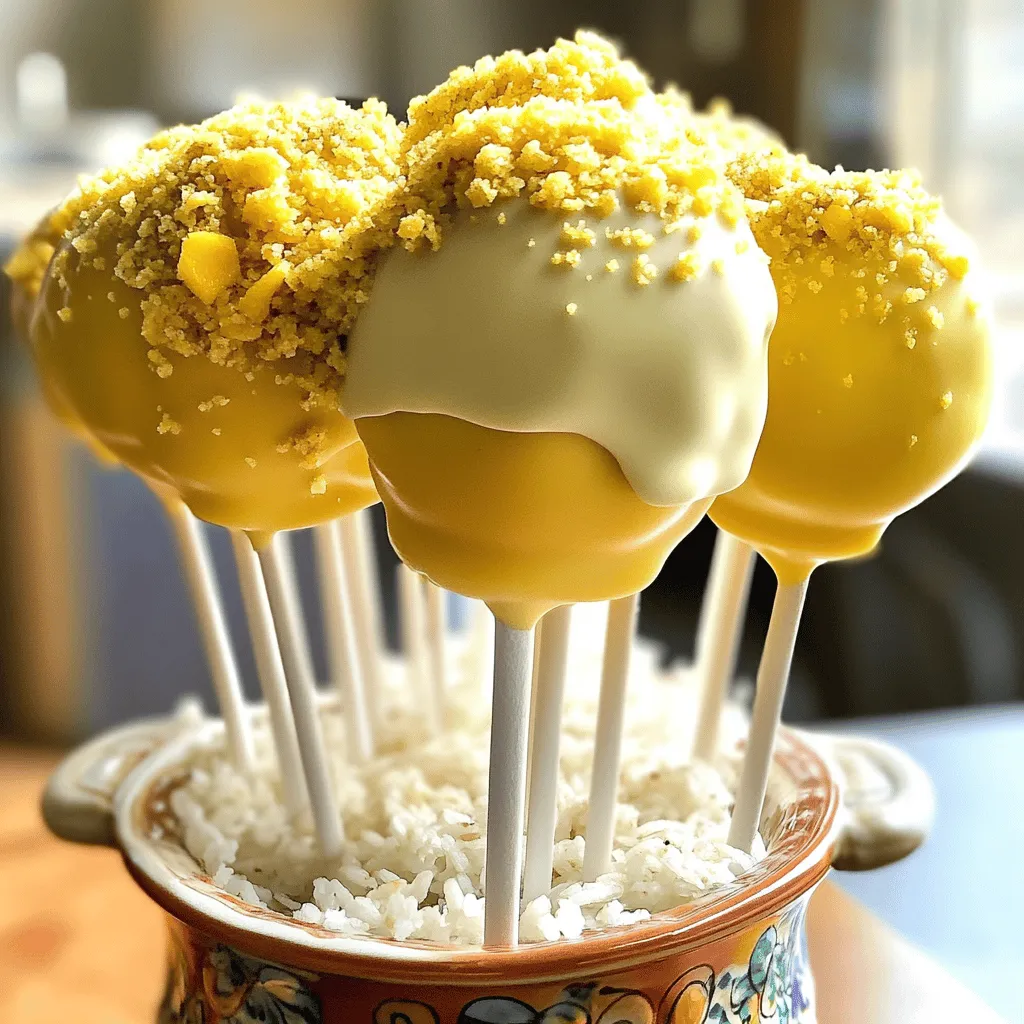
Mango Tajin Cake Pops Tasty and Fun Treats
Craving a unique treat? Try my Mango Tajin Cake Pops! These fun bites blend sweet mango with the zesty kick Read Full Recipe -
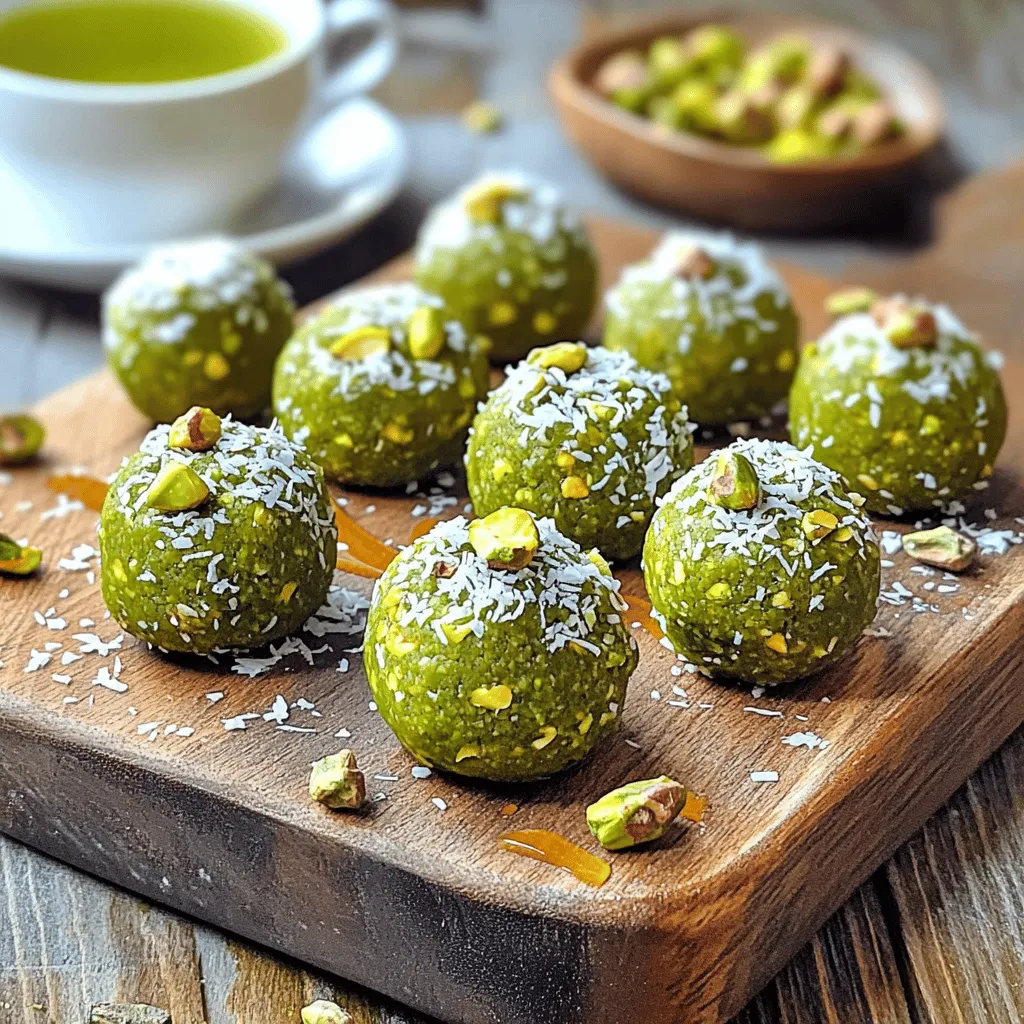
Matcha Pistachio Energy Bites Nourishing Snack Option
Looking for a tasty and healthy snack? Let me introduce you to Matcha Pistachio Energy Bites! Packed with oats, nuts, Read Full Recipe -
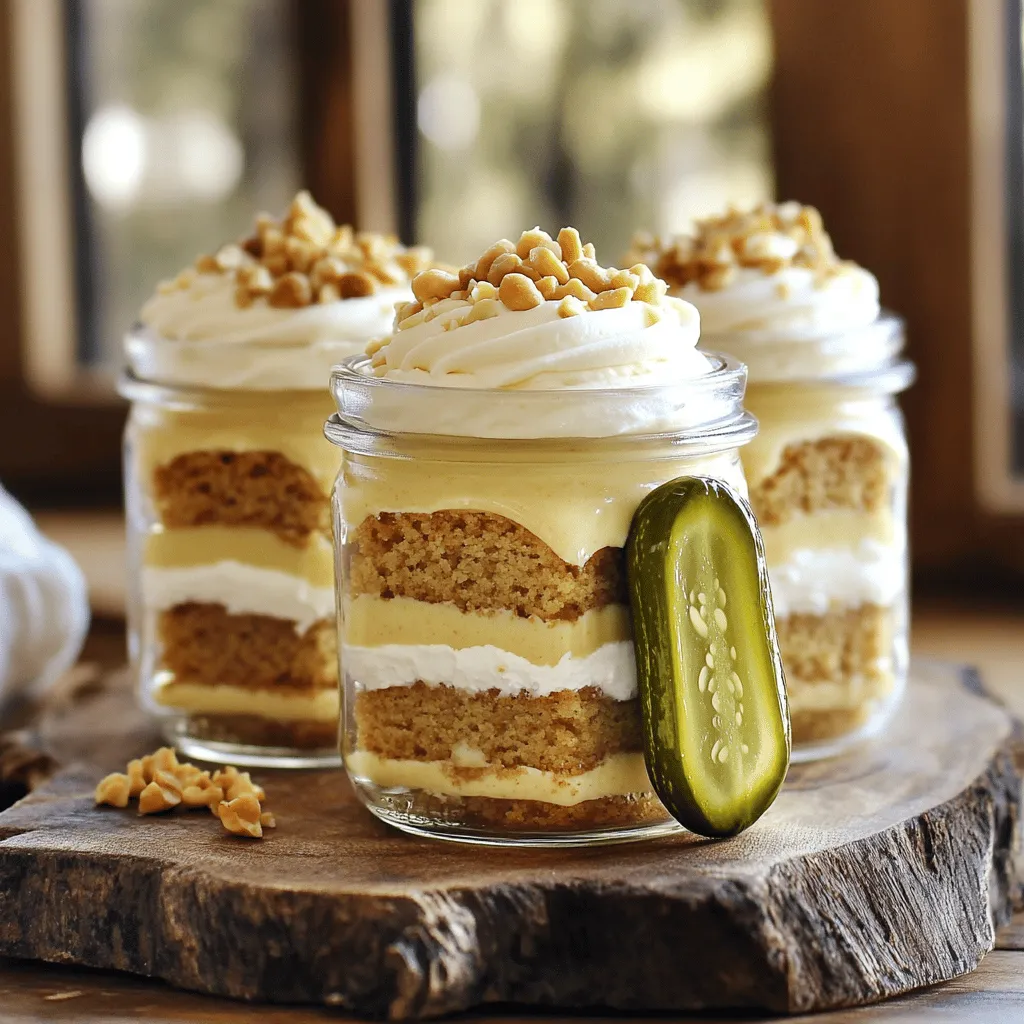
Peanut Butter Pickle Cake Jars Delightful and Unique Treat
Are you ready to try something truly different? Peanut Butter Pickle Cake Jars combine sweet and tangy flavors in a Read Full Recipe -
Healthy Banana Oat Muffins Nutrient-Packed Recipe
Looking for a tasty snack that’s packed with nutrients? You’re in the right place! My Healthy Banana Oat Muffins recipe Read Full Recipe -
No-Bake Chocolate Oat Bars Simple and Tasty Treat
Looking for a quick, tasty treat? You’re in the right place! My No-Bake Chocolate Oat Bars are simple to make Read Full Recipe -
No-Bake Chocolate Oatmeal Bars Simple and Tasty Treat
Looking for a simple and tasty treat that’s also healthy? You’ve found it! My No-Bake Chocolate Oatmeal Bars are a Read Full Recipe


hey,
i’m !
I’m so happy you’re here!
I pour heart and skill into every recipe I create. I know you’ll taste the difference now let’s enjoy this flavorful adventure together.
![To make the Mango Bango Smoothie, gather these tasty ingredients: - 1 ripe mango, peeled and chopped - 1 banana, sliced - 1 cup coconut milk (or almond milk for a nut-free version) - 1 tablespoon honey (or maple syrup for a vegan option) - 1/2 cup Greek yogurt (or dairy-free yogurt) - 1/4 teaspoon ground ginger (fresh ginger for an extra kick) - 1 tablespoon chia seeds - Ice cubes (optional for a thicker texture) These ingredients provide a sweet, creamy taste. The mango and banana blend well, making the smoothie delicious and nutritious. You can use fresh or frozen fruit for your smoothie. Fresh fruits give a vibrant taste. They are great if you have ripe mangoes and bananas. However, frozen fruit works too. It gives a smooth texture and chills the drink. Frozen mangoes are also perfect for a quick smoothie. If you want a thicker texture, use frozen fruit. It makes everything cold and creamy. If you have specific dietary needs, don't worry! You can easily swap some ingredients. For example, use almond milk instead of coconut milk for a nut-free option. If you prefer a vegan smoothie, swap honey for maple syrup. You can also use dairy-free yogurt instead of Greek yogurt. This way, you can enjoy the Mango Bango Smoothie no matter your diet. Start by gathering all your ingredients. You need: - 1 ripe mango, peeled and chopped - 1 banana, sliced - 1 cup coconut milk (or almond milk for a nut-free version) - 1 tablespoon honey (or maple syrup for a vegan option) - 1/2 cup Greek yogurt (or dairy-free yogurt) - 1/4 teaspoon ground ginger (fresh ginger for an extra kick) - 1 tablespoon chia seeds - Ice cubes (optional for a thicker texture) First, slice the mango and banana. Make sure the mango is ripe. A ripe mango gives the smoothie great flavor. Next, measure out your coconut milk and yogurt. This mix creates a creamy base. Now it's time to blend! In a blender, add the mango, banana, coconut milk, and honey. This step is important for sweetness. Then, add the Greek yogurt and ground ginger. The ginger gives it a nice zing. Sprinkle in the chia seeds for added health benefits. If you want a colder drink, toss in some ice cubes. Blend everything on high speed until it's smooth. Stop to scrape down the sides if needed. After blending, taste the smoothie. If you want it sweeter, add more honey or maple syrup. Pour the smoothie into tall glasses. Leave some space at the top for fun toppings. You can garnish with chia seeds and a slice of mango on the rim of the glass. This makes it look fancy! For extra fun, use colorful straws. Enjoy your Mango Bango Smoothie! For the complete details, check the Full Recipe. To find the best mango, look for one with smooth skin. It should feel slightly soft when you press it. A ripe mango has a sweet smell near the stem. Avoid hard or overly soft mangos. Color can vary, so focus on feel and smell. You can boost the flavor with a few extras. Try adding a splash of lime juice. This gives a nice tartness. You might also mix in spinach for added greens. If you love spice, a pinch of cayenne pepper can add heat. Experiment with different flavors to make it your own! If your smoothie is too thick, add more coconut milk. Blend it again to mix well. For a thinner smoothie, just add ice or more liquid. If it's too sweet, add a bit of yogurt or lemon juice to balance it. These simple fixes can help you get it just right. {{image_2}} You can give your Mango Bango Smoothie a fun twist by adding other fruits. Pineapple adds a tropical vibe, while strawberries bring a sweet touch. You can also try kiwi for a zesty flavor. Just chop up the fruit and toss it into the blender with the mango and banana. This will make your smoothie even more delicious and colorful. Want to add more nutrition? Consider adding spinach or kale. These greens blend well and add vitamins without changing the taste. You can also try adding protein powder for an extra energy boost. Flaxseeds are another great option. They are high in fiber and blend easily in the smoothie. Just remember to keep the balance of flavors when adding these healthy extras. You can choose different types of milk to suit your needs. Coconut milk gives a creamy texture and a light coconut flavor. If you want a nut-free option, almond milk works great too. For those who prefer dairy, regular milk or yogurt can be used. Each type of milk will change the taste and texture slightly, so feel free to experiment and find what you like best! If you have leftover Mango Bango Smoothie, store it in the fridge. Use a sealed container for best results. It will stay fresh for up to 24 hours. After that, it might lose its texture and flavor. Shake or stir well before drinking again. Freezing is a great option if you want to save some smoothie for later. Pour the remaining smoothie into ice cube trays or freezer bags. This way, you can portion it out easily. When you're ready to drink it, just blend the frozen cubes with a splash of milk. It will be like a fresh smoothie again! Choose the right containers for storing smoothies. Glass jars with lids work well. They keep your smoothie fresh and are easy to clean. BPA-free plastic containers are another good choice. Make sure they seal tightly to avoid spills. Yes, you can make the Mango Bango Smoothie ahead of time. Just blend all the ingredients and store the smoothie in the fridge. Keep it in a sealed container for up to 24 hours. When you're ready to drink it, give it a quick stir or shake. The smoothie may separate a bit, but that's normal. If you need a substitute for coconut milk, try almond milk or oat milk. Both options work well and still keep the smoothie creamy. You can also use soy milk for a nut-free option. Each milk adds a different flavor, so choose one that you like best. To boost protein in your Mango Bango Smoothie, add a scoop of protein powder. You can also use more Greek yogurt or even cottage cheese. These options will keep the smoothie tasty while making it more filling. Add some nut butter too, for extra protein and healthy fats. Feel free to explore the [Full Recipe] for all the details you need! Making a Mango Bango Smoothie is easy and fun. You learned about key ingredients, from fresh mango to substitutes for diets. Step-by-step instructions showed how to prepare, blend, and serve. Tips helped you choose the best mango and fix common issues. You explored tasty variations by adding fruits and healthy boosters. Finally, we covered storage and answered popular questions. Enjoy making this smoothie your way, and sip on something delicious!](https://foodishtalk.com/wp-content/uploads/2025/07/9a28147f-4108-4c75-aa15-df943a6694e6-300x300.webp)


Lemon Garlic Shrimp Flavorful and Quick Dinner Recipe
If you’re craving a quick and tasty meal, look no further! This Lemon Garlic Shrimp recipe is easy to whip up and packed with…

