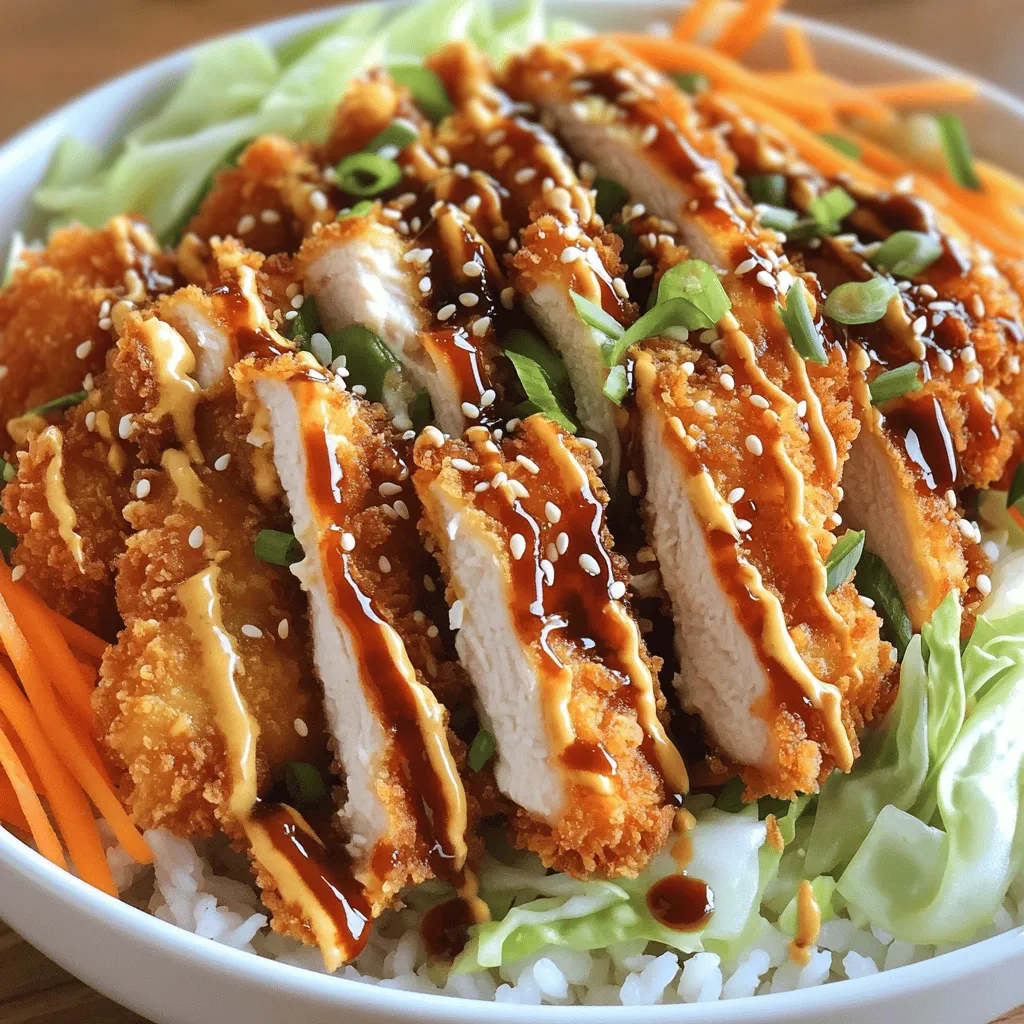
If you crave a dish that’s crispy, savory, and easy to make, you’re in the right place! Japanese Chicken Katsu Bowls are not just a meal; they’re a delight for your taste buds. This post walks you through simple steps to create this flavorful comfort food. With just a few ingredients, I’ll show you how to assemble a satisfying bowl that’ll impress your family and friends. Let’s get cooking!
Ingredients
Main Ingredients for Chicken Katsu
– 2 boneless, skinless chicken breasts
– 1 cup panko breadcrumbs
– 1/2 cup all-purpose flour
– 2 large eggs
For Chicken Katsu, I always use fresh ingredients. The chicken breasts should be boneless and skinless. This keeps the meat tender and juicy. I coat the chicken with panko breadcrumbs for that crunchy texture. Panko is lighter than regular breadcrumbs. It gives a great crunch. I use all-purpose flour and eggs to help the panko stick.
Additional Ingredients for Serving
– 1 cup cooked Japanese short-grain rice
– 1 cup shredded cabbage
– 1 carrot, julienned
– 1/4 cup green onions, sliced
– Sesame seeds for garnish
– Nori strips for garnish
For serving, I love cooked Japanese short-grain rice. It has a sticky texture that pairs well with chicken katsu. Shredded cabbage adds a nice crunch. I also use julienned carrots for color and sweetness. Green onions, sesame seeds, and nori strips make the dish pop! These toppings add flavor and make the bowl look pretty.
Essential Seasonings
– Salt and pepper
– Vegetable oil for frying
– 1/4 cup tonkatsu sauce
Seasoning is key to great chicken katsu. I sprinkle salt and pepper on the chicken before cooking. It brings out the chicken’s natural flavor. I use vegetable oil for frying. It has a high smoke point and gives a nice golden color. Lastly, I drizzle tonkatsu sauce on top. It adds a sweet and tangy kick that ties everything together.
Step-by-Step Instructions
Preparing the Chicken
To begin, flatten the chicken breasts. This helps them cook evenly. Place each breast between two sheets of plastic wrap. Use a meat mallet to pound them gently to an even thickness. Next, season both sides with salt and pepper. This adds flavor right to the meat.
Setting Up the Breading Station
Now, let’s create a breading station. In one shallow bowl, add flour. In another bowl, beat two large eggs. In a third bowl, pour in panko breadcrumbs. This setup makes breading easy. You can keep your hands clean by using one hand for wet ingredients and the other for dry ingredients.
Cooking the Chicken
It’s time to fry the chicken. Heat about half an inch of vegetable oil in a large skillet over medium-high heat. Once the oil is hot, carefully add the chicken. Fry each piece for about four to five minutes on each side. The chicken should turn golden brown and be cooked through. To check for doneness, cut into the thickest part. It should be white and juicy.
Assembling the Bowls
While the chicken rests, prepare the bowls. Cook one cup of Japanese short-grain rice according to the package. Divide the rice into serving bowls. On top of the rice, add shredded cabbage and julienned carrots. This adds a nice crunch and freshness to the dish.
Adding Final Touches
Now, let’s finish the bowls. Slice the cooked chicken into strips. Arrange these strips on top of the rice and vegetables. Drizzle tonkatsu sauce over everything for that sweet and tangy flavor. Finally, sprinkle sesame seeds and sliced green onions on top. If you like, add nori strips for extra flavor and texture.
Tips & Tricks
Achieving Perfectly Crispy Chicken Katsu
To make your chicken katsu super crispy, follow these tips:
– Tricks for panko adherence: After flattening your chicken, season it well. This adds flavor and helps the panko stick. Dredge it in flour first, then dip in beaten egg. Finally, coat it with panko. Press down firmly to help the crumbs cling.
– Oil temperature tips: Heat your oil to medium-high. If it’s too cool, the chicken will soak up oil and become greasy. Use a thermometer if you have one. The oil should be around 350°F. A small test is to drop a few panko crumbs in; they should sizzle right away.
Time-Saving Meal Prep
Save time by prepping ahead. Here’s how:
– Prepping ingredients ahead of time: You can cut your veggies and wash the rice before cooking. Store them in the fridge. This way, when it’s time to cook, everything is ready to go.
– Storing breaded chicken: After breading your chicken, you can place it on a tray and cover it with plastic wrap. If you want to make it later, freeze it for up to two hours. This keeps the breading intact while frying.
Serving Suggestions
Pair your chicken katsu with great sides and drinks:
– Pairing with sides: Serve your chicken katsu over soft rice and add shredded cabbage and carrots. This adds crunch and balance to the dish.
– Drinks that complement: I recommend serving green tea or a light beer. Both drinks work well with the flavors of the katsu and help cleanse your palate.
These tips will help you make a perfect chicken katsu bowl every time!

Variations
Vegetarian Options
You can easily switch chicken for a vegetarian choice. Tofu works great when you press it first. This helps it soak up flavors. Eggplant is another tasty option. Slice it into thick pieces and bread it like chicken. Both options give you a crunchy bite and a full meal.
Sauces and Toppings
You can make your own tonkatsu sauce. Mix ketchup, Worcestershire sauce, and a bit of sugar. This sweet and tangy sauce makes the dish pop. If you want more spice, try spicy mayo. Just mix mayo with sriracha. This adds a nice kick and is simple to make.
Serving Styles
You can serve chicken katsu in different styles. A bowl is classic, with rice and veggies. You can also make a bento box. Just add sliced chicken, rice, and some pickled veggies. This option is fun and easy to take on the go. Enjoy the meal your way!
Storage Info
Storing Leftover Chicken Katsu
To keep your chicken katsu fresh, follow these tips. First, let the chicken cool down to room temperature. Then, wrap each piece in plastic wrap or place it in an airtight container. This helps prevent it from drying out. Store it in the fridge for up to three days.
For longer storage, freeze the chicken. Wrap it well in plastic wrap and then in foil. This prevents freezer burn. It can stay in the freezer for up to three months. When you are ready to eat it, thaw it in the fridge overnight.
Reheating Guidelines
When reheating chicken katsu, the goal is to keep it crispy. The oven works best for this. Preheat your oven to 375°F (190°C). Place the chicken on a baking sheet and heat for about 10-15 minutes. Check to ensure it is hot throughout.
You can also use a skillet. Heat a bit of oil over medium heat. Add the chicken and cook for about 3-5 minutes on each side. This method also keeps the crust crunchy. If you have leftovers, you can turn them into a katsu sandwich. Just add some lettuce and sauce between two slices of bread.
Rice and Vegetables Storage
To keep your rice fresh, store it in an airtight container. This prevents it from getting hard. Rice can last in the fridge for about four days.
For cabbage and carrots, place them in separate containers. Keep them in the fridge. Cabbage can last up to a week, while carrots can stay fresh for about two weeks. If you see any wilting, use them quickly in stir-fries or salads.
FAQs
What is Chicken Katsu?
Chicken katsu is a Japanese dish made of breaded and fried chicken. It comes from the word “katsu,” meaning cutlet. This dish has roots in Western cooking, similar to schnitzel. It became popular in Japan around the late 19th century. The chicken is pounded thin, breaded with panko, and fried until crispy. It is often served with rice and tonkatsu sauce.
Can I make Chicken Katsu in an air fryer?
Yes, you can make chicken katsu in an air fryer! Here’s how:
1. Preheat the Air Fryer: Set it to 375°F (190°C).
2. Prepare the Chicken: Follow the same steps for flattening and breading.
3. Air Frying: Place the breaded chicken in a single layer. Cook for about 12-15 minutes. Flip halfway through for even crisping. Check that the internal temperature reaches 165°F (74°C).
This method cuts down on oil and still gives you a crispy finish!
What to serve with Japanese Chicken Katsu Bowls?
You can serve various side dishes with chicken katsu bowls:
– Steamed broccoli: Adds a healthy crunch.
– Pickled vegetables: Provides a tangy contrast.
– Miso soup: Complements the meal with warmth.
– Japanese pickles (tsukemono): Offer a nice bite.
For drinks, try green tea or a light beer. Both pair well with the flavors.
How to make homemade tonkatsu sauce?
Making homemade tonkatsu sauce is easy! Here’s a simple recipe:
– Ingredients:
– 1/4 cup ketchup
– 2 tablespoons Worcestershire sauce
– 1 tablespoon soy sauce
– 1 tablespoon sugar
– 1 teaspoon Dijon mustard
1. Mix Ingredients: In a small bowl, combine all ingredients.
2. Taste and Adjust: Feel free to tweak it to your liking.
This sauce adds a sweet and tangy flavor that pairs perfectly with chicken katsu!
Chicken katsu is a tasty and simple dish. We covered the main ingredients, from chicken to panko crumbs. I shared step-by-step instructions, tips for perfect frying, and meal prep ideas. You can even explore vegetarian options and variations. Lastly, we tackled storage and reheating tips.
With this knowledge, you can create a delicious chicken katsu meal that impresses. Enjoy your cooking and make every bite count!