Are you ready to satisfy your sweet tooth? In this guide, I’ll show you how to make homemade peanut butter cups that are simple and tasty! With just a few ingredients and steps, you can create a treat that beats store-bought options. From the smooth peanut butter filling to the rich chocolate shell, you’ll love every bite. Let’s dive in and master this fun recipe together!
Why I Love This Recipe
- Irresistible Flavor: The combination of rich dark chocolate and creamy peanut butter creates a delightful taste that is hard to resist.
- Simple Ingredients: All you need are a few pantry staples to whip up these delicious treats, making them easy to prepare.
- Customizable: You can easily adjust the sweetness or try different types of chocolate to suit your taste preferences.
- Fun to Make: This recipe is a great activity for kids and adults alike, adding a fun twist to your baking routine.
Ingredients
Detailed Ingredient List
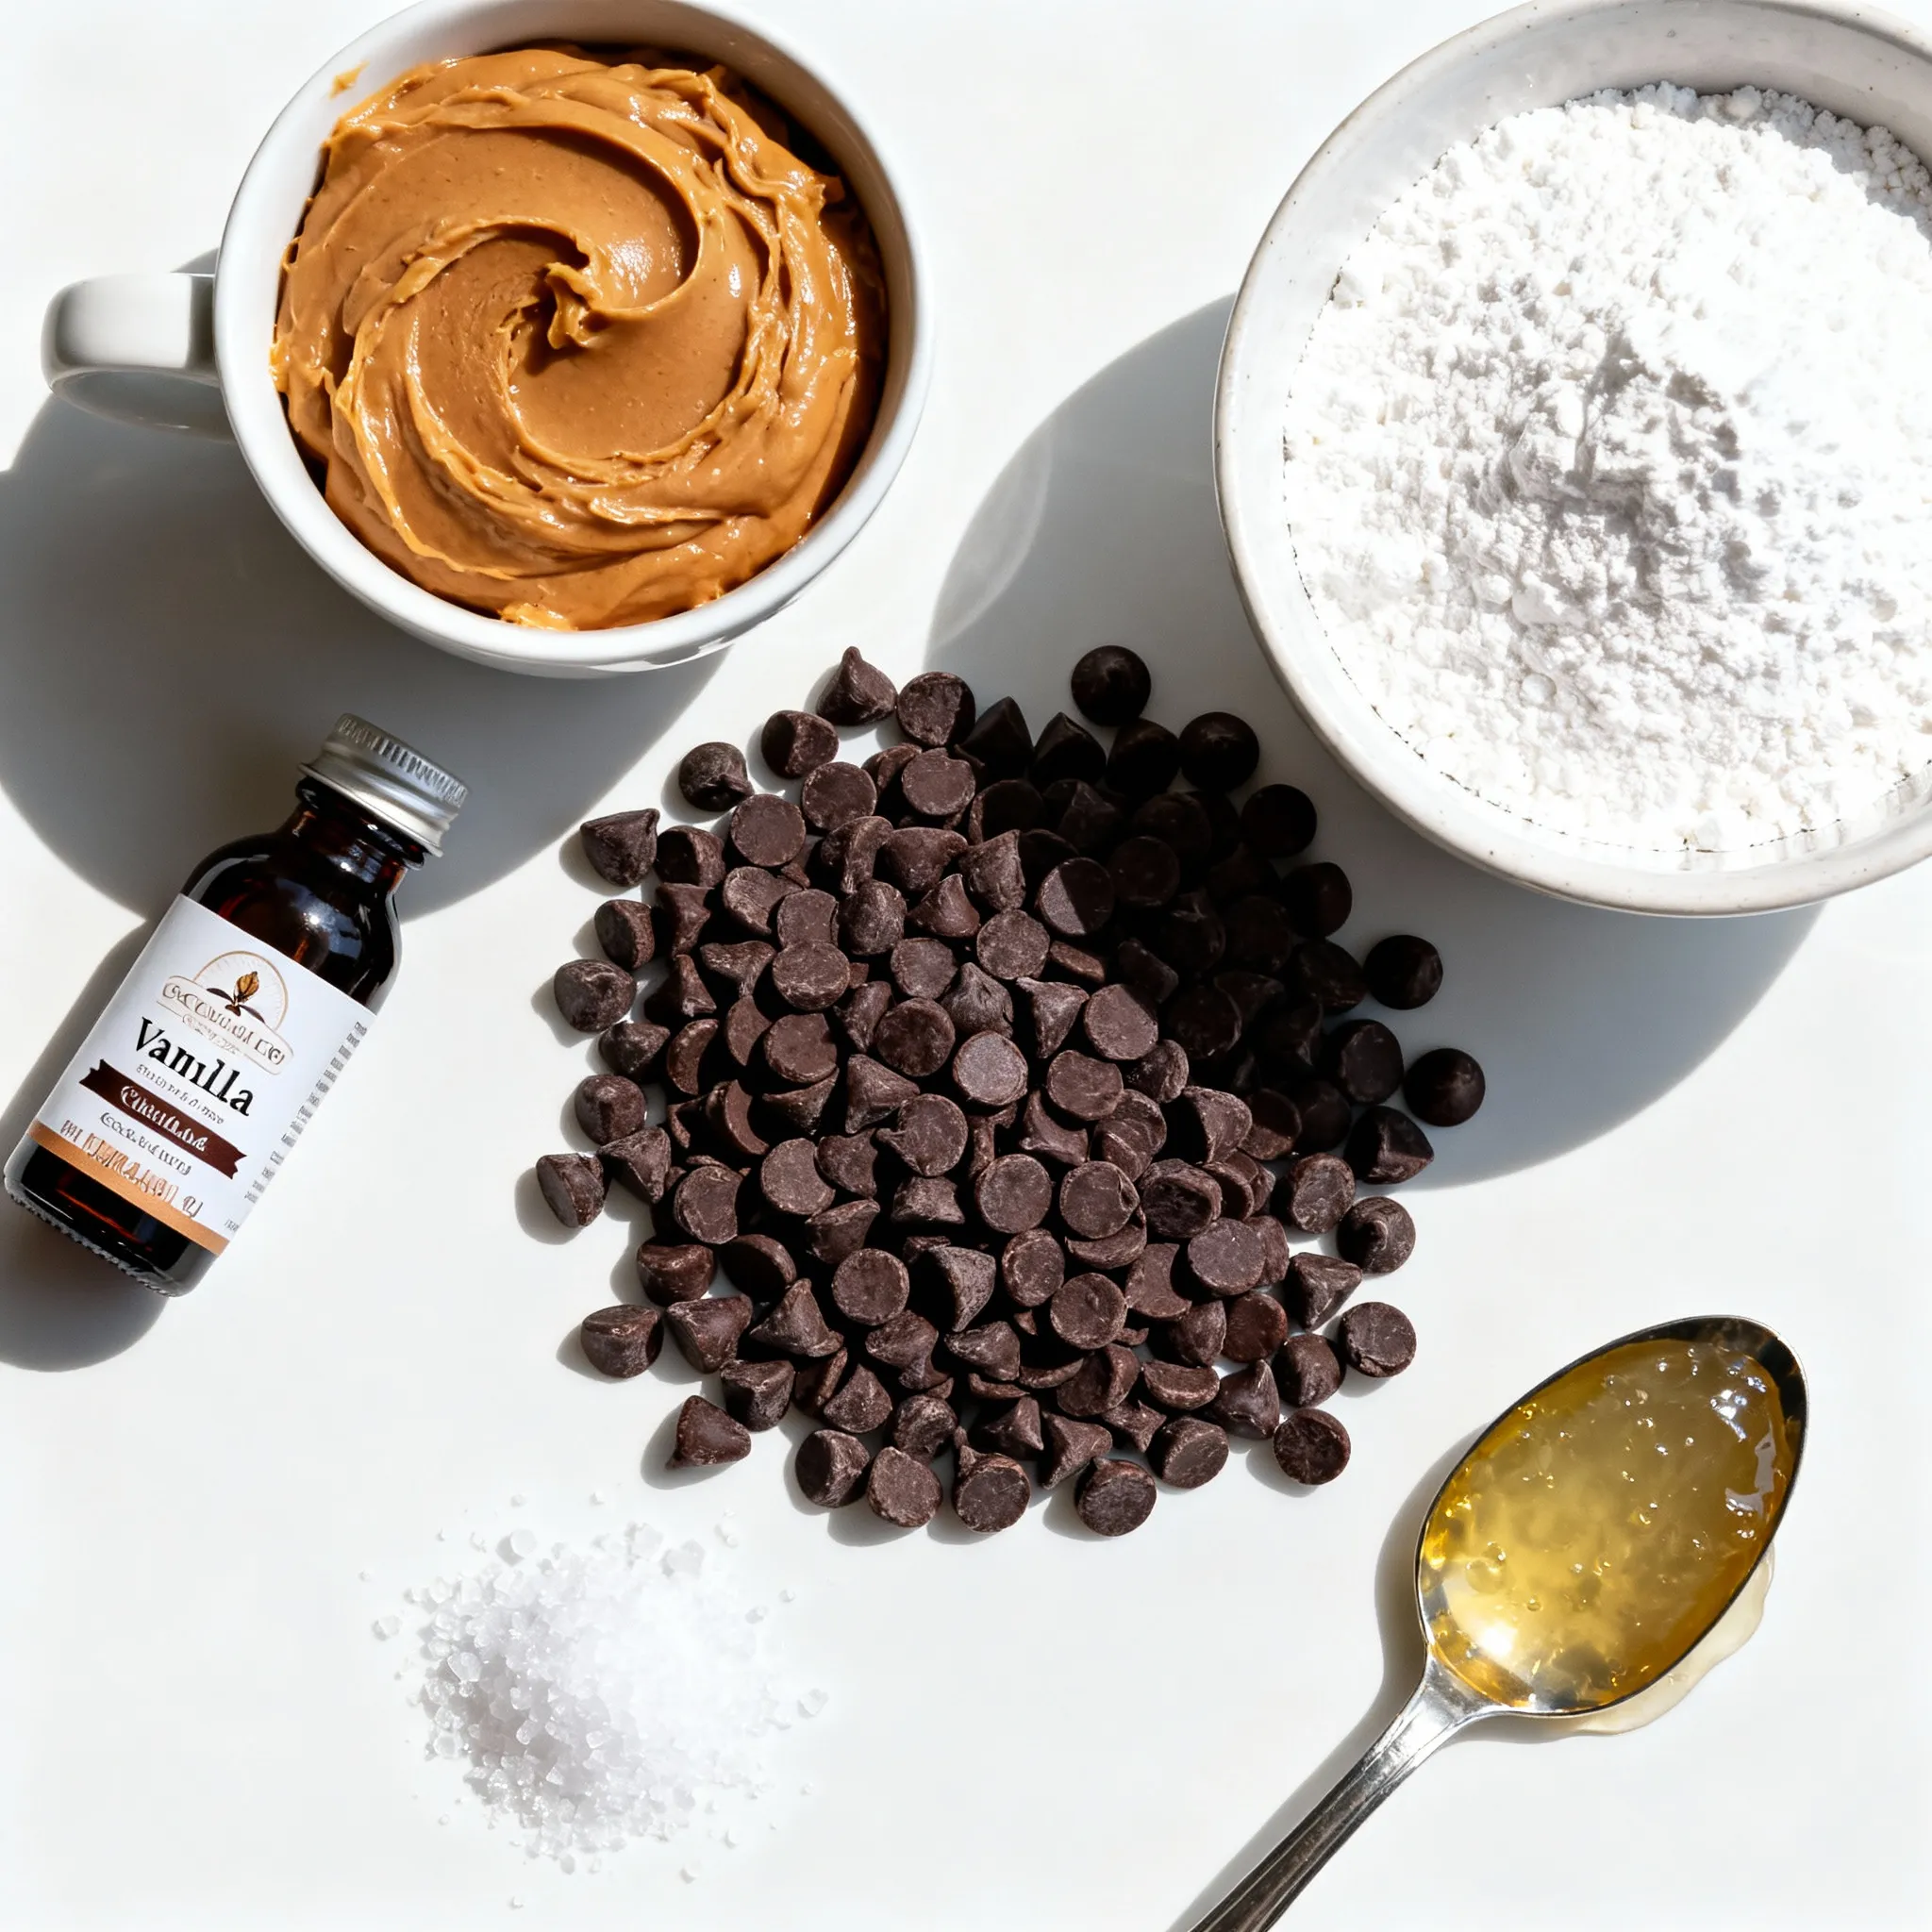
– 1 cup creamy peanut butter
– 1/4 cup powdered sugar
– 1/2 teaspoon vanilla extract
– 1 1/2 cups dark chocolate chips
– 1 tablespoon coconut oil
– A pinch of sea salt
Each ingredient plays a key role in making these treats. The creamy peanut butter provides a rich base. Powdered sugar adds just the right sweetness. Vanilla extract gives a lovely flavor boost. Dark chocolate chips create a tasty shell. Coconut oil helps the chocolate melt smoothly. A pinch of sea salt enhances the flavors.
Optional Ingredient Substitutes
– For creamy peanut butter, you can use crunchy peanut butter for added texture.
– Instead of powdered sugar, try maple syrup for a natural sweetener.
– If you don’t have vanilla extract, almond extract works well too.
– You can swap dark chocolate chips for milk chocolate or white chocolate, depending on your taste.
– For coconut oil, use vegetable oil as a substitute if needed.
These substitutes keep the recipe flexible. You can create new flavors and textures based on what you have at home.
Equipment Needed
– Muffin tin
– Paper liners
– Medium mixing bowl
– Microwave-safe bowl
– Spatula
– Spoon
Having the right tools makes this process easy. The muffin tin holds the cups, while paper liners help with cleanup. A mixing bowl is perfect for combining ingredients. A microwave-safe bowl is needed to melt chocolate easily. A spatula helps spread the chocolate and filling smoothly. A spoon is great for portioning out the peanut butter mixture.
Step-by-Step Instructions
Preparing the Peanut Butter Filling
Start by grabbing a medium bowl. Add 1 cup of creamy peanut butter to the bowl. Next, mix in 1/4 cup of powdered sugar. Pour in 1/2 teaspoon of vanilla extract for flavor. Finally, add a pinch of sea salt. Stir everything together until it’s well combined. This filling should be smooth and sweet.
Melting the Chocolate
Take a microwave-safe bowl and add 1 1/2 cups of dark chocolate chips. Next, add 1 tablespoon of coconut oil. This helps the chocolate melt smoothly. Heat the bowl in the microwave. Do this in 30-second intervals. Stir the chocolate after each interval. Keep heating until it is fully melted and smooth.
Creating the Chocolate Shells
Get a muffin tin and line it with paper liners. Pour about 1 tablespoon of the melted chocolate into each liner. Use the back of a spoon to spread the chocolate evenly across the bottom. This will create the base for your cups. Make sure to cover the bottom well.
Adding the Peanut Butter Filling
Now, take about 1 tablespoon of the peanut butter mixture. Place it on top of the chocolate layer in each liner. Press down gently to flatten the filling. The peanut butter should be even and smooth. This is the heart of your peanut butter cup.
Topping with More Chocolate
Pour more melted chocolate over the peanut butter filling. Use about 1 tablespoon on top of each cup. Smooth it out with a spatula. This seals the filling inside the chocolate shell. Make sure it covers the filling completely.
Chilling and Serving
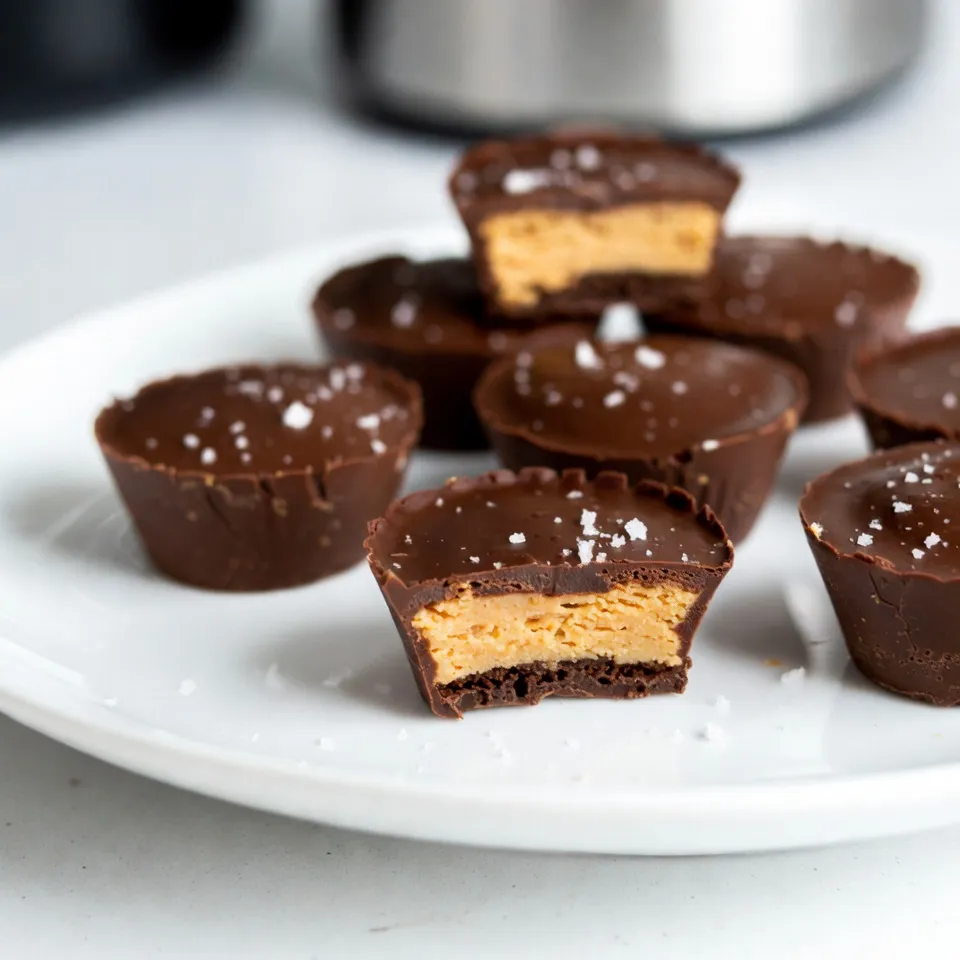
Place the muffin tin in the refrigerator. Let it chill for at least 30 minutes. This helps the chocolate harden fully. Once set, remove the cups from the muffin tin. Peel off the wrappers and enjoy your homemade peanut butter cups!
Tips & Tricks
How to Perfect the Chocolate Shell
To get a smooth chocolate shell, always use high-quality chocolate chips. Dark chocolate works best for a rich flavor. Melt the chocolate slowly in the microwave. Heat it in short bursts, stirring often. This keeps the chocolate from burning. Pour just enough melted chocolate into each liner, about one tablespoon. Use the back of a spoon to spread it evenly across the bottom. A thin layer helps the cups stay firm.
Suggestions for Smooth Peanut Butter Filling
For a great peanut butter filling, mix your ingredients well. Combine creamy peanut butter, powdered sugar, vanilla extract, and a pinch of sea salt in a bowl. Make sure there are no lumps in the mixture. You want a creamy texture. If you prefer a sweeter taste, adjust the powdered sugar to your liking. A little extra sugar adds to the flavor without overpowering it.
Common Mistakes to Avoid
One common mistake is rushing the melting process. Always melt chocolate slowly to avoid clumps. Another mistake is filling the cups too much. Keep one tablespoon of the filling per cup to ensure it seals well. Lastly, don’t skip the chilling step. This step is key for the chocolate to harden and hold its shape. If you follow these tips, your peanut butter cups will turn out perfect every time.
Pro Tips
- Use Quality Chocolate: The flavor of your peanut butter cups depends largely on the chocolate you use. Opt for high-quality dark chocolate for a richer taste.
- Chill Between Layers: For a cleaner separation between chocolate and peanut butter, chill the first chocolate layer before adding the peanut butter filling.
- Experiment with Flavors: Feel free to customize your peanut butter filling by adding ingredients like crushed pretzels, coconut, or even a dash of cinnamon for extra flavor.
- Store Properly: Keep your peanut butter cups in an airtight container in the refrigerator to maintain their freshness and prevent them from melting.
Variations
Flavor Additions
You can add fun flavors to your peanut butter cups. Here are some ideas:
– Sea Salt: Sprinkle a little sea salt on top. This adds a nice crunch and balance to the sweetness.
– Chocolate Drizzle: After chilling, melt some chocolate and drizzle it over the top. It looks pretty and tastes great.
– Nuts: Chop some nuts and mix them into the peanut butter filling for extra crunch.
Dietary Alternatives
You can also make your peanut butter cups fit your diet:
– Vegan: Use dairy-free chocolate chips and skip the coconut oil. This keeps it vegan-friendly.
– Sugar-Free: Substitute powdered sugar with a sugar-free sweetener. Just make sure it mixes well with the peanut butter.
– Gluten-Free: This recipe is naturally gluten-free! Just check your chocolate to ensure it’s safe.
Using Different Types of Chocolate
You don’t have to stick to dark chocolate. Here are some options:
– Milk Chocolate: For a sweeter taste, use milk chocolate chips. This will make your cups creamier.
– White Chocolate: If you love white chocolate, use it for a tasty twist. Just remember to adjust the sweetness.
– Bittersweet Chocolate: For a richer flavor, try bittersweet chocolate. It gives a nice depth to the flavor.
Feel free to mix and match these ideas to create your perfect peanut butter cup!
Storage Information
Best Storage Practices
To keep your homemade peanut butter cups fresh, store them in an airtight container. You can use a glass jar or a plastic container with a tight lid. Place parchment paper between layers to avoid sticking. Keep them in a cool, dry place, away from direct sunlight.
Shelf Life and Freezing Tips
These treats last about one week at room temperature. If you want to make them last longer, freezing works great! Place the cups in a single layer on a tray and freeze them for about one hour. Once firm, move them to an airtight container. They can stay in the freezer for up to three months.
Reheating/Serving Suggestions
No need to reheat these delicious cups. Simply take them out of the fridge or freezer and enjoy! If they are frozen, let them sit at room temperature for a few minutes. This will soften them just right for eating. You can also serve them with a glass of milk or a scoop of ice cream for an extra treat!
FAQs
Can I use milk chocolate instead of dark chocolate?
Yes, you can use milk chocolate. It will make the cups sweeter. Milk chocolate has a creamier taste. If you like sweeter treats, use it. Just melt it like dark chocolate. Follow the same steps for making the shells.
How do I make peanut butter cups without added sugar?
To make sugar-free peanut butter cups, skip the powdered sugar. Use natural peanut butter. It often has no added sugar. You can also add a sugar substitute. Choose one that suits your taste. Just mix it in with the peanut butter filling.
What is the best way to remove the cups from the liners?
To remove the cups, chill them well first. This helps the chocolate set. Once they are firm, gently peel the paper away. If they stick, try using a knife. Slide it around the edges to loosen them.
Can I make these peanut butter cups in advance?
Yes, you can make these cups ahead of time. They store well in the fridge. Just keep them in an airtight container. If you want to freeze them, wrap each cup in plastic. They will last up to three months in the freezer.
You learned how to make delicious peanut butter cups step-by-step. We covered ingredients, helpful tips, and variations to suit your taste. I shared easy storage methods to keep your treats fresh. Remember, a little practice makes perfect, especially with the chocolate shell. Try new flavors or dietary choices to make it your own. Enjoy your tasty creations, and don’t forget to share them with friend


