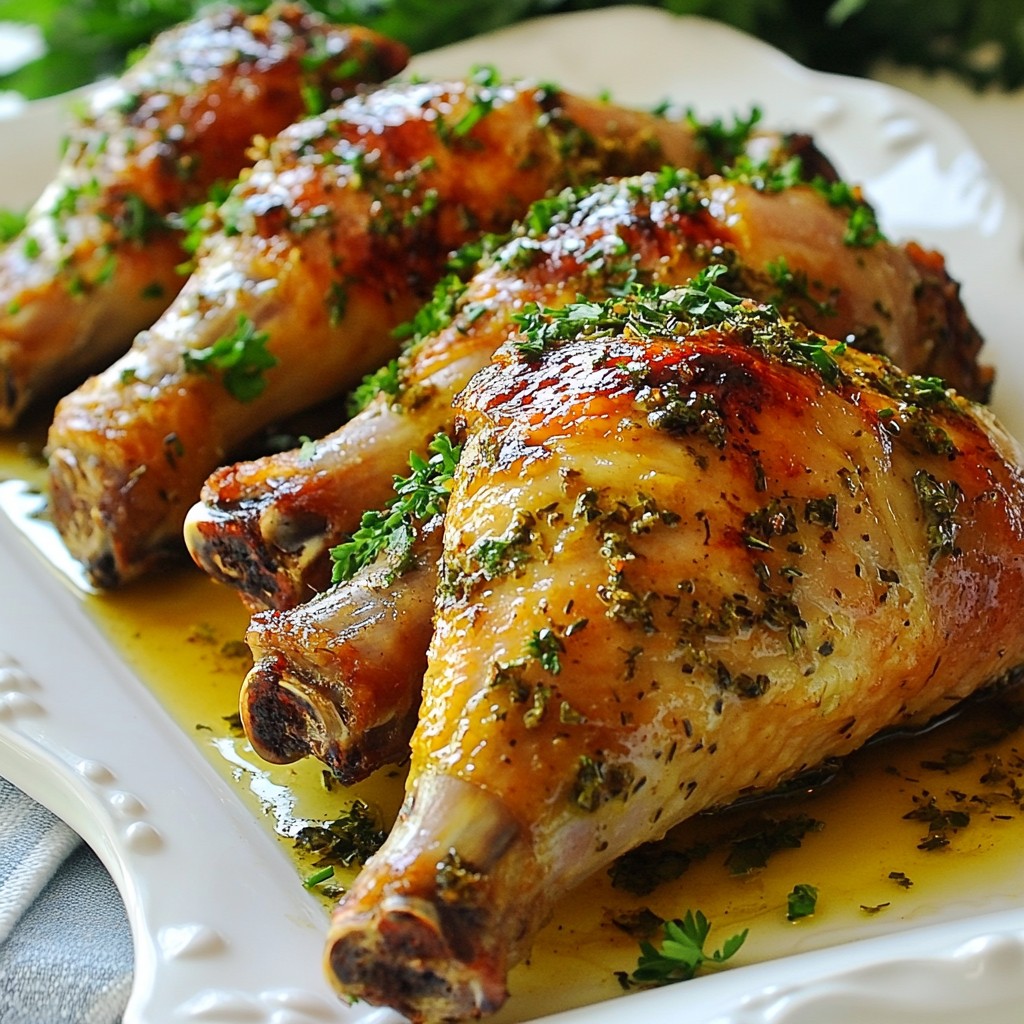
Are you ready for a dish that's both hearty and high in protein? Herb Roasted Turkey Legs are not just delicious; they’re easy to make and packed with flavor. With fresh herbs and garlic, this recipe will become a family favorite. Let me show you how to create the most flavorful turkey legs that are perfect for any celebration or cozy dinner. Dive in for step-by-step instructions and handy tips!
Why I Love This Recipe
- Flavorful Herb Blend: This recipe showcases a delicious combination of fresh herbs that infuse the turkey legs with an aromatic flavor profile, making each bite a delight.
- High in Protein: Turkey is an excellent source of lean protein, making these roasted legs a nutritious choice for a hearty meal.
- Simple Preparation: The easy steps and minimal prep time mean you can have a flavorful dinner ready without spending all day in the kitchen.
- Versatile Side Pairings: These herb roasted turkey legs pair wonderfully with a variety of sides, from roasted vegetables to fresh salads, allowing for creativity in meal planning.
Ingredients
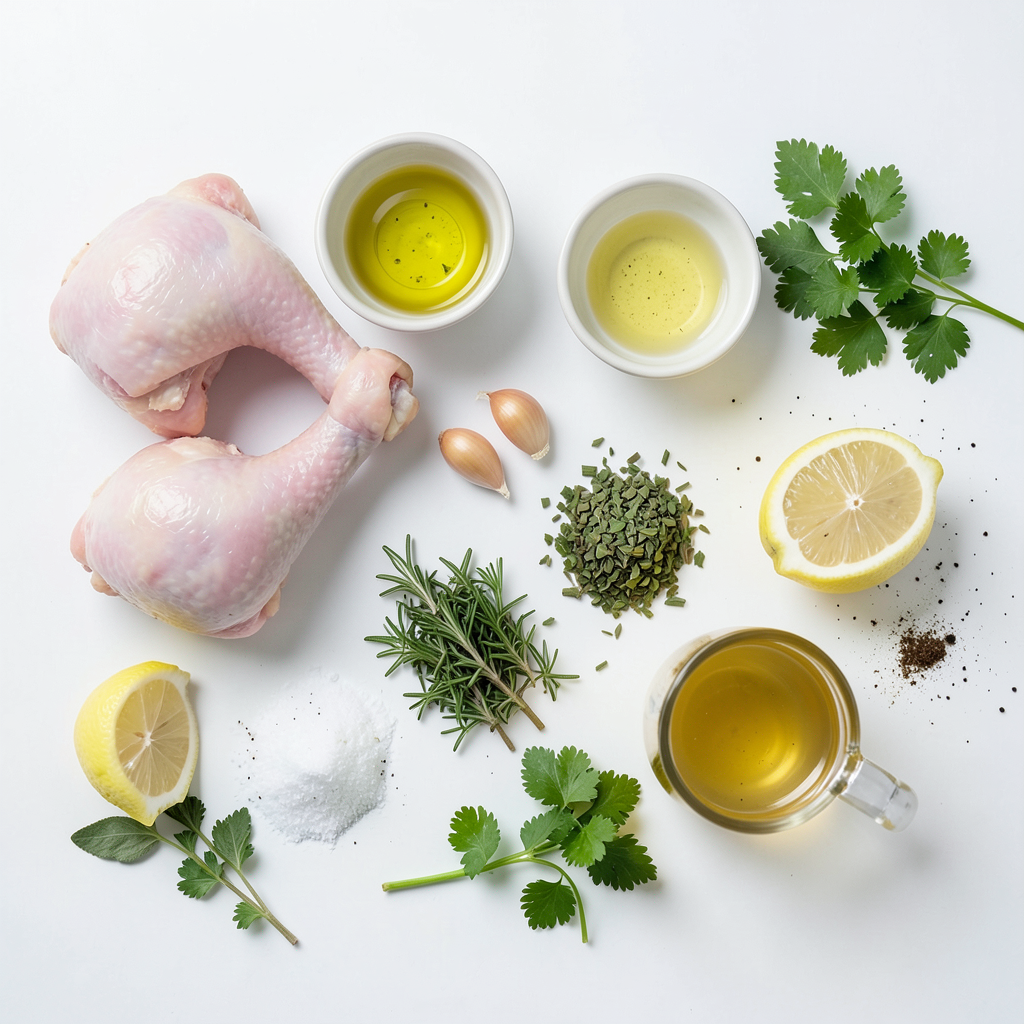
Required Ingredients
- 4 turkey legs
- 3 tablespoons olive oil
- 4 cloves garlic, minced
- 1 tablespoon fresh rosemary, chopped
- 1 tablespoon fresh thyme, chopped
- 1 tablespoon fresh sage, chopped
- Zest of 1 lemon
- 1 tablespoon lemon juice
- Salt and pepper to taste
Optional Ingredients
- 1 cup low-sodium chicken broth
- Fresh parsley for garnish
Using the right ingredients makes a big difference. You need four turkey legs for this dish. They should be fresh and plump. Olive oil adds richness and helps the skin crisp up. Garlic gives a strong flavor that pairs well with the herbs.
Fresh herbs are key to the taste. I like using rosemary, thyme, and sage. Each herb brings its own unique flavor. Lemon zest and juice brighten up the dish. They add a fresh taste that contrasts with the meat.
Salt and pepper enhance all the flavors. You can adjust them to your liking. For extra moisture, low-sodium chicken broth works well. It keeps the turkey juicy while cooking.
Finally, fresh parsley adds a nice pop of color. It makes the dish look inviting on the table.
Step-by-Step Instructions
Preparation
- Preheat your oven to 375°F (190°C).
- Grab a large roasting pan.
- In a small bowl, mix 3 tablespoons of olive oil.
- Add 4 minced garlic cloves, 1 tablespoon each of chopped rosemary, thyme, and sage.
- Include the zest of one lemon and 1 tablespoon of lemon juice.
- Season with salt and pepper.
- Stir well to form your herb paste.
Cooking
- Pat the 4 turkey legs dry with paper towels.
- Place the turkey legs in the roasting pan.
- Rub the herb paste over the turkey legs.
- Make sure to get some under the skin for extra flavor.
- Pour 1 cup of low-sodium chicken broth into the pan.
- Cover the pan loosely with aluminum foil.
- Roast the turkey legs for 1 hour in the oven.
Finishing Touches
- After an hour, remove the foil from the pan.
- Continue roasting for another 30-40 minutes.
- Check the turkey legs; they should be golden brown.
- The internal temperature should reach 165°F (75°C).
- Let the turkey legs rest for 10 minutes.
- Garnish with fresh parsley before serving.
Tips & Tricks
Cooking Tips
To keep turkey legs moist, always start with a good rub. The herb paste made from olive oil, garlic, and herbs helps. Rub it under the skin, too. This step locks in flavor and moisture. Pouring low-sodium chicken broth into the pan adds steam. It keeps the meat juicy as it roasts.
For seasoning, always use fresh herbs when possible. Fresh rosemary, thyme, and sage give great taste. Zest and juice from a lemon brighten the dish. Salt and pepper are key for balance. Be generous but taste as you go. You want to enhance the turkey, not overpower it.
Serving Suggestions
Pair your turkey legs with roasted vegetables. Carrots and potatoes work well. A light salad also complements the richness. Think greens with a simple vinaigrette for balance.
For presentation, use a large platter. Place the turkey legs in the center, drizzled with pan juices. Garnish with fresh parsley for color. Add extra lemon wedges for a pop of zest. This makes the dish inviting and festive.
Pro Tips
- Maximize Flavor: For even deeper flavor, let the herb paste marinate on the turkey legs in the refrigerator for a few hours or overnight before roasting.
- Check for Doneness: Always use a meat thermometer to ensure your turkey legs reach an internal temperature of 165°F (75°C) for safe consumption.
- Keep It Moist: Adding chicken broth to the roasting pan helps keep the turkey legs moist. You can also baste the legs with the pan juices halfway through cooking.
- Rest Before Serving: Let the turkey legs rest for about 10 minutes after roasting. This allows the juices to redistribute, ensuring each bite is tender and juicy.
Variations
Flavor Profiles
You can change the taste of your herb roasted turkey legs to fit your mood. Mix in different herbs like oregano or basil for a unique twist. Try adding smoked paprika for a smoky flavor. If you want a kick, add some red pepper flakes. You can also use citrus fruits like orange or lime instead of lemon. The zest and juice will give a fresh and bright taste.
Cooking Methods
You have options for cooking these turkey legs. Grilling adds a nice char and smoky flavor. It’s great for summer cookouts. Just make sure to keep turning the legs for even cooking. Roasting in the oven gives a tender and juicy result. It’s also easy since you can set it and forget it for a while.
If you prefer a slow cooker, you can adapt this recipe. Season the turkey legs as usual and place them in the slow cooker. Add the chicken broth and cook on low for 6-8 hours. This method makes the meat very tender and full of flavor. Plus, it frees up your oven for other dishes.
Storage Info
Leftover Storage
To store leftover turkey legs, let them cool first. Place them in an airtight container. This keeps them fresh and tasty. You can also wrap them tightly in plastic wrap or foil. Make sure to store them in the fridge. Properly stored, they last up to four days. If you want them to last longer, consider freezing them. Frozen turkey legs can stay good for about three months.
Reheating Instructions
When it's time to enjoy your leftovers, keep the turkey moist. The best way to reheat is in the oven. Preheat the oven to 350°F (175°C). Place the turkey legs in a baking dish. Add a splash of chicken broth to keep them juicy. Cover the dish with foil and heat for about 20 minutes. You can also use the microwave. Heat on medium power for about 5-7 minutes, checking often.
You can get creative with leftovers too! Shred the turkey and add it to soups or salads. Use it in tacos with fresh toppings. The options are endless, and it can give new life to your meal.
FAQs
Common Questions
How to ensure turkey legs are cooked thoroughly? To make sure your turkey legs are cooked right, use a meat thermometer. The thickest part of the leg should reach 165°F (75°C). This keeps the meat safe and juicy.
Can I use skinless turkey legs for this recipe? Yes, you can use skinless turkey legs. However, cooking with skin adds flavor and helps keep the meat moist. If you choose skinless, be careful not to overcook them.
What can I substitute for fresh herbs? If you don’t have fresh herbs, use dried ones. Use one-third the amount since dried herbs are stronger. For example, use 1 teaspoon of dried rosemary instead of 1 tablespoon of fresh.
Are these turkey legs suitable for meal prep? Definitely! These turkey legs store well. Cook them, let them cool, and place them in an airtight container. They last up to four days in the fridge.
What is the nutritional value of herb roasted turkey legs? Herb roasted turkey legs are high in protein. Each leg has about 30 grams of protein. They also provide essential vitamins like B6 and niacin, plus minerals like zinc and phosphorus.
This blog post covered how to prepare delicious herb-roasted turkey legs. We looked at all the needed ingredients, key steps, and helpful tips. Cooking turkey legs can be simple with the right approach. Remember to check for doneness and keep your dish moist. Feel free to customize your turkey legs with different herbs or cooking methods. Store your leftovers properly to enjoy them later. By following these steps, you’ll impress everyone at your table. Happy cooking!