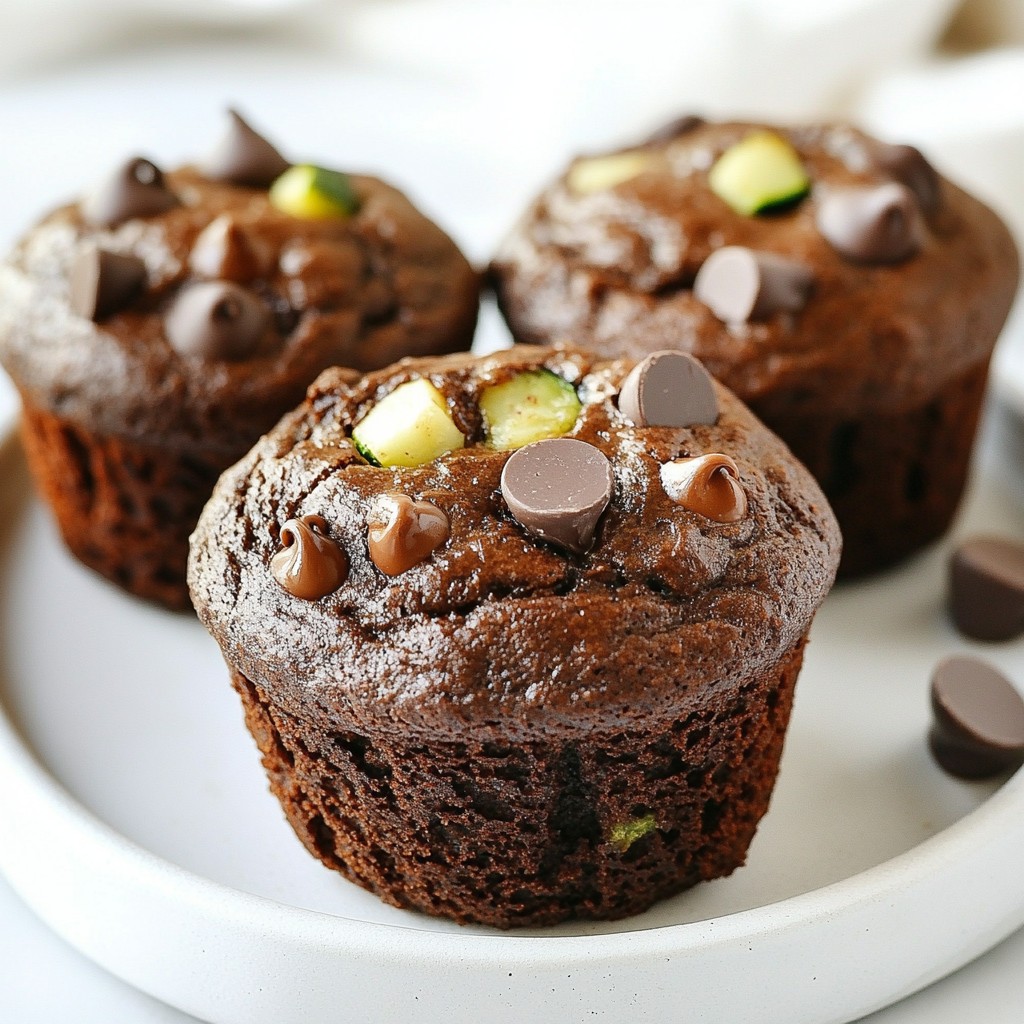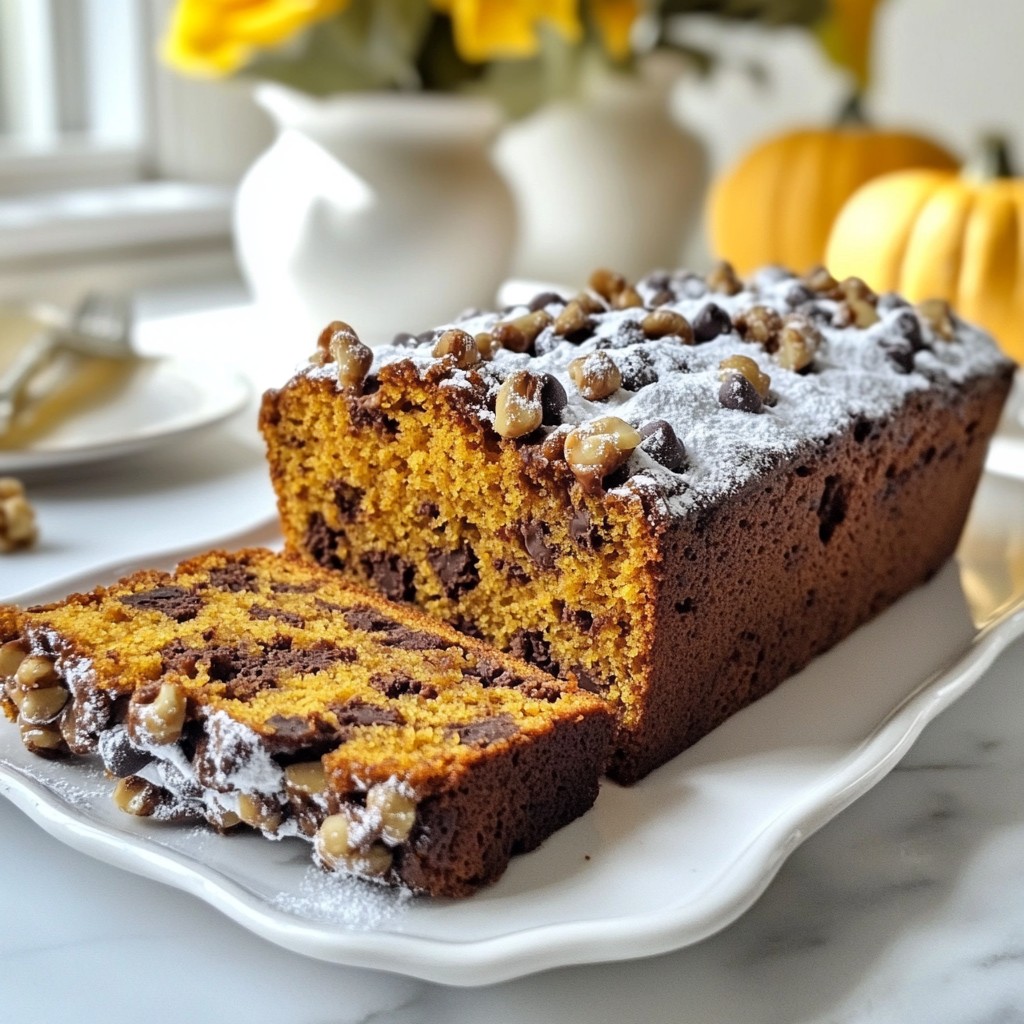
Fall is here, and it’s the perfect time to bake something special! Chocolate Chip Pumpkin Bread is easy to make and oh-so-delicious. With warm spices and rich chocolate, this loaf is sure to be a hit with family and friends. In this guide, I'll share the simple ingredients and steps you need to create this irresistible treat. Let’s dive in and bring some cozy flavors to your kitchen!
Error: Connection error.
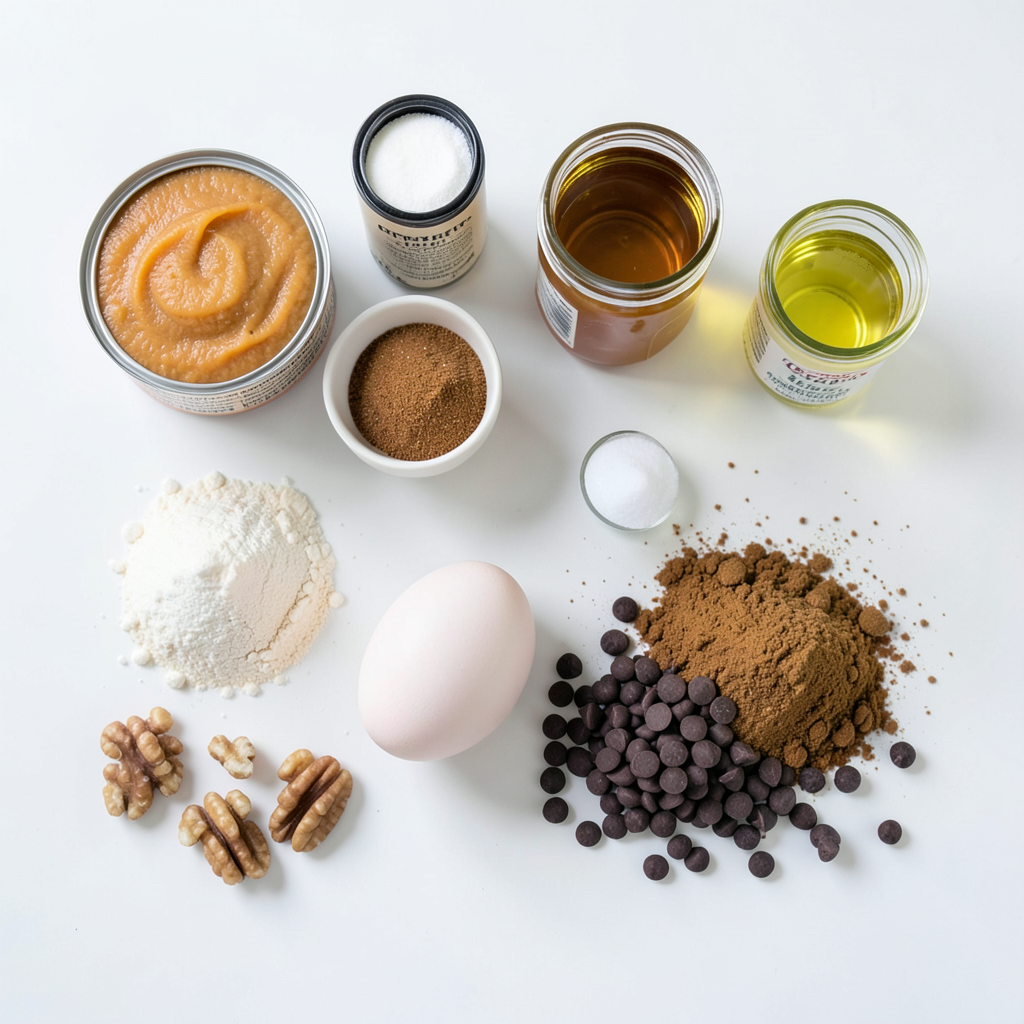
Ingredients
Main Ingredients
- 1 cup canned pumpkin puree
- 2/3 cup granulated sugar
- 1/3 cup brown sugar, packed
- 1/2 cup vegetable oil
- 2 large eggs
- 1 teaspoon vanilla extract
- 1 3/4 cups all-purpose flour
- 1 teaspoon baking soda
- 1/2 teaspoon baking powder
- 1/2 teaspoon salt
- 1 teaspoon ground cinnamon
- 1/2 teaspoon ground nutmeg
- 1/4 teaspoon ground ginger
- 1 cup semi-sweet chocolate chips
The star of this recipe is the canned pumpkin puree. It adds moisture and flavor. The sugars balance the taste and help the bread rise. The chocolate chips provide bursts of sweetness.
Optional Ingredients
- 1/2 cup chopped walnuts
- Spices for added flavor
You can add walnuts for crunch. They also add healthy fats. Extra spices like allspice or cloves give depth to the bread. These are not needed but can enhance the flavor.
Pantry Staples
- All-purpose flour
- Baking soda and baking powder
- Vegetable oil
These staples are key to making the bread rise. The flour gives structure. Baking soda and baking powder help it rise and stay soft. The vegetable oil keeps the bread moist. Each ingredient plays a part in creating the perfect loaf.
Step-by-Step Instructions
Preparation Steps
- Prepping the loaf pan: Start by preheating your oven to 350°F (175°C). Grease a 9x5-inch loaf pan or use parchment paper. This makes removing the bread easy later on.
- Mixing the wet ingredients: In a large bowl, mix together 1 cup of canned pumpkin puree, 2/3 cup of granulated sugar, and 1/3 cup of brown sugar. Add in 1/2 cup of vegetable oil, 2 large eggs, and 1 teaspoon of vanilla extract. Stir until everything is smooth and well-blended.
Combining Ingredients
- Sifting and adding dry ingredients: In another bowl, sift together 1 3/4 cups of all-purpose flour, 1 teaspoon of baking soda, 1/2 teaspoon of baking powder, 1/2 teaspoon of salt, 1 teaspoon of ground cinnamon, 1/2 teaspoon of ground nutmeg, and 1/4 teaspoon of ground ginger. This step helps mix the dry ingredients well and adds air for a lighter bread.
- Folding in chocolate chips and walnuts: Slowly add the dry mix to the wet ingredients. Stir gently until just combined; don’t overmix. Now, fold in 1 cup of semi-sweet chocolate chips and 1/2 cup of chopped walnuts if you like. This gives your bread a tasty crunch.
Baking the Bread
- Pouring batter into the pan: Carefully pour the batter into your prepared loaf pan. Use a spatula to smooth the top lightly.
- Baking time and doneness check: Place the pan in the oven and bake for 55-65 minutes. Check doneness by inserting a toothpick into the center; it should come out clean. If it does, your bread is ready to shine!
Tips & Tricks
Baking Tips
How to avoid overmixing To make soft bread, mix gently. Stir until the dry ingredients just blend. Overmixing makes the bread tough. Use a spatula to fold in the chocolate chips and walnuts. This keeps the batter light and fluffy.
Ensuring even baking Oven temperature matters. Always preheat your oven to 350°F (175°C). Place the loaf pan in the center of the oven. This helps the heat spread evenly. Use an oven thermometer to check the temperature. Baking times can change based on your oven.
Presentation Tips
Serving suggestions Serve this bread warm or at room temperature. Slice it into thick pieces. A light dusting of powdered sugar makes it look fancy. You can also add a dollop of whipped cream on top for a special touch.
Garnishing ideas for presentation Try adding fresh herbs like mint or a sprinkle of cinnamon on top. These add color and flavor. You can also serve it with seasonal fruits, like cranberries or sliced apples, to brighten the plate.
Substitutions
Alternative sweeteners If you want to use honey or maple syrup, that works well too. Just reduce the amount slightly since they are sweeter. For a lower-calorie option, use a sugar substitute like stevia. Adjust the liquid in your recipe to keep the right texture.
Replacing vegetable oil You can swap vegetable oil for melted coconut oil or applesauce. Coconut oil adds a nice flavor. Applesauce keeps it moist and is lower in fat. Just remember that the texture may change a bit, but it will still taste great!
Error: Connection error.
Variations
Flavor Variations
You can change the flavor of your chocolate chip pumpkin bread by adding spices. Try using allspice or cloves for a warm, cozy taste. These spices work well with pumpkin. You can also swap the semi-sweet chocolate chips for white chocolate chips. The sweet and creamy flavor of white chocolate pairs nicely with pumpkin.
Dietary Options
If you need a gluten-free version, use gluten-free flour instead of all-purpose flour. This keeps the bread soft and tasty. For a vegan option, replace eggs with flaxseed meal. Mix 1 tablespoon of flaxseed meal with 2.5 tablespoons of water. Let it sit for a few minutes until it thickens. This will help bind your batter just like eggs do.
Seasonal Twists
You can add holiday cheer by mixing in cranberries. They add a tart flavor that balances the sweetness of the bread. Another fun idea is to serve your bread with seasonal toppings. Try whipped cream or a sprinkle of cinnamon sugar. This makes each slice feel festive and special.
Storage Info
Short-term Storage
To keep your chocolate chip pumpkin bread fresh, store it at room temperature. Wrap it in plastic wrap or place it in an airtight container. These options help lock in moisture. A good choice is a bread box, as it allows air flow but keeps it safe from drying out.
Long-term Storage
If you want to save some for later, freezing works great. Slice the bread first for easy thawing. Wrap each slice in plastic wrap, then place them in a freezer bag. This keeps them safe from freezer burn. When you want to enjoy a slice, take it out and let it thaw at room temperature. You can also microwave it for a quick warm-up.
Shelf Life
At room temperature, the bread lasts about 3 to 5 days. Keep an eye out for signs of spoilage. If you see mold or notice a bad smell, it's time to toss it out. A dry texture or hard crust is also a sign that it’s past its prime. Enjoy your delicious treat while it’s fresh!
FAQs
Common Questions
Can I use fresh pumpkin instead of canned? Yes, you can use fresh pumpkin. Start by roasting or steaming the pumpkin. Then, blend it until smooth. This fresh puree can give your bread a unique taste. Just make sure to measure it like you would with canned puree.
What can I use instead of eggs for a vegan version? You can use a flax egg. Mix one tablespoon of ground flaxseed with three tablespoons of water. Let it sit for about five minutes to thicken. This works great in your pumpkin bread!
Troubleshooting
Why is my bread too dense? Dense bread may come from overmixing the batter. Mix just until combined. Also, check your flour measurement. Too much flour can make it heavy. Use a spoon to fluff the flour before measuring.
How do I know when my bread is done baking? Insert a toothpick into the center of the bread. If it comes out clean or with a few crumbs, it's done. If there is wet batter, bake a bit longer and check again.
Serving Questions
Can I serve it warm? Absolutely! Warm chocolate chip pumpkin bread is delicious. The chocolate chips will melt, adding extra flavor. Serve it right after baking for the best experience.
How to reheat chocolate chip pumpkin bread? You can reheat slices in a microwave for about 10-15 seconds. For a crispier crust, toast it in a toaster oven for a few minutes. Enjoy your warm treat!
In this post, we explored how to make delicious chocolate chip pumpkin bread. We covered all key ingredients, from the main ones like pumpkin puree and semi-sweet chocolate chips to optional add-ins like walnuts. You learned step-by-step instructions for prepping, mixing, and baking the bread. Plus, we shared tips for storage and variations to suit your taste.
I hope you feel confident to bake this treat yourself. It’s fun, easy, and the result is worth it. Enjoy every slice!