Skip to content
DisclaimerTerms Of UseGDPR PolicyCookie Policy

Foodish Talk

  • Home
  • Drinks
  • Appetizers
  • Dinner
  • Dessert
  • About
  • Contact
  • Privacy Policy
DisclaimerTerms Of UseGDPR PolicyCookie Policy

NO-ING-IMG

- Ripe Peaches: Choose 4 ripe peaches. They should be soft and fragrant. Slice them into wedges for the salad. Fresh peaches add sweetness and juiciness. - Mozzarella Balls: Use 1 cup of fresh mozzarella balls, known as bocconcini. They bring a creamy texture that pairs well with the peaches. - Greens and Herbs: You’ll need 1 cup of arugula or a mix of leafy greens. This adds a peppery flavor. Also, grab 2 tablespoons of fresh basil, chopped. This herb gives a bright, fresh taste. - Candied Pecans: You’ll want ½ cup of candied pecans, roughly chopped. They add crunch and a sweet, nutty flavor. - Feta Cheese: Use ½ cup of crumbled feta cheese. This cheese adds a salty kick that balances the sweetness of the peaches. - Olive Oil and Seasonings: For the dressing, mix 2 tablespoons of extra-virgin olive oil with 1 tablespoon of lemon juice. Add salt and freshly cracked black pepper to taste. This simple dressing enhances the salad's fresh flavors. All these ingredients make up the perfect blend for the Millionaire Peach Salad. For the full recipe, follow the steps closely to create this refreshing delight. Mixing the Fresh Ingredients Start by slicing four ripe peaches. Use a sharp knife for clean cuts. Place these peach slices in a large mixing bowl. Next, add one cup of fresh mozzarella balls. You can use bocconcini for a nice touch. Then, toss in one cup of arugula or mixed leafy greens. Finally, add two tablespoons of freshly chopped basil. This mix gives the salad a fresh taste. Adding the Cheese and Nuts Now it's time for the cheese and nuts. Sprinkle in half a cup of crumbled feta cheese. This adds a creamy texture. Then, toss in half a cup of roughly chopped candied pecans. They give a nice crunch and sweetness to the dish. Gently mix everything together. Make sure all the ingredients are well combined. Whisking the Ingredients Together In a small bowl, combine two tablespoons of extra-virgin olive oil with one tablespoon of lemon juice. Add a pinch of salt and some freshly cracked black pepper. Use a whisk to blend everything well. This dressing will enhance the salad's flavors. Adjusting for Taste Taste the dressing to see if it needs anything. If you want more tang, add a bit more lemon juice. For extra richness, a touch more olive oil works well. Adjust to your liking for the best flavor. Tossing Everything Together Drizzle the dressing over the salad mixture. Gently toss everything together until the salad is coated. This helps every bite taste amazing. Then, add the chopped candied pecans again for extra crunch. Give it one last gentle toss to make sure they are evenly spread. Presentation Guidelines Let the salad sit for about five minutes. This allows the flavors to meld. When ready to serve, use a large platter or individual bowls. Garnish with extra basil leaves and a sprinkle of pecans on top. This makes the dish look appealing and ready to impress. For more details, check the Full Recipe. Ingredient Substitutions Feel free to swap ingredients based on what you have. Use burrata cheese instead of mozzarella for a creamier texture. If you can’t find arugula, mixed greens work well too. You can also try walnuts if pecans are not available. They add a nice crunch. Flavor Enhancements Add a splash of balsamic vinegar for extra depth. Honey drizzled on top can add a sweet note. Fresh mint can also brighten up the salad. Experiment with spices like cayenne for a kick. Prepping Ingredients in Advance You can chop peaches and greens a few hours before serving. Keep them in separate containers. This keeps them fresh and crisp. Mix the dressing ahead of time, too. Just shake it up before adding to the salad. Storage Tips for Freshness Store leftovers in an airtight container. Keep it in the fridge and enjoy within two days. If the salad gets too soggy, serve it over fresh greens. This gives it a nice bounce back. Pairing with Summer Dishes This salad pairs well with grilled chicken or fish. It can also be a side dish for barbecues. Serve it alongside corn on the cob or potato salad for a fun meal. Ideal Occasions for This Salad Perfect for picnics, potlucks, or backyard barbecues. This salad brightens up any summer gathering. You can also serve it as a light lunch or a refreshing starter. Enjoying it on a sunny day makes it even better! {{image_2}} You can switch up the fruits in Millionaire Peach Salad. Adding berries makes it sweeter and colorful. Try blueberries, strawberries, or raspberries. They pair well with peaches and add a burst of flavor. Melons are another great choice. Cantaloupe or watermelon brings a refreshing crunch. Just cut them into small pieces and mix them in. This will give your salad a fun twist. For a tropical vibe, add mango. The juicy sweetness of ripe mango balances the salad's flavors. Slice a fresh mango and toss it in for a lively touch. Looking to add protein? Grilled chicken or shrimp works perfectly. Cook them simply with salt and pepper. Slice them and mix them into the salad. This addition makes it heartier and more filling. If you prefer a vegetarian option, quinoa is a great choice. Cooked quinoa adds texture and protein. Just mix in about a cup of cooked quinoa for a healthy twist. You can try different dressings to change the flavor. Balsamic vinaigrette adds a tangy sweetness. Just drizzle it over the salad instead of the lemon dressing. Citrus-based dressings are also a hit. Use orange juice or lime juice for a fresh taste. Mix these with olive oil for a bright and zesty dressing. Explore these variations to make your Millionaire Peach Salad unique and delightful. Check out the Full Recipe for more ideas! To store leftovers, place the salad in an airtight container. This keeps it fresh and safe. You want to enjoy this delightful salad for days. When stored properly, it lasts about 2 to 3 days in the fridge. However, the texture may change, especially with the mozzarella and greens. They can become a bit soggy over time. If you want the best taste, eat it within the first day. Can you freeze this salad? I do not recommend freezing it. Freezing can ruin the texture of fresh ingredients. Peaches and greens lose their crunch and become mushy. However, you can freeze some components separately. To freeze components, slice peaches and freeze them on a baking sheet. Once frozen, transfer them to a bag. This works well for smoothies too! You can also freeze the candied pecans. Just ensure they are stored in a sealed bag. They can last up to 3 months in the freezer. When you're ready, just thaw and add to your salad. Millionaire Peach Salad is a fresh and vibrant dish. It features ripe peaches, creamy mozzarella, and crunchy pecans. This salad brings summer flavors to life. I drew inspiration from classic summer salads that highlight seasonal fruits. The mix of sweet and savory makes it a real crowd-pleaser. You can enjoy it as a main dish or a side. Trust me, this salad is perfect for any summer gathering. Yes, you can make this salad ahead of time! To prepare it in advance, slice the peaches and mix them with other fresh ingredients. However, keep the dressing separate until you're ready to serve. This way, the salad stays crisp. Store the salad ingredients in the fridge, covered. The flavors will blend nicely if you let it sit for a bit. Just remember to add the candied pecans just before serving for extra crunch. Millionaire Peach Salad pairs well with many dishes. I suggest serving it with grilled chicken or fish for a hearty meal. It also goes great with a light pasta dish or a charcuterie board. For drinks, try a chilled white wine or a refreshing iced tea. The salad’s bright flavors complement these options beautifully. Feel free to mix and match to find your perfect pairings! Making this salad vegan is easy! Simply replace the mozzarella and feta with non-dairy cheese. Look for options made from nuts or soy to achieve a similar taste. For the dressing, use a vegan olive oil or a citrus-based dressing. You can also skip the cheese altogether and add more nuts or seeds for texture. This keeps the salad fresh and bright while catering to vegan diets. This blog shows how to make a fresh, tasty salad perfect for summer. You learned about key ingredients like ripe peaches and mozzarella. I shared steps for mixing, dressing, and serving. Useful tips help you prepare ahead and customize flavors. Variations let you add fruits or proteins. In the end, this salad is easy and fun. Enjoy making it your own!

Millionaire Peach Salad Refreshing Summer Delight

When summer arrives, nothing beats a refreshing salad bursting with flavor. That’s where my Millionaire Peach Salad comes in! This

To make a tasty cheesy veggie frittata, you need some key ingredients. Start with: - 6 large eggs - 1 cup spinach, chopped - 1 cup bell peppers (mixed colors), diced - 1/2 cup onion, finely chopped - 1/2 cup cherry tomatoes, halved - 1 cup shredded cheese (cheddar and mozzarella blend) - 1/4 cup milk - 2 tablespoons olive oil These ingredients bring great flavor and color to your dish. The eggs and milk create a rich base. The fresh veggies add texture and nutrients. The cheese gives it that delicious gooeyness. Don’t forget to add some seasoning. Here’s what you need: - Salt and pepper to taste - Olive oil for cooking - Fresh herbs (like basil or parsley) for garnish Salt and pepper enhance the taste of your frittata. Olive oil helps cook the veggies nicely. Fresh herbs not only look pretty but also add a burst of flavor. For the full recipe, check out the recipe card! To start, you need to prep your oven and skillet. Preheat your oven to 375°F (190°C). This helps the frittata cook evenly. Use an oven-safe skillet for the best results. A cast-iron skillet works great for this recipe. Next, whisk the egg mixture. In a big mixing bowl, crack six large eggs. Add 1/4 cup of milk. Whisk until the mixture is smooth. Season it with salt and pepper to taste. This is where the flavor starts! Now, it’s time to sauté the vegetables. Heat 2 tablespoons of olive oil in your skillet over medium heat. Add 1/2 cup of finely chopped onion and 1 cup of diced bell peppers. Sauté them for about 3-4 minutes, until they soften. Next, combine the veggies with the egg mixture. Add 1 cup of chopped spinach and 1/2 cup of halved cherry tomatoes to the skillet. Cook for another 2-3 minutes. The spinach should wilt, and the tomatoes should soften a bit. Spread the veggies evenly across the skillet. Pour the egg mixture over the veggies. Make sure it covers everything well. Now, we bake the frittata. Sprinkle 1 cup of shredded cheese on top of the egg-vegetable mix. Cook it on the stovetop for about 3-4 minutes. You want the edges to start setting. Then, transfer the skillet to the preheated oven. Bake for 15-20 minutes. The frittata should puff up, and a toothpick should come out clean when inserted in the center. Once it's done, remove it from the oven and let it cool for a few minutes. Cut it into wedges and garnish with fresh herbs like basil or parsley. This adds a nice touch! Enjoy your cheesy veggie frittata as a tasty meal or snack. For the detailed recipe, check the Full Recipe section. To make your frittata fluffy, use fresh eggs. They help create a light texture. Whisk the eggs well with milk. This adds air and makes it rise. Avoid overcooking the frittata. If you cook it too long, it gets rubbery. Cook on medium heat and watch closely. Remove it from the oven when a toothpick comes out clean. Use fresh herbs like basil or parsley for bright flavor. They add a nice touch to your frittata. You can also try spices like paprika or garlic powder. These spices add depth and warmth. For cheese, mix it up! Use a blend of cheddar and mozzarella for creaminess. You can also try feta for a tangy twist. Adjust the cheese to match your taste. Use a good oven-safe skillet. Cast iron or non-stick works well. These skillets help cook evenly and make serving easy. Make sure your baking dish is oven-safe. This is key for a well-cooked frittata. If you don’t have an oven-safe skillet, transfer the mixture to a baking dish before baking. {{image_2}} You can easily swap ingredients in your frittata. If you want a twist, try using zucchini or mushrooms instead of bell peppers. Both add great texture and taste. You can also mix in other veggies, like broccoli or kale, depending on what you have at home. For cheese, consider using feta or goat cheese if you want something different. These cheeses offer a tangy taste that pairs well with the veggies. Feel free to mix different cheeses to find your favorite blend. Making your frittata vegan is simple! Replace the eggs with a mixture of silken tofu and a bit of turmeric for color. You can still add your favorite veggies and seasonings. For a vegetarian option, stick to the original recipe, but skip the cheese or use a dairy-free version. If you're watching carbs, you can skip the milk and use fewer starchy veggies. Focus on spinach, bell peppers, and tomatoes. This keeps your frittata light and healthy. Pair your frittata with fresh fruit or a light salad for a complete meal. A side of mixed greens adds nice crunch and flavor. You can also enjoy it with whole-grain toast for some extra fiber. If you’re busy during the week, this frittata is a great meal prep option. Cut it into wedges and store them in the fridge. You can quickly reheat a slice for breakfast or lunch. For more ideas, check the Full Recipe. To store leftovers, place the frittata in an airtight container. This keeps it fresh longer. You can keep it in the fridge for up to four days. Make sure to let it cool down first before sealing it. For reheating, you can use the microwave or the oven. If using a microwave, heat it in short bursts. Start with 30 seconds, then check if it's warm. For the oven, preheat it to 350°F (175°C). Place the frittata in an oven-safe dish for about 10-15 minutes. This gives it a nice texture. For meal prep, slice the frittata into portions. Store each piece separately for easy access. This way, you can enjoy it throughout the week. You can freeze portions of the frittata, too. Wrap each slice tightly in plastic wrap, then place them in a freezer bag. It can last up to three months in the freezer. When you’re ready to eat, thaw it in the fridge overnight. For cooking, reheat it in the oven at 350°F (175°C) until it’s hot all the way through. Enjoy your cheesy veggie frittata anytime! For the full recipe, check out the [Full Recipe]. A frittata can last about 3 to 4 days in the fridge. To store it, place it in an airtight container. This keeps it fresh and safe to eat. Check for signs of spoilage, like a sour smell or mold. If you see these, toss it out. Yes, you can make a frittata ahead of time. It’s great for meal prep! Cool it down fully before storing. You can slice it into wedges for easy serving. Keep it in an airtight container in the fridge. Reheat it quickly in the oven or microwave. A frittata and an omelet differ mainly in how you make them. A frittata cooks slowly in the oven and has a thicker texture. You mix in the veggies and cheese before cooking. An omelet cooks faster in a pan and is usually folded. Its texture is softer and thinner. Both are tasty, but they have unique styles! Making a cheesy veggie frittata is simple and fun. You need basic ingredients like eggs, fresh veggies, and cheese. Follow the steps to whip it up and achieve the perfect texture using my tips. You can even swap ingredients for variety or adapt it to fit your diet. Store leftovers correctly, and enjoy them later! With these ideas, you can impress anyone with your cooking skills. Your next meal can be both delicious and satisfying!

Cheesy Veggie Frittata Simple and Tasty Recipe

Looking for a delicious meal that’s quick and easy? Try my Cheesy Veggie Frittata! Packed with fresh veggies and gooey

- 250g fresh okra (bhindi), washed and dried - 3 tablespoons chickpea flour (besan) - 1 teaspoon rice flour (for extra crispiness) - 1 teaspoon red chili powder - 1/2 teaspoon turmeric powder - 1 teaspoon cumin powder - Salt, to taste - 2 tablespoons oil (for shallow frying) - Fresh coriander leaves, chopped (for garnish) Choosing fresh okra: Look for firm, bright green pods. Avoid any that are too soft or blemished. Fresh okra ensures the best taste and texture. Alternative flours for crispiness: You can mix other flours like cornmeal or all-purpose flour for a different crunch. Experimenting helps you find your perfect blend. Adjusting spices for flavor balance: You can change the spice levels. Add more chili for heat or reduce it for milder taste. Always taste as you go to find your sweet spot. When you gather these ingredients, you set the stage for a delicious crispy bhindi okra fry. Each ingredient plays a role in making this dish simple yet full of flavor. For the full recipe, check out the details above. Enjoy your cooking! - Wash the okra well. Use cold water to remove any dirt. - Dry the okra completely with a kitchen towel. This step helps keep the fry crispy. - Trim the ends of the okra using a sharp knife. - Cut the okra into 1-inch pieces. Place them in a mixing bowl. - In another bowl, mix chickpea flour, rice flour, red chili powder, turmeric powder, cumin powder, and salt. This spice mix adds flavor. - Sprinkle the spice mix over the chopped okra. Toss gently until each piece is coated. - Heat oil in a frying pan over medium-high heat. Ensure the oil is hot before adding okra. - Carefully add the coated okra in batches. Do not overcrowd the pan. Fry until golden brown, about 3-4 minutes per side. - Use a slotted spoon to remove the fried okra. Drain them on a paper towel to remove excess oil. - Continue to fry the remaining okra until all are crispy and golden brown. For the full recipe, follow each step closely to enjoy this simple and flavorful delight! To get crispy bhindi okra fry, start with moisture-free okra. Wet okra turns soggy, so dry it well. I always pat it with a towel after washing. This makes a big difference. Next, use rice flour. It coats the okra and adds extra crunch. I mix it with chickpea flour for the best result. When serving, use a colorful bowl. It makes the dish pop! I love pairing this fry with tangy tamarind chutney. The dip brings out the flavors nicely. You can also serve it with yogurt or a spicy salsa. Fresh coriander on top adds a nice touch, too. Heat is key! Use medium-high heat for frying. This helps the okra fry quickly and evenly. I like to fry in small batches. This prevents overcrowding and ensures crispiness. If you have leftovers, store them in an airtight container. They stay best in the fridge. To reheat, use an oven or air fryer. This keeps them crispy. For the full recipe, check out the details above. {{image_2}} You can easily change the flavor of crispy bhindi okra fry by adding different spices. Try using garam masala for a warm touch. You can also mix in some chaat masala for a tangy kick. Adding herbs like fresh mint or curry leaves can make the dish even more vibrant. Just remember to adjust the amounts to match your taste. If you want a healthier version, consider oven-baking instead of frying. Preheat your oven to 400°F (200°C). Spread the coated okra on a baking sheet. Bake for about 20-25 minutes, turning halfway through. This method uses less oil, making it a lighter option. You can also use an air fryer for a crispy result with even less oil. Crispy bhindi fry has many global versions. The Indian-style bhindi fry stays true to the spices and flavors of the region. You can also find southern US-style fried okra, which often features cornmeal for a crunchy texture. Each style highlights okra's versatility and unique taste. For more details and a complete recipe, check the [Full Recipe]. To keep your crispy bhindi okra fry fresh, use airtight containers. Glass or plastic containers work well. Place leftovers in the fridge within two hours of cooking. They can last up to three days. Always label your container with the date. This helps you track freshness. When reheating, the oven is your best friend. Preheat it to 350°F (175°C). Spread the okra on a baking sheet. Heat them for about 10 minutes. This keeps them crispy. If using a microwave, place the okra on a plate. Heat in short bursts of 30 seconds. Check often to avoid sogginess. You can freeze uncooked okra for later use. Wash and dry the okra, then cut it. Spread the pieces on a baking sheet. Freeze them for about an hour. Once frozen, store them in a freezer bag. To cook, thaw the okra in the fridge overnight. Then coat and fry as usual. To make crispy bhindi okra fry, start by drying the okra well. Moisture makes it soggy. Cut the okra into 1-inch pieces. Coat them with a mix of chickpea flour and rice flour. Rice flour adds extra crispiness. Heat oil until hot before frying. Fry in small batches to keep them crispy. Yes, you can use frozen okra. However, you should thaw it first. Drain the water and pat it dry. Frozen okra has more moisture, so drying is crucial. Use the same spice mix and frying steps as fresh okra. Crispy bhindi okra fry pairs well with many dishes. Serve it with rice or flatbreads. You can also add a side of yogurt or a tangy chutney. This adds flavor and balance. For a colorful plate, add a salad or pickles. In this post, we shared how to make crispy bhindi fry using fresh okra. You learned about the key ingredients and preparation steps for great flavor and texture. By following tips to achieve crispiness and variations for a unique twist, you can enjoy this dish in many ways. Finally, storing and reheating your leftovers keeps the crunch intact. Enjoy making and sharing this delicious treat with family and friends!

Crispy Bhindi Okra Fry Simple and Flavorful Delight

Are you ready to elevate your snack game? Crispy Bhindi Okra Fry is a simple, tasty delight that you can

- 2 ripe avocados, diced - 1 large cucumber, thinly sliced - 1 cup cherry tomatoes, halved - 1 small red onion, finely chopped - 1/4 cup fresh cilantro, chopped - 2 tablespoons lime juice - 1 tablespoon olive oil - 1 teaspoon honey (optional) - Salt and pepper to taste When you measure your ingredients, be precise. Use a dry measuring cup for solids and a liquid measuring cup for liquids. A kitchen scale can also help for accuracy. For example, 1 avocado should weigh about 7 ounces. This helps ensure your salad has the right balance of flavors. To choose ripe avocados, look for ones that yield slightly to pressure. A ripe avocado should feel soft but not mushy. Avoid any with dark spots or blemishes. For cucumbers, choose a firm, shiny one. English cucumbers are great for salads as they have fewer seeds and a thin skin. Regular cucumbers work too, but peel them if the skin is too thick. These tips will help you pick the best ingredients for your Avocado Lime Cucumber Salad. You can find the full recipe in the earlier section. To make this salad, start by gathering your ingredients. You need: - 2 ripe avocados, diced - 1 large cucumber, thinly sliced - 1 cup cherry tomatoes, halved - 1 small red onion, finely chopped - 1/4 cup fresh cilantro, chopped - 2 tablespoons lime juice - 1 tablespoon olive oil - 1 teaspoon honey (optional) - Salt and pepper to taste First, take a large mixing bowl. Add the diced avocados, sliced cucumber, halved cherry tomatoes, and chopped red onion. This mixture gives a fresh base for your salad. Next, make the dressing. In a small bowl, whisk together the lime juice, olive oil, and honey if you like a hint of sweetness. This dressing adds a nice tangy flavor. Once mixed, drizzle the dressing over the salad ingredients. Now, gently toss everything together. Be careful not to mash the avocados. They should stay chunky for the best texture. Finally, stir in the chopped cilantro. Add salt and pepper to taste. Let the salad sit for about five minutes. This resting time helps the flavors to blend nicely. You can serve it chilled or at room temperature. When it comes to tossing the salad, use a light touch. I like to use a large spoon and gently lift the ingredients. This method keeps the avocado pieces intact. You want the salad to look fresh and vibrant, not a mushy mess. This salad tastes great at different temperatures. You can serve it chilled or at room temperature. I recommend presenting the salad in a large bowl or in individual servings. For a pretty touch, garnish with extra cilantro leaves and a lime wedge on the side. This adds color and makes it look appetizing. For more details on making this salad, check the Full Recipe. To make your Avocado Lime Cucumber Salad even zestier, consider adjusting the lime juice. Add a splash more for a brighter taste. You can also include some zest from the lime. This adds a strong citrus flavor. For fresh herbs, try adding dill or mint. Both herbs work well and can change the flavor profile. You might also sprinkle in some chili flakes for a spicy kick. This will give your salad an exciting twist! One common issue is browning avocados. To prevent this, use lime juice right away. The acid in lime juice slows down the browning. You can also keep the pit in the salad until serving. It helps to keep the other avocados green longer. Another mistake is overmixing the salad. Gently toss the ingredients to keep the avocados intact. If you mash them, your salad will look mushy. Remember to mix just enough to combine the flavors. If you want to prep ahead, do so carefully. Chop the cucumber, tomatoes, and onion early, but wait to add the avocado. Add it just before serving to keep it fresh. The salad tastes best within a few hours of making it. If you want to serve it later, cover it tightly with plastic wrap. This helps prevent the avocados from browning. Enjoy your fresh, zesty delight with every bite! For more details, check the Full Recipe. {{image_2}} You can make this salad more filling by adding protein. Here are some great options: - Grilled chicken: Slice cooked chicken breast and toss it in. - Shrimp: Cook shrimp on the grill or pan-fry them. Add them whole to your salad. - Beans: Black beans or chickpeas add a hearty touch. Rinse and mix them in. These additions help you turn your salad into a meal. They also boost flavor and texture. If you can't find some ingredients, don't worry! Here are some substitutes: - Cucumber: You can use zucchini for a different crunch. - Cilantro: If you dislike cilantro, parsley works just as well. - Cherry tomatoes: Regular tomatoes, diced small, are a fine swap. Feel free to play with these options. Each change can lead to a new favorite version of the salad. While the lime dressing is tasty, you can try other flavors too. Here are a couple of ideas: - Creamy avocado dressing: Blend an avocado with lime juice and yogurt for a smooth mix. - Spicy vinaigrette: Add chili flakes to olive oil and lime juice for a spicy kick. These dressings add variety and can match your mood. Explore different flavors to keep things fresh. If you want the original recipe, check the Full Recipe section. To keep your Avocado Lime Cucumber Salad fresh, store it in a sealed container. Use an airtight container to prevent air from getting in. If you have leftover salad, add a bit of lime juice on top. This helps stop the avocados from turning brown. Always keep the salad in the fridge if you're not eating it right away. This salad stays fresh in the refrigerator for about 1 to 2 days. The avocados may brown after that, but they are still safe to eat. If you notice browning, just remove the top layer of the salad. The flavors will still be good for a short time after that. I do not recommend freezing the salad as a whole. Freezing changes the texture of avocados and cucumbers. However, you can freeze some of the ingredients. For example, you can freeze diced avocados or chopped cilantro. Place them in freezer bags and squeeze out extra air. Use them in smoothies or other dishes later. To pick the best avocados, feel them gently. They should have a slight give when pressed. Look for avocados with dark skin. Avoid any with large dark spots or bruises. If they are hard, they are not ripe yet. You can ripen them at home by placing them in a paper bag for a day or two. Yes, you can prep this salad ahead of time. However, I recommend adding the avocado just before serving. If you make it overnight, the salad may lose some freshness. The lime juice helps slow browning, but avocados can still get mushy. If you want to make it early, store it in an airtight container. If you need a substitute for lime juice, try lemon juice. It has a similar tangy flavor. You can also use orange juice for a sweeter taste. Grapefruit juice works too if you want a more unique twist. Each option adds its own flavor, so feel free to experiment! This blog post covered the key ingredients and steps to make a fresh salad. We explored how to select ripe avocados and the best cucumber types. I shared tips for preparing, assembling, and serving the salad, plus ways to enhance flavors. Don't forget about making variations and proper storage tips to keep your salad fresh. With these ideas, you can enjoy a tasty salad any time. Start experimenting with your own twists and share the joy of healthy eating!

Avocado Lime Cucumber Salad Fresh and Zesty Delight

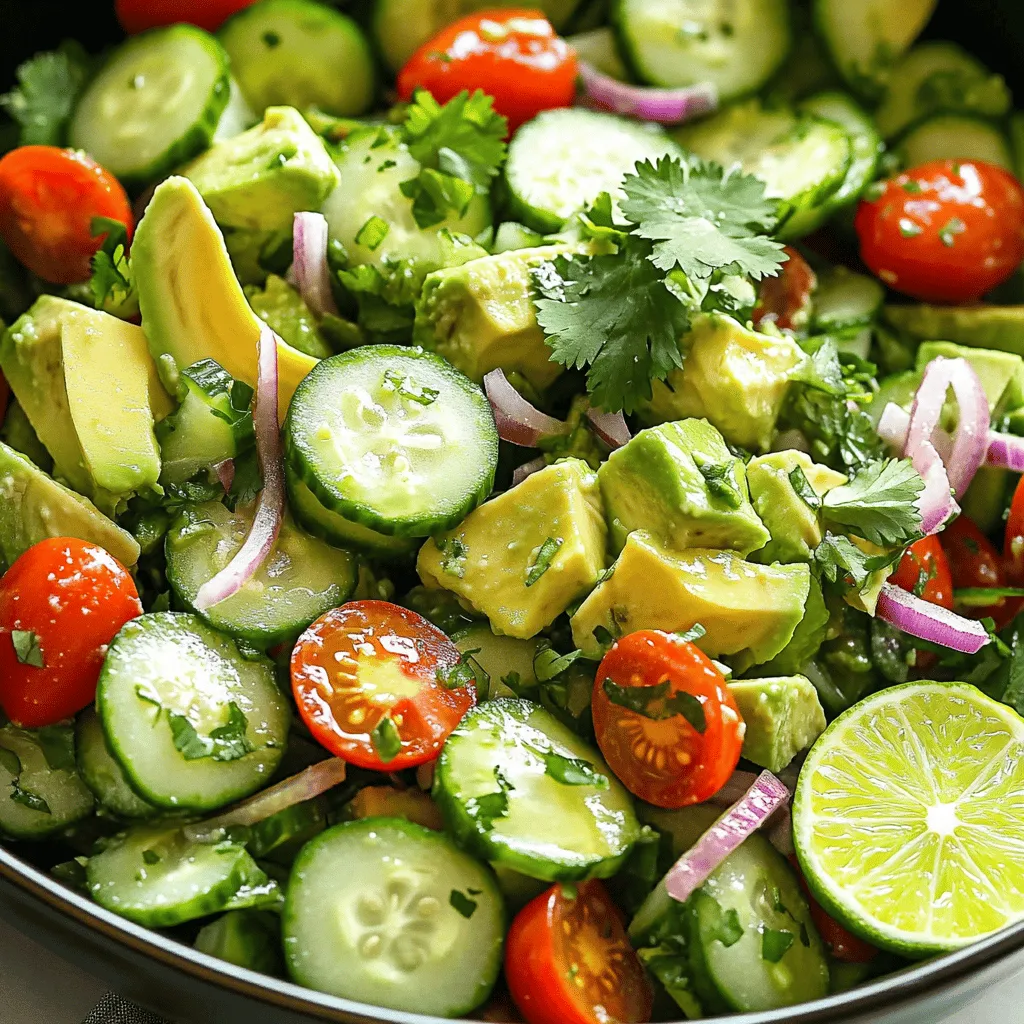
Looking for a refreshing dish that bursts with flavor? This Avocado Lime Cucumber Salad is the answer! With creamy avocados,

To make a tasty Zucchini Banana Bread, you need some simple ingredients. Here’s what you will need: - 1 cup mashed ripe bananas (about 2 to 3 bananas) - 1 cup grated zucchini (excess water squeezed out) - 1/3 cup melted coconut oil - 1/2 cup brown sugar - 1/4 cup granulated sugar - 1 large egg - 1 teaspoon vanilla extract - 1 1/2 cups all-purpose flour - 1 teaspoon baking soda - 1/2 teaspoon baking powder - 1/2 teaspoon cinnamon - 1/4 teaspoon nutmeg - 1/4 teaspoon salt - 1/2 cup chopped walnuts or pecans (optional) These ingredients mix well to create a moist and flavorful loaf. The bananas add sweetness while the zucchini keeps the bread soft. You can make this bread even better with some fun add-ins. Here are some ideas: - Chocolate chips for a sweet touch - Dried fruits like cranberries or raisins - Shredded coconut for a tropical twist - More spices like ginger or cardamom These add-ins can bring new flavors to your bread. Try different combinations to find your favorite! If you don’t have an ingredient, don’t worry! Here are some easy swaps: - Use applesauce instead of oil for a lower-fat option. - Swap granulated sugar with honey or maple syrup. - Replace all-purpose flour with whole wheat flour for added fiber. These substitutions can help fit your diet or what you have on hand. Experiment to see what works best for you! For the full recipe, check out the Zesty Zucchini Banana Bread 🥒 section. Start by preheating your oven to 350°F (175°C). This helps the bread bake evenly. Next, take a 9x5-inch loaf pan. Grease it or line it with parchment paper. This makes it easy to remove the bread later. In a large bowl, mix the melted coconut oil, brown sugar, and granulated sugar until well blended. It should look smooth. Now, add the mashed bananas, grated zucchini, egg, and vanilla extract. Mix these until they are smooth and combined. In a separate bowl, whisk together the flour, baking soda, baking powder, cinnamon, nutmeg, and salt. This helps to evenly distribute the dry ingredients. Gradually add this mixture to the wet ingredients. Stir gently until just combined. Be careful not to overmix, as this can make the bread tough. If you want, fold in chopped walnuts or pecans for extra crunch. Pour the batter into your prepared loaf pan. Smooth the top with a spatula to make it even. Place the pan in the oven and bake for 55 to 65 minutes. To check if it’s done, insert a toothpick into the center. If it comes out clean, your bread is ready. Once baked, remove the pan from the oven. Let the bread cool in the pan for about 10 minutes. After that, transfer it to a wire rack to cool completely. This step is important to keep your bread from getting soggy. To tell if your zucchini banana bread is done, use the toothpick test. If the toothpick comes out with moist crumbs, it's fine. If it has wet batter, bake a bit longer. You can also gently press the top of the bread. If it springs back, it's ready. Keep an eye on the time, but also trust your senses. The aroma of the bread will fill your kitchen. It will smell sweet and warm, which is a good sign. Enjoy the process, and remember, the goal is a flavorful, moist loaf. For the complete recipe, check out the Full Recipe. To get the best moist zucchini banana bread, I have some key tips. First, use ripe bananas. The darker the peel, the sweeter the flavor. Second, squeeze out excess water from the grated zucchini. Too much water can make the bread soggy. Mix the wet and dry ingredients gently. Overmixing can lead to a dense loaf. Lastly, try adding chopped nuts for crunch. They add texture and taste. To keep your zucchini banana bread fresh, store it in an airtight container. This helps retain moisture and flavor. You can also wrap it tightly in plastic wrap. If you have leftovers, it can stay at room temperature for about three days. For longer storage, freeze slices. Place parchment paper between each slice to make thawing easy. Just wrap the whole thing in foil or a freezer bag. Avoid these common mistakes for perfect zucchini banana bread. Do not skip the squeezing of the zucchini; it’s essential. Using too little banana can also affect the taste. Be careful not to overbake; check doneness with a toothpick. If it comes out clean, it's done. Lastly, let the bread cool completely before slicing. This helps it hold its shape better. For full details on the recipe, check the Full Recipe. {{image_2}} You can make your zucchini banana bread even better by adding chocolate chips. Just fold in about 1 cup of semi-sweet chocolate chips into the batter before pouring it into the loaf pan. The rich chocolate flavor pairs perfectly with the sweetness of bananas and the moistness of zucchini. You’ll get bites of gooey chocolate in every slice, which kids and adults love. If you need a gluten-free version, swap the all-purpose flour with a gluten-free flour blend. Be sure to check that your blend contains xanthan gum, which helps with texture. This change keeps the bread moist and fluffy. You might also try almond flour for a nutty flavor. Just remember to adjust the baking time, as gluten-free bread can cook faster. To make this recipe vegan, replace the egg with a flax egg. Mix 1 tablespoon of ground flaxseed with 2.5 tablespoons of water. Let it sit for a few minutes until it thickens. You can also use plant-based yogurt instead of coconut oil. This keeps the bread moist and adds a nice flavor. Enjoy the same great taste while sticking to your vegan diet! For the full recipe, check out the details above. Store your zucchini banana bread in an airtight container. This keeps it fresh and moist. You can place it at room temperature for up to three days. If you want to keep it longer, consider refrigeration. Just remember, cold air can dry it out, so wrap it well in plastic wrap. Freezing is a great option if you have leftovers. Let the bread cool completely first. Then, slice it or keep it whole. Wrap it tightly in plastic wrap and then in aluminum foil. This helps prevent freezer burn. You can freeze it for up to three months. When ready to enjoy, thaw it in the fridge overnight. If your bread gets stale, don’t worry! You can bring it back to life. Wrap it in a damp paper towel and microwave it for about 10-15 seconds. This adds moisture back into the bread. Alternatively, you can lightly toast slices in a pan. This gives them a nice warm crunch without drying them out. For more delicious ideas, check out the Full Recipe. Yes, you can use frozen zucchini. Just make sure to thaw it first. Squeeze out any extra water before adding it to the mix. This step helps keep the bread from getting soggy. You can check for doneness by inserting a toothpick into the center. If it comes out clean, the bread is ready. If it has wet batter on it, bake for a few more minutes. Keep an eye on the bread as it bakes. Store your zucchini banana bread in an airtight container. You can keep it at room temperature for a few days. If you need to store it longer, wrap it in plastic wrap and put it in the fridge. This will help keep it moist. Zucchini banana bread blends unique flavors into a tasty treat. We covered key ingredients, step-by-step instructions, and helpful tips. Explore variations like chocolate chip or vegan options to make it yours. Proper storage keeps it fresh, while knowing doneness ensures a perfect bake. Remember to avoid common mistakes for the best results. Enjoy your baking journey and savor your delicious creation!

Zucchini Banana Bread Flavorful and Moist Recipe

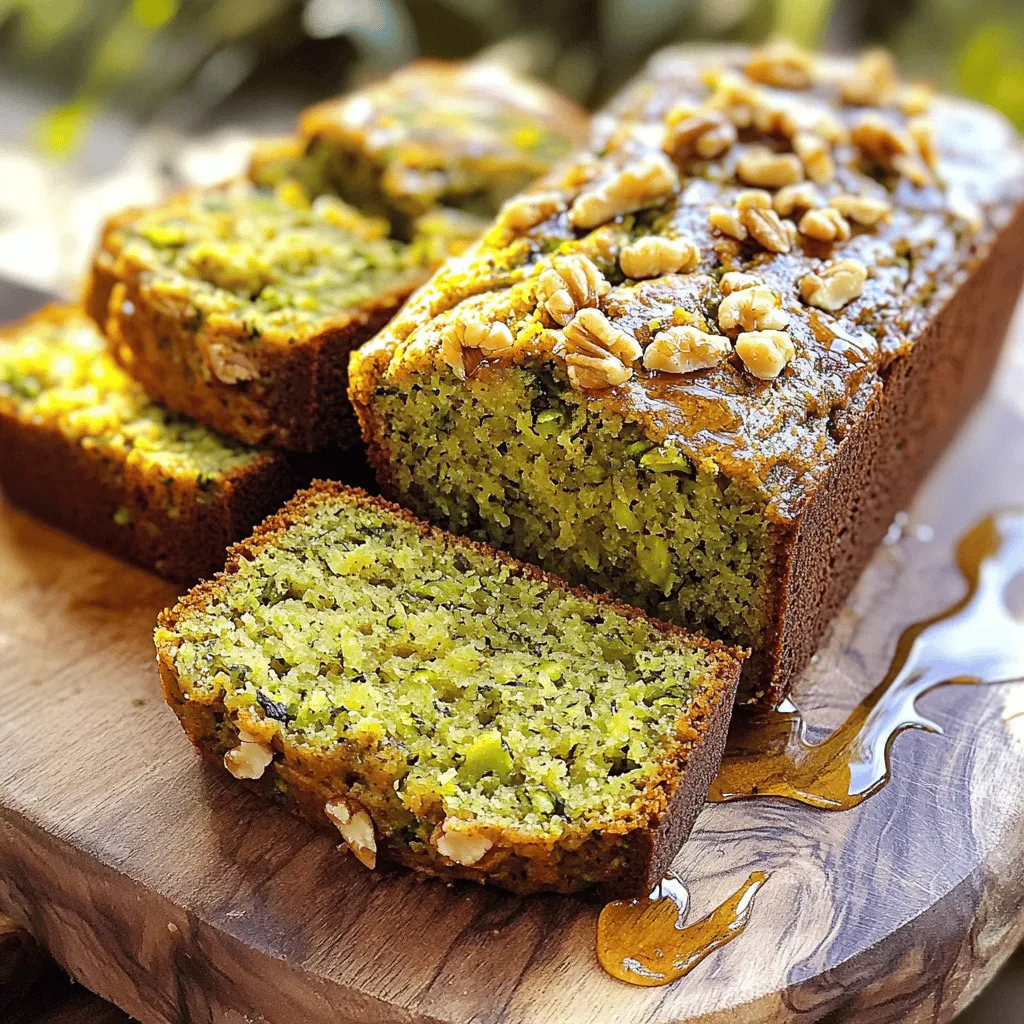
Do you love warm, fresh bread that bursts with flavor? You’re in the right spot! This Zucchini Banana Bread recipe

To make crunchy spiced pickled okra, gather these key ingredients: - 1 pound fresh okra, rinsed and trimmed - 2 cups water - 1 cup apple cider vinegar - 2 tablespoons sea salt - 2 tablespoons sugar - 4 cloves garlic, smashed These ingredients form the base of the brine. Fresh okra is vital for that perfect crunch. Choose bright green pods, as they hold their shape well during pickling. Next, you’ll need these essential spices: - 1 teaspoon black peppercorns - 1 teaspoon mustard seeds - 1 teaspoon coriander seeds - 1 red chili pepper (whole) These spices enhance the flavor of your pickled okra. Black peppercorns add warmth, while mustard seeds give a nice bite. The red chili pepper brings a hint of heat. For an extra layer of flavor, consider adding: - 1/2 teaspoon smoked paprika (optional for a smoky touch) Smoked paprika can transform the taste. It adds a subtle smokiness that pairs well with the okra's natural sweetness. Feel free to experiment with other spices too, like dill or thyme, to create your unique flavor profile. For the full instructions, check the Full Recipe section! To start, gather your ingredients. You need water, apple cider vinegar, sea salt, and sugar. In a saucepan, mix these four items. Heat the mixture over medium-high heat. Stir until the salt and sugar dissolve. Once dissolved, remove it from the heat. Allow the brine to cool slightly. This brine gives the okra a tasty flavor. While the brine cools, focus on your jars. You need to make sure they are clean. Place the jars in a large pot of water. Boil them for about 10 minutes. This step kills any germs. Sterilizing jars helps your pickles stay fresh longer. After boiling, let the jars cool before you use them. Next, prepare the spices. In each sterilized jar, place smashed garlic, black peppercorns, mustard seeds, coriander seeds, and a whole red chili pepper. If you like a smoky flavor, add smoked paprika. After adding spices, pack your trimmed okra into the jars. Stand the okra upright for the best look and taste. Now, it’s time to add the brine. Carefully pour the warm brine into each jar. Make sure the okra is fully submerged. Leave about 1/2 inch of space at the top. This space is important for sealing. Next, wipe the rims of the jars with a clean cloth. This step ensures a good seal. Seal the jars tightly with lids. Let them cool to room temperature. Once cool, place the jars in the refrigerator. For the best taste, allow the okra to pickle for at least 48 hours. Enjoy your crunchy spiced pickled okra! Check out the Full Recipe for more details. Pickling okra is fun and easy. Here are some best practices to ensure great results: - Choose Fresh Okra: Select firm and vibrant okra pods. Fresh okra gives the best flavor and crunch. - Use Sterilized Jars: Always sterilize your jars before packing them. This helps keep the okra safe and tasty. - Follow the Recipe: Stick to your chosen recipe. This ensures the right balance of flavors. Crunchiness is key for pickled okra. Here are my top tips: - Use Young Pods: Smaller, younger okra pods are crunchier. They have a firmer texture than larger ones. - Cool Brine: Pour the brine over the okra while it's warm but not boiling. This helps keep the crunch. - Don’t Overpack: Don't pack the jars too tightly. This allows for good brine circulation and keeps the okra crisp. Sometimes pickling doesn’t go as planned. Here’s how to fix common issues: - Soft Okra: If your okra turns soft, it may be overcooked in the brine. Use fresh, young pods next time. - Cloudy Brine: Cloudy brine can happen when jars are not fully sterilized. Ensure you sterilize jars properly. - Flavor Too Strong: If your pickles are too tangy, reduce the vinegar next time. Taste the brine before adding it to the jars. Try these tips to make your pickled okra a delight! For a full recipe and detailed steps, check out the Crunchy Spiced Pickled Okra. {{image_2}} Spicy pickled okra adds a kick to your meals. You can make it spicy by adding more red chili peppers or using jalapeños. Try using different spices like cayenne pepper or crushed red pepper flakes. These spices will bring heat and flavor to your pickles. If you prefer sweet and sour flavors, you can adjust the sugar in the brine. Adding more sugar will create a sweet profile. You can also mix in ingredients like honey or maple syrup for a twist. Use rice vinegar for a milder taste. This creates a balance between sweet and tangy that is delightful. Store your pickled okra in clean, sterilized jars. Keep them in the refrigerator after they cool. For spicy pickled okra, let them sit for at least 48 hours. This time helps the flavors blend well. Sweet and sour versions can be enjoyed sooner, but they taste better after a week. Always check your jars for any signs of spoilage before eating. To store pickled okra, keep it in the fridge. Use clean, airtight jars. Make sure the okra stays covered with the brine. This keeps it fresh and crunchy. Pickled okra lasts about three months in the fridge. For the best taste, eat it within one month. Keep it away from heat and sunlight. The cold helps maintain its flavor and texture. Check your pickled okra for any changes. If you see mold, it’s no good. A bad smell or a cloudy brine means spoilage. If the okra feels slimy, throw it away. Always trust your senses when checking for freshness. It takes about 48 hours to pickle okra. After you pack the jars and add the brine, let them sit in the fridge. The flavors develop best after two days. You can taste them after this time to see if they suit your liking. If you want stronger flavors, let them sit longer. I do not recommend frozen okra for pickling. Frozen okra loses its crispness during freezing. Fresh okra gives you the best crunch and flavor. Use fresh okra for a delightful and crunchy bite. You can find pickled okra at many grocery stores. Look in the pickle aisle or near the canned goods. Local farmers' markets might also sell homemade pickled okra. If you want a special flavor, check online for artisanal brands. Pickled okra offers several health benefits. It is low in calories and high in fiber. This helps with digestion and keeps you feeling full. Pickled okra also contains vitamins A and C, which support your immune system. The vinegar used in pickling may help control blood sugar levels, too. In this post, we explored how to make crunchy spiced pickled okra. We covered the key ingredients and the brining process. You learned tips for getting that perfect crunch. We discussed variations to suit your taste and how to store your okra properly. Pickled okra is not just tasty; it's also healthy. Experiment with flavors to make it your own. Enjoy the process and have fun while pickling!

Pickled Okra Delightful Crunchy Flavor Guide

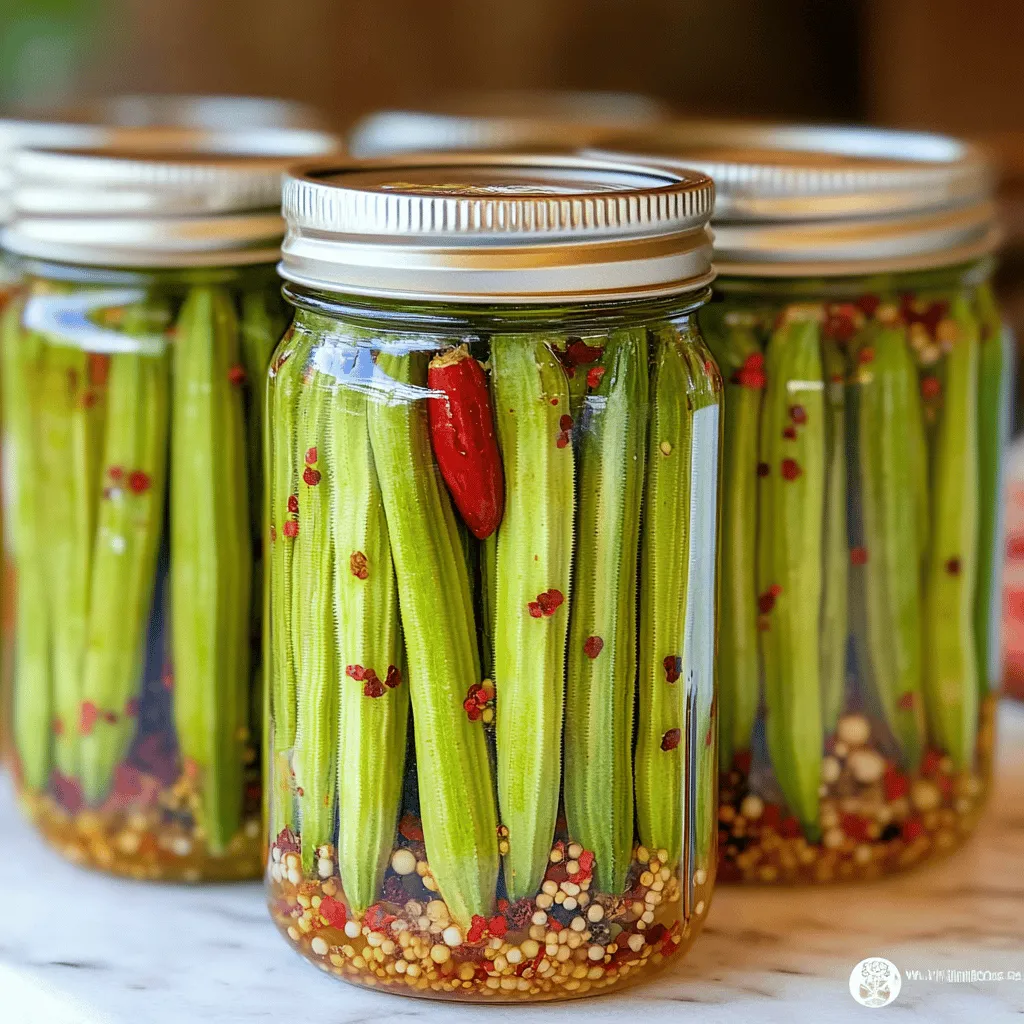
Do you want to add a zesty twist to your meals? Pickled okra offers a delightful crunch and rich flavor

- 1 pound fresh okra, sliced into ½ inch rounds - 1 cup buttermilk - 1 cup cornmeal - ½ cup all-purpose flour - 1 teaspoon garlic powder - 1 teaspoon onion powder - ½ teaspoon smoked paprika - ½ teaspoon cayenne pepper (adjust to taste) - Salt and pepper to taste - Vegetable oil for frying When you cook this crunchy fried okra, you need fresh okra. It gives the best taste and texture. Soaking it in buttermilk adds moisture and helps the coating stick. The cornmeal gives a lovely crunch. The spices like smoked paprika and cayenne pepper add flavor. - Calories per serving: About 200 calories - Macronutrient breakdown: - Carbohydrates: 30g - Proteins: 5g - Fats: 10g This dish offers a great mix of nutrients. The okra adds fiber, while the cornmeal offers carbs for energy. You can enjoy this tasty snack without guilt! 1. Soak the okra in buttermilk: Start by slicing 1 pound of fresh okra into ½ inch rounds. Place these slices in a large bowl and cover them with 1 cup of buttermilk. Let them soak for at least 30 minutes. This step helps the coating stick and adds flavor. 2. Create the coating mix: In another bowl, mix together 1 cup of cornmeal, ½ cup of all-purpose flour, 1 teaspoon of garlic powder, 1 teaspoon of onion powder, ½ teaspoon of smoked paprika, and ½ teaspoon of cayenne pepper. Add salt and pepper to taste. Stir until everything is well combined. 1. Heating the oil: Pour about 2 inches of vegetable oil into a deep skillet or frying pan. Heat the oil over medium-high heat. To check if it’s ready, drop a small amount of the coating mix into the oil. If it sizzles, the oil is hot enough. 2. Dredging and frying the okra: Remove the okra from the buttermilk and shake off any extra liquid. Dredge each piece of okra in the cornmeal mixture, coating them well. Shake off the excess and set them aside. Once the oil is ready, carefully add the coated okra to the hot oil in batches. Avoid overcrowding the pan to keep the oil hot. 3. Draining and seasoning: Fry the okra for about 3-4 minutes until they turn golden brown and crispy. Flip them halfway through cooking for even browning. Use a slotted spoon to take the okra out and drain them on paper towels. Sprinkle with additional salt while they’re hot to boost the flavor. Enjoy your crunchy fried okra snack! For the complete cooking instructions, check the Full Recipe. Soaking the sliced okra in buttermilk is key. This step helps the coating stick well. Buttermilk also adds a nice tang. I recommend soaking for at least 30 minutes. This gives the okra time to absorb the flavor and moisture. Next, let’s talk oil temperature. Heat your vegetable oil to about 350°F (175°C). You can test the heat by dropping in some coating mix. If it sizzles, you’re ready to fry. This hot oil creates that perfect crispy texture. Adding spices to your coating makes a big difference. I like to use garlic powder and onion powder for depth. Smoked paprika adds a nice smoky flavor. If you want heat, cayenne pepper is a great choice. Adjust the amount to suit your taste. For dips, try serving with ranch dressing or spicy aioli. These sauces complement the okra well. You can also explore other options, like a zesty salsa or a creamy yogurt dip. The right dip makes each bite even more enjoyable. You can find the Full Recipe for more details. Enjoy making this tasty snack! {{image_2}} You can switch up the flour for a gluten-free option. Use almond flour or rice flour. Both work well while keeping the crunch. If you want a vegan version, simply skip the buttermilk. Use a mix of plant-based milk and a bit of vinegar instead. This will mimic the tangy taste and help the coating stick. To make your fried okra even more exciting, try different spices. Add curry powder for a warm, earthy taste. Chili powder gives a nice kick. You can also mix in some cheese into the coating. Grated Parmesan or cheddar will melt slightly, adding a rich flavor. This makes each bite even more delightful! For the full recipe, check out the Crunchy Fried Okra Snack section. Enjoy experimenting with these fun variations! To keep your crunchy fried okra fresh, store it in an airtight container. Let the okra cool completely before sealing. Place it in the fridge if you plan to eat it within a few days. This method helps maintain its flavor and texture. If you want to save it longer, freezing is a great option. First, spread the fried okra on a baking sheet in a single layer. Freeze until solid, then transfer to a freezer bag. This prevents clumping and keeps it crispy when you reheat. To keep your okra crunchy when reheating, avoid the microwave. Instead, use an oven or an air fryer. Preheat your oven to 400°F (200°C). Spread the okra on a baking sheet in a single layer. Heat for about 10 minutes or until crispy. If using an air fryer, set it to 350°F (175°C). Place the okra in the basket and heat for 5-7 minutes. This method ensures your crunchy fried okra stays delicious and crispy. Enjoy every bite! Can I make crunchy fried okra in the oven? Yes, you can bake okra for a healthier option. Toss the coated okra in oil and place them on a baking sheet. Bake at 425°F for 20-25 minutes until crispy. What can I serve with crispy fried okra? Crispy fried okra pairs well with ranch dressing, spicy aioli, or a tangy remoulade. You can also enjoy it with your favorite barbecue sauce. How do I know when the okra is done frying? The okra is done when it turns golden brown. It should look crispy and feel firm to the touch. What is the best oil for frying? Vegetable oil works great for frying okra. It has a high smoke point, which helps achieve that crispy texture. You can also use canola or peanut oil. Can I use frozen okra instead of fresh? Yes, you can use frozen okra. Thaw and pat them dry before coating. However, fresh okra gives the best crunch. For the complete guide, check the Full Recipe. You learned how to prepare crispy fried okra with easy steps and tasty tips. Using simple ingredients like buttermilk and cornmeal ensures a great flavor and texture. Remember to soak the okra to get that crunch! Try different spices or dips to make it your own. Store leftovers properly for later enjoyment. Fried okra is a versatile dish that’s fun to share and eat. Explore the variations and get creative in the kitchen! Enjoy making this delicious treat!

Crunchy Fried Okra Snack Tasty and Quick Delight

Get ready for a tasty treat that you can whip up in no time! My Crunchy Fried Okra Snack is

To make the Crispy Tomato Pie, start with fresh tomatoes. You need: - 2 cups fresh tomatoes, sliced - 1 cup fresh basil leaves, chopped Fresh tomatoes give the pie a bright flavor. Use ripe, juicy ones for the best taste. Basil adds a nice herbal note and freshness. Cheese plays a big role in this dish. For this recipe, you will use: - 1 cup shredded mozzarella cheese - ½ cup crumbled feta cheese Mozzarella melts beautifully, creating a creamy texture. Feta adds a salty kick that balances the sweetness of the tomatoes. You can mix different cheeses too, if you like. The dry mix is the base of the pie. Gather these items: - 1 cup flour - ½ cup cornmeal - 1 teaspoon baking powder - ½ teaspoon salt - ½ teaspoon black pepper - 1 tablespoon garlic powder - Zest of 1 lemon This blend gives the pie its crispy crust. The cornmeal adds crunch, while the garlic and lemon zest enhance the overall flavor. Don't forget to whisk them well to combine! For the full recipe, follow the detailed steps and enjoy making this delightful dish. First, set your oven to 400°F (200°C). This heat helps make the crust crispy. Grease a 9-inch pie dish or a cast-iron skillet with olive oil. This step stops the pie from sticking. In a mixing bowl, combine flour, cornmeal, baking powder, salt, black pepper, and garlic powder. Use a whisk to blend these dry ingredients well. This mix gives the pie a great base. Take another bowl, and mix olive oil, buttermilk, and lemon zest. Stir until these wet ingredients blend smoothly together. This mix adds moisture and flavor to the pie. Slowly pour the wet mix into the bowl with dry ingredients. Stir until just combined. The batter will be thick and lumpy. Spread this batter evenly in the prepared dish. Smooth the top with a spatula. Now, layer the sliced tomatoes on top of the batter. Make sure the tomatoes cover the crust completely. Next, sprinkle shredded mozzarella and crumbled feta cheese over the tomatoes. Finish by adding the chopped basil. Bake in the oven for 25-30 minutes. Keep an eye on it. The crust should be golden brown, and the cheese should bubble. Once done, take the pie out and let it cool for about 10 minutes. Drizzle balsamic glaze on top just before serving to enhance the flavor. This process turns fresh ingredients into a crispy delight that you will love. For the complete recipe, check the Full Recipe section. To get a crispy crust, use a cast-iron skillet. The heat from cast iron helps crisp the bottom. Preheat the skillet in the oven before adding the batter. This step gives the crust a good start. Mix cornmeal into the dough for added crunch. It makes a big difference in texture. Also, don't forget to spread the batter evenly. An even layer helps it cook well. To elevate the taste, use fresh herbs like basil. I love adding lemon zest for a bright kick. You can also experiment with different cheeses. A mix of mozzarella and feta gives a nice balance. If you want extra flavor, sprinkle some red pepper flakes on top. Drizzling balsamic glaze just before serving adds a sweet touch. These little tweaks make the pie pop with flavor. One common mistake is using too many wet ingredients. This can make the crust soggy. Stick to the right amounts in the recipe. Another mistake is not letting the pie cool before slicing. If you cut too soon, it may fall apart. Lastly, avoid overcrowding the pie with toppings. Too many toppings can weigh it down. Stick to the recipe for the best results. {{image_2}} You can change the cheese in your crispy tomato pie. Try using gouda or cheddar for a bolder taste. Both melt well and add creaminess. If you want a sharp flavor, consider aged provolone. For a lighter option, use ricotta or cottage cheese. These cheeses can give a nice twist to the pie. Adding protein boosts the flavor and makes the dish heartier. Cooked bacon or sausage crumbles work great. They add a smoky taste that pairs well with tomatoes. If you prefer a healthier option, try cooked chicken or turkey. For a vegetarian choice, add chickpeas or lentils. These options can make your pie more filling. Herbs and spices can change the flavor profile of your pie. Instead of basil, use oregano or thyme for a different taste. These herbs bring their own unique flavors to the dish. You can also add a pinch of red pepper flakes for some heat. Experiment with fresh herbs like parsley or dill to find your favorite combination. Store any leftover crispy tomato pie in an airtight container. Place it in the fridge. This keeps it fresh for about 3 to 4 days. If you want to keep it longer, consider freezing it. You can freeze crispy tomato pie for up to 3 months. First, let it cool completely. Wrap it tightly in plastic wrap, then in aluminum foil. This prevents freezer burn. When ready to eat, you can thaw it overnight in the fridge. To reheat, preheat your oven to 350°F (175°C). Place the pie in a baking dish. Cover it with foil to keep it moist. Bake for about 20 minutes or until heated through. You can also microwave individual slices for 1 to 2 minutes. However, the oven keeps the crust crispy best. For more details, check the Full Recipe. Yes, you can use canned tomatoes. Make sure to drain them well. Canned tomatoes can add a nice, juicy flavor. However, fresh tomatoes give a better texture and taste. If you use canned, choose high-quality ones for the best flavor. Crispy Tomato Pie pairs well with many sides. Here are some ideas: - A fresh green salad - Garlic bread or breadsticks - Roasted vegetables - A light soup, like tomato or minestrone These sides bring out the dish’s flavors and add balance to your meal. Absolutely! To make this recipe gluten-free, swap the regular flour for a gluten-free blend. Many blends work well in baking. Just ensure the blend you choose can hold moisture. This way, you keep the pie’s lovely texture and taste. You learned about making a Crispy Tomato Pie, from fresh ingredients to cooking tips. We covered the best cheese choices and how to craft the perfect crust. I shared ways to add flavor and avoid mistakes. You can also explore variations and storage options for leftovers. Remember, follow the steps closely for great results. Enjoy your cooking journey and share this pie with family and friends!

Crispy Tomato Pie Flavorful Comfort Food Recipe

If you’re craving a dish that blends rich flavors with crispy goodness, you’ve found it! My Crispy Tomato Pie is

- 1 cup fresh or dried figs, chopped - 1/2 cup unsalted butter, softened - 1 cup granulated sugar - 1/4 cup honey - 1 1/2 cups all-purpose flour - 1 teaspoon baking powder - 1/2 teaspoon baking soda - 1/4 teaspoon salt - 1/2 cup ground almonds - 2 large eggs - 1 teaspoon vanilla extract - 1/2 cup buttermilk - Sliced figs and slivered almonds for garnish In this fig cake, the main ingredients form a rich base. Fresh or dried figs bring sweetness. Unsalted butter adds creaminess. Granulated sugar and honey blend for a sweet depth. The dry ingredients mix flour, baking powder, baking soda, salt, and ground almonds. They give the cake structure and flavor. Ground almonds add a slight crunch and nutty taste. For the liquid ingredients, eggs bind the batter. Vanilla extract adds warmth. Buttermilk keeps the cake moist and soft. Garnishes like sliced figs and slivered almonds make it pretty. This cake is all about balance. Sweet figs, creamy butter, and nutty almonds come together. You can find the full recipe to guide your baking journey. Enjoy the process! - Preheat the oven: First, set your oven to 350°F (175°C). This temperature helps the cake rise and bake evenly. Grease and flour a 9-inch round cake pan or use parchment paper for easy removal. - Prepare the figs: If you use dried figs, soak them in warm water for 15 minutes. This softens them. Then chop the figs into small pieces. If you have fresh figs, simply chop them. - Creaming butter and sugars: In a large bowl, mix the softened butter, granulated sugar, and honey. Use an electric mixer to beat until the mixture is light and fluffy. This step adds air and makes the cake soft. - Incorporating eggs and vanilla: Add the eggs one at a time. Make sure each egg is mixed in well before adding the next. Then mix in the vanilla extract for flavor. - Combining dry ingredients: In another bowl, sift together the flour, baking powder, baking soda, salt, and ground almonds. This helps blend the ingredients and removes any lumps. - Mixing wet and dry ingredients: Gradually add the dry mixture to the wet mixture. Alternate this with the buttermilk. Start and finish with the dry mix. Mix gently until just combined. - Folding in figs: Carefully fold in the chopped figs. This means you should mix gently to avoid breaking the figs. You want them evenly spread in the batter. - Baking and cooling: Pour the batter into your prepared pan. Smooth the top with a spatula. Bake for 30-35 minutes. Check if it’s done by inserting a toothpick. If it comes out clean, the cake is ready. Let it cool in the pan for 10 minutes. Then transfer it to a wire rack to cool completely. For a lovely finish, top with sliced figs and slivered almonds. You can find the Full Recipe for more details on making this delicious fig cake! To get a great texture, start with the creaming technique. Use soft butter, and mix it with sugar until it is fluffy. This adds air, making your cake light. Use an electric mixer for the best results. Next, use the folding method to add figs. Gently stir the figs into your batter. This way, you keep the air in the mix. Want to boost the flavor? Add a hint of cinnamon or nutmeg. These spices pair well with figs. You can also try using maple syrup instead of honey. It gives a unique twist to the cake. If you don’t have honey, agave syrup works too. For a beautiful finish, garnish the cake with sliced figs and slivered almonds. This adds color and crunch. Serve the cake on a nice plate for a special touch. Pair it with a scoop of vanilla ice cream for a delightful dessert experience. For an extra pop, drizzle a bit of honey on top before serving. Explore the [Full Recipe] for more details and enjoy your baking! {{image_2}} Gluten-free options You can make this cake gluten-free by swapping all-purpose flour for a blend of gluten-free flour. Look for a brand that has xanthan gum. This helps mimic the texture of regular flour. Vegan substitutions To turn this cake vegan, replace the eggs with flax eggs. Use one tablespoon of ground flaxseed mixed with three tablespoons of water for each egg. You can also use almond milk instead of buttermilk. Adding citrus zest For a zesty twist, add some lemon or orange zest to the batter. This brightens the flavor and pairs well with figs and almonds. Incorporating additional nuts Feel free to add walnuts or pecans for extra crunch. Just chop them up and mix them in with the figs. This adds more texture and depth to your cake. Pairing with sauces Serve your fig cake with a drizzle of honey or a dollop of whipped cream. A fruit sauce made from pureed berries also works well. Ideal occasions for serving This cake is perfect for celebrations or casual gatherings. It shines at brunch, afternoon tea, or even as a dessert at dinner. Many people love it for its unique flavors and tender crumb. For the complete guide, check the Full Recipe to get started on this delightful treat! - Room temperature storage: Keep your fig cake at room temperature. Place it in an airtight container. It stays fresh for up to three days. - Refrigeration tips: If you want it to last longer, put it in the fridge. Wrap it tightly in plastic wrap. It can last up to a week in the fridge. - Freezing instructions: To freeze, slice the cake first. Wrap each slice in plastic wrap and then foil. Store them in a freezer-safe bag. It can stay frozen for up to three months. - Reheating guidelines: When ready to eat, let it thaw in the fridge overnight. You can warm it in the oven at 350°F (175°C) for about 10 minutes. - How long it lasts: This cake is best enjoyed fresh but can last a week in the fridge. If frozen, it stays good for three months. - Signs of spoilage: Look for mold or an off smell. If it feels dry or hard, it’s time to toss it. You can use regular milk with vinegar or lemon juice. Just add one tablespoon of vinegar to a cup of milk. Let it sit for five minutes. This creates a similar tangy taste. If you have yogurt, you can thin it with water to mimic buttermilk. Yes, dried figs work well in this recipe. They add a sweet flavor. Just soak them in warm water for about 15 minutes. This helps soften them. Then, chop them before adding to the batter. Insert a toothpick into the center of the cake. If it comes out clean, the cake is done. You can also look for a golden-brown color on top. The edges will pull away slightly from the pan. Absolutely! You can bake the cake a day ahead. Just store it in an airtight container. This keeps the cake moist and fresh. You can frost or garnish it right before serving. Serve fig cake at room temperature. Slice it into generous pieces. You can top it with extra sliced figs and slivered almonds. A dollop of whipped cream or a scoop of vanilla ice cream adds a nice touch. For the full recipe, check out the Fig Cake with Almond and Honey Delight Recipe. This post covered how to make a delicious fig cake. We discussed key ingredients, step-by-step instructions, and tips for perfect texture. You learned about dietary variations, serving suggestions, and storage options. Remember, baking is about creativity. Feel free to play with flavors and textures. Enjoy making this cake for friends and family. It’s simple and rewarding. You’ll impress everyone with your baking skills. Now, it’s time to gather your ingredients and start baking!

Fig Cake with Almond and Honey Delight Recipe

Are you ready to indulge in a delightful treat? My Fig Cake with Almond and Honey recipe combines rich flavors

To make a tasty Italian Garden Frittata, gather these simple ingredients: - 6 large eggs - 1/4 cup milk - 1 cup fresh spinach, chopped - 1/2 cup cherry tomatoes, halved - 1/2 cup bell peppers (any color), diced - 1/4 cup red onion, finely chopped - 1/2 cup feta cheese, crumbled - 1 tablespoon olive oil - Salt and pepper to taste - Fresh basil leaves for garnish Eggs are the main star in this dish. They give the frittata its rich, creamy texture. They also pack protein and nutrients. When whisked with milk, they create a fluffy base. Choose large eggs for the best results. Make sure they are fresh for great flavor. Feta cheese shines in this recipe too. Its salty tang adds depth to each bite. You can also use goat cheese or cheddar for a different taste. Each cheese gives a unique flavor twist to the frittata. You can easily swap out some ingredients based on what you have. No spinach? Use kale or Swiss chard instead. Don’t have cherry tomatoes? Any diced tomato will work well. For the cheese, if you want a stronger taste, try Parmesan or mozzarella. If you want a vegan option, use tofu instead of eggs. Blend it with milk and spices for a creamy mix. You can also add more vegetables like zucchini or mushrooms. This way, you can create your own perfect frittata. For the full recipe, check the section above. First, gather your ingredients. You will need: - 6 large eggs - 1/4 cup milk - 1 cup fresh spinach, chopped - 1/2 cup cherry tomatoes, halved - 1/2 cup bell peppers (any color), diced - 1/4 cup red onion, finely chopped - 1/2 cup feta cheese, crumbled - 1 tablespoon olive oil - Salt and pepper to taste - Fresh basil leaves for garnish Next, wash the spinach and tomatoes. Chop the spinach into small pieces. Halve the cherry tomatoes. Dice the bell peppers and red onion. Crumble the feta cheese. Set everything aside in small bowls for easy access. Now, heat the olive oil in a large oven-safe skillet over medium heat. Add the red onion and bell peppers. Cook them for about 3 to 4 minutes until they soften. Stir often to prevent burning. Then, add the chopped spinach and halved tomatoes. Cook until the spinach wilts, which takes about 2 minutes. In a large mixing bowl, whisk together the eggs, milk, salt, and pepper. Make sure it blends well. Pour this egg mixture over the cooked vegetables in the skillet. Ensure that it covers all the veggies evenly. Finally, sprinkle the crumbled feta cheese on top. Now, let the frittata cook on the stovetop for about 3 to 4 minutes. Look for the edges to start setting. After that, transfer the skillet to your preheated oven at 375°F (190°C). Bake for 15 to 20 minutes. The frittata is ready when it puffs up and a knife inserted in the center comes out clean. Once it’s done, remove the skillet from the oven. Let it cool for a few minutes. Slice the frittata into wedges. For a fresh touch, garnish with basil leaves before serving. Enjoy your Italian Garden Frittata, and check the Full Recipe for more details! To make a great frittata, focus on the eggs. Use fresh eggs for the best taste. Whisk them well with milk, salt, and pepper. This adds a light texture. Choose veggies that you love. Spinach, tomatoes, and peppers are great. Cook them just enough to soften, but keep their color. This keeps your frittata vibrant and fresh. Don’t rush the cooking. Let it cook slowly, so it puffs up nicely. Use an oven-safe pan for easy cooking. Gather a few tools to help you. Here’s a quick list: - Large mixing bowl - Whisk - Oven-safe skillet - Spatula - Knife and cutting board These tools make the process smooth. A good whisk helps mix the eggs well. An oven-safe skillet ensures even cooking. Watch out for a few common mistakes. First, don’t overcook your frittata. It should be set but still moist. Second, avoid using too many heavy ingredients. They can weigh down your frittata. Stick to a balanced mix of veggies and cheeses. Lastly, don’t skip the garnishes. Fresh herbs add flavor and make your dish pop. For more guidance, check out the Full Recipe. {{image_2}} You can make a frittata that is all veggies. Use your favorite vegetables. Try zucchini, mushrooms, or asparagus. Each brings a unique taste. You can also mix in herbs like thyme or dill. These will add fresh flavors. For a creamier texture, add extra cheese. Goat cheese or mozzarella works great. This way, you have a colorful dish that is tasty and healthy. Meat can bring a new layer of flavor to your frittata. You can add cooked bacon, sausage, or ham. These meats give a savory depth to the dish. Make sure to cook the meat first. Chop it into small pieces before adding it to the egg mix. This ensures even cooking. You can also combine meats for a heartier frittata. Chicken and bacon together create a rich taste. Take your frittata on a world tour! For a spicy kick, add chorizo and jalapeños. This makes a Mexican-inspired frittata. You can also use curry powder and peas for an Indian twist. The flavors will surprise your taste buds. If you want an Italian flair, add sun-dried tomatoes and pesto. Each of these twists gives a unique spin on the classic recipe. Try these ideas for a fun cooking adventure. For the full recipe, check out the Italian Garden Frittata. After you enjoy your frittata, let it cool down. Place any leftovers in an airtight container. Store it in the fridge. It will stay fresh for about 3 to 4 days. Make sure to label the container with the date you made it. This helps you keep track of how long it's been stored. To reheat your frittata, use the oven for best results. Preheat the oven to 350°F (175°C). Place the frittata on a baking tray. Heat for about 10-15 minutes or until warm all the way through. You can also use a microwave. Just cover it with a damp paper towel. Heat for 1-2 minutes, checking often to avoid overcooking. If you want to save your frittata for later, freezing is a great choice. First, let it cool completely. Cut the frittata into slices. Wrap each slice in plastic wrap. Then, place the wrapped slices in a freezer-safe bag. Remove as much air as possible before sealing. It can last up to 2 months in the freezer. When ready to eat, thaw it in the fridge overnight before reheating. For detailed steps, check the Full Recipe. A frittata is an Italian egg dish. It is similar to an omelet but thicker. You mix eggs with vegetables, cheese, and sometimes meat. You cook it on the stove and finish it in the oven. It is fluffy, tasty, and very filling. You can make many types of frittatas based on what you have. Yes, you can make a frittata ahead of time. It stores well in the fridge for up to three days. Just make sure to cool it completely before storing. You can reheat it in the oven or microwave. This makes it great for meal prep or brunch gatherings. Your frittata is done when it puffs up and is firm. Insert a knife into the center. If it comes out clean, your frittata is ready. The top should look slightly golden. You want it set but not dry, so watch it closely. You can serve a frittata with many sides. Fresh salad adds a nice crunch. Toast or crusty bread pairs well too. You could also serve it with fruit for a sweet touch. Enjoy it with coffee or tea for a lovely breakfast. The word "frittata" comes from Italian. It means "fried." This name reflects how you cook the dish. In Italy, frittatas are common and loved. They are often made with leftovers, making them both tasty and resourceful. For a delicious frittata recipe, check out the Full Recipe. In this article, we explored everything about frittatas. We detailed the ingredients, spotlighting key components and substitutions. You learned step-by-step instructions for preparation, cooking, and baking. I shared tips to perfect your frittata and avoid common mistakes. We also discussed variations to suit your taste and how to store leftovers properly. Frittatas are easy and fun to make. You can enjoy them any time of day. Try your favorites, get creative, and have fun cooking!

Classic Frittata Flavorful and Simple Recipe Guide

Are you ready to whip up a dish that’s both simple and packed with flavor? In this guide, I’ll take

Older posts
Newer posts
← Previous Page1 … Page57 Page58 Page59 … Page84 Next →

dsad

© 2026 Foodish Talk • Built with GeneratePress

Our Policies

  • Copyright Policy
  • Cookie Policy
  • GDPR Policy
  • Privacy Policy
  • Disclaimer
  • Terms Of Use

More Information

  • Home
  • About
  • Contact
  • Appetizers
  • Dessert
  • Dinner
  • Drinks
©2026, Foodish Talk About Back To Top