Skip to content
DisclaimerTerms Of UseGDPR PolicyCookie Policy

Foodish Talk

  • Home
  • Drinks
  • Appetizers
  • Dinner
  • Dessert
  • About
  • Contact
  • Privacy Policy
DisclaimerTerms Of UseGDPR PolicyCookie Policy

NO-ING-IMG

To make these delicious maple brown sugar blondies, you need: - 1 cup unsalted butter, melted - 1 cup brown sugar, packed - 1/2 cup granulated sugar - 1/4 cup pure maple syrup - 2 large eggs - 1 tablespoon vanilla extract - 2 cups all-purpose flour - 1 teaspoon baking powder - 1/2 teaspoon baking soda - 1/2 teaspoon salt - 1 cup chopped walnuts or pecans (optional) - 1/2 cup white chocolate chips (optional) You can swap ingredients if needed. Use coconut oil instead of butter for a dairy-free option. Use light brown sugar instead of dark for a milder taste. If you don’t have maple syrup, honey works too. You can replace all-purpose flour with gluten-free flour. This helps to make these blondies fit your needs. Feel free to customize your blondies! You can add chopped nuts for crunch. Walnuts or pecans work nicely. White chocolate chips add sweetness. For a fun twist, mix in some chocolate chips or dried fruit. You can even add spices like cinnamon for extra warmth. Each add-in gives a unique flavor to your blondies. First, preheat your oven to 350°F (175°C). This step is crucial for even baking. Next, take a 9x13 inch baking pan and line it with parchment paper. Leave some paper hanging over the sides. This helps to lift the blondies out later. In a large bowl, add 1 cup of melted unsalted butter. Then, mix in 1 cup of packed brown sugar and 1/2 cup of granulated sugar. Whisk them together until the mixture is smooth. Now, pour in 1/4 cup of pure maple syrup. Add 2 large eggs and 1 tablespoon of vanilla extract. Whisk again until creamy. In a separate bowl, whisk together 2 cups of all-purpose flour, 1 teaspoon of baking powder, 1/2 teaspoon of baking soda, and 1/2 teaspoon of salt. This mix gives your blondies structure and helps them rise. If you want extra flavor, fold in 1 cup of chopped walnuts or pecans and 1/2 cup of white chocolate chips. Gently mix them into the batter. Don’t stir too much. You want to keep it light and fluffy. Pour the batter into your prepared pan. Spread it evenly for a nice bake. Place it in the oven and bake for 25-30 minutes. The edges should be golden. A toothpick inserted into the center should come out with a few moist crumbs. Let the blondies cool for about 10 minutes in the pan. Then, use the parchment to lift them out. Cool them completely on a wire rack before cutting into squares. To get that soft, chewy texture, don't over mix the batter. Mix just until the dry and wet ingredients blend. This keeps the blondies tender. Also, make sure your butter is melted but not too hot. Hot butter can cook the eggs, which makes the texture off. For a richer flavor, use dark brown sugar instead of light brown sugar. The deeper notes will add a nice touch. You can also try adding a pinch of cinnamon or nutmeg. These spices pair well with maple and add warmth. One big mistake is not measuring the flour correctly. Too much flour makes blondies dry. Use a spoon to fluff the flour before scooping it into your measuring cup. Another mistake is skipping the parchment paper. This paper helps you lift the blondies out easily. Without it, you might end up with a messy pan. {{image_2}} You can make nut-free blondies easily. Just leave out the chopped walnuts or pecans. You will still have a soft and chewy treat. The texture remains delightful without nuts. This option is great for those with nut allergies. You can enjoy the rich flavor of maple and brown sugar. Switching sweeteners can change your blondies. Instead of brown sugar, try coconut sugar. It gives a slight caramel taste. You can also use honey or agave syrup instead of maple syrup. Each sweetener brings a unique flavor. Experiment to find your favorite blend. This adds a personal touch to your dessert. You can play with flavors in your blondies. Add chocolate chips for a sweet twist. Dark or milk chocolate both work well. You can also add spices like cinnamon or nutmeg for warmth. These spices pair nicely with maple flavor. For a fun twist, try adding espresso powder for a coffee kick. Each variation creates a new experience. Enjoy discovering new flavor profiles! To keep your blondies fresh, store them in an airtight container. Use parchment paper to separate the layers if you stack them. Blondies stay tasty for up to a week at room temperature. If you want them to last longer, refrigerate them. This helps keep the flavors strong and moist. You can freeze blondies for later enjoyment. First, let them cool completely. Then, wrap each blondie tightly in plastic wrap. Place wrapped blondies in a freezer-safe bag or container. They can stay frozen for up to three months. When you are ready to eat, just thaw them in the fridge overnight. To enjoy warm blondies, preheat your oven to 350°F (175°C). Place the blondies on a baking sheet. Heat them for about 10 minutes. You can also use the microwave. Heat individual pieces for about 15-20 seconds. This will make them soft and gooey, just like fresh out of the oven! Blondies are sweet bars made with brown sugar. They are like brownies but without cocoa. They have a rich, chewy texture and a golden color. Blondies can be made plain or with add-ins like nuts and chocolate chips. They are a great treat for any time of day. Yes, you can make these blondies vegan. Replace the eggs with flax eggs or applesauce. Use vegan butter instead of regular butter. Choose maple syrup that is vegan-friendly. This way, you can enjoy a delicious treat without animal products. You can check if blondies are done by looking at the edges. They should be golden brown. Insert a toothpick in the center. If it comes out with a few moist crumbs, they are ready. If it is wet, bake for a few more minutes. Maple brown sugar blondies pair well with vanilla ice cream. A drizzle of caramel sauce makes them even better. You can serve them with a cup of coffee or tea. Adding fresh berries can give a nice touch too. Blondies can last up to a week when stored properly. Keep them in an airtight container at room temperature. You can also freeze them for up to three months. Just make sure to wrap them well to avoid freezer burn. This blog post covered how to make delicious blondies. We discussed the key ingredients, step-by-step instructions, and tips for perfecting texture and flavor. I shared how to customize your blondies with different add-ins and variations. We also went over storage tips to keep them fresh. Remember, you can adjust the recipe to suit your taste. Whether you want them nut-free or vegan, there’s a blondie for you. Enjoy baking, and savor your treats!

Bakery-Style Maple Brown Sugar Blondies Delight

Craving a sweet treat that’s soft, chewy, and packed with flavor? My Bakery-Style Maple Brown Sugar Blondies are just what

- 1 pound gnocchi (store-bought or homemade) - 2 tablespoons olive oil - 1 medium onion, diced - 3 cloves garlic, minced - 8 ounces mushrooms, sliced (such as cremini or button) - 4 cups fresh spinach - 1 cup vegetable broth - 1 cup heavy cream - 1 cup grated Parmesan cheese - Salt and pepper - 1 teaspoon dried thyme - Fresh parsley, chopped (for garnish) - Large pot or Dutch oven - Cooking utensils Gathering the right ingredients is key to your dish’s success. Start with gnocchi, which gives a lovely texture. You can buy it or make it from scratch. The olive oil adds a rich flavor when you sauté the onion and garlic. Onions and garlic are the base of many dishes. They create a sweet and savory aroma. Next, choose fresh mushrooms. I like cremini for their deep taste, but button mushrooms work well too. Fresh spinach adds color and health benefits. It wilts down beautifully, mixing well with the creamy sauce. Use vegetable broth for a flavorful base that ties everything together. Heavy cream is what makes this dish creamy. It adds richness you will love. Finally, don’t forget the Parmesan cheese. It melts into the sauce, making it even tastier. For seasoning, keep salt and pepper on hand. They enhance all the flavors. Dried thyme brings an earthy note to the dish. For garnish, fresh parsley adds a pop of color and freshness. Make sure you have a large pot or Dutch oven for cooking. This helps everything cook evenly. You’ll also need some cooking utensils like a wooden spoon for stirring. - Heating the Oil Start by pouring two tablespoons of olive oil into a large pot. Heat it over medium heat. This oil will add flavor and help cook the onions. - Sautéing Onion and Garlic Next, chop one medium onion and three cloves of garlic. Add the onion to the pot and sauté for about three to four minutes. Wait until it starts to soften. Then, stir in the minced garlic. Cook for one more minute, until it smells great. - Adding Mushrooms Slice eight ounces of mushrooms, like cremini or button. Add them to the pot with the onions and garlic. Season with salt and pepper. Cook for five to seven minutes. The mushrooms should turn brown and release their moisture. - Seasoning to Taste While cooking, taste the mushrooms. Adjust salt and pepper as you like. The seasoning enhances the dish's rich flavor. - Incorporating Gnocchi and Broth Now, take one pound of gnocchi and stir it into the pot. Pour in one cup of vegetable broth and add one teaspoon of dried thyme. Bring everything to a gentle simmer. - Adding Heavy Cream Once simmering, lower the heat. Pour in one cup of heavy cream. Stir gently to mix everything. Let it cook for three to four minutes. The sauce will become slightly thick. - Mixing in Spinach and Cheese Finally, add four cups of fresh spinach and one cup of grated Parmesan cheese. Stir until the spinach wilts and the cheese melts. Taste again and adjust seasoning if needed. To make the sauce just right, focus on the cream. If it seems too thick, add a splash of vegetable broth. This will help you get a nice, smooth texture. If it's too thin, let it simmer a bit longer. It will thicken as it cooks. Use heavy cream for the best flavor and richness. You can also try half-and-half for a lighter option, but it won't be as creamy. To boost the taste, think about adding more seasonings. A pinch of nutmeg can add warmth. You can also add a little red pepper flakes for some heat. Fresh herbs like basil or thyme can brighten the dish. Just sprinkle them on top before serving. They will add a pop of color and flavor. Use medium heat for the best results when cooking. Start by sautéing the onion and garlic slowly. This will bring out their sweetness. When you add the mushrooms, let them cook until they are browned. This step adds depth to the dish. Be sure to check the timing. The gnocchi cooks quickly, so keep an eye on it. Stir often to prevent sticking and ensure even cooking. {{image_2}} You can easily change this dish to fit your taste. If you want a different green, try kale or arugula. Both add a nice twist while keeping the dish healthy. For cheese, Parmesan is great, but you can swap it for mozzarella or goat cheese. Each type will give the dish a unique flavor. Want to make this vegan? Use coconut cream or almond milk instead of heavy cream. You can still enjoy the creamy texture without any dairy. If you need gluten-free options, look for gluten-free gnocchi. Many stores carry it now, and it tastes just as good! Adding protein can make this dish heartier. Cooked chicken or sausage works well. Just add it when you sauté the onions. You can also toss in extra veggies. Peas or bell peppers bring color and crunch. They blend well with the mushrooms and spinach, making each bite delightful! After enjoying your One-Pot Creamy Mushroom and Spinach Gnocchi, place any leftovers in the fridge. Keep them in a sealed container to maintain freshness. Use glass or plastic containers with tight lids for the best results. This dish stays good for up to three days in the refrigerator. When you're ready to eat the leftovers, reheat them gently. The best way is to use a pot on low heat. Stir often to keep the sauce creamy. Avoid using the microwave, as it can dry out the gnocchi and make it tough. Reheat until everything is hot but be careful not to overcook it. If you want to save some gnocchi for later, freezing works well. First, let the dish cool completely. Then, place it in freezer-safe containers. You can also use freezer bags, removing as much air as possible. This method helps prevent freezer burn. The gnocchi can freeze for up to three months. To thaw, place your frozen gnocchi in the fridge overnight. When ready, reheat it slowly in a pot. Add a splash of vegetable broth or cream to revive the sauce. Stir until it’s hot throughout and enjoy your delicious meal again! Gnocchi is made from simple ingredients. The main ones include: - 1 pound gnocchi (store-bought or homemade) - Potatoes or flour (for making homemade gnocchi) - Eggs (sometimes used for binding) - Salt Gnocchi is soft and chewy. It pairs well with many sauces, making it versatile. For this dish, I use store-bought gnocchi, which saves time and effort in the kitchen. Yes, you can use frozen spinach! Here are some benefits and considerations: - Convenience: Frozen spinach is easy to store and use. It’s already washed and chopped. - Nutrition: Frozen spinach retains most of its nutrients. It can be just as healthy as fresh spinach. - Texture: Frozen spinach will be softer. It may release extra water, so adjust cooking time if needed. Using frozen spinach can make your cooking quicker and still tasty. This dish is quick to make. Here’s the breakdown: - Prep Time: 10 minutes - Cook Time: 20 minutes - Total Time: 30 minutes You can have a delicious meal ready in half an hour. This recipe is perfect for busy weeknights! This blog post covered a delicious One-Pot Creamy Mushroom and Spinach Gnocchi. We explored the main ingredients, including gnocchi, spinach, and heavy cream. I shared step-by-step instructions to help you create this tasty dish. Tips on perfecting sauce and storage advice were also included. You can now make this dish your own with various substitutions and seasoning options. Enjoy experimenting; you'll discover your favorite flavors and variations! Cooking can be fun and satisfying, especially with a simple, hearty recipe like this one.

One-Pot Creamy Mushroom and Spinach Gnocchi Delight

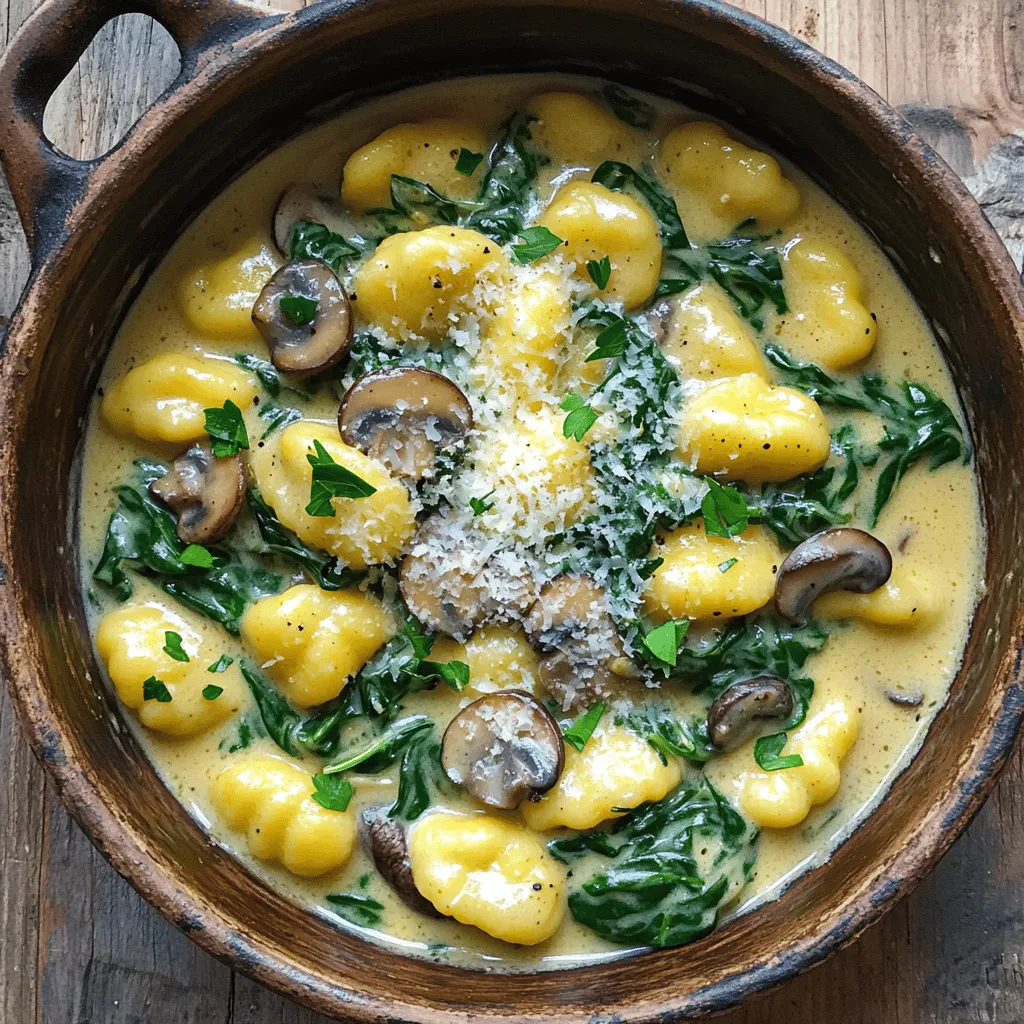
Welcome to a creamy, savory journey with my One-Pot Creamy Mushroom and Spinach Gnocchi Delight! This easy recipe brings rich

- 4 ears of corn, husked and cleaned - 1/4 cup unsalted butter, melted - 1/4 cup honey - 1 teaspoon garlic powder - 1 teaspoon smoked paprika - 1/2 teaspoon salt - 1/4 teaspoon black pepper - Fresh parsley, chopped For this recipe, you need fresh and simple ingredients. Start with four ears of corn. Make sure to husk and clean them well. Next, you need melted unsalted butter and honey. These will create a sweet and rich glaze. To add flavor, grab some garlic powder and smoked paprika. The garlic powder gives a nice kick, while the smoked paprika adds depth. You will also need salt and black pepper to enhance all the flavors. Finally, fresh parsley makes a lovely garnish. It adds color and freshness to the dish. With these ingredients, you will create a tasty treat that everyone will love! Start by preheating your air fryer to 380°F (193°C). This step takes about 5 minutes. Preheating helps cook the corn ribs evenly. Next, take your husked corn and cut each ear in half lengthwise. Then, cut each half into thirds. You will get 24 pieces, which we call corn ribs. Make sure to cut carefully to avoid any accidents. In a mixing bowl, combine 1/4 cup of melted butter, 1/4 cup of honey, 1 teaspoon of garlic powder, 1 teaspoon of smoked paprika, 1/2 teaspoon of salt, and 1/4 teaspoon of black pepper. Stir the mixture well until everything is blended nicely. This honey butter will add a sweet and savory flavor to the corn ribs. Now it’s time to coat the corn ribs. Take each rib and dip it into the honey butter mixture. Make sure they get well coated. Set aside some of the mixture for later basting. This step ensures every bite is packed with flavor. Arrange the corn ribs in a single layer in your air fryer basket. Leave some space between each rib. This space allows hot air to circulate and cook them evenly. Air fry the corn ribs at 380°F (193°C) for 10 to 12 minutes. Flip them halfway through and baste with the reserved honey butter mixture. The ribs should turn golden brown and slightly crisp. Once cooked, carefully remove the corn ribs from the air fryer. Let them cool for about a minute. For a nice finish, garnish with freshly chopped parsley. You can also drizzle any remaining honey butter over the top. Serve the corn ribs on a wooden board or a nice platter. Enjoy the sweet and savory flavors! To make sure your corn ribs cook evenly, space them well in the air fryer. This means not stacking them on top of each other. Each rib needs airflow to crisp up nicely. If you crowd the basket, some ribs will be soft while others will be crunchy. I recommend cooking in batches if you have a lot of corn ribs. You can add fun flavors to your corn ribs. Try adding chili powder for some heat or onion powder for extra taste. If you love herbs, mix in some dried oregano or thyme. You can even switch out the honey for maple syrup for a different sweetness. Be creative and find what you love! If you don’t have an air fryer, no problem! You can cook corn ribs in the oven. Preheat your oven to 400°F (200°C) and bake them on a baking sheet for about 20 minutes. Grill them on medium heat for a smoky flavor. Just watch them closely so they don’t burn. Each method gives a tasty result! {{image_2}} You can make your corn ribs sweet and spicy. Just add chili powder or cayenne pepper to the honey butter mix. Start with a small amount, like 1/4 teaspoon, and taste it. If you want more heat, add a bit more. This twist gives a nice kick to the sweet flavor. If you want a dairy-free version, that's easy too! Simply swap the unsalted butter for olive oil or vegan butter. Both options keep the ribs moist and tasty. The olive oil adds a light flavor, while vegan butter gives a creamy touch. Feel free to experiment with different glazes. Maple syrup can add a lovely sweetness. Alternatively, you can use sriracha for a spicy kick. Mix it into the honey butter or drizzle it on top after cooking. Each choice brings a unique flavor to your corn ribs. To keep your corn ribs fresh, store them in an airtight container. Place them in the fridge within two hours of cooking. They will stay good for about three days. Make sure the container is sealed tight to avoid drying out. You can also wrap them in plastic wrap before placing them in the container for extra protection. When you're ready to enjoy your leftovers, reheating is easy. Preheat your air fryer to 350°F (175°C). Place the corn ribs in the basket without overlapping. Heat them for about 5 to 7 minutes. This method helps keep the corn ribs crispy. If you want, brush them with a bit of the reserved honey butter before reheating for added flavor. If you want to save corn ribs for later, freezing is a good option. First, let them cool completely. Then, arrange them in a single layer on a baking sheet. Freeze them for a couple of hours until solid. After that, transfer the frozen ribs to a freezer bag. Be sure to remove as much air as possible. When you’re ready to eat, thaw them in the fridge overnight before reheating. Corn ribs are a fun way to enjoy corn on the cob. They are made by cutting corn into rib-like pieces. First, you cut each ear of corn in half lengthwise, then slice each half into thirds. This gives you pieces that look like ribs, which you can then season and cook. They are sweet and buttery, making them a great side dish or snack. To check if your corn ribs are done, look for a golden brown color. They should also feel slightly crisp to the touch. You can test one by piercing it with a fork. If it goes in easily, they are ready. Remember to flip them halfway through cooking for even browning. Yes, you can make corn ribs ahead of time. After cooking, let them cool completely. Store them in an airtight container in the fridge for up to three days. When you're ready to eat, reheat them in the air fryer for about 5 minutes at 350°F. This will help them regain their crispness. Corn ribs are a fun and tasty treat. You learned how to make them with easy steps and simple ingredients. We talked about spices, cooking methods, and ways to store your leftovers. You can even try different flavors to mix it up. Now, you have all you need to enjoy these delicious corn ribs whenever you want. Enjoy experimenting and sharing with friends!

Air Fryer Honey Butter Corn Ribs Easy and Tasty Recipe

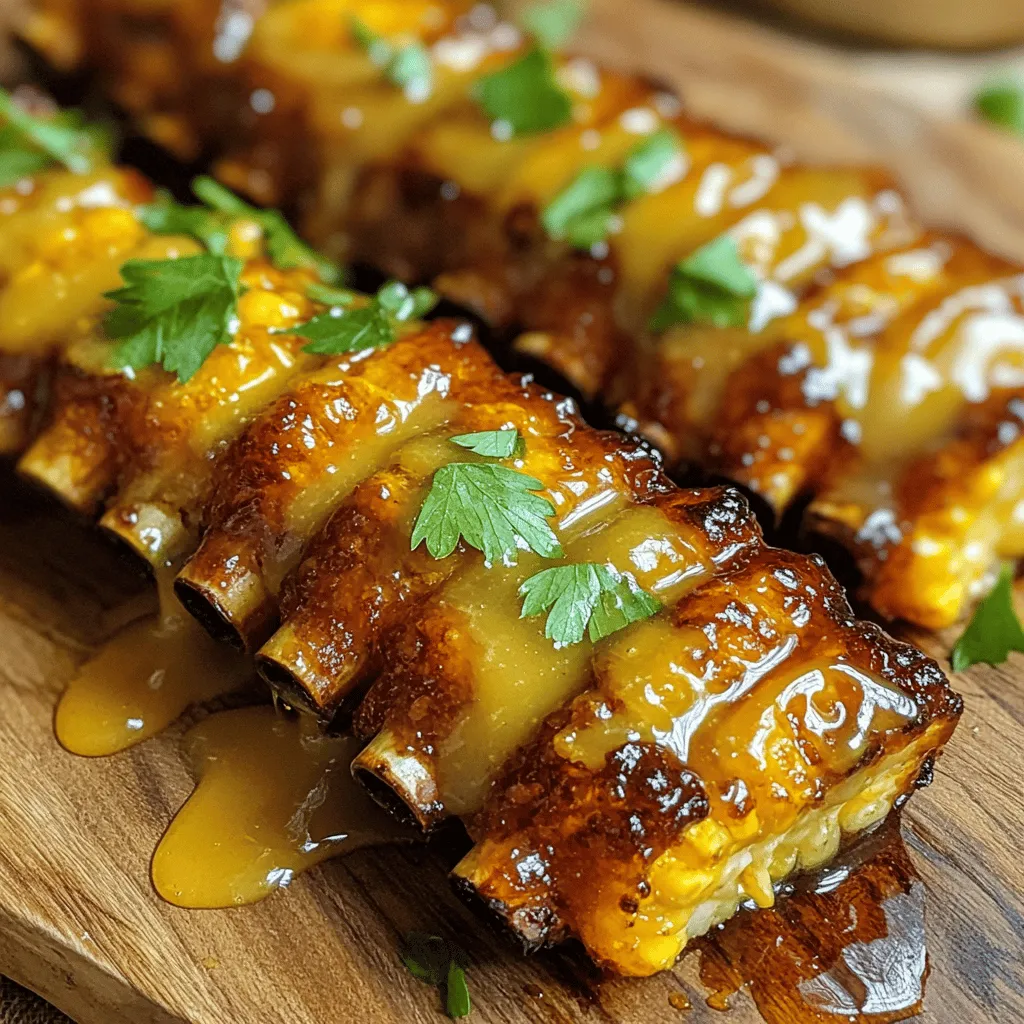
Looking for a fun and flavorful snack? Try my Air Fryer Honey Butter Corn Ribs! This tasty recipe brings together

- 2 cups apple cider - 1 cup granulated sugar - 1/2 cup brown sugar, packed - 1/2 cup vegetable oil - 3 large eggs - 2 teaspoons vanilla extract - 2 cups all-purpose flour - 1 teaspoon baking powder - 1 teaspoon baking soda - 1 teaspoon ground cinnamon - 1/2 teaspoon ground nutmeg - 1/2 teaspoon salt - 1/2 cup unsweetened applesauce - 1/4 cup granulated sugar (for coating) - 1 teaspoon ground cinnamon (for coating) These ingredients come together to create a moist and flavorful cake. The apple cider gives it a rich apple flavor. Both sugars add sweetness and depth. Eggs and oil help keep it tender. The spices bring warmth and comfort. - Thin apple slices for garnish - Powdered sugar for dusting Using thin apple slices or a sprinkle of powdered sugar adds a lovely touch. It enhances the autumn feel and makes each slice even more appealing. - 10-cup Bundt pan - Mixing bowls - Whisk - Spatula - Small saucepan - Toothpick for testing doneness - Wire rack for cooling These tools are key for making your bundt cake. A good Bundt pan shapes the cake well. Mixing bowls help combine your ingredients easily. A toothpick is essential to check if your cake is ready. Start by preheating your oven to 350°F (175°C). While the oven heats, grease a 10-cup Bundt pan. I like to use vegetable oil or butter for this. After greasing, sprinkle some flour into the pan. This helps the cake come out easily later. Next, grab a small saucepan. Pour in 2 cups of apple cider. Heat it over medium heat until it boils. Then, reduce the heat to a simmer. Let it cook until it shrinks to about 1 cup, which takes 10-15 minutes. This step is key to getting that rich apple flavor. After it reduces, set it aside to cool slightly. In a large mixing bowl, combine 1 cup of granulated sugar, 1/2 cup of brown sugar, and 1/2 cup of vegetable oil. Whisk them together until smooth. Add in 3 large eggs and 2 teaspoons of vanilla extract. Mix until it looks creamy. Now, stir in the cooled apple cider and 1/2 cup of unsweetened applesauce. In another bowl, whisk together 2 cups of all-purpose flour, 1 teaspoon of baking powder, 1 teaspoon of baking soda, 1 teaspoon of ground cinnamon, 1/2 teaspoon of ground nutmeg, and 1/2 teaspoon of salt. Gradually add this dry mix to the wet mix. Stir gently until combined. Pour the batter into your prepared Bundt pan. Smooth the top with a spatula for an even bake. Place it in the oven and bake for 45-50 minutes. Check if it’s done by inserting a toothpick into the center. If it comes out clean, the cake is ready. After baking, let the cake cool in the pan for 15 minutes. This makes it easier to remove. Then, transfer it to a wire rack to cool completely. While it cools, mix 1/4 cup of granulated sugar with 1 teaspoon of ground cinnamon in a small bowl. Once the cake is cool, coat it in the cinnamon-sugar mix. You can either roll it or sprinkle it over the top. This sweet touch makes it even better! To get the best texture, use fresh apple cider. The fresh cider gives moisture and flavor. Reducing the cider thickens it and enhances its taste. Make sure to mix your wet and dry ingredients gently. Overmixing can make the cake tough. Bake the cake until a toothpick comes out clean. This means it is ready to enjoy. To prevent sticking, grease your Bundt pan well. Use butter or cooking spray. Dust the pan with flour after greasing. This helps create a barrier. Let the cake cool in the pan for 15 minutes. Then, turn it out onto a rack. If it still sticks, gently run a knife around the edges. Spices make this cake special. Don't skip the ground cinnamon and nutmeg. They add warmth and depth. You can also try adding ginger or allspice. Mix the spices into your dry ingredients. This ensures an even flavor throughout the cake. For a twist, consider adding a splash of vanilla extract. This will brighten the taste even more. {{image_2}} You can add nuts or fruits to your Apple Cider Donut Bundt Cake for extra flavor. Walnuts or pecans work well. Chop them into small pieces and fold them into the batter. You can also add diced apples. They add moisture and a nice texture. Just make sure to keep the amounts balanced. About one cup of nuts or fruits is great. If you need a gluten-free version, it’s easy to adapt this recipe. Swap out the all-purpose flour for a gluten-free blend. Look for a blend that includes xanthan gum, as it helps with texture. You can also use almond flour for a nutty taste. Just remember, the baking time may vary slightly, so keep an eye on it. Frosting can take your bundt cake to the next level. A simple glaze made with powdered sugar and apple cider is a great choice. Mix one cup of powdered sugar with two tablespoons of cider until smooth. For a richer option, try cream cheese frosting. Beat together eight ounces of cream cheese, four tablespoons of butter, and one cup of powdered sugar. This adds creaminess and pairs well with the spices in the cake. To keep your Apple Cider Donut Bundt Cake fresh, store it properly. Place the cake in an airtight container. If you don’t have one, wrap it tightly in plastic wrap. This will help keep moisture in and prevent it from drying out. Store it at room temperature for up to three days. If you want to keep it longer, refrigeration is an option, but it may change the texture slightly. If you have extra cake, freezing is a great choice. First, let the cake cool completely. Next, wrap it tightly in plastic wrap. Then, place it in a freezer-safe bag or container. This way, it can last for up to three months in the freezer. When you want to enjoy it, thaw the cake in the fridge overnight before serving. To enjoy your Apple Cider Donut Bundt Cake again, reheat it gently. Place a slice on a microwave-safe plate and cover it with a damp paper towel. Heat it for 10 to 15 seconds, checking to avoid overheating. If you prefer, you can warm it in the oven. Preheat the oven to 350°F (175°C) and heat for about 5 to 10 minutes. This will make the cake soft and delightful once more. Yes, you can use store-bought apple cider. It saves time and still adds good flavor. Look for a cider that is pure, without added sugars or preservatives. This ensures your cake tastes fresh and rich. If you want a stronger apple flavor, simmer it down as the recipe shows. This step concentrates the taste and makes your cake even better. To check if your bundt cake is done, use a toothpick. Insert it into the center of the cake. If it comes out clean or with just a few crumbs, it’s ready. If the toothpick has wet batter on it, bake for a few more minutes. Remember, every oven is different. So, keep an eye on your cake starting at 45 minutes. If you don’t have applesauce, try using mashed bananas or yogurt. Both options keep the cake moist and add sweetness. You could also use pumpkin puree for a unique twist. Just make sure to adjust the spices to match your substitution. This way, you can still enjoy a delicious bundt cake! In this post, I shared how to make a tasty apple cider donut bundt cake. We covered ingredients, tools, and step-by-step instructions. I also shared tips for the best texture and flavor. Feel free to get creative with variations and enjoy the cake later with proper storage. Baking takes practice, but you’ll make a cake to impress yourself and others! Happy baking!

Irresistible Apple Cider Donut Bundt Cake Recipe

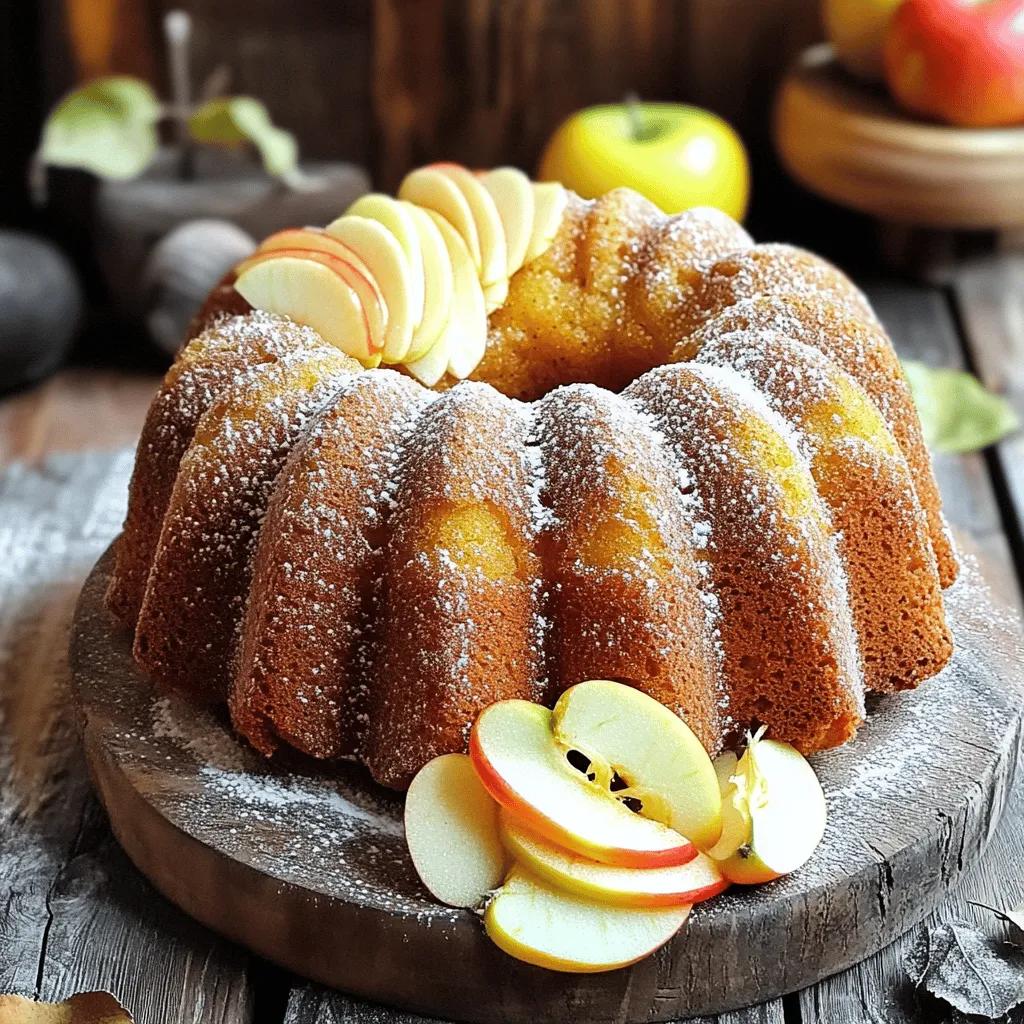
Get ready for fall with my irresistible Apple Cider Donut Bundt Cake recipe! This tasty cake captures the sweet, spiced

- 2 cans (15 oz each) chickpeas, drained and rinsed - 1 large onion, chopped - 2 garlic cloves, minced - 2 medium carrots, diced - 1 red bell pepper, chopped - 1 zucchini, diced - 1 can (14 oz) diced tomatoes - 2 cups vegetable broth - 1 teaspoon ground cumin - 1 teaspoon ground coriander - 1 teaspoon ground cinnamon - 1/2 teaspoon cayenne pepper (adjust for heat preference) - Salt and pepper to taste - 1/2 cup raisins or dried apricots, chopped - 2 cups fresh spinach (added at the end) - 2 tablespoons olive oil - Fresh cilantro or parsley, for garnish When I make this stew, I start with two cans of chickpeas. They give great protein and texture. I rinse them well to remove any extra salt. Next, I chop a large onion and mince two garlic cloves. They add a nice base flavor. For the veggies, I use two medium carrots, one red bell pepper, and one zucchini. Their colors make the dish bright and inviting. I include a can of diced tomatoes, which adds sweetness and acidity. The vegetable broth brings everything together. Spices are key in Moroccan cooking. I use ground cumin, ground coriander, and ground cinnamon. These spices create a rich flavor. I also add cayenne pepper for some heat. Don't forget salt and pepper to taste! For sweetness, I add 1/2 cup of raisins or chopped dried apricots. They balance the spices nicely. I finish with two cups of fresh spinach, which I stir in at the end. I drizzle two tablespoons of olive oil to add richness and depth. Finally, I garnish the stew with fresh cilantro or parsley. It makes a beautiful dish that is full of flavor and color. Start by washing the chickpeas. Drain and rinse two cans of chickpeas under cold water. This helps remove excess salt and makes them taste better. Next, chop your vegetables. Take one large onion and dice it finely. Mince two garlic cloves. Dice two medium carrots, one red bell pepper, and one zucchini. Keep your cuts even for nice cooking. Now, layer your ingredients in the slow cooker. First, add the chickpeas, onion, garlic, carrots, bell pepper, and zucchini. Pour in one can of diced tomatoes with juice and two cups of vegetable broth. This will create a rich base for the stew. Sprinkle in one teaspoon of ground cumin, one teaspoon of ground coriander, and one teaspoon of ground cinnamon. Add half a teaspoon of cayenne pepper for some heat. Season with salt and pepper to taste. Mix everything well to combine. Drizzle two tablespoons of olive oil on top and stir again. The oil helps to blend the spices and adds flavor. Cover the slow cooker with its lid. Set it to low for six to eight hours. If you're in a hurry, you can set it to high for three to four hours. During cooking, the veggies will soften, and the flavors will meld together. It's a slow process that makes the stew delicious. About 30 minutes before serving, add half a cup of raisins or chopped dried apricots for sweetness. Toss in two cups of fresh spinach and stir to combine. Let the spinach wilt into the stew. Taste the stew before serving. Adjust the seasoning if needed. Enjoy the warm, hearty dish! To make your stew just right, adjust the spices to fit your taste. If you want more heat, add extra cayenne pepper. For a milder flavor, cut back on it. Always taste as you cook. This helps you find the perfect balance. You can add salt and pepper later too. Remember, flavors grow as the stew cooks. Even cooking is key for the best stew. Stir the ingredients well before cooking. This helps mix the spices and flavors. Avoid overcrowding your slow cooker. This can lead to uneven cooking. When storing leftover ingredients, cool them first. Use airtight containers to keep them fresh. Enjoying this stew later is always a treat! {{image_2}} You can switch up the veggies in this stew. Try adding sweet potatoes or butternut squash for a sweeter taste. Broccoli or green beans can add a nice crunch. If you want to use different beans, kidney beans or black beans work great. They add a different texture and flavor. Just make sure to adjust cooking times if you use dried beans. This stew is already vegan and gluten-free. You don't need to change much to fit these diets. Just check your vegetable broth to ensure it's gluten-free. If you want more protein, add tofu or tempeh. These options soak up the stew's flavors well. You could also toss in some cooked quinoa or lentils for a hearty touch. To store leftovers, let the stew cool first. This avoids steam buildup in the container. I recommend using airtight containers. They keep the stew fresh and prevent spills. Glass containers work well, too. They don't stain or hold odors. To freeze the stew, let it cool completely. Pour it into freezer-safe bags or containers. Leave some space for expansion. Label the bags with the date. For thawing, place the stew in the fridge overnight. You can also use the microwave for a quick thaw. When reheating, heat it on the stove or in the microwave. Stir well to ensure even heating. You can store this stew in the fridge for about 4 to 5 days. Make sure to place it in an airtight container. The flavors will deepen as it sits, which is a nice bonus! Yes, you can prepare this stew a day or two ahead. Just cook it, cool it, and store it in the fridge. When ready to eat, gently reheat it on the stove or in the microwave. This stew pairs well with warm pita bread or fluffy couscous. You can also serve a light salad or some yogurt on the side for a refreshing contrast. Absolutely! If you like spice, add more cayenne pepper or even some chopped jalapeños. Start with a little, then taste as you go to find your perfect heat level. Yes, you can use dried chickpeas. Just soak them overnight and cook them before adding to the stew. This may change the cooking time, so plan for a longer meal prep! This blog post covers how to make a delicious Slow Cooker Moroccan Chickpea Stew. We explored the key ingredients, simple steps for preparation, and cooking in a slow cooker. I shared tips to enhance flavor and ways to adjust ingredients. We also discussed proper storage of leftovers and answered common questions. Now, you can enjoy making this hearty stew and share it with others. Happy cooking!

Slow Cooker Moroccan Chickpea Stew Tasty Recipe

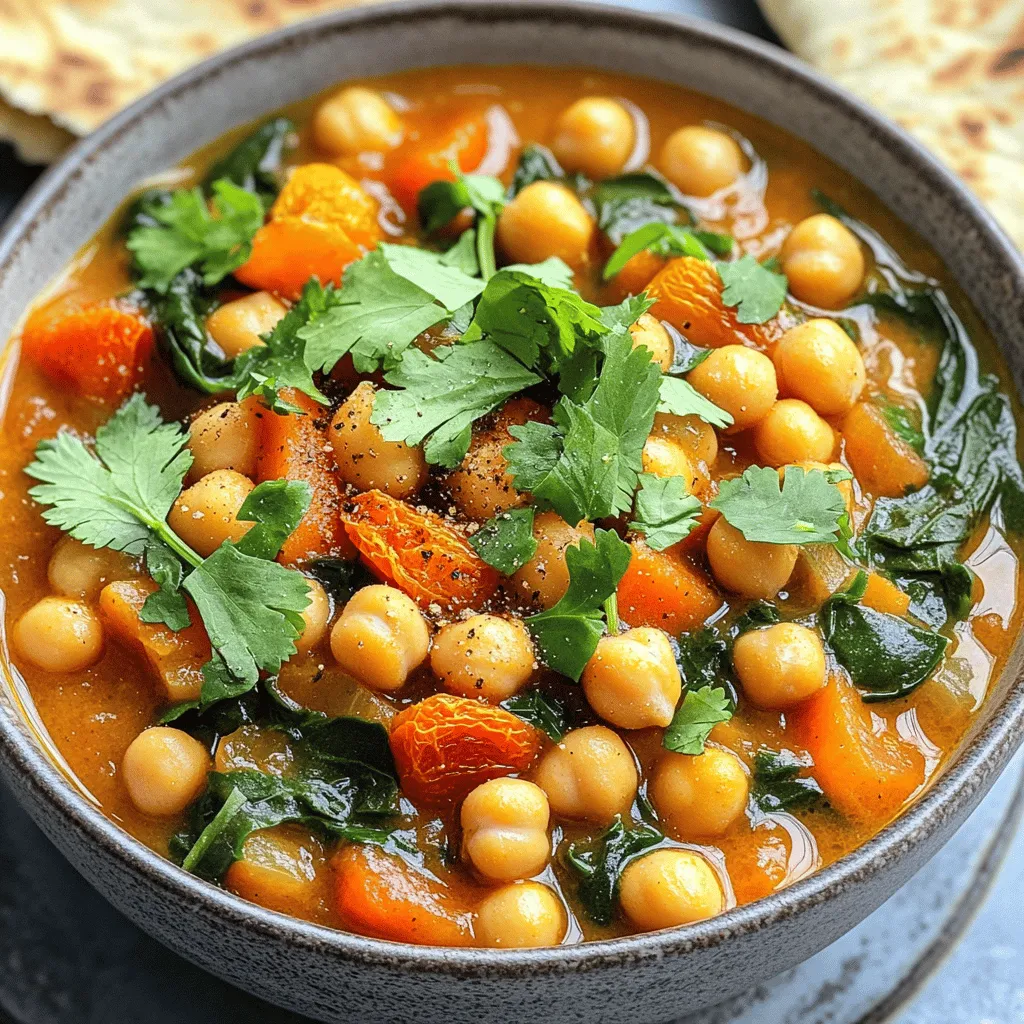
Get ready to savor a burst of flavors with my Slow Cooker Moroccan Chickpea Stew. This hearty dish combines simple

To make this tasty bake, you need some easy-to-find items. Here are the must-have ingredients: - 2 cans (12.5 oz each) refrigerated cinnamon roll dough - 2 medium-sized apples, peeled, cored, and diced - 1 teaspoon ground cinnamon - 1 tablespoon brown sugar - 1 cup maple syrup or caramel sauce These ingredients give the dish its sweet and warm flavor. The cinnamon roll dough makes it soft and fluffy, while the apples add a nice crunch. If you want to take your bake to the next level, consider these fun add-ins: - 1/2 cup chopped pecans or walnuts - 1/4 cup raisins Adding nuts gives a nice texture. Raisins bring extra sweetness. Both can enhance the flavor. Don't worry if you don't have all the ingredients. Here are some easy swaps: - Use any type of apples, like Granny Smith or Fuji. - Maple syrup can be replaced with honey or agave nectar. - If you don’t have cinnamon roll dough, use biscuit dough instead. These substitutions can still create a delicious dish. Don't hesitate to mix it up! First, you need to prepare your baking dish. Grab a 9x13 inch baking dish and grease it. Use butter or cooking spray to coat the bottom and sides. This step helps the rolls come out easily after baking. Next, let’s make the apple cinnamon mixture. Take two medium-sized apples and peel them. Core and dice them into small pieces. In a large bowl, mix the diced apples with one teaspoon of ground cinnamon and one tablespoon of brown sugar. If you like nuts, add half a cup of chopped pecans or walnuts. You can also toss in a quarter cup of raisins if you want. Mix it all well and set it aside. Now, it’s time to combine everything. Open the two cans of refrigerated cinnamon roll dough. Separate the rolls and cut each one into four pieces. In a large mixing bowl, gently mix the quartered rolls with the apple mixture. Make sure every piece is coated. Pour half of the maple syrup or caramel sauce into the bottom of the greased dish. Spread it out evenly. Then, add the cinnamon roll and apple mixture on top, spreading it evenly over the sauce. Drizzle the remaining syrup or sauce on top of the mixture. Bake your dish in the preheated oven at 350°F (175°C) for 25 to 30 minutes. You want the rolls to be golden brown and fully cooked. While it cools, whisk together half a cup of powdered sugar with one tablespoon of milk to make a glaze. Adjust the milk to your desired thickness. Once the bake cools a bit, drizzle the glaze on top and enjoy! To get great rolls, always preheat your oven to 350°F (175°C). This helps them cook evenly. Use a 9x13 inch baking dish and grease it well. This prevents sticking. Bake the rolls for 25-30 minutes. Check for a golden brown color on top. If they look too brown, cover them with foil. Serve the rolls warm for the best flavor. Drizzle the glaze on top just before serving. You can also add a scoop of vanilla ice cream for a tasty twist. If you like nuts, sprinkle some chopped pecans or walnuts on top. This adds a nice crunch. A common mistake is using cold dough. Always let the cinnamon roll dough sit at room temperature. This makes it easier to cut and mix. Another mistake is overbaking. Keep an eye on the rolls as they bake. Lastly, don’t skip the glaze! It adds sweetness and makes the dish shine. {{image_2}} You can switch up the apples for other fruits. Pears work great in this dish. They add a nice sweetness and soft texture. You can also try berries like blueberries or raspberries. They give a fresh, tart taste. Peaches or cherries are fun, too. Just make sure to cut them small, like the apples. This helps them cook well and blend with the rolls. Adding spices can change the whole taste. Try nutmeg for a warm flavor. A bit of ginger can add a fun kick. You could also use vanilla or almond extract. Just a teaspoon goes a long way. Mixing in some orange zest brings a bright note. It makes your bake smell amazing, too. Feel free to get creative with your favorite flavors! While maple syrup is classic, you can explore other sauces. Caramel sauce gives a rich, sweet twist. A simple vanilla glaze is another option; it’s light and tasty. You can even use chocolate sauce for a dessert-like feel. If you want a fruity touch, try a berry sauce. Each sauce adds its own fun flavor to the bake. To store leftovers, first let the bake cool down. Use a clean container with a lid. Place the bake inside and cover it well. You can keep it in the fridge for up to three days. Make sure to eat it quickly for the best taste! When you're ready to enjoy your leftovers, preheat your oven to 350°F (175°C). Place the bake in an oven-safe dish. Cover it with foil to keep it moist. Heat for about 15-20 minutes. You can also use the microwave. Just heat a slice for 30-45 seconds. Check to see if it’s warm enough. If you want to keep some for later, freezing works great! Cut the bake into individual portions. Wrap each piece in plastic wrap. Then, place the wrapped pieces in a freezer bag. Remove as much air as possible. You can freeze it for up to three months. To enjoy, thaw in the fridge overnight and reheat as mentioned above. Yes, you can prepare this dish in advance. You can mix the diced apples and cinnamon with the dough. Then, cover the bowl and keep it in the fridge for up to a day. When you're ready, just pour it into the baking dish and bake it as usual. This saves time, especially when you are busy. If you want to change the dough, use biscuit dough instead. You can also try puff pastry for a flakier texture. Both options will work well with the apples and cinnamon. Just make sure to cut them into small pieces, similar to the cinnamon rolls. Check the bake at 25 minutes. It should be golden brown on top. If you poke a roll with a toothpick, it should come out clean. If batter sticks, bake for a few more minutes. Keep a close eye after the 25-minute mark to avoid burning. This blog covers a simple apple cinnamon roll bake. I shared essential ingredients, plus some fun add-ins. You learned how to prep, mix, and bake the rolls step by step. I also gave tips for perfect results and enjoyable serving ideas. You can swap fruits and sauces, and I covered storage and reheating methods. In the end, this recipe is flexible and fun. Enjoy your baking adventure!

Easy Apple Cinnamon Roll Bake Simple and Delicious Treat

Looking for a fun and tasty treat? This Easy Apple Cinnamon Roll Bake is just what you need! It’s quick

To make a savory slow cooker maple brown sugar ham, you will need: - 1 whole bone-in ham (about 8-10 pounds) - 1 cup maple syrup - 1/2 cup packed brown sugar - 1/4 cup Dijon mustard - 1/4 cup apple cider vinegar - 2 teaspoons ground cinnamon - 1/2 teaspoon ground ginger - 1/4 teaspoon ground cloves - 1/4 teaspoon black pepper - 1/4 cup water These ingredients create a sweet and tangy glaze. The ham itself is juicy and tender, making each bite delicious. You can add a few optional ingredients to boost the flavor: - Pineapple slices for a tropical twist - Fresh herbs like rosemary for added aroma - A splash of bourbon for a richer taste These extras can make your dish unique and special. Experiment with what you enjoy! When picking a ham, size matters. Choose a ham that weighs about 8-10 pounds. This size serves around 12-14 people, perfect for gatherings. - For smaller groups, consider a half ham. - Always check if it fits in your slow cooker. A well-chosen ham ensures everyone enjoys a hearty meal together. Start by placing the whole bone-in ham in the slow cooker. Make sure the cut side faces down. This helps the ham cook evenly and stay juicy. In a mixing bowl, combine these ingredients: - 1 cup maple syrup - 1/2 cup packed brown sugar - 1/4 cup Dijon mustard - 1/4 cup apple cider vinegar - 2 teaspoons ground cinnamon - 1/2 teaspoon ground ginger - 1/4 teaspoon ground cloves - 1/4 teaspoon black pepper Whisk until everything blends well. This glaze adds a sweet and savory taste to the ham. Pour the glaze over the ham. Make sure it covers the meat. Add 1/4 cup water to the slow cooker. This keeps the ham moist. Cover the slow cooker and cook on low for 6-8 hours. The ham is ready when it’s heated through and tender. In the last 30 minutes, uncover the slow cooker. Baste the ham with the juices every 10 minutes. This gives the ham a nice glaze. When done, carefully remove the ham and let it rest for 15 minutes. This helps the juices settle. Slice the ham and drizzle some cooking liquid on top for extra flavor. Enjoy your meal! To get a great glaze, start with the right mix. Use maple syrup and brown sugar. These add sweetness and flavor. Whisk them well with Dijon mustard and apple cider vinegar. This blend gives a nice tang. Pour it over the ham for the best results. For the last 30 minutes, uncover the slow cooker. Baste the ham every 10 minutes. This helps create a shiny, tasty glaze. You can change the spice levels to suit your taste. If you love warmth, add more ground cinnamon or ginger. For a hint of spice, try a pinch of cayenne pepper. Want a sweeter ham? Add extra brown sugar or maple syrup. Always taste as you go. This way, you can find the perfect balance. Avoid cooking the ham on high heat. Low and slow is key for tenderness. Don’t skip the water; it keeps the ham moist. If you don’t baste, the glaze won’t shine. Lastly, let the ham rest before slicing. This helps keep it juicy. Follow these tips for a perfect maple brown sugar ham every time. {{image_2}} For a sweet twist, try adding honey and apple to your ham. Start by replacing half the maple syrup with honey. Then, mix in one cup of diced apples into the glaze. The apples will cook down and add a nice fruitiness. This variation pairs well with the spices, making it a great choice for fall gatherings. For a rich flavor, you can add bourbon to your glaze. Use half a cup of bourbon in place of the apple cider vinegar. The bourbon adds depth and complexity. It balances the sweetness of the maple and brown sugar. This variation works best if you love a robust taste in your ham. If you're watching your sugar intake, you can make a low-sugar ham. Use sugar-free maple syrup instead of regular syrup. You can also cut the brown sugar by half. Add a bit more Dijon mustard for tang. This option keeps the flavor strong without the extra sugar. To keep your leftover ham fresh, first let it cool to room temperature. Wrap it tightly in plastic wrap or foil. You can also use an airtight container. Store it in the fridge for up to four days. For longer storage, freezing is a great option. When you are ready to enjoy your ham again, slice it into even pieces. This helps it heat evenly. Place the slices in a baking dish. Drizzle some of the cooking liquid over the ham for added flavor. Cover the dish with foil to keep it moist. Heat in a 325°F oven for about 20-30 minutes, or until warmed through. If you want to save some ham for later, freezing is easy. Cut the ham into slices or cubes. Wrap each piece tightly in plastic wrap. Place the wrapped pieces in a freezer bag or container. Label it with the date. You can freeze ham for up to three months. When you want to use it, thaw it in the fridge overnight before reheating. Yes, you can use other types of ham. A boneless ham works well too. Look for a size that fits your slow cooker. If you try a smoked ham, it will add a nice flavor. Just keep an eye on the cooking time, as it may vary slightly. Cook the ham on low for 6 to 8 hours. This slow cook time helps the flavors blend well. You want the ham to be heated through and tender. If you have a smaller ham, check it at 6 hours. For larger hams, you may need the full 8 hours. Basting during the last 30 minutes helps add flavor and glaze. Many sides go well with this ham. Here are some great choices: - Roasted sweet potatoes - Green beans with almonds - Creamy mashed potatoes - Tangy coleslaw - Honey-glazed carrots - A fresh garden salad These sides will balance the sweet flavors of the ham. Enjoy your meal! In this blog post, we covered how to make a delicious slow cooker maple brown sugar ham. You learned about essential ingredients, step-by-step instructions, and tips for the best results. We explored tasty variations and how to store leftovers wisely. Remember, this recipe combines sweet and savory flavors for a true treat. Try my tips to avoid common mistakes and impress your family and friends. Enjoy making this ham, and savor every bite!

Savory Slow Cooker Maple Brown Sugar Ham Recipe

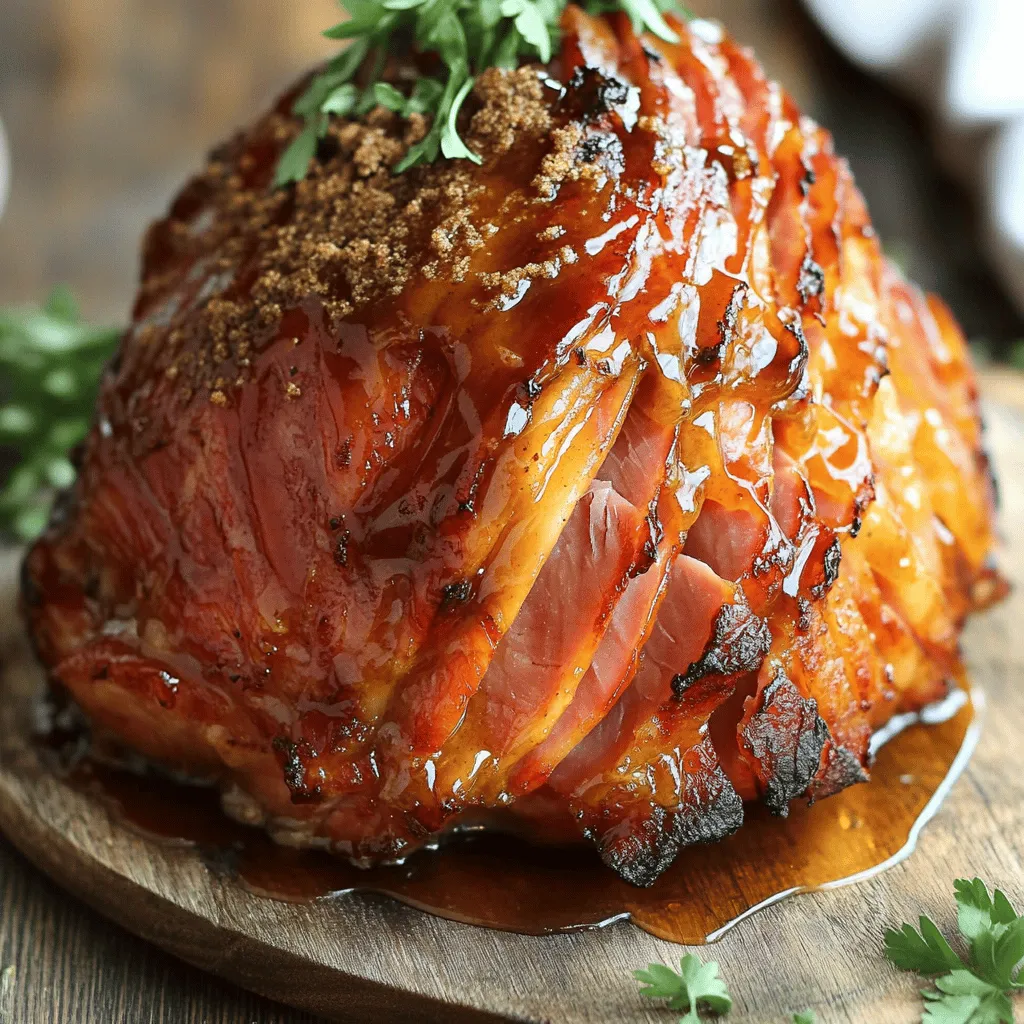
Are you ready to impress your family with a mouthwatering dish? This Savory Slow Cooker Maple Brown Sugar Ham recipe

- 2 cups cottage cheese (preferably low-fat) - 1/2 cup unsweetened cocoa powder - 1/3 cup honey or maple syrup (to taste) - 1 teaspoon vanilla extract - 1/4 cup almond milk (or any milk of choice) - 1/2 teaspoon instant coffee granules (optional, for added depth) - A pinch of salt You need simple ingredients for this mousse. Cottage cheese gives it a creamy base. I like using low-fat cottage cheese for a lighter option. Cocoa powder adds rich chocolate flavor. You can sweeten it with honey or maple syrup. I often adjust sweetness based on my taste. Vanilla extract boosts the flavor. Almond milk makes it smooth. You can use any milk you prefer. I sometimes add instant coffee for depth. It enhances the chocolate taste without being too strong. A pinch of salt balances the sweetness and flavor. - Fresh berries - Mint leaves For garnishing, fresh berries add color and a fruity touch. I love using strawberries or raspberries. Mint leaves offer a fresh taste. They look pretty and make the dish pop. You can mix and match these garnishes to your liking. These simple additions make the mousse even more fun! 1. First, drain the excess whey from the cottage cheese. This step is key. It helps make the mousse smooth and creamy. You can use a fine mesh strainer or cheesecloth for this. Let it sit for a few minutes to remove as much liquid as possible. 2. Next, combine all your ingredients in a blender. You will need: - 2 cups cottage cheese - 1/2 cup unsweetened cocoa powder - 1/3 cup honey or maple syrup - 1 teaspoon vanilla extract - 1/4 cup almond milk - 1/2 teaspoon instant coffee granules (if desired) - A pinch of salt 3. Blend on high speed until the mix is smooth. Scrape down the sides of the blender as needed. This ensures everything mixes well together. The result should be a nice, creamy texture. Taste the mixture and add more sweetener if needed. 1. Now, transfer the mousse into serving dishes. You can use small bowls or cups. Be careful not to make a mess! 2. Cover the mousse with plastic wrap. Refrigerate for at least 1 hour. This time helps the flavors blend and the mousse to set. Chilling makes it taste even better! 3. Before serving, give the mousse a gentle stir. This will make it even creamier. 4. Now, garnish with fresh berries and a sprig of mint. This adds a lovely touch and makes your dessert look great! To make a creamy cottage cheese chocolate mousse, you must drain the cottage cheese. This step removes extra whey and helps the mousse become smooth. If you skip this, your mousse might be runny. Use a fine mesh strainer or cheesecloth to get the best results. For blending, I recommend using a high-speed blender. This helps break down the cottage cheese completely. Blend until the mixture is silky and free of lumps. If needed, stop to scrape down the sides. This ensures every ingredient mixes well. Taste the mousse after blending to check the sweetness. You can easily adjust it. If it’s not sweet enough, add more honey or maple syrup. Start with one tablespoon and mix it in. Blend again and taste. A good ratio is 1/3 cup of honey or maple syrup for this recipe. If you prefer less sweetness, use less. Remember, you can always add more, but you can’t take it out once it's in! {{image_2}} You can easily change the taste of your cottage cheese chocolate mousse. Try different sweeteners. Honey and maple syrup both work well, but you can use agave or stevia for a lower-calorie option. Each sweetener gives a unique flavor, so experiment to find your favorite. Flavored extracts can also enhance your mousse. A dash of almond extract adds a nutty note. If you love coffee, add a bit more instant coffee granules. This will deepen the chocolate taste and add a nice kick. If you need a dairy-free version, you can swap cottage cheese with silken tofu. It blends smoothly and keeps the mousse creamy. Use a non-dairy milk like almond or oat milk instead of regular milk. For a low-calorie variation, reduce the sweetener or use a sugar substitute. You can also use low-fat cottage cheese to cut down on calories. These changes keep the mousse delicious and satisfying without adding too many calories. To keep your cottage cheese chocolate mousse fresh, use airtight containers. Glass jars or plastic containers work great. Make sure to seal them well to avoid air exposure. The mousse stays fresh for up to five days in the fridge. After that, it may lose its creaminess and flavor. If you want to save some mousse for later, freezing is a good option. Just scoop the mousse into freezer-safe containers. Leave some space at the top, as it may expand. When you are ready to eat, thaw it in the fridge overnight. This keeps the texture smooth. Serve the thawed mousse chilled. A quick stir may help restore its creaminess before serving. Can I use low-fat cottage cheese? Yes, low-fat cottage cheese works great for this mousse. It keeps the dish creamy while cutting down on calories. You still get all the flavor and protein without the extra fat. I often prefer it for a lighter treat. What can I substitute for cocoa powder? If you need a substitute, try carob powder. It has a sweet taste and is caffeine-free. You can also use dark chocolate melted down for a rich flavor. Just remember to adjust the sweetness since chocolate can be sweeter than cocoa powder. How can I make this mousse vegan? To make this mousse vegan, replace cottage cheese with silken tofu or vegan cream cheese. Use maple syrup as your sweetener. Almond milk is already a great choice. Just blend everything until smooth, and you’ll have a tasty vegan treat! Caloric content per serving Each serving of this mousse has about 140 calories. This is a great option for a sweet treat without the guilt. Protein content and other nutrition facts You get about 10 grams of protein per serving. Cottage cheese is a protein powerhouse. You also get healthy fats and calcium, making this dessert both tasty and nourishing. Plus, the cocoa adds antioxidants, so it’s a win-win! Making this chocolate mousse is simple with just a few key ingredients. You blend cottage cheese, cocoa powder, and your choice of sweeteners for a creamy treat. Consider garnishing with fresh berries or mint for a vibrant touch. Remember to drain the cottage cheese for the best texture, and adjust the sweetness to your taste. This mousse can be tailored to fit your dietary needs, whether low-calorie or dairy-free. Enjoy making this delicious and versatile dessert!

Cottage Cheese Chocolate Mousse Creamy and Delicious

Are you ready to treat yourself to a guilt-free dessert? This Cottage Cheese Chocolate Mousse is creamy, delicious, and surprisingly

- 4 bone-in, skin-on chicken thighs - 1 teaspoon smoked paprika - 1 teaspoon garlic powder - 1 teaspoon onion powder - 1 teaspoon dried oregano - 1 teaspoon salt - ½ teaspoon black pepper - 2 tablespoons olive oil - 1 red bell pepper, sliced - 1 yellow bell pepper, sliced - 1 red onion, cut into wedges - 2 cups cherry tomatoes, halved - Fresh parsley for garnish The heart of this dish is the spice blend. Smoked paprika gives a rich, smoky flavor. Garlic powder adds depth, while onion powder brings sweetness. Dried oregano adds a hint of earthiness. Salt and black pepper enhance all the flavors. This mix makes the chicken and veggies pop. I love to sprinkle fresh parsley on top before serving. It adds color and freshness. You can also add lemon wedges for a zesty touch. A drizzle of balsamic glaze can elevate the dish further. These simple garnishes make your meal look and taste amazing! First, set your oven to 425°F (220°C). This temperature gets the oven hot and ready. You want it to be nice and warm for cooking. Next, grab a small bowl. In this bowl, mix together: - 1 teaspoon smoked paprika - 1 teaspoon garlic powder - 1 teaspoon onion powder - 1 teaspoon dried oregano - 1 teaspoon salt - ½ teaspoon black pepper Stir these spices well. This mix gives your chicken a rich flavor. Now, take your chicken thighs. Pat them dry with paper towels. This helps the spices stick better. Rub the spice mix all over the chicken. Make sure every part is covered. In a large bowl, combine: - 1 red bell pepper, sliced - 1 yellow bell pepper, sliced - 1 red onion, cut into wedges - 2 cups cherry tomatoes, halved Drizzle with 2 tablespoons of olive oil. Toss the veggies to coat them evenly with the oil. Take a large sheet pan. Place the seasoned chicken thighs in the center. Spread the vegetable mix around the chicken. This way, they all roast together. Slide the sheet pan into your preheated oven. Roast for 30-35 minutes. Use a meat thermometer to check if the chicken is done. It should reach 165°F (74°C). If you want crispy skin, turn on the broiler for the last 2-3 minutes. Keep a close watch to avoid burning. After cooking, let it rest for 5 minutes. Garnish with fresh parsley before serving. To get that crispy skin, start by drying your chicken thighs. Use paper towels to pat them dry. This step helps the skin crisp up nicely. After drying, rub the spice mix all over. Make sure to coat every inch. If you want it extra crispy, broil the chicken for 2-3 minutes at the end. Watch it closely to avoid burning. For tender chicken, you need to cook it well. Bake the chicken thighs at 425°F (220°C). This high heat helps keep the meat juicy. Use a meat thermometer to check the internal temperature. It should reach 165°F (74°C). Let the chicken rest for 5 minutes after cooking. This allows the juices to settle. To roast your veggies just right, cut them into similar sizes. This helps them cook evenly. Toss them in olive oil and the spice mix before placing them on the pan. Make sure they are spread out. Crowding the pan can make them steam instead of roast. Stir the veggies halfway through cooking for even browning. {{image_2}} You can swap in many tasty veggies. Try zucchini or asparagus for a fresh twist. Broccoli florets also work well. Just cut them into bite-sized pieces. Root vegetables like carrots or sweet potatoes add a nice sweetness. Keep in mind that cooking times may change. Thicker veggies need a little extra time to cook. Want more heat? Add a pinch of cayenne pepper. If you prefer a more herbal flavor, consider adding thyme or rosemary. For a zesty kick, a squeeze of lemon juice can brighten the dish. Taste the spice mix before adding it to the chicken. This lets you adjust to your liking. You can also cut back on salt if needed. Feel free to use chicken breasts or drumsticks. If you use breasts, reduce the cooking time to avoid dryness. Drumsticks can add more flavor and moisture. Just remember to check the internal temperature. It should still reach 165°F (74°C). Each cut gives you a different texture and taste experience. To store your Smoky Paprika Chicken, first let it cool. Place the chicken and veggies in an airtight container. Make sure to keep them together for best flavor. Store in the fridge for up to three days. If you want to keep it longer, freezing is a great option. When you're ready to eat leftovers, preheat your oven to 350°F (175°C). Place the chicken and veggies on a baking sheet. Cover with foil to keep moisture in. Heat for about 15-20 minutes or until warmed through. You can also use the microwave. Heat in short bursts, stirring in between, until hot. For freezing, wrap the chicken and veggies tightly in plastic wrap. Then, place them in a freezer bag or container. Make sure to remove as much air as possible. This dish can last in the freezer for up to three months. When ready to eat, thaw it in the fridge overnight before reheating. Yes, you can use boneless chicken thighs. They will cook faster than bone-in thighs. Adjust the cooking time to about 25-30 minutes. Check that they reach 165°F for safety. This dish pairs well with many sides. Consider serving it with rice or quinoa. You can also add a fresh salad or some crusty bread. These options balance the rich flavors of the chicken. The best way to check chicken doneness is with a meat thermometer. Insert it into the thickest part of the thigh. It should read 165°F (74°C). If you don't have a thermometer, the juices should run clear. Yes, you can prep the chicken and veggies ahead of time. Season the chicken and store it in the fridge for up to a day. You can also chop the veggies and keep them in a sealed container. Just roast them when you're ready to eat. This blog shared a simple way to make smoky paprika chicken. We covered key ingredients, step-by-step instructions, and best tips for great results. You can try different veggies and chicken cuts to mix things up. Remember to store leftovers safely for later. I hope you feel ready to create a tasty meal that impresses. Enjoy every bite!

Smoky Paprika Chicken Sheet Pan Delightful Meal

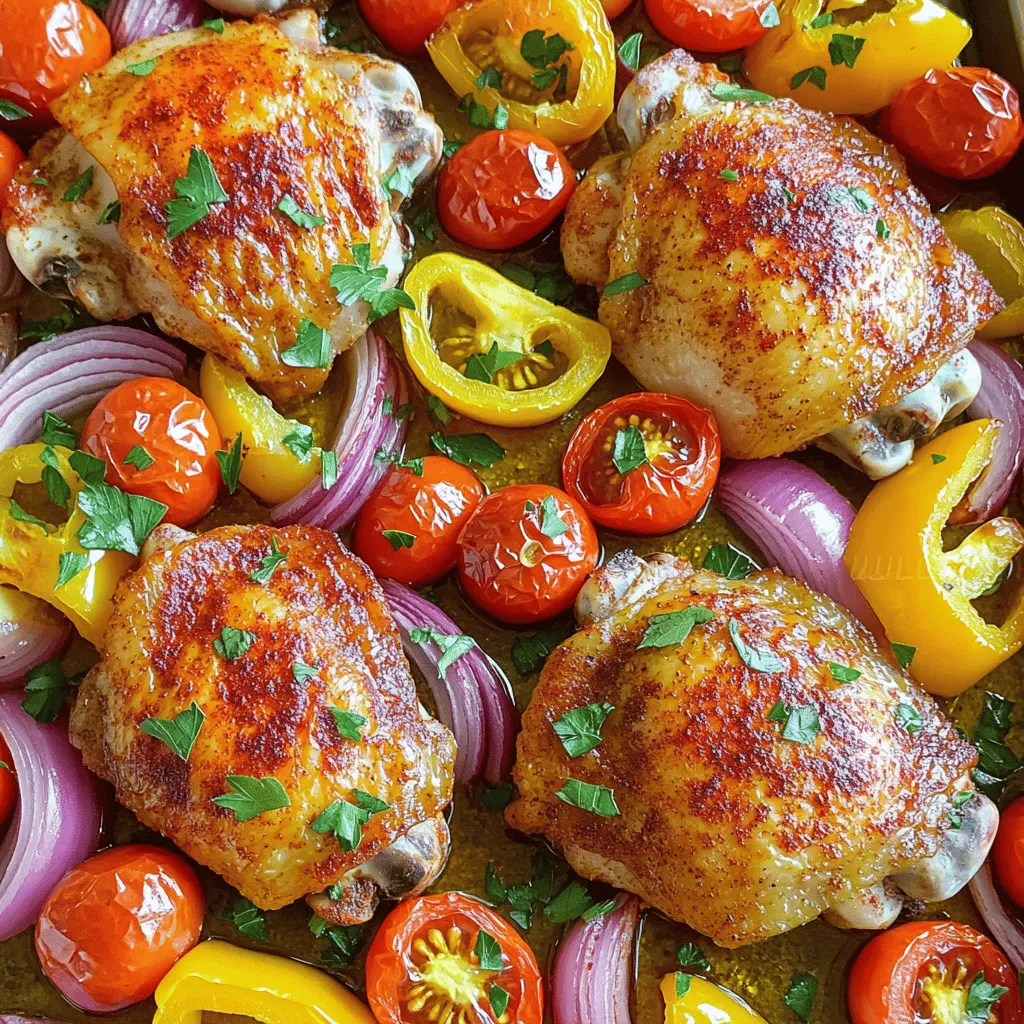
Get ready to impress your taste buds with my Smoky Paprika Chicken Sheet Pan! This dish combines tender chicken and

- 1 cup all-purpose flour - 1 teaspoon baking powder - 1 teaspoon baking soda - ½ teaspoon salt - 1 teaspoon ground cinnamon - ½ teaspoon ground nutmeg - ½ teaspoon ground ginger To start, gather your dry ingredients. I love using all-purpose flour for a soft texture. The baking powder and baking soda help the muffins rise. The salt enhances all the flavors. The spices add warmth and depth, making them perfect for fall. - ½ cup granulated sugar - ½ cup brown sugar, packed - ½ cup vegetable oil - 2 large eggs - 1 cup pure pumpkin puree - 1 teaspoon vanilla extract Next, let's prepare the wet ingredients. I mix granulated and brown sugar for a rich sweetness. The vegetable oil keeps the muffins moist. Adding eggs and pumpkin puree gives them a hearty texture. Finally, vanilla extract ties all these flavors together. - 8 ounces cream cheese, softened - ¼ cup powdered sugar - 1 teaspoon vanilla extract For the cream cheese filling, I use softened cream cheese for a smooth texture. The powdered sugar adds sweetness, making it a delightful surprise inside the muffins. A touch of vanilla extract enhances the taste, creating a creamy, dreamy filling. First, preheat your oven to 350°F (175°C). This helps the muffins cook evenly. Next, line your muffin tin with paper liners. You can also grease the cups lightly if you prefer. Start by mixing the dry ingredients. In a large bowl, whisk together the flour, baking powder, baking soda, salt, cinnamon, nutmeg, and ginger. Make sure everything is well combined. In another bowl, combine the wet ingredients. Mix the granulated sugar, brown sugar, vegetable oil, eggs, pumpkin puree, and vanilla extract. Blend until the mixture is smooth. Now, it’s time to combine both mixtures. Gradually add the wet mixture to the dry ingredients. Use a spatula to fold everything together. Be careful not to overmix; it’s okay if a few lumps remain. Next, let’s prepare the cream cheese filling. In a small bowl, beat together the softened cream cheese, powdered sugar, and vanilla extract until creamy and smooth. Now, fill the muffin tin. Spoon about 2 tablespoons of the muffin batter into each cup. Add about 1 teaspoon of the cream cheese filling in the center of each muffin. Top with more batter until the cups are three-quarters full. Place the muffin tin in the oven. Bake for 20-25 minutes. To check if they are done, insert a toothpick into a muffin, avoiding the cream cheese center. If it comes out clean, you’re ready to cool them. After baking, let the muffins cool in the pan for about 5 minutes. Then, transfer them to a wire rack. Allow them to cool completely before serving. Enjoy your warm, tasty muffins! To make great muffins, avoid overmixing. When you blend the wet and dry ingredients, mix just enough. A few lumps are fine. If you stir too much, the muffins will be tough. For filling the muffins, follow a simple method. Spoon two tablespoons of batter into each cup. Then, add one teaspoon of cream cheese filling. Top it with more batter until it’s three-quarters full. This way, you get the perfect cream cheese center. You can boost the flavor of your muffins with extra spices. Try adding allspice or cloves for warmth. You can also mix in chocolate chips or nuts for a fun twist. Dried cranberries or apples can add a sweet touch, too. Serve your muffins warm for the best taste. A sprinkle of cinnamon adds a nice touch. You can also drizzle honey or maple syrup on top. This makes your muffins look and taste even better. Enjoy them with a hot drink for a cozy fall treat. {{image_2}} You can change up the flavors in your pumpkin cream cheese muffins. Adding chocolate chips gives a sweet twist. Try semi-sweet or dark chocolate for a rich taste. You can also add nuts, like walnuts or pecans. They add crunch and a nice texture. Dried fruits, such as cranberries or raisins, add a hint of sweetness. Feel free to mix and match these additions to find your favorite combo! If you need gluten-free options, use almond flour or a gluten-free all-purpose blend. These options work well and keep the muffins soft. For dairy-free muffins, swap out the cream cheese for a dairy-free cream cheese. You can also use coconut oil instead of vegetable oil. These swaps make the muffins lighter while keeping them tasty. Fall is the perfect time to add more flavors. Try mixing in chopped apples or pears for a fruity twist. You can also add a sprinkle of nutmeg or cloves for extra warmth. If you love spice, mix in some chai tea blend for a cozy flavor. These seasonal additions will make your muffins even more delightful! To keep your pumpkin cream cheese muffins fresh, store them in an airtight container. Place them at room temperature. This method will keep them soft and tasty for a few days. Just make sure they cool completely before you store them. If you want to enjoy these muffins later, freezing is a great option. Wrap each muffin tightly in plastic wrap. Then, place them in a freezer-safe bag or container. They can last up to three months in the freezer. To reheat, simply take one out and let it sit at room temperature. You can also warm it in the microwave for about 15-20 seconds. These muffins stay fresh for about 3 to 5 days when stored correctly. If you notice any mold or off smells, it’s best to toss them. Keeping track of their freshness will help you enjoy them at their best! Yes, you can use fresh pumpkin! Fresh pumpkin gives your muffins a bright flavor. To prepare fresh pumpkin, cut it in half, remove the seeds, and roast it until soft. This takes about 30 to 45 minutes. After it cools, scoop out the flesh and mash it until smooth. You can then measure out one cup for your recipe. Fresh pumpkin adds a nice texture and taste. You can easily make these muffins healthier! Consider using applesauce instead of oil. This swap will cut the fat. You can also use honey or maple syrup instead of sugar. This change adds natural sweetness. If you want to lower the calories, try using whole wheat flour. It adds fiber and nutrients while keeping the taste delicious. Pair your muffins with warm drinks! Coffee or chai tea match well with pumpkin flavor. For a lighter option, try herbal tea. You can also serve these muffins with fruit. Slices of apple or pears make a great side. Add a dollop of yogurt for creaminess. This adds a nice contrast to the muffins! This blog post covered all you need for perfect pumpkin cream cheese muffins. We discussed the key ingredients divided into dry, wet, and filling categories. I shared step-by-step instructions, tips for great texture, flavor boosts, and fun variations. Lastly, we touched on storing your muffins for freshness. With these insights, you can wow your family and friends with delicious treats. Enjoy baking and make it your own!

Pumpkin Cream Cheese Muffins Delightful Fall Treat

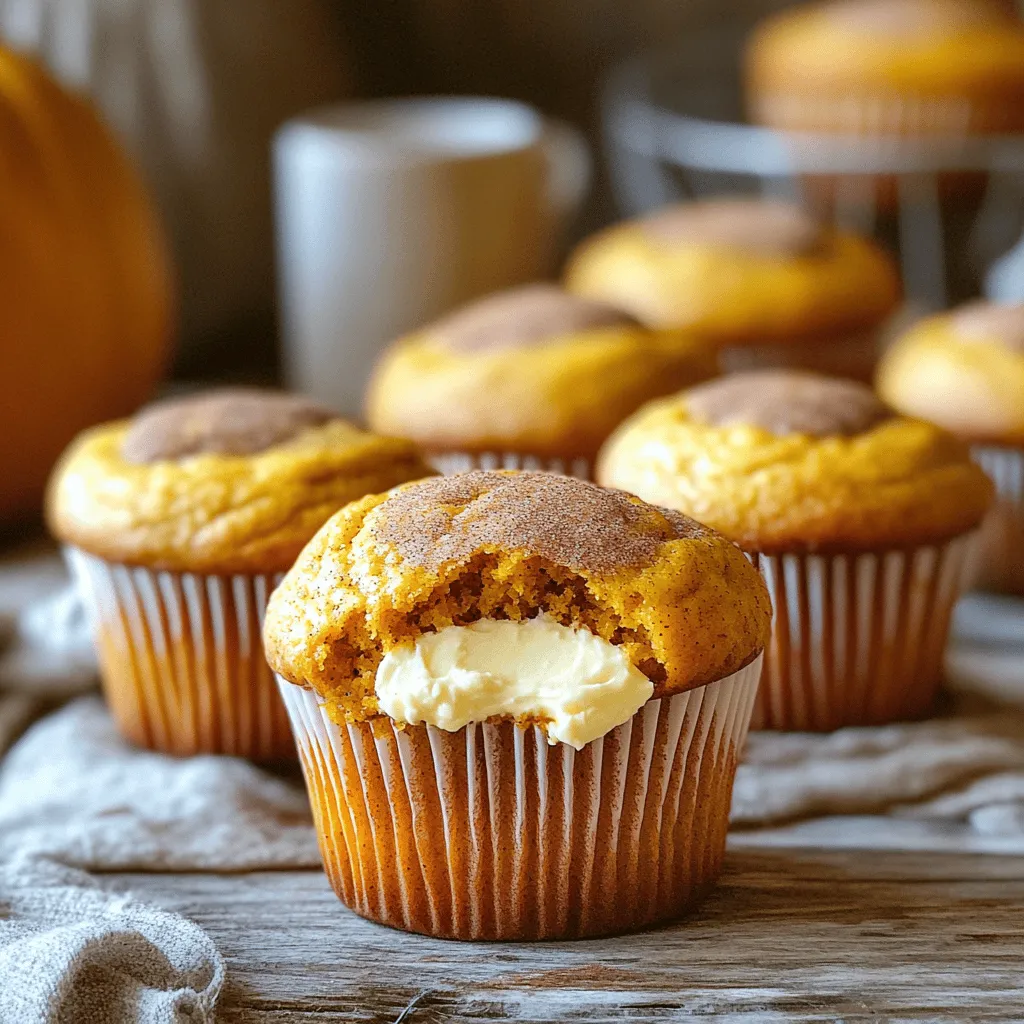
Fall is here, and so is the craving for warm, cozy treats! Let me introduce you to my Pumpkin Cream

Older posts
Newer posts
← Previous Page1 … Page27 Page28 Page29 … Page84 Next →

dsad

© 2026 Foodish Talk • Built with GeneratePress

Our Policies

  • Copyright Policy
  • Cookie Policy
  • GDPR Policy
  • Privacy Policy
  • Disclaimer
  • Terms Of Use

More Information

  • Home
  • About
  • Contact
  • Appetizers
  • Dessert
  • Dinner
  • Drinks
©2026, Foodish Talk About Back To Top