Skip to content
DisclaimerTerms Of UseGDPR PolicyCookie Policy

Foodish Talk

  • Home
  • Drinks
  • Appetizers
  • Dinner
  • Dessert
  • About
  • Contact
  • Privacy Policy
DisclaimerTerms Of UseGDPR PolicyCookie Policy

NO-ING-IMG

- 1 lb sirloin steak, cut into 1-inch cubes - 1 lb baby potatoes, halved - 4 tablespoons unsalted butter - 4 cloves garlic, minced - 1 teaspoon fresh rosemary, chopped - 1 teaspoon fresh thyme, chopped - Salt and pepper to taste - Olive oil for drizzling - Fresh parsley, chopped (for garnish) - Oven - Skillet - Baking sheet - Mixing bowl Gathering quality ingredients is key for great flavor. Sirloin steak is a perfect choice for tender bites. The baby potatoes add a nice texture and taste. Unsalted butter gives you control over saltiness. Fresh garlic and herbs bring the dish to life. When seasoning, use salt and pepper to enhance the meat and potatoes. A drizzle of olive oil helps the potatoes crisp up nicely. Fresh parsley adds a pop of color and freshness when serving. For equipment, you will need an oven to roast the potatoes, a skillet for the steak, a baking sheet to hold the potatoes, and a mixing bowl to combine the ingredients. Having these tools ready will make cooking easy and fun. Set your oven to 400°F (200°C). Preheating helps your potatoes roast evenly. It ensures that they get crispy and golden. In a large bowl, mix halved baby potatoes with olive oil, salt, and pepper. Toss them well to coat every piece. This step makes sure each potato gets flavor. Spread the coated potatoes on a baking sheet. Make sure they are in a single layer. Roast them for 25-30 minutes. Flip them halfway through for even cooking. This helps achieve that perfect crispiness. While the potatoes are roasting, heat a large skillet over medium-high heat. Add 2 tablespoons of butter to the pan and let it melt. Make sure the butter is hot before adding the steak. Once the steak is browned, lower the heat. Add minced garlic, chopped rosemary, and thyme to the skillet. Stir this mix and let it cook for 1-2 minutes. This step enhances the dish with rich flavors. Remove the skillet from heat and add the remaining 2 tablespoons of butter. Toss the steak bites in the melted butter. This makes them rich and delicious. Serve them alongside your crispy potatoes, garnished with fresh parsley for color. To make the best steak bites, cook them for about 2-3 minutes on each side. This gives you a nice sear while keeping the inside juicy. If you like your steak medium, aim for a little pink in the center. For seasoning, sprinkle salt and pepper on the steak cubes before cooking. You can also mix in some garlic powder for extra flavor. Use baby Yukon Gold or red potatoes for a crispy finish. These potatoes have a great texture when roasted. To get them extra crispy, coat them well with olive oil. Spread the potatoes on the baking sheet so they don’t touch. This helps them brown evenly. Don’t forget to flip them halfway through to ensure all sides get crispy. If you don’t have sirloin, you can use ribeye or flank steak. Both cuts work well and taste great. For herbs, try using oregano or basil if you want a different flavor. Fresh herbs add a nice touch to the dish. You can also add veggies like bell peppers for more color and taste. {{image_2}} Adding bell peppers or onions can enhance your dish. These veggies bring more texture and flavor. Cut them into bite-sized pieces. Toss them in with the steak bites near the end of cooking. This way, they soften but still keep some crunch. You’ll love the colorful plate and the added nutrients. For a kick, try incorporating red pepper flakes. Just a pinch can make a big difference. Add the flakes when you add the garlic. This gives the dish a nice heat without overpowering the steak. Adjust the amount to your taste. You can always add more if you want it spicier. Cooking all ingredients together saves time and cleanup. Start with the potatoes in the oven. After about 15 minutes, add the steak bites to the same baking sheet. Make sure to stir them halfway through. This method allows the flavors to blend beautifully. Plus, you get a great crispy texture on everything. After you enjoy your meal, you can store leftovers for later. First, let the steak bites and potatoes cool down to room temperature. Then, place them in an airtight container. This keeps air out and prevents moisture loss. You can refrigerate them for up to three days. Make sure to separate the steak and potatoes if you want them fresh longer. To reheat your leftovers, use the oven or a skillet. If you choose the oven, preheat it to 350°F (175°C). Place the steak bites and potatoes on a baking sheet. Heat for about 10-15 minutes, until warm. If using a skillet, add a bit of butter over medium heat. Cook for about 5 minutes, stirring gently. This helps keep the texture and flavor intact. If you want to store your meal longer, you can freeze it. First, let the dish cool completely. Next, place the steak bites and potatoes in a freezer-safe container. Seal it well to avoid freezer burn. You can freeze them for up to three months. When you're ready to eat, move the container to the fridge overnight to thaw. Then reheat as mentioned above. This way, you get to enjoy your garlic butter steak bites and potatoes again! Cooking steak bites takes about 10 to 15 minutes. The time varies by doneness. For rare, cook for about 2-3 minutes per side. For medium, aim for 3-4 minutes per side. Well-done requires about 4-5 minutes a side. Always check the center for your preferred doneness! Yes, you can! If you can't find baby potatoes, try Yukon Gold or red potatoes. These types will still give you a nice crispy texture. You can also use sweet potatoes for a twist. Just cut them into even pieces for even cooking. I love serving these with a fresh salad or steamed veggies. Grilled asparagus or green beans pair well. You can also add some crusty bread to soak up the garlic butter. It makes for a complete meal that feels fancy yet simple. Absolutely! To make it low-carb, skip the potatoes. Instead, serve the steak bites with sautéed zucchini or cauliflower rice. You can make a tasty side dish with these veggies. They will still give you a filling, satisfying meal without the carbs. In this blog post, we explored how to make garlic butter steak bites. We covered the main ingredients, proper seasoning, and necessary equipment. You learned step-by-step instructions, useful tips, and variations to try. Remember, the key to success is using fresh ingredients and cooking with care. Enjoy experimenting with this recipe and making it your own. Cooking should be fun, so don’t hesitate to add your favorite flavors or sides!

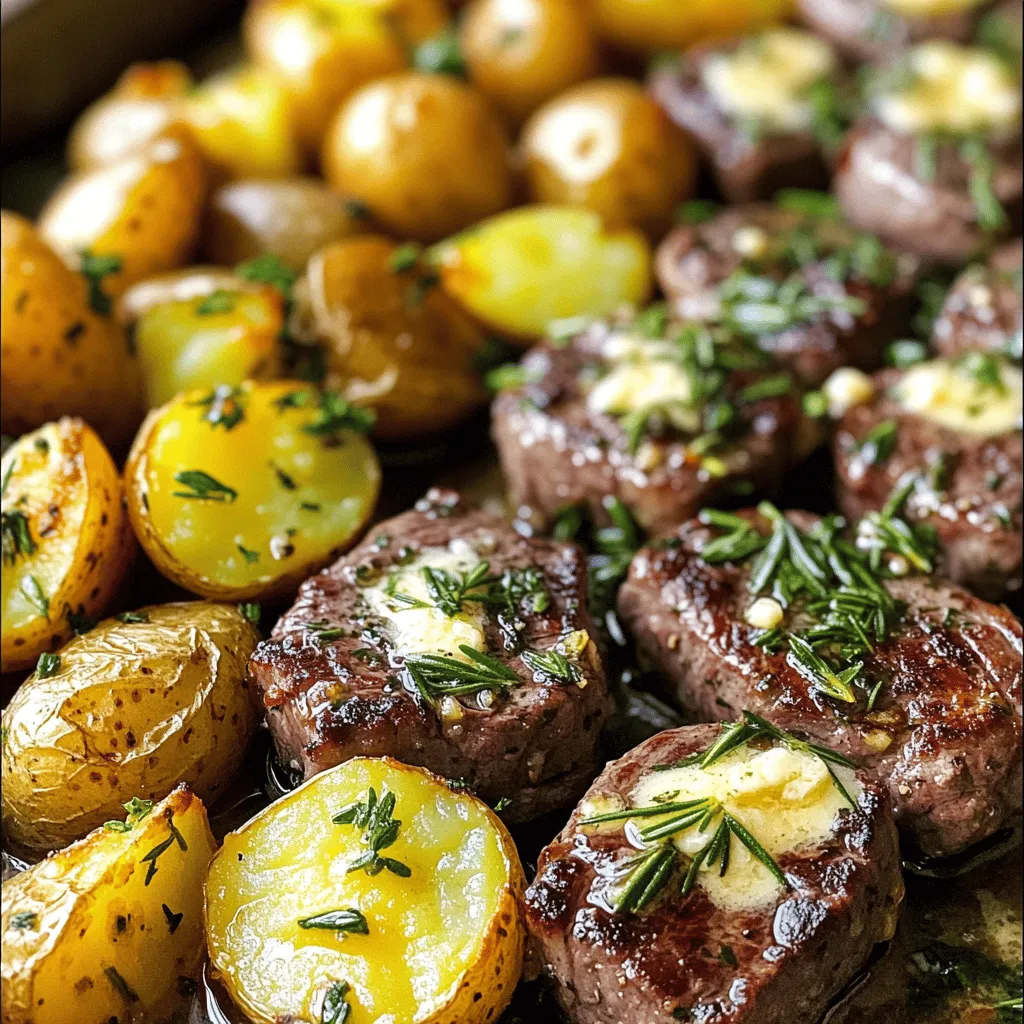
Garlic Butter Steak Bites & Potatoes Simple Delight

Are you ready to elevate your dinner game? Garlic Butter Steak Bites & Potatoes is a simple delight that brings

To make this tasty hummus, gather these key items: - 1 cup shelled edamame (fresh or frozen) - 2 tablespoons tahini - 2 tablespoons olive oil - 1 garlic clove, minced - 2 tablespoons lemon juice - 1/2 teaspoon ground cumin - Salt and pepper to taste - 1/4 cup water (or more for desired consistency) These ingredients create a creamy, protein-rich hummus. Edamame is packed with nutrients and gives this dip its bright green color. Tahini adds a nutty flavor, while lemon juice gives it a fresh zing. For the pita, you will need: - 4 whole wheat pita breads, cut into triangles These pita breads are perfect for dipping. Their whole grain nature also makes them a healthier choice. To spice things up, consider adding: - Fresh parsley, for garnish - Red pepper flakes for a spicy kick The parsley adds color and freshness. If you like a bit of heat, sprinkle some red pepper flakes on top of your hummus. This adds an exciting twist to your dish. First, if you have frozen edamame, steam it. Follow the package steps. This takes about 3 to 5 minutes. If you use fresh edamame, remove the pods and rinse them well. The edamame should be tender and bright green. This gives the hummus a fresh taste. Next, grab a food processor. Add the steamed edamame, tahini, olive oil, minced garlic, lemon juice, ground cumin, salt, and pepper. Blend these together. As you blend, slowly add water. Keep blending until the mixture is smooth and creamy. You can add more water if you want a thinner texture. After blending, taste the hummus. Adjust the salt, pepper, or lemon juice as needed for your taste. Now it's time to serve! Transfer the hummus to a bowl. Drizzle some olive oil on top for extra flavor. If you like a little spice, sprinkle red pepper flakes over the hummus. For the pita, you can serve it cold or warm. To warm it, pop the pita in a toaster or oven until it's lightly crisp. Cut the pita into triangles and arrange them around the bowl of hummus. Finish by garnishing with fresh parsley. Enjoy this tasty, high-protein snack! To make smooth hummus, start with cooked edamame. I love using fresh or frozen. If frozen, steam it first. You want it soft but not mushy. In the food processor, mix edamame with tahini, olive oil, garlic, lemon juice, cumin, salt, and pepper. Blend while adding water. Use a little at a time. Keep blending until you reach the smoothness you want. If it’s too thick, add more water. If it’s too runny, you can add more edamame. Pita bread is best served warm. You can toast it for a crispier bite. Cut the pita into triangles for easy dipping. Arrange the triangles around your hummus. This way, guests can grab them easily. If you want, serve it with a side of fresh veggies for more crunch. To make your hummus pop, think about adding spices. A pinch of red pepper flakes gives heat. Fresh herbs like cilantro or basil can add freshness. You could also try roasted garlic for a sweeter taste. For a nutty twist, sprinkle some toasted sesame seeds on top. These simple tweaks can elevate your dish! {{image_2}} High-protein edamame hummus packs a punch. Each serving provides about 7-8 grams of protein. Edamame comes from young soybeans, which are rich in protein. This makes the hummus a great snack for anyone wanting to add more protein to their diet. Protein helps build muscles and keeps you feeling full. It also plays a key role in your body's repair process. Adding this hummus to your meals can help with weight management and muscle growth. In addition to protein, edamame hummus is balanced in fats and carbs. Each serving has around 10 grams of healthy fats, mainly from olive oil and tahini. These fats support heart health and provide energy. The carbs in this hummus mainly come from edamame and whole wheat pita. They offer a good source of energy while being high in fiber. This fiber helps with digestion and keeps you feeling full longer. Edamame hummus is not only tasty but also nutrient-rich. It contains several important vitamins and minerals: - Vitamin K: Supports bone health. - Folate: Important for cell growth and metabolism. - Iron: Essential for transporting oxygen in the blood. - Magnesium: Helps with muscle and nerve function. These nutrients make this hummus a smart choice for anyone looking to eat healthy. Enjoy it as a snack or part of a meal for a boost of goodness. Want a kick? Add red pepper flakes to your hummus. This spice brings heat and flavor. Start with 1/4 teaspoon and taste. You can always add more! For a bolder spice, blend in a dash of hot sauce. This gives a nice zing. Herbs can change the taste of your hummus. Try fresh basil for a sweet, fresh flavor. Cilantro adds a bright twist. You can also use dill for a unique taste. Simply add one handful of your chosen herb to the blender. It makes a big difference! Pita is great, but you have options! Serve with veggie sticks for a crunchy bite. Carrots, cucumbers, and bell peppers work well. You can also try whole grain crackers for a different crunch. For a fun twist, spread hummus on sandwiches. This adds protein and flavor to your meal. Yes, you can use frozen edamame. Just steam it for about 3 to 5 minutes. This makes it tender and easy to blend. I often use frozen edamame for its convenience. It saves time and still tastes great. You can store edamame hummus in the fridge for up to a week. Make sure to keep it in an airtight container. If you want to keep it longer, freeze it for up to three months. Just thaw it before serving and give it a quick stir. The best dishes to serve with edamame hummus include whole wheat pita bread, fresh veggies, or crackers. You can also pair it with grilled chicken or fish for a hearty meal. This hummus goes well with almost anything! Edamame hummus is simple to make and packed with nutrients. We covered the main and optional ingredients that create rich flavors. I shared helpful steps to prepare, blend, and serve your hummus with pita. Tips on achieving perfect consistency and enhancing flavor were included. Plus, we explored different variations and answered common questions. This dish is a healthy snack option that everyone will enjoy. Try it out and have fun experimenting with your own flavors!

High-Protein Edamame Hummus & Pita Delight

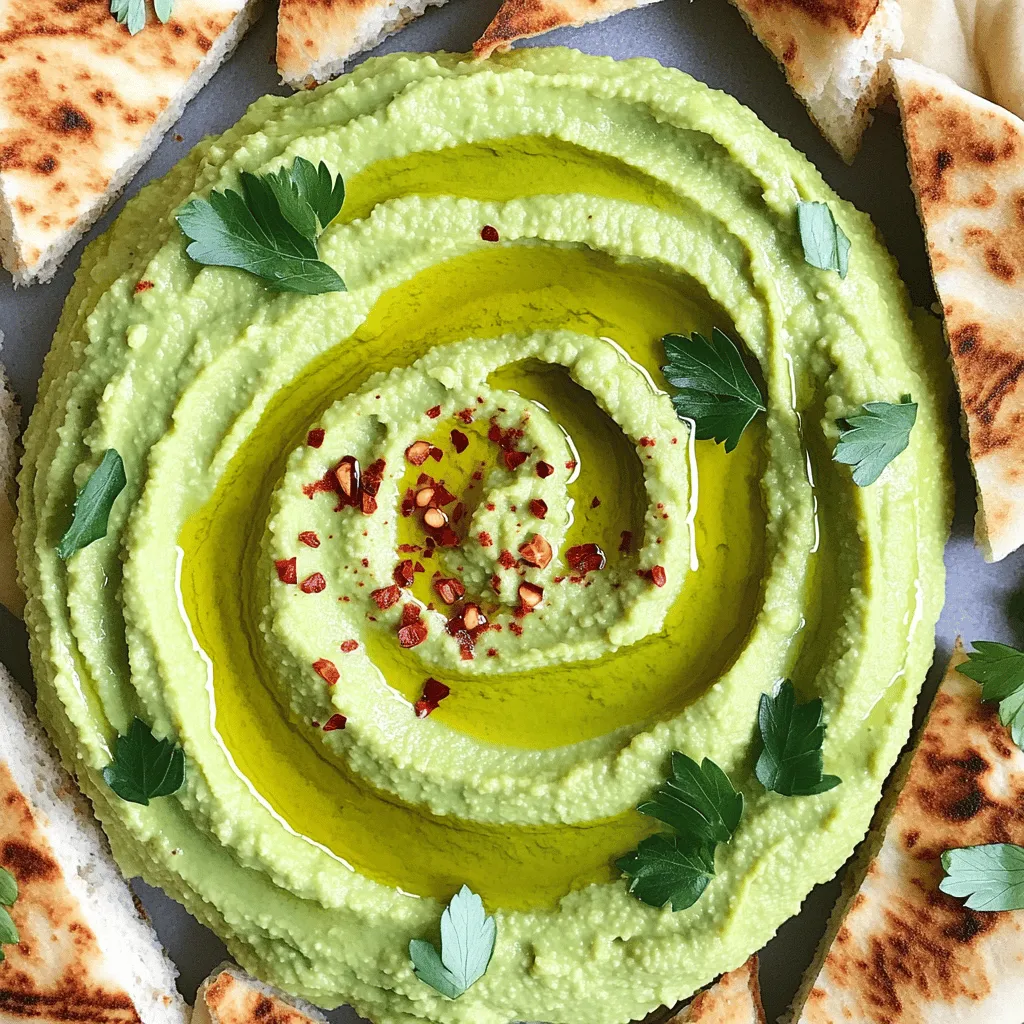
If you love delicious, healthy snacks, you’re in for a treat! Today, I’ll show you how to make High-Protein Edamame

To make your sheet-pan teriyaki salmon bowls, gather these ingredients: - 4 salmon fillets (about 6 oz each) - 1 cup broccoli florets - 1 red bell pepper, sliced - 1 cup snap peas - 2 tablespoons olive oil - Salt and pepper to taste This savory teriyaki sauce gives flavor to your salmon. You will need: - 1/3 cup low-sodium soy sauce - 2 tablespoons honey or maple syrup - 1 tablespoon rice vinegar - 1 teaspoon grated fresh ginger - 2 cloves garlic, minced - 1 tablespoon cornstarch mixed with 1 tablespoon water (slurry) Garnishes add a nice touch to your dish. Consider using: - 1 teaspoon sesame seeds (for garnish) - 1 green onion, sliced (for garnish) Gather these ingredients, and you’re on your way to a tasty meal. Each element works together to create a dish that is both simple and delicious. To make the teriyaki sauce, start by gathering your ingredients. You need low-sodium soy sauce, honey or maple syrup, rice vinegar, grated ginger, and minced garlic. In a small saucepan, mix the soy sauce, honey, rice vinegar, ginger, and garlic. Heat it over medium heat. Watch closely until it bubbles gently. This takes about 3-5 minutes. Then, mix cornstarch with water to make a slurry. Add this to the pan. Stir for 1-2 minutes until the sauce thickens. Remove it from heat and let it cool a bit. Now, get your salmon fillets ready. Place them on one side of your lined sheet pan. Brush each fillet with the teriyaki sauce you just made. Next, prepare your veggies. In a bowl, toss broccoli florets, sliced red bell pepper, and snap peas with olive oil, salt, and pepper. Make sure they are coated well. Spread the veggies on the other side of the sheet pan. Preheat your oven to 400°F (200°C). Once it’s hot, put the sheet pan inside. Bake for 12-15 minutes. The salmon should flake easily with a fork, and the veggies should be tender but still crisp. After baking, drizzle any leftover teriyaki sauce over the salmon and veggies. To serve, divide the salmon and vegetables into bowls. Top with sesame seeds and sliced green onion for a fresh touch. Enjoy your delicious meal! When you pick salmon, look for bright, pink color. The flesh should be firm. Avoid fish that smells too strong or has dark spots. Fresh salmon has a clean scent. If possible, buy salmon with skin on. The skin helps keep the fish moist while cooking. To roast veggies well, cut them into even pieces. This way, they cook evenly. Toss them with olive oil, salt, and pepper before baking. Broccoli, bell peppers, and snap peas are great choices. Spread them out on the sheet pan. Don’t overcrowd them; this helps them turn crispy. Bake at 400°F for 12-15 minutes. Check for tenderness but keep them crisp. You can change the teriyaki sauce to fit your taste. Instead of honey, try maple syrup for a different sweetness. Add a splash of citrus juice for brightness. If you want more heat, mix in some sriracha or chili flakes. You can also add sesame oil for a nutty flavor. These simple changes can make your sauce unique. {{image_2}} If you want to switch up the protein, you have great choices. Chicken works well in this dish. Use boneless thighs or breasts. Just cut them into similar sizes to the salmon. Marinate them in the teriyaki sauce for extra flavor. Tofu is another fantastic option. Choose firm tofu and press it to remove water. Cut it into cubes and marinate like the salmon. The sauce will soak in nicely. Feel free to change the veggies based on what you like. Carrots add a nice crunch. Just slice them thinly to cook evenly. Zucchini is also a great choice. Cut it into half-moons for a fun shape. You can even use asparagus or cauliflower. Pick what’s in season or what you have on hand. This recipe is all about making it yours. Switching up the sauce can bring new life to your meal. A sweet chili sauce adds a nice kick. It gives a spicy and sweet flavor that is hard to resist. Peanut sauce is another option. It adds a creamy, nutty taste that pairs well with veggies. Or try a lemon-garlic sauce for a fresh twist. Mix lemon juice, garlic, and olive oil for a bright flavor. These options keep the dish exciting and fun. To store your leftovers, let the salmon and veggies cool first. Place them in an airtight container. This step keeps the food fresh longer. You can keep them in the fridge for up to three days. If you want to enjoy them later, consider freezing. When you’re ready to eat, you can reheat in several ways. The best method is to use the oven. Preheat it to 350°F (175°C). Place the salmon and veggies on a baking sheet. Cover them with foil to keep moisture in. Heat for about 10 minutes. You can also use the microwave for a quicker option. Use a microwave-safe dish and cover it. Heat in short bursts, stirring in between, until warm. If you want to freeze your meal, it's easy! Wrap each portion tightly with plastic wrap. Then, place them in a freezer-safe bag. This way, you can keep them for up to three months. When you’re ready to eat, thaw in the fridge overnight. Then, reheat as mentioned above. This process helps you enjoy your teriyaki salmon bowls anytime! You can serve these bowls with rice or quinoa. Both add a nice touch. You can also add sliced cucumbers for crunch. A fresh salad on the side works well too. Feel free to mix in some avocado for creaminess. These options make a great meal together. Yes, you can easily make this dish gluten-free. Use gluten-free soy sauce instead of regular soy sauce. This small swap keeps the flavor while making it safe. Honey or maple syrup is gluten-free, so no worries there. Double-check the labels on all ingredients to ensure they are gluten-free. You can tell the salmon is done when it flakes easily with a fork. Look for a bright, opaque color. The internal temperature should reach 145°F (63°C). If you do not have a thermometer, check the thickest part of the salmon. It should no longer look raw or translucent. You now have all the tools to make delicious salmon bowls. We covered key ingredients, easy steps, and tips for perfect results. I shared ideas for variations and how to store your meals. Experiment with different proteins and sauces to find your favorite mix. Cooking should be fun and tasty. Enjoy creating your own teriyaki bowls and share the good times with friends and family!

Sheet-Pan Teriyaki Salmon Bowls Flavorful and Simple

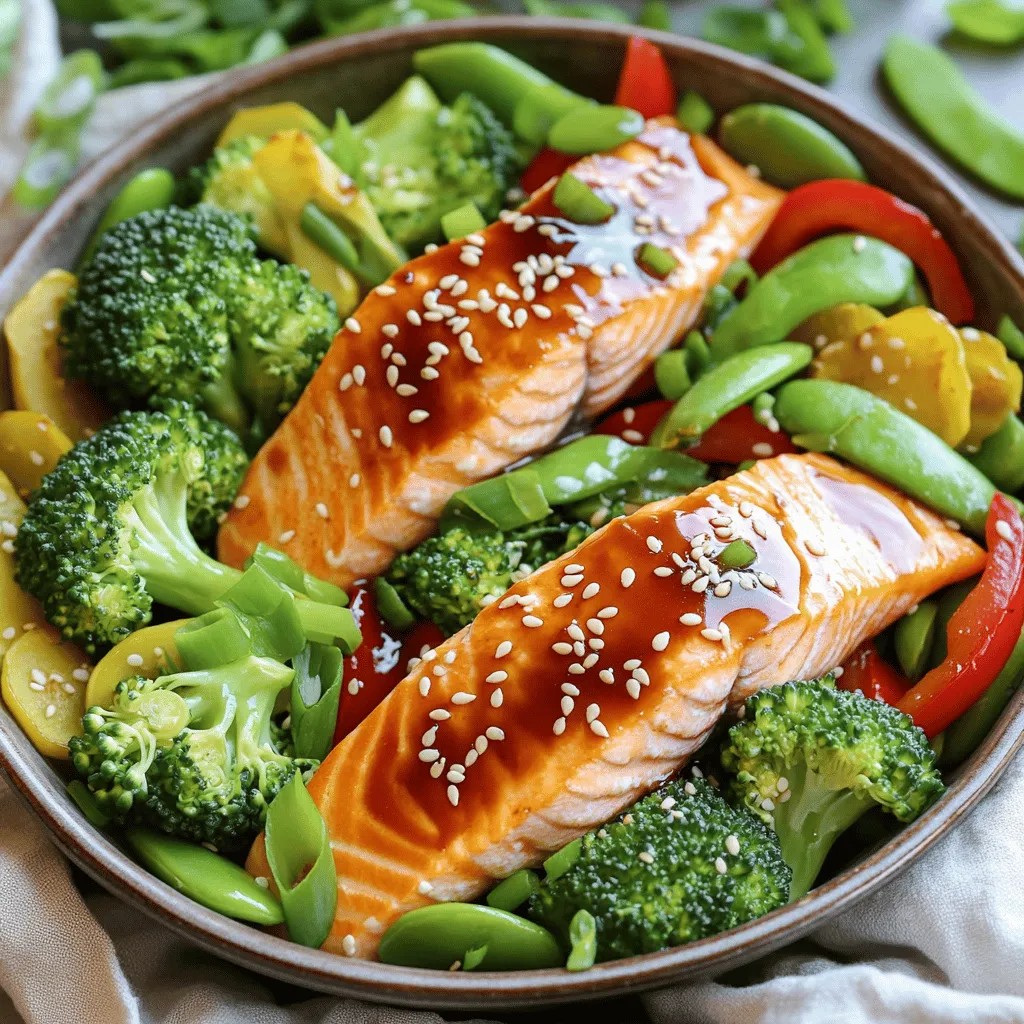
If you’re craving a quick and tasty meal, you’ll love my Sheet-Pan Teriyaki Salmon Bowls. This recipe is not just

Here are the simple ingredients you need for No-Bake Funfetti Cheesecake Bars: - 1 ½ cups graham cracker crumbs - ½ cup unsalted butter, melted - ¼ cup granulated sugar - 16 oz cream cheese, softened - ¾ cup powdered sugar - 1 teaspoon vanilla extract - 1 cup heavy whipping cream - ¼ cup rainbow sprinkles (plus extra for topping) - Pinch of salt These ingredients come together to create a creamy and fun dessert. The graham cracker crumbs form a tasty crust that holds everything together. The cream cheese makes the filling smooth and rich. The heavy cream helps it set nicely while adding a light texture. Don't forget the sprinkles! They add color and fun to every bite. Using good quality ingredients enhances the flavor. Make sure your cream cheese is at room temperature. This helps it mix smoothly with the other ingredients. Feel free to explore different types of sprinkles or flavors. You can use chocolate sprinkles or even nuts for a twist! Each option adds a unique touch to your cheesecake bars. Enjoy the process of making this delightful treat. First, grab a medium bowl. In it, combine 1 ½ cups of graham cracker crumbs, ½ cup of melted unsalted butter, and ¼ cup of granulated sugar. Mix until it looks like wet sand. This helps each bite feel rich and sweet. Next, press this mixture firmly into a lined 9x9-inch baking pan. Use a measuring cup or your hands to pack it down tightly. This forms a solid base for your bars. Place the pan in the fridge while you prepare the filling. Now, take a large mixing bowl. Beat 16 oz of softened cream cheese with an electric mixer until it’s smooth and creamy. Gradually add in ¾ cup of powdered sugar and 1 teaspoon of vanilla extract. Mix until fully combined. In a separate bowl, whip 1 cup of heavy whipping cream until stiff peaks form. Gently fold this whipped cream into your cream cheese mixture. Keep folding until no streaks remain. This step gives your filling a light texture. It’s time to add some fun! Stir in ¼ cup of rainbow sprinkles, being careful not to break them too much. Then, pour this cream cheese mixture over your prepared crust. Use a spatula to spread it evenly. Make sure the top is smooth. For a festive touch, sprinkle extra rainbow sprinkles on top. Cover the pan with plastic wrap and refrigerate for at least 4 hours. This helps the bars set perfectly. When they are firm, lift the cheesecake out of the pan using the parchment paper and cut into bars. Enjoy your delightful treat! To make the best cheesecake bars, start with soft cream cheese. Softening it helps you mix it easily. Cold cream cheese can lead to lumps. So, let it sit out for a while before you begin. Be careful when whipping the cream. Whip it just until stiff peaks form. Overwhipping can make it too dense. You want a light and airy texture in your cheesecake. This keeps every bite creamy and delightful. When it's time to serve, pick a colorful platter. A bright plate makes your bars pop. Add extra sprinkles on top for fun. It makes them look festive and inviting. For a touch of elegance, garnish with mint leaves. The green adds a nice contrast to the colors. It also gives a fresh smell that pairs well with the sweet taste. Your guests will love the looks as much as the flavor! {{image_2}} You can change the flavor of your Funfetti cheesecake bars easily. One way is to swap vanilla extract for almond extract. This gives a nice twist to the taste. You can also add chocolate chips to the filling. They melt slightly and add a rich chocolate flavor. Another fun idea is to use fruit preserves. Swirls of raspberry or strawberry can brighten your bars. Each choice adds a new layer of flavor to enjoy. If you need a gluten-free option, use gluten-free graham crackers. They work just as well as regular ones. This simple swap keeps the crust just as tasty. For those who cannot have dairy, you can substitute cream cheese. Look for lactose-free cream cheese at the store. It blends well and keeps the texture creamy. These small changes let more people enjoy these delicious bars. Store your No-Bake Funfetti Cheesecake Bars in an airtight container. They will stay fresh in the fridge for up to 5 days. Keep them covered to avoid drying out. Just grab a bar whenever you crave a sweet treat! To freeze the cheesecake bars, cut them into individual portions first. Wrap each piece tightly in plastic wrap and then place them in a freezer-safe container. This helps to keep them fresh and tasty. When you want to enjoy them, remove a bar from the freezer and let it thaw in the fridge overnight. This method keeps the flavors intact and the texture just right. Yes, you can make these cheesecake bars a day in advance. This saves time and allows the flavors to blend well. Just store them in the fridge until you are ready to serve. You can tell the cheesecake is set when it feels firm to the touch. It should not jiggle when you shake the pan slightly. This means it is ready to slice and serve. If you need a substitute for heavy whipping cream, consider using coconut cream or mascarpone. Both options work well and offer a creamy texture. Yes, you can use gluten-free graham crackers to make a gluten-free crust. This way, everyone can enjoy these funfetti cheesecake bars without worry. This blog post shows how to make simple, fun cheesecake bars. We covered ingredients, steps, tips, and variations. You learned to perfect the crust and filling while exploring different flavors. Remember, soft cream cheese is key for smooth mixing. Feel free to get creative with flavors and toppings. Store leftovers safely, so they last longer. These bars are great for any occasion. Enjoy this sweet treat with friends and family!

No-Bake Funfetti Cheesecake Bars Delightful Treat Idea

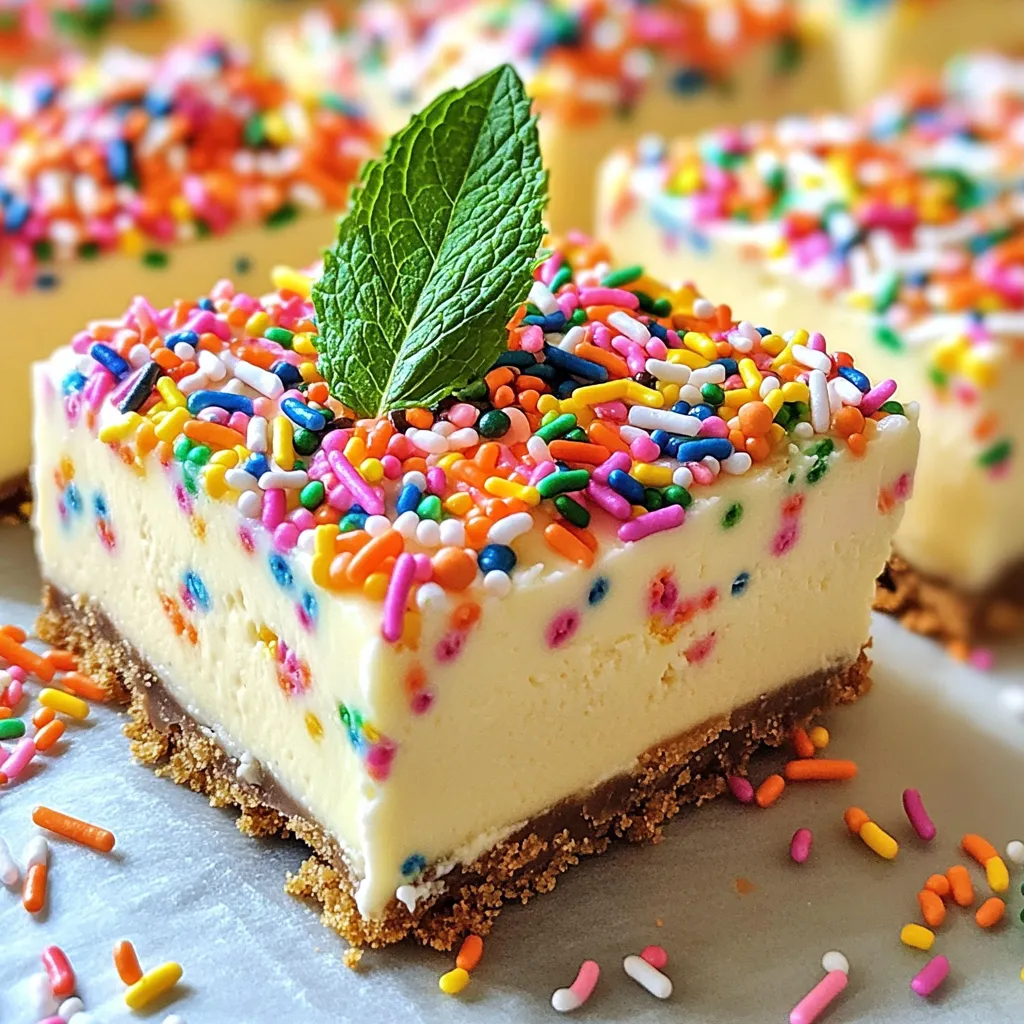
Looking for a sweet treat that’s easy and fun to make? These No-Bake Funfetti Cheesecake Bars are your answer! With

- 1 pound gnocchi (store-bought or homemade) - 2 tablespoons olive oil - 1 medium onion, diced The gnocchi is the star of this dish. You can use store-bought for ease or make it from scratch if you’re feeling adventurous. The olive oil adds richness and helps sauté the onion. Dicing the onion makes it sweet and soft as it cooks. - 4 cloves garlic, minced - 1 can (14 oz) diced tomatoes (with juices) - 1 cup vegetable broth Garlic brings a strong flavor. It pairs well with the tomatoes to create a base for the sauce. The canned tomatoes add sweetness and acidity. The vegetable broth enhances the flavor and keeps the dish light. - 1 cup heavy cream (or coconut cream for a dairy-free version) - 1 teaspoon dried Italian herbs - Salt and pepper to taste Heavy cream makes the dish rich and smooth. If you prefer a dairy-free option, coconut cream works well too. Italian herbs add depth, while salt and pepper bring out all the flavors. - 1 cup fresh basil leaves, chopped - ½ cup grated Parmesan cheese (optional) Basil adds freshness and a pop of color. It brightens the dish and gives it a garden feel. If you choose to add Parmesan, it will enhance the creaminess and umami. - Heat 2 tablespoons of olive oil in a large pot over medium heat. - Add 1 medium diced onion and sauté for 3-4 minutes until it turns soft. - Stir in 4 cloves of minced garlic and cook for 1 minute until fragrant. - Add 1 can (14 oz) of diced tomatoes with their juices, 1 cup of vegetable broth, and 1 cup of heavy cream. - Stir well to combine all the ingredients into a rich mixture. - Bring the mixture to a gentle simmer. - Add 1 pound of gnocchi and cook for 5-7 minutes. - Stir occasionally until the gnocchi are tender and fluffy. - Sprinkle in 1 teaspoon of dried Italian herbs. - Season with salt and pepper to taste. - Cook for an additional 2-3 minutes to let the flavors blend. - Remove the pot from heat and stir in 1 cup of chopped fresh basil. - Mix in ½ cup of grated Parmesan cheese if you want extra creaminess. - Spoon the creamy gnocchi into bowls. - Add more fresh basil and Parmesan on top for a lovely finish. To get the perfect gnocchi texture, choose fresh gnocchi if you can. Fresh gnocchi cooks quickly and has a light, fluffy feel. If you use dried gnocchi, follow the package directions for cooking time. For the best flavor, use fresh basil. Fresh basil adds a bright, sweet note. Dried basil works too but lacks that fresh taste. If using dried basil, add it earlier to let its flavor bloom. Pair your creamy gnocchi with crusty bread. The bread soaks up the sauce perfectly. A simple salad with mixed greens also works well. It adds a nice crunch and freshness. For garnishing, try adding more fresh basil leaves on top. You can also sprinkle extra Parmesan cheese for a rich finish. A drizzle of olive oil enhances the dish’s look and flavor. If you're looking for dairy-free options, use coconut cream instead of heavy cream. It gives a rich texture without dairy. To cut calories, use less cream or substitute with low-fat milk. You can also skip the cheese or use a lighter cheese. Adjusting these ingredients can help fit your health goals. {{image_2}} You can make this dish even better by adding protein. Consider adding cooked chicken or shrimp. Both options blend well with the creamy sauce. If you're looking for plant-based protein, try chickpeas or lentils. They add texture and keep the dish hearty. Want to add more greens? Incorporate spinach or kale. They cook down nicely and add nutrition. You can also toss in bell peppers or zucchini for color. This makes your dish more vibrant and fun to eat. If you like heat, add red pepper flakes. They give a nice kick to the creamy sauce. You can also try using spicy sausages. Just slice them up and cook them with the onions. This will add a whole new flavor profile to your gnocchi. To store your creamy tomato basil gnocchi, let it cool first. Place it in an airtight container. This way, it stays fresh. It lasts about 3 to 5 days in the fridge. If you want it to taste great, eat it within this time. Freezing gnocchi is easy. Portion it into small servings. Use freezer-safe containers or bags. Write the date on them. It lasts for about 2 to 3 months in the freezer. To reheat, let it thaw overnight in the fridge. It helps keep the texture nice. For reheating, the stovetop works best. Put the gnocchi in a skillet on low heat. Add a splash of broth or cream to keep it moist. Stir it often to avoid burning. You want it hot and creamy, not soggy. Enjoy your meal just like it was fresh! Yes, you can use frozen gnocchi. When using frozen gnocchi, skip the thawing process. Just add them straight to the pot when the sauce is simmering. This way, they will cook perfectly in about 8-10 minutes. Keep stirring occasionally to ensure even cooking. If you want a lighter option, use half-and-half or whole milk. For a lactose-free choice, coconut cream works well too. Almond milk or soy milk can also be used, but they may change the flavor slightly. Adjust the seasoning to balance any changes. To make this dish vegan, swap heavy cream for coconut cream or cashew cream. Use vegetable broth as your base. For cheese, try nutritional yeast for a cheesy flavor without dairy. All the other ingredients remain the same, making it easy to adapt. Yes, you can prepare this dish ahead of time. Cook the gnocchi and sauce, then cool it completely before storing. Keep it in an airtight container in the fridge for up to three days. To reheat, add a splash of broth or water to help it come back to life. Absolutely! This dish is perfect for meal prep. Portion it into containers and store it in the fridge. It lasts about three days. You can also freeze the portions for up to a month. Just make sure to reheat gently to avoid mushy gnocchi. In this article, I covered how to make a delicious gnocchi dish. You learned about essential ingredients, a step-by-step guide, and helpful tips. I shared ways to customize the recipe with proteins and veggies. Storing and reheating your leftovers will keep every bite tasty. Whether you crave creaminess or want a vegan version, you can adjust as needed. Enjoy creating this meal again and again, savoring each forkful!

One-Pot Creamy Tomato Basil Gnocchi Delight

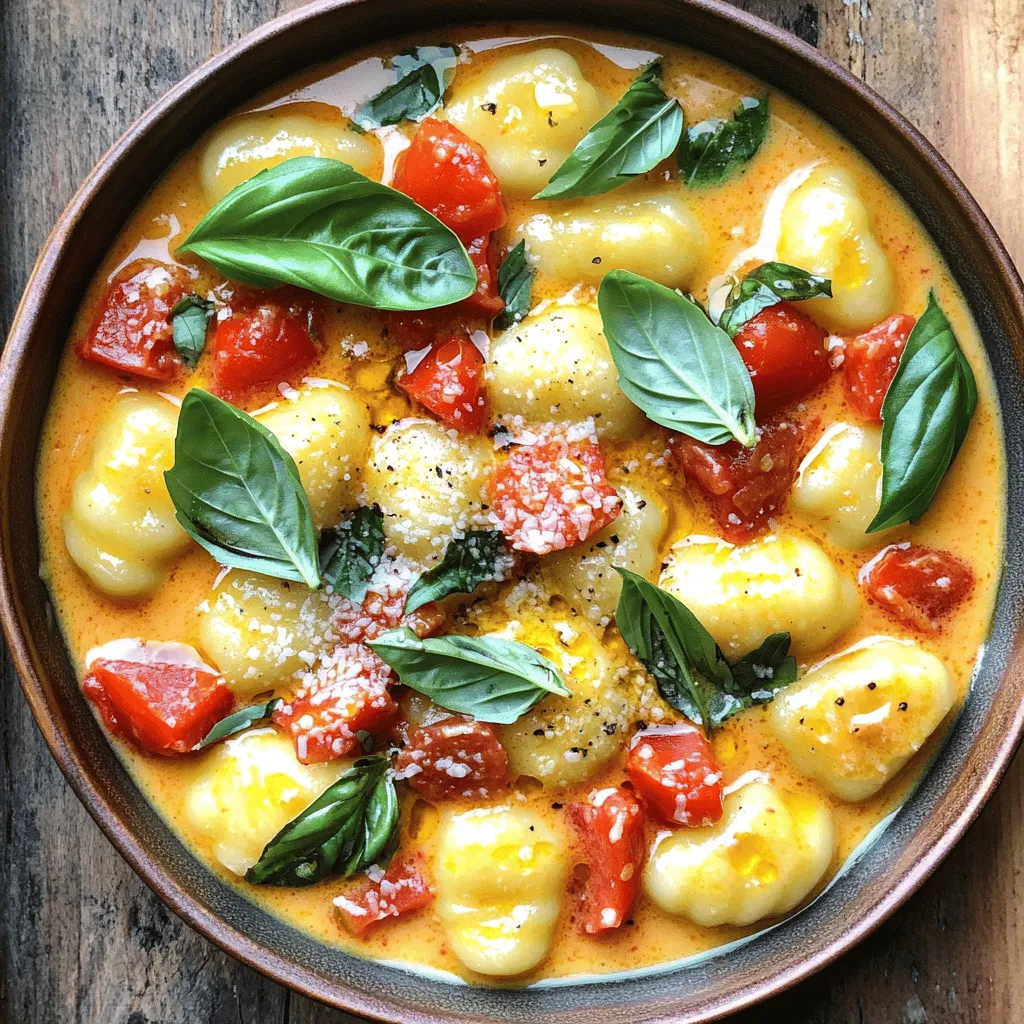
Welcome to One-Pot Creamy Tomato Basil Gnocchi Delight! If you crave a quick, hearty meal that bursts with flavor, you’re

To make these delicious apple cinnamon streusel muffins, gather the following ingredients: - 2 cups all-purpose flour - 1 cup granulated sugar - 1 tablespoon baking powder - 1/2 teaspoon baking soda - 1/2 teaspoon salt - 1 teaspoon ground cinnamon - 1/2 cup unsalted butter, melted - 2 large eggs - 1 cup buttermilk - 1 1/2 cups apples, peeled, cored, and diced (about 2 medium apples) - 1/2 cup finely chopped walnuts (optional) These basic ingredients create a soft and fluffy muffin. The apples add moisture and flavor. If you like nuts, add walnuts for a nice crunch. For the sweet streusel topping, you will need: - 1/2 cup all-purpose flour - 1/2 cup brown sugar, packed - 1/4 teaspoon ground cinnamon - 1/4 cup unsalted butter, softened The streusel brings a sweet and crunchy layer. Mix these well for the best texture. It gives the muffins a perfect finish. First, preheat your oven to 350°F (175°C). This step warms the oven, ensuring even baking. Next, line your muffin tin with paper liners. If you don’t have liners, grease the tin lightly with cooking spray. This helps prevent sticking, so your muffins come out easily. In a small bowl, mix together 1/2 cup of all-purpose flour, 1/2 cup of brown sugar, and 1/4 teaspoon of ground cinnamon. Use a fork to combine these dry ingredients well. Then, add 1/4 cup of softened unsalted butter. Mix until the mixture looks crumbly. This will be your tasty streusel topping. In a large mixing bowl, whisk together 2 cups of all-purpose flour, 1 cup of granulated sugar, 1 tablespoon of baking powder, 1/2 teaspoon of baking soda, 1/2 teaspoon of salt, and 1 teaspoon of ground cinnamon. Make sure everything is well combined. This mixture forms the base for your muffins. In another bowl, whisk together 1/2 cup of melted butter, 2 large eggs, 1 cup of buttermilk, and 1/2 teaspoon of vanilla extract. Mix until smooth. This wet mixture adds flavor and moisture to your muffins. Now, pour the wet mixture into the dry ingredients. Stir gently until just combined. It’s okay if there are a few lumps. Overmixing can make your muffins tough, so be careful here. Gently fold in 1 1/2 cups of diced apples and 1/2 cup of finely chopped walnuts, if you’re using them. This adds great flavor and texture. Next, scoop the batter into the muffin tin, filling each cup about 2/3 full. Sprinkle the streusel topping generously over each muffin. Bake in the preheated oven for 20-25 minutes. Check for doneness by inserting a toothpick in the center. If it comes out clean, your muffins are ready! To make perfect muffins, avoid overmixing the batter. When you mix too much, your muffins can become tough. Stir the wet and dry ingredients together gently. A few lumps are just fine. Ingredient temperature matters too. Use room temperature eggs and buttermilk. This helps your batter blend better and rise evenly in the oven. Choosing the right apples can make a big difference. I recommend using a mix of sweet and tart apples. Honeycrisp and Granny Smith work well together. They add great flavor and keep their shape when baked. You can also add spices for extra flavor. Consider mixing in some nutmeg or a bit of orange zest. These small changes can elevate the taste of your muffins. Serve your muffins warm for the best experience. Place them on a wooden board for a rustic look. Dust them lightly with powdered sugar for a sweet touch. For added flair, serve with caramel sauce for drizzling or a dollop of whipped cream. Both make your muffins even more tempting and tasty! {{image_2}} You can change up the flavor of your muffins and surprise your taste buds. Try adding different fruits like blueberries or pears. These fruits add a nice twist and keep things fresh. You can also mix in dried fruits, like cranberries or raisins, for added sweetness. If you're feeling adventurous, toss in some chocolate chips for a rich treat. The options are endless, and each variation offers a unique taste experience. If you want a gluten-free muffin, you can swap all-purpose flour for a gluten-free blend. This allows everyone to enjoy these delicious muffins without worry. For a dairy-free option, you can use almond milk or oat milk instead of buttermilk. Just add a splash of vinegar to help with the texture. These swaps make the recipe fit different diets while keeping it tasty. The streusel topping adds a lovely crunch, but you can get creative! Try mixing oats or nuts into your streusel for a different texture. You can also drizzle icing or glaze over the muffins for a sweet finish. A simple glaze made from powdered sugar and milk can elevate your muffins even more. These topping alternatives let you customize each batch to your liking. To keep your apple cinnamon streusel muffins fresh, store them at room temperature. Use an airtight container. This keeps moisture in and prevents them from drying out. If you have leftover muffins, let them cool first. Then, place them in the container with a paper towel. The towel absorbs extra moisture and helps keep them soft. For longer storage, freezing muffins is the way to go. Wrap each muffin tightly in plastic wrap. Place the wrapped muffins in a freezer bag or airtight container. This will keep them fresh for up to three months. When you are ready to enjoy them, thaw the muffins at room temperature. You can also reheat them in the oven at 350°F (175°C) for about 10 minutes. This brings back their warm, fresh-from-the-oven taste. It is important to know when muffins have gone bad. If you see mold, throw them away right away. A musty smell is another sign of spoilage. If the muffins feel dry or hard, they might not taste good anymore. Always check for a change in color or texture before eating. If you notice any of these signs, it’s best to discard the muffins for safety. To make muffins moist, use buttermilk and melted butter. Combine these with eggs for a rich texture. Do not overmix the batter. A few lumps are okay. Using fresh apples adds moisture too. This helps create a soft and tender muffin. Yes, you can use whole wheat flour. It gives muffins a nutty flavor. However, it may change the texture slightly. Whole wheat flour can make muffins a bit denser than regular flour. You might want to mix half all-purpose flour and half whole wheat for the best results. To prevent sticking, line the muffin tin with paper liners. You can also grease the tin with cooking spray or butter. Make sure to coat the sides well. This helps the muffins release easily after baking. You can make these muffins ahead of time. Bake them and let them cool completely. Store the muffins in an airtight container at room temperature. They stay fresh for about three days. You may also freeze them for up to three months. Apple Cinnamon Streusel Muffins pair well with coffee or tea. They also taste great with a side of caramel sauce. Whipped cream adds a nice touch too. For a unique twist, serve them with a scoop of vanilla ice cream. You learned how to make delicious Apple Cinnamon Streusel Muffins today. We covered the key ingredients, step-by-step instructions, and helpful tips. You can also explore variations to suit your taste and learn how to store your muffins properly. Remember, baking is as much about joy as it is about technique. Enjoy the process, share with friends, and make these muffins your own. Happy baking!

Apple Cinnamon Streusel Muffins Tempting and Tasty Treat

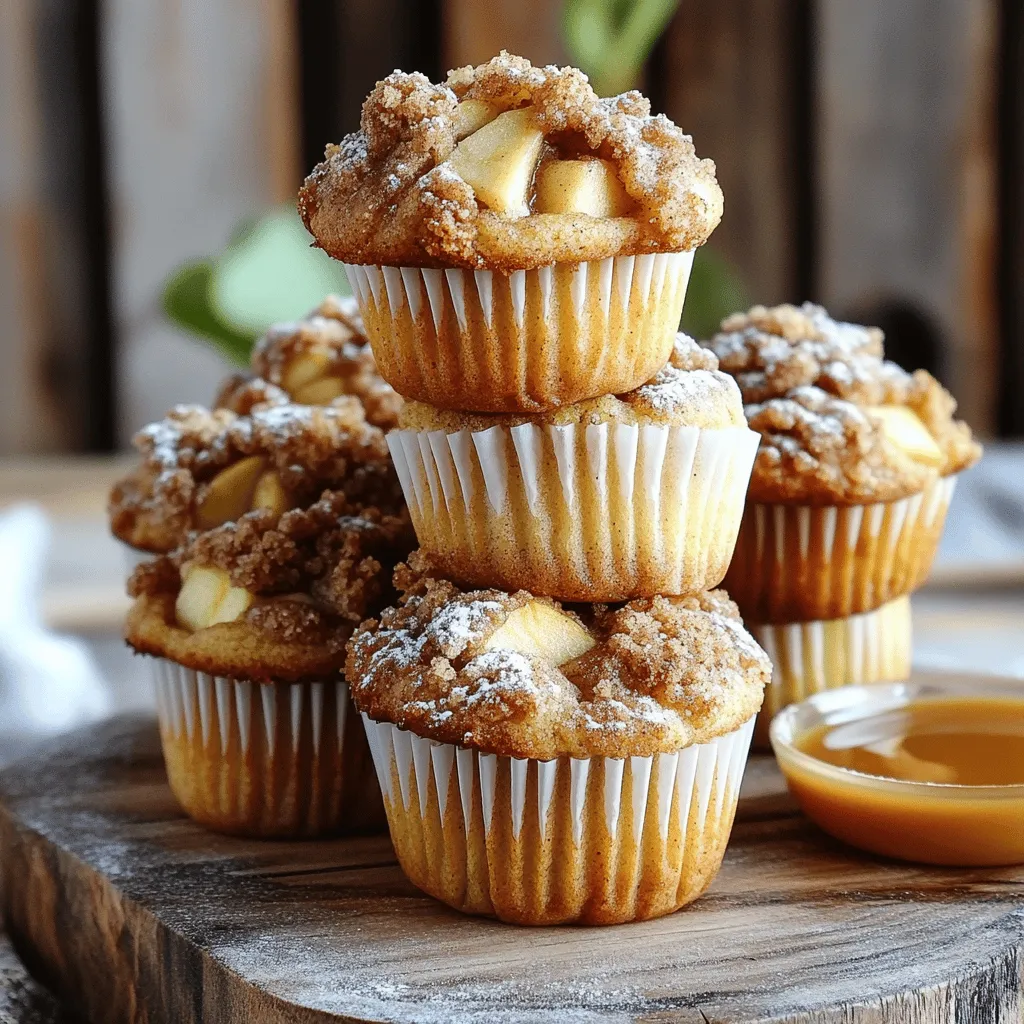
Are you ready to indulge in a warm, cozy treat? My Apple Cinnamon Streusel Muffins are the perfect blend of

To make White Chocolate Cranberry No Bake Bars, gather these simple ingredients: - 1 cup vanilla wafer crumbs - 1/2 cup unsweetened shredded coconut - 1 cup dried cranberries, chopped - 1 cup white chocolate chips - 1/2 cup sweetened condensed milk - 1 tablespoon coconut oil - 1 teaspoon vanilla extract - A pinch of salt These ingredients create a mix of sweet, creamy, and chewy. The vanilla wafer crumbs give a nice base. The coconut adds a tropical twist. The cranberries add a tart flavor that balances the sweetness. You can add extra toppings for even more flavor and texture. Consider: - Extra dried cranberries - Shredded coconut Sprinkling these on top makes the bars look pretty. It also gives a fun texture contrast. If you have allergies or want to switch things up, here are some ideas: - For vanilla wafer crumbs, use graham cracker crumbs. - Swap sweetened condensed milk with coconut milk for a dairy-free option. - Use dark chocolate chips instead of white chocolate for a richer taste. These swaps keep the bars tasty while catering to different diets. Start by lining an 8x8 inch baking dish with parchment paper. Leave some paper hanging over the sides. This helps when you lift out the bars later. In a large bowl, add 1 cup of vanilla wafer crumbs. Next, mix in 1/2 cup of unsweetened shredded coconut. Stir these together until they are well combined. Take a microwave-safe bowl and add 1 cup of white chocolate chips, 1 tablespoon of coconut oil, and a pinch of salt. Heat the bowl in the microwave for 30 seconds. Stir, then heat again for another 30 seconds. Keep stirring until the mixture is smooth and melted. Pour the melted white chocolate mixture into the bowl with the crumb and coconut mix. Add in 1/2 cup of sweetened condensed milk and 1 teaspoon of vanilla extract. Mix everything together until well combined. Now, transfer the mixture into your lined baking dish. Use the back of a spatula or your hands to press it down evenly. Make sure it is compact to help the bars hold their shape. If you want extra texture and flavor, sprinkle some dried cranberries and coconut on top. Now, place the dish in the fridge. Let it chill for at least 3 hours or until fully set. After that, lift the bars out using the overhanging parchment paper and cut them into squares. To get the best texture in your White Chocolate Cranberry No Bake Bars, use fresh ingredients. Make sure the coconut is unsweetened to keep the bars from being too sweet. The vanilla wafer crumbs should be fine to help the bars hold together. Press down firmly when you pack the mixture into the pan. This step is key! A compact mix prevents the bars from crumbling when you cut them. Store these bars in an airtight container in the fridge. They can last about a week, but they taste best in the first few days. For serving, cut them into small squares. You can add a few extra dried cranberries or coconut on top for a nice touch. Serve them chilled or at room temperature. They make a great snack or dessert! One common mistake is not letting the bars set long enough. They need at least three hours in the fridge. If you skip this step, they won’t hold their shape. Another mistake is not mixing the ingredients well. Stir until everything is fully combined. This ensures you get that sweet and tangy flavor in every bite. Finally, don’t skip the parchment paper. It helps remove the bars easily from the pan. {{image_2}} You can make these bars even more fun by adding flavors. Try mixing in chopped nuts like almonds or walnuts for a crunchy bite. You can also add spices like cinnamon or nutmeg for warmth. Just a pinch of either spice can change the whole taste. Experiment and find your favorite mix! While white chocolate shines in these bars, you can switch it up. Use dark chocolate or semi-sweet chocolate for a rich twist. You can also blend these chocolates for a unique flavor. Each type of chocolate brings its own charm to the bars. If you want a healthier snack, consider some swaps. You can use almond flour instead of vanilla wafer crumbs. This change adds fiber and protein. For a lower sugar version, use sugar-free white chocolate chips. You can even replace sweetened condensed milk with a mix of Greek yogurt and honey. Enjoying these treats can be guilt-free! To keep your white chocolate cranberry no-bake bars fresh, store them in the fridge. Place the bars in an airtight container. This helps seal in moisture. If you stack them, add parchment paper between layers. This prevents sticking. You can also freeze these bars for longer storage. Cut the bars into squares first. Wrap each square in plastic wrap. Then, place them in a freezer-safe bag or container. They can stay in the freezer for up to three months. When you're ready to enjoy, let them thaw in the fridge overnight. These bars last about one week in the fridge. Keep an eye on them for any signs of spoilage. If they smell off or look strange, it's best to toss them. Enjoy these treats while they are fresh for the best taste and texture. No, fresh cranberries are too tart for this recipe. Dried cranberries add sweetness and chew. If you want a twist, try using dried cherries or raisins. They work well too. These bars need at least three hours to set in the fridge. I recommend leaving them overnight for the best firmness. This wait makes them easier to cut and enjoy. Yes! You can use gluten-free vanilla wafers. They make a great base for these bars. Check the labels to ensure the other ingredients are also gluten-free. Use a sharp knife for clean cuts. First, let the bars set fully. Lift them out using the parchment paper edges. Cut them into squares while they are cold for neat pieces. This blog post covered everything you need to create delicious no-bake bars. We explored essential ingredients, optional toppings, and key substitutions. I detailed step-by-step instructions, shared helpful tips for the best texture, and avoided common mistakes. We also discussed fun flavor variations and proper storage methods to keep your treats fresh. Remember, experimenting can lead to exciting new flavors. Try different chocolate types and toppings. Enjoy making your no-bake bars and sharing them with others!

White Chocolate Cranberry No Bake Bars Delightful Treat

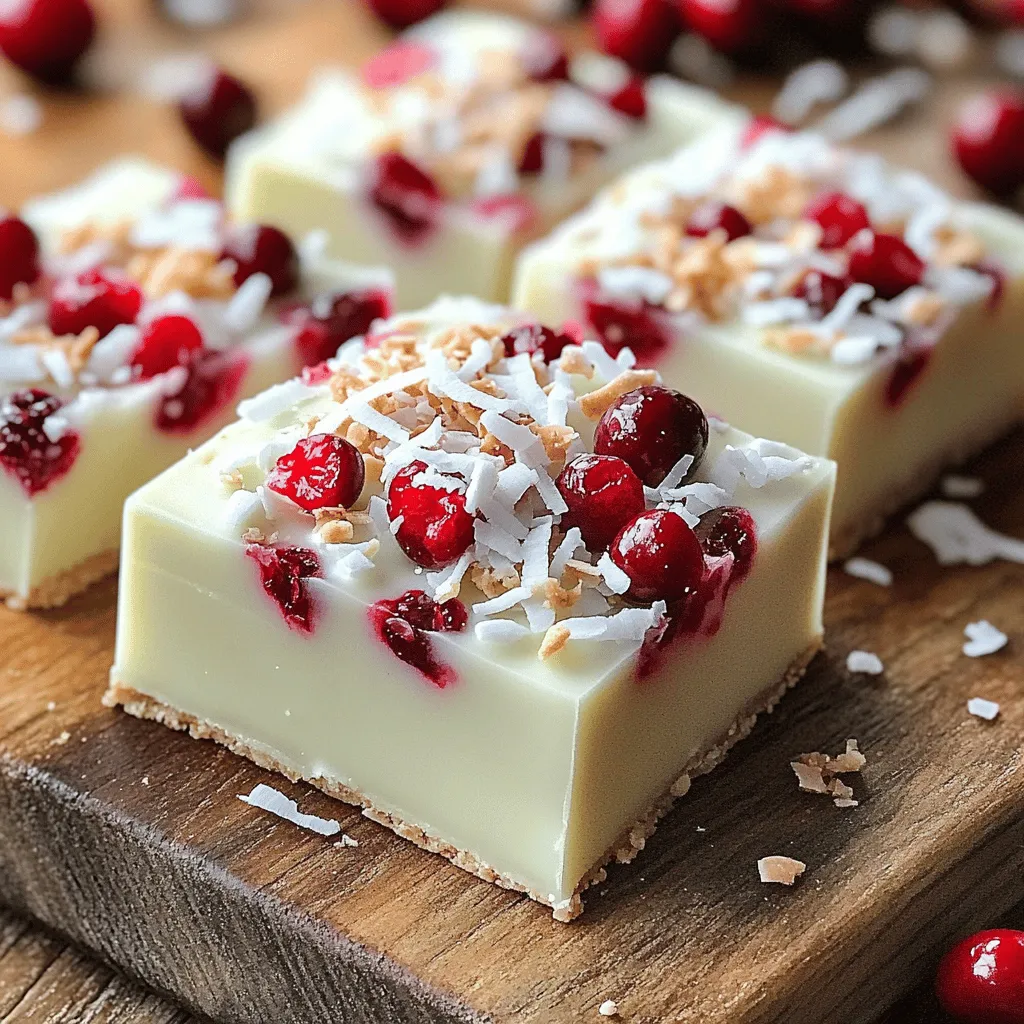
If you’re craving a sweet, simple treat, look no further. My White Chocolate Cranberry No Bake Bars are the perfect

To make a delicious pumpkin chai milkshake, you need a few key ingredients. Here’s what you will need: - 1 cup vanilla ice cream - 1/2 cup milk (dairy or non-dairy) - 1/2 cup pumpkin puree - 1 teaspoon chai spice blend (cinnamon, ginger, cardamom, cloves) - 2 tablespoons maple syrup (adjust to taste) - Whipped cream (for topping) - Ground cinnamon (for garnish) Each ingredient plays an important role in creating a creamy and flavorful milkshake. The vanilla ice cream gives it that smooth, rich base, while the milk adds creaminess. Pumpkin puree brings in the fall flavor we love, and the chai spice blend adds warmth and depth. Maple syrup sweetens it just right, and whipped cream makes it look fancy. Finally, a sprinkle of ground cinnamon on top adds that perfect touch. Enjoy gathering these ingredients, and get ready to make something wonderful! First, gather your ingredients. You need: - 1 cup vanilla ice cream - 1/2 cup milk (dairy or non-dairy) - 1/2 cup pumpkin puree - 1 teaspoon chai spice blend (cinnamon, ginger, cardamom, cloves) - 2 tablespoons maple syrup (adjust to taste) - Whipped cream (for topping) - Ground cinnamon (for garnish) Make sure you have everything ready before you start. This will help you work fast and keep things fun. Now, it’s time to blend. Add the vanilla ice cream, milk, pumpkin puree, chai spice blend, and maple syrup into your blender. Blend on high until the mixture is smooth and creamy. Check the mix to ensure all ingredients blend well. If you want it sweeter, add more maple syrup and blend again. Once you finish blending, pour the milkshake into tall glasses. Top each glass with a generous swirl of whipped cream. Finish with a dusting of ground cinnamon. This adds flavor and looks nice. Serve your pumpkin chai milkshake right away. You can use a straw or a long spoon to enjoy it. To get a smooth milkshake, make sure your ice cream is soft. Let it sit out for a few minutes before blending. This helps the ice cream blend well with the other ingredients. Use a high-powered blender for the best results. Blend on high until everything mixes into a creamy texture. If it seems too thick, add a splash of milk and blend again until you reach your desired consistency. Everyone has different tastes. Start with two tablespoons of maple syrup. Blend and taste the mixture. If it needs more sweetness, add more syrup, one tablespoon at a time. Mixing in some honey is another great way to sweeten. Remember, the pumpkin and spices have natural flavors, so don't overdo it on the sweetener. Serve your milkshake in tall glasses for a fun look. Top each glass with a swirl of whipped cream. Sprinkle some ground cinnamon on top for extra flavor and decoration. You can even add a cinnamon stick for a festive touch. For a special treat, serve with flavored straws or a long spoon. Enjoy your milkshake right away for the best taste! {{image_2}} You can easily make this milkshake dairy-free. Use non-dairy milk like almond or oat milk. Swap the vanilla ice cream for a dairy-free version. Many brands offer great flavors that work well. This change keeps the shake creamy without dairy. Want to mix things up? Add a scoop of peanut butter or a banana. These flavors add a fun twist. You could even try using different spices. Nutmeg or allspice can give a unique taste. A dash of vanilla extract can enhance the sweetness, too. If you want a lighter drink, consider these swaps. Use Greek yogurt instead of ice cream for a protein boost. You can also reduce the maple syrup. Try using a bit of honey or agave syrup instead. These changes keep the taste while cutting down on sugar. You might have some milkshake left after enjoying it. To store it, pour the leftover milkshake into an airtight container. Seal it tightly and place it in the fridge. Drink it within two days for the best taste. If you freeze it, the texture may change. Thaw it in the fridge before drinking. If you have extra pumpkin puree, freezing is a great choice. First, put the puree in a freezer bag. Remove as much air as you can before sealing it. You can also portion it into ice cube trays. This way, you can take out just what you need later. Pumpkin puree stays good in the freezer for up to six months. To keep your ingredients fresh, store them properly. Keep vanilla ice cream in the freezer and close the lid tightly. For milk, check the expiration date and keep it in the coldest part of the fridge. Pumpkin puree should also be sealed well if opened. Check spices for freshness by smelling them. If they lose their scent, it's time to replace them. Yes, you can make this milkshake vegan! Just use dairy-free ice cream and non-dairy milk. Almond milk or coconut milk works well. This keeps the flavor rich and creamy without any dairy. You can add more maple syrup to your taste. Start with one extra tablespoon. Blend again to mix it well. You can also use honey or agave syrup for sweetness. If you don't have chai spice, you can mix your own. Use equal parts cinnamon and ginger. Add a pinch of cardamom and cloves. This gives a similar warm flavor without chai spice. Absolutely! Add an extra tablespoon of pumpkin puree for a richer taste. This will make the milkshake thicker and more pumpkin-y. Just blend it well. You can use low-fat ice cream or yogurt. This reduces calories while keeping it creamy. You can also swap maple syrup for stevia or a banana for natural sweetness. It’s best to make it fresh. However, you can prepare the ingredients ahead. Just blend it when you are ready to serve. If you freeze leftovers, blend again before serving. You can use crumbled graham crackers or nuts for crunch. A sprinkle of nutmeg also adds great flavor. Get creative with your toppings to make it fun! If you have any leftovers, store them in the fridge for up to one day. Make sure to cover it tightly. The milkshake may separate, so just blend it again before serving. This blog post shared a tasty pumpkin chai milkshake recipe. You learned about the ingredients, like vanilla ice cream and chai spices. We covered steps to make it smooth and delicious. I offered tips for the best taste and texture, plus fun ways to change it. Remember, you can store leftovers easily. Now, make your own tasty milkshake. Enjoy the flavors and get creative with variations!

Pumpkin Chai Milkshake Creamy Fall Delight Recipe

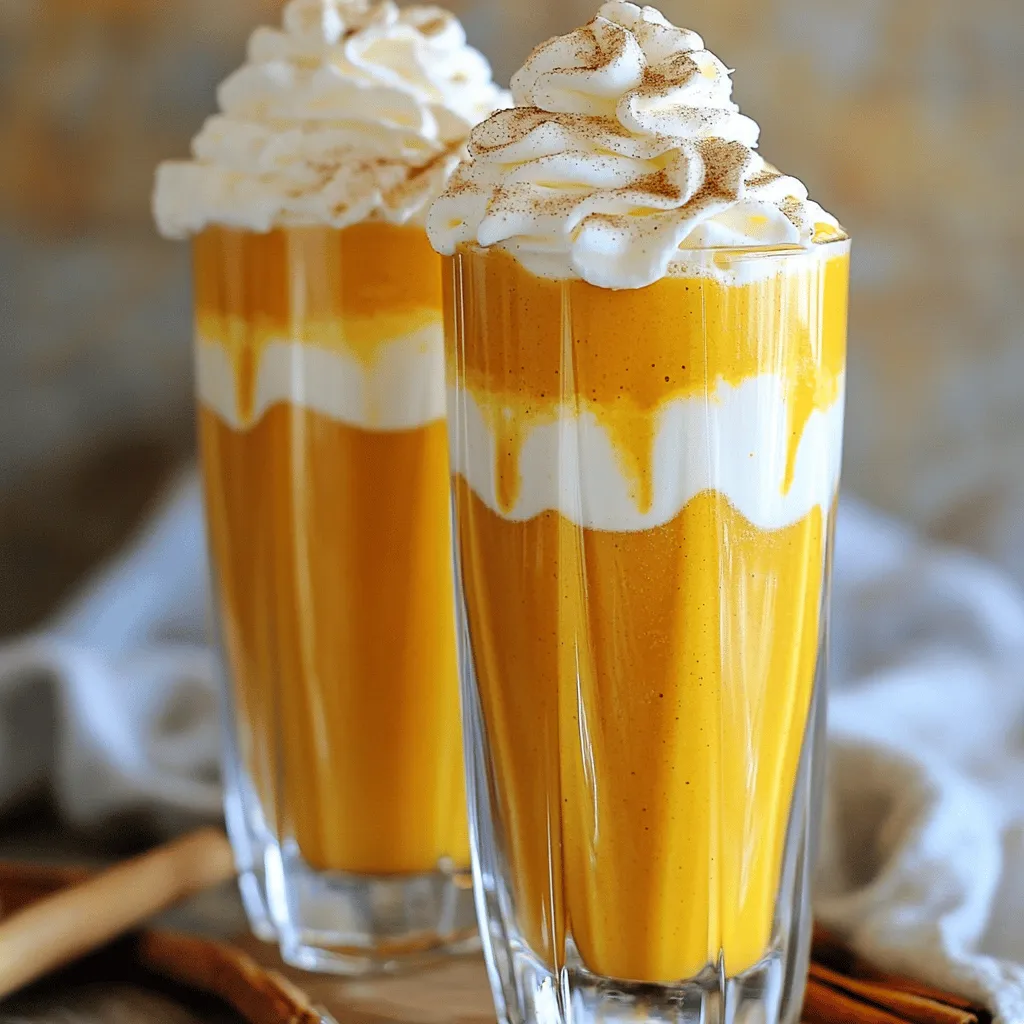
Craving a sweet treat that captures the essence of fall? You’ve found it! This Pumpkin Chai Milkshake is creamy, rich,

To create your Protein Chocolate Cottage Cheese Pudding, gather these simple ingredients: - Cottage cheese (1 cup, preferably low-fat) - Unsweetened cocoa powder (2 tablespoons) - Sweeteners (2 tablespoons honey or maple syrup) - Vanilla extract (1 teaspoon) - Chocolate protein powder (1 scoop) - A pinch of salt - Optional toppings (chopped nuts, cocoa nibs, or berries) These ingredients come together to make a tasty and nutritious treat. The cottage cheese provides protein and creaminess. Cocoa powder adds rich chocolate flavor. Sweeteners like honey or maple syrup balance the taste. Vanilla extract enhances all the flavors. The chocolate protein powder boosts the protein content, making it perfect for a snack or dessert. Salt rounds out the sweetness and deepens flavor. Feel free to customize your pudding with toppings. Chopped nuts give crunch, cocoa nibs add extra chocolate, and berries bring freshness. 1. Blending ingredients for a smooth texture First, grab your blender or food processor. Add 1 cup of cottage cheese, 2 tablespoons of unsweetened cocoa powder, 2 tablespoons of honey, 1 teaspoon of vanilla extract, 1 scoop of chocolate protein powder, and a pinch of salt. Blend on high for 1-2 minutes. Stop to scrape down the sides. You want it smooth and creamy. 2. Taste testing and adjusting sweetness After blending, it’s time to taste! If you find it needs more sweetness, add a little more honey or maple syrup. Blend again briefly to mix it in. This step makes sure it's just right for your taste buds. 3. Chilling process in the refrigerator Next, transfer the pudding to individual bowls or one big bowl. Chill it in the refrigerator for at least 30 minutes. This helps the flavors blend and makes it firm up a bit. - Ideas for presentation When ready to serve, you can get creative! Top each bowl with chopped nuts for a crunchy bite or cocoa nibs for extra chocolate. Fresh berries add color and freshness, making it look great. - Portioning for individual servings If you want to keep things neat, use small bowls or jars. This makes it easy for everyone to grab their own portion. Enjoying this pudding feels special when it’s nicely presented! To get the best texture in your pudding, focus on blending time. Blend for 1-2 minutes on high. This makes the pudding smooth and creamy. If you see lumps, stop and scrape down the sides. This ensures all ingredients mix well. If you skip this step, you may bite into unblended cottage cheese. That can ruin your pudding experience. A well-blended mix leads to a dessert that feels rich and delightful. You can adjust the sweetness based on your taste. Try using honey for a natural touch. Maple syrup is a great vegan option. If you want less sweetness, reduce the honey or syrup. Start with less and taste as you go. This way, you control how sweet your pudding becomes. You can also try stevia or agave for a different flavor. Always blend again after making changes to ensure it mixes well. {{image_2}} You can play with sweeteners in this recipe. If you want a lower-calorie option, try stevia. Agave syrup also works well and gives a nice flavor. For those who avoid dairy, vegan cottage cheese is a great swap. You can find it in many stores now, and it blends smoothly just like the regular kind. Make this pudding even better by adding spices. A little cinnamon can add warmth and depth. Nutmeg gives a lovely twist too. You might also try adding extracts. Almond extract adds a sweet nutty flavor. For a coffee kick, use coffee extract. These small changes can make your pudding feel fresh and new every time! To keep your protein chocolate cottage cheese pudding fresh, use airtight containers. Glass containers work best. They seal tightly and keep flavors locked in. You can also use plastic containers if you prefer. Just ensure they close well. Store the pudding in the fridge. It helps the flavors blend and stay fresh. This pudding lasts about 3 to 5 days in the fridge. Always check for signs of spoilage. If you see mold or an off smell, toss it. The texture should stay creamy and smooth. If it becomes watery or grainy, it’s time to say goodbye. Enjoy your pudding while it's fresh for the best taste! The pudding has a creamy and smooth texture. Blending cottage cheese with cocoa powder makes it rich. You get a dessert that feels indulgent yet healthy. This pudding melts in your mouth, making it a tasty treat. Yes, you can freeze this pudding. Just place it in an airtight container. When you want to enjoy it, let it thaw in the fridge overnight. The texture may change slightly, but it's still tasty. This recipe is perfect for meal prep. You can make it ahead and store it in the fridge. It lasts up to four days, so you can enjoy it anytime. Just add your toppings before serving for the best taste. Each serving has about 20 grams of protein. This comes from the cottage cheese and protein powder. It makes this pudding a great choice for a snack or dessert that fuels your day. This blog post explored a tasty Protein Chocolate Cottage Cheese Pudding. We covered key ingredients like cottage cheese, cocoa powder, and sweeteners. You learned the best preparation steps, serving suggestions, and tips for texture and sweetness. Variations include swaps for sweeteners and fun spice add-ins. Proper storage info ensures your pudding lasts longer. This recipe is simple and full of protein, making it a great treat. Enjoy experimenting with flavors and impressing your friends with this delicious dessert. It’s a win-win for your taste buds and health!

Protein Chocolate Cottage Cheese Pudding Delight

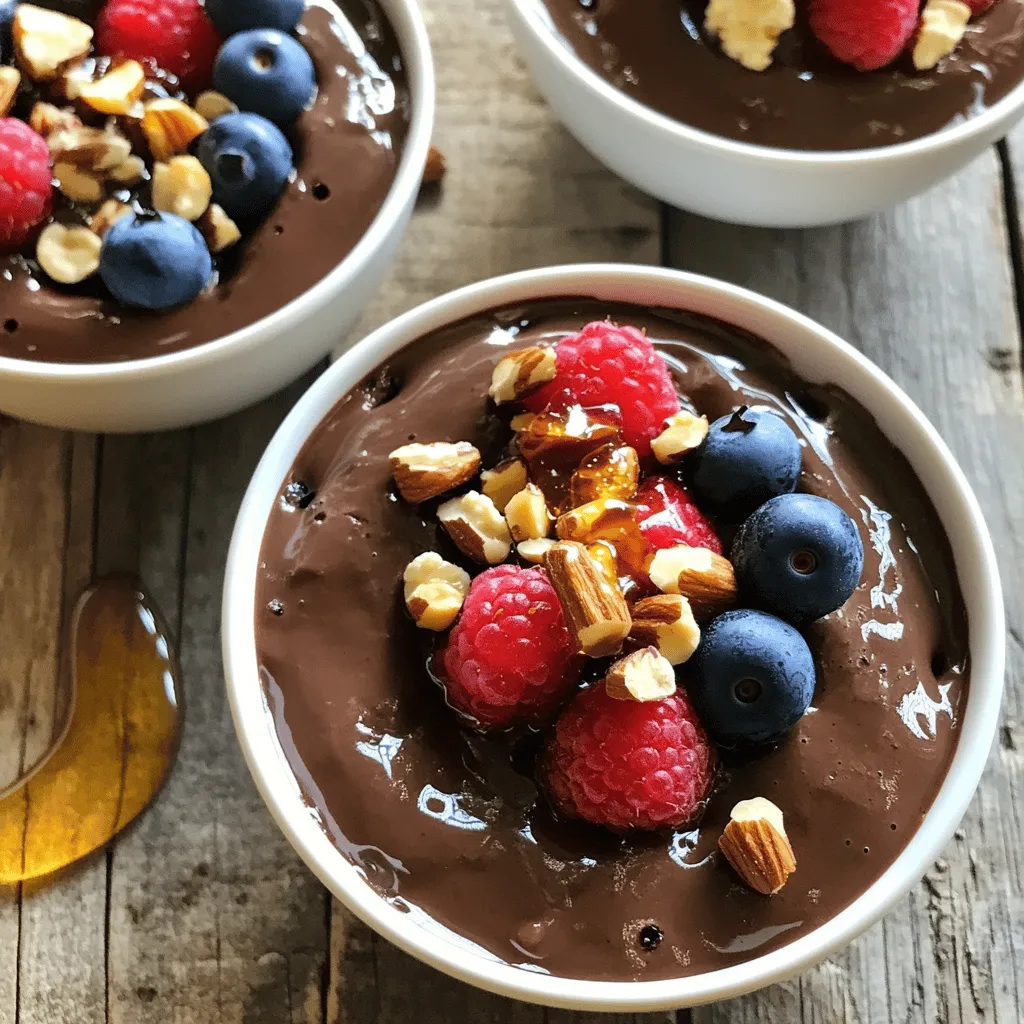
Looking for a tasty, protein-packed snack? You’re in the right place! My Protein Chocolate Cottage Cheese Pudding Delight is a

- 1.5 lbs boneless, skinless chicken breasts, sliced into strips - 1 red bell pepper, sliced - 1 green bell pepper, sliced - 1 medium yellow onion, sliced These ingredients come together to create a colorful and tasty dish. The chicken gives you protein and the peppers add crunch and sweetness. The onion brings in a nice flavor that ties it all together. - 3 tablespoons olive oil - 2 tablespoons chipotle seasoning (or a mix of chili powder, cumin, smoked paprika, and garlic powder) - 1 teaspoon salt - 1/2 teaspoon black pepper - 1 lime, juiced The seasonings are key to making this meal special. Olive oil keeps everything moist. The chipotle seasoning brings heat and depth. Lime juice adds a fresh twist. Salt and pepper enhance the flavors, making every bite tasty. - Fresh cilantro, chopped (for garnish) - Flour or corn tortillas (for serving) Cilantro adds a bright, fresh touch. You can use flour or corn tortillas, depending on your taste. Wrap up the chicken and veggies for a delicious meal that’s fun to eat. - Preheating the Oven Start by preheating your oven to 425°F (220°C). This helps get the chicken and veggies nice and crispy. - Preparing Chicken and Vegetables In a large bowl, slice 1.5 pounds of boneless, skinless chicken breasts into strips. Then, slice 1 red bell pepper, 1 green bell pepper, and 1 medium yellow onion. Add all of these to your bowl. - Seasoning the Mixture Drizzle 3 tablespoons of olive oil and the juice of 1 lime over the chicken and veggies. Add 2 tablespoons of chipotle seasoning, 1 teaspoon of salt, and 1/2 teaspoon of black pepper. Toss everything well so that it gets coated with the tasty mix. - Spreading on the Baking Sheet Take a large baking sheet and line it with parchment paper. Spread the chicken and vegetable mixture evenly on the sheet. Make sure it is in a single layer for even cooking. - Roasting the Mixture Place the baking sheet in your preheated oven. Roast the mixture for 20 to 25 minutes. Stir halfway through to help it cook evenly. The chicken should be cooked through, and the veggies will be tender and lightly charred. - Serving Suggestions Once cooked, remove the sheet from the oven and let it rest for 5 minutes. Serve the fajita mix in warm flour or corn tortillas. Add fresh cilantro on top for a burst of flavor. Enjoy your meal! Choosing the Right Chicken I prefer using boneless, skinless chicken breasts for this recipe. They stay tender and juicy. Cut the chicken into thin strips for even cooking and to soak up the flavors. Variations in Vegetables Feel free to mix and match your veggies. I love using red and green bell peppers, but you can add zucchini, mushrooms, or corn. Each veggie brings its own taste. Seasoning Adjustments Chipotle seasoning gives a nice kick. If you want less heat, cut back on the seasoning. You can also add a bit of lime zest for extra zing. Oven vs. Air Fryer The oven is great for roasting and gives a nice char. If you use an air fryer, cut cooking time in half. Both methods work well, so choose what fits your kitchen. How to Properly Roast Spread the chicken and veggies evenly on the pan. This helps everything roast well. Stir halfway through cooking for even browning. When done, let it sit for a few minutes for the best texture. {{image_2}} You can make these fajitas your own with some fun twists. - Adding Different Proteins Try using shrimp or beef instead of chicken. Just adjust cooking times. For shrimp, cook until they turn pink. For beef, use thin slices and cook until browned. - Vegetarian Options Swap chicken for hearty veggies like mushrooms or zucchini. Add black beans for protein. Roasting these adds great flavor. - Spice Level Adjustments Want a kick? Add more chipotle seasoning or fresh jalapeños. For a milder taste, reduce the seasoning or use sweet peppers. Pair your fajitas with tasty sides and dips. - Sides that Pair Well Serve with rice or beans for a filling meal. Corn salad or grilled corn on the cob also make great matches. Don’t forget a fresh salad with lime dressing. - Dipping Sauces Suggestions A creamy avocado sauce or simple sour cream works well. You can also try pico de gallo for a fresh taste. Salsa verde adds a nice zing, too. After you enjoy your meal, store leftovers right away. Place them in an airtight container. You can keep them in the fridge for up to three days. If you want to save them longer, freeze the fajita mixture. - Refrigeration Guidelines - Use an airtight container. - Store in the fridge for up to 3 days. - Freezing Instructions - Use freezer-safe bags or containers. - Store for up to three months. When it’s time to eat again, you want your fajitas to taste great. Reheat them well to enjoy the flavors. - Best Methods for Reheating - Use a skillet over medium heat for a few minutes. - You can also use the microwave for 1-2 minutes. - Tips to Maintain Texture - Stir the mixture while reheating. - Add a splash of water if it seems dry. - Avoid overheating to keep the chicken tender. How long do Chipotle Chicken Fajitas last in the fridge? Chipotle Chicken Fajitas last about 3 to 4 days in the fridge. Store them in an airtight container. This keeps the chicken and veggies fresh longer. Can I use frozen chicken for this recipe? Yes, you can use frozen chicken, but it needs to thaw first. Cooking frozen chicken directly can result in uneven cooking. Thaw it overnight in the fridge for best results. What's the best way to serve these fajitas? Serve these fajitas in warm tortillas. You can use flour or corn tortillas, depending on your taste. Add fresh cilantro and lime on top for extra flavor. Can I make this recipe in advance? Yes, you can prep the chicken and veggies ahead of time. Store them in the fridge for up to a day. This makes dinner prep quick and easy. What can I substitute for chipotle seasoning? You can mix chili powder, cumin, smoked paprika, and garlic powder. These spices give a similar smoky flavor. Adjust the amounts to suit your taste. How can I make this dish healthier? To make this dish healthier, use lean chicken breast and add more veggies. You can also use whole grain tortillas for added fiber. This boosts nutrition without losing flavor. In this post, we explored making tasty chicken fajitas. We covered essential ingredients like chicken, veggies, and seasonings. The step-by-step guide made cooking simple, and our tips shared ways to perfect your meal. Remember, you can customize your fajitas to fit your taste. Store leftovers properly to keep them fresh. With this easy recipe and helpful advice, you can enjoy delicious fajitas anytime. Happy cooking!

Chipotle Chicken Fajita Sheet Pan Delight Meal

Looking for a simple and tasty meal? My Chipotle Chicken Fajita Sheet Pan Delight Meal is the answer! This one-pan

Older posts
Newer posts
← Previous Page1 … Page23 Page24 Page25 … Page84 Next →

dsad

© 2026 Foodish Talk • Built with GeneratePress

Our Policies

  • Copyright Policy
  • Cookie Policy
  • GDPR Policy
  • Privacy Policy
  • Disclaimer
  • Terms Of Use

More Information

  • Home
  • About
  • Contact
  • Appetizers
  • Dessert
  • Dinner
  • Drinks
©2026, Foodish Talk About Back To Top