Skip to content
DisclaimerTerms Of UseGDPR PolicyCookie Policy

Foodish Talk

  • Home
  • Drinks
  • Appetizers
  • Dinner
  • Dessert
  • About
  • Contact
  • Privacy Policy
DisclaimerTerms Of UseGDPR PolicyCookie Policy

NO-ING-IMG

- 8 oz fettuccine pasta - 1 cup cottage cheese - 1/2 cup grated Parmesan cheese - 1/2 cup heavy cream - 3 cloves garlic, minced - 1 tablespoon olive oil - 1 teaspoon Italian seasoning - Salt and pepper to taste - Fresh parsley, chopped (for garnish) - Extra Parmesan cheese (for topping) To make the best Cottage Cheese Alfredo Pasta, measuring is key. Use dry measuring cups for pasta and cheese. For liquids like cream, use a liquid measuring cup. Always level off dry ingredients with a straight edge. This ensures you get the right amounts every time. Too much or too little can change the taste and texture. If you need to swap ingredients, it’s easy! Here are some ideas: - For fettuccine, try any pasta shape you like, such as penne or spaghetti. - You can use ricotta cheese instead of cottage cheese for a different flavor. - If you want a lighter sauce, swap heavy cream for half-and-half or milk. - For a dairy-free option, try using cashew cream or a dairy-free cheese. - Fresh basil can replace parsley for a fresh twist. These swaps will still give you a tasty dish while fitting your needs! First, grab a large pot. Fill it with water and add salt. Bring the water to a boil. Once boiling, add 8 oz of fettuccine pasta. Cook it according to the package instructions. You want it to be al dente, firm but cooked. After it's done, drain the pasta but save a cup of the water. Set the pasta aside for later. Next, take a medium saucepan. Heat 1 tablespoon of olive oil over medium heat. Add 3 cloves of minced garlic. Sauté the garlic for about 1 minute. You want it fragrant but not burned. This step gives the sauce a rich flavor. Now, grab your blender. Add 1 cup of cottage cheese, 1/2 cup of grated Parmesan cheese, and 1/2 cup of heavy cream. Toss in 1 teaspoon of Italian seasoning, and add salt and pepper to taste. Blend everything until it’s smooth and creamy. This mixture is the heart of your Alfredo sauce. Pour the blended cheese mixture into the saucepan with the garlic. Stir it over low heat until it warms up. If it’s too thick, slowly add some of that reserved pasta water. Keep stirring until you reach your desired sauce consistency. Finally, add the cooked fettuccine to the sauce. Gently toss to coat the pasta evenly. Cook it for an extra 2-3 minutes to let all the flavors blend. When ready, plate the pasta and sprinkle extra Parmesan cheese on top. Add fresh chopped parsley for a nice touch. Enjoy your creamy dish! To make your sauce creamier, blend the cottage cheese well. Use a high-speed blender for a smooth texture. If your sauce is still thick, add a little pasta water. This will help thin it out while keeping it rich. You can also mix in more heavy cream for extra creaminess. Just remember to add it slowly until you reach your desired texture. Adding herbs and spices can elevate your dish. Italian seasoning brings a classic flavor to the sauce. You can also try fresh herbs like basil or thyme for a fresh twist. A pinch of red pepper flakes adds a nice kick if you enjoy some heat. Taste your sauce as you mix in these flavors to ensure it’s just right. For perfectly cooked fettuccine, follow the package directions closely. Use plenty of salted water to enhance the pasta’s flavor. Stir the pasta often while it cooks to prevent it from sticking. When it’s al dente, drain it quickly but save some pasta water. This water is great for adjusting the sauce’s thickness later. {{image_2}} You can boost the nutrition of Cottage Cheese Alfredo Pasta by adding vegetables. Broccoli, spinach, or peas work well. Just steam or sauté them before mixing. This will keep the veggies bright and crisp. Bell peppers add a nice crunch and color too. You can even add zucchini for a fresh taste. If you want more protein, try adding chicken or shrimp. Grilled chicken adds a nice flavor and makes the dish heartier. If you like shrimp, sauté them in garlic and olive oil. Toss them in with the pasta for a quick meal. You can also use cooked sausage for a spicy twist. For gluten-free pasta, choose brown rice or chickpea pasta. They taste great and cook well in this dish. If you need a dairy-free option, use a plant-based cream and vegan cheese. Blending silken tofu with spices can make a creamy sauce too. These options keep the meal tasty while fitting your diet. After a meal, I often have some pasta left. Store your Cottage Cheese Alfredo Pasta in an airtight container. Make sure it cools down first. This helps keep it fresh. In the fridge, it lasts about 3 to 4 days. When it's time to eat again, reheat gently. Place the pasta in a pot over low heat. Add a splash of water or cream to keep it moist. Stir it often until warm. You can also use a microwave. Heat it in 30-second bursts. Stir in between to warm it evenly. If you want to save it longer, freezing is a great option. Portion the pasta into freezer-safe bags. Remove as much air as you can. Label the bags with the date. It can last up to 2 months in the freezer. To thaw, move it to the fridge a night before. Reheat as mentioned above, and enjoy! The best cheese for Alfredo sauce is Parmesan cheese. It adds a rich, nutty flavor. Freshly grated Parmesan works best for its smooth melt. You can mix in other cheeses too. For example, try Pecorino Romano for a saltier taste. Yes, you can use low-fat cottage cheese. It still gives the sauce a creamy texture. The flavor will be slightly less rich but still tasty. If you want a lighter dish, low-fat works well. To make this recipe vegan, swap cottage cheese for cashew cream or silken tofu. Use nutritional yeast instead of Parmesan for a cheesy flavor. Replace heavy cream with coconut cream or almond milk. These changes keep the dish rich and creamy. To make the Alfredo sauce thicker, you can add more cheese. Blending in extra Parmesan helps. You can also reduce the sauce on low heat. Adding a cornstarch slurry can thicken it quickly too. Mix one tablespoon of cornstarch with two tablespoons of water before adding. Cottage Cheese Alfredo Pasta can be healthy. It has protein from cottage cheese and Parmesan. You can control the fat by adjusting cream levels. Adding vegetables boosts nutrition too. Overall, it's a tasty and satisfying meal. This blog post covered how to make a delicious Alfredo pasta. We discussed the key ingredients, how to cook the pasta, and make the sauce. I shared tips to enhance flavor and texture, plus some tasty variations. We also explored how to store your leftovers. Simple adjustments let you create your perfect dish. Use fresh herbs or your favorite protein. Always keep these tips in mind to enjoy creamy Alfredo pasta any time. Happy cooking!

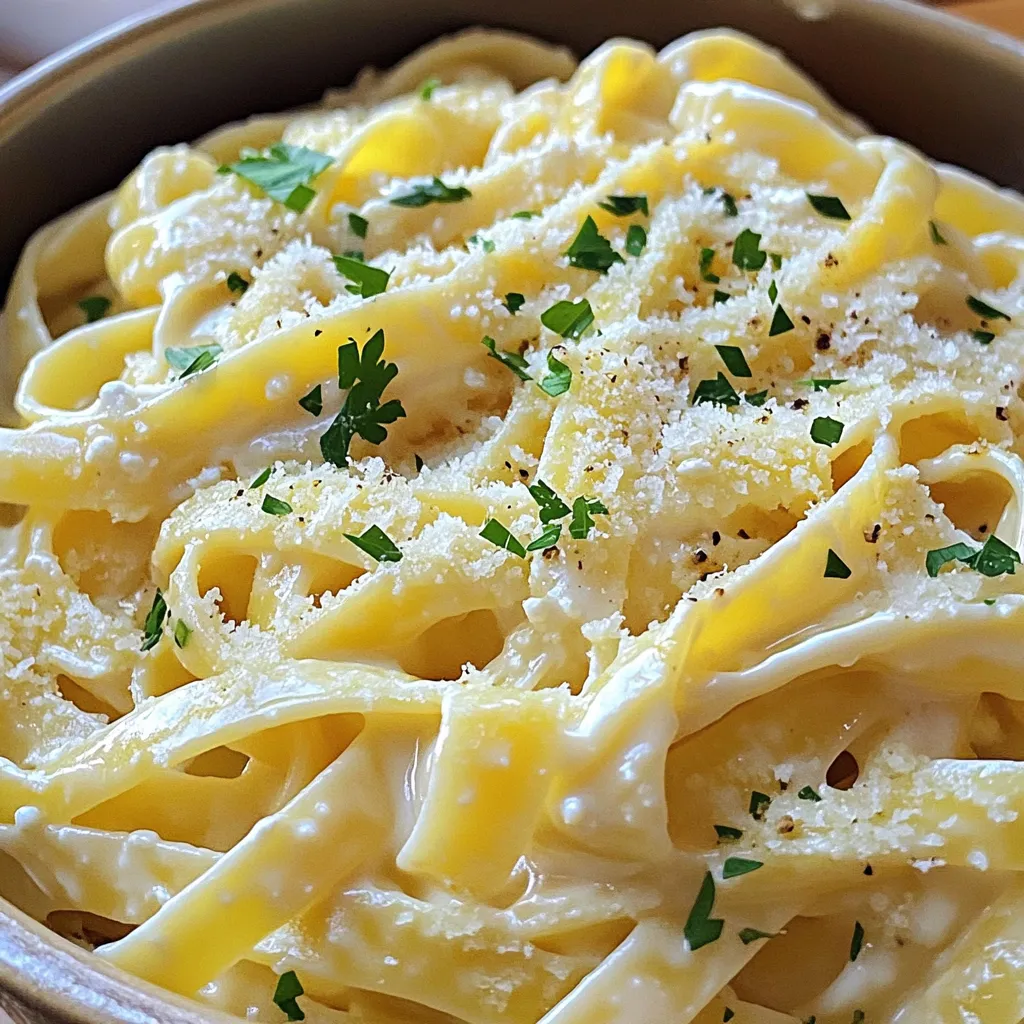
Cottage Cheese Alfredo Pasta Creamy and Easy Meal

Get ready to enjoy a creamy and easy meal that will change your pasta nights forever! This Cottage Cheese Alfredo

To make delicious Pumpkin Chocolate Chip Blondies, gather these essential ingredients: - 1 cup canned pumpkin puree - 1/2 cup unsalted butter, melted - 1 cup brown sugar, packed - 1/2 cup granulated sugar - 2 large eggs - 1 teaspoon vanilla extract - 1 1/2 cups all-purpose flour - 1 teaspoon baking powder - 1/2 teaspoon baking soda - 1 teaspoon pumpkin pie spice - 1/2 teaspoon salt - 1 cup chocolate chips (semi-sweet or milk chocolate) - 1/2 cup chopped pecans (optional) Canned pumpkin puree is perfect for this recipe. It adds moisture and flavor. Unsalted butter gives a rich taste without too much salt. The mix of brown sugar and granulated sugar creates a sweet balance. Eggs help bind everything together while vanilla extract adds a warm note. All-purpose flour forms the base, while baking powder and baking soda provide lift. Pumpkin pie spice gives that cozy fall flavor, and salt enhances all the sweet notes. Chocolate chips bring in sweetness and texture. You can add pecans for a crunchy twist, but they are optional. These ingredients come together to create a rich, flavorful treat that’s perfect for fall. First, preheat your oven to 350°F (175°C). This step sets the stage for baking. Next, grab an 8x8 inch baking pan. Line it with parchment paper. Leave some paper hanging over the edges. This makes it easy to lift the blondies out later. In a large bowl, combine melted butter, brown sugar, and granulated sugar. Whisk until it is smooth. Then, add the pumpkin puree, eggs, and vanilla extract. Mix until everything is well blended and smooth. In another bowl, sift together the all-purpose flour, baking powder, baking soda, pumpkin pie spice, and salt. This step helps to mix the dry ingredients well. Gradually add this dry mix to the wet ingredients. Use a spatula to fold it in gently. Avoid overmixing to keep the blondies soft. Next, gently fold in the chocolate chips. If you like, you can also add chopped pecans for extra crunch. Make sure they are evenly spread throughout the batter. Pour the batter into the prepared baking pan. Use a spatula to smooth the top. Bake in your preheated oven for 25 to 30 minutes. Check for doneness by inserting a toothpick. It should come out clean or with a few moist crumbs. After baking, let the blondies cool in the pan for about 10 minutes. Use the parchment paper to lift them out onto a wire rack. Allow them to cool completely. Once cool, cut them into squares. For a nice touch, dust with powdered sugar or drizzle with caramel sauce before serving. To make sure your blondies turn out great, avoid overmixing the batter. Mix until just combined. Overmixing can make them tough. Next, check for doneness by inserting a toothpick into the center. If it comes out clean or with a few moist crumbs, they are ready. For a lovely touch, dust the blondies with powdered sugar before serving. This adds a nice look and a bit of sweetness. You can also drizzle caramel sauce over the top. It makes every bite even more delicious. One common mistake is using incorrect ingredient ratios. Ensure you measure everything properly. Another mistake is not lining the pan well. Use parchment paper and let it hang over the edges. This makes it easy to lift the blondies out after baking. {{image_2}} You can change the flavor of your blondies in fun ways. Adding different types of chocolate can brighten the taste. Try dark chocolate for a rich flavor or white chocolate for a creamy touch. You can also use nuts or dried fruits. Pecans give a crunchy bite, while dried cranberries add a sweet twist. Mix and match to find your favorite combo. If you need gluten-free options, use almond flour or coconut flour instead of regular flour. These swaps can still give you a great texture. For a vegan version, substitute eggs. Use flaxseed meal or applesauce to replace them. Also, choose a plant-based butter to keep it dairy-free. Adding spices can elevate the taste of your blondies. Try cinnamon or nutmeg for a warm flavor. You can also add citrus flavors for a fresh twist. A bit of orange zest can brighten the taste and make it more lively. Get creative and enjoy different seasonal tastes! To keep your blondies fresh, store them in an airtight container. This helps them stay moist. You can use glass or plastic containers with tight lids. Layer parchment paper between the blondies. This prevents them from sticking together. You can freeze leftover blondies for later. Cut them into squares first. Wrap each piece in plastic wrap. Place the wrapped blondies in a freezer bag. Squeeze out as much air as you can. To thaw, take them out of the freezer. Let them sit at room temperature for about an hour. If you want a warm treat, heat them in the microwave for 10-15 seconds. In the fridge, blondies last about a week. Make sure they stay in an airtight container. In the freezer, they can last up to three months. Just remember to label the container with the date. This way, you’ll know when to enjoy your sweet treat! Yes, you can use fresh pumpkin. Fresh pumpkin has a great taste. However, it requires extra work. You need to roast and puree it first. This can take more time than opening a can. Canned pumpkin is smooth and easy to use. If you use fresh, make sure it is very soft. Otherwise, your blondies may be too thick. Check the blondies after 25 minutes of baking. Insert a toothpick in the center. If it comes out clean or has a few moist crumbs, they are ready. The edges should look set and slightly brown. If the center looks wet, bake for a few more minutes. Avoid overbaking, as they may dry out. Yes, you can make these blondies ahead of time. Bake them and let them cool. Once cool, store them in an airtight container. They can stay fresh for about 3 days at room temperature. For longer storage, freeze them. Wrap each piece tightly in plastic wrap and place in a freezer bag. If you need a butter alternative, you have options. Coconut oil works well and adds a nice flavor. You can also use vegetable oil, but it may change the texture. Applesauce is a great choice for a lower-fat option. Just use half the amount of applesauce as butter. Yes, these blondies are safe for kids. The ingredients are common and simple. They include eggs, sugar, and chocolate. Just watch for allergies. If you use nuts, check for nut allergies. Otherwise, these blondies are a fun treat for all ages! You can create delicious pumpkin chocolate chip blondies using simple ingredients and steps. We discussed essential ingredients, preparation, and baking techniques. I shared tips to avoid mistakes and ways to store your treats properly. You can also explore variations to suit your taste. With this guide, you're ready to make flavorful blondies that friends and family will love. Enjoy the process and the tasty results!

Pumpkin Chocolate Chip Blondies Delicious Fall Treat

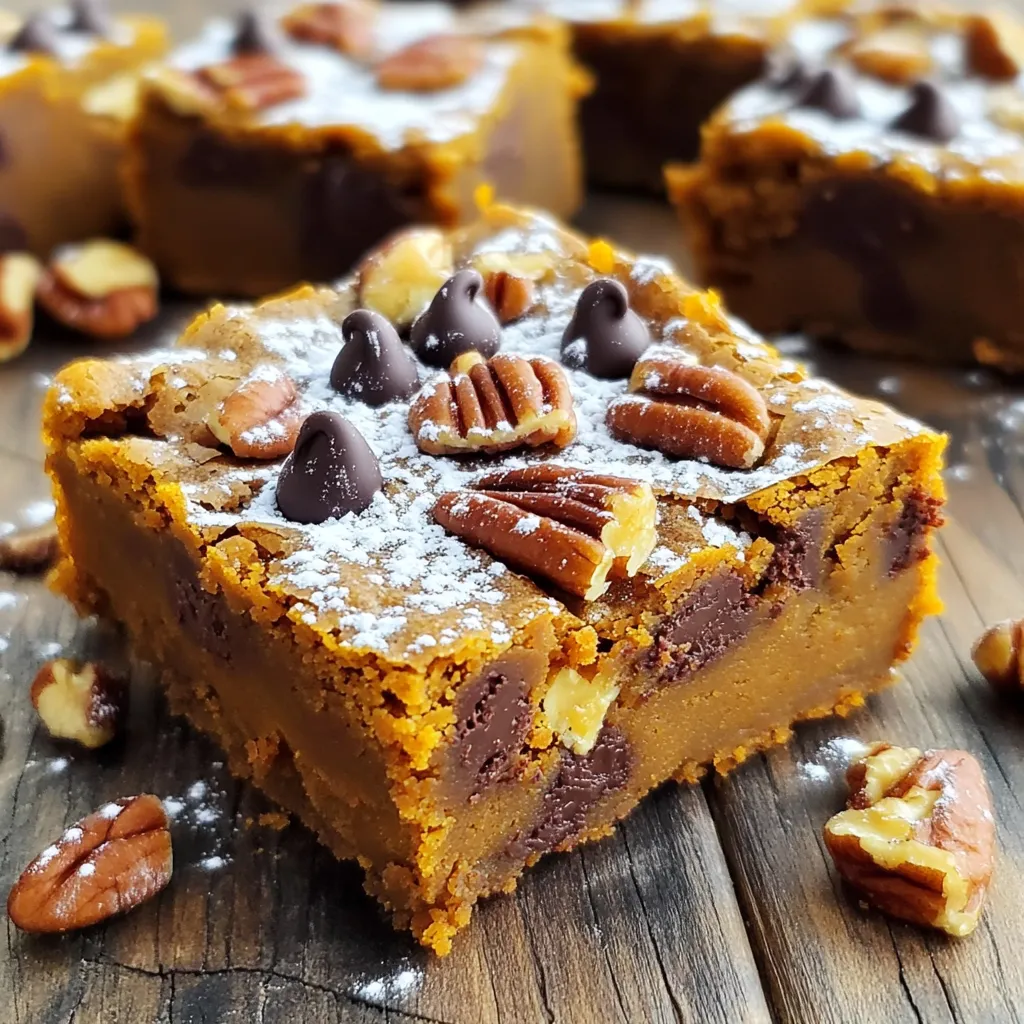
Are you ready to make a fall treat that combines the warm flavors of pumpkin with rich chocolate chips? These

To make Sheet Pan Balsamic Sausage & Peppers, you will need: - 1 pound Italian chicken sausage, sliced - 2 bell peppers (one red, one yellow), sliced - 1 large red onion, sliced - 3 cloves garlic, minced - 1/4 cup balsamic vinegar - 2 tablespoons olive oil - 1 teaspoon dried oregano - 1 teaspoon thyme - Salt and pepper to taste - Fresh basil, for garnish You can swap some ingredients to fit your taste. Use turkey sausage if you want a leaner option. Any color of bell pepper works well. Try using yellow or green bell peppers. If you don't have fresh garlic, garlic powder can work in a pinch. For herbs, fresh thyme can replace dried thyme. Fresh herbs add bright flavors, while dried herbs are more concentrated. If you use fresh oregano or thyme, you will need more than the dried version. I recommend using three times as much fresh herb. Fresh basil makes a great garnish. It adds color and flavor to the dish. First, gather all your ingredients. You will need: - 1 pound Italian chicken sausage, sliced - 2 bell peppers (one red, one yellow), sliced - 1 large red onion, sliced - 3 cloves garlic, minced - 1/4 cup balsamic vinegar - 2 tablespoons olive oil - 1 teaspoon dried oregano - 1 teaspoon thyme - Salt and pepper to taste - Fresh basil, for garnish Next, preheat your oven to 400°F (200°C). This step is key for even cooking. In a large mixing bowl, add the sliced sausage, bell peppers, red onion, and minced garlic. They will add great flavor and texture. In a smaller bowl, whisk together the balsamic vinegar, olive oil, oregano, thyme, salt, and pepper. This mix will coat your sausage and veggies nicely. Pour this mixture over the sausage and veggies. Toss everything until it is well coated. Now, spread the mixture evenly on a large sheet pan. Make sure it is in a single layer. This helps with even roasting. Place the sheet pan in your preheated oven. Roast for 25 to 30 minutes. Stir halfway through to ensure even cooking. The sausage should be cooked through, and the veggies should be tender and caramelized. The smell will be amazing as they cook! To check if the sausage is done, cut a piece in half. It should have no pink inside. The veggies should be soft and slightly brown. Once everything is cooked, remove the pan from the oven. Let it sit for a few minutes. Before serving, garnish with fresh basil for a pop of color and flavor. Enjoy your delicious Sheet Pan Balsamic Sausage & Peppers! For this dish, roasting is the best method. It allows the sausage and veggies to caramelize. I recommend using a large sheet pan. This gives enough space for the ingredients to roast well. Make sure to spread them in a single layer. This helps everything cook evenly. Stir halfway through cooking for the best results. Balsamic vinegar adds a deep, rich taste. You can boost flavor by adding a pinch of red pepper flakes for heat. Try using fresh herbs like basil or parsley. Fresh herbs bring brightness to the dish. A sprinkle of Parmesan cheese before serving adds a nice touch. For a sweeter flavor, add a bit of honey to the balsamic mix. Serve the dish straight from the sheet pan for a rustic look. Transfer it to a large platter for a more formal setting. Drizzling extra balsamic glaze on top makes it shine. Pair this dish with crusty bread or a light salad for balance. This meal is not only tasty, but it's also colorful and inviting. {{image_2}} You can switch up the sausage to fit your taste. Try turkey sausage for a leaner dish. Or, use pork sausage for a richer flavor. Spicy sausage adds a nice kick, while sweet Italian sausage gives a different twist. Each option brings its unique taste to the meal. If you prefer a meatless option, go for plant-based sausage. Many brands offer great flavors that mimic traditional sausage. You can also use marinated tofu or tempeh for a hearty texture. Chickpeas are a fun choice too; they soak up the balsamic well and add protein. Feel free to mix in your favorite veggies. Zucchini, mushrooms, and asparagus work great. Carrots add sweetness, while broccoli gives a nice crunch. You can also add cherry tomatoes for a burst of flavor. Just make sure to cut them so they cook evenly with the sausage. To keep your leftovers fresh, let the dish cool. Then, transfer it to an airtight container. Place it in the fridge. It will stay good for about three days. Make sure to seal it tightly to avoid any odors. When you are ready to eat, you can reheat the dish easily. Use a microwave for quick heating. Heat in one-minute intervals until warm. You can also reheat it in the oven. Set the oven to 350°F (175°C) and warm for about 10-15 minutes. This keeps the flavors nice. If you want to save some for later, freezing is a great option. First, cool the dish completely. Then, place portions in freezer-safe bags. Squeeze out as much air as you can before sealing. This way, the dish can last for up to three months. When you’re ready to eat, defrost it overnight in the fridge. Then reheat as needed. Yes, you can prepare this dish in advance. You can slice the sausage and veggies the night before. Just store them in the fridge until you're ready to cook. This makes dinner prep quick and easy. When you’re ready, toss everything with the balsamic mix and roast. It will taste great even after a night in the fridge. You have many tasty options for sides. Here are some ideas: - Rice or Quinoa: Both soak up the delicious juices. - Crusty Bread: Perfect for mopping up sauce. - Salad: A light green salad adds freshness. - Pasta: Toss some pasta with olive oil and herbs. These sides balance well with the dish's rich flavors. To check if the sausage is done, use a meat thermometer. The internal temperature should reach 165°F (74°C). If you don’t have a thermometer, cut a piece in half. The meat should be no longer pink inside. The juices should run clear. Don't forget to check the veggies too; they should be tender and caramelized. In this post, we explored the key steps to make Sheet Pan Balsamic Sausage & Peppers. We covered essential ingredients, cooking methods, and helpful tips to boost flavor. I shared ways to adjust ingredients for your taste and storage tips for leftovers. Remember, cooking should be fun and flexible. Use this guide to enjoy a tasty meal whether with meat or veggies. Enjoy your cooking and stay creative in the kitchen!

Sheet Pan Balsamic Sausage & Peppers Simple Recipe

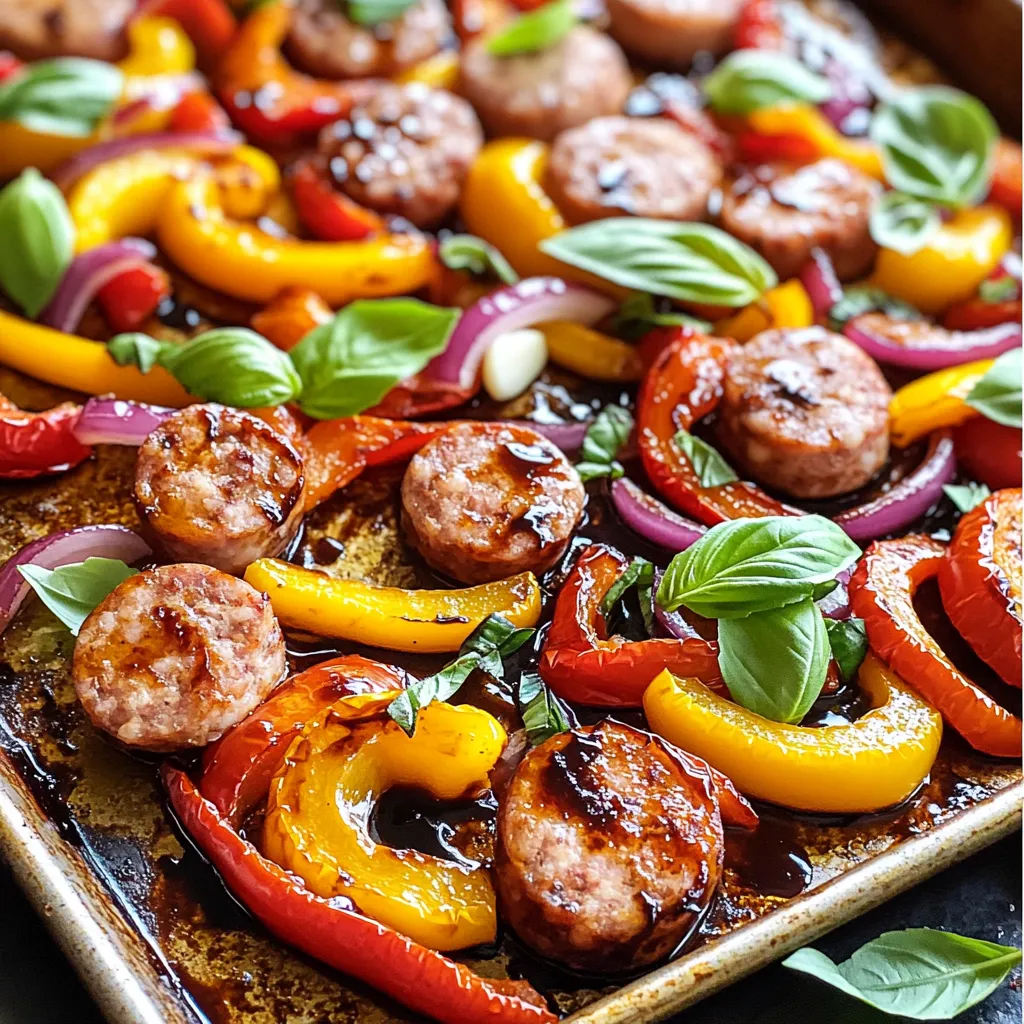
Looking for an easy, tasty meal? You’ve found it! This Sheet Pan Balsamic Sausage & Peppers recipe is packed with

- Beef and Vegetables - 1 pound beef chuck, cut into 1-inch cubes - 1 medium onion, diced - 2 cloves garlic, minced - 3 carrots, chopped - 2 celery stalks, chopped - Spices and Seasonings - 1 tablespoon olive oil - 1 teaspoon dried thyme - 1 teaspoon dried rosemary - 1 bay leaf - Salt and pepper to taste - Optional Add-ins - 1 cup barley, rinsed and drained - 6 cups beef broth - 1 cup frozen green peas (optional) - Fresh parsley for garnish I love using fresh ingredients for this soup. The beef chuck gives the soup a rich flavor. Olive oil helps in browning the beef and adds a nice depth. The diced onion, minced garlic, chopped carrots, and celery create a solid base. Each of these vegetables adds its own touch of sweetness and texture. Barley is the star of this dish. It makes the soup hearty and filling. I recommend rinsing the barley before adding it, as this helps remove any excess starch. The dried thyme and rosemary bring an earthy aroma that is hard to resist. The bay leaf adds a nice hint of flavor that ties everything together. Don't forget to season with salt and pepper. These simple ingredients can make a huge difference. If you want a pop of color and sweetness, add frozen green peas toward the end of cooking. Finally, sprinkle fresh parsley on top before serving. It brightens up the dish and looks great in a bowl. Browning the Meat First, heat one tablespoon of olive oil in a large pot over medium-high heat. Once the oil is hot, add one pound of beef chuck cut into 1-inch cubes. Season the beef with salt and pepper. Brown the meat on all sides for about 5 to 7 minutes. This step adds great flavor to your soup. Setting Aside the Beef After the beef is browned, remove it from the pot and set it aside. This helps keep the beef tender while the soup cooks. Sautéing the Onion, Garlic, Carrots, and Celery In the same pot, add the diced onion, two cloves of minced garlic, three chopped carrots, and two chopped celery stalks. Sauté the vegetables for about 5 minutes. You want them to soften and get fragrant. This base adds depth to your soup. Adding Barley and Broth Once the vegetables are soft, return the browned beef to the pot. Add one cup of rinsed barley, six cups of beef broth, one teaspoon of dried thyme, one teaspoon of dried rosemary, and one bay leaf. Stir everything together until well mixed. Cooking Time and Temperatures Bring the soup to a boil, then reduce the heat to low. Cover the pot and let it simmer for 45 minutes. This cooking time allows the barley and beef to become tender and flavorful. Final Steps before Serving If you want to add some color, stir in one cup of frozen green peas during the last 5 minutes of cooking. Taste the soup and adjust the seasoning with more salt and pepper if needed. Don't forget to remove the bay leaf before serving. Enjoy your hearty meal! Seasoning Adjustments To make the best beef barley soup, start with salt and pepper. These basic seasonings enhance all the flavors in your soup. After cooking, taste the soup and adjust as needed. If you like heat, add a pinch of red pepper flakes. A splash of soy sauce can add depth, too. Enhancing with Fresh Herbs Fresh herbs can transform your soup. I love adding parsley at the end for brightness. You can also use fresh thyme or rosemary. Just chop them finely and sprinkle them in right before serving. This adds a fresh touch that brightens each bowl. Best Practices for Browning Meat Browning the meat adds rich flavors to your soup. Use a large pot and heat the olive oil over medium-high heat. Add the beef cubes without crowding the pot. Let them brown on each side for about 5-7 minutes. This caramelization creates a tasty base for your soup. Simmering for Optimal Flavor Simmering helps all the flavors meld together. After adding your ingredients, bring the soup to a boil. Then, reduce the heat to low and cover the pot. Let it simmer for 45 minutes. This slow cooking makes the beef tender and the barley fluffy. Garnishing Ideas Presentation matters, especially for soups. Ladle the soup into bowls and sprinkle freshly chopped parsley on top. This adds color and freshness. You can also add a dash of black pepper for a little flair. Serving Suggestions Serve your beef barley soup with crusty bread. It’s perfect for dipping and makes the meal more filling. You can also pair it with a simple green salad. This adds crunch and balances the warmth of the soup. {{image_2}} You can switch up the beef with other meats. Chicken or turkey works well in this soup. If you want to keep it light, try using lean cuts. You can also add more veggies, like mushrooms or bell peppers. They add great flavor and texture. For a gluten-free option, use gluten-free grains like quinoa or rice instead of barley. Just be mindful of the cooking times, as they may differ. To boost the flavor, add spices like paprika or cayenne pepper. A squeeze of lemon juice or lime can brighten the dish too. If you like a warm spice, try adding nutmeg or cinnamon for a different twist. Changing the broth can also enhance your soup. Use vegetable broth for a lighter taste. If you want a richer flavor, try a beef bone broth. It adds depth and nutrition. You can make a vegan or vegetarian version by swapping beef for hearty beans or lentils. Use vegetable broth and skip the meat entirely. This will still give you a filling meal. For those watching sodium intake, use low-sodium broth. You can also skip added salt while cooking. Taste the soup first and season as needed. This way, you can control the saltiness while still enjoying a hearty meal. To store leftovers properly, let the soup cool to room temperature first. Then, place it in an airtight container. This keeps the soup fresh. Always label the container with the date. It helps you keep track of how long it has been stored. The shelf life of beef barley soup in the fridge is about 3 to 4 days. Make sure to check for any signs of spoilage before eating. If the soup smells off or looks strange, it's best to toss it. For best practices when freezing soup, use a freezer-safe container. Leave some space at the top for the soup to expand. You can also freeze it in individual portions for easy meals later. When you’re ready to eat, thaw the soup in the fridge overnight. Reheat it on the stovetop over medium heat. Stir often to ensure it heats evenly. You can also microwave it in a safe bowl, stirring every minute until it's hot. Can I use a different type of barley? Yes, you can use pearled barley, hull-less barley, or even quick-cooking barley. Each type has a different cooking time. Pearled barley is the most common choice for soup. It cooks well and gives a nice texture. How can I thicken the soup? You can thicken the soup by adding more barley or mashing some of the cooked vegetables. Another option is to mix a bit of cornstarch with water and stir it in. This will make your soup heartier. Is it possible to make this soup in a slow cooker or instant pot? Yes, you can! For a slow cooker, brown the beef first, then add all ingredients. Cook on low for 6-8 hours. For an instant pot, use the sauté function, then pressure cook for about 30 minutes. Calorie Count per Serving Each serving has about 350 calories. This can vary based on the beef and added veggies. Health Benefits of Ingredients - Beef: Provides protein and iron. - Barley: High in fiber and helps with digestion. - Vegetables: Packed with vitamins and minerals. Carrots add beta-carotene, and celery gives hydration. What can I serve with One Pot Beef Barley Soup? This soup pairs well with crusty bread or a fresh salad. You can also add cheese to the bread for extra flavor. Can I use this recipe as a base for other soups? Absolutely! You can add beans for a vegetarian twist or swap the beef for chicken. Feel free to change the broth or add herbs to fit your taste. This post covered how to make a tasty One Pot Beef Barley Soup. We explored the right ingredients, cooking steps, and tips for great flavor. I shared ways to modify the recipe for special diets and storage advice for leftovers. Embrace these tips and get creative in your kitchen. Enjoy every bowl of warmth!

Savory One Pot Beef Barley Soup Easy and Hearty Meal

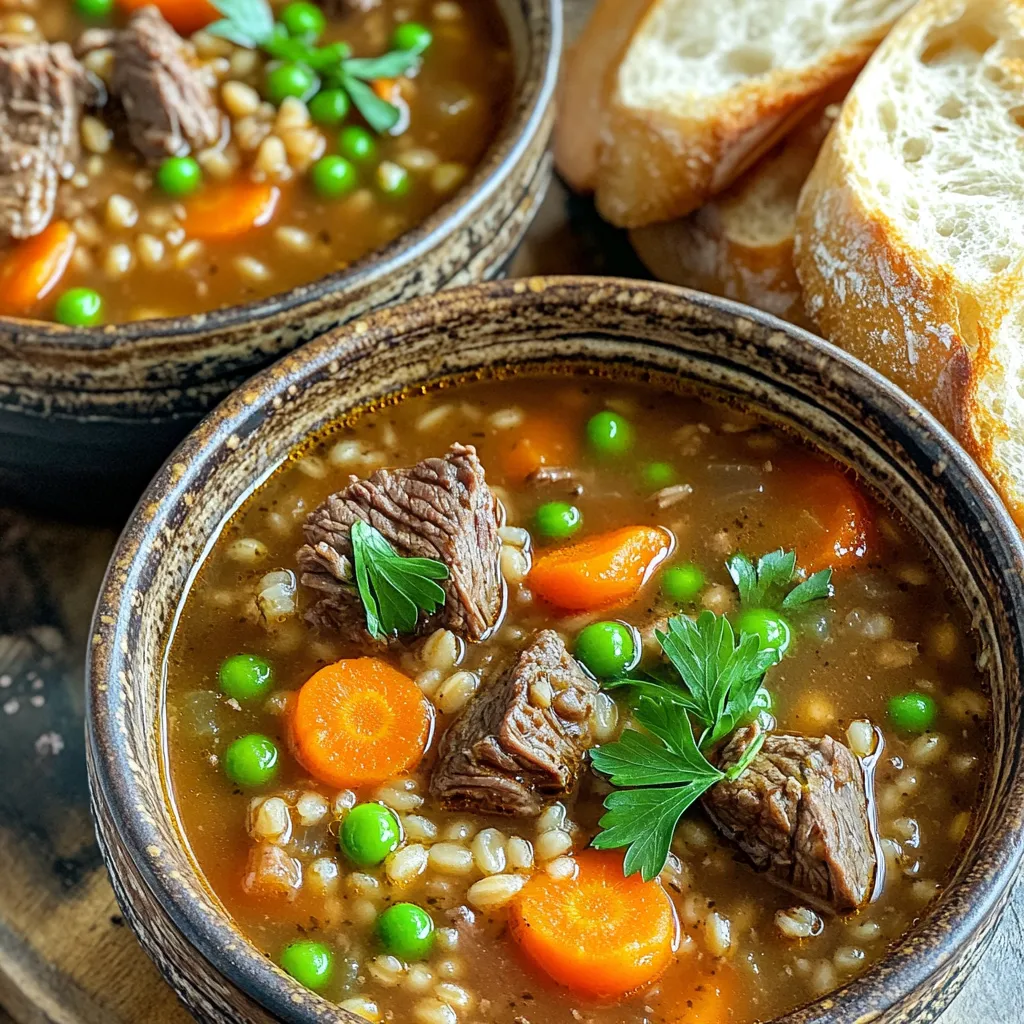
Warm up your kitchen with my Savory One Pot Beef Barley Soup! This hearty meal is packed with flavor and

- 2 (8 oz) packages cream cheese, softened - ¾ cup granulated sugar - 2 cups chopped apples (Granny Smith or Honeycrisp) Cream cheese gives the bars a rich and creamy texture. Granulated sugar adds sweetness to balance the tartness of the apples. I prefer Granny Smith or Honeycrisp apples for their crispness and flavor. - 1 ½ cups graham cracker crumbs - ½ cup unsalted butter, melted - 2 tablespoons brown sugar The graham cracker crumbs create a nice, crunchy base. Combine them with melted butter and brown sugar for extra flavor. This mixture will hold the bars together. - ½ cup old-fashioned oats - ½ cup brown sugar (for topping) - ½ teaspoon ground nutmeg - ¼ cup all-purpose flour - ¼ cup chopped walnuts (optional) Old-fashioned oats add a chewy texture to the top. Brown sugar, nutmeg, and walnuts (if you choose) enhance the flavor. This topping gives a classic crisp finish to your cheesecake bars. 1. Preheat your oven to 350°F (175°C). 2. Line an 8x8-inch baking pan with parchment paper. Leave some paper hanging over the edges. This helps you lift the bars out later. 3. In a medium bowl, mix 1 ½ cups of graham cracker crumbs, ½ cup of melted unsalted butter, and 2 tablespoons of brown sugar. Stir until it looks like wet sand. 4. Press the mixture firmly into the bottom of the pan. Make it even. 5. Bake the crust for 10 minutes, then take it out to cool slightly. 1. In a large bowl, beat 2 packages of softened cream cheese and ¾ cup of granulated sugar. Keep mixing until smooth. 2. Add 2 large eggs, 1 teaspoon of vanilla extract, and 1 teaspoon of ground cinnamon. Mix until well blended. 3. Gently fold in 2 cups of chopped apples. Use Granny Smith or Honeycrisp for the best flavor. 1. In a separate bowl, combine ½ cup of old-fashioned oats, ½ cup of brown sugar, ¼ cup of all-purpose flour, and ½ teaspoon of ground nutmeg. If you like, add ¼ cup of chopped walnuts for crunch. 2. Mix well to combine all the dry ingredients. 3. Sprinkle this topping evenly over the cheesecake layer. Spread it out with a spatula to cover every bit. Now, you’re ready to bake! Enjoy the sweet smell as it fills your kitchen. For these bars, I love using Granny Smith or Honeycrisp apples. Granny Smith apples add a nice tartness, while Honeycrisp offers sweetness and crunch. Both have great texture and flavor. When picking apples, look for firm, shiny skin. Soft spots mean they’re old. If you can, try to smell them. Fresh apples have a sweet, strong scent. Mixing the cream cheese smoothly is key for a creamy texture. First, let your cream cheese sit out for about 30 minutes. This helps it soften. Use a hand mixer or stand mixer on low speed to blend with sugar. Start slow, then increase speed. This way, you avoid lumps. Make sure there are no bits of cream cheese left. Knowing when your bars are done can be tricky. Bake them for 35 to 40 minutes. The edges should look set, and the center will jiggle slightly. After baking, let the bars cool in the pan on a wire rack. They will firm up as they cool. If you cut them too soon, they may fall apart. Patience is key for the best results! {{image_2}} You can make your apple crisp cheesecake bars even better by adding spices. Try mixing in ground nutmeg or ginger. Nutmeg gives a warm flavor that pairs well with apples. Ginger adds a nice kick, too. Start with ½ teaspoon of each spice. Adjust to your taste. This small change can elevate your bars and surprise your friends! While walnuts and oats are classic toppings, you can switch things up. Try using pecans instead of walnuts for a richer taste. You can also add shredded coconut for a tropical twist. If you want a crunch, swap oats for crushed graham crackers. Each topping gives a new texture and flavor. Experiment and find your favorite combo! If you need a gluten-free version, you can easily adapt this recipe. Just use gluten-free graham crackers for the crust. They work just as well and taste great. Make sure to check the labels on other ingredients, too. This way, everyone can enjoy these delicious cheesecake bars! Store your leftover apple crisp cheesecake bars in an airtight container. This keeps them fresh. You can also use a glass dish with a lid. If you stack the bars, place parchment paper between layers. This prevents sticking. To freeze, first cool the bars completely. Then, cut them into squares. Wrap each square in plastic wrap. Place the wrapped bars in a freezer bag. Make sure to remove excess air. To thaw, move the bars to the fridge for several hours or overnight. You can also let them sit at room temperature for about an hour. Fresh apple crisp cheesecake bars will last about 4 to 5 days in the fridge. Make sure to check for any signs of spoilage. If you freeze them, they can stay good for up to three months. Enjoy them while they taste their best! Yes, you can use alternatives if you want a dairy-free option. Silken tofu works well as a substitute. It gives a similar creamy texture. You can also use vegan cream cheese. Both options still yield tasty bars. Check the edges of the bars. They should look set and slightly golden. The center may jiggle a bit, which is normal. It will firm up as it cools. A toothpick inserted should come out mostly clean. Yes, you can prepare these bars in advance. Bake them and let them cool. Then, cover and store them in the fridge. They taste even better after a day. Just cut and serve when ready. You learned how to make delicious Apple Crisp Cheesecake Bars. We covered the main ingredients, from cream cheese to apples, and how to make a tasty crust. I shared steps for mixing and baking. You can also try variations to change up flavors and textures. Remember to store leftovers properly to enjoy later. With these tips and tricks, you can create a treat that's sure to impress. Dive into this recipe, and have fun in your kitchen!

Apple Crisp Cheesecake Bars Deliciously Simple Recipe

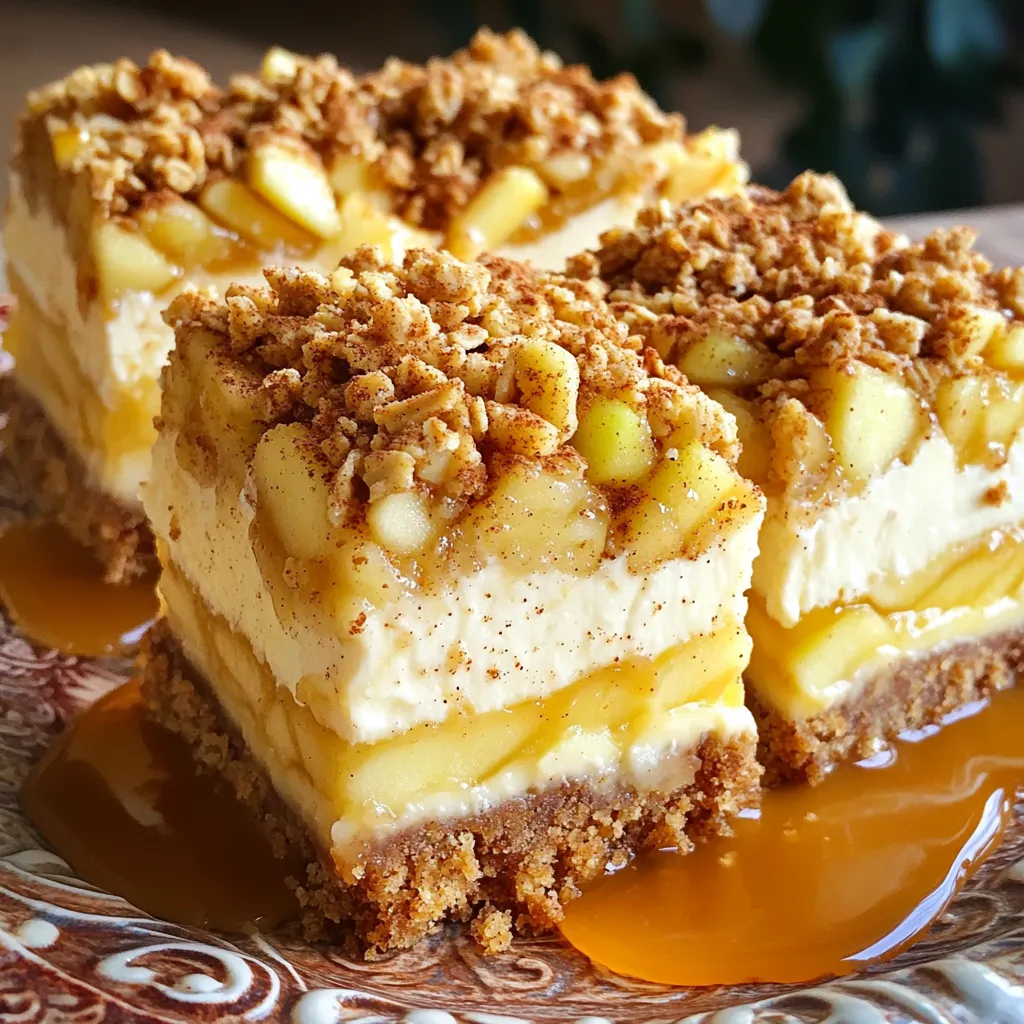
Are you ready to impress with a dessert that blends the best of both worlds? In this blog, I’ll share

- 1 cup dried chickpeas (soaked overnight) - 1 small onion, roughly chopped - 3 cloves garlic, minced - 1/4 cup fresh parsley, chopped - 1/4 cup fresh cilantro, chopped - 1 teaspoon ground cumin - 1 teaspoon ground coriander - 1/2 teaspoon baking powder - 1 teaspoon salt - 1/2 teaspoon black pepper - 2 tablespoons olive oil To make falafel, you start with dried chickpeas. Soaking them overnight helps them soften. Then, mix them with onions, garlic, parsley, and cilantro. Add cumin and coriander for flavor. Baking powder gives them a nice lift. Salt and pepper are key for taste. The olive oil helps them crisp up in the air fryer. - 1 cup Greek yogurt - 1/2 cucumber, grated and excess water squeezed out - 1 clove garlic, minced - 1 tablespoon lemon juice - Salt to taste For tzatziki, Greek yogurt is a must. It adds creaminess. Grated cucumber gives it a fresh crunch. Garlic and lemon juice bring a tangy flavor. Add a sprinkle of salt to enhance everything. - Chopped fresh mint - Extra olive oil for drizzling - Sliced cucumbers or tomatoes You can top your falafel with fresh mint for extra flavor. A drizzle of olive oil adds richness. Sliced cucumbers or tomatoes create a colorful plate. These garnishes make your dish look and taste even better! To start, gather your soaked chickpeas, onion, garlic, parsley, and cilantro. Add them to your food processor. Then, sprinkle in your cumin, coriander, baking powder, salt, and pepper. Pulse the mix until it forms a coarse blend. You want it textured, not mushy. The mix should still hold some shape when you press it. Next, take about 2 tablespoons of that mixture. Roll it into a ball or flatten it into a patty. Make sure they are even in size for even cooking. Repeat this until the entire mixture is shaped. You should have about 12-15 falafel balls, ready to fry. Set your air fryer to 375°F (190°C) and preheat it for 5 minutes. Lightly brush or spray your falafel balls with olive oil. This helps them get crispy. Place them in the fryer basket in a single layer. You may need to cook them in batches. Air fry for 12-15 minutes, shaking the basket halfway through. They should turn golden brown and crisp. While your falafel cooks, it’s time for the tzatziki. In a mixing bowl, add Greek yogurt, grated cucumber, minced garlic, lemon juice, and a pinch of salt. Stir it all together until mixed well. Taste it and adjust the salt if needed. This sauce adds a cool flavor to the warm falafel. Once the falafel is ready, serve it warm with your tzatziki on the side. You can place them on a plate or in a bowl. For a fun twist, add some fresh veggies or pita bread. Enjoy your crispy falafel with that creamy tzatziki! To get crispy falafel, you need to follow a few simple steps. First, make sure your chickpeas are soaked overnight. This softens them and helps them blend well. When you blend the mixture, do not over-process it. Aim for a coarse texture; this keeps the falafel from being too mushy. Next, lightly coat the falafel balls with olive oil before cooking. This step is key for that golden, crispy finish. Lastly, shake the basket halfway through cooking. This promotes even browning and crispiness. If you don’t have all the ingredients, don’t fret! You can swap out some for what you have. For example, you can use garlic powder instead of fresh garlic if you’re in a pinch. If you don’t have fresh herbs, dried herbs can work too. Just use less, as dried herbs are stronger. You can also try using canned chickpeas instead of dried ones. Just make sure to rinse and drain them well. This can save time, but you might lose some texture. Many people make the same mistakes when making falafel. One common error is not soaking the chickpeas long enough. They need to soak overnight for best results. Another mistake is over-blending the mixture. This can lead to flat, dense falafel. Also, avoid overcrowding the air fryer. Cook in batches to ensure each falafel gets enough hot air. Lastly, don’t skip the olive oil coating. This is vital for a crispy, flavorful outer layer. Following these tips will help you make perfect falafel every time. {{image_2}} To kick up the heat, add some spice. You can mix in cayenne pepper or crushed red pepper flakes. Start with 1/4 teaspoon and adjust to your taste. This gives the falafel a nice kick. You can also use spicy seasoning blends for extra flavor. Experimenting with spices makes the dish fun and unique. Making tzatziki vegan is simple. Swap Greek yogurt for dairy-free yogurt. Use coconut or almond yogurt for a creamy texture. Grate a cucumber and squeeze out the water just like before. Add minced garlic, lemon juice, and salt to taste. This version is just as tasty and fresh. Falafel pairs well with pita bread or fresh salad. For a quick meal, stuff falafel in pita with veggies. Add lettuce, tomatoes, and cucumbers for crunch. You can also serve it on a bed of greens. Drizzle with tzatziki for a refreshing touch. This makes for a light and satisfying meal. To store cooked falafel, let them cool first. Place falafel in an airtight container. They stay fresh for up to five days in the fridge. If you want to keep them longer, consider freezing. Arrange falafel in a single layer on a baking sheet. Freeze until solid, then move them to a freezer bag. They can last up to three months in the freezer. Tzatziki sauce is best fresh but can be stored too. Keep it in an airtight container in the fridge. It stays good for about three days. To extend its life, do not add salt until you're ready to use it. This helps keep the texture nice and fresh. When you reheat falafel, avoid the microwave. It makes them soggy. Instead, use the air fryer or oven. Preheat your air fryer to 350°F (175°C). Place falafel in the basket and heat for about 5 to 7 minutes. They will regain their crispy texture. Serve with fresh tzatziki for the best taste! Yes, you can use canned chickpeas for falafel. However, dried chickpeas give better texture. Canned chickpeas are softer and can make your falafel mushy. If you do use them, drain and rinse well. You may also need to adjust the amount of flour or add breadcrumbs to help bind the mixture. Falafel pairs well with many dishes. You can serve it with: - Pita bread - Fresh salad - Pickled vegetables - Hummus - Tahini sauce - Roasted vegetables These options add flavor and texture to your meal. Falafel can last for about 3-4 days in the fridge. Store it in an airtight container. Tzatziki, made with yogurt, also lasts about 3-4 days. Keep it in a sealed jar. If you notice any change in color or smell, it's best to discard it. Yes, air fryer falafel is often healthier. Traditional falafel is deep-fried, which adds extra fat and calories. Air frying uses less oil. This method keeps your falafel crispy while reducing fat content. Enjoy your delicious meal without the guilt! In this blog post, I shared how to make delicious falafel and tzatziki sauce. You learned about key ingredients, step-by-step instructions, and helpful tips for success. I also covered fun variations and proper storage methods. Now, you can create this dish with confidence. Enjoy exploring new flavors and impressing your family or friends. With practice, your falafel will be crispy, tasty, and a crowd favorite. Don't hesitate to try your own ideas and make it your own!

Air Fryer Falafel with Tzatziki Fresh Easy Recipe

Looking for a fresh, easy recipe that’s perfect for lunch or dinner? You’re in the right place! In this post,

- 2 pounds Yukon Gold potatoes, peeled and chopped - 4 cloves garlic, minced - 1 cup heavy cream - 1/2 cup unsalted butter, cubed - 1 cup grated Parmesan cheese - Salt and pepper to taste - Fresh chives or parsley, chopped for garnish - 1 cup = 8 fluid ounces - 1/2 cup = 4 fluid ounces - 2 pounds = 32 ounces - Use cauliflower for a low-carb option. - Swap heavy cream with almond or oat milk for dairy-free. - Replace Parmesan with nutritional yeast for a vegan twist. Using these ingredients and substitutions helps you tailor the dish to your needs. It keeps the flavor profile strong while making it suitable for different diets. Start by peeling and chopping 2 pounds of Yukon Gold potatoes. This kind of potato gives a creamy texture. Place the chopped potatoes in a large pot. Cover them with cold water and add a pinch of salt. Bring the pot to a boil over medium-high heat. Once boiling, reduce the heat and let them simmer for 15 to 20 minutes. You want them fork-tender, not mushy. While the potatoes cook, take 4 cloves of minced garlic and a cup of heavy cream. In a small saucepan, combine these two ingredients. Heat the mixture over low heat. Stir it gently and keep an eye on it. You want it warmed through, but do not let it boil. This step adds a rich flavor to the potatoes. Once the potatoes are tender, drain them well. Return the potatoes to the pot. Add 1/2 cup of cubed unsalted butter to the hot potatoes. Let the butter melt completely. Next, pour the warmed garlic cream mixture over the potatoes. Use a potato masher or hand mixer to mash until smooth and creamy. Stir in 1 cup of grated Parmesan cheese. Mix it well, and season with salt and pepper to taste. If it’s too thick, add a bit more heavy cream to reach your favorite level of creaminess. To get creamy mashed potatoes, start with Yukon Gold potatoes. They are soft and buttery. Peel and chop them into even pieces. This helps them cook evenly. Boil them until they are fork-tender, about 15-20 minutes. Drain well to get rid of extra water. Add flavor with garlic and Parmesan cheese. Heat minced garlic in heavy cream for a rich taste. The garlic cream makes the potatoes flavorful. Stir in grated Parmesan cheese after mashing. This adds a salty, nutty flavor. For extra taste, mix in chopped fresh herbs like chives or parsley. Use a large pot for boiling potatoes. A potato masher works great for mashing. If you want a super smooth texture, use a hand mixer. A small saucepan is best for warming the garlic cream. Make sure to have a good strainer to drain the potatoes. This will help you achieve the best results. {{image_2}} Fresh herbs can uplift your creamy garlic parmesan mashed potatoes. I love using chives or parsley. They add color and a fresh taste. Just chop a handful and mix them in before serving. You can also try rosemary or thyme for a different twist. Want to change the flavor? Try adding other cheeses! Creamy goat cheese adds tanginess. Sharp cheddar gives a rich taste. Mix them in with the Parmesan cheese for a cheesy delight. Just remember to adjust the salt, as some cheeses are saltier. If you want a vegan version, swap the heavy cream with coconut milk. Use vegan butter instead of regular butter. Nutritional yeast can replace Parmesan cheese for a cheesy flavor. This way, everyone can enjoy creamy mashed potatoes! To store leftover creamy garlic Parmesan mashed potatoes, place them in an airtight container. Make sure to cool them first. Leftovers will last in the fridge for about 3-5 days. If you notice any change in smell or color, it’s best to throw them out. When you’re ready to enjoy the leftovers, reheat them on the stove or in the microwave. If using the stove, add a splash of heavy cream or milk to keep them creamy. Stir often to avoid sticking. If using a microwave, heat in short bursts, stirring in between. This helps warm them evenly without drying them out. You can freeze these mashed potatoes for up to 2 months. To do this, scoop them into freezer-safe bags or containers. Flatten the bags to save space. When you want to use them, thaw them overnight in the fridge. Then reheat them using the stove or microwave, adding cream as needed to regain that creamy texture. I recommend using Yukon Gold potatoes. They have a natural buttery flavor. Their smooth texture makes them perfect for creamy mashed potatoes. Russet potatoes can also work, but they may be a bit fluffier and drier. Yes, you can prepare the mashed potatoes ahead of time. Make them and store in the fridge. When ready to serve, reheat gently on the stove. Add more cream if they seem too thick. If your mashed potatoes turn out gluey, add some warm milk or cream. Mix gently until you reach the right consistency. Avoid overmixing, as this causes the gluey texture. In this blog post, we explored how to make creamy mashed potatoes. We covered key ingredients, cooking steps, and helpful tips. You learned about variations and storage methods. Each point helps you create a dish that suits your taste and needs. Remember to choose the right potatoes and mix them well. Adjust flavors with herbs or cheeses. These mashed potatoes can bring joy to any meal. Enjoy your cooking and share your success with others!

Creamy Garlic Parmesan Mashed Potatoes Flavor Boost

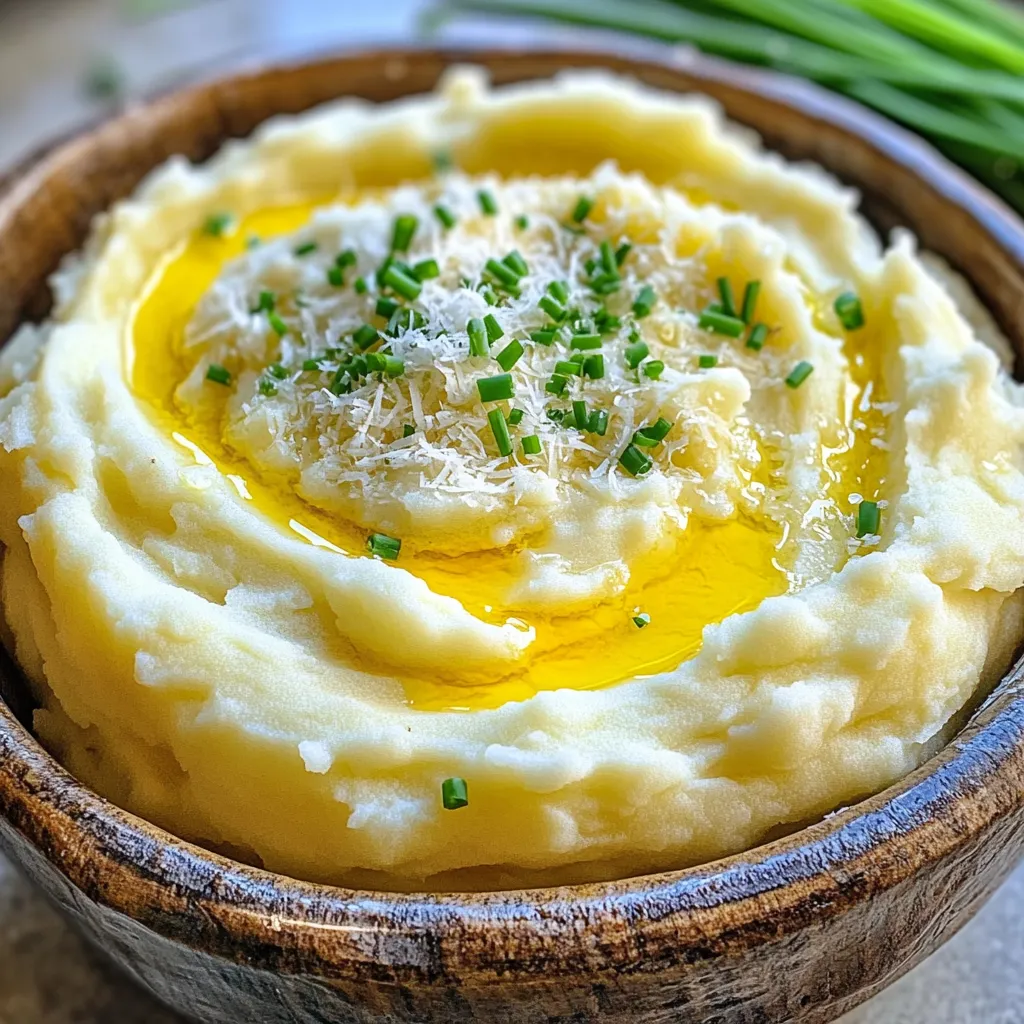
Get ready to elevate your mashed potatoes! My Creamy Garlic Parmesan Mashed Potatoes are a game-changer at any meal. Imagine

For a simple and tasty Christmas cranberry sauce, you will need: - 12 ounces fresh cranberries - 1 cup granulated sugar - 1 cup orange juice - Zest of 1 orange - 1 teaspoon ground cinnamon - ½ teaspoon ground ginger - ¼ teaspoon nutmeg - ½ cup chopped apples (preferably Granny Smith) - 1 tablespoon maple syrup These main ingredients give the sauce its sweet and tart flavor. The fresh cranberries provide a bright color and taste. The orange juice and zest add a lovely citrus note that brightens the sauce. The spices, like cinnamon and nutmeg, bring warmth and depth to your dish. You can make your cranberry sauce even better with these optional ingredients: - ½ cup chopped walnuts (for crunch) You can also garnish the finished dish. Try adding a sprig of fresh mint or a few slices of orange. These garnishes make the sauce look festive and inviting. If you need to swap ingredients, here are some ideas: - Use honey or agave syrup instead of granulated sugar. - Swap orange juice for apple juice for a different flavor. - If you don’t have fresh cranberries, frozen ones work too. These substitutions maintain the sauce's flavor while making it fit your needs. Enjoy experimenting with what you have at home! {{ingredient_image_1}} First, rinse the fresh cranberries under cold water. Look for any stems or bad berries. Remove those and set the good ones aside. This step ensures your sauce is tasty and fresh. Now, grab a medium saucepan. Combine one cup of granulated sugar and one cup of orange juice in it. Heat this mixture over medium heat. Stir until the sugar dissolves completely. Next, add the rinsed cranberries to the pan. Bring the mix to a boil. Once boiling, lower the heat to medium-low. Let the cranberries simmer for about 10 to 15 minutes. You will notice them burst, and the sauce will thicken. Stir occasionally to keep everything well mixed. After the cranberries have cooked down, it’s time to add flavor. Stir in the zest of one orange, one teaspoon of ground cinnamon, half a teaspoon of ground ginger, and a quarter teaspoon of nutmeg. Also, add half a cup of chopped apples and one tablespoon of maple syrup for sweetness. Simmer this mix for another five minutes. If you like, toss in half a cup of chopped walnuts for extra crunch. Once done, remove the saucepan from the heat. Let the sauce cool at room temperature; it will thicken more as it cools. Transfer it to a serving dish or an airtight container. Store it in the fridge until it’s time to serve. To make the best cranberry sauce, start with fresh cranberries. Rinse them well and remove any bad ones. Use equal parts sugar and orange juice for a balanced taste. The sugar helps the cranberries burst and thicken. Simmer them until they pop; this takes about 10 to 15 minutes. Stir the sauce often to prevent it from sticking. Add spices like cinnamon, ginger, and nutmeg for warmth. They enhance the flavor and make it festive. One big mistake is not rinsing the cranberries. This can leave dirt or stems in your sauce. Another mistake is using too much sugar. Balance is key; too much can make it overly sweet. Don’t skip the spices; they add depth and character. If your sauce is too runny, let it simmer longer. If it thickens too much, add a splash of orange juice. Serve your cranberry sauce in a festive bowl. A sprig of mint or orange slices makes it pop. This sauce pairs well with turkey, ham, or roast pork. It also tastes great on sandwiches the next day. For a twist, try it with cheese or yogurt. It adds a lovely tartness to your dishes. Pro Tips Use Fresh Cranberries: Always opt for fresh cranberries as they provide the best flavor and texture. Frozen cranberries can be used, but they may alter the sauce's consistency. Adjust Sweetness: Taste the sauce before adding all the sugar. Depending on the tartness of the cranberries, you may want to adjust the sugar or add more maple syrup for a different flavor profile. Add Spice Gradually: When adding spices like cinnamon, ginger, and nutmeg, start with a little and adjust to your preference. This allows you to control the flavor intensity. Chill for Best Flavor: Allow the cranberry sauce to chill in the refrigerator for a few hours or overnight. This resting period helps meld the flavors, resulting in a more delicious sauce. {{image_2}} You can add warm spices to your cranberry sauce for a cozy flavor. Try adding more cinnamon, ginger, or even cloves. These spices blend well with the tartness of the cranberries. I often add the zest of an orange for a bright taste. The citrus makes the sauce lively and fresh. It pairs well with holiday dishes and makes your home smell amazing. If you prefer a nut-free option, simply leave out the walnuts. The sauce still tastes great without them. You can add extra apples or even pears for texture. This makes the sauce smooth and fruity. Everyone can enjoy this version, even those with nut allergies. It keeps the flavors rich and satisfying. You can mix in other fruits to change the taste. Chopped pears or blueberries work well. For sweeteners, try using honey or agave syrup instead of sugar. This gives a unique twist to the sauce. You might also use less sugar if you prefer a tart flavor. Experiment with different combinations to find your favorite. Each variation can make your holiday meal special. After your meal, let the cranberry sauce cool. Once it reaches room temperature, place it in an airtight container. You can store it in the fridge for up to one week. This keeps the sauce fresh and tasty for later use. If you want to keep the sauce longer, freezing is a great option. Pour the cooled sauce into a freezer-safe container. Leave some space at the top, as the sauce will expand when frozen. It can last up to three months in the freezer. When you’re ready to use it, just thaw it in the fridge overnight. To reheat the sauce, you can use the stove or microwave. If using the stove, place the sauce in a saucepan over low heat. Stir it often to avoid sticking. If using a microwave, heat in short bursts, stirring in between. This way, you keep the flavor and texture just right. Yes, you can use frozen cranberries. They work well in this recipe. Just rinse them before use. Frozen cranberries tend to be softer, so the sauce may cook faster. Keep an eye on the cooking time to avoid overcooking. Homemade cranberry sauce lasts about one week in the fridge. Store it in a sealed container to keep it fresh. If you want to keep it longer, consider freezing it. Absolutely! This sauce tastes even better after a day or two. Make it up to three days before your meal. Just store it in the fridge. It will be ready when you are! You now have a complete guide to making Christmas cranberry sauce. We covered key ingredients and how to prepare them. I shared tips to avoid mistakes and enhance flavors in your sauce. You also explored tasty variations and helpful storage tips. Remember, cranberry sauce can be fun and easy to make. With this knowledge, you can impress everyone this holiday season. Enjoy your cooking adventure!

Christmas Cranberry Sauce Simple and Tasty Recipe

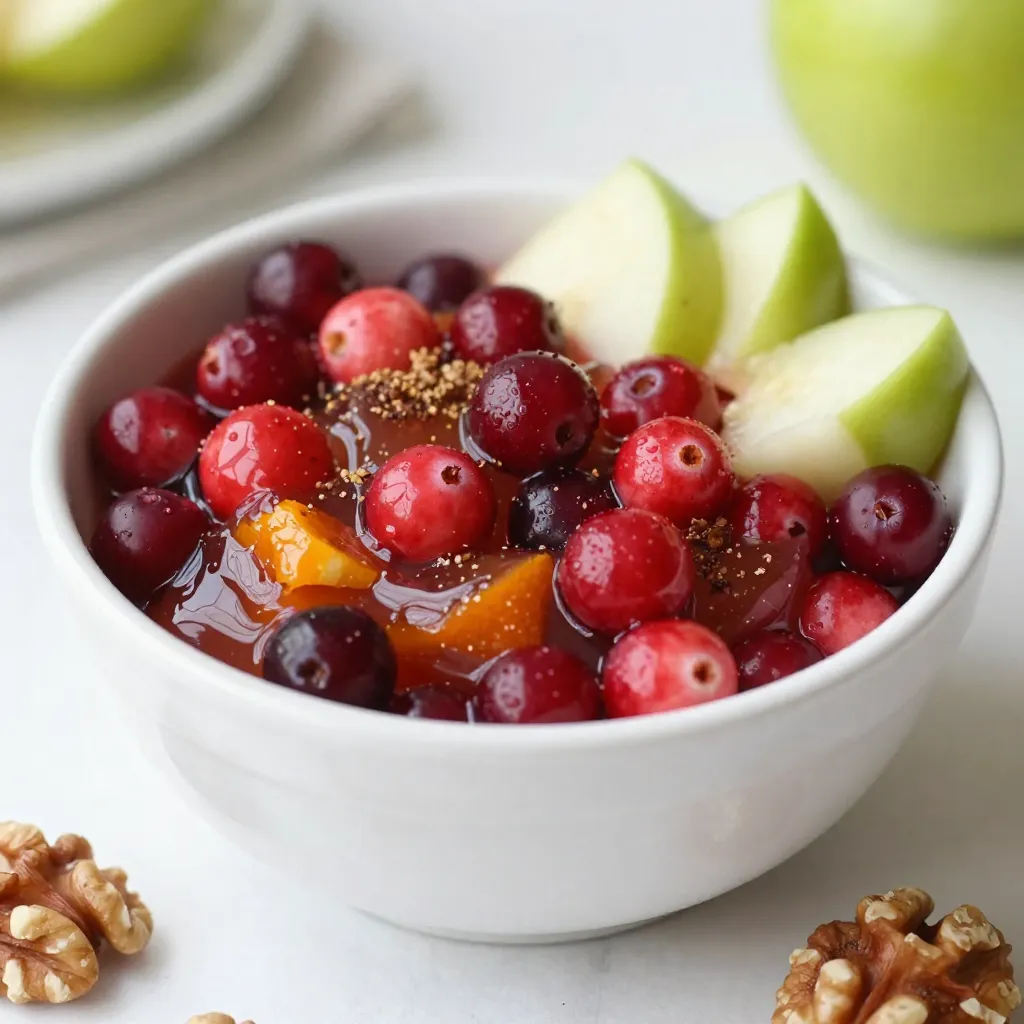
Ready to elevate your holiday feast? In this article, I’ll share my simple and tasty Christmas Cranberry Sauce recipe. You’ll

- 1 lb boneless, skinless chicken thighs - 1 cup jasmine rice - 2 cups chicken broth - 1/4 cup orange juice (freshly squeezed for best flavor) - Zest of 1 orange - 3 tablespoons soy sauce - 1 tablespoon honey - 1 teaspoon ginger, grated - 2 cloves garlic, minced - 1 bell pepper, sliced (red or yellow for color) - 1 cup broccoli florets - Sesame seeds for garnish - Chopped green onions for garnish In this recipe, I use boneless, skinless chicken thighs for their juicy flavor. Jasmine rice makes the base smooth and fragrant. Chicken broth adds depth to the rice, making it more flavorful. I love flavoring with fresh orange juice and zest. They bring out a bright sweetness that pairs well with the savory soy sauce and honey. Ginger and garlic add warmth and spice, creating a well-rounded sauce. For veggies, I choose bell pepper and broccoli. They add color and crunch. Sesame seeds and green onions are perfect for garnishing, giving a nice finish to the dish. Rinse 1 cup of jasmine rice under cold water. This helps remove extra starch. Keep rinsing until the water runs clear. Next, combine the rinsed rice and 2 cups of chicken broth in a medium saucepan. Bring it to a boil. Then reduce the heat to low. Cover the pot and simmer for 15 to 20 minutes. The rice should absorb all the liquid and become fluffy. After cooking, remove from heat, and let it sit for 5 minutes with the lid on. In a bowl, take 1 pound of boneless, skinless chicken thighs cut into bite-sized pieces. Toss the chicken with 1 tablespoon of cornstarch. Add salt and pepper to taste. Make sure each piece is evenly coated. This step will create a nice, crispy texture when you cook the chicken. Grab a separate bowl. Whisk together 1/4 cup of freshly squeezed orange juice, the zest of 1 orange, 3 tablespoons of soy sauce, 1 tablespoon of honey, 1 teaspoon of grated ginger, and 2 cloves of minced garlic. Mix until smooth. Set this flavorful sauce aside for later. Heat 2 tablespoons of vegetable oil in a large skillet or wok over medium-high heat. Once hot, add the coated chicken pieces. Stir-fry the chicken until golden brown and fully cooked, about 5 to 7 minutes. After cooking, remove the chicken from the skillet and set it aside. In the same skillet, add 1 sliced bell pepper and 1 cup of broccoli florets. Stir-fry them for 3 to 4 minutes. You want them to be tender yet still crisp. This adds a nice texture and freshness to your dish. Return the cooked chicken back into the skillet with the vegetables. Pour the prepared orange sauce over everything. Stir well to coat all the ingredients evenly. Cook for an additional 2 to 3 minutes, allowing everything to heat through. Fluff the cooked jasmine rice with a fork. Divide the rice among serving bowls. Top each bowl with the orange chicken and vegetable mixture. For a finishing touch, sprinkle sesame seeds and chopped green onions on top. Enjoy your savory orange chicken rice bowls! To get that crispy chicken, cornstarch is key. It forms a nice crust when cooked. Coat your chicken pieces well. This step makes a huge difference in texture. For cooking, use a hot skillet or wok. Heat the oil until it shimmers before adding the chicken. This helps seal in moisture and creates a golden outer layer. Stir-fry the chicken for about 5-7 minutes. Make sure it cooks evenly. To boost flavor, think about adding spices. A dash of garlic powder or red pepper flakes works well. These extras can take your dish to the next level. Fresh herbs like cilantro or basil can also add a nice touch. They brighten up the whole meal. Using fresh ingredients is important. Fresh orange juice and zest will make your sauce pop. Fresh garlic and ginger enhance the taste too. Always choose fresh over dried when you can. Meal prepping can save you a lot of time. Cook the rice and chicken ahead of time. You can store them in the fridge for a few days. This way, you can whip up the bowls in no time. If you're short on time, quick vegetable substitutes work great. Frozen bell peppers and broccoli are a good choice. They cook fast and are still healthy. You can add them straight to the skillet without thawing. {{image_2}} You can switch the chicken for other proteins. Tofu works well. It absorbs flavors nicely. Use firm tofu for a good texture. Just press it to remove extra water. Shrimp is another option. It cooks quickly and adds a nice seafood flavor. If you prefer chicken breast, that's fine too. It may be less juicy than thighs, but it works great. Jasmine rice is tasty, but you can try other grains. Quinoa is a great choice. It adds protein and fiber. Brown rice is another healthy option. Both provide different textures and flavors. If you're looking for a gluten-free option, use quinoa or rice. They fit well into any meal plan while still tasting delicious. Want a spicy twist? Add chili flakes or sriracha to the sauce. This gives your dish a nice kick. You can also mix in other citrus flavors. Try lime or lemon juice for a different taste. Each adds a unique zing to the orange chicken. These small changes can keep your meals exciting and fresh! To keep your orange chicken rice bowls fresh, store the leftovers in the refrigerator. Place the chicken, rice, and veggies in airtight containers. This helps keep moisture in and prevents odors from mixing. I recommend using glass containers. They are great for reheating and don’t stain easily. When you want to enjoy your leftovers, reheating is key. The best way is to use the microwave. Heat on medium power for 1-2 minutes. Stir halfway through to warm everything evenly. You can also use a skillet over low heat for about 5 minutes. This method keeps the chicken crispy and the veggies fresh. If you want to freeze your orange chicken rice bowls, freeze the chicken and rice separately. This keeps the textures nice. Use freezer-safe bags or containers. You can store them for about 2-3 months. When ready to eat, thaw overnight in the fridge before reheating. This way, your meal stays tasty and safe! Yes, you can use frozen chicken. First, thaw the chicken safely. The best way is to place it in the fridge overnight. If you need to thaw it quickly, submerge it in cold water. Change the water every 30 minutes until it’s thawed. Cooking frozen chicken takes longer. Always check the internal temperature. It should reach 165°F for safety. If you need a soy sauce substitute, try tamari. Tamari is gluten-free and has a similar taste. Coconut aminos also work well; it’s sweeter and lower in sodium. For a quick mix, try equal parts water and miso paste. It gives a nice umami flavor without soy. To add heat, you can use red pepper flakes or sriracha. Mix these into the sauce for flavor. You can also add fresh chili peppers when stir-frying the vegetables. For a different twist, try a dash of cayenne pepper in the chicken coating. Adjust the amount based on your heat preference. Yes, you can prepare this dish ahead. Cook the chicken and vegetables, then store them in the fridge. Keep the rice separate to prevent it from getting mushy. When ready to eat, reheat everything in a pan. Make sure the chicken is hot and reaches 165°F. This dish tastes great even after a day! This recipe brings together simple ingredients for an amazing dish. You learned about the key components like chicken thighs, jasmine rice, and flavorful sauces. Follow the steps to prepare and enjoy your meal. Remember, crispy chicken and fresh veggies make a big difference. With handy tips for variations and storage, you can make this dish your own. Keep experimenting, and enjoy the cooking journey!

Savory Orange Chicken Rice Bowls for Easy Meals

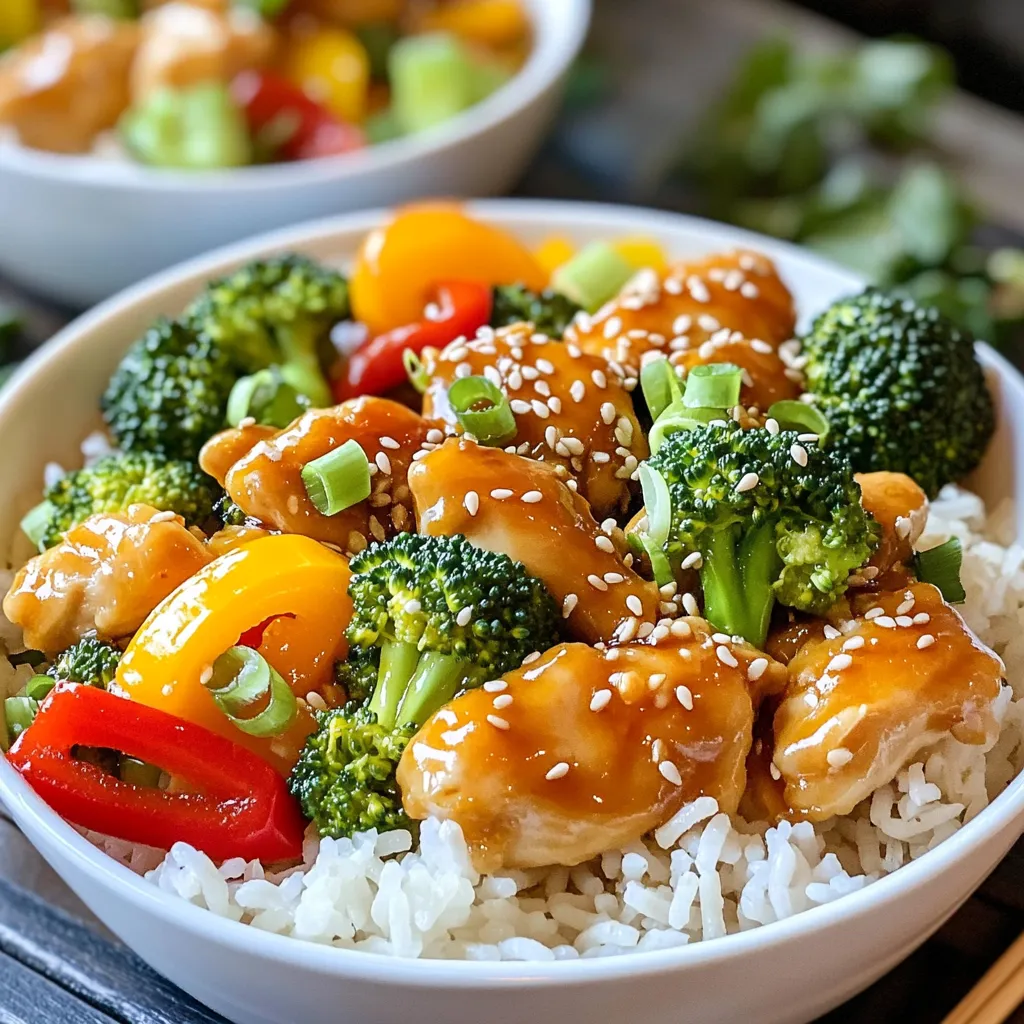
Craving a delicious meal that’s easy and quick? You’re in luck! These Savory Orange Chicken Rice Bowls pack a punch

- 1 cup (2 sticks) unsalted butter - 1 cup packed brown sugar - 1/2 cup granulated sugar - 2 large eggs - 2 teaspoons vanilla extract - 2 cups all-purpose flour - 1/2 teaspoon baking powder - 1/2 teaspoon baking soda - 1/2 teaspoon salt - 1 cup chopped pecans - 1/2 cup chocolate chips (optional for added decadence) Using the right measurements is key. For the butter, one cup equals two sticks. Pack the brown sugar tight in the cup for accuracy. The flour should be spooned into the measuring cup, not scooped. This helps avoid too much flour in your batter. Use a kitchen scale for precise weight if you have one. Each ingredient plays a role in making the blondies chewy and delicious. If you don’t have unsalted butter, use salted butter. Just cut back on added salt. For brown sugar, use white sugar mixed with molasses. This gives a similar taste. You can replace eggs with applesauce or flaxseed meal for a vegan version. If you want nuts, almonds or walnuts work well in place of pecans. For a gluten-free option, try gluten-free flour blends. These swaps help you customize the recipe to fit your needs without losing the rich flavor. Start by preheating your oven to 350°F (175°C). This step is key to getting those blondies just right. Next, you need to prepare your baking pan. You can grease a 9x13 inch pan with butter or line it with parchment paper. Lining the pan helps you remove the blondies easily later on. To make brown butter, melt the unsalted butter in a medium saucepan over medium heat. Keep an eye on it and stir often. After about 5 to 7 minutes, the butter will turn a golden brown. It will also have a nutty smell, which means it's ready. Be careful not to burn it! Once it's ready, take it off the heat and let it cool for a few minutes. In a large mixing bowl, combine the brown sugar and granulated sugar with the cooled brown butter. Whisk these together until smooth. Next, add the eggs, one at a time. Mix well after each egg. Stir in the vanilla extract for that extra flavor. In another bowl, whisk together the all-purpose flour, baking powder, baking soda, and salt. Gradually add this dry mix to the wet ingredients. Stir gently until just combined. You want to avoid overmixing. Finally, fold in the chopped pecans. If you want a treat, you can add chocolate chips too. Pour the batter into your prepared pan and spread it evenly. To get that chewy texture, use room-temperature eggs. They mix in better. Make sure to mix the butter and sugars well. This helps create a nice base. When adding flour, mix just until combined. Overmixing can lead to tough blondies. One common mistake is not browning the butter enough. Watch it closely for a nutty scent and golden color. Another pitfall is using too much flour. Always measure flour properly and level it off. Lastly, avoid opening the oven early. This can cause your blondies to sink. Feel free to add your favorite nuts or chocolate. Almonds or walnuts work well too. You can also tweak the vanilla extract with almond extract for a unique twist. For extra flavor, try adding a pinch of cinnamon or nutmeg. Just remember to keep the balance right! {{image_2}} You can change up the nuts in your blondies. Try walnuts, almonds, or hazelnuts. Each nut gives a unique taste and crunch. If you love chocolate, mix in white chocolate or dark chocolate chips. The added flavor makes each bite special and fun. For a gluten-free treat, swap all-purpose flour with almond flour or a gluten-free blend. This keeps the blondies chewy and tasty. To make them vegan, use flax eggs instead of regular eggs. Mix one tablespoon of ground flaxseed with three tablespoons of water. Let it sit until it thickens. Use vegan butter to replace regular butter for a delicious vegan delight. Spices can add depth to your blondies. A pinch of cinnamon or nutmeg gives warmth and richness. You can also add a splash of almond extract for a nutty twist. These small changes can turn a simple treat into something exciting and flavorful. Don’t be afraid to experiment! To keep your blondies fresh, store them in an airtight container. You can layer them with parchment paper to prevent sticking. This will help maintain their chewy texture. Keep the container at room temperature for the best taste. If your kitchen is warm, refrigerate them to prevent spoilage. If you want to save some blondies for later, freezing works great. First, let them cool completely. Then, cut them into squares. Wrap each square in plastic wrap and place them in a freezer bag. Label the bag with the date. You can freeze them for up to three months. When you're ready to eat, let them thaw at room temperature. When stored properly, blondies last about a week at room temperature. If you keep them in the fridge, they can last up to two weeks. Freezing can extend their life up to three months. Always check for signs of spoilage before eating. If they smell off or have a change in texture, it's best to toss them. Enjoy your chewy delight! Blondies and brownies are both baked treats, but they have key differences. Brownies use cocoa powder for a rich chocolate flavor. Blondies do not have cocoa, which gives them a sweet, buttery taste. Blondies are often lighter in color. The texture can be similar, but blondies are chewier and softer. Yes, you can make blondies without eggs. You can use substitutes like unsweetened applesauce or mashed banana. Each egg can be replaced with 1/4 cup of applesauce or 1/2 of a mashed banana. This will help bind the ingredients together. The texture may change slightly, but they will still taste great. To check if your blondies are done, insert a toothpick into the center. If it comes out with a few crumbs attached, they are ready. If the toothpick has wet batter, bake them a little longer. Keep an eye on the edges; they should look slightly golden. In this blog post, I covered how to make delicious blondies. You learned about the key ingredients and measured details. I shared tips to make the perfect texture and avoid common mistakes. We explored variations, including gluten-free and vegan options. I also detailed how to store blondies and their shelf life. Remember, baking is fun! Use these tips and tricks to create your own unique treats. Enjoy your baking journey, and let your creativity shine in every batch you make.

Brown Butter Pecan Blondies Perfectly Chewy Delight

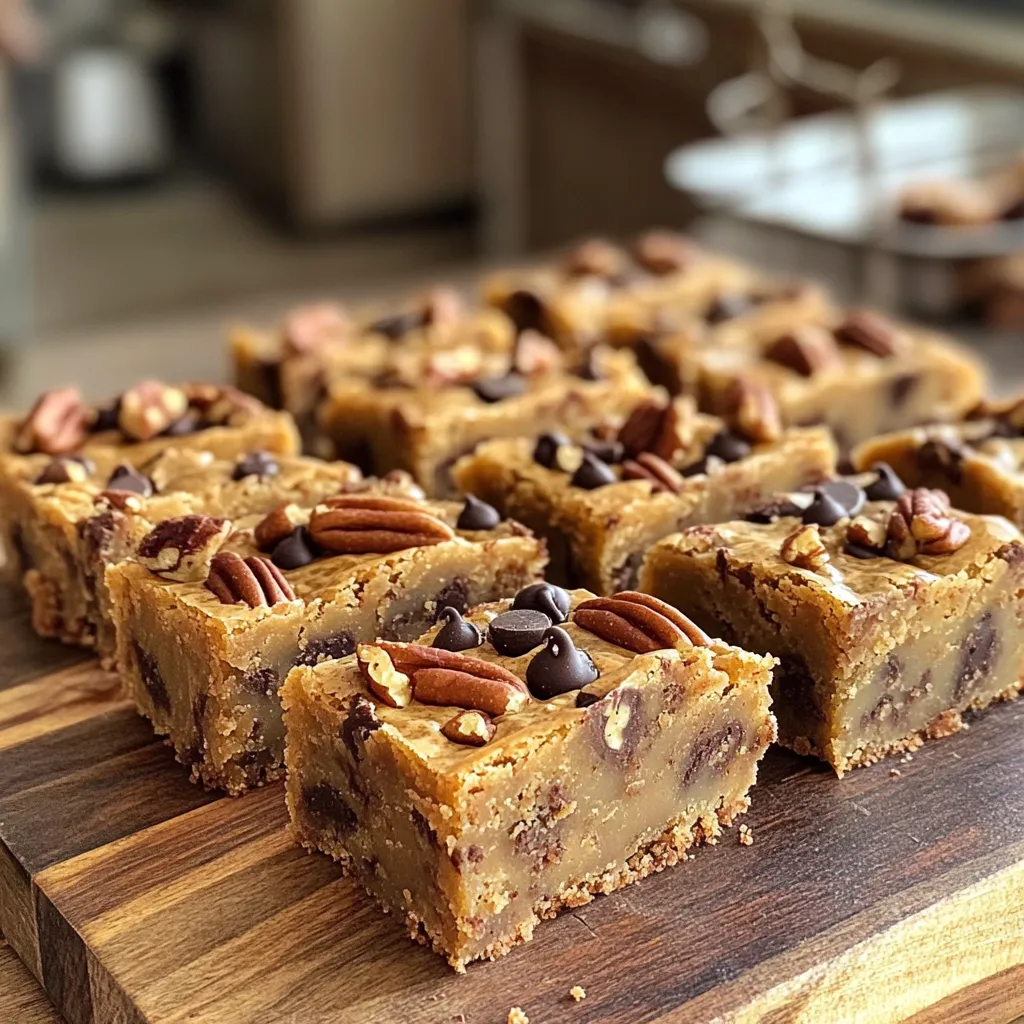
Craving a sweet treat that’s both chewy and nutty? Let’s dive into making Brown Butter Pecan Blondies! These blondies are

Older posts
Newer posts
← Previous Page1 … Page10 Page11 Page12 … Page84 Next →

dsad

© 2026 Foodish Talk • Built with GeneratePress

Our Policies

  • Copyright Policy
  • Cookie Policy
  • GDPR Policy
  • Privacy Policy
  • Disclaimer
  • Terms Of Use

More Information

  • Home
  • About
  • Contact
  • Appetizers
  • Dessert
  • Dinner
  • Drinks
©2026, Foodish Talk About Back To Top