
Latest & Greatest
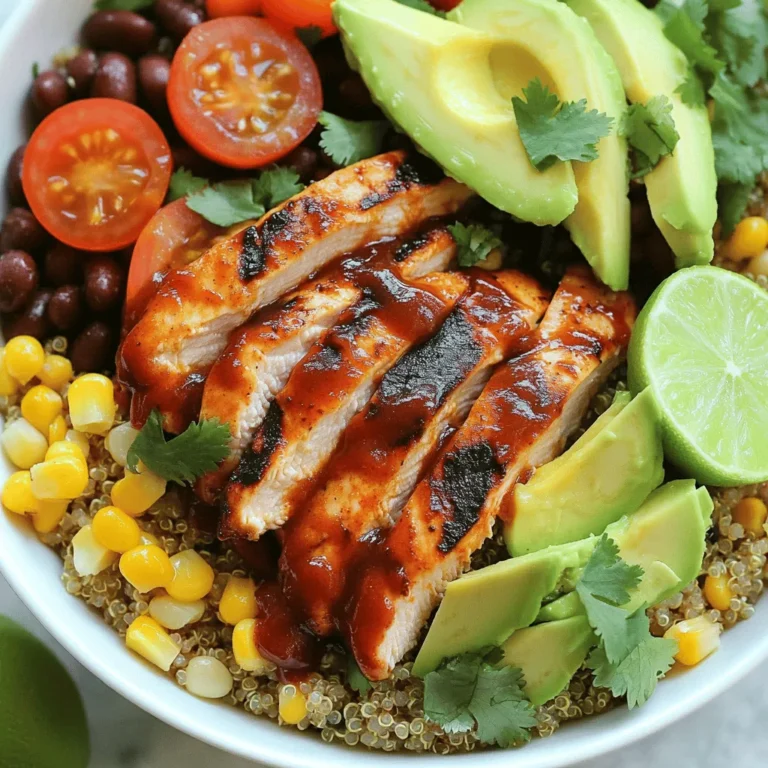
Sheet Pan Hawaiian Chicken Easy and Flavorful Meal
Looking for a simple yet tasty dinner idea? Say hello to Sheet Pan Hawaiian Chicken! This dish blends juicy chicken
Read more…
Creamy Garlic Butter Lobster Tails Simple Delight
Are you ready to impress your dinner guests with a delightful seafood dish? In this easy-to-follow guide, I’ll show you
Read more…
Mongolian Beef Noodles Flavorful and Easy Recipe
Are you craving a delicious meal that’s both quick and satisfying? Look no further! My Mongolian Beef Noodles recipe combines
Read more…
Perfect Apple Pie Cookies Easy and Delicious Recipe
If you love the taste of fresh apple pie but want a fun twist, you’ll adore these Perfect Apple Pie
Read more…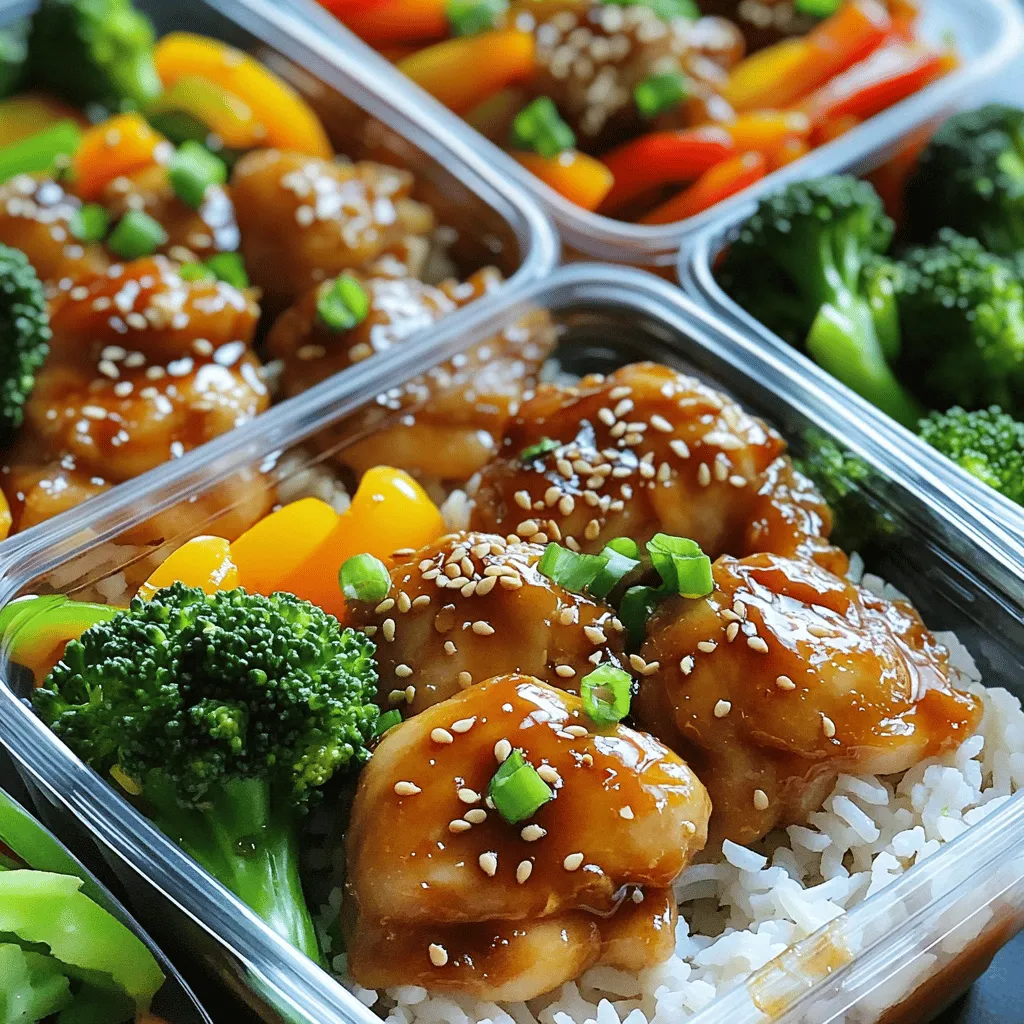
Easy Teriyaki Chicken Meal Prep Quick and Tasty Recipe
Looking for a quick and tasty meal prep? My Easy Teriyaki Chicken Meal Prep is just what you need! This
Read more…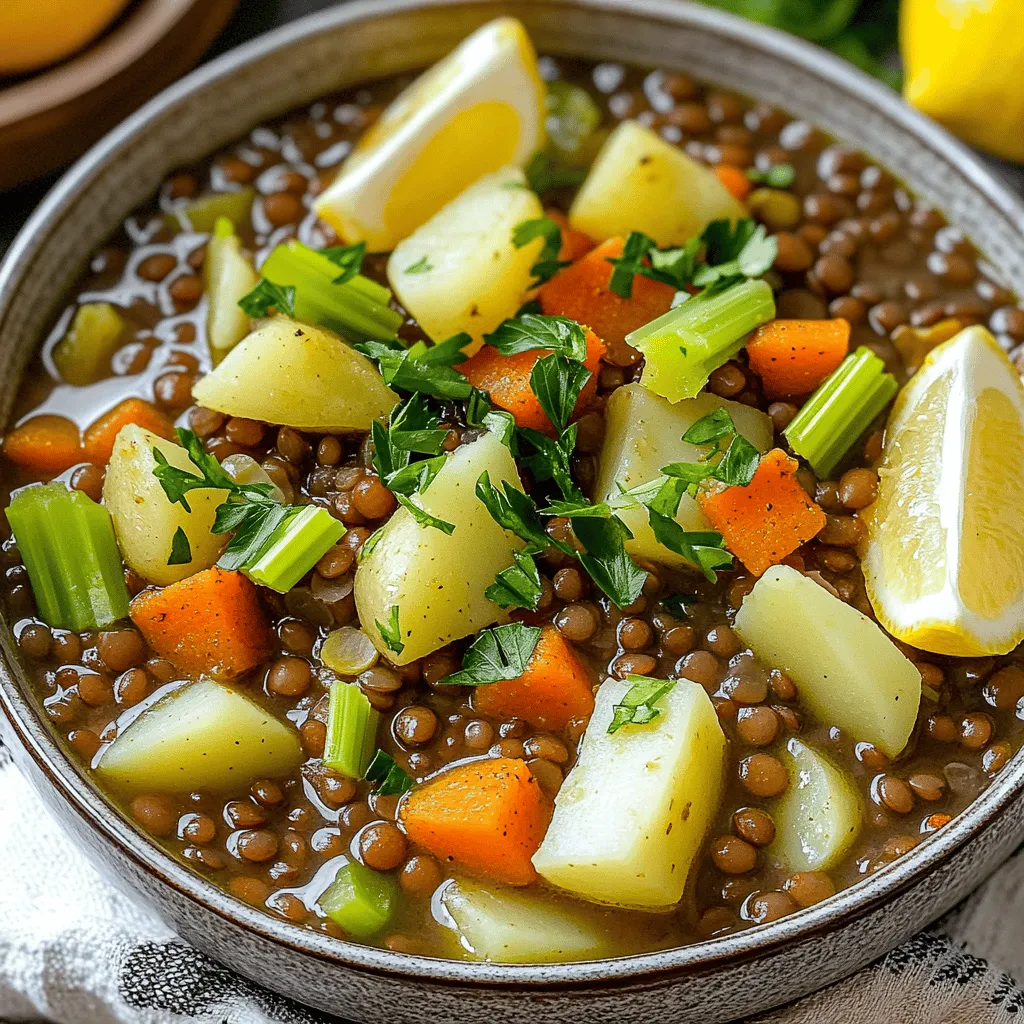
Iraqi Lentil Soup Flavorful and Nourishing Recipe
If you’re looking to warm your soul with a hearty dish, try my Iraqi Lentil Soup. This recipe is packed
Read more…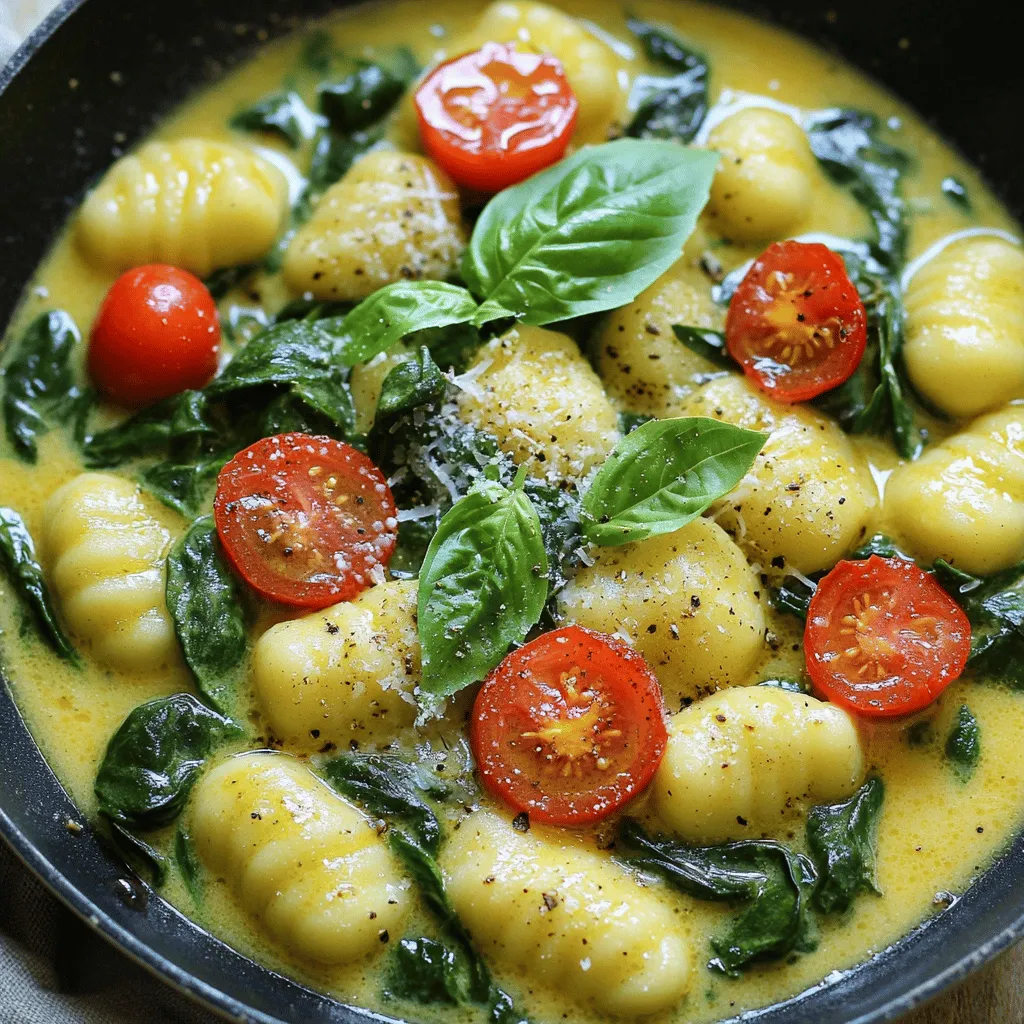
20-Minute One-Pan Spinach Gnocchi Delightful Meal
Looking for a quick and tasty meal? This 20-Minute One-Pan Spinach Gnocchi is your answer! It’s fast, easy, and packed
Read more…
Creamy Cajun Shrimp Pasta Flavorful and Easy Recipe
Are you ready for a taste of Louisiana? This Creamy Cajun Shrimp Pasta recipe brings bold flavors and a creamy
Read more…browse recipes


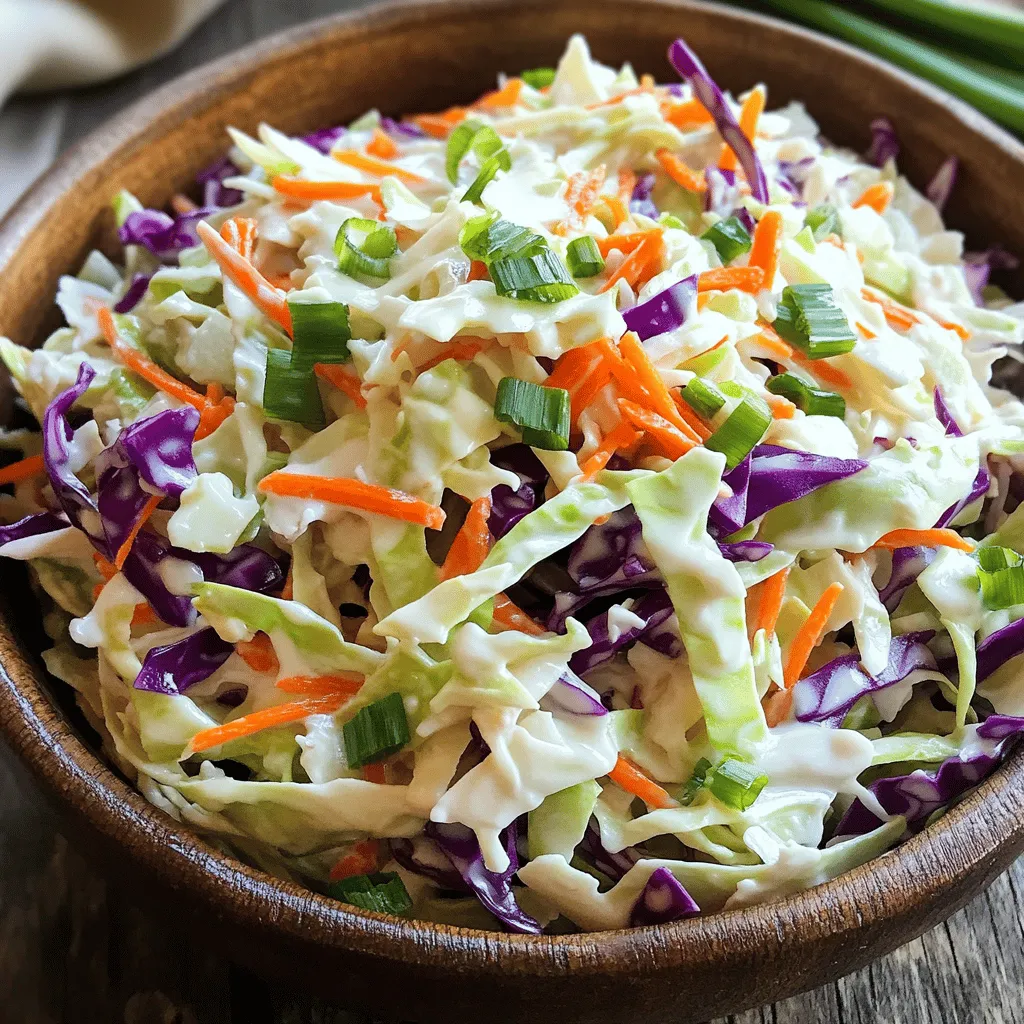
Classic Coleslaw Crunchy and Refreshing Side Dish
Looking for a perfect side dish that’s both crunchy and refreshing? This classic coleslaw recipe hits the mark! Packed with vibrant veggies and a…
My Latest Desserts

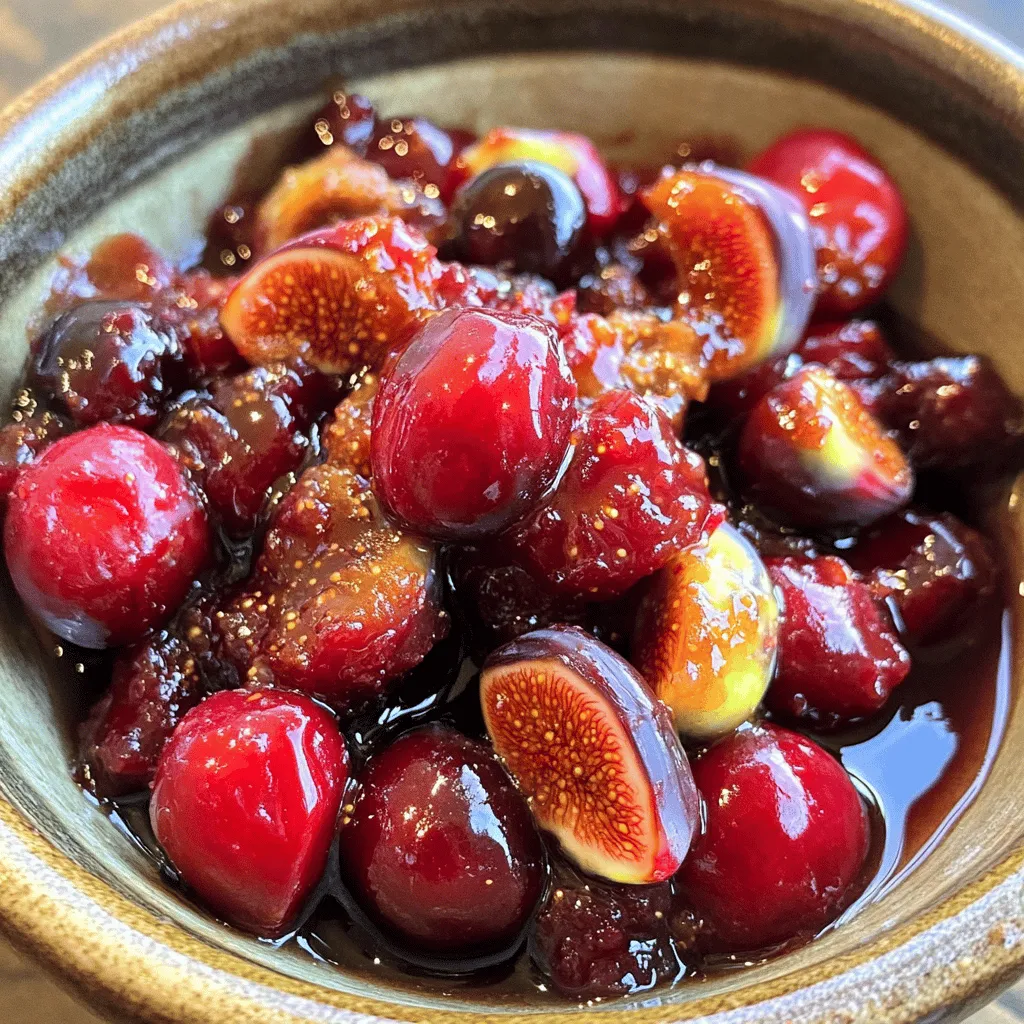
Ginger Fig Cherry Compote Flavorful and Easy Recipe
Are you ready to explore a dish that bursts with flavor? This Ginger Fig Cherry Compote is not only easy Read Full Recipe-
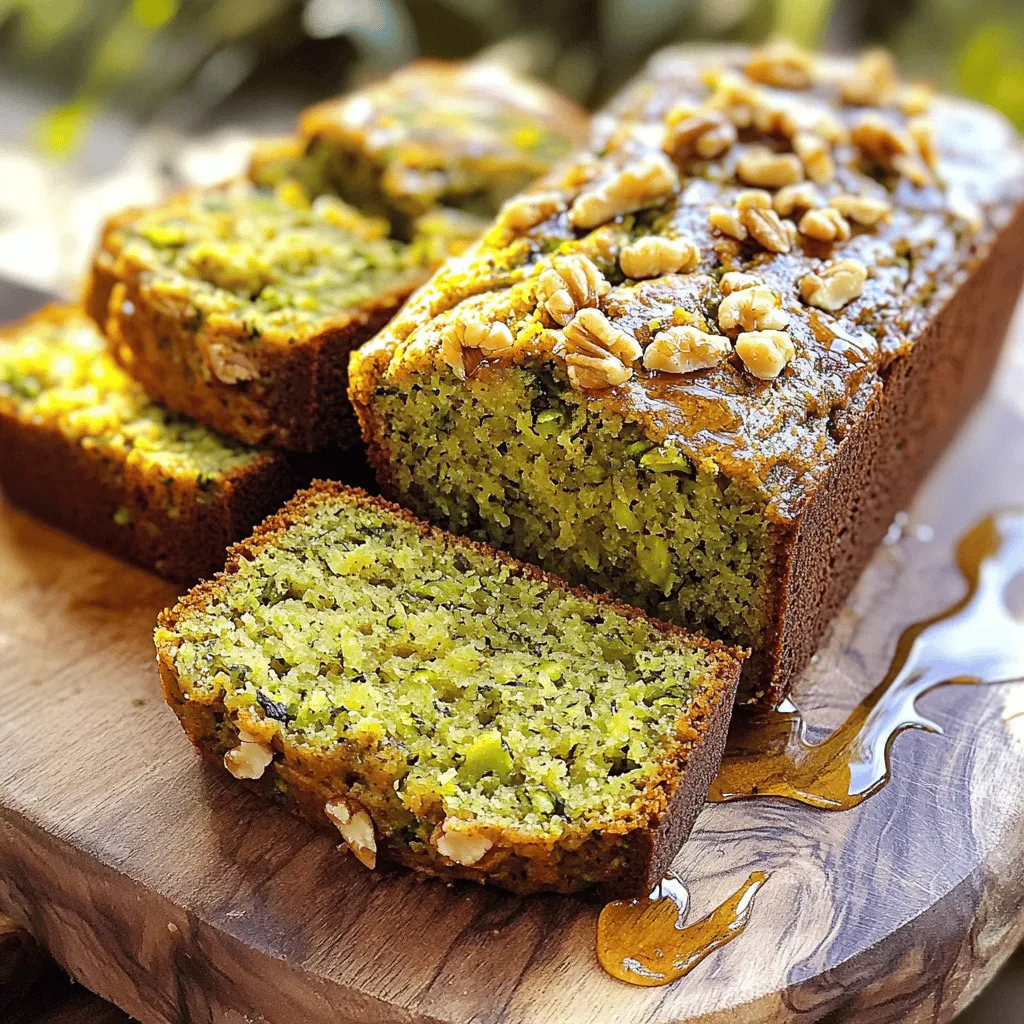
Zucchini Banana Bread Flavorful and Moist Recipe
Do you love warm, fresh bread that bursts with flavor? You’re in the right spot! This Zucchini Banana Bread recipe Read Full Recipe -
Fig Cake with Almond and Honey Delight Recipe
Are you ready to indulge in a delightful treat? My Fig Cake with Almond and Honey recipe combines rich flavors Read Full Recipe -
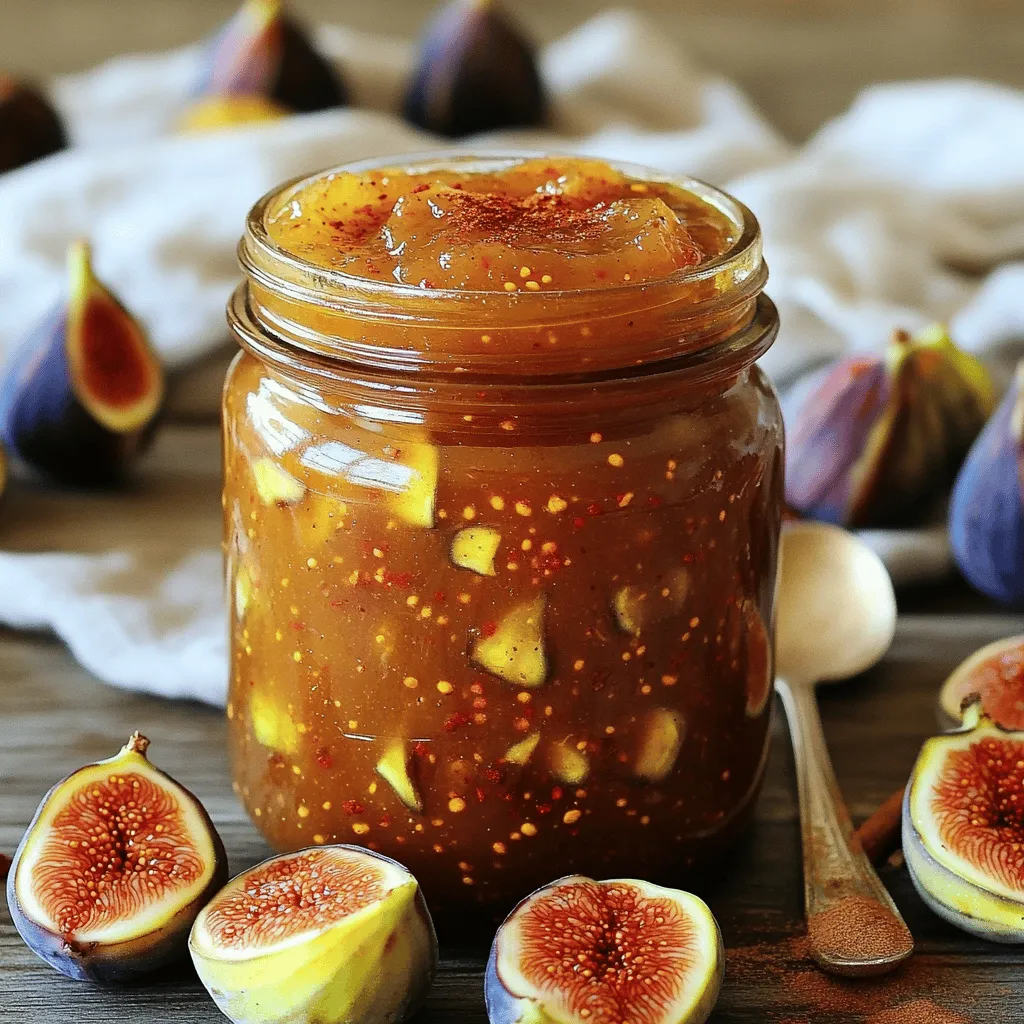
Simple Fig Jam Easy Recipe to Savor and Enjoy
Are you ready to make a burst of flavor with your next kitchen project? This Simple Fig Jam recipe is Read Full Recipe -
Mini Vanilla Cream Tarts with Raspberries Delight
Welcome to the sweet world of Mini Vanilla Cream Tarts with Raspberries! Today, I’ll show you how to make these Read Full Recipe -
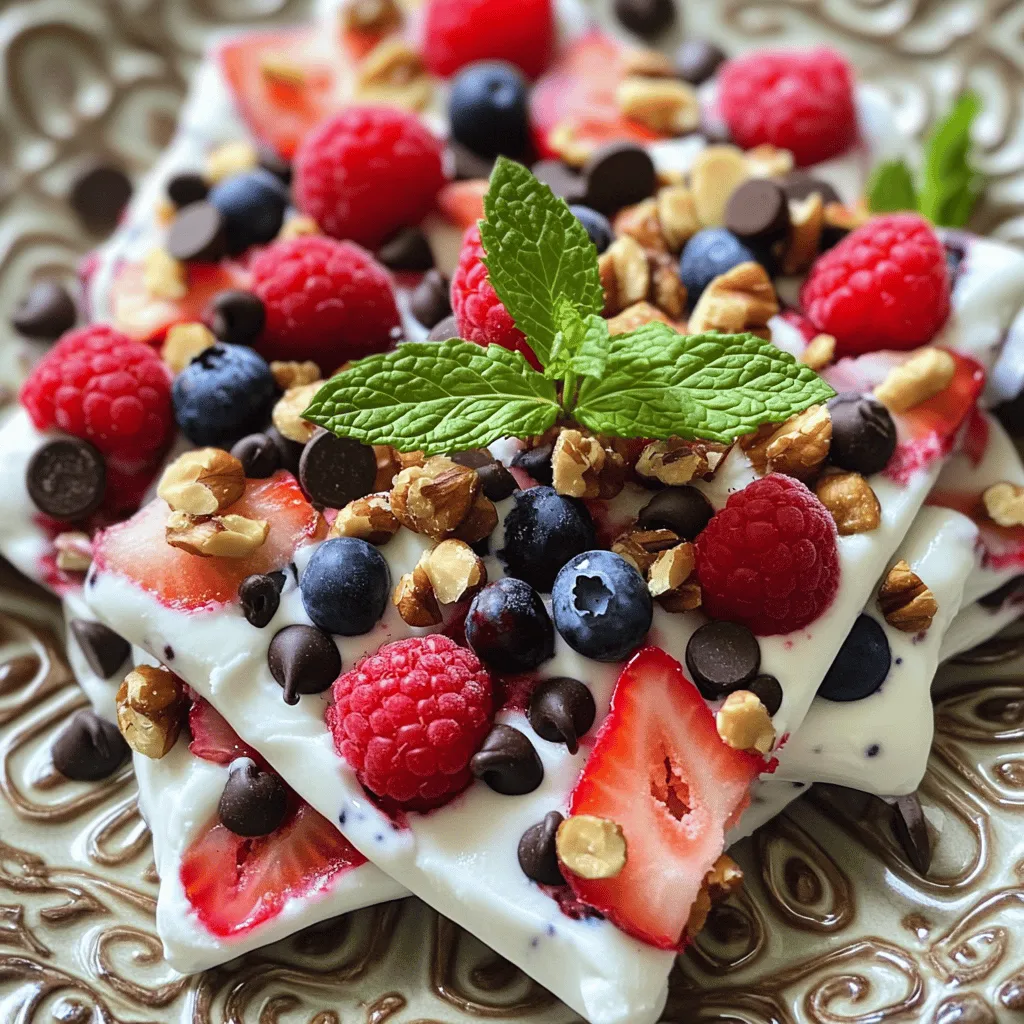
Frozen Yogurt Bark Delightful and Simple Treat
If you’re looking for a quick, tasty treat, frozen yogurt bark is a winner. It’s easy to make and fun Read Full Recipe -
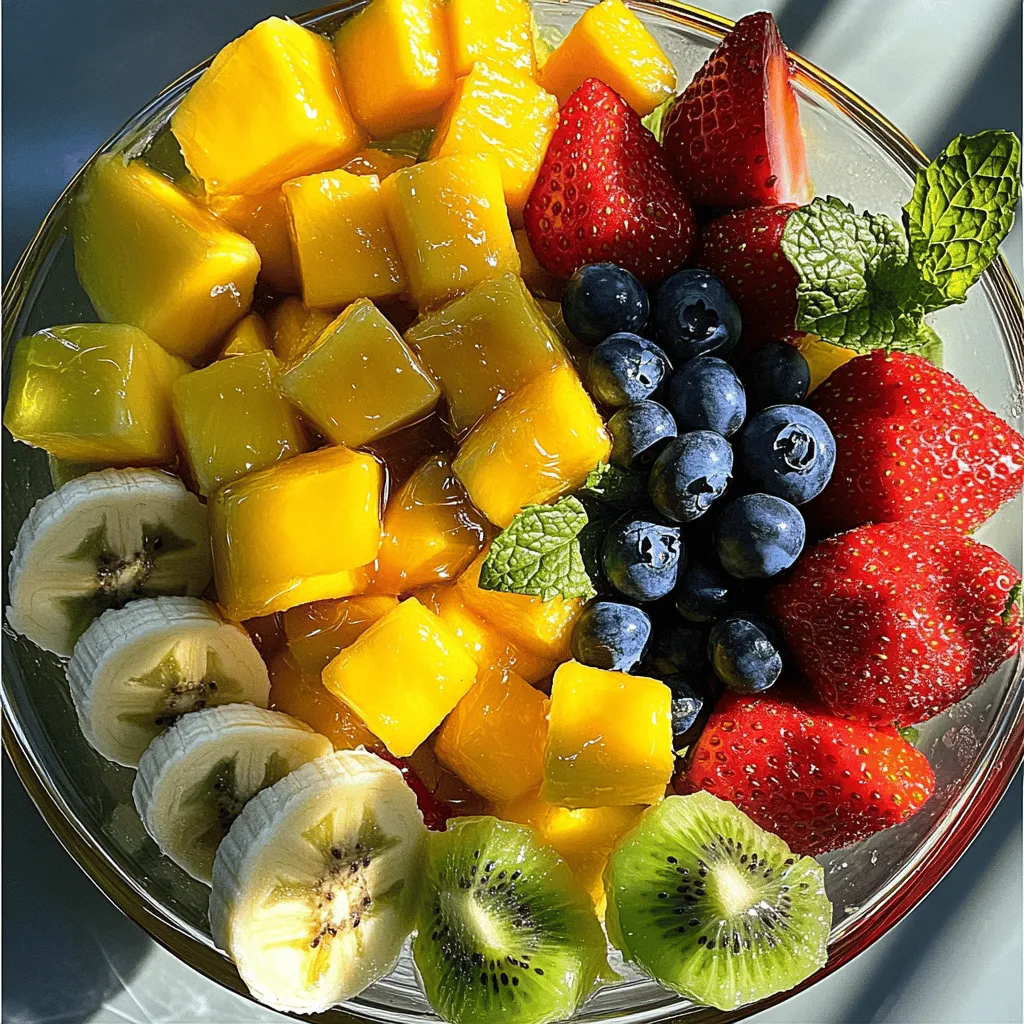
Fruit Salad with Honey Lime Dressing Easy Recipe
Looking for a fresh and easy treat? This Fruit Salad with Honey Lime Dressing is the perfect choice. Bursting with Read Full Recipe -
Blueberry Cheesecake Bars Simple and Delicious Treat
Looking for a dessert that’s easy to make and bursting with flavor? You’ve found it! These Blueberry Cheesecake Bars are Read Full Recipe -
Lemon Cheesecake Crumb Bars Delightful and Fresh Treat
Are you ready to brighten your day with a sweet treat? These Lemon Cheesecake Crumb Bars combine creamy cheesecake with Read Full Recipe -
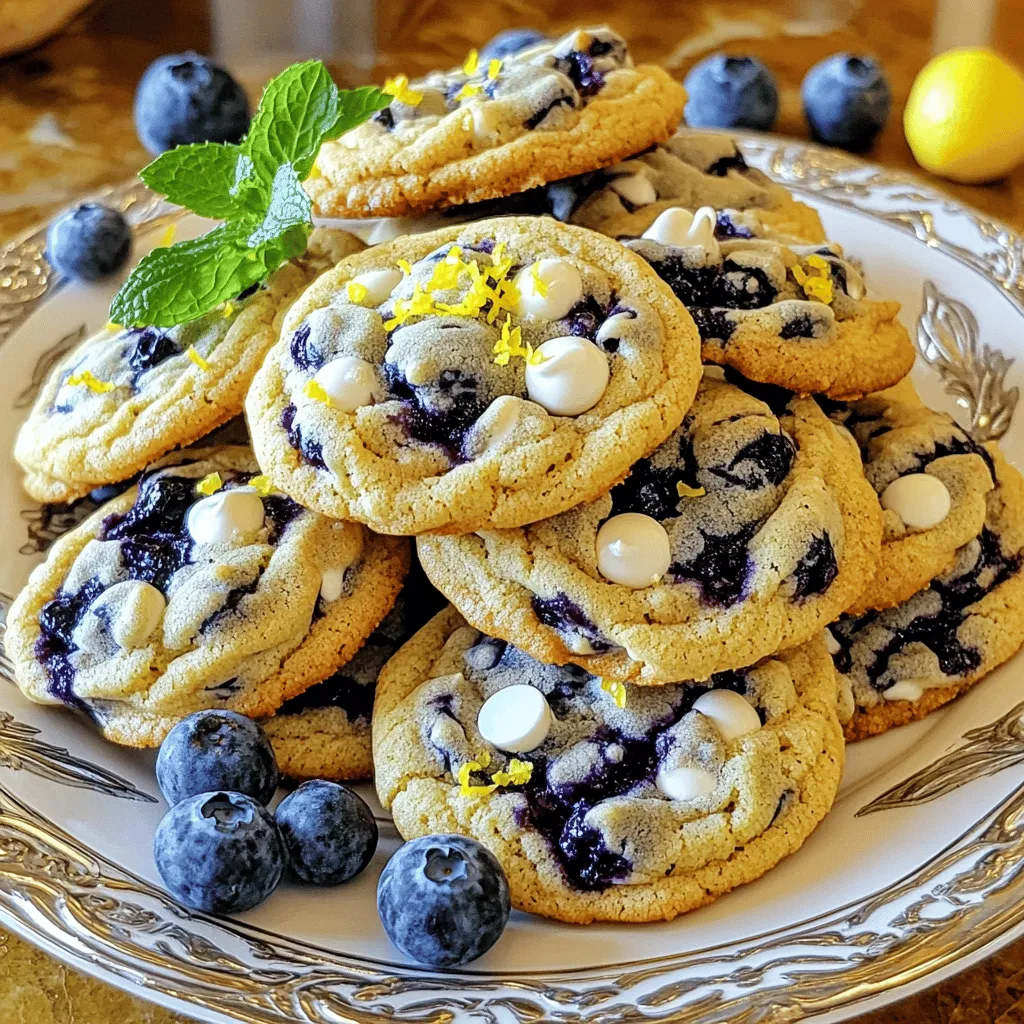
Blueberry Heaven Cookies Irresistible Sweet Treat
Welcome to your new favorite cookie recipe! Blueberry Heaven Cookies are the perfect blend of sweet and tart, making them Read Full Recipe


hey,
i’m !
I’m so happy you’re here!
I pour heart and skill into every recipe I create. I know you’ll taste the difference now let’s enjoy this flavorful adventure together.

![- Fresh Vegetables: - 4 medium zucchini, thinly sliced - 4 medium yellow squash, thinly sliced - 1 small onion, finely chopped - 2 cloves garlic, minced - 1 cup cherry tomatoes, halved - Base Ingredients: - 1 cup cooked quinoa - 2 tablespoons olive oil - Dairy Options: - 1 cup shredded mozzarella cheese (or dairy-free alternative) - 1/2 cup grated Parmesan cheese (or nutritional yeast for a vegan option) - Seasonings: - 1 teaspoon dried oregano - 1 teaspoon salt - 1/2 teaspoon black pepper - Fresh basil leaves, for garnish Using fresh ingredients makes this dish shine. Zucchini and yellow squash are perfect for summer cooking. They add color and taste. Onion and garlic bring depth to the flavors. Cherry tomatoes add a sweet burst. Quinoa serves as a hearty base. The olive oil keeps everything moist and rich. For cheese lovers, mozzarella and Parmesan add creaminess. You can swap them for dairy-free options if you want. The seasonings tie all the flavors together. Oregano, salt, and pepper enhance the dish. Fresh basil adds a lovely aroma. This recipe is a great way to enjoy summer squash. You can find the full recipe at [Full Recipe]. 1. Preheat the oven: Set your oven to 375°F (190°C). Grease a 9x13-inch baking dish with olive oil. This helps prevent the casserole from sticking. 2. Sauté onion and garlic: In a large skillet, heat 2 tablespoons of olive oil over medium heat. Add the chopped onion. Sauté it for about 3-4 minutes. You want it soft and translucent. Then, add the minced garlic. Cook for another minute until it smells good. 3. Combine vegetables with base ingredients: In a big bowl, mix together the sliced zucchini, yellow squash, cooked quinoa, sautéed onion, garlic, cherry tomatoes, oregano, salt, and black pepper. Stir well to coat everything evenly. 1. Layering ingredients in the baking dish: Start by adding half of the squash mixture into the greased baking dish. Sprinkle half of the mozzarella cheese on top. Repeat with the remaining squash mixture and the rest of the cheese. 2. Covering and baking the casserole: Sprinkle the grated Parmesan cheese evenly over the top. Cover the dish with aluminum foil. Bake for 25 minutes. After that, take off the foil and bake for another 15-20 minutes until the cheese is bubbly and golden brown. 1. Garnishing with fresh basil: Once you take the casserole out of the oven, let it cool for a few minutes. This helps with serving. Then, add fresh basil leaves on top for color and taste. 2. Suggested cooling time before serving: I recommend letting it cool for about 5 minutes before serving. This way, it will be easier to cut and serve. Enjoy your delicious Healthy Summer Squash Casserole! You can find the full recipe above. When choosing summer squash, look for firm zucchini and yellow squash. They should have smooth skin without soft spots. Bright colors show freshness. Avoid squashes that feel too heavy or have blemishes. Store your squash in a cool, dry place. Keep them in a paper bag to absorb moisture. Use them within a week for the best taste. If you want a dairy-free option, there are great cheese alternatives. Look for plant-based mozzarella that melts well. Nutritional yeast is a tasty substitute for Parmesan and adds a cheesy flavor. If you don’t have quinoa, try brown rice or couscous. Both work well and add a nice texture. To boost flavor, add spices like paprika or thyme. A pinch of red pepper flakes can give your dish a kick. Consider pairing your casserole with a fresh salad or crusty bread. Grilled chicken or fish also makes a great side. These combinations make your meal colorful and delicious. For the full recipe, you can check out the detailed steps and ingredients. {{image_2}} Adding protein can boost the nutrition of your casserole. You can use beans or lentils for a hearty touch. They add fiber and make the dish more filling. I love black beans or chickpeas for this. Simply mix them into the veggie blend before baking. If you want meat, try adding cooked chicken or tofu. Cooked chicken adds great flavor and texture. Just shred it and fold it into the mix. Tofu is a wonderful option for a plant-based meal. Use firm tofu for the best results. You can sauté it briefly before mixing it in. To change the flavor, you can add fun ingredients. For an Italian twist, try adding fresh basil or sun-dried tomatoes. These add a bright taste and aroma. They pair perfectly with the squash and cheese. Just chop and mix them into your squash blend. If you prefer a Mexican style, add corn and jalapeños. This will give your casserole a spicy kick. You can use fresh corn or canned, depending on what you have. Jalapeños can be fresh or pickled for more heat. You can cook this casserole in different ways. A slow cooker is great for easy meals. Combine all ingredients in the slow cooker. Cook on low for 4 to 6 hours. This method makes the flavors blend really well. If you prefer an oven, bake it for a crisp top. Preheat your oven to 375°F (190°C), as in the full recipe. Baking gives you that nice golden cheese on top. Grilling is another fun method. You can use a grill-safe dish. Just keep an eye on it to avoid burning. Grilling adds a smoky flavor that is unique and delicious. To store leftover casserole, let it cool first. Once cooled, cover it tightly with plastic wrap or aluminum foil. Place it in the fridge. Your casserole will stay fresh for about 3 to 4 days. Keep an eye on it, though—if it smells off, it's best to toss it. You can freeze portions of the casserole for later. First, let it cool completely. Cut it into individual servings. Wrap each piece in plastic wrap, then place them in a freezer bag. This way, you keep the flavor and texture. To reheat, just thaw overnight in the fridge, then warm it in the oven or microwave. This casserole makes an excellent meal prep dish. You can prepare it on the weekend and enjoy it all week. Just keep the portions in the fridge. For quick meals, reheat in the microwave or oven. It’s tasty hot or even at room temperature. Perfect for busy days! For the full recipe, check out the Healthy Summer Squash Casserole. Yes, you can make this casserole ahead. Prepare it a day before you plan to serve it. Once you layer the ingredients, cover the dish and place it in the fridge. This lets the flavors mix together. When you are ready to bake, take it out and let it sit for 30 minutes. This helps with even cooking. Bake it as directed in the Full Recipe. Leftovers can stay fresh in the fridge for about 3 to 4 days. This casserole pairs well with many sides. Here are some ideas: - A crisp green salad with lemon dressing - Roasted or steamed vegetables like broccoli or green beans - Quinoa or brown rice for added texture - Grilled chicken or fish for protein These sides enhance the meal and add variety to your plate. Yes, you can make a vegan version of this casserole. Use dairy-free cheese instead of mozzarella and Parmesan. Nutritional yeast works well for a cheesy flavor. This dish is full of good ingredients. Zucchini and yellow squash provide vitamins. Quinoa adds protein and fiber. These ingredients can help you feel full and satisfied. Enjoy a tasty and healthy meal! The Healthy Summer Squash Casserole blends fresh veggies and nourishing ingredients. You learned how to choose the best squash, layer flavors, and enhance your dish. We explored variations to suit your taste and storage tips for easy meal prep. This recipe fits many diets and is a great way to enjoy summer's bounty. Try it out! You’ll love how easy it is to make and serve. It’s not just a meal; it’s a quick solution for busy days.](https://foodishtalk.com/wp-content/uploads/2025/06/74ac0df9-1471-4dd8-8a34-4c0f07345f20-300x300.webp)
![To make a delicious Roasted Hazelnut Mocha Latte, you need a few key ingredients: - 1 cup brewed strong coffee or espresso - 1 tablespoon roasted hazelnut syrup (or homemade hazelnut paste) - 2 tablespoons unsweetened cocoa powder - 1 cup steamed milk (dairy or plant-based) - 1-2 teaspoons sugar or sweetener of choice (optional) - Whipped cream for topping (optional) - Chopped roasted hazelnuts for garnish - A pinch of sea salt These ingredients create a rich and cozy drink that warms the soul. You can make your latte even better with some fun additions: - Flavored syrups like vanilla or caramel - A dash of cinnamon or nutmeg for spice - Different milk options such as oat, almond, or coconut - Chocolate shavings or cocoa powder for extra garnish Feel free to mix and match based on your taste! If you can’t find a specific item, here are some options: - Use chocolate syrup instead of cocoa powder for sweetness. - Maple syrup can replace hazelnut syrup for a different flavor. - Any milk will work if you run out of your favorite kind. These substitutes will still give you a tasty latte experience. For the full recipe, check out the details above! Start by brewing your coffee or espresso. Use a strong brew for the best taste. You can use a coffee maker, French press, or espresso machine. Aim for about one cup. If you like espresso, pull a double shot for extra strength. Set your coffee aside while you prepare the other ingredients. In a small bowl, mix two tablespoons of unsweetened cocoa powder with sugar, if desired. Add a splash of hot water to the bowl. Stir until you get a smooth paste. This paste will add rich chocolate flavor to your latte. Make sure there are no lumps. If you prefer a sweeter drink, adjust the sugar to your taste. In a saucepan, combine your brewed coffee, roasted hazelnut syrup, and the chocolate paste. Whisk the mixture well over medium heat. Heat it until warm but not boiling. In a separate pan, steam your milk until it's hot and frothy. If you don't have a steamer, you can heat the milk on the stove or in the microwave. Use a whisk to froth it up. Grab a large mug. Pour the chocolate-hazelnut coffee mixture into the mug, leaving some space for the milk. Gently pour the frothed milk over the coffee blend. This will create a lovely layered effect. If you want, top your latte with whipped cream. Sprinkle chopped roasted hazelnuts and a pinch of sea salt on top for extra flair. Enjoy every sip of this cozy drink! For the complete recipe, refer to the [Full Recipe]. To get the best froth for your latte, start with cold milk. Use a milk frother if you have one. If not, heat the milk on the stove or in the microwave. Whisk the milk quickly to create bubbles. Aim for a thick, creamy texture. Try to incorporate air as you whisk. This step gives your latte that lovely, foamy top. You can make your latte even more special. Consider adding a splash of vanilla extract. This adds a warm sweetness. A sprinkle of cinnamon or nutmeg can also boost flavor. For a richer taste, add a dash of chocolate syrup. Don't forget, you can adjust sweetness with more sugar or sweeteners. Each addition makes your drink unique. Choose coffee beans that match your taste. Dark roast beans work well for a bold flavor. They balance the chocolate and hazelnut nicely. Look for beans labeled as “espresso” for a rich base. If you prefer something lighter, try a medium roast. Freshly ground coffee always tastes best. Aim for a grind size that suits your brewing method. For your Roasted Hazelnut Mocha Latte, quality beans make a big difference. {{image_2}} If you want a dairy-free or vegan Roasted Hazelnut Mocha Latte, it's easy! Use plant-based milk like almond, oat, or soy. These milks froth well and blend nicely. For the hazelnut syrup, check if it's dairy-free. Many brands offer vegan options. You can also make your own syrup by blending roasted hazelnuts with water and a sweetener. This way, you control all the ingredients. To enjoy a chilled version, make an Iced Roasted Hazelnut Mocha Latte. Start by brewing your coffee and letting it cool. Mix the cooled coffee with hazelnut syrup and cocoa powder. Pour this mixture over ice in a tall glass. Then, top with cold frothed milk. Stir it all together for a refreshing drink. It’s perfect for warm days and still tastes rich and cozy. You can play with flavors based on the seasons. In fall, add a pinch of cinnamon or nutmeg for a warm spice twist. For winter, try a splash of peppermint for a festive vibe. In spring, a hint of vanilla can brighten the drink. Use seasonal ingredients like pumpkin or caramel for a unique twist. These variations keep your Roasted Hazelnut Mocha Latte exciting all year long. For the full recipe, check out the earlier section. If you have leftover mocha latte, store it in the fridge. Use an airtight container to keep it fresh. It will stay good for two days. Before drinking, check for any changes in smell or taste. If it seems off, toss it out. Store your roasted hazelnut syrup in a cool, dark place. Keep it tightly sealed to avoid air exposure. Cocoa powder should go in a dry spot, away from moisture. For milk, always check the date and store it in the fridge. Fresh ingredients make a better drink. When you reheat your mocha latte, do it gently. Use the stove or microwave on low heat. Stir it well to mix any separated layers. Avoid boiling, as it can change the taste. For the best flavor, enjoy it warm, not hot. You can also add a little fresh whipped cream before serving. For the full recipe, check out the Roasted Hazelnut Mocha Latte section. A Roasted Hazelnut Mocha Latte can offer several health benefits. First, coffee provides antioxidants that help fight free radicals. Hazelnuts are rich in healthy fats, vitamins, and minerals. They can boost heart health and support brain function. Cocoa powder adds magnesium and iron, which are good for energy and mood. When you enjoy this drink, you get a tasty treat with some health perks too. You can find roasted hazelnut syrup at many grocery stores. Look in the coffee aisle or the baking section. You can also check specialty coffee shops. If you prefer online shopping, websites like Amazon and specialty food retailers often carry it. Just make sure to read the labels to choose a brand that uses real ingredients. Yes, you can make this drink without an espresso machine. Brew strong coffee using a drip coffee maker, French press, or pour-over method. Just make sure the coffee is strong for the best flavor. If you want frothy milk, heat it on the stove or in the microwave. Then whisk it vigorously to create some froth. Making roasted hazelnut syrup at home is easy. Start with these ingredients: - 1 cup water - 1 cup sugar - 1 cup roasted hazelnuts 1. Combine water and sugar in a saucepan and heat until sugar dissolves. 2. Add roasted hazelnuts to the saucepan. 3. Simmer for about 10 minutes, then let it cool. 4. Strain the syrup into a bottle and store in the fridge. You can use this syrup in your latte for a rich flavor. Many brands make great roasted hazelnut mocha latte products. Popular coffee chains often have their own versions. You can also try brands like Torani and DaVinci for syrup. If you prefer ready-made options, check out local cafes. They often offer unique drinks that feature roasted hazelnut mocha latte flavors. For a full recipe, click [Full Recipe]. You learned how to make a delicious Roasted Hazelnut Mocha Latte. We covered the key ingredients along with helpful tips and fun variations. With a few simple steps, you can enjoy this drink at home. Don’t forget to experiment with flavors and ingredients. Whether you prefer it hot or cold, there's a version for you. Now, grab your coffee gear and create your perfect cup. Enjoy the process and the rich taste!](https://foodishtalk.com/wp-content/uploads/2025/06/adc44de0-cabc-4210-be2e-833681039afd-300x300.webp)
![To make this dish, gather the following ingredients: - 1 package (16 oz) gnocchi (store-bought, typically found in the pasta section) - 2 cups fresh spinach, roughly chopped - 1 cup cherry tomatoes, halved - 1 cup vegetable broth - 2 tablespoons olive oil - 3 cloves garlic, minced - 1 teaspoon red pepper flakes (adjust to taste) - 1/2 cup grated Parmesan cheese (plus more for serving) - Salt and pepper to taste - Fresh basil leaves for garnish (optional) You can switch out some ingredients if you want. Here are a few ideas: - Use kale or arugula in place of spinach for a different flavor. - Swap cherry tomatoes for diced bell peppers or zucchini. - If you prefer, use chicken broth instead of vegetable broth. - For a vegan option, use nutritional yeast instead of Parmesan cheese. When picking fresh ingredients, look for these tips: - Choose spinach that is vibrant green and crisp. Avoid wilted or yellow leaves. - Select firm, shiny cherry tomatoes, with no blemishes or wrinkles. - When buying garlic, choose heads that are heavy and dry. Fresh garlic has a strong smell. - For olive oil, go for extra virgin for the best flavor. Check the label for freshness dates. This quick list will help you create a delicious meal with the right ingredients. For the full recipe, check out the details above. This dish is quick and easy. You can make it in just 20 minutes. First, gather all your ingredients. You will need gnocchi, spinach, cherry tomatoes, and more. It all comes together in one pan, making cleanup simple. 1. Heat the olive oil in a large skillet on medium heat. When it’s hot, add minced garlic and red pepper flakes. Sauté for about 30 seconds. You want the garlic to be fragrant. 2. Next, throw in the halved cherry tomatoes. Cook them for 3 to 4 minutes. Stir them now and then until they soften. This step builds flavor in your dish. 3. Now, pour in the vegetable broth. Bring it to a simmer. Add the gnocchi next. Stir gently to mix it all together. Cook for 2 to 3 minutes. Watch for the gnocchi to float; this means they’re ready. 4. Once the gnocchi floats, lower the heat. Add the chopped spinach to the skillet. Stir it in and let it wilt for about 1 to 2 minutes. Keep stirring to mix everything well. 5. It’s time to add the grated Parmesan cheese. Mix it in until it melts. This will create a creamy sauce. Season with salt and pepper to your liking. 6. Remove the skillet from heat. Let the dish sit for a minute to thicken slightly. 7. Serve it hot. You can garnish with more Parmesan and fresh basil if you like. - When sautéing garlic, watch it closely. Garlic can burn quickly, which makes it bitter. - Stirring the tomatoes helps them cook evenly. This keeps them juicy and sweet. - Use a wooden spoon or spatula when stirring the gnocchi. This prevents them from breaking. - Adding spinach last keeps it bright and fresh. Overcooking can make it mushy. - Letting it sit after cooking helps the sauce thicken. This makes it creamier and richer. For the full recipe, check the details above. Now you’re ready to enjoy your delightful meal! To boost the taste of your dish, use fresh garlic. Fresh garlic gives a strong, rich flavor. You can also add a squeeze of lemon juice. This brightens the dish and adds a nice zing. Consider using fresh herbs like basil or parsley. They add a fresh touch and make your meal more vibrant. When you cook gnocchi, pay attention to the water. It should be at a gentle simmer. If the water is boiling hard, the gnocchi can break apart. Stir gently to avoid sticking. Look for the gnocchi to float. This shows they are ready to eat. Once they float, let them cook just a bit longer. This gives you a nice, chewy texture. One common mistake is overcooking the gnocchi. This can make them mushy and lose their shape. Watch the time closely when they start to float. Another pitfall is not using enough salt. Salt is key to brightening the flavors in your dish. Be sure to taste as you go. This helps you adjust the seasonings just right. For the best results, follow the Full Recipe closely. {{image_2}} You can change up the flavors by adding various vegetables. For a crunchy bite, add bell peppers or zucchini. If you like a bit of sweetness, try adding corn or peas. Mushrooms bring an earthy taste and pair well with spinach. Carrots or kale can also add color and nutrition. Just chop them small so they cook quickly. Adding protein makes the dish heartier. You can toss in cooked chicken or shrimp for a boost. For a vegetarian option, try white beans or chickpeas. Both add protein and fiber. If you're in the mood for something different, add crumbled sausage or bacon. These options all mix well with the gnocchi and add depth to the flavor. You can easily adapt this recipe for different diets. To make it vegan, skip the cheese or use a dairy-free alternative. There are many good vegan cheeses on the market today. For gluten-free, choose gluten-free gnocchi, which is often made from rice or potatoes. Check the labels to ensure your broth is gluten-free too. These adjustments keep the dish delicious and friendly for everyone. For the full recipe, check the section above. To keep your spinach gnocchi fresh, store it in an airtight container. Make sure it cools before sealing to avoid steam inside. Place it in the fridge. It will stay good for about 3 days. If you want to enjoy it later, freezing works too. When you’re ready to eat, reheat the gnocchi on the stove. Add a splash of vegetable broth or water in a skillet. This helps keep it moist. Heat over medium heat, stirring gently until hot. You can also use the microwave. Just cover it with a damp paper towel to avoid drying out. If you plan to freeze the dish, place it in a freezer-safe container. It lasts up to 3 months in the freezer. To reheat, let it thaw in the fridge overnight. Then, use the stovetop method to heat it. This preserves its taste and texture. Yes, you can use frozen gnocchi. Just add them directly to your skillet. There’s no need to thaw them first. They will cook quickly in the vegetable broth. Follow the same cooking time as fresh gnocchi. The taste and texture will still be good. To serve more people, simply double the ingredients. Keep the same cooking steps. Use a larger skillet if needed. This will help you cook everything evenly. You can also add more broth if the sauce looks too thick. You can pair your gnocchi with a fresh salad. A simple side of garlic bread works well too. If you want a protein, grilled chicken or shrimp are great choices. This makes your meal more filling and colorful. Leftover spinach gnocchi can last in the fridge for 3 days. Store it in an airtight container. For best taste, eat it within this time. You can also freeze it for up to 2 months. Just make sure to reheat it well before eating. Yes, you can make it vegan. Just swap the Parmesan cheese for a plant-based option. Also, use vegetable broth to keep it vegan-friendly. This way, everyone can enjoy this delightful meal! Basil and parsley work well with this dish. Fresh herbs add flavor and a nice touch. You can also try thyme or oregano for a different taste. Add them at the end for the best flavor. Gnocchi is done when it floats to the top of the skillet. This takes about 2-3 minutes after adding it. If you want, taste one to check the texture. It should be soft but not mushy. Absolutely! You can add bell peppers, zucchini, or mushrooms. Just chop them small and add them with the tomatoes. This adds more color and flavor to your meal. Reheat gnocchi on the stove over low heat. Add a splash of broth or water to prevent sticking. Stir gently until heated through. You can also use a microwave, but the stove keeps it more flavorful. For the full recipe, check out the [Full Recipe]. In this post, we covered key ingredients, step-by-step cooking, and handy tips. You learned about flavor enhancements, variations, and storage methods. These insights will make your gnocchi cooking easier and more enjoyable. Follow the instructions to create a delicious dish everyone will love. Remember, use fresh ingredients for the best flavor and have fun experimenting with different options! Enjoy your cooking journey!](https://foodishtalk.com/wp-content/uploads/2025/05/87011368-d74f-45a3-b577-6b9a0e353299-300x300.webp)
Caramel Apple Cheesecake Bars Delightful and Easy Treat
If you love the sweet crunch of apples paired with rich cheesecake, you’re in for a treat! These Caramel Apple Cheesecake Bars blend the…
![To make the caramel apple cheesecake bars, you need a few simple ingredients. Here’s what you will need: - 1 1/2 cups graham cracker crumbs - 1/4 cup granulated sugar - 1/2 cup unsalted butter, melted - 2 (8 oz) packages cream cheese, softened - 1 cup brown sugar, packed - 1 teaspoon vanilla extract - 2 large eggs - 2 cups diced apples (preferably Granny Smith) - 1 teaspoon cinnamon - 1/2 cup caramel sauce (store-bought or homemade) - Whipped cream for serving (optional) - Additional caramel sauce for drizzling (optional) These ingredients come together to create a rich and tasty treat. The graham cracker crumbs form a crunchy base. Cream cheese and sugar make the cheesecake filling creamy. Diced apples add a fresh twist, while caramel sauce brings sweetness. The cinnamon gives the bars warmth and flavor. Choosing the right apples is key. Granny Smith apples work best. Their tartness balances the sweetness in the bars. You can also mix in other apple types for fun flavors. For a fun twist, you might want to add nuts or chocolate chips. These ingredients can change the bars' texture and taste. If you want to see how to combine these ingredients for a delicious treat, check out the Full Recipe. - Preheat the oven to 325°F (160°C). - Grease an 8x8 inch baking pan with non-stick spray. - Line the pan with parchment paper for easy removal. - In a bowl, mix the graham cracker crumbs, sugar, and melted butter. - Press this mixture into the bottom of the pan. - Bake for 10 minutes, then let it cool slightly. - In a large bowl, beat the softened cream cheese and brown sugar until smooth. - Add the vanilla extract and mix until well combined. - Add the eggs one at a time, mixing well after each. - Fold in the diced apples and cinnamon gently. - Pour the cheesecake mixture over the cooled crust. - Drizzle half of the caramel sauce on top. - Use a knife to swirl it into the cheesecake mixture. - Bake for 30-35 minutes, until the center is set but jiggly. - Remove from the oven and cool at room temperature. - Once cooled, refrigerate for at least 4 hours or overnight. You can find the Full Recipe in the previous section. To get the best texture, make sure the cream cheese is fully softened. Cold cream cheese can lead to lumps. Leave it at room temp for at least an hour. When it comes to apples, I love using Granny Smith. They give a tart flavor that balances the sweet cheesecake and caramel. Look for firm apples with a bright green color. Avoid soft or bruised fruit. For garnishes, top your caramel apple cheesecake bars with a dollop of whipped cream. Add a sprinkle of cinnamon for extra flair. You can also drizzle more caramel sauce on top. Pair these bars with coffee or a cup of spiced tea. The warm drinks enhance the sweet and creamy flavors. If your cheesecake cracks, don’t worry! Let it cool slowly at room temp before chilling. This helps reduce cracks. To prevent a soggy crust, make sure to bake it properly. Press the graham cracker mixture firmly into the pan. This keeps it crisp. You can bake it a bit longer if needed, just watch for browning. For the full recipe, check the beginning of the article. {{image_2}} You can make these bars even more fun by adding nuts or spices. I love using chopped pecans or walnuts for a crunchy bite. They add a great texture! You can also sprinkle some nutmeg or ginger for a warm flavor twist. If you prefer something creamier, try using flavored cream cheese. Options like cinnamon or caramel cream cheese can elevate the taste. If you need a gluten-free option, consider using ground almonds or gluten-free graham crackers for the crust. They work just as well and taste great! For a dairy-free version, look for dairy-free cream cheese. There are many brands available that mimic the taste and texture of regular cream cheese. Want to switch things up? You can transform these bars into a cheesecake pie. Just press the crust into a pie dish instead of a baking pan. You can also make mini cheesecake cups. Simply use a muffin tin, and fill each cup with the cheesecake mixture. This makes serving easy and fun! For the full recipe, check here: [Full Recipe]. To keep your caramel apple cheesecake bars fresh, refrigerate them in an airtight container. This method helps maintain their creamy texture. They will stay good for up to a week. If you want, you can also cover them with plastic wrap. This adds an extra layer of protection against drying out. Just make sure they cool completely before you store them. If you want to save the bars for later, freezing is a great option. First, cut them into squares and wrap each piece tightly in plastic wrap. Then, place them in a freezer-safe bag or container. This way, they can last for up to three months. When you’re ready to enjoy them again, take the bars out and let them thaw in the fridge overnight. This keeps their texture nice and smooth. Some people love their cheesecake bars warm. If you are one of them, simply place a bar on a microwave-safe plate. Heat it for about 15 to 20 seconds. Check if it’s warm enough for your liking. If you prefer to serve them cold, just take them out of the fridge and enjoy. Both ways are delicious! For the full recipe, check out the recipe section above. Can I use different types of apples? Yes, you can use various apples. Granny Smith apples work best for their tartness. Honeycrisp or Fuji apples add sweetness. Choose apples that you enjoy eating. How do I know when the cheesecake bars are done baking? The bars are done when the edges are set, but the center is still slightly jiggly. It should not look wet. A toothpick inserted should come out clean. Can I make this recipe dairy-free? Yes, you can use dairy-free cream cheese. Look for brands that offer good texture and taste. Use a dairy-free butter substitute for the crust too. What if I don't have graham crackers? You can use crushed cookies or biscuits. Vanilla wafers or digestive biscuits work well. Just adjust the sugar to your taste. How long do these bars last in the fridge? These bars last about a week in the fridge. Keep them in an airtight container. They taste better as they chill. Can I use homemade caramel sauce? Yes, homemade caramel sauce adds a personal touch. Just ensure it is thick enough to drizzle. It enhances the flavor of the bars nicely. Caramel apple cheesecake bars blend sweet and tart flavors. They offer a taste of fall all year round. You can create this treat with easy steps. Here's how to make them. - 1 1/2 cups graham cracker crumbs - 1/4 cup granulated sugar - 1/2 cup unsalted butter, melted - 2 (8 oz) packages cream cheese, softened - 1 cup brown sugar, packed - 1 teaspoon vanilla extract - 2 large eggs - 2 cups diced apples (preferably Granny Smith) - 1 teaspoon cinnamon - 1/2 cup caramel sauce (store-bought or homemade) - Whipped cream for serving (optional) - Additional caramel sauce for drizzling (optional) 1. Preheat the oven to 325°F (160°C). Grease an 8x8 inch baking pan with non-stick spray. Line the pan with parchment paper for easy removal. 2. Make the crust by mixing graham cracker crumbs, granulated sugar, and melted butter. Press this mix firmly into the bottom of the pan. Bake for 10 minutes. Let it cool slightly. 3. Prepare the cheesecake mixture. In a large bowl, beat softened cream cheese and brown sugar until smooth. Add vanilla extract and mix well. 4. Add eggs one at a time. Mix well after each addition. Make sure the batter is smooth. 5. Fold in diced apples and cinnamon. Mix gently until just combined. 6. Pour the cheesecake mixture over the cooled crust. Spread it evenly. Drizzle half of the caramel sauce over the top. Use a knife to swirl it gently into the batter. 7. Bake for 30-35 minutes. The center should be set but still slightly jiggly. Remove from the oven and let it cool at room temperature. 8. Refrigerate the cheesecake bars for at least 4 hours or overnight to set completely. 9. Serve by lifting the bars out of the pan using the parchment paper. Cut into squares. Drizzle with the remaining caramel sauce and add whipped cream if you like. This recipe is simple yet rewarding. The mix of apples and cheesecake makes each bite special. This recipe for Caramel Apple Cheesecake Bars combines sweet and creamy flavors. You learned how to create a tasty crust, a rich filling, and the right baking techniques. Using Granny Smith apples and caramel adds special touches. These bars are perfect for gatherings or a sweet treat at home. Enjoy your baking and share it with friends and family. Your success will inspire others to try this delicious dessert!](https://foodishtalk.com/wp-content/uploads/2025/05/0930575a-2604-4412-840b-5ca5489aee99.webp)
