

Latest & Greatest

Roasted Red Pepper Hummus Flavorful and Simple Recipe
Looking for a dip that’s both tasty and easy to make? Look no further! This Roasted Red Pepper Hummus recipe
Read more…
Cheesy Cauliflower Bake Deliciously Creamy Treat
Do you love comfort food that’s easy and tasty? My Cheesy Cauliflower Bake is the answer! This dish is creamy,
Read more…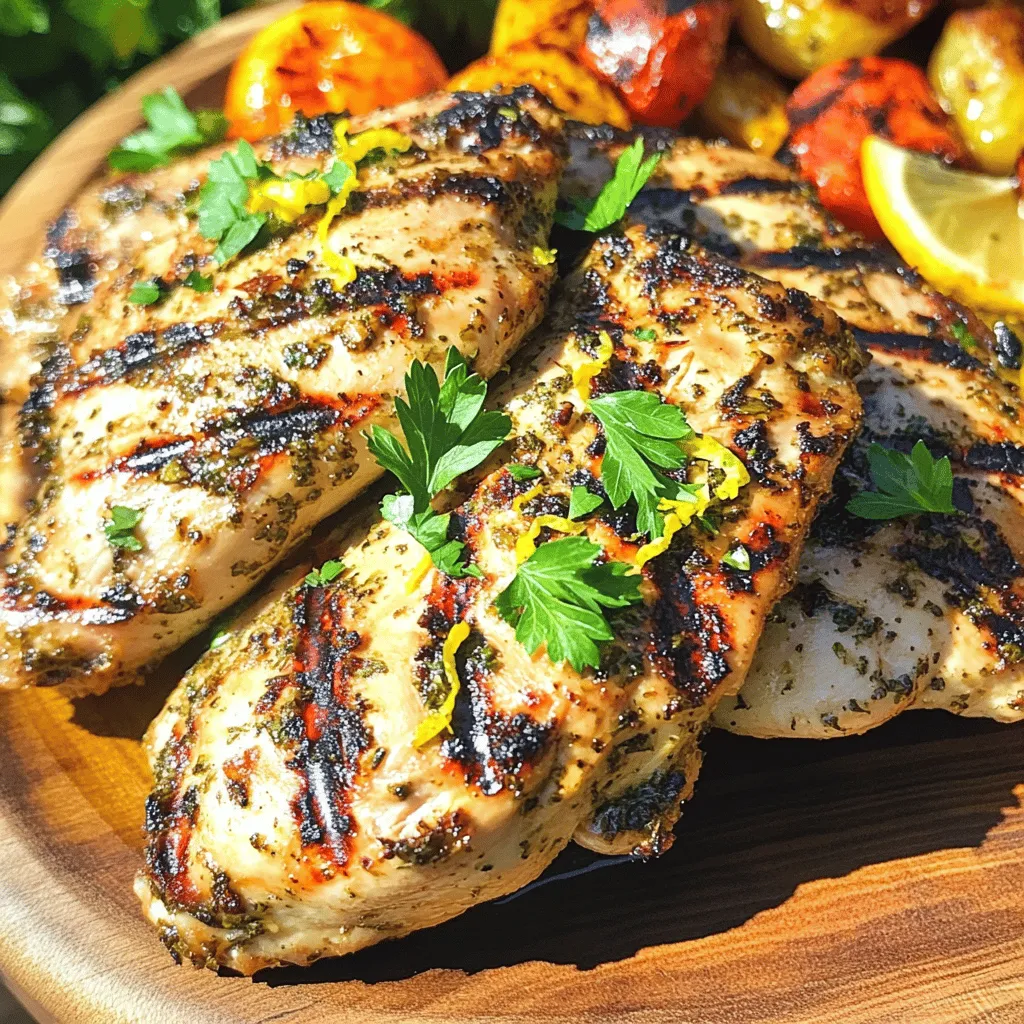
Lemon Herb Grilled Chicken Flavorful and Simple Dish
If you’re craving a simple yet tasty meal, Lemon Herb Grilled Chicken is the answer. With fresh flavors and easy
Read more…
Creamy Polenta with Mushroom Ragu Hearty and Flavorful
Are you ready to dive into a dish that is both hearty and flavorful? Creamy polenta with mushroom ragu is
Read more…
Spiced Apple Cider Instant Pot Flavorful Delight
Are you ready to warm your soul with a delicious cup of spiced apple cider? This Instant Pot recipe brings
Read more…
Nut-Free Granola Bars Simple and Tasty Recipe
Are you craving a tasty snack that’s safe for nut allergy sufferers? Look no further! In this post, I’ll share
Read more…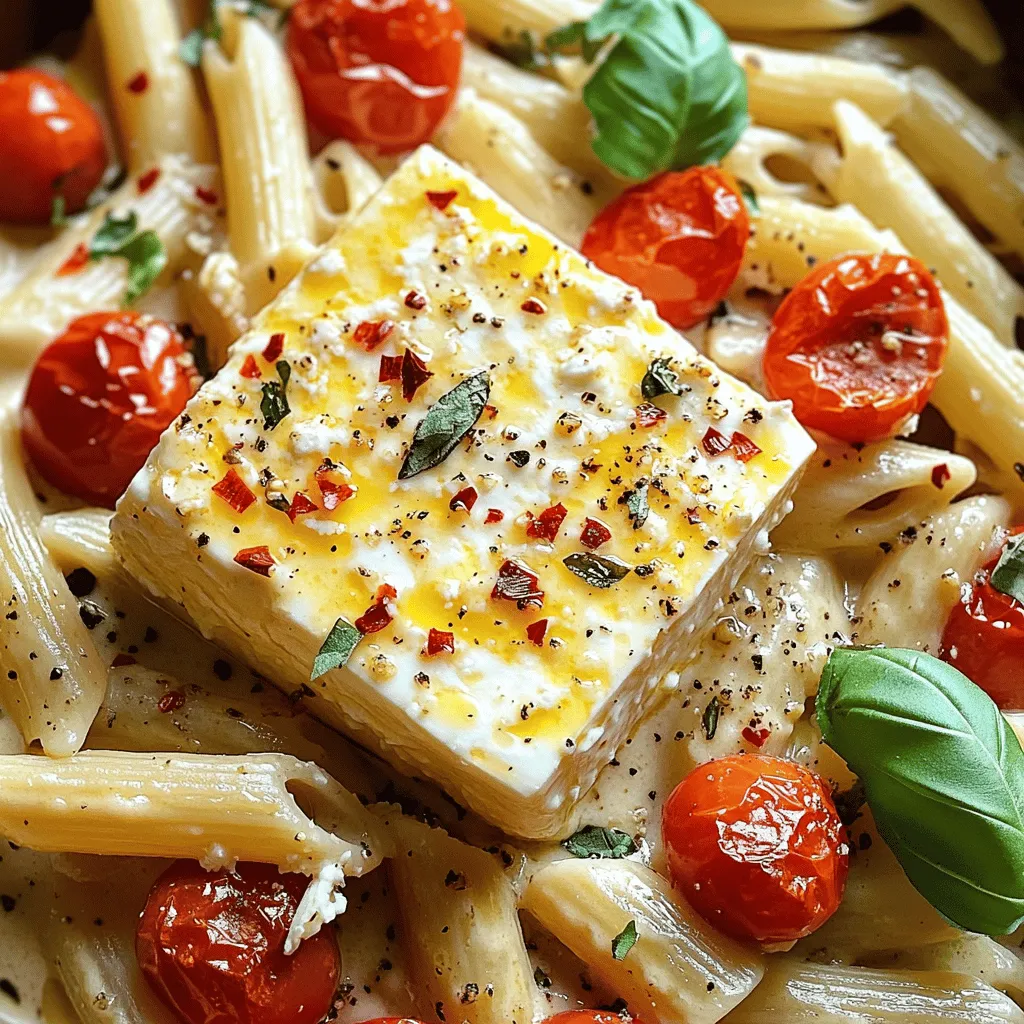
Baked Feta Pasta Delightfully Simple and Creamy Dish
Are you ready to make a dish that’s creamy, easy, and delicious? Baked Feta Pasta fits all those wishes! This
Read more…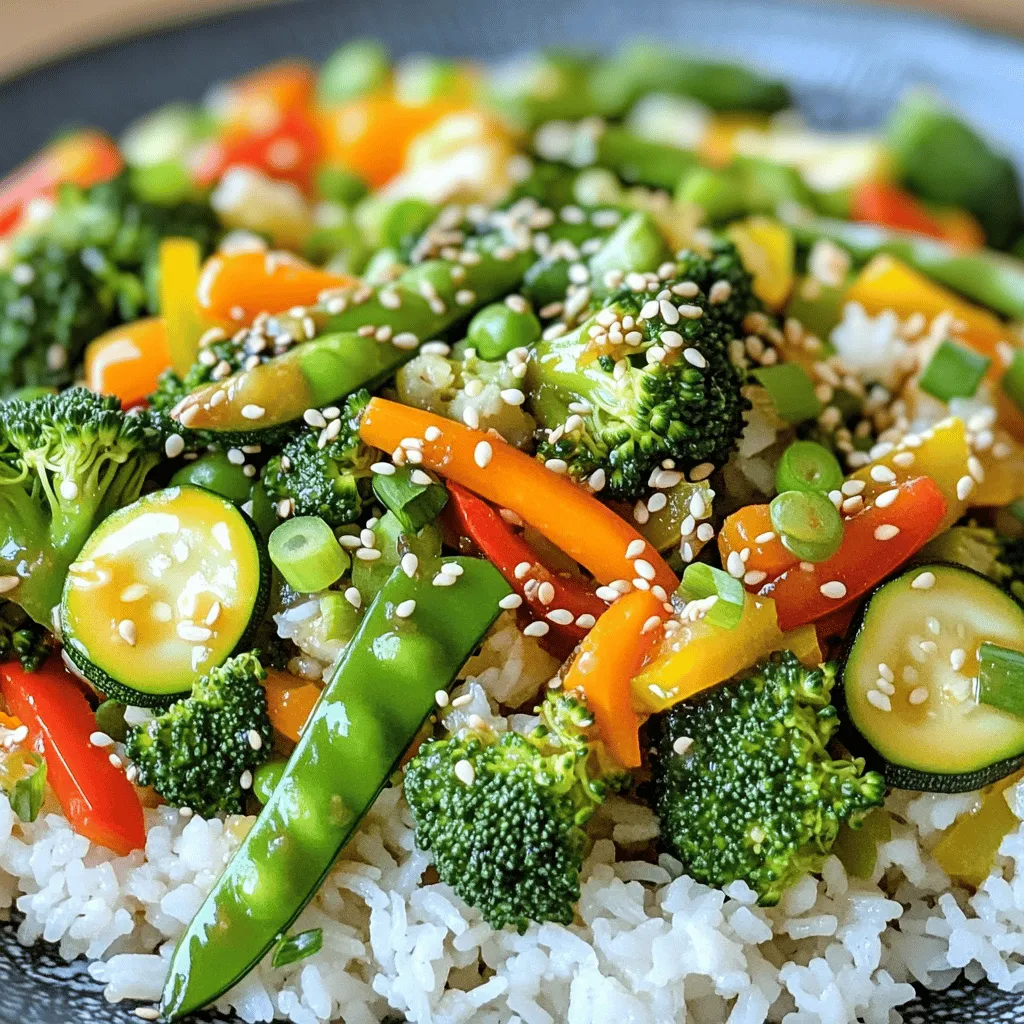
Easy Vegetable Stir-Fry Quick and Flavorful Recipe
Looking for a quick and tasty dinner? My Easy Vegetable Stir-Fry recipe packs flavor and nutrition in every bite. With
Read more…browse recipes


Korean Cheese Kimchi Kimbap Flavorful Rice Roll
Are you ready to try something delicious and fun? Korean Cheese Kimchi Kimbap is a tasty twist on the classic rice roll. With gooey…
My Latest Desserts

Healthy Banana Oat Muffins Nutrient-Packed Recipe
Looking for a tasty snack that’s packed with nutrients? You’re in the right place! My Healthy Banana Oat Muffins recipe Read Full Recipe-
No-Bake Chocolate Oat Bars Simple and Tasty Treat
Looking for a quick, tasty treat? You’re in the right place! My No-Bake Chocolate Oat Bars are simple to make Read Full Recipe -
No-Bake Chocolate Oatmeal Bars Simple and Tasty Treat
Looking for a simple and tasty treat that’s also healthy? You’ve found it! My No-Bake Chocolate Oatmeal Bars are a Read Full Recipe -
Peach Pie Cruffins Delightful and Simple Recipe
Are you ready to dive into a sweet and flaky treat? Peach Pie Cruffins are a delightful twist on classic Read Full Recipe -
Retro Zucchini Bread Healthy and Flavorful Delight
Are you ready to bake a delicious, healthy treat? Retro Zucchini Bread is packed with flavor and goodness. This simple Read Full Recipe -
Classic Fig Jam Simple and Delicious Recipe
Are you ready to savor the sweet taste of summer year-round? Making classic fig jam is simple and rewarding. With Read Full Recipe -
Fresh Peach Cobbler Flavorful and Easy Recipe Guide
Craving a sweet treat that showcases the juicy goodness of fresh peaches? You’re in the right place! In this guide, Read Full Recipe -
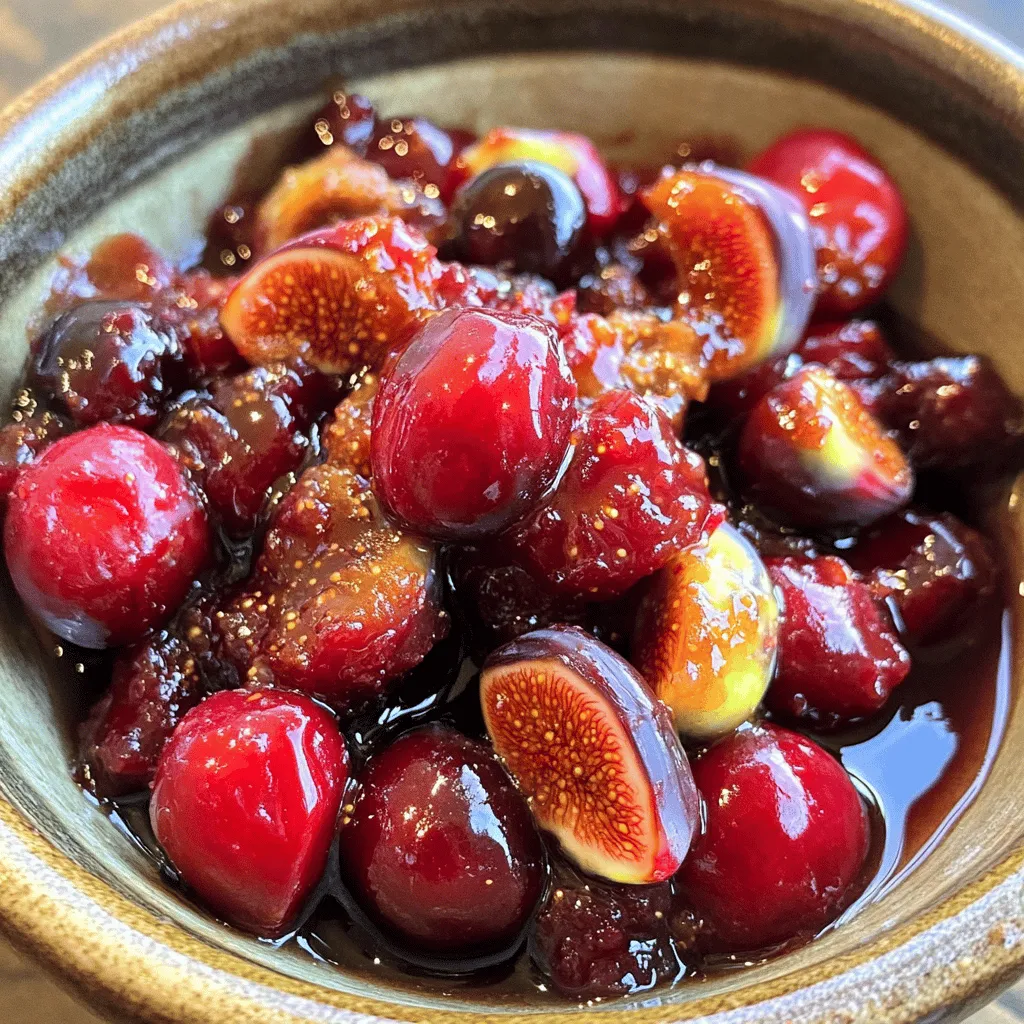
Ginger Fig Cherry Compote Flavorful and Easy Recipe
Are you ready to explore a dish that bursts with flavor? This Ginger Fig Cherry Compote is not only easy Read Full Recipe -
Zucchini Banana Bread Flavorful and Moist Recipe
Do you love warm, fresh bread that bursts with flavor? You’re in the right spot! This Zucchini Banana Bread recipe Read Full Recipe -
Fig Cake with Almond and Honey Delight Recipe
Are you ready to indulge in a delightful treat? My Fig Cake with Almond and Honey recipe combines rich flavors Read Full Recipe


hey,
i’m !
I’m so happy you’re here!
I pour heart and skill into every recipe I create. I know you’ll taste the difference now let’s enjoy this flavorful adventure together.

![For your spicy veggie stir fry, gather the following items: - 1 cup broccoli florets - 1 red bell pepper, sliced - 1 yellow bell pepper, sliced - 1 carrot, julienned - 1 zucchini, sliced - 1 cup snap peas - 3 cloves garlic, minced - 1 tablespoon fresh ginger, grated - 2 tablespoons soy sauce - 1 tablespoon sriracha (adjust to taste) - 1 tablespoon sesame oil - 1 tablespoon olive oil - 1 tablespoon sesame seeds (for garnish) - Salt and pepper to taste I often prefer fresh vegetables for stir fry. They taste better and add crunch. Fresh veggies also pack more nutrients. However, frozen vegetables work great too. They save time and are easy to store. When using frozen, thaw them first. This helps avoid excess water in your stir fry. Want more heat? Add extra sriracha or try red pepper flakes. For less spice, skip the sriracha or use half the amount. You control the heat in your dish. Experiment to find what you like best. This dish is all about your taste! For more details and a full recipe, check out the included link. Start by washing all your veggies well. Cut them into uniform pieces. This helps them cook evenly. I like to cut the broccoli into small florets. Slice the red and yellow bell peppers thinly. Julienning the carrot gives it a nice look. For the zucchini, simple slices work best. Finally, snap the peas by removing the ends. Keep all the veggies ready before cooking. This makes your stir fry fast and fun! Heat a large skillet or wok over medium-high heat. Add olive oil and let it warm up. Next, toss in minced garlic and grated ginger. Sauté for about 30 seconds until you smell the lovely aroma. Now add the broccoli and julienned carrots. Cook them for about three minutes. They should start to soften but still be crunchy. Then, add the bell peppers, zucchini, and snap peas. Stir everything well. In a small bowl, mix soy sauce, sriracha, and sesame oil. Pour this sauce over the veggies. Toss to coat them evenly, making every bite flavorful. Cook for another 4 to 5 minutes. The vegetables should turn vibrant and tender-crisp. Once cooked, season with salt and pepper. Remove from heat and serve hot. Sprinkle sesame seeds on top for a lovely finish. This dish is colorful and packed with flavors. For the full recipe, check back for the complete guide to a perfect Spicy Veggie Stir Fry! To get your veggies just right, cut them evenly. This helps them cook at the same time. I like to use fresh veggies, but frozen ones work too! If you want a nice crunch, stir-fry them for a shorter time. Aim for bright colors; they mean your veggies are cooked but still crisp. Seasoning is key to a tasty stir fry. Use soy sauce for depth. Sriracha gives it a kick, so adjust it based on your spice level. I love adding ginger and garlic for a fresh flavor. Just a minute in the hot oil brings out their best taste. You can also sprinkle sesame seeds at the end for extra crunch and flavor. To save time, prep all your veggies first. Wash and cut them before you start cooking. This way, you can focus on stir-frying. Use a wok or a large skillet to get that high heat you need. It helps the veggies cook fast and evenly. If you’re in a hurry, you can also use pre-cut veggies from the store. For the [Full Recipe], check the previous section. Enjoy your cooking! {{image_2}} Adding protein to your spicy veggie stir fry makes it heartier. Tofu is a great option. It soaks up flavors well. Choose firm tofu for a nice texture. Cut it into cubes and sauté it in the skillet before adding veggies. Tempeh is another fantastic choice. It has a nutty flavor and works well with the spices. Cook it the same way as tofu. You can also try edamame or chickpeas for a protein boost. The sauce you use can change the taste of your stir fry. Beyond soy sauce and sriracha, consider using teriyaki sauce. It adds sweetness and depth. You can also try hoisin sauce for a thicker, rich flavor. For a tangy kick, use a splash of rice vinegar. If you like it spicy, add more sriracha or a dash of chili paste. Mix and match sauces to find your favorite flavor. Using seasonal veggies keeps your stir fry fresh and exciting. In spring, add asparagus or snap peas for crunch. Summer calls for fresh corn or bell peppers. In fall, use squash or carrots for warmth. Winter is perfect for hearty greens like kale or Brussels sprouts. This keeps your dish colorful and packed with nutrients. The best part? You can change it up each time you make this recipe! You can store your spicy veggie stir fry in an airtight container. Let it cool first. Place it in the fridge. It will stay fresh for about three days. If you want to keep it longer, freezing is a great option. To reheat, use a skillet over medium heat. Add a splash of water or oil to keep it moist. Stir for about five minutes until hot. You can also use a microwave. Heat it in 30-second bursts, stirring in between. This keeps your veggies crisp. If you want to freeze your stir fry, let it cool completely first. Pack it in freezer-safe bags or containers. It can last up to three months in the freezer. When ready to eat, thaw it overnight in the fridge. Reheat as mentioned above. For best flavor and texture, don’t freeze it with sauce. Make the sauce fresh when reheating. You can find the full recipe in the earlier section. You can use chili paste, hot sauce, or even red pepper flakes. Each option brings its own heat level. Adjust the amount to fit your taste. If you like a milder dish, use less. Yes, you can prep the veggies and sauce ahead of time. Just store them in the fridge. When you're ready to eat, cook them quickly in a hot skillet. This keeps everything fresh and tasty. Some great side dishes include jasmine rice, quinoa, or cauliflower rice. You can also serve it with spring rolls or a light salad. These options balance the spice and add more texture to your meal. This post covered all you need for a great veggie stir fry. We explored ingredients, cooking steps, and tips for the best taste. You learned how to keep your veggies bright and how to save time in the kitchen. Don’t forget, you can mix in proteins or try new sauces for fun flavors. Finally, store your leftovers right to enjoy later. Cooking can be simple and tasty. Dive in and enjoy making this dish your own!](https://foodishtalk.com/wp-content/uploads/2025/06/cc6ad099-08e2-4c40-87ca-e58206b1f7d6-300x300.webp)
![To make a tasty fruit salad, gather these fresh fruits: - 1 cup diced pineapple - 1 cup diced mango - 1 cup hulled and halved strawberries - 1 cup blueberries - 1 kiwifruit, peeled and diced - 1 banana, sliced These fruits add color and flavor. Pineapple brings a sweet and tangy taste. Mango adds a tropical twist. Strawberries are juicy and bright. Blueberries are small and packed with nutrients. Kiwifruit gives a lovely texture. Finally, banana adds creaminess. For a zesty and sweet dressing, use: - 2 tablespoons honey - 2 tablespoons lime juice - Zest of 1 lime - Fresh mint leaves for garnish The honey adds sweetness, while lime juice gives a refreshing kick. Lime zest enhances the flavor with its bright notes. Mint leaves add a lovely aroma and look great on top. This salad is not only tasty but healthy, too. - Calories per serving: about 120 - Macronutrient breakdown: - Carbohydrates: 30g - Protein: 1g - Fat: 0.5g The fruits are rich in vitamins, fiber, and antioxidants. Pineapple and mango boost your immune system. Strawberries help with heart health. Blueberries are good for your brain. Kiwifruit aids digestion, and bananas provide energy. Enjoy this salad for a healthy treat! Check out the Full Recipe for more details. To make the fruit salad, start by washing all the fruits. You want them clean and ready. Here’s how to dice and slice each fruit: - Pineapple: Cut off the top and bottom. Stand it up and slice off the skin. Cut the fruit into long strips, then dice into small pieces. - Mango: Stand the mango upright. Slice along the pit on both sides. Dice the flesh into cubes. - Strawberries: Remove the green tops. Slice the strawberries in half or quarters, depending on size. - Blueberries: These are easy! Just rinse and they’re ready to go. - Kiwifruit: Peel the kiwi with a knife. Cut it in half and then slice it into small pieces. - Banana: Simply peel and slice it into rounds. Make sure to keep each fruit in its own bowl until you mix them together. The dressing adds a nice zing! To make it, grab a small bowl. Here’s how to mix your honey lime dressing: 1. Add 2 tablespoons of honey to the bowl. 2. Squeeze in 2 tablespoons of lime juice. 3. Grate the zest of 1 lime and add it to the mix. Whisk everything together until it’s smooth and well combined. You can taste it to see if you need more honey or lime. Now, it’s time to bring everything together. Here are some tips on how to toss the fruit without mashing: - Gently add all the prepared fruits to a large mixing bowl. - Pour the honey lime dressing over the fruits. - Use a large spoon to carefully toss the fruit and dressing together. Start from the bottom, lifting the fruit up rather than stirring aggressively. Let the salad sit for about 10 minutes. This helps the flavors mix nicely. Transfer it to a serving bowl or cups for a pretty display. Don’t forget to add fresh mint leaves for garnish! For the full recipe, check out the details above. Enjoy your refreshing fruit salad! To make a great fruit salad, pick fresh, ripe fruits. I love using seasonal fruits because they taste the best. In summer, try peaches, berries, or watermelon. In fall, apples, pears, and grapes shine. Always wash your fruits well to remove dirt and pesticides. You can boost the taste of your fruit salad with spices or herbs. Try adding a pinch of cinnamon for warmth. A sprinkle of nutmeg can add depth. Fresh herbs, like basil or mint, can brighten the dish. Just a little can make a big difference. Make your fruit salad look stunning for gatherings. Use a clear bowl to show off the colors. You can also serve in individual cups for a nice touch. Garnish with mint leaves on top for a pop of green. This makes your salad not just tasty, but beautiful too. For more ideas, check out the Full Recipe! {{image_2}} You can make this fruit salad even more fun by adding tropical fruits. Consider using papaya, which adds a sweet touch. Coconut flakes also bring a nice crunch and flavor. Other great options include kiwi, passion fruit, or even dragon fruit. These fruits add vibrant colors and unique tastes to your salad. Mix and match your favorites for a delightful twist. If you want a vegan option, use agave syrup instead of honey. This keeps the sweetness without using any animal products. For a sugar-free dressing, try a sugar substitute like stevia. You can also skip the dressing altogether and use fresh lime juice alone. This makes it refreshing and light. To make your salad exciting, think about adding some crunch. Nuts like chopped almonds or walnuts work well. They add a nice texture and healthy fats. You can also sprinkle in some chia seeds or sunflower seeds. These are nutritious and give a satisfying crunch. Adding these elements can elevate your fruit salad. For the full recipe, see [Full Recipe]. To keep your fruit salad fresh longer, store it in an airtight container. This helps reduce air exposure, which can cause the fruit to brown. Place a piece of plastic wrap directly on the salad before sealing it. This creates another layer of protection. Always keep the salad in the fridge until you are ready to eat. Fresh fruit can last about three days in the fridge. Can you freeze fruit salad? Freezing fruit salad is not the best idea. Many fruits get mushy after thawing. If you want to freeze it, use fruits that hold up well, like pineapple or mango. However, you may lose some texture and flavor. It's best to enjoy your salad fresh! Can this salad be made ahead of time? Yes, you can make this salad a few hours in advance. Just remember to add the honey lime dressing right before serving. This keeps the fruit crisp and flavorful. If you prep it too early, the fruits may release juices and become soggy. Keeping the dressing separate helps maintain the salad's fresh taste. For the full recipe, check out the Tropical Bliss Fruit Salad! Fruit salad lasts about 2 to 3 days in the fridge. To keep it fresh, store it in an airtight container. This helps prevent browning, especially with bananas and apples. If you notice any fruit getting mushy, remove it right away. Yes, you can! Feel free to swap in your favorite fruits. Consider using apples, grapes, or peaches. Adjust the honey lime dressing to match the new fruits you choose. This makes your fruit salad unique and fun! You can serve this fruit salad with yogurt or granola for breakfast. It pairs well with grilled chicken or fish for lunch. For a snack, try it with whole-grain crackers. Enjoy it any time of day! This blog post covered how to create a fresh fruit salad with honey lime dressing. You learned which fruits to use and how to prepare them. I shared tips for enhancing flavor and serving beautifully. You also discovered variations and storage tips to keep your salad fresh. Remember, this salad is not only tasty but healthy. Enjoy making it at home and share it with others. The right mix of fruits can make all the difference. Happy preparing!](https://foodishtalk.com/wp-content/uploads/2025/07/d251ba2a-5a7d-4441-a69a-f952b8d64a7d-300x300.webp)
![To make a delicious Mango Chickpea Salad, you need fresh and simple ingredients. Here is your list: - 1 ripe mango, diced - 1 can (15 oz) chickpeas, drained and rinsed - 1 red bell pepper, diced - ½ red onion, finely chopped - 1 cup cherry tomatoes, halved - 1 avocado, diced - ¼ cup fresh cilantro, chopped - 2 tablespoons olive oil - 1 tablespoon lime juice - 1 teaspoon ground cumin - Salt and pepper to taste Each ingredient adds flavor and texture. The mango gives sweetness, while chickpeas add protein. The red bell pepper and cherry tomatoes bring crunch and color. Avocado adds creaminess, making every bite delightful. You can customize your salad with extra ingredients. Here are some tasty options: - Cucumber for a refreshing crunch - Corn for sweetness and color - Feta cheese for a salty kick - Jalapeños for heat if you like spice Feel free to mix and match these add-ins. They can give your salad a unique twist and keep things exciting. This Mango Chickpea Salad is not only tasty but also healthy. Here’s what you get per serving: - Calories: Around 250 - Protein: About 10g - Fiber: 8g - Healthy fats from avocado and olive oil This salad provides a good balance of nutrients. It helps you feel full while being light and refreshing. It’s great for lunches or as a side dish at dinner. You can find the full recipe [here]. To start, gather all your ingredients. You will need a ripe mango, chickpeas, red bell pepper, cherry tomatoes, avocado, red onion, and cilantro. Dice the mango, avocado, and red bell pepper into small pieces. Place these in a large salad bowl. Next, drain and rinse the chickpeas. Add them to the bowl along with halved cherry tomatoes and finely chopped red onion. This mix gives the salad a fresh look and taste. Once your ingredients are prepared, it's time to combine them. Gently toss the mango, chickpeas, bell pepper, cherry tomatoes, avocado, red onion, and cilantro together in the bowl. Make sure everything is evenly mixed. The colors of the salad will pop, making it look inviting and delicious. This salad is not only tasty but also packed with nutrients. Now, let’s make the dressing. In a small bowl, whisk together olive oil, lime juice, ground cumin, salt, and pepper. This dressing adds a zesty flavor. Once mixed, drizzle it over the salad ingredients. Gently toss everything again to coat all the components well. Taste the salad and adjust the seasoning if needed. If you like a stronger flavor, add more salt, pepper, or lime juice. Chill the salad in the refrigerator for about 15 minutes. This waiting time helps the flavors blend beautifully. For the full recipe, check the details above. Chopping your ingredients well makes your salad look good. Here are some tips: - Use a sharp knife for clean cuts. - Cut the mango and avocado last to avoid browning. - Dice the red onion small so it blends well with other flavors. - Keep your cuts even for a nice look and feel. To make your salad pop, try these dressings: - Mix lime juice with honey for a sweet touch. - Add a dash of chili powder for heat. - Consider a splash of balsamic vinegar for richness. - Experiment with fresh herbs like basil or mint for a twist. Store your salad properly to keep it fresh: - Use an airtight container to lock in moisture. - Add the dressing just before serving to avoid sogginess. - Keep ingredients separate if you plan to store leftovers. - Refrigerate for up to two days for the best taste. For more details, check the Full Recipe for Mango Chickpea Delight. {{image_2}} You can keep this salad vegan easily. Swap the olive oil with avocado oil for a new taste. You can also use lemon juice instead of lime juice. If you like a creamy texture, add dairy-free yogurt. Try using hemp seeds for extra protein. They give a nice crunch, too. To make the salad more filling, add grains. Quinoa or brown rice works well. They add good texture and fiber. Cook the grains first, then mix them in. This will make the dish hearty and satisfying. You can serve it as a main meal or a side. If you love heat, add jalapeños. Dice them finely and mix them in with the other veggies. Start with a small amount, then taste it. You can always add more if you want. This will give the salad a spicy kick. It pairs well with the sweet mango, creating a balanced flavor. The mango chickpea salad stays fresh for about 3 days when stored properly. After that, the ingredients may lose their crunch and flavor. Keep an eye on the avocado, as it can brown quickly. If you notice browning, just scoop it out before serving. Use an airtight container to store the salad. Glass or plastic containers work well. If you have multiple servings, store them in smaller containers for easy access. This way, you can take a quick lunch or snack without mess. This salad is best enjoyed cold, so reheating isn’t necessary. However, if you prefer warmth, warm the chickpeas separately. Then, mix them back into the salad. Avoid heating the mango and avocado, as they can become mushy. For the best taste, enjoy the salad chilled! For the full recipe, check out the section above! Yes, you can make this salad ahead of time. I often prepare it a few hours before serving. The flavors mix well when they marinate. However, keep in mind that the avocado may brown. To prevent this, add it just before serving. This way, your salad stays fresh and bright. This salad pairs well with many dishes. You can serve it with grilled chicken or fish for protein. It also goes great with tacos or as a side for a barbecue. For a light meal, enjoy it with pita bread or tortilla chips. You can always add more veggies or grains to make it heartier. Yes, this recipe is gluten-free. All the ingredients, like chickpeas and mango, are naturally gluten-free. This makes it a safe choice for those with gluten sensitivities. Always check labels for any packaged ingredients to ensure they meet your dietary needs. Enjoy this fresh dish without worry! Mango Chickpea Salad is a simple and tasty dish full of nutrients. We covered key ingredients and optional add-ins, making it easy to customize. You learned step-by-step instructions for perfect prep and mixing. I shared tips for chopping and storing, so your salad stays fresh. Plus, we explored fun variations, including vegan and spicy options. This dish is versatile and enjoyable. Try it today for a healthy meal!](https://foodishtalk.com/wp-content/uploads/2025/06/73160f2a-299c-43b2-ad25-6c23d6de50a9-300x300.webp)
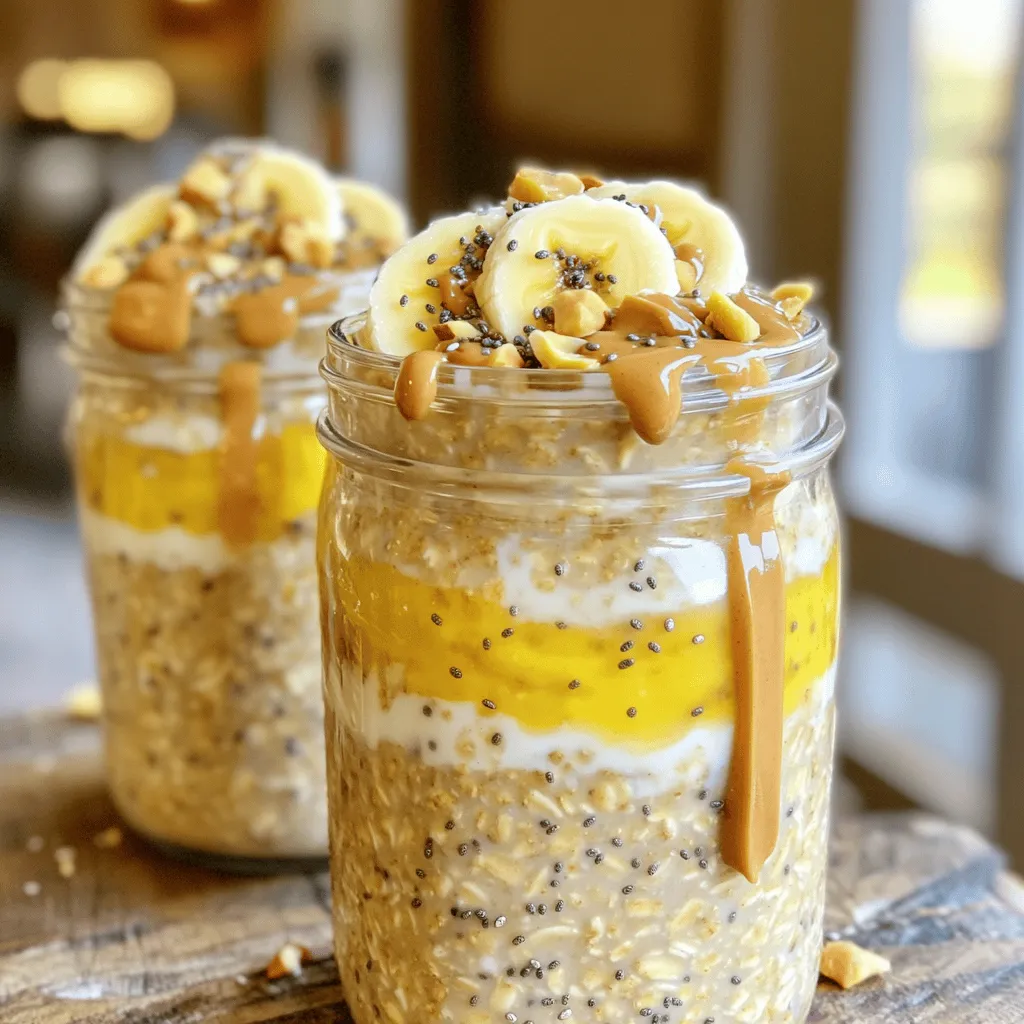
Peanut Butter Banana Overnight Oats Simple Recipe
Looking for a quick, tasty breakfast? Try Peanut Butter Banana Overnight Oats! This simple recipe combines creamy peanut butter, ripe bananas, and rolled oats…