
Latest & Greatest

Lemon Garlic Roasted Chicken Simple and Flavorful Dish
If you’re craving a simple yet tasty dish, look no further than Lemon Garlic Roasted Chicken. This recipe features juicy
Read more…
Baked Ziti with Three Cheeses Perfect Comfort Dish
Looking for a dish that warms your heart and fills your belly? Baked Ziti with Three Cheeses is the answer!
Read more…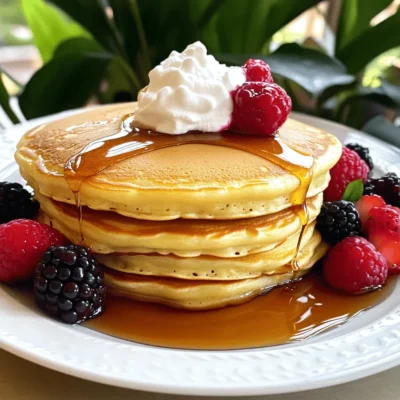
Fluffy Buttermilk Pancakes Easy Breakfast Delight
Start your day right with fluffy buttermilk pancakes that are easy to make and fun to eat! In this article,
Read more…
Classic Chicken Pot Pie Perfectly Comforting Meal
Warm up your kitchen with a Classic Chicken Pot Pie, the ultimate comfort meal. I’ll show you how to create
Read more…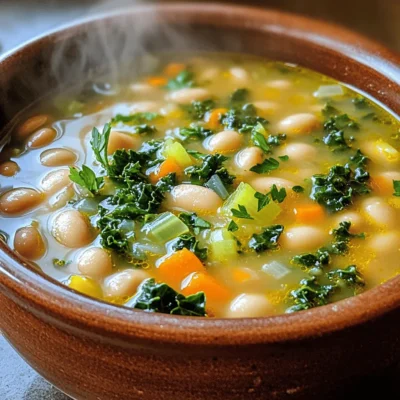
Tuscan White Bean Soup Hearty and Simple Recipe
If you’re craving a warm, filling dish, Tuscan White Bean Soup is your answer. This simple recipe is packed with
Read more…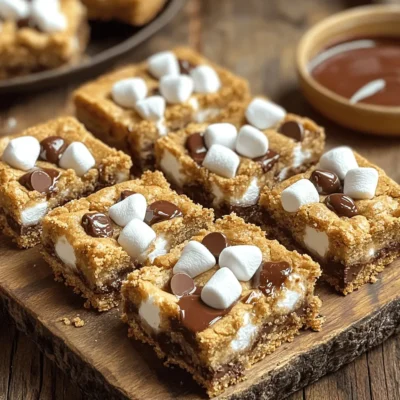
S’mores Cookie Bars Irresistible Treat to Enjoy
Get ready to enjoy a sweet twist on a classic favorite! S’mores Cookie Bars combine gooey marshmallows, rich chocolate, and
Read more…
Savory Spinach Artichoke Dip for Every Gathering
Ready to elevate your gatherings? My savory Spinach Artichoke Dip is the ultimate crowd-pleaser! With creamy textures and rich flavors,
Read more…
Quick Garlic Parmesan Knots Savory and Simple Treat
Are you craving a tasty, easy snack? Look no further! My Quick Garlic Parmesan Knots are here to save the
Read more…browse recipes


No-Bake Chocolate Oatmeal Bars Simple and Tasty Treat
Looking for a simple and tasty treat that’s also healthy? You’ve found it! My No-Bake Chocolate Oatmeal Bars are a perfect blend of rich…
My Latest Desserts

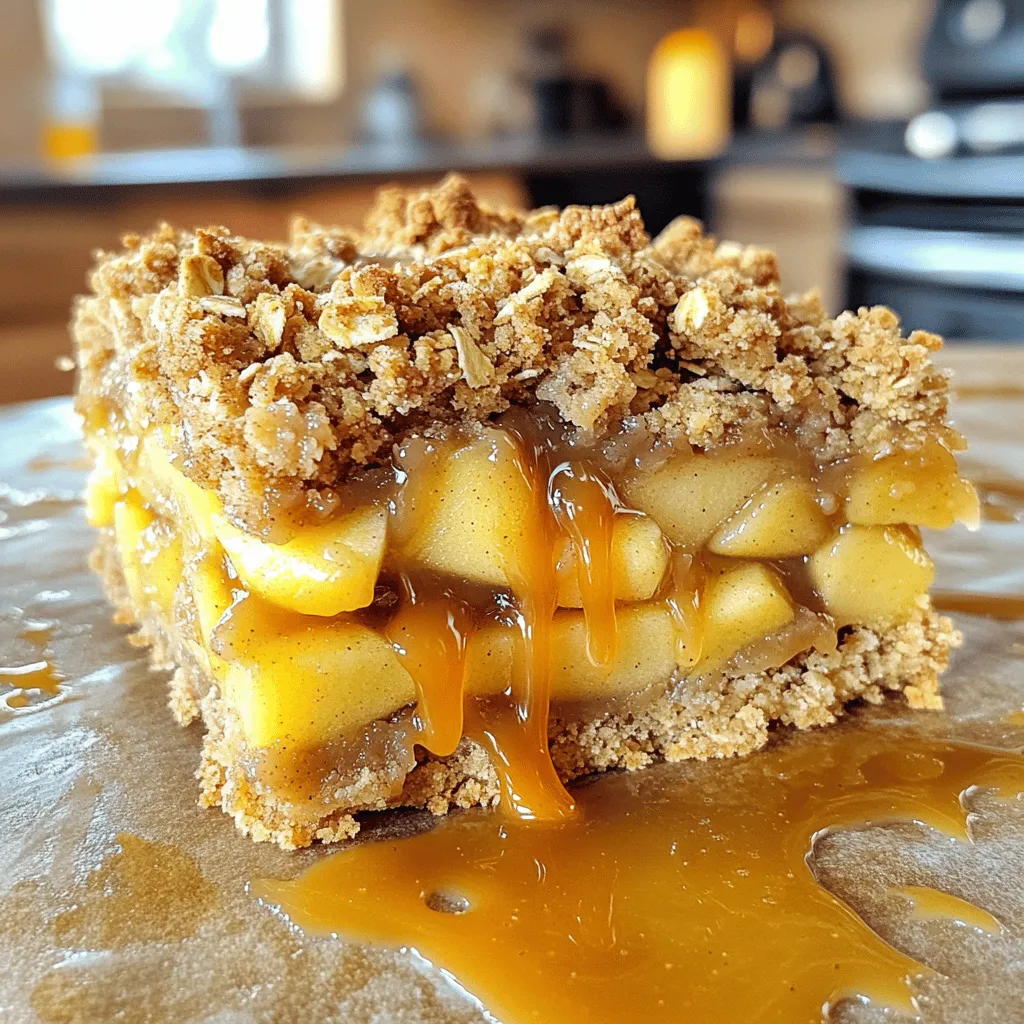
Miso Caramel Apple Crumble Bars Irresistible Treat
Are you ready to discover a dessert that combines sweet and savory in the best way? Miso Caramel Apple Crumble Read Full Recipe-
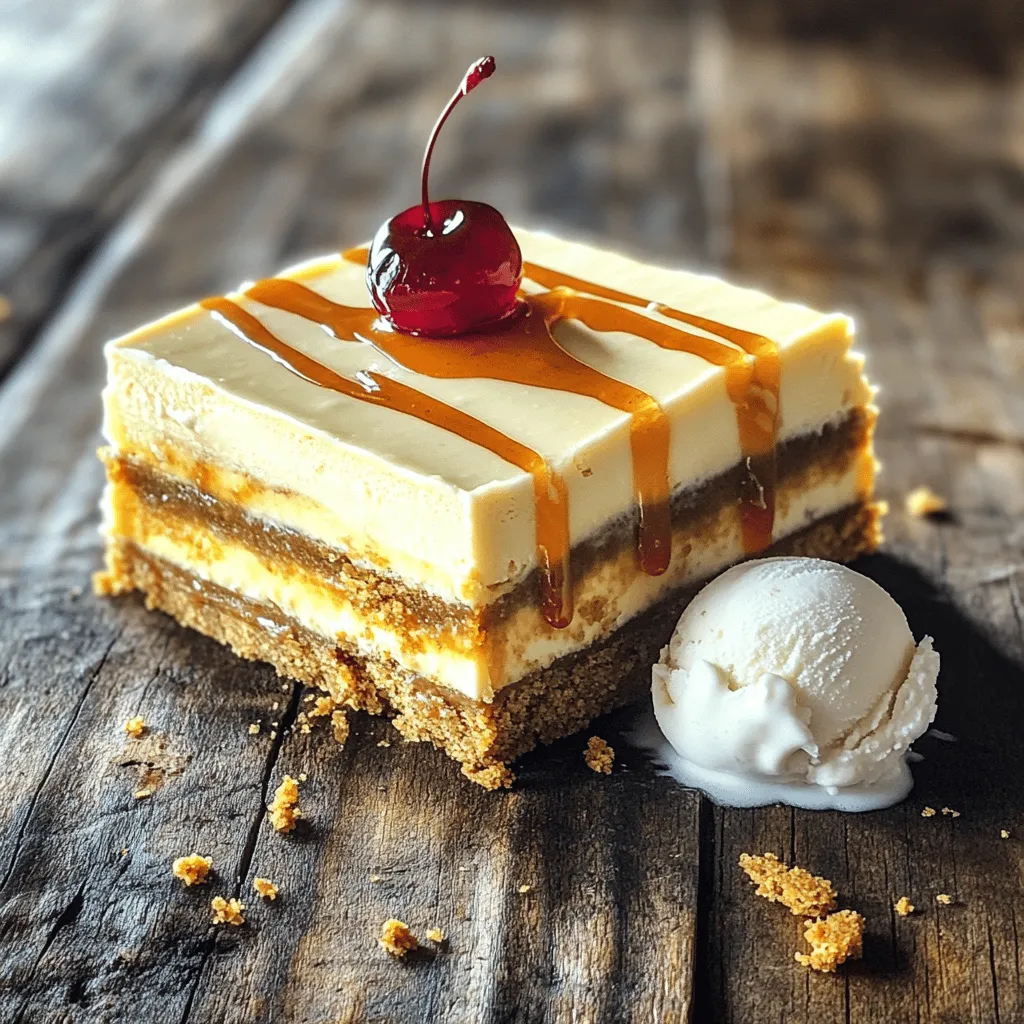
Pumpkin Cheesecake Swirl Brownies Rich and Creamy Treat
If you love rich and creamy desserts, you’re in for a treat! Pumpkin Cheesecake Swirl Brownies combine fudgy brownies with Read Full Recipe -
Miso Caramel Apple Crumble Bars Easy and Delicious Treat
If you’re looking for a treat that combines sweet apples, rich miso caramel, and a crunchy crumble, you’ve found it! Read Full Recipe -
Pumpkin Cheesecake Swirl Brownies Irresistible Delight
Get ready to savor the magic of fall with my Pumpkin Cheesecake Swirl Brownies! These decadent treats combine rich brownie Read Full Recipe -
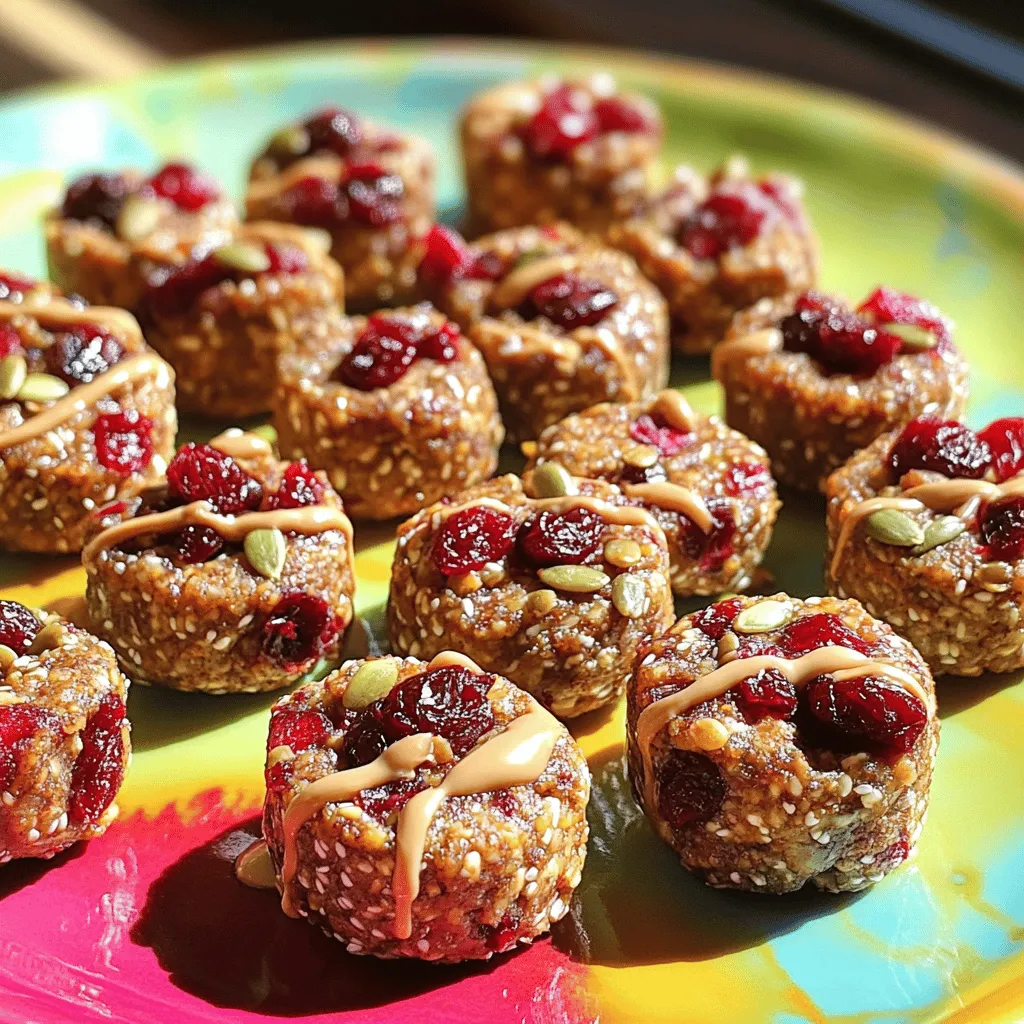
Cherry Tahini Energy Bites Healthy Snack Recipe
Looking for a quick, healthy snack? Let me introduce you to Cherry Tahini Energy Bites! Packed with flavor and nutrition, Read Full Recipe -
Root Beer Cream Bars Irresistible and Simple Treat
If you love the sweet nostalgia of root beer, you’re in for a treat! Root Beer Cream Bars combine creamy Read Full Recipe -
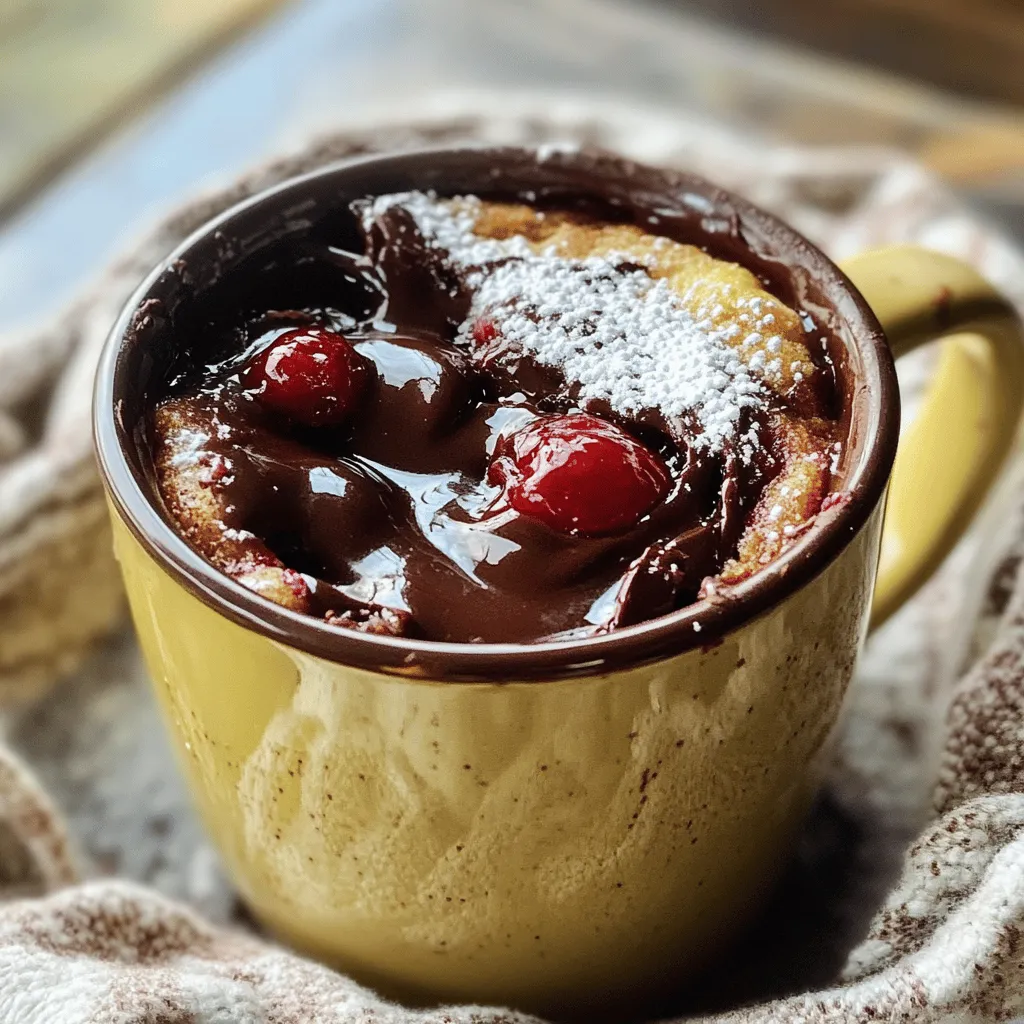
Cherry Chocolate Lava Mug Cake Delightful Recipe
Craving something sweet and quick? You’re in for a treat with my Cherry Chocolate Lava Mug Cake! This recipe packs Read Full Recipe -
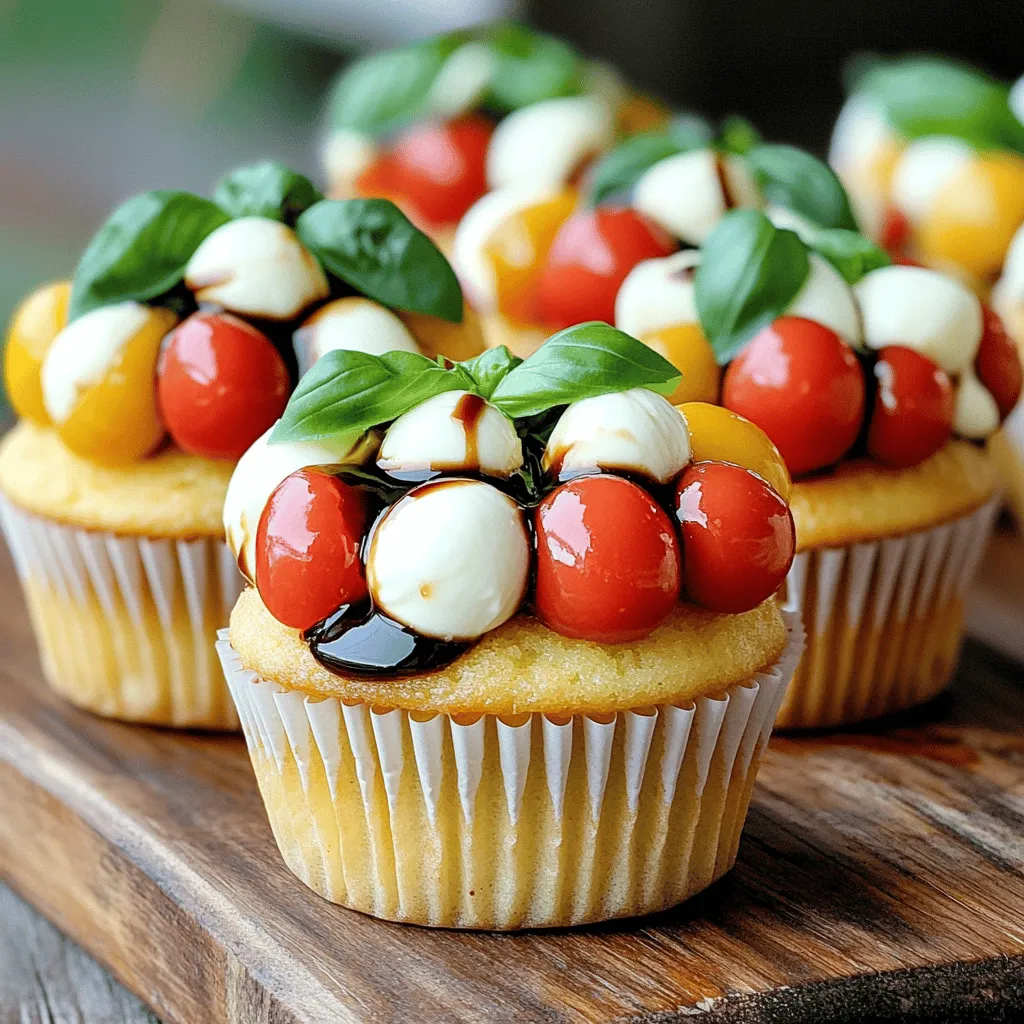
Caprese Stuffed Cupcakes Flavorful and Unique Treat
Are you ready to treat your taste buds to something new? Caprese Stuffed Cupcakes mix fresh flavors and fun in Read Full Recipe -
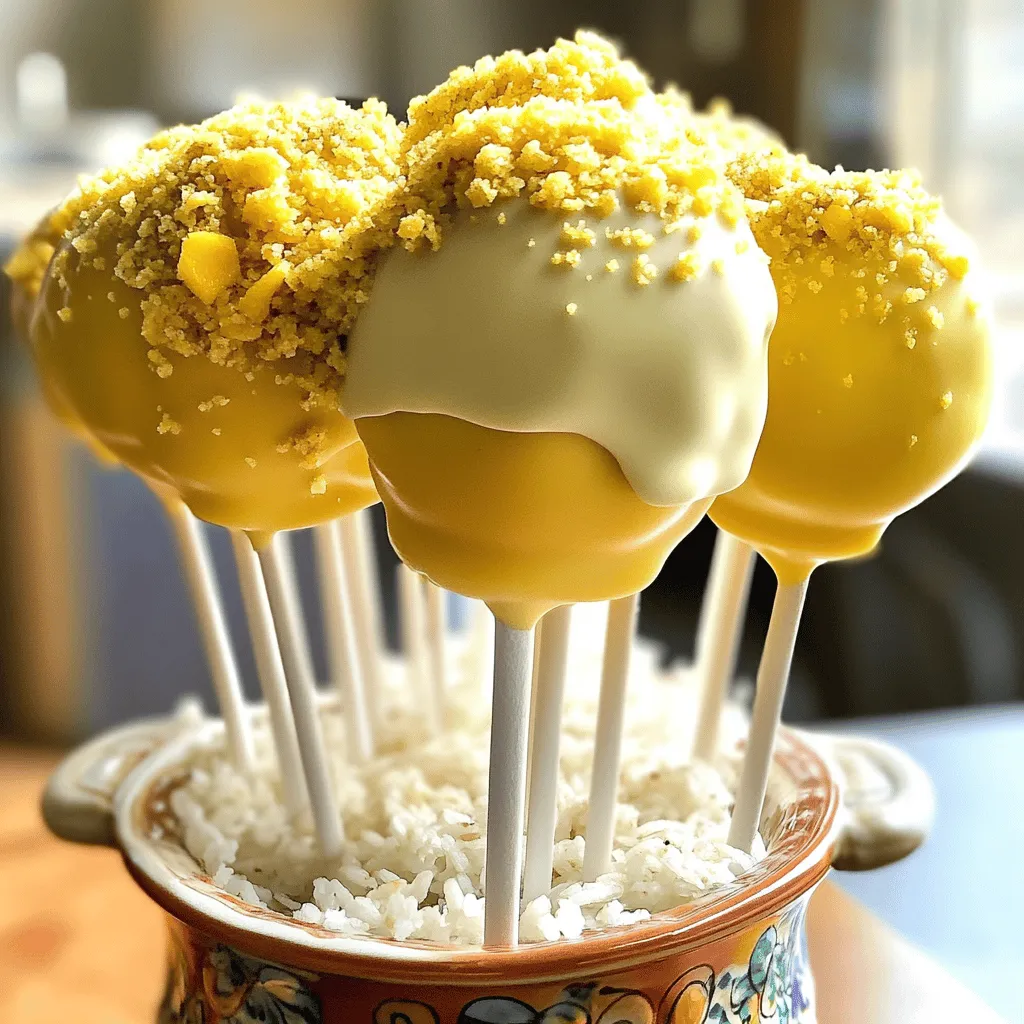
Mango Tajin Cake Pops Tasty and Fun Treats
Craving a unique treat? Try my Mango Tajin Cake Pops! These fun bites blend sweet mango with the zesty kick Read Full Recipe -
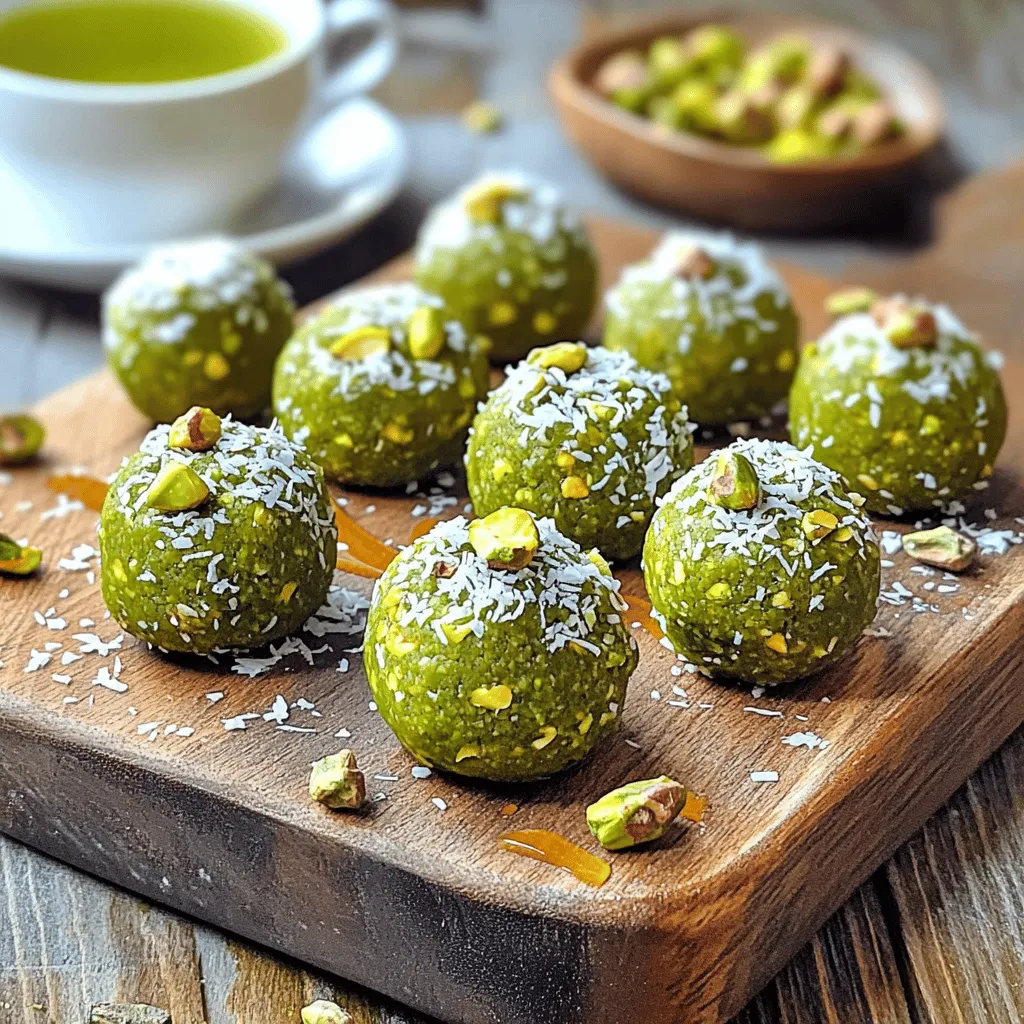
Matcha Pistachio Energy Bites Nourishing Snack Option
Looking for a tasty and healthy snack? Let me introduce you to Matcha Pistachio Energy Bites! Packed with oats, nuts, Read Full Recipe


hey,
i’m !
I’m so happy you’re here!
I pour heart and skill into every recipe I create. I know you’ll taste the difference now let’s enjoy this flavorful adventure together.
![To make Sriracha Honey Cauliflower Bites, you need simple, tasty ingredients. Here’s the list: - 1 large head of cauliflower, cut into bite-sized florets - 1/2 cup all-purpose flour - 1/2 cup breadcrumbs (Panko for extra crunch) - 1 teaspoon garlic powder - 1 teaspoon onion powder - 1/2 teaspoon smoked paprika - Salt and pepper, to taste - 1/4 cup sriracha sauce - 1/4 cup honey - 2 tablespoons olive oil - 1 tablespoon rice vinegar (or apple cider vinegar) - Fresh cilantro, chopped These ingredients create a great blend of flavors. The cauliflower is soft inside and crispy outside. The sriracha honey sauce adds a sweet and spicy kick. You can adjust the spice by adding more or less sriracha. It’s all about your taste! For the full recipe, check the details above. 1. Preheating and Prepping the Oven: Start by preheating your oven to 425°F (220°C). This high heat helps make the cauliflower bites crispy. Line a baking sheet with parchment paper for easy cleanup. 2. Mixing the Flour Mixture: In a large bowl, combine 1/2 cup of all-purpose flour, 1 teaspoon each of garlic powder and onion powder, and 1/2 teaspoon of smoked paprika. Add salt and pepper to taste. Mix everything until well blended. 3. Coating the Cauliflower Florets: Cut 1 large head of cauliflower into bite-sized florets. Toss these florets in the flour mixture. Shake off any extra flour so they are evenly coated. 1. Breadcrumb Coating Technique: To make them extra crunchy, dip the floured florets in water for a moment. Then, roll them in 1/2 cup of breadcrumbs until coated. Panko works best for a crispier texture. 2. Baking Time and Tips for Crispiness: Place the coated cauliflower on the prepared baking sheet. Lightly spray them with olive oil for added crunch. Bake for 20 to 25 minutes, turning halfway through. This ensures they cook evenly and get golden brown. 1. Combining Ingredients for the Sauce: While the cauliflower bakes, mix 1/4 cup of sriracha sauce, 1/4 cup of honey, 2 tablespoons of olive oil, and 1 tablespoon of rice vinegar in a bowl. Stir until smooth and well combined. 2. Adjusting for Spice Level: If you prefer a spicier bite, add more sriracha to the sauce until it meets your taste. It’s all about finding that perfect balance of heat and sweetness. Now, you're ready to enjoy these Sriracha Honey Cauliflower Bites! For the full recipe, refer to the earlier section. Ensuring Crispiness While Baking To get that perfect crunch, bake at 425°F (220°C). This high heat helps the cauliflower get crispy. Make sure to turn the bites halfway through baking. This ensures even cooking. If you want extra crispiness, spray them lightly with olive oil before baking. Flavoring Adjustments to Suit Personal Tastes You can change the flavor by adding different spices. If you like it spicy, add more sriracha. If you prefer a milder taste, use less. Feel free to mix in other spices like cumin or cayenne. This lets you make a flavor that suits you best. Importance of Shaking Off Excess Flour After coating the cauliflower in flour, shake off any extra. This helps the breadcrumbs stick better. Too much flour can make the bites heavy and less crispy. A light coating is key for a great texture. Using Panko vs. Regular Breadcrumbs I recommend using Panko breadcrumbs for this recipe. Panko gives a lighter, crunchier bite. Regular breadcrumbs work too, but they won’t be as crispy. If you love crunch, go with Panko. It makes a big difference in the final dish. For the full recipe, click here: [Full Recipe]. {{image_2}} Alternative Sauces and Marinades If you want to mix it up, try different sauces. You can use barbecue sauce for a sweet twist. A soy sauce and ginger mix adds a savory kick. You can even use a creamy ranch dressing for a cool contrast. Each sauce brings a unique flavor. Don’t be afraid to get creative! Gluten-Free Options For a gluten-free version, swap all-purpose flour with almond flour or chickpea flour. Use gluten-free breadcrumbs as well. This way, everyone can enjoy the bites without worry. It’s a great way to adapt the recipe to different diets. Pairing with Dips and Sides These bites shine when served with dips. Try them with ranch, blue cheese, or a yogurt dip. You can also serve them alongside crunchy veggies for a fun snack platter. Pairing adds variety and makes it more enjoyable. Presentation Ideas for Serving To make your dish look appealing, use a colorful plate. Arrange the bites in a circle, and sprinkle some chopped cilantro on top. You can also add lime wedges for a fresh touch. A beautiful plate grabs attention and enhances the dining experience. For the complete recipe, check out the [Full Recipe]. After enjoying your Sriracha Honey Cauliflower Bites, store any leftovers in the fridge. Place them in an airtight container. They will stay fresh for about 3 to 4 days. If you want to keep them longer, freezing is a great option. To freeze the cauliflower bites, let them cool completely. Then, place them in a freezer-safe bag or container. They can last up to 3 months in the freezer. Just remember to label the bag with the date! To enjoy your bites again, reheating is key. The best method is to use an oven or air fryer. Preheat your oven to 375°F (190°C). Spread the bites on a baking sheet. Bake for about 10 to 15 minutes. This will help them regain their crispiness. If you're using an air fryer, set it to 350°F (175°C). Heat them for about 5 to 7 minutes. This method works wonders for keeping the texture nice and crunchy. Avoid using a microwave if you want to keep them crispy. Microwaving can make the bites soggy and chewy. So, stick to the oven or air fryer for the best results. Enjoy your tasty snack again with that perfect crunch! How do I make Sriracha Honey Cauliflower Bites vegan? To make these bites vegan, swap honey with maple syrup or agave nectar. This change keeps the sweet flavor while making it plant-based. Can I prepare these bites in advance? Yes, you can prepare them ahead of time. Coat the cauliflower and store it in the fridge. Bake them fresh when ready to eat. What dishes pair well with Sriracha Honey Cauliflower Bites? These bites go great with rice, salads, or as a side for tacos. They add a nice kick to any meal. Can I fry these instead of baking? Yes, frying gives a nice crunch. Heat oil in a pan and fry the coated cauliflower until golden brown. How do I ensure the cauliflower is fully cooked? Check if the cauliflower is tender by piercing it with a fork. It should be soft inside and crispy outside. For more details, refer to the Full Recipe. You now have all the tools to make tasty Sriracha Honey Cauliflower Bites. We covered the right ingredients, preparation steps, and baking tips to achieve crispiness. You learned how to adjust flavors and make variations that suit your tastes. Storing leftovers is easy, and reheating keeps them crispy. Follow these tips, and you’ll enjoy delicious bites every time. Experiment with new dips and sides to elevate your dish. Enjoy your cooking adventure!](https://foodishtalk.com/wp-content/uploads/2025/05/e21298f4-3b47-4c76-ba30-ad9f3f5ed860-300x300.webp)


![- Fresh Peaches - Raspberries - Sweetener Options - Sparkling Water or Club Soda - Lime Juice - Garnishes To create a Peach Raspberry Bellini Mocktail, you need fresh peaches and ripe raspberries. These fruits give the drink its sweet and tangy flavor. Choose peaches that are soft but not mushy. Look for raspberries that are plump and vibrant. You can use honey or agave syrup to sweeten your drink. Adjust the amount based on your taste. For a fizzy touch, use sparkling water or club soda. Lime juice adds a pleasant tartness, balancing the sweetness. Don't forget your garnishes! Fresh mint leaves look great and smell amazing. - Blender - Fine-Mesh Sieve - Pitcher or Bowl - Serving Glasses You will need a blender to mix your fruits until smooth. A fine-mesh sieve helps strain out the pulp, giving you a nice juice. Use a pitcher or bowl to hold the juice mixture. Finally, grab your favorite serving glasses to show off this delightful drink. For the full recipe, check out the complete guide. Enjoy making this refreshing mocktail! How to Blend the Fruit First, take the ripe peaches and peel them. Dice them into small pieces. Next, add the diced peaches and fresh raspberries to your blender. Also, include the honey or agave syrup and the juice of one lime. Blend the mixture until it is smooth. This step brings all the flavors together. Straining the Mixture After blending, it’s time to strain the mixture. Use a fine-mesh sieve and place it over a bowl or pitcher. Pour the blended fruit mix into the sieve. This step removes any pulp, ensuring a smooth juice. You want a nice, clear liquid for your mocktail. Filling the Glasses Now, grab your serving glasses. Fill each glass halfway with the peach-raspberry juice you just made. This juice is where the magic starts. Adding Sparkling Water Next, top each glass with sparkling water or club soda. This adds fizz and makes your drink refreshing. Stir gently to combine the juice and soda. Be careful not to lose all the bubbles. Mint Leaves Placement To make your mocktail look pretty, add fresh mint leaves. Place a few leaves on top of each drink. This adds a nice pop of green and a lovely scent. Optional Garnish Ideas If you want to get creative, consider adding slices of peach or a few whole raspberries on top. These not only look great but also give hints of the flavors inside the drink. You can find the full recipe above for more details. Choosing ripe peaches is key for a great taste. Look for peaches that feel soft and smell sweet. This means they are juicy and ready. For the best flavor, use fresh raspberries. These berries add a nice tartness. If you want a sweeter drink, adjust the honey or agave syrup. Start with one tablespoon, then taste. Add more if you like it sweeter. You can prep the peach and raspberry mixture ahead of time. Blend the fruits and store the juice in the fridge. This way, you can serve it quickly. If you have leftover juice, keep it in a sealed container. It can stay fresh for about three days in the fridge. For a lovely presentation, serve the mocktail in clear glasses. This lets the vibrant colors shine. You can also rim the glasses with sugar for a fun touch. Don’t forget to garnish with mint leaves. They add a nice pop of color and smell great. For a twist, try adding a slice of peach on the rim. Enjoy this Peach Raspberry Bellini Mocktail! For the full recipe, refer to the section above. {{image_2}} You can switch up the berries in your Peach Raspberry Bellini Mocktail. Try using strawberries or blueberries for a new twist. Each berry brings its unique flavor. You can also mix in blackberries for a deeper taste. When it comes to sweeteners, you have options. Honey adds a floral note, while agave syrup gives a cleaner sweetness. Adjust based on your taste. Both work well in the recipe. Want to brighten your drink? Incorporate citrus flavors like lemon or orange juice. This change adds zing and freshness. You can also use zest from these fruits for extra flavor. For holidays, adapt the mocktail to fit the season. Add a splash of cranberry juice for a festive touch during winter. You can also use seasonal fruits like pomegranate for a colorful look. If you want to make a Peach Raspberry Bellini Cocktail, add a splash of prosecco or champagne. Pour the alcohol gently to keep the bubbles intact. This change elevates the drink for special occasions. Enjoy your peach raspberry delight! For the complete recipe, check out the [Full Recipe]. To keep your peach raspberry juice fresh, store it in the fridge. Use an airtight container for best results. This helps to lock in the flavor and aroma. You can enjoy the juice for up to three days. After that, it may lose some taste. Always check for any off smell or changes in color before using. If you want to save some juice, freezing is a great choice. Pour the juice into ice cube trays or freezer bags. This way, you can use it later for smoothies or another mocktail. Be sure to leave some space in the containers. This space helps the juice expand as it freezes. When you're ready to use the frozen juice, take it out and let it thaw. You can leave it in the fridge overnight or set it on the counter for a few hours. After thawing, stir it well before serving. This ensures a nice, smooth drink. You can also mix it with fresh sparkling water for that fizzy delight. Enjoy the taste of summer any time! Yes, this mocktail is great for kids. It has no alcohol, making it safe for all ages. You can serve it at parties or family gatherings. Kids love the sweet taste of peaches and raspberries. You can also let them help make it. They'll enjoy blending and pouring the drinks. This can be a fun kitchen activity. You can even encourage creativity with garnishes. Yes, you can use frozen fruit. Frozen fruit can make this drink easy year-round. It’s often picked at peak ripeness, so it tastes great. However, be mindful of a few things: - Pros: - Frozen fruit is convenient and reduces prep time. - It can be more affordable, especially out of season. - Cons: - Frozen fruit may result in a thicker texture. - It might make the drink slightly less fresh in flavor. You can thaw frozen fruit before blending for better results. Each serving has about 80 to 100 calories. This can vary based on the sweetener you use. Here’s a quick breakdown: - Peaches: 60 calories per medium fruit - Raspberries: 65 calories per cup - Honey or agave: 60 calories per tablespoon - Sparkling water: 0 calories This makes the mocktail a light, refreshing option. It’s perfect for those watching their calorie intake. To make this mocktail less sweet, you can adjust the sweetener. Try these tips: - Use less honey or agave: Start with half a tablespoon and taste. - Add more lime juice: This adds tartness and balances sweetness. - Incorporate more sparkling water: Diluting the juice can reduce sweetness. Feel free to experiment to find your perfect taste. You want it refreshing, not overly sweet. This blog post covered how to craft a refreshing peach raspberry mocktail. We explored its main ingredients, like fresh peaches and raspberries, and discussed the kitchen tools you need. I provided step-by-step instructions for blending and serving, plus tips for achieving the best flavor. In summary, this mocktail is perfect for all ages and occasions. Feel free to customize it with different berries or sweeteners. Get creative with garnishes for a beautiful presentation. Enjoy this drink and impress your family and friends!](https://foodishtalk.com/wp-content/uploads/2025/06/bd8c9b5e-bf7a-4de0-8764-a079351a9d45-300x300.webp)
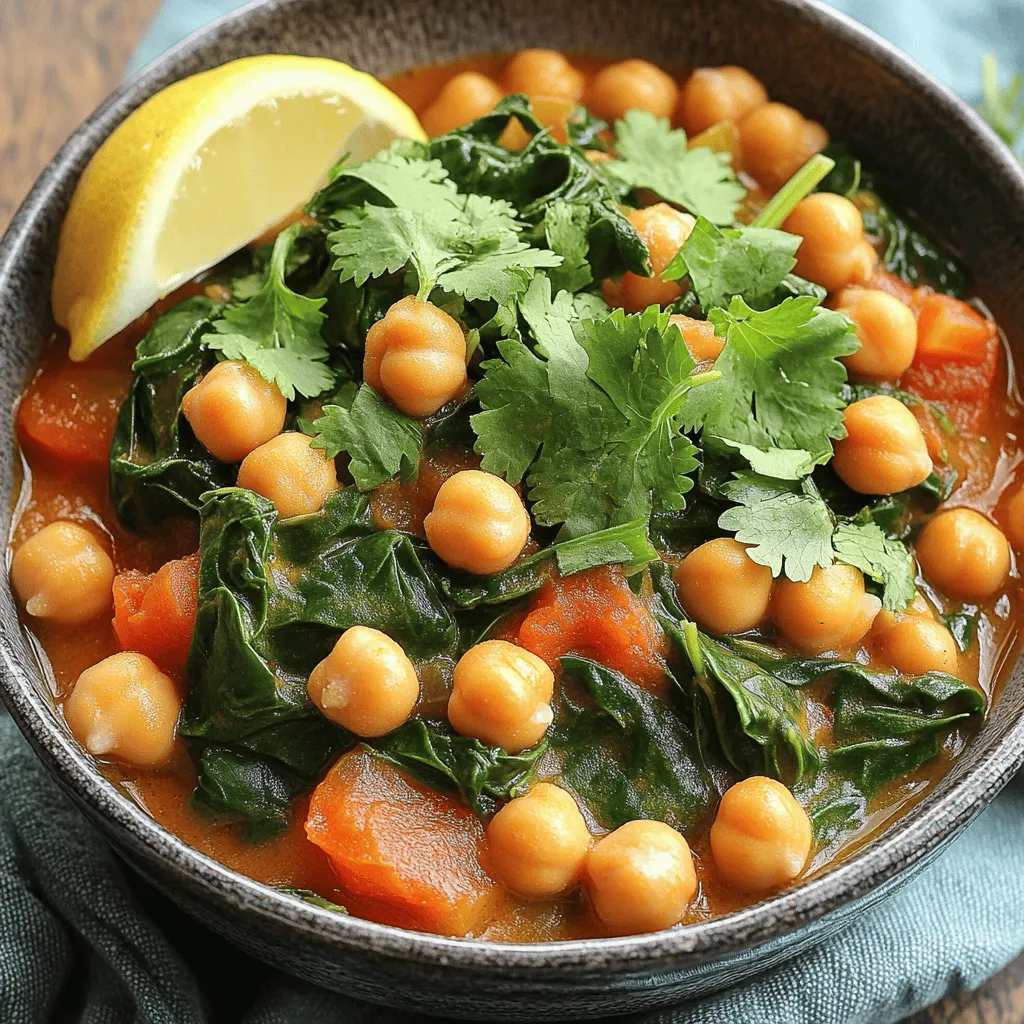
Chickpea and Spinach Stew Hearty Comfort Food Delight
Looking for a dish that warms your soul? My Chickpea and Spinach Stew is just the thing. It’s hearty, filling, and packed with nutrients.…