


Latest & Greatest

Crustless Squash Pie Delightful and Easy Recipe
Looking for a delicious, easy recipe that captures the essence of fall? You’re in the right place! My Crustless Squash
Read more…
Perfect Peach Sorbet Refreshing and Simple Treat
Craving a cool treat that screams summer? Look no further! This Perfect Peach Sorbet is refreshing and simple to make.
Read more…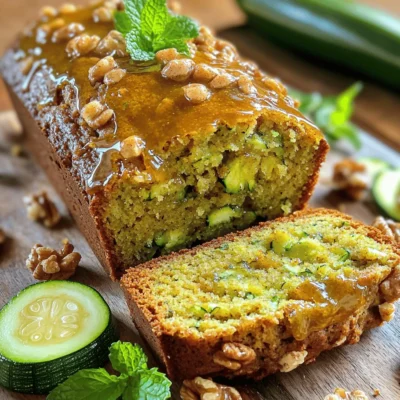
Best Zucchini Bread Recipe Simple and Delicious Treat
Are you ready to bake the best zucchini bread ever? This simple and delicious treat is perfect for breakfast or
Read more…
Super Easy Peach Cobbler Delightfully Simple Recipe
Are you craving a sweet and juicy dessert that’s simple to make? Look no further! My Super Easy Peach Cobbler
Read more…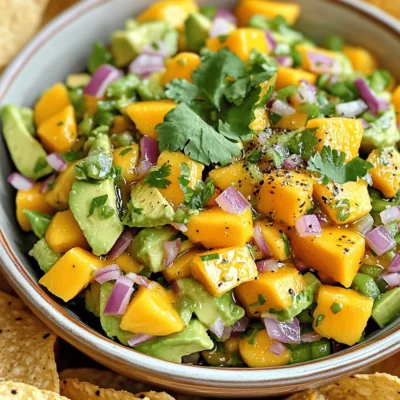
Mango Avocado Salsa Fresh and Flavorful Recipe
Are you ready to elevate your snack game? This Mango Avocado Salsa is a burst of fresh flavor that you’ll
Read more…
Thai Coconut Curry Chicken Flavorful Weeknight Meal
Looking for a quick and tasty dinner option? Thai Coconut Curry Chicken is the answer! This dish packs a punch
Read more…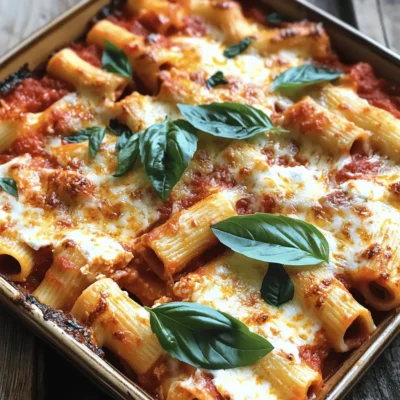
Baked Ziti with Ricotta Flavorful and Easy Recipe
If you crave a cozy meal that’s both flavorful and easy to make, you’ll love this Baked Ziti with Ricotta!
Read more…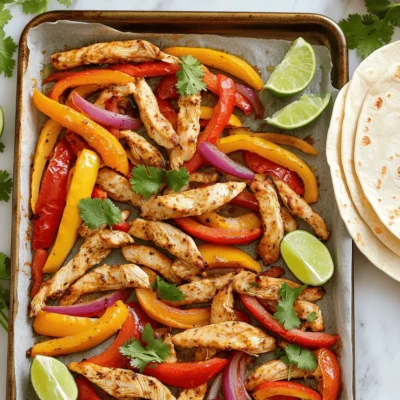
Easy Sheet Pan Fajitas Simple and Flavorful Meal
Looking for a quick and tasty meal? My Easy Sheet Pan Fajitas are the answer! With vibrant veggies and juicy
Read more…browse recipes


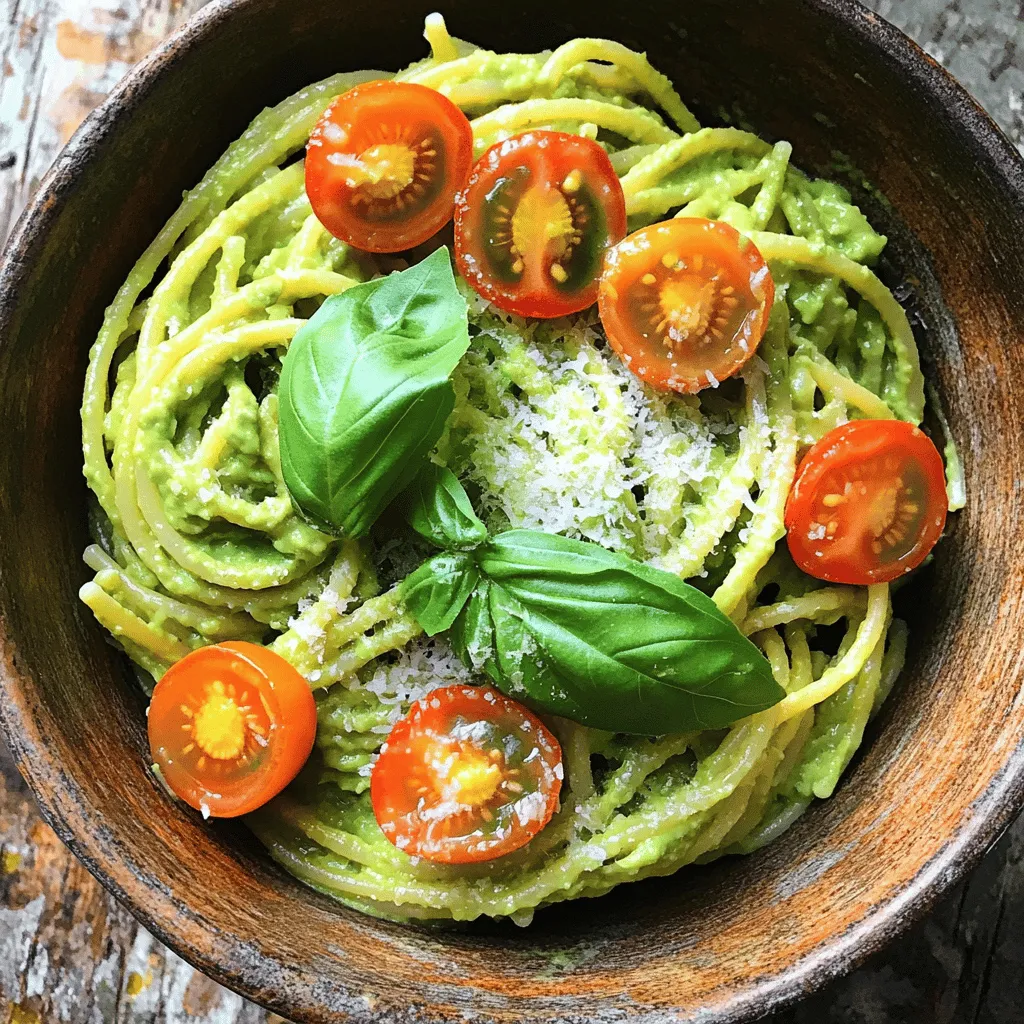
Creamy Avocado Pasta Delightfully Easy Recipe
Looking for a quick and tasty meal? Try my Creamy Avocado Pasta! This easy recipe uses fresh ingredients and simple steps. You can whip…
My Latest Desserts

Healthy Banana Oat Muffins Nutrient-Packed Recipe
Looking for a tasty snack that’s packed with nutrients? You’re in the right place! My Healthy Banana Oat Muffins recipe Read Full Recipe-
No-Bake Chocolate Oat Bars Simple and Tasty Treat
Looking for a quick, tasty treat? You’re in the right place! My No-Bake Chocolate Oat Bars are simple to make Read Full Recipe -
No-Bake Chocolate Oatmeal Bars Simple and Tasty Treat
Looking for a simple and tasty treat that’s also healthy? You’ve found it! My No-Bake Chocolate Oatmeal Bars are a Read Full Recipe -
Peach Pie Cruffins Delightful and Simple Recipe
Are you ready to dive into a sweet and flaky treat? Peach Pie Cruffins are a delightful twist on classic Read Full Recipe -
Retro Zucchini Bread Healthy and Flavorful Delight
Are you ready to bake a delicious, healthy treat? Retro Zucchini Bread is packed with flavor and goodness. This simple Read Full Recipe -
Classic Fig Jam Simple and Delicious Recipe
Are you ready to savor the sweet taste of summer year-round? Making classic fig jam is simple and rewarding. With Read Full Recipe -
Fresh Peach Cobbler Flavorful and Easy Recipe Guide
Craving a sweet treat that showcases the juicy goodness of fresh peaches? You’re in the right place! In this guide, Read Full Recipe -
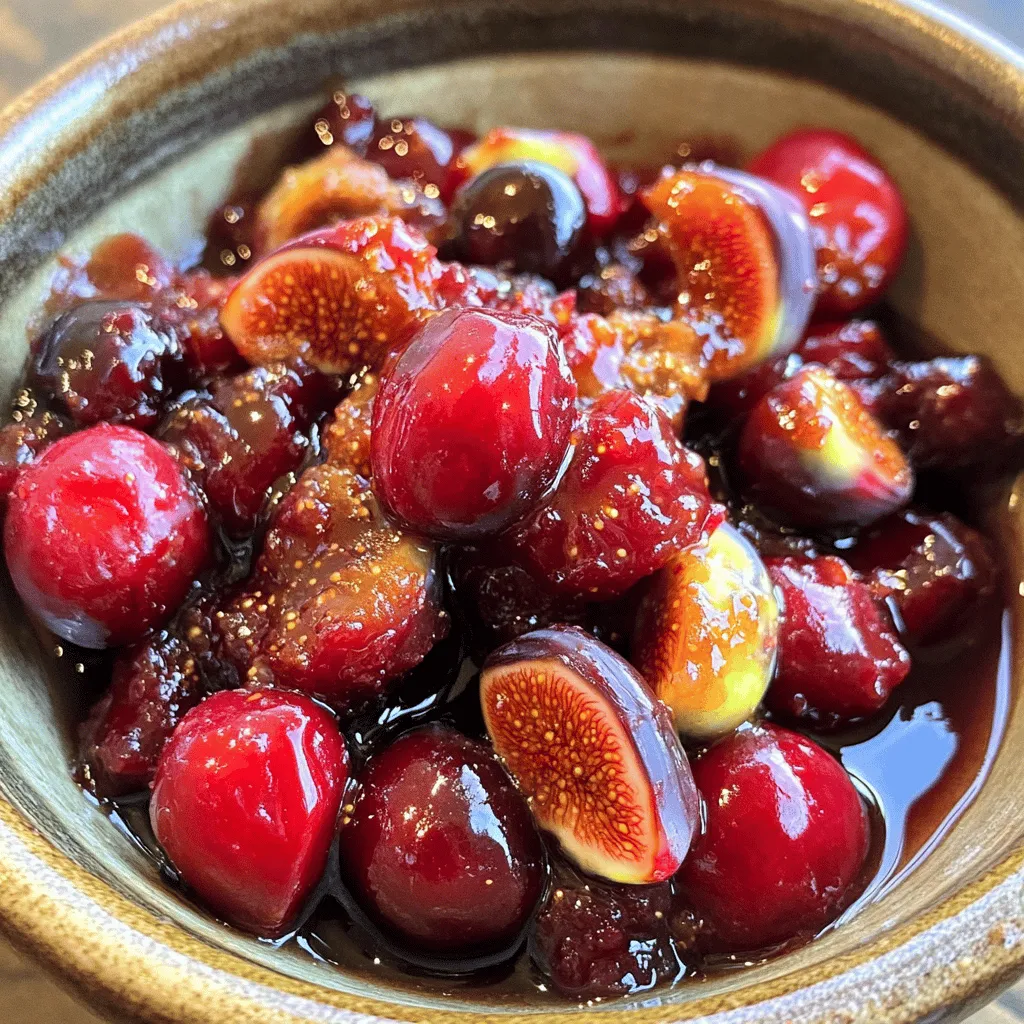
Ginger Fig Cherry Compote Flavorful and Easy Recipe
Are you ready to explore a dish that bursts with flavor? This Ginger Fig Cherry Compote is not only easy Read Full Recipe -
Zucchini Banana Bread Flavorful and Moist Recipe
Do you love warm, fresh bread that bursts with flavor? You’re in the right spot! This Zucchini Banana Bread recipe Read Full Recipe -
Fig Cake with Almond and Honey Delight Recipe
Are you ready to indulge in a delightful treat? My Fig Cake with Almond and Honey recipe combines rich flavors Read Full Recipe


hey,
i’m !
I’m so happy you’re here!
I pour heart and skill into every recipe I create. I know you’ll taste the difference now let’s enjoy this flavorful adventure together.

![- 2 ripe avocados - 2 cloves garlic, minced - 2 tablespoons lemon juice - ¼ cup fresh basil leaves - ½ cup Greek yogurt These main ingredients create a rich and tasty sauce. The avocados provide creaminess, while garlic adds depth. Lemon juice gives a bright flavor. Fresh basil brings a lovely aroma. Greek yogurt adds tang and makes the sauce smooth. - ½ teaspoon red pepper flakes (optional) - Salt and pepper to taste - 8 oz spaghetti or your choice of pasta - 2 tablespoons olive oil - Cherry tomatoes, halved (for garnish) The additional ingredients enhance your dish. Red pepper flakes add heat if you like spice. Salt and pepper balance the flavors. Choose your favorite pasta, and cook it al dente. Olive oil adds richness, while cherry tomatoes give a fresh pop of color. - Grated Parmesan cheese (for serving) If you want more flavor, sprinkle grated Parmesan cheese on top. It adds a nice salty taste and pairs well with the creamy sauce. For the full recipe, you can check out the [Full Recipe]. To cook pasta al dente, start by boiling water in a large pot. Add a pinch of salt to the water to enhance the flavor. Once the water is boiling, add your pasta. Stir it gently to keep it from sticking. Check the pasta package for cooking time. You want it firm but not hard. This means it should have a slight bite when you taste it. Before draining the pasta, reserve about ½ cup of the pasta water. This water has starch that helps bind the sauce and pasta together. Just use a cup or bowl to catch it before you pour the pasta into a colander. You will need a food processor or blender for the sauce. Cut the avocados in half and remove the pit. Scoop the flesh into your machine. Add minced garlic, lemon juice, fresh basil, Greek yogurt, red pepper flakes, salt, and pepper. Blend until everything is smooth and creamy. The key is to blend it well so there are no lumps. If it's too thick, feel free to add a bit of water to help it blend. You want a nice, creamy texture that coats the pasta beautifully. Once the pasta is cooked, return it to the pot. This keeps it warm while you mix in the sauce. Pour the creamy avocado sauce over the hot pasta. Use tongs or a spatula to toss the pasta and sauce together. Add reserved pasta water a little at a time. This helps you find the right consistency. If you want it creamier, add more water. If it’s too thin, just toss it a bit more until it’s perfect. Drizzle olive oil over the pasta and toss again for added flavor. Serve your creamy avocado pasta right away, garnished with halved cherry tomatoes and a sprinkle of grated Parmesan cheese if you like. Enjoy the fresh and delicious taste! When you pick avocados, look for the right signs of ripeness. A ripe avocado feels slightly soft when you gently squeeze it. The skin should be dark green or nearly black, depending on the type. Avoid avocados with large dents or dark spots. To store avocados, keep them at room temperature if they are not ripe yet. Once ripe, put them in the fridge. This slows down the ripening process and helps them last longer. If you cut an avocado, sprinkle lemon juice on the exposed flesh to prevent browning. To add more flavor, try using extra seasonings. A pinch of cumin or a dash of smoked paprika can elevate your dish. You can also add fresh herbs like cilantro or parsley for a different taste. If you want to explore alternative herbs, consider using dill or mint. Both can bring a fresh twist to your creamy avocado pasta. Mixing in a few chopped sun-dried tomatoes can also add a rich, tangy flavor. For the best pairings, consider adding toppings like toasted pine nuts or crushed red pepper. These can add crunch and spice to your dish. You can also sprinkle extra basil or a bit of lemon zest for a fresh finish. To present your pasta like a gourmet dish, use deep bowls instead of flat plates. Top the pasta with extra basil leaves and a light drizzle of olive oil. This not only looks great but also enhances the dish’s flavor. For a touch of color, add halved cherry tomatoes before serving. Enjoy your meal! {{image_2}} You can make a vegan version of creamy avocado pasta easily. Instead of Greek yogurt, use silken tofu or a plant-based yogurt. Both keep the sauce creamy without using dairy. Blend these with the avocado, garlic, and lemon juice for the same smooth texture. Adding protein makes the dish more filling. You can use grilled chicken, shrimp, or even beans for a plant-based option. If you pick chicken or shrimp, cook them separately and add them to the pasta at the end. For beans, just mix them in while tossing the pasta. Adding seasonal vegetables boosts nutrition and flavor. Think about tossing in spinach, peas, or zucchini. These can be added to the pasta as it cooks. For garnish, try fresh herbs like parsley or more basil. They add a fresh touch and color to the dish. This recipe is simple and can adapt to your taste. For the full recipe, check out the details above. To keep creamy avocado pasta fresh, store it in the fridge. Use an airtight container to prevent air from drying it out. It’s best to refrigerate within two hours of cooking. This helps keep the flavors and texture intact. If you notice the pasta starting to brown, add a bit of lemon juice before storing. This will help maintain its bright color. When reheating, do it gently to keep the creaminess. Use a saucepan over low heat and add a splash of water. This helps to bring back the smooth texture. Stir frequently to prevent sticking. Avoid using a microwave, as it can make the pasta mushy. Make sure to check the temperature before serving. You want it warm, not hot. You can freeze creamy avocado pasta, but it may change texture. To freeze, place it in a freezer-safe container. Leave some space at the top for expansion. When you want to eat it, thaw it overnight in the fridge. Heat it slowly on the stove with a little water to restore creaminess. Enjoy your meal! Creamy avocado pasta stays fresh for about 2 days in the fridge. Keep it in an airtight container. After that, the avocados may brown and the sauce may lose its creamy texture. Yes, you can prepare this dish ahead of time! Cook the pasta and make the sauce separately. Store them in separate containers. When ready to eat, combine them. This keeps the pasta fresh and the sauce creamy. I love to pair this dish with a simple side salad or garlic bread. Grilled chicken or shrimp also works well for added protein. You can also add roasted veggies for a healthy twist. Yes, creamy avocado pasta is healthy! It has healthy fats from avocados, protein from Greek yogurt, and fiber from pasta. Avocados are full of vitamins and minerals, making this dish a nutritious choice. Enjoy it guilt-free! For the full recipe, check out the details above. Creamy avocado pasta is a tasty dish that blends healthy flavors. We discussed key ingredients like ripe avocados, fresh garlic, and Greek yogurt. I shared step-by-step instructions for cooking the perfect pasta and making a creamy sauce. Tips also included choosing ripe avocados and ways to enhance flavor. Remember, you can customize this dish with proteins and seasonal veggies. Whether you enjoy it fresh or stored, this pasta remains a nutritious choice. Try it, and make it your own!](https://foodishtalk.com/wp-content/uploads/2025/05/f1949410-287c-49ba-92dd-0d53e6b6aa88-300x300.webp)


Taco Ranch Bites Flavorful Easy Party Appetizer
Get ready to elevate your next party with Taco Ranch Bites! This easy appetizer is packed with flavor and sure to wow your guests.…