
Latest & Greatest
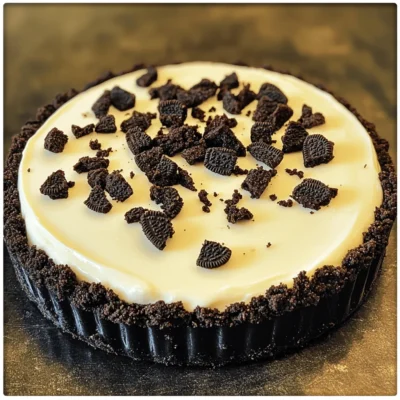
No-Bake Oreo Cheesecake Easy and Delicious Dessert
Looking for a dessert that’s easy to make and oh-so-delicious? You’re in the right place! This No-Bake Oreo Cheesecake is
Read more…
One-Pot Chicken Alfredo Creamy Pasta Delight
If you crave a creamy, comforting meal that’s quick and easy, you’re in the right place! This One-Pot Chicken Alfredo
Read more…
Garlic Butter Roasted Carrots Tasty and Simple Side
Looking for a simple yet delicious side dish? Garlic Butter Roasted Carrots are your answer! This recipe combines sweet baby
Read more…
Cheesy Broccoli Casserole Comforting Family Favorite
Are you ready to bring some cheesy goodness to your dinner table? This Cheesy Broccoli Casserole is your family’s new
Read more…
Lemon Blueberry Bread Fresh and Flavorful Delight
Are you ready to bake a treat that bursts with flavor? Lemon Blueberry Bread is fresh, tangy, and oh-so-delicious! In
Read more…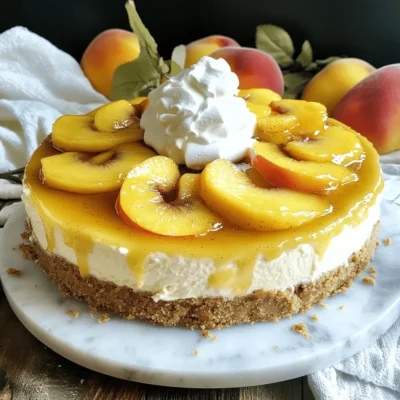
Peach Cobbler Cheesecake Irresistible and Simple Delight
If you love peach cobbler and cheesecake, you’re in for a treat! This Peach Cobbler Cheesecake is a simple delight
Read more…
Healthy Zucchini Brownies Moist and Nutritious Treat
Are you ready to enjoy a treat that’s both delicious and healthy? These Healthy Zucchini Brownies are moist, rich, and
Read more…
Easy Chicken Alfredo Bake Simple and Flavorful Dish
If you’re craving a warm, creamy dish that’s super easy to make, look no further! My Easy Chicken Alfredo Bake
Read more…browse recipes


![- 2 cups all-purpose flour - 1 tablespoon baking powder - 1/2 teaspoon salt - 1/4 teaspoon black pepper - 1 cup shredded sharp cheddar cheese - 1/2 cup grated parmesan cheese - 1/2 cup cold unsalted butter, cubed - 1/2 cup buttermilk - 1 large egg - Fresh chives, chopped (for garnish) To create these savory cheese scones, start with the main ingredients. All-purpose flour forms the base. You will also need baking powder to help them rise. Salt and black pepper add flavor and balance. For the cheese, I love using sharp cheddar for its bold taste. Parmesan adds a nice depth and richness. You can mix these two or try your favorites. Next, you need some additional ingredients. Cold unsalted butter brings flakiness to the scones. Buttermilk adds moisture and tang. An egg helps bind everything together. Finally, fresh chives give a burst of color and flavor as a garnish. Check the [Full Recipe] for detailed steps and tips to make these cheese scones perfect for any meal! First, preheat your oven to 400°F (200°C). This step helps the scones bake evenly. Next, line your baking sheet with parchment paper. This keeps the scones from sticking and makes cleanup easier. In a large bowl, whisk together the following dry ingredients: - 2 cups all-purpose flour - 1 tablespoon baking powder - 1/2 teaspoon salt - 1/4 teaspoon black pepper Make sure they blend well. The baking powder helps the scones rise. The salt and pepper add flavor. Now, add the cold butter, cut into small cubes. Use your fingers or a pastry cutter to work the butter into the flour mix until it looks like coarse crumbs. This step creates a flaky texture. Next, stir in: - 1 cup shredded sharp cheddar cheese - 1/2 cup grated parmesan cheese Mix well so the cheese spreads evenly throughout the dough. In a separate bowl, whisk together: - 1/2 cup buttermilk - 1 large egg Combine these wet ingredients well. Then, pour them into the dry mix. Gently stir until just combined. Be careful not to overmix, as this can make the scones tough. Turn the dough out onto a lightly floured surface. Pat it into a rectangle about 1 inch thick. Use a sharp knife to cut the dough into squares or triangles. Place them on the lined baking sheet with space between each scone. Bake in the preheated oven for 15-20 minutes. Check for doneness when they turn golden brown on top. Once done, remove them from the oven. Let them cool slightly, then garnish with fresh chives before serving. For the full recipe, check the recipe card. Cold ingredients are key for great scones. Use cold butter and buttermilk. This keeps the scones flaky. If the butter warms up, the dough won’t rise well. Avoid overmixing the dough. Mix until just combined. Overmixing makes the scones tough. You want them light and airy, not dense and chewy. Pair your savory cheese scones with soups or salads. They go well with creamy tomato soup or a fresh garden salad. Enjoy them as a side for brunch too. Serve your scones fresh from the oven. They taste best warm. If you need to reheat, warm them in the oven for a few minutes. Fresh herbs can elevate your scones. Try adding rosemary or thyme for extra flavor. They add a nice touch and make your scones look pretty. Spices can also give your scones a kick. Consider adding a pinch of cayenne or smoked paprika. This adds warmth and depth to the scone's flavor. {{image_2}} You can make your scones pop with fresh herbs. Try adding chopped chives, rosemary, or thyme to the dough. These herbs add flavor and aroma. When pairing herbs with cheese, think about the cheese's strength. For example, chives work well with sharp cheddar. Rosemary shines with creamy goat cheese. Mixing these flavors gives your scones a bright twist. If you love heat, consider adding jalapeños or red pepper flakes. These ingredients create a delicious kick in your scones. For a spicy twist, use pepper jack cheese. This cheese blends well with the heat and adds creaminess. Alternatively, sharp cheddar with red pepper flakes creates a bold flavor. Both options make your scones exciting and full of life. Mixing sweet and savory can create a unique scone experience. Try adding honey or fruit like figs or apples. These ingredients balance well with sharp cheeses like cheddar. Drizzle honey on top before serving for a lovely finish. For a fun twist, serve with a sweet fruit jam. This combination brings new life to your savor cheese scones and makes them hard to resist. For the full recipe, refer to the Savory Cheese Scones section. To keep your savory cheese scones fresh at room temperature, place them in a sealed container. This helps lock in moisture and prevents them from drying out. You can store them this way for up to three days. If you want to enjoy them warm, just pop them in the oven for a few minutes before serving. If you want to save the scones for later, freezing is a great option. First, let the scones cool completely. Then, wrap each scone in plastic wrap. Place them in a freezer bag, and label it with the date. They can last up to two months in the freezer. When you’re ready to eat them, reheat them in the oven at 350°F (175°C) for about 10-15 minutes for the best results. This keeps them soft and tasty. You should check your scones for any signs of spoilage. If they smell off or have an unusual texture, it's best to discard them. Mold is another clear sign that they are no longer good. Always trust your senses; if something seems off, don’t take chances. Enjoy your scones fresh to appreciate their flavor and texture. Savory cheese scones taste best fresh. They last about 2 to 3 days at room temperature. Store them in an airtight container. If you want them to last longer, freeze them. They keep well in the freezer for up to 3 months. To enjoy them later, thaw in the fridge overnight. Reheat in the oven to restore their warmth and crunch. Yes! You can mix and match cheeses. Try mozzarella for a milder taste or feta for a tangy kick. Gouda adds a rich flavor, while blue cheese gives a strong punch. Just keep the total amount of cheese the same as in the recipe. This way, your scones will still rise and stay fluffy. Savory cheese scones pair well with many dishes. Serve them warm with soup for a cozy meal. They also go great with salads, adding a nice texture. Try them with a dollop of cream cheese or butter. For a fun twist, use them as a base for a savory sandwich. Enjoy the flavors of your choice! This article covered how to make savory cheese scones, starting with the must-have ingredients like flour, cheese, and buttermilk. I shared step-by-step instructions to guide you through mixing and baking, plus tips for texture and flavor. Remember, using cold ingredients is key for the best scones. You can customize these scones with herbs or spices for fun twists. With proper storage, you can enjoy them fresh or reheated later. Dive into baking, and enjoy your delicious creations!](https://foodishtalk.com/wp-content/uploads/2025/05/12a912b3-969e-43ee-84c8-996b12089b1f.webp)
Savory Cheese Scones Perfect for Any Meal
Savory cheese scones are my go-to for any meal. They blend rich cheese flavors with a tender crumb. Whether you enjoy them for breakfast,…
My Latest Desserts

Ginger Fig Cherry Compote Flavorful and Easy Recipe
Are you ready to explore a dish that bursts with flavor? This Ginger Fig Cherry Compote is not only easy Read Full Recipe-
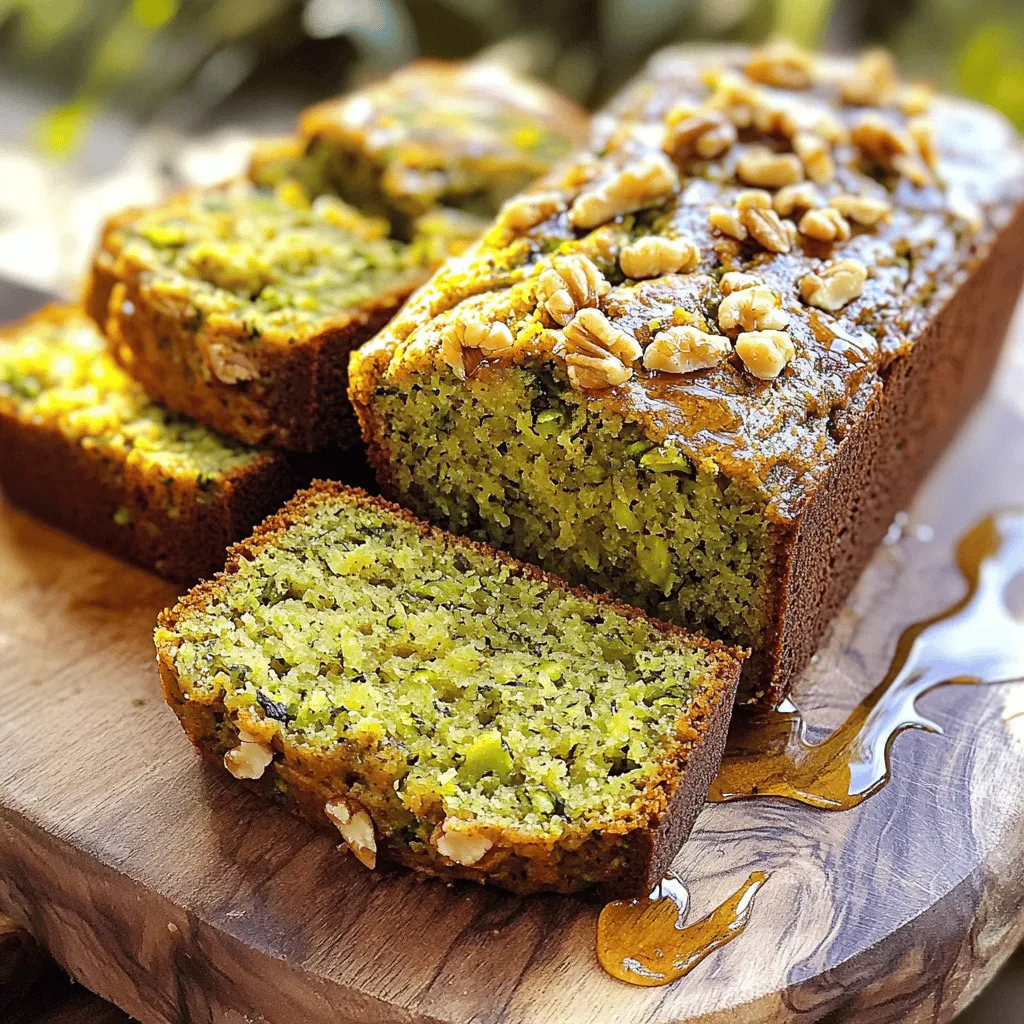
Zucchini Banana Bread Flavorful and Moist Recipe
Do you love warm, fresh bread that bursts with flavor? You’re in the right spot! This Zucchini Banana Bread recipe Read Full Recipe -
Fig Cake with Almond and Honey Delight Recipe
Are you ready to indulge in a delightful treat? My Fig Cake with Almond and Honey recipe combines rich flavors Read Full Recipe -
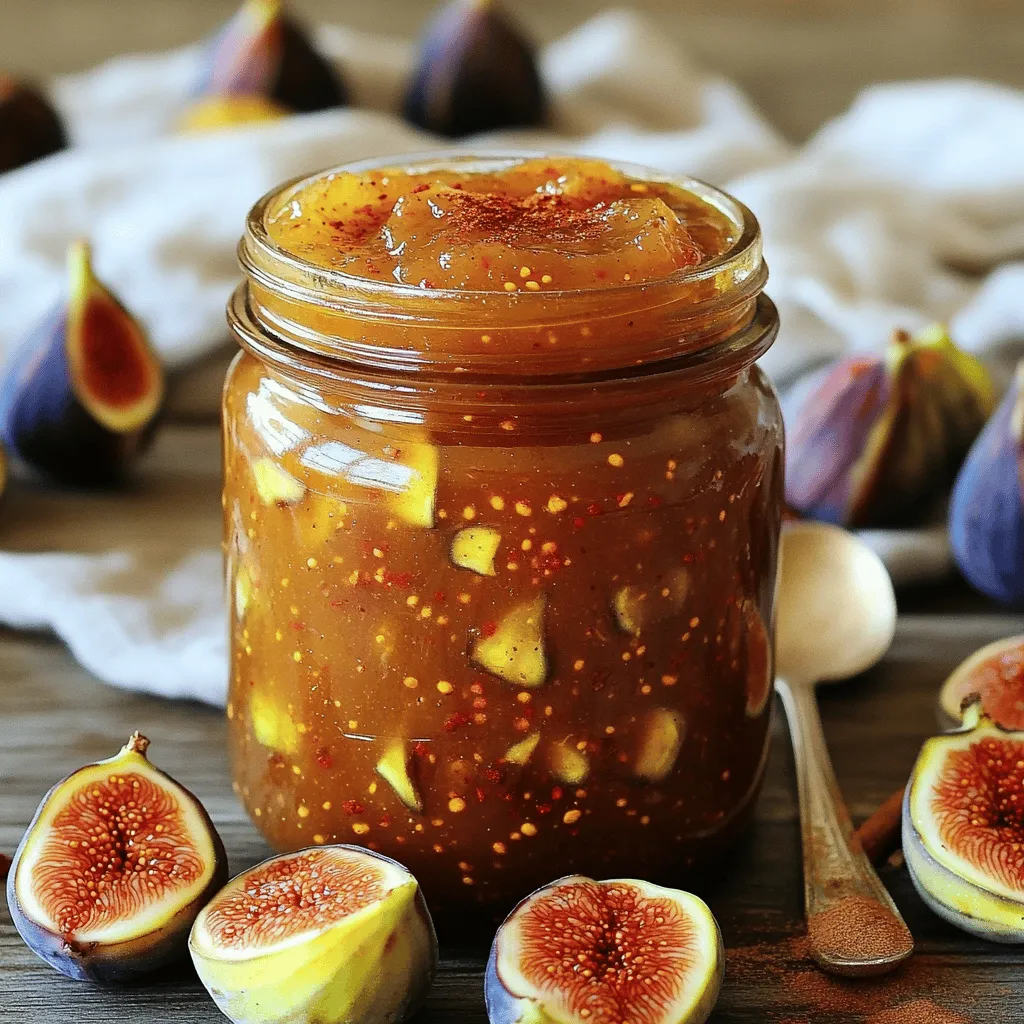
Simple Fig Jam Easy Recipe to Savor and Enjoy
Are you ready to make a burst of flavor with your next kitchen project? This Simple Fig Jam recipe is Read Full Recipe -
Mini Vanilla Cream Tarts with Raspberries Delight
Welcome to the sweet world of Mini Vanilla Cream Tarts with Raspberries! Today, I’ll show you how to make these Read Full Recipe -
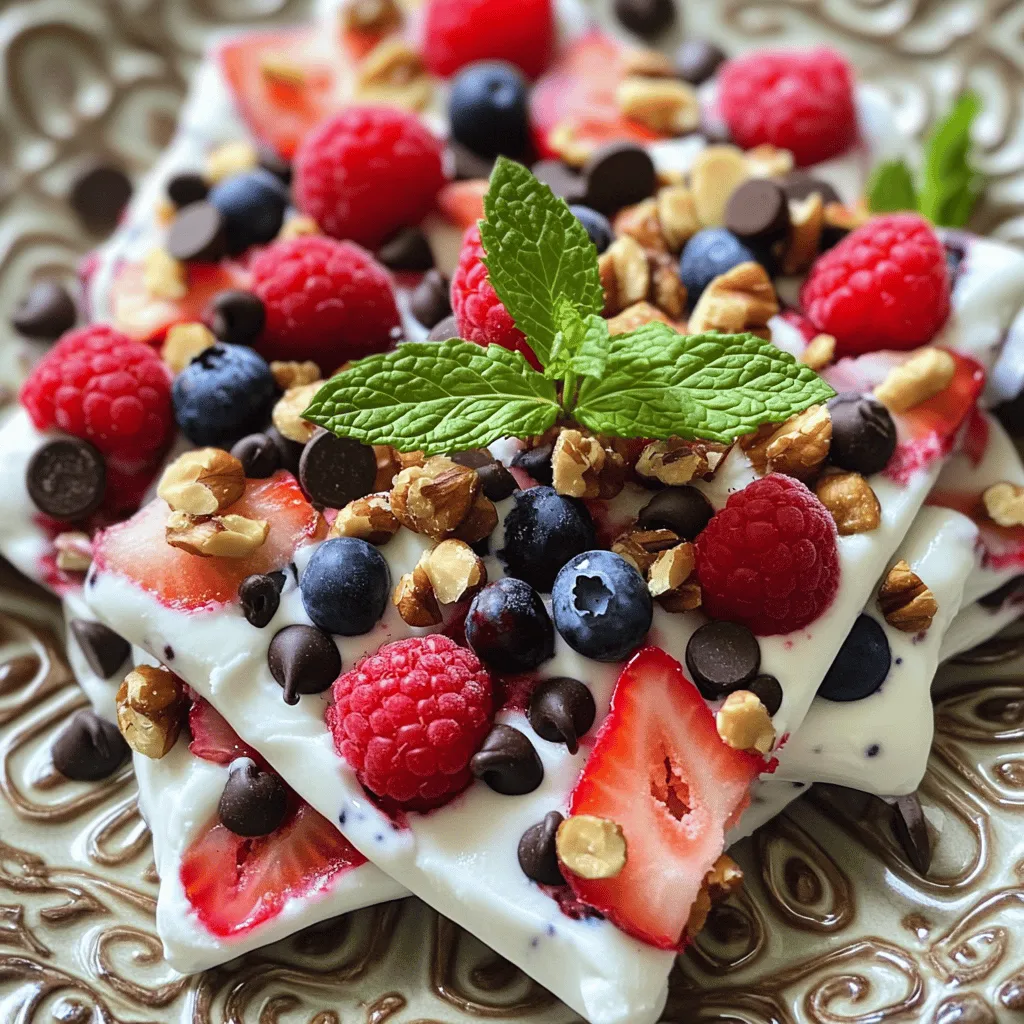
Frozen Yogurt Bark Delightful and Simple Treat
If you’re looking for a quick, tasty treat, frozen yogurt bark is a winner. It’s easy to make and fun Read Full Recipe -
Fruit Salad with Honey Lime Dressing Easy Recipe
Looking for a fresh and easy treat? This Fruit Salad with Honey Lime Dressing is the perfect choice. Bursting with Read Full Recipe -
Blueberry Cheesecake Bars Simple and Delicious Treat
Looking for a dessert that’s easy to make and bursting with flavor? You’ve found it! These Blueberry Cheesecake Bars are Read Full Recipe -
Lemon Cheesecake Crumb Bars Delightful and Fresh Treat
Are you ready to brighten your day with a sweet treat? These Lemon Cheesecake Crumb Bars combine creamy cheesecake with Read Full Recipe -
Blueberry Heaven Cookies Irresistible Sweet Treat
Welcome to your new favorite cookie recipe! Blueberry Heaven Cookies are the perfect blend of sweet and tart, making them Read Full Recipe


hey,
i’m !
I’m so happy you’re here!
I pour heart and skill into every recipe I create. I know you’ll taste the difference now let’s enjoy this flavorful adventure together.

. Ginger Sesame Noodles are easy to make with simple steps. First, boil the noodles and mix a tasty sauce. Then, sauté the veggies and combine everything for a quick meal. You can even swap ingredients based on your tastes or diet. Store leftovers well for more delicious meals later. If you’re looking for a healthy, flavorful dish, this one is a winner! Enjoy making it your own and share it with family and friends.](https://foodishtalk.com/wp-content/uploads/2025/05/2493c3e3-b980-4d20-bf39-497cb990eb74-300x300.webp)

![To make Sriracha Honey Cauliflower Bites, you need simple, tasty ingredients. Here’s the list: - 1 large head of cauliflower, cut into bite-sized florets - 1/2 cup all-purpose flour - 1/2 cup breadcrumbs (Panko for extra crunch) - 1 teaspoon garlic powder - 1 teaspoon onion powder - 1/2 teaspoon smoked paprika - Salt and pepper, to taste - 1/4 cup sriracha sauce - 1/4 cup honey - 2 tablespoons olive oil - 1 tablespoon rice vinegar (or apple cider vinegar) - Fresh cilantro, chopped These ingredients create a great blend of flavors. The cauliflower is soft inside and crispy outside. The sriracha honey sauce adds a sweet and spicy kick. You can adjust the spice by adding more or less sriracha. It’s all about your taste! For the full recipe, check the details above. 1. Preheating and Prepping the Oven: Start by preheating your oven to 425°F (220°C). This high heat helps make the cauliflower bites crispy. Line a baking sheet with parchment paper for easy cleanup. 2. Mixing the Flour Mixture: In a large bowl, combine 1/2 cup of all-purpose flour, 1 teaspoon each of garlic powder and onion powder, and 1/2 teaspoon of smoked paprika. Add salt and pepper to taste. Mix everything until well blended. 3. Coating the Cauliflower Florets: Cut 1 large head of cauliflower into bite-sized florets. Toss these florets in the flour mixture. Shake off any extra flour so they are evenly coated. 1. Breadcrumb Coating Technique: To make them extra crunchy, dip the floured florets in water for a moment. Then, roll them in 1/2 cup of breadcrumbs until coated. Panko works best for a crispier texture. 2. Baking Time and Tips for Crispiness: Place the coated cauliflower on the prepared baking sheet. Lightly spray them with olive oil for added crunch. Bake for 20 to 25 minutes, turning halfway through. This ensures they cook evenly and get golden brown. 1. Combining Ingredients for the Sauce: While the cauliflower bakes, mix 1/4 cup of sriracha sauce, 1/4 cup of honey, 2 tablespoons of olive oil, and 1 tablespoon of rice vinegar in a bowl. Stir until smooth and well combined. 2. Adjusting for Spice Level: If you prefer a spicier bite, add more sriracha to the sauce until it meets your taste. It’s all about finding that perfect balance of heat and sweetness. Now, you're ready to enjoy these Sriracha Honey Cauliflower Bites! For the full recipe, refer to the earlier section. Ensuring Crispiness While Baking To get that perfect crunch, bake at 425°F (220°C). This high heat helps the cauliflower get crispy. Make sure to turn the bites halfway through baking. This ensures even cooking. If you want extra crispiness, spray them lightly with olive oil before baking. Flavoring Adjustments to Suit Personal Tastes You can change the flavor by adding different spices. If you like it spicy, add more sriracha. If you prefer a milder taste, use less. Feel free to mix in other spices like cumin or cayenne. This lets you make a flavor that suits you best. Importance of Shaking Off Excess Flour After coating the cauliflower in flour, shake off any extra. This helps the breadcrumbs stick better. Too much flour can make the bites heavy and less crispy. A light coating is key for a great texture. Using Panko vs. Regular Breadcrumbs I recommend using Panko breadcrumbs for this recipe. Panko gives a lighter, crunchier bite. Regular breadcrumbs work too, but they won’t be as crispy. If you love crunch, go with Panko. It makes a big difference in the final dish. For the full recipe, click here: [Full Recipe]. {{image_2}} Alternative Sauces and Marinades If you want to mix it up, try different sauces. You can use barbecue sauce for a sweet twist. A soy sauce and ginger mix adds a savory kick. You can even use a creamy ranch dressing for a cool contrast. Each sauce brings a unique flavor. Don’t be afraid to get creative! Gluten-Free Options For a gluten-free version, swap all-purpose flour with almond flour or chickpea flour. Use gluten-free breadcrumbs as well. This way, everyone can enjoy the bites without worry. It’s a great way to adapt the recipe to different diets. Pairing with Dips and Sides These bites shine when served with dips. Try them with ranch, blue cheese, or a yogurt dip. You can also serve them alongside crunchy veggies for a fun snack platter. Pairing adds variety and makes it more enjoyable. Presentation Ideas for Serving To make your dish look appealing, use a colorful plate. Arrange the bites in a circle, and sprinkle some chopped cilantro on top. You can also add lime wedges for a fresh touch. A beautiful plate grabs attention and enhances the dining experience. For the complete recipe, check out the [Full Recipe]. After enjoying your Sriracha Honey Cauliflower Bites, store any leftovers in the fridge. Place them in an airtight container. They will stay fresh for about 3 to 4 days. If you want to keep them longer, freezing is a great option. To freeze the cauliflower bites, let them cool completely. Then, place them in a freezer-safe bag or container. They can last up to 3 months in the freezer. Just remember to label the bag with the date! To enjoy your bites again, reheating is key. The best method is to use an oven or air fryer. Preheat your oven to 375°F (190°C). Spread the bites on a baking sheet. Bake for about 10 to 15 minutes. This will help them regain their crispiness. If you're using an air fryer, set it to 350°F (175°C). Heat them for about 5 to 7 minutes. This method works wonders for keeping the texture nice and crunchy. Avoid using a microwave if you want to keep them crispy. Microwaving can make the bites soggy and chewy. So, stick to the oven or air fryer for the best results. Enjoy your tasty snack again with that perfect crunch! How do I make Sriracha Honey Cauliflower Bites vegan? To make these bites vegan, swap honey with maple syrup or agave nectar. This change keeps the sweet flavor while making it plant-based. Can I prepare these bites in advance? Yes, you can prepare them ahead of time. Coat the cauliflower and store it in the fridge. Bake them fresh when ready to eat. What dishes pair well with Sriracha Honey Cauliflower Bites? These bites go great with rice, salads, or as a side for tacos. They add a nice kick to any meal. Can I fry these instead of baking? Yes, frying gives a nice crunch. Heat oil in a pan and fry the coated cauliflower until golden brown. How do I ensure the cauliflower is fully cooked? Check if the cauliflower is tender by piercing it with a fork. It should be soft inside and crispy outside. For more details, refer to the Full Recipe. You now have all the tools to make tasty Sriracha Honey Cauliflower Bites. We covered the right ingredients, preparation steps, and baking tips to achieve crispiness. You learned how to adjust flavors and make variations that suit your tastes. Storing leftovers is easy, and reheating keeps them crispy. Follow these tips, and you’ll enjoy delicious bites every time. Experiment with new dips and sides to elevate your dish. Enjoy your cooking adventure!](https://foodishtalk.com/wp-content/uploads/2025/05/e21298f4-3b47-4c76-ba30-ad9f3f5ed860-300x300.webp)
Coconut Curry Lentils Flavorful and Easy Recipe
Let’s dive into a deliciously simple dish: Coconut Curry Lentils! This recipe is packed with flavor and is perfect for both busy nights and…