Get ready to impress your friends and family with the most delightful dessert: Molten Chocolate Lava Cakes! These rich, gooey treats are perfect for any occasion, and they’re easier to make than you think. In this guide, I'll share my favorite ingredients and step-by-step instructions to create that irresistible molten center. Let’s dive in and discover how to make these cakes that melt hearts and satisfy cravings!
Why I Love This Recipe
- Decadent Chocolate Experience: This recipe delivers a rich and intense chocolate flavor that is simply irresistible, making it a perfect dessert for chocolate lovers.
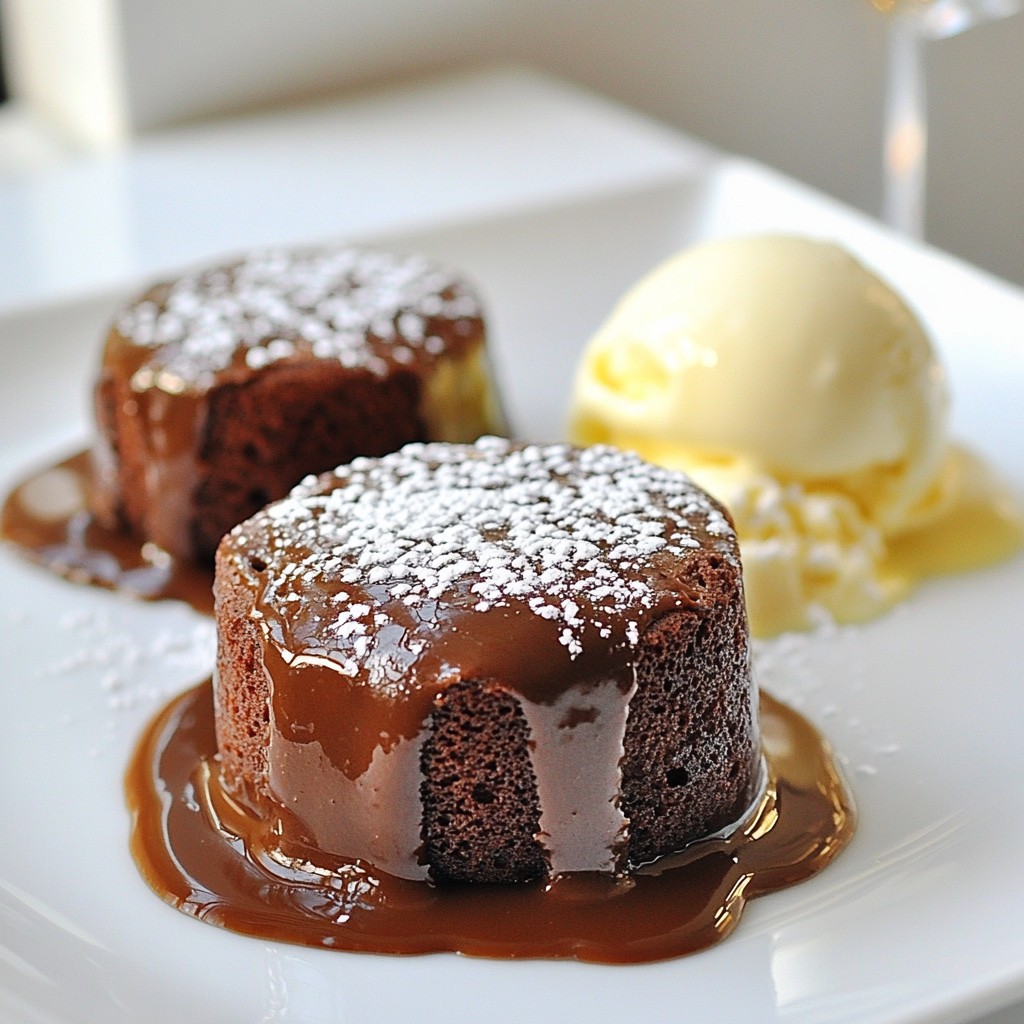
- Impressive Presentation: When you invert the ramekins, the molten center flows beautifully, creating a stunning dessert that is sure to impress your guests.
- Quick and Easy: With only 15 minutes of prep time, you can whip up this indulgent dessert in no time, perfect for last-minute gatherings.
- Customizable Delight: Serve it with vanilla ice cream or fresh berries for added flavor and texture, making it a versatile dessert for any occasion.
Ingredients
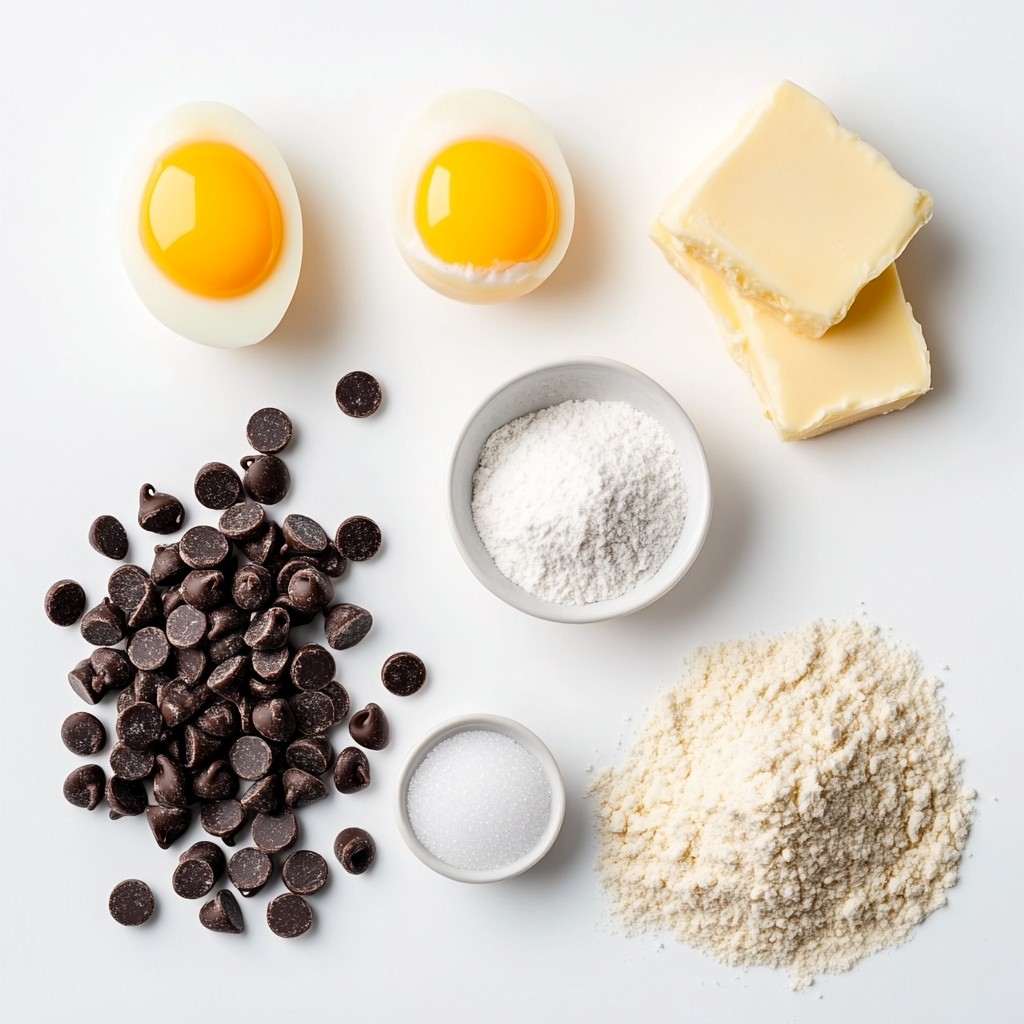
List of Ingredients
- ½ cup unsalted butter
- 1 cup high-quality dark chocolate chips
- 2 large eggs
- 2 large egg yolks
- ½ cup granulated sugar
- 2 tablespoons all-purpose flour
- ¼ teaspoon salt
- Powdered sugar (for dusting)
- Vanilla ice cream (optional for serving)
Making molten chocolate lava cakes is simple and fun. First, gather all your ingredients. Quality matters, especially with chocolate. I always choose dark chocolate chips with 60-70% cacao for the best flavor. This level of cacao gives a rich taste without being overly sweet.
You will need unsalted butter for a smooth texture and to avoid extra salt. The eggs and egg yolks add richness and help the cake rise. Granulated sugar sweetens the batter, while all-purpose flour acts as a binder. The salt enhances all the flavors, making each bite delightful.
For serving, I like to dust the cakes with powdered sugar. It adds a nice touch. A scoop of vanilla ice cream pairs perfectly with the warm, gooey center. It’s a match made in dessert heaven!
Step-by-Step Instructions
Preparation
1. Preheat your oven to 425°F (220°C). This step is key for the cakes.
2. Grease four ramekins with unsalted butter. Dust them lightly with flour.
3. Place the ramekins on a baking sheet for easy movement.
4. In a microwave-safe bowl, combine ½ cup of unsalted butter and 1 cup of dark chocolate chips.
5. Heat in the microwave in 30-second bursts. Stir after each round until smooth.
6. Allow the mixture to cool slightly before using it.
Mixing Ingredients
1. In a separate bowl, whisk 2 large eggs, 2 large egg yolks, and ½ cup of granulated sugar.
2. Whisk until the mixture is pale and frothy. This takes about 2-3 minutes.
3. Gently fold the melted chocolate mixture into the egg mixture.
4. Slowly sift in 2 tablespoons of all-purpose flour and ¼ teaspoon of salt.
5. Fold gently until just combined. Be careful not to overmix the batter.
Baking the Cakes
1. Divide the batter evenly among the prepared ramekins. Fill each about 2/3 full.
2. Bake in the preheated oven for 12-14 minutes. The edges should be firm, but the center stays soft.
3. You’ll know they’re ready when the tops form a slight crust.
4. After baking, remove the cakes from the oven. Let them cool for 1 minute.
5. Carefully invert each ramekin onto a serving plate. Gently tap to release the cake.
6. Dust the tops with powdered sugar. Serve immediately, with vanilla ice cream if you like.
Tips & Tricks
Achieving the Perfect Molten Center
To get that gooey center, timing is key. Bake your cakes for 12-14 minutes. You want the edges firm but the center soft. Every oven is different, so check your cakes. If you have a convection oven, reduce the bake time by a minute or two. Your goal is a slight crust on top, but a runny center inside.
Serving Suggestions
Serving molten chocolate lava cakes is simple but can be fun. You can add a scoop of vanilla ice cream on the side. The warm cake and cold ice cream mix well. For a nice look, dust the tops with powdered sugar. You can also add fresh berries for color. Place the cake on a plate and drizzle with chocolate sauce for an extra treat. Serve warm for the best taste!
Pro Tips
- Choose Quality Chocolate: Use high-quality dark chocolate with 60-70% cacao for the best flavor and texture in your lava cakes.
- Don’t Overbake: Keep a close eye on the cakes while baking; they should have a firm edge but a soft, gooey center. Overbaking will result in a cake instead of a lava texture.
- Cool for a Minute: Allow the cakes to cool for just one minute before inverting them. This helps them set slightly, making them easier to release without breaking.
- Serve Warm: For the best experience, serve your molten chocolate cakes warm and pair them with vanilla ice cream to balance the richness.
Variations
Flavor Variations
You can change up your molten chocolate lava cakes with fun flavors. A white chocolate version is sweet and creamy. Just swap dark chocolate with white chocolate chips. Melt them just like the dark chocolate. This gives a rich, sweet taste that pairs well with fresh berries.
Another great option is coffee or espresso-infused lava cakes. Just add one tablespoon of instant coffee or espresso powder to the melted chocolate mix. This adds a nice depth to the flavor. The coffee enhances the chocolate, making it taste richer and more complex.
Dietary Adjustments
If you need gluten-free options, you can use gluten-free flour. It works just as well in this recipe. Simply replace the all-purpose flour with a gluten-free blend. This way, everyone can enjoy the cake without worry.
For vegan substitutes, swap the eggs for a flaxseed mix. Use two tablespoons of ground flaxseed mixed with six tablespoons of water. Let it sit for a few minutes to thicken. For the butter, use coconut oil or a plant-based butter. These swaps keep the cake rich and delicious while being plant-friendly.
Storage Info
Storing Leftovers
To keep your molten chocolate lava cakes fresh, store them in the fridge. Use an airtight container to protect their rich flavor. Place the cakes in the container only after they cool down completely. This helps avoid sogginess.
Reheating instructions:
1. Preheat your oven to 350°F (175°C).
2. Place the cakes on a baking sheet.
3. Heat for about 8-10 minutes. This warms them gently without drying them out.
You can also use the microwave. Heat one cake at a time for about 30 seconds. Check to see if the center is warm. If not, heat for another few seconds.
Freezing Tips
You can freeze unbaked batter for later use. This is great for quick desserts. To freeze, pour the batter into greased ramekins. Cover each ramekin with plastic wrap.
Storage duration and thawing methods:
- Store unbaked cakes in the freezer for up to 3 months.
- When ready to bake, take them out and let them thaw in the fridge overnight.
- Bake as directed from the recipe, adding a minute or two to the baking time.
This way, you can enjoy fresh lava cakes anytime!
FAQs
Common Questions About Molten Chocolate Lava Cakes
Can I make the batter ahead of time? Yes, you can make the batter ahead. Mix it and store it in the fridge. Just remember to fill the ramekins and bake them when you’re ready. This makes it easy to enjoy fresh lava cakes anytime.
What if the center doesn't melt as expected? If the center does not melt, it might need more baking time. Aim for 12-14 minutes in the oven. If the cakes are too firm, reduce the baking time next time. Each oven is unique, so watch closely.
Can I use a different type of chocolate? Absolutely! You can try milk chocolate or even white chocolate. Just remember, different chocolates will change the taste. Dark chocolate gives a rich flavor, while milk chocolate is sweeter. Experiment and find your favorite!
This blog post guides you through making molten chocolate lava cakes. We covered the key ingredients, step-by-step instructions, and helpful tips to ensure a perfect dessert.
Finally, remember that practice makes perfect. Each try will boost your skills. Explore variations and share with friends. Enjoy the rich flavors and impress your guests with this easy recipe!


