Craving a sweet treat that’s creamy and easy to make? You’re in the right place! My Cottage Cheese Cheesecake Cups are the perfect blend of rich flavor and simple ingredients. They’re great for any occasion, from family dinners to parties. In this post, I’ll guide you step-by-step to craft these delightful treats. Get ready to impress yourself and your guests with this delicious twist on classic cheesecake!
Ingredients
Essential Ingredients for Cottage Cheese Cheesecake Cups
To make these yummy Cottage Cheese Cheesecake Cups, you will need:
– 2 cups cottage cheese, blended until smooth
– 1/2 cup Greek yogurt
– 1/2 cup honey or maple syrup
– 1 teaspoon vanilla extract
– 1 tablespoon lemon juice
– 1 teaspoon cornstarch
– 1/4 teaspoon salt
– 1 cup graham cracker crumbs
– 4 tablespoons unsalted butter, melted
These ingredients create a rich, creamy filling and a tasty crust. Blending the cottage cheese makes it smooth. This step is key for a nice texture.
Optional Garnishes and Toppings
You can add a few fun toppings to make your cups even better:
– Fresh berries like strawberries, blueberries, or raspberries
– Mint leaves for a pop of color and freshness
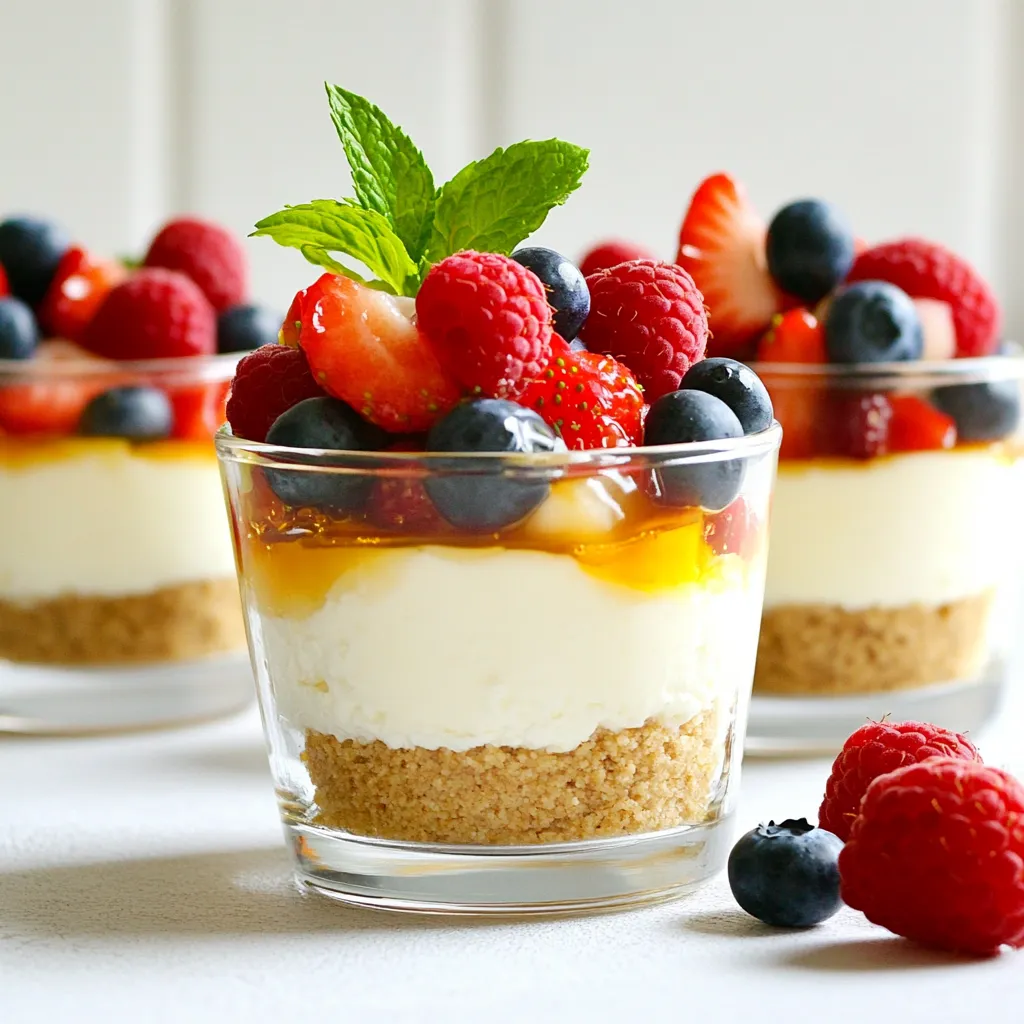
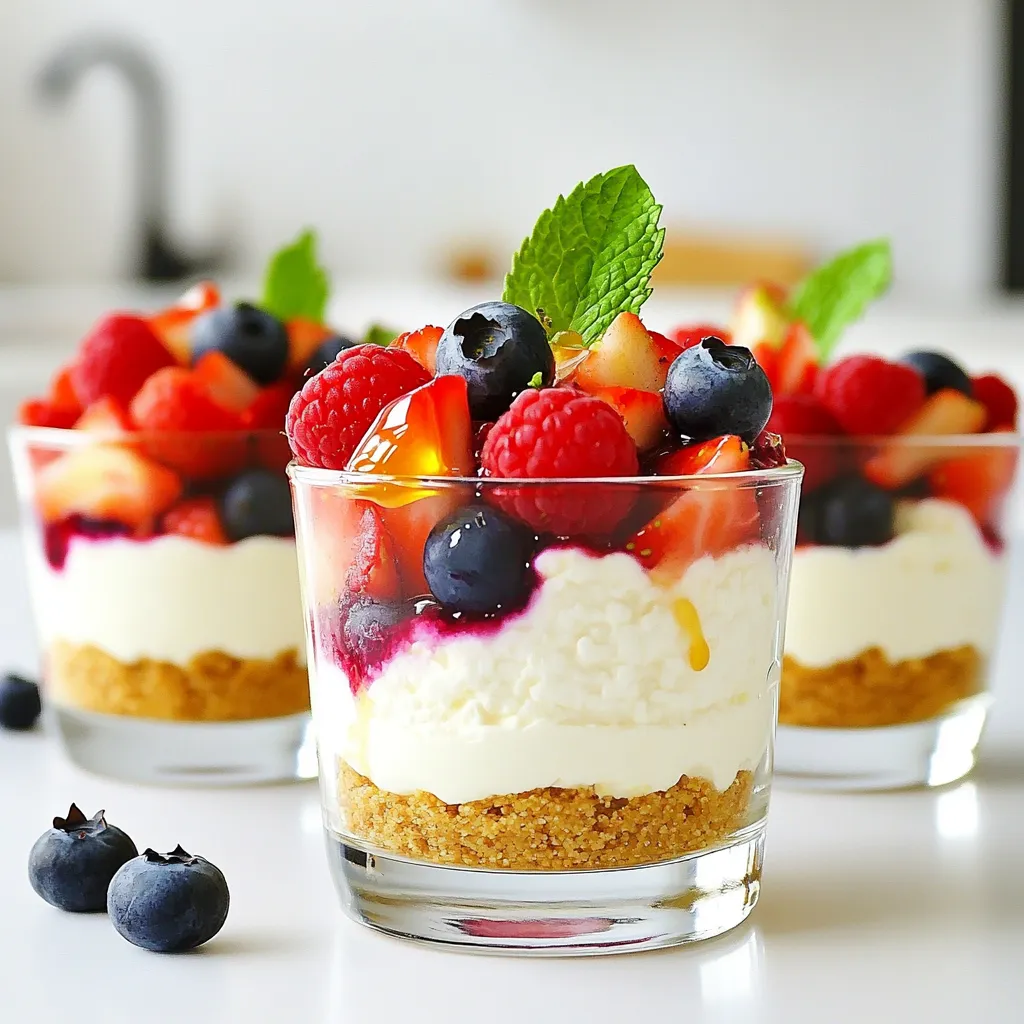
Adding berries gives a nice sweet touch. Mint leaves add a nice look and taste.
Equipment Needed
To make these cheesecake cups, grab these tools:
– Blender or food processor (for the filling)
– Medium bowl (for mixing the crust)
– Clear dessert cups or small glasses (for serving)
– Spoon (for layering the mixture)
Having the right tools makes your work easier. A blender helps you get the filling super smooth. Clear cups show off your beautiful dessert!
Step-by-Step Instructions
Preparing the Cottage Cheese Mixture
First, gather your ingredients. You need cottage cheese, Greek yogurt, honey or maple syrup, vanilla extract, lemon juice, cornstarch, and salt. Put the cottage cheese in a blender. Add Greek yogurt, honey or maple syrup, vanilla extract, lemon juice, cornstarch, and salt. Blend these until smooth and creamy. This step is key for a rich cheesecake flavor. Set this mixture aside while you make the crust.
Making the Graham Cracker Crust
Next, take a medium bowl. In it, add graham cracker crumbs and melted unsalted butter. Mix well until the crumbs look like wet sand. This helps the crust hold together. It should not be too dry or too wet. Press the mixture into the bottom of your dessert cups. This creates a nice base for your cheesecake.
Assembling the Cheesecake Cups
Now, grab your clear dessert cups or small glasses. Add about two tablespoons of the graham cracker crust to each cup. Press down gently to form a solid layer. Then, spoon the cottage cheese mixture onto the crust. Fill each cup about two-thirds full. Tap the cups lightly on the counter to remove air bubbles. This ensures a smooth finish.
Chilling and Setting the Cups
Finally, place the cups in the refrigerator. Let them chill for at least two hours. This helps the cheesecake set well. The longer they chill, the better the flavor will be. After chilling, they are ready to serve. Top with fresh berries and mint leaves if you like. Enjoy this creamy and simple treat!
Tips & Tricks
How to Achieve the Creamiest Texture
To get that smooth, creamy texture, blend the cottage cheese well. I use a high-speed blender. It helps break down any lumps. Add Greek yogurt for extra creaminess. The yogurt also adds a subtle tang. Make sure to mix in the honey or maple syrup well. This adds sweetness and helps the cheesecake cups stay creamy.
Common Mistakes to Avoid
One mistake is not blending enough. If you see lumps, it will not be smooth. Another issue is skipping the chilling step. Chilling helps set the cups. If you don’t chill them long enough, they won’t hold shape. Lastly, don’t forget to press the crust down firmly. A loose crust will crumble when you serve.
Sweetener Substitutes and Adjustments
If you want to switch sweeteners, try agave syrup or stevia. Agave has a mild taste. Stevia is much sweeter, so use less. You can also adjust the amount of honey or maple syrup to your taste. If you like it sweeter, add more. If you prefer less, cut back. Just be sure to keep the balance right for the best flavor.
Variations
Flavor Variations for Cheesecake Filling
You can change the flavor of your cheesecake cups easily. Try adding 1/4 cup of cocoa powder for a chocolate twist. You can also mix in fruit purees like strawberry or blueberry. A bit of almond extract gives a nice nutty flavor. For a fun twist, add a dash of pumpkin spice in the fall.
Alternative Crust Options
While graham cracker crumbs make a great base, you can try other options. Use crushed cookies like Oreos for a chocolatey crust. You can also use nuts and dates for a gluten-free option. Just blend them together, press them in the cups, and you are set.
Creative Toppings and Serving Suggestions
Toppings can take your cheesecake cups to the next level. Use fresh berries for a burst of color. Drizzle some chocolate or caramel sauce on top for extra sweetness. Add crushed nuts for a crunchy texture. For a fun idea, serve them in mason jars for a picnic or party.
Storage Info
How to Store the Cheesecake Cups
To keep your cheesecake cups fresh, place them in the fridge. Use airtight containers or cover them tightly with plastic wrap. This prevents moisture loss and keeps them from absorbing odors. If you have leftover cups, eat them within a few days for the best taste.
Shelf Life and Freezing Tips
These cheesecake cups stay good in the fridge for about 3 to 5 days. If you want to freeze them, do so before adding any toppings. Wrap each cup with plastic wrap and foil. This helps prevent freezer burn. They can last up to 2 months in the freezer. When ready to eat, thaw them in the fridge overnight.
Reheating Tips for Leftovers
You don’t need to reheat these cheesecake cups. They taste best chilled. If you prefer a slightly warmer dessert, let them sit at room temperature for about 10 minutes before eating. Enjoy them fresh, creamy, and delicious!
FAQs
Can I use low-fat or fat-free cottage cheese?
Yes, you can use low-fat or fat-free cottage cheese. The texture may change, but it will still taste good. Low-fat versions can make the cheesecake cups lighter. They may not be as creamy as full-fat options, but they work well.
How long do these cheesecake cups need to chill?
These cheesecake cups need to chill for at least 2 hours. Chilling helps the cups set and firm up. If you can wait longer, chilling overnight enhances the flavor and texture even more.
Can I make these cheesecake cups ahead of time?
Absolutely! You can make these cups a day in advance. Just store them in the fridge until you’re ready to serve. This makes them a great option for parties or meal prep.
What can I substitute for Greek yogurt?
You can use sour cream or regular yogurt as a substitute for Greek yogurt. Both options will keep the cups creamy. If you want a thicker texture, use sour cream. Regular yogurt works well if you prefer a lighter taste.
How can I make these dairy-free?
To make these cheesecake cups dairy-free, use dairy-free cottage cheese and yogurt. You can find plant-based options in stores. For sweetening, use maple syrup or agave nectar. This way, everyone can enjoy the treat!
In this article, we explored how to make delicious cottage cheese cheesecake cups. We covered essential ingredients, step-by-step instructions, and tips for the best results. You learned about storage and common questions, too.
Embrace your creativity with flavor variations and unique toppings. These cheesecake cups are fun and easy for anyone to make. Enjoy sharing them with friends and family or as a sweet treat for yourself. Happy baking!


