Skip to content
DisclaimerTerms Of UseGDPR PolicyCookie Policy

Foodish Talk

  • Home
  • Drinks
  • Appetizers
  • Dinner
  • Dessert
  • About
  • Contact
  • Privacy Policy
DisclaimerTerms Of UseGDPR PolicyCookie Policy

Ava

- Fresh carrots - Honey - Olive oil - Garlic - Rosemary - Salt and pepper - Sesame seeds When making honey garlic roasted carrots, I focus on fresh carrots as the main ingredient. They are sweet, crunchy, and colorful. Choose carrots that are firm and vibrant. Next, I use honey to add a rich sweetness. It helps the carrots caramelize in the oven. Olive oil is key too. It helps the honey stick and adds a nice flavor. For additional seasonings, I always include garlic. Fresh garlic gives a strong, savory taste. Rosemary adds a wonderful herbal note. I usually use fresh rosemary, but dried works too. Don't forget salt and pepper. They balance the sweetness and enhance the flavors. If I want to make the dish look even better, I sprinkle sesame seeds on top. They add a nice crunch and extra flavor. You can find the full recipe for honey garlic roasted carrots above for all the details on how to prepare this simple yet tasty dish. Start with fresh carrots. Peel them first, then cut them into sticks. Aim for uniform sizes to ensure even cooking. Gather all your ingredients now. You’ll need honey, olive oil, garlic, rosemary, salt, and black pepper. Having everything ready makes cooking smooth and fun. In a large bowl, combine the honey and olive oil. Add minced garlic, chopped rosemary, salt, and black pepper. Mix well until everything blends nicely. This mixture is key to the dish. It adds sweetness and flavor to the carrots. Now, add the carrot sticks to the bowl. Toss them well to coat each piece in the honey-garlic mixture. Next, spread the coated carrots on a baking sheet. Make sure they are in a single layer. This helps them roast evenly. Preheat your oven to 425°F (220°C). Roast the carrots for 25-30 minutes. Shake the pan halfway through to help with even cooking. Check for doneness by poking a carrot with a fork. They should be tender and caramelized. Once they are done, take them out and let them cool slightly. For the full recipe, make sure to follow the steps above carefully to enjoy delicious honey garlic roasted carrots. To get the best roasted carrots, start with the right oven temperature. Set your oven to 425°F (220°C). This high heat helps the carrots caramelize. It brings out their natural sweetness. Roast them for 25-30 minutes. Halfway through, shake the pan. This helps them cook evenly and avoid sticking. Want to elevate the taste? Consider adding spices or herbs. A pinch of paprika gives warmth. Fresh thyme adds a nice touch. If you like it sweet, adjust the honey. Add more for a sweeter flavor or less for a more savory bite. Pair honey garlic roasted carrots with many dishes. They go well with grilled chicken or baked fish. For a vegetarian meal, serve them with quinoa or lentils. Presentation matters, too! Arrange the carrots on a platter. Sprinkle sesame seeds on top for a lovely finish. This makes your dish pop and look appealing. For the full recipe, check out the detailed instructions. {{image_2}} You can use many types of carrots for this dish. - Rainbow carrots: These carrots come in purple, yellow, and orange. They add color and fun to your meal. Their sweet flavors work well with honey and garlic. - Baby carrots: These are small and tender. They cook fast and are easy to eat. You do not need to cut them, just coat and roast. If you want to change the sweetness, try these options. - Maple syrup: This syrup has a rich, deep flavor. It adds a unique twist to the dish. Use the same amount as honey. - Agave nectar: This is a light syrup that is sweeter than honey. It mixes well with the garlic and adds a nice taste. To add a new twist, try mixing in bold flavors. - Adding citrus elements: Squeeze fresh lemon or orange juice over the carrots. This brightens the dish and adds freshness. - Incorporating heat with red pepper flakes: A pinch of red pepper flakes can add spice. This creates a fun contrast to the sweet honey and garlic. For the full recipe, check [Full Recipe]. To keep your honey garlic roasted carrots fresh, place them in the fridge. Use an airtight container for best results. They will stay good for about three to four days. After that, the taste and texture may fade. You can freeze roasted carrots for later use. First, let them cool completely. Then, spread them in a single layer on a baking sheet. Freeze until solid, about an hour. After that, transfer the carrots to a freezer bag. They can last for up to three months in the freezer. When it’s time to eat your frozen carrots, you have two options: oven or microwave. For the oven, preheat it to 375°F (190°C). Spread the carrots on a baking sheet and heat for about 15-20 minutes. This method keeps them crispy and tasty. If you use the microwave, place them in a microwave-safe dish. Heat them in short bursts, about 1-2 minutes at a time. Stir between heats. This method is fast but may make them a bit soft. Aim to keep their flavor and texture intact while reheating. For the full recipe, check the main article. Honey garlic roasted carrots take about 25-30 minutes at 425°F (220°C). If you cut the carrots into larger pieces, they may need more time. For smaller pieces, check them at 20 minutes. Always test with a fork to see if they are tender. Yes, you can prepare the carrots in advance. Peel and cut them a day before. Store the carrot sticks in water in the fridge. You can also mix the honey garlic sauce ahead of time. Just keep it in a sealed jar until you're ready to use it. These carrots pair well with many dishes. Try serving them with grilled chicken or baked salmon. They also work well with quinoa or a fresh salad. For a vegetarian meal, serve them with lentils or chickpeas. This recipe is easy to adapt. To make it gluten-free, ensure your honey is pure and check for any additives. For a vegan option, simply replace honey with maple syrup or agave nectar. This keeps the dish sweet and delicious. In this post, we explored how to make delicious honey garlic roasted carrots. We covered main ingredients like fresh carrots, honey, and olive oil. You learned the step-by-step process, tips for perfect roasting, and variations to try. Remember, these carrots can fit into many meal plans. They pair well with various dishes and are easy to adapt. Now you have the tools to make this tasty side. Enjoy experimenting with flavors and have fun in the kitchen!

Honey Garlic Roasted Carrots Flavorful and Simple Dish

Are you ready to elevate your side dish game? Honey Garlic Roasted Carrots are a tasty and easy way to

To make this delicious avocado toast with poached egg, gather these simple ingredients: - 2 slices of whole grain bread - 1 large ripe avocado - 2 large eggs - 1 tablespoon lemon juice - 1/4 teaspoon garlic powder - 1/4 teaspoon red chili flakes - Salt and pepper to taste - Fresh parsley or cilantro, chopped for garnish - Olive oil for drizzling You can easily swap ingredients if needed. Here are some ideas: - Use sourdough or rye bread instead of whole grain. - If you don't like avocado, try hummus or ricotta. - Replace eggs with tofu for a vegan option. - Use lime juice instead of lemon for a different taste. - Swap garlic powder with onion powder for an extra kick. This dish is both tasty and nutritious. Here’s a quick breakdown: - Each serving has about 300 calories. - You get healthy fats from the avocado. - The eggs offer protein and vitamins. - Whole grain bread adds fiber to your diet. You can enjoy a well-rounded meal that fuels your day. Want more details? Check out the Full Recipe for specifics! Start by toasting two slices of whole grain bread. Use a toaster or a pan. Toast until the bread is golden and crispy. This gives a nice crunch to your dish. A sturdy base is key for holding the avocado. Next, grab a ripe avocado. Cut it in half and remove the pit. Scoop the flesh into a bowl. Use a fork to mash it. You want it creamy but still a bit chunky. Add one tablespoon of lemon juice to keep it bright. Sprinkle in garlic powder, salt, and pepper. This will bring out the avocado's flavor. To poach the eggs, fill a medium saucepan with water. Bring it to a gentle simmer. You can add a splash of vinegar if you like. Crack each egg into a small bowl. Gently slide them into the water one at a time. Cook for 3 to 4 minutes. The whites should be set, but the yolks stay runny. When they are done, use a slotted spoon to take them out. Place them on a paper towel to drain. Now you have all the parts ready for your avocado toast with poached egg. For the full recipe, check the earlier section. To poach eggs well, start with fresh eggs. Fresh eggs hold their shape better. Use a pot with simmering water. Adding a splash of vinegar helps the whites stay together. Crack the egg into a small bowl first. This makes it easier to slide in. Gently lower the egg into the water. Cook for 3-4 minutes for a runny yolk. Use a slotted spoon to lift the egg out. Place it on a paper towel to dry. To make your avocado shine, start with a ripe one. The riper, the creamier! Mash the avocado with a fork. Mix in lemon juice for zing. Garlic powder adds depth. A pinch of salt brings out the taste. Red chili flakes give a nice kick. Feel free to add herbs like cilantro. This makes your avocado toast even more tasty. For great toast, choose whole grain bread. Toast in a toaster or on a skillet. Aim for a golden, crispy finish. This adds texture to your meal. If using a skillet, drizzle a little olive oil on the bread. This adds flavor and helps with browning. Toasting well is key to a great base for your avocado. You want it strong enough to hold the toppings without getting soggy. For the full recipe, check out the Avocado Toast with Poached Egg section. {{image_2}} You can switch up the flavors in your avocado toast. Here are some tasty ideas: - Feta and Sun-Dried Tomatoes: Crumble feta cheese on top. Add chopped sun-dried tomatoes for a punch. - Smoked Salmon: Place slices of smoked salmon over the avocado. It adds savory depth. - Hummus and Cucumbers: Spread a layer of hummus before the avocado. Top with cucumber slices for crunch. These combos make each bite exciting and unique. The bread you choose can change how your toast tastes. Here are some great options: - Sourdough: Its tangy flavor pairs well with creamy avocado. - Rye Bread: This adds a nutty taste that complements the dish. - Ciabatta: This bread has a nice crust. It gives a good crunch to your toast. Experiment with these breads to find your favorite. Adding toppings can make your avocado toast even better. Consider these: - Cherry Tomatoes: Sliced cherry tomatoes add sweetness and color. - Radishes: Thinly sliced radishes give a peppery crunch. - Microgreens: These tiny greens add freshness and a pop of flavor. These toppings can enhance your dish and make it more fun to eat. For the full recipe, check out the earlier section. To store leftover avocado, sprinkle it with lemon juice. This helps keep it fresh. Place the avocado in an airtight container. Seal it tightly to prevent air from getting in. Use it within one day for the best taste. If you see browning, just scrape it off before using. Storing toast is simple. If you have leftover toast, let it cool completely. Place it in an airtight container. Keep it at room temperature for one day. For longer storage, freeze the toast. Wrap each slice in plastic wrap and place it in a freezer bag. It can last for up to three months. To reheat toast, use a toaster or an oven. For a toaster, just pop it in until warm. If you use an oven, preheat to 350°F (175°C). Place the toast on a baking sheet for about 5-7 minutes. Keep an eye on it to avoid burning. After reheating, top with fresh avocado and a poached egg. For the full recipe, check out the detailed instructions I provided earlier. Yes, you can make avocado toast ahead of time, but it's best to eat it fresh. If you need to prepare it early, keep the avocado separate. You can mash the avocado and add lemon juice to slow browning. Store it in an airtight container in the fridge. Toast the bread just before serving. This way, the toast stays crispy and the avocado stays green. If you want to skip the eggs, try these options: - Sliced tomatoes for freshness. - Crumbled feta cheese for a creamy texture. - Cooked chickpeas for protein. - Hummus for a flavor boost. These choices keep your toast tasty and add more nutrients. Yes, avocado toast is a healthy choice. It offers healthy fats from the avocado. Whole grain bread provides fiber, which helps digestion. The dish is low in sugar and high in vitamins. You can also add toppings like tomatoes or greens for extra nutrients. Overall, it’s a balanced meal that’s good for your body. For the full recipe, check out the section above. This guide covered all you need for great avocado toast. We discussed key ingredients, step-by-step prep, and useful tips. You can switch up flavors and store leftovers easily. Avocado toast is a simple, healthy meal. With practice, you can make it better each time. Enjoy trying new flavors and making it your own!

Avocado Toast with Poached Egg Simple and Tasty Dish

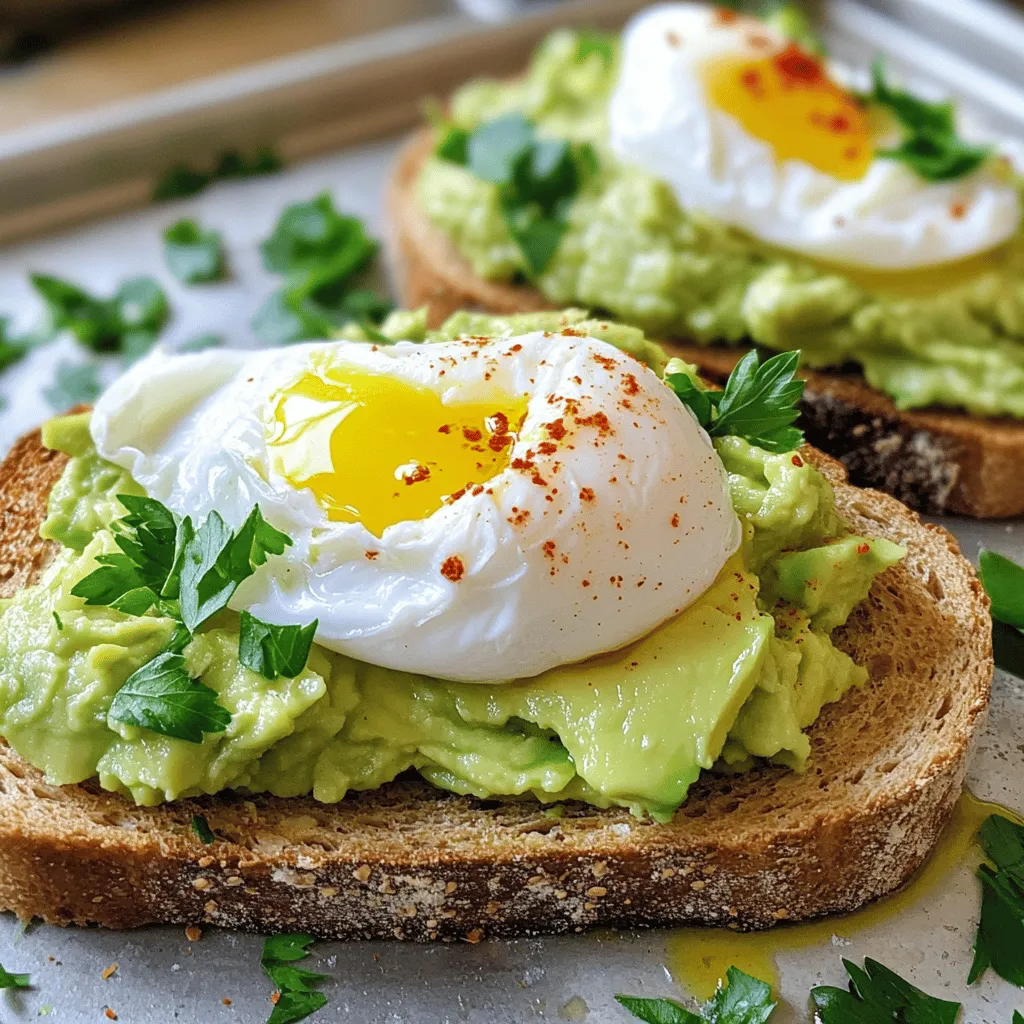
Are you ready to enjoy a simple and tasty dish? Avocado toast with a poached egg is a perfect meal

To make creamy tomato spinach pasta, you need a few key items: - 8 oz (225g) pasta (penne or fettuccine) - 2 cups fresh spinach, washed and chopped - 1 cup cherry tomatoes, halved - 1 cup heavy cream - 1 tablespoon olive oil - 2 cloves garlic, minced - 1 teaspoon Italian seasoning - ½ teaspoon red pepper flakes (optional) - Salt and pepper to taste - Grated Parmesan cheese for serving - Fresh basil leaves for garnish These ingredients come together to create a rich and tasty dish. The pasta provides the base, while the heavy cream adds a silky texture. Fresh spinach and cherry tomatoes bring color and flavor. You can easily adjust this recipe to suit your taste. Some optional ingredients include: - Fresh herbs like parsley or oregano - Sun-dried tomatoes for a deeper flavor - Cream cheese or ricotta for extra creaminess - Lemon juice for brightness - Mixed vegetables like bell peppers or zucchini Feel free to mix and match based on what you have at home. This flexibility makes the dish even more enjoyable. Garnishes can elevate your dish. Here are some great options: - Grated Parmesan cheese for a savory kick - Fresh basil leaves for a burst of flavor - Crushed red pepper for extra heat - A drizzle of olive oil for richness Garnishing not only makes your plate look beautiful but also adds layers of taste. Enjoy your creamy tomato spinach pasta with these simple touches! For the full recipe, refer to the earlier section. Start by boiling water in a large pot. Add a pinch of salt to the water. When it boils, add 8 oz of pasta. I like penne or fettuccine for this dish. Cook the pasta according to the package instructions until it is al dente. This usually takes about 8 to 10 minutes. Once done, drain the pasta. Don’t forget to save about ½ cup of the pasta water. This will help later. Grab a large skillet and place it on medium heat. Pour in 1 tablespoon of olive oil. Wait until the oil is hot, then add 2 cloves of minced garlic. Cook the garlic for about 30 seconds. You want it to smell nice, not burn. Next, add 1 cup of halved cherry tomatoes. Cook these for 3 to 5 minutes. You want them to soften a bit. Now, lower the heat and pour in 1 cup of heavy cream. Stir everything together. Then add 1 teaspoon of Italian seasoning and, if you like a kick, ½ teaspoon of red pepper flakes. Let this simmer for about 2 to 3 minutes. This helps the sauce thicken a little. Add the 2 cups of fresh spinach to the skillet. Stir until the spinach wilts, which takes about 2 minutes. Now, it’s time to bring in the pasta. Toss the cooked pasta into the skillet with the sauce. Mix it all well. If the sauce seems too thick, add some of that reserved pasta water. Keep adding until you reach your desired creaminess. Finally, taste the dish and adjust the salt and pepper as needed. Serve it hot, topped with grated Parmesan cheese and fresh basil leaves if you want. For the full recipe, check the section above. Enjoy your creamy tomato spinach pasta! To get the perfect sauce, focus on the cream. If it’s too thick, add some reserved pasta water. This will help to loosen it and create a creamy texture. If your sauce is too thin, let it cook a bit longer. This way, it will thicken up nicely. Stir the sauce often while it cooks to prevent sticking. You want it to coat the pasta well. You can easily change ingredients to fit your diet. For a lighter option, use half-and-half instead of heavy cream. This keeps the creaminess but lowers fat. If you're vegan, swap the heavy cream for coconut milk. This adds a nice flavor too. For gluten-free diets, choose gluten-free pasta. There are many good options available. Always check the labels to ensure they meet your needs. This dish pairs well with a fresh salad. A simple green salad with lemon vinaigrette balances the rich sauce. You can also serve garlic bread on the side. It’s perfect for dipping! For a fancy touch, add grilled chicken or shrimp on top. This adds protein and makes the meal more filling. Don't forget to sprinkle extra Parmesan cheese on top for added flavor. For the full recipe, check out the complete steps and enjoy making this tasty dish! {{image_2}} To make a vegan version, swap the heavy cream for coconut milk or cashew cream. Both add richness without dairy. Use nutritional yeast instead of Parmesan for flavor. You can also add some vegan cheese for a cheesy taste. This version still tastes great and keeps the creamy texture. If you need a gluten-free option, choose gluten-free pasta. Many brands offer tasty alternatives made from rice or chickpeas. They cook similarly to regular pasta. Just follow the package directions. You can enjoy the same creamy sauce with these gluten-free options. It’s a simple swap for a gluten-free meal. For extra protein, add cooked chicken or shrimp. If using chicken, grill or sauté pieces until cooked through. For shrimp, sauté them in the same skillet for about 3-4 minutes. Once they are pink and opaque, mix them into the pasta. This adds heartiness and makes the dish even more filling. You can find the full recipe above to guide you through each step. After you enjoy your creamy tomato spinach pasta, store leftovers in an airtight container. This keeps moisture in and prevents the pasta from drying out. Place it in the fridge. It will stay fresh for up to three days. If you want to keep it longer, freezing is a great option. To reheat, use the stove or microwave. For the stove, add the pasta to a pan. You may need to add a splash of water or cream to help it heat evenly. Stir gently until hot. If using a microwave, cover the dish and heat in short bursts. Stop to stir every minute. This way, it warms up without drying out. If you want to freeze your creamy tomato spinach pasta, let it cool first. Place it in a freezer-safe container, leaving some space at the top. The sauce may expand as it freezes. It can last for up to three months in the freezer. When you are ready to eat it, thaw it overnight in the fridge before reheating. This keeps the flavor and texture nice. For the full recipe, check the earlier sections. Creamy tomato spinach pasta lasts about 3 to 5 days in the refrigerator. Make sure to store it in an airtight container. It is best to let it cool before sealing. This way, you keep the flavor fresh for your next meal. Yes, you can make creamy tomato spinach pasta ahead of time. Cook the pasta and sauce separately. Combine them just before serving. This keeps the pasta from getting soggy. You can store each part in the fridge for up to 5 days. I recommend using penne or fettuccine for this recipe. Penne has ridges that hold the sauce well. Fettuccine provides a nice, creamy coating. You can also use gluten-free pasta if you prefer. Just be sure to cook it according to package instructions. If you want more ideas, check the Full Recipe for variations! This blog post explored making creamy tomato spinach pasta. We discussed key ingredients, optional choices, and tasty garnishes. You learned how to prepare pasta, cook the sauce, and combine everything perfectly. I shared tips for sauce consistency and ingredient swaps for different diets. Plus, we covered variations like vegan options and protein choices. To sum up, you can enjoy this dish in many ways. It’s simple, delicious, and versatile. Try it today to see how great it can be!

Creamy Tomato Spinach Pasta Tasty and Easy Recipe

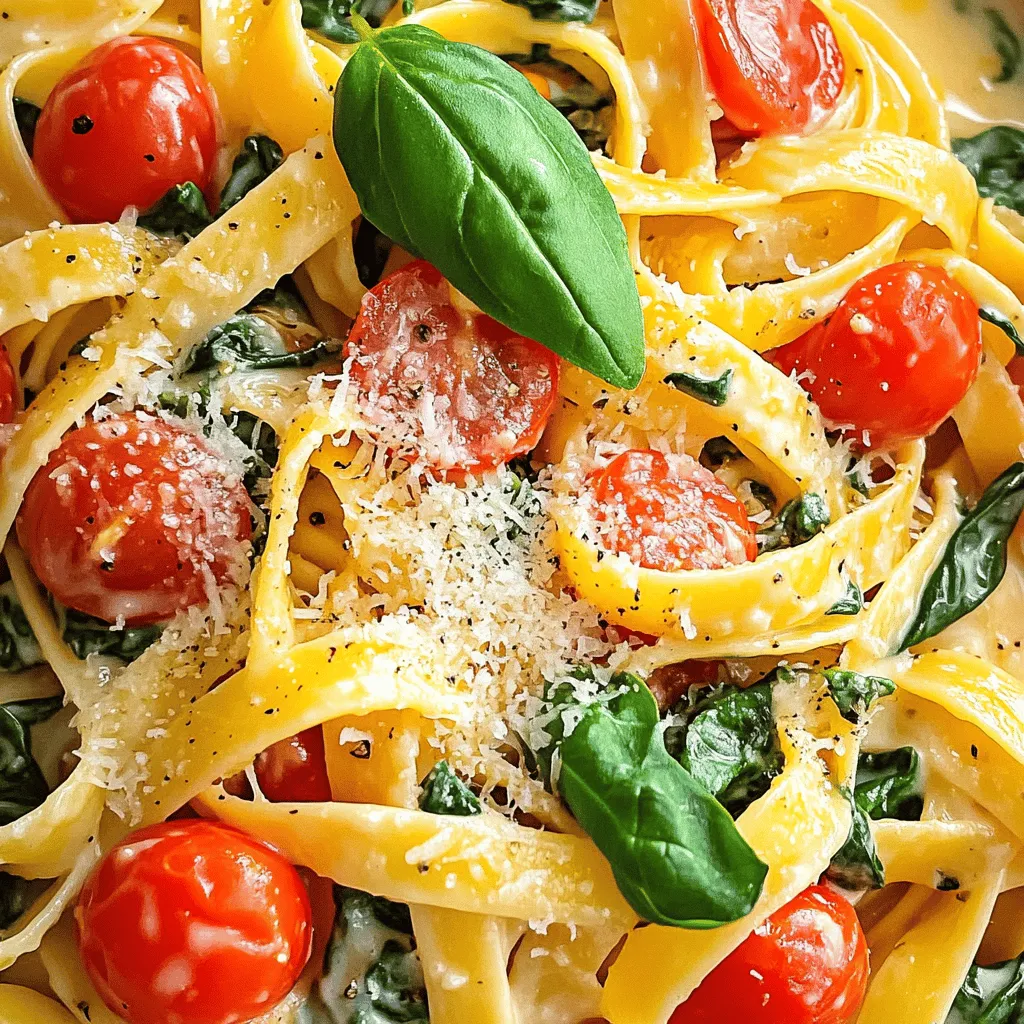
Looking for a quick and tasty meal? This Creamy Tomato Spinach Pasta recipe is your answer! With simple ingredients and

- 2 ripe avocados - 1/3 cup unsweetened cocoa powder - 1/4 cup pure maple syrup - 1/4 cup almond milk (or any non-dairy milk) - 1 teaspoon vanilla extract - A pinch of sea salt - Dark chocolate shavings and fresh berries for garnish The key to making a smooth and tasty chocolate avocado mousse starts with the right ingredients. Each one plays a big role in flavor and texture. For instance, ripe avocados give the mousse its creamy base. You want them soft and fresh for the best results. Cocoa powder adds the rich chocolate taste that makes this dessert a hit. Maple syrup brings sweetness. It also adds a nice depth. Almond milk keeps the mousse light and dairy-free, but you can choose any non-dairy milk you like. Vanilla extract enhances the overall flavor. Just a small pinch of sea salt balances the sweetness and brings out all the flavors. - Calories per serving: About 150 calories - Macros: 10g fats, 15g carbs, 2g protein Avocados are a star in this recipe. They are packed with healthy fats, vitamins, and minerals. These fats help you feel full and satisfied. They also support heart health. The fiber in avocados aids digestion. This mousse is not just a treat; it's genuinely good for you. Using the Full Recipe will help you create this delightful dessert in just a few simple steps. Enjoy this creamy and healthy chocolate avocado mousse anytime you want a guilt-free dessert! 1. Start by cutting the avocados in half. 2. Remove the pit carefully. 3. Scoop the green flesh into a blender. 4. Next, add the unsweetened cocoa powder. 5. Pour in the pure maple syrup. 6. Add the almond milk and vanilla extract. 7. Finally, sprinkle in a pinch of sea salt. 1. Blend everything on high speed. 2. Stop to scrape down the sides as needed. 3. Blend until you get a smooth, creamy texture. 4. Taste the mousse. If it needs more sweetness, add extra maple syrup. 5. Blend again to mix in the syrup. 1. Spoon the mousse into serving bowls. 2. Cover and chill for at least 30 minutes. 3. Before serving, top each bowl with dark chocolate shavings. 4. Add fresh berries for a colorful garnish. This mousse is rich and creamy, making it a perfect treat. For the full recipe, check out the details above. To get that smooth and creamy mousse, use ripe avocados. They blend better and provide a richer taste. Cut the avocados in half, remove the pit, and scoop the flesh into your blender. For your blender, I suggest a high-speed model. Brands like Vitamix or Ninja work well. If you use a food processor, ensure it has a strong motor to blend everything evenly. Blend until the mixture is silky. Stop to scrape down the sides and blend again. This helps mix all the ingredients. You can add some extra ingredients to boost the flavor. A pinch of cinnamon or a tablespoon of almond butter can add warmth and depth. For a bit of zing, try adding a splash of orange juice or zest. Adjusting sweetness is easy. After blending, taste the mousse. If you want it sweeter, add more maple syrup. Blend again to mix it in well. Presentation is key to impressing your guests. Serve the mousse in clear cups. This lets the rich, dark color shine. You can also layer it with fresh berries for a pop of color. When garnishing, use dark chocolate shavings on top. A sprig of mint adds freshness and looks great. For a fun twist, drizzle some extra maple syrup on top before serving. For the full recipe, check out the complete guide. {{image_2}} You can easily make this mousse vegan. Instead of honey or regular syrup, use maple syrup. It adds sweetness without animal products. For a creamy texture, choose unsweetened almond milk or coconut milk. Both options work well and keep the mousse rich. If you want a sugar-free mousse, use sugar-free sweeteners. Stevia or erythritol are great choices. They blend well and provide the sweetness you desire. Just reduce the amount since these sweeteners can be much sweeter than sugar. Adjust to taste as you blend. To spice things up, add a pinch of cinnamon or chili powder. These spices give a warm kick to the mousse. You can also try different extracts like almond or orange. They add unique flavors and can change the mousse experience. Mix and match to find your favorite! Store your Chocolate Avocado Mousse in the fridge. Use airtight containers to keep it fresh. Glass jars or plastic containers with tight lids work well. Make sure to cover the mousse to prevent it from absorbing any odors. This way, your dessert stays tasty and creamy for longer. In the fridge, your mousse lasts about 3 to 5 days. Always check for signs of spoilage. If the mousse smells off or has an unusual texture, it’s best to toss it. Fresh mousse should be smooth and rich without any browning on top. You can freeze Chocolate Avocado Mousse, but it may change texture. To freeze, place it in airtight containers. Leave some space for expansion. When you’re ready to serve, thaw it in the fridge overnight. Stir well before serving to bring back its creamy consistency. Enjoy your dessert anytime! Yes, Chocolate Avocado Mousse is healthy! The main ingredients pack a nutritional punch. Avocados are full of healthy fats, fiber, and vitamins. They help keep your heart healthy and your skin glowing. Cocoa powder is rich in antioxidants, which are good for your body. It can reduce inflammation and improve mood. The maple syrup adds sweetness but also contains some minerals. So, this dessert is not just tasty; it’s good for you, too! Absolutely! You can make this mousse ahead of time. It tastes even better after chilling. Just prepare it as per the Full Recipe and place it in the fridge. It can sit for up to two days. This makes it a great option for parties or busy days. Just remember to cover it well. This keeps it fresh and tasty. If you want to switch up the sweetener, you have options! Honey works great and adds a nice flavor. Agave syrup is another choice and is sweeter than maple syrup. For a sugar-free option, try stevia or erythritol. Just remember, these might change the taste a bit. Always taste and adjust the sweetness as needed! This blog post covers how to make delicious chocolate avocado mousse. You learned about the key ingredients like ripe avocados and cocoa powder. I shared preparation steps and tips for a smooth texture. You also discovered variations for vegan and sugar-free options. Finally, remember this mousse is healthy and easy to make. Store it properly to enjoy later. Get creative with flavors and enjoy your tasty dessert!

Chocolate Avocado Mousse Creamy Healthy Dessert

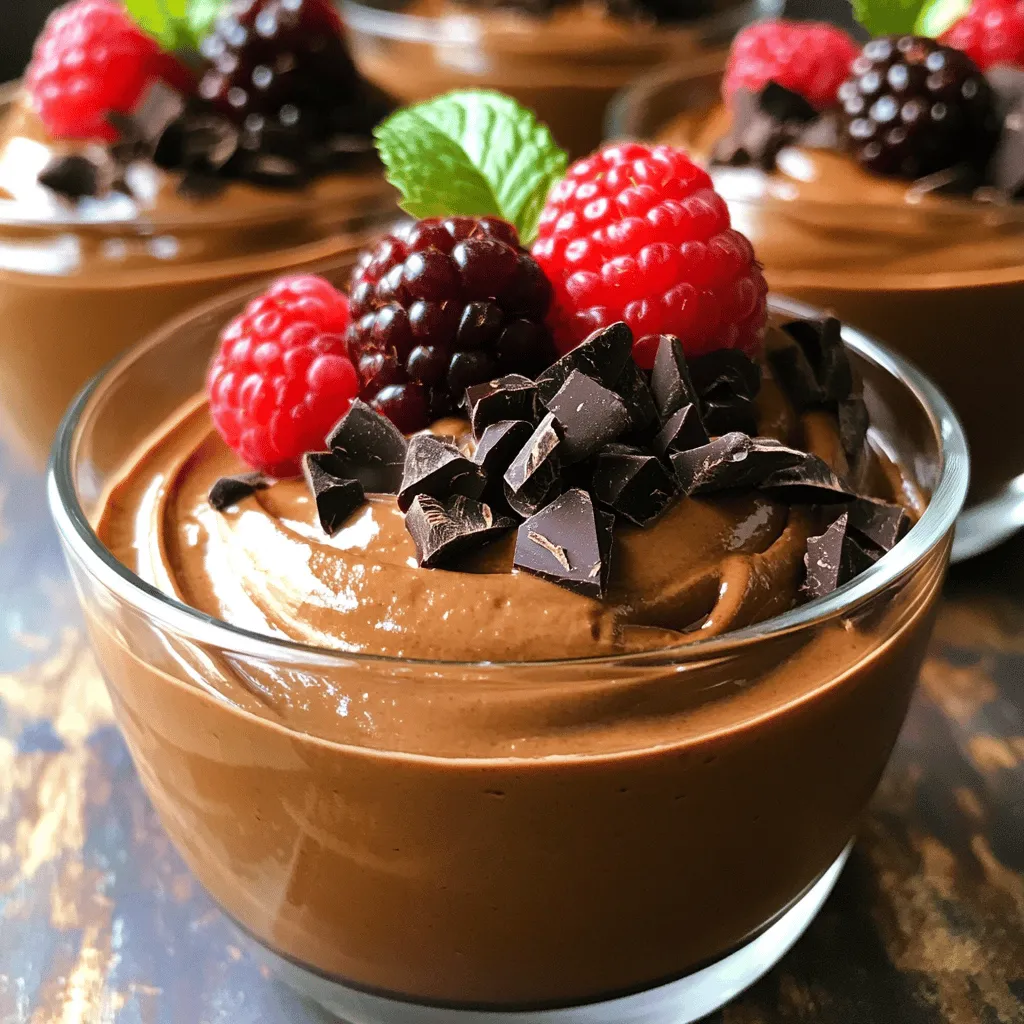
Are you ready for a dessert that’s both creamy and healthy? This Chocolate Avocado Mousse is a game-changer! Made with

To make the Mediterranean Chickpea Salad, you need fresh and bright ingredients. Here’s what you’ll need: - 1 can (15 oz) chickpeas, rinsed and drained - 1 cup cherry tomatoes, halved - 1 cucumber, diced - 1 red bell pepper, diced - 1/4 red onion, finely chopped - 1/2 cup Kalamata olives, pitted and halved - 1/4 cup feta cheese, crumbled - 2 tablespoons fresh parsley, chopped - 2 tablespoons olive oil - 1 lemon, juiced - 1 teaspoon dried oregano - Salt and pepper to taste These ingredients bring a mix of flavors and textures. The chickpeas offer protein and fiber. Cherry tomatoes add sweetness and color. Cucumbers bring a nice crunch, while red bell peppers add a bit of spice. Red onions give a sharp taste, and Kalamata olives add a briny bite. Feta cheese provides creaminess, and parsley adds freshness. Olive oil and lemon juice create a zesty dressing that ties everything together. For more details on how to prepare this delicious dish, check out the Full Recipe. 1. Start by adding all the ingredients to a large mixing bowl. This includes the chickpeas, cherry tomatoes, cucumber, red bell pepper, red onion, and Kalamata olives. Each ingredient adds flavor and color to the salad. 2. Next, take a separate small bowl and whisk together the dressing ingredients. In this bowl, combine olive oil, lemon juice, dried oregano, salt, and pepper. Whisk until everything blends well. 3. Now, pour the dressing over your salad mixture. Toss gently to coat all the ingredients evenly. This step is key to ensuring every bite is flavorful. 1. Once the salad is mixed, it’s time to add the crumbled feta cheese and chopped parsley. Toss lightly to combine. Be careful not to break the feta too much; we want those lovely chunks. 2. Taste the salad and adjust the seasoning if needed. You can add more lemon juice or olive oil to boost the flavor. Trust your taste buds! 3. Allow the salad to sit for at least 15 minutes. This lets the flavors meld together. The wait is worth it! For the complete recipe, check out the Full Recipe section. For a beautiful presentation, serve the Mediterranean Chickpea Salad in a large bowl. You can also plate it individually for guests. Adding fresh parsley on top makes it pop! A lemon wedge on the side adds color and a fun touch. Drizzling balsamic glaze over the salad gives it a fancy look and a sweet taste. The best serving temperature for this salad is cool or at room temperature. This keeps the flavors fresh and bright. Let it sit for about 15 minutes before serving. The flavors will blend and taste even better. Want to add a bit more tanginess? You can squeeze in more lemon juice. This gives the salad a zesty kick. If you prefer it spicy, add red pepper flakes or a dash of hot sauce. This will wake up your taste buds. For extra texture, try adding nuts like almonds or walnuts. These will give a nice crunch. You can also include avocado for creaminess. This balances the crisp veggies and makes the salad even more satisfying. You can find the Full Recipe to make this delightful dish easily! {{image_2}} You can easily change the chickpeas in this salad. Try black beans or cannellini beans for a new taste. If you want protein, add grilled chicken, tuna, or tofu. These swaps keep the dish healthy and fun. You can also mix in different veggies. Try diced carrots, radishes, or even corn. Each vegetable adds a unique crunch and flavor. For a twist, use roasted vegetables like zucchini or eggplant. If you're going vegan, switch the feta cheese with avocado or a nut-based cheese. These options keep the creamy texture while skipping dairy. You can also leave out the cheese entirely for a lighter salad. The dressing can change the whole feel of the salad. You can use balsamic vinegar for a sweet touch or red wine vinegar for a tangy taste. Olive oil is a great base, but you can mix in flavored oils too. Try garlic-infused or chili oil for an extra kick. To make a homemade vinaigrette, whisk together olive oil, vinegar, mustard, and honey. This mix gives a balanced flavor that pairs well with the salad. Adjust the ingredients to fit your taste. You can also add fun ingredients to the dressing. Toss in diced avocado for creaminess or chopped nuts for crunch. Both options make the salad more filling and exciting. To keep your Mediterranean Chickpea Salad fresh, follow these simple steps: - Store it in an airtight container. - Keep it in the fridge for up to three days. - Avoid adding dressing until ready to serve. For leftover salad, place it in a clean, sealed container. It’s best to eat it within three days. You can use glass or plastic containers that seal tightly. These work great to keep the salad crisp. Can you freeze this salad? No, it's not the best option for freezing. Freezing can change the texture of the veggies and chickpeas. If you want to freeze individual parts, you can freeze chickpeas or diced veggies separately. If you decide to freeze some, here’s how: - Place the ingredients in a freezer bag. - Remove as much air as possible. - Label the bag with the date. To thaw, place it in the fridge overnight. You can also run it under cold water. For best results, eat it fresh! How long does Mediterranean Chickpea Salad last in the fridge? Mediterranean Chickpea Salad lasts about three to five days in the fridge. Store it in an airtight container to keep it fresh. Can I make this salad in advance? Yes, you can make this salad in advance. It tastes even better after sitting for a bit. Just wait to add the feta cheese until you’re ready to serve. What are the health benefits of chickpeas? Chickpeas are packed with protein and fiber. They can help with digestion and keep you full. Plus, they are low in calories and high in vitamins. What to do if the salad is too salty? If the salad is too salty, add more diced cucumber or tomatoes. These will help balance the saltiness. You can also add a splash of lemon juice. How to fix a bland salad? To fix a bland salad, add more lemon juice or olive oil. A sprinkle of salt or pepper can also help boost the flavor. Adjusting for dietary restrictions If you have dietary restrictions, you can swap out the feta for a dairy-free cheese. You can also use gluten-free ingredients if needed. Just make sure to check all labels! For the complete recipe, check out the Full Recipe section. This article covered how to make a delicious Mediterranean Chickpea Salad. You learned about essential ingredients, step-by-step preparation, serving suggestions, and variations. I shared helpful tips for storage and common questions. Embrace this salad as a healthy, vibrant dish. Customize it to fit your taste. Enjoy the fresh flavors and great textures!

Mediterranean Chickpea Salad Fresh and Flavorful Meal

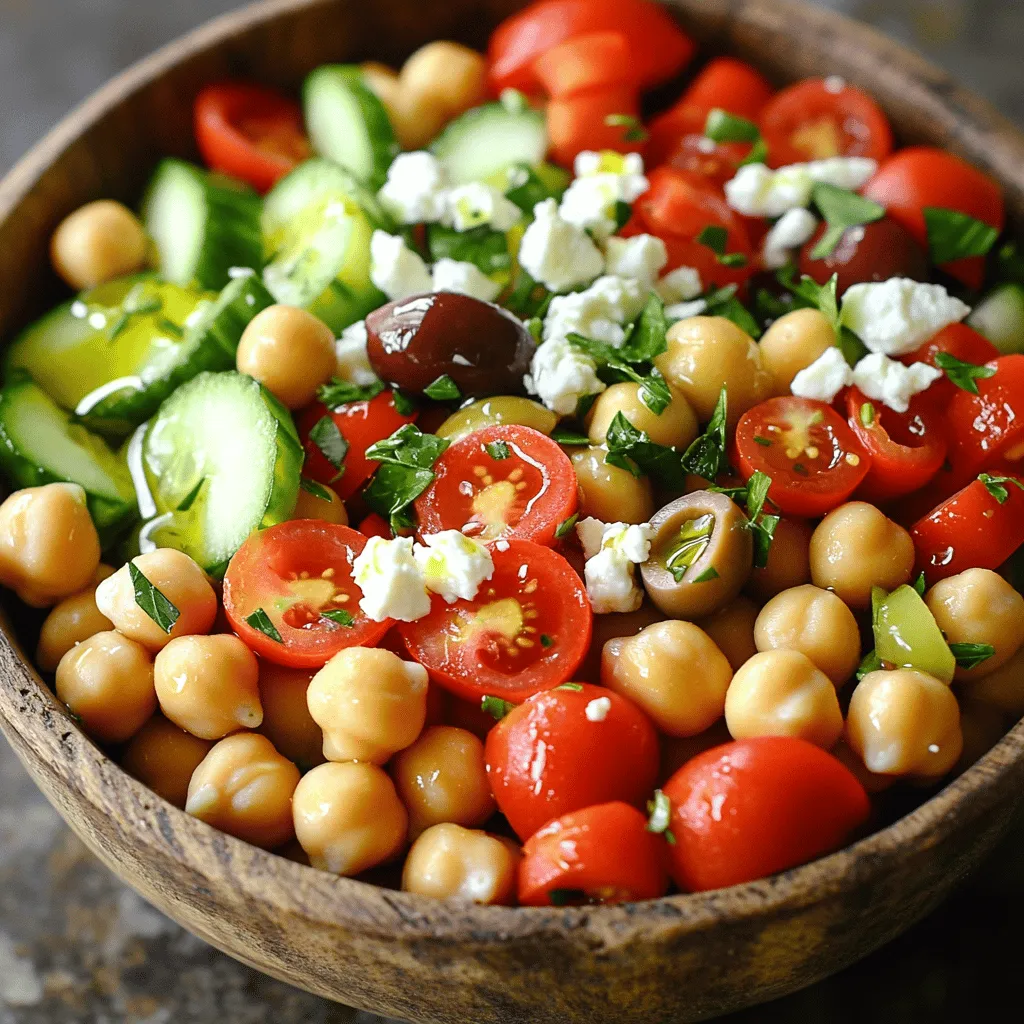
Looking for a meal that’s both fresh and packed with flavor? You’ve landed in the right place! This Mediterranean Chickpea

- 1 cup stone-ground grits - 4 cups chicken broth - 1 cup shredded sharp cheddar cheese - 1 cup milk - 1 pound shrimp, peeled and deveined - 1 bell pepper, diced (red or green) - 1 small onion, chopped - 2 cloves garlic, minced - 1 teaspoon smoked paprika - 1 teaspoon cayenne pepper (adjust to taste) - Salt and pepper, to taste - 2 tablespoons olive oil - 1 teaspoon fresh parsley, chopped (for garnish) When you gather your ingredients, think about where they come from. I love using fresh, local produce. This connects you with your food and makes it taste better. The stone-ground grits are key for a creamy base. They absorb flavors well and give a nice texture. The chicken broth adds depth. You can also use vegetable broth for a lighter touch. The sharp cheddar cheese brings a rich, tangy flavor. Make sure to use high-quality cheese for the best results. The shrimp is the star here. Using fresh shrimp maximizes taste, but frozen shrimp works too. Just thaw them properly. The spices, especially smoked paprika and cayenne, add warmth and a hint of smokiness. Adjust the spice level based on your taste. Fresh parsley at the end gives a pop of color and freshness. As you prepare, enjoy the process! Cooking is an art, and every ingredient plays a role. You can find the full recipe to guide you through making this delicious dish. - Calories per serving: Approximately 400-450 calories - Breakdown of macronutrients: - Carbohydrates: 45g - Protein: 25g - Fat: 15g Knowing the nutritional facts can help you plan meals better. This casserole is balanced with carbs, protein, and healthy fats. It's a hearty dish that can satisfy hunger while keeping you nourished. To start, pour four cups of chicken broth into a large saucepan. Bring it to a boil over medium heat. Once it boils, slowly stir in one cup of stone-ground grits. Reduce the heat to low. Cook the grits for about 20 to 25 minutes. Stir frequently to prevent clumping. The grits should thicken nicely during this time. Once thickened, mix in one cup of shredded sharp cheddar cheese and one cup of milk. Stir until creamy. Season with salt and pepper to your taste. Set this mixture aside for later. Next, grab a skillet and heat two tablespoons of olive oil over medium heat. Add one diced bell pepper, one small chopped onion, and two cloves of minced garlic. Sauté these until they soften, which takes about five to seven minutes. After that, toss in one pound of peeled and deveined shrimp. Sprinkle in one teaspoon of smoked paprika and one teaspoon of cayenne pepper. Cook the shrimp until they turn pink, which should take about three to four minutes. Once done, remove the skillet from the heat. Now it’s time to bring everything together. Take a large mixing bowl and combine the creamy cheese grits with the shrimp and vegetable mixture. Stir well to make sure everything is mixed evenly. Next, transfer this combined mixture to a greased 9x13 inch baking dish. Spread it out evenly. Preheat your oven to 350°F (175°C). Bake for 25 to 30 minutes until the top is golden and bubbly. After baking, let it cool for a few minutes. Then slice into squares and garnish with fresh parsley before serving. Enjoy your delicious shrimp and grits casserole! For the complete guide, check the Full Recipe. To make the best shrimp and grits casserole, you need creamy grits. Start by choosing stone-ground grits. They have more flavor and texture than instant or quick-cooking grits. The right choice makes a big difference. For cooking, bring chicken broth to a boil. Gradually stir in the grits. Reduce the heat to low and cook for about 20-25 minutes. Stir frequently to avoid lumps. The goal is a thick, smooth mixture. If they seem too thick, add a little more broth or milk. For shrimp, seasoning is key. I recommend using smoked paprika and cayenne pepper. They add depth and a slight kick. Feel free to adjust the cayenne to your taste. If you like it mild, use less. You can cook shrimp in different ways. Sautéing gives a nice sear and helps lock in flavor. Grilling adds a smoky touch, which is great for summer. Both methods work well, so choose what you prefer. Garnishes can elevate your dish. Fresh parsley adds color and a hint of freshness. You might also try a sprinkle of extra cheese or a dash of hot sauce for a kick. For side dishes, a simple green salad pairs well. You can also serve it with crusty bread to soak up any extra sauce. The combination of flavors will impress your guests. If you're ready to dive into the full recipe, check out the [Full Recipe]. {{image_2}} You can change the cheese and milk in this dish. Use cream cheese or a dairy-free milk like almond or oat milk. For cheese, try Monterey Jack or pepper jack for a spicy kick. If you want to switch the shrimp, consider using scallops or crawfish. These options bring new flavors and textures. They also cook quickly and add a nice seafood twist. To boost flavor, add spices or herbs. Thyme or basil can enhance the taste. You might also try adding some red pepper flakes for extra heat. Incorporate vegetables for color and nutrition. Spinach or diced tomatoes work well. They not only add flavor but also make the dish look more appealing. For gluten-free options, ensure your broth is gluten-free. Check the labels on all your ingredients. This will keep your dish safe and tasty. If you want a vegetarian version, skip the shrimp. Use mushrooms or zucchini instead. They will absorb flavors and add depth to your casserole. For the full recipe, check the details above. To store your leftover shrimp and grits casserole, let it cool completely. Transfer the casserole to an airtight container. You can keep it in the fridge for up to four days. This way, you can enjoy the dish multiple times. Just remember to check for any signs of spoilage before eating. If you want to keep your casserole for longer, freezing is a great option. Cut the casserole into portions before freezing. Wrap each piece tightly in plastic wrap, then place it in a freezer-safe bag. It will stay good for about three months. When you are ready to eat, take a piece out and thaw it overnight in the fridge. To reheat, place it in an oven at 350°F (175°C) until it's hot throughout. You can also use the microwave for a quicker option, but the oven gives a better texture. Enjoy your comfort food delight anytime! To make shrimp and grits casserole, start by cooking the grits. Boil chicken broth in a pot. Gradually stir in stone-ground grits. Cook on low heat until thick, about 20 to 25 minutes. Once thick, mix in cheese and milk until creamy. Meanwhile, sauté diced bell pepper, onion, and garlic in olive oil until soft. Add shrimp, smoked paprika, and cayenne pepper, cooking until shrimp turns pink. Mix the shrimp and veggie mix into the grits. Transfer to a greased baking dish and bake at 350°F for about 25 to 30 minutes. The top should be golden and bubbly when ready. For the full recipe, check out the earlier section. Yes, you can use frozen shrimp in this recipe. Frozen shrimp are convenient and save time. Just remember to thaw them before cooking. Place them in the fridge overnight or run them under cold water for a quick thaw. Fresh shrimp offer a slightly better taste and texture, but frozen shrimp will work great too. Just make sure to pat them dry before cooking. This will help the shrimp brown better. Shrimp and grits casserole pairs well with many sides. Try serving it with a crisp green salad. A light vinaigrette will balance the richness. You can also serve it with roasted vegetables for added color and nutrients. For drinks, a chilled white wine, like Sauvignon Blanc, complements the dish well. If you prefer non-alcoholic options, sweet tea is a classic Southern choice. This recipe blends rich flavors and creamy textures for a delicious dish. You learned how to make shrimp and grits, from prepping the ingredients to baking the casserole. Remember to adjust spices for your taste and try different veggies or seafood. Leftovers store well in the fridge or freezer, ensuring future meals are just as tasty. I hope you enjoy making this dish as much as I do. Happy cooking!

Savory Shrimp and Grits Casserole Comfort Food Delight

Are you ready to elevate your comfort food game? This Savory Shrimp and Grits Casserole is a blend of creamy

- 400g spaghetti - 6 cloves garlic, thinly sliced - 1/2 cup extra virgin olive oil - 1 teaspoon red pepper flakes - Zest and juice of 1 lemon - 1/4 cup fresh parsley, finely chopped - Salt, to taste - Parmesan cheese shavings for serving Spaghetti Aglio e Olio is a simple dish that shines with few ingredients. Each ingredient plays a key role in the flavor. I love how the garlic brings warmth, while olive oil adds richness. The red pepper flakes give a gentle heat. When you add lemon zest and juice, it brightens the dish, making it refreshing. Fresh parsley not only adds color but also a nice herbal touch. Parmesan cheese is optional, but it gives a creamy finish. You can adjust the salt to your taste, which makes this dish even better. For the full recipe, you can find all the steps to create this savory delight! - Bring salted water to a boil - Cook spaghetti until al dente Start by filling a large pot with water. Add a generous amount of salt. Bring the water to a boil. This step is key for flavor. Once boiling, add 400g of spaghetti. Stir the pasta to prevent it from sticking. Follow the package instructions for cooking time. You want it al dente—firm but not hard. Before draining, reserve 1 cup of that starchy pasta water. It will help the sauce later. - Heat olive oil over medium heat - Add garlic and sauté until golden brown In a large skillet, pour in 1/2 cup of extra virgin olive oil. Heat it over medium heat. Wait until the oil shimmers but does not smoke. Now, add 6 cloves of thinly sliced garlic. Sauté the garlic, stirring often for about 2-3 minutes. Keep an eye on it; we want it golden brown, not burnt. This garlic will be the heart of your dish. - Stir in red pepper flakes - Toss in the cooked spaghetti with the garlic oil mixture After the garlic is golden, stir in 1 teaspoon of red pepper flakes. This adds a nice kick. Sauté for another 30 seconds to release the flavor. Now, add the drained spaghetti to the skillet. Toss it well in the garlic oil mixture. If it looks dry, add some reserved pasta water a little at a time. Incorporate lemon zest and juice to brighten the dish. Finally, season with salt and toss in 1/4 cup of fresh chopped parsley. Your Spaghetti Aglio e Olio is ready to serve! For the full recipe, check out the complete guide. To make perfect spaghetti, cook it for about 8-10 minutes. This timing can vary by brand, so always check the package. You want it firm but not hard. To test for doneness, take a strand and bite it. It should be tender but still have a slight bite. Garlic can burn easily, which makes it bitter. To avoid this, sauté it on medium heat. Stir it often and watch for a golden color. This takes about 2-3 minutes. If it turns too dark, start over. Burnt garlic ruins the flavor. Lemon adds brightness to Spaghetti Aglio e Olio. Use both zest and juice for a fresh taste. Start with half a lemon, then taste. You can always add more! For spice, red pepper flakes give a nice kick. Adjust the amount to your heat preference. A little goes a long way. {{image_2}} You can make Spaghetti Aglio e Olio even heartier by adding proteins. Grilled chicken or shrimp works great. Simply cook them separately and toss them in with the pasta. You can also add sautéed vegetables. Spinach, zucchini, or bell peppers add color and nutrition. Just sauté them in the garlic oil before mixing them with the spaghetti. To switch things up, try different herbs. Fresh basil or thyme can add a new taste. Just chop them and mix them in at the end. You can also use various cheeses for extra flavor. A sprinkle of feta or a bit of goat cheese can change the whole dish. Experiment with what you like! If you need gluten-free options, there are great pasta choices. Look for gluten-free spaghetti made from rice or corn. Other shapes like penne or fusilli also work well with this recipe. They will still soak up the garlic oil and flavors nicely. Remember, the key is to enjoy your meal in a way that works for you. To keep your Spaghetti Aglio e Olio fresh, follow these steps: - Let the spaghetti cool down. - Place it in an airtight container. - Store it in the fridge for up to three days. Use clear containers so you can see what’s inside. When it's time to enjoy leftovers, you want to keep that great taste. Here’s how: - Use a skillet on low heat. - Add a splash of olive oil or pasta water. This helps keep the spaghetti moist. Stir gently to warm it through. Can you freeze Spaghetti Aglio e Olio? Yes, you can! Here’s how: - Cool it completely first. - Place it in a freezer-safe bag. - Squeeze out as much air as you can. To thaw, move it to the fridge overnight. Reheat gently in a skillet for the best results. Enjoy your meal again! Aglio e Olio means "garlic and oil" in Italian. This dish comes from Naples, Italy. It is simple yet full of flavor. The dish uses just a few key ingredients: spaghetti, garlic, olive oil, and red pepper flakes. This style of cooking shows how basic items can create magic. Yes, you can prepare this dish ahead of time. Cook the spaghetti and toss it with oil and garlic. Store it in an airtight container in the fridge. When you want to eat, simply reheat it on low heat. Add a splash of olive oil and a bit of pasta water to keep it moist. You can serve this dish with many sides. A fresh salad with greens and a light vinaigrette works well. Garlic bread is a classic choice too. For drinks, pair it with white wine or sparkling water. These flavors balance the dish nicely. Yes, this recipe is vegetarian. It contains no meat or animal products, making it a great choice for vegetarians. If you want to make it vegan, skip the Parmesan cheese. You can also add roasted vegetables for extra texture and taste. For the full recipe, check out [Full Recipe]. In this blog post, I covered how to make Spaghetti Aglio e Olio. We discussed the key ingredients like spaghetti, garlic, and olive oil. I shared step-by-step cooking instructions and tips for perfect texture and flavor. Variations included adding proteins and experimenting with herbs. Lastly, we looked at proper storage and reheating methods. This dish shines with simplicity. With a few tweaks, it can fit any taste. Give it a try and enjoy!

Spaghetti Aglio e Olio Simple and Savory Delight

Are you ready to whip up a simple yet delicious dish? Spaghetti Aglio e Olio is your answer! This classic

To make oven-baked chicken fajitas, you need some key ingredients. Here’s the list: - Chicken: boneless, skinless chicken breasts - Vegetables: red and yellow bell peppers, red onion - Seasonings: fajita seasoning, garlic powder, smoked paprika, salt, and pepper - Other Ingredients: olive oil and flour tortillas - Optional toppings: sour cream, guacamole, shredded cheese, fresh cilantro Each ingredient plays a role in creating the delicious, bold flavors of this dish. The chicken serves as the main protein, while the bell peppers and onions add sweetness and crunch. The seasonings give it that signature fajita taste. I love using fresh vegetables, as they bring color and nutrients. The olive oil helps everything cook evenly and adds richness. Don't forget the tortillas! They wrap all the tasty fillings perfectly. Feel free to customize with toppings. Adding sour cream or guacamole makes it even better. You can find the complete recipe details, including measurements, in the Full Recipe section. First, gather all your ingredients. You need: - 1 lb boneless, skinless chicken breasts - 1 red bell pepper - 1 yellow bell pepper - 1 red onion - 3 tablespoons olive oil - 2 tablespoons fajita seasoning - 1 teaspoon garlic powder - 1 teaspoon smoked paprika - Salt and pepper to taste - 8 small flour tortillas Start by slicing the chicken into thin strips. Next, slice the bell peppers and red onion. All pieces should be similar in size. This way, they cook evenly. Now, measure your seasonings. In a small bowl, mix the fajita seasoning, garlic powder, smoked paprika, salt, and pepper. Use this blend for great flavor. In a large mixing bowl, add the sliced chicken and vegetables. Drizzle the olive oil over them. Sprinkle your mixed seasonings on top. Now, it’s time to coat everything. Use your hands or a spoon to mix well. Make sure every piece of chicken and vegetable is covered in oil and spices. This step is key for flavor. Preheat your oven to 400°F (200°C). This is a crucial step. A hot oven helps cook the chicken and veggies right. Spread the coated mixture on a large baking sheet. Line it with parchment paper. This keeps things from sticking and makes cleanup easy. Bake in the oven for 20-25 minutes. Stir the mixture halfway through. This helps it cook evenly. To check if it’s done, cut a piece of chicken. It should be white inside, not pink. If it’s cooked, remove the sheet from the oven. Let everything rest for a couple of minutes before serving. You can warm the tortillas in a skillet while you wait. Enjoy your oven-baked chicken fajitas! For the full recipe, check the sections above. To get the best chicken, slice it into strips about half an inch thick. This thickness helps it cook evenly. Bake the chicken for 20 to 25 minutes at 400°F (200°C). To check if it's done, look for an internal temperature of 165°F (74°C). The chicken should be juicy and no longer pink inside. Want to kick up the flavor? Try adding spices like cumin, chili powder, or oregano. These spices add depth to your dish. For a fun twist, make your own fajita seasoning. Mix equal parts of chili powder, cumin, garlic powder, and onion powder. Add a pinch of salt for a tasty blend. Serve your fajitas in a fun way! Use a large platter and arrange the chicken and veggies in the center. Place warm tortillas on the side. Guests can build their own fajitas. Pair them with sides like Mexican rice or black beans. For drinks, try a refreshing limeade or a light beer. For the full recipe, check out the Oven-Baked Chicken Fajitas section above. {{image_2}} You can easily swap chicken for other proteins. Beef works well if you slice it thinly. Use flank steak or sirloin for best results. Shrimp adds a nice twist. Cook shrimp for just 10-15 minutes. Tofu is a great choice for a vegan option. Press and cube the tofu, then marinate it in the same seasonings. This keeps the flavors strong and tasty. To make this dish meat-free, use more vegetables. Zucchini, mushrooms, and corn add great flavor. Try adding black beans or chickpeas for protein. You can also use plant-based chicken for a closer taste. Just mix them with the same spices to keep it delicious. Experiment with different spice blends. Taco seasoning can give a fun twist. Try adding cumin or coriander for a new layer of flavor. For a smoky taste, use chipotle powder. Don’t forget to play with toppings. Try fresh salsa, pickled jalapeños, or diced avocado. Each adds a unique taste to your fajitas. For the full recipe, check the section above. To keep your leftover chicken fajitas fresh, place them in an airtight container. This helps avoid moisture loss. Store the container in the fridge. They can last up to three days. If you notice any excess liquid, drain it before sealing the container. This keeps your fajitas from getting soggy. Reheat your fajitas in the oven for the best results. Preheat your oven to 350°F (175°C). Place the fajitas on a baking sheet. Heat for about 10-15 minutes. Stir halfway through to ensure even warming. If you prefer the microwave, heat in 30-second bursts. This method can help keep the chicken juicy. If you want to save your chicken fajita ingredients for later, freezing is a great choice. Start by cooking the chicken and veggies as per the full recipe. Let them cool completely. Then, place them in a freezer-safe bag. Remove as much air as possible before sealing. You can freeze them for up to three months. When you're ready to eat, thaw them in the fridge overnight and reheat. Yes, you can use frozen chicken. Just be sure to thaw it first. Thawing helps cook the chicken evenly. You can do this in the fridge overnight or use the microwave. Once thawed, slice the chicken into thin strips before mixing with the veggies and seasonings. Bake the chicken fajitas for 20 to 25 minutes. This time ensures the chicken cooks through and the veggies become tender. Stir the mixture halfway through baking for even cooking. Always check the chicken's internal temperature. It should reach 165°F (75°C) for safe eating. Small flour tortillas work best for chicken fajitas. They are soft and pliable, making them easy to fold. You can also use corn tortillas for a gluten-free option. If you like a bit of crunch, try grilling or toasting the tortillas before serving. - Can I add more vegetables? Yes! Feel free to add zucchini, mushrooms, or corn for extra flavor. - Can I make this dish ahead of time? Yes, you can prep the ingredients a day before and store them in the fridge. - What toppings do you recommend? Try sour cream, guacamole, or fresh cilantro for added taste. You can also use shredded cheese for a creamy touch. For the full recipe, please check the details above! We covered all you need to know to make delicious chicken fajitas. From choosing the best ingredients to step-by-step instructions, you can create a tasty meal. Remember, you can customize flavors and protein options to fit your taste. Storing and reheating tips ensure you enjoy leftovers too. With a little creativity, you can serve these fajitas in style. Dive into your cooking adventure, and enjoy every bite of your homemade dish!

Oven-Baked Chicken Fajitas Simple and Flavorful Meal

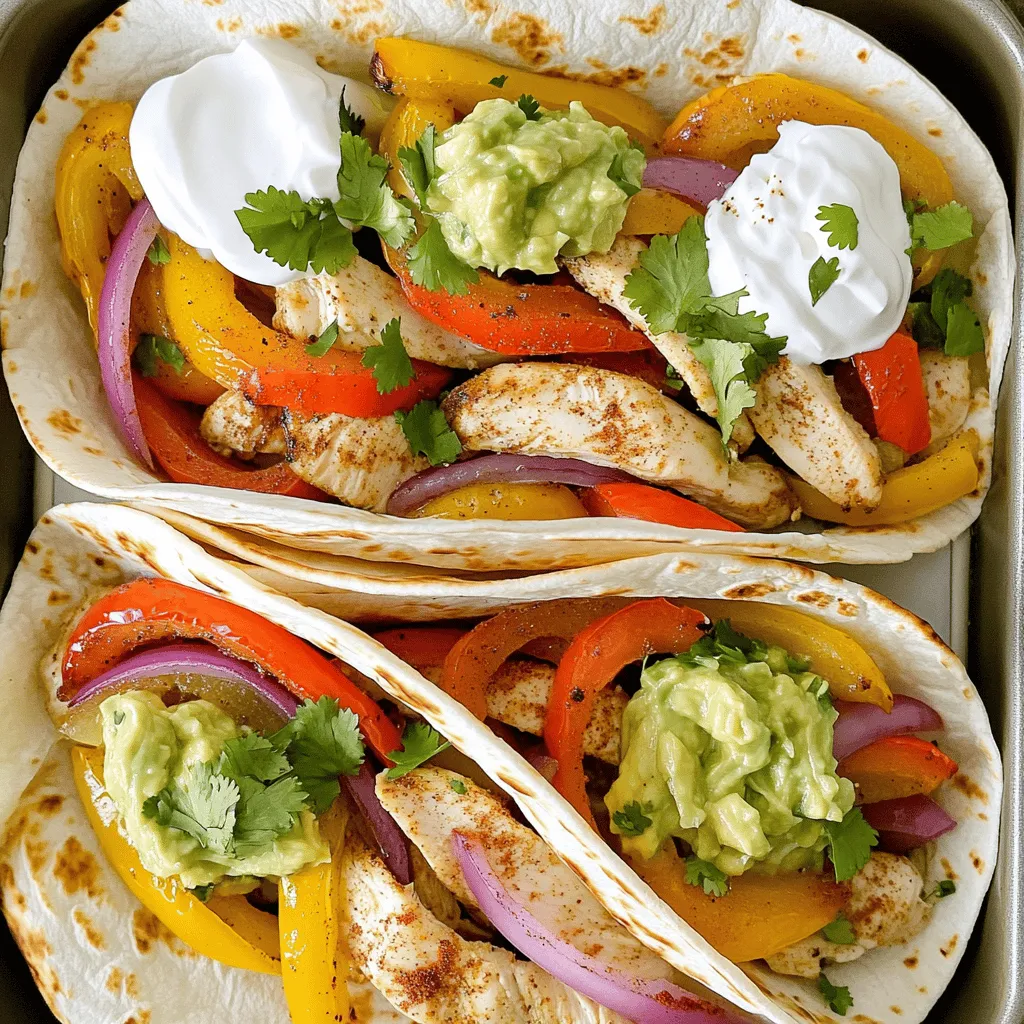
Looking for an easy, tasty meal? Oven-baked chicken fajitas are the answer! With juicy chicken, colorful veggies, and a mix

To make a tasty Mediterranean quinoa salad, you'll need these main items: - 1 cup quinoa, rinsed - 1 cup cherry tomatoes, halved - 1 cucumber, diced - 1 red bell pepper, diced - 1/2 red onion, finely chopped - 1/2 cup Kalamata olives, pitted and sliced - 1/2 cup feta cheese, crumbled These ingredients create a fresh and colorful base for your salad. Quinoa is a great grain that adds protein. The vegetables bring crunch and flavor. The olives and cheese add a savory kick. For the dressing, gather these components: - 3 tablespoons olive oil - 2 tablespoons lemon juice - 1 teaspoon dried oregano - Salt and pepper to taste This dressing is simple yet flavorful. The olive oil adds richness, while the lemon juice gives it a bright taste. The oregano adds a touch of Mediterranean flair, making the salad sing! You can also dress up your salad with: - 1/4 cup fresh parsley, chopped - 1/4 cup fresh mint, chopped - Additional feta cheese Fresh herbs add a burst of color and scent. They make your dish look and taste even better. You can sprinkle extra feta on top for a creamy finish. This Mediterranean quinoa salad is not just healthy; it’s fun to make and share! For the full recipe, check out the details above. First, rinse 1 cup of quinoa in a fine mesh strainer. This removes any bitter coating. Next, combine the rinsed quinoa with 2 cups of vegetable broth or water in a saucepan. Bring the mixture to a boil over medium heat. Once it boils, reduce the heat to low. Cover the pan and let it simmer for about 15 minutes. The quinoa will absorb the liquid and become fluffy. After 15 minutes, remove it from heat. Let it sit covered for 5 minutes. Finally, fluff the quinoa with a fork. In a large mixing bowl, add the cooked quinoa. Allow it to cool for a few minutes. Once cool, mix in your chopped vegetables. Add 1 cup of halved cherry tomatoes, 1 diced cucumber, 1 diced red bell pepper, 1/2 finely chopped red onion, and 1/2 cup of sliced Kalamata olives. Crumble in 1/2 cup of feta cheese for a delicious flavor. In a small bowl, whisk together 3 tablespoons of olive oil, 2 tablespoons of lemon juice, 1 teaspoon of dried oregano, and a pinch of salt and pepper. Pour this dressing over the quinoa salad. Gently toss to combine all the ingredients evenly. Now, fold in 1/4 cup of chopped fresh parsley and 1/4 cup of chopped fresh mint. This will add a burst of freshness. After mixing, adjust the seasoning if needed. Chill the salad in the refrigerator for at least 30 minutes. This helps the flavors meld beautifully. For the full recipe, refer to the previous section. Rinsing quinoa is key to removing its natural coating. This coating can make quinoa taste bitter. To rinse it, place the quinoa in a fine mesh strainer. Rinse under cold water for about a minute. This small step really helps enhance the flavor. To ensure fluffy quinoa, follow a simple method. Use two parts liquid to one part quinoa. Bring the liquid to a boil before adding the quinoa. After boiling, reduce the heat and cover it. Let it simmer for about 15 minutes. Once done, let it sit for five more minutes before fluffing it with a fork. This makes a big difference in texture. Adding spices can boost the flavor of your salad. Consider adding paprika or cumin for a warm touch. A pinch of red pepper flakes can add some heat. Experiment with these spices to find your favorite mix. When it comes to pairing, think of fresh herbs. Mint and parsley work well together. You can also add some avocado slices or nuts for extra creaminess and crunch. These additions can elevate your dish. You can serve this salad cold or at room temperature. Chilling it for at least 30 minutes helps the flavors blend well. It tastes great fresh out of the fridge. For a creative presentation, use a large bowl or platter. Arrange the salad in layers, showing off its colorful ingredients. Garnish with extra feta and herbs on top. You can also serve it with warm pita bread or grilled veggies for a full meal. {{image_2}} You can make this salad even more filling. Adding legumes boosts protein. Think chickpeas or black beans. They add texture and flavor. You can also swap out cheeses. Try goat cheese, or skip cheese for a vegan twist. Quinoa is great, but it’s not the only option. You can use bulgur or farro for a different texture. Rice also works well. Just remember to adjust the cooking time for these grains. For the dressing, keep it simple. Add a splash of vinegar or a pinch of spice to brighten the flavors. Seasonal veggies can change the salad's taste. In summer, fresh zucchini or bell peppers work well. In fall, roasted squash is a nice touch. You can also swap flavors based on what you find at the market. Use fresh herbs when they are in season for the best taste. Experiment with these variations to keep your Mediterranean quinoa salad fresh and exciting. For the full recipe, check out the complete guide. To store your Mediterranean quinoa salad, place it in an airtight container. This keeps it fresh. You can store it in the fridge for up to three days. The salad may taste better after a day, as the flavors mix. Just make sure to stir it before serving. If you see any moisture or separation, give it a quick mix. Can you freeze Mediterranean quinoa salad? Yes, but it’s not the best choice. Freezing can change the texture of the veggies. If you decide to freeze it, use a freezer-safe container. It’s best to freeze the salad without the dressing. This way, the veggies stay crisp. You can freeze it for up to a month. To thaw, move the salad from the freezer to the fridge a day before. This method keeps it safe. When ready to eat, do not microwave it. Instead, let it sit at room temperature for about 30 minutes. This helps keep the texture. If you want to warm it up, try a quick heat in a pan on low. Just be careful not to cook it. You want to keep the fresh taste. Mediterranean Quinoa Salad is a fresh dish packed with flavor. It combines fluffy quinoa with vibrant veggies. You will find cherry tomatoes, cucumber, and bell pepper in every bite. Kalamata olives and feta cheese add a salty kick. Fresh herbs like parsley and mint brighten the salad. The dressing is a simple mix of olive oil and lemon juice, bringing everything together. This salad is colorful and full of textures. You can find the full recipe above. Yes, this salad is very healthy! Quinoa is a grain high in protein and fiber. It helps keep you full and satisfied. The fresh veggies provide vitamins and minerals. For example, tomatoes are rich in vitamin C. Olives add healthy fats, while feta cheese offers calcium. Overall, this salad supports a balanced diet and can help you feel great. You can keep Mediterranean Quinoa Salad in the fridge for about three days. Make sure to store it in an airtight container. This helps keep it fresh and safe to eat. If you notice any change in smell or color, throw it away. To enjoy the best flavor, eat it within the first two days. This Mediterranean Quinoa Salad blends healthy ingredients and bright flavors. It starts with fluffy quinoa and fresh vegetables, then adds olives and cheese. The olive oil dressing ties everything together. You can customize it with herbs, spices, or additional toppings. In conclusion, this salad offers variety and nutrition. It’s easy to make and perfect for any meal. Embrace the flexibility of this dish and enjoy its vibrant taste. Your friends and family will love it. Happy cooking!

Mediterranean Quinoa Salad Fresh and Nutritious Dish

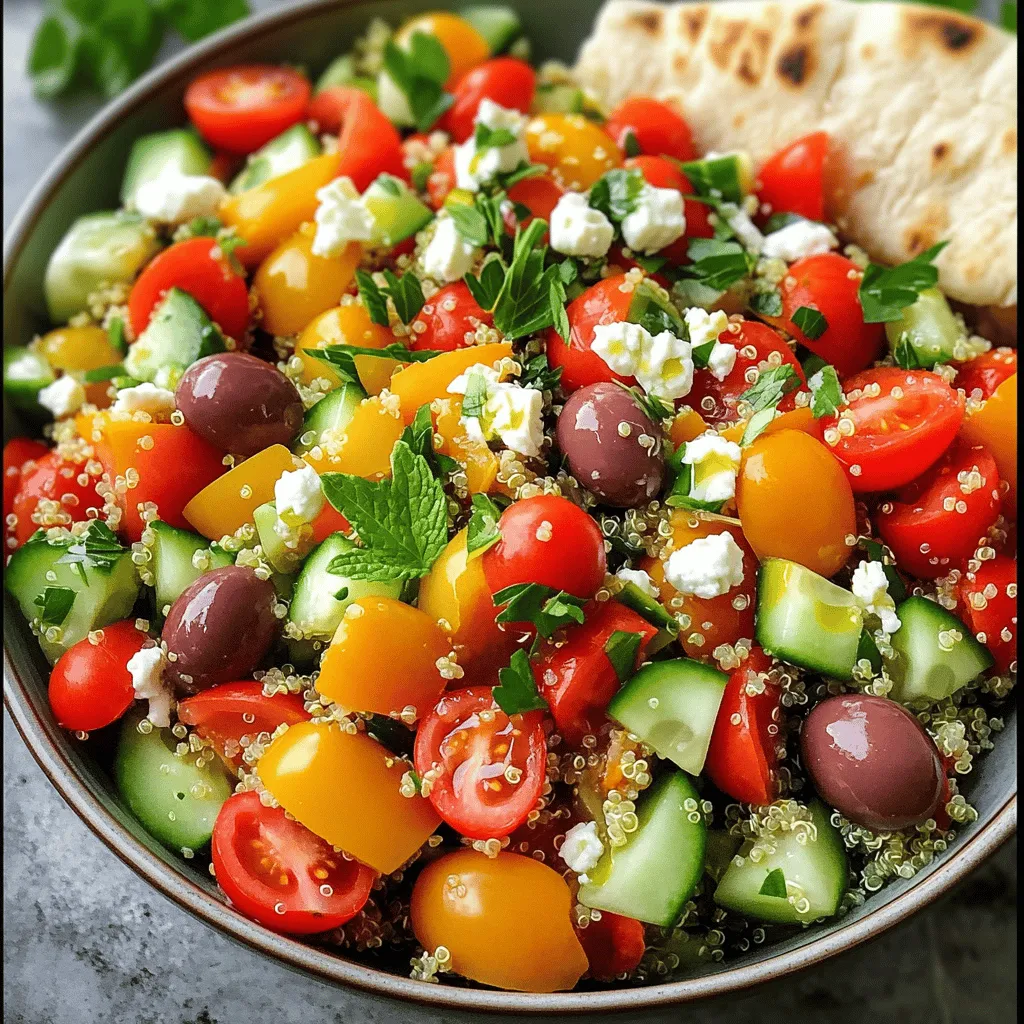
Looking for a fresh, healthy dish that bursts with flavor? You’ll love this Mediterranean Quinoa Salad! Packed with protein, vibrant

- 1 cup fresh spinach, chopped - 1 cup canned artichoke hearts, drained and chopped - 1 cup cream cheese, softened - 1/2 cup sour cream - 1/2 cup mayonnaise - 1 cup shredded mozzarella cheese - 1/2 cup grated Parmesan cheese - 2 cloves garlic, minced - 1 teaspoon red pepper flakes (optional) - Salt and pepper to taste Spinach artichoke dip needs fresh, vibrant ingredients. Fresh spinach adds color and flavor. Canned artichokes give a tender bite and rich taste. Cream cheese creates a smooth base. Sour cream and mayonnaise bring creaminess and tang. Mozzarella and Parmesan add cheesy goodness. Garlic gives a savory kick. Red pepper flakes add heat, but it's up to you. - Different cheese variations (like cheddar or feta) - Extra spices (such as onion powder or paprika) - Protein options (like cooked chicken or crab meat) You can switch it up if you want. Try using cheddar for a sharper taste. Feta adds a nice tangy flavor. Extra spices can enhance the dip. Onion powder or paprika can add depth. Adding cooked chicken or crab meat can make it more filling. - Caloric breakdown per serving - Health benefits of key ingredients Each serving of this dip has about 300 calories. Spinach is full of vitamins A and K. Artichokes offer fiber and antioxidants. Cream cheese and mozzarella add calcium, but they also add fat. Enjoy this dip in moderation to balance taste and health. For the full recipe, check out the instructions below and get ready to impress your guests! - Preheat the oven to 375°F (190°C). - In a large mixing bowl, mix the softened cream cheese, sour cream, and mayonnaise. Blend until smooth and creamy. This base adds rich flavor and texture. - Next, stir in the chopped spinach, artichoke hearts, and minced garlic. - Season the mixture with salt and pepper. The seasoning enhances the taste and balances the flavors. - Transfer the spinach-artichoke mixture to a baking dish. Smooth the top evenly. - Add the remaining mozzarella and Parmesan cheese on top. - Bake for 20-25 minutes, or until the dip is bubbling and the cheese melts and browns. - Allow the dip to cool slightly before serving. Enjoy this creamy delight with toasted bread, chips, or veggies. Follow the Full Recipe for a detailed guide to this dish. - How to prepare artichoke hearts: Start with canned artichoke hearts for ease. Drain them well, then chop them into small pieces. This makes them mix better in the dip. Fresh artichokes need more work, so use canned for quick prep. - Ensuring cream cheese is at room temperature for easier mixing: Softened cream cheese blends smoothly into the dip. Take it out of the fridge 30 minutes before you start. This helps it mix well with the other ingredients, making your dip creamy and smooth. - Best pairing options: Serve this dip hot with toasted bread, tortilla chips, or fresh veggie sticks. Each option adds a nice crunch and makes it fun to eat. I love using a mix of all three for a great spread. - Garnishing ideas for visual appeal: A sprinkle of red pepper flakes adds a pop of color. You can also add a few sprigs of fresh spinach on top for extra flair. This makes your dish look as good as it tastes. - How to prep in advance: You can mix the dip ingredients ahead of time. Just cover the bowl with plastic wrap and store it in the fridge. This makes it easy to bake when your guests arrive. - Recommended storage before baking: If you prep early, store the dip for no more than two days in the fridge. This keeps the flavors fresh and vibrant. When you’re ready, just pop it in the oven as per the full recipe instructions. {{image_2}} To make your spinach artichoke dip even more exciting, try adding herbs or veggies. Fresh herbs like basil or thyme can bring a new taste. They add freshness and aroma. You can also mix in other veggies. Chopped bell peppers or sun-dried tomatoes add color and flavor. These little changes can make a big difference. If you want a lighter dip, you can use low-fat substitutes. Choose low-fat cream cheese or Greek yogurt instead of sour cream. This keeps it creamy but cuts calories. For those who avoid gluten, use gluten-free mayonnaise. You can enjoy this dip without worry. These swaps help you stay healthy while still enjoying a tasty treat. You can have fun with themed dips too! For a Mexican twist, add chopped jalapeños. This gives a spicy kick that many love. If you prefer an Italian flair, mix in Italian seasoning and sun-dried tomatoes. Both options inspire new flavors that make your dip stand out. To keep your dip fresh, use an airtight container. Glass or plastic containers work well. I suggest using a container that fits the amount you have left. Store in the fridge for up to three days. After that, the dip may lose flavor and texture. You can freeze the dip before or after baking. For freezing before baking, place the dip in a freezer-safe container. Cover it tightly with plastic wrap and foil. It can last up to three months in the freezer. If you want to freeze it after baking, let it cool first. Then, store it in a similar manner. To thaw, move the dip to the fridge overnight. This makes it easy to reheat later. For the best taste, reheat the dip in the oven. Preheat your oven to 350°F (175°C). Place the dip in an oven-safe dish and cover it with foil. Heat for about 20 minutes. If you're in a hurry, you can use the microwave. Heat in short bursts of 30 seconds, stirring in between. To avoid sogginess, do not add extra moisture when reheating. Enjoy your dip warm and creamy! To make Spinach Artichoke Dip from scratch, follow these key steps: 1. Preheat your oven to 375°F (190°C). 2. In a big bowl, mix softened cream cheese, sour cream, and mayonnaise until smooth. 3. Add chopped spinach, drained artichoke hearts, minced garlic, and half of the cheeses. 4. Season with salt and pepper to taste. 5. Spread the mixture into a baking dish, then top with the rest of the cheeses. 6. Bake for 20-25 minutes until bubbling and golden. 7. Let it cool a bit before serving. You can find the full recipe above for more details. Yes, you can use frozen spinach. Just make sure to thaw it first. Squeeze out any extra water. This keeps the dip from getting too watery. Use about 1 cup of frozen spinach to replace 1 cup of fresh. Add it to your mix just like you would with fresh spinach. The best way to serve Spinach Artichoke Dip is hot. You can use containers like a small cast-iron skillet or a shallow dish. This makes it easy for guests to dip. Great options for dipping include toasted bread, tortilla chips, or fresh vegetable sticks. You can also garnish with red pepper flakes or fresh spinach for a pop of color. Yes, you can make a vegan version of Spinach Artichoke Dip. Instead of cream cheese, use vegan cream cheese. Swap sour cream and mayonnaise with plant-based substitutes. Nutritional yeast can add a cheesy flavor. Try using vegan mozzarella to finish it off. This keeps the texture and taste delicious and creamy! This blog post covers how to make a tasty Spinach Artichoke Dip. We looked at the ingredients needed, from fresh spinach to creamy cheeses. I shared step-by-step instructions for mixing and baking. Plus, I gave tips for variations and storage. This dip is easy to customize and perfect for any gathering. Whether you enjoy it warm or cold, it’s sure to be a hit. Use this guide to impress your friends and family with a fun, tasty dish!

Savory Spinach Artichoke Dip Recipe to Impress Guests

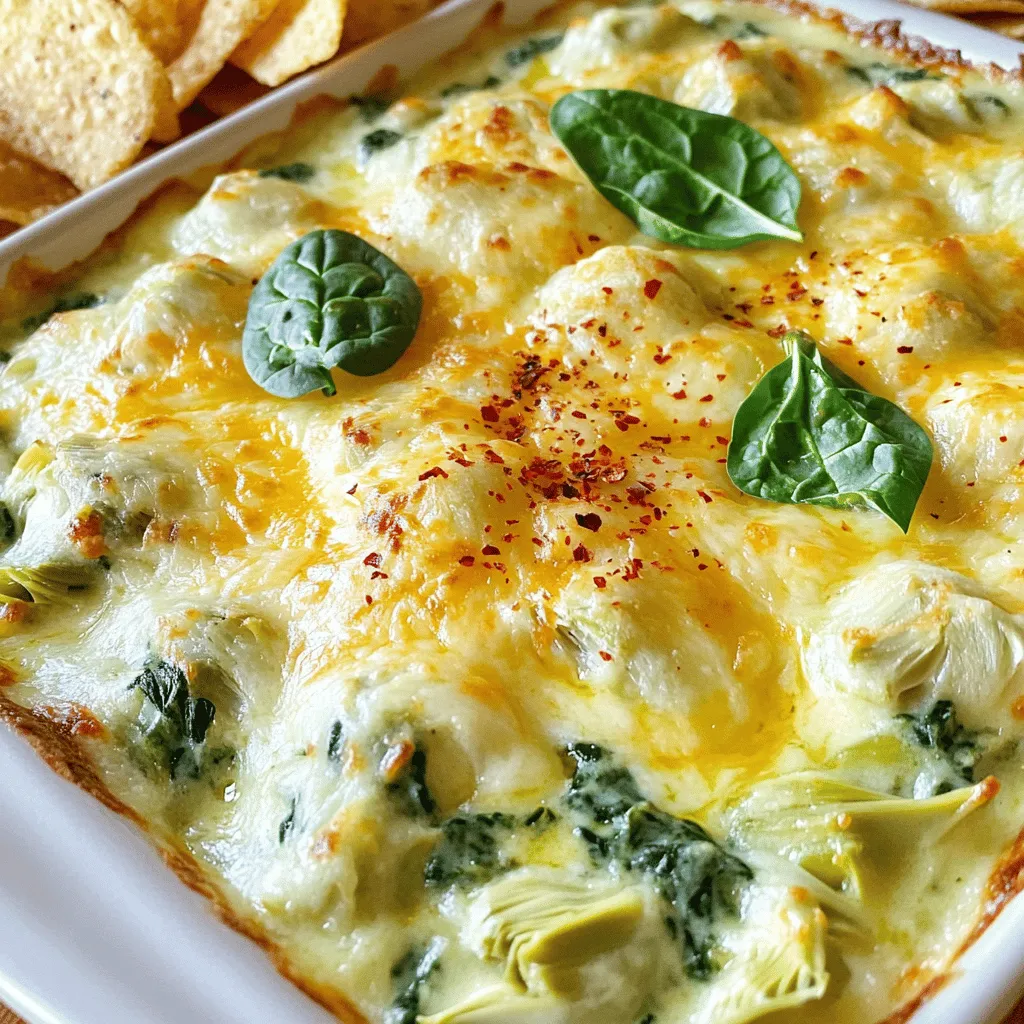
Are you ready to wow your guests with a creamy, dreamy Spinach Artichoke Dip? This savory recipe combines fresh spinach,

Older posts
Newer posts
← Previous Page1 … Page39 Page40 Page41 … Page66 Next →

dsad

© 2025 Foodish Talk • Built with GeneratePress

Our Policies

  • Copyright Policy
  • Cookie Policy
  • GDPR Policy
  • Privacy Policy
  • Disclaimer
  • Terms Of Use

More Information

  • Home
  • About
  • Contact
  • Appetizers
  • Dessert
  • Dinner
  • Drinks
©2025, Foodish Talk About Back To Top