Skip to content
DisclaimerTerms Of UseGDPR PolicyCookie Policy

Foodish Talk

  • Home
  • Drinks
  • Appetizers
  • Dinner
  • Dessert
  • About
  • Contact
  • Privacy Policy
DisclaimerTerms Of UseGDPR PolicyCookie Policy

Ava

To make Big Mac Wraps, you need a few key items. Here is what you will need: - 1 pound ground beef - 1 teaspoon onion powder - 1 teaspoon garlic powder - Salt and pepper to taste - 4 large flour tortillas - 1 cup shredded lettuce - 1 cup diced tomatoes - 1 cup shredded cheddar cheese - 1/2 cup pickles, sliced These ingredients create the tasty base for your wraps. The ground beef gives you that classic Big Mac flavor. The spices add depth, while the fresh veggies make it colorful and crunchy. The special sauce is what makes these wraps pop! Here are the ingredients for the sauce: - 1/2 cup mayonnaise - 2 tablespoons ketchup - 1 tablespoon Dijon mustard - 1 tablespoon sweet relish This sauce blends creamy and tangy flavors. It ties all the ingredients together and gives your wraps that iconic taste. If you want to add a little flair, consider these optional toppings: - Sliced onions - Fresh herbs, like parsley or cilantro - Jalapeños for spice These toppings can personalize your wrap. You can make each one unique. Just remember, the main goal is to enjoy your meal. For the full recipe, check out the details to guide you through the cooking process. Start by heating a skillet over medium heat. Add 1 pound of ground beef. Use a spatula to break it apart as it cooks. This takes about 5 to 7 minutes. You want the beef to be browned and fully cooked. Season it with 1 teaspoon of onion powder, 1 teaspoon of garlic powder, salt, and pepper. Once done, remove it from heat and set it aside. This beef gives the wrap its hearty flavor. In a small bowl, mix the ingredients for the special sauce. Combine 1/2 cup of mayonnaise, 2 tablespoons of ketchup, 1 tablespoon of Dijon mustard, and 1 tablespoon of sweet relish. Stir until the mixture is smooth and well combined. This sauce adds that classic Big Mac taste. Set it aside for later. Now it’s time to put everything together. Lay a large flour tortilla flat on a clean surface. In the center, add a generous portion of the cooked beef. Next, layer on 1 cup of shredded lettuce, 1 cup of diced tomatoes, 1 cup of shredded cheddar cheese, and 1/2 cup of sliced pickles. Drizzle a tablespoon of your special sauce over the top. Fold in the sides of the tortilla, then roll it up tightly from the bottom. Repeat this process for the remaining tortillas. For a tasty twist, heat a non-stick skillet over medium heat. Toast each wrap for about 2 minutes per side until they turn golden brown. This step adds a nice crunch. Enjoy your Big Mac Wraps with extra special sauce on the side for dipping. To make the special sauce shine, use fresh ingredients. The mix of mayo, ketchup, and Dijon mustard gives it a great kick. Sweet relish adds a nice touch too. If you want it extra special, let it chill in the fridge for at least 30 minutes. This helps the flavors blend well. You can also tweak it to suit your taste. Add a dash of hot sauce for some heat or a pinch of sugar for sweetness. Getting the wrap tight is key to a great meal. Start by laying the tortilla flat. Place the beef and toppings in the center. Fold the sides in first, then roll it from the bottom. Press down gently as you roll. This keeps everything inside. If you want a crispy wrap, you can toast it. Heat a skillet and cook each side for a couple of minutes. This step adds a nice crunch. Serve the wraps with extra special sauce on the side. This makes dipping fun! You can also add some crunchy chips or a fresh salad. If you're feeling fancy, garnish the platter with fresh herbs. This adds color and makes it look pretty. These wraps are great for a quick lunch or casual dinner. Enjoy them with family or friends for a tasty treat! {{image_2}} You can make a tasty vegetarian version of Big Mac wraps. Start with a meat substitute like black beans or lentils. Cook them with onion and garlic for flavor. Use the same spices from the original recipe. Layer the beans or lentils on the tortilla, just like the beef. Add lettuce, tomatoes, cheese, and pickles. Drizzle the special sauce over all the veggies. This gives you a satisfying and healthy meal. If you want a low-carb version, swap out the flour tortillas. Use large lettuce leaves instead. They hold all the fillings well and cut carbs. Add your cooked beef or a protein like chicken. Top with shredded cheese, lettuce, and pickles. Don't forget the special sauce! This wrap is fresh and light, perfect for a low-carb diet. For a spicy kick, add jalapeños or hot sauce to your wrap. Mix chopped jalapeños into the beef while cooking. You can also add a spicy mayo. Just blend mayonnaise with sriracha for a quick fix. Layer everything as usual and enjoy the heat! This twist makes the wrap exciting and full of flavor. To keep your Big Mac wraps fresh, wrap them in plastic wrap or foil. Place them in an airtight container. You can store them in the fridge for up to three days. Make sure they cool down before you store them. This helps keep the wraps from getting soggy. When you're ready to eat, take the wraps out of the fridge. You can reheat them in a microwave or skillet. For the microwave, place the wrap on a plate and cover it with a damp paper towel. Heat for about 30 seconds to 1 minute. For the skillet, heat on medium for 2-3 minutes per side. This gives you a warm wrap with a nice texture. You can also freeze Big Mac wraps for later. First, wrap each one tightly in plastic wrap. Then, place them in a freezer-safe bag or container. They can last up to three months in the freezer. When you're ready to eat, thaw them overnight in the fridge before reheating. This method keeps the flavors intact. To make the Big Mac Wrap healthier, you can swap some ingredients. Use lean ground turkey or chicken instead of beef. Opt for whole wheat tortillas instead of regular ones. You can also add more veggies, like spinach or bell peppers. This will boost fiber and nutrients. Choosing low-fat cheese and sauce can cut calories too. Yes, you can use different proteins in the wrap. Grilled chicken, turkey, or even tofu work well. Each option brings a unique flavor. Shredded rotisserie chicken is a great time-saver. You can also try plant-based ground meat for a vegan option. This adds variety and can fit your diet needs. If you want alternatives to the special sauce, try using ranch dressing or a spicy mayo. A yogurt-based sauce can be lighter and still tasty. You can also mix hummus with some herbs for a fresh touch. For a zesty kick, try adding sriracha or hot sauce. Each option can change the flavor profile of your wrap. For the full recipe, check out the details above. You learned how to make tasty Big Mac Wraps with simple steps. We covered the main ingredients, the special sauce, and fun toppings. I shared tips on cooking and wrapping for best results. You saw options for vegetarians and low-carb eaters too. Don't forget about storage and reheating those delicious leftovers. Experiment and make this wrap your own, and enjoy every bite!

Big Mac Wraps with Special Sauce Easy and Tasty Meal

If you love Big Macs but want a fun twist, try Big Mac Wraps with Special Sauce! This easy recipe

- 2 cups frozen peaches - 1 cup lemonade - 1/2 cup coconut water or water The main ingredients for this slushie are simple yet delicious. Frozen peaches give a sweet and fruity flavor. You can use store-bought lemonade or make your own. Coconut water adds a nice touch, but regular water works too. - 1 tablespoon honey or agave syrup - 1/2 teaspoon vanilla extract - Fresh mint leaves for garnish - Lemon slices for garnish You can add honey or agave syrup if you like it sweeter. A hint of vanilla extract enhances the taste. Garnishing with fresh mint leaves and lemon slices makes it look pretty. These options allow you to customize your slushie. For the full recipe, check out the details above. To start, gather your ingredients. You will need frozen peaches, lemonade, coconut water, honey, and vanilla. Combine all these items in your blender. Make sure to add them in this order for the best blend. Blend on high until everything turns smooth and slushy. You want a thick and icy texture. If it's too thick, add more coconut water. Blend again to mix it well. To get the perfect slushie, pay attention to its texture. If it feels too soft, add a few more frozen peaches. If it's too hard, add a splash of coconut water to loosen it up. When it comes to sweetness, taste your slushie. If you want it sweeter, add a bit more honey or agave syrup. Blend again to combine the sweetener well. This way, you get a drink just right for you. Now it’s time to serve! Take some chilled glasses from the freezer. Pour your slushie into each glass, filling them about three-quarters full. For a nice touch, garnish each drink with fresh mint leaves. You can also add a slice of lemon on the rim for extra flair. This not only looks pretty but adds a burst of flavor too. Enjoy your refreshing Frozen Peach Lemonade Slushie! For the full recipe, refer to the earlier section. When picking peaches, fresh is often best. Fresh peaches taste bright and sweet. If you cannot find fresh ones, frozen peaches work well too. They can be just as tasty. To choose ripe peaches, look for a few signs. A ripe peach feels slightly soft when you press it. It should smell fragrant and sweet. Avoid peaches with hard spots or blemishes. Ripe peaches bring great flavor to your slushie. Texture is key for a great slushie. Use enough ice to get that slushy feel. I find that about 1 to 2 cups of ice works well. But, adjust based on your blender's power. If you have a high-powered blender, it can crush ice easily. If your blender is less powerful, blend the ice first. Then, add the other ingredients. This helps to achieve that smooth texture. Want to make your slushie even better? Try adding fresh herbs like mint or basil. They add a nice twist. You can also add spices like ginger or cinnamon for warmth. Mix in other fruits for fun variations. Strawberries or mangoes blend well with peaches. Just swap out a cup of peaches for another fruit. This way, you can create a new flavor every time! For the full recipe, you can check the earlier sections. {{image_2}} When you make a Frozen Peach Lemonade Slushie, think about mixing it up! Here are some fun variations to try. - Strawberry Lemonade Slushie: Swap out peaches for frozen strawberries. Blend just like the peach version. You get a sweet and tangy drink that is perfect for summer. - Tropical Fruit Slushie: Use a mix of frozen pineapple and mango. This gives your slushie a fun beach vibe. Add a splash of coconut water for extra flavor. - Using flavored sparkling water: Instead of lemonade, try sparkling water. It adds fizz and makes the drink even more refreshing. Choose flavors like lemon or peach to enhance the taste. - Substituting lemonade with limeade: Limeade gives a zesty twist. The tartness pairs well with the sweetness of peaches. Try it for a new favorite. - Non-alcoholic slushie recipe ideas: This slushie is already kid-friendly! Just make sure you use non-alcoholic ingredients. Everyone can enjoy this cool treat on a hot day. - Incorporating additional fruits for a colorful mix: Add berries, like blueberries or raspberries. They not only taste great but also make the drink look pretty. This way, kids enjoy the flavor and the fun colors. These variations keep your Frozen Peach Lemonade Slushie exciting and delicious. Feel free to experiment! Explore the [Full Recipe] for original ideas, and enjoy creating your own favorite slushie. To store leftover slushie, pour it into a safe container. Seal it well to stop ice from forming. Place the container in your freezer. This keeps it fresh for later enjoyment. When you want to enjoy it again, take it out. Let it sit at room temperature for about 10 minutes. This helps soften it. You can also blend it again with a splash of lemonade. This refreshes the slushie and brings back its smooth texture. In the fridge, the slushie stays fresh for about 1 to 2 days. After that, it may start to lose flavor and texture. Watch for signs of spoilage. If it smells off or has ice crystals, it’s time to toss it. Always trust your senses. If it looks or smells bad, do not eat it. Enjoy your Frozen Peach Lemonade Slushie while it’s fresh for the best taste. For the full recipe, check the main section. If you want to swap coconut water, try using plain water. You can also use fruit juice or a light soda for more flavor. Fruit juice adds sweetness and a fruity touch. If you have almond milk or oat milk, those work too. They will change the taste a bit but will still taste great. Yes, you can make this slushie ahead of time. Blend all the ingredients and pour the mix into a freezer-safe container. Cover it tightly and freeze. When you're ready to serve, take it out and let it sit for a few minutes. Then, blend it again to get that slushy texture back. This way, you can enjoy it whenever you want! Absolutely! To make it vegan, simply skip the honey and use agave syrup instead. If you want a sugar-free option, look for sugar-free lemonade or use a sugar substitute. You can adjust the sweetness to your taste, making it perfect for everyone. This recipe fits many dietary needs, so feel free to get creative! The frozen peach lemonade slushie is a simple and refreshing drink. You need just three main ingredients: frozen peaches, lemonade, and coconut water. Blend them until smooth, and add optional ingredients like honey or mint for extra flavor. Try different fruits or base liquids to mix things up. Store leftovers in the freezer and enjoy them later. This slushie is easy to make, fun to customize, and perfect for hot days. Enjoy your tasty treat!

Frozen Peach Lemonade Slushie Refreshing Summer Drink

Beat the heat this summer with my delicious Frozen Peach Lemonade Slushie! This easy drink is a refreshing mix of

To make the Mango Bango Smoothie, gather these tasty ingredients: - 1 ripe mango, peeled and chopped - 1 banana, sliced - 1 cup coconut milk (or almond milk for a nut-free version) - 1 tablespoon honey (or maple syrup for a vegan option) - 1/2 cup Greek yogurt (or dairy-free yogurt) - 1/4 teaspoon ground ginger (fresh ginger for an extra kick) - 1 tablespoon chia seeds - Ice cubes (optional for a thicker texture) These ingredients provide a sweet, creamy taste. The mango and banana blend well, making the smoothie delicious and nutritious. You can use fresh or frozen fruit for your smoothie. Fresh fruits give a vibrant taste. They are great if you have ripe mangoes and bananas. However, frozen fruit works too. It gives a smooth texture and chills the drink. Frozen mangoes are also perfect for a quick smoothie. If you want a thicker texture, use frozen fruit. It makes everything cold and creamy. If you have specific dietary needs, don't worry! You can easily swap some ingredients. For example, use almond milk instead of coconut milk for a nut-free option. If you prefer a vegan smoothie, swap honey for maple syrup. You can also use dairy-free yogurt instead of Greek yogurt. This way, you can enjoy the Mango Bango Smoothie no matter your diet. Start by gathering all your ingredients. You need: - 1 ripe mango, peeled and chopped - 1 banana, sliced - 1 cup coconut milk (or almond milk for a nut-free version) - 1 tablespoon honey (or maple syrup for a vegan option) - 1/2 cup Greek yogurt (or dairy-free yogurt) - 1/4 teaspoon ground ginger (fresh ginger for an extra kick) - 1 tablespoon chia seeds - Ice cubes (optional for a thicker texture) First, slice the mango and banana. Make sure the mango is ripe. A ripe mango gives the smoothie great flavor. Next, measure out your coconut milk and yogurt. This mix creates a creamy base. Now it's time to blend! In a blender, add the mango, banana, coconut milk, and honey. This step is important for sweetness. Then, add the Greek yogurt and ground ginger. The ginger gives it a nice zing. Sprinkle in the chia seeds for added health benefits. If you want a colder drink, toss in some ice cubes. Blend everything on high speed until it's smooth. Stop to scrape down the sides if needed. After blending, taste the smoothie. If you want it sweeter, add more honey or maple syrup. Pour the smoothie into tall glasses. Leave some space at the top for fun toppings. You can garnish with chia seeds and a slice of mango on the rim of the glass. This makes it look fancy! For extra fun, use colorful straws. Enjoy your Mango Bango Smoothie! For the complete details, check the Full Recipe. To find the best mango, look for one with smooth skin. It should feel slightly soft when you press it. A ripe mango has a sweet smell near the stem. Avoid hard or overly soft mangos. Color can vary, so focus on feel and smell. You can boost the flavor with a few extras. Try adding a splash of lime juice. This gives a nice tartness. You might also mix in spinach for added greens. If you love spice, a pinch of cayenne pepper can add heat. Experiment with different flavors to make it your own! If your smoothie is too thick, add more coconut milk. Blend it again to mix well. For a thinner smoothie, just add ice or more liquid. If it's too sweet, add a bit of yogurt or lemon juice to balance it. These simple fixes can help you get it just right. {{image_2}} You can give your Mango Bango Smoothie a fun twist by adding other fruits. Pineapple adds a tropical vibe, while strawberries bring a sweet touch. You can also try kiwi for a zesty flavor. Just chop up the fruit and toss it into the blender with the mango and banana. This will make your smoothie even more delicious and colorful. Want to add more nutrition? Consider adding spinach or kale. These greens blend well and add vitamins without changing the taste. You can also try adding protein powder for an extra energy boost. Flaxseeds are another great option. They are high in fiber and blend easily in the smoothie. Just remember to keep the balance of flavors when adding these healthy extras. You can choose different types of milk to suit your needs. Coconut milk gives a creamy texture and a light coconut flavor. If you want a nut-free option, almond milk works great too. For those who prefer dairy, regular milk or yogurt can be used. Each type of milk will change the taste and texture slightly, so feel free to experiment and find what you like best! If you have leftover Mango Bango Smoothie, store it in the fridge. Use a sealed container for best results. It will stay fresh for up to 24 hours. After that, it might lose its texture and flavor. Shake or stir well before drinking again. Freezing is a great option if you want to save some smoothie for later. Pour the remaining smoothie into ice cube trays or freezer bags. This way, you can portion it out easily. When you're ready to drink it, just blend the frozen cubes with a splash of milk. It will be like a fresh smoothie again! Choose the right containers for storing smoothies. Glass jars with lids work well. They keep your smoothie fresh and are easy to clean. BPA-free plastic containers are another good choice. Make sure they seal tightly to avoid spills. Yes, you can make the Mango Bango Smoothie ahead of time. Just blend all the ingredients and store the smoothie in the fridge. Keep it in a sealed container for up to 24 hours. When you're ready to drink it, give it a quick stir or shake. The smoothie may separate a bit, but that's normal. If you need a substitute for coconut milk, try almond milk or oat milk. Both options work well and still keep the smoothie creamy. You can also use soy milk for a nut-free option. Each milk adds a different flavor, so choose one that you like best. To boost protein in your Mango Bango Smoothie, add a scoop of protein powder. You can also use more Greek yogurt or even cottage cheese. These options will keep the smoothie tasty while making it more filling. Add some nut butter too, for extra protein and healthy fats. Feel free to explore the [Full Recipe] for all the details you need! Making a Mango Bango Smoothie is easy and fun. You learned about key ingredients, from fresh mango to substitutes for diets. Step-by-step instructions showed how to prepare, blend, and serve. Tips helped you choose the best mango and fix common issues. You explored tasty variations by adding fruits and healthy boosters. Finally, we covered storage and answered popular questions. Enjoy making this smoothie your way, and sip on something delicious!

Mango Bango Smoothie Refreshing and Simple Recipe

Are you ready to sip on something delicious? The Mango Bango Smoothie is both refreshing and easy to make. With

- 1 can (15 oz) chickpeas, drained and rinsed - 1 cup cucumber, diced - 1 cup cherry tomatoes, halved - 1/2 red onion, finely chopped - 1/2 cup plain Greek yogurt - 1 clove garlic, minced - 2 tablespoons fresh dill (or 1 tablespoon dried dill) - 1 tablespoon lemon juice - 1 tablespoon extra virgin olive oil - Salt and pepper to taste - Feta cheese, crumbled - Fresh mint leaves for garnish When I make Tzatziki Chickpea Salad, I start with the main ingredients. The chickpeas give protein and fiber. They fill you up and keep you healthy. Next, I add fresh cucumber for crunch. It adds a nice, cool taste. Cherry tomatoes bring a pop of sweetness. They also make the salad colorful. Lastly, the red onion gives a sharp bite that balances the salad. Now for the tzatziki dressing! I mix Greek yogurt with minced garlic. This adds creaminess and flavor. Fresh dill brings a bright herbal taste. I use lemon juice for acidity. It brightens everything up. Extra virgin olive oil adds richness. This dressing ties the salad together. You can also add optional ingredients. Salt and pepper enhance the flavors. Crumbled feta cheese adds a salty and creamy touch. Fresh mint leaves make for a beautiful garnish. They give a refreshing finish. Make sure to check the [Full Recipe]. It guides you through each step! - Drain and rinse the chickpeas. - Dice the cucumber and halve the cherry tomatoes. - Finely chop the red onion. Start with the chickpeas. Rinsing them removes extra salt and makes them taste fresh. Next, the cucumber adds crunch. Slice it into small pieces to blend well. The cherry tomatoes bring sweetness, and halving them lets their juice mix into the salad. Lastly, chop the red onion finely. This gives a nice bite to the dish. - Whisk together Greek yogurt, garlic, dill, lemon juice, and olive oil. For the tzatziki dressing, use plain Greek yogurt. It’s thick and creamy. Add minced garlic for a tasty punch. Fresh dill adds a nice aroma and flavor. Squeeze in some lemon juice for zing. Lastly, drizzle olive oil to make the dressing smooth. Whisk it all together until it’s well mixed. - Mix the chickpea mixture and tzatziki dressing. - Garnish with feta cheese and mint leaves. - Chill for at least 30 minutes before serving. Now, combine the chickpeas, cucumber, tomatoes, and onion in a large bowl. Pour the tzatziki dressing over the top. Gently toss everything together. Make sure all the ingredients get coated nicely. If you choose to use feta cheese, sprinkle it on top now. Cover the bowl with plastic wrap and chill it in the fridge for at least 30 minutes. This waiting time helps the flavors mix and deepen. Enjoy this fresh dish as a light meal or side. For the full recipe, check out the earlier section! To make your Tzatziki Chickpea Salad shine, adjust seasoning to taste. Add salt and pepper as needed. Taste is key! Fresh herbs also enhance flavor. Use dill or mint for a bright touch. Serve your salad chilled or at room temperature. It’s great on hot days! Pair it with pita bread or grilled meats for a complete meal. This mix of flavors really brings joy to the table. If you need a nut-free option, swap Greek yogurt for a nut-free yogurt alternative. This keeps the salad creamy without nuts. Enjoy the same great taste while catering to dietary needs! For the full recipe, refer to the Tzatziki Chickpea Salad recipe section. {{image_2}} You can make this salad more filling by adding grilled chicken or shrimp. Both options add great taste and protein to the dish. I love using grilled chicken because it adds a nice smoky flavor. Shrimp is also a quick way to boost protein and works well with the tzatziki dressing. Want to pack in more nutrition? Include bell peppers or avocado in your salad. Bell peppers add a crunchy texture and sweet flavor. Avocado brings a creamy richness that pairs well with the chickpeas. I often add both for a colorful and tasty mix. If you want to change things up, try a lemon vinaigrette instead of tzatziki. A lemon vinaigrette gives the salad a bright, zesty taste. It can be lighter and refreshing, especially on a hot day. I enjoy experimenting with different dressings to keep this salad exciting. For the full recipe, check out the section above! Store any leftovers of the Tzatziki Chickpea Salad in an airtight container. This keeps the flavors fresh. You can enjoy it for up to 3 days. Make sure to seal the lid tight. Freezing this salad is not a good idea. The texture will change when thawed. The cucumbers and tomatoes may become mushy. It’s best to enjoy it fresh. To make meal prep easy, chop and store your ingredients ahead of time. Dice the cucumber, halve the tomatoes, and chop the onion in advance. When you are ready to eat, just mix everything together. This quick assembly saves time and keeps your meals fresh. Tzatziki is a creamy sauce made from yogurt, cucumber, and garlic. It has a cool and tangy flavor. This sauce comes from Greece and is often used in Mediterranean dishes. People enjoy tzatziki as a dip or a dressing. It pairs well with grilled meats and pita bread. Tzatziki adds a refreshing touch to many meals, making them more enjoyable. Yes, you can make this salad vegan! For the Greek yogurt, use a plant-based yogurt. Look for a dairy-free option made from coconut or almond milk. If you want to replace feta cheese, try using crumbled tofu or a vegan feta. Both options keep the salad tasty and creamy without dairy. You can easily customize this salad to suit your taste! Here are some fun ideas: - Add bell peppers for crunch. - Toss in avocado for creaminess. - Include olives for a briny flavor. - Swap out the dill for fresh parsley or mint. - Drizzle with a lemon vinaigrette instead of tzatziki for a new twist. These options can make your salad unique and exciting. Explore different flavors to find your perfect mix! For the full recipe, check out the Tzatziki Chickpea Salad section. This blog post covered a simple, tasty chickpea salad. We looked at the main ingredients like chickpeas and fresh veggies. I provided a quick and easy tzatziki dressing recipe, plus tips for serving. You can also customize it with proteins and more veggies. Remember to store leftovers properly for freshness. In conclusion, this salad is not just healthy; it’s fun to make and share. Enjoy your cooking!

Tzatziki Chickpea Salad Fresh and Flavorful Delight

Looking for a fresh and tasty dish that’s easy to make? My Tzatziki Chickpea Salad checks all the boxes! Packed

- Zucchini - Chickpeas - Seasonings - Olive oil - Lemon For this recipe, you will need: - 2 medium zucchinis, sliced into rounds - 1 can (15 oz) chickpeas, drained and rinsed - 2 tablespoons olive oil - 1 teaspoon smoked paprika - 1 teaspoon garlic powder - 1 teaspoon cumin - Salt and pepper to taste - Juice and zest of 1 lemon Using fresh ingredients is key. Fresh zucchini tastes better and gives a nice crunch. Also, fresh lemon adds bright flavor that makes the dish pop. - Fresh parsley - Additional lemon zest Fresh parsley adds a nice color and flavor. You can also sprinkle extra lemon zest for a stronger citrus taste. These garnishes make the dish look great and taste even better! For the full recipe, check out the details above. - Preheat grill accurately: Start by heating your grill or grill pan to medium heat. This ensures even cooking for your zucchini. - Patting chickpeas dry: Use a paper towel to dry the chickpeas well. This step helps them get crispy later. - Tossing with spices: In a bowl, combine the dry chickpeas with olive oil, smoked paprika, garlic powder, cumin, salt, and pepper. Mix well until all chickpeas are coated in spices. - Roasting instructions: Spread the chickpeas on a baking sheet in a single layer. Roast them in a preheated oven at 400°F (200°C) for 20-25 minutes. Shake the pan halfway to ensure they crisp evenly. - Combining ingredients: While the chickpeas roast, slice the zucchinis into rounds. In a bowl, mix the zucchini with olive oil, lemon juice, lemon zest, salt, and pepper. Toss until they are well coated. - Grill time tips: Grill the zucchini slices for about 4-5 minutes on each side. Look for nice grill marks and ensure they are tender but still have a slight crunch. Once everything is ready, layer the grilled zucchini on a platter and top with the crispy chickpeas. For more details, check the Full Recipe. Enjoy your delicious creation! To get crispy chickpeas, start by patting them dry. Moisture makes them soft. Toss the chickpeas in olive oil and spices for added flavor. Spread them out on a baking sheet. Avoid crowding them; this helps them crisp up. Common mistakes include not drying them enough or skipping the oil. Both lead to soggy chickpeas. Slice the zucchini into rounds about half an inch thick. This thickness ensures they cook well and stay firm. Too thin, and they may fall apart. Grill them for about 4-5 minutes on each side. You want nice grill marks and tender zucchini. If they’re too soft, they may lose their flavor. For plating, arrange the zucchini in a circular pattern on a platter. This creates an inviting look. Sprinkle the crispy chickpeas on top for a nice contrast. You can also drizzle some lemon juice before serving for extra zest. Pair this dish with a simple salad or grilled protein for a full meal. For a refreshing twist, serve with a yogurt dip. Enjoy your Lemony Grilled Zucchini with Crispy Chickpeas Delight! For the full recipe, check out the details above. {{image_2}} You can mix in other veggies for added flavor. Try bell peppers, eggplant, or asparagus. Each adds a unique taste and texture. If you want to grill different vegetables, cut them into similar sizes for even cooking. Zucchini pairs well with summer squash and mushrooms, too. Experiment with spices to change the taste. Try adding chili powder for heat or Italian herbs for a fresh twist. You can also add cheese, like feta, for creaminess. For protein, consider grilled shrimp or chicken. Both options will make your dish heartier and more filling. If you need vegan options, just skip any cheese and stick with veggies and chickpeas. For gluten-free needs, this recipe already fits! Always check labels to confirm your ingredients are gluten-free. You can also swap chickpeas for lentils for a different protein source. For the full recipe, check out the details in the earlier sections. To keep your Lemony Grilled Zucchini with Crispy Chickpeas fresh, use airtight containers. Glass or plastic containers work well. Make sure the lid seals tightly to avoid air exposure. Refrigerate the dish right after it cools down. This helps preserve flavor and texture. In the fridge, this dish lasts about three days. After that, the zucchini may become soggy, and the chickpeas can lose their crispiness. To reheat, use the oven at 350°F (175°C) for 10-15 minutes. This method helps restore some crunch to the chickpeas. You can also use a microwave, but it may not keep them crispy. If you want to freeze it, consider separating the zucchini and chickpeas. Place them in freezer bags or containers. This keeps them fresh longer. The zucchini lasts about two months in the freezer, while chickpeas can last up to six months. To thaw, move them to the fridge overnight. Reheat in the oven to keep the texture nice and crispy. To grill zucchini well, slice it into even rounds. Thin slices cook faster, while thicker ones hold moisture better. Preheat your grill to medium heat. Brush the zucchini with olive oil and season with salt and pepper. Grill for about 4-5 minutes on each side. This method gives you nice grill marks and keeps the zucchini tender. Yes, using canned chickpeas is great! Canned chickpeas save time and effort. They are already cooked, so you can focus on flavoring them. Just drain and rinse them well. Dried chickpeas require soaking and cooking, which takes longer. Canned chickpeas are perfect for quick meals. You can prep the zucchini and chickpeas in advance. Slice the zucchini and store it in an airtight container. Season and toss the chickpeas and keep them in the fridge. You can grill the zucchini and roast the chickpeas right before serving. This way, your dish stays fresh and tasty. If you want alternatives to chickpeas, try black beans or lentils. You can also use cooked quinoa or edamame for a protein boost. These options give you a different texture and flavor while keeping the dish nutritious and satisfying. Yes, this recipe is both gluten-free and vegan! All the ingredients, like zucchini, chickpeas, and olive oil, are plant-based. You can enjoy this dish without worrying about gluten or animal products. It’s a healthy and delicious choice for everyone. This recipe highlights simple yet tasty ingredients like zucchini and chickpeas. I shared key measurements to ensure freshness and added some optional garnishes for a pop of flavor. The step-by-step guide helps you grill to perfection, with tips on achieving crispy chickpeas and tender zucchini. You can explore variations and dietary modifications to suit your needs. Remember, cooking should be fun. Try new ingredients or spices to make the dish uniquely yours. Enjoy your delicious creation!

Lemony Grilled Zucchini with Crispy Chickpeas Delight

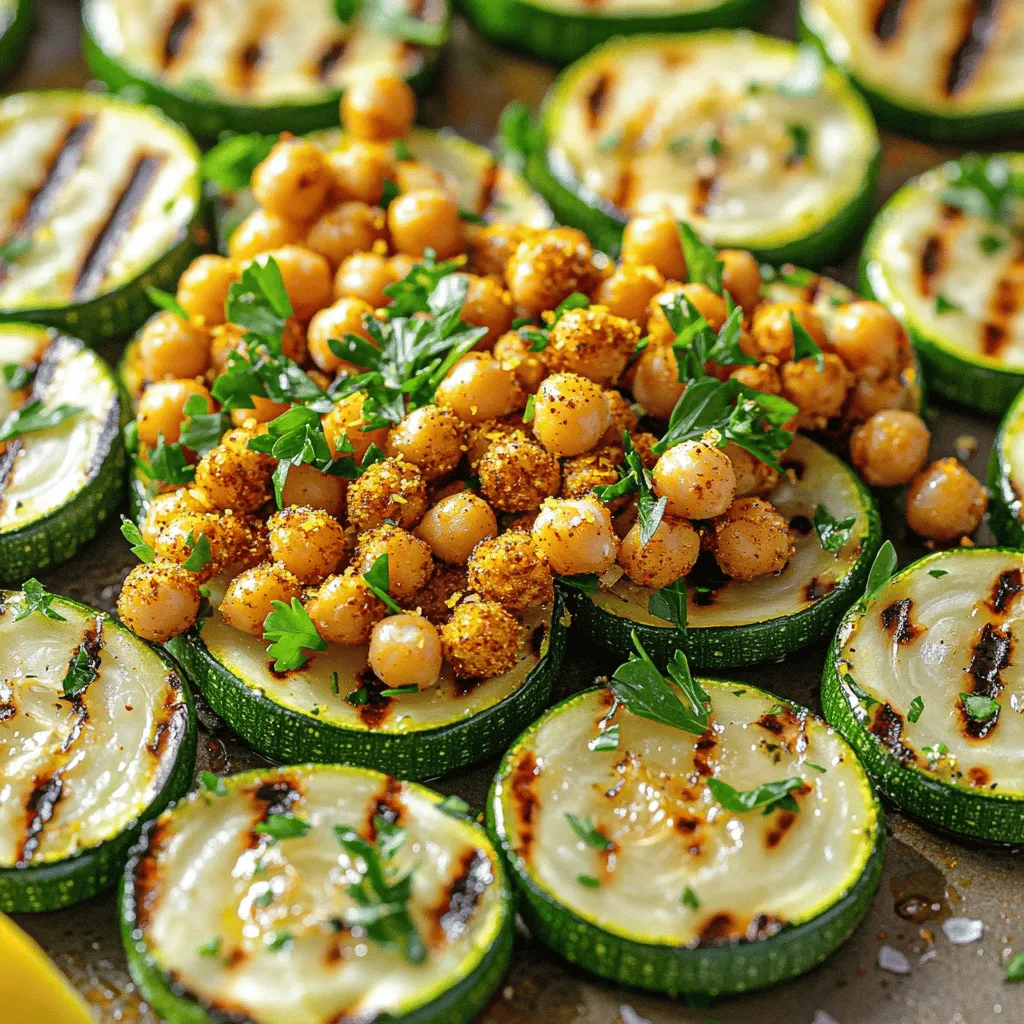
Are you ready to elevate your summer grilling game? In this article, I’ll show you how to make Lemony Grilled

- Watermelon - Feta Cheese - Fresh Mint The main ingredients in this salad are simple but flavorful. Watermelon adds sweetness and juiciness. Feta cheese brings in a salty kick. Fresh mint gives a burst of freshness. - Red Onion - Olive Oil - Balsamic Glaze - Pomegranate Seeds You can choose to add red onion for a crunch and sharp flavor. Olive oil helps to tie the salad together. Balsamic glaze adds sweetness and depth. Pomegranate seeds offer a pop of color and crunch. - Salt - Pepper Salt and pepper are key to enhancing all the flavors. Use them to season your salad to taste. Just a pinch can make a big difference! For the full recipe, check out the complete directions and tips. - Cutting the Watermelon Start by cutting the watermelon. First, slice it in half. Then, cut each half into smaller pieces. Aim for bite-sized cubes. Place these cubes in a large mixing bowl. - Combining Ingredients Next, add the red onion and fresh mint to the bowl. The red onion adds a nice crunch. The mint gives a fresh taste. Now, sprinkle the crumbled feta cheese on top of the mix. All these flavors will blend well together. - Adding Olive Oil and Balsamic Glaze Drizzle the olive oil evenly over the salad. Then, add the balsamic glaze. This gives the salad a sweet and tangy taste. - Seasoning with Salt and Pepper Don’t forget to season the salad. Add salt and pepper to taste. Gently toss all the ingredients together. Be careful not to crush the feta cheese. You want it to stay fluffy. - Allowing Flavors to Meld Let the salad sit for about 10 to 15 minutes. This waiting time helps the flavors meld together. - Garnishing with Pomegranate Seeds If you like, sprinkle pomegranate seeds on top. They add a pop of color and crunch. This step is optional but highly recommended for extra flavor. For detailed steps and measurements, check out the Full Recipe. Ripeness Indicators Look for a watermelon with a smooth, shiny skin. Check for a uniform shape. A yellow spot shows ripeness, as it means it sat on the ground. Tap the melon; a hollow sound means it is ripe and juicy. Best Varieties for Salads I recommend using seedless watermelons for this salad. They are easy to cut and eat. The Sugar Baby and Crimson Sweet are popular choices. Both offer sweet, crisp flesh perfect for salads. Crumbling Techniques To crumble feta, use your fingers or a fork. This keeps the cheese light and fluffy. Avoid pressing it too hard, or it will turn into a paste. For a chunkier texture, cut it into small pieces instead. Alternative Cheese Options If you want a change from feta, try goat cheese or ricotta. Both add a creamy texture and nice flavor. Vegan cheese options can also work well, especially those made from nuts. Making Ahead of Time You can make this salad up to 4 hours before serving. Just keep it covered in the fridge. Be sure to add the dressing just before serving. This keeps the salad fresh and tasty. Storing Leftovers Store any leftovers in an airtight container. It will last for about 2 days in the fridge. If the watermelon starts to get mushy, it’s time to toss it. Enjoy the fresh flavors while they last! {{image_2}} Adding cucumber to your salad gives it a crisp touch. This cool veggie pairs nicely with sweet watermelon. Just slice it thin and mix it in. You will love the added crunch! Incorporating avocado adds a creamy layer to the dish. The rich taste of avocado blends well with feta. Simply cut the avocado into cubes and fold it gently into the salad. This twist makes the salad even more satisfying. For a citrus dressing option, try mixing fresh lime juice with olive oil. This bright dressing boosts the flavors of the salad. Just whisk them together and drizzle over your mix. If you prefer a creamy dressing variation, combine Greek yogurt with a bit of honey. This adds a sweet tang that complements the feta. Pour it over the salad for a richer taste. Using seasonal fruits can elevate your salad. In summer, add fresh berries for a burst of flavor. In fall, consider diced apples or pears. Each fruit brings a new taste to your mix. Adjusting for holidays can make this salad festive. For example, add pomegranate seeds for a vibrant touch during winter. This not only looks great but adds a nice crunch too. Feel free to explore these variations and make the salad your own. For the full recipe, check out Watermelon Feta Bliss Salad. Store leftover watermelon feta salad in a sealed container. Keep it in the fridge. It stays fresh for up to three days. After that, the watermelon may get mushy. You can freeze watermelon, but it changes the texture. The salad doesn’t freeze well because of the feta and mint. If you freeze it, cut the watermelon into small pieces. When you need it, thaw it in the fridge overnight. This helps keep some of the shape. You can use leftover ingredients in other dishes. Add extra watermelon to smoothies or fruit salads. Crumbled feta works great on pasta or in omelets. You can also toss mint into tea or yogurt. These ideas help you enjoy every bit of your salad. For the full recipe, check out the Watermelon Feta Bliss Salad. You can use several cheese alternatives in your salad. Here are some options: - Goat cheese: It has a tangy flavor and creamy texture. - Ricotta: This cheese is mild and works well for a softer touch. - Cotija: A crumbly cheese similar to feta, but saltier. For vegan options, try these: - Tofu: Crumbled firm tofu can replace feta well. - Vegan feta: Some brands offer plant-based feta that mimics the taste. - Nutritional yeast: This adds a cheesy flavor without dairy. Watermelon Feta Salad lasts about 2-3 days in the fridge. Here are some insights: - Store it in an airtight container to keep it fresh. - The watermelon may release juice over time. Signs of spoilage include: - A slimy texture on the watermelon. - Off smells or discoloration. - Unpleasant changes in taste. Yes, you can make this salad ahead of time. Here are some prep tips: - Cut the watermelon and mix it with feta and mint a few hours in advance. - Add the dressing just before serving to keep it fresh. To maintain the best flavor: - Store it in the fridge until you’re ready to serve. - Keep the salad covered to avoid drying out. For the full recipe, check out the Watermelon Feta Bliss Salad section. This blog post covered everything about making a Watermelon Feta Salad. We discussed the key ingredients, from watermelon to feta cheese, and added tips for optional items like olives or pomegranate seeds. You learned how to prepare and dress the salad effectively while ensuring flavor blends well. Keep experimenting with different variations and storage tips to make this dish yours. Enjoy fresh flavors and fun twists for any occasion. Even a simple salad can be exciting and memorable!

Watermelon Feta Salad Refreshing and Easy Recipe

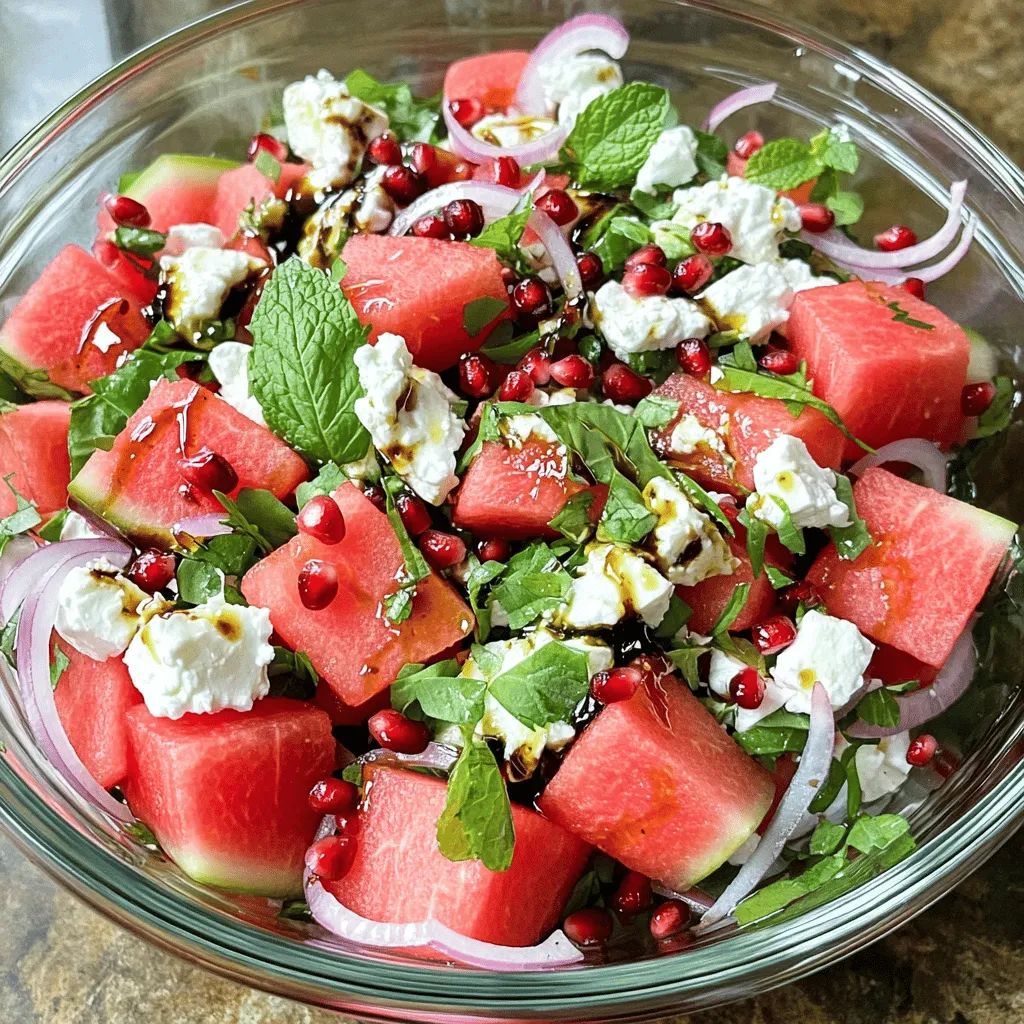
Looking for a cool and tasty dish? My Watermelon Feta Salad is your answer! This easy recipe combines juicy watermelon,

- 2 ripe peaches, sliced - 3 cups watermelon, cubed - ½ cup crumbled feta cheese - ¼ cup fresh mint leaves, chopped - 1 tablespoon honey - 2 tablespoons lime juice - Salt and pepper to taste - Optional: 1 tablespoon toasted pumpkin seeds - Large mixing bowl - Small bowl for dressing - Whisk When I create a Peach Watermelon Salad, I focus on fresh ingredients. The key to this dish is using ripe peaches and juicy watermelon. They pair well together and make a great summer treat. For this salad, you need peaches that are soft but not mushy. Look for vibrant colors and a sweet smell. Watermelon should be firm and heavy for its size. Feta cheese adds a nice salty touch, which balances the sweetness of the fruit. Fresh mint brings a refreshing flavor. Honey and lime juice create a simple dressing that ties all the flavors together. You will also need a large mixing bowl for the fruit and a small bowl to whisk the dressing. Whisking helps blend the honey and lime juice smoothly. This step is easy but crucial for a tasty salad. Once you gather your ingredients and equipment, you're ready to make this delicious Peach Watermelon Salad. For the full recipe, check out the complete guide. - First, take 2 ripe peaches and slice them. - Next, cube 3 cups of watermelon. - Combine the sliced peaches and cubed watermelon in a large mixing bowl. - Gently mix in ½ cup of crumbled feta cheese. Be careful not to mash the fruit. - In a small bowl, whisk together 1 tablespoon of honey and 2 tablespoons of lime juice until smooth. This will create a bright and tangy dressing. - Drizzle the honey-lime dressing over the fruit mixture. Toss gently to coat every piece of fruit. - Now, add ¼ cup of chopped mint leaves for freshness. - If you like, sprinkle 1 tablespoon of toasted pumpkin seeds on top for a nice crunch. Toss everything together one last time. - Chill the salad in the refrigerator for about 15 minutes. This helps the flavors meld. For the complete recipe, check out the Full Recipe. To make your Peach Watermelon Salad pop, think about adding fresh herbs like basil or cilantro. These herbs give a nice twist to the flavor. You can also sprinkle in a pinch of chili powder for heat. If you like it sweeter, use honey to adjust the taste. Just drizzle more honey over the salad and mix well. Serve your salad in a large, shallow bowl or in individual cups. This makes it look fancy and fun. For a colorful touch, garnish with fresh mint leaves. You can also sprinkle a few toasted pumpkin seeds on top for added crunch. This adds both flavor and a nice visual appeal. Prep your salad a little ahead of time for the best taste. You can slice the peaches and cube the watermelon up to a few hours before serving. Just keep them in the fridge to stay fresh. If you mix in the dressing too early, the fruit may get soggy. Instead, add the dressing right before serving. This keeps everything crisp and tasty. {{image_2}} You can switch out feta cheese for other options. Try goat cheese for a creamy taste. For a dairy-free option, use tofu or avocado. Both will add a nice texture too. Feel free to change the fruits in the salad. You can use strawberries, blueberries, or even oranges. Each fruit adds its own flavor. Mixing different fruits can make the salad even more fun and colorful. If you want to change the dressing, try balsamic vinegar instead of honey and lime. It gives a sweet and tangy taste. You might also like a citrus vinaigrette for a zesty kick. For a creamy dressing, mix yogurt with lime juice. This gives a rich flavor while keeping it light. You can also use a ranch or tahini dressing if you want something bolder. To enjoy this salad all year, think about seasonal fruits. In fall, add apples or pears. In winter, try citrus fruits like oranges or grapefruits. Each season brings new flavors. You can also add nuts or seeds for crunch. Toasted almonds or walnuts work well. They add a nice texture and extra nutrients to the salad. To keep your Peach Watermelon Salad fresh, store it in the fridge. Use an airtight container. This will help keep the flavors bright and the texture crisp. If you plan to eat it later, separate the dressing. You can mix it in just before serving. This ensures your salad stays juicy and fresh. In the refrigerator, Peach Watermelon Salad lasts about 2 to 3 days. After that, the fruit may start to break down. Look for signs of spoilage like an off smell or mushy texture. If the salad looks watery, it's best to throw it out. Freezing Peach Watermelon Salad is not the best choice. The texture of the fruit will change when frozen. If you want to freeze it, consider freezing just the watermelon and peaches. Before freezing, cut them into pieces and spread them on a baking sheet. Once frozen, transfer them to a freezer bag. This way, you can add them to smoothies later! Yes, you can make Peach Watermelon Salad ahead of time. This salad tastes great when chilled. To prepare in advance, cut the fruit and store it separately. Mix the honey-lime dressing and keep it in the fridge. Combine the ingredients just before serving. This keeps the salad fresh and avoids sogginess. If you want an alternative to feta cheese, try goat cheese or ricotta. Both add a creamy texture. You can also use vegan cheese if you prefer a dairy-free option. Fresh mozzarella is another tasty choice for a milder flavor. Peach Watermelon Salad is very healthy! Peaches are rich in vitamins A and C. Watermelon is hydrating and has low calories. Feta adds protein and calcium. Mint offers fresh flavor and has health benefits, too. This salad is a great way to enjoy summer fruits. This blog post shared a simple recipe for Peach Watermelon Salad. You learned about the key ingredients and how to put them together. I also covered useful tips for flavor, storage, and variations to keep it exciting. Remember, this salad is fresh, easy, and healthy. You can enjoy it anytime or switch up the ingredients to suit your taste. Now, grab your peaches and watermelon, and create something delicious!

Peach Watermelon Salad Refreshing Summer Delight

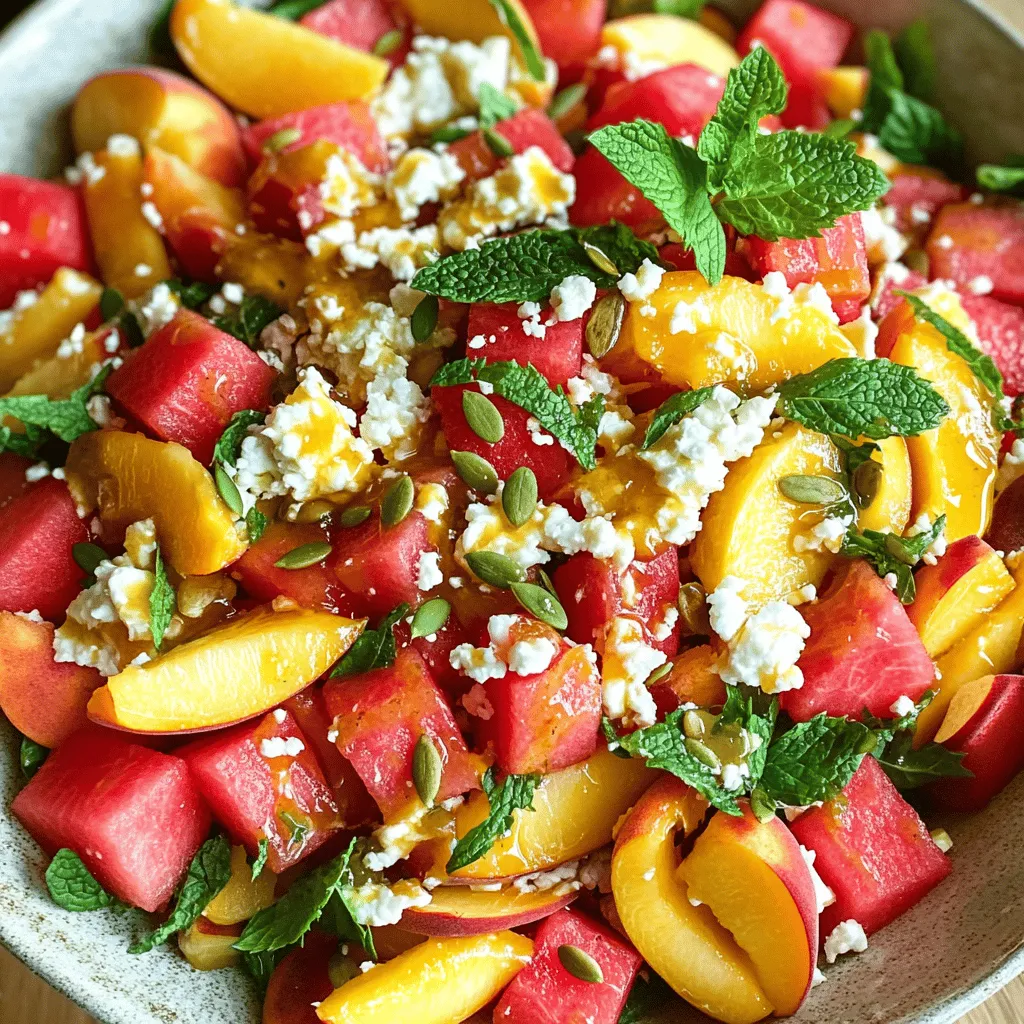
Looking for the perfect summer dish? Peach Watermelon Salad is both refreshing and easy to make. With ripe peaches and

- 1 cup cooked chicken breast, shredded - 1 cup shredded cabbage - 1 cup carrots, julienned - 1/2 cup bean sprouts - 2 green onions, finely chopped - 1 tablespoon soy sauce - 1 tablespoon sesame oil - 1 teaspoon ginger, grated - 1 teaspoon garlic, minced - 12 rice paper wrappers - Vegetable oil for frying - Salt and pepper to taste The main ingredients create the heart of your spring rolls. Shredded chicken breast gives a great protein base. The fresh vegetables, like cabbage and carrots, add crunch and color. Green onions add a mild, sharp flavor. The rice paper wrappers are key for that crispy finish. - Additional spices or herbs You can add bean sprouts for extra crunch. Other spices or herbs can also enhance the flavor. Try adding Thai basil or cilantro for a fresh twist. - Large mixing bowl - Shallow dish for soaking wrappers - Deep skillet or fryer You need a large mixing bowl to combine your filling. A shallow dish helps soak the rice paper wrappers. Finally, a deep skillet or fryer is best for crispy spring rolls. You can find the full recipe [here](#). In a large bowl, combine the following ingredients: - 1 cup cooked chicken breast, shredded - 1 cup shredded cabbage - 1 cup carrots, julienned - 1/2 cup bean sprouts - 2 green onions, finely chopped - 1 tablespoon soy sauce - 1 tablespoon sesame oil - 1 teaspoon ginger, grated - 1 teaspoon garlic, minced Mix these well until everything is coated and seasoned. You can adjust the salt and pepper to your taste. A good mix ensures each spring roll is packed with flavor. To soften the rice paper, fill a shallow dish with warm water. Submerge one wrapper for about 10-15 seconds. You want it soft but not too mushy. After soaking, lay it flat on a clean surface. Be gentle when handling; the wrappers can tear easily if you rush. Place about 2 tablespoons of the filling in the center of the wrapper. Fold the sides over the filling. Then, roll it tightly from the bottom up. This keeps the filling snug inside. Make sure the edges seal well to prevent any leaks during frying. Repeat this with the remaining wrappers and filling. Heat vegetable oil in a deep skillet or fryer over medium-high heat. I recommend about 350°F (175°C) for the best results. Fry the rolls in batches, making sure not to crowd the pan. Cook for about 3-4 minutes, or until they turn golden brown and crispy. Remove them and let them drain on paper towels. This helps keep them crunchy. Enjoy your crispy chicken spring rolls warm with a sweet chili sauce or soy sauce for dipping. To get that perfect crunch, you must pay attention to oil temperature. Heat your oil to about 350°F (175°C). This hot oil cooks the rolls fast, making them crispy. If the oil is too cool, the rolls soak up oil and become soggy. Always test a small piece first to check the heat. To avoid sogginess, do not overfill your rolls. If you add too much filling, the wrappers can break. This will let oil seep in during frying. Stick to about two tablespoons of filling per roll. This keeps the rolls light and crispy. One common mistake is overfilling the rolls. It might seem tempting, but it leads to messy spring rolls. Use just enough filling so you can fold and seal them easily. Another mistake is not sealing properly. Make sure to press the edges of the wrappers together tightly. If they are not sealed well, they can open up in the hot oil. Serve your crispy spring rolls with a side of sweet chili sauce or soy sauce for dipping. These sauces add a burst of flavor that pairs well with the rolls. The ideal serving temperature is warm, right after frying. This way, you enjoy the crunch and flavor at their best. You can also garnish with fresh herbs for added color and taste. {{image_2}} You can swap chicken for shrimp or tofu in your spring rolls. Shrimp adds a sweet flavor and a nice bite. Simply cook and chop the shrimp before mixing it with your veggies. Tofu is a great choice for a plant-based option. Use firm tofu, press it to remove water, then cube and sauté it. Both choices give you tasty and healthy rolls. For a meat-free version, focus on fresh veggies. Use these ingredients: - 1 cup shredded cabbage - 1 cup carrots, julienned - 1/2 cup bean sprouts - 2 green onions, finely chopped - 1 tablespoon soy sauce - 1 tablespoon sesame oil - 1 teaspoon ginger, grated - 1 teaspoon garlic, minced This mix is colorful and flavorful. You can add mushrooms or bell peppers for extra crunch. Just ensure to season well with soy sauce for a savory kick. Spice things up by adding different herbs or spices. Try fresh cilantro or mint for a refreshing twist. You can also mix in some chili flakes for heat. If you want a sweeter taste, add a dash of hoisin sauce. Mixing in different vegetables, like bell peppers or zucchini, keeps your rolls exciting every time you make them. For the full recipe, check out the Crispy Chicken Spring Rolls section. To keep your chicken spring rolls fresh, store them in the fridge. Wrap each roll in plastic wrap or place them in an airtight container. This keeps them from drying out. Make sure to eat leftovers within three days for the best taste. To reheat your spring rolls, use an oven or an air fryer. Preheat the oven to 375°F (190°C). Place the rolls on a baking sheet and heat for about 10-15 minutes. This method keeps them crispy. An air fryer works well too. Set it to 350°F (175°C) and cook for 5-7 minutes. Avoid microwaving, as it makes them soggy. You can freeze both uncooked and cooked spring rolls for later use. For uncooked rolls, lay them on a baking sheet and freeze until solid. Then, transfer them to a freezer bag. To freeze cooked rolls, let them cool completely first. Wrap each roll in plastic wrap, then place them in a bag. They last for about three months in the freezer. When ready to eat, you can fry them straight from the freezer. Just add a few extra minutes to the cooking time. For more details, check the Full Recipe. You can make chicken spring rolls by baking them. Preheat your oven to 400°F (200°C). After rolling your spring rolls, place them on a baking sheet. Brush them lightly with oil. Bake for about 20 minutes, flipping halfway through. This method gives you a crispy roll without frying. For chicken spring rolls, I recommend sweet chili sauce or soy sauce. These sauces add flavor and a nice kick. You could also try hoisin sauce or peanut sauce for a different twist. Each sauce brings a unique taste to your rolls. Yes, you can use other wrappers. Try using egg roll wrappers or wonton wrappers. They will give your rolls a different texture and flavor. However, rice paper offers a light and chewy bite that many love. Experiment to find your favorite! You can store chicken spring rolls in the fridge for up to three days. Keep them in an airtight container to maintain freshness. Make sure to eat them quickly for the best taste and texture. If they start to get soggy, it’s time to toss them. Spring rolls have roots in Chinese cuisine. They date back to the 4th century. Originally, they celebrated the spring harvest. Today, many cultures enjoy them worldwide, often with unique fillings and wrappers. Their popularity continues to grow as people explore different flavors. You learned how to make chicken spring rolls, from ingredients to storage tips. I shared key steps for a tasty filling, perfect rolling, and crisp frying. You can use various proteins and veggies to customize your rolls. Remember, avoid overfilling and seal them tightly for the best results. Whether frying or experimenting with other cooking methods, enjoy delicious spring rolls at any time. With the right techniques and practice, you’ll impress anyone. Dive into this fun dish and make it your own!

Chicken Spring Rolls Crispy and Flavorful Snack Delight

If you’re craving a crispy and flavorful snack, chicken spring rolls are the perfect choice! In this post, I’ll guide

To make a great Strawberry Kiwi Pavlova, you need these key items: - 4 large egg whites - 1 cup granulated sugar - 1 teaspoon white vinegar - 1 teaspoon cornstarch These ingredients create a light and airy meringue. The egg whites whip up to give the pavlova its unique structure. The sugar adds sweetness and helps form a crisp outer shell. White vinegar stabilizes the egg whites, while cornstarch gives the meringue its soft center. The toppings bring freshness and flavor to the pavlova. Gather these items: - 1 cup heavy whipping cream - 2 tablespoons powdered sugar - 1 teaspoon vanilla extract - 1 cup strawberries, hulled and sliced - 2 kiwis, peeled and sliced - Fresh mint leaves for garnish (optional) The heavy cream adds a rich, smooth layer on top. Powdered sugar sweetens the cream just right, and vanilla extract enhances the flavor. Strawberries and kiwis not only add color but also a burst of fruity taste. Mint leaves can make your dessert look fancy and fresh. For the full method, check the Full Recipe. 1. First, preheat your oven to 275°F (135°C). Line a baking sheet with parchment paper. Use a pencil to draw a 9-inch circle on the paper. This helps you shape the pavlova. 2. In a large bowl, beat 4 large egg whites with an electric mixer. Start on medium speed. Beat until soft peaks form. This takes about 2-3 minutes. 3. Gradually add 1 cup of granulated sugar. Add it one tablespoon at a time. Keep beating until stiff peaks form. The mixture should look glossy. This will take around 5-7 minutes. 1. Gently fold in 1 teaspoon of white vinegar and 1 teaspoon of cornstarch using a spatula. Be careful not to deflate the egg whites. 2. Spoon the meringue onto the parchment paper. Use the drawn circle as a guide. Shape it into a round, shallow nest. Make the edges slightly raised. 3. Bake in your preheated oven for 1 hour. After an hour, turn off the oven. Leave the pavlova inside to cool. Leave the door slightly ajar. This helps prevent cracks. 1. While the pavlova cools, prepare the whipped cream. In a mixing bowl, combine 1 cup of heavy whipping cream, 2 tablespoons of powdered sugar, and 1 teaspoon of vanilla extract. Beat on medium-high speed until soft peaks form. 2. Once the pavlova is cool, carefully transfer it to a serving platter. 3. Spread the whipped cream over the top. Smooth it into an even layer. 4. Arrange 1 cup of sliced strawberries and 2 sliced kiwis on top. This adds vibrant color and flavor. 5. If you like, garnish with fresh mint leaves for a touch of freshness. For the full recipe, check the Full Recipe section. Enjoy your Strawberry Kiwi Pavlova! To make the best meringue, start with clean tools. Any grease can ruin your egg whites. Wash your mixing bowl and beaters with soap and water. Rinse them well before use. Achieving stiff peaks is key. Beat the egg whites until they start to hold shape. Gradually add sugar, one tablespoon at a time. This step helps create a glossy finish. Keep beating until the mixture is firm and shiny. To prevent cracks, bake your meringue at a low temperature. I suggest 275°F (135°C). After baking, turn off the oven. Let it cool inside with the door slightly open. This slow cooling helps keep the meringue intact. For a stunning dessert, serve the pavlova on a pretty cake stand. This adds a special touch. Slice it at the table for a wow factor. You will love the mix of crunchy meringue and soft cream. Garnish with mint leaves for a fresh pop of color. You can also drizzle a bit of honey or a fruit sauce on top. This adds extra flavor and makes it look even more appealing. For a fun twist, try adding a sprinkle of nuts or coconut flakes. These can enhance the texture and taste of your pavlova. Enjoy your delicious creation! {{image_2}} You can make this dessert even more fun with swaps. If you want a dairy-free version of the cream, use coconut cream instead of heavy cream. It gives a nice taste and texture. For the fruit toppings, you can switch up the flavors. Try using mango or blueberries for a fresh twist. They add a burst of color too! If you want a healthier option, consider using natural sweeteners. Maple syrup or honey can replace granulated sugar in the whipped cream. This keeps it sweet without too much sugar. Adding a bit of citrus zest can boost the flavor of your cream. A teaspoon of lemon or lime zest makes it bright and zesty. Your guests will love this added kick! You can also use flavored extracts in the meringue. Almond or lemon extracts add a new layer of flavor. Just a few drops will make a big difference. Lastly, feel free to change the toppings with the seasons. In summer, use peaches or raspberries. In fall, try sliced apples or pears. Each season brings its own tasty options for your pavlova! To keep your pavlova fresh, store it in a cool, dry place. Use an airtight container to prevent moisture. If you have leftover whipped cream, place it in a separate container. Cover it tightly with plastic wrap or a lid. This keeps it from absorbing other flavors in the fridge. For fruit toppings, store them in the fridge. Place sliced strawberries and kiwis in a bowl, covering them with plastic wrap. This helps them stay fresh and prevents browning. You can add them to the pavlova just before serving. Can pavlova be reheated? No, pavlova does not reheat well. The texture changes and becomes chewy. If you left it out too long, it may lose its crunch. To revive texture if stored improperly, try placing it in a low oven. Set the oven to 200°F (93°C) for about 10 minutes. This can help restore some crispness to the outer shell. However, it’s best to enjoy it fresh. For the full recipe, check out the Strawberry Kiwi Pavlova. Enjoy your delicious treat! What is the origin of pavlova? Pavlova comes from Australia and New Zealand. It is named after the Russian ballerina Anna Pavlova. Chefs created this dessert in her honor during her tour in the 1920s. The light and airy meringue represent the grace of ballet. How do I keep meringue from getting soggy? To keep meringue crisp, bake it slowly at a low temperature. After baking, let it cool in the oven with the door ajar. This helps it dry out and stay crunchy. Store the meringue in an airtight container until you're ready to serve. Can I make this recipe ahead of time? Yes, you can make pavlova ahead of time. Prepare the meringue and store it for a day or two. Avoid adding cream and fruit until you are ready to serve. This keeps the textures fresh and tasty. Why did my pavlova crack during baking? Pavlova may crack if it bakes too quickly. Ensure your oven temperature is low. Avoid opening the oven door while it bakes. Cracks can also happen if the egg whites are overbeaten. How can I fix a collapsed pavlova? If your pavlova collapses, it may have been underbaked. You can try to salvage it by adding whipped cream and fruit on top. This adds structure and hides imperfections. What can I do if my whipped cream doesn’t whip? If your cream doesn’t whip, check its freshness. Use cold cream and a chilled bowl for the best results. Beat on high until soft peaks form. If it still doesn’t whip, it may be too warm or past its prime. For the full recipe, check out the detailed instructions above. Making Strawberry Kiwi Pavlova combines simple ingredients into a delightful dessert. We explored essential components like egg whites, sugar, and fresh fruit. I shared step-by-step instructions for meringue, baking, and assembling. Tips helped perfect your technique, while variations allowed for creativity. Lastly, storing and reheating advice ensures your pavlova stays fresh. Enjoy making this treat; it’s fun and satisfying. You’ll impress friends and family with each bite.

Strawberry Kiwi Pavlova Fresh and Fruity Delight

If you crave a sweet treat that’s fresh and fruity, try my Strawberry Kiwi Pavlova! This dessert dazzles with its

Making mango popsicles is simple and fun. Here’s what you need: - Fresh mangoes: Choose two ripe mangoes. Look for mangoes that feel slightly soft when you press them gently. They should smell sweet. - Coconut milk: You can use canned coconut milk or carton coconut milk. Both work well, but canned gives a creamier texture. - Sweeteners: You can add honey or maple syrup. Honey has a strong flavor, while maple syrup is lighter. - Additional flavoring ingredients: Lime juice adds a nice zing. A pinch of sea salt enhances the flavors too. These ingredients create a refreshing treat. You can find the complete process in the Full Recipe. Enjoy making these tasty mango popsicles! To start, take two ripe mangoes. Peel and dice them into small pieces. Place the mango pieces in a blender. Next, add one cup of coconut milk. Lime juice brings brightness, so add one tablespoon. A pinch of sea salt will enhance the flavors. Blend the mixture on high until it is smooth and creamy. If needed, stop and scrape down the sides. This ensures every mango piece blends well. Taste the mixture. If it needs sweetness, add one tablespoon of honey or maple syrup. Blend again to mix. Now, it’s time to fill the molds. Pour the mango mixture into each popsicle mold. Fill them about three-quarters full. This lets the popsicle expand as it freezes. To prevent spillage, hold the mold steady while pouring. You can also place the molds in a bowl for extra support. If you want to make your popsicles fun, add slices of fresh mango or berries. Just drop them in before you insert the sticks. Put the filled molds in the freezer. Freeze them for at least six hours. This makes sure they are solid and tasty. When you’re ready to eat, take the molds out of the freezer. To release the popsicles, run warm water over the outside of the molds for a few seconds. Then, gently pull the popsicles out. Enjoy this refreshing treat on a hot day! For the complete recipe, check out the Full Recipe section. To make the best mango popsicles, you need ripe mangoes. Look for a mango that feels slightly soft when you press it. The skin should be smooth and have a vibrant color. A sweet scent near the stem also shows it’s ripe. If the mango is hard, let it sit at room temperature for a few days. This will help it ripen. Not all mangoes are equally sweet. You may want to taste the blended mixture before freezing. If it needs more sweetness, add honey or maple syrup. Blend again to mix well. You can adjust the sweetness to fit your taste. Remember, the lime juice adds a tangy flavor, so balance it out to your liking. Serving mango popsicles can be fun and creative. Place the popsicles on a bright plate for a cheerful look. You can add fresh mint leaves for extra color. If you want, garnish with slices of fresh mango or berries. This makes each popsicle look even more tempting. For the best experience, enjoy them on a sunny day with friends and family. For the complete recipe, check out the Full Recipe section above. {{image_2}} For a fun twist, you can make tropical mango popsicles by adding pineapple or coconut. Both ingredients bring extra sweetness and a fresh taste. Start by blending ripe mangoes with diced pineapple. This combo gives you a fruity burst. You can also use coconut milk instead of regular milk for a creamy texture. Blend it all together until smooth. This tropical flavor transports you to a sunny beach! If you love creamy popsicles, try making creamy mango yogurt pops. Just add yogurt to the mango mixture for a rich and smooth treat. Greek yogurt works great here! It adds protein and a nice tang. Blend it with the mangoes and a touch of honey for sweetness. The yogurt makes the popsicles silky and delicious. You will enjoy every bite! For those who like a kick, spicy mango popsicles are a must-try. You can infuse them with chili powder or jalapeño. Start with your mango base, then add a pinch of chili powder. If you want more heat, finely chop a jalapeño and mix it in. This spicy twist balances the sweetness of the mango. The heat will surprise your taste buds in the best way! You can find the full recipe for mango popsicles in my earlier notes. Enjoy exploring these fun variations! Mangoes are more than just tasty. They pack a punch of vitamins. They are rich in vitamin C, which boosts your immune system. They also provide vitamin A, which is good for your eyes. Antioxidants in mangoes help fight free radicals. This can lead to better skin and overall health. Each mango popsicle has about 100 calories. This comes mostly from the mangoes and coconut milk. You'll also find healthy fats from coconut milk, which are good for your heart. Each serving contains natural sugars from the mangoes. This makes it a sweet but healthy treat. You can make these popsicles even healthier. Try using dairy-free milk like almond or oat milk. You can also use less honey or maple syrup. This cuts down on sugar while keeping the taste. If you want a creamier texture, add Greek yogurt. This adds protein and makes the popsicles rich without extra sugar. For the full recipe, check out Mango Bliss Popsicles ! Mango popsicles can last up to three months in the freezer. To keep them fresh, store them in an airtight container. This helps prevent freezer burn. You can also wrap each popsicle in plastic wrap. Make sure to label the container with the date. This way, you know when you made them. Yes, you can use frozen mangoes! Frozen mangoes work well in this recipe. They save time since you skip peeling and chopping fresh mangoes. Just let them thaw a bit before blending. This will help achieve a smooth texture. If your frozen mangoes are sweetened, adjust the honey or syrup in the recipe. You can find mango popsicles in most grocery stores. Look for brands like Outshine or Whole Fruit. They often have natural ingredients and great flavor. You can also check local farmers' markets for homemade options. They may offer unique flavors or organic choices. Absolutely! If you don't have popsicle molds, use small cups instead. Fill the cups with the mango mixture, then insert a stick. You can also use ice cube trays. Just pop out the frozen cubes when ready to enjoy. This way, you can still savor the refreshing taste of mango popsicles. For the full recipe, see above. Mango popsicles are a fun treat that anyone can enjoy. We explored the best ingredients, from fresh mangoes to sweeteners like honey or maple syrup. I shared step-by-step instructions for making and freezing your popsicles. You can adjust the sweetness and try fun variations too. Remember, ripe mangoes pack the best flavor. This treat is not just tasty; it's also healthy. Enjoy the process of making these popsicles as much as eating them! Keep experimenting for your perfect recipe.

Mango Popsicles Refreshing Summer Treat for Everyone

Craving a cool and tasty treat this summer? Mango popsicles are the answer! These vibrant snacks are easy to make

Older posts
Newer posts
← Previous Page1 … Page3 Page4 Page5 … Page62 Next →

dsad

© 2025 Foodish Talk • Built with GeneratePress

Our Policies

  • Copyright Policy
  • Cookie Policy
  • GDPR Policy
  • Privacy Policy
  • Disclaimer
  • Terms Of Use

More Information

  • Home
  • About
  • Contact
  • Appetizers
  • Dessert
  • Dinner
  • Drinks
©2025, Foodish Talk About Back To Top