Skip to content
DisclaimerTerms Of UseGDPR PolicyCookie Policy

Foodish Talk

  • Home
  • Drinks
  • Appetizers
  • Dinner
  • Dessert
  • About
  • Contact
  • Privacy Policy
DisclaimerTerms Of UseGDPR PolicyCookie Policy

Ava

To make Asian Sesame Chicken Salad, you need the following items: - 2 cups cooked and shredded chicken breast - 4 cups mixed greens (spinach, romaine, and arugula) - 1 cup shredded carrot - 1 red bell pepper, thinly sliced - 1 cup cucumber, julienned - 1/4 cup green onions, sliced - 1/4 cup sesame seeds, toasted - 1/2 cup edamame, shelled - 1/3 cup sesame oil - 2 tablespoons soy sauce - 2 tablespoons honey - 1 tablespoon rice vinegar - 1 tablespoon fresh ginger, minced - Salt and pepper to taste For the best taste, always choose fresh ingredients. Fresh greens and vegetables give your salad a crisp bite. Frozen ingredients may lack texture, but they can work in a pinch. Just ensure they are thawed and drained well. You can add more flavors and textures to your salad with these options: - Nuts and seeds: Try peanuts, almonds, or sunflower seeds for extra crunch. - Additional veggies: Add bell peppers, snap peas, or radishes for more color and taste. These add-ins not only taste great but also boost nutrition. You can make a simple dressing at home. Use these ingredients for a tasty mix: - 1/3 cup sesame oil - 2 tablespoons soy sauce - 2 tablespoons honey - 1 tablespoon rice vinegar - 1 tablespoon fresh ginger, minced - Salt and pepper to taste Mix these in a bowl until smooth. If you want something different, try using a peanut dressing or coconut aminos instead of soy sauce. These alternatives add a unique twist to your salad. For the Full Recipe, follow the steps and enjoy your flavorful dish! How to shred chicken efficiently To shred chicken easily, use two forks. Hold one fork in each hand. Grab a piece of cooked chicken with one fork and pull it apart with the other fork. This method works well and keeps your hands clean. Preparing vegetables correctly Wash all your veggies first. Cut the red bell pepper into thin slices. Julienning the cucumber means cutting it into long, thin strips. Use a box grater for the carrot to make nice shreds. This adds color and crunch to your salad. Tips for even dressing distribution Pour the dressing over the salad right before serving. Use tongs to toss everything gently but well. This helps coat each piece with flavor. Don’t rush. Take your time to ensure all ingredients mix nicely. Importance of letting flavors meld Let the salad sit for about 5-10 minutes. This waiting time allows the flavors to blend. It makes every bite taste better. You’ll enjoy a more flavorful dish after the salad has marinated a bit. Recommended serving styles Serve the salad in individual bowls. This makes it easy for everyone to enjoy. You can also use large plates for a family-style meal. Garnish with extra sesame seeds and green onion slices for a pop of color. Pairing side dishes or drinks Asian sesame chicken salad pairs well with rice or spring rolls. For drinks, try iced green tea or a light white wine. These options complement the fresh flavors of the salad beautifully. For juicy chicken, use boneless, skinless chicken breasts. Grill, bake, or pan-sear them. Aim for an internal temperature of 165°F. Let the chicken rest for a few minutes after cooking. This keeps it moist and tender. If you have leftovers, store them in an airtight container. You can use them for salads, sandwiches, or wraps. To store your salad, place it in a sealed container in the fridge. Keep the dressing separate until you are ready to eat. This helps maintain the freshness of the greens. For reheating chicken, place it in the microwave for 30 seconds. Check if it's warm. If not, heat for another 15 seconds. You can easily customize this salad. For a gluten-free option, use tamari instead of soy sauce. If you have nut allergies, skip the sesame seeds. To add variety, mix in seasonal veggies like bell peppers or snap peas. This keeps the salad fresh and exciting. For a twist, try using fresh fruits like mango or berries. They add sweetness and color to your dish. For more detailed guidance, check out the Full Recipe. {{image_2}} You can easily swap chicken with tofu for a vegetarian option. Use firm tofu for the best texture. Press the tofu to remove extra water. Cut it into cubes and pan-fry until golden. This adds flavor and a nice crunch. Other protein alternatives include chickpeas or tempeh. Both options provide a hearty bite. To enhance sweetness, consider adding fruits. Sliced mango or mandarin oranges brighten the dish. They pair well with the sesame flavors. You can also spice things up. Add sliced jalapeños or a dash of chili flakes. This gives the salad a fun kick. If you want to change the dressing, try an Asian peanut dressing. It adds creaminess and a nutty taste. Blend peanut butter, soy sauce, and lime juice for a quick mix. Coconut aminos can replace soy sauce for a soy-free option. It still gives that rich flavor without gluten. Check out the Full Recipe for more details! You can keep Asian Sesame Chicken Salad in the fridge for up to three days. To keep it fresh, store the dressing separately from the salad. This way, your greens stay crisp, and the flavors stay bright when you're ready to eat. I don’t recommend freezing the salad as it can change the texture. However, you can freeze the cooked chicken. Wrap it tightly in plastic wrap or a freezer bag to keep it fresh. When you’re ready to use it, thaw it in the fridge overnight for best results. To make meal prep easy, you can chop your veggies and cook your chicken ahead of time. Store them in airtight containers in the fridge. When you want to eat, just toss the ingredients together. This saves you time and lets you enjoy a fresh meal in minutes. To make this salad gluten-free, you can swap out soy sauce. Use tamari or coconut aminos instead. Both options give a similar flavor without gluten. Ensure your sesame oil is pure and check labels on any packaged ingredients. Yes, you can use different greens in this salad. Try kale, butter lettuce, or even baby spinach. Each green adds its unique taste and texture. Mixing different greens can make your salad even more colorful and fun. This salad is packed with nutrients. Here’s a quick look at key ingredients: - Chicken: A great source of protein. It helps build and repair muscles. - Greens: Loaded with vitamins A and C, they support your vision and immune system. - Carrots: High in beta-carotene, good for skin health. - Cucumber: Hydrating and low in calories, perfect for weight management. - Edamame: Rich in fiber and protein, it helps keep you full. Adjusting the recipe is easy. Just double or halve the ingredient amounts. For example, if you want to serve eight, use four cups of chicken and eight cups of greens. Keep the dressing ratio the same for best flavor. This blog post covers how to create a delicious Asian Sesame Chicken Salad. You learned about choosing fresh ingredients, adding nuts or extra veggies for crunch, and making your own dressings. I shared tips for cooking juicy chicken and storing leftovers. You can customize the recipe for dietary needs or seasonal tastes. In sum, enjoy experimenting with flavors that fit your taste. Create a salad that’s tasty and healthy!

Asian Sesame Chicken Salad Flavorful and Fresh Meal

Are you craving a fresh and flavorful meal? Look no further than Asian Sesame Chicken Salad! This dish combines tender

- 4 medium zucchinis - 1 cup cooked quinoa - 1 cup cherry tomatoes, halved - 1/2 cup red bell pepper, finely chopped - 1/2 cup corn kernels (fresh or frozen) - 1 cup black beans, rinsed and drained - 1 teaspoon ground cumin - 1 teaspoon chili powder - 1/2 teaspoon garlic powder - 1 cup shredded cheese (cheddar or mozzarella) - Salt and pepper to taste - 2 tablespoons olive oil - Fresh cilantro, for garnish When it comes to making stuffed zucchini boats, the ingredients play a key role. Each item adds its own flavor and texture. Zucchini is soft and mild, which makes it the perfect vessel. The quinoa brings a nutty touch and a healthy grain base. Cherry tomatoes add sweetness and a pop of color. Red bell pepper gives a nice crunch, while corn adds sweetness and vibrancy. Black beans provide protein and a hearty feel. Spices like cumin and chili powder add warmth and depth. Garlic powder gives a hint of savory flavor. Finally, the cheese melts beautifully, adding richness. This recipe is not just easy; it is also healthy. The mix of these ingredients creates a balanced meal. You can find the full recipe to guide you through each step and ensure success. First, preheat your oven to 375°F (190°C). This step is key for cooking your zucchini evenly. Next, wash the zucchinis under cool water. After that, slice them in half lengthwise. Use a spoon to scoop out the seeds and some flesh. This creates a boat shape for your filling. Drizzle olive oil over the zucchini halves. Make sure to sprinkle salt and pepper for flavor. Place the zucchini cut side up on a baking sheet. This helps them cook nicely. In a large mixing bowl, combine the cooked quinoa with the veggies. Add halved cherry tomatoes, chopped red bell pepper, corn, and black beans. This mix adds color and taste to your dish. Next, season the filling mixture. Sprinkle in ground cumin, chili powder, and garlic powder. Stir well until everything blends together. This step ensures each bite is full of flavor. Now it’s time to fill the zucchini boats. Spoon the quinoa mixture evenly into each half. Press gently to pack the filling, so it stays put. Top each stuffed zucchini with shredded cheese. This will melt and give a delicious finish. Cover the baking sheet with aluminum foil for the first part of baking. Bake in the preheated oven for 20 minutes. After that, remove the foil and bake for an additional 10-15 minutes. You want the cheese to melt and bubble. The zucchinis should be tender too. Once done, take them out and garnish with fresh cilantro. Enjoy your flavorful and easy stuffed zucchini boats! For the complete recipe, refer to the Full Recipe. To make great stuffed zucchini boats, start by scooping them out well. Use a small spoon to dig deep but not too deep. The perfect scoop should leave about a quarter-inch of flesh. This keeps the boat strong and prevents it from breaking. Next, avoid a watery filling. If your filling has too much liquid, it can soak the zucchini. To fix this, use fresh or frozen corn without extra water. Rinse the black beans well to remove extra liquid. For tomatoes, drain them to keep your filling dry. Do not overcook your zucchini. If you leave them in the oven too long, they get mushy. Bake them just until they are tender. You want a nice bite, not mush. When adding filling, make sure to spread it evenly. This helps each bite taste great. Use a spoon to pack the filling lightly but firmly. This way, the filling stays in the boat during cooking. For a full recipe, check out the delightful stuffed zucchini boats. {{image_2}} You can change the filling in stuffed zucchini boats to suit your taste. For meat lovers, ground turkey or beef works great. They add protein and flavor. Just cook the meat before mixing it with the other ingredients. This adds a hearty touch to your meal. For a vegetarian option, try using tofu or lentils. Tofu is light and absorbs flavors well. You can crumble it and mix it in with your veggies. Lentils are another great choice. They are rich in protein and fiber. Both options make the dish healthy and filling. Adding spices and herbs can elevate your stuffed zucchini boats. You can try cumin, paprika, or Italian herbs for extra depth. These flavors make the dish exciting and delicious. Fresh herbs like basil or parsley also bring brightness to the meal. Toppings and sauces can add a fun twist. You might drizzle some salsa or a tangy yogurt sauce on top. Shredded cheese is a must, but consider adding crunchy breadcrumbs for texture. These little changes can turn a simple dish into something special. For the full recipe, check out the Delightful Stuffed Zucchini Boats section. Store any leftover stuffed zucchini boats in the fridge. Use an airtight container. They stay fresh for about three days. To keep the filling from getting soggy, do not add extra sauce until ready to eat. If you want to freeze them, let the boats cool completely. Wrap each one in plastic wrap or foil. Then, place them in a freezer bag. They last well for up to three months. When ready to eat, thaw them in the fridge overnight. To reheat stuffed zucchini boats, use an oven or microwave. The oven keeps the texture nice. Preheat it to 350°F (175°C). Place the zucchini on a baking sheet, cover with foil, and heat for about 15-20 minutes. If using a microwave, place one boat on a plate. Heat for 2-3 minutes. Check that it's hot all the way through. Avoid overcooking, as this can make the zucchini mushy. Enjoy your delicious leftovers! How can I make stuffed zucchini boats vegan? To make stuffed zucchini boats vegan, swap out the cheese for a plant-based option. You can also use tofu or chickpeas for protein. What else can I stuff in zucchini boats? You can fill zucchini boats with many tasty ingredients. Try using rice, lentils, or different veggies. Ground meat or fish also works great. How do I prevent zucchinis from getting soggy? To stop zucchinis from getting soggy, scoop out some flesh but leave enough. Also, bake them briefly before adding the filling. This helps to firm them up. What’s the best way to cut zucchini for boats? Cut zucchinis in half lengthwise. Use a sharp knife for a clean cut. Be careful while cutting, as zucchinis can be slippery. Can I prepare zucchini boats ahead of time? Yes, you can prepare zucchini boats ahead. Stuff them and store them in the fridge for up to 24 hours. Just bake them when you are ready to eat. What to serve with stuffed zucchini boats? Serve stuffed zucchini boats with a fresh salad or some crusty bread. You can also add a side of rice or quinoa for extra carbs. How to pair with side dishes or salads? Pair your zucchini boats with light dishes like cucumber salad or a simple tomato salad. These add freshness and balance to the meal. Stuffed zucchini boats are a fun and healthy dish. We covered ingredients, preparation, and baking techniques. Remember to mix your filling well and avoid overcooking zucchini. Try different proteins or spices to keep things fresh. Store any leftovers properly for later enjoyment. With the tips shared, you can master this dish and impress your friends. Enjoy making stuffed zucchini boats that are both tasty and good for you!

Stuffed Zucchini Boats Flavorful and Easy Recipe

Are you ready to discover a delicious new way to enjoy zucchini? My stuffed zucchini boats are both flavorful and

When making maple glazed carrots, you only need a few simple ingredients. Each one adds to the sweet and savory taste of this dish. Here’s what you’ll need: - 1 lb baby carrots (or regular carrots, peeled and cut into sticks) - 2 tablespoons unsalted butter - 3 tablespoons pure maple syrup - 1 tablespoon fresh thyme leaves (or 1 teaspoon dried thyme) - Salt and pepper to taste - 1 teaspoon lemon juice (optional, for brightness) With these ingredients, you can create a dish that shines on any table. The maple syrup brings a sweet flavor, while the butter adds richness. Fresh thyme gives a lovely herbal note. Don't forget the salt and pepper for balance! You can even add lemon juice for a hint of brightness that cuts the sweetness. First, wash your carrots well. If you use regular carrots, peel them and cut them into even sticks. Uniform sizes help them cook evenly. Baby carrots can skip the peeling and cutting steps, making prep quick and easy. Next, grab a large skillet and place it on medium heat. Add two tablespoons of unsalted butter to the skillet. Let it melt and bubble gently. Once the butter melts, add your prepared carrots. Stir them occasionally for about five minutes. You want them to soften and brighten in color. Now it’s time for the sweet part! Drizzle three tablespoons of pure maple syrup over the carrots. Add one tablespoon of fresh thyme leaves for a burst of flavor. Toss the carrots until they are well coated. Keep cooking for another five to seven minutes. Stir them often. The maple syrup will thicken and create a beautiful glaze. Finally, season with salt and pepper to taste. If you like, add a teaspoon of lemon juice for a bright finish. This step balances the sweetness and adds a nice zing. Enjoy your maple glazed carrots as a delicious side dish! For the full recipe, click here. To get the best glaze on your carrots, cook them just right. Aim for about 10 to 12 minutes of cooking time. You want them tender but still slightly crisp. Start with medium heat. This allows the butter to melt well and prevents burning. Keep stirring the carrots to coat them evenly in the maple syrup. If they start to brown too quickly, lower the heat a bit. To boost the flavor, think about herbs. Fresh herbs like parsley or dill can add a nice touch. You can also try adding some garlic for a savory kick. If you want to switch things up, use honey or agave instead of maple syrup. This gives a different sweetness that works well, too. {{image_2}} You can mix maple glazed carrots with other veggies. Try green beans, Brussels sprouts, or parsnips. These vegetables add color and flavor. When using different veggies, adjust the cooking time. For example, green beans cook faster than carrots. Cut vegetables into similar sizes for even cooking. This way, everything cooks together well. Adding nuts gives a nice crunch to your maple glazed carrots. Walnuts and pecans work great here. Toast the nuts for extra flavor. To do this, heat them in a dry pan over medium heat. Stir often until they turn golden and smell good. Mix the toasted nuts into the glazed carrots in the last few minutes of cooking. This adds a lovely texture and taste. Try this twist for a fun upgrade to the dish! For the full recipe, check the previous sections. To keep your maple glazed carrots fresh, use an airtight container. Glass or plastic containers work well. Store them in the fridge for up to four days. Make sure they cool down before sealing the container to avoid steam buildup. Reheat your carrots gently to maintain their glaze. The best method is to use a skillet over low heat. Add a splash of water to help steam them. Stir often to keep the glaze from burning. You can also use the microwave. Heat in short bursts, stirring between each to ensure even warming. Yes, you can use frozen carrots. Frozen carrots save time and are easy to find. They are often pre-cut and ready to cook. However, they may not have the same crisp texture as fresh carrots. When cooked, frozen carrots can become softer. To use them, just thaw and sauté as you would fresh carrots. You might need to adjust the cooking time. Start with less time and check for doneness. Maple glazed carrots pair well with many main courses. They add a sweet touch to savory dishes. Some great options include: - Roast chicken or turkey - Grilled pork chops - Baked salmon - Vegetarian lasagna - Quinoa and black bean salad These dishes balance the sweetness of the carrots nicely. Feel free to mix and match based on your meal! To make maple glazed carrots vegan, swap out the butter. Use coconut oil or vegan butter instead. As for the maple syrup, you can keep it since it is already vegan. If you want a unique twist, try agave syrup or brown rice syrup. These options keep the sweetness intact while catering to a vegan diet. Enjoy your dish without losing flavor! This post covered how to make delicious maple glazed carrots. You learned the key ingredients, step-by-step instructions, and helpful tips. Variations, like adding nuts or other veggies, can enhance the dish. Proper storage and reheating ensure your carrots stay tasty. Enjoy trying this simple recipe. Your meals will shine with these flavorful carrots.

Maple Glazed Carrots Perfect for Any Meal

Love the sweet crunch of carrots? I’m excited to share my Maple Glazed Carrots recipe! This dish is simple yet

- 9 lasagna noodles - 2 cups ricotta cheese - 1 large egg - 3 cups fresh spinach, chopped - 1 cup mozzarella cheese, shredded - 1/2 cup Parmesan cheese, grated - 3 cups marinara sauce - 1 teaspoon dried oregano - 1/2 teaspoon black pepper - Salt to taste - Olive oil, for sautéing You can swap ricotta cheese with cottage cheese for a lighter option. If you want a vegan version, try tofu blended with a bit of lemon juice. For cheese, use a mix of gouda or fontina for a different flavor. Each cheese gives a unique taste to the lasagna. I love using fresh spinach because it adds vibrant color and flavor. Fresh spinach is also packed with nutrients. If you use frozen spinach, make sure to thaw it first. Squeeze out excess water after thawing. This step keeps your lasagna from being too watery. First, preheat your oven to 375°F (190°C). This step helps cook the lasagna evenly. While the oven warms up, prepare your baking dish. A 9x13 inch pan works great. Next, cook the lasagna noodles according to the package. Aim for al dente, so they hold up well. Drain the noodles and lay them flat on a clean kitchen towel. This keeps them from sticking together. To get perfectly sautéed spinach, heat a drizzle of olive oil in a skillet over medium heat. Add the chopped spinach. Sauté it for about 3-4 minutes until it wilts. Stir gently to avoid burning. Once it’s ready, remove it from the heat and let it cool. Cooling the spinach is key. It prevents the ricotta from getting too runny when mixed. Now it’s time to layer the lasagna. Start by spreading a thin layer of marinara sauce on the bottom of your baking dish. Place 3 lasagna noodles over the sauce. Next, spread half of the ricotta-spinach mixture over the noodles. Then, add 1 cup of marinara sauce and half of the mozzarella cheese. Repeat this process with another set of noodles and fillings. Finish with the last 3 noodles on top, cover with marinara sauce and sprinkle Parmesan cheese. This order helps each layer shine. Proper sauce distribution ensures a moist, flavorful dish. For the full recipe, check [Full Recipe]. To prevent your lasagna from becoming watery, avoid over-saucing. Use just enough marinara sauce to keep everything moist. Also, make sure to drain your spinach well after cooking. This keeps extra moisture from ruining your layers. For the best cheese melt, bake your lasagna at 375°F for 25 minutes covered, then 15 minutes uncovered. This technique helps the cheese get bubbly and golden without burning. Letting it rest before serving also helps the layers hold together. Pair your lasagna with a fresh side salad. A simple mix of greens, tomatoes, and a light vinaigrette works well. Garlic bread is also a great choice. It complements the rich flavors of the dish. For wine, try a medium-bodied red like Chianti. It enhances the flavors of the cheese and sauce. If you prefer white wine, a crisp Pinot Grigio also pairs nicely. For an attractive presentation, cut the lasagna into neat squares. Serve on a colorful plate to make the dish pop. A sprinkle of fresh basil on top adds a bright touch. When plating, use a spatula to lift each piece carefully. This keeps the layers intact and looks great on the plate. You can also drizzle a bit of marinara sauce around the edges for extra flair. {{image_2}} You can add ground meat for a heartier meal. Ground beef or turkey works well. Cook the meat in a pan until it's brown. Drain the fat before mixing it into the sauce. If you're looking for a meatless option, try using vegetarian meat alternatives. Products like lentils or plant-based crumbles add protein and flavor. They blend nicely with the spinach and cheese. To make a dairy-free version, swap out the ricotta. Use blended tofu or cashew cream instead. They create a creamy texture without the dairy. For a complete vegan meal, add vegetables like mushrooms or zucchini. Nutritional yeast can replace Parmesan for a cheesy flavor. This makes your lasagna both tasty and plant-based. If you need gluten-free noodles, try rice or chickpea pasta. They hold up well in baking. Make sure to check the labels for gluten-free certification. When it comes to sauce and cheese, look for gluten-free brands. Many major brands offer gluten-free options. This way, everyone can enjoy a delicious slice of lasagna. To keep your lasagna fresh, store it in an airtight container. Cover it tightly with plastic wrap or aluminum foil. This helps prevent the lasagna from drying out. You can also use a glass dish with a lid for easy storage. Leftovers last in the fridge for about 3 to 5 days. Always make sure to check for any signs of spoilage before eating. If you notice any bad smells or mold, it's best to throw it away. Freezing lasagna is easy. First, let it cool completely after baking. Then, cut it into portions for easy serving later. Wrap each piece tightly in plastic wrap, then in aluminum foil. This prevents freezer burn and keeps the flavor. When ready to eat, you can reheat frozen lasagna. Place it in the fridge overnight to thaw. For best results, heat it in the oven at 375°F. Cover the dish with foil to keep it moist. Bake for about 25 minutes, then remove the foil for another 10 minutes. This warms it through and gives a nice golden top. You can prep ingredients ahead of time for quick assembly. Cook the noodles and store them in a separate container. Keep the sauce and cheese in their own bowls too. Chop the spinach and store it in a sealed bag. For freshness, store each ingredient separately. This way, when you're ready to make your lasagna, you can put it together quickly. It's a great way to save time on busy days. For more tips on preparation, check the Full Recipe. How long to bake lasagna at 375°F? Bake your lasagna for 25 minutes covered with foil. Remove the foil and bake for 15 more minutes. This helps the cheese melt and turn golden. The total cooking time is about 40 minutes. Can you assemble lasagna ahead of time? Yes, you can! Assemble your lasagna, cover it tightly, and store it in the fridge. It can stay there for a day before baking. This makes dinner prep easy. Can I use no-boil noodles for this recipe? Absolutely! No-boil noodles work well in this recipe. They absorb moisture from the sauce while baking. This makes for a great texture. How much spinach should I use if substituting with frozen? If using frozen spinach, use about 1.5 cups. Make sure to thaw and drain it well. This way, it won’t make your lasagna watery. What is the secret to a layer lasagna? The secret is in the sauce. Spread a thin layer on the bottom first. Then, layer evenly with noodles, filling, and sauce. This keeps everything from sliding around. How can I make my lasagna spicy? Add red pepper flakes to the marinara sauce for some heat. You can also use spicy sausage instead of ground beef. Both options add great flavor. To wrap up, making lasagna can be simple and fun. You need basic ingredients like noodles, ricotta, and spinach. Remember to sauté your spinach well for flavor. Layering is key to a tasty dish. Use tips for cooking and serving to impress. Consider variations like meat, vegan options, or gluten-free noodles. Store leftovers properly to enjoy later. With these guidelines, you can make a delicious lasagna that satisfies every time. Happy cooking!

Classic Lasagna with Spinach Hearty and Simple Recipe

Are you ready to make a classic lasagna with a healthy twist? This hearty recipe features spinach, adding flavor and

- 2 cups all-purpose flour - 1 tablespoon baking powder - 1/2 teaspoon salt - 1/4 teaspoon black pepper - 1/2 cup cold unsalted butter, cubed - 1 cup sharp cheddar cheese, grated - 1/4 cup fresh chives, chopped - 2/3 cup whole milk - 1 large egg (for egg wash) To make my savory cheddar and chive scones, start with simple, fresh ingredients. Each one plays a key role in creating flavor and texture. The all-purpose flour gives the scones a light base. It helps them rise and stay fluffy. The baking powder is essential for that lift. It makes the dough airy. Don't forget the salt and black pepper. These bring out the flavors in the cheese and chives. Using cold unsalted butter is vital. It creates a flaky texture. I cut the butter into cubes to make mixing easier. Sharp cheddar cheese adds a rich, tangy flavor. I love using fresh chives for a bright, onion-like taste. They add a nice pop of color too. The whole milk binds everything together. It keeps the scones moist. Lastly, a large egg will give the scones a beautiful golden finish when brushed on top. For the full recipe, check out the preparation steps that follow. 1. Preheat the oven to 400°F (200°C). Line a baking sheet with parchment paper. 2. In a large bowl, whisk together these dry ingredients: - 2 cups all-purpose flour - 1 tablespoon baking powder - 1/2 teaspoon salt - 1/4 teaspoon black pepper 3. Now, add the cold butter cubes. Work the butter into the flour until it looks like coarse crumbs. 1. Stir in the grated cheddar cheese and chopped chives. Make sure they mix well with the dough. 2. Slowly pour in the whole milk, mixing gently with a fork. Stop once the dough starts to come together. Avoid overworking it. 1. Move the dough to a floured surface and knead it gently a few times. Flatten it into a circle about one inch thick. 2. Cut the dough into 8 wedges or use a round cutter to shape the scones. Place them on the prepared baking sheet. 3. Beat the egg in a small bowl. Brush it over the tops of the scones for a golden finish. 4. Bake the scones for 15-20 minutes until golden brown. Remove from the oven and let them cool a bit before serving. This simple recipe creates delightful savory cheddar and chive scones. For more details, check the Full Recipe. To get great scones, start with cold butter. Cold butter keeps the scones light and fluffy. When you mix the cold butter into your flour, it should feel crumbly. This step is key for the right texture. Also, avoid over-mixing the dough. When the dough comes together, stop mixing. Over-mixing makes the scones tough. Gently knead the dough only a few times. This keeps them soft and tender. Adding herbs and spices can boost the taste of your scones. Besides chives, you can try adding rosemary or thyme for a fresh twist. A pinch of garlic powder can also add depth to the flavor. Choosing the right cheese variety matters too. Sharp cheddar gives a strong flavor, but you can change it up. Try Gouda for a creamier taste or Gruyere for a nutty flavor. This lets you customize your scones. Serve your warm scones on a rustic wooden board. This adds charm and makes the meal feel special. For a lovely touch, garnish with extra chives. You can also add a small bowl of butter on the side. This makes it easy for everyone to add their desired amount to their scones. Enjoy the delightful presentation as much as the flavor! {{image_2}} You can swap cheddar cheese with other tasty options. Gouda brings a creamy texture. Gruyere offers a nutty flavor. Both melt well and add depth. For chives, try fresh herbs like parsley or dill. Each herb brings its own charm. Basil adds a sweet note, while thyme gives a warm, earthy taste. Mix and match to find your favorite blend. Want to switch things up? Modify the recipe for sweet scones. Replace cheese and chives with fruits like blueberries or cranberries. Add a hint of cinnamon or vanilla for a sweet twist. Pair sweet scones with honey or jam. For savory options, serve with cheese or spreads. Both styles delight the taste buds and suit any occasion. For the full recipe, check the Savory Cheddar and Chive Scones section above. To keep your savory cheddar and chive scones fresh for 1-2 days, store them in an airtight container. Place parchment paper between layers to avoid sticking. This method helps maintain moisture and flavor. If you want a crispy texture, leave them uncovered for a few hours. This allows some air to circulate and keeps the crust firm. If you want to save scones for later, you can freeze them. Wrap each scone in plastic wrap, then place them in a freezer bag. They can last up to three months in the freezer. When you’re ready to enjoy them, you can reheat them straight from the freezer. Preheat your oven to 350°F (175°C) and bake for about 15 minutes. This restores their freshness and warmth without drying them out. Enjoy with a pat of butter or your favorite spread! For the full recipe, make sure to check the earlier sections. Savory cheddar and chive scones pair well with many dishes. For brunch, you can serve them with: - Fresh fruit salad - Creamy scrambled eggs - A light salad with vinaigrette - Smoked salmon or ham - A dollop of butter or cream cheese These scones also shine at afternoon tea. Offer them with: - A selection of herbal teas - Sweet jams or spreads - A cheese platter with assorted cheeses Yes, you can use whole wheat flour. It will change the texture and flavor. Whole wheat is denser and has a nuttier taste. To adjust the recipe, consider these tips: - Use a mix of 1 cup whole wheat and 1 cup all-purpose flour for lighter scones. - Add a bit more milk to keep the dough moist. - Watch the baking time; whole wheat scones may need a few extra minutes. You can tell when the scones are done by looking for a few signs: - They should be golden brown on top. - A toothpick inserted into the center should come out clean. - The edges will feel firm to the touch. Let them cool slightly before serving for the best flavor. For the full recipe, check out the earlier sections. The blog post covered key steps for making delicious savory cheddar and chive scones. We discussed important ingredients, preparation steps, and helpful tips for texture and flavor. I shared fun variations to try and storage tips for keeping your scones fresh. These scones are easy to bake and perfect for any time. Enjoy experimenting with flavors and impressing friends and family with your baking skills!

Savory Cheddar and Chive Scones Delightful Recipe Guide

Welcome to my delightful guide on Savory Cheddar and Chive Scones! If you’re craving a treat that’s both easy to

- 1 cup rolled oats - 1 cup almond milk (or any milk of choice) - 1/2 cup Greek yogurt (or plant-based yogurt) These key ingredients form the base of your lemon blueberry overnight oats. Rolled oats give a chewy texture and are filling. Almond milk adds creaminess without extra calories. Greek yogurt brings protein and tang, making your breakfast satisfying. - 1 tablespoon honey or maple syrup (adjust to taste) - Zest of 1 lemon - Juice of 1 lemon - 1/2 teaspoon vanilla extract - 1/2 teaspoon cinnamon Flavor enhancers make your oats pop. Honey or maple syrup adds sweetness. Lemon zest and juice provide a bright zing. Vanilla extract brings warmth, while cinnamon adds depth. Each ingredient works together to create a delightful taste. - 1/2 cup fresh blueberries (plus extra for topping) - Additional sweeteners - Other fruit options Toppings are where you can get creative. Fresh blueberries add color and flavor. You can also add more sweeteners if you like it sweeter. Feel free to mix in other fruits like bananas or strawberries. Each variation adds a unique twist to your breakfast. For the full recipe, check out the Lemon Blueberry Delight Overnight Oats section. To start, mix your rolled oats and almond milk in a medium bowl. Stir well until they blend smoothly. Next, add Greek yogurt, honey or maple syrup, lemon zest, lemon juice, vanilla extract, cinnamon, and a pinch of salt. Mix all these ingredients until they are well combined. This base creates a creamy, tangy mixture that will make your oats taste great. Now, it’s time to add the fresh blueberries. Use a gentle folding technique to mix them into the oat mixture. This helps to keep the blueberries intact and evenly spread. Make sure each spoonful has some blueberries for the best flavor. This step is key to enjoying bursts of sweetness in every bite. After mixing, transfer the oat mixture into a jar or an airtight container. Seal it tightly and refrigerate overnight or for at least 4-6 hours. This chilling time allows the oats to soak up the milk and flavors. When you wake up, the mixture will be thick and ready to eat. Before serving, stir the oats. If they seem too thick, add a splash of milk. Enjoy them topped with extra blueberries and a drizzle of honey or syrup. You will love how easy this breakfast is! For the full recipe, check out the section above. To get the right texture, adjust the milk. Start with one cup of almond milk. If you want creamier oats, add more milk. On the other hand, if you like thicker oats, use less milk. The flavors will improve overnight. They mix together as they sit. The lemon zest and juice wake up the taste. Choose jars or airtight containers for serving. They look nice and keep the oats fresh. For a complete breakfast, serve with nuts or seeds. You can also add a side of fruit or yogurt. This makes it filling and fun. Avoid over-soaking the oats. If they sit too long, they can become mushy. Aim for soaking them overnight or for about six hours. Don’t skip on the lemon zest and juice. They add bright flavor and make the dish special. {{image_2}} You can easily change the taste of your lemon blueberry overnight oats. Try adding nuts or seeds for a nice crunch. Chopped almonds or walnuts work great. You can also add chia seeds for extra fiber. If you want to switch up the fruit, use strawberries or peaches instead of blueberries. Each fruit gives a unique flavor and keeps breakfast fun. If you need gluten-free options, use gluten-free oats. They will taste just as good. For a vegan twist, swap Greek yogurt for a plant-based yogurt. Almond or coconut yogurt are great choices. Make sure to check the labels to ensure they are dairy-free. Citrus fruits can change with the seasons. In winter, try adding a bit of orange zest for a bright touch. In summer, go wild with fresh berries like raspberries or blackberries. You can even mix different berries for a fun flavor explosion. Seasonal fruit makes your breakfast fresh and exciting. For the complete recipe, check out the [Full Recipe]. To keep your lemon blueberry overnight oats fresh, use an airtight container. Glass jars work well. They keep the taste and texture just right. Stored this way, the oats last about 3 to 5 days in the fridge. Check for any signs of spoilage before eating. Making a big batch saves time. You can prepare several jars at once. Just double or triple the recipe. If you want to freeze some, divide them into single servings. They freeze well for up to 3 months. Thaw overnight in the fridge for a quick breakfast. To ensure your oats are safe, check for spoilage. If they smell sour or off, it's best to toss them. Also, look for changes in texture. If they feel slimy or mushy, don’t eat them. Remember, freshness is key to enjoying your lemon blueberry overnight oats. For the full recipe, check out the details above. Yes, you can use quick oats. However, they absorb liquid faster. This may change the texture. Rolled oats give a chewier bite. Quick oats make the mix softer. If you prefer softer oats, go for quick oats. If you want a heartier meal, stick with rolled oats. You can store overnight oats in the fridge for up to five days. They stay fresh and tasty. Just make sure to use an airtight container. The flavors blend nicely over time. If you see any signs of spoilage, it’s best to toss them. Absolutely! You can choose any milk you like. Almond, soy, or oat milk all work well. For yogurt, use Greek or plant-based options. This flexibility allows you to meet your taste and dietary needs. Be sure to adjust sweetness if you switch to flavored yogurt. Add more yogurt or a splash of milk. Blending in a banana or avocado can also help. These ingredients add creaminess without changing the taste much. Experiment with different amounts to find your perfect texture. Yes, feel free to add any fruit you enjoy! Sliced bananas, strawberries, or peaches all make great choices. Just remember that some fruits might change the flavor. Add them right before serving for the best texture. Honey and maple syrup are popular choices. You could also use agave nectar or stevia. Adjust the amount based on your taste. Just remember, less is more if you want to let the lemon shine. Definitely! Make a big batch at once. Use separate containers to store them for the week. This way, you have ready meals for busy mornings. Just grab and go! Yes, you can freeze them! Use freezer-safe containers. Just leave some space for expansion. When you’re ready to eat, thaw them in the fridge overnight. Stir well before serving. No problem! You can swap them for any other fruit. Try raspberries, blackberries, or even chopped apples. The lemon flavor pairs well with many fruits, so feel free to get creative! Serve them cold or warm them up in the microwave. Top with extra fruit, nuts, or seeds. This adds texture and flavor. For a fancy touch, drizzle honey on top before serving. For a complete guide, check out the Full Recipe! Lemon blueberry overnight oats are simple and fun to make. You blend rolled oats, milk, and yogurt for a tasty base. Add fresh blueberries, lemon zest, and your favorite sweeteners for flavor. Always remember to adjust the milk for the right texture and avoid over-soaking. Try different fruits or toppings for variety. Store leftovers in airtight containers, and check for spoilage to stay safe. Enjoy this healthy breakfast that satisfies all tastes and preferences!

Lemon Blueberry Overnight Oats Delicious Breakfast Idea

Are you looking for a fresh breakfast that’s easy to make? Lemon Blueberry Overnight Oats might be your new go-to!

- 8 oz penne pasta - 1 tablespoon olive oil - 4 cloves garlic, minced - 1 can diced tomatoes, undrained - 2 cups vegetable broth - 1 cup heavy cream or coconut cream - 1 teaspoon dried basil - Salt and pepper to taste - 1 cup fresh basil leaves, chopped - ½ cup grated Parmesan cheese or nutritional yeast The key to this dish is its simple, fresh ingredients. The penne pasta serves as the base, soaking up all the wonderful flavors. Olive oil adds richness, while minced garlic gives a fragrant kick. You can use canned diced tomatoes for convenience. They bring a burst of flavor without much fuss. For liquids, vegetable broth enhances the taste and keeps it plant-based. The heavy cream or coconut cream creates that creamy texture we all love. This balance of flavors makes the dish truly delightful. Fresh ingredients are essential too. Dried basil adds a hint of earthiness, while fresh basil leaves bring a vibrant color and burst of freshness. The grated Parmesan or nutritional yeast finishes the dish with a savory touch. If you're curious about the full process, check the Full Recipe for step-by-step instructions. 1. Heat the olive oil in a large pot over medium heat. 2. Add the minced garlic and sauté for 1-2 minutes. Watch it closely to avoid burning. 3. Open the can of diced tomatoes and pour it into the pot without draining. 4. Add the vegetable broth and dried basil. Stir everything together well. 1. Now, add the penne pasta to the pot. 2. Bring the mixture to a gentle simmer. 3. Cover the pot and let it cook for 10-12 minutes. 4. Stir occasionally until the pasta is al dente and most of the liquid is absorbed. 1. Remove the pot from heat. Stir in the heavy cream or coconut cream. 2. Season with salt and pepper to taste. Let it simmer for an extra 2-3 minutes. 3. Incorporate the chopped fresh basil and grated Parmesan cheese. Mix well. For the complete recipe, check out the [Full Recipe]. Enjoy your creamy tomato basil pasta! - Best practices for sautéing garlic: Start with a cold pan. Add olive oil and minced garlic. Heat over medium. Stir often. Cook for 1-2 minutes until fragrant. Watch it closely! Garlic can burn fast. Burnt garlic tastes bitter. - Ensuring perfect pasta texture: Use a timer! Cook the penne for 10-12 minutes. Stir it a few times to avoid sticking. Check for al dente texture. The pasta should be firm but not hard. This ensures it absorbs the sauce well. - Suggestions for additional herbs: Add more herbs for extra flavor. Try oregano, thyme, or parsley. Fresh herbs add brightness. Dried herbs work too but use less. They are stronger in taste. - Adjusting creaminess and richness levels: For a creamier dish, use more heavy cream. If you want it lighter, use coconut cream or less cream. You can also add more broth for a thinner sauce. Adjust to your taste! - Ideal pairings and sides: Serve with garlic bread or a fresh salad. A crisp green salad complements the pasta well. You could also pair it with roasted veggies for a healthy side. - Presentation tips for a beautiful dish: Use a large bowl for serving. Garnish with fresh basil leaves. Sprinkle some grated Parmesan on top. This makes the dish look inviting and fresh! A pretty dish is more enjoyable to eat. {{image_2}} You can easily make this dish vegan. Simply swap the heavy cream for coconut cream. This change keeps the dish rich and creamy while being plant-based. For those on a gluten-free diet, use gluten-free pasta. Many brands offer great options that cook up similarly to regular pasta. Feel free to switch up the vegetables in this recipe. You can add spinach, bell peppers, or zucchini. These swaps add color and nutrients to your meal. If you want to change the cheese, try goat cheese or feta for a tangy taste. Nutritional yeast also works well for a cheesy flavor if you go vegan. Want to boost the protein? Add cooked chicken or shrimp to the pot. This extra step makes the dish more filling. You can also mix in spices like red pepper flakes or Italian seasoning for unique flavors. These small additions can transform your creamy tomato basil pasta into a new dish every time. For the full recipe, check out the One-Pot Creamy Tomato Basil Pasta section above. To store your creamy tomato basil pasta, let it cool first. Place leftovers in an airtight container. This keeps the pasta fresh and tasty. Store it in the fridge for up to three days. When reheating, add a splash of water or broth. This helps bring back its creamy texture. You can freeze this dish for later. Use a freezer-safe container or bag. Make sure to leave some space for expansion. It can stay good in the freezer for up to two months. When you're ready to eat, thaw it overnight in the fridge. Reheat it on the stove or in the microwave. Add a little cream or broth to keep it smooth. Refrigerated pasta lasts about three days. If you freeze it, aim to eat it within two months. Check for signs of spoilage before eating. If it has an off smell or strange color, it's best to toss it. Keeping an eye on these details helps you enjoy your meal safely. For the full recipe, check the earlier section. One-pot cooking means you prepare a full meal in one pot. This method saves time and effort. You chop, cook, and serve all in the same container. The biggest advantage? You reduce clean-up! Less mess means more time to enjoy your meal. Plus, all the flavors blend well when cooked together. This makes dishes like One-Pot Creamy Tomato Basil Pasta so tasty and satisfying. Yes, you can make this pasta ahead of time. Meal prep is easy with one-pot meals. Cook the dish as usual, then cool it down. Store it in an airtight container in the fridge. It can last for about three days. When you want to eat, just reheat. This makes it perfect for busy days or quick dinners. To reheat leftover pasta, use low heat on the stove. Add a little water or broth to keep it moist. Stir often to prevent sticking. You can also use the microwave. Place the pasta in a bowl, add a splash of water, and cover it. Heat for about one minute at a time, stirring in between. This way, you keep the creamy texture of the sauce. This dish combines simple ingredients and easy steps to create a delightful meal. We covered everything from cooking techniques to flavorful variations. You learned how to enhance flavors and store leftovers to keep them fresh. Remember, cooking should be fun and creative. Try different ingredients to make this dish your own. Enjoy serving it at home or bringing it to gatherings. Happy cooking!

One-Pot Creamy Tomato Basil Pasta Quick and Tasty Meal

Are you ready for a quick and tasty dinner? This One-Pot Creamy Tomato Basil Pasta is your perfect meal solution.

- 2 cans chickpeas (15 oz each), rinsed and drained - 1 large onion, finely chopped - 3 cloves garlic, minced - 1-inch piece ginger, grated - 1 can coconut milk (13.5 oz) - 1 can diced tomatoes (14.5 oz) - 2 tablespoons curry powder - 1 teaspoon cumin - 1 teaspoon turmeric - 1 teaspoon chili powder (adjust to taste) - 2 tablespoons olive oil - Salt and pepper to taste - Fresh spinach (2 cups) - Fresh cilantro, chopped (for garnish) - Cooked rice or naan (for serving) Use these ingredients to create a tasty vegan chickpea curry. Feel free to add optional toppings like avocado or lime wedges for a fresh twist. Serving suggestions include warm rice or soft naan, which pair perfectly with the curry. For extra flavor, sprinkle some chopped cilantro on top before serving. You can find the full recipe and get all the details you need for a delicious meal. To make the chickpea curry, start by gathering your ingredients. This will help you stay organized. 1. Heat the oil: In a large pot, pour in the olive oil and heat it over medium heat. 2. Cook the onion: Add the chopped onion and sauté for about 5 minutes. You want it soft and see-through. 3. Add garlic and ginger: Stir in the minced garlic and grated ginger. Cook for 2 more minutes. The smell will be amazing! 4. Mix in spices: Add curry powder, cumin, turmeric, and chili powder. Stir these into the mix for one minute. This helps the spices release their flavors. 5. Combine tomatoes and coconut milk: Pour in diced tomatoes and coconut milk. Stir everything well. Bring the mixture to a gentle simmer. 6. Add chickpeas: Rinse your chickpeas and toss them in. Season with salt and pepper. Let the mix simmer for 15 to 20 minutes. This lets the flavors meld together nicely. 7. Finish with spinach: In the last few minutes, stir in the fresh spinach until it wilts. Taste and adjust the seasoning if needed. Safety Tips: When working with spices, be careful. Some spices can be hot. If you touch them, wash your hands right away. Always handle hot pots with care to avoid burns. Sautéing is an important step. This method cooks food quickly in a small amount of oil. It gives the onion, garlic, and ginger a nice flavor. Simmering is also key. It means cooking food slowly over low heat. This lets flavors mix well. For seasoning, balance is crucial. Too much salt can overpower the dish. Start with a little and taste as you go. Remember, you can always add more, but you can’t take it away. These techniques make your chickpea curry not only simple but also full of flavor. Enjoy this delicious dish with rice or naan for a full meal. For the full recipe, check the earlier section! To make your chickpea curry burst with flavor, here are some tips: - Use fresh spices: Old spices lose their punch. Check the dates and buy fresh ones. - Brown your onions: Sauté them until they are golden brown. This adds depth to your dish. - Add a squeeze of lemon: Just before serving, a splash of lemon juice brightens the flavors. - Experiment with heat: If you like spice, try adding fresh chili peppers or more chili powder. Common mistakes can ruin your curry: - Not rinsing the chickpeas: Canned chickpeas can have a metallic taste. Rinse well to remove this. - Skipping the simmer: Letting your curry simmer helps blend the flavors. Don’t rush it! - Overcooking spinach: Add it at the end to keep it vibrant and fresh. Pair your chickpea curry with: - Cooked rice: White, brown, or basmati rice all work well. - Naan bread: Soft naan is perfect for scooping up the curry. For a creative presentation: - Use a bowl: Serve the curry in a shallow bowl with a swirl of coconut milk on top. - Add color: Sprinkle fresh cilantro on top for brightness. You can also use red pepper flakes for a pop of color. Explore the full recipe for more details on crafting this dish! {{image_2}} You can change the chickpeas for other beans like black beans or kidney beans. Each type brings a new taste. Adding veggies like cauliflower, bell peppers, or peas can also change the dish. If you want more crunch, try adding some carrots or zucchini. For spices, you can swap curry powder for garam masala or even a bit of smoked paprika. These spices bring different flavors and can make your curry unique. If you like it spicy, add cayenne pepper or fresh chili peppers. Play with the spices to find your favorite mix. To make this recipe gluten-free, choose a gluten-free curry powder. Most spices are gluten-free, but always check the label. For a nut-free version, ensure your coconut milk does not contain any nut additives. If you have special dietary needs, use vegetable broth instead of coconut milk. This keeps it vegan but still tasty. You can also add more veggies to increase the nutrients without losing flavor. Adjust the recipe to fit your needs while keeping it delicious. For the full recipe, check the link above. To store your leftover vegan chickpea curry, let it cool first. Then, place it in an airtight container. Store it in the fridge for up to four days. When reheating, use a pot over medium heat. Stir occasionally to heat evenly. You can also use the microwave, but stir halfway through for best results. If you want to freeze it, let the curry cool completely. Pour it into freezer-safe bags or containers. Remove as much air as possible to prevent freezer burn. The curry can last in the freezer for up to three months. When ready to use, defrost it in the fridge overnight. Reheat it on the stove or in the microwave. Vegan chickpea curry is best when fresh but lasts well. In the fridge, it stays fresh for four days. Look for signs of spoilage, like an off smell or mold. If the curry looks dry or has an unusual texture, it’s best to toss it. Always trust your senses when deciding whether to eat leftovers. How to make vegan chickpea curry spicier? To spice up your vegan chickpea curry, add more chili powder. You can also toss in fresh chili peppers. If you want a deeper heat, consider adding cayenne pepper. Always taste as you go to get it just right. Can I use dried chickpeas instead of canned? Yes, you can use dried chickpeas. Just soak them overnight and cook them until soft. This will take more time than using canned chickpeas, but the flavor can be richer. What are the health benefits of chickpeas in this recipe? Chickpeas are high in protein and fiber. They help keep you full and support digestion. They also offer vitamins and minerals like iron and folate, making them a great addition to any meal. How do I thicken my chickpea curry if it's too watery? If your chickpea curry is too watery, try mashing a few chickpeas. This will help create a thicker texture. You can also let it simmer longer to reduce excess liquid. Can this recipe be made in a slow cooker? Yes, you can make this recipe in a slow cooker. Just add all the ingredients, and cook on low for 6-8 hours. You will get a nice, rich flavor. Is it possible to make chickpea curry without coconut milk? Absolutely! You can use vegetable broth or almond milk instead of coconut milk. This will change the flavor a bit but will still be tasty. How do I enhance the nutritional value of the dish? To boost the nutrition, add more veggies like bell peppers, carrots, or sweet potatoes. You can also serve it with quinoa instead of rice for extra protein. For the full recipe, check out the detailed steps above. This blog post covered every step to make chickpea curry. We explored ingredients, cooking methods, and tips to boost flavor. You learned serving ideas and how to store leftovers. I shared variations for different diets and answered common questions to guide you. Chickpea curry is flexible and fun to make. Use this knowledge to create your own tasty version. Enjoy cooking and experimenting with flavors!

Vegan Chickpea Curry Simple and Flavorful Recipe

Looking for a simple, tasty meal that packs a punch? This Vegan Chickpea Curry is just what you need! With

- Essential Ingredients - 1 pound Brussels sprouts, trimmed and halved - 3 tablespoons olive oil - 4 cloves garlic, minced - 1/2 cup grated Parmesan cheese - 1 teaspoon salt - 1/2 teaspoon black pepper - 1/2 teaspoon red pepper flakes (optional, for a kick) - 2 tablespoons balsamic vinegar - Fresh parsley, chopped (for garnish) These ingredients come together to create a crispy and tasty side dish. The Brussels sprouts provide a hearty base, while garlic and Parmesan cheese add rich flavor. The olive oil helps the sprouts crisp up nicely in the oven. - Optional Ingredients for Flavor - Red pepper flakes - Lemon zest - Other hard cheeses like Pecorino Romano Red pepper flakes give a nice spicy touch. Lemon zest can add brightness and depth. If you have hard cheese on hand, feel free to use that instead of Parmesan. - Ingredients Substitutions - Olive oil can be replaced with avocado oil or melted butter. - For a dairy-free option, use nutritional yeast instead of Parmesan. - If you lack balsamic vinegar, try apple cider vinegar or lemon juice. These substitutions let you adjust the recipe to your taste or what you have available. Use what fits your diet or preferences best. For the full recipe, check out the details in the main article. 1. Preheating and Preparing the Baking Sheet First, preheat your oven to 400°F (200°C). This will help the sprouts roast evenly. Next, line a baking sheet with parchment paper. This makes clean-up easy and keeps the sprouts from sticking. 2. Tossing Brussels Sprouts with Ingredients In a large bowl, take 1 pound of halved Brussels sprouts. Add 3 tablespoons of olive oil, 4 minced garlic cloves, 1 teaspoon of salt, 1/2 teaspoon of black pepper, and optional red pepper flakes for a kick. Toss everything well until the sprouts are evenly coated. This step is key to getting great flavor. 1. First Roasting Phase Spread the coated Brussels sprouts in a single layer on your prepared baking sheet. Make sure they have space. If they are too close, they won’t get crispy. Roast them in the oven for about 20 minutes. 2. Adding Parmesan and Final Roasting Phase After 20 minutes, take the baking sheet out. Sprinkle 1/2 cup of grated Parmesan cheese over the sprouts. Toss them gently to mix. Return the sprouts to the oven for 10-15 more minutes. You want them to turn golden brown and crispy. The cheese will melt and add extra flavor. 1. Drizzling Balsamic and Garnishing Once the sprouts are done, drizzle 2 tablespoons of balsamic vinegar over them. Toss them lightly to combine. This adds a nice tangy flavor that balances the rich cheese. Transfer the crispy Brussels sprouts to a serving dish and garnish with chopped parsley. Serve them right away for the best crunch. For the full recipe, don’t forget to check the detailed instructions! - Spacing and Temperature Considerations To get your Brussels sprouts crispy, space them out on the baking sheet. If they are too close, they will steam instead of roast. Roasting them at 400°F (200°C) also helps to achieve that perfect crunch. This high heat makes sure the outsides get nice and brown while the insides stay tender. - Using Parchment vs. Baking Spray I love using parchment paper. It keeps the sprouts from sticking and makes cleanup a breeze. If you don’t have parchment, baking spray works, but it may not give the same crispiness. Parchment allows for better heat circulation, leading to a crunchier texture. - Alternative Seasonings While garlic and Parmesan are classic, you can mix it up! Try adding smoked paprika or lemon zest for a fresh twist. A touch of cumin can also add a warm, earthy flavor. Feel free to experiment with your favorite spices! - Best Cheese Variations Parmesan is great, but you can try other cheeses too. Aged cheddar gives a strong flavor, while feta adds a tangy twist. For a nutty taste, sprinkle some Gruyère on top. Each cheese brings its own charm to the dish. Check out the Full Recipe to make these delicious sprouts your new favorite side! {{image_2}} To make these Brussels sprouts vegan, swap out the Parmesan cheese. Use nutritional yeast instead. This will add a cheesy flavor without dairy. You can also try vegan Parmesan cheese if you prefer. This recipe is naturally gluten-free. Just make sure to check your balsamic vinegar for gluten. If you want to avoid nuts, this recipe is safe as written. There are no nuts in the ingredient list. Using an air fryer can make these Brussels sprouts even crispier! Just toss the sprouts with olive oil and spices as usual. Place them in the air fryer basket. Set the temperature to 375°F (190°C) and cook for about 15-20 minutes. Toss halfway through for even cooking. After they’re golden, sprinkle the cheese and air fry for 5 more minutes. Grilling adds a wonderful smoky flavor to Brussels sprouts. Preheat your grill to medium heat. Toss the sprouts with oil and spices, then place them in a grill basket. Grill for about 15-20 minutes, turning occasionally. Just before they finish, add the cheese. Let it melt slightly before serving. - Best Practices for Refrigeration To store leftover crispy garlic Parmesan Brussels sprouts, place them in an airtight container. Keep them in the fridge for up to three days. Make sure they cool down before sealing the container. This helps maintain their crispiness. - Freezing Tips If you want to freeze them, lay the sprouts on a baking sheet in a single layer. Freeze them for about an hour. After they are solid, transfer them to a freezer bag. They can last for up to two months. When ready, thaw them in the fridge before reheating. - Oven vs. Microwave Reheating The oven is the best method to reheat Brussels sprouts. Preheat your oven to 350°F (175°C). Spread the sprouts on a baking sheet and heat for about 10-15 minutes. This keeps them crispy. If you use a microwave, place them in a bowl and cover loosely. Heat for 1-2 minutes. This method may make them a bit soggy, but it’s quick. For the best taste, I recommend using the oven. How to make Brussels sprouts less bitter? To lessen the bitterness, trim and halve the Brussels sprouts. Roasting them helps, too. Adding salt and Parmesan cheese can balance the flavors. For a sweeter taste, try a drizzle of balsamic vinegar after roasting. Can I prepare these in advance? You can prep the Brussels sprouts ahead of time. Clean and cut them, then store in the fridge. Toss them with oil and spices just before roasting. This keeps them fresh and tasty. What can I serve with Crispy Garlic Parmesan Brussels Sprouts? These sprouts pair well with many dishes. Try them with grilled chicken or fish. They also go great with pasta or quinoa salads. For a lighter meal, serve them alongside a fresh green salad. For the full recipe, check out the Crispy Garlic Parmesan Brussels Sprouts section. This blog post shared how to make crispy garlic Parmesan Brussels sprouts. We covered key ingredients, preparation steps, and roasting methods. I included tips for extra crispiness and flavor tweaks. You can even try different cooking methods or variations. Lastly, we discussed storage and answered common questions. These sprouts can be a delicious side dish or snack. I hope you feel ready to enjoy this tasty recipe!

Crispy Garlic Parmesan Brussels Sprouts Tasty Side Dish

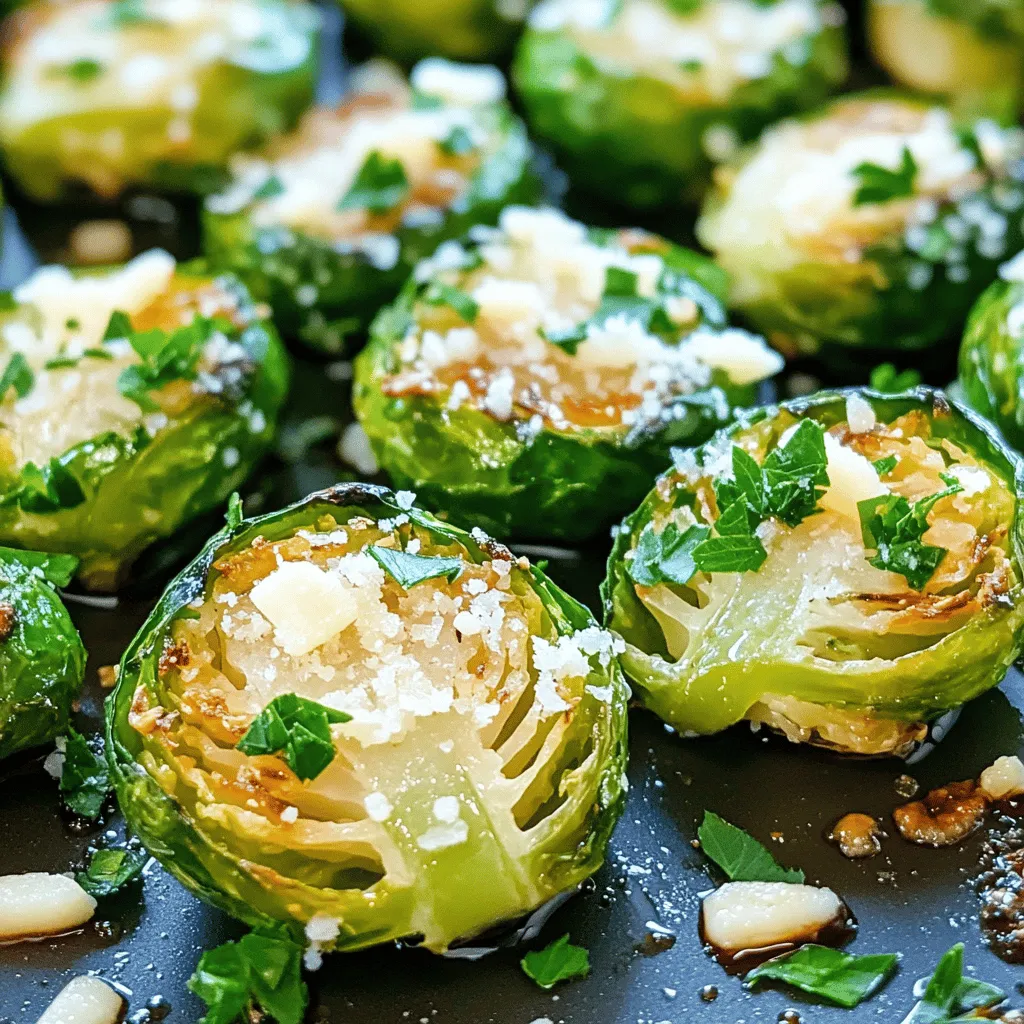
If you’re looking for a tasty side dish that steals the show, you’ve found it! Crispy Garlic Parmesan Brussels sprouts

To make this tasty delight, gather these simple ingredients: - 1 cup coconut milk (canned or carton) - 1/2 cup almond milk (or any milk of your choice) - 1/4 cup chia seeds - 2 tablespoons maple syrup (adjust to taste) - 1 ripe mango, diced - 1 teaspoon vanilla extract - Pinch of salt - Toasted coconut flakes (for garnish) - Fresh mint leaves (for garnish) You can swap some ingredients if needed: - Use oat milk or soy milk instead of almond milk. - Try honey instead of maple syrup for sweetness. - If mango is not in season, use diced peaches or pineapple. - For a nut-free option, avoid almond milk and use coconut milk only. This mango coconut chia pudding is not just tasty but also nutritious. Here’s a quick look at its nutritional content per serving: - Calories: About 230 - Total Fat: 12g - Saturated Fat: 10g - Sugars: 8g - Protein: 3g - Fiber: 10g This pudding brings a good mix of healthy fats and fiber. It’s a great choice for breakfast or dessert! For the full recipe, check out the detailed instructions. Start by gathering your ingredients. You will need coconut milk, almond milk, chia seeds, maple syrup, vanilla extract, and a pinch of salt. In a mixing bowl, pour in the coconut milk and almond milk. Add the chia seeds next. They are the stars of this dish. Then, mix in the maple syrup to add sweetness. Stir in the vanilla extract and salt. Make sure to mix well so the chia seeds do not clump together. Cover your mixing bowl with plastic wrap. Place it in the fridge for at least four hours or overnight. This is when the magic happens! The chia seeds absorb the liquid and swell up. They turn into a thick, pudding-like texture. If you leave it overnight, the pudding will be even creamier. Once the pudding has chilled, give it a stir. If it feels too thick, add a splash of almond milk. Now it’s time to serve! Use small cups or bowls for a fun presentation. Start by adding a layer of the chia pudding. Then, add a layer of the diced mango on top. Repeat these layers until the cups are full. To finish, sprinkle toasted coconut flakes on the top. Add fresh mint leaves for a pop of color and a fresh taste. For an extra touch, drizzle a swirl of coconut milk on top before serving. Enjoy this tropical delight! To get the best texture, start with good chia seeds. Use fresh seeds for the best results. Mix them well with the liquid. Stir until they are evenly spread. Let the mixture sit for at least four hours. This allows the seeds to soak and expand. If you want it creamier, add more coconut milk. Adjust the thickness by adding almond milk if needed. One common mistake is not stirring the mix well. Chia seeds can clump together if you skip this step. Always ensure your mixture is smooth before chilling. Another mistake is not using enough liquid. Without enough liquid, the pudding won't set properly. Lastly, avoid leaving the pudding too long in the fridge. It can become too thick or dry out. The ideal chilling time for your pudding is at least four hours. However, overnight is even better. This gives chia seeds enough time to soak up the liquid. If you’re in a hurry, try chilling for at least two hours. But remember, the longer you chill, the better the texture. For optimal flavor, let it chill overnight if you can. For the full recipe, check the detailed steps above. {{image_2}} You can change up the fruit in your mango coconut chia pudding. Try using fresh berries like strawberries or blueberries. They add a bright color and a sweet taste. You could also use banana slices for a creamy texture. Pineapple pieces give a tropical twist. Don’t be afraid to mix fruits! Each choice brings a new flavor. If you want a dairy-free version, this recipe is perfect. Use coconut milk and almond milk, which are both rich and creamy. You can also try oat milk for a different taste. These options keep this pudding light and tasty. If you want added creaminess, blend some soaked cashews into the mix. It will make the pudding even richer without dairy. To make your chia pudding special, think about flavor boosts. Add a pinch of cinnamon or nutmeg for warmth. A drop of almond extract can give it a nice twist too. You could even mix in cocoa powder for a chocolatey treat. These small changes can make your pudding unique. Each flavor will surprise your taste buds in a fun way. For the full recipe, click here. To store leftover mango coconut chia pudding, place it in a sealed container. Make sure the lid fits tightly. This keeps the pudding fresh and tasty. You can store it in the fridge for up to five days. If you notice any changes in smell or texture, it's best to toss it. If you want to save some pudding for later, you can freeze it. Pour the pudding into freezer-safe containers. Leave some space at the top for expansion. Cover the containers well. You can freeze it for up to three months. To eat, thaw it in the fridge overnight. Stir well before serving. Each ingredient in this recipe has its own shelf life. Coconut milk lasts about 7 to 10 days once opened. Almond milk can stay fresh for 5 to 7 days after opening. Chia seeds can last for years if stored in a cool, dark place. Fresh mango should be used within a few days of ripening. Always check the dates on packages for the best quality. For the full recipe, refer back to the ingredients listed above. Yes, you can use various types of milk. Almond milk, oat milk, or soy milk work well. Each milk gives a unique taste. Coconut milk adds a rich flavor. If you prefer a lighter version, go for almond or oat milk. Experiment with different milks for fun results. Chia pudding lasts up to five days in the fridge. Store it in a sealed container. The longer it sits, the thicker it gets. If it becomes too thick, stir in a little milk to bring it back. Always check for freshness before eating. Absolutely! This recipe is already vegan. Use plant-based milk and maple syrup. You can omit honey or any animal products. This makes it a great choice for everyone. Enjoy this tasty treat without any worries! For the full recipe, check the earlier section. Mango coconut chia pudding is a simple, tasty treat. We covered its ingredients and how to mix them. You learned about perfect texture and common mistakes to avoid. We explored different fruit options and how to store leftovers. With this recipe, you can be creative and make it your own. Enjoy your pudding fresh, or try a fun twist. Follow these steps for a delicious, healthy snack anytime. It’s all about flavor and fun!

Mango Coconut Chia Pudding Simple and Tasty Delight

Looking for a quick, tasty treat? Mango Coconut Chia Pudding is the answer! This simple recipe combines the bright flavors

Older posts
Newer posts
← Previous Page1 … Page36 Page37 Page38 … Page67 Next →

dsad

© 2025 Foodish Talk • Built with GeneratePress

Our Policies

  • Copyright Policy
  • Cookie Policy
  • GDPR Policy
  • Privacy Policy
  • Disclaimer
  • Terms Of Use

More Information

  • Home
  • About
  • Contact
  • Appetizers
  • Dessert
  • Dinner
  • Drinks
©2025, Foodish Talk About Back To Top