Skip to content
DisclaimerTerms Of UseGDPR PolicyCookie Policy

Foodish Talk

  • Home
  • Drinks
  • Appetizers
  • Dinner
  • Dessert
  • About
  • Contact
  • Privacy Policy
DisclaimerTerms Of UseGDPR PolicyCookie Policy

Ava

For a delicious creamy avocado pasta, gather these fresh ingredients: - 2 ripe avocados, pitted and peeled - 2 cloves garlic, minced - 1/4 cup fresh basil leaves - 2 tablespoons lemon juice - 8 oz spaghetti or your choice of pasta These fresh ingredients give the dish its tasty and creamy flavor. Ripe avocados are key. They create that smooth sauce we all love. Fresh basil adds a nice herbal touch. Garlic gives it a wonderful kick. And lemon juice brightens the whole dish. Next, you’ll need some kitchen staples: - 1/4 cup olive oil - Salt and pepper to taste Olive oil is important for the creamy texture. It makes the sauce silky. Salt and pepper are also vital. They help to enhance the flavors of the dish. To make your dish look even better, consider these optional garnishes: - 1/4 cup cherry tomatoes, halved - Grated Parmesan cheese (for garnish, optional) Cherry tomatoes add a pop of color and sweetness. They contrast nicely with the creamy sauce. You can also use grated Parmesan cheese for a salty twist. It adds a rich flavor that many enjoy. For the full recipe, check out the detailed instructions to create this creamy avocado pasta! First, fill a large pot with water and add a pinch of salt. Bring it to a boil. Add 8 ounces of spaghetti or your favorite pasta. Cook according to the package instructions, usually around 8 to 10 minutes. You want it al dente, which means firm to the bite. Before draining, reserve half a cup of the pasta water. This water helps make your sauce creamy later. Once done, drain the pasta in a colander. Now grab a food processor. Add 2 ripe avocados, pitted and peeled, to the bowl. Next, add 2 cloves of minced garlic and 1/4 cup of fresh basil leaves. Squeeze in 2 tablespoons of lemon juice and pour in 1/4 cup of olive oil. Blend until the mix is smooth and creamy. Taste it and add salt and pepper to your liking. If the sauce feels too thick, slowly mix in some of the reserved pasta water until it’s just right. In a large mixing bowl, combine the drained spaghetti with the creamy avocado sauce. Toss well to coat every strand of pasta. If needed, adjust the flavor with extra salt, pepper, or lemon juice. Serve your creamy avocado pasta right away in bowls. For a nice touch, top each serving with halved cherry tomatoes and a sprinkle of grated Parmesan cheese if you like. Enjoy this delightful dish! Check the Full Recipe for more details. To get the best creaminess, use ripe avocados. They should feel soft but not mushy. When you blend the sauce, add olive oil slowly. This helps create a smooth texture. If the sauce is too thick, add a bit of reserved pasta water. Keep blending until it’s just right. You can boost the flavor easily. Try adding a pinch of red pepper flakes for heat. Fresh lemon zest also adds a nice touch. For a cheesy flavor, mix in nutritional yeast. You can also swap fresh basil with spinach or arugula. Each herb gives a unique taste. This recipe is quite flexible. For gluten-free diets, use gluten-free pasta. You can also make it vegan by skipping the cheese garnish. If you want a nut-free option, skip any nut-based toppings. Feel free to adjust the recipe to meet your needs for any dietary restriction. {{image_2}} You can make your creamy avocado pasta heartier by adding protein. Grilled chicken or shrimp works well. Simply cook your protein, slice it, and toss it with the pasta. You can also use canned chickpeas for a vegetarian option. Just rinse and drain the chickpeas before adding them. They bring a nice texture and protein boost. If you need a gluten-free meal, you have options. Look for gluten-free pasta made from rice or quinoa. These types cook well and hold the sauce nicely. Cook them just like regular pasta and follow the same steps in the recipe. You won't miss the gluten at all! Herbs can change the flavor of your pasta. While basil is great, try fresh cilantro or parsley for a twist. You can also mix in some mint for a fresh taste. Just chop the herbs finely and blend them into your avocado sauce. This way, you can create a new flavor each time! For the full recipe, check the section above. Enjoy your cooking! After your meal, store any leftover creamy avocado pasta in an airtight container. Keep it in the fridge. It will stay fresh for up to two days. This dish can lose its vibrant color due to the avocado. To slow this, drizzle some lemon juice over the pasta before storing. When it's time to enjoy leftovers, reheat gently. I recommend using a skillet over low heat. Add a splash of water or olive oil to keep it creamy. Stir often to avoid burning. You can also microwave it but do so in short intervals. Cover the dish to retain moisture. Freezing creamy avocado pasta isn’t the best choice. Avocado can change texture when frozen. If you must freeze it, store just the sauce separately. Use a freezer-safe container. When ready to eat, thaw the sauce in the fridge overnight. Cook fresh pasta and mix them together. Enjoy the taste of fresh ingredients! For the full recipe, refer to the main article. You can prepare the sauce ahead of time, but it may brown. To avoid this, add lemon juice right before serving. Store the sauce in an airtight container in the fridge for up to a day. Cook the pasta fresh for the best taste and texture. If you don't have avocados, try using silken tofu. It gives a similar creamy texture. You can also use mashed banana for a sweeter option, but it will change the flavor. Another choice is a store-bought creamy sauce, though it won't be as fresh. Yes, creamy avocado pasta is vegan! It uses avocados, herbs, and oil. Just skip the Parmesan cheese or use a vegan cheese alternative. This dish is perfect for anyone looking for plant-based meals. If your avocado sauce is thick, add a bit of reserved pasta water. Start with one tablespoon and blend again. Keep adding until you reach the right creaminess. This makes the sauce smooth and easy to mix with your pasta. We covered how to make creamy avocado pasta with fresh ingredients and kitchen staples. I shared tips for perfect creaminess and how to store your dish. You can add protein or herbs to customize flavors. Remember, it's easy to make this dish your own. This delicious meal meets various dietary needs. Enjoy experimenting with it!

Creamy Avocado Pasta Delightfully Easy Recipe

Looking for a quick and tasty meal? Try my Creamy Avocado Pasta! This easy recipe uses fresh ingredients and simple

To make Spicy Garlic Noodles, gather these main ingredients: - 8 oz of spaghetti or any preferred noodles - 4 tablespoons olive oil - 6 cloves garlic, minced - 1-2 tablespoons red chili flakes (adjust based on spice preference) - 1 tablespoon soy sauce - 1 tablespoon sesame oil - 1/4 cup scallions, chopped - 1/4 cup fresh cilantro, chopped - Salt to taste These ingredients create a rich, flavorful base. The garlic adds warmth, while the chili flakes give a nice kick. You can enhance the dish with these optional ingredients: - 1 tablespoon lime juice for added zing Adding lime juice brings a bright, fresh taste to the noodles. It balances the spice and makes the dish pop. While spaghetti works well, feel free to try other noodle types: - Rice noodles - Udon noodles - Soba noodles Each type adds a unique texture and taste. Choose what you enjoy most. For the full recipe, check the detailed instructions. Start by boiling water in a large pot. Once it boils, add 8 oz of spaghetti or your favorite noodles. Cook the noodles according to the package instructions. You want them al dente, which means they should still have a little bite. When they are done, drain them well, but save about 1/2 cup of the pasta water. This water helps make the sauce creamy later. In a large skillet, heat 4 tablespoons of olive oil over medium heat. Once the oil is warm, add 6 cloves of minced garlic. Sauté the garlic for about 2 minutes. You want it to smell amazing and turn a light gold color. Stir it often to avoid burning. Next, add 1 to 2 tablespoons of red chili flakes. If you enjoy extra heat, add more flakes! Sauté this mix for another minute to release all those bold flavors. Now it’s time to add the cooked noodles to the skillet. Toss them gently to coat them in the garlic oil. Pour in 1 tablespoon of soy sauce and 1 tablespoon of sesame oil. Mix everything well! Add a little of the reserved pasta water, a bit at a time, until you reach your desired sauce consistency. Be careful with salt because the soy sauce adds a salty flavor. Lastly, turn off the heat and stir in 1/4 cup of chopped scallions and 1/4 cup of fresh cilantro. If you want a zesty kick, add 1 tablespoon of lime juice. Serve the noodles hot, and enjoy your flavorful dish! For the complete recipe, check the full recipe details. To make your noodles just right, start with 1 tablespoon of red chili flakes. If you want more heat, add an extra half tablespoon. Taste as you go. This way, you find the perfect spice for your palate. Remember, you can always add more, but it’s hard to take spice away! When cooking noodles, always bring a large pot of water to a boil. Add a pinch of salt for flavor. Stir the noodles often to prevent them from sticking. Cook until they are al dente, which means they should have a slight bite. Reserve some pasta water before draining; it helps to create a nice sauce later. Serve these noodles hot for the best flavor. Garnish with extra scallions and cilantro for a fresh touch. You can squeeze lime juice on top for added zing. Pair them with veggies, chicken, or shrimp for a full meal. For more ideas, check out the Full Recipe to explore different serving options! {{image_2}} You can easily make Spicy Garlic Noodles vegetarian or vegan. Just skip the meat and use vegetable broth instead of water when cooking noodles. For added flavor, toss in some fresh veggies like bell peppers, carrots, or snap peas. They will add crunch and color to your dish. You can also use plant-based sauces, such as tamari or coconut aminos, for a great taste without any animal products. Want to make your Spicy Garlic Noodles heartier? Add protein! Chicken, shrimp, or tofu work great. For chicken, cook diced pieces in the skillet before adding garlic. For shrimp, toss them in when the garlic is fragrant. If you prefer tofu, use firm tofu, cut it into cubes, and cook until golden. This adds a nice texture and protein boost to your meal. Feel free to play with the sauces and seasonings. If you want a different taste, try hoisin sauce, sriracha, or oyster sauce. You can even mix in some peanut butter for a creamy twist. Don't forget to taste as you go! This helps you find the flavor that best suits your palate. To store your Spicy Garlic Noodles, let them cool first. Place them in an airtight container. Make sure to seal it well to keep out air. Store the container in the fridge. Your noodles will stay fresh for about three days. When you are ready to eat the leftovers, reheat them gently. Use a skillet over low heat for best results. Add a splash of water or oil to help them heat evenly. Stir the noodles often to avoid sticking. You can also microwave them in short bursts. Just cover them with a damp paper towel to keep them moist. If you want to save your noodles for later, freezing is a great option. Place the cooled noodles in a freezer-safe bag or container. Remove as much air as possible before sealing. They can last up to three months in the freezer. When you are ready to eat, thaw them overnight in the fridge. Then reheat as described above for a quick meal. For the full recipe, check the earlier section. Enjoy your flavorful noodles! If you need a soy sauce substitute, use tamari. Tamari is a great option for those who want gluten-free. Coconut aminos also work well and add a slight sweetness. If you’re looking for a low-sodium choice, opt for a low-sodium soy sauce. Both options give you a similar salty flavor. Yes, you can easily make Spicy Garlic Noodles gluten-free. Use gluten-free noodles like rice noodles or quinoa pasta. Make sure to use tamari instead of soy sauce. This way, you keep all the flavor without the gluten. Spicy Garlic Noodles last about 3 to 5 days in the fridge. Store them in an airtight container to keep them fresh. When ready to eat, just reheat them in the microwave or on the stove. For full recipe details, refer to the earlier sections. I covered how to make spicy garlic noodles with key ingredients, steps, and tips. You learned about choosing the right noodles and how to adjust spice levels. I also shared storage tips and techniques for making this dish your own. Remember, you can customize the recipe to suit your taste. Try different proteins and sauces to add your twist. With some practice, you'll create flavorful meals everyone will love. For full recipe details, refer back to the sections above. Enjoy your cooking!

Spicy Garlic Noodles Flavorful and Quick Meal Idea

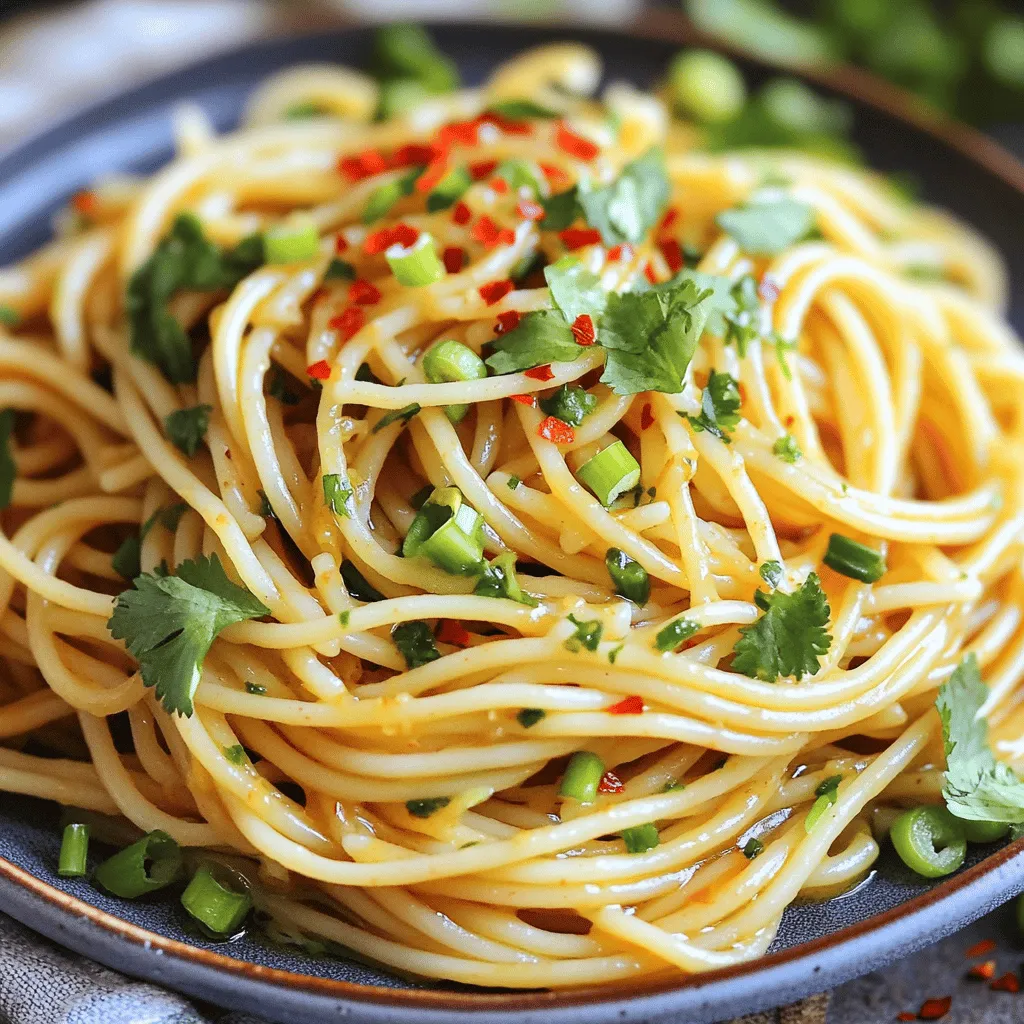
Looking for a meal that’s quick, bold, and packed with flavor? Spicy Garlic Noodles might be your new favorite dish!

To make a great Sunday gravy, you need simple, fresh ingredients. Here’s a list of what you’ll need: - 2 tablespoons olive oil - 1 large onion, finely chopped - 4 cloves garlic, minced - 1 large carrot, diced - 1 celery stalk, diced - 2 cans (28 oz each) crushed tomatoes - 2 tablespoons tomato paste - 1 teaspoon dried oregano - 1 teaspoon dried basil - 1 teaspoon sugar - Salt and pepper to taste - 1 bay leaf - 5 Italian sausage links (mild or spicy, your choice) - 1 pound beef chuck, cut into large chunks - Fresh basil for garnish These ingredients create a rich base for your sauce. Each one plays a key role. The onions and garlic bring sweetness, while the meat adds depth. Tomatoes give the sauce its heart and soul. While the essential ingredients are crucial, adding optional ones can elevate your gravy. Consider these extras: - Red wine for richness - Fresh parsley for brightness - Crushed red pepper for heat - Parmesan rind for umami These ingredients can give your gravy a unique twist. If you want, try adding them to see how they change the flavor. When it comes to tomatoes, both fresh and canned have their place. Fresh tomatoes are great in summer. They add bright, bold flavor. However, canned tomatoes are more consistent and easier to use. They are also often picked at peak ripeness, so they have great taste. For Sunday gravy, I recommend using canned crushed tomatoes. They save time and give you a rich sauce every time. For the full recipe, check out Savor the Sunday: Authentic Italian Gravy. Enjoy making this special dish for your family! Start by heating 2 tablespoons of olive oil in a large pot. Use medium heat. Add 1 large onion, chopped finely. Next, toss in 1 diced large carrot and 1 diced celery stalk. Sauté these until soft, about 5 to 7 minutes. Then, stir in 4 minced garlic cloves. Cook until you smell that garlic goodness, about 1 minute. Now, it's time for the tomatoes. Pour in 2 cans of crushed tomatoes and 2 tablespoons of tomato paste. Stir well to mix. Sprinkle in 1 teaspoon each of dried oregano and dried basil. Then, add 1 teaspoon of sugar, salt, and pepper to taste. Toss in 1 bay leaf. Bring this mixture to a gentle simmer. In a separate pan, brown 5 Italian sausage links over medium heat. Make sure they are nicely browned on all sides. This step adds lots of flavor to your gravy. Once done, add the sausages to the pot with the sauce. Next, sear 1 pound of beef chuck, cut into large chunks, in the same pan. Brown those pieces on all sides. This will build more flavor. After browning, transfer the beef to the pot as well. Cover the pot and let the sauce simmer on low heat for about 1.5 to 2 hours. Stir occasionally. This lets all those flavors blend beautifully. If the sauce becomes too thick, add a bit of water to reach your desired thickness. After simmering, taste the sauce. Adjust it with more salt or pepper if needed. Don't forget to remove the bay leaf before serving. Enjoy your delicious Sunday gravy! For the full recipe, check out the details above. To make your Sunday gravy truly special, focus on fresh ingredients. Use ripe tomatoes for the best taste. Sauté your veggies until they are soft. This builds a strong flavor base. Add garlic near the end of cooking to keep its punch. If you want more depth, try adding a splash of red wine. A bay leaf brings out the aroma, too. Don't rush the simmering process. A long, slow cook allows flavors to blend well. Avoid adding salt too early; wait until the end. This way, you can taste and adjust. Overcooking the meat can make it tough. Lastly, don’t forget to remove the bay leaf before serving. Prep your veggies the night before. This cuts down your cooking time. You can also brown the meat ahead of time. If you have a busy day, use a slow cooker. Just set it and let the flavors meld while you go about your day. For quick meals, consider making a larger batch. You can freeze leftovers for easy dinners later. For the full recipe, check out the detailed steps above. {{image_2}} You can customize your Sunday gravy by adding different meats. Italian sausage is a favorite, but try meatballs or pork ribs. Meatballs can add a nice texture and flavor. If you like, use both sausage and meatballs for a hearty mix. Pork ribs give it a rich taste and are tender after simmering. You can also add chicken for a lighter option. Just remember to adjust the cooking time for any new meats. If you prefer a vegetarian dish, skip the meat entirely. Use mushrooms for a hearty texture. They absorb flavors well and add a deep, earthy taste. You can also add lentils for protein and fiber. To enhance the sauce, include extra veggies like zucchini and bell peppers. They bring color and flavor to the gravy. Don't forget to add extra herbs and spices to keep the taste vibrant. To spice up your sauce, consider adding red pepper flakes for heat. Start with a small amount and taste as you go. You can also mix in fresh herbs like parsley or thyme for a fresh touch. A splash of red wine can enhance the flavor, too. Just let it simmer a bit longer for the alcohol to cook off. Experiment with these ideas to create your own version of Sunday gravy. You'll find a mix that your family loves! To keep your Sunday gravy fresh, let it cool first. Transfer the gravy to an airtight container. You can store it in the fridge for up to 4 days. Make sure to label the container with the date. This way, you know when to use it. If you want to save your gravy for later, freezing is a great option. Allow the gravy to cool completely before freezing. Use freezer-safe containers or bags. Leave some space in the container for expansion. Label it with the date. You can freeze it for up to 3 months. When you're ready to enjoy your gravy again, thaw it overnight in the fridge. Heat it on the stove over low heat, stirring often. If it seems too thick, add a splash of water or broth. You can also microwave it in short bursts. Just remember to stir in between to heat evenly. For the best taste, serve it over fresh pasta. For the full recipe, refer to the earlier section. An authentic gravy comes from tradition. It has rich flavors and uses fresh ingredients. Quality tomatoes, herbs, and meat create depth. Slow cooking is key, letting flavors blend well. Classic recipes often use family techniques passed down through generations. This creates a warm, hearty dish that feels like home. Yes, you can use a slow cooker for Sunday Gravy. Start by sautéing the vegetables and meat in a pan. Then, transfer everything to the slow cooker. Add the crushed tomatoes and spices. Set it on low for 6 to 8 hours. This method lets the flavors develop nicely while you go about your day. To adjust spice, start by tasting your sauce. If you want more heat, add red pepper flakes or spicy sausage. For less heat, use mild sausage or skip any spicy ingredients. You can also add a touch of sugar to balance the flavors if it gets too spicy. Sunday Gravy can last about 3 to 4 days in the fridge. Make sure to store it in an airtight container. If you want it to last longer, consider freezing it. Gravy can stay good in the freezer for up to 3 months. Just thaw it overnight in the fridge before reheating. You learned about the key elements for making Sunday Gravy, from essential ingredients to storage tips. I shared step-by-step instructions to create a rich, flavorful sauce. You can enhance your gravy with my tips, avoid common mistakes, and explore variations. Remember, cooking is about finding what you love. Don't be afraid to adjust flavors or experiment. With practice, you'll make a Sunday Gravy that your family will enjoy. Happy cooking!

Authentic Italian Sunday Gravy Savory Family Recipe

If you want to impress your family with a true Italian feast, look no further than Sunday gravy. This savory

- 1 cup unsalted butter, softened - 2 cups granulated sugar - 4 large eggs - 1 teaspoon almond extract - 1 teaspoon vanilla extract - 3 cups all-purpose flour - 1 teaspoon baking powder - 1/2 teaspoon salt - 1 cup whole milk - 1/2 cup sliced almonds (for topping) - Powdered sugar (for dusting, optional) How to measure flour correctly Use a spoon to scoop flour into a measuring cup. Then, level it off with a knife. This method avoids packing the flour too tightly. Tips for softening butter If your butter is cold, cut it into small pieces. Let it sit at room temperature for about 15 minutes. You can also microwave it for just 10 seconds for quick softening. Understanding egg sizes and their impact on baking Most recipes call for large eggs. If you use medium or extra-large, adjust the number. This helps keep the cake moist and fluffy. For a delightful treat, follow the full recipe. Enjoy baking! 1. Preheat your oven to 350°F (175°C). 2. Grease and flour a 10-inch bundt pan. This helps the cake slide out easily. 3. In a large bowl, cream 1 cup of softened butter with 2 cups of granulated sugar. Use a hand mixer for about 4-5 minutes. The mix should look light and fluffy. 1. Add 4 large eggs, one at a time. Mix well after each egg. 2. Stir in 1 teaspoon of almond extract and 1 teaspoon of vanilla extract until blended. This gives the cake a lovely flavor. 3. In another bowl, whisk together 3 cups of all-purpose flour, 1 teaspoon of baking powder, and 1/2 teaspoon of salt. 4. Slowly add the dry mix to the butter mix. Alternate with 1 cup of whole milk. Start and end with the dry mix. Mix gently until just combined. 1. Pour the batter into the prepared bundt pan. Smooth the top with a spatula. 2. Sprinkle 1/2 cup of sliced almonds evenly over the top. This adds a nice crunch. 3. Bake for 50-60 minutes. Check for doneness with a toothpick. It should come out clean. 4. Let the cake cool in the pan for 15 minutes. Then, transfer it to a wire rack to cool completely. You can dust it with powdered sugar for a sweet touch. For the full recipe, see Almond Bliss Pound Cake. When baking almond pound cake, avoid common mistakes to get the best results. Here are key points to keep in mind: - Overmixing the batter: This can lead to a dense cake. Mix just until combined. - Incorrect oven temperature: Always check that your oven is calibrated. A wrong temp can ruin the cake. - Not greasing the pan: Ensure you grease and flour your bundt pan well. This prevents sticking and helps the cake release easily. To achieve a moist texture, consider these tips: - Use room temperature ingredients: Cold butter or eggs can make mixing hard and affect texture. - Don’t skip the milk: It adds moisture and richness. Make sure you use whole milk for the best results. - Let the cake cool properly: Allow it to cool in the pan for 15 minutes. This helps keep it moist. You can easily enhance the flavor of your almond pound cake. One way is by using different extracts. For example: - Try lemon or orange extract: These citrus flavors can brighten your cake. - Experiment with coconut extract: It adds a tropical twist that pairs well with almond. The temperature of your ingredients is also key. Always use: - Room temperature butter and eggs: This helps them mix better and create a smoother batter. - Warm milk: Slightly warming the milk can help it blend seamlessly into the batter. Remember, these small tweaks can take your almond pound cake from good to great! For a detailed recipe, check out the Full Recipe. {{image_2}} You can change your almond pound cake to suit your taste. Here are two fun ideas: - Chocolate almond pound cake: Add cocoa powder to the batter. Use 1/2 cup of unsweetened cocoa powder. This gives a rich taste. Mix it with the flour for the best result. You can also add chocolate chips for extra sweetness. - Citrus-infused almond pound cake: Add a burst of flavor with citrus. Use the zest of one lemon or orange. This brightens the cake. You can also add a splash of juice to the batter. It makes the cake fresh and lively. Sometimes you may need to swap ingredients. Here are some smart substitutes: - Alternatives for butter and sugar: If you want a lighter cake, use coconut oil instead of butter. It adds a nice flavor. For sugar, try honey or maple syrup. Use about 3/4 cup for every cup of sugar. Adjust the liquid in the recipe to keep the right texture. - Gluten-free options: If you or someone you know is gluten-free, use a gluten-free flour blend. Make sure it has xanthan gum for the right texture. This allows everyone to enjoy the cake without worries. By mixing flavors and swapping ingredients, you can create your own twist on this almond pound cake. Check out the Full Recipe for more details! To keep your almond pound cake fresh, wrap it tightly in plastic wrap. Place it in an airtight container. You can also use aluminum foil. This keeps moisture in and air out. Storing it this way helps the cake stay soft and tasty. If you want to refrigerate it, place the wrapped cake in the fridge. It will last about a week this way. However, the cake can dry out faster in the fridge. Freezing is another great option. Wrap the cake well in plastic wrap, then place it in a freezer bag. It can stay frozen for about three months. When you're ready to eat it, let it thaw in the fridge overnight. Homemade almond pound cake lasts about 4 to 5 days at room temperature. Keep it in a cool, dry place. If you see any signs of mold or an off smell, throw it away. Signs that your cake has gone bad include a dry texture or a change in color. If the cake starts to taste sour, it's time to toss it. Enjoy your almond pound cake while it's fresh! For the full recipe, check out the details above. How to make almond pound cake from scratch? To make almond pound cake from scratch, follow the full recipe. Start by preheating your oven to 350°F (175°C). Cream the butter and sugar until fluffy. Add eggs and extracts. Mix flour, baking powder, and salt in another bowl. Combine both mixtures with whole milk. Pour into a bundt pan and bake until done. Can I use almond flour instead of all-purpose flour? Yes, you can use almond flour. However, it may change the cake's texture. Almond flour is denser, so you might need to adjust the liquid. Use a combination of all-purpose and almond flour for the best results. What can I serve with almond pound cake? You can serve almond pound cake with fresh fruits, whipped cream, or ice cream. A drizzle of chocolate sauce also adds a tasty touch. Pairing it with a cup of tea or coffee makes it delightful. Is almond extract necessary for flavor? Almond extract adds a unique flavor. While it is not strictly necessary, it enhances the cake's taste. You can use vanilla extract if you prefer a milder flavor. How can I make the cake more visually appealing? To enhance the cake's look, sprinkle sliced almonds on top before baking. After cooling, dust with powdered sugar. You can also add fresh berries or a glaze for extra flair. Why did my almond pound cake not rise? If your almond pound cake did not rise, check your baking powder's freshness. Also, ensure you creamed the butter and sugar well. Overmixing the batter can also prevent a good rise. How do I fix a dense pound cake? To fix a dense pound cake, ensure you measured your ingredients correctly. Adding more liquid can help lighten the texture. You can also try mixing the batter less to avoid overworking it. In this post, we covered how to make almond pound cake from scratch. We listed key ingredients, shared measurement tips, and provided detailed instructions. I also offered helpful baking tips and variations to try. Remember, measuring ingredients correctly and avoiding common mistakes are vital for success. With these steps, you can enjoy a delicious cake every time. Experiment with flavors and enjoy sharing your tasty results. Happy baking!

Almond Pound Cake Delightfully Simple and Sweet Treat

Are you craving a dessert that’s both simple and satisfying? Look no further than almond pound cake! With just a

- 4 salmon fillets (about 6 oz each) - 3 tablespoons olive oil - 2 cloves garlic, minced - 1 cup cherry tomatoes, halved - 1 cup spinach, roughly chopped - 1 teaspoon dried Italian herbs (oregano, basil, thyme) The main ingredients create a base of flavor. Salmon is rich and healthy. Olive oil adds a nice touch of richness. Garlic gives a warm, inviting aroma. Cherry tomatoes add a burst of sweetness. Spinach brings a fresh note. Italian herbs tie all these flavors together. - 1/2 teaspoon red pepper flakes (adjust for spice preference) - Salt and pepper to taste - Zest and juice of 1 lemon Seasoning is key to a great dish. Red pepper flakes add a hint of heat. Salt and pepper enhance all the flavors. Lemon zest and juice brighten the dish and add a fresh kick. - Fresh basil leaves Garnishing is not just for looks. Fresh basil leaves add a pop of color and flavor. They give the dish a nice finish. You can tear the leaves by hand for a rustic touch. If you want to see how to put this all together, check out the Full Recipe. First, preheat your oven to 400°F (200°C). This will ensure even cooking for your salmon. While the oven heats, grab a large oven-safe skillet. Add two tablespoons of olive oil to the skillet over medium heat. Once the oil is warm, add two cloves of minced garlic. Sauté the garlic for about one minute. Watch it closely; we do not want it to burn. Now, it’s time to add flavor. Toss in one cup of halved cherry tomatoes. Sauté these for three to four minutes. You want them soft and juicy. Next, incorporate one cup of roughly chopped spinach into the skillet. Now, add one teaspoon of dried Italian herbs, half a teaspoon of red pepper flakes, and salt and pepper to taste. Stir everything together. Cook until the spinach wilts, which takes about two minutes. Next, push the veggies to the side of the skillet. Add one more tablespoon of olive oil to the empty space. Place four salmon fillets in the skillet, skin-side down. Season the fillets with salt, pepper, and the zest from one lemon. Drizzle the lemon juice over the salmon and vegetable mix. Now, transfer the skillet to your preheated oven and bake for 12 to 15 minutes. You know the salmon is done when it flakes easily with a fork. For the full recipe, check out the instructions provided. Choosing the right salmon You want to pick fresh salmon. Look for fillets that are bright in color and firm to the touch. Avoid any fish that looks dull or has brown spots. Wild-caught salmon often has a richer flavor than farmed varieties. If you want a milder taste, farmed salmon is a good choice. Checking doneness To check if your salmon is cooked, use a fork. Gently poke the fillet. If it flakes easily, it’s done. Salmon should be opaque and not translucent. It’s best to cook it until it reaches an internal temperature of 145°F (63°C). Suggested spice adjustments If you like it spicy, add more red pepper flakes. For a milder flavor, reduce the amount you use. You can also try adding a pinch of smoked paprika for a smoky touch. Experimenting with spices makes the dish your own. Additional herb options Besides Italian herbs, try fresh dill or parsley. Both add fresh notes to the dish. You can also mix in some fresh thyme for an earthy flavor. Choose herbs based on what you enjoy. Best ways to plate the dish When plating, start with the veggies on the bottom. Place the salmon fillet on top. This way, the colors pop and make the dish look vibrant. Arrange the cherry tomatoes around the salmon for a splash of color. Use of garnishes Fresh basil leaves make a great garnish. They add a lovely aroma and visual appeal. You can also sprinkle some lemon zest on top for a bright finish. A drizzle of extra olive oil can enhance the look and flavor too. For more details on the recipe, check out the Full Recipe. {{image_2}} You can change the vegetables in Savory Tuscan Salmon to suit your taste. Try adding: - Zucchini, sliced - Bell peppers, diced - Asparagus, cut into pieces These swaps keep the dish fresh and colorful. You can also use different fish. Instead of salmon, consider: - Trout for a milder flavor - Cod for a firmer texture - Tilapia for a lighter option If you prefer grilling, this dish works well on the grill. Just preheat your grill to medium-high. Place the salmon on a grill-safe pan with the veggies, and grill for about 10-12 minutes. Baking is simple, but stovetop sautéing is another fun method. Heat a skillet over medium heat, add oil, and cook the salmon for about 5-7 minutes on each side. This method gives a nice crisp to the skin. For gluten-free needs, this dish is already safe. Just ensure your ingredients are free from gluten. If you're looking for dairy-free options, you can skip any buttery sauces or creams. The olive oil and lemon juice provide enough flavor. Enjoy this dish as a healthy choice any day! For the full recipe, check the original instructions. To store leftovers, place your Savory Tuscan Salmon in an airtight container. Make sure it cools down to room temperature first. This helps keep it fresh. Store it in the fridge for up to three days. After that, the taste and texture may change. If you want to freeze the dish, first wrap the salmon tightly in plastic wrap. Then, place it in a freezer-safe bag or container. This keeps out air and prevents freezer burn. You can freeze it for up to three months. When you're ready to eat, thaw it in the fridge overnight. This keeps the salmon safe and tasty. To reheat salmon, use the oven or a skillet. Preheat the oven to 300°F (150°C). Place the salmon on a baking sheet and cover it with foil. Heat for about 10-15 minutes. If using a skillet, add a little olive oil over medium heat. Cook for about 3-5 minutes on each side. Avoid microwaving as it can dry out the fish. For more cooking tips, check out the Full Recipe. You can tell if salmon is done by checking its color and texture. Cooked salmon should be opaque and flake easily with a fork. To be safe, the internal temperature should reach 145°F (63°C). Use a meat thermometer for accuracy. Remember, salmon continues to cook a bit after you take it out of the oven. Yes, you can prepare Savory Tuscan Salmon in advance. You can chop the veggies and season the salmon beforehand. Store them in the fridge for up to a day. When you're ready to cook, just heat the skillet and add everything. This saves time and makes dinner easy. Savory Tuscan Salmon pairs well with many side dishes. Here are some tasty options: - Quinoa for a nutty flavor - Garlic mashed potatoes for creaminess - Steamed asparagus for a fresh crunch - A crisp green salad for lightness - Rice pilaf to soak up the juices These sides will complement the salmon perfectly, creating a well-rounded meal. For the full recipe, check out the detailed instructions above. This blog post shows you how to make Savory Tuscan Salmon easily. We covered all the key ingredients, from fresh salmon to vibrant vegetables and herbs. You learned how to prepare, cook, and garnish your dish for a delicious meal. Remember, tuning flavors and choosing the right cooking method can make a big difference. You can even adapt this recipe to fit your diet! With simple storage tips, you can enjoy this meal later, too. Now, it's time to try your hand at making this tasty salmon dish!

Savory Tuscan Salmon Flavorful and Easy Dinner Choice

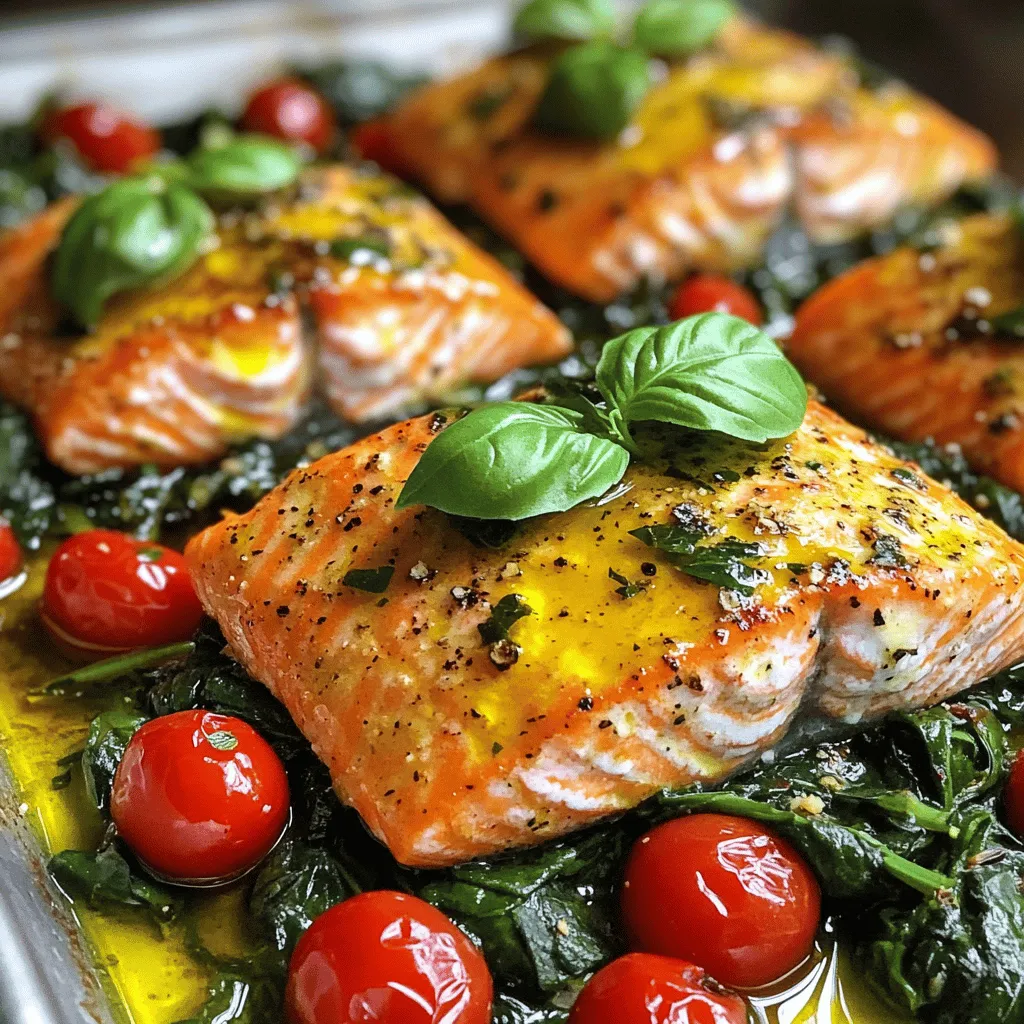
Looking for a quick and tasty dinner idea? Savory Tuscan Salmon is your answer! With fresh salmon, zesty lemon, and

To make the perfect cheesy truffle mac and cheese, gather these ingredients: - 8 oz elbow macaroni - 2 tablespoons unsalted butter - 2 tablespoons all-purpose flour - 2 cups milk (whole or 2%) - 1 cup shredded sharp cheddar cheese - 1 cup shredded Gruyère cheese - 1/2 cup grated Parmesan cheese - 1 tablespoon truffle oil - 1/2 teaspoon garlic powder - 1/2 teaspoon onion powder - Salt and pepper to taste - 1/2 cup panko breadcrumbs - 2 tablespoons chopped fresh parsley (for garnish) When choosing your ingredients, quality matters. Use fresh cheeses for the best taste. Sharp cheddar gives a rich flavor. Gruyère adds creaminess and depth. If you can find it, go for high-quality truffle oil. It enhances the dish without being too strong. Always check that your pasta is firm but tender. This ensures it absorbs the sauce well. You can change some ingredients based on what you have. For the elbow macaroni, use any pasta shape you like. If you want a lighter dish, choose low-fat milk. Instead of truffle oil, try a splash of olive oil or butter for richness. You can swap cheeses too! Mozzarella gives a gooey texture, while feta adds a tangy twist. For a crunchy topping, use crushed crackers or cornflakes instead of panko. First, you need to cook the pasta. In a large pot, boil salted water. Add 8 oz of elbow macaroni. Cook it according to the package instructions until it is al dente. This means it should still have a little bite to it. Once it is done, drain the pasta and set it aside. Next, let’s make the cheese sauce. In the same pot, melt 2 tablespoons of unsalted butter over medium heat. Once melted, whisk in 2 tablespoons of all-purpose flour. Cook this for about 1-2 minutes until it is lightly golden and bubbly. Slowly whisk in 2 cups of milk, making sure there are no lumps. Keep whisking until the mixture thickens, which should take about 5-7 minutes. Reduce the heat to low, then stir in 1 cup of shredded sharp cheddar cheese, 1 cup of shredded Gruyère cheese, and 1/2 cup of grated Parmesan cheese. Mix until the cheese melts and the sauce is smooth. Add 1 tablespoon of truffle oil, 1/2 teaspoon of garlic powder, 1/2 teaspoon of onion powder, and season with salt and pepper to taste. Now it's time to combine the pasta and sauce. Fold in the cooked macaroni until it is well coated with the cheese sauce. Preheat your oven to 350°F (175°C). Transfer the mac and cheese to a greased baking dish. For the topping, mix 1/2 cup of panko breadcrumbs with a drizzle of olive oil and a pinch of salt. Sprinkle this evenly over the mac and cheese. Bake it in the oven for about 20-25 minutes or until the top is golden brown and crispy. When it is done, remove it from the oven and let it cool for a few minutes. You can garnish it with 2 tablespoons of chopped fresh parsley before serving. For the full recipe, check out the Cheesy Truffle Mac & Cheese ! To make your mac and cheese super creamy, use a mix of cheeses. I love sharp cheddar, Gruyère, and Parmesan. Each cheese adds its own flavor and creaminess. You can also stir in some cream cheese or sour cream. They melt well and boost the creaminess. Use a bit more milk or cream when making the cheese sauce. This helps keep it smooth and rich. If you're looking for a healthier twist, try using whole grain pasta. It adds fiber and nutrients. You can swap regular cheese for low-fat or dairy-free options. Nutritional yeast is a great choice for a cheesy flavor without dairy. Adding veggies like spinach or broccoli boosts the nutrition. You can also use cauliflower to make a lighter cheese sauce. Simply steam it and blend it smooth with spices. You don’t need fancy gear to make great mac and cheese. Here are the must-haves: - Large pot for boiling pasta - Whisk for mixing sauces - Measuring cups for ingredients - Baking dish for the final bake - Wooden spoon for stirring These tools make cooking easy and fun. They help you create that perfect dish every time. {{image_2}} Classic mac and cheese is a warm hug on a plate. It uses simple, tasty ingredients. You can make it with just elbow macaroni and cheese. But gourmet mac and cheese takes it to the next level. It adds rich flavors and unique ingredients. You can use fancy cheeses like Gruyère or add truffle oil. These changes make the dish special for fancy meals or gatherings. You can mix in many flavors to enhance your mac and cheese. Bacon is a favorite. It adds a nice crunch and smoky taste. Lobster is another great choice, making it feel luxurious. You can also try vegetables, like spinach or roasted peppers. Each flavor twist keeps the dish exciting and new. Many people have special diets today. You can still enjoy mac and cheese if you are gluten-free or vegan. For gluten-free mac and cheese, use gluten-free pasta. Almond or oat milk works well for the sauce. For vegan options, use cashew cheese or nutritional yeast. These swaps keep the creamy goodness without dairy. Each variation makes sure everyone can have a bowl of comfort. Check out the Full Recipe for a delicious cheesy truffle option. To store leftover mac and cheese, wait until it cools. Transfer it to an airtight container. This keeps your dish fresh. You can store it in the fridge for up to three days. If you want to keep it longer, freezing is a great option. Reheating mac and cheese is easy. For the best results, use the oven. Preheat it to 350°F (175°C). Place the mac and cheese in an oven-safe dish. Add a splash of milk to keep it creamy. Cover with foil and heat for about 20 minutes. You can also use the microwave. Heat in short bursts, stirring in between. Freezing mac and cheese works well. First, cool it completely. Portion it into freezer-safe bags or containers. Make sure to remove as much air as possible. Label the bags with the date. You can freeze it for up to three months. When ready to eat, thaw in the fridge overnight before reheating. Try the full recipe for a creamy delight! The best cheeses for mac and cheese are sharp cheddar and Gruyère. These cheeses melt well. They add great flavor and creaminess. You can also mix in some Parmesan for a salty kick. Feel free to try different cheeses. Mozzarella and Fontina are good options too. Each cheese gives a unique taste to your dish. Yes, you can make mac and cheese ahead of time. Just prepare it as usual, then store it. Place your dish in the fridge before baking. Cover it tightly with foil or plastic wrap. When you are ready to bake, take it out and let it sit for about 30 minutes. Then bake as directed in the Full Recipe. This makes it easy for parties or busy nights. If your mac and cheese is grainy, don't worry. This can happen if the cheese overheats. To fix it, add a splash of milk or cream. Stir this in over low heat until smooth. You can also blend the sauce in a blender. This will help mix everything well. Remember to add the cheese slowly when making the sauce. This helps keep it creamy. In this article, we explored how to make delicious mac and cheese. We outlined the best ingredients, plus tips for quality and substitutes. You learned step-by-step cooking methods for the pasta and cheese sauce. We also shared tricks for creaminess and healthy swaps. Different variations let you customize this dish to your taste. Finally, we covered how to store and reheat leftovers. With these tips, you can create a cozy meal that everyone will love. Enjoy your cooking and your tasty mac and cheese!

Mac and Cheese Comforting Dish for All Occasions

Mac and cheese is more than just a dish; it’s a warm hug on a plate! Whether you’re hosting a

- 1 can refrigerated biscuit dough (8 count) - 1 cup shredded mozzarella cheese - 4 tablespoons unsalted butter, melted - 3 cloves garlic, minced - 1 teaspoon dried Italian herbs (oregano, basil, thyme mix) - 1/2 teaspoon garlic powder - 1/4 teaspoon red pepper flakes (optional for spice) - 1/4 teaspoon salt - Fresh parsley, chopped (for garnish) To make Biscuit Garlic Butter Cheese Bombs, you need simple, tasty ingredients. First, grab a can of refrigerated biscuit dough. This dough is the base of your cheese bombs. It’s soft and easy to work with. Next, shredded mozzarella cheese brings delicious gooeyness. You can also try other cheeses if you like. Melted unsalted butter adds richness. It helps give the bombs a nice, golden finish. Now, let’s spice things up! Minced garlic is key. It gives a strong, savory flavor. Dried Italian herbs add a nice touch. They mix well with garlic and cheese. Garlic powder boosts the garlic taste. Red pepper flakes can add a kick, but it's up to you. Finally, a pinch of salt enhances all the flavors. To finish, fresh parsley brightens the dish. It makes your cheese bombs look great and adds color. With these ingredients, you are set to create a tasty treat. For the full recipe, check out the section below. - Preheat your oven to 375°F (190°C). Line a baking sheet with parchment paper. This step helps the cheese bombs bake evenly. - In a small bowl, combine 4 tablespoons of melted butter, 3 cloves of minced garlic, 1 teaspoon of dried Italian herbs, 1/2 teaspoon of garlic powder, 1/4 teaspoon of red pepper flakes, and 1/4 teaspoon of salt. Mix well to create a flavorful garlic butter. - Open the can of refrigerated biscuit dough. Separate each biscuit and flatten each one slightly in your hand. Aim for a small circle. - Take about 1 tablespoon of shredded mozzarella cheese and place it in the center of each biscuit circle. This cheese will melt and create a gooey center. - Fold the biscuit around the cheese. Pinch it closed and roll it into a ball shape. Make sure the cheese is fully sealed inside to avoid leaks. - Arrange each cheese bomb seam side down on your prepared baking sheet. This keeps them from opening in the oven. - Brush the tops of the biscuit bombs with the garlic butter mixture. Use all of the mixture to get a rich flavor. - Bake in the preheated oven for 12-15 minutes. Look for a golden brown color to know they are cooked through. - Once baked, remove the cheese bombs from the oven and let them cool for a couple of minutes. Garnish with fresh chopped parsley before serving. For a detailed list of ingredients and instructions, check out the Full Recipe. To make the best Biscuit Garlic Butter Cheese Bombs, sealing the cheese is key. After placing cheese in the biscuit, fold it tightly. Pinch the edges well to keep the cheese inside. This step prevents leaks while baking. Baking temperature and timing matter too. Preheat your oven to 375°F (190°C). Bake the cheese bombs for 12 to 15 minutes. Look for a golden brown color to know they’re ready. You can prepare these cheese bombs in advance. Start by mixing the garlic butter and seasoning. Prepare the biscuits and cheese as directed. You can keep them in the fridge for up to a day before baking. For storage, place the unbaked cheese bombs in an airtight container. You can also freeze them for longer storage. Just make sure to place parchment paper between layers. When ready to eat, bake straight from the fridge or freezer. If frozen, add a few extra minutes to the baking time. Follow the Full Recipe for more helpful tips. {{image_2}} You can change the cheese in your biscuit garlic butter cheese bombs. While mozzarella is great, you can try cheddar or pepper jack for a twist. Cheddar gives a sharp flavor. Pepper jack adds a nice kick. You can also mix cheeses for fun flavors. Try half mozzarella and half cheddar for a rich taste. Mixing cheeses creates a unique experience in every bite. Add extra herbs and spices to boost flavor. Consider adding some fresh basil or chives for a bright taste. You can also sprinkle in some Italian seasoning to enhance the dish. For those who like heat, diced jalapeños can give a spicy bite. If you want a savory touch, bacon bits work wonders. Just cook the bacon first, then mix it in with the cheese. These flavor additions make your cheese bombs even more exciting! Discover more ideas and tips in the [Full Recipe]. After enjoying your biscuit garlic butter cheese bombs, store any leftovers in the fridge. Place them in an airtight container. This helps keep them fresh for up to three days. If you want to save space, wrap them in plastic wrap first, then put them in the container. This extra layer keeps moisture in and helps prevent them from drying out. To freeze these cheesy delights, let them cool completely. Once cooled, place them on a baking sheet in a single layer. Freeze them for about one hour until they are firm. After that, transfer the cheese bombs to a freezer bag. Remove as much air as you can to prevent freezer burn. They will stay fresh for about three months in the freezer. When you’re ready to eat, you can reheat them straight from the freezer. Preheat your oven to 350°F (175°C). Place the frozen cheese bombs on a baking sheet and cover them with foil. Heat them for about 15-20 minutes. Remove the foil for the last 5 minutes to get a nice, crispy top. Enjoy your tasty treat anytime! To add spice to your cheese bombs, mix in red pepper flakes. You can adjust the amount based on your taste. For even more heat, try adding diced jalapeños or a dash of hot sauce to the cheese filling. These additions will kick up the flavor and make each bite exciting. Yes, you can use homemade biscuit dough! Just make sure the dough is easy to work with. Roll it out to a similar thickness as store-bought dough. This way, you can still create the perfect cheese bombs. Homemade dough can make them even tastier. To reheat leftover cheese bombs, place them in a preheated oven at 350°F (175°C). Bake for about 10 minutes or until warm. This method keeps them crispy. You can also microwave them for 30-45 seconds, but they may lose some crunch. You’ll know the cheese bombs are done when they turn golden brown. Check the edges for color and the center for firmness. If they look golden and feel firm to the touch, they are ready to enjoy. Trust your eyes and nose; the garlic smell will be a good sign too! You now know how to make cheese bombs from simple ingredients. We covered the key steps, flavors, and storage tips. These treats are fun to make and perfect for sharing. Don't hesitate to customize them with your favorite cheeses or spices. Proper preparation ensures a great result each time. Enjoy your delicious cheese bombs hot or as leftovers. Remember, making these treats can be a great way to bond with family or friends. Happy cooking!

Biscuit Garlic Butter Cheese Bombs Easy and Tasty Treat

If you’re craving a simple yet delicious snack, these Biscuit Garlic Butter Cheese Bombs are the perfect treat! In just

- 2 cups all-purpose flour - 1 teaspoon sugar - 1 tablespoon active dry yeast - 1 teaspoon salt To make the perfect crust, start with essential ingredients. The blend of flour, sugar, yeast, and salt creates a strong base. I use all-purpose flour for its versatility. Sugar helps the yeast thrive, giving the dough a nice rise. Salt adds flavor and strengthens the dough. - 1 cup ricotta cheese - 1 cup shredded mozzarella cheese - ½ cup grated Parmesan cheese Cheese makes the pizza rich and creamy. I love using ricotta for its smooth texture. It blends well with the mozzarella, which melts beautifully. Parmesan adds a sharp flavor. This mix creates a cheese experience that you’ll remember. - 1 cup fresh spinach, chopped - 1 cup Italian sausage, crumbled - Optional spices Fresh spinach gives color and nutrition. It blends perfectly with the savory sausage. I use Italian sausage for its bold flavor. You can add spices like garlic powder or red pepper flakes for extra kick. Remember, the right balance makes every bite count. If you want the Full Recipe, you can find it above. To start, grab a large bowl. In it, combine ¾ cup warm water, 1 teaspoon sugar, and 1 tablespoon active dry yeast. Let this sit for about 5 minutes. You want it to get frothy. This shows the yeast is active. Next, add 2 cups all-purpose flour, 1 teaspoon salt, and 1 tablespoon olive oil to the yeast mix. Stir until the dough forms. Then, knead the dough on a floured surface for about 5-7 minutes. You want it smooth and elastic. Now, place the dough in a greased bowl. Cover it with a damp cloth. Let it rise in a warm spot for about 1 hour. The dough should double in size. While the dough rises, heat a skillet over medium heat. Add 1 cup of crumbled Italian sausage. Cook it until it’s browned and fully cooked. Drain any excess fat and set the sausage aside. In a separate bowl, mix together 1 cup ricotta cheese, 1 cup shredded mozzarella cheese, and ½ cup grated Parmesan cheese. Add 1 teaspoon garlic powder, ½ teaspoon onion powder, salt, and pepper to taste. If you like some heat, add a pinch of red pepper flakes. Then, stir in the cooked sausage and 1 cup of chopped spinach. Once the dough has risen, punch it down. Roll it out on a floured surface to fit your deep-dish pizza pan. Press the dough into the pan, making sure it comes up the sides. Spread the cheese and sausage mixture evenly over the crust. Cover the assembled pizza and let it rise for another 15-20 minutes. Preheat your oven to 425°F (220°C). Once preheated, bake the pizza for 25-30 minutes. Look for a golden brown crust and bubbling cheese. Let the pizza cool for about 5 minutes before slicing into wedges. For the full recipe, you can refer to the detailed instructions. Enjoy the great flavors of this dish! Kneading dough is very important. It helps develop gluten, which gives the crust its nice chew. To knead, push the dough with your palms, fold it, and turn it. Do this for about 5 to 7 minutes. Your dough should feel smooth and elastic when done. For a fluffy crust, make sure you let the dough rise. It needs warm air to grow. Place the dough in a lightly greased bowl, cover it, and let it sit in a warm spot for an hour. This helps it double in size. Customizing the cheese blend can really change the flavor. I like to mix ricotta, mozzarella, and Parmesan for a creamy and cheesy delight. You can also add a bit of cream cheese for extra richness. Optional add-ins can enhance the mix too. Try adding herbs like basil or oregano. You can also throw in some sun-dried tomatoes for a tangy twist. Feel free to get creative with your cheese! The optimal baking time for this pizza is about 25 to 30 minutes. Keep an eye on the cheese. It should be bubbly and golden. For oven temperature, preheat to 425°F (220°C). This hot oven helps the crust cook evenly and become crispy. If your crust browns too fast, you can cover it lightly with foil. This way, the cheese stays melty while the crust finishes baking. {{image_2}} You can add more toppings to your sausage and spinach white deep dish pizza. Try adding sliced mushrooms, bell peppers, or olives. These will boost the flavor and texture. If you want a vegetarian option, skip the sausage. Replace it with more veggies like artichokes or zucchini. This keeps it hearty and delicious without meat. While ricotta, mozzarella, and Parmesan are great, you can mix in other cheeses. Cheddar gives a sharp taste. Feta adds a salty kick. Goat cheese brings a creamy texture. Experiment with your favorite cheeses to find the perfect blend for you. If you enjoy heat, adjust the spices. Add more red pepper flakes to the cheese mix. You can also sprinkle cayenne pepper for extra spice. For a smoky flavor, include smoked paprika. Just remember, start with a little. You can always add more later! To store leftovers, let the pizza cool completely. Cut it into slices and place them in an airtight container. You can also wrap the slices in plastic wrap or aluminum foil. This keeps the pizza fresh for up to three days in the fridge. Make sure you label the container with the date, so you know when you made it. To freeze your pizza, follow these steps. First, allow the pizza to cool completely. Then, slice it into portions. Wrap each slice tightly in plastic wrap. After that, place the wrapped slices in a freezer bag or container. This method keeps the pizza good for up to three months. When you're ready to eat, just thaw it in the fridge overnight before reheating. For the best reheating, use an oven. Preheat the oven to 375°F. Place the slices on a baking sheet and cover them with foil. Heat for about 10-15 minutes, or until the cheese is melted. You can also use a skillet. Heat on low and cover the skillet. This keeps the crust crispy while warming the cheese. Avoid using the microwave, as it may make the crust soggy. If you're looking for the Full Recipe, check the main article for all the details. To make the crust crispy, follow these tips: - Use a hot oven, around 425°F (220°C). - Preheat your pizza pan for a few minutes before adding the dough. - Roll the dough thin for a crunchier base. - Brush olive oil on the crust before baking. Yes, you can use store-bought dough for convenience. Look for deep-dish dough or pizza crust. This will save you time and still taste great. If you want meatless options, try: - Crumbled tempeh or tofu for a protein boost. - Use plant-based sausage for a similar taste. - Mushrooms also add a savory flavor without meat. To prevent cheese from burning: - Cover the pizza with foil for the first half of baking. - Add cheese in layers, putting some on top later in baking. - Keep an eye on it and lower the oven temperature if needed. Yes, you can swap spinach with: - Kale, which has a nice texture. - Swiss chard for a slightly sweet taste. - Arugula adds a peppery flavor. You can find the Full Recipe for Sausage & Spinach White Deep Dish Pizza in the earlier section. This will guide you through each step to make this delicious pizza. This blog post covered how to make a tasty pizza from scratch. We explored the key ingredients, including dough and cheeses, and gave you a step-by-step guide. I shared tips for perfecting the dough and how to customize toppings. Plus, I offered storage and reheating advice to keep your pizza fresh. Now, you're ready to create your own perfect pizza. Enjoy the process as much as the pizza!

Sausage & Spinach White Deep Dish Pizza Delight

Are you ready to take your pizza night to a whole new level? In this post, I’m sharing my delicious

- 2 large sweet potatoes, washed and scrubbed - 3 tablespoons olive oil - 1 teaspoon smoked paprika - 1 teaspoon garlic powder - 1 teaspoon onion powder - ½ teaspoon sea salt - ¼ teaspoon black pepper Sweet potatoes are the star of this dish. They have a natural sweetness and a creamy texture. Olive oil helps the wedges crisp up in the oven. The seasonings add flavor and depth to each bite. I love using smoked paprika for a hint of smokiness. Garlic and onion powder give that savory kick. Sea salt and black pepper enhance everything, making it all taste better. - Fresh parsley, chopped (for garnish) Fresh parsley adds a pop of color and freshness. It looks great on the plate. Plus, it gives a nice, herbal taste that brightens the dish. You can sprinkle it on right before serving to impress your guests. - Additional spices (cayenne pepper, cumin) If you want more heat, add cayenne pepper. It gives the wedges a spicy kick. Cumin adds warmth and earthiness. Feel free to mix and match these optional spices to suit your taste. Each add-in can change the flavor profile and make these wedges even more fun to eat. For the full recipe, check out the detailed instructions. 1. Preheat your oven to 425°F (220°C). This high heat helps the wedges become crispy. 2. Cut the sweet potatoes into wedges that are about 1 inch thick. This thickness allows for even cooking. Use a sharp knife and make sure to cut carefully. 1. In a large bowl, combine the following ingredients: - 3 tablespoons olive oil - 1 teaspoon smoked paprika - 1 teaspoon garlic powder - 1 teaspoon onion powder - ½ teaspoon sea salt - ¼ teaspoon black pepper 2. Mix well until the seasonings blend together. This mixture will add great flavor to the sweet potato wedges. 1. Spread the seasoned wedges on a baking sheet lined with parchment paper. Make sure they do not overlap. This ensures that each wedge cooks evenly and gets crispy. 2. Bake for 25-30 minutes. Flip the wedges halfway through. This helps them brown on all sides. They are done when they are golden brown and crispy around the edges. 3. Let them cool for a few minutes after baking. This cooling time helps maintain their crispiness. You can find the full instructions in the [Full Recipe]. Enjoy your crispy and flavorful treat! To get that crispy finish on your sweet potato wedges, you need the right oven temperature. I recommend baking at 425°F (220°C). This high heat helps create a nice crust while keeping the inside soft. Flipping the wedges halfway through baking is key. Use a spatula to gently turn them over. This allows both sides to crisp up evenly. If you have leftovers, you want to keep them crispy. First, let the wedges cool completely. Then, store them in an airtight container in the fridge. Avoid stacking them on top of each other. This keeps moisture away and helps maintain their crunch. One common mistake is overcrowding the baking sheet. If the wedges are too close, they will steam instead of crisp. Make sure to leave space between each wedge. Another mistake is not seasoning enough. Sweet potatoes have a naturally sweet taste, but they need flavor. Use the full amount of spices listed in the Full Recipe. You can adjust based on your taste, but don’t skip the seasoning. {{image_2}} You can change the flavor of your baked sweet potato wedges easily. For a spicy kick, add cayenne pepper or chili powder to your seasoning mix. This will make your wedges hot and full of flavor. If you prefer a sweet taste, sprinkle some cinnamon and brown sugar on the wedges before baking. This combo gives a warm, sweet flavor that pairs well with the natural sweetness of sweet potatoes. You can cook sweet potato wedges in different ways. The air fryer is a great option. Preheat your air fryer to 400°F (200°C). Cook the wedges in a single layer for about 15 to 20 minutes. Shake the basket halfway through for even cooking. Grilling is another fun method. Heat your grill to medium-high. Brush the wedges with olive oil and place them on the grill. Cook for about 5 to 7 minutes on each side. This adds a smoky flavor that is hard to resist. Baked sweet potato wedges taste great with dips. Try serving them with garlic aioli, ranch dressing, or a spicy yogurt dip. These dips bring out the flavors of the wedges. For side dish ideas, pair your wedges with grilled chicken, fish tacos, or a fresh salad. They make a colorful and tasty addition to any meal. For the complete recipe, check out the Full Recipe section. You can store your baked sweet potato wedges in the fridge for up to 5 days. Make sure they cool down first. Once cool, place them in an airtight container. This keeps them fresh and ready for your next meal. To freeze your sweet potato wedges, follow these steps: 1. Let the wedges cool completely after baking. 2. Arrange them in a single layer on a baking sheet. 3. Freeze for about 1 hour until solid. 4. Transfer the frozen wedges to a freezer-safe bag. 5. Label the bag with the date for easy tracking. Tips for maintaining texture: - Do not stack the wedges when freezing. - Remove as much air as possible from the bag. - For best results, consume within 3 months. You have three great options for reheating: oven, microwave, or air fryer. - Oven: Preheat to 400°F (200°C). Spread the wedges on a baking sheet and heat for about 10-15 minutes. This keeps them crispy. - Microwave: Place a few wedges on a microwave-safe plate. Heat for 1-2 minutes. Note that they may not be as crispy as baking. - Air Fryer: Set your air fryer to 375°F (190°C). Heat for about 5-7 minutes. This method gives a nice crunch back to the wedges. Using these methods ensures your baked sweet potato wedges stay tasty and enjoyable! To make your sweet potato wedges crispier, follow these tips: - Use High Heat: Bake at 425°F (220°C) for better crisping. - Cut Evenly: Make sure your wedges are 1-inch thick for even cooking. - Don’t Overcrowd: Spread them out on the baking sheet. Give them space to crisp. - Pat Dry: Dry the wedges after washing. Less moisture means more crunch. These steps help create that perfect crispy texture. Yes, you can use other potatoes. Here are some good options: - Russet Potatoes: These are starchy and get crispy. - Yukon Golds: Creamy and flavorful, they also roast well. - Fingerling Potatoes: They add a fun shape and taste. Feel free to experiment with these alternatives. Beyond the basic recipe, you can try these spices: - Cayenne Pepper: Adds heat for a spicy kick. - Cinnamon: For a sweet twist, mix it with brown sugar. - Cumin: Offers a warm, earthy flavor. Mix and match to find your favorite combo. Look for these signs to know they are ready: - Color: They should be golden brown. - Crispiness: The edges should feel crisp to the touch. - Fork Test: A fork should slide in easily without resistance. These cues will help you serve delicious wedges every time. Baked sweet potato wedges are a delicious treat you can easily make. We covered the key ingredients, prep steps, and baking techniques to achieve crispiness. Remember to store leftovers properly to keep them tasty. Try different spices and cooking methods to find your favorite flavor. With these tips, you’ll be a sweet potato wedge pro in no time. Enjoy your cooking adventure and share your tasty creations!

Baked Sweet Potato Wedges Crispy and Flavorful Treat

If you’re craving a snack that’s both crispy and healthy, look no further! Baked sweet potato wedges are the perfect
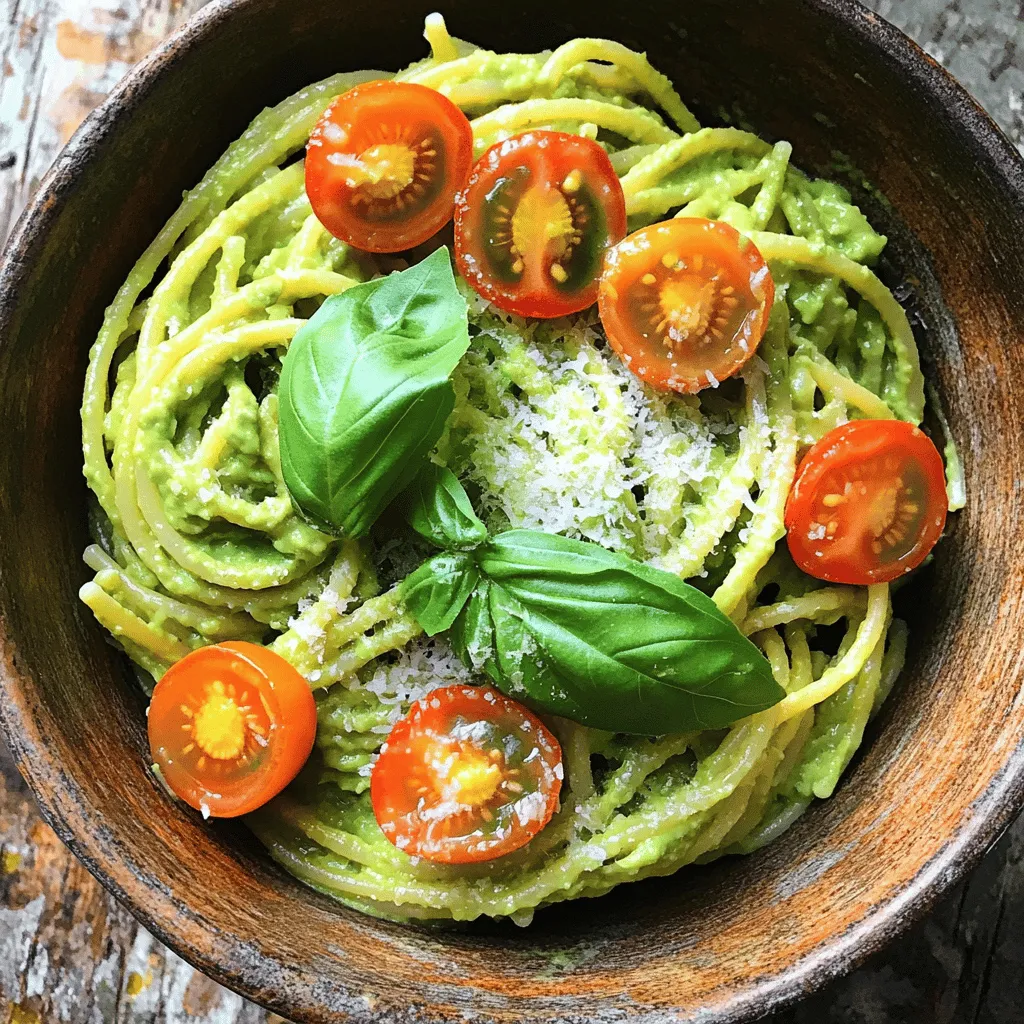
- 2 ripe avocados - 2 cloves garlic, minced - 2 tablespoons lemon juice - ¼ cup fresh basil leaves - ½ cup Greek yogurt These main ingredients create a rich and tasty sauce. The avocados provide creaminess, while garlic adds depth. Lemon juice gives a bright flavor. Fresh basil brings a lovely aroma. Greek yogurt adds tang and makes the sauce smooth. - ½ teaspoon red pepper flakes (optional) - Salt and pepper to taste - 8 oz spaghetti or your choice of pasta - 2 tablespoons olive oil - Cherry tomatoes, halved (for garnish) The additional ingredients enhance your dish. Red pepper flakes add heat if you like spice. Salt and pepper balance the flavors. Choose your favorite pasta, and cook it al dente. Olive oil adds richness, while cherry tomatoes give a fresh pop of color. - Grated Parmesan cheese (for serving) If you want more flavor, sprinkle grated Parmesan cheese on top. It adds a nice salty taste and pairs well with the creamy sauce. For the full recipe, you can check out the [Full Recipe]. To cook pasta al dente, start by boiling water in a large pot. Add a pinch of salt to the water to enhance the flavor. Once the water is boiling, add your pasta. Stir it gently to keep it from sticking. Check the pasta package for cooking time. You want it firm but not hard. This means it should have a slight bite when you taste it. Before draining the pasta, reserve about ½ cup of the pasta water. This water has starch that helps bind the sauce and pasta together. Just use a cup or bowl to catch it before you pour the pasta into a colander. You will need a food processor or blender for the sauce. Cut the avocados in half and remove the pit. Scoop the flesh into your machine. Add minced garlic, lemon juice, fresh basil, Greek yogurt, red pepper flakes, salt, and pepper. Blend until everything is smooth and creamy. The key is to blend it well so there are no lumps. If it's too thick, feel free to add a bit of water to help it blend. You want a nice, creamy texture that coats the pasta beautifully. Once the pasta is cooked, return it to the pot. This keeps it warm while you mix in the sauce. Pour the creamy avocado sauce over the hot pasta. Use tongs or a spatula to toss the pasta and sauce together. Add reserved pasta water a little at a time. This helps you find the right consistency. If you want it creamier, add more water. If it’s too thin, just toss it a bit more until it’s perfect. Drizzle olive oil over the pasta and toss again for added flavor. Serve your creamy avocado pasta right away, garnished with halved cherry tomatoes and a sprinkle of grated Parmesan cheese if you like. Enjoy the fresh and delicious taste! When you pick avocados, look for the right signs of ripeness. A ripe avocado feels slightly soft when you gently squeeze it. The skin should be dark green or nearly black, depending on the type. Avoid avocados with large dents or dark spots. To store avocados, keep them at room temperature if they are not ripe yet. Once ripe, put them in the fridge. This slows down the ripening process and helps them last longer. If you cut an avocado, sprinkle lemon juice on the exposed flesh to prevent browning. To add more flavor, try using extra seasonings. A pinch of cumin or a dash of smoked paprika can elevate your dish. You can also add fresh herbs like cilantro or parsley for a different taste. If you want to explore alternative herbs, consider using dill or mint. Both can bring a fresh twist to your creamy avocado pasta. Mixing in a few chopped sun-dried tomatoes can also add a rich, tangy flavor. For the best pairings, consider adding toppings like toasted pine nuts or crushed red pepper. These can add crunch and spice to your dish. You can also sprinkle extra basil or a bit of lemon zest for a fresh finish. To present your pasta like a gourmet dish, use deep bowls instead of flat plates. Top the pasta with extra basil leaves and a light drizzle of olive oil. This not only looks great but also enhances the dish’s flavor. For a touch of color, add halved cherry tomatoes before serving. Enjoy your meal! {{image_2}} You can make a vegan version of creamy avocado pasta easily. Instead of Greek yogurt, use silken tofu or a plant-based yogurt. Both keep the sauce creamy without using dairy. Blend these with the avocado, garlic, and lemon juice for the same smooth texture. Adding protein makes the dish more filling. You can use grilled chicken, shrimp, or even beans for a plant-based option. If you pick chicken or shrimp, cook them separately and add them to the pasta at the end. For beans, just mix them in while tossing the pasta. Adding seasonal vegetables boosts nutrition and flavor. Think about tossing in spinach, peas, or zucchini. These can be added to the pasta as it cooks. For garnish, try fresh herbs like parsley or more basil. They add a fresh touch and color to the dish. This recipe is simple and can adapt to your taste. For the full recipe, check out the details above. To keep creamy avocado pasta fresh, store it in the fridge. Use an airtight container to prevent air from drying it out. It’s best to refrigerate within two hours of cooking. This helps keep the flavors and texture intact. If you notice the pasta starting to brown, add a bit of lemon juice before storing. This will help maintain its bright color. When reheating, do it gently to keep the creaminess. Use a saucepan over low heat and add a splash of water. This helps to bring back the smooth texture. Stir frequently to prevent sticking. Avoid using a microwave, as it can make the pasta mushy. Make sure to check the temperature before serving. You want it warm, not hot. You can freeze creamy avocado pasta, but it may change texture. To freeze, place it in a freezer-safe container. Leave some space at the top for expansion. When you want to eat it, thaw it overnight in the fridge. Heat it slowly on the stove with a little water to restore creaminess. Enjoy your meal! Creamy avocado pasta stays fresh for about 2 days in the fridge. Keep it in an airtight container. After that, the avocados may brown and the sauce may lose its creamy texture. Yes, you can prepare this dish ahead of time! Cook the pasta and make the sauce separately. Store them in separate containers. When ready to eat, combine them. This keeps the pasta fresh and the sauce creamy. I love to pair this dish with a simple side salad or garlic bread. Grilled chicken or shrimp also works well for added protein. You can also add roasted veggies for a healthy twist. Yes, creamy avocado pasta is healthy! It has healthy fats from avocados, protein from Greek yogurt, and fiber from pasta. Avocados are full of vitamins and minerals, making this dish a nutritious choice. Enjoy it guilt-free! For the full recipe, check out the details above. Creamy avocado pasta is a tasty dish that blends healthy flavors. We discussed key ingredients like ripe avocados, fresh garlic, and Greek yogurt. I shared step-by-step instructions for cooking the perfect pasta and making a creamy sauce. Tips also included choosing ripe avocados and ways to enhance flavor. Remember, you can customize this dish with proteins and seasonal veggies. Whether you enjoy it fresh or stored, this pasta remains a nutritious choice. Try it, and make it your own!

Creamy Avocado Pasta Simple and Flavorful Recipe

Looking for a quick and tasty dinner? Creamy avocado pasta is your answer! This simple recipe combines ripe avocados, garlic,

Older posts
Newer posts
← Previous Page1 … Page35 Page36 Page37 … Page67 Next →

dsad

© 2025 Foodish Talk • Built with GeneratePress

Our Policies

  • Copyright Policy
  • Cookie Policy
  • GDPR Policy
  • Privacy Policy
  • Disclaimer
  • Terms Of Use

More Information

  • Home
  • About
  • Contact
  • Appetizers
  • Dessert
  • Dinner
  • Drinks
©2025, Foodish Talk About Back To Top