. To keep your homemade granola bars fresh, store them in an airtight container. This helps prevent them from getting stale. You can use glass jars, plastic containers, or resealable bags. If you want to keep them extra fresh, place a piece of parchment paper between layers of bars. At room temperature, these bars last about one week. For longer storage, freeze them. Wrapped in plastic wrap or foil, they can last up to three months in the freezer. Just remember to thaw them at room temperature before enjoying. Check for signs of spoilage before eating. If the bars smell off or have a dry texture, it's time to toss them. Also, if you see mold or any weird spots, throw them away. Trust your senses; they are good guides for freshness. How to make granola bars without nut butter? You can use mashed bananas, applesauce, or tahini instead of nut butter. These options help bind the bars together like nut butter does. They also add moisture and flavor. Can I use different types of oats? Yes, you can use quick oats or steel-cut oats. Quick oats will make the bars softer. Steel-cut oats will give a chewier texture. Just note that cooking times may vary. What can I substitute for honey? Maple syrup or agave nectar works well as a honey substitute. Both add sweetness without changing the taste too much. You can also use brown rice syrup if you want a thicker texture. Are homemade granola bars healthier than store-bought? Yes, homemade bars often contain fewer added sugars and no preservatives. You can control the ingredients, making them healthier. Plus, you can add superfoods like seeds and dried fruit for extra nutrition. What is the calorie count for one bar? Each granola bar has about 150 calories. The exact count can change based on your ingredients and portion size. For a more precise number, consider the specific brands you use. Can I add protein powder? Absolutely! You can mix in protein powder to boost the protein content. Start with one scoop and adjust based on your taste. Just remember to increase the wet ingredients slightly to balance it out. How to make them less sweet? Cut down on honey or syrup by one-half. You can also add unsweetened coconut or nuts for flavor without extra sugar. This way, you can enjoy a tasty treat without too much sweetness. You can make delicious granola bars with simple ingredients and easy steps. First, we covered the key items needed and how to prepare your baking pan. Then, I shared tips for mixing, baking, and enhancing flavors. You can even try vegan and gluten-free options. Finally, I explained the best ways to store your bars for freshness. Enjoy your homemade granola bars as a healthy snack or on-the-go treat!](https://foodishtalk.com/wp-content/uploads/2025/06/b7713dad-fcf8-4a76-ae37-79b24d1ad4dc.webp)
Homemade Granola Bars Nutrient-Packed Easy Recipe
Are you tired of store-bought snacks loaded with sugar? Let’s change that! I’m sharing my easy, nutrient-packed homemade granola bars
Are you tired of store-bought snacks loaded with sugar? Let’s change that! I’m sharing my easy, nutrient-packed homemade granola bars
![The core of this dish brings together simple, yet tasty ingredients. Here’s what you need: - 2 cups cooked rice (white or brown) - 2 cups fresh broccoli florets - 1 cup shredded sharp cheddar cheese - 1 cup sour cream - 1/2 cup cream of mushroom soup - 1 small onion, finely chopped - 2 cloves garlic, minced - 1 teaspoon Dijon mustard - 1 teaspoon dried thyme - Salt and pepper to taste - 1/2 cup breadcrumbs - 2 tablespoons olive oil These ingredients blend well together. Each adds its own flavor and texture to the casserole. You can switch things up based on what you like. Here are some ideas: - Swap cheddar cheese for mozzarella or pepper jack for a kick. - Use Greek yogurt instead of sour cream for a tangy twist. - Add cooked chicken or turkey for protein. - Toss in some red bell pepper or spinach for extra veggies. Feel free to experiment! Selecting fresh ingredients makes a big difference. Look for vibrant broccoli with tight florets. Choose rice that is fluffy and not sticky. Always check the expiration date on dairy products. Use high-quality cheese for a rich flavor. Fresh herbs provide more taste than dried ones. Quality ingredients lead to a better casserole. For a full recipe, check the details above to get started on this delightful dish! Start by making the broccoli bright and tender. Boil a pot of salted water. Add the fresh broccoli florets to the pot. Blanch them for 2-3 minutes. This helps keep the color and nutrients. After blanching, drain the broccoli and set it aside. Next, we focus on the aromatics for flavor. In a skillet, heat 2 tablespoons of olive oil over medium heat. Add the finely chopped onion and minced garlic. Sauté for 3-4 minutes until they soften. The smell will make you hungry! Now it’s time to mix everything together. In a large bowl, combine the cooked rice, blanched broccoli, and sautéed onion and garlic. Add 1 cup of shredded sharp cheddar cheese, 1 cup of sour cream, and 1/2 cup of cream of mushroom soup. Stir in 1 teaspoon of Dijon mustard, 1 teaspoon of dried thyme, salt, and pepper. Mix until everything is well combined. Pour the mixture into a greased 9x13 inch casserole dish. Spread it out evenly. For the topping, mix 1/2 cup of breadcrumbs with a tablespoon of olive oil. Sprinkle this mixture and some reserved cheddar cheese on top. Bake in a preheated oven at 350°F (175°C) for 25-30 minutes. The casserole should be bubbly and golden. Let it cool for 5-10 minutes before serving. This waiting helps it set. For the full recipe, refer to the recipe section above. Enjoy your delicious Cheesy Broccoli Rice Casserole! To make your casserole creamy, focus on the right balance of ingredients. Use full-fat sour cream for the best texture. This adds richness and smoothness. The cream of mushroom soup also helps with creaminess. If you want an extra touch, add a splash of milk or a bit of cream. Mixing these well ensures every bite is creamy and tasty. For a golden topping, use breadcrumbs mixed with a little olive oil. This adds crunch and color. Spread the breadcrumb mix evenly over the casserole. Don't forget to sprinkle some cheese on top too! The cheese melts and helps achieve that beautiful golden color. Keep an eye on it while it bakes. You want it bubbly and golden, not burnt. Want to boost flavor? Start by sautéing your onions and garlic. This brings out their sweetness and adds depth. Adding Dijon mustard gives a subtle tang that brightens the dish. Don't skip the dried thyme; it adds warmth and earthiness. You can also mix in some cooked bacon for a smoky twist. These small changes can make your casserole shine. For the full recipe, check out the detailed steps. {{image_2}} You can make this dish fully vegetarian by swapping out the cream of mushroom soup. Use a vegan cream soup or a homemade version. You can also add more vegetables like carrots or bell peppers. These will keep your casserole colorful and tasty. If you want to add protein, cooked chicken, or turkey works great. You can use shredded rotisserie chicken for speed. For a totally different flavor, add cooked sausage or bacon. Each will give your casserole a savory kick. For a gluten-free version, use gluten-free breadcrumbs. They work well for the topping and still add crunch. You can also check for gluten-free cream of mushroom soup. This keeps your dish safe for gluten-sensitive eaters. Follow the [Full Recipe] to create a base that works for all these variations! Store leftover Cheesy Broccoli Rice Casserole in an airtight container. Keep it in the fridge for up to four days. Make sure it cools completely before sealing it. This helps prevent moisture build-up and sogginess. To freeze, place the cooled casserole in a freezer-safe dish. Cover it tightly with plastic wrap and then with aluminum foil. This keeps out air and prevents freezer burn. It can last for up to three months in the freezer. Label the dish with the date, so you know when to use it. When you're ready to eat, thaw the casserole in the fridge overnight if frozen. Heat it in the oven at 350°F (175°C) for about 20-25 minutes. You can also microwave individual portions, cooking them for about 2-3 minutes until hot. For a crispy top, finish it under the broiler for a minute or two. Enjoy every cheesy bite! Yes, you can prepare Cheesy Broccoli Rice Casserole ahead of time. Just follow the recipe up to the baking step. Then, cover the dish and store it in the fridge. You can make it a day in advance. When you are ready to bake, take it out of the fridge and let it sit for about 30 minutes. This helps it heat evenly. Then, simply pop it in the oven. To reheat leftovers, the oven is the best choice. Preheat your oven to 350°F (175°C). Place the casserole in an oven-safe dish. Cover it with foil to keep it moist. Heat for about 20-25 minutes. If you want a crispy top, remove the foil for the last 5 minutes. You can also use a microwave, but the oven gives better results. Yes, you can use frozen broccoli. It saves time and is convenient. Just make sure to thaw and drain it first. This step helps remove excess water. If you add it straight from the freezer, the casserole might be too watery. Frozen broccoli works well, but fresh gives a better texture. For the full recipe, check out the details provided earlier. In this blog post, we explored how to make a cheesy broccoli rice casserole. We covered key ingredients, including optional add-ins for extra flavor. I shared steps for prepping, sautéing, and baking the dish. I also offered tips to ensure creaminess and a golden topping. Remember, you can adjust the recipe to fit your needs. Experiment with variations like vegetarian options or protein additions. Enjoy your delicious casserole, and don’t forget to save leftovers for later!](https://foodishtalk.com/wp-content/uploads/2025/06/9ee963d6-7744-4fcc-b8ab-846d02882ece.webp)
Looking for a simple, tasty dinner idea? My Cheesy Broccoli Rice Casserole is a hit with my family, and it’s
![- 1 lb sirloin steak - Salt and black pepper - 4 tablespoons unsalted butter - 4 cloves garlic, minced - Fresh parsley - Fresh rosemary (or dried) - 1 teaspoon lemon juice - A pinch of red pepper flakes - Large skillet - Tongs - Serving platter To make Garlic Butter Steak Bites, you will need some key ingredients. First, choose a good cut of steak. I prefer sirloin because it's tender and full of flavor. You can also use ribeye or filet mignon if you want to be fancy. Next, season the steak with salt and black pepper. This simple step adds a lot of taste. You will also need unsalted butter and garlic. Garlic brings a rich, savory taste that pairs well with the steak. Mince the garlic into small pieces for the best flavor. You can add optional ingredients for extra flavor. Fresh parsley and rosemary give a nice herbal touch. Lemon juice adds brightness, while red pepper flakes bring heat. These are all great ways to customize your dish. For tools, a large skillet is a must. It helps cook the steak bites evenly. Use tongs to flip the steak without losing any juices. Lastly, have a serving platter ready to show off your yummy dish. This combination of ingredients and tools makes for a quick, easy, and flavorful meal. For the full recipe, check out the details above to start your cooking adventure! Seasoning the steak cubes First, take your sirloin steak and cut it into 1-inch cubes. This size helps them cook evenly. Next, season the steak cubes well with salt and black pepper. Make sure every piece is coated. This seasoning adds flavor and enhances the taste of the beef. Properly heating the pan Now, grab a large skillet and place it over medium-high heat. Add 2 tablespoons of unsalted butter and let it melt. You want the butter to sizzle, signaling that the pan is hot enough. A hot pan is key to getting a nice sear on the meat. Searing the steak bites Once the pan is ready, add the seasoned steak cubes. Make sure to place them in a single layer. Do not overcrowd the pan; this lets them sear nicely. Cook one side for 2-3 minutes until it turns golden brown. Then, flip the cubes and cook for another 2 minutes, or until they reach your desired doneness. Medium-rare is usually the best choice for steak bites. Adding garlic and herbs After searing, lower the heat to medium. It’s time to add flavor! Toss in minced garlic, chopped parsley, and fresh rosemary. Stir them around for 1-2 minutes. You want the garlic to become fragrant but not burnt, as burnt garlic can taste bitter. Incorporating butter and lemon Next, add the remaining 2 tablespoons of butter to the skillet. Squeeze in some lemon juice, and if you like spice, add a pinch of red pepper flakes. Toss the steak bites in this buttery mixture. Cook until the sauce is bubbling, which takes just a minute. Serving suggestions When ready, remove the skillet from heat. Let the steak bites sit for a minute to soak up the flavors. Serve them on a platter, garnished with more parsley and some lemon wedges. This adds color and a fresh touch. For gatherings, consider using toothpicks for easy serving. Enjoy your Garlic Butter Steak Bites! For the full recipe, refer to the earlier section. To get the best doneness, start with a hot pan. Heat your skillet until it shimmers. This helps create a nice sear on the steak. For medium-rare, cook the steak bites for 2-3 minutes on each side. Use a meat thermometer if you want precision; aim for 130°F. Do not overcrowd the pan. If you add too many steak bites, they will steam instead of sear. This will make them less tasty. Work in batches if needed. You want each piece to get that golden crust. To boost flavor, consider adding spices and herbs. Fresh thyme or oregano can add depth. You can mix and match to find your favorite. A pinch of red pepper flakes also brings a nice kick. Adjust the amount based on your heat preference. It can turn a good dish into a great one. For plating, arrange the steak bites on a wide platter. This gives them space and looks inviting. Add a sprinkle of parsley on top for a pop of color. Lemon wedges on the side also add brightness. They look great and give a fresh taste. You can even use toothpicks for easy serving at parties. This adds a fun touch for your guests. {{image_2}} You can switch the sirloin steak for chicken or pork. Both meats work well with garlic butter. For chicken, use chicken breast cut into small pieces. For pork, pork tenderloin is a great choice. These options will give you delicious bites with a different taste. If you prefer vegetarian options, try mushrooms or tofu. Use portobello mushrooms for a hearty bite. You can also cube firm tofu for a protein-rich dish. Both options soak up the garlic butter flavor nicely. Mix up the herbs for more flavor. Try basil, thyme, or even oregano. Each herb adds a unique taste to the dish. You can also use a blend of herbs for an exciting twist. Adding sauces or marinades before cooking can change the flavor too. Consider using soy sauce or teriyaki sauce. These sauces add depth and make the steak bites even more tasty. Pair garlic butter steak bites with sides like rice, mashed potatoes, or salads. These sides complement the rich flavors of the steak. They also help create a balanced meal. You can also transform the steak bites into a wrap or sandwich. Use a soft tortilla or crusty bread. Add your favorite toppings like lettuce, tomatoes, or cheese for a fun and easy meal. For the full recipe, check out [Full Recipe]. To store leftover garlic butter steak bites, let them cool down first. Place them in an airtight container. Make sure to seal it well to keep the moisture in. They will stay fresh in the fridge for up to three days. To keep them tasty, do not store them with sides, as they can absorb flavors. When you’re ready to enjoy your steak bites again, the best way to reheat them is in a skillet. Heat the skillet over medium heat and add a little butter or oil. Place the steak bites in the skillet and cook for about three to four minutes. Stir them gently to warm them evenly. This method keeps the meat juicy and avoids drying it out. You can also use the microwave, but be careful. Heat them in short bursts to avoid toughening the meat. If you want to save garlic butter steak bites for later, freezing is a great option. Allow the bites to cool completely. Then, place them in a freezer-safe bag or container. Remove as much air as you can before sealing. They can last in the freezer for up to three months. When you’re ready to eat, thaw them overnight in the fridge. Reheat them as mentioned above to restore their flavor and texture. Enjoy them anytime you crave a delicious meal! The best cut for Garlic Butter Steak Bites is sirloin. Sirloin is tender and has great flavor. It cooks quickly, which is perfect for this recipe. Ribeye is another good option, as it has more fat and flavor. However, sirloin is leaner and still very tasty. You can prepare the steak bites ahead of time. Just season and cut the steak into cubes. Store them in the fridge for up to a day before cooking. When ready, follow the cooking steps in the Full Recipe. This way, you save time and still enjoy a fresh meal. To serve more people, simply double or triple the ingredients. Use a larger skillet or cook in batches. Make sure not to overcrowd the pan. This keeps the steak bites juicy and gives them a nice crust. Adjust the cook time as needed, and enjoy your gathering! In this blog post, we explored how to make Garlic Butter Steak Bites. We covered essential ingredients, handy tools, and easy step-by-step cooking instructions. You learned tips for perfecting flavors and presentation. We also discussed variations and storage methods. Cooking can be fun and rewarding. With this guide, you can easily whip up a tasty dish that impresses. Enjoy your time in the kitchen and savor every bite!](https://foodishtalk.com/wp-content/uploads/2025/06/c0f2fb60-761d-46c7-9305-ead88cabc61b.webp)
Craving a savory meal that’s both quick and flavorful? You’re in the right place! My Garlic Butter Steak Bites recipe
![- 4 boneless, skinless chicken breasts: Choose breasts that are about the same size. This helps them cook evenly. Look for fresh chicken to get the best taste. - 1 cup fresh spinach, chopped: Use fresh spinach for a bright flavor. Wash it well and chop it finely to mix easily with other ingredients. - 1/2 cup feta cheese, crumbled: Feta adds a creamy and salty taste. You can use plain or herbed feta. Crumble it well so it mixes nicely with the spinach. - 1/4 cup cream cheese, softened: Cream cheese helps the filling stay moist. Make sure it's soft so it blends well with the spinach and feta. - 2 cloves garlic, minced: Garlic gives a strong flavor. Use fresh garlic for the best taste. Mince it finely to release all its oils. - 1/2 teaspoon dried oregano: Oregano adds a nice herb flavor. It works well with the chicken and cheese. - 1/2 teaspoon black pepper: Black pepper adds a bit of heat. You can adjust the amount based on your taste. - 1/2 teaspoon salt: Salt enhances all the flavors. Keep in mind that feta cheese is salty too, so don’t overdo it. - 1 tablespoon olive oil: Olive oil helps to sear the chicken. It also adds a bit of healthy fat. - 1/2 cup cherry tomatoes, halved (for garnish): Cherry tomatoes add color and freshness. They give a nice sweet contrast to the dish. - Fresh basil leaves (for garnish): Basil adds a fresh touch. It brightens the dish and makes it look nice. These ingredients work together to create a tasty meal. Each one plays a role in the flavor and texture of the dish. For the complete recipe, check out the [Full Recipe]. Start by preheating your oven to 375°F (190°C). This step is key for even cooking. Next, prepare your stuffing mixture. In a medium bowl, combine: - 1 cup fresh spinach, chopped - 1/2 cup feta cheese, crumbled - 1/4 cup cream cheese, softened - 2 cloves garlic, minced - 1/2 teaspoon dried oregano - 1/2 teaspoon black pepper - 1/2 teaspoon salt Mix these ingredients until they blend well. This mix brings a creamy and savory flavor that pairs perfectly with chicken. Now, let’s move on to the chicken. Pat the chicken breasts dry with paper towels. Carefully cut a pocket into each chicken breast. Slice horizontally, but be careful not to cut through the other side. This pocket is where you will stuff your mixture. Stuff each chicken breast with the spinach and feta mixture. Make sure to divide it evenly among the breasts. If needed, secure the openings with toothpicks. Next, heat 1 tablespoon of olive oil in a large oven-safe skillet over medium-high heat. Once the oil is hot, place the stuffed chicken in the skillet. Sear each side for about 3-4 minutes until they turn golden brown. Once seared, transfer the skillet to your preheated oven. Bake for an additional 20-25 minutes. The chicken is ready when it is cooked through and no longer pink in the center. After baking, remove the skillet from the oven. Let the chicken rest for a few minutes. This resting time helps keep the chicken juicy. Before serving, garnish the stuffed chicken with 1/2 cup of halved cherry tomatoes and some fresh basil leaves. These add a fresh touch and a pop of color. For the full recipe, check out the complete guide. Enjoy your flavorful family meal! The best way to cook chicken is to hit the right internal temperature. For stuffed chicken, aim for 165°F (75°C). This ensures the chicken is safe to eat and juicy. To avoid overcooking, use a meat thermometer. Insert it into the thickest part of the chicken breast. If you don’t have one, look for the juices. They should run clear. If they are pink, cook a bit longer. Another tip is to let the chicken rest after baking. This keeps the juices inside. If you skip this, the chicken can dry out. If you want to boost the flavor, try adding more herbs. Thyme, dill, or parsley work well with spinach and feta. A pinch of red pepper flakes can add a nice kick, too. If you don't have feta cheese, you can use goat cheese or ricotta. Both give a creamy texture and taste great. You can also mix in some mozzarella for a stretchier cheese experience. For more tasty ideas and the complete recipe, check out the Full Recipe. {{image_2}} You can change the stuffing to make your dish unique. Try adding other vegetables like sun-dried tomatoes or artichokes. These add great flavor and texture. You can also use mushrooms for an earthy taste. Just chop them finely before mixing. Another fun option is to switch up the cheese. While feta is a star, you can try goat cheese or mozzarella. Both will give your chicken a different taste. Goat cheese adds tanginess, while mozzarella brings creaminess. Mix and match to find what you love. Cooking methods can vary too. You can grill the chicken for a smoky flavor. Just preheat your grill and cook each side for about 6-8 minutes. Make sure the chicken is cooked through and has nice grill marks. If you prefer low and slow, use a slow cooker. This method makes the chicken tender and juicy. Simply place the stuffed chicken in the slow cooker. Add a splash of chicken broth for more flavor. Cook on low for 4-6 hours or on high for 2-3 hours. This is a great way to prepare meals ahead of time. For the full recipe, check out the details above. To keep your Feta Spinach Stuffed Chicken fresh, follow these steps: - Refrigerating Leftovers: Let the chicken cool down to room temperature. Place the stuffed chicken in an airtight container. It will stay good in the fridge for about 3-4 days. Always label your container with the date for easy reference. - Freezing Instructions: You can freeze the stuffed chicken for later use. Wrap each piece tightly in plastic wrap and then place them in a freezer bag. This helps prevent freezer burn. Properly stored, they can last for 3 months. Remember to label the bag with the date and contents. To enjoy your delicious leftovers, reheating properly is key. - Reheating Without Losing Moisture: Preheat your oven to 350°F (175°C). Place the stuffed chicken in an oven-safe dish. Add a splash of chicken broth or water to the dish. Cover it with aluminum foil to trap moisture. Heat for about 20-25 minutes, checking to ensure it warms through. - Best Methods for Reheating Stuffed Chicken: You can also use a microwave for quick reheating. Place the chicken on a microwave-safe plate. Cover it with a damp paper towel to keep it moist. Heat on medium power for 2-3 minutes, checking halfway through. If you prefer crisp skin, use the oven method instead. By following these storage and reheating tips, you can enjoy your Feta Spinach Stuffed Chicken to the fullest. For the full recipe, refer back to the ingredients and instructions above. Can I make Feta Spinach Stuffed Chicken ahead of time? Yes, you can prep the stuffed chicken in advance. Prepare the filling and stuff the chicken. Wrap it tightly and store it in the fridge. You can keep it fresh for up to 24 hours. When ready to cook, just sear and bake it as per the full recipe. What can I serve with Feta Spinach Stuffed Chicken? This dish pairs well with several sides. Try roasted vegetables, rice, or a fresh salad. You can also serve it with mashed potatoes for a comforting meal. The bright flavors of the chicken complement many sides. Is this recipe suitable for meal prepping? Absolutely! Feta Spinach Stuffed Chicken is great for meal prep. You can cook a batch for the week. Store portions in airtight containers in the fridge. Reheat them for quick, healthy meals that are full of flavor. Nutritional information overview This chicken dish is rich in protein and healthy fats. Each serving provides essential vitamins from spinach. Feta adds calcium and flavor without too many calories. It’s a balanced meal when paired with wholesome sides. How to adjust for dietary restrictions If you need to make changes, you can use dairy-free cheese. Substitute with a plant-based cream cheese if you are lactose intolerant. For gluten-free options, ensure your chicken broth and any sides are gluten-free. You can still enjoy the same great taste! In this blog post, I shared a detailed guide on making Feta Spinach Stuffed Chicken. We covered essential ingredients, step-by-step cooking instructions, and helpful tips. You learned how to enhance flavors and explore variations. Remember to store your leftovers properly and reheat them right. Cooking can be fun and rewarding. With this recipe, you'll impress yourself and others. Enjoy your meal and keep experimenting in the kitchen!](https://foodishtalk.com/wp-content/uploads/2025/06/c4c3f88f-eb92-443e-9f75-0ea5ed1e2eea.webp)
Are you ready to impress your family with a meal that’s both delicious and easy to make? This Feta Spinach
![- 2 large sweet potatoes - 2 tablespoons olive oil - 1 teaspoon garlic powder - 1 teaspoon smoked paprika - ½ teaspoon sea salt - ½ teaspoon black pepper - ¼ teaspoon cayenne pepper (optional) - Alternatives to sweet potatoes: You can use regular potatoes or carrots for a change. Both give a nice flavor and texture. - Oil options for frying: If you prefer, you can swap olive oil with avocado oil or coconut oil. Both work well in the air fryer. - Spices to consider: Try using chili powder or onion powder for different flavors. These spices can add a nice twist to your fries. For the complete recipe to make these fries, check the [Full Recipe]. - Wash and peel the sweet potatoes. This removes dirt and skin. - Cut them into even sticks, about 1/4 inch thick. This helps them cook evenly. - Soak the fries in cold water for at least 30 minutes. This removes extra starch, making them crispy. After soaking, drain and pat them dry with a towel. - Preheat your air fryer to 400°F (200°C) for about 5 minutes. This ensures the fries cook evenly and get that perfect crisp. - Place the sweet potato fries in a single layer in the air fryer basket. If needed, cook in batches to avoid crowding. - Air fry at 400°F (200°C) for 15-20 minutes. Shake the basket halfway through for even cooking. - Check the fries when the time is up. They should be golden and crispy. If they need more time, add an extra 2-3 minutes. To make your sweet potato fries super crispy, soak them in cold water. This step removes excess starch. Aim for at least 30 minutes. After soaking, drain the fries and pat them dry with a towel. This helps them crisp up nicely. Air circulation is key in your air fryer. Avoid overcrowding the basket. When fries are in a single layer, hot air can move freely. This leads to even cooking and better texture. If you have a lot of fries, cook them in batches. This helps you get that perfect crispiness you want. For the best flavor, mix up your seasonings. I love using garlic powder and smoked paprika for a savory kick. Sea salt and black pepper add balance. If you enjoy a bit of heat, sprinkle in some cayenne pepper. You can also play with spices. Try adding a pinch of cinnamon for warmth or chili powder for some extra zest. The right seasoning can transform your fries from good to great. For a unique twist, consider mixing in some fresh herbs after frying. This adds freshness and flavor. For more details on making these tasty treats, check out the Full Recipe. {{image_2}} You can easily change up your sweet potato fries with fun flavors. Here are two tasty ideas: - Honey-balsamic sweet potato fries: Drizzle honey and balsamic vinegar over your fries before cooking. This mix gives a sweet and tangy taste that is hard to resist. - Spicy chipotle sweet potato fries: Add chipotle powder or sauce to your seasoning mix. This kick of spice makes the fries bold and zesty. Feel free to mix and match these flavors to find your favorite. Pairing your sweet potato fries with the right dips can elevate the dish. Here are some great options: - Dips that pair well: Consider serving your fries with a creamy yogurt dip or a spicy sriracha mayo. Both options add fun flavors. - Ideas for pairing with main dishes: These fries go great with burgers, grilled chicken, or even as a side with tacos. They add a sweet touch to savory meals. For the full recipe, check out the detailed steps above. Enjoy your cooking! To store leftover fries, let them cool first. Place them in an airtight container. Keep the fries in the fridge for up to three days. This keeps them fresh and tasty. To reheat fries in the air fryer, set it to 400°F (200°C). Place the fries in a single layer in the basket. Heat them for about 5 to 7 minutes. This gives them back their crispiness. Shake the basket halfway through for even heating. Yes, you can freeze sweet potato fries! To freeze them, first, let them cool completely. Spread the fries in a single layer on a baking sheet. Place them in the freezer for about 1 to 2 hours until firm. Then, transfer them to a freezer-safe bag. Squeeze out as much air as possible. They can last for up to three months in the freezer. When ready to cook, you can air fry them straight from frozen. Just add a few extra minutes to the cooking time. Using an air fryer for sweet potato fries has many benefits. First, it uses less oil than traditional frying. This cuts down on fat and calories. Second, the air fryer cooks fries quickly and evenly. You get crispy fries without the mess of deep frying. Lastly, an air fryer is easy to clean. You can enjoy your sweet potato fries with less hassle. Sweet potato fries need 15 to 20 minutes to cook in an air fryer. Set your air fryer to 400°F (200°C). Shake the basket halfway through cooking to ensure even crispiness. If the fries aren’t crispy enough, add 2-3 more minutes. Keep an eye on them to prevent burning. Soaking sweet potato fries helps make them crispier. When you soak them in cold water for at least 30 minutes, it removes excess starch. Less starch means less moisture. This leads to a better crunch when they cook. After soaking, dry the fries well before seasoning and air frying them. Yes, you can use frozen sweet potatoes for air frying. They cook well in the air fryer. However, they may not be as crispy as fresh fries. If you use frozen fries, follow the cooking time on the package. Keep in mind that you may need to adjust the time slightly for the best results. You learned how to make tasty air fryer sweet potato fries. We covered ingredients, cooking steps, and tips for crispiness. Remember, using the right spices and techniques makes a big difference. You can also try fun variations and serve them with great dips. Storing leftovers is easy, too. Enjoy your cooking adventure and share these tips with friends! Your sweet potato fries will be a hit every time.](https://foodishtalk.com/wp-content/uploads/2025/06/1da50cdb-a618-425f-9a74-7ea2918330a1.webp)
Looking for a simple, delicious snack that won’t ruin your diet? Air fryer sweet potato fries are the answer! This
![- Chicken and Dairy Ingredients - 1 pound boneless, skinless chicken thighs, cut into bite-sized pieces - 1 can (14 oz) coconut milk - 2 tablespoons red curry paste - 1 tablespoon olive oil - Vegetables and Seasonings - 1 onion, finely chopped - 3 cloves garlic, minced - 1 tablespoon fresh ginger, grated - 1 bell pepper (red or yellow), sliced - 1 cup baby spinach - 2 tablespoons fish sauce (or soy sauce for a vegetarian option) - 1 tablespoon brown sugar - Salt and pepper to taste - Optional Garnishes - Fresh cilantro for garnish - Cooked jasmine rice for serving Using fresh ingredients makes a big difference. The chicken adds protein, while coconut milk gives creaminess. Red curry paste brings warmth and spice. The vegetables provide color and crunch. You can also add lime wedges for a zesty kick. For a full experience, serve it over jasmine rice. This recipe is simple and full of flavor. You can find the full recipe for Coconut Curry Chicken in the previous sections. Enjoy making this dish! Sautéing Onions and Aromatics First, heat 1 tablespoon of olive oil in a large skillet over medium heat. Add 1 finely chopped onion. Sauté it for about 3 to 4 minutes. You want the onion to turn soft and clear. Next, add 3 minced garlic cloves and 1 tablespoon of grated ginger. Stir for 1 minute until you can smell the aroma. This step builds a great flavor base for your dish. Incorporating Curry Paste Now, it’s time to add 2 tablespoons of red curry paste. Stir it in and cook for about 2 minutes. This helps the flavors mix well. You’ll see the color deepen and smell the spices come to life. Adding Coconut Milk and Ingredients Next, pour in 1 can of coconut milk. Mix it well with the onion and spices. Then, add 1 pound of bite-sized chicken thighs. Toss in 1 sliced bell pepper, 2 tablespoons of fish sauce (or soy sauce if you prefer), and 1 tablespoon of brown sugar. Add salt and pepper to taste. Bring everything to a gentle simmer. Simmering for Perfection Cover the skillet and let it cook for about 15 minutes. This gives the chicken time to become tender and soak up the flavors. Stir occasionally to keep everything well mixed. Adding Spinach and Adjusting Seasoning After 15 minutes, add 1 cup of baby spinach. Cook for another 2 to 3 minutes until the spinach wilts. Taste the curry and adjust the salt and pepper if needed. Garnishing and Presentation Once done, remove the skillet from heat. Garnish your dish with fresh cilantro. Serve the Coconut Curry Chicken hot over jasmine rice. For an extra zing, add lime wedges on the side. This way, you have a colorful and tasty meal ready to enjoy. For complete details, check the [Full Recipe]. Importance of Fresh Ingredients Fresh ingredients make this dish shine. Use fresh chicken, veggies, and herbs. Freshness enhances taste and adds vibrancy. Always choose ripe bell peppers and crisp spinach. They not only look good but also taste better. Avoid wilted or old produce. Your curry will be much tastier with fresh items. Adjusting Spice Levels You control the heat! If you love spice, add more red curry paste. Start with a small amount first. Taste as you go. You can always add more later. For less spice, use half the paste. Consider adding coconut milk to tone down the heat. It balances flavors and keeps it creamy. Best Utensils for Cooking Coconut Curry Chicken Use a large skillet or Dutch oven. These allow for even cooking and easy stirring. A wooden spoon works best for mixing. It helps prevent sticking and scraping. If you have a lid, use it while simmering. This keeps moisture in and makes chicken tender. Simmering vs. Boiling Simmering is key for flavor. It cooks food gently and evenly. Boiling can make the chicken tough. Keep the heat low and let it bubble softly. This way, the spices blend well. Simmering also helps the chicken soak up all the yummy spices. For the best results, stick to simmering. For the full recipe, check out the [Full Recipe]. {{image_2}} You can easily swap out chicken for other proteins. If you want a vegetarian option, use tofu. Tofu absorbs flavors well. Cut it into cubes and cook it just like chicken. You can also use your favorite veggies like cauliflower or chickpeas. This makes the dish colorful and healthy. For meat lovers, consider shrimp or beef. Shrimp cooks quickly and adds a nice touch. If you choose beef, use tender cuts. Slice them thin for even cooking. Both options give the dish a different taste and texture. To spice things up, try different curry pastes. Red, green, or yellow curry pastes all bring unique flavors. Each one can change the whole dish. You can also use store-bought curry sauces for convenience. Adding nuts boosts the dish's texture. Cashews or peanuts add crunch and richness. Dried fruits like raisins or mango can add sweetness. These ingredients make your coconut curry chicken even more exciting and satisfying. For more tips, check out the Full Recipe for inspiration! After you enjoy your Coconut Curry Chicken, you might have some leftovers. Store them in an airtight container. This keeps the curry fresh. Place your chicken in the fridge. It can last up to four days. Make sure to let it cool before sealing it. When you want to eat the leftovers, you can reheat them on the stove or in the microwave. For the stove, use low heat. Stir often until hot. In the microwave, cover the container and heat in short bursts. Stir in between to heat evenly. To keep your Coconut Curry Chicken longer, freezing is a great option. First, let it cool completely. Then, transfer it to a freezer-safe container. You can also use freezer bags. Remove as much air as you can to avoid freezer burn. It can stay frozen for up to three months. When you are ready to eat it, thaw it in the fridge overnight. This keeps it from getting watery. If you need to cook it from frozen, place it in a pot over low heat. Stir it often until heated through. You can also use the microwave, but monitor it closely. For a full experience, check out the Full Recipe to make this dish from scratch! Can I make Coconut Curry Chicken dairy-free? Yes, you can make Coconut Curry Chicken dairy-free. Use coconut milk as your base, which is already dairy-free. If you want to boost the creaminess, you can add more coconut milk. Avoid any dairy products like cream or butter in this dish. How long does Coconut Curry Chicken last in the fridge? Coconut Curry Chicken lasts about 3 to 4 days in the fridge. Store it in an airtight container to keep it fresh. When you reheat it, make sure it’s hot all the way through. What to serve with Coconut Curry Chicken? I love serving Coconut Curry Chicken over jasmine rice. The rice soaks up the rich sauce and adds a nice texture. You can also pair it with naan bread or a fresh salad for a complete meal. Can I prepare this dish in advance? Yes, you can prepare Coconut Curry Chicken in advance. Cook it ahead of time and store it in the fridge. Just reheat it when you're ready to serve. This makes it great for meal prep or busy weeknights. For the full recipe, check out the previous section! You’ve learned how to make a tasty Coconut Curry Chicken. We covered the key ingredients, step-by-step cooking, and useful tips to enhance flavor. You can use different proteins and spices to make it your own. Remember to follow storage tips for leftovers, and check common FAQs for extra help. Enjoy this dish with friends or family. It’s sure to impress. Your cooking skills can shine with this recipe. Happy cooking!](https://foodishtalk.com/wp-content/uploads/2025/06/4f6e2466-2054-4aa1-9904-7c4e33eebb3f.webp)
Are you ready to savor a meal that’s both flavorful and simple? My Coconut Curry Chicken recipe offers a delightful
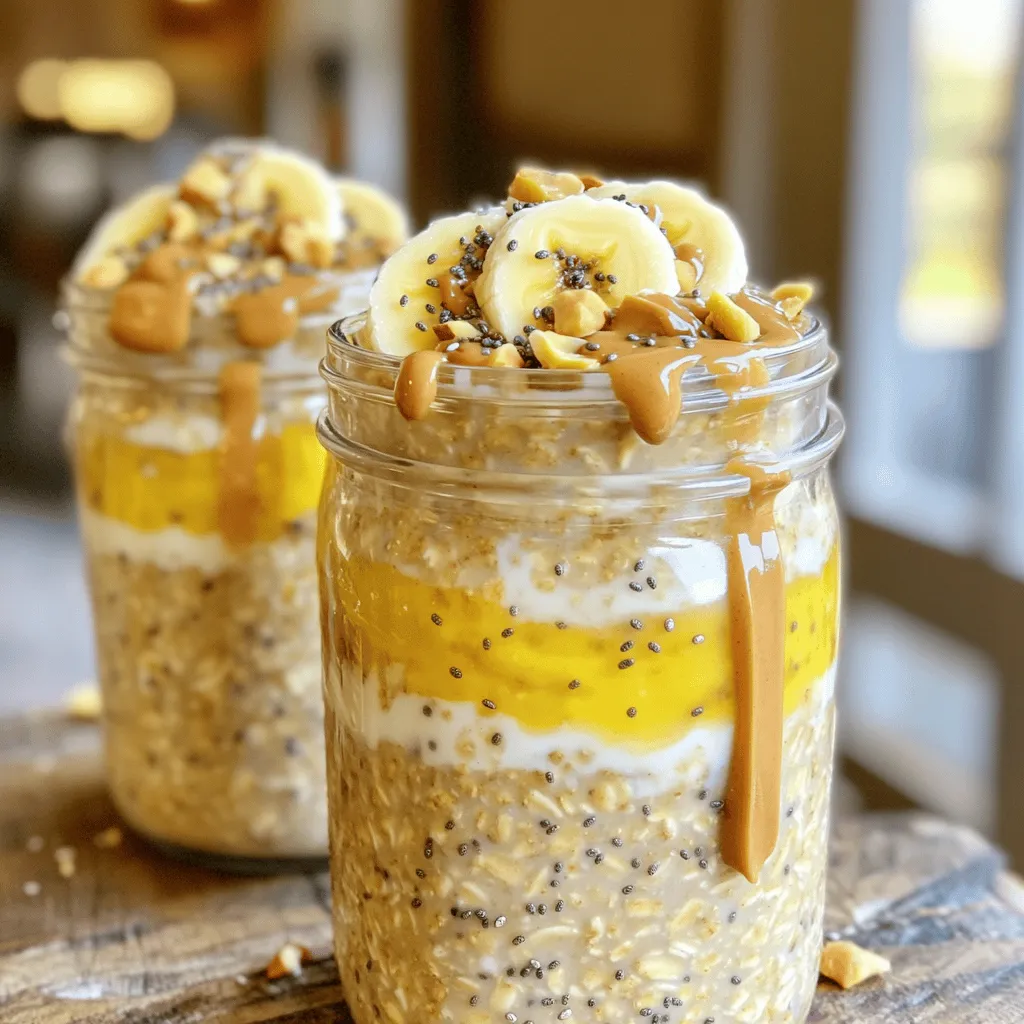
Looking for a quick, tasty breakfast? Try Peanut Butter Banana Overnight Oats! This simple recipe combines creamy peanut butter, ripe
![To make tasty Mini Caprese Skewers, you need a few key items. Here’s what to gather: - 1 pint cherry tomatoes - 8 ounces fresh mozzarella balls (bocconcini) - Fresh basil leaves - 2 tablespoons balsamic glaze - 1 tablespoon extra virgin olive oil - Salt and pepper to taste - Skewers (4-6 inch long) These ingredients create a mix of fresh, bright flavors. The tomatoes add sweetness, while mozzarella gives a creamy texture. Basil brings a fragrant note that ties them all together. Feel free to add your personal touch with these optional items: - A sprinkle of red pepper flakes for heat - Prosciutto for a savory twist - Different types of cheese, like feta or goat cheese - Cherry peppers for extra flavor These ingredients can enhance the dish or change it up to suit your taste. Choosing the right ingredients is key for great skewers. Here’s how to select fresh produce: - Tomatoes: Look for firm, shiny cherry tomatoes without blemishes. - Mozzarella: Choose mozzarella balls that are plump and packed in water for freshness. - Basil: Pick bright green leaves with no brown spots. Fresh basil should smell strong and sweet. Fresh ingredients make all the difference. They bring vibrant flavors and textures to your skewers. For the complete preparation, check out the Full Recipe. First, rinse the cherry tomatoes under cold water. Pat them dry with a clean towel. Next, take the fresh mozzarella balls and drain any extra liquid from the packaging. This step helps keep the skewers from getting soggy. Grab your skewer and begin threading. Start with one cherry tomato. Then, add a fresh basil leaf. Follow it up with a mozzarella ball. Repeat this process for each skewer. Aim for about three to four sets of tomato, basil, and mozzarella. Leave some space at each end for easy handling. Once you finish, lay the skewers on a serving platter. Drizzle the extra virgin olive oil over the skewers. Next, sprinkle with salt and pepper to taste. Finally, add a generous drizzle of balsamic glaze. This step adds flavor and makes your dish look beautiful. You can serve them right away or chill in the fridge for up to an hour. This waiting time helps the flavors blend nicely. Enjoy your Mini Caprese Skewers as a fresh, tasty snack! For the full recipe, check out the provided link. To make the best Mini Caprese Skewers, follow these tips: - Use ripe cherry tomatoes. They add sweet flavor. - Choose fresh mozzarella balls for a creamy texture. - Select bright green basil leaves for a fragrant touch. - Soak wooden skewers in water. This keeps them from burning. - Space the items evenly for a nice look. Avoid these common errors when making skewers: - Don’t overcrowd the skewer. Leave space for easy eating. - Avoid using old or wilted ingredients. Freshness matters! - Don’t skip the seasoning. Salt and pepper enhance taste. - Keep the skewers chilled before serving. This keeps them fresh. To boost the flavor of your Mini Caprese Skewers, try these ideas: - Add a dash of lemon juice for brightness. - Mix herbs like oregano or thyme with the basil. - Experiment with flavored olive oil for a unique twist. - Serve with a side of pesto for dipping. - Consider adding a sprinkle of crushed red pepper for heat. For a complete guide, check out the Full Recipe. {{image_2}} You can switch up the ingredients for Mini Caprese Skewers. Here are some ideas: - Grape Tomatoes: If cherry tomatoes are not available, use grape tomatoes. They taste sweet and work well. - Mozzarella Alternatives: Try using burrata cheese for a creamier texture. Feta cheese also adds a nice tang. - Herb Variations: Use mint or parsley instead of basil for a different flavor. These herbs bring a fresh twist. Mixing flavors can make your skewers stand out. Here are some fun combinations to try: - Pesto Drizzle: Instead of balsamic glaze, drizzle pesto over your skewers. It adds richness and a burst of flavor. - Spicy Kick: Add a slice of jalapeño or a dash of red pepper flakes. This adds heat and excitement. - Sweet Touch: Include a slice of fresh peach or strawberry for a sweet contrast. It balances the saltiness of cheese. You can adapt Mini Caprese Skewers for various diets: - Vegan Version: Replace mozzarella with avocado slices or marinated tofu. Both options are creamy and delicious. - Gluten-Free: The recipe is already gluten-free! Just ensure your balsamic glaze has no added gluten. - Low-Carb: Skip the tomatoes and use only mozzarella and basil. This keeps it light and keto-friendly. For the full recipe, check out the [Full Recipe] section. Enjoy exploring these variations! To store Mini Caprese Skewers, place them in an airtight container. Cover the container tightly to keep air out. You can store them in the fridge for up to two days. This keeps the ingredients fresh and tasty. If you want to make them ahead, prep the ingredients separately and assemble close to serving. Keep cherry tomatoes and mozzarella balls in their original packaging until ready to use. Store fresh basil in a glass of water, like a flower bouquet. This helps keep the basil vibrant and green. When storing skewers, avoid stacking them. This prevents squishing and keeps them looking nice. Mini Caprese Skewers are best served cold. If you have leftovers, enjoy them straight from the fridge. If you prefer them warm, you can briefly heat them in the microwave. Just 10-15 seconds should be enough. Be careful not to overheat, or the mozzarella may become rubbery. For a warm twist, try grilling them for a few minutes to enhance the flavor. You can prepare Mini Caprese Skewers a few hours in advance. Simply follow the steps to assemble the skewers. After they are made, cover them with plastic wrap. Store them in the fridge until you are ready to serve. This helps keep them fresh. Just remember to drizzle the balsamic glaze right before serving. The glaze can make the skewers soggy if added too early. Enjoy the flavors that develop from resting! Yes, you can make Mini Caprese Skewers without mozzarella. If you want a dairy-free version, try using vegan cheese. Another option is to add avocado or even marinated artichokes. These will bring a creamy texture and unique flavor. You can still use cherry tomatoes and basil to keep the classic look. If you don’t have balsamic glaze, you can use balsamic vinegar instead. Just drizzle a little on the skewers for that tangy flavor. You can also make a quick glaze by simmering balsamic vinegar until it thickens. Honey, maple syrup, or even a splash of lemon juice can work too. Each option will give a different taste, so feel free to experiment! Creating Mini Caprese Skewers is simple and fun. We covered key ingredients and tips. You learned how to select fresh produce and assemble skewers with flavor. I shared mistakes to avoid and ways to adapt for diets. Remember, storing them correctly keeps them fresh. Try these ideas for your next gathering. With a little creativity, you can impress your guests. Enjoy making and sharing this tasty treat!](https://foodishtalk.com/wp-content/uploads/2025/06/d1f2594d-0152-4f5d-9d00-0af444c1b2dc.webp)
Looking for a fresh appetizer that’s both tasty and easy to make? Mini Caprese skewers are your answer! This simple
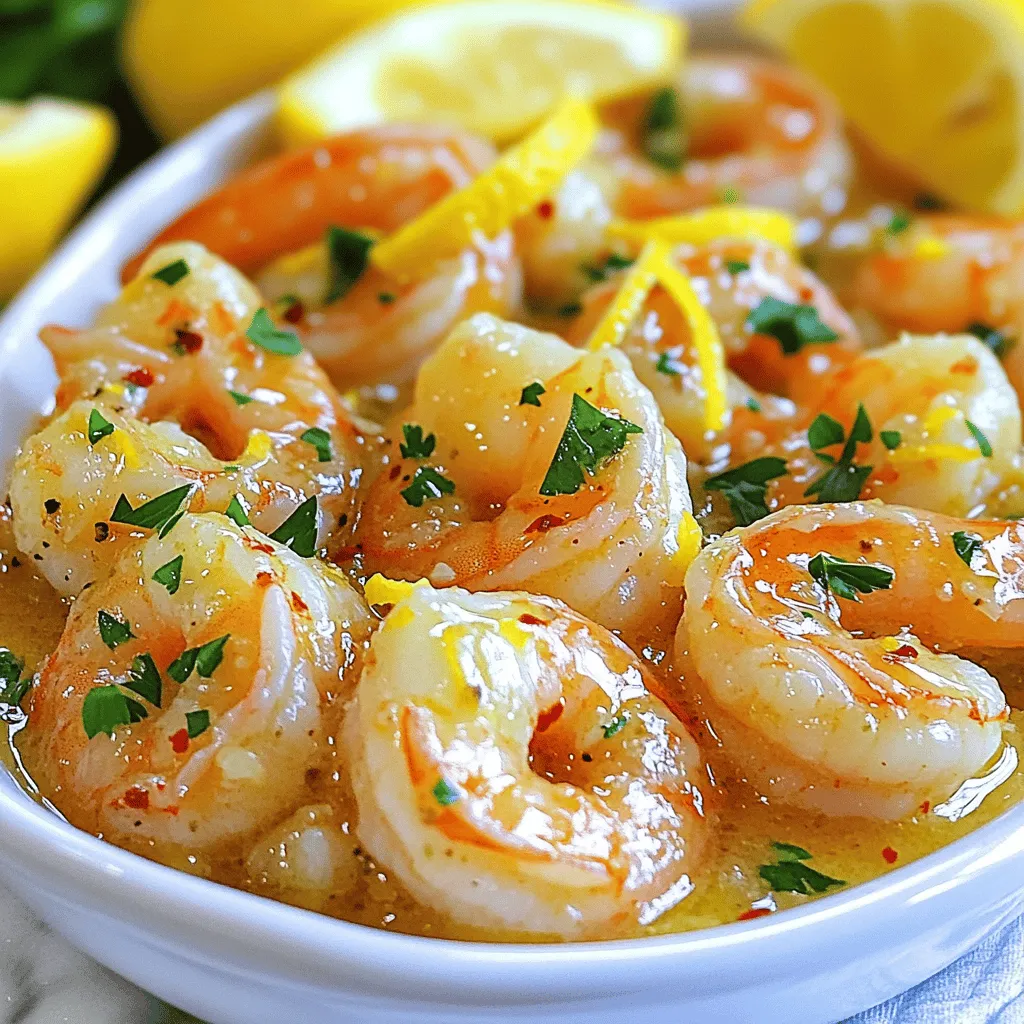
Are you ready to dive into a delicious world of flavors? This Lemon Garlic Butter Shrimp recipe is both tasty
![To make Mango Coconut Chia Pudding, you need: - 1 cup coconut milk (canned or carton) - 1/2 cup almond milk (or any milk of choice) - 1/4 cup chia seeds - 2 tablespoons honey or maple syrup (adjust to taste) - 1 ripe mango, diced - 1/2 teaspoon vanilla extract - A pinch of salt - Fresh mint leaves for garnish You can adjust the measurements based on your taste. If you want it sweeter, add more honey or maple syrup. Want a creamier texture? Use more coconut milk. Feel free to mix different milks. Almond, oat, or soy milk all work well. The key is to have a good balance between the liquids and chia seeds. This pudding is not only tasty but also healthy. One serving contains about: - Calories: 180 - Protein: 4g - Carbohydrates: 30g - Dietary Fiber: 10g - Sugars: 8g - Fat: 6g Chia seeds are full of omega-3 fatty acids. They help keep your heart healthy. Coconut milk adds healthy fats, while mango gives you vitamins and antioxidants. This makes it a great snack or breakfast choice. Check out the Full Recipe for more details on how to prepare this delightful treat! Making mango coconut chia pudding is simple and fun. You need just a few steps. The prep time is only 10 minutes. The pudding does need time to chill, so plan for at least 4 hours before serving. 1. Mix the Base: In a mixing bowl, add 1 cup of coconut milk and 1/2 cup of almond milk. Add 2 tablespoons of honey or maple syrup, 1/2 teaspoon of vanilla extract, and a pinch of salt. Whisk it all together until smooth. 2. Add Chia Seeds: Pour in 1/4 cup of chia seeds. Stir well to mix. This step is key to avoid clumping. 3. Chill the Mixture: Cover the bowl and place it in the fridge. Let it chill for at least 4 hours, or better yet, overnight. This helps the chia seeds absorb the liquid and form a pudding-like texture. 4. Prepare to Serve: After chilling, take the bowl out and gently stir the pudding. This helps to break up any lumps that may have formed. 5. Layer for Presentation: Use serving glasses or bowls. Start with a layer of the chia pudding. Next, add a layer of diced mango. Keep layering until you fill the glasses. 6. Garnish: Top with fresh mint leaves. This adds color and a fresh taste. Serve this pudding as a healthy breakfast or a light dessert. It goes great with fresh fruit or granola on top. You can also enjoy it as a snack. For a fun twist, try adding some toasted coconut flakes. Check out the Full Recipe for more details on this delicious treat! When making mango coconut chia pudding, avoid these common mistakes: - Not stirring enough: After adding chia seeds, mix well. This helps prevent clumps. - Using low-quality ingredients: Fresh mango and good coconut milk make a big difference. - Not waiting long enough: Allow the pudding to chill for at least four hours. Overnight is best. To boost the flavor and texture of your pudding: - Add spices: A pinch of cinnamon or nutmeg adds warmth. - Mix in zest: Grate some lime or lemon zest for a fresh kick. - Use flavored milk: Try using coconut milk with added vanilla for more depth. You can easily customize your pudding to fit your taste: - Change the fruit: Use berries, bananas, or peaches instead of mango. - Try different sweeteners: Swap honey for agave or use stevia for a low-cal option. - Add nuts or seeds: Top with almonds, walnuts, or sunflower seeds for crunch. For the complete recipe, check out the [Full Recipe]. {{image_2}} You can change the fruit in your Mango Coconut Chia Pudding. Pineapple gives a bright flavor. Strawberries bring sweetness and color. Blueberries add a nice pop of juicy goodness. You can even mix fruits for a fun look. Just make sure the fruit is ripe and fresh for the best taste. While coconut and almond milk are great, you can try other types too. Oat milk adds a creamy texture. Soy milk gives a nice protein boost. You can use regular cow's milk if you prefer. Each milk will change the taste a bit, so feel free to experiment. Want to change the flavor? You can add cocoa powder for a chocolate twist. Cinnamon gives a warm spice that pairs well with mango. Try adding a splash of orange juice for a citrus kick. You can even swap honey for maple syrup or agave for a different sweetness. The options are endless, so have fun mixing flavors in your pudding. For more ideas, check out the Full Recipe. Store your mango coconut chia pudding in an airtight container. This keeps it fresh and tasty. Make sure the pudding is completely cool before sealing it. This helps avoid moisture buildup. If you plan to eat it later, divide it into smaller portions. This way, you can enjoy it without opening the whole batch. You can freeze chia pudding if you want to keep it longer. Use a freezer-safe container. Leave some space at the top, as the pudding expands when frozen. To thaw, move it to the fridge overnight. Stir it well before serving, as it may separate a bit. In the fridge, your pudding lasts for about 4 to 5 days. Check for any off smells or changes in texture before eating. If you freeze it, it can last up to 3 months. Just remember to label the container with the date. Enjoy your mango coconut chia pudding fresh for the best taste! For the full recipe, refer to the instructions above. You can serve Mango Coconut Chia Pudding in clear glasses or bowls. This way, the layers look pretty. Start with a layer of pudding. Then, add a layer of diced mango. Repeat until the glass is full. Top it off with fresh mint leaves. This adds color and freshness. Yes, you can easily make this recipe vegan. Simply use maple syrup instead of honey. Also, ensure that your milk choice is plant-based. Almond milk or coconut milk works great. This way, you keep it delicious and vegan-friendly. To adjust sweetness, taste the mixture before refrigerating. If it needs more sweetness, add more honey or maple syrup. Mix it well to combine. Keep in mind that fruits like mango will add natural sweetness too. So, don’t overdo the sweetener. The pudding takes about 4 hours to set. However, I recommend letting it sit overnight. This allows the chia seeds to absorb the liquid fully. The longer it sits, the thicker and creamier it gets. Yes, you can use many fruits! Berries, bananas, or kiwi are great options. Just chop them small and layer them in the pudding. Feel free to mix and match for different flavors! This blog post covered all you need to know about making delicious Mango Coconut Chia Pudding. We explored the right ingredients, measurements, and nutritional facts. I offered a step-by-step guide to help you prepare and serve this treat. You learned tips to avoid common mistakes and how to enhance flavor. Don’t forget the variations to suit your taste and storage tips to keep it fresh. Enjoy your pudding and feel free to get creative. Your kitchen adventures just got a lot more fun!](https://foodishtalk.com/wp-content/uploads/2025/06/f0aaee88-d731-4124-8b2a-efc5fafc320a.webp)
Are you looking for a tasty treat that’s both refreshing and healthy? Mango Coconut Chia Pudding is your answer! This
