Skip to content
DisclaimerTerms Of UseGDPR PolicyCookie Policy

Foodish Talk

  • Home
  • Drinks
  • Appetizers
  • Dinner
  • Dessert
  • About
  • Contact
  • Privacy Policy
DisclaimerTerms Of UseGDPR PolicyCookie Policy

Ava

To make a tasty Chicken Tetrazzini, you need the right ingredients. Here’s what you’ll need: - 2 cups cooked chicken, shredded - 8 ounces spaghetti or fettuccine pasta - 1 cup sliced mushrooms - 1 cup frozen peas - 1/2 cup grated Parmesan cheese - 1 cup shredded mozzarella cheese - 1/4 cup butter - 1/4 cup all-purpose flour - 2 cups chicken broth - 1 cup milk - 1 teaspoon garlic powder - 1 teaspoon onion powder - Salt and pepper to taste - Fresh parsley, chopped (for garnish) These simple ingredients create a creamy and rich dish. You can use leftover chicken to save time. The pasta adds a nice touch, while mushrooms and peas give it color and flavor. Cheese makes it gooey and delicious. The butter and flour help form a creamy sauce. The broth and milk keep it moist. Seasonings add depth. This dish is easy to make and perfect for any day. For more details, check the Full Recipe. 1. Preheat your oven to 350°F (175°C). Grease a 9x13 inch baking dish with butter. 2. Cook 8 ounces of spaghetti or fettuccine pasta according to package instructions until al dente. Drain and set aside. 3. In a large skillet, melt 1/4 cup butter over medium heat. Add 1 cup of sliced mushrooms and sauté for about 4-5 minutes, until they soften. 1. Stir in 1/4 cup of all-purpose flour to create a roux. Cook for 1-2 minutes, stirring constantly. 2. Gradually whisk in 2 cups of chicken broth and 1 cup of milk, ensuring there are no lumps. Continue stirring until the mixture thickens and bubbles. 1. In a large bowl, mix 2 cups of cooked chicken, the drained pasta, 1 cup of frozen peas, half of the grated Parmesan cheese, and half of the shredded mozzarella cheese. 2. Pour the sauce over this mixture and stir until everything is well combined. 3. Transfer the mixture to the prepared baking dish. Spread it evenly and top with the remaining mozzarella and Parmesan cheeses. 1. Bake in the preheated oven for 25-30 minutes, or until the top is golden and bubbly. 2. Let it cool for a few minutes before serving. This gives the dish time to set. Enjoy your Creamy Cheesy Chicken Tetrazzini! Check out the Full Recipe for more details. To keep your pasta from turning mushy, cook it just until it's al dente. This means it should be firm when you bite into it. Drain it right away and toss it with a bit of oil to prevent sticking. For extra flavor, try adding spices. A pinch of smoked paprika adds depth. You can also use Italian seasoning for a classic touch. Experiment with flavors to find your perfect mix! Chicken Tetrazzini pairs well with a simple side salad. A fresh green salad with a light vinaigrette balances the creaminess of the dish. Garlic bread is another great option. The crunch of the bread complements the soft pasta. For a more filling meal, serve it with roasted vegetables. Roasted carrots, broccoli, or Brussels sprouts add color and nutrition. Choose sides that you love to make your meal complete. Garnish your dish for a beautiful look. A sprinkle of fresh parsley adds a pop of color. You can also add a little extra cheese on top before serving for an inviting touch. When serving, aim for a portion size of about one cup. This keeps it generous without being overwhelming. Using a wide serving dish can help show off the layers of pasta, chicken, and cheese. Enjoy making your Chicken Tetrazzini beautiful! {{image_2}} You can easily switch out chicken for leftover turkey. This option adds a new twist. You can make your dish just as tasty. For a vegetarian take, use mushrooms and a mix of vegetables. Bell peppers and zucchini work great. They add texture and flavor. Plus, they help keep the dish light. If you want a richer sauce, try using cream instead of milk. The cream gives your dish a smooth, velvety texture. You can also explore different cheeses for added flavor. Gouda and cheddar melt well and create a unique taste. Mixing cheeses can surprise your palate and make it fun. For those busy days, try a slow cooker. Just add your ingredients and let it cook. This method is easy and saves time. If you own an Instant Pot, you can make Chicken Tetrazzini fast. Just sauté your mushrooms, add the rest, and cook on high pressure for quick results. Both methods make dinner a breeze. For the full recipe, check out the detailed instructions above. To store leftovers, place Chicken Tetrazzini in an airtight container. This keeps it fresh. You can refrigerate it for up to four days. Make sure it cools down before sealing it. For freezing, let Chicken Tetrazzini cool first. Use a freezer-safe container. It can last up to three months in the freezer. For best taste, write the date on the container. When ready to eat, thaw it overnight in the fridge. You can also use the microwave for a quick thaw. Reheat in the oven at 350°F (175°C) for about 20 minutes. Make sure it is hot all the way through. Enjoy your creamy Chicken Tetrazzini again! For a complete guide, check the Full Recipe. Can I make Chicken Tetrazzini ahead of time? Yes, you can. Prepare the dish, but do not bake it. Cover and store it in the fridge for up to 24 hours. When you are ready, just bake it straight from the fridge. This makes it easy for busy nights. How do I make it gluten-free? To make Chicken Tetrazzini gluten-free, use gluten-free pasta. You can also swap all-purpose flour for a gluten-free blend. For the broth, choose a gluten-free option. Always check labels for hidden gluten. Alternatives for chicken broth If you want a different flavor, use vegetable broth or mushroom broth. Both add great taste. You can also use homemade broth if you have it on hand. Dairy-free options available To make this dish dairy-free, use plant-based milk like almond or soy milk. Swap butter for olive oil or coconut oil. Choose dairy-free cheese for topping. There are many tasty options available now. Adjustments for different serving sizes If you want to make more or less, simply change the amount of chicken and pasta. Keep the sauce ratio the same for best results. This way, you can scale it to fit your needs. Recommendations for cooking at high altitudes At high altitudes, increase cooking times slightly. You may also need to add more liquid. Keep an eye on the dish while it bakes to ensure it cooks evenly. Chicken Tetrazzini is a tasty and fun dish to make. We covered the key ingredients, easy steps, and helpful tips. This meal is great for gatherings or a family dinner. There are many ways to change the recipe to fit your needs, such as using turkey or making it vegetarian. Remember to store leftovers properly for later. With these insights, I hope you feel excited to try making Chicken Tetrazzini. Enjoy your cooking adventure!

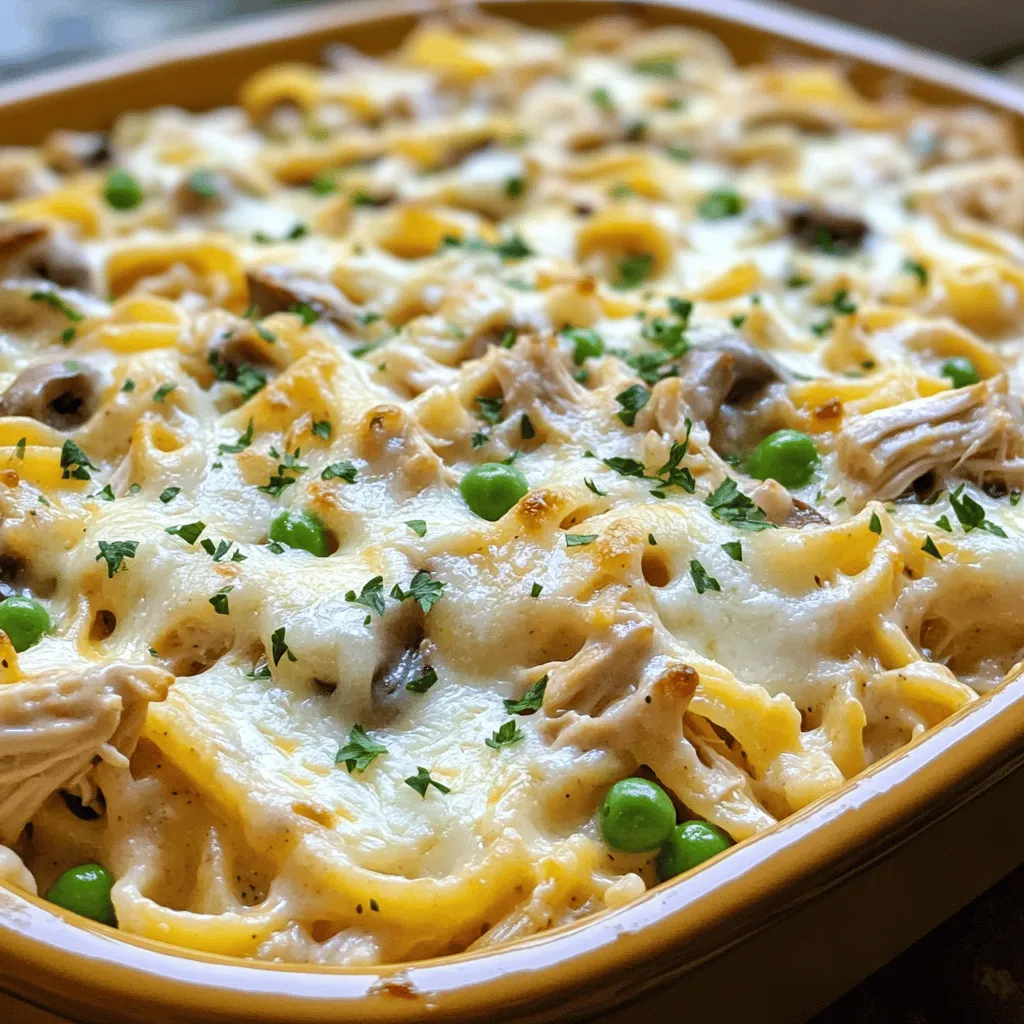
Easy Chicken Tetrazzini Comforting and Creamy Dish

If you’re in search of a warm, comforting meal, Easy Chicken Tetrazzini is perfect. This creamy dish blends tender chicken,

- 2 cups cooked chicken, shredded - 1 cup shredded mozzarella cheese - 1 cup shredded cheddar cheese - 1/2 cup cream cheese, softened - 1/2 cup bell peppers, diced (mix of red and green) - 1/2 cup red onion, diced For cheesy chicken quesadillas, the main ingredients are key. The shredded chicken gives it protein. Mozzarella and cheddar cheese melt beautifully and add rich flavor. Cream cheese makes the filling creamy and smooth. Adding bell peppers and red onion gives crunch and fresh taste. - 2 tablespoons taco seasoning - Optional spices for added flavor For this recipe, taco seasoning is a must. It adds a kick of spice and depth. You can also add optional spices like cumin or paprika for extra flavor. A pinch of garlic powder can also enhance the taste. Experiment to find your favorite mix! - 4 large flour tortillas When choosing tortillas, I recommend using large flour tortillas. They are soft and easy to fold. They also hold the filling well. You can use corn tortillas if you prefer a gluten-free option, but they may crack more easily. Brands like Mission or Tortilla Land work well for flour tortillas. To start, mix your filling well. In a bowl, combine: - 2 cups cooked chicken, shredded - 1 cup shredded mozzarella cheese - 1 cup shredded cheddar cheese - 1/2 cup cream cheese, softened - 1/2 cup bell peppers, diced (mix of red and green) - 1/2 cup red onion, diced - 2 tablespoons taco seasoning The right mix makes a big difference. Ensure even ratios of chicken to cheese. This balance gives the quesadillas great flavor and texture. Now, heat your skillet. Set it to medium heat. Add 1 tablespoon of olive oil. Cooking too hot can burn the tortillas. You want a nice golden brown. Place one tortilla in the skillet. Spread half of the chicken and cheese mixture over one half. Fold the tortilla in half. Cook for 3-4 minutes until the bottom is crispy. Flip it carefully. Cook the other side for another 3-4 minutes. You want the cheese melted and the tortilla crunchy. Repeat with the rest of the tortillas and filling. Keep adding olive oil as needed to avoid sticking. For sides, consider sour cream and salsa. These add zest and freshness. You can also serve with a simple salad or guacamole for a more filling meal. For plating, slice the quesadillas into wedges. Arrange them on a colorful plate. Add a dollop of sour cream and a small bowl of salsa. This makes your dish look good and inviting. For the full recipe, check out the complete guide! To make your cheesy chicken quesadillas even better, add fun ingredients. Try adding diced jalapeños for a spicy kick. You can also toss in fresh spinach for a pop of color and nutrition. For dips, sour cream and salsa work great. You might also enjoy guacamole or a zesty ranch dip. A crispy quesadilla is a must. To achieve this, use enough oil in the skillet. Heat it well before adding the tortilla. Cook each side for about 3-4 minutes. This helps create that golden brown crust. Avoid soggy tortillas by not overfilling them. A thin layer of filling keeps them crisp. If you plan to serve many people, this recipe scales easily. Just double or triple the ingredients. Use multiple skillets to speed up cooking. To keep quesadillas warm, place them in a low oven. Cover them with foil to keep the heat in. Enjoy your gathering with tasty food everyone will love! For the full recipe, check out the details shared earlier. {{image_2}} You can switch up the protein in your quesadillas. Try using beef, shrimp, or even tofu for a vegetarian option. If you go with beef, use ground beef or steak strips. For shrimp, cook them until pink and tender. Adjust your cooking times so all proteins are cooked well. Each protein brings its own flavor and texture. While mozzarella and cheddar are classic choices, don’t stop there! You can explore other cheese types like pepper jack for a spicy kick or gouda for a rich, smoky flavor. If you prefer dairy-free options, look for vegan cheese that melts well. These can give your quesadillas a unique twist. Want to spice things up? Consider adding international flavors to your quesadillas. BBQ chicken with a tangy sauce can be a hit. You can also try curry chicken for a warm, fragrant taste. Each flavor brings a new experience. Feel free to mix and match, and create your own global quesadilla masterpiece. For more ideas, check out the Full Recipe. To store leftover quesadillas, let them cool first. Place them in an airtight container. This keeps them fresh and tasty. You can stack them if needed. Use parchment paper between layers to prevent sticking. I recommend using glass or plastic containers with tight lids. Freezing quesadillas is easy for quick meals. Wrap each quesadilla in plastic wrap. Then, place them in a freezer-safe bag. Press out as much air as you can before sealing. For reheating, you can bake them in the oven. Preheat your oven to 375°F (190°C). Bake for about 15-20 minutes. You can also use a skillet on low heat for about 5-7 minutes. Quesadillas stay fresh in the fridge for about 3-4 days. If frozen, they last up to 2-3 months. Look for signs of spoilage, like a strange smell or mold. If they seem dry or tough, it's best to toss them out. Keeping track of freshness helps you enjoy every bite! For the full recipe, check out the earlier section. To make quesadillas crispy, use a hot skillet. Heat it over medium-high heat before adding oil. Olive oil works well for flavor and crisping. Ensure you don’t overcrowd the pan. Cook one or two quesadillas at a time. Flip them only when the bottom is golden brown. This helps to get that perfect crunch. Yes, you can use different tortillas. Flour tortillas are soft and easy to fold. They give a nice chewiness. Corn tortillas are crispy and have a stronger flavor. They are a good choice if you want a gluten-free option. However, corn tortillas can break more easily. Choose based on your taste and texture preference. You can serve quesadillas with many tasty sides. Sour cream adds a cool contrast. Salsa brings a nice kick of flavor. Guacamole is another great choice for creaminess. Fresh veggies like cucumber or carrot sticks add crunch. A simple salad can also balance the meal. Yes, this recipe is great for meal prep. You can make the filling ahead of time. Store it in the fridge for up to three days. When ready to eat, just assemble and cook the quesadillas. They reheat well in a skillet, keeping them crispy. This makes it easy to enjoy a quick meal on busy days. For the full recipe, check out the earlier section! Cheesy chicken quesadillas are easy to make and full of flavor. We covered the main ingredients, seasonings, and tortilla choices that enhance taste. I shared step-by-step instructions to prepare the filling and cook the quesadillas just right. Useful tips for serving and storage will help keep your dish fresh. Don't forget to explore variations and exciting flavors. This dish is fun and safe to enjoy any time. Experiment and create your own twist to make it your favorite meal!

Cheesy Chicken Quesadillas Flavorful and Quick Recipe

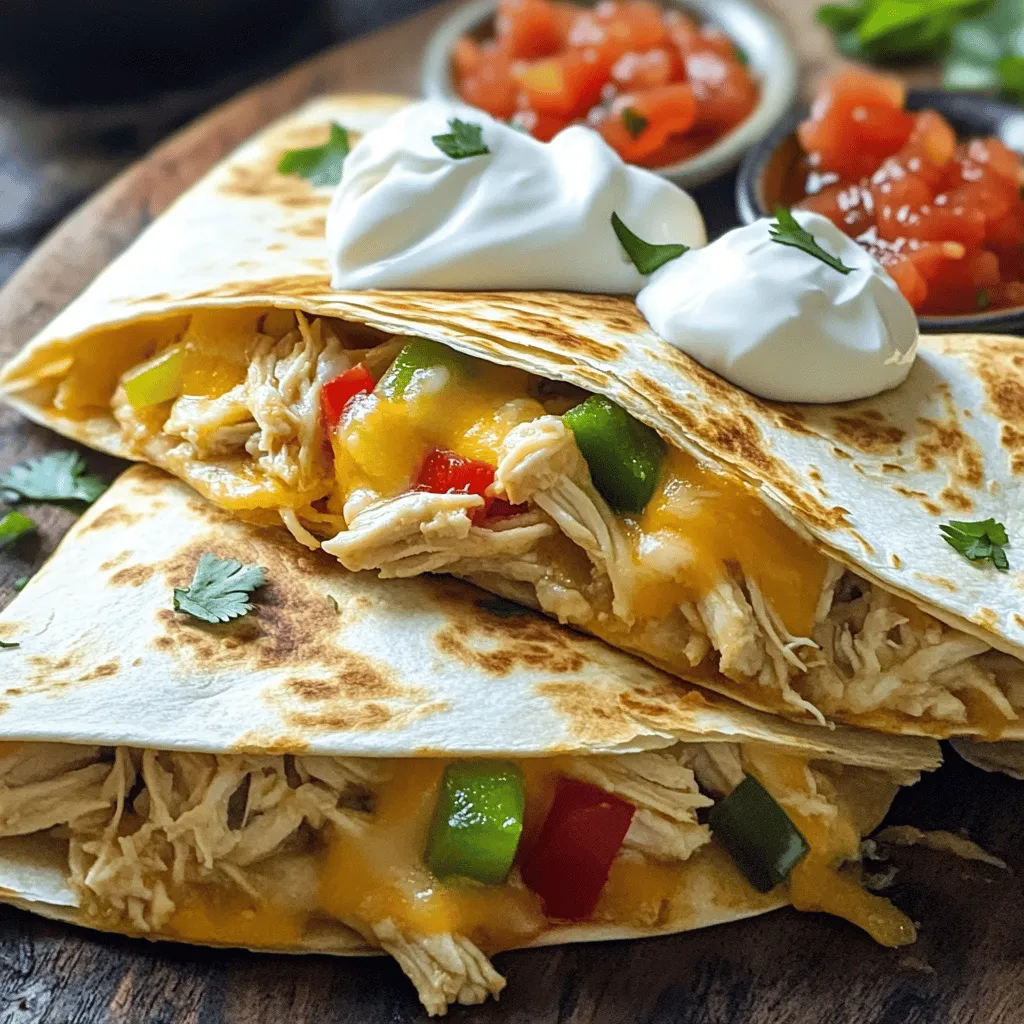
If you’re craving a tasty meal that’s quick and easy, look no further than cheesy chicken quesadillas. This recipe combines

To make a Chicken Enchilada Skillet, you need: - 1 lb (450g) boneless, skinless chicken breasts, cut into bite-sized pieces - 1 tablespoon olive oil - 1 small onion, diced - 2 cloves garlic, minced - 1 bell pepper (red or green), diced - 1 can (15 oz) black beans, rinsed and drained - 1 can (10 oz) enchilada sauce - 1 cup corn (fresh or frozen) - 1 teaspoon ground cumin - 1 teaspoon chili powder - Salt and pepper to taste - 1 ½ cups shredded Mexican cheese blend - Fresh cilantro, chopped (for garnish) - Sliced jalapeños (optional, for garnish) If you have dietary needs, you can swap some ingredients: - Use turkey instead of chicken for a leaner option. - Try quinoa or lentils instead of black beans for a plant-based meal. - Use dairy-free cheese for a vegan option. - Fresh vegetables are great, but canned veggies can save time. To cook this dish, you’ll need: - A large skillet that can hold all the ingredients. - A sharp knife for chopping. - A cutting board for prep work. - A spatula for mixing. For the skillet, I recommend a non-stick or cast iron skillet. These help the food cook evenly and make cleanup easy. To make Chicken Enchilada Skillet, start by gathering your ingredients. You will need: - 1 lb boneless, skinless chicken breasts, cut into bite-sized pieces - 1 tablespoon olive oil - 1 small onion, diced - 2 cloves garlic, minced - 1 bell pepper, diced - 1 can black beans, rinsed and drained - 1 can enchilada sauce - 1 cup corn - 1 teaspoon ground cumin - 1 teaspoon chili powder - Salt and pepper to taste - 1 ½ cups shredded Mexican cheese blend - Fresh cilantro, chopped, for garnish - Sliced jalapeños, for garnish Before you start cooking, wash and chop all your veggies. This helps keep your kitchen organized. Use a sharp knife for quicker prep. You can also measure out your spices ahead of time. This saves time when you cook. Heat the olive oil in a large skillet over medium heat. Add the diced onion and bell pepper. Cook them until they soften, about 4-5 minutes. Stir in the minced garlic and cook for one more minute. This brings out the garlic's aroma. Next, add the chicken pieces to the skillet. Cook them until they turn golden brown, about 6-7 minutes. Season the chicken with cumin, chili powder, salt, and pepper. This adds depth to your dish. Once the chicken is cooked, mix in the black beans, corn, and enchilada sauce. Stir everything together well. Heat it until warm, about 2-3 minutes. Now for the best part—melt the cheese! Sprinkle the shredded cheese evenly over the top of your skillet. Cover the skillet with a lid. Let it cook for 2-3 minutes. This melts the cheese just right. Once the cheese is bubbly and gooey, remove the skillet from heat. Garnish with chopped cilantro and sliced jalapeños if you want some heat. The colors will make your dish pop! For the full recipe, check the details above. Enjoy your flavorful Chicken Enchilada Skillet! To ensure the chicken remains tender and juicy, don't overcook it. Cook the pieces until they are golden brown and no longer pink inside. Use a meat thermometer to check for doneness; it should reach 165°F. To prevent the dish from getting too watery, avoid adding extra liquid. Use just the right amount of enchilada sauce. You want the sauce to coat the chicken and veggies, not drown them. To maximize flavor, use fresh spices. Ground cumin and chili powder are key ingredients in this dish. Toasting them in the skillet for a minute brings out their best taste. Layer flavors by adding ingredients step by step. Start with onions and peppers, then add garlic, and finally the chicken. This builds a great base for your enchiladas. Serve the chicken enchilada skillet hot. It pairs well with sides like Mexican rice or a fresh salad. For portion sizes, serve about one and a half cups per person. This gives everyone a good amount without leftovers. Top with fresh cilantro and sliced jalapeños for a nice touch. For the full recipe, check out the detailed steps above. {{image_2}} You can easily switch things up based on your needs. For a vegetarian or vegan option, replace the chicken with mushrooms or sautéed zucchini. Use black beans or lentils for added protein. This keeps the dish full of flavor without meat. If you prefer different types of meat, ground turkey or beef works great. You can also use shredded rotisserie chicken for a quick fix. Each choice brings its own taste, making the meal fun and versatile. Want some extra kick? Add jalapeños or cayenne pepper to your skillet. For a sweeter touch, try adding corn or a splash of honey. These spices change the dish's vibe and make it exciting. You can also swap out the enchilada sauce. Try green sauce or salsa verde for a fresh twist. Experiment with different cheese types, like pepper jack or cheddar, to enhance flavor and meltiness. Plating can make a meal feel special. For a family-style look, serve the skillet right from the pan. This keeps it casual and fun. If you want to impress, plate individual portions. Use a scoop of the enchilada mix, top with cheese, and add fresh cilantro. You can garnish with avocado slices or lime wedges for color. Each method adds a personal touch to your meal. For the full recipe and more ideas, check out the [Full Recipe]. Storing leftovers correctly is key to keeping them fresh. Once your chicken enchilada skillet cools, place it in an airtight container. This helps seal in flavor and moisture. The dish will last up to three to four days in the fridge. Always check for any changes in smell or color before eating leftovers. To freeze the chicken enchilada skillet, let it cool completely first. Then, transfer it to a freezer-safe container. Make sure to leave some space at the top for expansion. Seal it well to prevent freezer burn. It can stay fresh for up to three months in the freezer. When you’re ready to eat, thaw it overnight in the fridge. Reheat in a skillet over medium heat. Stir occasionally until heated through, about 10-15 minutes. Planning ahead is smart for busy weeknights. You can chop vegetables and cook the chicken in advance. Store these in the fridge for easy access. Another great tip is to batch cook. Make multiple servings of the chicken enchilada skillet and freeze them. This way, you have quick meals ready to go any night. To make your Chicken Enchilada Skillet spicier, you have a few options: - Use extra chili powder. - Add diced jalapeños or serrano peppers. - Include a dash of hot sauce. - Try spicier enchilada sauce. Start with small amounts, then taste as you go. This way, you control the heat. Yes, you can use frozen chicken. - Simply thaw it first in the fridge overnight. - If you're in a rush, you can cook the chicken from frozen. Just add a few extra minutes to your cooking time. Cut the chicken into pieces for even cooking. Pair your Chicken Enchilada Skillet with some tasty sides: - Rice or quinoa for a filling meal. - A fresh salad with lime dressing. - Tortilla chips with salsa for crunch. - Guacamole adds a creamy touch. These sides complement the flavors well. To reheat leftovers, follow these tips: - Use the microwave for quick reheating. - Cover the dish to keep the moisture in. - Heat in short bursts, stirring in between. For the stovetop, use medium heat in a skillet. Add a splash of water to keep it moist. This preserves the flavor and texture. In this article, we explored how to make a delicious chicken enchilada skillet. You learned about the key ingredients you need, along with handy substitutions for dietary needs. We covered step-by-step instructions for prepping and cooking, along with cooking tips to keep your chicken tender. We also discussed flavor and presentation variations, plus smart storage methods. Now, you can enjoy creating your unique twist on this dish. Remember, cooking is about having fun and sharing good food with others.

Chicken Enchilada Skillet Flavor-Packed Comfort Meal

If you’re craving a meal that’s both comforting and bursting with flavor, look no further! This Chicken Enchilada Skillet is

To make tasty buffalo chicken wraps, gather these key items: - 2 cups cooked chicken, shredded - 1/2 cup buffalo sauce (adjust to spice preference) - 1/2 cup ranch dressing (or blue cheese dressing for a classic twist) - 4 large flour tortillas - 1 cup shredded lettuce - 1 cup diced tomatoes - 1/2 cup shredded cheese (cheddar or a blend) - 1/4 cup chopped green onions (optional) - Salt and pepper to taste These ingredients create a delicious mix of flavors. The buffalo sauce gives heat, while ranch dressing adds creaminess. You can personalize your wraps with these extras: - Avocado slices for creaminess - Jalapeños for extra spice - Corn for sweetness - Black beans for added protein Feel free to mix and match. This way, you can make the wraps your own. For dipping and extra flavor, I suggest: - Additional ranch dressing - Blue cheese dressing for a bold taste - Salsa for a fresh kick - Extra green onions for crunch These dressings and toppings enhance the overall taste and make your meal more exciting. Enjoy experimenting to find your perfect combo! First, take your cooked chicken. You can use rotisserie chicken or leftover chicken. Shred it into small pieces. Place the shredded chicken in a medium bowl. Next, pour in the buffalo sauce. Mix it well until the chicken is fully coated. This step adds a nice kick to your wraps. You can adjust the amount of buffalo sauce based on how spicy you like it. For those who enjoy heat, feel free to add more. Grab a large flour tortilla. Lay it flat on your counter. Spread a generous tablespoon of ranch dressing in the center. This dressing adds a creamy touch to balance the heat. Next, layer on the shredded lettuce and diced tomatoes. Sprinkle the shredded cheese on top. Now, add a good scoop of the buffalo chicken mixture. If you like green onions, toss some on top. Season with salt and pepper for added flavor. It’s time to cook your wraps! Heat a skillet over medium heat. Place the wraps seam-side down in the skillet. Cook for about 2-3 minutes on each side. You want them to turn golden brown and crispy. This step gives your wraps a nice crunch. After cooking, let them cool for a minute. Slice each wrap in half for easy eating. Serve with extra ranch dressing on the side for dipping. For the full recipe, check the earlier section. To boost flavor in your Buffalo chicken wraps, use good-quality chicken. I love rotisserie chicken for its taste and ease. Mix the chicken with buffalo sauce thoroughly. This ensures every bite is full of flavor. For extra zest, add a splash of lemon juice to the chicken mix. It brightens the dish and balances the heat. Don’t forget to taste as you go, adjusting spices to suit your palate. Folding a tortilla can be tricky, but practice makes perfect. Start by placing your filling in the center. Make sure you don’t overfill. This helps in folding. Fold the sides in first, then roll from the bottom. Tuck in the filling as you roll. This way, it stays secure. For a crispier finish, heat the wraps seam-side down in a skillet. This gives a nice crunch and keeps them together. Serve your buffalo chicken wraps with extra ranch dressing or blue cheese dressing. It makes for a great dip! You can also pair the wraps with celery sticks or carrot sticks for a fresh crunch. If you want a full meal, add a side salad. A simple green salad with a light vinaigrette complements the spicy wraps perfectly. For a fun twist, consider a side of sweet potato fries. They balance the heat with their sweetness. Check out the Full Recipe for more tips! {{image_2}} You can still enjoy the flavor of buffalo wraps without chicken. Use roasted cauliflower for a tasty twist. It adds a nice crunch and soaks up the sauce well. You can also try chickpeas. They bring protein and a hearty texture. Add your favorite veggies, like bell peppers or carrots, for extra flavor and color. If you want to switch from chicken, turkey is a great option. It has a similar taste but less fat. You can also use tofu for a plant-based version. Just marinate the tofu in buffalo sauce and grill or bake it. For seafood lovers, shrimp works well too. Cook them in the buffalo sauce for a spicy kick. Buffalo sauce can be fun to mix up. You can use barbecue sauce for a sweeter flavor. Mixing buffalo and ranch dressing creates a creamy, tangy taste. For those who love heat, try adding sriracha to the mix. You can also go for a honey mustard blend for a sweet and spicy wrap. Don't forget to check the Full Recipe for more ideas! To keep your Buffalo Chicken Wraps fresh, wrap them tightly in plastic wrap or foil. Place them in an airtight container. Store them in the fridge. They will stay good for up to three days. If you want to keep them longer, freezing is a great option. When you're ready to eat your leftovers, heat them in a skillet. This gives the wraps a nice crispy texture. Cook on medium heat for about 3–5 minutes on each side. You can also use a microwave. Just wrap them in a damp paper towel. Heat for about 30 seconds, checking often to avoid sogginess. To freeze your wraps, make sure they are fully cooled. Wrap each one in plastic wrap, then place them in a freezer bag. They can last for up to three months in the freezer. To thaw, move them to the fridge overnight. When you're ready, reheat them as mentioned above for the best taste. For the full recipe, check out the complete section earlier in the article. The best wrapper for buffalo chicken wraps is a large flour tortilla. It holds the filling well and is soft to eat. Whole wheat tortillas are a healthier choice. You can also use gluten-free tortillas if needed. You can make buffalo chicken wraps spicier by adding more buffalo sauce. Try mixing in a dash of hot sauce or cayenne pepper for extra heat. Chopped jalapeños or crushed red pepper flakes also add a nice kick. Yes, you can prepare buffalo chicken wraps in advance. Assemble the wraps and wrap them tightly in plastic wrap. Keep them in the fridge for up to 24 hours. Just remember to add fresh toppings like lettuce and tomatoes right before serving for the best taste. Many grocery stores and delis sell buffalo chicken wraps. You can also find them at restaurants or fast-food places. Check local eateries or use delivery apps to find options near you. For a quick and easy recipe, you can always refer to the Full Recipe. Buffalo chicken wraps are tasty and fun to make. We covered the main ingredients and options for customization. I shared simple, clear steps for preparing and cooking your wraps. You learned tips for flavor and folding, plus serving ideas. We explored variations for vegetarians and different proteins. Finally, I gave storage and reheating advice. Now, you'll enjoy delicious buffalo chicken wraps at home. Try new flavors and share with friends!

Buffalo Chicken Wraps Flavorful and Quick Recipe

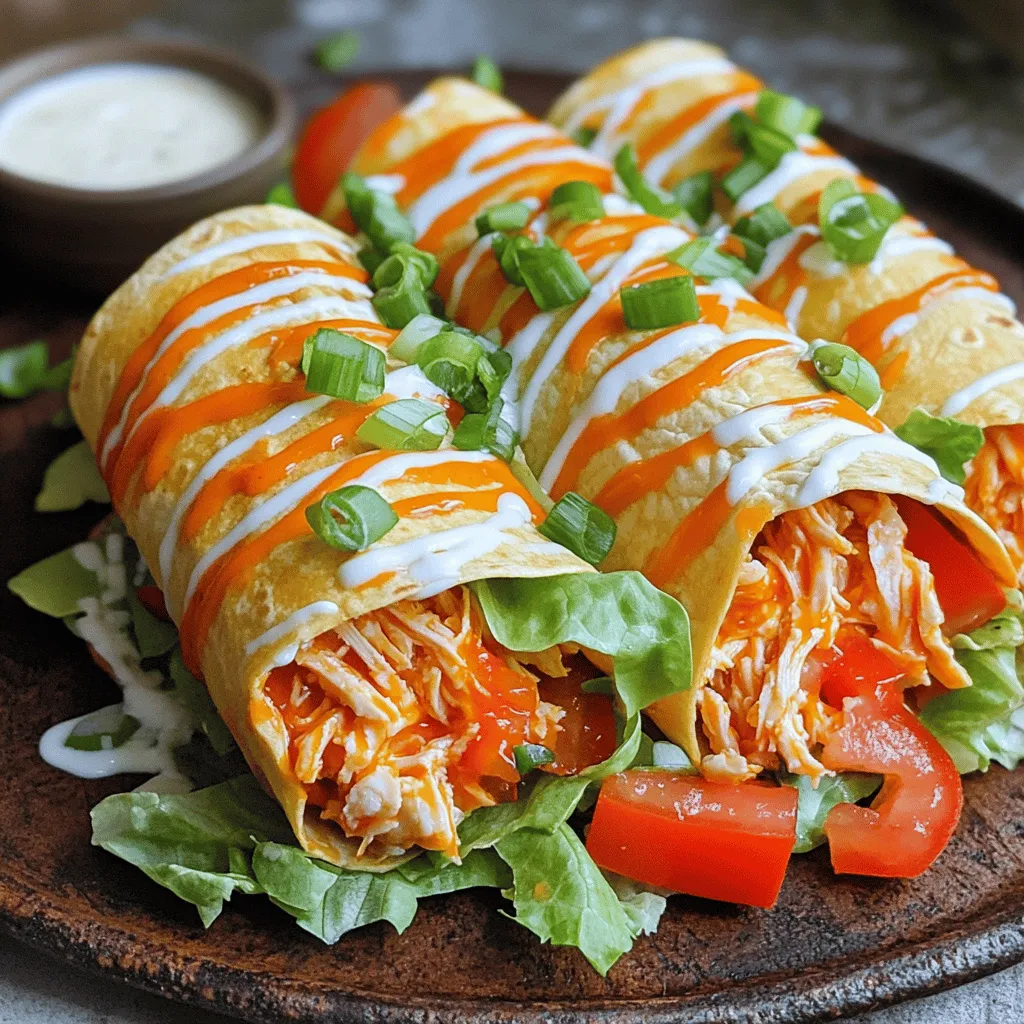
Looking for a quick meal that packs a punch? My Buffalo Chicken Wraps are your tasty solution! With spicy chicken,

To make a tasty Chicken Bacon Ranch Casserole, gather these simple ingredients: - 2 cups cooked chicken, shredded - 8 ounces egg noodles - 1 cup ranch dressing - 1 cup sour cream - 2 cups shredded cheddar cheese - 1 cup frozen peas and carrots (thawed) - 1 teaspoon garlic powder - 1 teaspoon onion powder - Salt and pepper to taste - ½ cup crispy fried onions for topping (optional) Each ingredient plays a role in creating the creamy, savory flavor. The chicken adds protein, while the noodles provide a comforting base. Ranch dressing and sour cream give it a rich taste. Cheddar cheese melts beautifully on top, adding a delicious layer. Peas and carrots bring color and nutrients. Garlic and onion powder enhance the overall flavor. You can adjust the salt and pepper to fit your taste. If you like extra crunch, add crispy fried onions on top. For the full recipe, check out the [Full Recipe]. First, preheat your oven to 350°F (175°C). This step warms the oven and helps the casserole cook evenly. Next, grease a 9x13 inch casserole dish with some oil or butter. This helps prevent sticking later on. Now, cook the egg noodles according to the package instructions. Usually, this takes about 7 to 10 minutes. Drain them when they are just tender. Set the noodles aside to cool a bit. In a large mixing bowl, combine the shredded chicken, ranch dressing, and sour cream. Add half of the cheddar cheese, the thawed peas and carrots, garlic powder, onion powder, salt, and pepper. Mix all these ingredients until they blend well. When your mixture is smooth, gently add the cooked noodles. Stir carefully until the noodles are well coated with the sauce and chicken. This is where the magic really starts to happen! Transfer the mixture into your prepared casserole dish. Spread it out evenly so it cooks uniformly. Top the casserole with the remaining cheddar cheese. If you want a crunchy topping, sprinkle crispy fried onions over the cheese. Now it's time to bake! Place the casserole in the oven and bake for 25 to 30 minutes. You want the cheese to be bubbly and golden. After baking, let it cool for a few minutes before serving. This dish is perfect for family dinners or gatherings. Don't forget to check out the Full Recipe for detailed instructions! To make sure your casserole is perfect, you must avoid mushy noodles. Here’s how: - Cook noodles al dente: Follow the package instructions but cook them for one minute less. This keeps them firm. - Rinse with cold water: After draining, rinse the noodles briefly with cold water. This stops the cooking process. Ingredient temperature is also key. Use room temperature ingredients. Cold items can make the dish uneven. Let your chicken and sour cream sit out for about 30 minutes before mixing. This helps them blend smoothly with the rest. Garnishing your casserole makes it look nice and adds flavor. Here are some tips: - Chopped parsley: Sprinkle some fresh parsley on top before serving. It adds color and freshness. - Crispy onions: If you use fried onions, add them just before serving. This keeps them crunchy. For sides, consider: - Green salad: A simple salad pairs well with the rich flavors of the casserole. - Garlic bread: This adds a nice crunch and complements the creamy texture. You can easily customize this dish for different diets. Here are some ideas: - Substitute chicken: Try turkey or cooked ham if you want a change. - Dairy-free options: Use dairy-free sour cream and cheese. For flavor variations, consider: - Add spices: A pinch of paprika or cayenne can spice things up. - Mix in veggies: Try adding bell peppers or spinach for extra nutrition. For the complete recipe, check out the [Full Recipe]. {{image_2}} You can make a tasty vegetarian version of this casserole. Start by using plant-based proteins like tofu or tempeh. These options add protein without meat. You can also use hearty vegetables instead of chicken. Try mushrooms, zucchini, or eggplant. They will soak up the flavors of the ranch dressing. For a lighter dish, swap out some ingredients. Use Greek yogurt in place of sour cream. This cuts calories and boosts protein. You can also choose whole grain noodles for extra fiber. If you need a gluten-free option, use rice noodles or gluten-free pasta. These swaps keep the dish yummy and healthy. To make your casserole even better, add spices or herbs. A pinch of smoked paprika or Italian seasoning can add depth. Fresh herbs like parsley or basil can brighten the dish. Don't forget about cheese! Try mixing different cheeses like mozzarella or pepper jack. This can give your casserole a unique taste. For the full recipe, check out the Creamy Chicken Ranch Casserole. To keep your Chicken Bacon Ranch Casserole fresh, store it in an airtight container. Place it in the fridge within two hours of cooking. This helps prevent bacteria growth. You can keep it in the fridge for up to four days. Always check for any off smells or changes in color before eating. Reheat your casserole in the oven for the best results. Set your oven to 350°F (175°C). Cover the dish with foil to keep it moist. Heat for about 20 minutes or until warm. You can also microwave it, but be careful. Microwaving can make the noodles soggy. To avoid this, heat in short bursts. Stir in between to heat evenly. You can freeze the casserole if you want to save some for later. First, let it cool down completely. Then, wrap it tightly in plastic wrap. Place it in a freezer-safe container or bag. You can freeze it for up to three months. To use it, thaw it overnight in the fridge. Then, bake it at 350°F (175°C) for 30-40 minutes until heated through. Enjoy your meal again with ease! Yes, you can make this casserole ahead of time. This is great for busy days. To do this, follow these steps: - Make the filling: Prepare the chicken mixture as usual. - Assemble the casserole: Place the mixture in the dish but do not bake it yet. - Cover and chill: Wrap the dish tightly with plastic wrap. Store it in the fridge for up to 24 hours. - Bake when ready: When you are ready to eat, just remove the wrap and bake. You may need to add a few extra minutes to the cooking time. Absolutely! You can switch out the chicken for other meats. Here are some great options: - Turkey: A lean option that works well. - Pork: Shredded pork adds a nice flavor. - Beef: Ground beef can also be a tasty choice. Just ensure the meat is cooked and well-seasoned before mixing it in. This casserole pairs well with many sides. Here are some popular choices: - Green salad: A fresh salad adds crunch. - Garlic bread: Great for soaking up the creamy sauce. - Steamed vegetables: Broccoli or green beans are nice options. These sides will complement the casserole's rich flavors and make your meal complete. In this blog post, I shared a simple and tasty Chicken Bacon Ranch Casserole recipe. We covered the key ingredients, preparation steps, and baking time. I also offered tips to make your casserole perfect, with options for variations and healthier choices. Remember, this dish is not only easy but also adaptable to fit your needs. Try experimenting with flavors and customizing it for your family. Enjoy the great taste and ease of making this meal any night of the week. Happy cooking!

Chicken Bacon Ranch Casserole Easy Comfort Food Dish

If you crave a satisfying meal that’s easy to make, you’re in the right place! My Chicken Bacon Ranch Casserole

To make Philly cheesesteak sliders, you need these key items: - 12 slider rolls - 1 pound ribeye steak, thinly sliced - 1 medium onion, thinly sliced - 1 medium green bell pepper, thinly sliced - 1 cup provolone cheese, shredded - 1/2 cup cream cheese, softened - 2 tablespoons olive oil - 1 teaspoon garlic powder - Salt and pepper to taste These ingredients create a rich and tasty flavor. Ribeye steak gives the sliders a juicy bite. Cream cheese adds a smooth texture. Provolone cheese melts beautifully, making each bite gooey and delicious. You can tweak the recipe with these extras for more flavor: - 1 tablespoon Worcestershire sauce Adding Worcestershire sauce can enhance the umami taste. It adds a savory depth that pairs well with the beef and cheese. Having the right tools makes cooking easier. Here are some you should use: - Large skillet - 9x13 inch baking pan - Sharp knife for slicing - Cutting board These tools help you prepare and cook the sliders efficiently. A good skillet heats evenly, and a sharp knife makes slicing quick and safe. To start, gather all your ingredients. You will need slider rolls, ribeye steak, onion, bell pepper, provolone cheese, and cream cheese. Also, keep garlic powder, salt, pepper, and olive oil nearby. 1. Preheat your oven to 350°F (175°C). This step is key to getting those sliders just right. 2. In a large skillet, heat the olive oil over medium-high heat. The oil should shimmer before adding veggies. 3. Add the thinly sliced onion and green bell pepper. Sauté them for 5-7 minutes. You want them soft and a little caramelized. After the veggies are ready, it's time for the steak: 1. Remove the veggies from the skillet and set them aside. Use the same skillet to keep the flavors. 2. Add the thinly sliced ribeye steak to the hot skillet. 3. Season the steak with garlic powder, salt, and pepper. If you want extra flavor, add Worcestershire sauce. 4. Cook the steak for 3-4 minutes. It should be browned but still tender. 5. Mix the sautéed onions and bell peppers back into the cooked steak. Stir well to combine. Now, we get to the fun part—putting it all together! 1. Slice the slider rolls in half. Place the bottom halves in a greased 9x13 inch baking pan. 2. Spread cream cheese evenly over these bottom halves. This adds a rich and creamy layer. 3. Load the steak and veggie mixture over the cream cheese. Make sure it’s even. 4. Generously sprinkle shredded provolone cheese on top of the steak mixture. 5. Place the top halves of the slider rolls on the cheese. 6. Cover the pan with aluminum foil. Bake for 15 minutes. 7. After 15 minutes, remove the foil and bake for another 5-10 minutes. You want the cheese bubbly and the tops golden brown. 8. Once done, let the sliders cool a bit before slicing into individual pieces. For the full process, check out the Full Recipe. Enjoy your delicious Philly cheesesteak sliders! One common mistake is overcooking the steak. Ribeye cooks fast. If you cook it too long, it gets tough. Aim for just a few minutes on high heat. Another mistake is not seasoning enough. Salt and pepper make a big difference. Don’t forget to season the vegetables, too. Finally, using the wrong type of bread can ruin your sliders. Choose soft slider rolls that hold up well. When cooking for a larger group, double your ingredients. You can use two pans to cook the steak and veggies at once. This speeds up the process. You can also bake multiple trays at the same time. Just make sure to check on them. Keep an eye on the cheese; it should bubble nicely. If you find it hard to serve, consider using a buffet style. To boost the flavor, try adding marinades to your meat. A simple mix of soy sauce and garlic works wonders. You can also switch cheeses. Provolone is great, but try cheddar or pepper jack for a twist. Adding Worcestershire sauce gives a nice depth. Lastly, fresh herbs like parsley or thyme can brighten the dish. These small changes make your sliders extra special. You can find the full recipe to explore more flavor options. {{image_2}} You can swap out provolone cheese for other types. Cheddar gives a sharp tang. Swiss adds a nutty flavor. For a fun twist, try pepper jack for a kick. Each cheese brings a unique taste to your sliders. Mix and match to find your favorite. You don’t need steak to enjoy these sliders. Use mushrooms as a hearty base. Portobello or shiitake mushrooms offer great texture. Add sautéed onions and bell peppers for flavor. Use a vegan cream cheese if you want to keep it plant-based. These veggie sliders still pack a punch. If you like heat, add jalapeños or hot sauce. Mix diced jalapeños into the steak mixture. You can also sprinkle crushed red pepper flakes on top. For more flavor, use spicy cheese like pepper jack. These spicy sliders will wow your guests! For the full recipe, check out the details above. To keep your Philly cheesesteak sliders fresh, store them in an airtight container. If you have leftovers, let them cool down first. Place a piece of wax paper between layers to avoid sogginess. This helps keep the rolls soft and the cheese from sticking. When you’re ready to enjoy your sliders again, preheat your oven to 350°F (175°C). Place the sliders on a baking sheet. Cover them with aluminum foil to keep them moist. Heat them for about 10-15 minutes. You want the cheese to melt and the rolls to warm up without drying out. If you want to freeze your sliders, wait until they are fully cooled. Wrap each slider tightly in plastic wrap. Then, place them in a freezer-safe bag. They can last for up to three months in the freezer. When you’re ready to eat them, let them thaw in the fridge overnight before reheating. This method helps keep them tasty and fresh. You can make Philly cheesesteak sliders ahead of time. Start by cooking the steak and veggies as usual. After mixing them, let the mixture cool. Then, store it in the fridge. When you are ready to bake, spread cream cheese and add the mixture to the rolls. Cover with cheese and bake. This way, you save time when guests arrive. You can prepare everything a day before and enjoy fresh sliders. Yes, you can use other meats in this recipe. Chicken, turkey, or pork work well. Just slice them thin, like the ribeye. Cook them in the skillet, just like the steak. Each meat adds its unique flavor, so feel free to experiment. You can even try ground beef or sausage for a different taste. The key is to season them well, regardless of the meat choice. You can serve several tasty sides with Philly cheesesteak sliders. Here are a few ideas: - French fries: Crispy fries pair well with sliders. - Potato chips: Crunchy chips add a nice texture. - Coleslaw: A fresh slaw adds crunch and flavor. - Pickles: Pickles are a great tangy contrast. These sides complement the rich flavors of the sliders. Feel free to mix and match based on your taste! This article covered everything you need for making Philly Cheesesteak Sliders. We discussed the core and optional ingredients, plus the tools you’ll need. You also learned the step-by-step instructions for preparation, cooking, and assembly. I shared tips to avoid common mistakes and how to serve larger crowds. You can try various cheese and make vegetarian or spicy versions. Remember to store leftovers properly and reheat them safely. Now you are ready to enjoy your sliders!

Philly Cheesesteak Sliders Flavorful Crowd-Pleaser

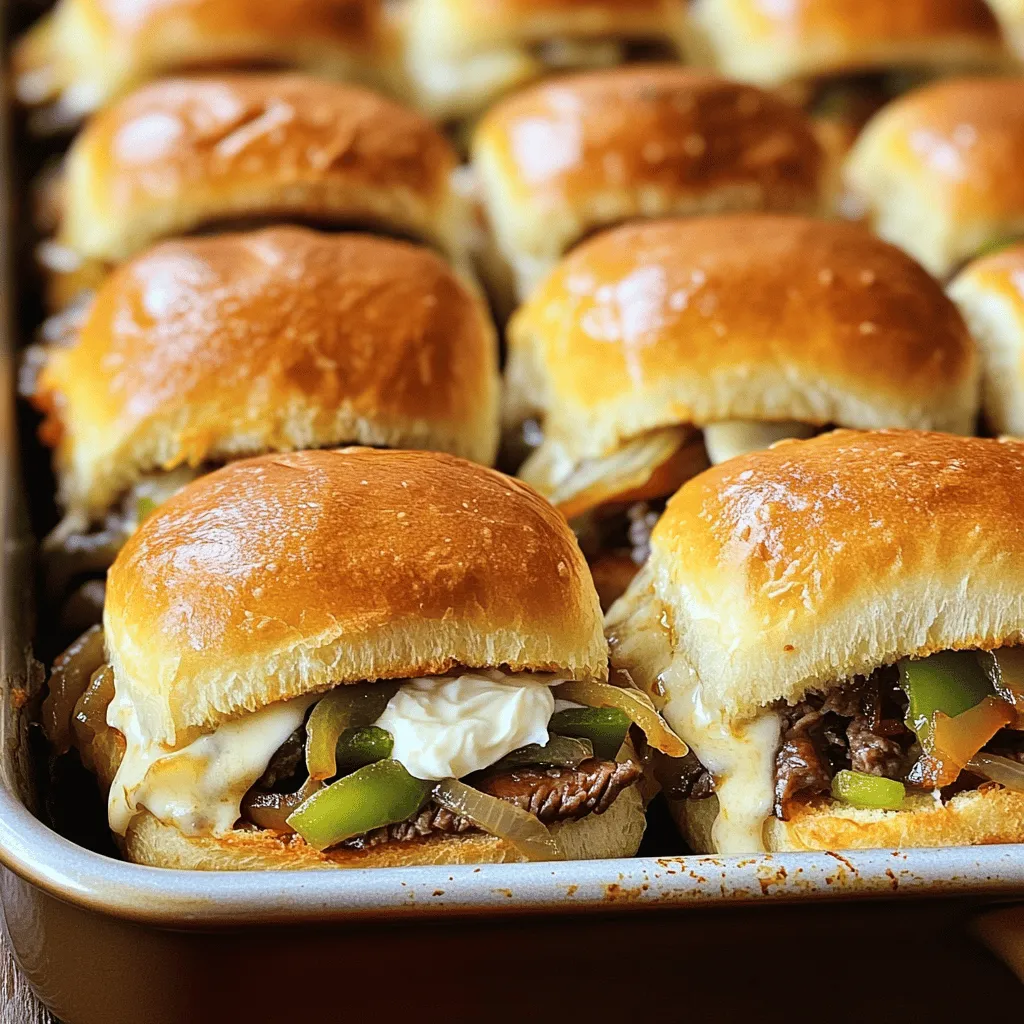
Looking for a tasty snack that everyone will love? Philly Cheesesteak Sliders are your answer! These little bites pack all

To make these easy sheet pan quesadillas, gather the following main ingredients: - 8 large flour tortillas - 2 cups shredded cheese (cheddar, Monterey Jack, or a blend) - 1 can (15 oz) black beans, drained and rinsed - 1 cup corn (fresh, frozen, or canned) - 1 bell pepper, diced (any color) - 1 small red onion, diced - 1 teaspoon cumin - 1 teaspoon garlic powder - Salt and pepper to taste These ingredients create a tasty base. The flour tortillas hold everything together. The cheese adds creaminess, while the veggies and beans give flavor and nutrition. You can add these optional garnishes for extra flavor: - Fresh cilantro, chopped - Sour cream (for dipping) - Salsa (for serving) These garnishes bring freshness and zest. They also make the meal look nice. Serve your quesadillas with these great sides: - A fresh side salad - Guacamole - Extra salsa These sides balance the meal. They add more color and taste to your plate. For the full recipe, check the instructions above. Start by preheating your oven to 425°F (220°C). This step is key for crisp tortillas. Line a large baking sheet with parchment paper. This makes cleanup easy and helps the quesadillas not stick. In a big bowl, mix the black beans, corn, diced bell pepper, red onion, cumin, garlic powder, salt, and pepper. Stir well until all the ingredients blend. Next, lay four flour tortillas on the baking sheet. Overlap them just a bit to cover the whole surface. Sprinkle half of the cheese evenly across the tortillas. Spoon the black bean mixture on top of the cheese. Then, add the rest of the cheese over the mixture. Place the remaining four tortillas on top. Press them down gently to hold everything together. Now it’s time to bake! Put the baking sheet in the oven and let it bake for about 15 to 20 minutes. Keep an eye on them until the tortillas turn golden brown and the cheese melts. Once done, take the sheet out and let it cool for a few minutes. Slice the quesadillas into wedges. For a fresh touch, garnish with chopped cilantro. Serve with sour cream and salsa for dipping. Enjoy your easy sheet pan quesadillas! For the complete recipe, check out the Full Recipe section. To get that perfect crispy tortilla, use a high oven temp. I set my oven to 425°F. This heat helps the tortillas get golden and crunchy. Make sure to overlap the tortillas slightly on the baking sheet. This keeps all the flavors in. Also, use a good amount of cheese, as it helps with crisping. Cheese is key for flavor in quesadillas. I love using a mix of cheddar and Monterey Jack. This combo melts well and adds a rich taste. You can also try pepper jack for a spicy kick. Just make sure to shred fresh cheese. Pre-shredded cheese can have anti-caking agents that may affect melting. You can prep these quesadillas in advance. Just assemble them and cover with plastic wrap. Store them in the fridge for up to 24 hours. When you are ready to bake, take them out and let them sit for a few minutes. This helps them cook evenly. Enjoy a quick meal without extra stress! Check the Full Recipe for more details. {{image_2}} You can add protein to your sheet pan quesadillas. Chicken, beef, or tofu work great. For chicken, use cooked, shredded meat. It adds nice flavor and texture. For beef, try ground beef. Brown it in a pan before adding it to the mix. Tofu is a great choice for a vegetarian twist. Just cube it and sauté it until golden. Mix your protein with the black beans for a hearty meal. If you want a vegetarian or vegan option, it's easy to modify. Skip the meat and use more veggies. Spinach or mushrooms make great additions. You can also add more beans or different types like pinto or kidney beans. For a vegan recipe, use dairy-free cheese. This way, everyone can enjoy the dish, no matter their diet. Spice it up to match your taste! Add jalapeños for heat. You can use fresh ones or pickled for a tangy zing. If you like a smoky flavor, add smoked paprika. For more depth, try adding chili powder or cayenne. You can also mix in some fresh herbs like cilantro or parsley. This will brighten up your quesadillas and make them even more tasty. For a full recipe, check out the full recipe for Easy Sheet Pan Quesadillas. After you enjoy your Easy Sheet Pan Quesadillas, store leftovers in the fridge. Place slices in an airtight container. Make sure to eat them within three days for the best taste. If you keep them too long, they may lose their flavor and texture. Want to save some for later? You can freeze the quesadillas! First, let them cool completely. Then, wrap each slice in plastic wrap. Place the wrapped slices in a freezer bag. They will stay good for about two months. When you freeze them, you can enjoy them anytime! To reheat, you have a few options for the best taste. You can use an oven, a skillet, or a microwave. For the oven, preheat it to 350°F (175°C). Place the quesadillas on a baking sheet and heat for about 10-15 minutes until warm. In a skillet, heat over medium heat for about 3-5 minutes on each side. If you use a microwave, heat for about 30-60 seconds. The oven and skillet will keep the quesadillas crispy, while the microwave works for a quick fix. Enjoy them warm with sour cream and salsa! Yes, you can use corn tortillas. They add a nice flavor and crunch. Just be careful! Corn tortillas can break more easily than flour ones. You might need to adjust the baking time. Check for golden edges and melted cheese. To add some heat, you can use jalapeños or hot sauce. Dice fresh jalapeños and mix them into your filling. You can also sprinkle chili powder or cayenne pepper in the mix. If you want a milder spice, add a little and taste as you go. You can use pinto beans or kidney beans instead. Both options work well and taste great. If you want a different flavor, try cooked chicken or tofu. Just make sure to season them well so they blend with the other ingredients. For the full recipe, check out the Easy Sheet Pan Quesadillas section. In this post, we covered how to make easy sheet pan quesadillas. We explored essential ingredients, garnishes, and sides to enhance your meal. I shared step-by-step instructions to make the process simple. We also discussed tips for crispy tortillas and flavor variations. Lastly, we went over storage methods for leftovers. These quesadillas are fun to make and perfect for sharing. I hope you enjoy creating your own delicious versions!

Easy Sheet Pan Quesadillas Quick and Tasty Meal

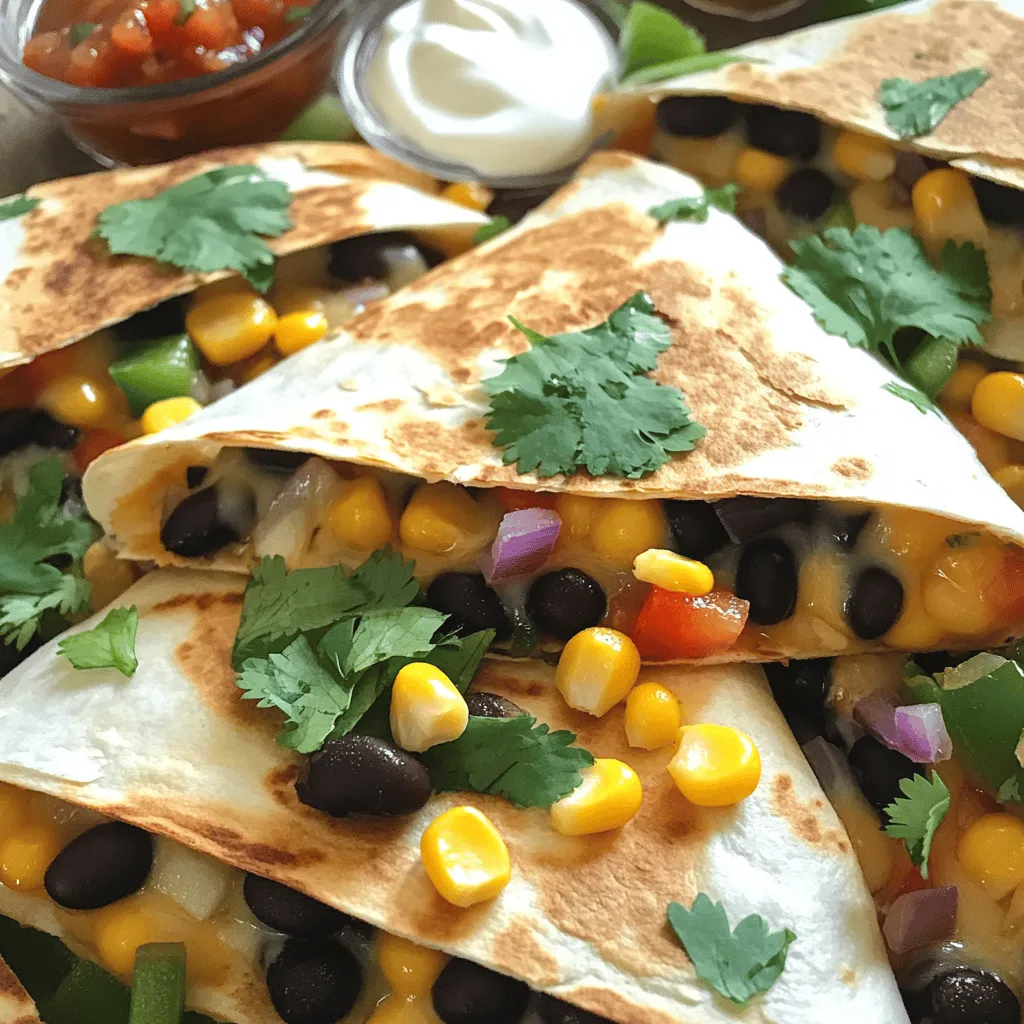
Looking for a quick and tasty meal? You’re in the right place! Easy sheet pan quesadillas are a fun way

For a tasty Egg Roll in a Bowl, you need some key ingredients. Here’s what you’ll use: - 1 pound ground chicken (or turkey for a leaner option) - 1 tablespoon sesame oil - 2 cups coleslaw mix (shredded cabbage and carrots) - 1 small onion, diced - 2 cloves garlic, minced - 1 tablespoon ginger, grated - 1/4 cup soy sauce (or tamari for gluten-free) - 1 tablespoon rice vinegar - 1 teaspoon sriracha (optional, for heat) - 2 green onions, sliced (for garnish) - Toasted sesame seeds (for garnish) These ingredients work together to create a rich taste that mimics a classic egg roll. The ground meat gives the dish protein while the coleslaw mix adds crunch. You can make your Egg Roll in a Bowl even better with some extra toppings. Here are a few ideas: - Chopped cilantro for freshness - Crushed peanuts for crunch - Extra veggies like bell peppers or snap peas Adding these toppings can change the flavor experience. They add brightness and make the dish more colorful. If you have dietary needs, you can still enjoy this dish. Here are some swaps: - For gluten-free, use tamari instead of soy sauce. - For a vegetarian or vegan version, replace the meat with tofu or tempeh. These changes keep the dish tasty while meeting different diets. You won’t miss out on flavor or satisfaction even with these swaps. You can find the Full Recipe to ensure you have all the ingredients and steps needed. To make Egg Roll in a Bowl, you need to prep the veggies and meat. Start by chopping one small onion and mincing two cloves of garlic. Grate a tablespoon of fresh ginger too. If you choose ground chicken, make sure it is thawed. For a leaner option, turkey works well too. Gather these kitchen tools: - Large skillet or wok - Spatula for stirring - Cutting board and knife - Measuring spoons Now for the fun part: cooking! Heat one tablespoon of sesame oil in your skillet over medium-high heat. Add the diced onion and sauté for 2-3 minutes. You want the onion to be soft and clear. Then, toss in the minced garlic and grated ginger. Cook for one more minute until you smell their lovely scent. Next, add the ground chicken or turkey. Break it apart with your spatula. Cook for 5-7 minutes until it turns brown and is no longer pink. This step is key for flavor. After that, stir in two cups of coleslaw mix, soy sauce, and rice vinegar. If you like heat, add sriracha. Cook everything for another 3-5 minutes. You want the cabbage to be tender, but still a bit crunchy. Finally, taste your dish. If it needs more flavor, add a splash of soy sauce or extra sriracha. Remove the skillet from heat and let it sit for a minute before serving. Serve your Egg Roll in a Bowl in nice, deep bowls. This dish looks great with a sprinkle of sliced green onions and toasted sesame seeds on top. For a complete meal, you can pair it with steamed rice or crispy wontons. When making Egg Roll in a Bowl, keep an eye on your veggies. Overcooking them makes them mushy. Undercooking can leave them too hard. Aim for tender but crunchy vegetables. Also, don’t skip seasoning adjustments. Taste your dish as you cook. Add soy sauce or sriracha to boost flavor. To speed up this dish, use pre-chopped coleslaw mix. This saves time on prep. You can also cook the meat ahead of time. Meal prepping helps you make this meal quickly. Cook a big batch and store it in the fridge. You’ll have a tasty meal ready in just minutes. For extra flavor, try adding sauces or toppings. I love adding hoisin sauce or extra soy sauce. Top with sesame seeds or chopped peanuts for crunch. Want more heat? Adjust the spice with sriracha or chili flakes. This way, you can personalize each bowl to your taste. If you follow the Full Recipe, you will enjoy a great meal! {{image_2}} You can switch out ground chicken for many proteins. Ground turkey is a leaner choice. If you want something different, try pork or beef. For a plant-based option, use crumbled tofu or tempeh. These options add unique flavors and textures. Want to spice things up? Add ingredients like water chestnuts for crunch. Try using different sauces, like hoisin or chili garlic sauce. For low-carb diets, skip the coleslaw mix. Use cauliflower rice instead. This keeps the dish filling without the carbs. Make this dish kid-friendly by adding more veggies. Bell peppers and snap peas are great choices. If your kids dislike spice, leave out the sriracha. You can also serve it with soy sauce on the side. This way, each person can adjust the flavor. To keep your Egg Roll in a Bowl fresh, use an airtight container. Glass containers work well, but plastic also does the job. Store it in the fridge and enjoy it within three to four days. Keeping it cool helps maintain its flavor and texture. When you want to reheat, use a skillet over medium heat. This method warms it evenly and keeps it tasty. Stir it often to avoid burning. You can also use a microwave on low power. To prevent sogginess, add a splash of water before microwaving. Cover it loosely to keep moisture in, but allow steam to escape. To freeze Egg Roll in a Bowl, let it cool completely first. Place it in a freezer-safe container or bag. Remove as much air as possible to avoid freezer burn. It can last for up to three months in the freezer. When you're ready to eat, thaw it overnight in the fridge. Reheat it in a skillet for the best taste and texture. Egg Roll in a Bowl is a deconstructed version of the classic egg roll. It has all the flavor but skips the wrapper. This dish combines ground meat, cabbage, and tasty seasonings, all in one bowl. You can use chicken, turkey, or even plant-based meat. Common variations include adding different vegetables like bell peppers or mushrooms. To make this dish vegan, substitute the ground meat with a plant-based option. You can use mushrooms, tofu, or tempeh. Replace the soy sauce with a vegan alternative like tamari. Ensure your rice vinegar and sesame oil are vegan too. Yes, you can easily make Egg Roll in a Bowl gluten-free. Use tamari instead of soy sauce. Check that your rice vinegar is gluten-free as well. Be mindful of cross-contamination with gluten-containing foods. Use clean utensils and surfaces if someone has a gluten allergy. Egg Roll in a Bowl goes well with many sides. Try serving it with steamed rice or cauliflower rice for a lighter option. A fresh salad or crispy spring rolls can complement the meal nicely. For drinks, pair it with green tea or a light soda. You can also explore flavors with a fruity iced tea. Egg Roll in a Bowl is a simple and tasty meal. We discussed key ingredients like ground meat and seasonings. You can enhance flavors with toppings and extra veggies. Dietary needs can be met with easy substitutions. Followed by step-by-step prep and cooking tips, you'll avoid common mistakes. Each variation allows you to explore different proteins and flavors. Store leftovers properly for best taste, and reheating tips will bring back that first-day flavor. With this knowledge, you can create a delicious, flexible dish that suits everyone. Enjoy your cooking!

Egg Roll in a Bowl Flavorful and Easy Recipe

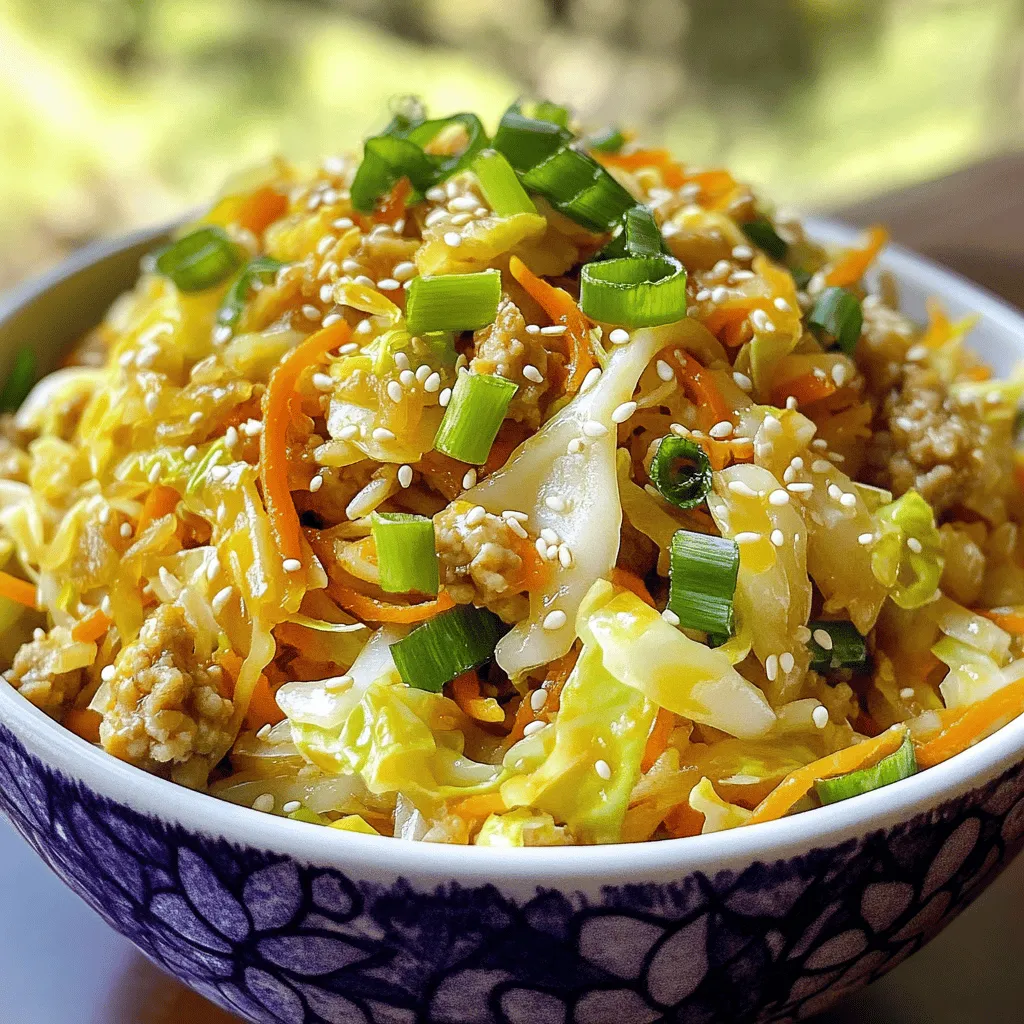
If you crave the bold flavors of classic egg rolls but want a simpler dish, you’re in for a treat!

- 2 cups cooked chicken, shredded - 1 cup ranch dressing - 1 cup cream of chicken soup - 1 cup shredded cheddar cheese - 1 cup cooked pasta (e.g., penne or rotini) - 1/2 cup frozen peas - 1 teaspoon garlic powder - 1 teaspoon onion powder - 1/2 teaspoon black pepper - 1/2 teaspoon salt - 1/2 cup crispy tortilla strips (for topping) - Fresh parsley, chopped (for garnish) Gathering the right ingredients makes all the difference in flavor. Start with cooked chicken, which gives the dish a hearty base. I love using shredded chicken for its texture and ability to soak up flavors. The ranch dressing and cream of chicken soup provide creamy goodness that binds everything together. Next, add cooked pasta for a filling touch. I recommend penne or rotini; they hold the sauce well and add a nice bite. Adding frozen peas not only brings a pop of color but also a bit of sweetness. Spices like garlic powder and onion powder boost the flavor without overpowering the dish. A touch of salt and black pepper rounds everything out. Finally, don’t forget the toppings! Crispy tortilla strips add a fun crunch, while fresh parsley makes the dish look nice and bright. For the full recipe, check the instructions above and get ready for a flavor-packed delight! - Preheat your oven to 350°F (175°C). - Gather all your ingredients in one place for easy access. This makes cooking smooth and fun. You won't have to rush around searching for things. - In a large mixing bowl, combine: - 2 cups cooked chicken, shredded - 1 cup ranch dressing - 1 cup cream of chicken soup - 1 cup shredded cheddar cheese - 1 cup cooked pasta (like penne or rotini) - 1/2 cup frozen peas - 1 teaspoon garlic powder - 1 teaspoon onion powder - 1/2 teaspoon black pepper - 1/2 teaspoon salt Stir until all ingredients are well mixed. Every bite should burst with flavor! - Transfer the mixture to a greased casserole dish. Spread it evenly. - Add 1/2 cup crispy tortilla strips on top for a crunchy finish. - Bake in the preheated oven for 25-30 minutes. Check for doneness. The casserole should be hot, bubbly, and golden on top. Enjoy this flavor-packed delight straight from the oven! For a full recipe, see the section above. Cooking Tips for Best Results To get the best flavor, cook the chicken fully. Shred it well for even bites. I like to mix different cheeses, as it adds depth to the dish. Try cheddar and mozzarella for a creamy twist. Presentation Tips Serve the casserole hot right from the dish. This makes it easy and fun. Add a side of ranch dressing for drizzling. It brings out the ranch flavor even more. Don't forget to sprinkle fresh parsley on top. It adds a nice pop of color and taste. Timing Tips Always check for doneness. The casserole should be hot and bubbly. If it is, you know it’s ready to serve. Let it cool for a few minutes before digging in. This helps the flavors settle and makes it easier to serve. {{image_2}} You can easily change up your Chicken Bacon Ranch Casserole. For a quick meal, use rotisserie chicken. It saves time and still tastes great. You can also swap in turkey if you prefer. If you want a lighter dish, replace ranch dressing with Greek yogurt. It adds creaminess without the extra calories. Need to make it gluten-free? Just choose gluten-free pasta and dressing. This way, everyone can enjoy the dish. For a vegetarian option, use plant-based chicken alternatives. They work well and keep the dish filling. Want to spice things up? Add jalapeños for heat or bell peppers for a crunchy bite. You can also mix in sun-dried tomatoes or spinach. These ingredients boost the flavor and add nutrients. With these simple swaps, your casserole stays fresh and exciting. To store your leftover Chicken Bacon Ranch Casserole, place it in an airtight container. Make sure the container is sealed tight to keep it fresh. You can store it in the fridge for about three to four days. This way, you can enjoy the rich flavors again soon. If you want to freeze the casserole, you can do it before or after baking. For freezing before baking, assemble the casserole in a safe dish. Cover it tightly with plastic wrap and aluminum foil. For freezing after baking, let it cool completely first. Then, wrap it well and place it in the freezer. It can last for up to three months. When ready to eat, thaw it overnight in the fridge and reheat. For reheating, the oven is the best choice. Preheat it to 350°F (175°C) and bake the casserole until hot. This method warms it evenly and keeps it nice. If you are in a hurry, you can use a microwave. Just heat it in short bursts to avoid drying it out. Both options work well, but the oven gives the best results. Making Chicken Bacon Ranch Casserole is quick and easy. You'll need about 15 minutes to prep and 30 minutes to cook. In total, it takes around 45 minutes from start to finish. This includes gathering your ingredients and baking the casserole until it's hot and bubbly. Yes, you can prepare this casserole in advance. Mix the ingredients and store them in the fridge for up to 24 hours before baking. Just cover the dish with plastic wrap or foil to keep it fresh. When you’re ready, bake it straight from the fridge, adding a few extra minutes to the cooking time. This casserole is rich and filling, so you can keep sides simple. Here are some great options: - A fresh green salad - Steamed broccoli or green beans - Garlic bread or crusty rolls - Roasted vegetables for a healthy touch These sides balance the main dish and add nice colors to your plate. You can make this casserole dairy-free with a few swaps. Use dairy-free ranch dressing and a dairy-free cream soup. For cheese, try a plant-based cheese option. These changes keep the flavors bright while ensuring everyone can enjoy the meal. Absolutely! You can change the flavor to suit your taste. Here are some ideas: - Add spices like paprika or cayenne for heat - Mix in diced bell peppers for crunch - Include mushrooms or spinach for extra veggies - Swap the ranch dressing for a spicy dressing for a kick These small changes create new flavors and keep dinner exciting. For the full recipe, check out the complete details. In this post, I shared how to make a tasty Chicken Bacon Ranch Casserole. We covered the essential ingredients like cooked chicken and ranch dressing. I explained step-by-step how to mix and bake the dish. I offered tips for the best taste and fun variations to try. Remember, cooking should be fun and easy. Feel free to make it your own! Enjoy your meal and share it with friends. It’s a dish everyone will love.

Chicken Bacon Ranch Casserole Flavor-Packed Delight

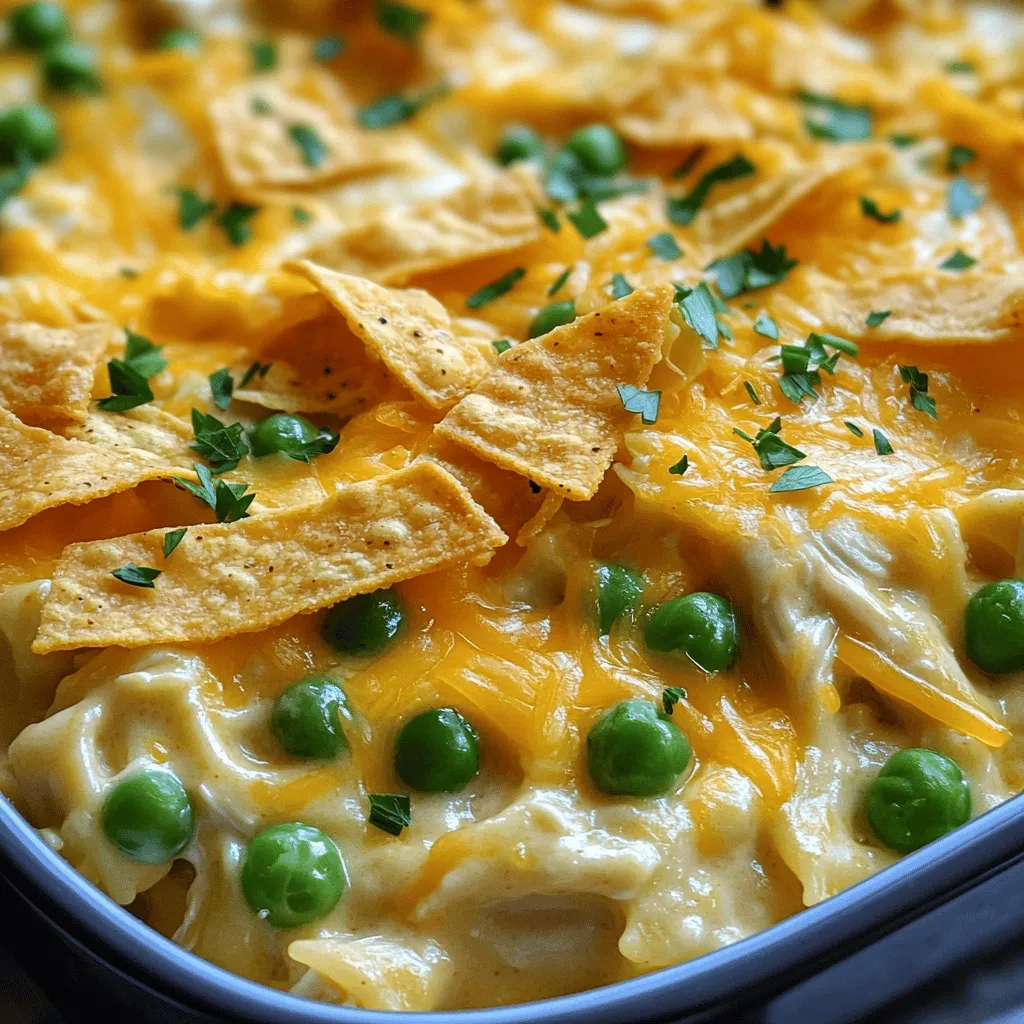
Are you ready to dive into a flavor-packed delight? This Chicken Bacon Ranch Casserole is the ultimate comfort food, combining

- 4 cups all-purpose flour - 1 packet (2 ¼ teaspoons) active dry yeast - 1 cup warm milk (about 110°F) - ⅓ cup granulated sugar - ¼ cup unsalted butter, melted - 1 large egg - 1 teaspoon salt - 1 tablespoon ground cinnamon - ½ cup packed brown sugar - ¼ cup unsalted butter, softened (for filling) - 1 cup powdered sugar (for frosting) - 2 tablespoons milk (for frosting) - 1 teaspoon vanilla extract To make amazing cinnamon rolls, you need to gather key ingredients. First, flour and yeast help create the dough's structure. All-purpose flour gives a soft texture. Active dry yeast is crucial for leavening. It makes the dough rise and become fluffy. Next, sugar and butter add flavor and richness. Granulated sugar sweetens the dough, while melted butter keeps it moist. The egg acts as a binder, giving your rolls a nice, rich taste. Cinnamon is the star of the filling. Ground cinnamon gives a warm, sweet flavor. Brown sugar adds depth and moisture to the filling. Lastly, don’t forget the frosting. Powdered sugar, milk, and vanilla extract combine to create a sweet drizzle on top. For the full recipe, check out the instructions above. You'll love how these ingredients come together to make warm, delicious rolls! To start, we need to activate the yeast. In a small bowl, mix warm milk with granulated sugar. Sprinkle the yeast on top and wait 5-10 minutes. It should look frothy. This means the yeast is alive and ready to work. Next, we mix the wet and dry ingredients. In a large bowl, combine 2 cups of flour, melted butter, the egg, and salt. Stir well. Then, add the frothy yeast mixture to this bowl. Gradually mix in the rest of the flour, half a cup at a time. Keep mixing until a soft dough forms. Now it’s time to knead the dough. Place it on a floured surface. Use your hands to push and fold the dough for about 5-7 minutes. You're looking for a smooth and elastic texture. Then, put the dough in a greased bowl. Cover it with a clean towel. Let it rise in a warm area for about 1 hour, or until it doubles in size. Once the dough has risen, it’s time to shape the rolls. First, punch the dough down gently. Roll it out on a lightly floured surface into a rectangle. Aim for about 16x12 inches. Spread softened butter over the dough. Then, mix brown sugar and ground cinnamon in a bowl. Sprinkle this mixture over the butter. Now, start from one long side and roll the dough tightly into a log. Pinch the seams to seal. Using a sharp knife, cut the log into 12 equal slices. Place these rolls in a greased baking dish or on a parchment-lined sheet, leaving space between them. Cover again and let rise for another 30 minutes. Preheat your oven to 350°F (175°C). Bake the rolls for 20-25 minutes, until they are golden brown. Keep an eye on them. They should look puffy and slightly golden. While they bake, prepare the frosting by whisking powdered sugar, milk, and vanilla extract until smooth. Once the rolls cool slightly, drizzle with frosting. Enjoy your warm, fluffy treats! For the complete recipe, you can refer to the Full Recipe. To make your cinnamon rolls fluffy, pay close attention to the dough. If your rolls turn out dense, check these common issues: - Yeast Activation: Make sure your yeast is fresh. It should foam when mixed with warm milk and sugar. If it doesn't, your rolls will not rise. - Kneading: Knead the dough well. This creates gluten, which helps the rolls rise. Aim for a smooth and elastic texture. - Rising Time: Let the dough rise until it doubles in size. This can take longer in cold kitchens. Be patient! For a fluffy texture, follow these tips: - Warm Environment: Dough rises best in a warm place. Consider using your oven with just the light on. - Avoid Overworking: Once the dough is smooth, stop kneading. Overworking can lead to tough rolls. - Right Flour Amount: Use enough flour, but not too much. A sticky dough is good; it becomes less sticky when you knead it. Serving your cinnamon rolls can be just as fun as making them. Here are some ideas to enhance their appeal: - Warm Platter: Serve the rolls warm on a large platter. Warm rolls taste best! - Frosting Drizzle: Drizzle the frosting generously over the top. This adds sweetness and makes them look inviting. - Cinnamon Sprinkle: Add a sprinkle of ground cinnamon on top. This gives a nice touch and extra flavor. For the best visual effect, consider pairing your cinnamon rolls with a cup of coffee or tea. The contrast of warm rolls and a hot drink makes a perfect treat. For the full recipe, check the earlier section. {{image_2}} To make gluten-free cinnamon rolls, you need to change the flour. Use a gluten-free all-purpose blend. Look for one that includes xanthan gum. This gum helps mimic the texture of wheat flour. You may also want to add a bit of almond or coconut flour for added flavor. When you mix the dough, it will feel different. Gluten-free dough is often stickier. Use more flour when rolling it out. You may need to adjust the baking time too. Keep an eye on them as they bake. They may need a little more time to set. For vegan cinnamon rolls, replace the milk and butter. Use almond or oat milk instead of regular milk. Coconut oil or vegan butter works well in place of regular butter. Make sure to use a flax egg for the egg substitute. Mix one tablespoon of ground flaxseed with three tablespoons of water. Let it sit for a few minutes to thicken. Follow the same steps in the recipe, but check for any animal products. Use maple syrup instead of powdered sugar for the frosting if you want. This keeps it vegan-friendly while still tasting sweet. To keep your cinnamon rolls fresh, wrap them in plastic wrap. You can also use an airtight container. This helps to keep them soft and tasty. Store them at room temperature for up to 2 days. If you want them to last longer, move them to the fridge. They can stay fresh in the fridge for about a week. Freezing cinnamon rolls is a great way to save some for later. To prepare them for freezing, let them cool completely after baking. Then, wrap each roll in plastic wrap. Place the wrapped rolls in a freezer bag or container. This will help prevent freezer burn. When you want to enjoy a roll, simply take it out of the freezer. Let it thaw overnight in the fridge. If you want to eat it warm, you can reheat it in the oven. Preheat the oven to 350°F (175°C) and bake for about 10 minutes. Enjoy your delicious treat anytime! For the full recipe, check back to ensure you're making the best rolls possible. To make your cinnamon rolls rise better, use fresh yeast. Make sure your milk is warm, not hot. The ideal temperature is about 110°F. If your kitchen is cool, place the dough in a warm spot. You can preheat your oven for a minute, then turn it off and let the dough rise inside. Yes, you can prepare the dough the night before. After you knead the dough, place it in the fridge instead of letting it rise. Cover it with plastic wrap. In the morning, take it out and let it sit at room temperature for about 30 minutes. Then, shape and bake your rolls as normal. If you need to replace the egg, use 1/4 cup of unsweetened applesauce. You can also use a flax egg. To make a flax egg, mix 1 tablespoon of ground flaxseed with 2.5 tablespoons of water. Let it sit for about 5 minutes until it thickens. Your cinnamon rolls are done when they turn golden brown on top. You can also poke one with a toothpick. If it comes out clean, they are ready. The rolls should feel soft but not doughy when you touch them. You can find the full recipe for fluffy twisted cinnamon rolls above in the ingredients and instructions section. Cinnamon rolls are fun to make and share. We covered the key ingredients and steps. You now know how to knead, shape, and bake your rolls. Remember to troubleshoot any issues for the best texture. Feel free to try the gluten-free and vegan options too. Store and freeze them properly to enjoy later. With these tips, your cinnamon rolls will impress everyone. Happy baking!

Homemade Cinnamon Rolls Fluffy and Simple Recipe

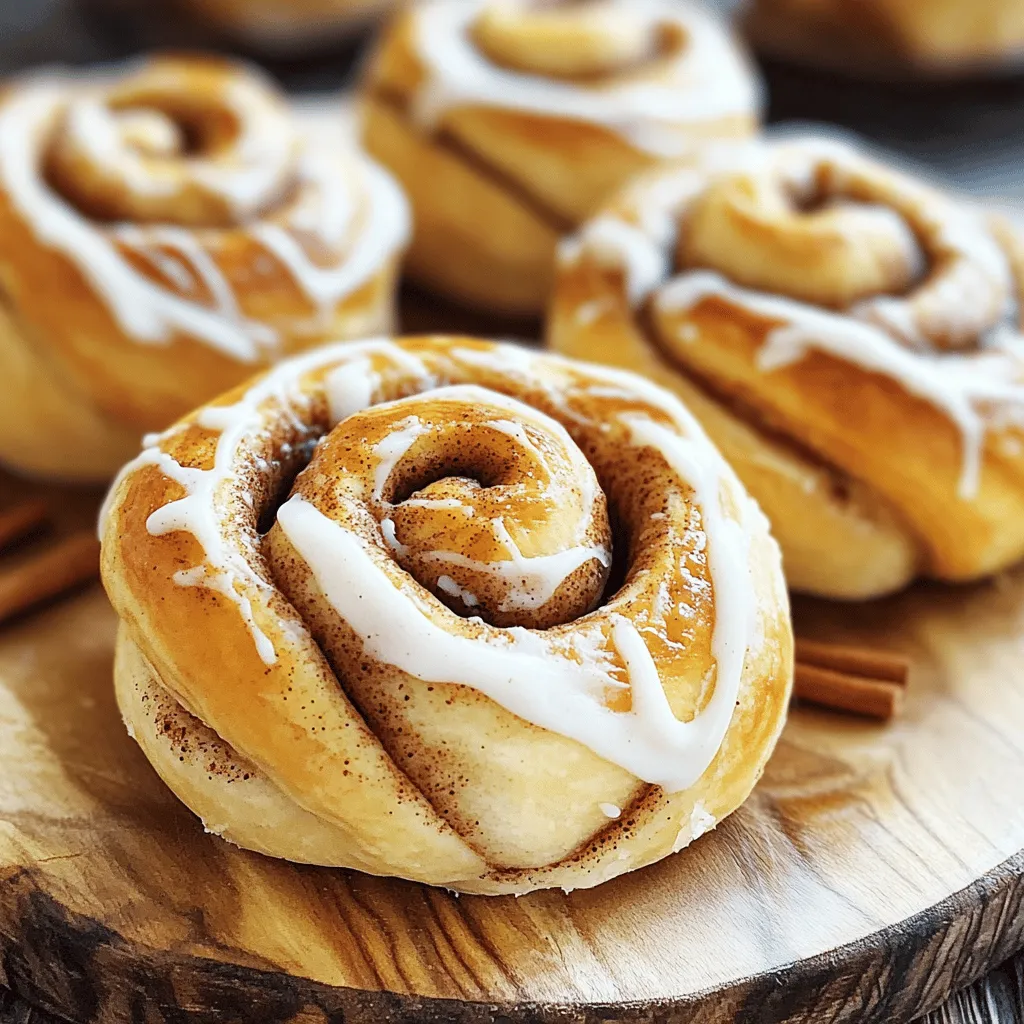
Do you dream of warm, fluffy cinnamon rolls fresh from your oven? Let me show you how to make the

Older posts
Newer posts
← Previous Page1 … Page22 Page23 Page24 … Page65 Next →

dsad

© 2025 Foodish Talk • Built with GeneratePress

Our Policies

  • Copyright Policy
  • Cookie Policy
  • GDPR Policy
  • Privacy Policy
  • Disclaimer
  • Terms Of Use

More Information

  • Home
  • About
  • Contact
  • Appetizers
  • Dessert
  • Dinner
  • Drinks
©2025, Foodish Talk About Back To Top