Skip to content
DisclaimerTerms Of UseGDPR PolicyCookie Policy

Foodish Talk

  • Home
  • Drinks
  • Appetizers
  • Dinner
  • Dessert
  • About
  • Contact
  • Privacy Policy
DisclaimerTerms Of UseGDPR PolicyCookie Policy

Ava

To make the spiced mango tamarind cooler, gather these key items: - 2 ripe mangoes, peeled and diced - 2 tablespoons tamarind paste - 2 tablespoons honey or maple syrup (to taste) Ripe mangoes are the star of this drink. They give it a sweet and rich flavor. Tamarind paste adds a tangy twist. Sweeteners like honey or maple syrup balance the flavors just right. Next, we need some spices to elevate the drink: - 1 teaspoon ground cumin - 1/2 teaspoon black salt (or regular salt) - 1 teaspoon fresh ginger, grated Ground cumin brings warmth and depth. Black salt adds a unique taste, while ginger gives a fresh kick. These spices transform the cooler into a delight for your palate. Finally, don’t forget the garnishes: - Fresh mint leaves - Lime wedges Fresh mint leaves add a burst of color and aroma. Lime wedges provide a zesty finish. Together, they make the drink look and taste amazing. For the full recipe, check out the Spiced Mango Tamarind Cooler section. To start, you need to blend the key ingredients. Take two ripe mangoes, peel and dice them. Add the mangoes to your blender. Next, include two tablespoons of tamarind paste. Tamarind adds a tangy flavor that balances the sweetness. Now, add two tablespoons of honey or maple syrup for sweetness. Adjust this to your taste. Then, add one teaspoon of ground cumin for a warm spice note. Finally, include half a teaspoon of black salt and one teaspoon of grated fresh ginger for extra flavor. Add one cup of cold water to the blender. Blend it all until smooth. This creates a thick and vibrant mixture. After blending, taste it. If it needs more sweetness, add more honey or maple syrup and blend again. Next, it’s time to strain the mixture. Grab a fine mesh sieve and a large pitcher. Pour the blended mixture through the sieve. This step helps remove any pulp. Use a spatula to press down gently. This action gets out as much liquid as possible. You want a smooth drink for the best experience. Now, you can finalize your cooler. Add the remaining two cups of cold water or sparkling water to the pitcher. This step lightens the drink and adds a refreshing fizz if you use sparkling water. Stir well to mix everything together. Chill your spiced mango tamarind cooler in the fridge for at least 30 minutes. This wait makes the flavors meld and cools it for serving. When ready to serve, fill glasses with ice cubes. Pour the cooler over the ice. Don’t forget to garnish with fresh mint leaves and a lime wedge for a bright touch. Enjoy your refreshing summer drink! You can find the full recipe at the beginning of this article. To make a great spiced mango tamarind cooler, start with ripe mangoes. You want mangoes that feel soft when you press them gently. Look for ones with a sweet smell and a golden hue. This ripeness gives your drink the best flavor. If the mangoes are too hard, wait a few days for them to ripen. Perfect mangoes bring sweetness and richness to your cooler. Everyone has their own taste for sweetness. You can change how sweet your cooler is by adding more honey or maple syrup. Start with the amount in the recipe and blend it well. Then taste it. If you want it sweeter, add more sweetener a little at a time. Remember, you can also use less sweetener if you prefer a tangy drink. This way, you make the drink just right for you. Serve your spiced mango tamarind cooler in tall glasses. This drink looks great with ice cubes. Pour the cooler over the ice for a refreshing touch. It is best served chilled, so let it sit in the fridge for at least 30 minutes before you serve it. Garnish each glass with fresh mint leaves and a lime wedge. This adds a pop of color and extra flavor. Enjoy your drink on a hot summer day! {{image_2}} You can make this drink into a fun cocktail. Just add some rum or vodka. Mix in about one ounce of alcohol per glass. This adds a nice kick to the sweet and tangy flavors. It makes the spiced mango tamarind cooler perfect for parties or a summer day by the pool. Feel free to get creative with other fruits! Pineapple or lime can really boost the taste. Try adding half a cup of diced pineapple or the juice of one lime. This adds extra zest and freshness to your drink. It can change the flavor profile while keeping it delicious. Not everyone likes sweet drinks. You can make this cooler less sweet by using less honey or maple syrup. You can also try sugar substitutes like stevia. This way, you can enjoy the drink without the extra sugar. It still tastes great and is a perfect choice for those watching their sugar intake. To keep your spiced mango tamarind cooler fresh, store it in the fridge. This drink stays good for about three days. Make sure to use an airtight container. This helps keep the flavors strong and fresh. You can freeze the cooler for longer storage. Pour the mixture into ice cube trays. Once frozen, transfer the cubes to a bag. This way, you can enjoy a refreshing drink later. Just blend the cubes with some water to bring it back to life. If you have leftovers, don’t let them go to waste. You can use the cooler in smoothies. Just blend it with yogurt and ice for a tasty treat. It also works great as a base for popsicles. Pour the cooler into molds and freeze. Enjoy a fun, fruity snack on hot days! For this cooler, I recommend using Ataulfo or Haden mangoes. Ataulfo mangoes are small, sweet, and creamy. They add a nice texture to the drink. Haden mangoes are larger and have a rich flavor. Both varieties work well in this recipe. Yes, you can use dried tamarind. To substitute, soak about 2 tablespoons of dried tamarind in warm water for 30 minutes. Then, strain the mix to get a smooth paste. This gives you a similar taste to tamarind paste. You can store the cooler in the fridge for up to three days. Make sure to keep it in a sealed container. This helps maintain its flavor and freshness. If it separates, just stir before serving. This blog post covered how to make a Spiced Mango Tamarind Cooler. We discussed the main ingredients, spices, and garnishes that create a refreshing drink. The step-by-step instructions helped you blend and chill your cooler. We also shared tips for choosing the right mango and adjusting sweetness. You can try different variations, like adding rum or other fruits. For storage, we explained how to keep it fresh and reuse leftovers. Enjoy creating your flavorful cooler. It’s a fun way to beat the heat!

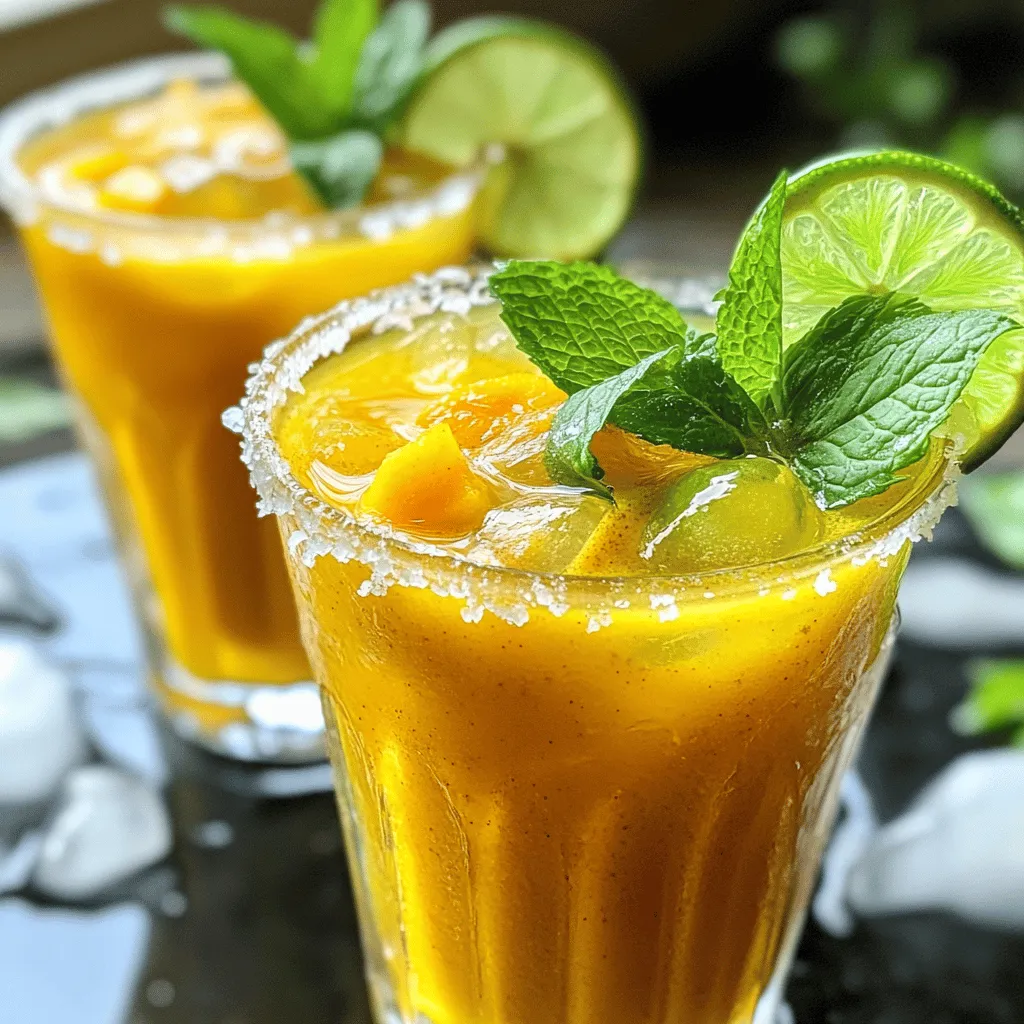
Spiced Mango Tamarind Cooler Refreshing Summer Drink

Looking for a refreshing drink to beat the summer heat? Try my Spiced Mango Tamarind Cooler! This vibrant blend of

- 1 cup fresh or frozen raspberries - 1 cup brewed and chilled hibiscus tea - 1 tablespoon rose water - 1 tablespoon honey or agave syrup - 1 frozen banana - 1 cup ice cubes - Optional toppings: whipped cream, edible rose petals To make a Raspberry Hibiscus Rose Frappe, you need to measure your ingredients carefully. - Raspberries: Use either fresh or frozen raspberries. They give the frappe a sweet and tangy flavor. One cup is perfect to start. - Hibiscus tea: Brew one cup of hibiscus tea and let it chill. The tea adds a vibrant color and refreshing taste. - Rose water: Just a tablespoon of rose water enhances the floral notes in the drink. It’s a real game-changer! - Sweetener: You can use honey or agave syrup. One tablespoon works well, but feel free to adjust this to suit your taste. - Frozen banana: This adds creaminess without dairy. Slice and freeze one banana for the best texture. - Ice cubes: One cup of ice cubes makes the frappe cold and slushy. - Optional toppings: Whipped cream adds indulgence, while edible rose petals give a beautiful finish. Gather these items, and you will be ready to make a delicious Raspberry Hibiscus Rose Frappe. For the full recipe, check the earlier section. To start, you need to brew your hibiscus tea. Use 1-2 hibiscus tea bags in 1 cup of boiling water. Steep the tea bags for about 5-7 minutes. This helps the tea get a strong flavor. After steeping, remove the tea bags. Now, let the tea cool. You can speed this up by placing it in the refrigerator. Next, grab your blender. In it, combine the cooled hibiscus tea and the raspberries. Add 1 tablespoon of rose water and 1 tablespoon of honey or agave syrup. Toss in 1 frozen banana and 1 cup of ice cubes. Blend on high until smooth and frothy. It should not have any ice chunks. Taste your mixture. If you need more sweetness, add a bit more honey. Now, it's time to serve your frappe. Pour the mixture into tall glasses. For a special touch, you can top it with whipped cream. This adds creaminess and a fun look. To make it even prettier, sprinkle edible rose petals on top. Serve your Raspberry Hibiscus Rose Frappe right away for the best taste. Enjoy your refreshing summer treat! For detailed steps, check out the Full Recipe. To get the right sweetness in your Raspberry Hibiscus Rose Frappe, adjust honey or agave syrup to taste. Start with one tablespoon, then blend. Taste the mix. If it needs more sweetness, add a little more. This lets you control how sweet you want it. Remember, the flavors from raspberries and hibiscus can change the sweetness level. A frozen banana is key for a creamy texture. It gives your frappe a smooth, thick feel. Make sure to slice and freeze your banana ahead of time. If you don’t have a banana, try using yogurt or coconut cream. These options also add creaminess. Just blend them in with the other ingredients for a delightful treat. Serving your Raspberry Hibiscus Rose Frappe in tall glasses makes it look fancy. You can top it with whipped cream for a special touch. Edible rose petals make a beautiful garnish. Scatter them on top or along the rim of the glass. For a fun twist, use colorful straws or even a slice of lemon on the side. These small details make your drink even more inviting. {{image_2}} You can mix up the flavors in your Raspberry Hibiscus Rose Frappe. Adding fruits like strawberries or mango gives a fresh twist. These fruits pair well with hibiscus tea. They can enhance the sweetness and add new textures. Try using a mix of raspberries and strawberries for a berry blast. For a tropical vibe, mango brings a lovely fruity note. Herbs can also change the taste. Mint is a great choice. It adds a cool, refreshing note that balances the sweetness. Just a few mint leaves blended in will do. You’ll love the extra burst of flavor! For those who follow a vegan diet, making simple swaps is easy. Use agave syrup instead of honey for sweetness. This keeps your frappe plant-based. You can also opt for a dairy-free whipped cream. Look for coconut or almond-based options to top your drink. They taste great and fit the vegan lifestyle. If you want a sugar-free version, use a sugar substitute. Many options work well, such as stevia or erythritol. You can adjust the sweetness to your taste without sugar. This way, you can enjoy the frappe without added calories. In summer, this frappe is a refreshing treat. You can serve it cold on hot days. It’s perfect for picnics or pool parties. The vibrant colors and flavors are a hit! For cozy winter versions, you can warm up the hibiscus tea. Blend the other ingredients with warm tea for a comforting drink. Add spices like cinnamon or nutmeg to enhance the flavor. This gives it a festive feel, perfect for holiday gatherings. Your Raspberry Hibiscus Rose Frappe will last in the fridge for about 1 day. For best taste, drink it fresh. Store it in an airtight container. Glass jars work well and keep flavors strong. You can also use plastic containers, but make sure they seal tightly. If you have leftover frappe, freezing is a great choice. Pour the frappe into ice cube trays. Once frozen, pop out the cubes and place them in a freezer bag. This method makes it easy to use later. To enjoy, thaw a few cubes at room temperature. Then, toss them back into the blender for a quick re-blend. This will bring back the original texture. When you’re ready to serve your stored frappe, check the texture. If it seems too thick, add a bit of chilled hibiscus tea or water. Blend again until smooth. This helps keep the taste fresh and light. If you want to enhance the flavor, add a touch of honey or rose water. Enjoy sipping on your delicious, refreshing treat! Hibiscus tea comes from the petals of the hibiscus flower. It has a bright red color and a tart flavor. This tea is rich in antioxidants. Antioxidants help fight free radicals, which can harm your body. Drinking hibiscus tea may lower blood pressure and support heart health. Some studies even suggest it can aid digestion. Overall, it's a tasty drink with many health perks. Yes, the Raspberry Hibiscus Rose Frappe is naturally non-alcoholic. This drink is perfect for everyone, from kids to adults. You can enjoy it at any time, making it a great summer treat. Just follow the Full Recipe to whip up this refreshing drink without any alcohol. You can find this drink at many cafes and juice bars. Some places offer pre-made versions in bottles. Look for local shops that focus on fresh juices and smoothies. If you can't find it nearby, try making it at home using the Full Recipe. It's fun and easy! To make your frappe dairy-free, skip the whipped cream topping. Instead, use coconut cream or almond milk for a creamy texture. Both options add a nice flavor without dairy. You can also blend in some soaked cashews for extra creaminess. Enjoy your delicious dairy-free Raspberry Hibiscus Rose Frappe! This article explored how to make a Raspberry Hibiscus Rose Frappe, from selecting ingredients to serving tips. We learned about brewing hibiscus tea, blending ingredients, and enhancing both flavor and texture. Don't forget the fun variations and storage tips! You can change up flavors and make it suited for your diet. Enjoy creating this refreshing drink, whether for yourself or friends. It’s a delicious treat perfect for any time of the year!

Raspberry Hibiscus Rose Frappe Refreshing Summer Treat

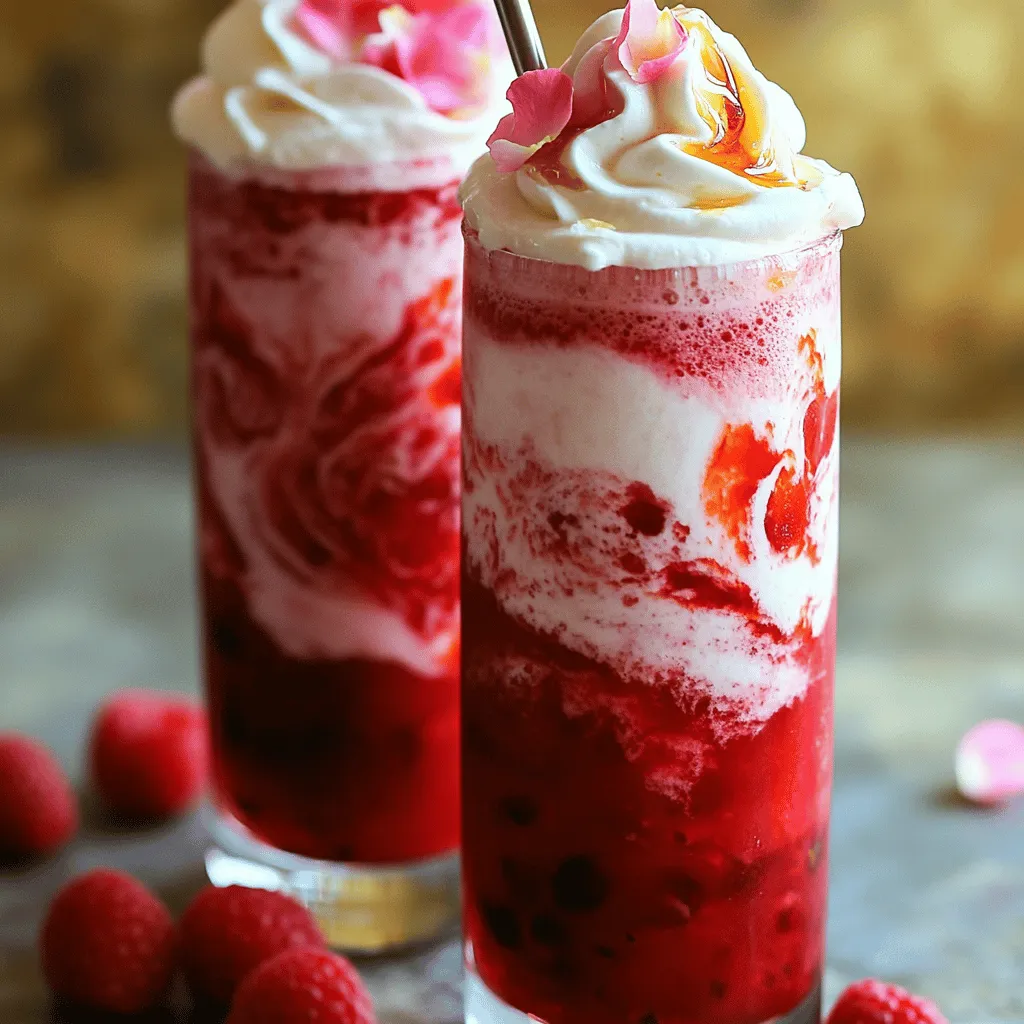
Looking for a cool and unique treat this summer? The Raspberry Hibiscus Rose Frappe is not just refreshing; it bursts

- 1 cup long-grain white rice - 4 cups water - 1 ripe banana, plus extra for garnish - 1 cup milk (or nut milk for a vegan option) - 1/2 cup sugar - 1 teaspoon ground cinnamon - 1 teaspoon vanilla extract - 1/4 cup caramel sauce - A pinch of salt Each ingredient plays a key role in making this drink special. The long-grain white rice gives a creamy base. It also adds a slight texture. Water helps to soak and blend the rice smoothly. Bananas add natural sweetness. Using a ripe banana is vital. It gives more flavor and makes the drink sweeter. Milk or nut milk adds creaminess. It balances the drink's texture. Sugar gives the drink its sweet touch. You can adjust the amount based on your taste. Ground cinnamon adds warmth and spice. Vanilla extract enhances the overall flavor. Caramel sauce gives a rich, sweet twist. The pinch of salt rounds out the flavors, making them pop. You can use different types of milk. Almond, soy, or oat milk work well. If you want to cut down on sugar, try agave or honey. They can replace regular sugar. For extra flavor, add chocolate or nutmeg. These will give your drink a unique twist. Feel free to experiment! For the full recipe, check out the link provided. Start by rinsing the rice. Rinse it under cold water until the water runs clear. This step helps remove excess starch. It also keeps your drink from being too thick. Next, blend the rinsed rice with 4 cups of water in a blender. Blend it for about 1-2 minutes. You want the mixture to look milky. Now, pour the rice mixture into a large bowl or pitcher. Cover it and let it sit at room temperature for about 3-4 hours. For the best flavor, soak it overnight. This soaking time really helps the rice release its flavor into the water. After soaking, blend the rice mixture again briefly. This helps break up any clumps that formed. Next, strain the mixture using a fine mesh sieve or cheesecloth. Discard the rice solids. What you have left is a smooth rice liquid. Now, add the ripe banana, milk, sugar, ground cinnamon, vanilla extract, and a pinch of salt to the strained rice liquid. Blend until everything is smooth and well combined. Make sure the banana and spices mix well with the rice liquid for the best flavor and texture. Taste the mixture to check for sweetness. You might want to add more sugar or caramel to suit your taste. Remember, a little sweetness can brighten the flavors. When adding the caramel sauce, drizzle it in and blend briefly. You want to see swirls of caramel. This gives the drink a lovely look and flavor. For the full recipe, refer to the detailed instructions earlier. To make the best Banana Caramel Horchata, start with pre-soaking the rice. Soaking for 3-4 hours or even overnight helps bring out a creamy texture. This step is key for rich flavor. After soaking, blend the rice with water until it looks milky. Straining the mixture is also vital. It removes the rice solids and gives you that smooth, creamy drink. Use a fine mesh sieve or cheesecloth for the best results. Serve your horchata cold for a refreshing drink. Pour it into tall glasses filled with ice. Presentation matters! Garnish with a slice of banana on the rim. Drizzle extra caramel sauce on top for a sweet touch. This adds both flavor and flair. To elevate the taste, add spices like nutmeg or a vanilla bean. These give a warm, inviting flavor. You can also experiment with pairing your horchata. It goes well with light snacks or desserts. Consider serving it with churros or fresh fruit for a delightful treat. For the full recipe, check out the detailed instructions that guide you through every step. {{image_2}} You can give your Banana Caramel Horchata a fun twist! Try making a Chocolate Banana Caramel Horchata. Just add cocoa powder or chocolate syrup. This adds a rich flavor that pairs well with banana. Blend it all together for a delicious treat. Another idea is the Nutty Banana Caramel Horchata. Use almond or hazelnut milk instead of regular milk. This gives your drink a lovely nutty taste. You might even want to add crushed nuts for a crunchy touch. If you want a healthier option, consider low-sugar or sugar-free alternatives. You can use natural sweeteners like stevia or monk fruit. These options keep the drink sweet without adding extra sugar. For those who are dairy-free, try nut-based milks like almond, cashew, or oat milk. These choices make your horchata creamy while keeping it vegan. Just use the same amount as regular milk in the recipe. You can make your horchata extra special by adding seasonal fruits. In summer, try mixing in fresh berries or peaches. In fall, consider using pumpkin spice for a cozy flavor. To make it festive, add a splash of peppermint extract during the winter. Serve it in pretty glasses with candy canes for a fun touch. These seasonal flavors keep your Banana Caramel Horchata exciting all year round! For those looking for the full recipe, check out the detailed instructions above. To store leftover horchata, first place it in a clean jar or bottle. Seal it well to keep the flavor fresh. You can refrigerate it for up to three days. The sweet banana and caramel taste will still shine through. Always give it a good shake before serving. This helps mix any settled ingredients. For long-term storage, you can freeze your horchata. Pour it into ice cube trays or freezer-safe containers. Leave space at the top for expansion. It will last for up to three months in the freezer. When you want to enjoy it again, simply thaw it in the fridge overnight. To keep the texture smooth, avoid using a microwave. Instead, let it thaw slowly. You can get creative with leftover horchata! Try using it in smoothies for a tasty twist. Blend it with frozen fruits like strawberries or mangoes. You can also pour it over ice cream for a quick dessert. Another fun idea is to use it in pancakes or waffles instead of regular milk. Each option adds a sweet flavor that makes your dish special. To enhance the flavor, consider these tips: - Use a ripe banana for natural sweetness. - Add a splash of vanilla extract for richer taste. - Experiment with spices like nutmeg or a pinch of salt. - Drizzle extra caramel sauce before serving for a sweet touch. These tweaks will elevate your drink and make it even more delightful. Yes, you can use brown rice. But the texture will change. Brown rice has a nuttier flavor and a chewier texture. This might give a unique twist to your horchata. However, white rice blends smoother and creates a creamier drink. So, choose based on the texture you prefer. Yes, it can be vegan. Simply replace regular milk with any nut milk. Almond milk, cashew milk, or oat milk work well. Use plant-based caramel sauce if you want to keep it vegan. This way, everyone can enjoy this creamy treat. Homemade horchata can last about 3 to 5 days in the fridge. Store it in a sealed container to keep it fresh. Before serving, shake it well, as ingredients may settle. Always check for any off smell or changes in texture before drinking. Enjoy it chilled for the best taste! In this blog post, we explored how to make Banana Caramel Horchata. We covered key ingredients and their roles, plus tips for blending and serving. I shared fun variations and storage ideas to keep your horchata fresh. Remember, using ripe bananas boosts sweetness. Experiment with flavors and have fun with this refreshing drink. Enjoy your delicious creation, and don’t hesitate to make it your own!

Banana Caramel Horchata Delightful Creamy Drink

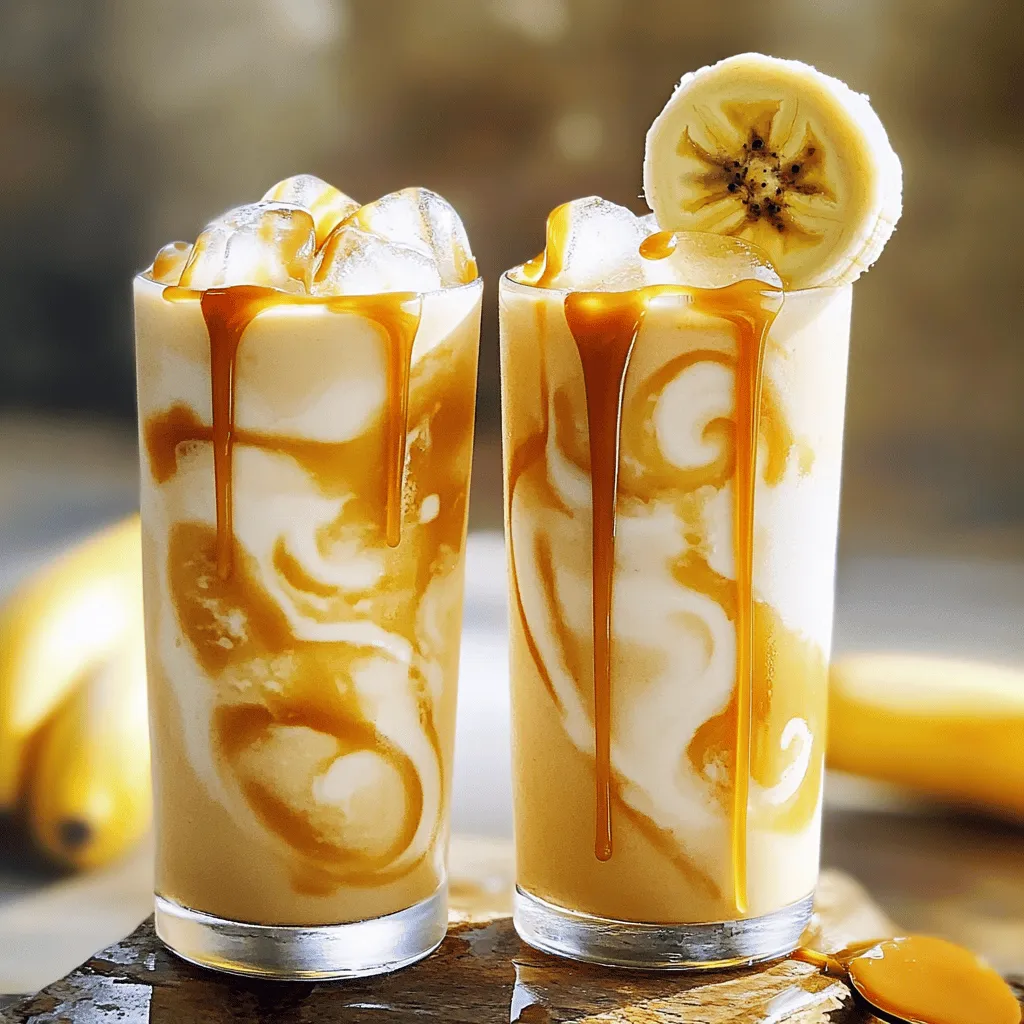
Are you ready to treat your taste buds? Dive into the world of Banana Caramel Horchata, a creamy drink that

To make Plum Ginger Kombucha Pop, gather these essential ingredients: - 2 cups brewed kombucha (store-bought or homemade) - 1 cup ripe plums, pitted and chopped - 1 tablespoon fresh ginger, grated These ingredients bring a bright, fruity flavor that stands out in the drink. Kombucha adds tang and fizz, while plums lend a sweet, juicy taste. The fresh ginger gives a spicy kick that balances the sweetness. Next, you'll want to include some sweeteners and add-ins. These will enhance the flavor and make the drink more enjoyable: - 2 tablespoons honey or maple syrup (adjust to taste) - Juice of 1 lime - Sparkling water (optional, for fizz) Honey or maple syrup sweetens the pop, while lime juice adds a burst of citrus. If you prefer more bubbles, adding sparkling water gives that fizzy sensation. Finally, don't forget the garnish! It adds a nice touch to the drink: - Fresh mint leaves for garnish Mint leaves not only look pretty but also provide a fresh aroma. They elevate the drink to a new level, making it even more refreshing. You can find the full recipe in the section above! To start, I blend the ripe plums and fresh ginger. This step brings out their natural flavors. Use a good blender to get a smooth mix. Next, I strain the mixture using a fine mesh sieve. This helps extract all the juicy goodness while leaving behind the pulp. Press the pulp with the back of a spoon to get every drop of liquid. Now, I mix the fresh plum-ginger juice with the brewed kombucha. It’s best to do this in a large bowl. Stir gently to keep the bubbles from the kombucha. If you want extra fizz, add a splash of sparkling water. This will give your drink a delightful sparkle. Finally, I taste the mixture and adjust the sweetness. If you need more sweetness, add honey or maple syrup to your liking. To serve, I fill glasses with ice first. This keeps the drink cold and refreshing. Then, I pour the kombucha mixture over the ice. For a nice touch, I garnish with fresh mint leaves. This adds a pop of color and a hint of herbal flavor. Enjoy your Plum Ginger Kombucha Pop as a cool treat! To make your Plum Ginger Kombucha Pop great, focus on taste. Start with lime juice. It adds a nice zing. If you find it too sour, add a little honey or maple syrup. This balances the flavors perfectly. Adjust the sweetness to your liking. You want it refreshing but not too sweet. When serving, the right glass makes a difference. I love using clear jars or tall glasses. They show off the vibrant color of the drink. For ice, choose large cubes. They chill your drink without watering it down. This keeps the fizz lively and fun. Don’t stop with plums and ginger. Try adding other fruits, like berries or peaches, for a twist. You can mix up the flavors. Fresh herbs, like basil or rosemary, can also add a unique taste. They give your drink a fresh, garden vibe. Explore and have fun with your flavors! {{image_2}} You can add other fruits to your Plum Ginger Kombucha Pop. Think about using peaches, cherries, or even berries. These fruits can bring new flavors. Each fruit adds its own taste and color. For a fun twist, try different kombucha flavors too. Mango or hibiscus kombucha can make your drink more exciting. Mix and match to find your favorite! If you want to keep it vegan, use maple syrup instead of honey. It adds sweetness without any animal products. You can also lower the sugar content. Use less syrup or try a sugar substitute. This way, you can enjoy the drink without worrying about added sugar. Spices can change the whole drink. Adding a pinch of cinnamon gives warmth. Cardamom adds a nice twist too. You can also play with ginger types. Use fresh ginger for a strong bite. Dried ginger gives a milder flavor. Powdered ginger is easy to mix in. Have fun and try different spices to find what you like best! To keep your Plum Ginger Kombucha Pop fresh, store it in the fridge. Use a clean, airtight container to seal in flavors. It stays tasty for about three days. After that, the taste may change. Always check for off-flavors before drinking. The best temperature for your kombucha pop is around 34 to 40 degrees Fahrenheit. This range keeps it cool and refreshing. Always use airtight containers. This helps keep the bubbles and flavors intact. You can freeze kombucha pop, but it might lose its fizz. To freeze, pour it into ice cube trays. Once frozen, you can use the cubes in smoothies. When you want to drink it again, let it thaw in the fridge. Avoid using a microwave, as it can ruin the flavor. Kombucha is a fizzy drink made from sweetened tea and a culture of yeast and bacteria. This drink is rich in probiotics, which are good for your gut health. Probiotics help with digestion and may boost your immune system. The key ingredients in Plum Ginger Kombucha Pop add even more benefits. Plums are high in vitamins C and K, and they have antioxidants. Ginger helps with inflammation and digestion. Honey or maple syrup can give you a quick energy boost while also being natural sweeteners. Making kombucha at home is simple. You need a few main items: - 1 cup of sugar - 8 tea bags (black or green tea) - 1 SCOBY (symbiotic culture of bacteria and yeast) - 14 cups of water - A large glass jar - Cheesecloth or a clean kitchen towel 1. Boil the water and dissolve the sugar in it. 2. Steep the tea bags in the hot water for about 15 minutes. 3. Let the tea cool down to room temperature. 4. Pour the tea into the glass jar and add the SCOBY. 5. Cover the jar with cheesecloth to keep out dust. 6. Let it sit in a warm area for 7-14 days to ferment. Once you have made your kombucha, you can follow the Full Recipe to create your Plum Ginger Kombucha Pop. Yes, many brands offer Plum Ginger Kombucha Pop. Popular brands include GT's, Health-Ade, and Brew Dr. You can find these drinks at health food stores, supermarkets, or online. Check local stores like Whole Foods or online sites like Amazon for easy access. Most kombucha has a small amount of alcohol due to fermentation. However, the alcohol content is usually below 0.5%. If you want a completely alcohol-free drink, you can make your own kombucha and stop the fermentation early. Use the same ingredients from the recipe but skip the fermentation step. You can also use store-bought kombucha that is labeled as alcohol-free. This way, you can enjoy a tasty drink without any alcohol. In summary, this blog post guides you through making Plum Ginger Kombucha Pop. You learned essential ingredients, like ripe plums and fresh ginger, and tips for perfecting your drink's flavor. I also shared variations for creativity and how to store leftovers. Remember, experimenting with fruits and spices can lead to new favorites. Enjoy your homemade drink and impress your friends with these tasty kombucha ideas!

Plum Ginger Kombucha Pop Refreshing and Flavorful Drink

Are you ready to discover a drink that bursts with flavor and refreshment? In this blog, I’ll show you how

- 1 cup butterfly pea flower tea (brewed and cooled) - 1 cup sparkling water - 2 tablespoons blue curaçao syrup (non-alcoholic) - 1 tablespoon fresh lime juice - 1 teaspoon agave syrup (optional, for sweetness) - Lime slices for garnish - Edible flowers for decoration - Butterfly pea flower tea: Brew 1 tablespoon of dried flowers in 1 cup of water. - Sparkling water: Use 1 cup, or more for a fizzy kick. - Blue curaçao syrup: Measure 2 tablespoons for that vibrant color. - Fresh lime juice: Squeeze 1 tablespoon for a zesty flavor. - Agave syrup: Add 1 teaspoon if you want extra sweetness. - Lime slices: Use a few for garnish. - Edible flowers: Use them to make the drink look pretty. Using fresh ingredients makes your Blue Curacao Butterfly Pea Spritz taste better. Fresh lime juice adds a bright twist. Freshly brewed butterfly pea tea gives you the best color and flavor. When you use fresh, you also get more nutrients. Plus, the drink looks great with fresh lime slices and edible flowers. Always choose quality ingredients for a delightful drink experience. Start by making the butterfly pea flower tea. You need dried butterfly pea flowers and boiling water. Use 1 tablespoon of flowers for each cup of water. Let the flowers steep for 5-7 minutes. When done, strain the tea to remove the flowers. The tea should be a deep blue color. Allow it to cool completely before using. In a large glass or pitcher, pour in the cooled butterfly pea flower tea. Add 2 tablespoons of blue curaçao syrup. This syrup adds a lovely blue hue and sweet flavor. Next, squeeze in 1 tablespoon of fresh lime juice. Mix these ingredients well. If you want your drink sweeter, add a teaspoon of agave syrup and stir again. Grab a tall glass and fill it halfway with ice cubes. Pour the butterfly pea mixture over the ice. Top it off with sparkling water for that fizzy touch. Gently stir to mix without losing bubbles. For a beautiful finish, garnish your drink with lime slices and edible flowers. This will make your drink not just tasty, but also eye-catching. Enjoy! For the full recipe, check the Blue Curacao Butterfly Pea Spritz section. Finding the right sweetness for your Blue Curacao Butterfly Pea Spritz is key. Start with the basic recipe. If it tastes too tart, add agave syrup. Use one teaspoon at first, then taste. You can always add more if needed. Remember, the blue curaçao syrup adds sweetness, too. Adjust based on your taste. A stunning drink makes it even more fun! Use clear, tall glasses to show off the colors. Fill each glass with ice first. Pour the butterfly pea mixture over the ice. Add sparkling water last for a fizzy touch. Garnish with lime slices and edible flowers. The flowers create a lovely and colorful look. When making your spritz, avoid a few common pitfalls. First, don’t skip cooling the tea. Warm tea can melt the ice quickly. This dilutes the drink and changes the taste. Second, mix the ingredients gently. Stir too hard, and you lose the fizz. Lastly, taste as you go. This way, you can adjust flavors before serving. {{image_2}} You can easily turn the Blue Curacao Butterfly Pea Spritz into a fun cocktail. To do this, add a splash of vodka or gin. This small change adds a nice kick. You can also try rum for a tropical twist. Mix one ounce of your chosen spirit with the other ingredients. Serve over ice, just like the original recipe. Want to make your drink unique? Consider adding fresh herbs or fruits. Mint leaves add a refreshing taste. You can muddle them before mixing the drink. Fresh berries like blueberries or raspberries add a fruity twist. Simply drop a few into your glass before serving. You can also experiment with citrus slices, like orange or grapefruit. This brightens the drink's flavor and makes it even more colorful. If you're watching your calories, you can make some easy swaps. Use a zero-calorie sweetener instead of agave syrup. This keeps the drink sweet without the extra calories. Opt for diet sparkling water to cut back on sugar. You could also skip the syrup altogether for a lighter option. This allows the natural flavors of the tea and lime to shine through. After making your butterfly pea tea, you may have some leftover. Store it in a clean glass jar. Keep the jar in the fridge. It stays fresh for up to three days. Make sure the jar has a tight lid. This helps retain the tea's flavor and color. If you have leftover spritz, it's best to drink it fresh. The fizz from the sparkling water fades quickly. If you need to store it, keep it in the fridge for one day. Do not add the sparkling water until you are ready to drink. This keeps it bubbly and fun. Most of the ingredients have a good shelf life. Dried butterfly pea flowers can last for up to a year if kept dry and cool. Blue curaçao syrup is good for about six months when stored in a cool place. Fresh lime juice should be used within a week for the best taste. Always check for freshness before using any ingredient. For the full recipe, refer back to your original notes. Butterfly pea flower tea comes from the butterfly pea plant. It has bright blue petals that make the tea a deep blue color. The tea has a mild flavor, similar to green tea. It is caffeine-free and often used for its health benefits. Butterfly pea flower tea is rich in antioxidants. You can drink it hot or cold. It is great for adding color to drinks. You can find dried flowers at many health food stores or online. Yes, you can make this recipe ahead of time. Brew the butterfly pea flower tea and chill it in the fridge. Mix it with the blue curaçao syrup and lime juice. Store this mixture in a sealed container. When you are ready to serve, pour it over ice and add sparkling water. The drink stays fresh for up to two days. Just remember to add the sparkling water just before serving to keep it fizzy. If you do not have blue curaçao syrup, you can use other options. You can replace it with blue raspberry syrup for a similar color. Another option is to use a mix of simple syrup and food dye. This will help you achieve a nice blue hue. You can also try using agave syrup with a splash of lemon juice for a unique twist. Just keep in mind, the flavor will change a bit! You learned about butterfly pea flower tea and how to brew it. Fresh ingredients are key for great flavor. Follow the step-by-step guide to mix your drink, avoid common mistakes, and impress with your drink's look. Try the variations for fun twists, like an alcoholic version or low-calorie changes. Store any leftovers properly to keep them fresh. Now, you have all you need to enjoy this colorful and tasty tea!

Blue Curacao Butterfly Pea Spritz Refreshing Drink Idea

Looking for a fun and colorful drink to impress your friends? The Blue Curacao Butterfly Pea Spritz is a vibrant

To make a Cardamom Vanilla Oat Latte, you need the following ingredients: - 1 cup rolled oats - 3 cups water - 1 teaspoon ground cardamom - 1 vanilla bean (or 1 teaspoon vanilla extract) - 2 tablespoons maple syrup (or to taste) - A pinch of salt - 1 cup brewed espresso or strong coffee - Ground cinnamon for garnish You can customize your latte with these optional ingredients: - A splash of almond or coconut milk for creaminess - A dash of nutmeg for extra warmth - Sweeteners like honey or agave syrup - Flavored syrups, such as hazelnut or caramel For the best flavor, source your ingredients wisely: - Oats: Look for organic rolled oats at health food stores. - Cardamom: Choose whole cardamom pods and grind them fresh for the best taste. - Vanilla: Buy whole vanilla beans or pure extract from specialty shops. - Maple Syrup: Select pure maple syrup, not imitation, for a rich flavor. Using fresh and high-quality ingredients makes your Cardamom Vanilla Oat Latte shine. For the full recipe, check the ingredient list above. To start, you need rolled oats, water, cardamom, and salt. In a blender, mix 1 cup of rolled oats with 3 cups of water. Add 1 teaspoon of ground cardamom and a pinch of salt for flavor. Blend on high speed for about 30 seconds until it's smooth. This oat milk will be creamy and rich, perfect for your latte. Next, you should strain the blended mixture. Pour it through a nut milk bag or a fine mesh sieve into a bowl. This step separates the oat milk from the solids. Squeeze the bag or press the solids gently to get every drop of milk. This gives you a smooth, tasty base for your drink. To make the drink flavorful, you need to add sweetness and depth. If you have a vanilla bean, slice it open and scrape out the seeds. If not, use 1 teaspoon of vanilla extract. Combine this with 2 tablespoons of maple syrup and the strained oat milk. Blend it briefly again to mix the flavors. Now, you’re ready to combine everything. Brew 1 cup of strong coffee or espresso. In a large mug, pour in the brewed coffee first. Slowly add the warm oat milk mixture on top, stirring gently to combine. This will create a beautiful and cozy drink. For more detailed instructions, check the Full Recipe. Enjoy your Cardamom Vanilla Oat Latte! To get the best froth, start with fresh oat milk. Blend your oats and water well. Strain it properly to avoid grainy bits. When heating the milk, keep it warm but do not boil. Use a milk frother for the best results. If you don’t have one, whisk vigorously to create bubbles. This makes your drink creamy and light. One common mistake is not blending the oats long enough. This can leave your milk chunky. Always use a fine mesh sieve or a nut milk bag for straining. This helps remove the solids. Avoid boiling the oat milk as it can change the texture. Also, don’t forget to taste and adjust the sweetener to your liking. To boost the flavor, try using fresh vanilla beans instead of extract. The seeds add a rich taste. You can also experiment with spices. A dash of nutmeg or ginger can add warmth. For a sweeter touch, adjust the maple syrup. Lastly, sprinkle some cinnamon on top for a lovely finish. These small tweaks can take your Cardamom Vanilla Oat Latte to the next level. For a complete guide, check out the Full Recipe. {{image_2}} If you want a dairy-free option, using oat milk is a great start. It's creamy and blends well with flavors. You can also try almond milk or coconut milk for different tastes. Each milk brings its own unique flavor. Almond milk adds a nutty twist, while coconut milk gives a tropical vibe. Both work great in a Cardamom Vanilla Oat Latte. Sweetness is a personal choice. The recipe calls for maple syrup, but you can change it up. If you prefer less sweetness, use less syrup. You can also try honey or agave syrup. For those who want a sugar-free option, use stevia or monk fruit. Adjust according to your taste buds for the perfect drink. Spices can change the whole drink. While cardamom is the star, you can experiment. Try adding ground ginger for warmth or nutmeg for a cozy feel. Each spice will create a new experience. You can also mix in a little cocoa powder for a chocolatey twist. The spices you choose can transform your Cardamom Vanilla Oat Latte into something special. After making your oat milk, you may have some left over. To store it, pour it into a clean, airtight container. A glass jar works well. Keep it in the fridge. This oat milk will stay fresh for about 4 days. Always shake it before using, as it can separate. When you want to enjoy your oat milk again, gently reheat it. Pour the milk into a small saucepan. Heat it over low to medium heat. Stir it often to prevent burning. Do not let it boil, or it may change texture. You can also warm it in the microwave. Use a microwave-safe container. Heat in short bursts of 20 seconds, stirring in between. The prepared Cardamom Vanilla Oat Latte tastes best fresh. However, if you have leftovers, store them in the fridge as well. They will last about 2 days. When you reheat, keep in mind that the flavor may change slightly. The spices and sweetness might settle, so stir well before drinking. Always check for any off smells or changes in texture before enjoying. The best coffee for a Cardamom Vanilla Oat Latte is brewed espresso or strong coffee. Espresso adds rich flavor and boldness. If you don't have espresso, use a dark roast coffee. This choice gives you depth and goes well with cardamom and vanilla. Yes, you can make this latte without an espresso machine. Just brew strong coffee using a French press or pour-over method. Aim for a strong brew to match the oat milk's rich flavor. This way, you still enjoy a cozy drink. Yes, oat lattes offer a few health benefits. Oats are high in fiber, which aids digestion. They also have antioxidants that help fight inflammation. Oat milk is lower in calories than whole milk, making it a lighter option. Adding cardamom may help with digestion and boost metabolism. To adjust for more servings, simply multiply the ingredients. For example, if you want four servings, use two cups of rolled oats and six cups of water. Scale the flavorings, like cardamom and vanilla, to taste. Keep the same steps in the Full Recipe for best results. You learned how to create a delicious Cardamom Vanilla Oat Latte. We covered the ingredients you can use, optional flavors for a personal touch, and where to get fresh ingredients. I provided easy steps to prepare, strain, and flavor your latte. You also found tips for frothing and avoiding common mistakes. Plus, we explored variations and storage tips. This latte is a fun drink to explore. Each sip brings unique flavors to your day. Enjoy making it your own!

Cardamom Vanilla Oat Latte Cozy and Flavorful Drink

Looking for a warm, cozy drink that’s packed with flavor? My Cardamom Vanilla Oat Latte is just what you need.

To make a refreshing tangerine turmeric tonic, gather these ingredients: - 2 cups fresh tangerine juice - 1 teaspoon ground turmeric - 1 tablespoon raw honey (or maple syrup) - 1 tablespoon fresh ginger, grated - 1 cup coconut water - 1/2 teaspoon black pepper - Fresh mint leaves for garnish - Ice cubes (optional) These ingredients work together to create a drink that is not only tasty but also packed with health benefits. Fresh tangerine juice offers sweet and tangy flavors. Ground turmeric provides vibrant color and health perks. Raw honey or maple syrup adds a natural sweetness. Fresh ginger brings a spicy kick. Coconut water hydrates and balances flavors. Black pepper enhances turmeric's absorption. Mint leaves add a fresh touch. You can use ice cubes for a chilled drink. For the full recipe and instructions, check the section above. 1. Blend tangerine juice, turmeric, honey, and ginger Start by adding the fresh tangerine juice, ground turmeric, raw honey, and grated ginger into a blender. Blend all the ingredients until they mix well. The bright color will cheer you up! 2. Combine blended mixture with coconut water Pour the blended mixture into a large pitcher. Now, add one cup of coconut water. This adds a refreshing twist and balances the flavors. Stir gently until the mixture is smooth. 3. Add black pepper and adjust sweetness Sprinkle in half a teaspoon of black pepper. This helps your body absorb the turmeric better. Next, taste your tonic. If it needs more sweetness, add extra honey or maple syrup. Mix again until everything is just right. Check out the Full Recipe for even more details. Enjoy your refreshing drink! Selecting ripe tangerines is key for your tonic. Look for tangerines that are firm and heavy. Their skin should be bright and smooth. A sweet scent is a good sign too. This ensures a flavorful drink. Black pepper is crucial for turmeric absorption. Adding just a pinch helps your body use turmeric better. Without it, you miss out on many health benefits. So, don’t skip this step! You can adjust the sweetness in your tonic. Taste it after mixing all the ingredients. If it’s too tart, add more honey or maple syrup. Always use raw honey for the best flavor. You control how sweet you want it! If you want to explore more, check the Full Recipe for additional tips! {{image_2}} You can make your tangerine turmeric tonic even better! Here are some fun ways to customize it: - Adding other citrus juices: You can mix in other fruits. Try fresh orange, lemon, or lime juice. Each adds a unique twist. This gives you more flavor and vitamins. - Using different sweeteners: If raw honey isn't your thing, use maple syrup or agave. Each sweetener changes the taste a bit. Choose what you like best. - Incorporating additional herbs and spices: Feel free to experiment! Add a pinch of cinnamon for warmth or a dash of cayenne for heat. Fresh herbs like basil or rosemary can brighten the tonic. Mix and match these ideas to find your favorite version. You can check the Full Recipe for the base drink. Enjoy creating your perfect tonic! To keep your tangerine turmeric tonic fresh, choose the right container. Glass jars work well. They seal tightly and help keep flavors strong. If you don't have glass jars, use plastic bottles that close securely. Once you make your tonic, store it in the fridge. It stays fresh for about three days. If you see any change in smell or color, toss it out. Always check before you sip! If you want to keep your tonic longer, freezing is a great option. Pour the tonic into ice cube trays. Once frozen, pop the cubes into a freezer bag. This way, you can enjoy a refreshing drink later. Just take out a few cubes, let them thaw, and add them to your glass. For the full recipe, check out the instructions above! What are the health benefits of tangerine and turmeric? Tangerines are rich in vitamin C. This vitamin helps boost your immune system. Turmeric has curcumin, which may reduce inflammation. Together, they can improve digestion and skin health. Can I make this tonic in advance? Yes, you can make this tonic ahead of time. Just store it in the fridge. It tastes best within two days. Shake it well before serving. Is it possible to use pre-made tangerine juice? You can use pre-made tangerine juice. Just be sure it has no added sugar. Fresh juice gives the best taste and nutrients, but pre-made works in a pinch. How does turmeric affect the body? Turmeric can help reduce swelling and pain. It may also support brain health. Many people use it to boost their mood and energy levels. Where can I find a pre-made tangerine turmeric tonic? You can find ready-made tangerine turmeric tonics in health stores. Some online shops also sell them. Check local markets for fresh options too. If you want the best flavor, try making it at home using the Full Recipe. You now have a simple guide to making a healthy tangerine turmeric tonic. We covered the key ingredients, the step-by-step process, and tips for the best flavor. You can even personalize your tonic with different juices and sweeteners. Remember, this drink not only tastes great but also offers health benefits. You can store it easily, letting you enjoy it fresh or frozen. Try making this tonic today and boost your wellness!

Tangerine Turmeric Tonic Refreshing Healthy Drink

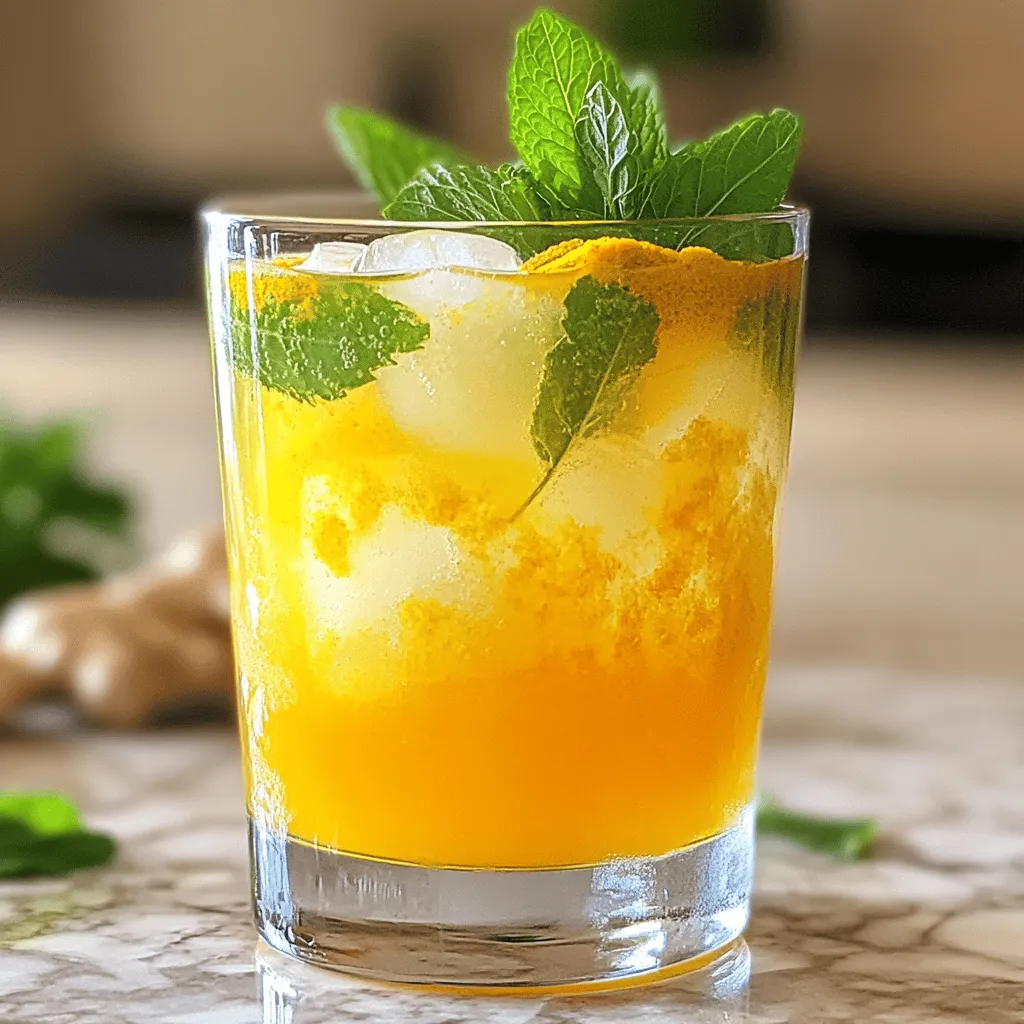
Looking for a drink that bursts with flavor and boosts your health? Meet the Tangerine Turmeric Tonic! This vibrant beverage

To make a Chocolate Cherry Almond Milkshake, you need simple, tasty ingredients. Here’s what you will grab: - 2 cups vanilla almond milk - 1 cup frozen cherries - 1 ripe banana - 2 tablespoons unsweetened cocoa powder - 2 tablespoons almond butter - 1 tablespoon honey or maple syrup (optional) - 1/2 teaspoon vanilla extract - Ice cubes (optional) - Whipped coconut cream (for topping) - Chopped almonds and whole cherries (for garnish) These ingredients work together to create a creamy and delicious shake. The vanilla almond milk adds a nice base. Cherries give a burst of flavor. The banana adds natural sweetness and creaminess. Cocoa powder mixes in rich chocolate taste. Almond butter brings nuttiness, and honey or maple syrup can sweeten it up more if you want. You can adjust the ingredients to match your taste. If you like it thicker, add ice cubes. For extra fun, top it with whipped coconut cream, chopped almonds, and whole cherries. You’ll have a treat that looks as good as it tastes! If you want the full recipe, check out the complete instructions. - Step 1: Blend all ingredients until smooth. Start by adding the vanilla almond milk, frozen cherries, and ripe banana to your blender. Then, scoop in the cocoa powder and almond butter. If you want a sweeter shake, add honey or maple syrup. Don’t forget the vanilla extract! Blend on high until everything mixes well. - Step 2: Adjust thickness with ice cubes if desired. If you like your milkshake thick, toss in a few ice cubes. Blend again until you reach your perfect consistency. This step is fun. You can make it as creamy or icy as you want. - Step 3: Taste and customize sweetness. After blending, take a sip. Does it need more sweetness? Add more honey or maple syrup if you want it sweeter. Each sip should make you smile! - Step 4: Pour and serve. Carefully pour your chocolate cherry almond milkshake into tall glasses. For a special touch, top with whipped coconut cream. Sprinkle chopped almonds on top and add a few whole cherries for a pretty finish. Your shake is now ready to enjoy! This recipe is a quick and tasty treat. You can find the full recipe to guide you through the steps. Enjoy your creamy delight! To make your chocolate cherry almond milkshake even better, consider these tips: - Adding additional frozen fruits: You can mix in strawberries or blueberries. They add new flavors and extra nutrition. - Adjusting sweetness with natural sweeteners: Try using agave syrup or date paste for a healthier option. This keeps your milkshake tasty without extra sugar. - Experimenting with different nut butters: Swap almond butter for peanut or cashew butter. Each choice gives a unique twist to your shake. How you serve your milkshake can make a big difference. Here are some fun ideas: - Serving suggestions with fun straws: Use colorful paper straws to make it more playful. Kids and adults alike will love it! - Creative garnishing techniques: Top your shake with whipped coconut cream and sprinkle with crushed almonds. A few whole cherries on top add a festive look. - Using tall glasses versus traditional mugs: Tall glasses show off the layers and colors in your shake. They also give a fancy feel to your treat. Remember, these tips will enhance your experience with the chocolate cherry almond milkshake. For the complete method, check the Full Recipe. {{image_2}} You can customize your chocolate cherry almond milkshake in fun ways. Try adding spices like cinnamon or nutmeg. Just a pinch can add warmth and depth to your shake. You can also use chocolate-flavored almond milk instead of vanilla. This will give your drink an extra boost of cocoa flavor. If you love coffee, create a mocha version. Just mix in a shot of brewed coffee for that rich taste. If you want a vegan milkshake, you can swap sweeteners. Use maple syrup or agave nectar instead of honey. This keeps it plant-based while still sweet. Also, check your almond butter for gluten-free labels. Most almond butters are naturally gluten-free, so you should be safe. Just make sure to read the labels. These small tweaks make your chocolate cherry almond milkshake tasty for everyone. You can find the full recipe above to get started! You can store any leftover milkshake in the fridge. Pour it into a sealed container. It will stay fresh for up to two days. When you want to enjoy it again, just stir it well. If it seems too thick, add a splash of almond milk. I don’t recommend reheating milkshakes. The ingredients don't blend well after heating. If you want to enjoy it cold, just blend again with some ice. If you want to freeze your milkshake, pour it into an ice cube tray. Once frozen, pop the cubes into a bag. You can blend them later to make a quick treat. The ingredients in your milkshake have different shelf lives. Frozen cherries last about six months in the freezer. Almond milk can stay fresh for up to a week after opening. Bananas should be used within a few days of ripening. Signs your shake has gone bad include an off smell or change in texture. If it separates too much, it may not taste fresh anymore. Always trust your senses before enjoying leftovers. You can use oat milk or soy milk instead. Coconut milk adds a rich flavor, too. Each will change the taste slightly, but they all work well in this recipe. Yes, you can use fresh cherries. Just pit and chop them first. You may need to add ice cubes for a cold, thick texture. This milkshake is already dairy-free! Use almond milk and avoid any dairy toppings. Whipped coconut cream is a great dairy-free choice. Absolutely! You can use peanut butter or cashew butter. Each type will give the shake a unique taste. You need a blender to mix everything smoothly. Use tall glasses for serving and a spoon for toppings. If you want, grab some fun straws, too! For the full recipe, check the earlier section. You learned how to make a tasty milkshake with simple steps. We covered the key ingredients, preparation, and ways to enhance flavor. You can also explore fun variations and enjoy creative presentations. Always remember to store your shake properly to keep it fresh. With these tips, you'll enjoy a delicious treat that fits your taste. Happy shaking!

Chocolate Cherry Almond Milkshake Creamy Delight

Indulging in a Chocolate Cherry Almond Milkshake is a treat you deserve! This creamy delight blends rich chocolate, tart cherries,

Let's gather the tasty bits for our Blackberry Mint Julep Mocktail. Here’s what you need: - Fresh blackberries - Mint leaves - Sweeteners (honey or agave syrup) - Sparkling water or club soda - Fresh lime juice - Crushed ice - Garnishes (lime wedges, additional mint) These ingredients create a refreshing drink. Fresh blackberries give it a sweet and tart flavor. Mint leaves add a cool, bright touch. You can use honey or agave syrup to sweeten. Adjust the amount to fit your taste. The sparkling water brings fizz, while lime juice adds a zesty kick. Crushed ice cools it down and makes it fun to drink. Don't forget the lime wedges and mint for a pretty finish. For a detailed recipe, check out the Full Recipe! First, gather your fresh blackberries and mint leaves. In a cocktail shaker, muddle them together. Press down on the blackberries. This helps release their juice and flavor. As you muddle, the mint will give off a nice scent. Next, add your honey or agave syrup to the shaker. You can adjust this to your taste. Then, squeeze in your fresh lime juice. Mix these ingredients well to blend the flavors. Now, fill the shaker with crushed ice. Pour sparkling water or club soda over the ice. Stir gently to combine everything. Be careful not to lose any fizz. Taste your drink and add more honey if you want it sweeter. To serve, grab a highball glass and fill it with more crushed ice. Pour the blackberry mint mixture over the ice. It should look vibrant and inviting. For a nice finishing touch, garnish your drink. Add a sprig of mint on top. You can also place a lime wedge on the rim. This adds a pop of color and flavor. Enjoy your refreshing drink! For the full recipe, refer to the earlier section. To make your blackberry mint julep mocktail even better, adjust the sweetness to your taste. I often start with two tablespoons of honey or agave syrup. Then, I mix well. After tasting, I decide if I need more sweetener. You can always add more but can't take away once it's mixed. You can also change the sweetener. If you want a vegan option, use agave syrup. For a lighter taste, try using a natural sweetener like stevia. Each sweetener brings out different notes in the drink. Experiment to find your perfect mix! A great drink looks as good as it tastes. For a fun touch, garnish your mocktail creatively. Use a sprig of fresh mint on top. You can also add lime wedges to the rim of the glass. This adds color and draws attention. Choosing the right glassware also helps. A highball glass works well for this mocktail. It shows off the colorful layers. If you want a more festive vibe, try a mason jar or a fancy coupe glass. The right glass makes your drink feel special! If you want to make this drink, check out the Full Recipe for all the details! {{image_2}} You can switch blackberries with raspberries or strawberries. Raspberries add a tangy twist. They give a nice balance to the drink. Strawberries bring a sweeter taste. They also look great in your glass. You can mix and match fruits for fun flavors. Try adding citrus fruits like oranges or lemons. They brighten the drink with a zesty kick. A splash of orange juice can make it more refreshing. Lemon juice can add a sharp, crisp taste. These fruits can change the drink's flavor profile easily. While mint is classic, you can try basil or rosemary for a different taste. Basil gives a fresh, sweet note that pairs nicely with berries. Rosemary adds a piney flavor that can elevate your drink. You might enjoy mixing mint with these herbs for a unique blend. For instance, a mix of mint and basil can create a garden-like flavor. Get creative with herbs to find your favorite combination. Each herb can bring its own personality to the drink! To store leftover Blackberry Mint Julep Mocktail, put it in a sealed jar. Keep it in the fridge to maintain its taste. Avoid adding ice to your leftovers. Ice can water down the flavor. Instead, add fresh ice when serving later. Consume the mocktail within two days for the best taste. You can prepare this mocktail ahead of time. Muddle the blackberries and mint leaves early. Mix in the honey and lime juice, and store this blend in the fridge. When you’re ready to serve, add the sparkling water and crushed ice. This method is great for parties. You can make a large batch using the Full Recipe. Just scale up the ingredients to fit your group size. A mocktail is a non-alcoholic drink that looks and tastes great. It offers the fun of a cocktail without the booze. Mocktails use fresh fruits, herbs, and mixers to create tasty flavors. You can enjoy them at any time or event. They are perfect for parties or family gatherings. Yes, you can use frozen blackberries in this recipe. They work well and add a nice chill to your drink. Just make sure to thaw them slightly before muddling. This helps release their juice and flavor. Using frozen blackberries can also make this drink easier to prepare. To make your mocktail less sweet, simply reduce the amount of honey or agave syrup. Start with less sweetener and taste the drink as you go. You can also add more lime juice for a tangy kick. This balance will help you control the sweetness to your liking. Definitely! This mocktail is great for kids. It is fruity, fun, and refreshing. The ingredients are safe and healthy. Kids can enjoy it at parties or family meals. It makes a lovely alternative to sugary sodas. You can add alcohol if you want an adult version. A splash of bourbon or rum can enhance the flavors beautifully. Just remember to adjust the sweetness, as alcohol can change the taste. Enjoy your drink in whatever way suits your taste! For the full recipe, check out the detailed instructions above. This blog post covered the fun and easy steps to make a delicious mocktail. We explored fresh ingredients like blackberries, mint, and lime juice. I showed you how to muddle, mix, and serve this tasty drink. You learned tips for flavor and creative garnishes. There are even variations to try with other fruits and herbs. In conclusion, this mocktail is refreshing and perfect for any occasion. Experiment with different flavors, and enjoy your drink!

Blackberry Mint Julep Mocktail Refreshing Drink Recipe

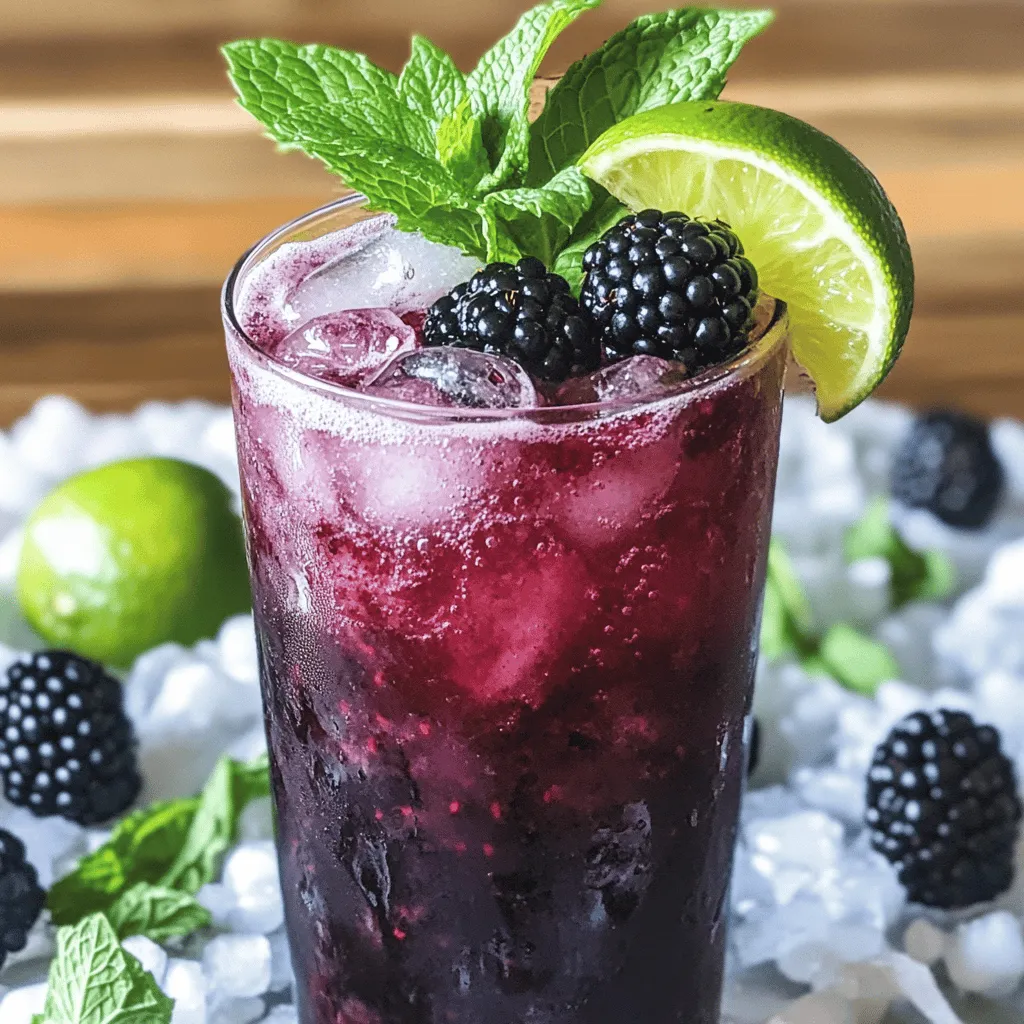
Looking for a refreshing drink that packs a flavorful punch? Let’s dive into making a Blackberry Mint Julep Mocktail! With

- 1 cup fresh strawberries, hulled and halved - 2 ripe kiwis, peeled and sliced - 1 banana, frozen - 1 cup plain Greek yogurt - 1 tablespoon honey or agave syrup (optional) The main ingredients are simple and fresh. Fresh strawberries give a sweet and tangy taste. Ripe kiwis add a unique flavor and vibrant color. The frozen banana makes the smoothie creamy and thick. Greek yogurt adds protein and richness. Honey or agave syrup sweetens the drink, but it is optional. - 1 tablespoon chia seeds for nutrition - Ice cubes for a thicker consistency - Alternative milk options (like almond or oat milk) You can add chia seeds for extra nutrition. They are great for fiber and omega-3s. Ice cubes help make the smoothie colder and thicker. You can also swap regular milk for any nut or plant-based milk. - Servings: 2 - Adjusting ingredient quantities for larger batches This recipe serves two people. If you need more, just double the ingredients. You can easily adjust the amounts to fit your needs. Enjoy this refreshing drink any time of the day! Check out the Full Recipe for more details. To start, you need to prepare your fruits. First, wash the strawberries. Remove the green tops, also called hulls. Cut the strawberries in half to make them easier to blend. Next, take the ripe kiwis. Peel them with a knife, then slice them into rounds. If you want, you can also cut them into smaller pieces. Lastly, grab your banana. If it's not frozen yet, peel it and put it in the freezer for a few hours. Now it's time to blend. In your blender, add the prepared strawberries, kiwis, and the frozen banana. Then, pour in the plain Greek yogurt and the almond milk. If you like it sweeter, drizzle in honey or agave syrup. Blend everything on high speed until the mixture is smooth and creamy. This usually takes about 30 seconds. You can stop and scrape down the sides if needed. If you want a colder smoothie, toss in a few ice cubes and blend again. After blending, taste your smoothie. If it's not sweet enough, add more honey or agave syrup. Blend again briefly to combine. For serving, pour the smoothie into glasses. To make it look pretty, you can garnish with a slice of kiwi or some halved strawberries on top. A sprinkle of chia seeds or a mint leaf adds a nice touch too. Serve with colorful straws for fun! You can find the [Full Recipe] to follow along easily. To make your smoothie nice and creamy, I always use frozen bananas. They add a rich texture. Plus, they cool down the drink without needing extra ice. If you want to change the milk, try almond, oat, or coconut milk. Each milk gives a different taste. Almond milk adds a nutty flavor, while coconut milk gives a tropical twist. You can add fun flavors to your smoothie. A splash of vanilla extract works great. It gives a sweet and warm taste. You can also mix in other fruits. Berries or mango will add color and flavor. Just remember to balance the sweetness. Experiment and find what you love! Strawberries and kiwis pack a lot of nutrients. Strawberries are rich in vitamin C. They help boost your immune system. Kiwis are great for digestion and have lots of fiber. Using Greek yogurt adds protein to your drink. It makes you feel full and helps with muscle repair. This smoothie is not just tasty; it is healthy too! Want to make it? Check out the Full Recipe. {{image_2}} If you want a dairy-free version, try using coconut yogurt. This yogurt adds a creamy texture and a hint of tropical flavor. It pairs wonderfully with strawberries and kiwis. For a milk alternative, you can use oat milk or soy milk. Both options work well, keeping your smoothie smooth and tasty. To add a healthy green twist, include a handful of spinach or kale. These greens blend well and boost nutrients. To balance the flavor, squeeze in some lemon or lime juice. The citrus adds brightness and enhances the fruity taste of the strawberries and kiwis. For an extra protein kick, mix in a scoop of protein powder. This makes your smoothie more filling and is great post-workout. You can also add nut butter, like almond or peanut butter. This addition gives a rich flavor and healthy fats. Feel free to explore these variations for your Strawberry Kiwi Yogurt Smoothie. Each change brings a new taste and experience. You can find the full recipe [Full Recipe]. To keep your smoothie fresh, refrigerate it right away. It lasts 1-2 days in the fridge. Just remember to shake or stir it before drinking. If you want to enjoy it later, freezing is a great option. Pour leftover smoothie into ice cube trays. Once frozen, transfer the cubes to a bag. This way, you can blend them into a new smoothie later. When storing your smoothie, choose the right container. Glass jars are great because they do not absorb odors. They also keep flavors fresh. Plastic bottles are lighter but may not prevent oxidation as well. To minimize oxidation, fill your container to the top. This reduces air space and keeps your smoothie tasting great. Don't let leftover fruits go to waste! Use them in other recipes. You can mix fruits into oatmeal or bake them in muffins. You can also make another smoothie with different fruits. Try blending the leftover strawberries or kiwis with other flavors. Check out the Full Recipe for more ideas on how to enjoy your smoothie. Yes, you can use frozen strawberries or kiwis in this smoothie. Frozen fruit gives you a chill factor. It can make your drink cold and thick. Plus, using frozen fruit means less prep work. You don't have to wash or slice them. They also last longer, so you reduce waste. Frozen fruit keeps all the good nutrients too. To make this smoothie vegan, swap out Greek yogurt for coconut yogurt. You can also use almond milk or oat milk. For sweetness, use maple syrup instead of honey. These simple changes keep the taste yummy while fitting your diet. Pair this smoothie with a few tasty sides. Try whole-grain toast with avocado. You can also enjoy some granola or nuts. A light salad with greens and veggies works well too. These sides create a balanced breakfast or snack that feels complete. To make this smoothie more filling, add oats or flaxseeds. These grains add fiber and keep you full longer. Chia seeds are another great option. They thicken the smoothie and boost nutrition. You can also toss in a scoop of nut butter for healthy fats. This blog post covered how to make a tasty strawberry kiwi yogurt smoothie. You learned about the main ingredients, optional add-ins, and serving sizes. I shared step-by-step instructions to help make blending easy. We explored tips to customize flavor and improve creaminess. Variations, like dairy-free options and protein boosts, can add fun twists. Lastly, I gave storage tips and answered frequent questions. This healthy smoothie is simple and quick to enjoy anytime!

Strawberry Kiwi Yogurt Smoothie Refreshing and Tasty Drink

Looking for a refreshing drink that bursts with flavor? This Strawberry Kiwi Yogurt Smoothie is just what you need! Packed

Older posts
Newer posts
← Previous Page1 … Page11 Page12 Page13 … Page63 Next →

dsad

© 2025 Foodish Talk • Built with GeneratePress

Our Policies

  • Copyright Policy
  • Cookie Policy
  • GDPR Policy
  • Privacy Policy
  • Disclaimer
  • Terms Of Use

More Information

  • Home
  • About
  • Contact
  • Appetizers
  • Dessert
  • Dinner
  • Drinks
©2025, Foodish Talk About Back To Top