Go Back
To make the no-bake cookie dough bars, you need these simple ingredients: - 1 cup all-purpose flour (heat-treated for safety) - 1/2 cup unsalted butter, softened - 1/2 cup packed brown sugar - 1/4 cup granulated sugar - 1 teaspoon vanilla extract - 1/4 teaspoon salt - 1/2 cup mini chocolate chips - 1/4 cup chopped walnuts (optional) - 1/2 cup melted chocolate (for topping) Each ingredient plays a key role in making these treats delicious. The heat-treated flour ensures safety, while the butter adds creaminess. Brown sugar gives a rich flavor, and granulated sugar adds sweetness. Vanilla extract brings warmth, and salt balances the flavors perfectly. The mini chocolate chips add delightful bites of sweetness, while walnuts, if you choose to use them, offer a nice crunch. Finally, the melted chocolate topping adds a smooth finish. Gather these ingredients to create your cookie dough bars. You’ll love how easy it is to prepare! 1. Start by creaming the butter and sugars. In a large bowl, mix the softened butter with brown sugar and granulated sugar. Beat them together until the mixture is light and fluffy. This step adds air and makes the bars soft. 2. Next, incorporate the wet ingredients. Add in the vanilla extract and mix well. This adds a lovely flavor to your dough. 3. Now, it’s time to add the dry ingredients. Gradually mix in the heat-treated flour and salt. Keep stirring until a soft dough forms. Make sure there are no dry spots. Then fold in the mini chocolate chips and walnuts if you like nuts. This makes the dough extra tasty. 1. Line an 8x8 inch baking dish with parchment paper. Leave some overhang for easy removal later. This step helps keep the bars from sticking. 2. Now, press the dough into the bottom of the dish. Use a spatula to smooth it out evenly. Make sure it is packed tightly for best results. 3. For the chocolate topping, melt the chocolate. Use a microwave-safe bowl and heat it in 30-second intervals. Stir until it is smooth and melted. This will create a delicious layer on top. 4. Pour the melted chocolate over the pressed cookie dough. Use the spatula to spread it evenly across the top. This will give your bars a rich finish. 1. Place the baking dish in the fridge to chill. Let the bars set for at least one hour. This helps the chocolate harden and makes the bars easier to slice. 2. Once set, lift the bars out using the parchment paper overhang. Slice them into squares with a sharp knife. For a nice touch, arrange the bars on a decorative plate. 3. To make them look even better, sprinkle extra mini chocolate chips on top. You can also drizzle more melted chocolate over each bar before serving. Enjoy your delicious no-bake cookie dough bars! - Ensuring the flour is heat-treated: To keep your bars safe, heat-treat your flour. Spread it on a baking sheet and bake at 350°F for five minutes. This kills any harmful bacteria. Let it cool before using it in your recipe. - Tips for the perfect dough consistency: Your dough should be soft yet firm. If it’s too sticky, add a little more flour. If it’s too dry, add a splash of milk. - Best mixing bowls and utensils: Use a large mixing bowl that can hold all your ingredients. A sturdy spatula is great for mixing and pressing the dough. A hand mixer can make creaming the butter and sugars easier. - Recommended baking dishes: An 8x8 inch baking dish works best. Line it with parchment paper for easy removal. A glass dish helps you see if the chocolate has set. - Overmixing the dough: Mix until just combined. Overmixing can make the dough tough. You want it to be light and easy to press into the pan. - Not setting the bars long enough: Chill the bars for at least one hour. This helps the chocolate firm up and gives the bars the right texture. If you skip this step, they may fall apart when you slice them. {{image_2}} You can have fun with flavors in your no-bake cookie dough bars. Here are some ideas: - Different types of chocolate: Swap mini chocolate chips for dark, white, or even peanut butter chips. Each type adds a unique taste. - Nuts: Try using different nuts like pecans or almonds. They add crunch and flavor. - Dried fruits: Mix in some raisins, cranberries, or chopped apricots. They bring a hint of sweetness and chewiness. If you have dietary needs, don’t worry! You can easily modify this recipe: - Gluten-free alternatives: Use gluten-free flour instead of all-purpose flour. This keeps the bars safe for those with gluten issues. - Vegan modifications: Replace butter with coconut oil or vegan butter. You can also use maple syrup instead of brown sugar for a vegan twist. Serving these bars can be just as fun as making them! Here are some ideas: - Pairing: Serve your bars with a scoop of ice cream or a dollop of whipped cream. This adds a nice, creamy contrast to the sweet bars. - Creative plating: Arrange the bars on a colorful plate. Sprinkle extra mini chocolate chips on top and drizzle melted chocolate for a fancy touch. This makes your dessert look as good as it tastes. To keep your cookie dough bars fresh, store them in the fridge. Place the bars in an airtight container. This method keeps them soft and tasty. If you want to save them for later, freezing is a great option. Wrap each bar in plastic wrap, then place them in a freezer-safe bag. This helps keep them from getting freezer burn. In the fridge, these bars last about one week. If you freeze them, they can stay good for up to three months. Just make sure to label the bags with the date. This way, you’ll know when to enjoy them! You can enjoy these bars cold right from the fridge. They taste great chilled! If you prefer a warm treat, heat them in the microwave for about 10 to 15 seconds. This melts the chocolate just enough for a gooey treat. Enjoy your cookie dough bars however you like! If you lack heat-treated flour, you can easily make your own. Spread regular flour on a baking sheet. Bake it at 350°F for about 5 minutes. This process kills harmful bacteria. Let it cool before using it in your recipe. Yes, you can use various chocolate chips. Dark chocolate, white chocolate, or even peanut butter chips work well. Choose what you like best. Mixing different types can create a fun flavor twist. To make nut-free bars, simply omit the walnuts. You can replace them with seeds like sunflower or pumpkin. These seeds give a nice crunch without nuts. You can also add more chocolate chips for extra sweetness. Yes, you can swap some ingredients for healthier options. Use whole wheat flour instead of all-purpose flour. You can also reduce the sugar or use a natural sweetener like honey or maple syrup. This way, you still get a tasty treat. You can tell the chocolate is set when it looks shiny and firm. If you gently touch it, your finger should not leave a mark. It may take about an hour in the fridge. If you are unsure, give it more time to chill. You now have a tasty guide to making these dessert bars. We covered the key ingredients, clear steps, and helpful tips to ensure success. Throughout this process, it’s important to avoid common mistakes like overmixing. Creative variations let you customize the flavors. Proper storage means you enjoy these treats longer. With these insights, you can bake with confidence. Enjoy your dessert bars, share with friends, and try new twists in the future!

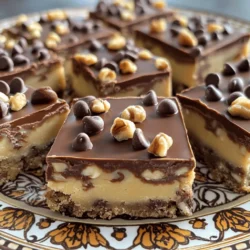
No-Bake Cookie Dough Bars

Indulge in these easy and delicious no-bake cookie dough bars that are perfect for satisfying your sweet cravings! Made with simple ingredients like heat-treated flour, butter, and mini chocolate chips, these bars come together in just 15 minutes. With a rich chocolate topping, they're a delightful treat for any occasion.

Ingredients
  

1 cup all-purpose flour (heat-treated for safety)

1/2 cup unsalted butter, softened

1/2 cup packed brown sugar

1/4 cup granulated sugar

1 teaspoon vanilla extract

1/4 teaspoon salt

1/2 cup mini chocolate chips

1/4 cup chopped walnuts (optional)

1/2 cup melted chocolate (for topping)

Instructions
 

In a mixing bowl, cream together the softened butter, brown sugar, and granulated sugar until light and fluffy.

    Add the vanilla extract and mix well to combine.

      Gradually add the heat-treated flour and salt, mixing until a soft dough forms.

        Fold in the mini chocolate chips and walnuts (if using) until evenly distributed.

          Line an 8x8 inch baking dish with parchment paper, allowing some overhang for easy removal.

            Press the cookie dough mixture evenly into the bottom of the prepared baking dish, smoothing it out with a spatula.

              In a microwave-safe bowl, melt the chocolate in 30-second intervals, stirring until smooth.

                Pour the melted chocolate over the pressed cookie dough and spread evenly with a spatula.

                  Refrigerate the bars for at least one hour or until the chocolate is set.

                    Once set, lift the bars out of the baking dish using the parchment overhang and slice into squares.

                      Prep Time: 15 minutes | Total Time: 1 hour 15 minutes | Servings: 16 bars

                        - Presentation Tips: Arrange the bars on a decorative plate and sprinkle a few extra mini chocolate chips on top for an appealing look. For an added touch, drizzle a bit of melted chocolate over the individual bars when serving.