Go Back
To can tomatoes, you will need these simple ingredients: - 10-12 ripe tomatoes (any variety) - 1 tablespoon lemon juice (per quart) - 1 teaspoon salt (optional, per quart) - Water (for processing) Using fresh, ripe tomatoes makes a big difference. Choose tomatoes that are firm and free from blemishes. Any type can work, but meaty varieties like Roma hold up well. Always add lemon juice for safety. The acidity helps prevent bacteria from growing. Salt is optional but adds flavor. If you don't have lemon juice, you can use citric acid instead. Just use 1/4 teaspoon per quart. For salt, feel free to skip it if you're watching your sodium. If you want a hint of spice, consider adding crushed red pepper flakes. This can give your canned tomatoes a little kick. Start by getting your jars ready. You need to sterilize your canning jars, lids, and rings. To do this, boil them in a large pot of water for at least 10 minutes. After that, let them dry on a clean towel. This step helps keep your canned tomatoes safe from germs. Next, wash the tomatoes well. This removes dirt and any debris. To make peeling easier, score a small X on the bottom of each tomato. Blanch them in boiling water for 1-2 minutes. You will see the skins start to crack. Quickly move them to an ice bath to cool down. Once cooled, peel off the skins. You can chop the tomatoes into quarters or leave them whole, based on what you like. Now it’s time to fill the jars. In each sterilized jar, add 1 tablespoon of lemon juice and 1 teaspoon of salt if you want. Start packing the tomatoes into the jar. Leave about 1/2 inch of space at the top. Wipe the rims of the jars with a clean cloth to help ensure a good seal. Place the sterilized lids on top and screw on the rings until they are fingertip-tight. Next, place the jars in a boiling water canner. Make sure they are fully submerged. Process the jars for 40-45 minutes, adjusting for your altitude if needed. After processing, carefully remove the jars with jar tongs. Place them on a clean towel or rack to cool completely. You should hear a popping sound as the jars seal. To check the seal, press down in the center of the lid. If it does not pop back, the jar is sealed. If it does pop back, refrigerate and use it in a few days. This process is part of the full recipe for canning tomatoes, and it’s simple once you get the hang of it! Safety is key in home canning. Always use clean, sterilized jars. This keeps out germs. Use a boiling water bath for canning tomatoes. This method helps kill harmful bacteria. Always check your jars after cooling. Press the lid's center. If it pops back, the jar didn’t seal. Store any unsealed jars in the fridge and use them soon. Avoid using damaged jars or lids. They can cause leaks. Don’t skip the lemon juice. It adds acidity and helps preserve the tomatoes. Make sure to leave enough headspace in the jars. This prevents overflow during processing. Lastly, don’t rush the cooling process. Let jars cool slowly to ensure a good seal. To seal jars well, wipe the rim before sealing. This removes any food particles that may block the seal. Tighten the rings just until they are snug. Too loose, and air may enter; too tight, and they may break. After processing, let your jars sit undisturbed. You will hear the popping sound as they seal. This sound means your hard work has paid off! You can find the full recipe above to get started. {{image_2}} You can make your canned tomatoes extra tasty by adding some simple ingredients. You might try: - Fresh basil leaves - Oregano - Garlic cloves - Red pepper flakes - Bay leaves Just add these items to the jars before sealing them. Each of these add-ins gives your tomatoes a unique flavor. Experiment to find your favorite mix! You can use two main methods for canning tomatoes: water bath canning and pressure canning. - Water Bath Canning: This method is simple and works well for high-acid foods. It uses boiling water to seal jars. The tomatoes get heated enough to kill germs. This method is great for plain canned tomatoes and works well with the full recipe. - Pressure Canning: This method uses steam and high pressure. It is best for low-acid foods. It heats jars at a higher temperature. This helps keep your food safe and fresh longer. Choose the method that suits your tomatoes best! Canned tomatoes are super versatile! You can use them in many recipes. Here are some ideas: - Soups: Add them to your favorite soup for a rich base. - Sauces: Use them for pasta sauce or pizza sauce. - Stews: Toss them into stews for added flavor. - Salsas: Blend them with onions, peppers, and spices for salsa. - Casseroles: Layer them into your casseroles for moisture and taste. Canned tomatoes make cooking quick and easy. Enjoy your homemade flavor! Store your canned tomatoes in a cool, dark place. A pantry or cupboard works well. Keep them away from heat and light. This helps keep the flavors fresh. Make sure they are upright. If they fall over, they may leak. Canned tomatoes can last for up to a year. If stored well, they may last even longer. Check the canning date to track freshness. Always use the oldest jars first. This keeps the flavors at their best. Inspect your jars before use. Look for any dents, rust, or leaks. If you see any of these, do not use the jar. Check the lid too. If it bulges or pops when you press it, throw it away. If the tomatoes smell bad or look off, discard them. Always prioritize safety over taste. Canned tomatoes can last for a year or more. Store them in a cool, dark place. This helps keep their taste fresh. After opening, use them within five days. Always check for signs of spoilage before use. You can use overripe tomatoes, but they may not taste as good. They can be softer and more watery. If you choose them, make sure they are still safe to eat. Look for any bad spots and cut them away. If your jars didn't seal, don't worry. First, check the lid. If it pops back when pressed, it didn't seal. You can reprocess the jar or refrigerate it. Use the contents within a few days. Always keep an eye on your jars. If you see any signs of spoilage, throw them away. In this post, we covered all you need for successful canning. You learned about required ingredients, tips for preparation, and step-by-step instructions. We discussed safety guidelines and common mistakes too. Plus, I shared ways to store canned tomatoes and their shelf life. Remember to keep an eye on your jars for spoilage signs. Home canning can be fun and rewarding. Now you can create tasty meals with your own home-canned tomatoes. Enjoy the process, and let your creativity shine!

Beginner’s Guide to Canning Tomatoes

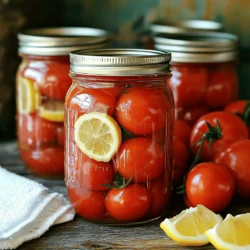
Preserve the flavors of summer with this beginner's guide to canning tomatoes! Learn step-by-step how to turn fresh, ripe tomatoes into delicious jars of goodness that you can enjoy year-round. With easy instructions on sterilizing jars, prepping tomatoes, and sealing them for storage, you'll feel confident in your canning skills. Click through for the full recipe and start creating your own homemade tomato preserves today!

Ingredients
  

10-12 ripe tomatoes (any variety)

1 tablespoon lemon juice (per quart)

1 teaspoon salt (optional, per quart)

Water (for processing)

Instructions
 

Prepare the Jars: Start by sterilizing your canning jars, lids, and rings. Boil them in a large pot of water for at least 10 minutes, then let them dry on a clean towel.

    Prepare the Tomatoes: Wash the tomatoes thoroughly to remove any dirt or debris. To easily remove the skins, score a small X on the bottom of each tomato, then blanch them in boiling water for about 1-2 minutes until the skins start to crack. Transfer them immediately to an ice bath to cool.

      Peel and Chop: Once cooled, peel the skins off the tomatoes. You can chop them into quarters or leave them whole, depending on your preference.

        Fill the Jars: In each sterilized jar, add 1 tablespoon of lemon juice and 1 teaspoon of salt if desired. Pack the tomatoes into the jar, leaving about 1/2 inch of headspace at the top.

          Seal the Jars: Wipe the rims of the jars with a clean cloth to ensure a good seal, then place the sterilized lids on top and screw on the rings until they're fingertip-tight.

            Process the Jars: Place the jars in a boiling water canner, ensuring they are completely submerged. Process for 40-45 minutes (adjust for altitude if necessary).

              Cool Down: After processing, carefully remove the jars using jar tongs and place them on a clean towel or rack to cool completely. You should hear a popping sound as the jars seal.

                Check the Seal: After the jars have cooled, check the seals by pressing down in the center of the lid. If it doesn’t pop back, the jar is sealed. If it does, refrigerate and use it within a few days.

                  Prep Time: 20 minutes | Total Time: 1 hour 30 minutes | Servings: About 4 quart jars