Skip to content
DisclaimerTerms Of UseGDPR PolicyCookie Policy

Foodish Talk

  • Home
  • Drinks
  • Appetizers
  • Dinner
  • Dessert
  • About
  • Contact
  • Privacy Policy
DisclaimerTerms Of UseGDPR PolicyCookie Policy

NO-ING-IMG

To make simple fig jam, start with 2 pounds of fresh figs. Look for figs that are ripe and soft. Remove the stems and chop the figs into small pieces. The more ripe the figs, the sweeter your jam will be. Next, you will need 1 cup of granulated sugar. This sugar helps balance the natural sweetness of the figs. Add 1 tablespoon of lemon juice. This will brighten the flavor and help the jam set. You can also include 1 teaspoon of ground cinnamon for warmth and depth. For a little kick, add 1/2 teaspoon of red pepper flakes. Adjust this to your taste. Finally, use 1/4 teaspoon of sea salt to enhance all the flavors. These ingredients create a base for your jam. You can also experiment with other flavors. Consider adding vanilla extract or ginger for a twist. These small changes can create unique tastes. Don't be afraid to try new things! For the full recipe, follow the steps carefully to enjoy your sweet and spicy fig jam. Start by gathering all your ingredients. You need fresh figs, sugar, lemon juice, and spices. Chop the figs into small pieces. This helps them break down while cooking. In a large pot, mix the chopped figs with sugar, lemon juice, ground cinnamon, red pepper flakes, and sea salt. Stir well to combine. This mixture will be the base of your fig jam. Place the pot on the stove over medium heat. You want to bring the mixture to a gentle boil. Stir occasionally to help dissolve the sugar. Once it starts boiling, reduce the heat to low. Let it simmer uncovered for about 30 to 40 minutes. Stir it frequently. The mixture will thicken and look jam-like as it cooks. To test if your jam is ready, grab a cold plate from the freezer. Drop a spoonful of jam onto the plate. Let it sit for a minute. If the jam holds its shape and doesn’t run, it’s done! If it’s too runny, keep cooking for a few more minutes. Once it’s ready, remove the pot from the heat. Let the jam cool for a few minutes before putting it in sterilized jars. When making fig jam, pick ripe figs. They should feel soft but not mushy. Look for figs that have a deep color and a sweet scent. If you can, buy organic figs. They taste better and are better for you. You can mix different fig types for more flavor. The recipe calls for one cup of sugar. You can adjust this to your taste. If you like it less sweet, use less sugar. If you want more spice, add extra red pepper flakes. Start with a small amount and taste as you go. This way, you can find the perfect balance for your jam. Before you store your jam, make sure your jars are clean. Wash them in hot soapy water. Then, rinse and dry them well. To sterilize, place them in boiling water for 10 minutes. You can also put them in the oven at 225°F for 15 minutes. This keeps your jam safe. Always use clean jars to avoid spoilage. For the full recipe, check out the Sweet & Spicy Fig Jam recipe above! {{image_2}} You can add other fruits to your fig jam. This gives it new flavors. Try adding peaches for a sweet twist. Apples can add a nice crunch. You can even mix in berries for a tart touch. Just chop the fruits and add them to the fig mixture. Adjust the sugar as needed. More fruit means more natural sweetness! Herbs can change the taste of your fig jam. Rosemary adds a woodsy flavor. Basil gives a sweet and fresh taste. Mint can make it bright and refreshing. To infuse herbs, add them to the pot while cooking. Use fresh herbs for the best flavor. You can strain them out before storing the jam if you prefer a smooth texture. If you want a healthier option, try using honey or maple syrup. These sweeteners can change the flavor a bit. Honey adds a floral note, while maple syrup gives a rich taste. You can also use agave nectar if you want a low-glycemic option. Just remember to adjust the amount. Each sweetener has a different level of sweetness. Experiment to find what you like best! For the full recipe, check out the Sweet & Spicy Fig Jam recipe above! Once you make your fig jam, let it cool. Transfer it to clean jars. Seal them tightly and store in the fridge. Your fig jam stays fresh for up to three weeks. Always use a clean spoon to scoop out the jam. This helps keep it safe and tasty. If you want to keep your fig jam longer, freezing is a great option. Pour the jam into freezer-safe containers. Leave some space at the top for expansion. Seal the containers tightly. Your fig jam can last up to a year in the freezer. When ready to use, thaw it in the fridge overnight. To enjoy your fig jam longer, follow these tips: - Use sterilized jars for storage. - Keep the jam sealed tightly. - Store it in a cool, dark place if not refrigerated. - Check for any signs of spoilage before use. These steps help ensure you savor every delicious bite of your homemade sweet and spicy fig jam. You can make fig jam without pectin by using the natural sugars in the figs. The key is to cook the figs down until they break apart. This method allows the jam to thicken naturally. Use the right amount of sugar and lemon juice to help with this process. The lemon juice adds acidity, which balances the sweetness. Yes, you can use dried figs, but the jam will taste different. Dried figs are sweeter and have a chewier texture. To use them, chop the dried figs and soak them in water for a few hours. This helps them soften and release their natural sugars. After soaking, follow the same steps in the Full Recipe. Fig jam pairs well with many foods. You can enjoy it with cheese, like goat cheese or brie. Use it as a spread on toast or biscuits. It also works great in desserts, like tarts or pastries. Try it on grilled meats for a sweet twist. The flavor is versatile and adds a nice touch to any meal. In this blog post, we explored the simple process of making fig jam. We covered fresh figs, sweeteners, and spices. You learned the steps for preparing, cooking, and testing your jam. Tips helped you pick the right figs and adjust flavors. Variations showed you how to add fruits and herbs. We also discussed storing your jam safely. Making fig jam is fun and rewarding. Enjoy every bite of your homemade treat!

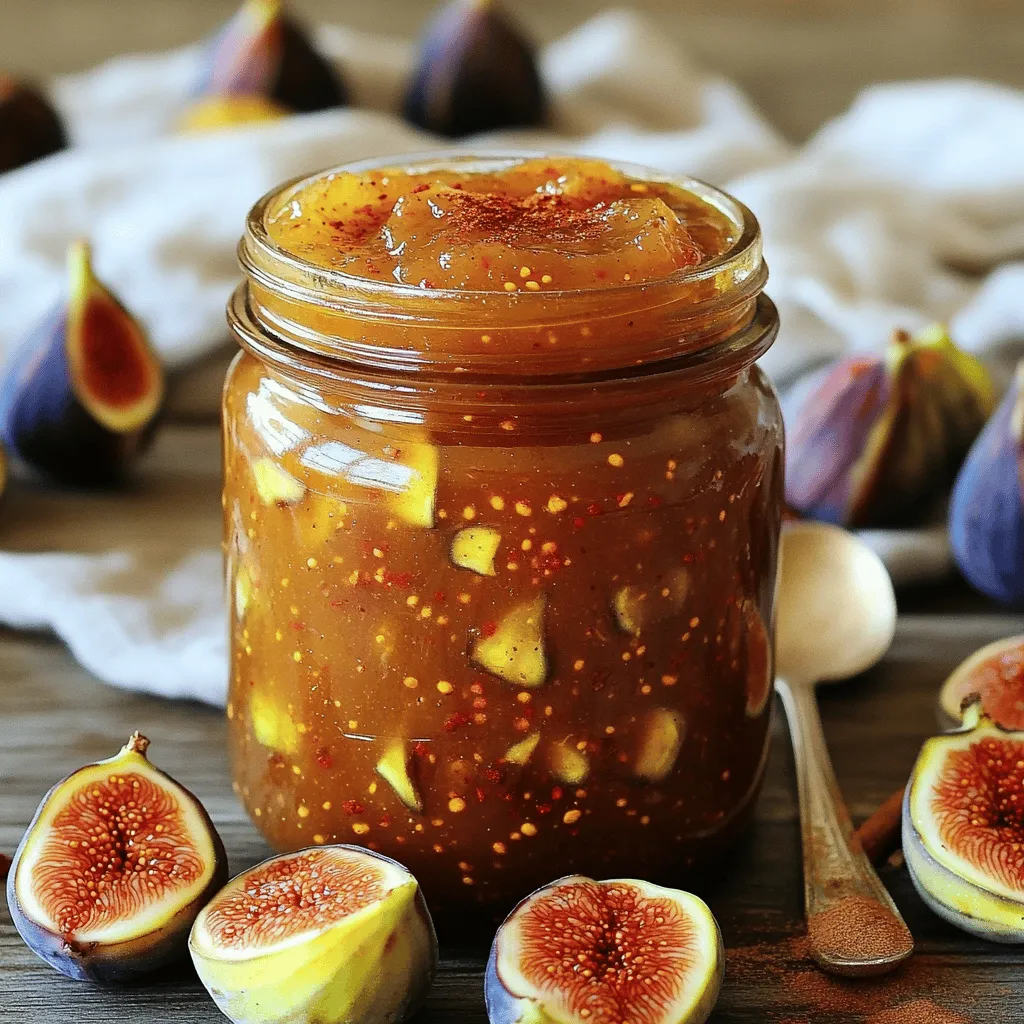
Simple Fig Jam Easy Recipe to Savor and Enjoy

Are you ready to make a burst of flavor with your next kitchen project? This Simple Fig Jam recipe is

- 1 lb chicken breasts, cut into bite-sized pieces - 2 cups fresh okra, sliced into 1/2-inch pieces - 1 cup buttermilk (or milk with 1 tbsp vinegar added) - 1 ½ cups cornmeal - 1 cup all-purpose flour - 1 tsp garlic powder - 1 tsp onion powder - 1 tsp smoked paprika - ½ tsp cayenne pepper (adjust for heat) - Salt and pepper to taste - Oil for frying (vegetable or canola oil) - Fresh parsley, chopped for garnish Gathering the right ingredients is key. The chicken should be fresh and cut into bite-sized pieces. Okra adds a lovely crunch. Buttermilk makes the chicken tender. If you do not have buttermilk, mix milk with vinegar. Cornmeal and flour create a crispy coating. The seasonings bring flavor, so use garlic powder, onion powder, smoked paprika, and cayenne pepper. Adjust the cayenne for spice. For frying, pick a neutral oil like vegetable or canola. Fresh parsley at the end adds a nice touch. You can find the full recipe in the Crunchy Fried Okra & Chicken Delight section. - Start by combining chicken pieces with buttermilk in a medium bowl. - Season the mixture with salt and pepper. - Let the chicken marinate for at least 30 minutes. For best results, marinate up to 2 hours in the fridge. - In another bowl, mix cornmeal, flour, garlic powder, onion powder, smoked paprika, cayenne pepper, and a pinch of salt and pepper. - The right consistency should be dry but not too thick. You want it to stick to the chicken and okra well. - Remove the chicken from the buttermilk. Allow the excess to drip off. - Dredge each piece in the cornmeal mixture. Make sure they are fully coated. Set them aside on a plate. - Next, add sliced okra to the same cornmeal mixture. Toss until the okra is coated well. - Pour enough oil into a large skillet to cover the bottom by about 1 inch. - Heat the oil over medium-high heat until it reaches 350°F (175°C). - Fry the chicken pieces in batches. Do not overcrowd the pan. Cook for about 6-8 minutes until golden brown. - Remove the chicken and place it on a paper towel-lined plate to drain. - In the same hot oil, add the okra. Fry for about 3-4 minutes until crispy and golden. Use a slotted spoon to remove and drain on paper towels. - Arrange the fried chicken and okra on a serving platter. - Garnish with chopped parsley for a touch of color. - Serve with ranch or remoulade sauce for dipping. Enjoy your meal! To get that perfect crunch, you must control the oil temperature. I recommend heating the oil to 350°F (175°C). This temperature ensures the coating crisps up nicely. If the oil is too hot, the coating burns. If it's too low, your food absorbs too much oil and becomes soggy. Another key tip is to avoid overloading the frying pan. Fry in small batches. This way, the oil temperature stays even. If you add too much food at once, the temperature drops. Your chicken and okra won't fry well. You can adjust the seasoning to make it your own. I like to add more garlic powder for a bolder taste. You can also try different spices, like cumin or thyme, for a unique twist. Fresh herbs can also elevate your dish. Adding chopped parsley or cilantro right before serving gives a fresh kick. Don't be afraid to experiment with flavors you enjoy. For frying, I suggest using a cast-iron skillet. It heats evenly and helps achieve that crispy texture. A heavy-bottomed pan also works well. A thermometer is essential for oil temperature. It helps you maintain the right heat. If you don't have one, watch for small bubbles when you drop in a piece of chicken. If it sizzles, your oil is ready! {{image_2}} You can make fried okra and chicken healthier. One easy way is by baking. Baking gives you that crispiness without all the oil. It takes a bit longer, but it’s a lighter option. You can also use gluten-free flour. This makes the dish safe for those with gluten issues. Just swap out regular flour for gluten-free flour in your coating mix. Want to spice things up? You can add different spices to the coating. Try cayenne pepper for heat or smoked paprika for a deeper flavor. You can also mix in cheese or other veggies. Grated cheese melts nicely and adds richness. Chopped peppers or onions can add fun textures and tastes. Fried okra and chicken shines in Southern cooking. The South loves its crispy, flavorful dishes. In other cultures, you might find variations, too. For example, in some Caribbean recipes, they use coconut milk for marinating. This adds a sweet twist. Each region puts its spin on this classic dish, making it fun to explore! To store leftovers, let them cool to room temperature. Place the fried okra and chicken in an airtight container. Store the container in the fridge. Enjoy them within 3 days for the best taste. For long-term storage, freeze the fried okra and chicken. Use a freezer-safe bag or container. Make sure to remove as much air as possible. This keeps them fresh for up to 3 months. When ready to eat, thaw them in the fridge overnight. Reheat in the oven at 350°F for about 15-20 minutes. This helps maintain their crunch. Check your leftovers before eating. Look for any off smells or changes in color. If they seem soggy, they may not taste as good. To keep them crispy, store the chicken and okra separately. Reheat them in the oven, not the microwave. This will help them stay crunchy. For more cooking tips, check the Full Recipe. Yes, you can use frozen okra. Frozen okra is easy to find. It saves prep time. However, it may not be as crunchy. Fresh okra has a better texture. If you use frozen, thaw it first. Pat it dry to remove moisture for better frying. Dipping sauces make this meal even better. Here are some great options: - Ranch dressing: Creamy and tangy, it complements the crunch. - Remoulade: This spicy sauce adds a kick. - Honey mustard: Sweet and zesty, it balances the flavors. - Hot sauce: For those who love heat, add a splash. To check if chicken is done, look for these signs: - The chicken should be golden brown on the outside. - Use a meat thermometer; it should read 165°F (75°C). - The juices should run clear, not pink. - If you cut into it, the meat should be white, not red. Sides can enhance your meal and add variety. Here are some tasty ideas: - Coleslaw: Crunchy and refreshing, it balances the fried food. - Cornbread: Sweet and soft, it complements the dish well. - Mashed potatoes: Creamy and comforting, they pair nicely. - Green beans: A healthy option that adds color. You can find the full recipe for "Crunchy Fried Okra & Chicken Delight" [here](#). Enjoy frying this tasty dish! You now have a complete guide to making crunchy fried chicken and okra. From marinating chicken to perfecting the frying technique, each step aims for delicious results. Remember, cooking is about balance; adjust flavors to suit your taste. Experiment with healthier options or regional twists for variety. Store leftovers properly to keep them tasty. With these tips, you can enjoy a meal that impresses family and friends. Dive in and enjoy making this dish your own!

Fried Okra and Chicken Tasty Crispy Comfort Meal

Craving a meal that brings warmth and comfort? Look no further than my Fried Okra and Chicken! This tasty dish

Here’s what you need to make a tasty creamy cucumber salad: - 2 large cucumbers, thinly sliced - 1 cup Greek yogurt - 1 tablespoon apple cider vinegar - 1 clove garlic, minced - 1 teaspoon dill, chopped (fresh or dried) - 1 tablespoon honey - Salt and pepper to taste - 1/4 red onion, thinly sliced - 1/4 cup cherry tomatoes, halved (optional for garnish) These simple ingredients come together to create a fresh and flavorful treat. Each one adds its own unique taste. For example, the Greek yogurt brings creaminess, while the apple cider vinegar adds a nice tang. The dill gives that herbaceous kick, perfect for summer. You can find the full recipe in the earlier sections, which guides you through each step to make this salad a hit. Enjoy this salad chilled as a side or a light meal. - Wash and slice cucumbers thinly. - Optional: Peel cucumbers for a lighter flavor. Start by picking fresh cucumbers. Rinse them under cool water. Thinly slice them for the best texture. If you want a milder taste, peel off the skin. This step is not necessary but can help if you prefer a lighter flavor. - Combine Greek yogurt, apple cider vinegar, minced garlic, dill, and honey in a mixing bowl. - Stir until the mixture is smooth and creamy. In a bowl, mix Greek yogurt with apple cider vinegar. Add minced garlic, dill, and honey. Use a whisk or spoon to blend it well. The goal is a smooth and creamy dressing. It should taste tangy and slightly sweet, perfect for the cucumbers. - Season the yogurt dressing with salt and pepper to taste. - Combine cucumbers and red onion in a large bowl, then pour the yogurt dressing over them. - Gently toss ingredients until cucumbers are well coated. Now, season your yogurt dressing with salt and pepper. Take a large bowl and add your cucumber slices and some sliced red onion. Pour the creamy yogurt dressing over the top. Gently toss the salad until every cucumber is coated. This salad looks great and tastes even better! For the full recipe, check out the details above. - Adjust honey or vinegar for your preferred sweetness and tanginess. - Add fresh herbs like mint or parsley for extra flavor. You can play with the dressing. If you like it sweeter, add more honey. If you want it tangy, add more vinegar. Fresh herbs elevate the taste, making it bright and lively. - Serve in a chilled bowl and garnish with fresh dill. - Optional: Include a side of whole grain crackers for crunch. A chilled bowl makes the salad look fresh and inviting. Fresh dill not only adds flavor but also looks pretty. Crackers give a nice crunch, making each bite fun. - Prepare salad ahead of time for easy serving. - Refrigerate for at least 30 minutes before serving for optimal flavor melding. Making the salad ahead of time saves stress. The flavors mix well when it sits in the fridge. Aim for at least 30 minutes of chilling for the best taste. Check out the Full Recipe for more details! {{image_2}} You can make your creamy cucumber salad even better by adding fresh herbs. Try using mint for a cool taste or parsley for a fresh kick. Both herbs bring a new flavor. You can also mix different herbs for a unique twist. A little basil or chives can make your salad special. Want to add more color and crunch? Toss in some bell peppers or carrots. They add a nice snap to every bite. If you want creaminess, mix in some avocado. The avocado will blend well with the yogurt dressing. If you want a vegan version, it's easy! Just swap Greek yogurt for a vegan yogurt alternative. This keeps the salad creamy without dairy. You can also use agave instead of honey to sweeten it up. This makes it sweet and still vegan-friendly. Explore these variations to find your perfect creamy cucumber salad! For the full recipe, check out the earlier section. Store leftovers in an airtight container in the refrigerator. This keeps the salad fresh and tasty. It’s best consumed within 2-3 days for optimal flavor. After that, the cucumbers may lose their crispness. Freezing this salad is not a good idea. Cucumbers change in texture when frozen. They become mushy and lose their crunch. Always use fresh ingredients for the best results. You can prepare the dressing ahead of time. This saves you time when you want to serve the salad. Slice the cucumbers just before serving to keep them crisp. Enjoy the fresh flavors with each bite! Generally lasts 2-3 days when stored properly. Keep it in an airtight container. This helps keep the flavors fresh. After a few days, it may lose some crunch. Yes, but Greek yogurt offers a thicker and creamier texture. This makes the salad richer and more satisfying. Regular yogurt may make the dressing thinner. If you prefer a lighter salad, regular yogurt works fine. It pairs well with grilled meats, as a side dish, or on its own for a light meal. Try it with chicken, fish, or steak. You can also enjoy it with whole grain crackers or bread. Yes, all ingredients are naturally gluten-free. This makes it a great option for those with gluten sensitivities. Enjoy this salad without worry. It’s fresh, tasty, and perfect for many diets. This blog post has shown you how to make a tasty creamy cucumber salad. You learned about the fresh ingredients and easy steps for preparing it. We covered some handy tips for adding flavors and different vegetable options. Remember, you can make it vegan or change the herbs to fit your taste. Keeping it fresh ensures every bite is crisp and delightful. With proper storage, your salad stays delicious for days. Enjoy creating this refreshing dish and experimenting with your favorite flavors!

Creamy Cucumber Salad Fresh and Flavorful Treat

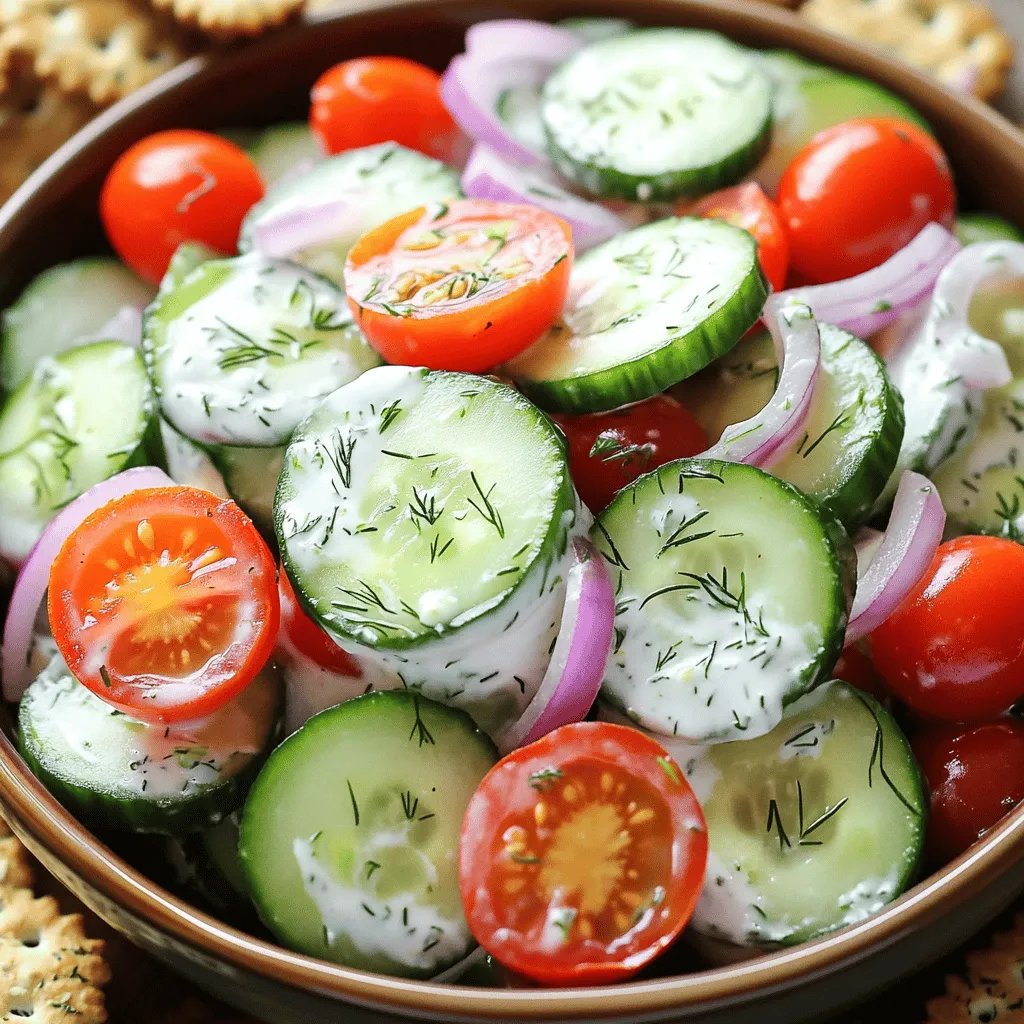
Looking for a refreshing dish that’s simple to make? My Creamy Cucumber Salad is the answer! With crisp cucumbers and

To make a great zucchini cornbread, you need some key ingredients. Here’s what you should gather: - 1 cup all-purpose flour - 1 cup cornmeal - 1 tablespoon baking powder - 1/2 teaspoon salt - 1/2 teaspoon cayenne pepper (optional) - 1/4 cup sugar - 1 cup buttermilk (or plant-based milk) - 1/4 cup honey or maple syrup - 2 large eggs (or 1/4 cup applesauce) - 1 cup grated zucchini (about 1 medium zucchini) - 1 cup corn kernels (fresh, canned, or frozen) - 1/2 cup diced bell pepper (any color) - 1/4 cup chopped fresh cilantro (optional) - 1/4 cup melted butter or coconut oil These ingredients make the cornbread moist and flavorful. The zucchini adds a nice texture. The corn gives it a sweet flavor. If you want to switch things up, consider these optional ingredients: - Use cheese for a savory twist. - Try adding spices like cumin or garlic powder for extra flavor. - Swap honey for agave syrup if you prefer. You can also use different types of milk. Almond, soy, or oat milk work well too. Zucchini is a great vegetable to use in cornbread. It has many health benefits: - Low in calories and high in water content, great for hydration. - Packed with vitamins A and C, which support skin and eye health. - Contains fiber that helps digestion. Adding zucchini to your cornbread not only makes it tasty but also boosts its nutrition. This makes your meal more balanced and satisfying. For the full recipe, check the earlier section. First, gather your ingredients. You will need flour, cornmeal, baking powder, and salt. Make sure you have grated zucchini and corn kernels ready. This helps the recipe go smoothly. Preheat your oven to 375°F (190°C). Grease an 8-inch baking dish to prevent sticking. 1. In a large bowl, mix the flour, cornmeal, baking powder, salt, and sugar. Use a whisk to blend them well. 2. In another bowl, combine the buttermilk, honey, and eggs. Whisk until smooth. 3. Slowly add the wet mix to the dry mix. Stir gently to combine. Don’t overmix; a few lumps are fine. 4. Fold in the grated zucchini, corn, diced bell pepper, and melted butter. Mix until just combined. 5. Pour the batter into the greased dish. Smooth the top with a spatula. 6. Bake for 25-30 minutes. Check with a toothpick; it should come out clean. 7. Let it cool for about 10 minutes before slicing. To get the right texture, don’t overmix your batter. Lumps are okay! If your zucchini is very watery, squeeze some moisture out before adding it. This helps keep the bread from being too wet. For extra flavor, consider using fresh herbs or spices. The right additions can really elevate your cornbread. When making zucchini cornbread, avoid overmixing the batter. This can make it tough. Mix just until combined. Another mistake is not squeezing excess water from the zucchini. Wet zucchini can lead to a soggy bread. Always grate it and then squeeze out the water before adding it to the mix. Lastly, don’t skip preheating your oven. A hot oven helps the bread rise properly. To boost flavor, consider adding spices like cumin or paprika. These spices can give your cornbread a warm kick. For extra sweetness, add a bit more honey or maple syrup. You can also toss in cheese, like cheddar, for a rich texture and flavor. Adding fresh herbs like cilantro or green onions will brighten the taste. Don’t forget to fold in some cooked bacon or jalapeños for a savory twist. To make this recipe vegan, swap eggs for applesauce and use plant-based milk. For gluten-free options, replace all-purpose flour with a gluten-free flour blend. Just check if your cornmeal is gluten-free, too. If you want a lower sugar option, reduce the honey or maple syrup. You can also use stevia or another sweetener as a substitute. These changes help everyone enjoy this delicious dish. For the full recipe, check out the detailed instructions above. {{image_2}} You can make zucchini cornbread even better by adding cheese or spices. Try mixing in 1 cup of shredded cheese, like cheddar or pepper jack. This adds creaminess and a nice flavor. If you like heat, add a teaspoon of chili powder or a pinch of cumin. These spices will give your cornbread a tasty twist. Want to make this recipe vegan? Use plant-based milk and replace eggs with 1/4 cup of applesauce. For a gluten-free version, swap all-purpose flour with a gluten-free blend. Just check that your cornmeal is also gluten-free. These changes keep the cornbread soft and moist. Get creative with add-ins for your cornbread. Consider adding cooked bacon bits for a savory touch. You can also fold in diced jalapeños for spice. If you prefer sweet, try mixing in blueberries or chopped apples. These flavors will give your cornbread a unique and yummy twist. For the full recipe, check out the Zesty Zucchini Cornbread. To keep your zucchini cornbread fresh, store it in an airtight container. If you have leftovers, let the cornbread cool first. Then, place it in the container and seal it tight. This helps prevent it from drying out. You can keep it at room temperature for up to two days. For longer storage, move it to the fridge. It will stay good for about a week. Reheating zucchini cornbread is simple. Preheat your oven to 350°F (175°C). Place the slices on a baking sheet. Cover them with foil to keep them moist. Heat for about 10 to 15 minutes. If you're in a rush, you can use the microwave. Heat for 15 to 30 seconds per slice. Check that it is warm all the way through. Freezing zucchini cornbread is a great option for long-term storage. First, let the cornbread cool completely. Then, slice it into pieces. Wrap each piece in plastic wrap. After that, place the wrapped slices in a freezer bag. Be sure to squeeze out as much air as you can. This helps prevent freezer burn. You can freeze it for up to three months. To thaw, place it in the fridge overnight or let it sit at room temperature for a few hours. Enjoy the full recipe anytime you want! Yes, you can use frozen zucchini. Just thaw it first and drain any excess water. This helps keep your cornbread from becoming too wet. Frozen zucchini works well if you do not have fresh zucchini on hand. To make your cornbread sweeter, add more sugar or honey. You can also mix in some mashed bananas or applesauce. These options add extra sweetness and moisture. Adjust the amount based on your taste. Serve your Zucchini Cornbread warm with honey or butter. It also pairs well with soups and stews. For a twist, add a dollop of sour cream or yogurt on top. You can even enjoy it as a snack with a side of salsa. Try it with a fresh salad for a light meal. For the full recipe, check out the Zesty Zucchini Cornbread above. Zucchini cornbread is a fun and tasty dish. We explored key ingredients and options to change the flavors. I shared easy steps for preparation and tips to avoid mistakes. You learned how to store leftovers and even adjust the recipe for different diets. Zucchini adds health benefits like vitamins and fiber. With these ideas, you can make delicious cornbread every time! Enjoy trying new variations and sharing them with friends.

Zucchini Cornbread Flavorful and Easy to Make Recipe

Are you ready to bake something special? Zucchini cornbread is a tasty way to enjoy summer produce. This easy recipe

For these enchiladas, you need key items that make them tasty. Gather these main ingredients: - 2 cups shredded cooked chicken - 1 cup black beans, rinsed and drained - 1 cup corn kernels (fresh or frozen) - 1 cup diced bell peppers (red and green) - 1 small onion, finely chopped - 2 cloves garlic, minced - 1 cup sour cream - 1 cup shredded cheese (cheddar or a blend) - 8 large flour tortillas - 2 cups enchilada sauce (store-bought or homemade) These elements come together to create a hearty filling that packs flavor. Now, let’s talk about the seasonings. They add depth and warmth to your dish. You will need: - 1 teaspoon ground cumin - 1 teaspoon chili powder - 1 tablespoon olive oil - Salt and pepper to taste These spices enhance the chicken and veggies, making every bite delicious. Garnishes add color and freshness. For your enchiladas, consider: - Fresh cilantro This bright herb brings a nice touch to the dish. You can also add extra sour cream or some salsa on the side for more flavor. Enjoy your cooking! {{ingredient_image_1}} Start by preheating your oven to 375°F (190°C). This helps cook the enchiladas evenly. While the oven heats, grab a large skillet. Pour in one tablespoon of olive oil and set it over medium heat. Add one finely chopped onion and one cup of diced bell peppers. Cook them for about five minutes. You want them soft and fragrant. Next, stir in two cloves of minced garlic, one teaspoon of ground cumin, and one teaspoon of chili powder. Cook this mixture for another minute. The spices will give your filling a great flavor. In a large bowl, mix two cups of shredded cooked chicken, one cup of rinsed black beans, one cup of corn kernels, and the sautéed veggie mix. Add half of the one cup of shredded cheese and one cup of sour cream. Season with salt and pepper to your taste. This filling is packed with flavor. Now, it’s time to roll the enchiladas. Take one large flour tortilla and lay it flat on a clean surface. Spoon about one-quarter cup of the chicken mixture into the center. Roll the tortilla tightly and place it seam-side down in a greased 9x13 inch baking dish. Repeat this step with the remaining tortillas and filling. Make sure to fit them snugly in the dish. Once all tortillas are rolled, pour two cups of enchilada sauce evenly over them. Ensure every tortilla is covered. Next, sprinkle the remaining cheese on top. This will melt beautifully while baking. Cover the baking dish with aluminum foil. This keeps the enchiladas moist as they bake. Place the dish in your preheated oven for 20 minutes. After that, remove the foil. Bake for another 10 minutes until the cheese is bubbly and slightly golden. When done, take the dish out of the oven. Let it cool for a few minutes. Before serving, garnish with fresh cilantro. Serve these enchiladas hot, and enjoy every bite. For extra flavor, add some sour cream on top or serve with tortilla chips and salsa. To boost the flavor of your enchiladas, use fresh spices. Ground cumin and chili powder are key. They add warmth and depth. When sautéing, let the onion and peppers cook until soft. This step builds a solid base. Mix in the garlic last to keep its bold taste. For a twist, add a splash of lime juice to the filling. It brings brightness and freshness. Want to save time? Use rotisserie chicken. It’s already cooked and adds great flavor. You can also buy pre-chopped vegetables. This cuts down on prep time. Store-bought enchilada sauce works well too. If you want, mix it with a bit of sour cream. This adds creaminess and a unique taste without much effort. Serve your enchiladas hot and fresh. Top them with extra sour cream and cilantro. This adds color and flavor. Pair them with tortilla chips for crunch. A side of salsa brings a nice kick. For a complete meal, add a green salad. Fresh greens balance the richness of the enchiladas. Enjoy every bite! Pro Tips Use Rotisserie Chicken: For a quicker prep time, consider using store-bought rotisserie chicken. It adds great flavor and saves you time on cooking the chicken. Customize the Heat: Adjust the chili powder and cumin to suit your spice preference. You can also add diced jalapeños or a dash of hot sauce for an extra kick. Make Ahead: These enchiladas can be assembled and refrigerated a day in advance. Just cover with foil and bake when ready to serve, adding a few extra minutes to the baking time. Garnish Creatively: Enhance presentation by garnishing with sliced avocados, diced tomatoes, or a drizzle of lime crema for a burst of freshness and color. {{image_2}} You can change the filling in your enchiladas to match your taste. For a twist, try adding cooked shrimp or sautéed mushrooms. You can also use roasted vegetables like zucchini or squash. If you want more spice, add jalapeños or diced green chiles. You can even make a breakfast version with scrambled eggs and cheese. While enchilada sauce is classic, don’t be afraid to switch it up. You can use green salsa or mole sauce for a unique flavor. You might also try a creamy white sauce made with sour cream and green chilies. For a fun spin, mix in some chipotle peppers for a smoky taste. Experiment with different sauces and find what excites your palate. If you want a healthier enchilada, consider using whole wheat tortillas. You can also swap sour cream for Greek yogurt. Instead of cheese, use a sprinkle of nutritional yeast for a cheesy flavor. For extra veggies, add spinach or kale to the filling. These changes can make your enchiladas lighter while still being tasty! After enjoying your ultimate chicken enchiladas, you may have extras. To store leftover enchiladas, let them cool down to room temperature. Then, place them in an airtight container. You can keep them in the fridge for up to three days. Make sure the container is sealed well to avoid drying out. When you are ready to eat your enchiladas again, reheating is simple. Preheat your oven to 350°F (175°C). Place the enchiladas in a baking dish. Cover them with foil to keep them moist. Heat for about 15-20 minutes. If you want them extra cheesy, remove the foil for the last five minutes. This way, the cheese will melt perfectly. If you want to save enchiladas for later, freezing is a great option. First, let them cool completely. Wrap each enchilada tightly in plastic wrap. Then, place them in a freezer-safe bag. You can freeze them for up to three months. When you are ready to eat, thaw them overnight in the fridge. Reheat in the oven as mentioned above for the best taste. The best way to cook chicken for enchiladas is to roast or boil it. You can use a rotisserie chicken for quick prep. Just shred the cooked chicken into small pieces. It should be moist and flavorful. Seasoning the chicken with salt, pepper, and spices helps too. This will add more taste to your enchiladas. Yes, you can use corn tortillas instead of flour. Corn tortillas give a great flavor and texture. They are also gluten-free, which is perfect for those with dietary needs. Just warm them slightly before filling. This makes them easier to roll without breaking. To make enchilada sauce from scratch, follow these simple steps. Start with these ingredients: - 2 tablespoons olive oil - 2 tablespoons chili powder - 1 teaspoon ground cumin - 2 cups tomato sauce - 1 cup vegetable or chicken broth - Salt to taste 1. Heat olive oil in a pan over medium heat. 2. Add chili powder and cumin, cooking for one minute. 3. Mix in tomato sauce and broth, stirring well. 4. Bring to a simmer and cook for about 10 minutes. 5. Add salt to taste, and your sauce is ready! This sauce is fresh and full of flavor, perfect for your enchiladas. You learned the key ingredients and steps for making chicken enchiladas. The tips provided will help you create the best flavor. Explore different fillings and sauces to keep things fresh. Don't forget how to store and reheat leftovers for future meals. Experiment with the variations to make it your own. Enjoy your cooking journey and have fun with this tasty dish!

Ultimate Chicken Enchiladas Tasty and Easy Recipe

Are you ready to elevate your dinner game? My Ultimate Chicken Enchiladas recipe promises tasty flavors and simple steps. You’ll

- 2 packets frozen acai puree - 1 ripe banana - 1 cup unsweetened almond milk - 1 tablespoon almond butter - Sweetener (honey or agave syrup) To make the acai smoothie bowl, start with quality ingredients. Frozen acai puree gives a rich taste and vibrant color. A ripe banana adds natural sweetness and creaminess. Almond milk serves as a smooth base, but you can use any milk you like. Almond butter adds a nice nutty flavor. You can choose your sweetener based on your taste. - 1/2 cup granola - 1/4 cup shredded coconut - Fresh fruits (strawberries, blueberries, kiwi, mango) - Chia seeds and mint leaves For the toppings, granola provides a crunchy texture. Shredded coconut adds a tropical twist. Fresh fruits not only look great but also boost flavor and nutrients. You can mix and match fruits based on what you love. Chia seeds give a nice crunch and healthy benefits. Mint leaves add freshness and a pop of color. This recipe is flexible. You can use the [Full Recipe] to explore all the delicious options for your acai smoothie bowl. Enjoy creating your energizing and healthy delight! 1. First, gather your ingredients. You need frozen acai, a ripe banana, almond milk, almond butter, and a sweetener. 2. Next, place the frozen acai, sliced banana, almond milk, almond butter, and your choice of sweetener into a blender. 3. Blend these ingredients until smooth and creamy. If it's too thick, add more almond milk. 4. Taste the mixture and adjust the sweetness if needed. Add more honey or agave syrup for a sweeter flavor. 1. Pour the blended acai mixture into a bowl. 2. Now, it's time to add your toppings. Arrange granola, fresh fruits, and shredded coconut on top. 3. For a finishing touch, sprinkle chia seeds over the bowl. 4. Finally, garnish with fresh mint leaves to add a pop of color and freshness. You can find the full recipe for the Acai Bliss Smoothie Bowl at the end of the article. Enjoy your vibrant and energizing delight! To make your acai smoothie bowl smooth, start with the right amount of almond milk. Use one cup, but you can add more if it is too thick. This helps blend the frozen acai and banana well. When you use frozen ingredients, blend in small bursts. This prevents the blender from getting stuck. If you notice lumps, stop and stir the mixture. Keep blending until it’s creamy and smooth. You can boost the flavor and health benefits of your smoothie bowl easily. Try adding a scoop of protein powder or a handful of fresh spinach. Both options mix well and add extra nutrients. For sweeteners, consider using maple syrup or coconut sugar instead of honey. This gives you a chance to switch up the taste. Each choice brings a unique flavor to your acai bowl. {{image_2}} You can switch up the fruits in your acai smoothie bowl. A tropical version adds fun and flavor. Use mango, pineapple, and banana. This mix creates a sweet and refreshing taste. Another option is the berry medley. Combine strawberries, blueberries, and raspberries. These berries pack a punch of color and vitamins. Each bite bursts with juicy goodness. Feel free to mix and match your favorites! Change your toppings for new textures and flavors. Nut butter is a great choice. Almond, peanut, or cashew butter all work well. They add richness and creaminess to your bowl. Seeds and nuts offer a nice crunch. Try chia seeds, pumpkin seeds, or walnuts. These add healthy fats and protein. Plus, they make your bowl more filling. Adding different toppings keeps things interesting and fun! For the full recipe, check out the Acai Bliss Smoothie Bowl. Enjoy the journey of creating your perfect bowl! To keep your acai smoothie bowl fresh, refrigerate any leftovers right away. Place the bowl in an airtight container. This helps to keep the air out and maintain the taste. Use a glass or plastic container that seals tightly. If you store it properly, your smoothie bowl can last up to two days in the fridge. You can freeze the smoothie base for later use. Pour the leftover smoothie into ice cube trays or freezer-safe bags. This way, you can enjoy it later. To thaw, simply remove the cubes or bags and let them sit at room temperature for about 30 minutes. You can also microwave them for a quick thaw. Just make sure to stir well before serving. An acai smoothie bowl is a thick blend of acai berries, bananas, and milk. It often features toppings like fruits, granola, and seeds. This dish is popular for breakfast or as a snack. The vibrant color and fresh taste make it appealing. It’s healthy, refreshing, and full of nutrients. Many people love it because it looks great and tastes even better. Yes, you can make acai bowls without frozen acai. You can use acai powder instead. Mix the powder with yogurt or milk for a creamy base. Some people use other berries like blueberries or strawberries. This way, you can still enjoy a tasty bowl without acai. Just blend your chosen fruit with milk and add your favorite toppings. Acai berries are rich in antioxidants, vitamins, and minerals. They help fight inflammation and boost heart health. Acai also contains healthy fats that support brain function. One serving has fiber that aids digestion and keeps you full. Eating acai can improve your skin and give you energy. It’s a smart choice for a healthy diet. You can find acai products at most grocery stores. Look in the frozen foods section for acai puree. Health food stores often carry acai powder. Many online shops offer these products as well. Brands like Sambazon and Açaí Roots are popular and trusted. Always check for organic options for better quality. You can easily adjust the acai bowl recipe for dietary needs. To make it vegan, just use plant-based milk and skip honey. For gluten-free, ensure your granola is labeled gluten-free. If you need nut-free, swap almond butter for sunflower seed butter. You can still enjoy a delicious acai bowl while meeting your dietary requirements. Acai Bliss Smoothie Bowl 🥥 Recipe Details You learned how to make a tasty acai smoothie bowl. We covered the main ingredients, like frozen acai puree and banana, and showed you the best toppings. I provided step-by-step instructions for blending and serving. We talked about tips for the perfect consistency and added nutrition. If you want to get creative, try different fruits or toppings. Store any leftovers properly or even freeze them for later. Enjoy the health benefits of acai while making it your own. Dive into this delicious treat today!

Acai Smoothie Bowl Energizing and Healthy Delight

Are you ready to whip up a tasty treat that’s both delicious and good for you? Acai smoothie bowls are

- 1 ½ cups all-purpose flour - ½ cup powdered sugar - ½ cup unsalted butter, softened - 1 egg yolk - 1 teaspoon vanilla extract - 1 cup heavy cream - 1 cup whole milk - ½ cup granulated sugar - 2 tablespoons cornstarch - 2 teaspoons vanilla extract (for filling) - 1 cup fresh raspberries - Fresh mint leaves for garnish To make Mini Vanilla Cream Tarts with Raspberries, you need simple ingredients. Each one plays a key role in creating the perfect tart. The flour is the base for the crust. It gives the tart its shape and texture. Powdered sugar sweetens the crust and makes it tender. The butter adds richness and flavor, while the egg yolk helps bind everything together. Vanilla extract brings a warm, sweet aroma. For the filling, heavy cream and whole milk create a smooth, creamy texture. Granulated sugar balances the flavors, and cornstarch thickens the cream. The extra vanilla enhances the taste, making it more delightful. Fresh raspberries add a pop of color and a tart flavor. Finally, mint leaves serve as a bright garnish. These fresh ingredients come together to create a beautiful dessert. For the full recipe, refer to the mentioned section above. Making Mini Vanilla Cream Tarts is a fun and rewarding task. Let's dive into the steps to create these delightful treats. - Combine 1 ½ cups all-purpose flour and ½ cup powdered sugar in a bowl. - Add ½ cup softened unsalted butter, 1 egg yolk, and 1 teaspoon vanilla extract. - Mix until the dough is crumbly and holds together. - Chill the dough for at least 30 minutes. Wrap it in plastic wrap. - On a floured surface, roll the dough out to about ¼ inch thick. - Cut circles that fit your mini tart pans and press them gently inside. - Prick the bottoms of the tart shells with a fork to stop bubbling. - Blind bake the tart shells at 350°F (175°C) for 15-20 minutes. - Let them cool completely before filling with homemade vanilla cream. - Spoon or pipe the cooled vanilla cream into each tart shell. - Place fresh raspberries on top in a decorative way. - Chill the tarts in the fridge for at least one hour before serving. For a complete guide, check out the Full Recipe. Enjoy crafting these sweet bites! To make the best mini vanilla cream tarts, you need to chill the dough properly. Chilling firms up the dough, making it easier to roll out. I recommend at least 30 minutes in the fridge. This step is key to preventing shrinkage during baking. Next, pay close attention to your baking time. If your oven runs hot, check the tarts a few minutes early. You want them to be lightly golden, not dark. If you underbake, the shells may be too soft. If you overbake, they will taste dry. Presentation makes a big difference in how your tarts are enjoyed. Garnish each tart with a fresh mint leaf. The bright green color adds a nice contrast to the tarts. It’s simple but effective. When serving, arrange the tarts on a decorative platter. A beautiful display draws people in. You can also use a cake stand for a more elegant touch. While raspberries shine in these tarts, consider other fruits too. Sliced strawberries or blueberries can change the look and taste. You can also try topping with a drizzle of chocolate sauce. A berry coulis can add a splash of color and flavor. For a fun twist, think about adding lemon curd or caramel. These flavors mix well with vanilla cream. Experimenting with toppings can make your tarts even more special. Check the Full Recipe for more ideas! {{image_2}} You can change the filling to fit your taste. Try making a chocolate cream. Just swap in some melted chocolate for half of the vanilla cream. You can also use fruit-flavored cream. Add lemon or orange zest for a citrus kick. Mix in pureed berries for a fruity twist. This way, you can create fun flavors that everyone will enjoy. Not a fan of the classic crust? You can use different types. Graham cracker crust adds a sweet crunch. Just crush the crackers and mix with melted butter. For a nutty flavor, try almond flour crust. Mix almond flour with coconut oil and a bit of sugar. These alternatives can give your tarts a unique taste and texture. If you need gluten-free options, you can use gluten-free flour blends. They work just as well in the crust. For dairy-free needs, swap heavy cream with coconut cream. This adds richness without the dairy. You can also use almond milk instead of whole milk. These changes keep your tarts delicious for everyone to enjoy. For the full recipe, check out the Mini Vanilla Cream Tarts with Raspberries. To keep your mini vanilla cream tarts fresh, store them in the fridge. Place the tarts in an airtight container. This will prevent them from drying out. Keep them chilled for best taste and texture. It's best to avoid stacking them, as this can cause damage. If you want to save some tarts for later, freezing is an option. First, make sure the tarts are completely cool. Then, wrap each tart tightly in plastic wrap. After that, place them in a freezer-safe bag. They can last for up to two months in the freezer. When you're ready to eat them, thaw them in the fridge overnight. In the fridge, mini vanilla cream tarts stay fresh for about three days. After that, the crust may get soggy, and the cream can lose its texture. For the best taste, enjoy them within this time frame. This way, you’ll have the best flavor and texture with each bite. Making mini vanilla cream tarts takes about 2 hours total. Here’s the time breakdown: - Prep time: 30 minutes for mixing and chilling the dough. - Baking time: 15-20 minutes for blind baking. - Filling: 15 minutes to prepare the vanilla cream. - Chilling time: At least 1 hour before serving. Yes, you can use frozen raspberries! Here are the pros and cons: - Pros: Frozen raspberries are often cheaper and available all year. They are also easy to store. - Cons: They may be softer and release more juice than fresh raspberries. This can make your tarts a bit soggy. If you want a lighter or dairy-free option, try these substitutes: - Coconut cream: It adds a nice flavor and is dairy-free. - Cashew cream: Blend soaked cashews with water for a creamy option. - Half-and-half: It’s lower in fat than heavy cream but still rich. You can prepare the tarts in advance: - Make the tart shells a day before and store them in an airtight container. - You can also prepare the vanilla cream a day ahead. Just keep it in the fridge. - Fill the shells and add raspberries a few hours before serving for the best taste. Yes, you can adapt these tarts for different diets: - Gluten-free: Use almond flour or a gluten-free flour blend. - Vegan: Substitute the butter with coconut oil and use a plant-based cream. - Dairy-free: Try coconut or almond milk instead of dairy milk and cream. For the full recipe, check out the details above. Enjoy making these delightful mini tarts! You've learned how to make delicious mini vanilla cream tarts. We covered the key ingredients, from buttery dough to fresh raspberries. The step-by-step instructions guide you through making, baking, and decorating your tarts perfectly. We also explored variations and storage tips. With a few simple tricks, you can impress anyone. Enjoy crafting your tarts and experimenting with flavors. They bring joy and taste to any occasion. Whether for a party or a cozy night, these tarts are a treat!

Mini Vanilla Cream Tarts with Raspberries Delight

Welcome to the sweet world of Mini Vanilla Cream Tarts with Raspberries! Today, I’ll show you how to make these

To make crispy garlic Parmesan potatoes, you need: - 2 pounds baby potatoes, halved - 4 tablespoons olive oil - 4 cloves garlic, minced - 1 teaspoon garlic powder - 1 teaspoon onion powder - 1 teaspoon paprika - ½ teaspoon dried thyme - ½ teaspoon salt - ½ teaspoon black pepper - ½ cup grated Parmesan cheese - Fresh parsley, chopped (for garnish) When measuring, it's best to use a kitchen scale for the potatoes. This gives you exact amounts. For the olive oil, use a tablespoon measure for accuracy. A garlic press works well for mincing garlic. If you don’t have one, chop it finely with a knife. Each teaspoon of spices should be leveled off for precise flavor. If you don’t have baby potatoes, you can use regular potatoes. Cut them into smaller pieces. For olive oil, feel free to use canola or avocado oil. If you need a dairy-free option, try nutritional yeast instead of Parmesan cheese. You can also switch garlic powder for more fresh garlic if you like a stronger flavor. Fresh herbs, like rosemary or thyme, can replace dried thyme for more aroma. Explore the [Full Recipe](#) for more insights on cooking tips! First, gather your baby potatoes. I like to use 2 pounds of them. Halve each potato to help them cook evenly. This step is important for crispiness. Next, preheat your oven to 425°F (220°C). Line your baking sheet with parchment paper. This makes cleanup easier and helps the potatoes crisp up well. In a large bowl, pour in 4 tablespoons of olive oil. Then, add 4 cloves of minced garlic for a strong flavor. Next, include 1 teaspoon each of garlic powder, onion powder, and paprika. These spices add depth to the dish. Add ½ teaspoon each of dried thyme, salt, and black pepper for balance. Mix well to create a tasty blend. Now, toss the halved potatoes in the garlic oil mixture. Ensure each potato is coated well. Spread them in a single layer on the baking sheet, cut side down. This helps them get crispy. Roast in the oven for about 25-30 minutes. Flip the potatoes halfway through to ensure even cooking. When they are golden and tender, take them out. Sprinkle ½ cup of grated Parmesan cheese on top. Return the potatoes to the oven for 5 more minutes. This melts the cheese and gives it a nice crunch. Finally, let them cool for a few minutes. Garnish with fresh parsley before serving. Enjoy your crispy garlic Parmesan potatoes! For the full recipe, check out the earlier section. To get that crispy texture, start with the right potatoes. Baby potatoes work best. They have a thin skin that crisps up nicely. Halve them to increase the surface area for roasting. This allows more edges to turn golden brown. Make sure to coat the potatoes evenly in oil. Use enough olive oil to help them crisp. Spread them out in a single layer on your baking sheet. Crowding them can lead to steaming instead of roasting. Flip the potatoes halfway through cooking for even crispiness. Flavor comes from the right blend of seasonings. I like to mix garlic, onion powder, and paprika. This blend gives great depth. The garlic adds a nice punch. The paprika gives a bit of smokiness. Roasting at a high temperature is key. Set your oven to 425°F (220°C). This helps the potatoes cook quickly. It also ensures they become tender inside while getting crispy outside. Want to amp up the flavor? Consider adding more ingredients. Fresh herbs like rosemary or thyme can add a nice touch. You can mix them in with the garlic oil. If you love cheese, try different types. Cheddar or feta can bring a new taste. For a spicy kick, add chili flakes. Just a pinch can make a big difference. You can find the full recipe to make these delicious Crispy Garlic Parmesan Potatoes and explore more fun ideas! {{image_2}} You can change the cheese for a new taste. Instead of Parmesan, try cheddar. It gives a nice sharp flavor. You can also use feta for a tangy twist. Crumbled goat cheese adds creaminess. Each cheese offers a unique touch to your crispy garlic parmesan potatoes. Herbs can boost the flavor of your dish. Try adding fresh rosemary or thyme. These herbs bring a delightful aroma. You can also use dried herbs if fresh is not available. Mixing in some Italian seasoning can enhance the overall taste. Experiment with your favorite herbs to find what you love. Want some heat? Add chili flakes to your garlic mix. Start with a small amount and add more if you like it spicy. You can also toss in some cayenne pepper for an extra kick. A dash of hot sauce before serving can also spice things up. Adjust the heat to match your taste buds. For the full recipe, check out the original instructions above! To store leftover potatoes, let them cool first. Place them in an airtight container. Seal it well to keep them fresh. Store them in the fridge for up to three days. This helps maintain their flavor and texture. When you're ready to eat the leftovers, preheat your oven to 350°F (175°C). Spread the potatoes on a baking sheet. Heat them for about 10-15 minutes. This will help restore their crispiness. You can also use a microwave. Just remember, they might not be as crispy. Freezing these potatoes is easy. First, allow them to cool completely. Then, place them in a freezer-safe bag. Remove as much air as possible before sealing. They can stay in the freezer for up to three months. To enjoy, thaw in the fridge overnight and reheat in the oven. This way, you will still have a tasty treat later! For the full recipe, check the earlier section. Yes, you can use regular potatoes. Just cut them into small, even pieces. This helps them cook the same as baby potatoes. Aim for about the same size as halved baby potatoes. This will help with even cooking and crispiness. To make this recipe vegan, simply skip the Parmesan cheese. You can use nutritional yeast instead for a cheesy flavor. It gives a nice taste and keeps the dish plant-based. You could also try vegan cheese if you prefer a melted texture. To ensure even cooking, cut the potatoes into uniform pieces. This way, they all roast at the same rate. Spread them out on the baking sheet in a single layer. Avoid crowding the pan, as this can lead to steaming instead of roasting. Flipping them halfway through cooking also helps achieve that perfect crisp. For the full recipe, check the detailed steps above. Crispy garlic parmesan potatoes are simple and fun to make. We covered all the key steps, from ingredients to cooking tips. You can swap ingredients or add flavors to suit your taste. Storing and reheating your leftovers keeps them tasty. Remember, the perfect crisp comes from the right techniques. Don’t hesitate to experiment! Creating your own version can bring new joy. Enjoy your cooking and share the results with friends and family.

Crispy Garlic Parmesan Potatoes Savory and Simple Dish

Do you crave a tasty and easy side dish? Look no further! Crispy Garlic Parmesan Potatoes are simple to make

To make frozen yogurt bark, you need a few key ingredients: - 2 cups Greek yogurt (plain or flavored) - 1 tablespoon honey or maple syrup (optional) - 1/2 cup mixed berries (strawberries, blueberries, raspberries) - 1/4 cup chopped nuts (almonds, walnuts, or pistachios) - 2 tablespoons dark chocolate chips (optional) These ingredients create a creamy and tasty treat. The Greek yogurt gives it a rich base. You can use any flavor of yogurt you like. If you want your bark a bit sweeter, try adding honey or maple syrup. Just one tablespoon will do. This step is optional, so feel free to skip it if you prefer less sweetness. The berries and other toppings add their own natural sweetness too. You can get creative with your toppings! Here are some fun ideas: - Fresh fruits like banana slices or kiwi - Nuts such as pecans or hazelnuts - Granola for a crunchy texture - Coconut flakes for extra flavor Mix and match these options to find your favorite combination. Each topping adds a new twist to your frozen yogurt bark. To start, gather your ingredients. You will need Greek yogurt, mixed berries, nuts, and more. Line a baking sheet with parchment paper. This helps with easy removal later. In a bowl, mix Greek yogurt with honey or maple syrup. Stir until smooth and creamy. Then, spread the yogurt mixture on the lined baking sheet. Aim for about 1/4 inch thick. This thickness helps it freeze well. Next, sprinkle your mixed berries over the yogurt. Press them in gently so they stick. Then, add your chopped nuts and dark chocolate chips. Spread them evenly for a nice crunch. Use a spatula to spread the yogurt. Start from the center and push out to the edges. This method helps to keep the layer even. If you want a smooth top, use the back of the spatula. Make sure there are no holes or gaps. These could lead to uneven freezing. Once you have everything spread out, place the baking sheet in the freezer. Freeze it for at least 4 hours. This time allows the yogurt to become solid. If you want to check if it’s ready, poke it gently. If it feels firm, it’s done. After freezing, take it out and peel off the parchment paper. Now you can break the bark into pieces. Serve right away or store in an airtight container in the freezer. You can find the full recipe above for more details. To get that ideal texture in your frozen yogurt bark, use full-fat Greek yogurt. This yogurt is rich and creamy, giving a nice bite. If you choose a low-fat version, it may freeze too hard. Mix in honey or maple syrup for a touch of sweetness. This makes the bark softer and easier to break apart. Spread the yogurt about 1/4 inch thick on the baking sheet. A thicker layer may take longer to freeze, so keep it even. You can make frozen yogurt bark your own! Try using different fruits like mango or kiwi. Each fruit adds a special taste and color. For nuts, use what you love—almonds, walnuts, or pistachios work great. Want more fun? Add dark chocolate chips or coconut flakes. Be creative! You can even mix in spices like cinnamon or vanilla for extra flavor. Just ensure you balance the flavors with the yogurt base. When it’s time to serve, break the bark into pieces of any size. Arrange them on a nice plate for a fun look. Add fresh mint leaves on top for a pop of green. A drizzle of honey over the bark makes it even more appealing. You can also pair it with fresh fruit on the side. This gives a nice touch and adds to the fun. Enjoy your frozen yogurt bark as a cool snack or a light dessert! For a full recipe, check the Full Recipe. {{image_2}} You can use various yogurts for your bark. Greek yogurt is thick and creamy. It offers a rich taste. You can also try flavored yogurts like vanilla or strawberry. These add a fun twist. For a lighter option, use regular yogurt. Each choice gives a unique flavor to your treat. Seasonal fruits make great toppings. In summer, choose fresh berries like strawberries and blueberries. In fall, add sliced apples or pumpkin spice. Winter calls for citrus fruits like oranges or pomegranates. Each season brings new tastes. Don’t forget to add nuts for crunch. They add a nice texture and flavor contrast. You can easily make this treat vegan. Use coconut yogurt or almond yogurt instead of dairy. These options are creamy and delicious. For sweetening, use maple syrup or agave nectar. They blend well with plant-based yogurts. This way, everyone can enjoy Frozen Yogurt Bark without dairy. To keep your frozen yogurt bark fresh, place it in an airtight container. I prefer using a glass or plastic container with a tight lid. This helps keep moisture out and flavor in. If you made a big batch, you can also wrap the bark pieces in plastic wrap before placing them in the container. Make sure to layer parchment paper between the pieces to avoid sticking. If you have leftovers, you can re-freeze them easily. Just ensure the bark is in an airtight container. When you're ready to enjoy it again, take it out and let it sit for a few minutes. This softens it slightly, making it easier to break into pieces. If it was not fully thawed before, it may have a little ice. Just give it a gentle squeeze or tap to break it apart. Frozen yogurt bark can last up to two months in the freezer. After this time, it may lose some flavor and texture. To enjoy it at its best, eat it within the first month. The yogurt may become icy but should still taste good. When you pull it out, check for any off smells or changes in color. If it looks good, it’s still safe to eat. For the best experience, serve it fresh or within a few weeks of making it. Frozen yogurt bark is a fun, tasty treat. It is made from yogurt that you freeze. You can add fruits, nuts, and chocolate to it. When frozen, you can break it into pieces. Each bite is cool and creamy. It’s a great way to enjoy yogurt in a new form. You can make it with Greek yogurt for a thicker texture or use flavored yogurt for more taste. The best part? You can customize it however you want! Yes, you can use non-dairy yogurt! Many people enjoy dairy-free options. Almond, coconut, or soy yogurt works great. Just make sure it has a similar texture to Greek yogurt. This will help your bark hold its shape. You can still add your favorite fruits and nuts. Non-dairy yogurt makes this treat friendly for everyone. You can freeze frozen yogurt bark for up to two months. It stays tasty and fresh during this time. For best results, keep it in an airtight container. This helps prevent ice crystals. When you’re ready to eat it, just break off a piece. You can let it sit a bit to soften or enjoy it right away! You learned how to make tasty frozen yogurt bark. We covered essential ingredients, sweeteners, and toppings to enhance flavor. I shared easy step-by-step instructions, tips for texture, and storage methods. You can even customize your bark with unique flavors and options. Now, enjoy making this fun treat your way! With simple steps and fun variations, this dessert will please everyone. Keep experimenting, and you might discover your favorite version.

Frozen Yogurt Bark Delightful and Simple Treat

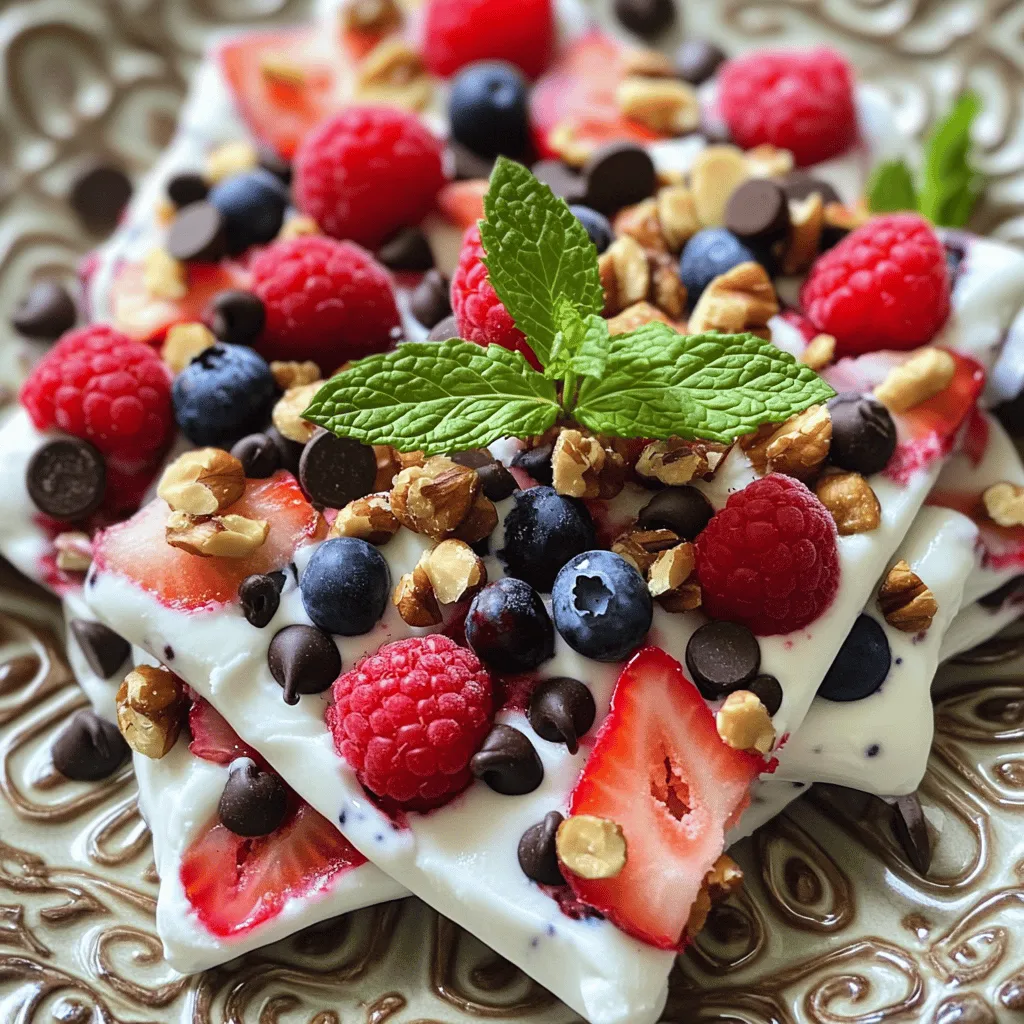
If you’re looking for a quick, tasty treat, frozen yogurt bark is a winner. It’s easy to make and fun

- 1 cup taro root, peeled and diced - 1 cup milk (dairy or non-dairy) - 2-3 tablespoons sugar or sweetener (to taste) Taro root is the star of this drink. It has a sweet, nutty flavor. You can find it fresh at most markets. If you can't find taro root, you can use taro powder instead. Milk gives the latte its creamy texture. You can pick any milk you like. Dairy, almond, or oat milk all work well. The sweetener adds the right amount of sweetness. Adjust it to your taste. - 1/2 teaspoon vanilla extract - Ice cubes (optional for iced latte) - Taro powder for garnish (optional) You can add vanilla extract for extra flavor. This gives your latte a nice, warm hint. If you want a cold drink, ice cubes are perfect. Just blend your latte over the ice. Taro powder makes a fun garnish. It adds a nice touch and looks great in your glass. - Blender - Pot for cooking - Glass or mug for serving You need a blender to mix everything until smooth. A pot is essential for cooking the taro root. Finally, use a glass or mug to serve your delicious latte. For the Full Recipe, you can check the details above. Enjoy making this tasty drink! - Start by peeling the taro root. - Next, dice the taro into small cubes. - In a pot, add the diced taro and 2 cups of water. - Bring the water to a boil over medium heat. - Once boiling, reduce the heat and let it simmer. - Cook for about 15-20 minutes until the taro is tender. - You should be able to pierce it easily with a fork. - After cooking, drain the water from the taro. - Transfer the soft taro into a blender. - Add 1 cup of milk and your sweetener of choice. - Include 1/2 teaspoon of vanilla extract and a pinch of salt. - Blend everything together until smooth and creamy. - You want a nice, thick texture that is easy to pour. - If you love warm drinks, pour the mixture back into the pot. - Heat it gently over low heat, stirring often. - For a cold treat, prepare a glass with ice cubes. - Pour the creamy taro blend over the ice. - If you like, sprinkle some taro powder on top for fun. - Now, you can enjoy your delicious taro latte at home! For the full recipe, refer to the earlier section. To get a nice creamy texture in your taro latte, start by picking the right taro root. Look for firm, smooth taro with no blemishes. The color should be light purple to white. This gives the drink a rich, creamy base. For milk options, you can use both dairy and non-dairy milk. Whole milk creates a thick texture. Almond or oat milk adds a nutty flavor. Coconut milk brings a tropical touch. Choose what fits your taste best. Getting the sweetness just right makes a big difference. Start with 2 to 3 tablespoons of sugar. Taste the latte after blending. Add more sugar if needed. You want it sweet but not too sweet. If you want alternatives to sugar, try honey or maple syrup for a natural touch. You can also use stevia or agave syrup. These give sweetness without extra calories. Making your taro latte look great is fun! You can garnish it with a sprinkle of taro powder. This adds color and flair. Try adding whipped cream for a rich finish. For gatherings, serve your latte in clear glasses. This lets guests see the lovely purple color. Pair it with small snacks. It makes a perfect treat for any occasion. {{image_2}} To make a refreshing iced taro latte, start with the full recipe. Once blended, pour the mixture over ice. This creates a cool drink for hot days. You can also add matcha for a unique twist. Matcha brings a lovely green color and a rich taste. It pairs well with the sweet taro flavor. For a vegan version, swap dairy milk with almond, oat, or coconut milk. These options keep the drink creamy and delicious. You can use natural sweeteners like agave or maple syrup. They add sweetness without refined sugar. This way, everyone can enjoy a tasty taro latte. You can spice things up by adding cinnamon. Just a pinch enhances the flavor and warmth. If you like coffee, mix in a shot of espresso. This creates a delightful blend of taro and coffee. Alternatively, try brewing it with your favorite tea for a new twist. Each option adds a fun layer to the classic taro latte. To keep your leftover taro latte fresh, store it in the fridge. Use an airtight container. This way, you can enjoy it for up to two days. When you want to drink it again, gently reheat it on the stove. Stir it often to warm it evenly. You can also use a microwave for quick reheating. Just heat it in short bursts to avoid overheating. Taro root lasts about one to two weeks when stored in a cool, dark place. Avoid moisture to prevent spoilage. For milk, check the expiration date. Dairy milk lasts about a week after opening. Non-dairy milk can last longer, but always check the label. Store milk in the fridge and keep it sealed tight. You can freeze taro latte if you want to save some for later. Pour the latte into ice cube trays or a freezer-safe container. Once frozen, it can last up to three months. To thaw, move it to the fridge overnight. When ready, blend it again for a smooth texture. Freezing may slightly change the texture. It might not be as creamy, but the flavor stays delicious. Taro latte is made from a few key ingredients. Here’s what you need: - 1 cup taro root, peeled and diced - 2 cups water - 1 cup milk (dairy or non-dairy) - 2-3 tablespoons sugar or sweetener (to taste) - 1/2 teaspoon vanilla extract - A pinch of salt - Ice cubes (optional for iced latte) - Taro powder for garnish (optional) Taro root gives the drink its unique flavor and color. Milk adds creaminess and richness. Sugar balances the natural earthiness of taro. Vanilla extract enhances the overall taste. This mix creates a delightful and satisfying beverage that you can enjoy anytime. You can find taro lattes at many Asian cafes or bubble tea shops. Look for places that serve specialty drinks. Most grocery stores offer taro root and taro powder in the Asian food aisle. You might also find them at local farmers' markets. If you prefer online shopping, check out popular grocery delivery services. They often have taro root and other ingredients. Taro root is not just tasty; it also has health benefits. Here are some key points: - Rich in fiber: This helps digestion and keeps you full. - Good source of vitamins: Taro contains vitamins A, C, and E. - Low in fat: It is a great option for a healthy diet. - Contains minerals: Taro has potassium, which helps control blood pressure. These benefits make taro a nutritious addition to your diet. Customizing your taro latte is fun and easy! Here are some ideas: - Add spices: Try cinnamon or nutmeg for warmth. - Mix flavors: Blend in matcha or cocoa for a twist. - Change milk types: Use almond, oat, or coconut milk for variety. - Top it off: Add whipped cream or a sprinkle of taro powder for flair. Experimenting with flavors lets you create a drink that suits your taste perfectly. Taro latte offers a tasty blend of earthy taro root, milk, and sweetener. You can make it warm or iced, and it's easy to customize with different flavors. I shared tips to make it creamy and sweet, along with variations like vegan options and unique spices. Storing leftovers is straightforward too. Try this delightful drink at home; it's worth it. Enjoy the fun of creating your own perfect cup!

Taro Latte Delight Easy Recipe to Enjoy at Home

Are you ready to enjoy a delightful Taro Latte at home? This easy recipe will guide you through creating a

Older posts
Newer posts
← Previous Page1 … Page58 Page59 Page60 … Page84 Next →

dsad

© 2026 Foodish Talk • Built with GeneratePress

Our Policies

  • Copyright Policy
  • Cookie Policy
  • GDPR Policy
  • Privacy Policy
  • Disclaimer
  • Terms Of Use

More Information

  • Home
  • About
  • Contact
  • Appetizers
  • Dessert
  • Dinner
  • Drinks
©2026, Foodish Talk About Back To Top