Skip to content
DisclaimerTerms Of UseGDPR PolicyCookie Policy

Foodish Talk

  • Home
  • Drinks
  • Appetizers
  • Dinner
  • Dessert
  • About
  • Contact
  • Privacy Policy
DisclaimerTerms Of UseGDPR PolicyCookie Policy

NO-ING-IMG

- 2 large sweet potatoes, sliced into thin rounds - 1 tablespoon olive oil - 1 teaspoon smoked paprika - 1 teaspoon garlic powder - 1 teaspoon cumin - Salt and pepper to taste - 1 cup black beans, rinsed and drained - 1 cup corn kernels (fresh, frozen, or canned) - 1 cup cherry tomatoes, halved - 1 cup shredded cheddar cheese (or vegan cheese) - 1 avocado, diced - 1 jalapeño, sliced (optional for heat) - Fresh cilantro, chopped (for garnish) - Sour cream or Greek yogurt (for drizzling or serving) Sweet potatoes are rich in vitamins A and C. They help boost your immunity. Olive oil provides healthy fats that support heart health. Smoked paprika adds flavor and has antioxidants. Garlic powder also boosts your immune system and adds taste. Cumin aids digestion and adds warmth to the dish. Black beans are high in fiber, which is great for digestion. Corn kernels provide energy and are full of vitamins. Cherry tomatoes are packed with vitamins C and K. Cheddar cheese offers protein and calcium for strong bones. Avocado contains healthy fats and is good for your skin. Jalapeños can boost metabolism and add a spicy kick. Fresh cilantro adds flavor and has vitamins A and K. Sour cream or Greek yogurt gives creaminess and can aid digestion. If you can't find sweet potatoes, you can use regular potatoes. Olive oil can be swapped with avocado oil for a different flavor. If you want a smoky taste, try using liquid smoke instead of smoked paprika. You can replace garlic powder with fresh minced garlic for more flavor. For a milder spice, skip the jalapeño or use bell peppers instead. If you want a dairy-free option, go for vegan cheese or skip cheese entirely. You can also use plain yogurt instead of sour cream for a tangy flavor. Start by preheating your oven to 425°F (220°C). This will help our nachos get crispy. Next, take two large sweet potatoes and slice them into thin rounds. In a big bowl, mix the potato slices with one tablespoon of olive oil. Add one teaspoon each of smoked paprika, garlic powder, and cumin. Don’t forget to season with salt and pepper! Toss everything well until the slices are coated. Spread the sweet potato slices in a single layer on a baking sheet lined with parchment paper. Make sure they are not touching. Bake these slices for 20 to 25 minutes. Flip them halfway through. You want them crispy on the edges and soft on the inside. After baking, remove them from the oven and get ready to layer. Now it’s time to build your nachos! Take the baked sweet potato slices and layer them on an oven-safe dish. Evenly sprinkle one cup of black beans and one cup of corn on top. Then, add one cup of halved cherry tomatoes and one cup of shredded cheddar cheese. For those who like it extra cheesy, feel free to add more cheese! Return the dish to the oven for another 5 to 7 minutes. You want the cheese to melt and bubble. Once done, top it with diced avocado, jalapeño slices if you like heat, and fresh cilantro. You can enjoy your savory and flavorful Loaded Sweet Potato Nachos with a drizzle of sour cream or Greek yogurt. For the Full Recipe, check the earlier section! To get crispy sweet potatoes, slice them thin. Aim for about 1/4 inch thick. This helps them cook evenly. Toss the slices with olive oil and spices. Make sure every piece gets coated. Spread them out on the baking sheet. Don’t crowd them; they need space to crisp up. Bake at 425°F (220°C) for 20-25 minutes. Flip them halfway through for even cooking. For the best cheese melt, use shredded cheese. Shredded cheese melts quicker than slices. Add the cheese after the sweet potatoes and toppings. Return them to the oven for 5-7 minutes. This allows the cheese to bubble and brown. If you want a stretchy melt, try a mix of cheeses. Cheddar and Monterey Jack work well together. To save time, prep your ingredients ahead. You can slice sweet potatoes a day before. Store them in water to keep them fresh. Use canned black beans and corn for quick assembly. You can also make the toppings ready ahead of time. This way, you can layer and bake in no time. For the complete process, check out the Full Recipe for Loaded Sweet Potato Nachos. {{image_2}} You can easily make Loaded Sweet Potato Nachos vegan. Swap out the cheddar cheese for vegan cheese. Many brands offer great plant-based options that melt well. You can also use cashew cream as a tasty substitute for sour cream. It adds creaminess without dairy. Feel free to mix up your toppings! Instead of black beans, try chickpeas or lentils. These add protein and taste great. You can also use different veggies. Bell peppers, zucchini, or even mushrooms can work well. If you like heat, add more jalapeños or try spicy salsa. Want to boost the flavor? Try adding some lime juice over the nachos before serving. It adds a zesty kick. You can also sprinkle chili flakes or hot sauce for an extra kick. Fresh herbs like basil or mint can make the dish pop, too. Explore these variations to make your nachos unique! For the complete recipe, check out the Full Recipe section. To keep your loaded sweet potato nachos fresh, store them in an airtight container. Let them cool first, then place them in the fridge. They can last for up to three days. If you want to keep them longer, consider freezing them. However, the texture might change. When you are ready to enjoy your leftovers, preheat your oven to 350°F (175°C). Place the nachos on a baking sheet and cover them with foil. Heat for about 10-15 minutes. This method helps keep the sweet potatoes crispy. You can also use a microwave, but the texture may not be as good. For meal prep, cook the sweet potatoes ahead of time. Store them separately from the toppings. This way, you can mix and match. When you are ready to eat, layer the toppings and bake. It makes for a quick and easy meal. You can find the Full Recipe to guide you through the cooking process. Yes, you can use regular potatoes. However, sweet potatoes add a nice sweetness. They also bring more nutrients and fiber. If you choose regular potatoes, try a starchy type like russets. They will get crispy, too, but the flavor will change. This recipe is naturally gluten-free. Just make sure all your toppings are gluten-free. Check the labels for any sauces or toppings you use. Most cheese and veggies are safe, but it's good to confirm. You can mix it up with many toppings! Here are some ideas: - Grilled chicken or beef - Black olives - Green onions - Pineapple - Salsa or pico de gallo - Different types of cheese, like mozzarella or pepper jack Feel free to add your favorites! The Full Recipe for Loaded Sweet Potato Nachos includes ingredients like sweet potatoes, black beans, and cheese. You can find the detailed steps in the main article. Enjoy making this tasty dish! This article covered how to make delicious Loaded Sweet Potato Nachos. We explored the key ingredients and their benefits. I shared easy steps for preparation and baking. You learned useful tips for crispy sweet potatoes and cheese melting. Plus, I offered tasty variations and storage tips. Now, you have all the tools to create this fun dish. Enjoy making your nachos with confidence!

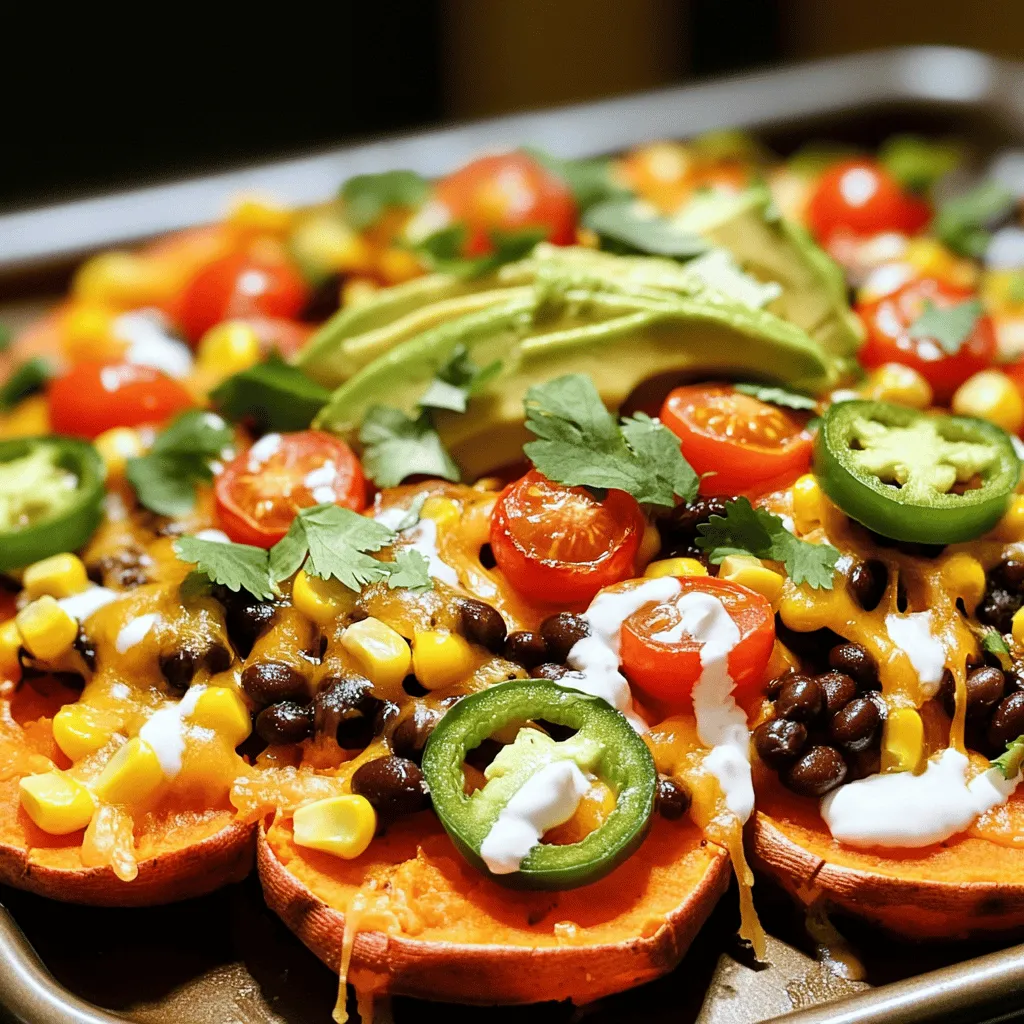
Loaded Sweet Potato Nachos Savory and Flavorful Treat

If you’re looking for a delicious and healthy snack, Loaded Sweet Potato Nachos are the answer! These nachos are easy

To make Healthy Banana Oat Muffins, gather these simple and wholesome ingredients: - 2 ripe bananas, mashed - 1 cup rolled oats - 1/2 cup almond milk (or any milk of choice) - 1/4 cup honey or maple syrup - 1/4 cup coconut oil, melted - 1 teaspoon vanilla extract - 1 teaspoon baking powder - 1/2 teaspoon baking soda - 1/2 teaspoon ground cinnamon - 1/4 teaspoon salt - Optional: 1/4 cup chopped nuts or chocolate chips These ingredients blend well for a tasty and nutritious snack. The ripe bananas add natural sweetness and moisture. The rolled oats give a hearty texture. Almond milk keeps it light and dairy-free, but you can use any milk you like. Honey or maple syrup sweetens the muffins without refined sugar. Coconut oil adds rich flavor and moisture. Baking powder and soda help the muffins rise. Ground cinnamon gives warmth and spice. A pinch of salt balances the flavors. If you want to add extra crunch, toss in some nuts or chocolate chips. Check the [Full Recipe] for exact measurements and tips to make these muffins shine! - Preheat your oven to 350°F (175°C) and prepare your muffin tin with liners. - Take 2 ripe bananas and mash them in a large bowl until they are smooth. - Pour in 1/2 cup of almond milk, 1/4 cup of honey (or maple syrup), 1/4 cup of melted coconut oil, and 1 teaspoon of vanilla extract. Mix until the wet ingredients blend well. - In a separate bowl, combine 1 cup of rolled oats, 1 teaspoon of baking powder, 1/2 teaspoon of baking soda, 1/2 teaspoon of ground cinnamon, and 1/4 teaspoon of salt. Stir these dry ingredients together. - Gradually add the dry mix to the wet mix. Stir gently until just combined. - If you want, fold in 1/4 cup of chopped nuts or chocolate chips. This adds flavor and texture. - Spoon the muffin batter into the prepared muffin tin. Fill each cup about 3/4 full. - Bake in the preheated oven for 18-22 minutes. Check with a toothpick; it should come out clean. - Let the muffins cool in the tin for 5 minutes. Then move them to a wire rack to cool completely. This recipe makes 12 tasty muffins. Enjoy them warm, or as a snack later! For the full recipe, check out the details above. To get the best muffin texture, avoid overmixing the batter. When you mix too much, your muffins can turn tough. Stir just until the dry ingredients blend with the wet ones. This keeps your muffins light and fluffy. For baking time, aim for 18 to 22 minutes. You'll know they are done when a toothpick inserted in the center comes out clean. If it has wet batter on it, bake a few more minutes. Keep an eye on them to avoid overbaking, which can dry them out. If you want to swap honey or maple syrup, you can use agave nectar or brown sugar. Both options will still keep your muffins sweet. Adding spices can boost the flavor and nutrition. Consider mixing in ground flaxseed or chia seeds for extra fiber. You can also try cinnamon or nutmeg for a warm taste. These small changes can make a big difference in both nutrition and flavor. Serve your muffins warm for the best taste. You can dust them with powdered sugar or top them with Greek yogurt. This adds a nice touch and makes them look inviting. For a breakfast spread, arrange the muffins on a colorful platter. You can add fresh fruit or yogurt cups next to them. This makes your table look bright and appealing. Guests will enjoy picking from a beautiful display! {{image_2}} You can easily change some ingredients in this recipe. Here are a few simple swaps: - Whole Wheat Flour: If you want a different texture, use whole wheat flour instead of oats. This will give your muffins a denser feel while still being healthy. - Dairy-Free and Nut-Free: For a dairy-free option, use oat milk or soy milk. If you need a nut-free choice, choose sunflower oil in place of coconut oil. Adding new flavors can make these muffins even more exciting: - Adding Fruits: Try mixing in blueberries or diced apples. These fruits add natural sweetness and great texture. - Incorporating Spices: Add spices like nutmeg or ginger for extra warmth. These spices can really elevate the flavor profile of your muffins. Finish your muffins with fun toppings or drizzles: - Toppings: You can top your muffins with yogurt, nuts, or coconut flakes to enhance the look and taste. These add a nice crunch and extra nutrition. - Drizzles or Syrups: A drizzle of honey or maple syrup can provide a sweet touch. This makes each bite more delightful. Feel free to explore these variations to make your Healthy Banana Oat Muffins your own! For the complete recipe, refer to the Full Recipe. To keep your Healthy Banana Oat Muffins fresh, store them in an airtight container. This helps maintain moisture and flavor. You can keep them at room temperature for up to three days. If you want them to last longer, refrigeration is a good option. Just remember, refrigeration may change the texture a bit. Freezing is a great way to save muffins. Here’s how you can do it: 1. Cool Completely: Let the muffins cool on a wire rack. 2. Wrap Well: Wrap each muffin in plastic wrap. Then, place them in a freezer bag. 3. Label and Freeze: Write the date on the bag and put it in the freezer. For best quality, eat the muffins within three months. To thaw, place them in the fridge overnight or at room temperature for a few hours. Reheating muffins can bring back their soft texture. Here are the best methods: - Microwave: Place a muffin on a microwave-safe plate. Heat for about 15-20 seconds. Check if it’s warm enough for you. - Oven: Preheat your oven to 350°F (175°C). Wrap muffins in foil and heat for 10-15 minutes. This method makes them crispy outside and soft inside. Following these tips will help keep your muffins tasting great! For the full recipe, check out the details above. Yes, you can easily make these muffins vegan. To start, substitute the honey or maple syrup with agave nectar or brown rice syrup. For the almond milk, use any plant-based milk you like. Instead of coconut oil, try applesauce or mashed avocado. These swaps keep the muffins moist and tasty. To make your muffins gluten-free, use gluten-free rolled oats. You can also swap in almond flour or coconut flour. These flours add unique flavors and textures. Just remember, gluten-free flours may need a little more liquid. Adjust the almond milk to get the right batter consistency. You can add a lot of fun mix-ins to your muffins. Popular choices include chopped nuts, chocolate chips, or dried fruit. For a fruity twist, add blueberries or raspberries. You can also change up the spices. Try nutmeg for warmth or a dash of ginger for a kick. These muffins stay fresh for about four days at room temperature. Store them in an airtight container to keep them moist. If you notice any mold or an off smell, discard them. To extend freshness, you can freeze the muffins. They last up to three months in the freezer. When ready to eat, thaw at room temperature or warm in the microwave. These healthy banana oat muffins are easy and fun to make. We covered simple ingredients, step-by-step instructions, and various tips to perfect your muffins. You can enjoy many flavor variations and know how to store leftovers. Remember, customizing these muffins makes them unique to you. Try freezing extras for later or reheating them for a quick snack. Get creative with your add-ins and impress everyone at breakfast. Now, it’s time to bake and enjoy these tasty treats!

Healthy Banana Oat Muffins Nutrient-Packed Recipe

Looking for a tasty snack that’s packed with nutrients? You’re in the right place! My Healthy Banana Oat Muffins recipe

- 1 lb Brussels sprouts, trimmed and halved - 2 tablespoons olive oil - 1 teaspoon garlic powder - 1 teaspoon onion powder - 1/2 teaspoon smoked paprika - Salt and pepper to taste - 1/4 cup grated Parmesan cheese (optional) - Fresh lemon wedges for serving Garlic and onion powder are key to this dish. They add a rich, savory taste. Garlic powder gives a warm, aromatic flavor that lifts the sprouts. Onion powder adds depth and sweetness, balancing the dish. Smoked paprika brings a unique twist. It adds a slight smokiness that enhances the Brussels sprouts. This spice pairs well with the natural nuttiness of the sprouts. Together, these seasonings create a tasty base that makes every bite memorable. For a detailed guide on how to prepare this dish, see the Full Recipe. First, you need to preheat your air fryer to 380°F (190°C) for about 5 minutes. This step is key for getting those Brussels sprouts crispy. While it heats, prepare the Brussels sprouts. To trim them, cut off the stem ends. Then, slice each sprout in half. This helps them cook evenly. If you see any yellow leaves, remove those, too. Fresh sprouts give the best taste. Now comes the fun part! In a big bowl, mix the halved Brussels sprouts with 2 tablespoons of olive oil, 1 teaspoon of garlic powder, 1 teaspoon of onion powder, and 1/2 teaspoon of smoked paprika. Add salt and pepper to taste. Toss until they are well-coated. Place the sprouts in the air fryer basket in one layer. Avoid overcrowding; this helps them crisp up. Air fry for 15 to 20 minutes. Be sure to shake the basket halfway through to ensure even cooking. Look for a golden brown color and a crispy texture. If you want to add a cheesy flavor, sprinkle 1/4 cup of grated Parmesan cheese over the sprouts during the last 2 minutes of cooking. This allows the cheese to melt nicely without burning. Once you take the Brussels sprouts out, squeeze a bit of fresh lemon juice over them. This small step adds a bright flavor that makes the dish pop. Enjoy your crispy air fryer Brussels sprouts! For the full recipe, refer to the earlier sections. To get crispy Brussels sprouts, set your air fryer to 380°F (190°C). This temperature is key for the best texture. Cook them for 15 to 20 minutes. Remember to shake the basket halfway through cooking. This helps them crisp up evenly. Don’t overcrowd the air fryer basket. If you add too many sprouts at once, they will steam instead of fry. Cook in batches if needed for the best results. A common mistake is overcooking or undercooking the Brussels sprouts. Overcooked sprouts become mushy. Aim for golden brown and crispy. If they are too soft, try cooking them a bit longer. Finding the right seasoning balance is also important. Too much salt can overpower the dish. Use just enough garlic powder, onion powder, and smoked paprika for optimal flavor. Taste as you go! For presentation, serve the crispy Brussels sprouts in a rustic bowl. Add lemon wedges on the side for a pop of color. This makes the dish look fresh and inviting. You can pair Brussels sprouts with many options. They go well with roasted chicken or grilled fish. They also complement grain bowls or hearty salads. Try adding them to your next meal for a tasty boost! For the full recipe, check out the Crispy Air Fryer Brussels Sprouts section. {{image_2}} You can change the flavor of your Brussels sprouts with different spices and herbs. Try adding cayenne pepper for some heat. You can use Italian seasoning for a fresh twist. For cheese lovers, you can swap Parmesan with feta or goat cheese. Both add a creamy texture and rich taste. You can sprinkle cheese on just before the cooking ends to get a nice melt. If you're looking for vegetarian or vegan options, you can skip the cheese. Use nutritional yeast instead. It adds a cheesy flavor without dairy. You can also try plant-based sauces. A touch of balsamic glaze or tahini can enhance the taste. Both options bring a unique twist to the dish. Seasonal ingredients can make your Brussels sprouts even better. In fall, add diced apples or nuts for crunch. In winter, toss in pomegranate seeds for a pop of color and sweetness. You can modify the recipe for holidays too. For Thanksgiving, mix in some cranberries or a hint of cinnamon. This adds warmth and festivity to the dish. Explore the [Full Recipe] for more ideas and tips! To keep your leftover crispy Brussels sprouts fresh, use an airtight container. Glass or plastic containers work great. Make sure to cool the sprouts to room temperature before sealing them. This helps prevent moisture build-up, which can lead to sogginess. In the fridge, your Brussels sprouts will last about 3 to 5 days. If you want to enjoy them later, you can freeze them. Place them in a freezer bag, and they will stay good for up to 3 months. For the best results when reheating, use the air fryer again. Set it to 350°F (175°C) and heat for about 5 to 7 minutes. This method helps them stay crispy. If you don't have an air fryer, you can use an oven. Preheat the oven to 375°F (190°C) and spread the sprouts on a baking sheet. Heat for about 10 minutes. Avoid using a microwave, as it can make them soggy. Crispy Brussels sprouts are best when they are hot and crunchy! To make Brussels sprouts less bitter, start by choosing fresh ones. Look for sprouts that are bright green and firm. Avoid any that are yellow or soft. Trim the tough ends and remove any outer leaves. Cooking them with olive oil and spices will also help reduce bitterness. Pairing them with a little lemon juice adds a fresh taste. Yes, you can prepare Crispy Air Fryer Brussels sprouts in advance. Cook them and then let them cool completely. Store them in an airtight container in the fridge. They can last for up to three days. When you want to eat them, just reheat in the air fryer for a few minutes. This will help them regain their crispiness. Brussels sprouts pair well with many dipping sauces. Here are some popular options: - Ranch dressing - Balsamic glaze - Garlic aioli - Spicy sriracha - Honey mustard These sauces enhance the flavor and add a fun twist to your meal. Crispy Air Fryer Brussels sprouts go great with many dishes. Here are some meal ideas: - Grilled chicken or steak - Quinoa or rice bowls - Pasta with creamy sauce - Tacos with beans and veggies - A fresh salad with nuts and cheese These pairings create a balanced meal and are sure to please everyone at the table. For the full recipe, check out the Crispy Air Fryer Brussels Sprouts section! Crispy air fryer Brussels sprouts are simple and fun to make. We covered ingredients, the right steps, and tips for success. Remember to adjust seasonings for your taste and try new flavors. You can also store and reheat leftovers with ease. Enjoy your tasty dish with friends or family. Each bite will leave you wanting more! Happy cooking!

Crispy Air Fryer Brussels Sprouts Flavorful and Easy

Are you ready to enjoy perfectly crispy Brussels sprouts? In this post, I’ll share my easy air fryer recipe that

To make these tasty egg bites, you will need: - 6 large eggs - 1/2 cup cottage cheese - 1/2 cup shredded cheese (cheddar or a blend) - 1/4 cup bell peppers, finely diced (use red or green for color) - 1/4 cup cooked spinach, chopped (optional) - 1/4 teaspoon garlic powder - 1/4 teaspoon onion powder - Salt and pepper to taste - Fresh herbs (like chives or parsley) for garnish You can mix in some optional ingredients to add extra flavor. Try these: - Cooked bacon or sausage for a protein boost - Diced tomatoes for fresh taste - Jalapeños if you like some heat If you want to switch things up, here are some great swaps: - Use Greek yogurt instead of cottage cheese for creaminess - Swap the cheddar for feta or goat cheese - Replace bell peppers with zucchini or mushrooms for variety For the full recipe, check out the detailed instructions above. You can customize these bites based on what you have at home. Enjoy your cooking! Start by preheating your oven to 375°F (190°C). While it heats, grease a muffin tin with cooking spray. You can also use silicone muffin liners for easy removal. This step is key to avoid sticking later. Gather your blender, measuring cups, and mixing spoon. In your blender, combine the eggs, cottage cheese, and shredded cheese. Add garlic powder, onion powder, salt, and pepper. Blend until the mix is smooth. This will create a creamy base. Once blended, gently stir in the finely diced bell peppers and cooked spinach. Make sure all the ingredients mix well. Pour the egg mixture into each muffin cup, filling them about 3/4 full. Now, place the muffin tin in a larger baking dish. Fill the baking dish with hot water halfway up the sides of the muffin tin. This steam bath keeps the egg bites moist. Bake for 25-30 minutes. Check for doneness with a toothpick; it should come out clean. After baking, let the bites cool for a few minutes before removing them. Garnish with fresh herbs for a nice touch. Enjoy your tasty egg bites! For full instructions, check the Full Recipe. To get your egg bites just right, use fresh eggs. Fresh eggs whip up better. Blend eggs and cottage cheese until smooth. This mix adds creaminess. Use a water bath for baking. It keeps the bites moist. If you overbake, they might become dry. Watch closely during the last few minutes. A toothpick should come out clean when they are done. Add herbs to boost taste. Fresh chives or parsley make a great choice. Try different cheese for a new twist. Feta or goat cheese can add a nice kick. You can also spice it up with red pepper flakes. This adds a hint of heat. Don’t forget about seasoning; salt and pepper are key. Taste your mix before baking for best results. These egg bites are perfect for breakfast or a snack. Serve them warm with a side of salsa. They also go well with avocado slices. For a brunch spread, pair them with fresh fruit. You can even serve them on a bagel for a fun twist. They are easy to grab and go, too. Enjoy them fresh or store them for later. Check out the Full Recipe for more details! {{image_2}} You can change the cheese in your egg bites. Cheddar is a classic choice. It adds a sharp flavor that many love. Try Monterey Jack for a smooth, mild taste. If you want something tangy, go for feta. You can even mix cheeses for a fun twist. A blend of mozzarella and parmesan can make these bites extra creamy. Adding veggies boosts flavor and nutrition in your egg bites. Bell peppers are great, but you can try others too. Zucchini adds moisture, while tomatoes give a fresh taste. Spinach works well and blends nicely. You can also add mushrooms for a savory kick. Just chop them small so they cook evenly. Want extra protein? You can add cooked meats to your egg bites. Diced ham or cooked bacon can enhance the flavor. If you prefer plant-based options, try black beans or tofu. Both add protein without much fuss. Just remember to chop everything small for even cooking. This way, every bite is packed with flavor. To store your egg bites, let them cool first. Place them in a tight container. Keep them in the fridge for up to four days. Make sure to cover them well to keep them fresh. You can freeze these egg bites for later. Wrap each bite in plastic wrap. Then, place them in a freezer bag or container. They will stay good for up to three months. Label the bag with the date to track freshness. When you’re ready to eat, take out the egg bites. If they are frozen, thaw them in the fridge overnight. To reheat, place them on a plate and microwave for about 30 seconds. You can also heat them in the oven at 350°F (175°C) for about 10 minutes. Enjoy your Copycat Starbucks Egg Bites warm and tasty! These egg bites can last up to five days in the fridge. Store them in an airtight container. This keeps them fresh and tasty. If you want them to last longer, you can freeze them. Yes, you can make these egg bites ahead of time! They are great for meal prep. Just cook a batch, cool them, and store them in the fridge. You can enjoy them all week. Absolutely! These egg bites are packed with protein and nutrients. They use eggs, cottage cheese, and veggies. This makes them a good choice for a healthy meal. You control what goes in, so you can keep them light and tasty. For the full recipe, check the earlier section! To wrap it up, we covered all key parts of making tasty egg bites. We talked about the main and optional ingredients, plus good swaps. Then, I walked you through the steps to blend, bake, and get the right texture. We explored ways to enhance flavors and add fun twists. Lastly, I shared how to store, freeze, and reheat your bites. With these tips and details, you'll create delicious egg bites every time. Enjoy making your own and impress your family!

Copycat Starbucks Egg Bites Simple and Tasty Recipe

Are you craving those delicious, fluffy egg bites from Starbucks, but want to save some cash? I’ve got you covered!

To make great overnight oats, you need a few basic ingredients. Here’s what you'll need: - 1 cup rolled oats - 2 cups almond milk (or any milk of choice) - 1 tablespoon chia seeds - 2 tablespoons maple syrup (or honey) - 1 teaspoon vanilla extract These ingredients create a creamy and tasty base for your oats. They soak overnight, making them soft and ready to eat in the morning. Now, let's add some fun flavors to each type of overnight oats. Here’s what you can use for each variation: - Berry Blast: 1/2 cup mixed berries (strawberries, blueberries, raspberries) - Nutty Chocolate: 2 tablespoons cocoa powder, 1/4 cup chopped nuts (walnuts, almonds) - Tropical Paradise: 1/2 banana, 1/4 cup coconut flakes, 1/4 cup diced pineapple - Apple Cinnamon Delight: 1/2 apple (diced), 1 teaspoon cinnamon, 1 tablespoon peanut butter - Savory Spinach Feta: 1/2 cup fresh spinach, 1/4 cup crumbled feta, 1 tablespoon olive oil, salt and pepper to taste These add-ins make each jar unique and flavorful. You can mix and match to find your favorite! Toppings can make your overnight oats even more exciting. Here are some great ideas: - Fresh fruits (extra berries, banana slices, or apple slices) - Nuts and seeds (almonds, walnuts, or sunflower seeds) - Drizzles of honey or maple syrup - A sprinkle of cinnamon or nutmeg Adding toppings adds texture and flavor to your oats. You can experiment with different combinations to find your perfect breakfast! If you want the full recipe, check out the complete guide for Overnight Oats Five Ways. To start, you need to mix the base ingredients. In a large bowl, add: - 1 cup rolled oats - 2 cups almond milk (or any milk of choice) - 1 tablespoon chia seeds - 2 tablespoons maple syrup (or honey) - 1 teaspoon vanilla extract Stir well until everything blends nicely. This mix is the foundation for your overnight oats. After mixing, divide it evenly into five jars or containers. Each jar will hold one unique flavor. Now, let’s add some fun flavors! Here’s how to create each version: 1. Berry Blast: In one jar, add 1/2 cup mixed berries. Stir gently to mix. 2. Nutty Chocolate: In the second jar, mix in 2 tablespoons cocoa powder and 1/4 cup chopped nuts. 3. Tropical Paradise: In the third jar, layer 1/2 banana (sliced), 1/4 cup coconut flakes, and 1/4 cup diced pineapple. 4. Apple Cinnamon Delight: In the fourth jar, mix in 1/2 diced apple, 1 teaspoon cinnamon, and 1 tablespoon peanut butter. 5. Savory Spinach Feta: In the fifth jar, mix in 1/2 cup fresh spinach, 1/4 cup crumbled feta, and 1 tablespoon olive oil. Season with salt and pepper. After preparing each jar, close them tightly and place them in the fridge overnight. Layering is key for flavor and texture. To keep things neat: - Add fruit or toppings on top of the oats. This keeps them fresh and crunchy. - Mix dry ingredients separately and add them to the oats. This helps blend flavors evenly. - If you want to switch it up, feel free to add other toppings in the morning. Some ideas are nuts, seeds, or extra fruit. By following these steps, you can create five tasty variations of overnight oats. Enjoy your delicious breakfasts with ease! For the full recipe, refer to the detailed instructions above. When making overnight oats, keep these tips in mind: - Use glass jars: They help keep your oats fresh and let you see the layers. - Prep in bulk: Make multiple jars at once. This saves time for busy mornings. - Mix well: Stir the base mixture thoroughly to avoid clumps. A good mix ensures creamy oats. Here are some mistakes to steer clear of: - Skipping the chia seeds: They help thicken your oats. Don’t leave them out! - Too much liquid: If you use too much milk, your oats can turn soupy. Stick to the recipe. - Skipping toppings: Toppings add flavor and texture. Always include them for a better breakfast. You can make overnight oats a few days in advance: - Store in the fridge: Keep them cold for freshness. - Label jars: Write the date on the jars. This helps track freshness. - Use variations: Rotate flavors each week. This keeps breakfast exciting! Try out the Full Recipe to create these delicious oats in no time! {{image_2}} For a fresh start, try the Berry Blast. You need: - 1/2 cup mixed berries (strawberries, blueberries, raspberries) This mix gives a sweet and tart taste. Just add the berries to your jar after mixing the oats. Stir gently to keep berries whole. They will soak overnight and burst with flavor by morning. If you crave something rich, go for Nutty Chocolate. Gather these: - 2 tablespoons cocoa powder - 1/4 cup chopped nuts (walnuts, almonds) Mix the cocoa powder into your oats for a deep chocolate flavor. Fold in the nuts for that crunchy texture. This combo makes breakfast feel like dessert! For a taste of the tropics, make Tropical Paradise. You’ll need: - 1/2 banana, sliced - 1/4 cup coconut flakes - 1/4 cup diced pineapple Layer the banana, coconut, and pineapple in your oats. This mix is perfect for sunny days. For a warm cozy vibe, try Apple Cinnamon Delight. Gather these: - 1/2 apple, diced - 1 teaspoon cinnamon - 1 tablespoon peanut butter Stir the apple, cinnamon, and peanut butter into your oats. This combo is comforting and filling. For something different, go savory with Savory Spinach Feta. You’ll need: - 1/2 cup fresh spinach - 1/4 cup crumbled feta - 1 tablespoon olive oil - salt and pepper to taste Mix in the spinach and feta, then drizzle olive oil. Season with salt and pepper. This one is great for those who want a savory breakfast. All these recipes use the same base from the Full Recipe. You can mix and match to fit your taste. Enjoy your oats in many fun ways! To store overnight oats, use airtight containers. I prefer glass jars for easy viewing. Seal them tightly to keep out air and moisture. Place your jars in the fridge right after making them. This keeps the oats fresh and tasty. Each jar is ready to eat the next morning. - Layering Ingredients: To keep flavors fresh, layer your ingredients. Place wetter toppings at the bottom. This way, they won’t make the oats soggy. - Mix Before Serving: Give each jar a good stir before eating. It redistributes flavors and textures. - Use Fresh Ingredients: Always use fresh fruits and nuts. They add crunch and taste. Avoid adding toppings until you are ready to eat. This keeps them crisp. - Rolled Oats: Last up to 6 months in the fridge. - Chia Seeds: Stay fresh for about 2 years when stored properly. - Milk: Depends on the type. Almond milk lasts about 7-10 days once opened. - Fruits: Fresh fruits like berries last 3-5 days. Bananas may brown faster, so add them just before eating. - Nuts: Keep well for 1-2 months. Store them in a cool, dry place. These tips help you enjoy overnight oats at their best! For a detailed recipe, check the Full Recipe section. You can keep overnight oats in the fridge for up to five days. This makes them great for meal prep. Just remember to store them in airtight containers. Each morning, stir your oats well before eating. If you notice any changes in smell or texture, it’s best to toss them. Yes, you can use steel-cut oats, but the texture will change. Steel-cut oats take longer to soften. I suggest soaking them longer than rolled oats. If you want creamy oats, use rolled oats for best results. Steel-cut oats will give a chewier bite and a heartier feel. You have many great options for dairy substitutes. Almond milk is a favorite, but you can also try: - Coconut milk - Soy milk - Oat milk - Cashew milk These options add unique flavors and keep your oats creamy. Choose what fits your taste or dietary needs. For a richer taste, try full-fat coconut milk. Overnight oats are easy and fun to make. You learned about the main ingredients, how to prepare them, and tasty variations to try. We covered vital tips for meal prep and storage. Now, you can enjoy oats that fit your taste. Start exploring different flavors and enjoy the benefits of healthy eating. Remember, the key is to experiment and find what you love. Happy oat-making!

Overnight Oats Five Ways for Tasty Breakfast Ideas

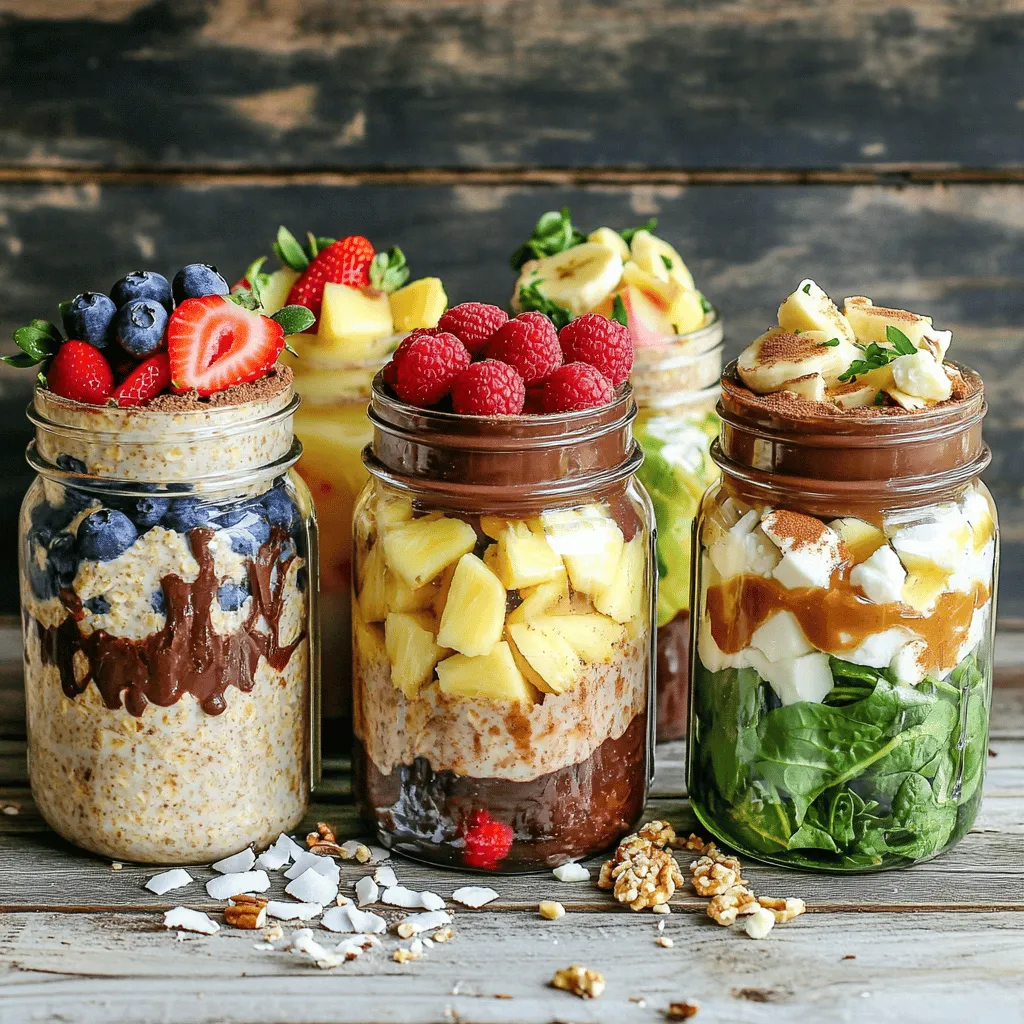
Are you ready for a breakfast that’s quick, tasty, and healthy? Overnight oats are the perfect solution! In this post,

To make these delicious bars, you'll need just a few key ingredients: - 2 cups rolled oats - 1 cup almond butter (or peanut butter) - 1/2 cup honey or maple syrup - 1/3 cup unsweetened cocoa powder - 1/2 cup dark chocolate chips - 1/2 teaspoon vanilla extract - A pinch of salt These ingredients come together to give the bars a rich and tasty base. The oats provide a great texture, while the cocoa powder adds a deep chocolate flavor. The nut butter binds everything together and adds creaminess. You can enhance your bars with these optional add-ins: - 1/4 cup shredded coconut - 1/4 cup chopped nuts (like walnuts or almonds) These add-ins bring extra crunch and flavor. Shredded coconut gives a hint of sweetness, while nuts add a nice bite. Feel free to mix and match based on what you love! Each bar has about: - Calories: 150 - Protein: 4g - Fat: 7g - Carbohydrates: 19g These bars are a great snack. They provide energy and nutrition without the need to bake. For more details on how to make these bars, check out the Full Recipe! Start by gathering your ingredients. You need rolled oats, cocoa powder, and a pinch of salt. In a large bowl, mix the rolled oats, cocoa powder, and salt. Stir well until they blend together. This step builds a solid base for your bars. Now, take a separate bowl. Measure out your almond butter and honey or maple syrup. Microwave this mix for about 30 seconds. It should feel warm and pourable. Stir until smooth and mixed. This warms the nut butter and helps it blend better with the oats. Pour the warm mixture into your dry ingredients. Add a splash of vanilla extract. Mix well until everything sticks together. The mixture should feel thick and sticky. Next, fold in your dark chocolate chips, coconut, and nuts, if you like. Line an 8x8 inch baking dish with parchment paper. Transfer the mix to the dish. Press it down firmly to form an even layer. Use your hands or a spatula to pack it tight. Finally, chill this in the fridge for at least one hour to set. Once firm, cut into squares or rectangles. Enjoy your tasty no-bake chocolate oat bars! For the full recipe, refer to the earlier section. To make your chocolate oat bars just right, focus on the mixture's consistency. You want it thick and sticky but not too dry. If it feels crumbly, add a bit more almond butter or honey. This helps bind everything together. Press the mixture firmly into your baking dish. This step gives you a nice, dense bar. The more you pack it down, the better the final texture. To keep your bars fresh, store them in an airtight container. This helps prevent them from drying out. You can also place parchment paper between the layers to stop them from sticking. Keep the bars in the fridge for the best taste. They will stay fresh for up to a week. If you want to store them longer, consider freezing them. Just wrap each bar in plastic wrap and place them in a freezer-safe bag. Cutting these bars can be tricky, but I have a few tips. First, let the bars chill in the fridge for at least one hour. This makes them firmer and easier to cut. Use a sharp knife for clean edges. If the knife sticks, run it under warm water and dry it off. This method helps you get neat, perfect squares. Enjoy your bars as a tasty treat! For the full recipe, check out the complete guide above. {{image_2}} You can switch up the nut butter for fun. Almond butter is great, but peanut butter adds a nice kick. Cashew butter gives a creamier taste. Sunflower seed butter is perfect for nut-free diets. Each choice brings a new flavor, making your treats unique. Dried fruits add sweetness and texture. Raisins or cranberries work well. You might enjoy chopped apricots too. Seeds like chia or flax add crunch and nutrition. Feel free to mix and match to find your favorite combo. These additions make the bars even more exciting. To make these bars vegan, use maple syrup instead of honey. Most nut butters are vegan-friendly too. For gluten-free bars, ensure your oats are certified gluten-free. This way, everyone can enjoy them without worry. You get a treat that fits many diets while still being tasty. To keep your no-bake chocolate oat bars fresh, store them in an airtight container. Place parchment paper between layers to avoid sticking. This method helps maintain their shape and flavor. Keep the container in the fridge for best results. The cool temperature keeps the bars firm and tasty. If you want to save some for later, freezing works well. First, cut the bars into squares. Wrap each square in plastic wrap. Then, place the wrapped bars into a freezer-safe bag. Squeeze out any air before sealing. They can last up to three months in the freezer. When you're ready to eat, just thaw them in the fridge overnight. Homemade no-bake chocolate oat bars stay good in the fridge for about one week. If stored properly in an airtight container, they remain fresh and delicious. This makes them a great treat to have on hand for snacks or desserts. Enjoy them while they last! For the full recipe, check out the instructions above. Yes, you can use quick oats. They will work in this recipe. Quick oats absorb moisture faster. This may change the texture a bit. The bars might be softer but still tasty. If you want a chewier bar, stick with rolled oats. To lower the sugar, reduce the honey or syrup amount. You can also use unsweetened cocoa powder. Try adding mashed bananas or applesauce for sweetness. These options add flavor and moisture too. Always taste the mixture before pressing it into the pan. You can use peanut butter as a great substitute. Sunflower seed butter works well for nut-free options. This keeps the bars delicious and helps with allergies. Just note that each nut butter has a unique flavor and texture. Adjust your expectations for taste based on your choice. For more detailed steps, check the Full Recipe to create these delicious treats! In this post, I shared how to make tasty no-bake chocolate oat bars. We covered key ingredients, easy steps, and helpful tips. You can mix in different flavors or adapt them for diets. Proper storage keeps your bars fresh longer. Whether for snacks or treats, these bars are simple and fun to make. Enjoy your delicious creations and feel good about the choices you make. You'll love making these homemade treats again and again. Now, go enjoy your bars!

No-Bake Chocolate Oat Bars Simple and Tasty Treat

Looking for a quick, tasty treat? You’re in the right place! My No-Bake Chocolate Oat Bars are simple to make

To make a great spinach artichoke dip, you need fresh and tasty ingredients. Here’s the list of what you will need: - Fresh spinach - Artichoke hearts - Cream cheese - Sour cream - Mayonnaise - Shredded mozzarella cheese - Grated Parmesan cheese - Minced garlic - Red pepper flakes - Salt and pepper - Fresh parsley for garnish Each ingredient plays a key role in making this dip creamy and full of flavor. The fresh spinach adds a nice green touch, while artichoke hearts bring a unique taste that stands out. Cream cheese, sour cream, and mayonnaise create a rich, smooth base. Mozzarella and Parmesan cheese work together to give that cheesy goodness we all love. Garlic adds depth, and red pepper flakes can give it a little kick if you like heat. Don’t forget salt and pepper to season it just right. Finally, fresh parsley isn’t just for looks; it adds a pop of flavor and color. For the full recipe, check out Savory Spinach Artichoke Delight. 1. Preheat your oven to 350°F (175°C). This step warms the oven for even baking. 2. In a large mixing bowl, combine the cream cheese, sour cream, and mayonnaise. Mix until smooth and creamy. 3. Next, stir in the chopped spinach, artichoke hearts, and minced garlic. Make sure everything blends well. 1. Transfer the mixture to a baking dish. Spread it evenly across the dish. 2. Bake in the preheated oven for 25-30 minutes. Check for doneness when it bubbles and turns golden. 3. Once done, remove it from the oven. Let it cool for a few minutes. Garnish with fresh parsley before serving. For more details, check the Full Recipe. To ensure a creamy texture in your spinach artichoke dip, use softened cream cheese. This helps it mix well with other ingredients. If your dip is too thick, add a bit more sour cream. This adds creaminess without changing the taste too much. Adjusting seasoning is important for personal taste. Start with salt and pepper, then taste the dip. You can add more seasoning as needed. If you like spice, consider adding more red pepper flakes. Using quality cheese really makes a difference. I recommend fresh mozzarella and good Parmesan. These cheeses melt well and add great flavor. Avoid pre-shredded cheese if you can; it often has anti-caking agents that affect meltability. When serving your dip, think about great sides. Tortilla chips, sliced baguette, or fresh veggies work well. They help balance the rich flavors of the dip. Consider creative serving ideas, such as a bread bowl. Simply hollow out a round loaf of bread, fill it with the dip, and serve. This creates a fun way to enjoy the dish. You can also serve it with crackers or pita chips for variety. For the full recipe, check out the detailed steps to create this tasty dish. {{image_2}} You can easily swap some ingredients to make this dip even better. For a healthier option, try using Greek yogurt instead of sour cream and mayonnaise. Greek yogurt gives a creamy texture with less fat. You can also use low-fat cream cheese for a lighter dip. When it comes to cheese, feel free to mix things up. You can add goat cheese for a tangy taste or use sharp cheddar for extra flavor. Adding spices like smoked paprika or cumin can also make your dip unique. These small changes can take the classic taste to new heights. If you have dietary needs, don’t worry! You can make this dip gluten-free by ensuring your ingredients are safe. Most canned artichokes and spices are gluten-free, so just check the labels. For dairy-free or vegan options, substitute cream cheese and sour cream with cashew cream or coconut cream. Nutritional yeast can replace the cheese, adding a cheesy flavor without dairy. These swaps keep the dip rich and tasty while meeting your diet needs. With these variations, you can enjoy spinach artichoke dip in many delicious ways! For the full recipe, check out the Savory Spinach Artichoke Delight. To keep your spinach artichoke dip fresh, store it in an airtight container. Make sure it cools down first. The dip lasts in the fridge for about 3 to 5 days. When you want to reheat it, place it in an oven-safe dish. Cover it with foil to keep it moist. Heat it at 350°F (175°C) for around 15 to 20 minutes. Stir it halfway through so it warms evenly. This method helps maintain the dip's creamy texture and flavor. If you have extra dip, freezing is a great option. First, let it cool completely. Then, scoop it into a freezer-safe container. Leave some space at the top, as it will expand when frozen. Seal the container tightly and label it with the date. The dip can last in the freezer for up to 3 months. To thaw, move it to the fridge overnight. When ready to eat, reheat it in the oven, covered, at 350°F (175°C) until hot. This way, you can enjoy your tasty spinach artichoke dip anytime! For the full recipe, check out the earlier section. Can I make spinach artichoke dip ahead of time? Yes, you can prepare the dip a day in advance. Just mix all the ingredients and store it in the fridge. When you're ready to serve, bake it according to the recipe. This saves time when guests arrive. What is the best way to serve this dip? Serve the dip warm from the oven. Pair it with tortilla chips, bread, or veggie sticks. You can also put it in a bread bowl for a fun twist. This makes for a great party snack! Can I use frozen spinach instead of fresh? Absolutely! Frozen spinach works well. Just make sure to thaw and drain it first. Squeeze out extra water to keep the dip creamy. This way, you get great flavor without the hassle of fresh spinach. Breakdown of the nutritional content per serving Each serving has about 250 calories. You get 20g of fat and 9g of carbs. It also has 6g of protein. This makes it a hearty snack for gatherings. Tips for lowering calories or fat content To make a lighter version, use low-fat cream cheese and Greek yogurt instead of sour cream and mayonnaise. You can also reduce the cheese or swap in nutritional yeast for a cheesy flavor. These swaps keep it tasty while lowering the calories. This blog shows how to make a tasty spinach artichoke dip. We covered ingredients, step-by-step instructions, and helpful tips. You learned how to store leftovers and adapt recipes for dietary needs. Remember, great dips start with quality ingredients and care in preparation. Use this guide to impress friends at your next gathering. Enjoy the creamy, cheesy goodness of this classic dish!

Spinach Artichoke Dip Simple and Delicious Recipe

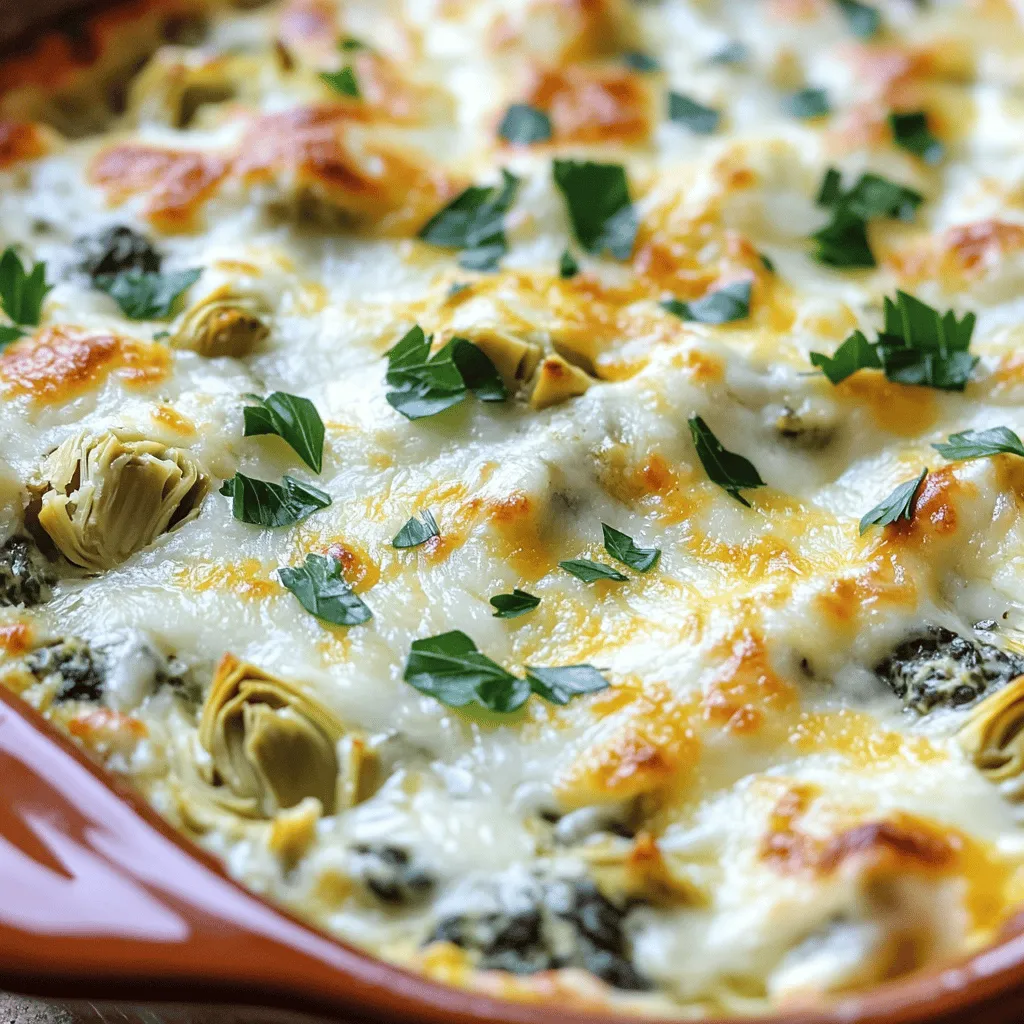
Are you ready to create a crowd-pleaser? This Spinach Artichoke Dip is simple and so tasty. With fresh spinach, creamy

To make your no-bake chocolate oatmeal bars, you need a few simple ingredients. Here’s the full list: - 2 cups rolled oats - 1/2 cup creamy peanut butter (or almond butter) - 1/2 cup honey or maple syrup - 1/4 cup unsweetened cocoa powder - 1/2 teaspoon vanilla extract - 1/4 teaspoon salt - 1/2 cup dark chocolate chips (dairy-free if needed) - 1/4 cup chopped nuts (walnuts or almonds) - 1/4 cup shredded coconut (optional) Each ingredient plays a key role. Rolled oats form the base and add texture. Peanut butter gives richness and helps bind everything together. Honey or maple syrup adds sweetness and moisture. Cocoa powder gives the bars their chocolatey flavor. Vanilla extract enhances the taste, while salt balances the sweetness. Dark chocolate chips add delightful bursts of chocolate. Chopped nuts add crunch, and shredded coconut gives a fun twist. This recipe is flexible. You can swap ingredients based on your taste. You can find the full recipe in the article. To make these no-bake chocolate oatmeal bars, we start with a few simple steps. Each step is fun, and you can get your kids involved too! 1. Combining dry ingredients In a large bowl, take 2 cups of rolled oats. Add 1/4 cup of unsweetened cocoa powder and 1/4 teaspoon of salt. Mix them well with a spoon until they are evenly combined. 2. Mixing wet ingredients In a microwave-safe bowl, combine 1/2 cup of creamy peanut butter and 1/2 cup of honey or maple syrup. Heat this in the microwave for about 30 seconds. Stir it well until it becomes smooth and creamy. 3. Combining mixtures Pour the warm peanut butter mixture into the dry ingredients. Stir everything together until all the oats are coated. You want all the dry bits to disappear into the mix. 4. Pressing into the baking dish Line an 8x8 inch baking dish with parchment paper. This makes removal easy later. Transfer your mixture into the dish. Press it down firmly with a spatula or your hands. Make sure it is evenly spread out. 5. Setting the bars in the fridge Now, pop the dish into the fridge for at least 2 hours. This helps the bars set. Once they are firm, you can remove them from the dish and cut them into squares or bars. This quick and easy method gives you a tasty treat full of flavor and nutrients. You can find the full recipe above if you want to see all the details! To make your no-bake chocolate oatmeal bars great, follow these tips: - How to press the mixture evenly: Use a spatula or your hands. Start from the center and push outward. Make sure to press firmly for a flat layer. This helps the bars hold together when you cut them. - Best refrigeration practices: Chill the bars for at least two hours. This really helps them set. If you want firmer bars, try leaving them in the fridge longer. - Alternative ingredients for different flavors: You can swap peanut butter for almond butter. Try maple syrup instead of honey for a different taste. Add spices like cinnamon for a fun twist. When it's time to serve, make it special: - Presentation ideas for serving: Cut the bars into fun shapes or sizes. Serve them on a colorful plate. Drizzle melted dark chocolate on top for a fancy touch. You can also sprinkle some extra chocolate chips or nuts for flair. - Pairing with drinks or sides: These bars go well with milk, almond milk, or even coffee. Serve them with fresh fruit like berries for a refreshing bite. They make a great snack or dessert for any occasion. For the full recipe, check out the earlier section! {{image_2}} You can make these no-bake chocolate oatmeal bars even better. Try adding spices or extracts to change the taste. A dash of cinnamon gives warmth and depth. Almond extract adds a sweet nuttiness. You can also switch up your nut butter. If you prefer almond butter or cashew butter, go for it! Each nut butter adds its own unique flavor. For a fun texture, consider including seeds. Chia seeds or flaxseeds work well. They add a nice crunch and boost nutrition. You can also use different types of chocolate. Dark chocolate gives a rich taste, while milk chocolate offers a sweeter bite. For a twist, try white chocolate chips for a creamy contrast. These small changes can make your bars feel new and exciting! For the complete recipe, check out the Full Recipe section. To keep your no-bake chocolate oatmeal bars fresh, store them in an airtight container. This helps lock in moisture and flavor. You can use a glass or plastic container with a tight lid. If you stack the bars, add parchment paper between layers to prevent sticking. Keep them in the fridge for the best taste and texture. This way, they stay firm and delicious for days. You can freeze these bars for longer storage. Cut them into squares or bars before freezing. Wrap each piece in plastic wrap, then place them in a freezer bag. Make sure to remove as much air as possible to prevent freezer burn. When you want to enjoy them, just take out the bars and thaw them in the fridge for a few hours. They can last up to three months in the freezer without losing taste. Yes, you can use maple syrup or agave nectar instead of honey. Both options work well. They keep the bars sweet and tasty. Just measure the same amount as you would honey. These bars stay fresh for about a week at room temperature. Just store them in an airtight container. If it’s hot, keep them in the fridge to prevent melting. Absolutely! You can skip the nuts or use seeds instead. Sunflower seeds or pumpkin seeds make great substitutes. This way, you can enjoy the bars without nuts. Yes, these bars are vegan-friendly if you use maple syrup. Just make sure to use dairy-free chocolate chips. This way, you can treat yourself to a yummy snack without any animal products. For the full recipe, check the instructions above! This blog post covered the fun and easy ways to make delicious snack bars. We explored key ingredients like oats, peanut butter, and cocoa powder. I shared simple steps for mixing and preparing the bars, along with tips for great results. You learned about flavor and texture variations, plus how to store and freeze them for freshness. In the end, these bars are a tasty treat. They are simple to make and perfect for any time. Enjoy creating your own unique recipes!

No-Bake Chocolate Oatmeal Bars Simple and Tasty Treat

Looking for a simple and tasty treat that’s also healthy? You’ve found it! My No-Bake Chocolate Oatmeal Bars are a

To make a fluffy vegetable frittata, you need these key items: - 6 large eggs - 1/4 cup milk (or plant-based milk) - 1 cup spinach, chopped - 1/2 cup bell peppers, diced (any color) - 1/2 cup cherry tomatoes, halved - 1/4 cup red onion, finely chopped - 1/2 cup zucchini, diced - 1/2 teaspoon garlic powder - 1/2 teaspoon salt - 1/4 teaspoon black pepper - 1/4 teaspoon paprika - 2 tablespoons olive oil You can enhance your frittata with these tasty options: - 1/4 cup feta cheese, crumbled - Fresh herbs like parsley or basil for garnish If you have special dietary needs, consider these swaps: - Use egg substitutes for a vegan option. - Choose almond or soy milk for a dairy-free frittata. - Swap zucchini with mushrooms or asparagus for different flavors. This list should help you gather your ingredients and customize your dish. Check out the Full Recipe to see how to bring it all together! First, gather your ingredients. You will need eggs, milk, and lots of fresh veggies. Chop the spinach, bell peppers, cherry tomatoes, red onion, and zucchini. This makes cooking easier. In a large bowl, whisk together the eggs and milk. Add garlic powder, salt, black pepper, and paprika. Mix until it is smooth and well combined. Set this bowl aside for later. Take an oven-safe skillet and heat it over medium heat. Pour in the olive oil and let it warm. Add the chopped red onion. Cook it for about 2-3 minutes until it softens. Next, toss in the bell peppers, zucchini, and spinach. Sauté these veggies for 3-4 minutes. They should be tender but not mushy. Now, pour your egg mixture over the sautéed veggies. Make sure it covers everything well. Sprinkle the halved cherry tomatoes and feta cheese on top if you like. Now, cook the frittata over low heat for about 5 minutes. Use a spatula to lift the edges gently. This helps the uncooked eggs move underneath. When the edges set but the center is still wobbly, it’s time to bake. Carefully transfer the skillet to your preheated oven. Bake for 10-15 minutes. Look for a lightly golden top and that the frittata is fully set. Once done, take it out and let it cool for a few minutes. Slice it into wedges and add fresh herbs for garnish. This makes a lovely dish to share. For the full recipe, check out the earlier section. To make your frittata fluffy, beat the eggs well. Whisk them until they are light and frothy. This air helps create a soft texture. Adding milk also adds moisture and helps the frittata rise. Cook the frittata on low heat before moving it to the oven. This gentle cooking helps keep the eggs from getting tough. Choose fresh vegetables for the best flavor. Spinach, bell peppers, and zucchini work great. Cut them into small pieces for even cooking. You can also mix in seasonal veggies for variety. Just be sure they are not too watery, or they may make the frittata soggy. Serve the frittata warm, cut into wedges. It looks lovely on a wooden board. Add fresh herbs for color and taste. Pair it with a side salad or crusty bread. This makes a balanced meal. You can also enjoy it with a light dressing for added zing. For a complete breakfast, serve it with fresh fruit or yogurt. {{image_2}} You can add meat for more protein. Ham, bacon, or sausage work well. Cut the meat into small pieces. Cook it in the skillet before adding vegetables. This gives a savory flavor. You can use leftover cooked meat too. Just make sure it’s heated through. Cheese adds a nice touch. Feta gives a tangy taste. Cheddar adds sharpness, while mozzarella adds creaminess. You can mix cheeses for even more flavor. Just sprinkle it on top of the egg mixture. The cheese will melt as it bakes, creating a delightful layer. Use fresh, seasonal veggies for the best taste. In spring, try asparagus or peas. Summer is great for fresh tomatoes and corn. Fall brings squash and kale. Winter is perfect for hearty greens like spinach or chard. Swapping vegetables keeps the frittata fun and exciting. It also helps you use what you have at home. To store leftover frittata, let it cool first. Then, slice it into wedges. Place the slices in an airtight container. This helps keep it fresh. You can store it in the fridge for up to three days. If you want to keep it longer, freezing is a great option. When you are ready to enjoy your frittata again, preheat your oven to 350°F (175°C). Place the frittata slices on a baking sheet. Cover them loosely with aluminum foil. This keeps them from drying out. Bake for about 10-15 minutes. You can also reheat it in the microwave. Heat it for 30 seconds at a time until warm. To freeze your frittata, wrap each slice in plastic wrap. Then, place the wrapped slices in a freezer bag. Label the bag with the date. You can freeze frittata for up to three months. When you want to eat it, thaw it overnight in the fridge. Then, reheat it using the oven or microwave. This way, you can enjoy a quick meal anytime! For the full recipe, check out the Fluffy Vegetable Frittata 🥦 section. You can use several options if you want to skip eggs. Common substitutes include: - Silken tofu: Blend it until smooth, using 1/4 cup for each egg. - Flaxseed meal: Mix 1 tablespoon of flaxseed with 2.5 tablespoons of water. Let it sit for five minutes. - Chia seeds: Use the same method as flaxseed meal, but with chia seeds. - Applesauce: Use 1/4 cup of unsweetened applesauce per egg. These substitutes work well in a frittata. They provide moisture and help bind the ingredients together. Yes, you can prepare the frittata in advance. Cook it, cool it, and store it in the fridge. It stays fresh for up to three days. You can also mix the veggies and eggs the night before. Just cook it in the morning for a quick breakfast. Your fluffy vegetable frittata will last for about three to four days in the fridge. Store it in an airtight container to keep it fresh. If you want to enjoy it later, freeze slices for up to three months. Just thaw and reheat before serving. We explored the essential ingredients and steps to make a delicious frittata. Optional flavors and dietary substitutions offer tasty choices. Tips helped me show you how to achieve that fluffy texture you want. Variations with meats and cheeses add new tastes. Storing and reheating methods ensure leftovers remain yummy. This frittata is more than just a meal; it's a canvas for your style and taste. Enjoy making it your own!

Fluffy Vegetable Frittata Quick and Easy Recipe

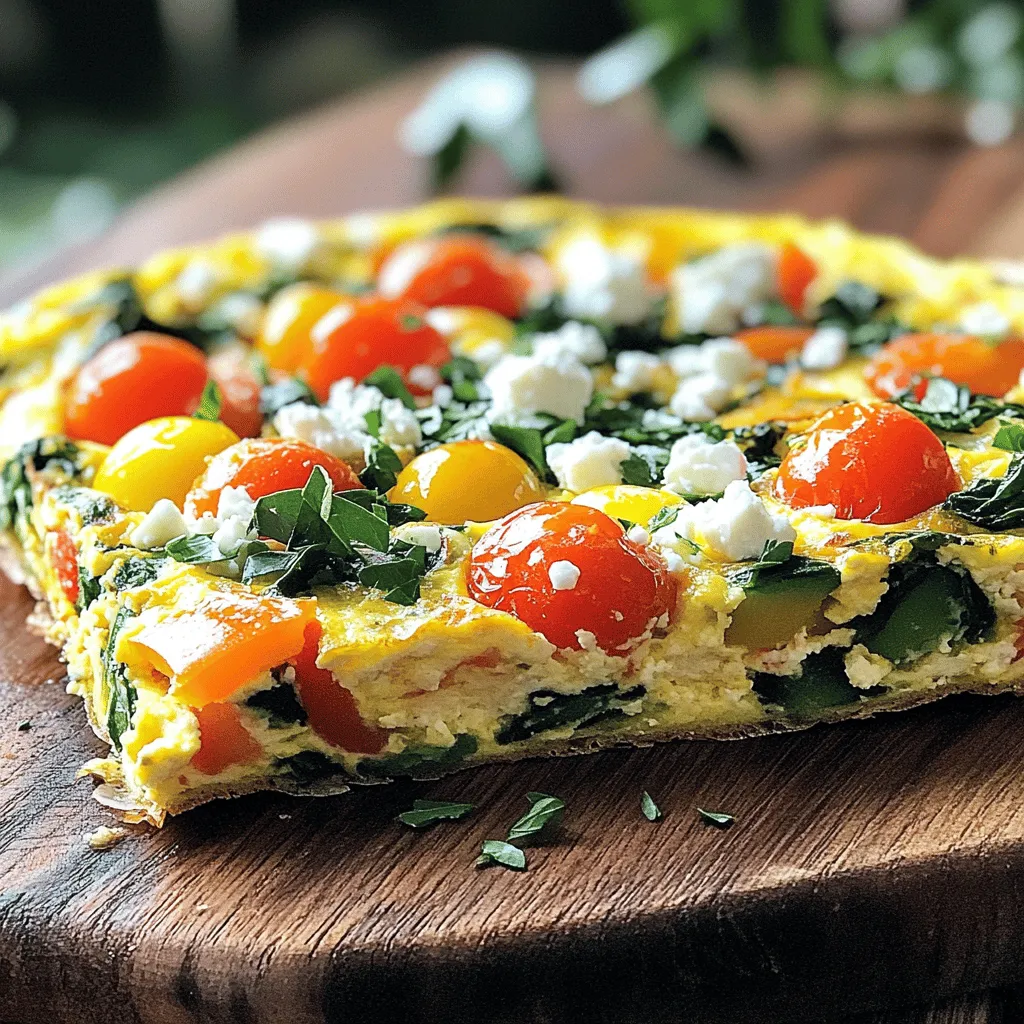
Looking for a quick and easy meal that’s both tasty and healthy? This Fluffy Vegetable Frittata recipe is your answer!

- 1 cup ripe peaches, peeled and diced - 3 tablespoons sugar (divided) - 1 teaspoon cinnamon - 2 cups all-purpose flour - 1 tablespoon baking powder - ½ teaspoon salt - ¼ cup unsalted butter, melted - 1 large egg - ¾ cup milk - 1 teaspoon vanilla extract - 1 cup pre-made croissant dough (store-bought or homemade) - Optional: powdered sugar for dusting Gathering your ingredients is the first step. Start with ripe peaches. They should be soft, sweet, and fragrant. Dice them into small pieces. Next, grab your sugar. You will need three tablespoons, but save two for later. Cinnamon will add warmth to your filling, so don’t skip it. Next, you will need flour, baking powder, and salt. These are your dry ingredients. For the wet part, get unsalted butter, an egg, milk, and vanilla extract. You can use store-bought croissant dough or make your own; either works. Lastly, if you like, get some powdered sugar for a sweet finish. This mix of ingredients creates a tasty treat. You will enjoy the sweet peaches wrapped in flaky dough. Make sure you have everything ready. This makes cooking easier and more fun. Check the [Full Recipe] for detailed steps! To start, mix 1 cup of ripe peaches, 2 tablespoons of sugar, and 1 teaspoon of cinnamon in a small bowl. This blend brings out the sweetness and spice. Stir well and let this mix sit for about 15 minutes. This helps the flavors meld nicely. The peaches will soften, making for a tasty filling. In a large bowl, whisk together 2 cups of all-purpose flour, 1 tablespoon of baking powder, and ½ teaspoon of salt. In another bowl, combine ¼ cup of melted unsalted butter, 1 tablespoon of sugar, 1 large egg, ¾ cup of milk, and 1 teaspoon of vanilla extract. Mix until smooth. Pour the wet mix into the dry ingredients and stir gently. Avoid over-mixing; you want it just combined. Now, preheat your oven to 375°F (190°C). Grease a muffin tin to prevent sticking. Roll out 1 cup of pre-made croissant dough into thin rectangles. Cut the dough into 2-3 long strips. Layer these strips slightly overlapping. This layering creates a nice texture in the cruffins. Take a small spoonful of the peach filling and place it at the end of each dough strip. Roll it up tightly from the filling end, tucking the edges in as you go. Gently press to seal the cruffins. This helps keep the filling inside while baking. Place each rolled cruffin in the greased muffin tin. Bake them in the preheated oven for 20-25 minutes. They should look golden brown and puffed up. The aroma will fill your kitchen, making it hard to wait! Once baked, let the cruffins cool in the tin for 5 minutes. Then, move them to a cooling rack. Just before serving, dust with powdered sugar for a sweet touch. This final step adds beauty and flavor. For the full recipe, check the details above. To get the right texture for your cruffins, focus on your dough. Use cold ingredients for a flaky crust. This helps create layers that puff up nicely when baked. Don't rush the mixing. Combine wet and dry ingredients gently to keep the air in. This air is key for that perfect rise. To avoid sogginess, make sure your peach filling isn’t too wet. Drain excess juice before adding it to the dough. This keeps your cruffins light and fluffy. Also, allow the filling to macerate first. This step enhances the flavor and reduces moisture. Pair your warm cruffins with a scoop of vanilla ice cream or a dollop of whipped cream. Both add a creamy touch. For drinks, try pairing them with iced tea or a light rosé. The fruity flavors complement the cruffins well. When serving, warm cruffins taste best. The heat brings out the peach flavor. However, chilled cruffins can also be delightful, especially on a hot day. Store them in the fridge for a refreshing treat later. To reheat leftover cruffins, place them in a preheated oven at 350°F (175°C) for about 5-10 minutes. This helps regain their crispness. Avoid the microwave, as it can make them soggy. You can also repurpose cruffins into a delicious bread pudding. Tear them into pieces, mix with custard, and bake until golden. This adds a fun twist to your leftover treats. For more ideas, check the Full Recipe. {{image_2}} You can swap peaches for other fruits. Try apples, berries, or cherries. Seasonal fruits also work well. In summer, use ripe strawberries or plums. In fall, pears or apples shine in this recipe. Each fruit brings its own sweet twist. If you need gluten-free options, use gluten-free flour. You can also find gluten-free croissant dough. For a vegan twist, replace the egg with flaxseed meal. Use almond milk instead of regular milk. These changes make the cruffins tasty for everyone. Enhance flavors by adding spices. Try nutmeg or cardamom for extra warmth. You can also add a splash of almond extract. For crunch, incorporate chopped nuts like pecans or walnuts. Want a sweet twist? Add chocolate chips for a rich flavor. Check out the Full Recipe for more details on making your Peach Pie Cruffins. Storing your cruffins correctly keeps them tasty. You can store them at room temperature or in the fridge. If you keep them at room temperature, place them in a sealed container. This helps to keep them fresh for up to 2 days. If you want them to last longer, store them in the fridge. They can stay fresh for about 5 days this way. You can also freeze cruffins for up to 3 months. Wrap each cruffin in plastic wrap and place them in a freezer bag. When you want to enjoy one, just take it out and let it thaw. To keep your cruffins soft, avoid stacking them. This can make them soggy. Instead, let them sit in a single layer. To reheat, preheat your oven to 350°F (175°C). Place the cruffins on a baking sheet for about 10 minutes. This brings back their crispness and warmth. You can also use a microwave, but they may lose some texture. Just heat them for 15-20 seconds. Enjoy your Peach Pie Cruffins from the Full Recipe! Peach Pie Cruffins are a fun twist on a classic dessert. They combine a flaky croissant dough with sweet, juicy peaches. You get the best of both worlds: the rich flavor of peach pie and the light texture of a cruffin. Each bite offers layers of buttery goodness and a burst of peach flavor. Peach Pie Cruffins stay fresh for about 2 to 3 days when stored properly. Keep them in an airtight container at room temperature. If you want them to last longer, you can refrigerate them for up to a week. Just make sure to reheat them before serving for the best taste. You can use both fresh and canned peaches. Fresh peaches give a bright flavor and a nice texture. Canned peaches are convenient and save time. If using canned peaches, drain them well to avoid extra liquid. I recommend using fresh peaches when they're in season for the best taste. Serve Peach Pie Cruffins warm for a delightful treat. Dust them with powdered sugar for a sweet touch. Pair them with a scoop of vanilla ice cream or whipped cream for extra indulgence. These cruffins are great for breakfast, brunch, or as a sweet snack. Enjoy them with a cup of coffee or tea for a lovely treat! You learned how to make peach pie cruffins from scratch. We covered the key ingredients and step-by-step instructions for perfect results. I shared tips to avoid sogginess and offered delicious variations. Remember, you can mix in other fruits or make them gluten-free. Store your cruffins properly for the best taste. This dish is fun and simple. Enjoy making and sharing your tasty cruffins!

Peach Pie Cruffins Delightful and Simple Recipe

Are you ready to dive into a sweet and flaky treat? Peach Pie Cruffins are a delightful twist on classic

Older posts
Newer posts
← Previous Page1 … Page55 Page56 Page57 … Page84 Next →

dsad

© 2026 Foodish Talk • Built with GeneratePress

Our Policies

  • Copyright Policy
  • Cookie Policy
  • GDPR Policy
  • Privacy Policy
  • Disclaimer
  • Terms Of Use

More Information

  • Home
  • About
  • Contact
  • Appetizers
  • Dessert
  • Dinner
  • Drinks
©2026, Foodish Talk About Back To Top