Skip to content
DisclaimerTerms Of UseGDPR PolicyCookie Policy

Foodish Talk

  • Home
  • Drinks
  • Appetizers
  • Dinner
  • Dessert
  • About
  • Contact
  • Privacy Policy
DisclaimerTerms Of UseGDPR PolicyCookie Policy

NO-ING-IMG

To make these tasty Herbed Ricotta Zucchini Roll Ups, you will need: - 2 medium zucchinis - 1 cup ricotta cheese - 1/4 cup grated Parmesan cheese - 1/4 cup fresh basil, finely chopped - 2 tablespoons fresh parsley, finely chopped - 1 garlic clove, minced - 1 teaspoon lemon zest - Salt and pepper to taste - 1 cup marinara sauce (for serving) - Olive oil for drizzling You can enhance the flavor of the roll ups with these extras: - Crushed red pepper flakes for heat - Fresh oregano or thyme for more herb flavor - A splash of balsamic vinegar for a tangy twist - Sun-dried tomatoes for a bit of sweetness Feel free to mix and match these options to make your roll ups unique! If you have dietary needs, here are some great swaps: - Use dairy-free ricotta for a vegan option. - Replace Parmesan with nutritional yeast for a cheesy taste without dairy. - Try gluten-free marinara if you need it to be gluten-free. - Use eggplant slices instead of zucchini for a different vegetable base. These changes keep the dish tasty while catering to different diets. For the full experience, don’t forget to check the Full Recipe. Start by preheating your oven to 400°F (200°C). This heat helps soften the zucchini. Next, take two medium zucchinis and slice them lengthwise. Use a vegetable peeler or mandoline. Aim for thin strips about 1/8-inch thick. You will need 12 to 16 strips. Lay them on a baking sheet lined with parchment paper. Drizzle the strips with olive oil and sprinkle some salt. Roast them in the oven for 10 minutes until they soften. Once done, let them cool slightly. In a mixing bowl, combine the ricotta cheese, grated Parmesan cheese, fresh basil, fresh parsley, minced garlic, lemon zest, salt, and pepper. Mix these well until you have a creamy filling. This blend adds great flavor to your roll ups. You can taste and adjust the seasoning if needed. Take a zucchini strip and spoon about 1 tablespoon of the ricotta mixture at one end. Carefully roll it up, keeping the filling inside. Place the roll up seam-side down on a serving plate. Repeat this process with the rest of the zucchini strips until you use all the filling. This part is fun and easy! You can serve the roll ups warm or at room temperature. Pair them with marinara sauce for dipping. This adds a lovely touch to the dish. For a beautiful presentation, arrange the roll ups on a large platter. Drizzle with extra olive oil and sprinkle more herbs on top. This makes the dish look and taste great! Check out the Full Recipe for all the details. When I slice zucchini for roll ups, I aim for thin strips. Use a vegetable peeler or a mandoline for even slices. Aim for about 1/8-inch thick. This thinness allows the zucchini to cook well without being too chewy. Slicing lengthwise gives a nice shape for rolling. You can get about 12-16 strips from two medium zucchinis. To get the right ricotta texture, mix it well with other ingredients. I blend in grated Parmesan, fresh herbs, and garlic. This mix should be creamy but not too runny. If it feels too thick, add a splash of olive oil or lemon juice. Taste it; it should be tasty with a hint of salt and pepper. This filling makes every bite burst with flavor. For a beautiful display, arrange the roll ups on a large platter. Drizzle them with olive oil for shine. Sprinkle extra herbs on top for color. You can also serve them with marinara sauce for dipping. This adds a lovely contrast to the green zucchini. A colorful plate makes the dish appealing and fun to eat. For the full recipe, check out the details above. {{image_2}} You can change the taste of your Herbed Ricotta Zucchini Roll Ups with different herbs and cheeses. Try using oregano or thyme for a new twist. If you love cheese, substitute the Parmesan with mozzarella or feta. This will give your roll ups a creamy or tangy flavor. Mixing in a bit of sun-dried tomatoes or spinach can also add color and taste. These roll ups work well as both appetizers and main dishes. If serving as an appetizer, cut them into bite-sized pieces and place them on a platter. Drizzle with olive oil and sprinkle extra herbs on top. For a main course, serve them with a side salad or garlic bread. You can also layer them in a baking dish with marinara sauce and bake until bubbly. Grilling your zucchini roll ups gives them a nice smoky flavor. Brush the assembled roll ups with olive oil and grill them over medium heat for about 3-4 minutes on each side. If you prefer frying, heat some olive oil in a pan and fry the roll ups until golden brown. Both methods will add a crispy texture that complements the creamy filling. For the full recipe, check the above section. After you enjoy your Herbed Ricotta Zucchini Roll Ups, you may have some left. To keep them fresh, place the roll ups in an airtight container. Make sure to layer parchment paper between them. This helps prevent them from sticking together. Store the container in the fridge. They should stay good for about 3 days. When you're ready to eat the leftovers, reheating is easy. Preheat your oven to 350°F (175°C). Place the roll ups on a baking sheet. Cover them with foil to keep them from drying out. Bake for about 10-15 minutes, or until they are warm. You can also use a microwave. Just heat them for 1-2 minutes on a microwave-safe plate. If you want to save some roll ups for later, freezing works well. First, let the roll ups cool completely. Then, place them in a single layer on a baking sheet. Put them in the freezer for about 1 hour. This helps them freeze without sticking together. After that, transfer the roll ups to a freezer-safe bag or container. They can last up to 2 months in the freezer. When you're ready to eat them, thaw in the fridge overnight and reheat as mentioned above. Yes, you can! Eggplant and bell peppers work well too. Slice them thin like zucchini. You can also try yellow squash for a twist. Each veggie adds its own flavor, so feel free to experiment. The roll ups should be golden and slightly crispy on the edges. The cheese inside will be warm and gooey. If you see bubbling marinara sauce, that means they’re ready to serve! These roll ups pair nicely with marinara sauce for dipping. You can also serve them with a fresh salad or garlic bread. A light Italian white wine enhances the meal too. These roll ups stay fresh for about 3 days in the fridge. Store them in an airtight container to keep them tasty. Just reheat them gently before serving again. Yes, you can prepare them in advance! Assemble the roll ups and store them in the fridge. Bake them just before serving. That way, you’ll have a fresh dish with minimal effort. Check out the Full Recipe for more details! In this post, I covered how to make herbed ricotta zucchini roll-ups. You learned about key ingredients, including options for different diets. I explained step-by-step how to prepare and bake these rolls. I shared tips for slicing zucchini and achieving the right ricotta texture. You also explored variations, storage tips, and common questions. These roll-ups are easy to make and taste great. Try them out, share with friends, and enjoy your cooking!

Herbed Ricotta Zucchini Roll Ups Delicious and Easy

Ready to impress your friends with a tasty dish? Herbed Ricotta Zucchini Roll Ups are not only simple but also

Here’s what you need to make these Dill Pickle Deviled Eggs with Hot Sauce. Each ingredient adds a special touch. Gather these items before you start: - 6 large eggs - 3 tablespoons mayonnaise - 2 tablespoons dill pickles, finely chopped - 1 teaspoon Dijon mustard - 1 teaspoon apple cider vinegar - 1 teaspoon hot sauce (adjust to taste) - Salt and pepper to taste - Fresh dill for garnish - Extra dill pickle slices for garnish These ingredients are simple but create a big flavor. The eggs form a solid base, while the mayo makes the mix creamy. Dill pickles bring a tangy crunch, and the hot sauce adds a zesty kick. You can change the hot sauce amount to fit your taste. I love using fresh dill for garnish. It looks nice and adds more flavor. For a fun twist, add extra dill pickle slices on top. This makes your dish pop with color and flavor. For more details, check the Full Recipe! To start, place your eggs in a large saucepan. Cover them with water, ensuring at least an inch of water is above the eggs. This prevents them from sticking to the pan. Heat the water over medium-high until it boils. Once boiling, cover the pan and remove it from heat. Let the eggs sit for 10-12 minutes for perfect hard-boiled eggs. After the eggs sit, it's time to cool them down. Transfer the eggs to an ice bath, which is a bowl filled with ice and water. Let them cool for 5-10 minutes. This makes peeling easier. When you peel, try doing it under cold running water. The water helps separate the shell from the egg. Now, slice each egg in half lengthwise. Gently scoop out the yolks into a mixing bowl. Use a fork to mash the yolks until they're crumbly. Add mayonnaise, chopped dill pickles, Dijon mustard, apple cider vinegar, and hot sauce to the yolks. Mix well until you achieve a smooth, creamy consistency. Taste and adjust the seasoning with salt and pepper. Next, it's time to fill the egg whites. You can either spoon the yolk mixture back in or use a piping bag for a neat look. If you want to garnish, a slice of dill pickle on top adds a nice touch. A sprinkle of fresh dill also makes it pop and look inviting. For the full recipe, check it out [here]. To change the heat in your deviled eggs, start with the hot sauce. If you want less heat, add less than one teaspoon. You can mix in more if you like it spicy. Try adding a pinch of cayenne or crushed red pepper for more kick. Always taste as you go to get it just right. For a richer taste, use fresh herbs like chives or parsley. They add a nice pop of color too. You can also swap dill pickles with spicy pickles or bread-and-butter pickles for a sweet twist. Each type of pickle brings its own flavor and character to the dish. To avoid green yolks, time is key. Boil your eggs for 10-12 minutes and then cool them fast. An ice bath helps stop cooking right away. This keeps the yolks bright yellow and creamy. When you peel eggs, do it under running water to make it easier. You’ll end up with perfect halves every time. {{image_2}} You can make a tasty vegan version of deviled eggs. Instead of eggs, use chickpeas. They mash well and add creaminess. For mayonnaise, try using vegan mayo or blended silken tofu. Here’s how you can make it: - 1 cup chickpeas, drained and rinsed - 3 tablespoons vegan mayo - 2 tablespoons finely chopped dill pickles - 1 teaspoon Dijon mustard - 1 teaspoon apple cider vinegar - 1 teaspoon hot sauce (adjust to taste) - Salt and pepper to taste This mix gives you that classic deviled egg flavor without any animal products. You can add a bit of turmeric for color too! Want to spice things up? There are many ways to add flavor to your deviled eggs. Try using sriracha or wasabi for a kick. Just mix a small amount into your filling. You can also play with toppings. Here are some fun ideas: - Crumbled bacon for crunch - Shredded cheese for creaminess - Chopped green onions for freshness These additions will make your deviled eggs even more exciting. For the full recipe, visit the link provided. To keep your Dill Pickle Deviled Eggs fresh, use an airtight container. Place a piece of plastic wrap directly on the eggs to reduce air exposure. Store them in the fridge at a temperature below 40°F. These eggs will stay good for up to three days. If you know you won't eat them all, it's best to fill only what you plan to serve. Deviled eggs are best served cold, so reheating is not recommended. If you want to enjoy them warm, do so gently. Place them in a warm oven for a few minutes, but be careful. You don't want the filling to dry out or lose its creamy texture. Always check for flavor before serving. These eggs shine when they are cool and fresh, just like in the Full Recipe. Yes, you can make these deviled eggs ahead of time. To prepare them in advance, follow these tips: - Hard boil the eggs a day before serving. - Keep the egg whites and yolk mixture separate until you're ready to serve. - Store the egg whites in an airtight container in the fridge. - Place the yolk mixture in another container. When it's time to serve, fill the egg whites with the yolk mix. This keeps the eggs fresh and tasty. If you don't have dill pickles, try these options: - Bread and butter pickles for a sweeter taste. - Sweet gherkins for a milder flavor. - Relish, which adds a similar texture. Each choice gives a different flavor, so pick one that suits your taste. Deviled eggs can last 3 to 5 days in the fridge. To keep them fresh: - Store them in an airtight container. - Place a damp paper towel over the eggs to prevent drying. - Always check for any off-smells before enjoying. Safety first! Yes, Dill Pickle Deviled Eggs are gluten-free! All the ingredients are safe for those avoiding gluten. Just double-check any brands of hot sauce or mayonnaise to confirm they are gluten-free. Enjoy this tasty dish without worry! This blog post shared a simple recipe for dill pickle deviled eggs. We covered the ingredients, step-by-step instructions, and handy tips. You learned how to adjust flavors and explore variations, like vegan options. Deviled eggs are fun and flexible. Make them your own with spices and herbs. Whether for parties or snacks, these eggs delight everyone. Keep practicing, and you’ll master this classic dish in no time!

Dill Pickle Deviled Eggs with Hot Sauce Delightful Dish

If you’re looking for a tasty twist on classic deviled eggs, you’ve found it! My Dill Pickle Deviled Eggs with

To make Sunset Cherry Peach Sangria, gather these key items: - 2 cups cherry juice (100% juice, no added sugar) - 1 cup peach nectar - 1 cup sparkling water - 1 cup fresh cherries, pitted and halved - 1 ripe peach, sliced - 1 orange, sliced - 1 lime, sliced - A handful of fresh mint leaves - 1 tablespoon agave syrup or honey (optional, for sweetness) Each ingredient plays a role in creating a balanced flavor. Cherry juice adds a rich taste and deep color. Peach nectar brings sweetness and a hint of floral notes. Fresh fruits like cherries, peaches, oranges, and limes give the drink a fresh burst of flavor. You can adjust the sweetness with agave syrup or honey, depending on your taste. To prepare your sangria, use these tools: - Pitcher - Measuring cups - Stirring spoon A pitcher is key for mixing all the ingredients. Measuring cups help you get the right amounts. A stirring spoon is perfect for blending flavors together. With these tools, you will make the process smooth and easy. For the full recipe, check out [Full Recipe]. To start, take a large pitcher. Combine 2 cups of cherry juice and 1 cup of peach nectar. Stir well to mix these two tasty drinks. Next, add in the fresh fruits. Use 1 cup of pitted cherries, a sliced peach, an orange, and a lime. Each fruit adds its own flavor to the sangria. The colorful mix looks great and tastes even better. Now, let’s make it sweeter if you like. You can mix in 1 tablespoon of agave syrup or honey. Stir until the sweetener dissolves. This step is optional, but it makes the drink even yummier. Next, pour in 1 cup of sparkling water. This gives the sangria a nice fizz. Gently stir again to combine everything. Now it’s time to let the flavors meld. Place the pitcher in the fridge for at least 30 minutes. This chilling time helps the fruits release their juices. When ready to serve, pour the sangria over ice. Add a sprig of mint or a slice of peach for a pretty touch. Enjoy this refreshing drink with friends or family. The full recipe can be found above for easy reference. To make your Sunset Cherry Peach Sangria shine, focus on the sweetness. You can adjust it easily. If you like it sweeter, add agave syrup or honey. Start with one tablespoon, then taste it. You can always add more. Balancing flavors is key. The cherry juice and peach nectar work well together. The fresh fruits add freshness. The orange and lime bring a nice zing. Always taste your mix. If it needs more depth, add more fruit or a splash of juice. Choose the right glassware to elevate your drink. I love using large wine glasses or fun mason jars. They show off the colors and fruits beautifully. This adds to the experience. Garnish is where you can get creative. A sprig of fresh mint looks great. You can also add a slice of peach or a few cherries on top. It makes your sangria pop and invites people to take a sip. {{image_2}} You can mix and match fruits to make your Sunset Cherry Peach Sangria even more exciting. Here are some tasty ideas: - Berries: Add strawberries or blueberries for a burst of color and flavor. - Citrus: Lemons or grapefruits can give your drink a zesty kick. - Melons: Watermelon or cantaloupe slices add a refreshing touch. - Tropical Fruits: Pineapple chunks bring a sweet, sunny vibe. If you want to switch up the juices, try these options: - Pineapple Juice: It pairs well with cherries and peaches. - Apple Juice: This juice gives a crisp, sweet flavor. - Lemonade: For a tangy twist, mix in some lemonade. To give your sangria an adult twist, consider adding wine or spirits. Here are some ideas: - Red Wine: A dry red wine works well with cherry juice. - White Wine: Use a fruity white for a lighter drink. - Sparkling Wine: Champagne or prosecco adds bubbles and fun. For those who prefer not to drink alcohol, you can make a great alcohol-free version. Here are some choices: - Soda: Use lemon-lime soda for a fizzy alternative. - Non-Alcoholic Wine: There are many good options on the market. - Flavored Sparkling Water: Look for cherry or peach flavors for a nice touch. The key is to find combinations that you love. Enjoy experimenting with your own variations! Store your Sunset Cherry Peach Sangria in the fridge. Use a large glass pitcher or a sealed jar. Keep it covered to prevent the drink from absorbing other smells. This helps keep the flavors fresh and bright. If you have leftovers, pour them into a clean container. A mason jar works well for this. Make sure to leave some space at the top. This allows the fizz to stay longer. How long does it last? Your sangria will stay fresh for about 3 days in the fridge. The best taste is within the first 24 hours after you make it. Signs of spoilage include off smells or a change in color. If you see any floating bits that look odd, it’s best to toss it out. Enjoy your sangria while it’s fresh for the best flavor! How do I make the sangria less sweet? To reduce the sweetness, skip the agave syrup or honey. You can also add more sparkling water. This will give it a light and fizzy taste. If you want more flavor, try adding extra fruit slices. Fresh citrus like lime or lemon works great. Can I prepare the sangria in advance? Yes, you can make this sangria ahead of time! Mix the cherry juice, peach nectar, and fruits. Store it in the fridge for a few hours or even overnight. Just add the sparkling water right before serving. This keeps the fizz fresh and delightful. What other herbs can be used for garnish? Mint is my favorite for garnish, but you can try basil or rosemary too. They add a unique twist to the drink. Just make sure to use fresh herbs for the best flavor. A sprig of basil can bring a lovely scent and taste to your sangria. This blog post guided you through making a delicious sangria. We covered essential ingredients like cherry juice and fresh fruits, along with tools you need. The step-by-step instructions made preparation simple. Plus, tips helped you perfect your drink. Variations offered creative ideas, and storage advice will keep your sangria fresh. Enjoy experimenting to find your perfect mix. Sangria is fun and versatile, so let your creativity flow!

Sunset Cherry Peach Sangria Refreshing Summer Drink

Looking for a fun summer drink? Try my Sunset Cherry Peach Sangria! It’s a light, fruity mix that’s easy to

- 4 ripe tomatoes, diced - 2 ripe peaches, diced - 1 small red onion, finely chopped - 1 jalapeño, deseeded and minced - 1/4 cup fresh cilantro, chopped - 2 tablespoons lime juice - 1 tablespoon smoked paprika - Salt and pepper to taste - Grill or smoker - Mixing bowl - Knife and cutting board I love using fresh ingredients in my recipes. For this smoked tomato peach salsa, ripe tomatoes and peaches are key. They bring natural sweetness and juicy flavor. The red onion adds a nice crunch, while the jalapeño gives it a spicy kick. I like to use fresh cilantro for its bright taste. In the condiments section, lime juice gives the salsa a zesty splash. Smoked paprika adds depth and warmth. Don’t forget to season with salt and pepper to bring all the flavors together. For tools, you will need a grill or smoker to achieve that smoky flavor. A mixing bowl helps combine everything easily. A knife and cutting board are essential for chopping up those fresh ingredients. For the full recipe, make sure you check the details to create this flavorful summer delight! To start, preheat your grill or smoker to medium heat. This step is key for great flavors. If you don’t have a smoker, don’t worry! You can use a grill with a smoking box or make a foil packet with wood chips. This method will still give you that nice smoky taste. Next, slice the tomatoes in half. Place them cut-side down on your grill. Do the same with the peaches. This helps them get a nice char. Grill the tomatoes and peaches for about 6 to 8 minutes. You want them to show grill marks. This step brings out their natural sweetness and adds depth to your salsa. After grilling, take the tomatoes and peaches off the heat. Let them cool for a moment. Then, chop them into small pieces. In a mixing bowl, combine the diced smoked tomatoes and peaches. Now, add the chopped red onion, minced jalapeño, and fresh cilantro. Drizzle in the lime juice. Finally, sprinkle the smoked paprika over the mixture. Toss everything gently until well mixed. Don't forget to season with salt and pepper to taste. Let your salsa sit for at least 15 minutes. This waiting time allows the flavors to meld beautifully. For the complete recipe, check out the [Full Recipe]. To boost the smoky flavor, consider adding spices like cumin or chili powder. Fresh herbs like basil or oregano can also add depth. If you don’t have a grill, you can use liquid smoke. Just a few drops can bring that smoky taste right to your salsa. Another option is to roast your tomatoes and peaches in the oven on high heat. This adds a nice char without a grill. Letting your salsa sit is key. This waiting time helps the flavors blend well. I suggest at least 15 minutes. When it comes to sweetness and heat, balance is important. If your peaches are very sweet, add more jalapeño for heat. A pinch of sugar can help if you find it too spicy. This salsa pairs perfectly with tortilla chips. It also works great as a condiment on tacos or grilled chicken. Try it as a topping for fish or even mixed in with your salads. The fresh flavors make any dish pop. You can find the full recipe above to get started! {{image_2}} You can easily change this recipe to fit your needs. To make it vegan, just skip the smoked paprika or use a plant-based version. For a gluten-free option, ensure your smoked paprika is gluten-free. You can swap out peaches for mangoes or pineapple. These fruits add a tropical twist. Use what you find in your garden or local market. In summer, try adding fresh corn for sweetness. In the fall, bell peppers can add crunch and flavor. You can also use seasonal herbs like basil or mint for a fresh taste. These small changes can make your salsa unique and fun. If you love spice, add more jalapeños or use serrano peppers. For a milder salsa, use sweet bell peppers instead. You can also remove the seeds from the jalapeño to lower the heat. Always taste as you go, and adjust to your liking. This way, your salsa will be perfect for everyone. To keep your smoked tomato peach salsa fresh, store it in the fridge. Use an airtight container. This helps prevent air from getting in. Glass jars or plastic containers work well. Make sure the salsa is cool before sealing it. This keeps moisture in and stops bacteria growth. In the fridge, your salsa lasts about 3-5 days. After that, it may lose flavor. Look for signs that it has gone bad. If you see mold or it smells sour, it’s time to toss it. Fresh salsa should look bright and smell fruity. You can freeze salsa for longer storage. First, pour it into a freezer-safe container or bag. Leave some space for expansion. Seal it tightly and label it with the date. To thaw, place it in the fridge overnight. You can also use it straight from the freezer in cooked meals. Just remember, the texture might change a bit after freezing. Yes, you can make Smoked Tomato Peach Salsa ahead of time. I recommend making it up to two days in advance. This allows the flavors to blend beautifully. Store it in an airtight container in the fridge. Just remember to stir it well before serving. You can serve this salsa with many dishes. It pairs well with tortilla chips for a tasty snack. You can also add it to grilled chicken or fish for a fresh twist. Try it on tacos or as a topping for burgers. It brightens up any meal! Scaling up the recipe is easy! Double or triple the ingredients based on your needs. Keep the same ratios to maintain the flavor. Use a larger mixing bowl to combine everything. This is great for parties or family gatherings. Yes, you can add sweetness in a few ways. Try adding a bit of honey or agave syrup. You can also use more peaches if you want a fruity kick. Another option is to mix in diced mango or pineapple for a tropical touch. In this post, we explored the steps for making a Smoked Tomato Peach Salsa. You learned about fresh ingredients, useful equipment, and grilling techniques. We covered tips for enhancing flavor and common variations. Always let your salsa sit for better taste. Store it properly to keep it fresh longer. Whether spicy or sweet, adjust the recipe to fit your taste. Enjoy your homemade salsa with chips or on your favorite dishes. Making this salsa is simple and fun, so dive in and enjoy your creation!

Smoked Tomato Peach Salsa Flavorful Summer Delight

Summer flavors come alive with my Smoked Tomato Peach Salsa! This vibrant mix of juicy tomatoes and sweet peaches is

- Rainbow sherbet - Lemon-lime soda (or sparkling water) - Club soda The heart of this float is rainbow sherbet. It brings bright colors and fun flavors. You can find it in most stores. Lemon-lime soda or sparkling water gives the float a fizzy kick. Club soda adds even more bubbles. Together, they create a refreshing drink that dances on your taste buds. - Whipped cream - Colorful sprinkles - Fresh mint leaves (optional) Now, let’s talk toppings! Whipped cream makes it creamy and rich. Colorful sprinkles add a fun crunch and extra color. If you want a fresh twist, add mint leaves on top. They look great and offer a nice aroma. - Tall glass - Spoon - Straw You need a tall glass to show off your float. A spoon helps you scoop up the sherbet. And don’t forget a straw! It makes sipping easy and fun. These simple tools make your float experience even better. For the full recipe, check out the Rainbow Sherbet Soda Float section. - Step 1: Adding the first scoop of sherbet Start with a tall glass. Place one scoop of rainbow sherbet at the bottom. This bright scoop gives your float a fun start. - Step 2: Pouring in lemon-lime soda Carefully pour in lemon-lime soda until the glass is halfway full. Watch the fizzy bubbles rise! This adds a refreshing taste. - Step 3: Adding a second scoop of sherbet Next, add another scoop of sherbet on top of the soda. This creates a lovely, colorful layer that looks great! - Step 4: Pouring club soda for fizz Gently pour club soda over the sherbet. The bubbles will make it fizz and create even more layers. It’s a fun science trick! - Step 5: Drizzling grenadine syrup Now, drizzle a tablespoon of grenadine syrup into the glass. Watch as it sinks and creates a beautiful rainbow effect. This makes your float even more fun. - Step 6: Topping with whipped cream and garnishes Finally, top your float with a generous dollop of whipped cream. Add colorful sprinkles on top and a mint leaf for a nice touch. Serve this treat right away with a straw and a spoon. Enjoy your Rainbow Sherbet Soda Float! For the complete process, check out the Full Recipe. To keep the rainbow effect, layer your ingredients carefully. Start with one scoop of sherbet at the bottom. Pour the lemon-lime soda next. Wait a moment for bubbles to rise. Then, add another scoop of sherbet. This helps keep the layers distinct. Finally, pour the club soda gently on top. It should create a beautiful fizz without mixing the colors too much. To maintain fizzy consistency, use chilled soda. Warm soda can lose its bubbles fast. Also, pour slowly to avoid a big foam mess. If you want more fizz, add a little more club soda at the end. For the best presentation, use tall glasses. These show off the colorful layers well. You can also try fancy dessert glasses for a special touch. A clear cup lets everyone see the rainbow effect. Pair this float with light snacks. Think cookies or fruit. They balance the sweetness of the float. For dessert, serve a slice of cake or brownies. The flavors mix well and create a fun treat. To adjust sweetness levels, use less grenadine syrup. You can also use a lighter soda, like lemon-lime soda. This cuts back on sugar while keeping it tasty. For non-alcoholic variations, simply skip any adult drinks. Stick to soda and sherbet. Kids love this float just as much! You can even add fruit pieces. They add flavor and make it even more fun. {{image_2}} You can change the sherbet flavors to make it your own. Try orange, lime, or raspberry sherbet. Each choice gives a new taste to your float. Experiment with different soda options too. Use root beer or ginger ale for a fun twist. Each soda brings a unique fizz and flavor. If you want a vegan or dairy-free option, use coconut or almond milk-based sherbet. These taste great and keep the float creamy. For a sugar-free version, look for sugar-free sherbet and diet soda. These swaps let everyone enjoy this tasty treat without worry. Make holiday-themed floats by using colors and flavors that match the season. For Halloween, try orange sherbet with a dark soda. For summer, add fresh fruits like berries or peaches. Toss them in with the sherbet for an extra burst of flavor. Each season can bring a new spin to the classic float. After making your Rainbow Sherbet Soda Float, you might have some ingredients left. Here’s how to store them: - Rainbow Sherbet: Keep it in the freezer. Place it in an airtight container to prevent freezer burn. - Lemon-Lime Soda: Seal the bottle tightly and store it in the fridge. Use it within a week for best taste. - Club Soda: Similar to lemon-lime soda, keep it in the fridge. Use it within a few days for the best fizz. - Grenadine Syrup: Store it in a cool, dark place. It lasts for months if kept sealed. You can prepare parts of your float ahead of time: - Sherbet Scoops: Pre-scoop the rainbow sherbet and place the scoops on a tray in the freezer. This helps them hold their shape. - Soda Mix: Mix the lemon-lime soda and club soda in a pitcher. Store it in the fridge for a quick pour later. - Complete Floats: I recommend making the float fresh. However, if you must, prepare it without the soda. Add soda just before serving to keep the fizz. It’s good to know how long each ingredient lasts: - Rainbow Sherbet: It stays good for about 2-4 months in the freezer. Look for ice crystals as a sign it may be losing quality. - Lemon-Lime Soda: Once opened, it lasts about 3-5 days in the fridge. If it goes flat, it’s time to toss it. - Club Soda: Similar to lemon-lime soda, use it within a week after opening. Check for fizz; if it’s flat, don’t use it. - Grenadine Syrup: This can last 6 months or more if unopened. If it changes color or smells funny, discard it. These steps help keep your ingredients fresh and ready for your next delicious float! For the full recipe, check out the Rainbow Sherbet Soda Float section above. To make Rainbow Sherbet Soda Floats for a crowd, start with the Full Recipe. Multiply each ingredient by the number of servings you need. Use large glasses or clear plastic cups for easy serving. - Tips for scaling the recipe: - Use a large bowl for the sherbet. - Keep the soda cold for the best fizz. - Set up a float station with all ingredients. - Serving suggestions for gatherings: - Offer fun straws and colorful spoons. - Add a “build-your-own” sign for guests. - Consider themed decorations to match the rainbow vibe. Yes, you can use homemade sherbet! Making your own gives you control over flavors and sweetness. - Instructions for using homemade options: - Let your sherbet soften slightly before scooping. - Follow the same layering steps in the Full Recipe for best results. - Flavor recommendations: - Try fruity flavors like mango or raspberry. - You can mix and match for a unique twist! You can get creative with your Rainbow Sherbet Soda Floats! - Creative ideas for customizing flavors and presentations: - Use different sherbet flavors like orange or lime. - Layer the sodas for a colorful effect. - Alternative beverages to mix with sherbet: - Experiment with lemonade or fruit punch. - Sparkling iced tea can add a refreshing twist. You learned how to make a fun Rainbow Sherbet Soda Float. We covered the main ingredients, step-by-step instructions, and tips for a perfect float. You can explore variations, dietary options, and even ways to handle leftovers. Making this treat offers tasty joy for you, friends, and family. Enjoy creating!

Rainbow Sherbet Soda Float Flavorful and Fun Treat

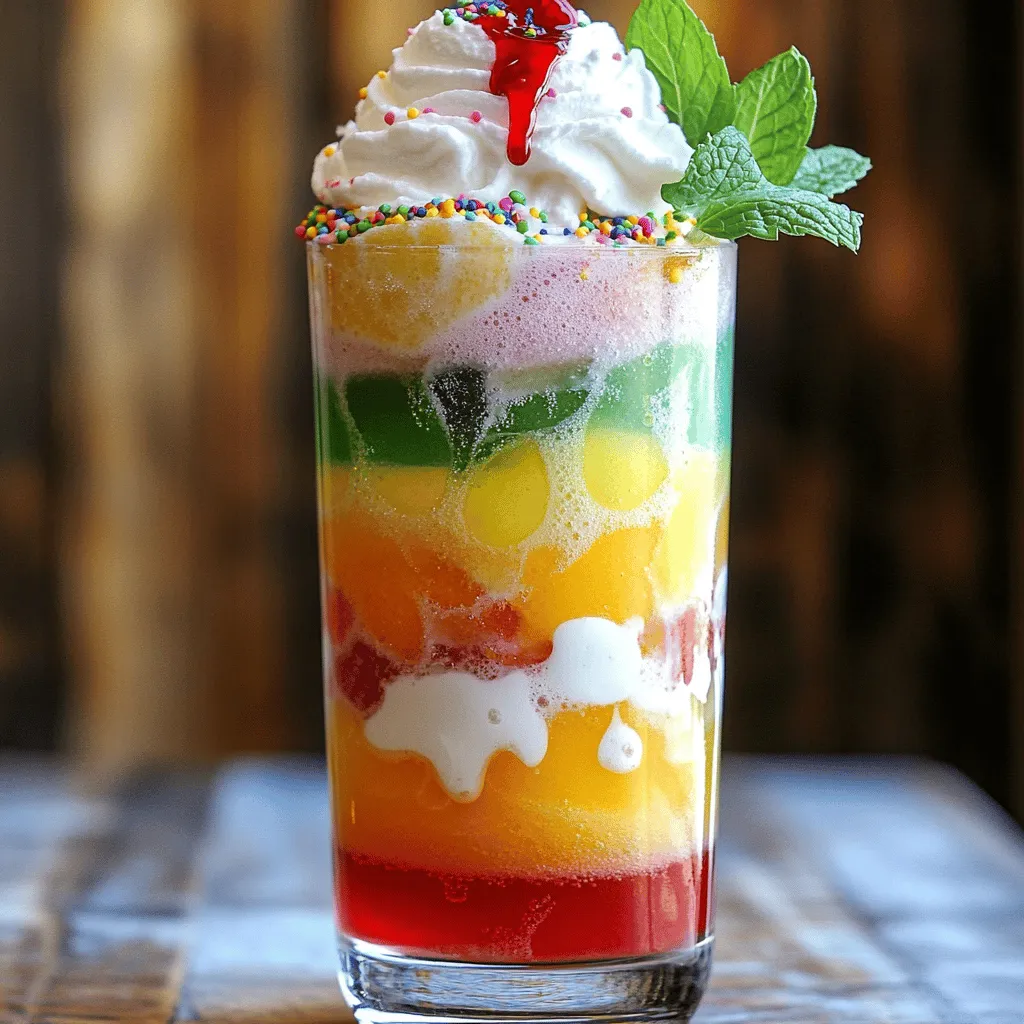
Get ready for a treat that’s as colorful as it is delicious! The Rainbow Sherbet Soda Float combines fruity flavors

Creating Matcha Pistachio Energy Bites is simple and fun. Here’s what you need: - 1 cup rolled oats - 1/2 cup pistachios, shelled and roughly chopped - 1/4 cup honey or maple syrup - 2 tablespoons matcha powder - 1/4 cup almond butter (or any nut butter of choice) - 1/4 cup chia seeds - 1/2 teaspoon vanilla extract - Pinch of sea salt - 1/4 cup unsweetened shredded coconut (optional) Gathering fresh, quality ingredients makes a big difference. You want to use good matcha powder for its rich taste and health benefits. Pistachios add a nice crunch and protein. I love using almond butter, but any nut butter works well too. The sweetness from honey or maple syrup balances the earthy matcha flavor. If you like texture, add shredded coconut. It gives these bites a nice chew. Feel free to adjust the ingredients based on your taste or what you have at home. Check out the Full Recipe to see how these ingredients come together in a few simple steps. To start, gather your dry ingredients. In a large mixing bowl, combine: - 1 cup rolled oats - 1/2 cup pistachios, shelled and roughly chopped - 1/4 cup chia seeds - 2 tablespoons matcha powder - Pinch of sea salt Mix them well. This ensures every bite gets the good stuff. Next, we make the wet mixture. In a separate bowl, mix together: - 1/4 cup almond butter (or any nut butter of choice) - 1/4 cup honey or maple syrup - 1/2 teaspoon vanilla extract Stir until it’s smooth and well blended. Now, combine the wet and dry ingredients. Pour the wet mixture into the dry mix. Stir until everything is fully incorporated. If you want extra texture, fold in: - 1/4 cup unsweetened shredded coconut (optional) It's time to shape our bites. Use your hands to form small balls, about 1 inch in diameter. If the mixture feels too crumbly, add a bit more almond butter or honey. This will help it stick better. To keep them uniform, roll each ball gently in your hands. This helps them hold their shape. Chill the energy bites for about 30 minutes. This helps them firm up nicely. Once chilled, store them in a container. They can sit in the fridge for up to a week. For longer storage, freeze them. You can easily grab one for a quick snack later. Enjoy your Matcha Pistachio Energy Bites as a tasty and healthy treat! For the full recipe, check the previous section. - Nut butter options: You can swap almond butter for peanut butter or cashew butter. Each choice brings a unique taste but keeps the bites creamy. - Sweetener alternatives: Use agave syrup or brown rice syrup if you want a different flavor. Each sweetener will change the taste slightly. - Suggestions for additional mix-ins: Feel free to add dried fruits like cranberries or apricots for sweetness. You can also mix in seeds like pumpkin or sunflower for crunch. - How to adjust matcha flavor intensity: If you want a stronger matcha taste, add an extra tablespoon of matcha powder. Start small and taste as you go to find your perfect level. - Recommended sizes for energy bites: Aim for bites that are about 1 inch wide. This size makes them easy to eat and share. - Adjusting cooking times for larger sizes: If you make larger bites, chill them longer to set properly. If they are 2 inches, add an extra 15 minutes in the fridge. These tips will help you create the perfect Matcha Pistachio Energy Bites. For the full recipe, check out the earlier section. Enjoy! {{image_2}} You can easily modify this recipe to fit different diets. For a vegan version, switch honey with maple syrup. This keeps the bites sweet while making them plant-based. If you need gluten-free options, use oats labeled as gluten-free. This simple change ensures you enjoy the energy bites without worry. Let your creativity shine by adding different nuts. Try almonds or cashews for a new twist. You can also infuse your bites with spices. A pinch of cinnamon or ginger adds warmth and depth. These small changes can transform the taste and make your energy bites unique. For a fun twist, create a chocolate matcha version. Just add cocoa powder to the mix. This adds a rich flavor that pairs well with matcha. You can also incorporate dried fruits for extra sweetness. Dried cranberries or apricots bring a chewy texture and a burst of flavor. For the Full Recipe, follow the detailed steps to make these energy bites. Enjoy your cooking! Matcha Pistachio Energy Bites last about one week in the fridge. To keep them fresh, store them in an airtight container. This helps prevent them from drying out or absorbing other smells from the fridge. Always make sure the lid is tight after you take some bites. To freeze these energy bites, simply place them in a single layer on a baking sheet. Freeze them for about an hour until firm. Once frozen, transfer them to a freezer-safe bag or container. To enjoy later, just take out a few bites and let them thaw at room temperature. This keeps their texture nice. Use small, airtight containers for the best storage. Glass or sturdy plastic containers work well. For easy access, label your containers with the date you made them. This helps you track how long they have been stored. With proper care, you can enjoy these tasty bites whenever you want! Matcha Pistachio Energy Bites last about a week in the fridge. To keep them fresh, store them in an airtight container. If you want them to last longer, freeze them. They can stay frozen for up to three months. Yes, you can swap pistachios for any nut or seed you like. Almonds, walnuts, or sunflower seeds work well. Just make sure to chop them if they are large. This keeps the bites easy to eat. Matcha packs a lot of nutrients. It contains antioxidants that help fight free radicals. Matcha can boost your metabolism and give you energy without a crash. It also has L-theanine, which promotes calmness and focus. Yes, these energy bites are great for kids. They are healthy and tasty. Just check for nut allergies before serving. If your child has an allergy, use seeds instead of nuts. You can make these bites without matcha. Simply leave it out and use cocoa powder instead. This gives a rich chocolate flavor while keeping the bites delicious. For the full recipe, check the main article. You learned how to make Matcha Pistachio Energy Bites using simple ingredients. The step-by-step guide helps you mix, shape, and store them easily. With various tips for flavors and adjustments, you can create bites that fit your needs. These tasty snacks are great for kids and packed with health benefits. Try out different variations to find your favorite! Making energy bites is fun, and they are a healthy treat you will enjoy. Keep them stored well for the best taste and freshness. Enjoy your energy bites anytime!

Matcha Pistachio Energy Bites Nourishing Snack Option

Looking for a tasty and healthy snack? Let me introduce you to Matcha Pistachio Energy Bites! Packed with oats, nuts,

- 4 ears of corn, husked and halved lengthwise - 1/4 cup honey - 2 tablespoons soy sauce - 3 cloves garlic, minced - 1 tablespoon sriracha (adjust to taste) - 1 teaspoon smoked paprika - 1/2 teaspoon salt - 1/2 teaspoon black pepper - 2 tablespoons lime juice - Fresh cilantro, chopped (for garnish) - Lime wedges (for serving) Each ingredient plays an important role in this dish. The corn is the star, providing a sweet and crunchy base. Honey adds a natural sweetness that balances the heat. Soy sauce gives depth and umami flavor. Garlic brings a strong aroma and taste. Sriracha adds heat, which you can adjust to fit your liking. Smoked paprika gives a nice smoky touch. Salt and black pepper enhance all the flavors. Lime juice adds brightness and acidity. Fresh cilantro is a great finish, adding a burst of freshness. When choosing corn, look for bright green husks. The husks should feel moist and tight around the kernels. Check for plump kernels by gently pressing on them. If they feel firm, they are fresh. Avoid corn with brown or dried-out husks. Also, check for any signs of mold at the ends. Fresh corn tastes best when picked in season. Enjoying corn at its peak makes your Spicy Honey Garlic Corn Ribs even more delightful. For the full recipe, check below! Start by preheating your oven to 400°F (200°C). This heat will help cook the corn ribs perfectly. Take four ears of corn and husk them. Cut them in half lengthwise. Next, use a sharp knife to cut each half into quarters. You should have long, rib-like pieces of corn. Place these corn ribs on a baking sheet lined with parchment paper. This makes clean-up easy later. In a mixing bowl, gather the ingredients for the sauce. Add 1/4 cup honey, 2 tablespoons soy sauce, and 3 minced garlic cloves. Then, mix in 1 tablespoon of sriracha. You can adjust the sriracha for more or less heat. Next, add 1 teaspoon smoked paprika, 1/2 teaspoon salt, and 1/2 teaspoon black pepper. Finally, squeeze in 2 tablespoons of lime juice. Whisk everything together until it is well combined. This sauce will give the corn its tasty kick. Now, brush the spicy honey garlic sauce over the corn ribs. Make sure to coat them evenly. Save some sauce for basting later. Place the baking sheet in the oven and bake for 20-25 minutes. Halfway through, turn the corn to cook evenly. During the last 10 minutes, baste the corn with the reserved sauce for a sticky finish. For extra flavor, switch your oven to broil. Broil the corn ribs for 2-3 minutes. Keep a close eye to avoid burning. When done, they should look golden and sticky. Enjoy these delicious corn ribs with a garnish of fresh cilantro and lime wedges. You can find the full recipe in the previous section. To get that perfect glaze on your corn ribs, you need to apply the sauce well. Brush the sauce over the corn ribs before baking. Save some sauce for basting later. This keeps the corn juicy and flavorful. When you turn the corn, baste it with the reserved sauce. This adds layers of taste and makes the corn shiny. Want more heat? Just add more sriracha to the sauce. If you prefer milder corn ribs, use less sriracha. You can also try adding a pinch of cayenne pepper for a warm kick. Taste the sauce before glazing the corn. This way, you can adjust it to fit your taste. It’s your dish, so make it how you like it! Using the right tools makes cooking easier. A sharp knife helps cut the corn safely into ribs. A sturdy cutting board is also a must. Use a whisk for mixing your sauce. A brush helps to coat the corn ribs evenly. Finally, line your baking sheet with parchment paper for quick clean-up. These tools will make your cooking experience smooth and fun. For the full recipe, you can check the details above. Enjoy your cooking! {{image_2}} You can switch up the flavors in Spicy Honey Garlic Corn Ribs. Try adding chili powder for heat. If you like a smoky taste, use chipotle powder instead. You can also mix in some cumin for a warm, earthy flavor. Experimenting can lead to exciting new tastes. While the honey garlic sauce is amazing, you can explore other sauces too. A tangy barbecue sauce can add a different twist. You can also use a sweet chili sauce for a milder kick. For a creamy option, try ranch dressing drizzled on top after cooking. Both grilling and baking give you tasty corn ribs, but they have different results. Grilling adds a nice char and smoky flavor. Bake them for a caramelized glaze and a soft texture. If you want to grill, simply cook them over medium heat for about 10 to 15 minutes. Just keep turning them to avoid burning. Whether you bake or grill, you’ll enjoy a delicious treat. For the complete recipe, check the Full Recipe section. To keep your corn ribs fresh, store them in an airtight container. Make sure they cool completely before sealing. This way, they can stay tasty for up to three days in the fridge. If you want to keep them longer, freezing is a great option. When you're ready to enjoy leftovers, reheating is easy. Preheat your oven to 350°F (175°C). Place the corn ribs on a baking sheet. Heat them for about 10-15 minutes until warm. You can also use a microwave, but this may make them a bit soggy. So, the oven is best for keeping that nice texture. To freeze your corn ribs, wrap each piece tightly in plastic wrap. Then, put them in a freezer bag. They can last for up to three months in the freezer. When you're ready to eat, just thaw them in the fridge overnight. Then, reheat as mentioned above. This makes for a quick and delicious snack later! You can use frozen corn, but fresh corn is better. Fresh corn gives a sweet taste and crisp texture. If you choose frozen corn, let it thaw first. Drain any extra water to avoid soggy ribs. To cut corn into ribs, first husk the corn. Place the corn upright on a cutting board. Use a sharp knife to cut the corn in half lengthwise. Then, cut each half into quarters. This gives you rib-like pieces. Be careful and keep your fingers safe while cutting. These corn ribs pair well with many dishes. Try serving them with grilled chicken or fish. They also go great with salads or as a side for tacos. For a tasty twist, add a scoop of guacamole or salsa on the side. Enjoy experimenting with your favorite dishes! For the full recipe, check out the instructions above. In this blog post, I covered how to make delicious corn ribs. We explored key ingredients and their importance, plus tips for selecting fresh corn. I shared step-by-step instructions for preparing the corn and sauces, along with baking and broiling techniques. You learned ways to perfect the glaze and adjust spice levels. We also discussed variations and tips for storing leftovers. Enjoy your corn ribs any way you like them! Cook with confidence and have fun experimenting with flavors.

Spicy Honey Garlic Corn Ribs Tasty Summer Treat

Looking for a fun and tasty summer snack? Try my Spicy Honey Garlic Corn Ribs! This dish pairs sweet honey

- 1 cup all-purpose flour - 1 teaspoon baking powder - 1/2 teaspoon baking soda - 1/4 teaspoon salt - 1/4 cup unsalted butter, softened - 1/2 cup granulated sugar - 2 large eggs - 1/2 cup creamy peanut butter - 1/2 cup dill pickle juice - 1 cup diced pickles (preferably sweet or dill to balance the flavors) - 1/2 cup creamy frosting (store-bought or homemade) - Crushed peanuts for garnish Peanut butter and pickles bring unique flavors and health perks. Peanut butter is rich in protein, which helps build muscle. It also has healthy fats for energy. Plus, it contains vitamins E and B6. Pickles add crunch and a zesty taste. They are low in calories and provide probiotics, which support gut health. Dill pickle juice also adds moisture and tang to our cake, giving it a special touch. If you want to swap ingredients, here are some ideas: - Use whole wheat flour for a more nutritious base. - Swap unsalted butter with coconut oil for a dairy-free option. - For a vegan choice, replace eggs with flax eggs or applesauce. - Choose almond or cashew butter in place of peanut butter for nut allergies. - Use sweet pickle juice if you prefer a sweeter taste. These swaps help you enjoy the treat while catering to your needs! First, preheat your oven to 350°F (175°C). This will help the cake bake evenly. Next, take an 8-inch square baking pan. Line the bottom with parchment paper. This makes it easy to remove the cake later. Make sure to grease the sides of the pan with butter or cooking spray. This step helps the cake rise without sticking. In a medium bowl, whisk together the flour, baking powder, baking soda, and salt. This mixes the dry ingredients well. In a large bowl, cream the softened butter and sugar. Use a hand mixer for about three minutes. You want the mixture to be light and fluffy. It’s key for a soft cake. Beat in the eggs one at a time. Mix well after each addition. Then blend in the creamy peanut butter. This adds a rich taste to the cake. Gradually add the dry mix to the wet mix. Alternate with the dill pickle juice. Start and end with the flour mixture. Mix until just combined. Finally, fold in the diced pickles for extra flavor. Pour the batter into the prepared pan. Smooth the top with a spatula. Bake in the preheated oven for 25-30 minutes. To check if it's done, insert a toothpick in the center. It should come out clean. Let the cake cool completely in the pan on a wire rack. Once cooled, cut the cake into squares. For more fun, layer pieces in a mason jar with frosting. This makes a great treat! For the full recipe, check out the details above. To keep your Peanut Butter Pickle Cake Jars fresh, store them in the fridge. Use tight-fitting lids to prevent drying out. These jars taste best cold, so serve them straight from the fridge. For a fun touch, add a colorful ribbon around each jar. It makes a great gift or party treat! If your cake turns out dry, check your oven's temperature. An oven that runs hot can bake the cake too fast. Also, avoid overmixing the batter. This can lead to a tough cake. If your frosting is too sweet, add a pinch of salt. This balance helps cut the sweetness. Want to amp up the flavor? Try adding a pinch of cinnamon or nutmeg to the batter. These spices add warmth and depth. You can also mix in chocolate chips for a sweet surprise. Chopped nuts, like pecans or walnuts, can add texture and crunch. Don't shy away from experimenting! {{image_2}} You can mix other fun flavors with peanut butter and pickles. Try adding chocolate chips for a sweet twist. You can also use caramel sauce to make it richer. If you like spice, add a pinch of cayenne or chili powder for a kick. Another option is to mix in some crushed pineapple for a tropical flair. Each of these ingredients adds a new layer of taste to your cake jars. You can make this cake vegan or gluten-free. For a vegan version, replace eggs with flaxseed or applesauce. Use plant-based butter and dairy-free frosting. For gluten-free cake, swap all-purpose flour with gluten-free flour. Check the labels to ensure all ingredients fit your needs. These swaps keep the fun alive for everyone. Layering your cake jars can be a fun art project. Start with a slice of cake, then add a layer of frosting. You can repeat this process until the jar is full. Top it off with crushed peanuts for crunch. To make it extra special, tie a colorful ribbon around the jar. You can also add a small pickle slice on the edge for a unique touch. This makes for a delicious treat that looks great too. Store your Peanut Butter Pickle Cake Jars in the fridge. Use airtight jars to keep them fresh. This helps maintain their unique flavors and soft texture. Before serving, let them sit at room temperature for a few minutes. This little wait makes each bite more enjoyable. These cake jars stay fresh for about 5 to 7 days in the fridge. Keep an eye on them, as the pickles can change texture over time. If you notice any odd smells or a change in color, it's best to toss them. Enjoy them while they are still delightful! You can freeze the cake jars for later enjoyment. To do this, leave some space at the top of the jars. This allows for expansion as they freeze. Seal the jars tightly, then place them in the freezer. They can last for up to 3 months. When you're ready to eat, move them to the fridge to thaw overnight. After thawing, they taste almost as good as fresh! For the full recipe, check the earlier sections. Yes, you can use crunchy peanut butter! The texture will change. Crunchy peanut butter adds little bits of peanuts. This gives your cake a fun crunch. However, it may make the cake slightly drier. You might want to add a bit more pickle juice. This will help keep the cake moist. Dill pickle juice adds a unique flavor. It balances the sweetness of the cake. This tangy juice also brings moisture to the batter. Without it, the cake might taste too sweet. The juice makes each bite interesting. It pairs well with peanut butter, creating a fun flavor mix. You can easily scale this recipe. To make more jars, just double or triple the ingredients. Use larger jars if you make more cake. A bigger baking pan also helps. Keep an eye on the baking time, as larger cakes may need more time. A toothpick test will help you know when it's done. This post covered all aspects of making delicious cake jars with unique flavors. We looked at key ingredients like peanut butter and pickles, their benefits, and alternative options for different diets. I shared step-by-step instructions, tips for success, and ways to enhance flavor. Lastly, we discussed storage, variations, and answered common questions. Experiment with your favorite flavors and have fun creating! Enjoy making these cake jars your own.

Peanut Butter Pickle Cake Jars Delightful and Unique Treat

Are you ready to try something truly different? Peanut Butter Pickle Cake Jars combine sweet and tangy flavors in a

- 2 ripe avocados - 4 slices of whole grain bread - 1 lemon, juiced - Salt and pepper to taste - 2 ripe avocados - 4 slices of whole grain bread - 1 lemon, juiced - Salt and pepper to taste - 1 small clove of garlic, minced - 1 teaspoon chili flakes - 2 ripe avocados - 4 slices of whole grain bread - 1 lemon, juiced - Salt and pepper to taste - 1/2 cup cherry tomatoes, halved - 1/4 cup feta cheese, crumbled - 2 tablespoons balsamic glaze - Fresh basil leaves for garnish - Red pepper hummus (for one variation) - Poached egg (for another variation) - Toasted pumpkin seeds (for another variation) These ingredients make avocado toast fun and tasty. You can mix and match to find your favorite. For the full recipe, check the full recipe section. Enjoy creating your own tasty versions! 1. Prep the Avocados: Cut the avocados in half. Remove the pits and scoop the flesh into a bowl. Add lemon juice, salt, and pepper. Mash with a fork until smooth or chunky, depending on your choice. 2. Toast the Bread: Toast the slices of whole grain bread until golden brown and crispy. You can use a toaster or griddle. 3. Assemble: Spread the mashed avocado on each slice of bread. This is your classic avocado toast. 1. Prep the Avocados: Use the same method as before to mash your avocados. 2. Toast the Bread: Toast the whole grain bread until crispy and golden. 3. Add Spice: Spread the mashed avocado on the bread. Sprinkle chili flakes on top. This adds a nice heat. 4. Finish: Garnish with a few fresh basil leaves for a burst of flavor. 1. Prep the Avocados: Mash the avocados as you did before. 2. Toast the Bread: Toast your whole grain bread slices until they are just right. 3. Choose Your Toppings: You can create three tasty options: - Mediterranean Delight: Spread avocado on two slices. Top with halved cherry tomatoes, crumbled feta cheese, and a drizzle of balsamic glaze. Add chili flakes for extra flavor. - Hummus Heaven: Spread red pepper hummus on two slices. Add the mashed avocado, then sprinkle with toasted pumpkin seeds and paprika. - Egg-Centric Dream: Spread avocado on two slices. Top each with a poached egg. Garnish with fresh basil leaves, salt, and chili flakes. 4. Serve: Arrange your three toasts on a platter. Feel free to add more toppings or spices to make them pop. This simple guide allows you to create delicious avocado toast three ways using the full recipe provided. Enjoy your time in the kitchen! To pick the best avocados, feel the skin. It should be slightly soft but not mushy. Check for dark green or black skin. If it’s too hard, it’s not ripe yet. You can also look for avocados with a small stem. If it comes off easily, the avocado is ripe. If you want to eat it later, choose one that feels firmer. Let it ripen at home for a few days. For great toast, start with whole grain bread. Slice the bread thick enough to hold toppings. Use a toaster, pan, or griddle to toast it. Toast until golden brown and crispy. This will help the toast hold the creamy avocado well. If you want extra flavor, brush the bread with olive oil before toasting. This also gives a nice crunch. Garnishing makes avocado toast fun! Use fresh herbs like basil or cilantro. They add color and taste. You can also sprinkle chili flakes for a spicy kick. Crumbled feta cheese gives a salty, creamy touch. For a sweet twist, drizzle balsamic glaze on top. Cherry tomatoes add freshness and color. Try a poached egg for protein and richness. For more ideas, check the Full Recipe and explore different toppings to suit your taste! {{image_2}} You can switch up your avocado toast with many toppings. Here are some of my favorites: - Sliced radishes add a nice crunch and peppery flavor. - Smoked salmon brings a rich taste that pairs well with avocado. - Sliced bananas with honey can make a sweet breakfast option. - Sriracha or hot sauce gives your toast a spicy kick. - Nuts and seeds, like almonds or sunflower seeds, add protein and crunch. Feel free to mix and match these toppings to create your perfect bite. The type of bread you use can change your avocado toast game. Here are some great choices: - Whole grain bread offers fiber and nutrients. - Sourdough has a tangy flavor and chewy crust. - Rye bread gives a hearty taste that works well with avocado. - Gluten-free bread is a good option for those with gluten allergies. - Bagels make a fun twist on classic avocado toast. Experiment with different breads to find your favorite base. You can easily tailor your avocado toast for different diets: - For vegan options, skip the eggs and cheese. Use hummus or nutritional yeast instead. - If you need low-carb choices, try using lettuce wraps instead of bread. - For paleo diets, choose almond or coconut flour bread. - To make it keto-friendly, keep the toppings low in carbs. Use cheese and seeds. With these ideas, you can create a meal that fits your needs. Check out the Full Recipe for more inspiration! Storing leftover avocado toast can be tricky. The bread can get soggy fast. If you have some left, place it in an airtight container. Keep it in the fridge. For best taste, eat it within one day. If the toast is dry, use it as a base for a new dish later. To keep your ingredients fresh, store them separately. Place the mashed avocado in a bowl. Cover it tightly with plastic wrap or a lid. This helps reduce air exposure. Store the bread in a cool, dry place. Keep it in a bread bag or container. You want to avoid moisture to prevent mold. To prevent avocado from turning brown, use lemon juice. The acid from lemon slows the browning process. If you have leftover mashed avocado, mix in a bit of lemon juice. Cover it well to keep it fresh. You can also place the avocado pit in the bowl. This can help keep the avocado from browning too fast. For more tips on how to make the most of your avocado toast, check out the Full Recipe. I love using whole grain bread for avocado toast. It has a nice flavor and great texture. Sourdough is another good choice. Its tanginess pairs well with creamy avocado. You can also try rye or multigrain bread for a different taste. The key is to pick a bread that toasts well and holds toppings without getting soggy. Making avocado toast vegan is simple! Start with your favorite bread, like whole grain or sourdough. Instead of using dairy toppings, skip them or use plant-based options. For example, you can add a layer of red pepper hummus on your toast. It adds flavor and creaminess without any animal products. You can also top your toast with seeds or nuts for crunch. Yes, you can use frozen avocados! They are great for quick meals. Just thaw them before using. You might find them a bit softer, so be gentle when mashing. Frozen avocados can be just as tasty as fresh ones. They save time and reduce waste. If you want to try a fun twist, look for frozen avocado puree, which is ready to use! For full details on making avocado toast, check the Full Recipe. Avocado toast is simple but very tasty. We covered classic and spicy options along with various toppings. You now know how to select avocados and toast bread just right. Remember to customize your toast with different toppings and breads to fit your diet. Store leftovers carefully to keep them fresh. Enjoy making your avocado toast unique, delicious, and healthy. Keep exploring new flavors, and have fun in the kitchen!

Avocado Toast Three Ways Tasty and Simple Ideas

Are you ready to elevate your breakfast game? Today, I’ll show you how to make avocado toast three ways: classic,

For a perfect Cheesy Cauliflower Bake, you need fresh and tasty ingredients. Here’s what you will need: - 1 large head of cauliflower, cut into florets - 2 cups of shredded cheddar cheese - 1 cup of cream cheese, softened - 1/2 cup of milk These main ingredients create a creamy and cheesy base for our dish. The cauliflower adds a nice texture and makes this dish filling. - 2 cloves of garlic, minced - 1/2 teaspoon of onion powder - 1/2 teaspoon of paprika - Salt and pepper to taste - 1/4 cup of breadcrumbs - 2 tablespoons of fresh parsley, chopped Seasoning is key for flavor. Garlic gives a nice aroma. Onion powder and paprika add depth. Salt and pepper enhance all the flavors. The breadcrumbs on top create a crispy finish, while parsley adds a fresh touch. When you gather these ingredients, you're set for a delightful cooking adventure. I recommend using fresh ingredients for the best taste. For the full recipe, check the section above. Enjoy making this dish! 1. Preheat your oven to 375°F (190°C). 2. Bring a large pot of salted water to a boil. 3. Cut your cauliflower into florets. 4. Add the florets to the boiling water. Cook for 5-7 minutes, until tender but still firm. 5. Drain the cauliflower and set it aside. 1. In a mixing bowl, add 1 cup of softened cream cheese. 2. Pour in 1/2 cup of milk. 3. Add 2 cloves of minced garlic, 1/2 teaspoon of onion powder, and 1/2 teaspoon of paprika. 4. Season with salt and pepper to taste. 5. Whisk until the mixture is smooth. 6. Gradually fold in 2 cups of shredded cheddar cheese. 1. Grease a baking dish with a bit of oil. 2. Arrange the drained cauliflower florets in the dish. 3. Pour the cheesy cream mixture over the cauliflower. 4. Make sure all pieces are coated. 5. Sprinkle the remaining cheddar cheese on top. 6. Add 1/4 cup of breadcrumbs evenly over the top. 1. Cover the dish with aluminum foil. 2. Bake in the preheated oven for 20 minutes. 3. After 20 minutes, remove the foil. 4. Bake for an additional 10-15 minutes, until the top is golden brown and bubbly. 5. Let it cool slightly before serving. 6. Garnish with 2 tablespoons of chopped parsley for a fresh touch. For the full recipe, check out the detailed steps above. Enjoy your Cheesy Cauliflower Bake! To make the best Cheesy Cauliflower Bake, avoid overcooking the cauliflower. Cook it just enough to keep it firm and tasty. This way, it will hold its shape and not turn mushy. After cooking, drain the cauliflower well. Cover the dish with foil while baking. This helps steam the cauliflower and keeps it moist. After a bit of time, remove the foil for that lovely crispy top. Don't be afraid to try new cheeses! Cheddar is great, but you can switch it up. Use mozzarella for a gooey texture or gouda for a smoky flavor. If you're dairy-free, use cream cheese made from nuts or soy. These options still give a creamy taste while being kind to your diet. This dish pairs well with many foods. It makes a great side with grilled chicken or fish. For a lighter meal, serve it with a fresh salad. You can also get creative with garnishes! Fresh herbs like parsley or chives add color and flavor. A sprinkle of paprika on top can give it a nice, spicy kick. For the full recipe, check the main section. {{image_2}} You can make your Cheesy Cauliflower Bake even better with herbs and spices. Try adding fresh thyme or rosemary for a bright taste. You can also sprinkle in some chili flakes for a bit of heat. These small changes can add big flavor to your dish. For more nutrition, think about mixing in veggies. Spinach, broccoli, or bell peppers work well. Adding these will boost vitamins and fiber. Plus, they add color to your bake, making it even more appealing. If you want a low-carb version, swap the breadcrumbs for crushed pork rinds. They give a nice crunch without the carbs. You can also use almond flour as a topping. It keeps the dish tasty and still low in carbs. For a gluten-free option, you can use gluten-free breadcrumbs. These are easy to find in stores. They work just like regular breadcrumbs but fit your dietary needs. For an Italian twist, mix in some Italian seasoning and use mozzarella cheese. The flavors will remind you of a classic pizza. You can even add some diced tomatoes for freshness. If you love Mexican food, try adding taco seasoning and pepper jack cheese. This will give your bake a spicy kick. Top it with some sliced jalapeños or cilantro for extra flavor. These variations can help you create a dish that feels new each time. Check out the Full Recipe to get started on this savory journey! To keep your Cheesy Cauliflower Bake fresh, store it in an airtight container. Place it in the fridge right after it cools. This helps maintain its flavor and texture. The bake lasts about 3 to 5 days in the fridge. If you want to enjoy it later, freezing is a good option. When reheating, the best method is to use the oven. Preheat the oven to 350°F (175°C). Place the dish in for about 15-20 minutes. This keeps the texture nice and cheesy. You can also use a microwave, but it may not keep the same texture. If you freeze it, let it thaw in the fridge overnight before reheating. This helps it heat evenly. To make weeknight meals easy, prepare the bake ahead of time. You can assemble it and keep it in the fridge for one or two days. Portion it into smaller servings; this makes it easy to grab and bake. You can even freeze portions for a quick meal later. Just follow the freezing instructions for best results. For the full recipe, check out the detailed steps above. To make Cheesy Cauliflower Bake, start by preheating your oven to 375°F (190°C). Boil salted water in a large pot. Add the cauliflower florets and cook them for 5-7 minutes. They should be tender, but not too soft. Drain the florets and set them aside. In a mixing bowl, whisk together softened cream cheese, milk, minced garlic, onion powder, paprika, salt, and pepper until smooth. Fold in one cup of shredded cheddar cheese. In a greased baking dish, layer the cauliflower and pour the cheesy mixture over it. Top with the remaining cheddar cheese and breadcrumbs. Cover with foil and bake for 20 minutes. Then, remove the foil and bake for another 10-15 minutes until golden brown. For the full recipe, check the section above. Yes, you can use frozen cauliflower. It saves time and makes prep easier. Just thaw the cauliflower and drain any excess water before using. Fresh cauliflower has a firmer texture, while frozen may be softer. Adjust your cooking time if you use frozen. You may need to reduce the boiling time to avoid mushiness. If you need a cream cheese substitute, consider using Greek yogurt, ricotta cheese, or cottage cheese. These options provide a creamy texture. You can also use vegan cream cheese for a dairy-free version. Each alternative may change the flavor slightly, so choose based on your taste preference. To add heat, you can mix in red pepper flakes or cayenne pepper. Start with a small amount and taste as you go. Another great tip is to add diced jalapeños or hot sauce into the cheese mixture. This will give your dish a nice kick without overpowering the cheese flavor. Cheesy Cauliflower Bake can be a healthy dish when prepared with care. Cauliflower is low in calories and high in fiber. However, cream cheese and cheddar cheese add fat and calories. To keep it balanced, watch your portion sizes. Pair it with a salad or lean protein for a well-rounded meal. Cheesy cauliflower bake offers a delicious and simple side dish. We covered the key ingredients, steps, and tips to ensure the best results. Flavor variations and storage methods can help you customize this meal. Whether you stick to the classic or try new twists, this recipe is versatile and easy. Enjoy making this dish for yourself and those you love. You’ll create a tasty, healthy option that pleases everyone at the table.

Cheesy Cauliflower Bake Savory and Satisfying Dish

Cauliflower gets a delicious makeover with my Cheesy Cauliflower Bake. This savory and satisfying dish combines tender cauliflower with creamy

Older posts
Newer posts
← Previous Page1 … Page54 Page55 Page56 … Page84 Next →

dsad

© 2026 Foodish Talk • Built with GeneratePress

Our Policies

  • Copyright Policy
  • Cookie Policy
  • GDPR Policy
  • Privacy Policy
  • Disclaimer
  • Terms Of Use

More Information

  • Home
  • About
  • Contact
  • Appetizers
  • Dessert
  • Dinner
  • Drinks
©2026, Foodish Talk About Back To Top