Skip to content
DisclaimerTerms Of UseGDPR PolicyCookie Policy

Foodish Talk

  • Home
  • Drinks
  • Appetizers
  • Dinner
  • Dessert
  • About
  • Contact
  • Privacy Policy
DisclaimerTerms Of UseGDPR PolicyCookie Policy

NO-ING-IMG

To make Christmas Crack Saltine Toffee, you will need: - 40 Saltine crackers - 1 cup unsalted butter - 1 cup brown sugar, packed - 2 cups semi-sweet chocolate chips - 1 cup chopped pecans or walnuts (optional) - Sea salt for sprinkling You can make some easy swaps for the ingredients: - Butter: You can use salted butter instead of unsalted. It adds a nice flavor. - Brown Sugar: Coconut sugar works well if you want a healthier option. - Chocolate: Try using milk chocolate or dark chocolate chips for a different taste. - Nuts: If you want nut-free, skip the nuts entirely or use seeds like sunflower seeds. These substitutions can help you tailor the recipe to your taste or dietary needs. {{ingredient_image_1}} Lining with parchment paper Start by preheating your oven to 350°F (175°C). Grab a baking sheet and line it with parchment paper. Make sure the paper hangs over the edges. This helps you lift the toffee out later. Arranging Saltine crackers Next, lay out 40 Saltine crackers in a single layer on the baking sheet. Cover the whole surface. This step is key for even toffee coverage. Melting butter and mixing with brown sugar In a medium saucepan, melt 1 cup of unsalted butter over medium heat. Once the butter melts, add 1 cup of packed brown sugar. Stir the mix until it boils gently. Cooking tips for boiling Let the mix boil for 2-3 minutes without stirring. This helps achieve that rich toffee flavor. Watch it closely to avoid burning. Timing for baking Pour the hot toffee mix evenly over the Saltine crackers. Use a spatula to spread it out gently. Bake it in the oven for 5-6 minutes. You want it bubbly and golden. Melting chocolate and spreading tips After baking, remove the sheet from the oven. Immediately sprinkle 2 cups of semi-sweet chocolate chips on top. Let them sit for a few minutes to melt. This makes spreading easier. Adding nuts and sea salt Once melted, spread the chocolate with a spatula. For extra crunch, add 1 cup of chopped pecans or walnuts if you like. Finally, sprinkle a dash of sea salt on top. This adds a nice flavor contrast. To get the best results with your Christmas Crack, follow these tips. First, set your oven to 350°F (175°C). This temperature works well for toffee. Keep an eye on it while baking. The toffee should be bubbly and golden. This usually takes about 5-6 minutes. To check for doneness, look for a rich golden color. If it looks too light, give it a minute more. Avoid opening the oven door too often, as this can change the heat. Choose the right tools for your Christmas Crack. Use a rimmed baking sheet to catch any overflow. A half-sheet pan works well. Line it with parchment paper for easy removal. For spreading the toffee and chocolate, a silicone spatula is best. It helps you get an even spread without sticking. A sharp knife or a bench scraper can help when breaking the toffee into pieces later. One common mistake is overheating the toffee mixture. When boiling the butter and sugar, keep it to a gentle boil. If it cooks too long, the toffee can burn. As for the chocolate, another mistake is not spreading it evenly. Once the chocolate melts, use your spatula to cover the toffee fully. This ensures every bite has that rich chocolate taste. Pro Tips Tip Title: Use Quality Chocolate: Opt for high-quality semi-sweet chocolate chips for a richer flavor and smoother texture. Tip Title: Watch the Toffee: Keep an eye on the toffee as it bakes; it can go from golden to burnt quickly. Tip Title: Let It Cool: Allow the toffee to cool completely before breaking it apart for clean edges and less mess. Tip Title: Experiment with Toppings: Feel free to add different nuts or even crushed candy canes for a festive twist! {{image_2}} You can make Christmas Crack even tastier. Try adding spices like cinnamon or a splash of vanilla. These small changes add warmth and depth to the flavor. If you want, you can also swap nuts or leave them out entirely. This lets you customize it to your taste or to those who have nut allergies. Holiday flavors can make your treat even more special. Think about adding peppermint extract or crushed candy canes for a festive twist. You can also use seasonal nuts like pistachios or hazelnuts. These variations not only look great but also add unique tastes that fit the season. If you have dietary needs, you can still enjoy this treat. Use vegan butter and dairy-free chocolate chips for a vegan version. For those who need gluten-free options, swap Saltine crackers for gluten-free crackers. This way, everyone can enjoy this delightful holiday treat without worry. To keep your Christmas Crack fresh, use an airtight container. This helps prevent moisture from making it soggy. Glass or plastic containers work well. Store it in a cool, dry place. Avoid direct sunlight or heat sources. If you live in a humid area, the fridge might be a good option. Just let it come to room temperature before serving. Christmas Crack can last up to two weeks at room temperature. If stored in the fridge, it can last up to three weeks. Check for signs of spoilage, like a stale taste or soft texture. If it loses its crunch, it’s time to toss it. You can freeze Christmas Crack for longer storage. First, allow it to cool completely. Then, wrap it tightly in plastic wrap and place it in a freezer-safe bag. It can last up to three months in the freezer. To thaw, simply leave it at room temperature for a few hours. Enjoy your treat without worry! To reduce stickiness, you can adjust the sugar content. Use a bit less brown sugar. This change helps the toffee set better. You can also let the toffee cool longer. The longer it cools, the firmer it gets. If your toffee is still sticky, try chilling it in the fridge. This will also help it harden. Yes, you can use other crackers. Some people like to use graham crackers or even butter crackers. These options give a different taste. You can also try rice crackers for a gluten-free version. Just keep the same baking method for best results. To break the toffee into pieces, use a sharp knife. First, score the toffee gently with the knife. Then, snap it apart with your hands. You can also place it in the fridge for a bit. Cold toffee is easier to break. For uniform pieces, use a ruler to measure before cutting. This guide explains how to make delicious toffee using simple ingredients. You learned about essential items like Saltine crackers, butter, brown sugar, and more. We covered step-by-step baking instructions and helpful tips to avoid mistakes. Variations allow for fun changes in flavor, plus storage options keep your treats fresh longer. Toffee is easy and fun to make. Try different flavors and enjoy the results!

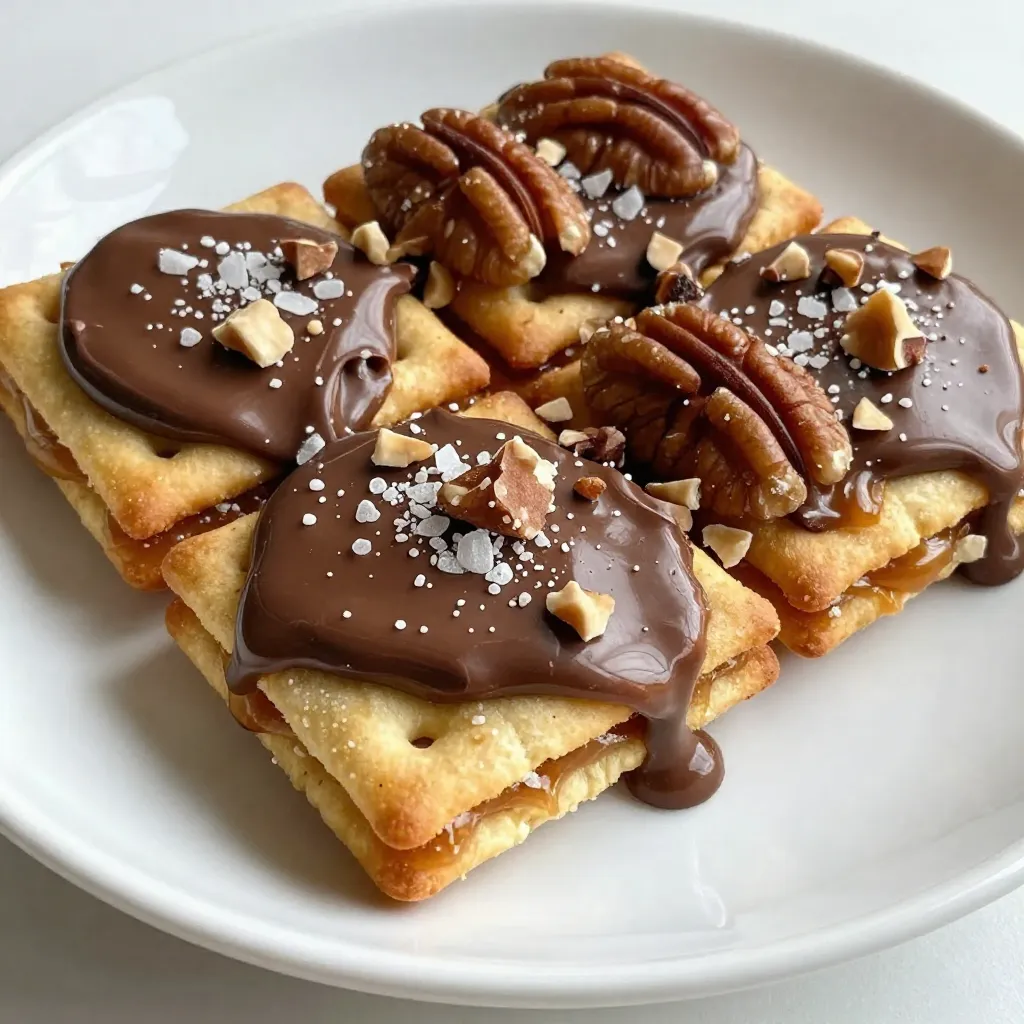
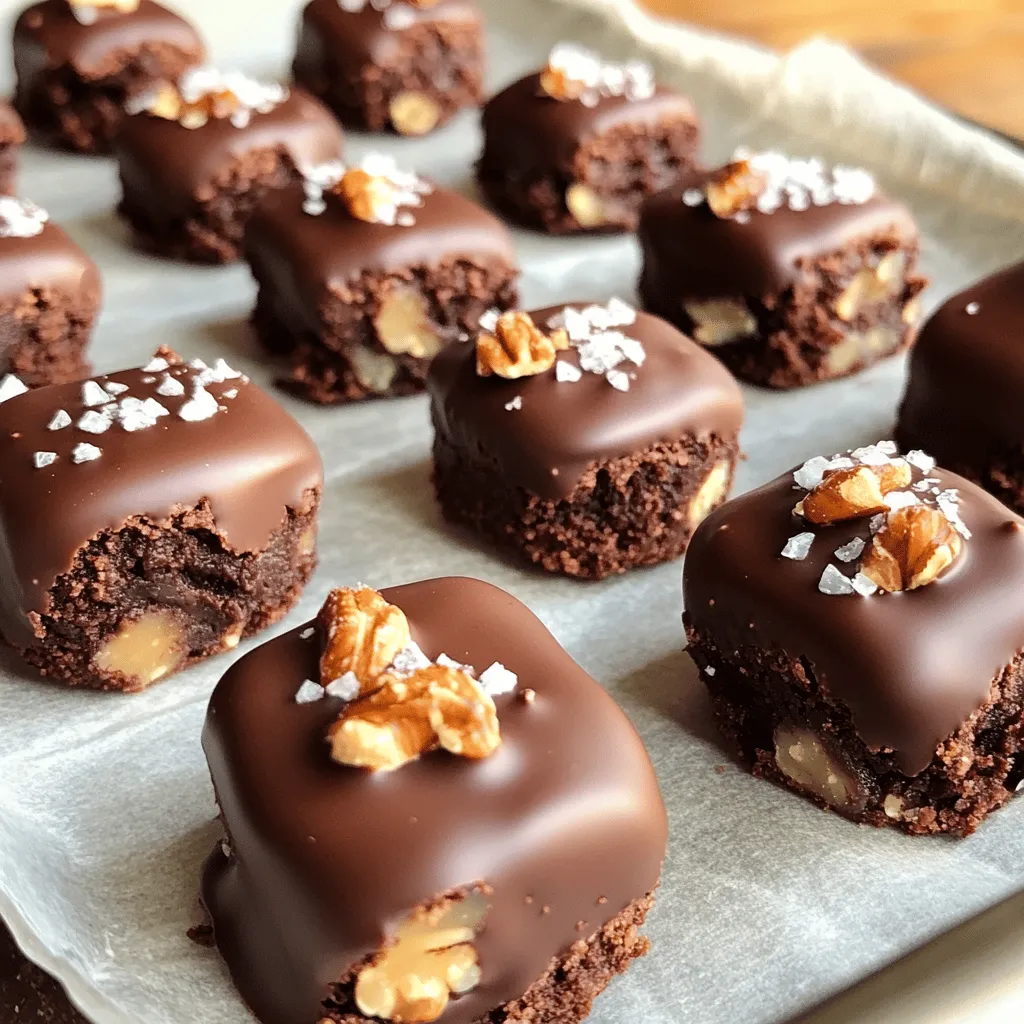
Christmas Crack Saltine Toffee Delightful Holiday Treat

Get ready to create a holiday treat that will dazzle your taste buds! Christmas Crack Saltine Toffee combines the perfect

To make the perfect Cinnamon Apple Crumb Cake, gather these key ingredients: - 2 cups all-purpose flour - 1 ½ teaspoons baking powder - ½ teaspoon baking soda - ½ teaspoon salt - 1 teaspoon ground cinnamon - ¾ cup unsalted butter, softened - 1 cup granulated sugar - 2 large eggs - 1 teaspoon vanilla extract - 1 cup buttermilk - 2 large apples (Granny Smith or Honeycrisp), peeled, cored, and diced - ¼ cup brown sugar - 1 tablespoon lemon juice For the crumb topping, you'll need: - ½ cup all-purpose flour - ½ cup brown sugar - ½ teaspoon ground cinnamon - ¼ cup unsalted butter, chilled and cubed - ¼ cup old-fashioned oats Each ingredient plays a role in creating a rich flavor and soft texture. The apples bring moisture and sweetness. The cinnamon adds warmth and comfort. The crumb topping gives a nice crunchy texture. 1. Preheat your oven to 350°F (175°C). This step makes sure the cake bakes evenly. 2. Grease a 9x13 inch baking pan. This helps the cake come out easily. 3. Toss 2 large diced apples with ¼ cup brown sugar and 1 tablespoon lemon juice. This makes the apples sweet and tangy. Set the apples aside for a bit. 1. In a bowl, whisk together 2 cups all-purpose flour, 1 ½ teaspoons baking powder, ½ teaspoon baking soda, ½ teaspoon salt, and 1 teaspoon ground cinnamon. This mix adds structure and flavor. 2. In a large bowl, cream together ¾ cup softened unsalted butter and 1 cup granulated sugar. Mix until it becomes light and fluffy. This usually takes about 3-4 minutes. 3. Add 2 large eggs one by one, mixing well after each. Stir in 1 teaspoon vanilla extract. This adds richness to our batter. 4. Gradually add the dry mix to the butter mix, alternating with 1 cup buttermilk. Start and end with dry ingredients. Mix until just combined. 5. Gently fold in the apple mixture into the batter. This helps distribute the apples evenly. 1. To make the crumb topping, combine ½ cup all-purpose flour, ½ cup brown sugar, and ½ teaspoon ground cinnamon in a small bowl. 2. Add ¼ cup chilled and cubed unsalted butter. Use your fingers to mix until it looks crumbly. Stir in ¼ cup old-fashioned oats for a nice texture. 3. Pour the batter into your prepared baking pan. Spread it evenly. Sprinkle the crumb topping generously over the batter. 4. Bake for 35-40 minutes. A toothpick inserted in the center should come out clean. 5. Let the cake cool in the pan for about 10 minutes. This helps it set before you slice. Enjoy your warm cake! - Importance of ingredient temperature: Use room temperature butter and eggs for a smooth batter. Cold ingredients can create lumps and toughen the cake. - How to check for doneness: Insert a toothpick into the center of the cake. If it comes out clean, the cake is ready. If not, bake for a few more minutes. - Preventing a dry cake: Avoid over-mixing your batter. Mix until just combined. Also, keep an eye on the baking time to prevent drying out. - Dusting with powdered sugar: After cooling, sprinkle powdered sugar on top. This adds a lovely touch and sweetness. - Serving with whipped cream or ice cream: Pair slices with whipped cream or vanilla ice cream. The coolness contrasts well with the warm cake. - Garnishing options: Add a sprinkle of cinnamon or a few apple slices for a pretty finish. This makes the cake even more inviting. {{image_2}} You can make this cake gluten-free! Use 2 cups of a gluten-free flour blend. Look for blends that include xanthan gum. This will help the cake rise and stay together. To make a vegan version, replace eggs with flax eggs. Mix one tablespoon of flaxseed meal with three tablespoons of water. Let it sit for five minutes. For dairy, use plant-based milk and vegan butter. These swaps keep the cake moist and tasty. You can add nuts like walnuts or pecans for a crunchy texture. Dried fruits like raisins or cranberries add sweetness. For apples, try different types. Fuji apples bring a sweet taste, while Granny Smith adds a tartness. Mixing apple types can give your cake a fun twist! To keep your Cinnamon Apple Crumb Cake fresh, use a few simple steps. First, let the cake cool completely after baking. Then, cover it tightly with plastic wrap or place it in an airtight container. This helps keep moisture in and prevents it from drying out. You can store the cake in the refrigerator for up to five days. The cold will help maintain its flavor and texture. If you want to save some for later, freezing is a great option. Start by slicing the cake into pieces. Wrap each slice tightly in plastic wrap. Then, place them in a freezer-safe bag or container. This keeps them fresh and easy to grab. The cake can stay in the freezer for up to three months. When you're ready to enjoy it, just take out a slice and let it thaw in the fridge overnight. You can also warm it up in the microwave for a few seconds for a fresh-baked taste. How do you store a cake with crumb topping? To store your cake, cover it loosely with foil or plastic wrap. This keeps the crumb topping soft. Place it in a cool place. You can also refrigerate it for longer freshness. Can I use other fruits instead of apples? Yes, you can swap apples for pears or berries. Each fruit gives a unique taste. Just remember to adjust the sugar based on the fruit’s sweetness. How can I make this cake moist? To keep your cake moist, measure your flour correctly. Too much flour makes it dry. Also, do not overmix the batter. This keeps the cake light and fluffy. What can I use instead of buttermilk? You can mix 1 cup of milk with 1 tablespoon of lemon juice or vinegar. Let it sit for five minutes. This gives a similar tangy flavor to buttermilk. Is it possible to make the crumb topping ahead of time? Absolutely! You can prepare the crumb topping a day in advance. Just store it in the fridge until you are ready to bake. How long will the cake last at room temperature? The cake stays fresh for about 2 to 3 days at room temperature. If you cover it well, it will remain tasty and moist. This blog post provided a clear guide to making a delicious Cinnamon Apple Crumb Cake. We discussed the key ingredients and detailed steps for preparation and baking. I shared tips for baking success and ways to enhance presentation. The variations section allowed you to explore gluten-free and vegan options. Remember to store leftovers properly for the best taste. Enjoy trying new flavors and serving ideas. Baking can be fun, and this cake is a great choice for any occasion. Happy baking!

Cinnamon Apple Crumb Cake Delightful and Simple Treat

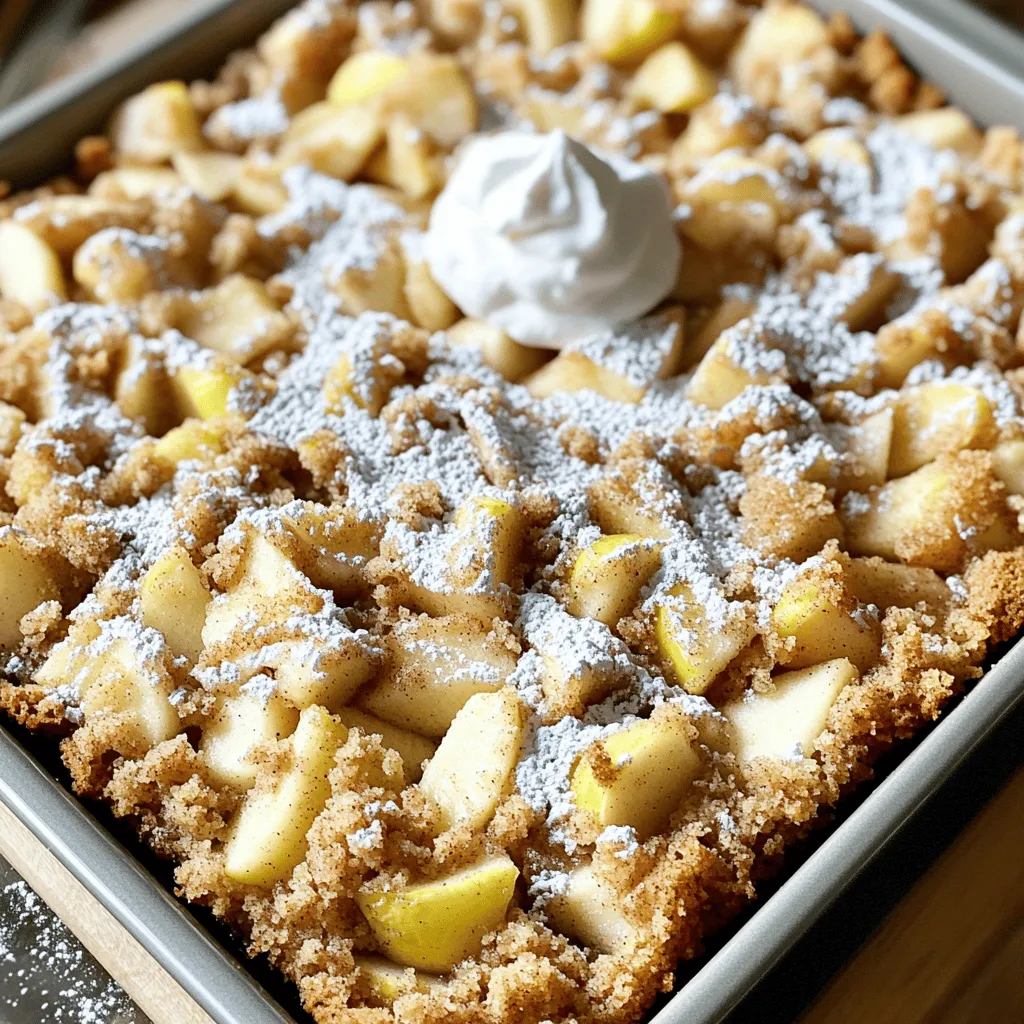
Are you craving a sweet treat that’s easy to make? Look no further! This Cinnamon Apple Crumb Cake is not

- Fresh Corn: Use 4 ears, husked. Fresh corn gives the best taste and texture. - Mayonnaise: You need 1/2 cup. This adds creaminess and helps flavors stick. - Queso Fresco or Feta Cheese: Use 1/2 cup, crumbled. Both cheeses add a salty kick. - Cilantro: Fresh and chopped. It brightens the dish and adds color. - Lime Wedges: These are for serving. Squeeze them on the corn for extra zest. - Additional Spices: Try chili powder or smoked paprika. They enhance the flavor even more. - Preheat Grill or Stovetop Grill Pan Start by turning your grill to medium-high heat. If you use a grill pan, heat it up the same way. This step is key for getting those nice grill marks. - Husk and Prepare Corn Take four ears of fresh corn and remove the husks. Make sure to take off all the silk. This will help the corn cook evenly and taste great. - Grilling the Corn to Perfection Place the husked corn directly on the grill. Cook it for about 10 to 15 minutes. Turn the corn every few minutes. You want it to be tender and have those lovely grill marks. - Timing for Tender Kernels Keep an eye on the corn while it cooks. The kernels should be soft but not mushy. You can test this by gently squeezing the corn with tongs. - Preparing the Mayo Mixture In a bowl, mix together 1/2 cup of mayonnaise, 1/2 cup of crumbled queso fresco, 1 teaspoon of chili powder, 1 teaspoon of smoked paprika, and 1 tablespoon of lime juice. Add a pinch of salt and stir well. This mixture gives the corn its creamy and zesty flavor. - Coating the Grilled Corn Once the corn is done, take it off the grill. Let it cool for a minute, then generously brush the mayo mixture onto each ear. Make sure all the kernels are nicely coated. Top it off with more queso fresco and a sprinkle of chili powder for extra punch. Selecting the Right Type of Corn Choose fresh, sweet corn for the best taste. Look for corn with bright green husks. The kernels should feel firm and plump. Sweet corn adds that perfect crunch and flavor. You can find it at local markets or grocery stores. Ideal Grilling Techniques Grilling corn gives it a smoky taste. Preheat your grill to medium-high heat. Place the corn directly on the grill. Turn it every few minutes. Cook for about 10 to 15 minutes. Look for golden-brown grill marks on the corn. This step makes the flavors pop. Garnishing Suggestions Garnish your corn with fresh cilantro. It adds a nice color and flavor. Sprinkle additional queso fresco on top. You can also add a pinch of chili powder for a kick. This makes your dish look inviting and delicious. Serving Style for Authentic Feel Serve the corn on wooden skewers or in a basket. Add lime wedges on the side. This way, guests can squeeze lime on their corn. It enhances the flavor and gives a true street food vibe. Enjoy your authentic Mexican street corn! {{image_2}} You can change the cheese to suit your taste. Cotija cheese is a great choice. It has a salty flavor that pairs well with corn. Crumble it over your grilled corn for a tasty twist. If you want a vegan option, use nutritional yeast. It gives a cheesy flavor without any dairy. You can also try vegan cheese crumbles. These still give that nice, creamy taste. Want to kick up the heat? Add diced jalapeños to the mayo mix. This gives your corn a spicy kick. You can also sprinkle them over the finished corn for extra crunch. Don’t stop there! Experiment with other seasonings too. Try garlic powder for a savory touch. Or mix in some cumin for a warm, earthy flavor. A dash of hot sauce can also add a nice zing. The key is to have fun and find your favorite mix! To keep your Mexican street corn fresh, store it in the fridge. Place any leftover corn in an airtight container. It stays good for up to three days. If you want to freeze it, wrap each ear in plastic wrap. Then, put them in a freezer bag. It can last up to three months in the freezer. The best way to reheat your corn is on the grill. Just heat it over medium. Grill for about five minutes until warm. You can also use a stovetop pan. Heat it over low heat for about the same time. After reheating, brush on more mayo mixture if you like. Serve with fresh lime wedges to boost the flavor. Enjoy your next bite just like the first! Mexican street corn is also known as elote. It is a popular snack in Mexico. Vendors sell it on streets and at fairs. Elote consists of grilled corn on the cob. They coat it in mayonnaise and sprinkle cheese on top. The flavors mix together to create a tasty treat. Elote holds cultural significance. It brings people together. Families and friends enjoy it at gatherings. It reflects the joy of Mexican cuisine. Each bite offers a taste of tradition and community. Yes, you can make Mexican street corn in the oven. Oven roasting is a great option if you don’t have a grill. Preheat your oven to 400°F (200°C). Place the husked corn on a baking sheet. Roast for about 20-25 minutes. Turn the corn halfway through for even cooking. Grilling adds a smoky flavor. The grill marks give it a nice look. Oven-roasting works well, too, but it may lack that charred taste. Choose the method that suits you best. You can add heat to your elote in a few ways. One simple option is to mix chopped jalapeños into the mayonnaise. This will give it a nice kick. Another idea is to sprinkle cayenne pepper on top. You can adjust the amount based on your spice level. If you want more heat, use hot sauce on your finished corn. Experiment with different spices to find your favorite flavor. This blog post covered how to make Mexican Street Corn, or Elote. We highlighted key ingredients like fresh corn and cheese, and optional toppings that boost flavor. You learned step-by-step instructions for grilling and coating the corn. We shared tips for the best taste and presentation. You can try variations with different cheeses and spices. Finally, we discussed how to store leftovers and reheat them. Now, you have everything to create and enjoy this tasty dish. Just gather your ingredients and start grilling!

Authentic Mexican Street Corn Flavorful and Easy Recipe

Are you ready to take your taste buds on a flavorful journey? Authentic Mexican street corn, or elote, is a

- Dough: - 2 cups all-purpose flour - 1 tablespoon sugar - 1 teaspoon baking powder - 1/2 teaspoon baking soda - 1/4 teaspoon salt - 1/2 cup unsalted butter, chilled and cubed - 1/2 cup cold buttermilk - 1 medium apple, peeled and diced - 1/2 teaspoon cinnamon - Cheesecake Filling: - 8 oz cream cheese, softened - 1/4 cup sugar - 1 egg - 1 teaspoon vanilla extract - Crumble Topping: - 1/2 cup rolled oats - 1/2 cup brown sugar - 1/4 cup melted butter - 1/2 teaspoon cinnamon When making these Apple Cheesecake Crumble Buns, I love to gather the ingredients first. This keeps things smooth as I cook. The dough forms the base of the bun, creating a soft, flaky texture. It uses simple pantry staples like flour, sugar, and butter. The cold butter is key; it helps the buns rise and stay tender. Next, we have the cheesecake filling. Cream cheese gives it a rich flavor, while sugar and vanilla add sweetness. The egg helps it set up nicely. I always beat it until smooth for the best texture. Finally, the crumble topping adds a nice crunch. Oats and brown sugar combine to create a sweet, crunchy layer. The melted butter binds it all together. I love how the cinnamon in both the dough and topping brings a warm, cozy flavor. With all these ingredients ready, we can create a dessert that everyone will love! Start by mixing the dry ingredients in a large bowl. Whisk together 2 cups of all-purpose flour, 1 tablespoon of sugar, 1 teaspoon of baking powder, 1/2 teaspoon of baking soda, and 1/4 teaspoon of salt. Next, add 1/2 cup of chilled and cubed unsalted butter. Mix until the texture resembles coarse crumbs. Then, pour in 1/2 cup of cold buttermilk. Stir gently until just combined. Finally, fold in 1 medium peeled and diced apple along with 1/2 teaspoon of cinnamon. Be careful not to overmix; we want a light dough. In a separate bowl, beat 8 ounces of softened cream cheese with 1/4 cup of sugar until smooth. Then, add 1 egg and 1 teaspoon of vanilla extract. Mix until fully blended. This filling adds a creamy touch to our buns, making them even more delightful. On a lightly floured surface, roll out the dough into a rectangle about 1/2 inch thick. Cut the dough into squares. In the center of each square, place a tablespoon of the cream cheese filling. Fold the corners over to create a bun shape and seal them well. This step is key to keeping the filling inside while baking. Preheat your oven to 375°F (190°C) and line a baking sheet with parchment paper. In a small bowl, mix together 1/2 cup of rolled oats, 1/2 cup of brown sugar, 1/4 cup of melted butter, and 1/2 teaspoon of cinnamon until crumbly. Place the buns on the prepared baking sheet and top each with the crumble topping. Bake for 20-25 minutes, or until the buns turn golden brown. The aroma will fill your kitchen, making it hard to wait! To make the best dough, avoid overmixing. Mix until just combined. Too much mixing can make the buns tough. Ensure the butter is chilled before you start. Cold butter helps create a flaky texture in the dough. For the cheesecake filling, you can play with flavors. Try adding vanilla or even chocolate for a twist. To get a smooth consistency, beat the cream cheese well before adding other ingredients. This helps prevent lumps. For the crumble topping, use the right ratios. I recommend equal parts oats and brown sugar for the best crunch. To serve, drizzle warm caramel sauce on top. This adds a sweet touch that pairs well with the apple and cheesecake flavors. {{image_2}} You can change the fruit in these buns to mix things up. Try using pears or mixed berries instead of apples. Each fruit adds a unique taste and keeps things fun. You can also switch spices to add depth. Nutmeg gives a warm touch, while allspice brings a hint of sweetness. If you need gluten-free options, use a gluten-free flour blend in place of regular flour. This works well without losing the bun's charm. For a dairy-free filling, replace cream cheese with a dairy-free cream cheese option. This way, everyone can enjoy these buns! To keep your Apple Cheesecake Crumble Buns fresh, store them in an airtight container. This helps maintain their softness and flavor. You can keep them at room temperature for up to two days. If you want to store them longer, the fridge is a great option. They will last for about a week when chilled. For the best results, use a container that fits the buns snugly. This prevents them from getting squished. You can also layer parchment paper between the buns to keep them from sticking together. If you want to enjoy these buns later, freezing is a smart choice. First, let the baked buns cool completely. Then, wrap each bun tightly in plastic wrap. Place them in a freezer-safe bag or container. They can last up to three months in the freezer. When you're ready to eat them, take the buns out of the freezer. Let them thaw in the fridge overnight or at room temperature for a few hours. To reheat, pop them in the oven at 350°F (175°C) for about 10-15 minutes. This warms them up and keeps them soft and yummy. How long do the buns stay fresh? The buns stay fresh for about two days. Store them in an airtight container. Can I make the dough ahead of time? Yes, you can make the dough a day in advance. Wrap it tightly and chill. What can I serve with these buns? These buns pair well with vanilla ice cream or whipped cream. A drizzle of caramel adds a nice touch. What to do if my filling is too runny? If the filling is too runny, add a bit more cream cheese. Mix until smooth. How to tell when the buns are done baking? The buns are done when they turn golden brown. A toothpick should come out clean when inserted. Is there a vegan version of this recipe? Yes, you can use vegan cream cheese and flax eggs. Substitute dairy ingredients with plant-based options. Can I use a different cheese for the filling? You can use mascarpone or ricotta cheese for a different flavor. Adjust sugar to taste. You now have a complete guide to making delicious Apple Cheesecake Crumble Buns. We covered key ingredients, step-by-step instructions, and useful tips. You learned about variations, storage options, and answered common questions. With this knowledge, you can create your own tasty treats. Try different flavors or dietary options to make them unique. Enjoy the process and share your results with others. Happy baking!

Apple Cheesecake Crumble Buns Irresistible Dessert Treat

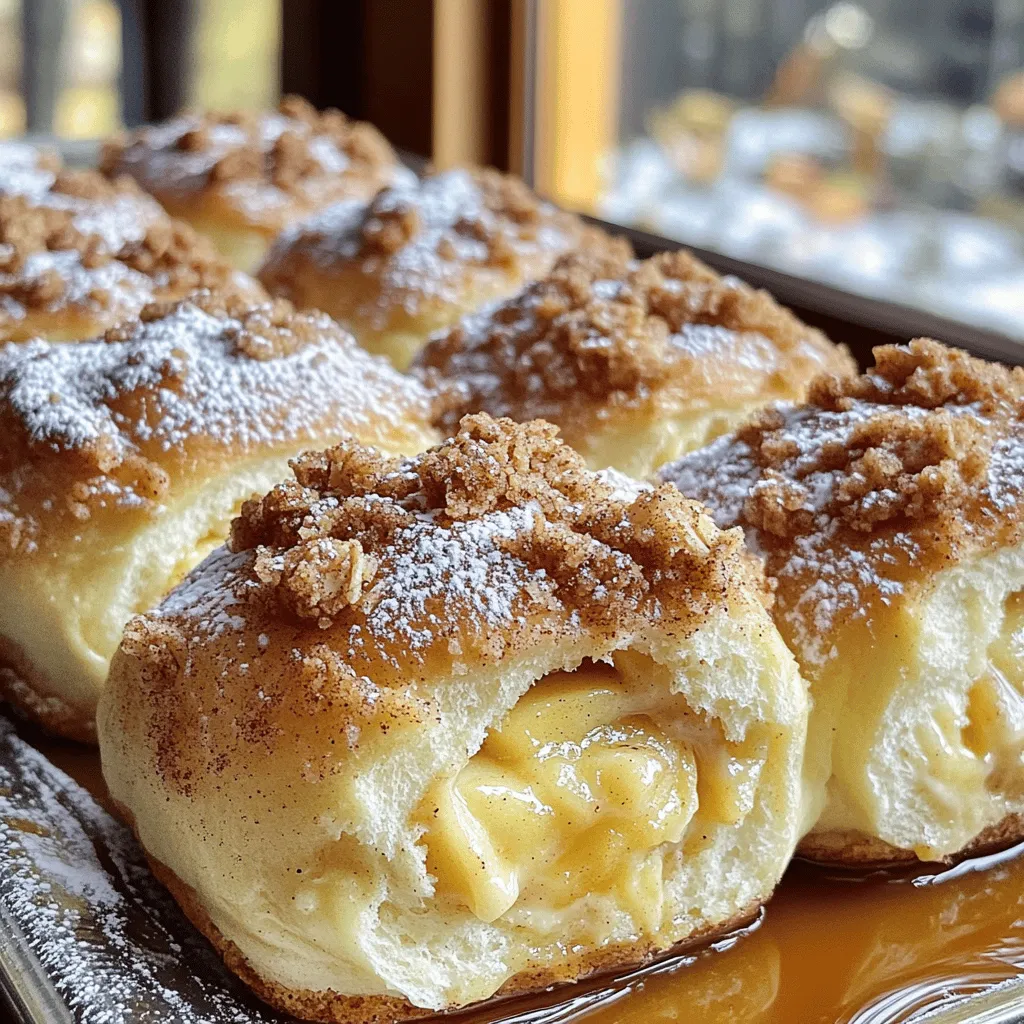
Craving a sweet treat that feels grand yet is easy to make? Look no further! Apple Cheesecake Crumble Buns bring

- 2 large apples (Granny Smith or Honeycrisp), peeled and diced - 1 tablespoon lemon juice - 1/4 cup brown sugar - 1 teaspoon cinnamon - 1/4 teaspoon nutmeg - 1 tablespoon cornstarch - 12 egg roll wrappers - Oil for frying - Powdered sugar for dusting (optional) - Vanilla ice cream for serving (optional) Best apples for apple pie I love using Granny Smith or Honeycrisp apples. They are crisp and tart. This makes them perfect for pie. Tart apples balance well with sweet sugar. Alternative sweeteners You can swap brown sugar with maple syrup or honey. Both add a nice flavor. Just adjust the amount since they are liquid. Choosing egg roll wrappers Look for thin, flexible egg roll wrappers. They should be easy to roll. Check the package for freshness. Fresh wrappers yield the best results. How to prepare the apple filling Start by peeling and dicing 2 large apples. I like using Granny Smith or Honeycrisp. In a medium bowl, mix the diced apples with 1 tablespoon of lemon juice. Add 1/4 cup of brown sugar, 1 teaspoon of cinnamon, 1/4 teaspoon of nutmeg, and 1 tablespoon of cornstarch. Stir until the apples are well coated. This mix gives your egg rolls a sweet and spicy flavor. Assembling the egg rolls Lay out your egg roll wrappers on a clean surface. Place a spoonful of the apple mixture in the center of each wrapper. For rolling, fold the bottom corner over the filling. Then, fold in the sides. Roll it tightly away from you. This keeps the filling inside. To seal the edge, use a bit of water. Repeat this with the rest of the wrappers and filling. Sealing techniques Make sure to seal each egg roll well. If you leave gaps, the filling may leak out during frying. A good seal locks in all the deliciousness. Frying the egg rolls: important steps In a large skillet, heat oil over medium-high heat. You want enough oil to cover the bottom of the skillet. Carefully place the egg rolls in the hot oil. Fry them in batches if needed. Cook them until golden brown and crispy, around 3-4 minutes per side. Tips for achieving crispiness To get that perfect crispy texture, do not crowd the pan. Fry in small batches for even cooking. Keep an eye on the oil temperature; it should be hot but not smoking. If it’s too cool, the egg rolls will soak up oil and become soggy. Serving warm for best taste Once fried, remove the egg rolls and place them on paper towels. This helps drain excess oil. Serve the egg rolls warm. For a fun twist, dust with powdered sugar. A scoop of vanilla ice cream on the side makes it even better! To make the best apple pie egg rolls, focus on these key tips: - Avoiding sogginess: Use firm apples like Granny Smith or Honeycrisp. These apples stay crisp and hold their shape. Also, mix in cornstarch to absorb extra moisture in the filling. - Ensuring a crispy texture: Heat the oil to 350°F before frying. If the oil is too cool, the egg rolls can soak up oil and become greasy. Fry in small batches, so the temp stays high. - Flavor boosters and enhancements: Add a pinch of salt to the filling. This helps to balance the sweetness. You can also sprinkle in some lemon zest for extra brightness. To ensure your egg rolls shine, watch out for these common mistakes: - Overfilling the wrappers: Use just a spoonful of filling for each wrapper. Too much filling makes it hard to seal and leads to messy cooking. - Incorrect oil temperature: Always test the oil before frying. Drop a small piece of wrapper in the oil. If it bubbles and rises, the oil is ready. If not, wait a bit longer. - Not sealing properly: Make sure to seal each roll tightly. Use a bit of water to help the edges stick. A good seal keeps the filling inside while cooking. {{image_2}} You can change up the taste of your apple pie egg rolls. Adding nuts or raisins gives a nice crunch and sweetness. Try chopped walnuts or pecans, or mix in some raisins for extra flavor. Different spices can also make a big difference. You might add ginger for a warm kick or cloves for a deeper spice. Drizzling chocolate or caramel sauce on top adds a sweet touch. It pairs well with the warm, crispy egg rolls. These variations let you create your perfect dessert. If you need gluten-free options, you can find gluten-free egg roll wrappers at many stores. They work just as well in this recipe. For vegan egg rolls, swap the filling with a mixture of sautéed apples and brown sugar. You can also use plant-based ice cream as a tasty side. If you have nut allergies, leave out the nuts in your filling. You can still enjoy the sweet apple taste without them. These substitutions make the recipe more inclusive for everyone. To keep your apple pie egg rolls fresh, store them properly. First, let them cool down to room temperature. Then, place them in an airtight container. You can keep them in the fridge for up to three days. If you want to store them longer, freezing is a great option. Wrap each egg roll tightly in plastic wrap. Then, put them in a freezer-safe bag or container. They will stay good for about three months in the freezer. When you're ready to enjoy your leftover egg rolls, it's important to reheat them well. The best way to keep them crispy is to use an oven. Preheat your oven to 375°F (190°C). Place the egg rolls on a baking sheet. Heat them for about 10-15 minutes until they're hot and crispy again. You can also use an air fryer if you have one. Set it to 350°F (175°C) and cook for about 5-7 minutes. Avoid using the microwave. It can make the egg rolls soggy. Enjoy your tasty treat! Making Apple Pie Egg Rolls is fun and simple. Start with fresh ingredients. Use Granny Smith or Honeycrisp apples for the best flavor. Here's a quick guide for homemade wrappers: - Use flour and water for dough. - Roll the dough thin, about 1/8 inch. - Cut the dough into squares, about 6 inches each side. - Keep wrappers covered with a damp cloth to avoid drying. You can also buy pre-made egg roll wrappers to save time. This shortcut helps you focus on the filling. Yes, you can bake Apple Pie Egg Rolls! Baking gives a different texture. - Frying makes them golden and crispy. - Baking is lighter and less greasy. To bake, preheat your oven to 400°F (200°C). Brush the egg rolls with oil and place them on a baking sheet. Bake for about 20 minutes. Turn them halfway for even cooking. Serving Apple Pie Egg Rolls is easy and fun. Here are some ideas: - Dust with powdered sugar for sweetness. - Serve warm with vanilla ice cream on the side. - Drizzle caramel or chocolate sauce for extra flavor. For drinks, pair them with warm cider or coffee. The flavors complement each other perfectly. Enjoy these treats at parties or cozy nights at home! We covered all you need for tasty apple pie egg rolls. You learned about ingredients, preparation, and cooking tips. I shared ways to avoid common mistakes while making them. Remember to try different flavors and make adjustments for dietary needs. Store leftover egg rolls properly to enjoy them later. Your homemade treats can bring joy with the right care and fun variations. Enjoy the process of creating and sharing these delicious bites!

Delicious Apple Pie Egg Rolls Crunchy and Sweet Treat

Craving a dessert that bursts with flavor and crunch? You’re in for a treat! These Apple Pie Egg Rolls combine

To make the perfect pumpkin banana bread, you will need: - 1 cup ripe bananas (about 2-3 bananas), mashed - 1 cup canned pumpkin puree - 1/2 cup vegetable oil - 1 cup brown sugar - 1/2 cup granulated sugar - 3 large eggs - 1 teaspoon vanilla extract - 2 cups all-purpose flour - 1 teaspoon baking soda - 1/2 teaspoon baking powder - 1/2 teaspoon salt - 1 teaspoon ground cinnamon - 1/2 teaspoon ground nutmeg - 1/4 teaspoon ground ginger You can make your bread even better with these optional add-ins: - 1/2 cup chopped walnuts or pecans - 1/2 cup chocolate chips If you need to swap out some items, try these ideas: - Use coconut oil instead of vegetable oil for a subtle flavor. - Substitute applesauce for half the oil to cut calories. - For a gluten-free option, replace all-purpose flour with a gluten-free blend. - Replace eggs with flaxseed meal mixed with water for a vegan version. These options help you customize your pumpkin banana bread to your taste or needs. You can find the full recipe above to guide you through the process! First, gather all your ingredients. You will need ripe bananas, pumpkin puree, oils, sugars, eggs, and spices. Start by preheating your oven to 350°F (175°C). Next, grease a 9x5-inch loaf pan or line it with parchment paper. This step helps with easy removal later. In a large bowl, combine the mashed bananas and pumpkin puree. Mix until smooth. Then, add the vegetable oil, brown sugar, granulated sugar, eggs, and vanilla extract. Whisk until the mixture is creamy and well combined. In another bowl, sift together the flour, baking soda, baking powder, salt, and spices. This step adds air and helps the bread rise. Gradually mix the dry ingredients into the wet mixture. Stir gently until just combined. Remember, a few lumps are okay! If you want, fold in the chopped walnuts or chocolate chips at this point. Pour the batter into your loaf pan and spread it evenly. Bake the bread in the oven for 60-70 minutes. To check doneness, insert a toothpick into the center. It should come out clean. Once your pumpkin banana bread is baked, remove it from the oven. Let it cool in the pan for 10 minutes. Then, transfer it to a wire rack to cool completely. This step is key to avoiding soggy bread. When ready to serve, slice the bread and enjoy it warm. A pat of butter on top adds a nice touch. For a special presentation, sprinkle a little cinnamon or add banana or pumpkin seeds on top! For the full recipe, be sure to check out the ingredients and steps to make this delightful bread. Mixing is key to great pumpkin banana bread. Begin with ripe bananas. They should be soft and sweet. Mash them well to avoid lumps. Combine them with the pumpkin puree until smooth. This helps create a moist texture. When adding dry ingredients, do it slowly. Stir gently until just combined. Overmixing can lead to dense bread. A few lumps are okay. Your batter should look thick but not overloaded. To check if your bread is done, use a toothpick. Stick it into the center of the loaf. If it comes out clean, your bread is ready. If it has batter on it, bake a bit longer. Keep an eye on the edges. They should look golden brown. The bread will also spring back when lightly pressed. Spices add warmth and depth to your pumpkin banana bread. Ground cinnamon is a must for that cozy taste. Nutmeg adds a nice zing, while ginger gives it a kick. You can also experiment with cloves or allspice. If you want a sweeter touch, add a little vanilla extract. Each spice brings out the flavors of pumpkin and banana. For a twist, try adding a pinch of cardamom. It’s fragrant and delightful. For the full recipe, check out the detailed instructions above. {{image_2}} You can make this bread gluten-free with simple swaps. Use gluten-free all-purpose flour instead of regular flour. Check the label to ensure it has a binding agent, like xanthan gum. This will help give the bread a nice texture. The taste remains just as good! To make this recipe vegan, replace the eggs with flax eggs. Mix one tablespoon of ground flaxseed with three tablespoons of water for each egg. Let it sit for five minutes to thicken. Use a plant-based oil, like coconut oil, instead of vegetable oil. You can also replace the brown sugar with coconut sugar for a great taste. Mix-ins can really enhance the taste. Try adding 1/2 cup of chopped nuts like walnuts or pecans. They add a nice crunch. For a sweeter touch, toss in some chocolate chips. You can even add dried fruits, like raisins or cranberries, for a fruity twist. Choose what you love and enjoy the flavors! For the complete recipe, check out the Full Recipe section. To keep your pumpkin banana bread fresh, wrap it well. Use plastic wrap or foil. Store it at room temperature for up to three days. If you want it to last longer, place it in the fridge. This will keep it good for about a week. Remember to let it cool completely before wrapping. This stops moisture build-up, which can make it soggy. Freezing is a great way to save your bread for later. First, slice the bread. Wrap each slice tightly in plastic wrap. Then place the slices in a freezer bag or airtight container. This helps stop freezer burn. You can freeze it for up to three months. When you’re ready to enjoy it, just take out a slice and let it thaw at room temperature. To enjoy your pumpkin banana bread warm, you have a few options. You can use a toaster or an oven. For the oven, preheat it to 350°F (175°C). Place the slice on a baking sheet and heat for about 10 minutes. If you prefer the toaster, toast it on low until warm. You can also use the microwave. Heat it for about 15-20 seconds. This makes it nice and cozy, perfect for enjoying with a cup of tea or coffee. Yes, you can use fresh pumpkin. First, cook the pumpkin until soft. Then, mash it well. Use about one cup of fresh puree for the recipe. This gives a tasty, natural flavor. It can also add some moisture to your bread. Pumpkin banana bread lasts about 4 to 5 days at room temperature. Store it in an airtight container. It can stay fresh even longer in the fridge, up to a week. If you want to keep it for months, freeze it. Just wrap it well in plastic wrap. If your bread is too dry, try adding a bit of milk or oil. You can also add some mashed bananas or pumpkin puree to the batter. This will help to make it moist. Always check the baking time, as overbaking can also dry it out. For the best results, follow the Full Recipe. You now know the key ingredients, steps, and tips for making pumpkin banana bread. Remember, you can customize it with flavor add-ins or make it gluten-free or vegan. Store leftovers properly to enjoy your bread later. If you have any questions, the FAQs cover common concerns. Baking can be fun and easy. Experiment with spices and variations to find your perfect recipe. Enjoy your delightful treats and share them with loved ones!

Pumpkin Banana Bread Fresh and Flavorful Treat

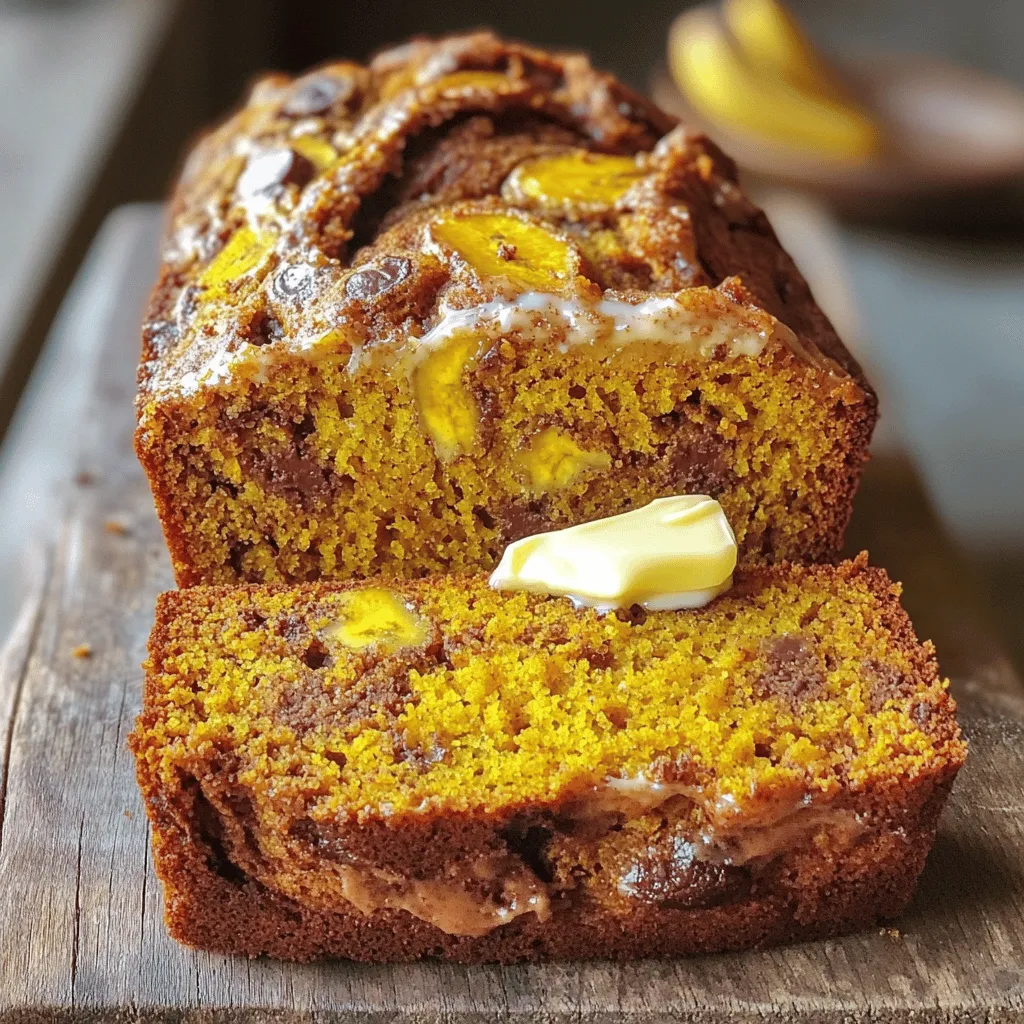
If you love fall flavors, you’ll adore this Pumpkin Banana Bread. It’s soft, moist, and easy to make. You can

- 1 cup walnuts - 1 cup pitted dates - 1/4 cup unsweetened cocoa powder - 1/4 cup almond flour - 1/4 teaspoon sea salt - 1 teaspoon vanilla extract - 1/4 cup dark chocolate chips (dairy-free if desired) - 2 tablespoons almond butter (or peanut butter) - Sea salt flakes for topping To make no-bake brownie bites, gather these simple ingredients. Each one plays a key role. Walnuts give a nice crunch and healthy fats. Dates act as a natural sweetener and binder. Cocoa powder adds rich chocolate flavor. Almond flour brings a soft texture. Sea salt balances the sweetness. Vanilla gives a lovely aroma. Dark chocolate chips add extra indulgence. Almond butter creates creaminess, but peanut butter works too. Finally, sea salt flakes enhance the taste. - Alternative nuts or seeds - Using honey or agave instead of dates - Substituting cocoa powder with carob powder Feel free to get creative! You can swap walnuts for other nuts or seeds. If you want a sweet kick without dates, honey or agave works. For a different taste, try carob powder instead of cocoa. Each choice can change the flavor and texture of your brownie bites. Remember, the best cooking often involves personal touches. Enjoy experimenting! For the complete recipe, visit Full Recipe. - Combine walnuts and dates in a food processor. - Pulse until a sticky mixture forms. Start by placing the walnuts and pitted dates into your food processor. You want to blend them until they stick together. This forms a great base for your brownie bites. It should look crumbly yet sticky. If it’s too dry, you can add a little water and pulse again. - Add dry ingredients and pulse until combined. - Incorporate wet ingredients, adjusting with water as needed. Next, it’s time to add the dry ingredients. Put in the cocoa powder, almond flour, and a sprinkle of sea salt. Pulse the mixture until everything blends well. Then, add the wet ingredients: the vanilla extract, almond butter, and dark chocolate chips. Keep processing until it sticks together. If the mix feels too dry, add water one tablespoon at a time. You want a dough-like consistency. - Roll mixture into bite-sized balls. - Refrigerate for 30 minutes before serving. Now, take clean hands and grab small portions of the mixture. Roll them into bite-sized balls, about one inch in diameter. Place them on a tray lined with parchment paper. To add a touch of flair, sprinkle a pinch of sea salt flakes on top. Chill these brownie bites in the fridge for at least 30 minutes. This step helps them firm up nicely. After that, they are ready to enjoy! For the full recipe, check the earlier section. To make your brownie bites stick together, texture matters. If your mix feels dry, add water. Start with just one tablespoon at a time. Pulse the mixture and check the texture. You want it sticky but not too wet. When rolling your bites, use clean hands. Take small portions and roll them into 1-inch balls. Keep them uniform for even bites. This makes them look great and ensures they chill properly. Want to spice things up? Try adding a bit of cinnamon or espresso powder. These flavors boost the chocolate taste. Just a pinch can change the whole treat. You can also switch up your nut butter. Use flavored nut butters like almond or cashew. This adds a fun twist and can change the taste completely. Pair these bites with a tall glass of almond milk. The smoothness complements the rich chocolate. You can serve them on a cute platter for a special touch. For a fun twist, try skewering them with fruit. Use strawberries or bananas for a colorful display. This makes your dessert pop and adds freshness. For the full recipe, check out the details above! {{image_2}} If you want to skip walnuts, you can use sunflower seeds or oats. Both give a nice crunch and keep the texture you want. You can also try almond flour or coconut flour as a base. These keep the bites moist and tasty. To switch things up, add caramel or nut butter centers. This makes each bite a fun surprise. You can also use different types of chocolate. Try milk, white, or dark chocolate for unique flavors. Each type will change the taste and sweetness of your bites. You can make themed brownie bites for holidays. Think peppermint for winter or pumpkin spice for fall. These flavors make the bites festive and fun. They are also great for celebrations. Make them bite-sized for parties or special treats. You can find the full recipe for these delicious bites to explore all these variations. Store your no bake brownie bites in the refrigerator for best results. They stay fresh and tasty. If you want to keep them longer, freezing works too. Just ensure you wrap them well. Use airtight containers for both methods. This will help keep moisture out and flavors in. Brownie bites last about a week in the fridge. In the freezer, they can last for about three months. Check for signs of spoilage. If they smell off or look dry, it's time to toss them. Freshness is key for the best taste! Don’t waste any leftover brownie bites! You can add them to smoothies for a rich flavor. They also taste great crumbled over yogurt or ice cream. This adds a nice crunch and extra sweetness to your treats. Get creative and enjoy these bites in new ways! To make No Bake Brownie Bites vegan, you need to swap a few ingredients. Use almond butter or peanut butter instead of any non-vegan butter. Ensure your chocolate chips are dairy-free. The rest of the ingredients are naturally vegan. These simple swaps keep the bites delicious while meeting vegan needs. Yes, you can freeze No Bake Brownie Bites. To freeze, place them in an airtight container. Ensure they are in a single layer to avoid sticking. When you want to eat them, just take out the desired amount. Let them thaw in the fridge for a few hours or on the counter for about 30 minutes. If you need a date substitute, consider using raisins or prunes. Both offer a natural sweetness. However, they can change the flavor slightly. You might need to adjust the amount of sweetener in the recipe. Applesauce can also work but may alter the texture. To customize sweetness, adjust the amount of dates or sweetener. If you want a less sweet bite, cut back on the dates. If you like it sweeter, add a bit more almond butter or a dash of maple syrup. Taste as you go to find your perfect balance. For the complete recipe and more tips, check the Full Recipe section above. In this post, we explored how to make no-bake brownie bites with simple ingredients. You learned about required items, optional add-ins, and step-by-step instructions. We also shared tips for perfecting your bites and exciting variations to try. With easy storage tips and answers to common questions, these brownie bites are perfect for all. Enjoy customizing them to fit your taste, and share them with friends. Happy making!

No Bake Brownie Bites Quick and Easy Delight

Looking for a sweet treat that’s quick and easy? You’ll love these No Bake Brownie Bites! Made with simple ingredients

For a delicious Pumpkin Crunch Cake, gather these key ingredients: - 1 can (15 oz) pumpkin puree - 1 cup granulated sugar - 1 cup packed brown sugar - 1/4 cup vegetable oil - 4 large eggs - 2 teaspoons vanilla extract - 2 cups all-purpose flour - 2 teaspoons baking powder - 1 teaspoon baking soda - 1 teaspoon ground cinnamon - 1/2 teaspoon ground nutmeg - 1/2 teaspoon ground ginger - 1/2 teaspoon salt - 1 cup chopped pecans (optional) - 1/2 cup melted butter (for topping) - 1 cup brown sugar (for topping) - 1 cup crushed graham crackers (for topping) - 1/2 teaspoon ground cinnamon (for topping) Each ingredient plays a role in creating the rich, warm flavors of fall. Pumpkin puree gives moisture and sweetness, while sugars add depth. The spices bring out the essence of autumn. You can enhance your Pumpkin Crunch Cake with optional ingredients: - Chopped pecans add a nice crunch. You can swap them for walnuts or leave them out for a nut-free cake. - Consider toppings like whipped cream, a scoop of vanilla ice cream, or a sprinkle of cinnamon for extra flavor and flair. Using these optional ingredients can personalize your cake. Each choice brings its unique taste and texture. Now let’s look at the nutritional side. - Caloric content: Each serving has about 350 calories. - Main nutrients: - Carbohydrates: 56g - Protein: 6g - Fat: 12g - Fiber: 2g This cake provides a balance of carbs and fats, making it a satisfying treat. Be mindful of portion sizes, especially if you are watching calories. Enjoying a slice can be a delightful part of your fall festivities. First, preheat your oven to 350°F (175°C). While the oven warms, grease a 9x13 inch baking pan. This helps the cake not stick. Next, grab a large mixing bowl. Combine the pumpkin puree, granulated sugar, brown sugar, vegetable oil, eggs, and vanilla extract. Mix until the ingredients are smooth and well blended. This will be the base of your cake. In a different bowl, whisk together the flour, baking powder, baking soda, cinnamon, nutmeg, ginger, and salt. This mix gives the cake its flavor and texture. Gradually add this dry mix to the pumpkin mixture. Stir gently until just combined. Be careful not to overmix; this can make the cake tough. If you want to add pecans, fold them in now. Pour the batter into your prepared pan. Spread it evenly to ensure it bakes well. In a small bowl, mix melted butter, brown sugar, crushed graham crackers, and cinnamon for the topping. Sprinkle this mixture over the batter. Bake your cake for 45-50 minutes. To check if it's done, insert a toothpick in the center. It should come out clean. Once baked, let the cake cool in the pan for at least 20 minutes before serving. How to avoid overmixing Overmixing can make your cake tough. Mix gently when combining wet and dry ingredients. Stir until just mixed. You want some lumps in the batter. This keeps your cake soft and fluffy. Ensuring even baking To bake evenly, spread the batter smoothly in the pan. Use a spatula to flatten the top. Make sure your oven is preheated to 350°F (175°C). Place the cake in the center of the oven. This helps it bake evenly all around. Serving suggestions Serve your Pumpkin Crunch Cake warm or at room temperature. It tastes great with whipped cream or a scoop of vanilla ice cream. You can also serve it with a drizzle of caramel sauce for extra sweetness. Garnishing ideas for an appealing look Garnish with a sprinkle of ground cinnamon or some chopped pecans. You can also add a few fresh pumpkin seeds on top. This adds color and a fun touch to your cake. Over or under baking Check your cake at 45 minutes. Insert a toothpick in the center. If it comes out clean, your cake is done. If it has batter on it, bake for a few more minutes. Watch closely to avoid overbaking, which can dry it out. Substitution errors Stick to the recipe for best results. Substituting ingredients can change the flavor or texture. For example, using a different sugar can affect how the cake rises. If you want to change flavors, try adding spices instead of swapping key ingredients. Remember, these tips will help you create a delicious and beautiful Pumpkin Crunch Cake. For the full recipe, check out the complete instructions! {{image_2}} You can change the flavors of Pumpkin Crunch Cake with some fun twists. Adding spices like allspice or cloves can give it a warm kick. You might also try mixing in some chocolate chips for a sweet surprise. If you want crunch, use different nuts like walnuts or almonds. Adding fruits, like diced apples or raisins, can also add a new taste. Think of these as ways to make the cake your own. For those who need gluten-free options, swap the all-purpose flour for a gluten-free blend. Many brands work well in baking. If you want a vegan version, replace the eggs with flax eggs. Just mix one tablespoon of flaxseed meal with three tablespoons of water for each egg. Use a plant-based oil instead of vegetable oil, too. These changes keep the cake tasty and friendly for all diets. Pair your Pumpkin Crunch Cake with a warm drink like cider or coffee. The flavors mix well and make for a cozy snack. You can also serve it with whipped cream or vanilla ice cream on top for a special touch. If you want something different, try serving it as mini cupcakes or in jars for a fun dessert. Each way to serve it offers a new experience. For the full recipe, check the detailed steps above. To store Pumpkin Crunch Cake at room temperature, cover it tightly with plastic wrap. This keeps it moist and fresh. You can leave it out for up to three days. If you want to keep it longer, refrigeration is a good option. Place the cake in an airtight container. It will stay fresh for about a week in the fridge. For long-term storage, freezing is best. Cut the cake into portions for easy thawing. Wrap each piece in plastic wrap, then place it in a freezer-safe bag. This way, it stays fresh for up to three months. Use heavy-duty foil or a freezer-safe container to prevent freezer burn. To defrost, place the cake in the fridge overnight. This keeps it from getting soggy. If you’re in a hurry, you can use the microwave. Heat it on low for a few seconds, checking often. To maintain texture when reheating, avoid high heat. An oven set to 300°F (150°C) warms it gently, keeping it soft and delicious. Enjoy your Pumpkin Crunch Cake again, just like fresh! Pumpkin Crunch Cake is a delicious fall dessert. It has layers of pumpkin, spices, and a crunchy topping. The cake is moist and rich, with a warm flavor that makes it perfect for autumn. The topping is made from crushed graham crackers, pecans, and brown sugar. Each bite gives you a mix of soft cake and crunchy goodness. You can serve it warm or at room temperature, and it pairs well with whipped cream or ice cream. Yes, you can make Pumpkin Crunch Cake ahead of time. It stays fresh for up to three days when stored properly. To store, cover the cake with plastic wrap or foil. Keep it at room temperature for a day or two. After that, it’s best to refrigerate it. If you want to freeze it, wrap it tightly and store it for up to three months. Just remember to let it cool completely before wrapping. To get the best texture, avoid overmixing your batter. Mix just until the wet and dry ingredients come together. This keeps the cake light and fluffy. Also, make sure to use fresh pumpkin puree. If you use canned puree, check the label for any added ingredients. Baking at the right temperature is key too. Use an oven thermometer for accuracy. Finally, let the cake cool in the pan for a while before serving. Yes, you can substitute pumpkin puree. If you can’t find it, you can use sweet potato puree or butternut squash puree. Both options give a similar taste and texture. You can also make your own puree by roasting pumpkin. Just scoop the flesh and blend it until smooth. This way, you control the flavor and freshness. Using these alternatives can create a fun twist on the classic recipe. For the full recipe, check out the detailed instructions to make your Pumpkin Crunch Cake irresistible! This blog post covered the essential ingredients for pumpkin crunch cake. We discussed both key and optional items, plus nutritional data. I provided clear steps for preparation, baking, and tips to avoid common mistakes. Remember, small changes can lead to big flavors. Enjoy experimenting with variations and serving suggestions. Follow the storage tips to keep your cake fresh. Embrace the joy of baking this tasty treat! You’ll impress everyone with your new skills.

Pumpkin Crunch Cake Irresistible Fall Flavor Treat

Pumpkin Crunch Cake is the perfect treat to make your fall cozy and sweet. Imagine soft pumpkin cake topped with

- 1 cup pure pumpkin puree - 1/2 cup brown sugar - 1/4 cup granulated sugar - 2 large eggs - 1/4 cup vegetable oil These main ingredients bring rich flavor and moisture to our muffins. Pumpkin puree makes the muffins soft and adds a lovely orange hue. The brown sugar gives a deep sweetness, while the granulated sugar balances it out. Eggs help bind everything together, while oil keeps them moist. - 1 1/2 cups all-purpose flour - 1 teaspoon baking powder - 1/2 teaspoon baking soda - 1/2 teaspoon cinnamon - 1/4 teaspoon nutmeg - 1/4 teaspoon ginger - 1/4 teaspoon salt The dry ingredients are key to the muffins’ texture. All-purpose flour forms the base for structure. Baking powder and baking soda make the muffins rise and stay fluffy. Spices like cinnamon, nutmeg, and ginger add warmth and flavor, while salt enhances the sweetness. - 1 cup semi-sweet chocolate chips Chocolate chips are the star of these muffins. They melt slightly during baking, creating pockets of gooey goodness. Each bite bursts with rich chocolate flavor, making these muffins a treat. You’ll love how the chocolate pairs with the pumpkin spices. For the full recipe, check out the details above. 1. Preheating the oven: Start by preheating your oven to 350°F (175°C). This step warms your oven and helps the muffins rise well. 2. Mixing wet ingredients: In a large bowl, whisk together 1 cup of pumpkin puree, 1/2 cup of brown sugar, 1/4 cup of granulated sugar, 2 large eggs, 1/4 cup of vegetable oil, and 1 teaspoon of vanilla extract. Mix until smooth and well blended. 3. Combining dry ingredients: In a separate bowl, sift together 1 1/2 cups of all-purpose flour, 1 teaspoon of baking powder, 1/2 teaspoon of baking soda, 1/2 teaspoon of cinnamon, 1/4 teaspoon of nutmeg, 1/4 teaspoon of ginger, and 1/4 teaspoon of salt. This helps mix the dry items evenly. 1. Folding in chocolate chips: Gradually add the dry mix to the wet mix. Stir gently until just combined. It’s okay if there are small lumps. Then, fold in 1 cup of semi-sweet chocolate chips to distribute them throughout the batter. 2. Filling muffin cups: Line a muffin tin with paper liners or grease it lightly. Divide the batter evenly among the muffin cups, filling each about 2/3 full. This gives them room to rise. 3. Baking time and temperature: Place the muffin tin in the preheated oven. Bake for 18-20 minutes. Check if they are done by inserting a toothpick in the center. If it comes out clean, your muffins are ready! 1. Cooling in the pan: After baking, let the muffins cool in the pan for about 5 minutes. This helps them set before moving. 2. Transferring to a wire rack: Carefully transfer the muffins to a wire rack to cool completely. This prevents sogginess and keeps them fluffy. 3. Serving suggestions: Serve warm or at room temperature. These muffins pair great with a cup of coffee or tea. They make a tasty breakfast or snack. For the full recipe, check out the [Full Recipe]. To ensure your muffins rise properly, always preheat your oven. A hot oven helps the muffins rise quickly. Use fresh baking powder and baking soda for best results. These ingredients give the muffins lift. Avoiding overmixing is key to soft muffins. When you mix, do it gently. Mix until the dry ingredients are just combined with the wet ones. A few lumps in the batter are just fine. You can enhance the flavor of your muffins in simple ways. Adding nuts like walnuts or pecans gives a nice crunch. Dried fruits like cranberries or raisins add sweetness. Using different types of chocolate can change things up. Try dark chocolate chips for a richer taste. You can even mix semi-sweet with milk chocolate for fun flavor twists. For the best muffins, use a non-stick muffin tin. Silicone muffin tins work great too. They make it easy to pop out the muffins. Choose paper liners that fit your muffin tin well. This will help keep the muffins moist and easy to serve. For mixing and measuring, a large mixing bowl is best. A whisk helps mix wet ingredients smoothly. Use a spatula to gently fold in the dry ingredients and chocolate chips. For the full recipe, check out the details above and enjoy your baking! {{image_2}} If you need a gluten-free option, you can use gluten-free flour. Many brands offer great blends. Just swap the all-purpose flour with a gluten-free mix. Ensure the mix has xanthan gum for good texture. This helps your muffins stay moist and fluffy. For a dairy-free version, you can use almond milk or oat milk. These alternatives work well in this recipe. You can also replace the vegetable oil with coconut oil or avocado oil. Both will add a nice flavor. You can add cranberries or apples for a fun twist. These fruits bring a sweet-tart flavor that pairs well with pumpkin. You might also adjust the spices. Try adding more cinnamon in fall or a hint of nutmeg in winter. This keeps your muffins exciting all year round. Check out the Full Recipe for more details on making these delicious muffins! To keep your pumpkin chocolate chip muffins fresh, use an airtight container. This helps lock in moisture and flavor. Store them at room temperature for up to three days. If you want them to last longer, refrigerate them. Just remember to let them cool completely before you store them. Freezing muffins is a smart way to save them for later. First, wrap each muffin in plastic wrap. Then, put the wrapped muffins in a freezer bag. Remove as much air as you can. They stay fresh for about three months in the freezer. When you want one, just take it out and let it thaw at room temperature. To enjoy your muffins warm, use an oven or microwave. For the oven, preheat it to 350°F (175°C). Place the muffins on a baking sheet and heat for about 10 minutes. If you use a microwave, heat one muffin for about 15-20 seconds. This warms it up and keeps it moist. Enjoy your muffins just like they came out of the oven! To check if the muffins are done, use a toothpick. Insert it into the center of a muffin. If it comes out clean, the muffins are ready. If it has batter on it, bake for a few more minutes. This simple test helps avoid undercooked muffins. Yes, you can make this recipe ahead of time. Mix the batter and store it in the fridge for up to 24 hours. This makes baking fresh muffins easy. You can also bake the muffins ahead. Store them in an airtight container for about three days. For longer storage, freeze them. Just let them cool completely before freezing. Absolutely! You can substitute ingredients for allergies or preferences. Use gluten-free flour if you need a gluten-free option. You can also replace eggs with mashed bananas or applesauce for a vegan choice. For the sugars, coconut sugar works well too. Explore these options to make the muffins fit your needs. Check the Full Recipe for more details. You now have all the tools to bake delicious muffins. You learned about key ingredients, how to mix them, and the baking process. Remember to explore fun twists, like adding nuts or using gluten-free options. Don’t forget proper storage to keep your muffins fresh. Whether you enjoy them right away or save them for later, these muffins are sure to please. Simple tricks can elevate your baking and flavor. Enjoy your baking journey!

Pumpkin Chocolate Chip Muffins Delightful and Moist

Welcome to the delicious world of Pumpkin Chocolate Chip Muffins! These moist treats combine the warmth of pumpkin with sweet

- 2 cups all-purpose flour - 2 medium apples, peeled, cored, and diced - 1/2 cup granulated sugar - 1 tablespoon baking powder - 1 teaspoon ground cinnamon - 1/4 teaspoon nutmeg - 1/2 teaspoon salt - 3/4 cup milk - 2 large eggs - 1/4 cup unsalted butter, melted - 1 teaspoon vanilla extract - 1 cup powdered sugar (for glaze) - 2 tablespoons milk (for glaze) - Extra cinnamon for dusting When making oven baked apple fritters, the right ingredients matter. Start with fresh apples. I love using Granny Smith apples for their tartness. They balance the sweetness well. Honeycrisp apples also work nicely for their crisp bite. Fuji apples provide a great mix of sweet and tart flavors. The flour acts as a base for the fritters, giving them structure. Baking powder helps them rise and become light. The sugar adds sweetness, while salt enhances all the flavors. Cinnamon and nutmeg bring warmth and depth, making each bite delicious. Don’t forget the eggs and milk! They create a moist batter that holds everything together. The melted butter adds richness. Finally, the glaze made from powdered sugar and milk finishes the fritters perfectly. For more details, check the Full Recipe. It guides you step by step. Enjoy the process of making these tasty treats! 1. First, preheat your oven to 375°F (190°C). This ensures even baking. 2. Line a baking sheet with parchment paper. This helps the fritters not stick. 3. In a large bowl, mix the dry ingredients: all-purpose flour, sugar, baking powder, cinnamon, nutmeg, and salt. Stir well to combine. 4. In another bowl, whisk together milk, eggs, melted butter, and vanilla extract. This mixture adds moisture and flavor. 1. Pour the wet ingredients into the dry mix. Stir gently until they just blend. Don't overmix. This keeps the fritters tender. 2. Carefully fold in the diced apples. They add sweetness and texture. Make sure they are evenly mixed in. 1. Using a large spoon or ice cream scoop, drop heaping tablespoons of the batter on the prepared baking sheet. Leave space between each fritter. 2. Bake in your preheated oven for 18-20 minutes. The fritters should turn golden brown. Use a toothpick to check if they are done. 3. While baking, mix powdered sugar and 2 tablespoons of milk in a small bowl. Stir until smooth for the glaze. 4. Once baked, let the fritters cool for a few minutes. Then drizzle the glaze over them. Dust with extra cinnamon if you like. This easy process leads to tasty Oven Baked Apple Fritters. You can follow the Full Recipe for more details. To make the best fritters, avoid overmixing the batter. When you mix too much, the fritters can turn out tough rather than tender. Mix until just combined. This keeps them light and fluffy. Also, make sure to distribute the apples evenly in the batter. This helps each bite have the right balance of fruit and dough. A common mistake is skipping the parchment paper. Using it prevents the fritters from sticking to the pan. It also makes cleanup easier. Another mistake is not checking for doneness. Use a toothpick to test if they are cooked through. Insert it into the center; if it comes out clean, they are ready! To elevate the flavor, consider adding spices like ginger or cloves. These spices can add warmth and depth. You can also experiment with different glazes. A maple glaze or a cinnamon sugar could give your fritters a unique twist. Feel free to get creative with flavors! For the full recipe, check the reference above. {{image_2}} You can switch up the flavors in your fritters. Try using pears instead of apples. Pears give a softer texture and a sweet taste. You might also enjoy mixed berries for a fruity twist. They add sweetness and color to the dish. Strawberries, blueberries, and raspberries work well together. Want a healthier fritter? Use whole wheat flour instead of all-purpose flour. Whole wheat adds fiber and nutrients. You can also use Greek yogurt in place of eggs. This keeps the fritters moist and adds protein. If you need gluten-free fritters, I have great options. Almond flour is a tasty choice. It gives a nutty flavor and a nice texture. Coconut flour is another option. It absorbs moisture well, so you need less of it. You can also use cornstarch as a binding agent. This helps hold everything together without gluten. These variations make your oven baked apple fritters unique and fun to make! - Store fritters in an airtight container. - Keep them in the fridge to maintain freshness. These steps will help your fritters stay tasty. The airtight container keeps moisture out. Refrigerating helps preserve the flavors and texture. If you do not use them right away, this will save them for later. - Reheat in the oven for that crispy bite. - Use the microwave for a quick snack. For the oven, set it to 350°F (175°C). Place the fritters on a baking sheet. Heat for about 5-10 minutes until warm. This method keeps the outside crispy. If you are in a hurry, the microwave works too. Heat them for 20-30 seconds. They may lose some crispiness, but they will be warm. - Freeze unbaked batter for easy prep later. - Store baked fritters in the freezer for later enjoyment. To freeze the batter, scoop it onto a baking sheet lined with parchment. Place it in the freezer until solid. Then, transfer the frozen scoops into a zip-top bag. When you’re ready to bake, just add a few extra minutes to the time. For baked fritters, let them cool first. Wrap each one in plastic wrap, then place in a freezer bag. This keeps them fresh. You can enjoy them whenever you want! For the full recipe, check out the steps I shared. To get a crispy outside, follow these tips: - Use cold butter in the dough. - Add a bit of cornstarch to the flour. - Bake on a wire rack to let air flow. - Increase the baking time slightly for a crunchier texture. These tricks can help you achieve that perfect crunch with each bite. Yes! You can prepare the fritters in advance. Here’s how: - Make the batter and store it in the fridge for up to 2 hours. - You can also shape the fritters and freeze them. - When ready to bake, just pop them in the oven straight from the freezer. This way, you can enjoy fresh fritters without too much hassle. Oven Baked Apple Fritters can pair well with many items. Here are some ideas: - Serve with a scoop of vanilla ice cream for dessert. - Enjoy with a side of yogurt or whipped cream for breakfast. - Drizzle warm caramel sauce over them for extra sweetness. These pairings add flavor and fun to your meal. You can find the full recipe of Crispy Oven Baked Apple Fritters on the recipe page. It has all the steps and tips you need to make these delicious treats at home. Oven baked apple fritters are easy and fun to make. You need simple ingredients like apples, flour, and spices. Follow the steps to create a delicious treat. Remember to avoid common mistakes for the best results. You can also try different fruits or make them gluten-free. Store and reheat your fritters to enjoy later. Overall, these fritters offer great taste and versatility. Enjoy your baking adventure and share these tasty treats with others!

Oven Baked Apple Fritters Flavorful and Easy Recipe

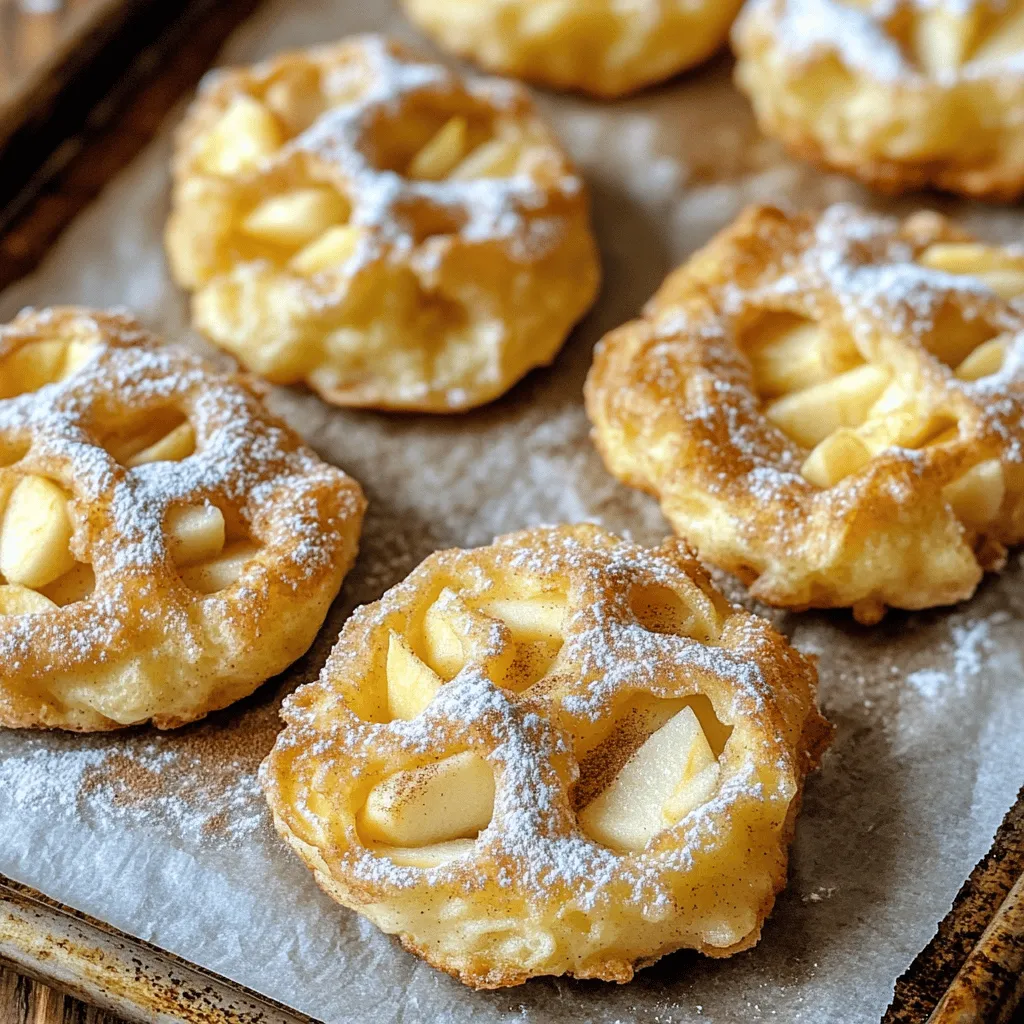
Craving a sweet and warm treat? Try my Oven Baked Apple Fritters! They’re easy to make and packed with flavor.

Older posts
Newer posts
← Previous Page1 … Page41 Page42 Page43 … Page84 Next →

dsad

© 2026 Foodish Talk • Built with GeneratePress

Our Policies

  • Copyright Policy
  • Cookie Policy
  • GDPR Policy
  • Privacy Policy
  • Disclaimer
  • Terms Of Use

More Information

  • Home
  • About
  • Contact
  • Appetizers
  • Dessert
  • Dinner
  • Drinks
©2026, Foodish Talk About Back To Top