Skip to content
DisclaimerTerms Of UseGDPR PolicyCookie Policy

Foodish Talk

  • Home
  • Drinks
  • Appetizers
  • Dinner
  • Dessert
  • About
  • Contact
  • Privacy Policy
DisclaimerTerms Of UseGDPR PolicyCookie Policy

NO-ING-IMG

To make a delicious One-Pot Creamy Vegetable Soup, gather these key ingredients: - 1 tablespoon olive oil - 1 medium onion, chopped - 2 cloves garlic, minced - 2 medium carrots, diced - 1 celery stalk, diced - 1 medium potato, peeled and diced - 1 zucchini, diced - 1 cup broccoli florets - 1 cup frozen peas - 4 cups vegetable broth - 1 cup heavy cream (or coconut cream for a dairy-free option) - 1 teaspoon dried thyme - 1 teaspoon Italian seasoning - Salt and pepper to taste - Fresh parsley, chopped (for garnish) These ingredients work together to create a rich, creamy, and comforting soup. The olive oil adds a healthy fat, while the onion and garlic build a strong flavor base. Carrots, celery, and potatoes give the soup its heartiness. Zucchini and broccoli add color and nutrition, and peas bring sweetness. Using vegetable broth provides depth while heavy cream makes it creamy. If you want a lighter soup or a vegan option, you can substitute coconut cream. The herbs, thyme and Italian seasoning, tie all the flavors together. Finally, fresh parsley adds a pop of color and freshness when served. Feel free to customize this list based on what you have at home. This soup is forgiving, and you can swap or add veggies as needed. Start by heating the olive oil in a large pot over medium heat. Add the chopped onion first. Sauté it for about 3-4 minutes until it looks soft. Then, add the minced garlic. Cook this for 1 more minute, letting the smell fill your kitchen. Next, it’s time to add the root vegetables. Toss in the diced carrots, celery, and potato. Stir these for about 5 minutes. This step helps bring out their flavors and starts to build the soup's base. Now, let’s mix in the rest of the vegetables. Add the diced zucchini, broccoli florets, and frozen peas to the pot. Stir everything together so the veggies are well combined. This colorful mix adds both taste and nutrition to your soup. After the veggies cook for a while, pour in the vegetable broth. Bring this mix to a boil. Once it boils, lower the heat and let it simmer. This should take about 15-20 minutes until the vegetables are tender. When they are ready, it’s blending time! Use an immersion blender to blend the soup until smooth or chunky, based on what you like. If you use a regular blender, let it cool slightly before blending in smaller batches. Once blended, return the soup to the pot. Stir in the heavy cream or coconut cream. Season it with thyme, Italian seasoning, salt, and pepper. Let it simmer for another 5-10 minutes. This warms it up and lets the flavors mix well. Give it a taste and adjust the seasoning as needed. Now your one-pot creamy vegetable soup is ready to enjoy! To get the perfect texture, decide if you want a smooth or chunky soup. A smooth soup feels creamy and rich. For this, blend it well until no lumps remain. If you prefer a chunky soup, blend only half. This gives you a mix of smooth and bits of veggies that add fun to each bite. When blending, I recommend using an immersion blender. It’s easy and quick. Just be careful not to splash. If you use a regular blender, let the soup cool first. Blend in small batches, and remember to vent the lid to avoid pressure build-up. To boost flavor, try adding dried thyme and Italian seasoning. These spices add warmth. Use salt and pepper to taste, but go easy; you can always add more later. For the best veggies, cook them until they are tender. This usually takes about 15 to 20 minutes. Check the soup as it cooks. You want the veggies soft but not mushy. Their flavors will blend beautifully with the broth. I love using a large pot for one-pot meals. A heavy-bottom pot is best. It spreads heat evenly and helps avoid burning. Look for one with a lid to keep moisture in. For easy cleanup, use a pot that is non-stick. A silicone spatula helps get every bit of soup out. You can also line your pot with parchment paper if you want to make cleaning even easier. {{image_2}} You can make this soup fit your diet. For a dairy-free option, use coconut cream instead of heavy cream. This gives the soup a nice, rich taste without dairy. If you need it gluten-free, stick with the vegetable broth and fresh veggies. All the ingredients in this recipe are naturally gluten-free. Want to make your soup heartier? Add proteins like beans or lentils. They boost the nutrition and make the soup more filling. You can also throw in seasonal vegetables. Try adding sweet potatoes in fall or fresh peas in spring. These little changes keep the soup exciting and fresh. If you like some heat, add red pepper flakes. This spicy version warms you up on cold days. For an Italian twist, sprinkle in some dried basil or oregano. These herbs add a lovely aroma and flavor. Feel free to mix and match to find your favorite version! To keep your One-Pot Creamy Vegetable Soup fresh, follow these steps: - Refrigerating: Let the soup cool down. Pour it into an airtight container. Store it in the fridge for up to 4 days. This keeps the flavors intact and prevents spoilage. - Freezing: If you want to save it longer, freeze the soup. Use freezer-safe containers or bags. Make sure to leave some space at the top for expansion. The soup can last for 3 months in the freezer. When ready to eat, just thaw it overnight in the fridge. When reheating, you want to keep the soup creamy and smooth. Here are some tips: - Stovetop method: Pour the soup into a pot. Heat on low to medium heat. Stir often until it warms up. This keeps the texture just right. - Microwave method: Transfer the soup to a microwave-safe bowl. Cover it loosely with a lid. Heat in short bursts, stirring in between. This helps heat evenly. For storage, use: - Airtight containers: These keep the soup fresh and prevent spills. - Glass containers: They are great for reheating and do not retain odors. Following these tips ensures your soup stays delicious for future meals! Yes, you can use frozen vegetables in this recipe. They save time and add convenience. Frozen veggies often lock in flavor and nutrients. This means they can be just as good as fresh. If you use frozen vegetables, skip the thawing step. Just toss them right into the pot. This will make your soup quick and easy. To make this soup vegan, you can swap out the heavy cream. Use coconut cream instead for a rich taste. You can also add plant-based milk for a lighter option. For the broth, ensure it’s vegetable-based. This way, you keep all the flavors while staying plant-based. This soup pairs well with many sides. Try serving it with warm bread or crusty rolls. A fresh salad also complements it nicely. You can add a sprinkle of cheese on top, if you like. For a heartier meal, serve it with a grain, like quinoa or rice. This blog post covered how to make a tasty, creamy vegetable soup. We discussed the key ingredients, step-by-step instructions, and helpful tips. You learned how to adjust the recipe for different diets and flavors. Proper storage and reheating also matter. Remember, cooking should be fun and creative. Explore your options with this versatile dish. Enjoy your time in the kitchen and share this warm soup with others!

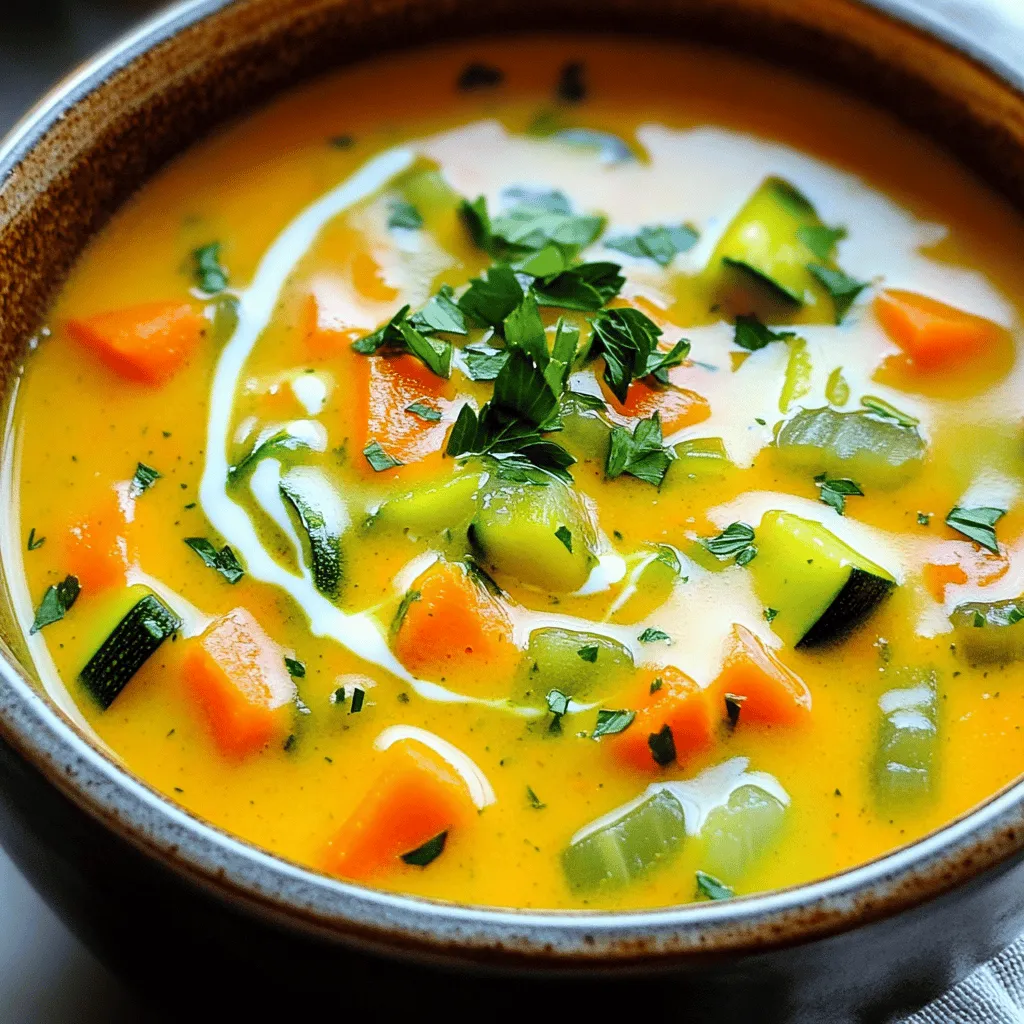
One-Pot Creamy Vegetable Soup Simple and Comforting

Are you craving a warm, cozy meal that’s easy to make? Look no further than this One-Pot Creamy Vegetable Soup!

- 2 medium zucchinis, cut into fry shapes - 1 cup breadcrumbs (preferably panko for extra crunch) - ¼ cup grated Parmesan cheese - 1 teaspoon garlic powder - 1 teaspoon onion powder - ½ teaspoon smoked paprika - 2 large eggs - Salt and pepper to taste - Olive oil spray Zucchini is the star of this dish. You want fresh, firm zucchinis. Look for ones that are not too big. Smaller zucchinis taste better and hold up well. Cutting them into fry shapes makes them fun to eat. For the breadcrumbs, I recommend panko. It adds a nice crunch. You can also use regular breadcrumbs, but panko gives that extra texture. The seasoning is key. Garlic powder and onion powder add great flavor. Smoked paprika gives a nice touch of warmth. Don't forget the salt and pepper. They help bring all the flavors together. Finally, the eggs help the coating stick. A light spray of olive oil before cooking makes everything crisp up nicely. 1. Preheating the air fryer Start by preheating your air fryer to 400°F (200°C). This step is key for getting that crispy texture. 2. Mixing the coating ingredients In a shallow bowl, mix together the breadcrumbs, grated Parmesan cheese, garlic powder, onion powder, smoked paprika, salt, and pepper. Make sure to blend them well. This mix adds a tasty layer to your fries. 3. Preparing the zucchini fries Grab two medium zucchinis. Cut each zucchini into fry shapes. Aim for uniform sizes. This helps them cook evenly and look great. 4. Coating the zucchini fries In a separate bowl, beat two large eggs until smooth. Take each zucchini fry, dip it into the egg, and let the extra drip off. Next, roll the fry in the breadcrumb mix. Press gently to help the coating stick well. 1. Air frying process Lightly spray the air fryer basket with olive oil. Place the coated zucchini fries in a single layer. Be sure not to crowd them. Spray the tops lightly with olive oil for extra crunch. 2. Checking for doneness Cook the fries for about 10-12 minutes. Halfway through, shake the basket to ensure even cooking. They are done when they are golden brown and crispy. 3. Serving suggestions Once cooked, take them out and let them rest for a minute. Serve your zucchini fries hot. They pair well with marinara sauce or garlic aioli. For a pop of color, garnish with fresh parsley. To get your zucchini fries extra crispy, focus on the coating. Use panko breadcrumbs instead of regular ones. Panko gives a light and crunchy texture that makes a difference. Mix in grated Parmesan cheese with the breadcrumbs. The cheese adds flavor and helps with browning. Cut the zucchini into uniform fry shapes. This ensures they cook evenly. Aim for pieces that are about the same size as your pinky finger. Thicker pieces may not cook through, while thinner ones can burn. If your fries come out soggy, check the coating. Make sure you coat each fry well. If they are too wet, the coating won't stick. You can also try cooking them a bit longer. Just watch closely to avoid burning. Adjusting the cooking time can also help. If they’re not done after 10-12 minutes, add a few more minutes. Air fryers can vary in power, so keep an eye on your fries. You want them golden brown and crispy for the best taste! {{image_2}} To make your zucchini fries pop, try different spices. You can add cayenne for heat or Italian herbs for a fresh taste. You can also mix in some lemon zest. It adds a nice zing. For cheese lovers, there are fun options too. Instead of Parmesan, use shredded mozzarella or a sharp cheddar. Each cheese gives a unique taste and matching texture. If you want a lighter version, try baked zucchini fries. Simply place the coated fries on a baking sheet and bake at 425°F (220°C) for 20-25 minutes. They will be crispy and tasty without the air fryer. For those with gluten issues, you can use gluten-free breadcrumbs. Almond flour or crushed cornflakes are excellent choices. They give a crunchy bite and keep your dish gluten-free. To keep your zucchini fries fresh, store them in the fridge. First, let them cool completely. Then, place them in an airtight container. This helps to keep them crispy and tasty. You can store them for up to three days. If you have more, you can freeze them. Just make sure to use freezer-safe bags. To reheat your zucchini fries, the best method is the air fryer. Set it to 350°F (175°C). Place the fries in for about 5 minutes. This keeps them crispy. You can also use an oven. Preheat to 350°F (175°C) and bake for about 8-10 minutes. Avoid microwaving them, as this will make them soggy. Can I use frozen zucchini for this recipe? No, frozen zucchini does not work well for this recipe. It gets too mushy after cooking. Fresh zucchini holds its shape better and gives a nice crunch. How can I make zucchini fries vegan? To make zucchini fries vegan, skip the eggs. Instead, use a mixture of ground flaxseed and water. Mix one tablespoon of ground flaxseed with three tablespoons of water. Let it sit until it thickens. What dipping sauces pair well with zucchini fries? Zucchini fries taste great with marinara sauce, ranch dressing, or garlic aioli. You can also try spicy ketchup or a lemon tahini dip for a fresh twist. How do I know when zucchini fries are done? Zucchini fries are done when they are golden brown and crispy. You can also use a fork to check if they are tender inside. What air fryer temperature is best for vegetables? The best air fryer temperature for vegetables is usually around 400°F (200°C). This temperature helps to cook them evenly and get that nice crunch. Can I make zucchini fries without breadcrumbs? Yes, you can make zucchini fries without breadcrumbs. Try using crushed nuts or ground oats for a different texture. Just make sure they are seasoned well for flavor. We covered how to make delicious air fryer zucchini fries. I shared the essential ingredients, like the right zucchini and breadcrumb choices. You learned step-by-step prep and cooking instructions to get that perfect crispness. I also included tips to fix common problems and variations to suit your taste. In the end, enjoy getting creative in the kitchen. With these tips, your zucchini fries will be a hit. Happy cooking!

Crispy Air Fryer Zucchini Fries Simple and Tasty Recipe

If you’re craving a tasty snack that’s both simple and healthy, air fryer zucchini fries are the answer. With their

- 4 cups mixed greens (spinach, arugula, and kale) - 1 cup pomegranate seeds - 1 medium orange, segmented - 1/2 cup toasted pecans - 1/2 cup feta cheese, crumbled - 1/4 red onion, thinly sliced - 1 avocado, diced - 2 tablespoons olive oil - 1 tablespoon balsamic vinegar - 1 teaspoon honey - Salt and pepper to taste - Mixed greens: These greens are full of vitamins A and C. They help support your immune system. - Pomegranate seeds: They are rich in antioxidants. These seeds can help reduce inflammation. - Orange: Oranges are high in vitamin C. They boost your skin health and immune function. - Toasted pecans: They provide healthy fats. Pecans support heart health and give you energy. - Feta cheese: Feta adds calcium and protein. It helps build strong bones and muscles. - Red onion: This onion has compounds that may lower blood pressure. It also adds flavor and crunch. - Avocado: Avocados are a great source of healthy fat. They keep your heart healthy and help you feel full. - Olive oil: This oil is loaded with good fats. It can lower bad cholesterol levels. - Balsamic vinegar: This vinegar adds flavor with few calories. It may also help regulate blood sugar. - Honey: Honey adds sweetness and can soothe a sore throat. It also has some antioxidants. - Salt and pepper: These enhance flavor. Use them to taste for the best results. - For mixed greens, pick leaves that are bright and crisp. Avoid wilting or browning. - Choose pomegranates that are heavy for their size. This means they are juicy and ripe. - Look for oranges that are firm and smooth. Avoid soft spots or blemishes. - Select pecans that are whole and not broken. Fresh nuts smell sweet, not rancid. - For feta cheese, check the expiration date. Choose cheese that is moist and crumbly. - Pick red onions that feel firm. They should have a smooth skin without dark spots. - Choose avocados that yield slightly to pressure. If they are too hard, they are not ripe. - Look for olive oil labeled "extra virgin" for the best quality. It should smell fresh and fruity. - Pick balsamic vinegar that is dark and thick. It should have a rich, sweet aroma. - For honey, choose raw honey for the most nutrients. Check for local options for better flavor. {{ingredient_image_1}} 1. Start by washing your mixed greens. I like to use spinach, arugula, and kale. This mix adds great texture and flavor. 2. In a large salad bowl, place the greens as your base. Make sure they cover the bottom well for a colorful display. 3. Next, evenly sprinkle the pomegranate seeds on top. Their bright red hue adds a festive touch. 4. Add the orange segments for a burst of citrus flavor. They provide a nice contrast to the greens. 5. Toss in the toasted pecans. They offer a crunchy texture that complements the softness of the greens. 6. Crumble the feta cheese over the salad. This salty cheese enhances the overall taste. 7. Thinly slice the red onion and distribute it evenly across the salad. It adds a sharp flavor that balances the sweetness. 8. Finally, dice the avocado and place it atop the salad. Its creaminess is a delightful addition. 1. Take a small bowl to make your dressing. This will ensure all the flavors mix well. 2. Add 2 tablespoons of olive oil. This will serve as your base. 3. Pour in 1 tablespoon of balsamic vinegar. It adds a tangy kick to the dressing. 4. Add 1 teaspoon of honey. This will sweeten the dressing just right. 5. Sprinkle in some salt and pepper to taste. These will enhance all the other flavors. 6. Whisk everything together until it’s well combined. You want a smooth and flavorful dressing. 1. Serve the salad in wide, shallow bowls. This creates a beautiful presentation. 2. Drizzle the dressing over the salad just before serving. This keeps the greens fresh and crisp. 3. Gently toss the salad to mix the dressing with all the ingredients. This ensures every bite is packed with flavor. 4. Taste and adjust the seasoning if needed. You want it just right for your palate. 5. For a pop of color, garnish with extra pomegranate seeds and a sprig of fresh mint. This adds a touch of elegance and freshness to the dish. When making Pomegranate Winter Salad, avoid a few common mistakes. First, do not skip washing your greens. Rinsing them removes dirt and grit. Second, cut your avocado last. This helps keep it fresh and green. If you add it too early, it may brown. Third, do not use old pomegranate seeds. Fresh seeds bring juicy flavor. Lastly, do not over-dress the salad. A light drizzle of dressing enhances flavor without making it soggy. To ripen an avocado, place it in a paper bag. This traps ethylene gas, speeding up ripening. Add an apple or banana for extra gas if needed. Check the avocado daily. It usually ripens in 2 to 5 days. When it feels slightly soft, it is ready to eat. Remember, if it feels mushy, it may be overripe. Use ripe avocados in your salad for the best creaminess. If you have leftover salad, store it properly. Keep the dressing separate to avoid sogginess. Place leftover salad in an airtight container. It lasts about 1 day in the fridge. To store cut avocado, sprinkle it with lemon juice. This helps keep it from browning. Wrap it tightly in plastic wrap or place it in a small container. Use any leftover ingredients within a few days for the best taste. Pro Tips Use Fresh Ingredients: Always opt for the freshest greens and fruits to enhance the flavor and nutritional value of your salad. Toast Pecans for Extra Flavor: Toasting the pecans brings out their natural oils and adds a delightful crunch to the salad. Customize the Dressing: Feel free to experiment with different vinegars or add herbs to the dressing for a personalized flavor profile. Layer for Presentation: Layer the ingredients rather than mixing them all at once to create a visually appealing salad that showcases each component. {{image_2}} You can boost the protein in your Pomegranate Winter Salad with chicken, tofu, or beans. Grilled chicken adds a savory touch. It also makes the salad hearty. You can use any leftover chicken, too. Just slice it up and add it on top. Tofu is another great choice. It absorbs flavors well. Marinate it in soy sauce, then grill or sauté it. For a plant-based option, use chickpeas or black beans. They add fiber and taste. Just rinse them and sprinkle them in. While the olive oil and balsamic vinegar dressing is tasty, you can try other dressings. A citrus vinaigrette brings a bright zing. Just mix orange juice, lemon juice, and olive oil. You can also make a honey mustard dressing. Combine honey, mustard, and olive oil. This will give your salad a sweet and tangy flavor. Don't be afraid to experiment. Each dressing will change how the salad tastes. In winter, some ingredients shine more than others. You can swap the orange for grapefruit for a tangy kick. If pomegranates are hard to find, try cranberries. They add a pop of color and sweetness. You can even add roasted root vegetables. Roasted beets or sweet potatoes work well. They add warmth and depth to the salad. Adjust the ingredients based on what’s fresh and in season. This keeps your salad exciting and fun! To keep your Pomegranate Winter Salad fresh, store it in an airtight container. If you have leftover dressing, keep that separate to avoid soggy greens. When ready to eat, you can toss the salad with the dressing for a fresh taste. - Mixed Greens: 3-5 days in the fridge. - Pomegranate Seeds: 5-7 days if stored properly. - Orange Segments: 2-3 days, best kept in a sealed container. - Toasted Pecans: 1-2 weeks in the pantry or up to a month in the fridge. - Feta Cheese: 5-7 days once opened. - Red Onion: 1-2 weeks in the fridge. - Avocado: 1-2 days after cutting. - Always wash greens before storage, then dry them well. - Store pomegranate seeds in a sealed container to keep them juicy. - Keep avocados at room temp until ripe. Once cut, store them in lemon juice. - Use parchment paper to wrap nuts to prevent them from going stale. - Keep feta cheese submerged in brine for longer freshness. These simple steps can help you enjoy your salad for days. Yes, you can make Pomegranate Winter Salad ahead of time. If you want to save time, prepare the salad in advance. Keep the dressing separate until you are ready to serve. This way, the greens stay fresh and crisp. You can mix everything the day before and store it in the fridge. Just remember to add the avocado and dressing right before serving to avoid browning. Pomegranate seeds are a superfood packed with benefits. They are rich in antioxidants, which help fight free radicals. They also have vitamins C and K, both good for your health. Eating pomegranate seeds may improve heart health and lower blood pressure. Plus, they offer anti-inflammatory properties that can help your body. Adding them to your salad boosts both flavor and nutrition. If you need a substitute for feta cheese, try goat cheese. It has a similar tangy flavor. You can also use ricotta for a creamier texture. For a dairy-free option, try crumbled tofu mixed with lemon juice. This will give you a fresh taste without the dairy. Each of these options will still keep your salad delicious and satisfying. This blog post covered how to make a tasty Pomegranate Winter Salad. You learned about the ingredients, their benefits, and how to pick fresh produce. I shared simple steps to prepare the salad and the dressing. Tips on serving and fixing common mistakes helped you succeed. Remember, you can switch up the recipe by adding protein or trying new dressings. After making it, store leftovers correctly for later enjoyment. This salad is not just healthy; it’s a fun way to enjoy winter flavors.

Pomegranate Winter Salad Fresh and Flavorful Delight

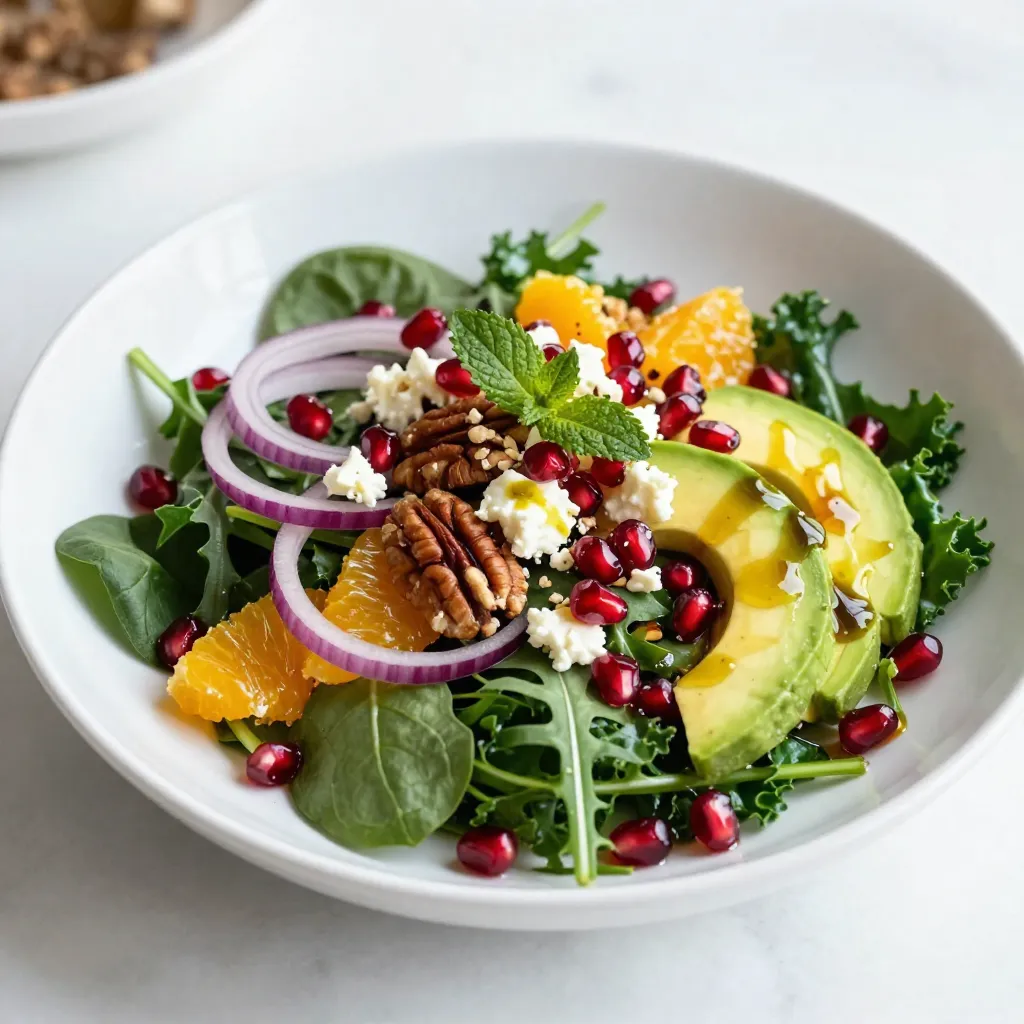
Welcome to a burst of freshness! This Pomegranate Winter Salad is your answer to healthy and vibrant meals during the

For this Chicken Tikka Masala, you will need: - 1.5 lbs boneless, skinless chicken thighs, cubed - 1 cup plain Greek yogurt - 3 tablespoons vegetable oil - 1 medium onion, finely chopped - 4 cloves garlic, minced - 1 tablespoon fresh ginger, minced - 1 can (14 oz) crushed tomatoes - 1 cup coconut milk These ingredients are key to a rich and creamy dish. The chicken thighs stay juicy and tender, while the Greek yogurt adds a nice tang. The spices bring life to the dish. You will need: - 2 tablespoons garam masala - 1 tablespoon ground cumin - 1 tablespoon ground coriander - 1 teaspoon turmeric - 1 teaspoon cayenne pepper - 1 teaspoon salt Each spice adds its own flavor. Garam masala is warm and fragrant. Cumin and coriander give a deep taste, while turmeric adds color. Cayenne pepper can spice things up, so adjust to your taste. Finishing touches make a meal special. You might want: - Fresh cilantro, chopped for garnish Cilantro adds a burst of color and freshness. It brightens the dish and enhances the flavors. Feel free to add a squeeze of lime for extra zest! {{ingredient_image_1}} First, take a large bowl. Add 1.5 pounds of cubed chicken thighs. Next, mix in 1 cup of plain Greek yogurt. Then, add 2 tablespoons of garam masala, 1 tablespoon of ground cumin, and 1 tablespoon of ground coriander. Sprinkle in 1 teaspoon of turmeric and 1 teaspoon of cayenne pepper. Finally, add 1 teaspoon of salt. Stir well to coat the chicken. Let it marinate for at least 30 minutes. If you have time, refrigerate it for 2 hours for more flavor. Now, turn on the Instant Pot. Select the sauté function and add 3 tablespoons of vegetable oil. Once the oil is hot, toss in 1 finely chopped medium onion. Sauté for 3-4 minutes until the onion is soft and clear. Next, add 4 minced cloves of garlic and 1 tablespoon of fresh minced ginger. Sauté for another 30 seconds. The smell should be amazing! After that, add the marinated chicken to the pot. Stir it for about 5 minutes until it starts to brown. Pour in 1 can of crushed tomatoes and mix everything together. Be sure to scrape the bottom of the pot to avoid burning. Now, close the lid and check that the vent is set to sealing. Select the Manual or Pressure Cook function and set the timer for 10 minutes. When the timer goes off, let it release pressure naturally for 10 minutes. After that, carefully switch to a quick release for any extra pressure. Open the lid and stir in 1 cup of coconut milk until the sauce is smooth. Turn the sauté function back on and let it simmer for 5-7 minutes. This will let the sauce thicken. Taste it and adjust the seasoning if needed. Finally, garnish with fresh chopped cilantro before serving. Enjoy your meal! To make the best Chicken Tikka Masala, start with the marinade. Use Greek yogurt as your base. It adds creaminess and helps tenderize the chicken. Mix the cubed chicken with yogurt and spices. The spices include garam masala, cumin, coriander, turmeric, cayenne pepper, and salt. Coat the chicken well and let it marinate for at least 30 minutes. For richer flavor, let it sit in the fridge for up to 2 hours. This step makes a big difference in taste. Spice levels can vary based on your taste. If you like it mild, cut down on cayenne pepper. You can also add more yogurt to balance the heat. For those who love spice, feel free to add more cayenne or even some chopped green chilies. Always taste as you go. Adjusting spice levels lets you create a dish that suits your palate perfectly. To get a rich, thick sauce, use coconut milk. Add it after cooking the chicken and tomatoes. This gives a nice creaminess to the dish. If you want it thicker, turn on the sauté function after adding the coconut milk. Let it simmer for 5 to 7 minutes. Stir occasionally to prevent sticking. This will help reduce the sauce and intensify the flavors. Pro Tips Marination Time: Allowing the chicken to marinate for at least 2 hours enhances the flavor, making the dish richer and more aromatic. Instant Pot Sauté: Ensure the pot is hot before adding the oil. This helps to sear the chicken and develop a more complex flavor profile. Coconut Milk Addition: Stir in the coconut milk after cooking to maintain its richness and prevent curdling during pressure cooking. Garnishing Tips: Fresh cilantro not only adds a pop of color but also enhances the overall flavor. Consider adding a squeeze of lime for extra zest. {{image_2}} You can easily make this dish vegetarian. Swap the chicken for 1.5 lbs of firm tofu or chickpeas. Tofu takes on flavors well. Cut it into cubes and marinate just like chicken. If using chickpeas, rinse and drain a can of them. Cook them with the sauce directly. Both options create a hearty meal. Feel free to switch proteins based on your taste. You can use shrimp or fish. For shrimp, use about 1 lb of large, peeled shrimp. Add them in the last few minutes of cooking to avoid overcooking. If you prefer fish, choose firm white fish like cod or halibut. Cut it into chunks and add it after the pressure cooking. If you want to change the sauce, try a coconut curry base or a tomato basil sauce. For a coconut curry, use coconut milk, curry paste, and veggies. For tomato basil, simply replace the crushed tomatoes with tomato sauce and add fresh basil. Both options create a new twist on the classic dish. To keep your Chicken Tikka Masala fresh, place it in an airtight container. Make sure to cool the dish to room temperature first. Store it in the fridge for up to four days. This dish tastes even better the next day as the flavors meld. When you’re ready to eat, you can easily reheat it. Use the microwave for quick warming. Place the dish in a microwave-safe bowl, cover it, and heat for 2-3 minutes. Stir halfway through to ensure even heating. For stovetop reheating, use a pan over low heat. Stir often to prevent sticking. If you want to save some for later, freezing works great. Let the Chicken Tikka Masala cool completely. Transfer it to a freezer-safe container or bag. It can last in the freezer for up to three months. When you're ready to enjoy it, thaw it overnight in the fridge before reheating. Yes, you can skip the yogurt. Use coconut milk instead. This will keep it creamy. However, the yogurt adds tang and richness. If you want an alternative, try sour cream. Just add it at the end, so it doesn’t curdle. To get the best taste, marinate the chicken well. Let it sit for at least 30 minutes. For deeper flavor, refrigerate it for up to 2 hours. Use fresh spices instead of old ones. Fresh spices have more aroma and taste. Sauté your aromatics like garlic and onion until soft. This builds a strong base. Yes, you can use frozen chicken. However, it will take longer to cook. Increase the pressure cooking time to about 15 minutes. Make sure to check the chicken's internal temperature after cooking. It should reach 165°F for safety. Always adjust your cooking time for frozen meat. This blog post explored Chicken Tikka Masala in depth. We covered key ingredients, spices, and garnishes. I shared step-by-step cooking instructions and helpful tips to enhance your dish. We also discussed tasty variations, including vegetarian options and sauces. Lastly, I provided storage tips for leftovers. Remember, with practice, you can make this classic dish your own. Enjoy cooking, and don't hesitate to experiment with flavors!

Instant Pot Chicken Tikka Masala Tasty and Quick Meal

Are you craving a tasty and quick meal? Look no further than Instant Pot Chicken Tikka Masala. This dish bursts

To make the no-bake cookie dough bars, you need these simple ingredients: - 1 cup all-purpose flour (heat-treated for safety) - 1/2 cup unsalted butter, softened - 1/2 cup packed brown sugar - 1/4 cup granulated sugar - 1 teaspoon vanilla extract - 1/4 teaspoon salt - 1/2 cup mini chocolate chips - 1/4 cup chopped walnuts (optional) - 1/2 cup melted chocolate (for topping) Each ingredient plays a key role in making these treats delicious. The heat-treated flour ensures safety, while the butter adds creaminess. Brown sugar gives a rich flavor, and granulated sugar adds sweetness. Vanilla extract brings warmth, and salt balances the flavors perfectly. The mini chocolate chips add delightful bites of sweetness, while walnuts, if you choose to use them, offer a nice crunch. Finally, the melted chocolate topping adds a smooth finish. Gather these ingredients to create your cookie dough bars. You’ll love how easy it is to prepare! 1. Start by creaming the butter and sugars. In a large bowl, mix the softened butter with brown sugar and granulated sugar. Beat them together until the mixture is light and fluffy. This step adds air and makes the bars soft. 2. Next, incorporate the wet ingredients. Add in the vanilla extract and mix well. This adds a lovely flavor to your dough. 3. Now, it’s time to add the dry ingredients. Gradually mix in the heat-treated flour and salt. Keep stirring until a soft dough forms. Make sure there are no dry spots. Then fold in the mini chocolate chips and walnuts if you like nuts. This makes the dough extra tasty. 1. Line an 8x8 inch baking dish with parchment paper. Leave some overhang for easy removal later. This step helps keep the bars from sticking. 2. Now, press the dough into the bottom of the dish. Use a spatula to smooth it out evenly. Make sure it is packed tightly for best results. 3. For the chocolate topping, melt the chocolate. Use a microwave-safe bowl and heat it in 30-second intervals. Stir until it is smooth and melted. This will create a delicious layer on top. 4. Pour the melted chocolate over the pressed cookie dough. Use the spatula to spread it evenly across the top. This will give your bars a rich finish. 1. Place the baking dish in the fridge to chill. Let the bars set for at least one hour. This helps the chocolate harden and makes the bars easier to slice. 2. Once set, lift the bars out using the parchment paper overhang. Slice them into squares with a sharp knife. For a nice touch, arrange the bars on a decorative plate. 3. To make them look even better, sprinkle extra mini chocolate chips on top. You can also drizzle more melted chocolate over each bar before serving. Enjoy your delicious no-bake cookie dough bars! - Ensuring the flour is heat-treated: To keep your bars safe, heat-treat your flour. Spread it on a baking sheet and bake at 350°F for five minutes. This kills any harmful bacteria. Let it cool before using it in your recipe. - Tips for the perfect dough consistency: Your dough should be soft yet firm. If it’s too sticky, add a little more flour. If it’s too dry, add a splash of milk. - Best mixing bowls and utensils: Use a large mixing bowl that can hold all your ingredients. A sturdy spatula is great for mixing and pressing the dough. A hand mixer can make creaming the butter and sugars easier. - Recommended baking dishes: An 8x8 inch baking dish works best. Line it with parchment paper for easy removal. A glass dish helps you see if the chocolate has set. - Overmixing the dough: Mix until just combined. Overmixing can make the dough tough. You want it to be light and easy to press into the pan. - Not setting the bars long enough: Chill the bars for at least one hour. This helps the chocolate firm up and gives the bars the right texture. If you skip this step, they may fall apart when you slice them. {{image_2}} You can have fun with flavors in your no-bake cookie dough bars. Here are some ideas: - Different types of chocolate: Swap mini chocolate chips for dark, white, or even peanut butter chips. Each type adds a unique taste. - Nuts: Try using different nuts like pecans or almonds. They add crunch and flavor. - Dried fruits: Mix in some raisins, cranberries, or chopped apricots. They bring a hint of sweetness and chewiness. If you have dietary needs, don’t worry! You can easily modify this recipe: - Gluten-free alternatives: Use gluten-free flour instead of all-purpose flour. This keeps the bars safe for those with gluten issues. - Vegan modifications: Replace butter with coconut oil or vegan butter. You can also use maple syrup instead of brown sugar for a vegan twist. Serving these bars can be just as fun as making them! Here are some ideas: - Pairing: Serve your bars with a scoop of ice cream or a dollop of whipped cream. This adds a nice, creamy contrast to the sweet bars. - Creative plating: Arrange the bars on a colorful plate. Sprinkle extra mini chocolate chips on top and drizzle melted chocolate for a fancy touch. This makes your dessert look as good as it tastes. To keep your cookie dough bars fresh, store them in the fridge. Place the bars in an airtight container. This method keeps them soft and tasty. If you want to save them for later, freezing is a great option. Wrap each bar in plastic wrap, then place them in a freezer-safe bag. This helps keep them from getting freezer burn. In the fridge, these bars last about one week. If you freeze them, they can stay good for up to three months. Just make sure to label the bags with the date. This way, you’ll know when to enjoy them! You can enjoy these bars cold right from the fridge. They taste great chilled! If you prefer a warm treat, heat them in the microwave for about 10 to 15 seconds. This melts the chocolate just enough for a gooey treat. Enjoy your cookie dough bars however you like! If you lack heat-treated flour, you can easily make your own. Spread regular flour on a baking sheet. Bake it at 350°F for about 5 minutes. This process kills harmful bacteria. Let it cool before using it in your recipe. Yes, you can use various chocolate chips. Dark chocolate, white chocolate, or even peanut butter chips work well. Choose what you like best. Mixing different types can create a fun flavor twist. To make nut-free bars, simply omit the walnuts. You can replace them with seeds like sunflower or pumpkin. These seeds give a nice crunch without nuts. You can also add more chocolate chips for extra sweetness. Yes, you can swap some ingredients for healthier options. Use whole wheat flour instead of all-purpose flour. You can also reduce the sugar or use a natural sweetener like honey or maple syrup. This way, you still get a tasty treat. You can tell the chocolate is set when it looks shiny and firm. If you gently touch it, your finger should not leave a mark. It may take about an hour in the fridge. If you are unsure, give it more time to chill. You now have a tasty guide to making these dessert bars. We covered the key ingredients, clear steps, and helpful tips to ensure success. Throughout this process, it’s important to avoid common mistakes like overmixing. Creative variations let you customize the flavors. Proper storage means you enjoy these treats longer. With these insights, you can bake with confidence. Enjoy your dessert bars, share with friends, and try new twists in the future!

No-Bake Cookie Dough Bars Simple Sweet Treat

If you crave a sweet treat that requires no baking, try these No-Bake Cookie Dough Bars! They are soft, chewy,

Here’s what you need to make fluffy cinnamon roll swirls. Gather these items: - 4 cups all-purpose flour - 1/4 cup granulated sugar - 1 packet (2 1/4 teaspoons) active dry yeast - 1 cup warm milk (110°F/43°C) - 1/4 cup unsalted butter, melted - 1 teaspoon salt - 2 large eggs - 1 tablespoon ground cinnamon - 1/2 cup brown sugar, packed - 1/2 cup unsalted butter, softened (for filling) - 1 cup powdered sugar (for icing) - 2 tablespoons milk (for icing) - 1 teaspoon vanilla extract (for icing) These ingredients create soft, sweet rolls with a warm, spiced filling. Each component plays a key role. For instance, the warm milk wakes up the yeast. This helps the dough rise well. The butter adds richness and keeps the rolls moist. The combination of brown sugar and cinnamon creates that classic flavor we love. It’s important to pack the brown sugar. This adds sweetness and depth to the filling. The icing, made from powdered sugar, milk, and vanilla, finishes the rolls perfectly. When you have all the ingredients ready, you're set to create something delicious! 1. Start by mixing warm milk and sugar in a large bowl. Sprinkle the yeast over the milk. Let it rest for 5-10 minutes. You want it to froth up. 2. Next, combine the melted butter, salt, and eggs into the yeast mixture. Mix this well. 3. Gradually add flour, one cup at a time. Mix until a soft dough forms. 4. Knead the dough on a floured surface for 5-7 minutes. It should feel smooth and elastic. Place it in a greased bowl. Cover it with a damp cloth. Let it rise in a warm spot for about 1 hour or until it doubles in size. 1. After the dough has risen, punch it down gently. This helps to release the air. 2. Now, roll the dough out into a rectangle. Aim for about 16x12 inches in size. 1. Spread softened butter evenly over the rolled-out dough. This helps to make the rolls rich. 2. In a small bowl, mix the cinnamon and brown sugar together. Sprinkle this mixture evenly over the buttered dough. 3. Starting from one long side, roll the dough tightly into a log. Cut this log into 12 equal slices. Place them cut side up in a greased baking dish. 1. Cover the dish with a clean towel. Let the rolls rise again for about 30 minutes. 2. While they rise, preheat your oven to 375°F (190°C). 3. Once the rolls have risen, bake them for 25-30 minutes. They should turn golden brown. 1. To make the icing, mix powdered sugar, milk, and vanilla extract in a bowl. 2. Drizzle this icing over the warm rolls. Enjoy the sweet goodness! To make your cinnamon rolls extra fluffy, knead your dough well. This step helps develop gluten, which gives the rolls their structure. I usually knead the dough for about 5-7 minutes. After that, let it rise in a warm place. A good rise helps create air pockets in the dough. Use warm milk to activate the yeast. The milk should be around 110°F. This temperature helps the yeast grow and makes the rolls light. The right mix of cinnamon and sugar is key. I recommend using one tablespoon of cinnamon and half a cup of brown sugar. This balance gives a sweet and warm flavor. Spread the mixture evenly over the butter on the dough. Even distribution ensures every bite is full of flavor. It’s best to use softened butter for easy spreading. For the icing, you can go with cream cheese or maple. Both options add a nice touch. Mix one cup of powdered sugar with two tablespoons of milk and one teaspoon of vanilla for a classic icing. To drizzle evenly, use a spoon or a squeeze bottle. This makes your rolls look beautiful and tasty. {{image_2}} You can make these rolls even more fun! Try adding nuts or chocolate chips to the filling. Walnuts or pecans add a nice crunch. Chocolate chips bring a sweet surprise in every bite. You can also mix it up with flavored fillings. Think about using pumpkin spice or even a chocolate spread. These flavors will give your rolls a new twist! Want to make a healthier version? Use whole wheat flour instead of all-purpose flour. It will give your rolls a nutty taste. If you need a gluten-free option, you can use gluten-free flour blends. Just make sure to follow any special instructions on the package. Icing isn’t the only way to top these rolls. You can try a simple glaze made from milk and sugar. It’s lighter and still tasty! If you want something fruity, add fresh berries on top. You could sprinkle cinnamon or nutmeg for extra spice. These options will make your rolls pop with flavor! To keep your cinnamon rolls fresh, you have a few options. If you plan to eat them soon, store them in the fridge. Place them in an airtight container. This way, they stay soft and tasty. They can last in the fridge for about 3 to 5 days. For longer storage, freezing is a great choice. Wrap each roll tightly in plastic wrap. After that, place them in a freezer bag. Remove as much air as possible. You can freeze them for up to 3 months. Just remember to label the bag with the date. When you're ready to enjoy your rolls again, you have two main ways to reheat them. The oven is the best method to keep them fluffy. Preheat your oven to 350°F (175°C). Place the rolls on a baking sheet. Cover them with foil to prevent drying out. Heat for about 10-15 minutes. If you're in a hurry, the microwave works too. Place a roll on a microwave-safe plate. Add a small cup of water next to it. This helps keep the roll moist. Heat for about 15-20 seconds. Check if it's warm enough and enjoy! With these tips, your cinnamon rolls will remain delicious, whether fresh or reheated. To make cinnamon rolls fluffy, you must follow a few key steps. First, use warm milk to activate the yeast. This helps the dough rise. Kneading the dough well also adds air, making it light. Allow the dough to rise in a warm spot. This will double its size. Finally, don’t rush the second rise after cutting the rolls. This step is crucial for fluffiness. Yes, you can freeze cinnamon rolls before baking. After you cut the rolls, place them in a greased dish. Cover them tightly with plastic wrap and foil. Freeze them for up to three months. When you want to bake them, let them thaw overnight in the fridge. Allow them to rise for about 30 minutes before baking. The best way to store homemade cinnamon rolls is in an airtight container. You can keep them at room temperature for up to two days. If you want them to last longer, store them in the fridge. They can stay fresh for up to a week. Just make sure they are well wrapped to avoid drying out. Homemade cinnamon rolls last about two days at room temperature. If stored in the fridge, they can last up to a week. If you freeze them, they can last for three months. Just remember to thaw and let them rise again before baking for the best taste. Yes, you can use other types of flour. Whole wheat flour is a great choice for a healthier option. Just note that it may make the rolls denser. You can also try gluten-free flour blends. Be sure to follow the package instructions for best results. You can find the full recipe for Fluffy Cinnamon Roll Swirls above in this article. It includes all the ingredients and step-by-step instructions to help you make these delicious rolls. Enjoy your baking! You have learned how to make delicious cinnamon rolls from scratch. We covered all the ingredients, step-by-step instructions, and tips to ensure they turn out fluffy. Don't forget to try variations, like nuts or flavored fillings, to make the rolls your own. Proper storage is key to keeping them fresh. Enjoy the sweet smell and warm taste of your homemade rolls. There’s nothing quite like sharing them with family and friends. Happy baking!

Fluffy Cinnamon Roll Swirls Perfect for Any Occasion

Are you ready to bake the fluffiest cinnamon rolls ever? These Fluffy Cinnamon Roll Swirls are a treat for any

To make Garlic Butter Angel Hair, you need a few key items: - 8 oz angel hair pasta - 4 tablespoons unsalted butter - 5 cloves garlic, minced - 1 teaspoon red pepper flakes (adjust for spice) - ½ cup grated Parmesan cheese - 2 tablespoons fresh parsley, chopped - Zest of 1 lemon - Salt and pepper to taste - Lemon wedges for garnish These ingredients work together to create a rich and tasty dish. The garlic and butter give a wonderful flavor, while the lemon adds brightness. You can change the dish to fit your taste. Here are some fun ideas: - Add cooked shrimp or grilled chicken for protein. - Toss in cherry tomatoes for a pop of color and extra flavor. - Use different herbs like basil or thyme for a fresh twist. Feel free to experiment! Each change can make the dish your own. Choosing the right ingredients matters. Here are some tips: - Pasta: Look for high-quality angel hair. Check the packaging for freshness. - Garlic: Choose firm cloves with no sprouting for the best taste. - Butter: Unsalted butter lets you control the salt level. - Parsley: Pick bright green leaves. Avoid yellow or wilted ones. - Lemon: A fresh lemon should feel heavy and firm. Fresh ingredients lead to a better dish. Always take a moment to inspect what you buy. To start, fill a large pot with water. Add salt to the water and bring it to a boil. Once boiling, add 8 oz of angel hair pasta. Cook it for about 4-5 minutes until it is al dente. Be careful not to overcook it. Drain the pasta but save ½ cup of the water. Set the pasta aside for later. Next, grab a large skillet and place it over medium heat. Add 4 tablespoons of unsalted butter. Allow the butter to melt completely. After it melts, add 5 cloves of minced garlic and 1 teaspoon of red pepper flakes. Sauté this mixture for 1-2 minutes. Watch the garlic closely; it should smell great and turn golden. Avoid burning it, as burnt garlic tastes bitter. Once the garlic is ready, add the cooked angel hair pasta to the skillet. Pour in the reserved pasta water, too. Toss the pasta well to coat it in the garlic butter sauce. Next, stir in ½ cup of grated Parmesan cheese. If the sauce is too thick, add more pasta water. Season with salt and pepper to taste. Finally, mix in 2 tablespoons of chopped fresh parsley and the zest of 1 lemon. Toss everything together, then serve hot. Add extra Parmesan on top and lemon wedges on the side for a burst of flavor. Enjoy! To boost the flavor of Garlic Butter Angel Hair, use fresh garlic. Fresh garlic gives a brighter taste. You can also add herbs like basil or thyme. These herbs add depth and freshness. For a zesty kick, try lemon juice instead of just zest. A squeeze of lemon brightens every bite. You can adjust red pepper flakes for more or less spice. This lets you control how spicy your dish is. One common mistake is overcooking the pasta. Angel hair cooks fast, so watch it closely. Drain it right when it’s al dente. This keeps the noodles firm and tasty. Another mistake is burning the garlic. Garlic cooks quickly, so keep an eye on it. If it turns too dark, it can taste bitter. Finally, be careful with the salt. Taste the dish before adding more salt. The Parmesan already adds some saltiness. Use a large pot for boiling the pasta. A big pot helps the pasta move freely. This prevents it from sticking together. A skillet is key for making the garlic butter sauce. I recommend a non-stick skillet for easy cleanup. Tongs are great for tossing the pasta in the sauce. They help coat every strand evenly. A microplane is perfect for zesting the lemon. It gives you fine zest without the bitter white pith. {{image_2}} Adding proteins can make Garlic Butter Angel Hair even better. You can use cooked chicken or shrimp. For chicken, grill or pan-sear it first. Cut it into bite-sized pieces and mix it in with the pasta. For shrimp, sauté them in the garlic butter sauce until pink. Both options add a nice texture and flavor. If you want to keep it vegetarian, try adding veggies or tofu. Broccoli, spinach, or bell peppers work well. Sauté them in the garlic butter before adding the pasta. You can also use firm tofu. Cube it and cook until golden. This adds protein and makes the dish colorful and healthy. You can swap out the garlic butter for other sauces, too. Try olive oil for a lighter option. A splash of cream can make it richer. If you like a kick, add some pesto or a dash of soy sauce. Experiment with different herbs like basil or thyme to find your favorite flavor. To store leftovers, let the Garlic Butter Angel Hair cool down. Place it in an airtight container. Make sure to refrigerate it if you won’t eat it right away. It will stay fresh for about 3 days in the fridge. When you are ready to reheat, add a splash of water to the pasta. Microwave it for about 1 to 2 minutes. Stir it halfway through to heat evenly. You can also reheat it in a skillet over low heat. Just add a bit of butter and toss until warm. If you want to freeze the dish, use a freezer-safe container. Store it in the freezer for up to 2 months. To use, just thaw it in the fridge overnight. Reheat as explained above. The flavors will still be good, but the texture may change a bit. If you need a substitute for Parmesan cheese, try Pecorino Romano. It has a sharp flavor. You can also use nutritional yeast for a dairy-free option. Grated mozzarella gives a creamy touch but is milder. Yes, you can make this dish ahead of time. Cook the pasta and sauce separately. Store them in the fridge. When you're ready to eat, just reheat both parts and combine. To adjust the spice level, change the amount of red pepper flakes. Start with a little. You can always add more if you like heat. If it gets too spicy, add more butter or cheese to balance it out. No, traditional angel hair pasta contains gluten. If you need a gluten-free dish, use gluten-free pasta. Many brands make good options like rice or quinoa pasta. Always check the label to ensure it's gluten-free. This blog post covered all you need for Garlic Butter Angel Hair. We talked about key ingredients and tips for fresh selections. I shared step-by-step cooking instructions and ways to boost flavor. You learned how to customize with proteins or veggies. I also included storage methods for leftovers and answers to common questions. Enjoy making this dish your own, and remember: cooking is fun!

Garlic Butter Angel Hair Simple and Flavorful Dish

Looking for a simple yet tasty dish? You’re in for a treat with Garlic Butter Angel Hair! This dish combines

- 1 tablespoon olive oil - 1 medium onion, chopped - 2 cloves garlic, minced - 2 medium carrots, diced - 1 zucchini, diced - 1 bell pepper (any color), chopped - 2 cups cauliflower florets - 4 cups vegetable broth - 1 cup coconut milk - 1 teaspoon dried thyme - 1 teaspoon smoked paprika - Salt and pepper to taste - Fresh parsley for garnish To create a silky creamy veggie soup, gather these key ingredients. The olive oil helps in sautéing the onion and garlic, giving a fragrant base. The onion adds sweetness while the garlic gives depth. For the veggies, carrots, zucchini, bell pepper, and cauliflower bring color and nutrition. The vegetable broth provides a flavorful base, while coconut milk adds creaminess. Dried thyme and smoked paprika elevate the taste with earthy and smoky notes. Finally, season with salt, pepper, and finish with fresh parsley for a pop of color. Each component plays a vital role in making this dish nourishing and delicious. 1. In a large pot, heat 1 tablespoon of olive oil over medium heat. 2. Add 1 medium chopped onion and sauté it until it turns translucent. This should take about 5 minutes. 3. Next, add 2 cloves of minced garlic and cook for about 1 minute. Stir it well to prevent burning. 1. Stir in 2 medium diced carrots, 1 diced zucchini, 1 chopped bell pepper, and 2 cups of cauliflower florets. 2. Cook these vegetables for about 5 to 7 minutes. This softens them slightly. 3. Pour in 4 cups of vegetable broth and bring the soup to a simmer. 4. Add 1 teaspoon of dried thyme and 1 teaspoon of smoked paprika. Cover the pot and let it simmer for 15 to 20 minutes. The veggies should be tender by now. 1. Remove the pot from heat. Blend the soup until it is silky smooth. You can use an immersion blender or transfer it to a stand blender in batches. 2. Return the blended soup to the pot. Stir in 1 cup of coconut milk. Heat it over medium-low until it’s warm. 3. Finally, season the soup with salt and pepper to taste. Serve it hot, garnished with freshly chopped parsley. To get a smooth soup, I recommend using an immersion blender. It makes blending easy and quick. Blend until the soup is completely smooth. This step gives you that silky consistency that makes every spoonful delightful. Don't be afraid to adjust the spices to your taste. You can also add a splash of lemon juice. This small addition brightens the flavor and adds a nice zing to the soup. Serve your silky creamy veggie soup in deep bowls. A drizzle of coconut milk on top adds richness. Garnish with freshly chopped parsley for a pop of color. This makes your dish look as good as it tastes. {{image_2}} You can swap coconut milk for heavy cream. This change gives the soup a rich, different flavor. It adds a creamy taste that pairs well with the veggies. You can also experiment with seasonal vegetables. Using fresh produce keeps the soup vibrant and exciting. Try using squash in fall or asparagus in spring for a fun twist. To make the soup heartier, incorporate cooked lentils or beans. These add more nutrition and fiber. They also make the dish filling. For a crunchy texture, top the soup with croutons or toasted seeds. These toppings add a nice crunch and enhance the soup's taste. Feel free to try adding curry powder or ginger. These spices give the soup a unique twist. They create warmth and depth in flavor. You can also use fresh herbs, like basil or cilantro. Adding herbs right before serving brings a fresher taste to each bowl. To keep your soup fresh, store it in an airtight container. Place it in the refrigerator. This method helps keep the flavors intact. Enjoy your leftovers within 3-4 days for the best taste. If you want to save some soup for later, freezing is a great option. Pour the soup into portions before freezing. This way, you can grab a quick meal when you need it. To enjoy, thaw the soup overnight in the fridge. Reheat it gently on the stove to maintain its creamy texture. For the best texture, always reheat your soup on the stovetop. This method gives you that silky feel. If it looks thick, add a splash of broth or coconut milk while heating. This little trick makes it just as creamy as when you first made it. Yes, the soup is already vegan-friendly. I use coconut milk for creaminess. This milk adds a rich taste without any animal products. You can enjoy it without worry. To lower the calories, reduce the coconut milk. You can also try low-fat milk options. Use just enough to keep it creamy. Remember, less is often more in cooking. Pair this soup with crusty bread for a hearty meal. A fresh salad adds crunch and color. You can also enjoy it with a side of grilled cheese. It makes for a tasty combo! This recipe shows you how to make a delicious veggie soup. It uses simple ingredients like carrots, zucchini, and cauliflower. You can customize flavors and textures to suit your taste. Try adding lentils or different spices for more variety. Storing leftovers is easy, and you can freeze them for later use. Enjoy making this soup anytime for a warm, tasty meal. It's a great way to eat more veggies and feel good!

Silky Creamy Veggie Soup Delicious and Nourishing Dish

Looking for a warm and comforting dish that’s both delicious and healthy? Look no further than my Silky Creamy Veggie

- 4 ears of fresh corn, husked and kernels removed - 2 cups vegetable broth - 1 medium onion, diced - 2 cloves garlic, minced - 1 jalapeño, deseeded and diced (adjust for spice preference) - 1 teaspoon ground cumin - 1 teaspoon smoked paprika - ½ cup heavy cream or coconut milk for a dairy-free option - 1 lime, juiced - Salt and pepper to taste - Fresh cilantro, chopped for garnish - Crumbled cotija cheese (or feta) for topping - Tortilla chips, for serving Fresh corn is the star here. It gives the soup a sweet flavor. You need to husk it and remove the kernels. You can use a sharp knife for this task. Next, vegetable broth adds depth. It helps blend the flavors. You can use homemade or store-bought broth. Aromatics bring life to the soup. I like to use onion, garlic, and jalapeño. The onion adds sweetness, while garlic gives a nice aroma. Jalapeño adds heat. You can adjust it according to your spice level. Spices like ground cumin and smoked paprika enhance the taste. They add warmth and a hint of smokiness. For creaminess, either heavy cream or coconut milk works. Coconut milk is a great option for those who prefer a dairy-free choice. Lime juice brightens the dish. It also balances the flavors. Finally, salt and pepper help season the soup. They enhance all the other ingredients. Garnishes make this soup fun. Fresh cilantro adds freshness. Crumbled cotija cheese adds a salty bite. Don't forget the tortilla chips for crunch! They make each bite exciting. Gather all these ingredients, and you'll have a delicious bowl of Mexican street corn soup. To start, you need to prepare your corn and vegetables. Husk the corn and cut off the kernels using a sharp knife. Dice the onion and mince the garlic. For a spicy kick, take out the seeds from the jalapeño and chop it finely. Next, grab a large pot and heat a drizzle of olive oil over medium heat. Once hot, add the diced onion. Sauté it for about five minutes until it becomes translucent. Then, stir in the minced garlic and diced jalapeño. Cook for another one to two minutes until you smell their aroma. After that, toss the corn kernels into the pot along with the ground cumin and smoked paprika. Mix everything well and let it cook for around three to four minutes. This step helps to bring out all the flavors. Now, pour in two cups of vegetable broth and bring the mixture to a simmer. Let it cook for about ten to fifteen minutes. This allows the flavors to blend nicely. Once your soup is cooked, it's time to blend it. I recommend using an immersion blender for this step. It is easy and quick. Blend the soup until it is smooth. If you like your soup a bit chunky, blend only half of it. This gives a nice mix of textures. Now, stir in half a cup of heavy cream or coconut milk if you want a dairy-free option. Squeeze the juice of one lime into the pot. This adds brightness to the dish. Season with salt and pepper to taste. Make sure to adjust the flavors before serving. When you are ready to serve, ladle the soup into bowls and add some fresh cilantro on top. Sprinkle crumbled cotija cheese or feta cheese for a tasty finish. Serve with crunchy tortilla chips on the side for extra texture. Enjoy this flavorful and comforting dish! To make your Mexican street corn soup shine, focus on fresh ingredients. Use sweet, juicy corn for the best flavor. If you have access, grill the corn first for a smoky taste. Grilling enhances the soup's depth and adds richness. When it comes to spices, add ground cumin and smoked paprika. They give a warm and earthy flavor. Adjust the amount based on your taste. If you want a spicier kick, keep the seeds in the jalapeño. For a milder soup, remove them. If you have dietary restrictions, you can substitute the heavy cream. Use coconut milk for a dairy-free option. This keeps the soup rich while being inclusive. You can also swap the vegetable broth for chicken broth if you prefer. For a beautiful dish, ladle the soup into vibrant bowls. Top each bowl with fresh cilantro and crumbled cotija cheese. This adds color and texture. Serve with tortilla chips on the side for a crunchy contrast. You can also add a lime wedge for an extra pop of flavor. This brightens the dish and enhances the corn's sweetness. A sprinkle of chili powder can add a nice visual touch too. Enjoy the soup warm, and share it with friends! {{image_2}} You can easily make this soup vegetarian or vegan. For a vegan version, swap heavy cream for coconut milk. It gives the soup a rich texture without dairy. You can also add more veggies. Try bell peppers, zucchini, or carrots. These add flavor and nutrition. They also make the soup even more colorful. If you want more heat, add extra jalapeño or some cayenne pepper. Start with a little. You can always add more later. For a milder soup, skip the jalapeño or use just a bit. You can also add sweet corn for a nice balance if it gets too spicy. Remember, it’s all about your taste! Toppings make your soup fun and unique. Try crumbled feta or avocado slices for creaminess. You can also add crispy bacon bits or crunchy tortilla strips. Fresh herbs like cilantro or green onions add a nice touch too. Feel free to be creative. Each topping changes the soup’s flavor and texture! After making Mexican street corn soup, let it cool down. You can store it in the fridge for about 3 to 4 days. Use an airtight container for best results. This keeps the soup fresh and tasty. To freeze the soup, first let it cool completely. Then, pour it into freezer-safe containers. Leave some space at the top, as liquids expand when frozen. Seal tightly and label with the date. The soup can stay frozen for about 2 to 3 months. When you're ready to eat, take it out and thaw it in the fridge overnight. If you need it faster, use the microwave on the defrost setting. Reheat the soup on the stove over medium heat, stirring often. Add a splash of broth or water if it seems too thick. Enjoy your comforting soup anytime! Mexican street corn soup is a tasty dish inspired by elote, or Mexican street corn. It combines fresh corn, spices, and cream into a comforting soup. The flavors of garlic, onion, and jalapeño blend well with the corn, creating a delicious meal. You can adjust the spice level easily. To make it spicy, add more jalapeño or include cayenne pepper. For a milder version, remove the seeds from the jalapeño or use less of it. You can also skip spicy toppings like hot sauce. Yes, frozen corn works well in this recipe. It saves prep time and gives you great flavor. Use about 3 cups of frozen corn to replace fresh corn. Just add it to the pot the same way as you would with fresh corn. Toppings make this soup extra special. Here are some great options: - Crumbled cotija cheese or feta - Fresh cilantro, chopped - Sliced jalapeños for extra heat - Crunchy tortilla chips for texture - A squeeze of fresh lime juice for brightness Feel free to mix and match toppings to suit your taste! This blog post covered the main ingredients and steps to make Mexican street corn soup. You learned about preparation, blending techniques, and final touches. We explored tips for authenticity and variations to suit your taste. You also found storage guidelines to keep your soup fresh. Remember, cooking should be fun and creative. So, experiment with flavors and toppings. Enjoy every spoonful of your homemade soup!

Mexican Street Corn Soup Flavorful and Comforting Dish

Welcome to the comforting world of Mexican Street Corn Soup! This dish combines fresh corn, rich spices, and creamy goodness,

To make honey sesame chicken, you need these key ingredients: - 500g boneless chicken thighs, cut into bite-sized pieces - 3 tablespoons honey - 2 tablespoons soy sauce - 1 tablespoon sesame oil - 2 cloves garlic, minced - 1 tablespoon fresh ginger, grated - 1 tablespoon cornstarch - 1 tablespoon water - 1/4 cup sesame seeds - 2 green onions, chopped - Salt and pepper to taste These ingredients create a great balance of sweet and savory. The honey gives a nice glaze, while the soy sauce adds depth. The sesame oil brings warmth, and garlic and ginger add a fragrant kick. You can add more ingredients to boost the flavor: - Red pepper flakes for spice - Chopped bell peppers for crunch - Broccoli for a pop of color - Pineapple chunks for sweetness These extras can make your dish more vibrant and fun. To round out your meal, consider these side dishes: - Steamed broccoli for a healthy touch - Fried rice for a heartier option - A fresh salad for a light contrast These sides complement the sweetness of the chicken and add balance to your plate. Enjoy each bite! Start by making the marinade. In a large bowl, mix 3 tablespoons of honey, 2 tablespoons of soy sauce, and 1 tablespoon of sesame oil. Add 2 cloves of minced garlic and 1 tablespoon of grated ginger. Whisk the ingredients well until combined. Next, cut 500 grams of boneless chicken thighs into bite-sized pieces. Toss the chicken into the marinade. Make sure each piece is coated. Let the chicken marinate for at least 30 minutes. For more flavor, refrigerate it for up to 2 hours. Heat a large skillet over medium-high heat. Once hot, add the marinated chicken along with the marinade. Cook the chicken for about 5 to 7 minutes. Stir occasionally until the chicken is cooked through and slightly caramelized. The chicken should have a nice golden color. In a small bowl, mix 1 tablespoon of cornstarch with 1 tablespoon of water to make a slurry. Pour this mixture into the skillet with the chicken. Stir gently to combine and thicken the sauce. Cook for an additional 2 to 3 minutes. The sauce should become glossy and thickened. Sprinkle 1/4 cup of sesame seeds over the chicken. Stir to combine and cook for another minute to lightly toast the sesame seeds. Finally, season with salt and pepper to taste. Serve the chicken over cooked jasmine rice and garnish with chopped green onions. Marinating is key for great flavor. Use a large bowl for mixing. Combine honey, soy sauce, sesame oil, garlic, and ginger well. Toss in the chicken pieces and coat them fully. For best results, let the chicken sit for at least 30 minutes. If you have time, marinate for up to 2 hours in the fridge. This deepens the taste and makes the chicken tender. Cook your marinated chicken in a hot skillet. Use medium-high heat for even cooking. Add the chicken and marinade to the skillet. Stir occasionally to avoid sticking. Cook for 5 to 7 minutes until the chicken is fully cooked. Look for a slight caramelization for a nice finish. Remember, overcooking can make chicken dry, so keep an eye on it. Presentation matters, so make it look good! Serve the honey sesame chicken over jasmine rice. Sprinkle sesame seeds on top for a nutty crunch. Add chopped green onions for a fresh touch. You can also place extra sesame seeds around the dish for flair. For a pop of color, serve with steamed broccoli on the side. This not only looks great but also adds nutrients. {{image_2}} Adding vegetables to honey sesame chicken makes it more colorful and healthy. You can use bell peppers, broccoli, or snap peas. These veggies add crunch and nutrition. Just chop them into bite-sized pieces. Add them to the skillet when you cook the chicken. They will cook quickly and stay bright. It’s a great way to sneak in more vitamins. If you want to change the protein, try tofu or shrimp. Tofu works well for a plant-based option. Cut it into cubes and marinate just like the chicken. Cook it in the same way until it's golden. Shrimp cooks fast, so add them to the skillet for just 3-5 minutes. Both options keep the dish tasty and fun. You can switch up the sauce for new flavors. Try adding spicy chili sauce for heat. For a tangy twist, mix in orange juice or zest. If you enjoy a richer taste, add hoisin sauce. Each sauce gives honey sesame chicken a unique flair. Experiment and find your favorite! To store leftovers, let the honey sesame chicken cool to room temperature. Transfer it to an airtight container. Place parchment paper between layers if you stack the chicken. This prevents sticking and keeps it fresh. Store it in the fridge for up to three days. When you're ready to eat the leftovers, reheating is easy. You can use a microwave or a skillet. If using a microwave, cover the chicken with a damp paper towel. Heat it in 30-second bursts until warm. If using a skillet, add a splash of water to prevent sticking. Warm it over low heat for about 5 minutes. If you want to freeze the dish, do so before reheating. Place the cooled chicken in a freezer-safe container. Make sure to remove excess air to avoid freezer burn. It can stay in the freezer for up to three months. To thaw, move it to the fridge overnight before reheating. Enjoy your honey sesame chicken later! Yes, you can use chicken breast. Chicken breast is leaner than thighs. It cooks faster, so watch the time. You may need to adjust the cooking time to avoid dryness. Thighs are juicier and more tender, but breasts work too. To make this dish gluten-free, use tamari instead of soy sauce. Tamari is a gluten-free soy sauce alternative. Also, check that your cornstarch is gluten-free, which most brands are. You can enjoy this tasty dish without gluten. A chilled Riesling pairs well with honey sesame chicken. The wine's sweetness matches the honey. You could also try a Sauvignon Blanc for a crisp contrast. Both wines enhance the dish's flavors and make your meal special. This post shared how to make honey sesame chicken. You learned about the key ingredients, steps, and tips for great flavor. I also shared side dishes and variations to try. Whether you add veggies or switch proteins, you can customize it. Remember to store leftovers well for easy meals later. Enjoy your cooking, and I hope this dish brings you joy and flavor!

Honey Sesame Chicken Flavorful Recipe to Savor

If you’re craving a dish that’s both sweet and savory, then you’ll love this Honey Sesame Chicken recipe! It’s simple

Older posts
Newer posts
← Previous Page1 … Page37 Page38 Page39 … Page84 Next →

dsad

© 2026 Foodish Talk • Built with GeneratePress

Our Policies

  • Copyright Policy
  • Cookie Policy
  • GDPR Policy
  • Privacy Policy
  • Disclaimer
  • Terms Of Use

More Information

  • Home
  • About
  • Contact
  • Appetizers
  • Dessert
  • Dinner
  • Drinks
©2026, Foodish Talk About Back To Top