Skip to content
DisclaimerTerms Of UseGDPR PolicyCookie Policy

Foodish Talk

  • Home
  • Drinks
  • Appetizers
  • Dinner
  • Dessert
  • About
  • Contact
  • Privacy Policy
DisclaimerTerms Of UseGDPR PolicyCookie Policy

NO-ING-IMG

- 1 cup plain Greek yogurt - 1/2 cup peanut butter (creamy or crunchy) - 2 tablespoons honey or maple syrup - 1 teaspoon vanilla extract - 1/4 cup mini chocolate chips - 1/4 cup chopped nuts (optional: almonds, walnuts, or peanuts) - A pinch of sea salt Each ingredient plays a key role in making these frozen yogurt bites a treat. The Greek yogurt gives a creamy base. Peanut butter adds a rich, nutty flavor. Honey or maple syrup sweetens the mix. Vanilla extract adds warmth and depth. Mini chocolate chips bring a burst of sweetness. Chopped nuts add crunch, but they are optional. A pinch of sea salt balances all the flavors. When selecting your ingredients, use high-quality ones for the best results. Opt for plain Greek yogurt for creaminess. Choose your favorite peanut butter, whether creamy or crunchy. Honey or maple syrup can add unique flavors based on your choice. This simple list makes it easy for anyone to whip up these delicious bites. With these ingredients, you can create a healthy snack that kids and adults will love! 1. In a mixing bowl, combine the Greek yogurt, peanut butter, honey, vanilla, and salt. 2. Stir the mixture well until it is smooth and creamy. 3. Gently fold in the mini chocolate chips and any chopped nuts you want. 4. Prepare a mini muffin tray by lining it with silicone or paper liners. 5. Spoon the yogurt mixture into each muffin liner, filling them about three-quarters full. 6. Lightly tap the tray on the counter to release any air bubbles. 7. Place the tray in the freezer. Let the bites freeze for at least 3 hours. 8. Once solid, pop the bites out of the tray. Store them in an airtight container in the freezer for up to one month. This easy step-by-step guide helps you create tasty frozen yogurt bites with rich flavors. You get a blend of creamy peanut butter and sweet chocolate in every bite. To get a smooth texture, mix the Greek yogurt and peanut butter well. Use a sturdy spoon to blend them until you see no lumps. This step is key to a creamy bite. When adding mini chocolate chips, fold them in gently. This keeps them evenly mixed throughout. If you stir too hard, you might break them apart. Air bubbles can ruin your bites. To avoid them, fill the muffin liners slowly. After filling, tap the tray lightly on the counter. This helps release any trapped air. You can present your yogurt bites in fun ways. Try placing them on a colorful platter. Adding extra mini chocolate chips and nuts around them makes a great display. For snacks or desserts, serve these bites with fresh fruit. Slices of banana or strawberries pair well. You can also enjoy them with a scoop of ice cream for a treat. {{image_2}} You can change the nut butter to suit your taste. Try almond butter or sunflower seed butter for a different flavor. Each nut butter adds its own twist to the bites. For sweeteners, honey works well, but you can also use agave syrup or even stevia. Each sweetener brings a unique taste level. Add fruits to the yogurt mix for more fun. Small pieces of strawberries or blueberries work great. They add color and flavor to your frozen treats. Want to spice things up? Add cinnamon or nutmeg for warmth. Just a pinch can change the whole taste. Vanilla extract is a classic, but almond or coconut extract can give a tasty twist. These little changes can make your yogurt bites stand out and feel special. To keep your yogurt bites fresh, store them in an airtight container. This prevents freezer burn. You can use a plastic or glass container. Always make sure the lid fits well. For the best taste, enjoy them within one month. After that, they may lose some flavor and texture. To thaw the frozen bites, take them out of the freezer. Let them sit at room temperature for about 10 minutes. This makes them easier to eat. If you're in a hurry, you can microwave them for about 5 seconds. Be careful not to melt them. Enjoy your tasty treats as a quick snack or dessert! Can I use non-dairy yogurt? Yes, you can use non-dairy yogurt. Look for options made from almond, coconut, or soy. These will work well in this recipe. Just ensure they are plain and unsweetened for the best taste. How long can these be stored in the freezer? You can store these yogurt bites in the freezer for up to one month. Keep them in an airtight container to maintain their flavor and texture. Are there any allergens to be aware of? Yes, this recipe contains common allergens. It has dairy from yogurt and nuts from peanut butter. If you have allergies, consider using alternatives like non-dairy yogurt or sunbutter. Can I omit the sweetener? Yes, you can omit the sweetener if you prefer. The peanut butter and yogurt have some natural sweetness. Try it first without sweetener and see if you like the taste. What substitutes can I use for chocolate chips? You can use carob chips, chopped dried fruit, or even small pieces of dark chocolate. Each option gives a unique taste and texture. Choose what you like best! You learned how to make easy and tasty yogurt bites. We covered ingredients, step-by-step prep, and tips for the best texture. You can swap ingredients and add flavors to fit your taste. Remember to store the bites right to keep them fresh. These yogurt bites are not just snacks; they can also be a fun dessert. Try them out and make them your own! Enjoy creating something new for you and your family.

Chocolate Chip Peanut Butter Frozen Yogurt Bites Delight

Looking for a quick and tasty treat that’s healthy too? Chocolate Chip Peanut Butter Frozen Yogurt Bites are the answer!

To make Crockpot Chicken Soup Supreme, you need a mix of simple, fresh ingredients. Each one adds flavor and nutrition to the dish. - 2 boneless, skinless chicken breasts - 4 cups chicken broth - 1 cup diced carrots - 1 cup diced celery - 1 cup diced potatoes - 1 can (15 oz) corn, drained - 1 cup frozen peas - 1 teaspoon dried thyme - 1 teaspoon dried oregano - 2 cloves garlic, minced - 1 onion, chopped - 1/2 teaspoon black pepper - 1/2 teaspoon salt (adjust to taste) - 2 tablespoons olive oil - 1 tablespoon lemon juice - Fresh parsley, chopped (for garnish) The chicken breasts give the soup its protein. The broth adds a rich base. Carrots, celery, and potatoes provide texture and taste. Canned corn and frozen peas make the soup colorful and sweet. There are no hard-to-find ingredients in this recipe. You can find everything at your local grocery store. The dried thyme and oregano add an herbaceous touch, making the soup comforting and aromatic. For a finishing touch, you can sprinkle fresh parsley on top. It brightens the dish and adds a pop of color. You can also adjust the salt and pepper to match your taste. If you like heat, feel free to add some red pepper flakes or hot sauce while cooking. To start, I sauté the aromatics. Heat 2 tablespoons of olive oil in a skillet over medium heat. Add 1 chopped onion and 2 minced garlic cloves. Cook until the onion turns soft and clear, about 3 to 4 minutes. This step builds a great base for the soup. Next, season the chicken. Take 2 boneless, skinless chicken breasts and sprinkle them with 1/2 teaspoon of salt, 1/2 teaspoon of black pepper, 1 teaspoon of dried thyme, and 1 teaspoon of dried oregano. This will infuse the chicken with tasty flavors. Now, layer the ingredients in the crockpot. Place the seasoned chicken at the bottom. Then, add the sautéed onions and garlic. Next, toss in 1 cup each of diced carrots, diced celery, and diced potatoes. Follow this with a can of drained corn and 1 cup of frozen peas. Each layer adds to the flavor and texture. For cooking, you can choose low or high settings. If you use low, let it cook for 6 to 8 hours. On high, it will cook in about 3 to 4 hours. Both methods will make the chicken and veggies tender and delicious. To ensure the chicken and vegetables are tender, use a fork to check the chicken. It should shred easily. Also, the veggies should be soft but not mushy. About half an hour before you serve, remove the chicken. Use two forks to shred it into bite-sized pieces. Return the shredded chicken to the soup. This makes it easier to eat. Add 1 tablespoon of lemon juice to brighten the flavors. Taste and adjust seasonings if needed. You might want to add more salt or pepper. Finally, garnish with fresh chopped parsley for a nice touch. For the best flavor, I suggest balancing your herbs. Use thyme and oregano in equal parts. These herbs enhance the taste of the chicken and veggies. Cooking time matters a lot. For tender chicken and veggies, cook on low for 6 to 8 hours. If you are short on time, the high setting works well in 3 to 4 hours. One common mistake is overcooking. If you cook too long, the chicken may dry out. Always check the chicken's texture before serving. Another mistake is under-seasoning. Taste your soup before serving. Add more salt or pepper if needed. Layering ingredients is key. Start with the chicken, then add the sautéed onions and garlic. Next, add the carrots, celery, potatoes, corn, and peas. Proper layering helps cook everything evenly. {{image_2}} If you want to make this soup gluten-free, choose a gluten-free chicken broth. Most brands offer options that work well. You can also check the labels on your spices to be safe. For vegetarian or vegan versions, swap the chicken with chickpeas or lentils. Use vegetable broth instead of chicken broth. This change keeps the soup hearty and flavorful. If you have food allergies, you can easily swap ingredients. For instance, if you're allergic to corn, try adding diced zucchini or yellow squash. Both add great texture. Seasonal vegetables are a fun way to change the soup. In summer, use fresh tomatoes and green beans. In fall, add butternut squash or pumpkin for a cozy touch. The options are endless! You can keep your Crockpot Chicken Soup Supreme in the fridge for up to four days. Make sure to use an airtight container. This helps keep the soup fresh and tasty. Always let the soup cool before you cover it. If you leave it out too long, bacteria can grow. For freezing, let the soup cool completely. Then, pour it into freezer-safe bags or containers. Remove as much air as you can. This helps prevent freezer burn. You can freeze it for up to three months. When you’re ready to eat it, thaw the soup in the fridge overnight. To reheat, warm it on the stove over low heat or in the microwave. Stir often to ensure even heating. If the soup seems thick, add a bit of broth or water to thin it out. Store any leftovers properly to keep your meal fresh and delicious. You can enjoy this soup with many sides. Here are some great options: - Crusty bread: Perfect for dipping. - Grilled cheese: A classic comfort combo. - Salad: Fresh greens add crunch and color. - Rice or quinoa: They soak up the soup nicely. - Biscuits: Fluffy biscuits pair well with soup. These sides enhance your meal and make it feel complete. Yes, you can use frozen chicken! Just follow these tips: - No need to thaw: Place frozen chicken directly in the crockpot. - Adjust cooking time: Cook on high for about 4-5 hours. - Check for doneness: Ensure the chicken reaches 165°F before shredding. Using frozen chicken makes meal prep easy and quick. If you like heat, here are some ways to spice it up: - Add red pepper flakes: Start with a pinch and adjust to taste. - Include chopped jalapeños: Fresh or pickled add a nice kick. - Use hot sauce: A few dashes can bring warmth. - Mix in cayenne pepper: Use a little for a bold flavor. These additions will give your soup a fun twist! This post shared how to make a great crockpot chicken soup. We talked about the key ingredients, special tips, and common mistakes. You learned how to prepare and store soup, along with helpful variations. Keep these tips in mind to create a delicious dish. Remember, the right seasoning and cooking time matter most for the best flavor. Enjoy your cooking, and never hesitate to try new ingredients! Your soup journey begins now, so have fun and be creative!

Crockpot Chicken Soup Supreme Flavorful Comfort Food

If you’re searching for a warm hug in a bowl, look no further than this Crockpot Chicken Soup Supreme. With

To make tasty cheese turnovers, gather these main items: - 2 cups all-purpose flour - 1/2 teaspoon salt - 1/4 cup unsalted butter, chilled and cubed - 1/4 cup cold water - 1 cup shredded mozzarella cheese - 1/2 cup ricotta cheese - 1/2 cup grated Parmesan cheese - 1 teaspoon garlic powder - 1/2 teaspoon dried oregano - 1 egg (for egg wash) - Fresh parsley, chopped (for garnish) These ingredients create a rich and cheesy filling, balanced with the flaky crust. You can add extra flavors to your cheese turnover filling. Consider these options: - Fresh herbs like basil or thyme - Spices like crushed red pepper for heat - Sautéed onions or mushrooms for depth - Cooked spinach for a veggie boost These extras make your turnovers even more delicious and fun to customize. If you need to change any ingredients, here are some good swaps: - Use gluten-free flour instead of all-purpose flour for a gluten-free option. - Substitute vegan butter for the unsalted butter to make it dairy-free. - Try nut-based cheese if you're avoiding dairy. These substitutions keep the recipe friendly for various dietary needs while staying tasty. Start by mixing 2 cups of all-purpose flour and 1/2 teaspoon of salt in a bowl. Cut in 1/4 cup of chilled, cubed butter with a pastry cutter or your fingers. Mix until it looks like coarse crumbs. This step is key to a flaky dough. Next, add 1/4 cup of cold water slowly. Stir until the dough forms a ball. Wrap it in plastic wrap and chill it in the fridge for at least 30 minutes. This resting time helps the dough relax. In another bowl, mix together 1 cup of shredded mozzarella, 1/2 cup of ricotta, and 1/2 cup of grated Parmesan cheese. Add 1 teaspoon of garlic powder and 1/2 teaspoon of dried oregano for flavor. You can also season with salt and pepper to taste. Make sure to blend all the cheeses well. This filling brings rich flavors to your turnovers. Preheat your oven to 375°F (190°C) and line a baking sheet with parchment paper. On a floured surface, roll out the chilled dough to about 1/8-inch thick. Cut the dough into 4-inch squares. Place a spoonful of cheese filling in the center of each square. Fold the dough over to form a triangle and press the edges to seal. Use a fork to crimp the edges. This adds a nice touch and keeps the filling inside. Beat 1 egg and brush it on top of each turnover for a golden finish. Arrange them on the baking sheet and bake for 20-25 minutes. Once they are golden brown and puffy, take them out and let them cool. Garnish with fresh parsley for a pop of color. To get flaky pastry, use cold ingredients. Cold butter works best. When you mix the butter into the flour, use a pastry cutter or your fingers. Stop mixing when it looks like coarse crumbs. This keeps the butter in small bits. When you bake, the bits of butter melt and create layers. Chill the dough for at least 30 minutes. This helps it relax and makes it easier to roll out. For a great cheese filling, mix different cheeses. I love using mozzarella, ricotta, and Parmesan. The mozzarella gives the filling stretch. Ricotta adds creaminess. Parmesan packs a punch of flavor. Add garlic powder and oregano for extra taste. Mix well, but don't overdo it. You want a smooth texture, but not too mixed. Taste the filling and add salt and pepper to your liking. One mistake is using warm butter. This can make your dough tough. Always use cold butter. Another mistake is not sealing the turnovers well. If you don't seal them, the filling will leak out. Press the edges firmly and use a fork to crimp them. Also, don’t skip the egg wash. It gives a beautiful golden finish. Lastly, watch the baking time. Overbaking can dry them out. Aim for a golden brown color. {{image_2}} You can mix and match cheese for fun flavors. Try using cheddar for a sharp taste. Goat cheese adds a tangy kick. Blend cream cheese for a creamy texture. You can also use blue cheese for a bold flavor. Each choice changes the taste and makes it unique. Adding vegetables makes your turnovers even better. Spinach, mushrooms, or bell peppers work great. Sauté them first for more flavor. You can also add spices to spice things up. Red pepper flakes add heat. Basil or thyme gives a fresh taste. Get creative and find what you like best. Baking is the healthier option, and it makes the dough nice and crispy. Frying gives a golden color and a crunchy bite. If you fry, do it in hot oil for a few minutes. Always drain them on paper towels after frying. Each method offers a different taste and texture. To store leftover cheese turnovers, let them cool first. Place them in an airtight container. You can keep them in the fridge for up to three days. If you want to keep them longer, freezing is a great option. You can freeze cheese turnovers both before and after baking. To freeze before baking, place the filled turnovers on a baking sheet. Freeze them for about an hour until firm. Then, transfer them to a freezer bag. They can last up to three months in the freezer. To freeze baked turnovers, let them cool down. Wrap each in plastic wrap and place them in a freezer bag. To reheat, you have a few options. For the oven, preheat it to 350°F (175°C). Place the turnovers on a baking sheet. Bake for about 10-15 minutes until heated through. If you use a microwave, place a turnover on a plate. Heat for 30-second intervals until warm. The oven gives a crispier texture, while the microwave is quick. Enjoy your tasty cheese turnovers! The best cheese for turnovers is mozzarella. It melts well and adds great flavor. Ricotta cheese also works well, making the filling creamy. Parmesan cheese adds a nice salty bite. You can mix these cheeses for a rich taste. Feel free to experiment with other cheeses like cheddar or feta, too! Yes, you can make cheese turnovers ahead of time. Prepare the dough and filling, then store them separately in the fridge. You can fill and shape the turnovers a few hours before baking. If you want to make them even earlier, freeze them. Just be sure to thaw before baking. You will know the turnovers are done when they turn golden brown. They should look puffy and crispy on the outside. You can gently press the top; it should feel firm. If you want perfection, use a food thermometer. The inside should reach 165°F (74°C). Enjoy the delicious aroma as they bake! This article covered essential ingredients and steps for making delicious cheese turnovers. I shared tips for flaky pastry and common mistakes to avoid. Different cheese combos and cooking methods can elevate your dish. Plus, I provided storage info to keep them fresh. Remember, you can personalize this recipe to fit your taste. Making cheese turnovers can be fun and rewarding, so give it a try! Enjoy your cooking journey and make every bite count.

Cheese Turnovers Simple and Tasty Recipe Guide

Craving a delicious snack? Cheese turnovers are a simple and tasty treat you can whip up in no time! With

- 1 pound breakfast sausage - 6 large eggs - 2 cups milk - 4 cups cubed bread - 2 cups shredded cheddar cheese The main ingredients bring rich flavor and a hearty texture to the dish. Breakfast sausage adds a savory kick. Eggs provide structure and protein. Milk makes the casserole creamy. Cubed bread acts as the base, soaking up all the delicious flavors. Shredded cheddar cheese gives a gooey finish that everyone loves. - 1 bell pepper, diced - 1 small onion, diced - 1 teaspoon garlic powder - 1 teaspoon dried oregano - Salt and pepper to taste Adding vegetables enhances both taste and nutrition. Diced bell pepper adds sweetness and color. The onion brings a savory depth. Garlic powder and oregano infuse the dish with warmth. Salt and pepper balance all the flavors perfectly. - Fresh chives - Fresh parsley For a fresh touch, consider garnishing with chives or parsley. These herbs add visual appeal and a burst of flavor. A little greenery goes a long way in making this dish even more inviting. - Preheat your oven to 350°F (175°C). Grease a 9x13 inch baking dish. - In a large skillet, cook 1 pound of breakfast sausage over medium heat. Crumble the sausage as it cooks. Brown it fully for about 5-7 minutes. Drain any excess fat and set it aside. - In a large bowl, whisk together 6 large eggs, 2 cups of milk, 1 teaspoon of garlic powder, 1 teaspoon of dried oregano, and a sprinkle of salt and pepper. Mix until smooth. - Add 4 cups of cubed bread to the egg mixture. Gently fold it in so the bread gets coated well. - Stir in the cooked sausage, 1 diced bell pepper, and 1 diced onion. Make sure everything is mixed well. - Pour the mixture into the greased baking dish. Spread it evenly. - Top with 2 cups of shredded cheddar cheese, spreading it out across the top. - Bake in the preheated oven for 30-35 minutes. Check that the eggs are set and the top is golden brown. Let it cool for a few minutes before slicing. Enjoy! - Ensuring sausage is fully cooked: Cook the sausage in a skillet over medium heat. Crumble it as it cooks. You want it to be brown and no longer pink. This usually takes about 5-7 minutes. Drain any fat before mixing it into the casserole. - How to properly cube bread for even absorption: Use day-old bread for the best texture. Cut it into 1-inch cubes. This size helps the bread soak up the egg mixture evenly. Toss the cubes gently in the egg mix to coat them well. - Suggestions for additional spices or herbs: Try adding a pinch of cayenne for heat. You can also use fresh herbs like thyme or basil for a fresh twist. A dash of paprika adds a nice color and flavor too. - Alternatives to cheddar cheese: If you want a different flavor, use mozzarella or pepper jack cheese. Feta cheese can add a tangy kick, while goat cheese offers creaminess. Mix and match to find your favorite combo. - Garnishing the casserole for serving: Once baked, let the casserole cool for a few minutes. Then, sprinkle chopped chives or parsley on top. This adds a pop of color and freshness. - Serving suggestions, such as sides or sauces: Serve with fruit salad or yogurt for a light touch. A drizzle of hot sauce can add a fun kick. You could also pair it with crispy bacon or fresh toast for a hearty meal. {{image_2}} You can change the sausage in this dish. Try turkey sausage for a leaner option. You can also use plant-based sausage for a meat-free version. The flavor will still be great! If you want to switch up the bread, use croissants or bagels instead. These options add a unique taste and texture to the casserole. If you need gluten-free options, choose gluten-free bread. There are many good brands available. For dairy-free needs, look for plant-based milk and cheese. Almond milk or oat milk works well. Dairy-free cheese melts nicely, so it won’t alter the taste too much. Adding veggies makes this dish even better! You can include spinach, mushrooms, or zucchini. These add great flavor and color. If you want some heat, sprinkle in cayenne pepper or red pepper flakes. These spices give the casserole a nice kick! To store leftover sausage breakfast casserole, let it cool down first. Place the casserole in a container with a tight lid. I recommend using glass or plastic containers. These keep the food fresh and help avoid spills. The casserole will last in the fridge for about three to four days. If you want to freeze the casserole, cut it into portions. Wrap each piece tightly in plastic wrap. Then, place the wrapped pieces in a freezer bag. This helps keep out air and moisture. For best taste, use it within three months. To reheat, thaw it overnight in the fridge before cooking. You can reheat the casserole in the oven or microwave. The oven gives a crispier texture. Preheat the oven to 350°F (175°C) and bake for 15-20 minutes. If using the microwave, heat it in short bursts. Check every 30 seconds to avoid drying it out. Keeping it covered helps maintain flavor and moisture. You can keep the casserole in the fridge for about 3 to 4 days. Make sure to store it in an airtight container. This keeps it fresh and safe to eat. If you want to enjoy it later, consider freezing it. Yes, you can prepare the casserole a day before. Just mix all the ingredients and store it in the fridge overnight. Bake it in the morning for a hot, tasty breakfast. The best way to reheat it is in the oven. Preheat the oven to 350°F (175°C). Place the casserole in a baking dish, cover it with foil, and heat for about 15 to 20 minutes. This keeps it moist and tasty. You can also use a microwave, but the oven gives a better texture. Yes, you can use egg substitutes like flaxseed meal or silken tofu. Each substitute may change the flavor and texture a bit. If you need a vegan option, these work great in this casserole. The casserole is done when the eggs are set and the top is golden brown. You can insert a knife in the center. If it comes out clean, it's ready. This usually takes about 30 to 35 minutes in the oven. This breakfast casserole uses sausage, eggs, and bread to create a hearty meal. We discussed the main ingredients, how to properly mix and bake them, and shared tips like cooking techniques and flavor enhancements. You can make this dish suit your taste by swapping ingredients or adapting it for dietary needs. Remember to store leftovers well and reheat them carefully to keep the flavor intact. With these simple steps, you will enjoy a tasty breakfast every time. Happy cooking!

Sausage Breakfast Casserole Easy and Flavorful Dish

Looking for a breakfast dish that’s easy to make and bursting with flavor? You’ve found it! This Sausage Breakfast Casserole

- 1 medium eggplant, diced - 2 zucchini, diced - 1 bell pepper (red or yellow), diced - 1 large onion, chopped - 3 cloves garlic, minced The fresh ingredients bring life to this Ratatouille Vegetable Soup. The eggplant adds a meaty texture. Zucchini gives a mild flavor and keeps it light. Bell pepper adds sweetness, while onion and garlic provide a solid base. - 2 ripe tomatoes, diced - 1 cup vegetable broth - 1 cup water - 1 teaspoon dried thyme - 1 teaspoon dried basil - ½ teaspoon smoked paprika - Salt and pepper to taste - 2 tablespoons olive oil The broth and seasonings elevate the soup. Ripe tomatoes add acidity and depth. Vegetable broth and water create a rich liquid base. Thyme and basil offer an herbal touch. Smoked paprika brings a hint of warmth. Olive oil adds richness and helps the flavors mingle. - Fresh basil leaves for garnish Garnishing with fresh basil leaves makes the soup pop. It adds a burst of color and a fresh taste. You can also drizzle a bit of olive oil on top for a lovely finish. 1. Heat 2 tablespoons of olive oil in a large pot over medium heat. 2. Add 1 chopped onion. Sauté it for about 5 minutes. The onion should soften and become clear. 3. Stir in 3 minced garlic cloves. Cook for another minute. This will make your kitchen smell amazing. 4. Next, add 1 medium diced eggplant. Cook for 5 to 7 minutes. The eggplant will soften and soak up the flavors. 1. Now, mix in 2 diced zucchini and 1 diced bell pepper. Sauté for another 5 minutes. Stir occasionally to keep things from sticking. 2. Add 2 diced ripe tomatoes, 1 cup of vegetable broth, and 1 cup of water. Bring this mixture to a boil. You want to see bubbles dancing on the surface. 1. Once boiling, lower the heat. Stir in 1 teaspoon of dried thyme, 1 teaspoon of dried basil, and ½ teaspoon of smoked paprika. Add salt and pepper to your taste. 2. Let the soup simmer for about 20 minutes. This helps the flavors blend nicely. 3. After simmering, use an immersion blender to blend the soup. You can make it smooth or keep some chunks for texture. 4. Taste your soup and adjust the seasoning if needed. Enjoy this warm and hearty dish! To make your Ratatouille Vegetable Soup even tastier, adjust the seasoning to your liking. Start with salt and pepper. Taste the soup as it cooks. If it needs more depth, add a pinch of salt or pepper. For herbs, I love using dried thyme and basil. They bring warmth and earthiness. You can also try adding oregano or rosemary for a twist. Fresh herbs, like parsley or cilantro, can boost freshness right before serving. Decide if you want a creamy or chunky soup. If you like it creamy, blend it well. For a chunkier style, blend it just a bit. This keeps some veggies intact. Using an immersion blender is easy. It lets you blend right in the pot. Just be careful not to splash! Serve your soup in rustic bowls. It adds a cozy touch. Drizzle a little olive oil on top for shine and flavor. Garnish with fresh basil leaves for color. This makes the dish pop. You can also serve with crusty bread on the side. This completes the meal and adds a nice crunch. {{image_2}} To make this ratatouille soup vegan, skip any animal products. Use vegetable broth as your base. This dish is already gluten-free, so you don’t need to change much. You can swap vegetables based on your taste. If you don’t like eggplant, try mushrooms. For a sweet touch, add carrots. You can mix and match veggies to create your favorite blend. Want to boost protein? Add beans or lentils. These not only fill you up but also add texture. They blend well with the flavors of the soup. You can spice things up too! Try adding chili flakes or paprika for some heat. Other spices like oregano or cumin can bring new flavors. Experimenting is fun, so feel free to try different combinations. This soup pairs well with crusty bread. The bread soaks up the broth and adds a nice crunch. A side salad can also balance the meal. Choose a fresh salad with greens and a light dressing. You can serve the soup in rustic bowls for a cozy feel. Don't forget to drizzle some olive oil on top. It adds richness and makes the dish look appealing. Ratatouille Vegetable Soup lasts about 3 to 4 days in the fridge. To store it well, let the soup cool down first. Use an airtight container to keep it fresh. Label the container with the date. This way, you know when to eat it. To freeze Ratatouille Vegetable Soup, let it cool completely. Pour the soup into a freezer-safe container. Leave some space at the top for expansion. You can freeze it for up to 3 months. When you're ready to eat, move it to the fridge to thaw overnight. For warming up leftover soup, you have a few options. You can use the stove or microwave. If using the stove, heat it gently over medium heat. Stir often to avoid hot spots. If you use the microwave, heat it in short bursts, stirring in between. This keeps the flavor and texture nice. Can I use frozen vegetables instead of fresh? Yes, you can use frozen vegetables. They are great for saving time. Just make sure to thaw them before adding to the soup. This will help them cook evenly. What can I substitute for vegetable broth? If you don’t have vegetable broth, use water with a little salt. You can also use chicken broth for added flavor. Just keep in mind, it will change the soup's taste. How do I make this soup spicy? To add heat, include red pepper flakes or cayenne pepper. Start with a small amount, then taste. You can always add more if you want it spicier. Can I prepare the soup in advance? Yes! You can make this soup ahead of time. It keeps well in the fridge for up to a week. The flavors will blend even more as it sits. What is the best way to thicken the soup? To thicken the soup, blend a portion with an immersion blender. This will give you a creamy texture while keeping some chunks. You can also add a bit of potato for extra thickness. How many calories are in Ratatouille Vegetable Soup? One serving has about 150 calories. This makes it a light and healthy option for any meal. Is this soup healthy and suitable for meal prep? Yes! This soup is full of veggies and low in calories. It is perfect for meal prep since it is nutritious and filling. Enjoy it as a main dish or a side! This blog post outlined a simple and flavorful Ratatouille Vegetable Soup. We covered fresh ingredients like eggplant, zucchini, and bell pepper. You learned step-by-step instructions on preparing the base, adding veggies, and finishing with seasoning. We also discussed tips for enhancing flavor, serving suggestions, and dietary variations. Remember, cooking should be fun and creative! Explore your twist on this soup. Try new ingredients or spices. With a little practice, you’ll make a dish that delights everyone. Enjoy your cooking adventure!

Ratatouille Vegetable Soup Flavorful and Nourishing Dish

If you’re looking for a warm, tasty dish that fills you up, try Ratatouille Vegetable Soup. This colorful soup mixes

- 9 lasagna noodles - 2 cups fresh spinach, chopped - 1 cup ricotta cheese - 1 cup mozzarella cheese, shredded - 1 cup parmesan cheese, grated - 1 egg - 1 teaspoon garlic powder - 1 teaspoon dried oregano - Salt and pepper to taste - 2 cups marinara sauce - 1 tablespoon olive oil - Fresh basil for garnish (optional) Gathering the right ingredients is key to making a great spinach ricotta lasagna. You want fresh spinach for a vibrant taste. Ricotta cheese gives a creamy texture. Mozzarella and parmesan add richness and flavor. - Large mixing bowl - Baking dish - Aluminum foil - Pot for boiling noodles - Slotted spoon or colander Using the best tools makes cooking easier. A good baking dish helps with even cooking. Aluminum foil keeps the lasagna moist while baking. - Servings: 6 - Calories per serving: 380 - Protein: 20g - Carbohydrates: 40g - Fat: 18g This dish packs a good amount of protein and fats. It's a great choice for a hearty meal. The balance of flavors and nutrients makes it satisfying. First, preheat your oven to 375°F (190°C). This step is key for cooking. While the oven warms up, get a pot of water boiling. Cook 9 lasagna noodles according to the package directions. Aim for al dente, which means they should still be firm. Once cooked, drain the noodles and set them aside. This helps them stay intact for layering. In a large bowl, mix together 1 cup of ricotta cheese and 2 cups of chopped fresh spinach. You want to stir until smooth. Add 1 egg, 1 teaspoon of garlic powder, 1 teaspoon of dried oregano, and some salt and pepper. Stir again until you have a nice mixture. This blend gives the lasagna its rich flavor. Start by spreading a thin layer of marinara sauce on the bottom of your baking dish. This prevents sticking. Lay 3 noodles over the sauce. Next, spread half of your ricotta-spinach mixture over the noodles. Follow that with another layer of marinara sauce and a sprinkle of 1 cup of shredded mozzarella cheese. Repeat this process one more time. For the final layer, place the last 3 noodles on top. Cover with the remaining marinara sauce, then add a generous layer of mozzarella and 1 cup of grated parmesan cheese. Drizzle 1 tablespoon of olive oil over the cheese. This adds extra richness. Cover the dish with aluminum foil and bake for 25 minutes. Afterward, remove the foil and bake for another 15 minutes. You want the cheese to be bubbling and golden brown. Let the lasagna cool for 10 minutes before slicing. Enjoy your hearty and flavorful meal! To keep your lasagna from getting soggy, use less sauce in each layer. A little goes a long way. Spread a thin layer of marinara sauce at the bottom. This helps the noodles cook well. Cook the noodles al dente, so they stay firm when baked. Drain the noodles well and let them cool slightly before layering. This prevents extra moisture from seeping in. For a rich flavor, I love using ricotta, mozzarella, and parmesan. Ricotta gives a creamy texture. Mozzarella melts beautifully and adds stretch. Parmesan adds a nice sharpness. You can also try other cheeses like fontina or goat cheese. Mix and match for unique flavors. Just remember to use high-quality cheeses for the best taste. Cooking time is key to a perfect lasagna. Bake covered for the first 25 minutes to steam the layers. This helps the noodles cook through. After 25 minutes, remove the foil to let the cheese brown. Bake until the cheese is bubbling and golden. This usually takes another 15 minutes. Let it cool for 10 minutes before slicing. This helps the layers set and makes serving easier. {{image_2}} You can swap some ingredients in this lasagna. Instead of ricotta, try cottage cheese. It gives a similar texture but with a lighter taste. For a twist, use goat cheese for a tangy flavor. If you want less dairy, use almond milk cheese. It melts well and makes the dish creamy. To make this dish vegan, omit the egg and use a vegan ricotta. You can blend tofu with lemon juice and nutritional yeast for a tasty option. Be sure to check your marinara sauce, as some brands add cheese. Choose a sauce that is plant-based to keep it vegan. You can boost nutrition by adding more veggies. Try diced zucchini, bell peppers, or mushrooms. Spinach pairs well with these additions. If you want protein, add cooked lentils or crumbled tempeh. You could also layer in some shredded chicken for a heartier meal. These changes keep the dish interesting and tasty! After enjoying your Spinach Ricotta Lasagna, store leftovers in an airtight container. This helps keep it fresh. Place the lasagna in the fridge if you plan to eat it in a few days. It will stay good for about 3 to 5 days. Make sure to cover it well to avoid drying out. You can freeze leftover lasagna for later. First, let it cool completely to room temperature. Cut it into portions for easy use. Wrap each piece tightly in plastic wrap, and then place it in a freezer bag. Label the bag with the date. Frozen lasagna can last up to 3 months. When you crave it, simply thaw it in the fridge overnight before reheating. Reheating your lasagna is easy. For the best results, use the oven. Preheat it to 350°F (175°C). Place your lasagna in a baking dish and cover it with foil. Heat for about 20 minutes. This keeps the cheese from burning. If you want a bubbly top, uncover the dish for the last 5 minutes. You can also use the microwave if you are in a hurry. Just heat individual slices for about 1-2 minutes until warm. Enjoy your tasty meal! Yes, you can make Spinach Ricotta Lasagna ahead. Prepare the dish up to the baking step. Cover it well and store it in the fridge for one day. You can also freeze it for up to three months. Just thaw it overnight in the fridge before baking. This makes meal prep easier and keeps flavors fresh. Absolutely! You can make this lasagna without eggs. Replace the egg with an equal amount of ricotta cheese. You can also use a flaxseed mixture. Mix one tablespoon of flaxseed meal with three tablespoons of water. Let it sit for a few minutes until it thickens. This works great as an egg substitute. You can serve many sides with Spinach Ricotta Lasagna. A fresh green salad pairs nicely. Try a simple mix of lettuce, tomatoes, and a light dressing. Garlic bread is also a great choice. It adds crunch and flavor. For a heartier meal, serve it with roasted vegetables. These sides balance the richness of the lasagna. This blog post shared all you need to know to make Spinach Ricotta Lasagna. We discussed the key ingredients, tools, and nutrition facts. Next, I detailed step-by-step instructions to guide you through the cooking process. You learned helpful tips to enhance your lasagna and variations to fit your diet. Finally, I covered the best ways to store your leftovers and answered common questions. Cooking this dish can be fun and rewarding. Enjoy every bite of your delicious creation!

Spinach Ricotta Lasagna Hearty and Flavorful Recipe

If you crave a hearty yet light dish, you’ll love my Spinach Ricotta Lasagna! This recipe bursts with rich flavors

- 12 oz spaghetti or your pasta of choice - 2 cups fresh spinach, roughly chopped - 2 cups cherry tomatoes, halved - 3 cloves garlic, minced - 1 medium onion, finely chopped - 1/4 cup olive oil - 1 teaspoon red pepper flakes (adjust to taste) - Salt and pepper to taste - 1/4 cup grated Parmesan cheese (optional) - Fresh basil for garnish Using fresh, bright ingredients makes this dish shine. The spinach adds color and nutrients. Cherry tomatoes bring sweetness and juiciness, while garlic and onion add depth. Olive oil binds it all together, enhancing flavor. Red pepper flakes add a gentle heat, but feel free to adjust. Parmesan cheese is optional but adds a creamy touch. Fresh basil is perfect for garnish and brings a fresh aroma. These ingredients create a quick and tasty meal that feels special. Enjoy the beauty of this simple yet flavorful dish! Start by bringing a large pot of salted water to a boil. Use enough water so the pasta cooks evenly. Once the water boils, add 12 ounces of spaghetti. Cook it according to the package instructions. You want the pasta to be al dente, which means it should still have a slight bite. After cooking, reserve one cup of pasta water. This water will help the sauce later. Drain the spaghetti in a colander and set it aside. Next, grab a large skillet and heat 1/4 cup of olive oil over medium heat. Once the oil is hot, add a finely chopped medium onion. Sauté it for about 3 to 4 minutes until it softens. Now, add 3 cloves of minced garlic and 1 teaspoon of red pepper flakes to the skillet. Stir this mix for one minute. The goal is to get the garlic fragrant but not burnt. Then, toss in 2 cups of halved cherry tomatoes. Cook these for about 5 to 7 minutes. You want them to soften and release their juices. This will create a tasty sauce base. Finally, add 2 cups of roughly chopped spinach to the skillet. Toss everything together and cook for another 2 to 3 minutes until the spinach wilts. Now it's time to bring everything together. Combine the drained spaghetti with the tomato and spinach mixture in the skillet. Pour in a little of that reserved pasta water to help create a nice sauce. Mix everything well. Next, season the dish with salt and pepper to taste. Allow the pasta to heat through for another 2 minutes. If you like cheese, sprinkle 1/4 cup of grated Parmesan over the top. Toss again to combine. After that, remove the skillet from heat. Let the pasta sit for a minute before serving. Enjoy your colorful, tasty Spinach Tomato Pasta! How to avoid mushy pasta To keep your pasta firm, cook it just until al dente. This means it should have a slight bite when you chew it. Use a big pot of salted water. This adds flavor and helps with texture. Remember to stir the pasta often while it cooks. Best pasta types for this recipe I love using spaghetti for spinach tomato pasta. It holds the sauce well. You can also try penne or fusilli. These shapes catch the sauce and veggies, making each bite tasty. Additional spices and herbs to try Besides red pepper flakes, consider adding dried oregano or fresh thyme. These add depth to your dish. A squeeze of lemon juice brightens the flavors too. You can also use a pinch of sugar to balance the acidity of the tomatoes. Tips for sautéing vegetables Start by cooking onions until they are soft. This takes about 3-4 minutes. Then add garlic for flavor. Keep an eye on the heat; you don't want the garlic to burn. It should become fragrant in about a minute. Add tomatoes next and let them soften. Finally, toss in the spinach until it wilts. Serving ideas with garnishes Serve the pasta in a big bowl or on individual plates. Top with fresh basil leaves for color. A sprinkle of Parmesan cheese adds a nice touch. You can also drizzle olive oil on top for extra flavor. Pairing suggestions for side dishes This pasta pairs well with a crisp green salad. A side of garlic bread is also a great choice. It complements the dish and adds a hearty element to your meal. {{image_2}} You can add protein to make this dish heartier. Adding chicken or shrimp works well. Simply cook bite-sized pieces of chicken or shrimp in the skillet before you add the spinach. This adds great flavor and boosts nutrition. If you prefer vegan options, try chickpeas or lentils. They are rich in protein and add texture. Mix them in with the spinach and tomatoes for a filling meal. You can swap out vegetables based on what you have. Bell peppers, zucchini, or broccoli can work well. Simply chop them and add them to the skillet when you cook the onion. Think about seasonal variations, too. In summer, use fresh corn or green beans. In winter, add roasted butternut squash or kale. This keeps the dish fresh and exciting. Different sauces can change the taste of your pasta. Try a pesto or Alfredo sauce to mix things up. Both will give your meal a new twist. For cheese, Parmesan is classic, but you can use feta or mozzarella too. Crumbled feta adds a salty kick, while mozzarella gives a creamy texture. Experiment with different cheeses for your favorite flavor! To store your spinach tomato pasta, place it in an airtight container. Make sure to cool it first. This keeps moisture in and prevents it from drying out. It stays fresh for about 3 to 5 days in the fridge. When reheating pasta, you have a few options. You can use the microwave or the stove. If using the microwave, add a splash of water. This helps steam the pasta and keeps it moist. Stir it every 30 seconds for even heating. If using the stove, warm it in a pan over low heat. Add a little olive oil to keep it from sticking. Yes, you can freeze spinach tomato pasta! To freeze it, let the pasta cool completely. Then, place it in a freezer-safe bag or container. Be sure to remove excess air to prevent freezer burn. It can last about 2 to 3 months in the freezer. When ready to eat, thaw it in the fridge overnight and reheat as mentioned. To make Spinach Tomato Pasta gluten-free, use gluten-free pasta. Many brands offer great options. Rice, quinoa, or chickpea pasta works well. Check the cooking times, as they may vary. Yes, you can use frozen spinach. Just thaw it first and drain any excess water. Frozen spinach is a time-saver and still tasty. If you want to skip Parmesan, try nutritional yeast for a cheesy flavor. You can also use pecorino or a dairy-free cheese. These options give great taste without dairy. Adding protein is easy! Chicken or shrimp cooks well with the pasta. For a plant-based option, add chickpeas or tofu. Store leftover Spinach Tomato Pasta in an airtight container. It stays fresh in the fridge for up to three days. Yes, you can reheat the pasta in the microwave or on the stove. Add a splash of water to help it steam and soften. Yes, you can prepare the pasta ahead. Store the sauce and pasta separately for best results. Combine them when ready to serve. Fresh herbs like basil, parsley, or oregano add great flavor. Add them at the end for freshness. Dried herbs also work well if fresh isn't available. To add more heat, increase the red pepper flakes. You can also include a dash of hot sauce. Adjust the spice level to your taste! This recipe for Spinach Tomato Pasta is simple and tasty. You can make it with fresh ingredients and basic steps. Remember to cook your pasta just right and try different flavors. Adding proteins or using other veggies can change it up. Storing and reheating it correctly keeps the taste fresh. Enjoy making this meal your own with our tips! Your dinner will be healthy and satisfying.

Spinach Tomato Pasta Quick and Flavorful Dinner Recipe

Welcome to a quick and tasty dish that you can whip up in no time! This Spinach Tomato Pasta recipe

To make bakery-style blueberry white chocolate cookies, gather these ingredients: - 1 cup unsalted butter, softened - 3/4 cup granulated sugar - 3/4 cup brown sugar, packed - 2 large eggs - 2 teaspoons vanilla extract - 2 1/4 cups all-purpose flour - 1 teaspoon baking soda - 1/2 teaspoon salt - 1 cup dried blueberries (or fresh if preferred) - 1 cup white chocolate chips - Zest of 1 lemon Each ingredient plays a key role in creating that soft, chewy texture. The unsalted butter adds richness, while the sugars provide sweetness and help with browning. The eggs bind everything together, making your cookies tender. Vanilla extract and lemon zest add depth, enhancing the overall flavor. The dry ingredients, like flour, baking soda, and salt, give structure and balance. Dried blueberries offer chewy bursts of flavor, and white chocolate chips add creamy sweetness. You can also use fresh blueberries if you prefer their juiciness. Gather all these items before you start. This way, you’ll have everything ready and can enjoy the baking process without interruption. 1. First, preheat your oven to 350°F (175°C). Line two baking sheets with parchment paper. This helps cookies bake evenly and prevents sticking. 2. In a large bowl, cream together 1 cup of softened unsalted butter, 3/4 cup of granulated sugar, and 3/4 cup of brown sugar. Mix until light and fluffy. This step adds air and gives your cookies a nice texture. 3. Next, add 2 large eggs, one at a time. Blend well after each egg. Then stir in 2 teaspoons of vanilla extract and the zest of 1 lemon. The lemon zest adds a fresh, bright flavor. 1. In another bowl, whisk together 2 1/4 cups of all-purpose flour, 1 teaspoon of baking soda, and 1/2 teaspoon of salt. This helps distribute the baking soda evenly. 2. Gradually mix the dry ingredients into the wet ingredients. Stir until just combined. Do not overmix, or your cookies may become tough. 1. Now, gently fold in 1 cup of dried blueberries and 1 cup of white chocolate chips. Make sure they are evenly mixed into the dough. The blueberries add a nice chew, while the chocolate brings sweetness. 2. Scoop out tablespoon-sized portions of dough. Place them on the prepared baking sheets, leaving space between each cookie. They will spread while baking. 1. Bake the cookies in the preheated oven for 10-12 minutes. Look for lightly golden edges, but the center should still be soft. 2. Once done, remove them from the oven. Let the cookies cool on the baking sheets for 5 minutes. Then, transfer them to a wire rack to cool completely. Enjoy your delicious cookies! To get the best texture, you want to know the difference between light and fluffy and chewy. Light and fluffy cookies are soft and airy. They often use more fat. Chewy cookies have a denser feel. They use more brown sugar for moisture. The temperature of your ingredients matters. Use softened butter to mix easily with sugars. Cold eggs can slow the mixing process. Let them sit out for a bit. This helps create that perfect dough. For a lovely display, stack your cookies neatly on a platter. Use a cake stand for height if you have one. Dust them lightly with powdered sugar to add flair. For extra appeal, serve with fresh blueberries on the side. This adds color and freshness to your plate. Cookies can spread too much in the oven. If this happens, try chilling the dough for 30 minutes before baking. This helps the cookies keep their shape. If you live at a high altitude, you may need to adjust the recipe. Add a bit more flour or reduce sugar. This helps cookies bake well without spreading too much. {{image_2}} You can change the flavor of these cookies easily. Try using dark or milk chocolate instead of white. This switch gives a rich taste. You can also add nuts or seeds. Chopped walnuts or pecans add a nice crunch. Sunflower seeds or pumpkin seeds can work too. These additions make the cookies unique and fun. Using fresh blueberries gives a juicy burst in every bite. They add a lovely flavor. On the other hand, dried blueberries are sweet and chewy. They mix well in the dough. The downside of fresh berries is that they can release moisture during baking. This may make cookies flatter. If using fresh, rinse and dry them well. This step helps keep the dough from getting too wet. For gluten-free cookies, use almond flour or oat flour. These flours make soft cookies. You can mix them with a gluten-free blend for best results. For dairy-free options, try coconut oil instead of butter. You can also use dairy-free chocolate chips. These small changes let everyone enjoy the cookies. Store your cookies at room temperature. This keeps them soft and fresh. Use an airtight container to keep moisture in. If you want to keep them longer, you can also refrigerate them. Just make sure they are in a sealed container. However, refrigeration can change the texture. The cookies may become a bit firmer. Glass jars or plastic containers work great. Choose containers with tight lids. You can also use resealable plastic bags. Just make sure to remove as much air as possible. If you layer cookies, place parchment paper in between. This keeps them from sticking together. To freeze cookies, you have two options: unbaked or baked. For unbaked cookies, scoop dough onto a baking sheet. Freeze the scoops until firm, then transfer them to a freezer bag. This way, you can bake them fresh later. For baked cookies, let them cool completely. Then, place them in an airtight container or freezer bag. Remove as much air as you can. You can freeze baked cookies for up to three months. To thaw cookies, take them out of the freezer. Let them sit at room temperature for about 30 minutes. For unbaked cookies, bake them straight from the freezer. Just add a minute or two to the baking time. Enjoy your cookies fresh and tasty! To make these cookies, follow these steps: 1. Preheat the oven to 350°F (175°C). Line two baking sheets with parchment paper. 2. In a large bowl, cream together 1 cup of softened butter, 3/4 cup of granulated sugar, and 3/4 cup of brown sugar until it is light and fluffy. 3. Add 2 large eggs one at a time. Mix well after each egg. Then stir in 2 teaspoons of vanilla extract and the zest of 1 lemon. 4. In another bowl, whisk together 2 1/4 cups of all-purpose flour, 1 teaspoon of baking soda, and 1/2 teaspoon of salt. 5. Gradually add the dry mix to the wet mix. Mix until just combined. 6. Fold in 1 cup of dried blueberries and 1 cup of white chocolate chips until they are evenly spread in the dough. 7. Scoop tablespoon-sized portions onto the baking sheets, leaving space between each cookie. 8. Bake for 10-12 minutes. Look for lightly golden edges, but the center should stay soft. 9. Cool on the sheets for 5 minutes, then transfer to a wire rack. Yes, you can use frozen blueberries. They will make the dough a bit wetter. This may slightly change the texture of your cookies. Since they are colder, you may need to add a minute or two to the baking time. Make sure not to thaw them before adding. This helps keep the cookies from spreading too much. Baking at high altitudes can change your cookies. Here are some tips: - Increase flour by 1-2 tablespoons to help with the rise. - Decrease sugar by 1-2 tablespoons to avoid excess spreading. - Add extra liquid if needed, about 1-2 tablespoons, to keep the dough moist. These adjustments will help you achieve the best texture and flavor at high elevations. You now have all the tools to make Blueberry White Chocolate Cookies. We covered the key ingredients, step-by-step instructions, and tips for perfect results. Remember, baking is both science and art. Don’t be afraid to try new flavors and tweak the recipe. Whether you choose fresh or dried blueberries, your cookies will shine. Enjoy sharing these tasty treats. Happy baking!

Bakery-Style Blueberry White Chocolate Cookies Recipe

If you crave cookies that taste like they came straight from a bakery, you’re in luck! This Bakery-Style Blueberry White

- 1 cup pastina (small pasta, like little stars or dots) - 4 cups vegetable broth - 1 medium onion, diced - 2 cloves garlic, minced - 2 medium carrots, diced - 1 zucchini, diced - 1 cup fresh spinach, roughly chopped - 1 teaspoon dried oregano - 1 teaspoon dried basil - 2 tablespoons olive oil - Salt and pepper to taste - Grated Parmesan cheese (for serving) - Fresh parsley, chopped (for garnish) If you can’t find pastina, you can use small shells or orzo. Both work well in soup. For the broth, feel free to use chicken broth if you prefer. You can also swap out vegetables based on what you have. Peas, green beans, or bell peppers can add nice flavors. If you want a creamier soup, add a splash of heavy cream or milk towards the end. Fresh ingredients make a big difference in flavor. Fresh spinach adds a bright touch. Diced carrots and zucchini bring great texture and a slight sweetness. Always choose the best quality possible. Fresh herbs like parsley enhance the soup's taste. Using good-quality olive oil adds richness. When you use fresh ingredients, your soup will taste even better! Start by gathering all your vegetables. You will need one medium onion, two cloves of garlic, two medium carrots, and one zucchini. Dice the onion and carrots into small pieces. Mince the garlic. Cut the zucchini into small cubes. This will help them cook evenly. Also, chop one cup of fresh spinach. Set all the veggies aside for later. In a large pot, heat two tablespoons of olive oil over medium heat. Add the diced onion and minced garlic. Sauté them for about three to four minutes. You want the onion to turn translucent. Next, add the diced carrots and zucchini. Stir these for five minutes. They should start to soften a bit. Now, pour in four cups of vegetable broth. Bring this mixture to a boil. Once the broth boils, stir in one cup of pastina, one teaspoon of dried oregano, and one teaspoon of dried basil. Reduce the heat to a simmer. Cook for about eight to ten minutes. Check the pastina for tenderness. After that, add the fresh spinach. Let it wilt for one to two minutes. Finally, season with salt and pepper to taste. Serve the soup hot, topped with grated Parmesan cheese and fresh parsley. Enjoy the warmth of this cozy soup! To make this soup shine, use fresh vegetables. Fresh veggies add bright flavors. Sauté your onions and garlic well. This step builds a strong base. Keep an eye on the heat. You don’t want to burn them. When the onion turns clear, you are ready to add the carrots and zucchini. Let them soften before adding broth. This extra time makes your soup rich and tasty. The pastina cooks quickly. It usually takes about 8-10 minutes. Check it for tenderness as you cook. Too long can make it mushy. You want it just right. If you cook it too long, it loses its shape. So, stir and taste it a few minutes before the time is up. Serve your soup hot. A sprinkle of Parmesan cheese adds great flavor. Fresh parsley makes it look pretty. You can also pair this soup with crusty bread. It’s perfect for dipping! Want to make it heartier? Add cooked chicken or beans for protein. Enjoy every comforting spoonful! {{image_2}} You can add protein to your Italian pastina soup for more flavor. Some tasty choices include: - Chicken: Shredded, cooked chicken adds heartiness. - Tofu: Firm tofu works well for a plant-based option. - Beans: Canned white beans bring extra texture and protein. Simply add your choice of protein after the vegetables soften. Stir it in before adding the pastina. This way, the protein warms up and blends with the soup. This soup is easy to make vegan or vegetarian. To do this: - Use vegetable broth instead of chicken broth. - Skip the cheese or use a vegan alternative. You can also add more veggies for flavor and nutrition. Try using mushrooms or bell peppers. They add depth and richness to the soup. You can change the vegetables based on the season. Here are some great swaps: - Winter: Use root veggies like parsnips or turnips. - Spring: Try asparagus or peas for a fresh touch. - Summer: Use corn or bell peppers for sweetness. - Fall: Add squash or pumpkin for warmth. These swaps keep the soup exciting and help you use fresh, local produce. Adjust the cooking time if needed, especially for harder veggies. Enjoy experimenting! Store your leftover soup in an airtight container. Let the soup cool first. This helps keep it fresh. It’s best to eat the soup within three days. If you want it to last longer, try freezing it. To freeze your pastina soup, first cool it completely. Pour it into freezer-safe bags or containers. Leave some space at the top for expansion. Label each bag with the date. You can freeze it for up to three months. When you’re ready to eat it, just take it out and thaw. When reheating, do it slowly on the stove. Add a bit of water or broth if needed. This keeps the soup from getting too thick. Heat it until it’s warm all the way through. You can also use the microwave if you’re in a hurry. Just remember to stir it halfway through cooking. Pastina is a tiny type of pasta. It comes in shapes like stars or dots. This pasta cooks quickly and adds a cozy feel to soups. It is often a favorite for kids and adults alike. The soft texture makes it perfect for comforting meals. Yes, you can use other small pasta shapes. Options like orzo or ditalini work well too. Just keep an eye on cooking times. Larger pasta types will need longer to cook. Adjust the broth amount if you use a bigger pasta. This soup lasts about 3 to 4 days in the fridge. Store it in an airtight container. The pastina may soak up some broth over time. If that happens, add a splash of water when reheating. This recipe is not gluten-free because it uses pastina made from wheat. If you need a gluten-free option, look for gluten-free pasta. Many brands offer small shapes that work well in this soup. Always check the label to be sure. This blog post covered key steps to make a delicious soup with pastina. We discussed the essential ingredients and how fresh ones improve flavor. I detailed easy preparation methods, cooking tips, and variations to suit your taste. Remember, small changes like adding protein or swapping veggies can add excitement. Store your leftovers well for later enjoyment. With these insights, you can create a tasty soup that brings comfort to any meal. Enjoy exploring different flavors and make this recipe your own!

Italian Pastina Soup Comforting and Simple Recipe

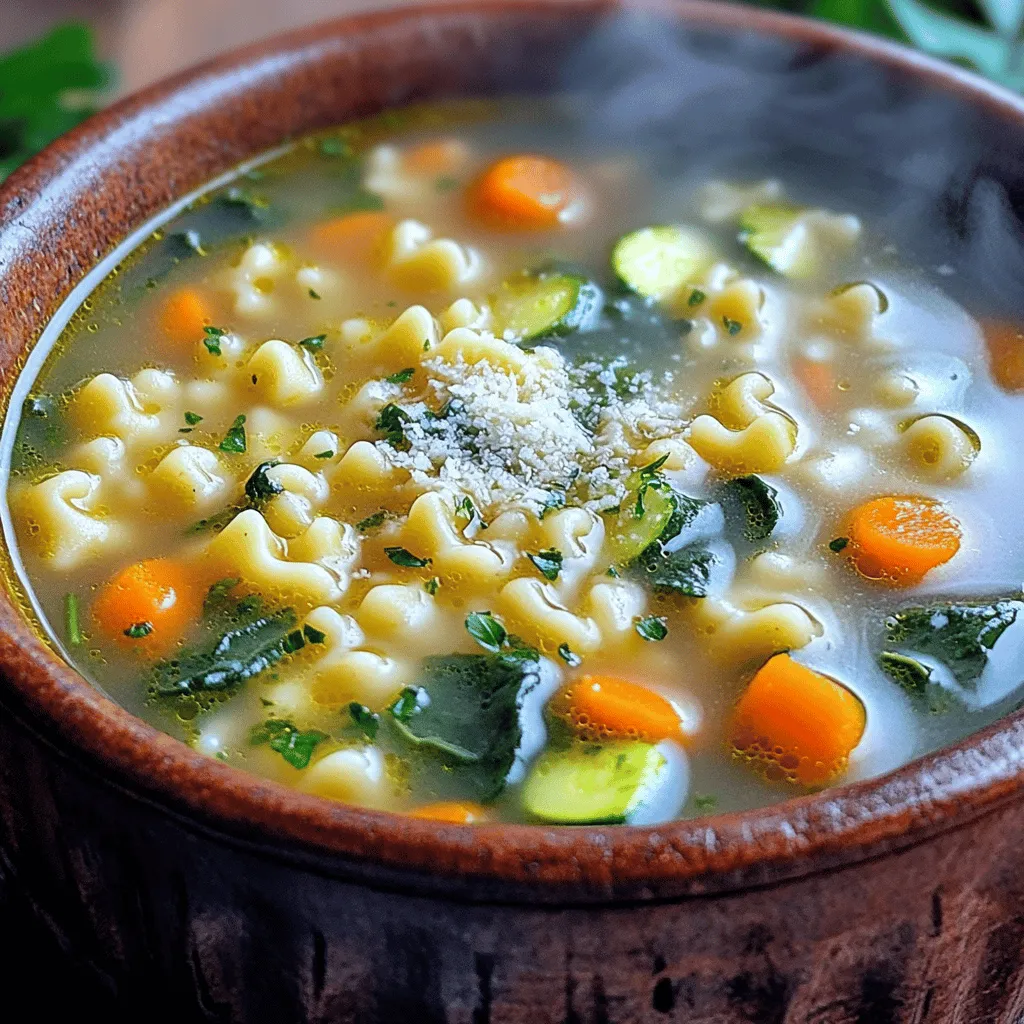
If you seek comfort in a bowl, Italian Pastina Soup is your answer. This simple recipe warms your heart and

- 2 boneless, skinless chicken breasts - 1 cup panko breadcrumbs - 1/2 cup all-purpose flour - 2 large eggs For Chicken Katsu, I always use fresh ingredients. The chicken breasts should be boneless and skinless. This keeps the meat tender and juicy. I coat the chicken with panko breadcrumbs for that crunchy texture. Panko is lighter than regular breadcrumbs. It gives a great crunch. I use all-purpose flour and eggs to help the panko stick. - 1 cup cooked Japanese short-grain rice - 1 cup shredded cabbage - 1 carrot, julienned - 1/4 cup green onions, sliced - Sesame seeds for garnish - Nori strips for garnish For serving, I love cooked Japanese short-grain rice. It has a sticky texture that pairs well with chicken katsu. Shredded cabbage adds a nice crunch. I also use julienned carrots for color and sweetness. Green onions, sesame seeds, and nori strips make the dish pop! These toppings add flavor and make the bowl look pretty. - Salt and pepper - Vegetable oil for frying - 1/4 cup tonkatsu sauce Seasoning is key to great chicken katsu. I sprinkle salt and pepper on the chicken before cooking. It brings out the chicken's natural flavor. I use vegetable oil for frying. It has a high smoke point and gives a nice golden color. Lastly, I drizzle tonkatsu sauce on top. It adds a sweet and tangy kick that ties everything together. To begin, flatten the chicken breasts. This helps them cook evenly. Place each breast between two sheets of plastic wrap. Use a meat mallet to pound them gently to an even thickness. Next, season both sides with salt and pepper. This adds flavor right to the meat. Now, let’s create a breading station. In one shallow bowl, add flour. In another bowl, beat two large eggs. In a third bowl, pour in panko breadcrumbs. This setup makes breading easy. You can keep your hands clean by using one hand for wet ingredients and the other for dry ingredients. It’s time to fry the chicken. Heat about half an inch of vegetable oil in a large skillet over medium-high heat. Once the oil is hot, carefully add the chicken. Fry each piece for about four to five minutes on each side. The chicken should turn golden brown and be cooked through. To check for doneness, cut into the thickest part. It should be white and juicy. While the chicken rests, prepare the bowls. Cook one cup of Japanese short-grain rice according to the package. Divide the rice into serving bowls. On top of the rice, add shredded cabbage and julienned carrots. This adds a nice crunch and freshness to the dish. Now, let’s finish the bowls. Slice the cooked chicken into strips. Arrange these strips on top of the rice and vegetables. Drizzle tonkatsu sauce over everything for that sweet and tangy flavor. Finally, sprinkle sesame seeds and sliced green onions on top. If you like, add nori strips for extra flavor and texture. To make your chicken katsu super crispy, follow these tips: - Tricks for panko adherence: After flattening your chicken, season it well. This adds flavor and helps the panko stick. Dredge it in flour first, then dip in beaten egg. Finally, coat it with panko. Press down firmly to help the crumbs cling. - Oil temperature tips: Heat your oil to medium-high. If it’s too cool, the chicken will soak up oil and become greasy. Use a thermometer if you have one. The oil should be around 350°F. A small test is to drop a few panko crumbs in; they should sizzle right away. Save time by prepping ahead. Here’s how: - Prepping ingredients ahead of time: You can cut your veggies and wash the rice before cooking. Store them in the fridge. This way, when it's time to cook, everything is ready to go. - Storing breaded chicken: After breading your chicken, you can place it on a tray and cover it with plastic wrap. If you want to make it later, freeze it for up to two hours. This keeps the breading intact while frying. Pair your chicken katsu with great sides and drinks: - Pairing with sides: Serve your chicken katsu over soft rice and add shredded cabbage and carrots. This adds crunch and balance to the dish. - Drinks that complement: I recommend serving green tea or a light beer. Both drinks work well with the flavors of the katsu and help cleanse your palate. These tips will help you make a perfect chicken katsu bowl every time! {{image_2}} You can easily switch chicken for a vegetarian choice. Tofu works great when you press it first. This helps it soak up flavors. Eggplant is another tasty option. Slice it into thick pieces and bread it like chicken. Both options give you a crunchy bite and a full meal. You can make your own tonkatsu sauce. Mix ketchup, Worcestershire sauce, and a bit of sugar. This sweet and tangy sauce makes the dish pop. If you want more spice, try spicy mayo. Just mix mayo with sriracha. This adds a nice kick and is simple to make. You can serve chicken katsu in different styles. A bowl is classic, with rice and veggies. You can also make a bento box. Just add sliced chicken, rice, and some pickled veggies. This option is fun and easy to take on the go. Enjoy the meal your way! To keep your chicken katsu fresh, follow these tips. First, let the chicken cool down to room temperature. Then, wrap each piece in plastic wrap or place it in an airtight container. This helps prevent it from drying out. Store it in the fridge for up to three days. For longer storage, freeze the chicken. Wrap it well in plastic wrap and then in foil. This prevents freezer burn. It can stay in the freezer for up to three months. When you are ready to eat it, thaw it in the fridge overnight. When reheating chicken katsu, the goal is to keep it crispy. The oven works best for this. Preheat your oven to 375°F (190°C). Place the chicken on a baking sheet and heat for about 10-15 minutes. Check to ensure it is hot throughout. You can also use a skillet. Heat a bit of oil over medium heat. Add the chicken and cook for about 3-5 minutes on each side. This method also keeps the crust crunchy. If you have leftovers, you can turn them into a katsu sandwich. Just add some lettuce and sauce between two slices of bread. To keep your rice fresh, store it in an airtight container. This prevents it from getting hard. Rice can last in the fridge for about four days. For cabbage and carrots, place them in separate containers. Keep them in the fridge. Cabbage can last up to a week, while carrots can stay fresh for about two weeks. If you see any wilting, use them quickly in stir-fries or salads. Chicken katsu is a Japanese dish made of breaded and fried chicken. It comes from the word "katsu," meaning cutlet. This dish has roots in Western cooking, similar to schnitzel. It became popular in Japan around the late 19th century. The chicken is pounded thin, breaded with panko, and fried until crispy. It is often served with rice and tonkatsu sauce. Yes, you can make chicken katsu in an air fryer! Here’s how: 1. Preheat the Air Fryer: Set it to 375°F (190°C). 2. Prepare the Chicken: Follow the same steps for flattening and breading. 3. Air Frying: Place the breaded chicken in a single layer. Cook for about 12-15 minutes. Flip halfway through for even crisping. Check that the internal temperature reaches 165°F (74°C). This method cuts down on oil and still gives you a crispy finish! You can serve various side dishes with chicken katsu bowls: - Steamed broccoli: Adds a healthy crunch. - Pickled vegetables: Provides a tangy contrast. - Miso soup: Complements the meal with warmth. - Japanese pickles (tsukemono): Offer a nice bite. For drinks, try green tea or a light beer. Both pair well with the flavors. Making homemade tonkatsu sauce is easy! Here’s a simple recipe: - Ingredients: - 1/4 cup ketchup - 2 tablespoons Worcestershire sauce - 1 tablespoon soy sauce - 1 tablespoon sugar - 1 teaspoon Dijon mustard 1. Mix Ingredients: In a small bowl, combine all ingredients. 2. Taste and Adjust: Feel free to tweak it to your liking. This sauce adds a sweet and tangy flavor that pairs perfectly with chicken katsu! Chicken katsu is a tasty and simple dish. We covered the main ingredients, from chicken to panko crumbs. I shared step-by-step instructions, tips for perfect frying, and meal prep ideas. You can even explore vegetarian options and variations. Lastly, we tackled storage and reheating tips. With this knowledge, you can create a delicious chicken katsu meal that impresses. Enjoy your cooking and make every bite count!

Japanese Chicken Katsu Bowls Flavorful and Easy Meal

If you crave a dish that’s crispy, savory, and easy to make, you’re in the right place! Japanese Chicken Katsu

Older posts
Newer posts
← Previous Page1 … Page36 Page37 Page38 … Page84 Next →

dsad

© 2026 Foodish Talk • Built with GeneratePress

Our Policies

  • Copyright Policy
  • Cookie Policy
  • GDPR Policy
  • Privacy Policy
  • Disclaimer
  • Terms Of Use

More Information

  • Home
  • About
  • Contact
  • Appetizers
  • Dessert
  • Dinner
  • Drinks
©2026, Foodish Talk About Back To Top