Skip to content
DisclaimerTerms Of UseGDPR PolicyCookie Policy

Foodish Talk

  • Home
  • Drinks
  • Appetizers
  • Dinner
  • Dessert
  • About
  • Contact
  • Privacy Policy
DisclaimerTerms Of UseGDPR PolicyCookie Policy

NO-ING-IMG

To make Dairy-Free Chocolate Banana Bark, you'll need the following items: - 2 large ripe bananas - 1 cup dairy-free dark chocolate chips - 1 tablespoon coconut oil - ½ cup unsweetened coconut flakes - ¼ cup chopped nuts (e.g., almonds or walnuts) - 2 tablespoons chia seeds - A pinch of sea salt If you don't have an ingredient, try these swaps: - Use any nut butter instead of coconut oil for a creamy twist. - Swap bananas for ripe strawberries or apples for a fresh taste. - Use any type of dairy-free chocolate chips, like semi-sweet or white chocolate. - Replace coconut flakes with crushed graham crackers for a crunchy texture. - Use sunflower seeds if you want a nut-free option. This treat is a great mix of flavors and nutrients. Each serving has about: - Calories: 180 - Protein: 3g - Carbohydrates: 25g - Dietary Fiber: 4g - Sugars: 10g - Fats: 8g - Saturated Fat: 6g Packed with healthy fats, fiber, and natural sugars, this bark is a tasty snack. Enjoy it as a treat or a quick energy boost! 1. Start by lining a baking sheet with parchment paper. This keeps the bark from sticking. 2. Next, slice the two large ripe bananas into thin rounds. Set these aside for later. 1. Take a microwave-safe bowl and add the dairy-free dark chocolate chips and coconut oil. 2. Microwave this mix in 30-second bursts. Stir between each burst until the chocolate is smooth. 1. Once the chocolate is ready, pour it onto the parchment-lined baking sheet. Spread it out evenly into a rectangle. 2. Gently place the banana slices on top of the melted chocolate. Press them down just a bit. 3. Now, sprinkle the coconut flakes, chopped nuts, chia seeds, and a pinch of sea salt over the top. 4. Finally, put the baking sheet in the freezer. Wait for about 1-2 hours until the chocolate is firm. 5. When it’s set, break or cut the bark into pieces and enjoy! To melt chocolate, use a microwave-safe bowl. Add the dairy-free dark chocolate chips and coconut oil. Microwave in short bursts of 30 seconds. Stir after each burst to keep the heat even. This helps avoid burning the chocolate. When it is smooth and shiny, it is ready. Remember, patience is key here! Use ripe bananas for the best flavor. Slice them into thin rounds, about a quarter inch thick. Thin slices help the bananas fit well in the bark. Use a sharp knife for clean cuts. If the bananas are too thick, they may not blend well with the chocolate. Place the slices on a plate and set them aside for later. Once your bark is ready, cut it into pieces. Store the pieces in an airtight container. Keep them in the fridge to stay fresh. If you want to store them longer, you can freeze the bark. Just wrap it well in plastic wrap before placing it in a freezer bag. This keeps it tasty for weeks! {{image_2}} You can get creative by adding different nuts and seeds. Try using cashews, pecans, or pistachios. Each nut gives a unique taste and crunch. For seeds, consider pumpkin or sunflower seeds. They add a nice texture and boost nutrition. Mix and match to find your favorite combo! You can flavor your chocolate bark in fun ways. Add a dash of cinnamon for warmth. A hint of vanilla extract brings a lovely aroma. For a fruity twist, sprinkle some freeze-dried berries on top. These flavors make each bite interesting and delicious! If you want to cut sugar, use alternative sweeteners. Maple syrup or agave nectar can replace sugar. They add sweetness without being too heavy. You can also try a sugar-free chocolate option. This keeps your bark tasty and friendly for different diets. To keep your chocolate banana bark fresh, store it in an airtight container. Use parchment paper between layers to avoid sticking. This will help maintain the bark's texture and flavor. Place the container in a cool, dry place. Avoid direct sunlight and heat, as they can cause the chocolate to melt. When stored properly, your chocolate banana bark lasts about one week at room temperature. If you want it to last longer, freeze it. Wrap each piece in plastic wrap or foil before placing it in a freezer-safe bag. This helps prevent freezer burn. The bark can stay fresh for up to three months in the freezer. To thaw frozen chocolate banana bark, simply take it out of the freezer. Let it sit at room temperature for about 15 to 20 minutes. This will make it easier to bite into. Do not use a microwave to thaw it, as this can alter its texture. Enjoy your treat once it’s ready! Yes, you can use different chocolates. Milk chocolate or white chocolate works well, too. Just make sure they are dairy-free if needed. Each type gives a unique taste. Dark chocolate has a rich flavor, while milk chocolate is sweeter. Experiment with what you like best. To make this bark healthier, use less chocolate. You can add more fruits instead. Try dried cranberries or sliced strawberries for added flavor. You might also swap nuts for seeds. This will change the texture and can add protein. Using unsweetened coconut flakes can cut added sugar. Absolutely! This recipe is great for kids. It has fun textures and a sweet taste. You can involve them in making it, too. Let them help slice bananas or sprinkle toppings. It is a fun way to get kids excited about cooking. Plus, it’s a healthy snack they will enjoy. In this blog post, we explored making delicious chocolate banana bark. We covered ingredients, substitutions, and nutritional info to help you get started. The step-by-step instructions made the process easy. We shared tips for melting chocolate and storing your bark. You can mix in nuts, seeds, and flavors for fun twists. Lastly, we discussed storage methods, shelf life, and addressed common questions. Enjoy your tasty treat, and get creative with your chocolate bark!

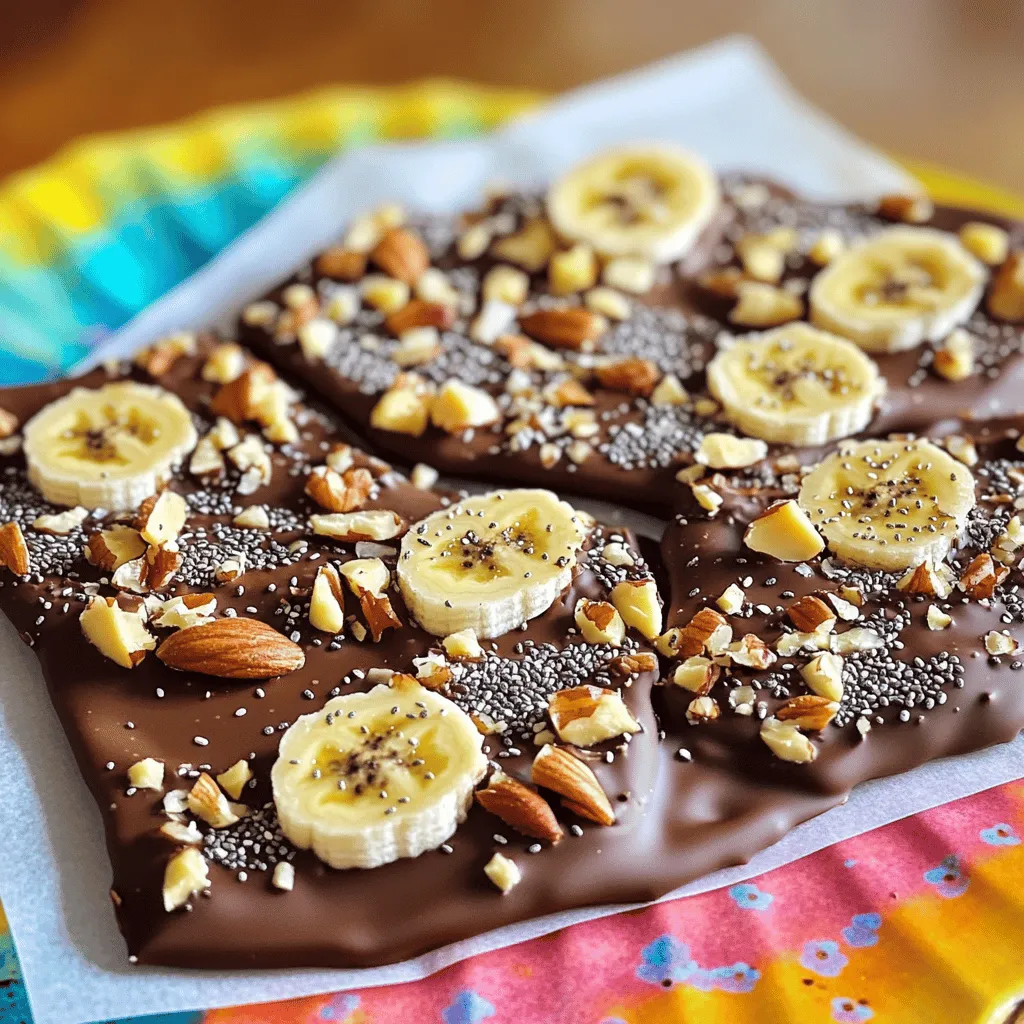
Dairy-Free Chocolate Banana Bark Easy and Delightful Treat

Looking for a sweet treat that’s easy to make and dairy-free? You’re in the right place! This Dairy-Free Chocolate Banana

- Sweet potatoes - Chicken breasts - BBQ sauce - Olive oil - Smoked paprika - Garlic powder - Corn kernels - Avocado - Green onions - Feta cheese When I create BBQ chicken sweet potato bowls, I start with the main ingredients. Sweet potatoes are my base. They bring sweetness and a creamy texture. I always use two large sweet potatoes, peeled and cubed for even cooking. Next, I choose boneless, skinless chicken breasts. They cook nicely and soak up flavors well. I like to use about two chicken breasts for this recipe. Finally, I add BBQ sauce. You can use homemade or store-bought. The sauce gives a rich, smoky taste that pairs perfectly with sweet potatoes. Next come the seasonings. I use one tablespoon of olive oil to coat the sweet potatoes. It helps with roasting. I add one teaspoon each of smoked paprika and garlic powder. These spices bring depth to the dish. Now, for the optional toppings. Corn kernels add a crunchy texture. Slices of avocado give creaminess. I also sprinkle chopped green onions for freshness. If you like a salty bite, crumbled feta cheese is a great choice. These toppings elevate the meal and make it even more satisfying. This combination of ingredients creates a colorful and flavorful dish. Each bite is a mix of sweet, smoky, and creamy. It's one of my favorite meals to make! 1. Preheating the oven: Start by preheating your oven to 400°F (200°C). This step is key for roasting sweet potatoes perfectly. 2. Preparing sweet potatoes: Peel and cube the two large sweet potatoes. In a bowl, toss them with one tablespoon of olive oil, one teaspoon of smoked paprika, one teaspoon of garlic powder, and salt and pepper to taste. Make sure each piece gets coated well. Spread the sweet potatoes out on a baking sheet in a single layer. 1. Seasoning and cooking method: While the sweet potatoes roast, take two boneless, skinless chicken breasts. Season them with salt and pepper. Heat a skillet over medium heat and add the chicken. Cook for 6 to 7 minutes on each side, until they are brown and fully cooked. 2. Shredding the chicken: Once done, take the chicken out of the skillet. Let it rest for a few minutes. Then, use two forks to shred the chicken into bite-sized pieces. 1. Layering the ingredients: Start by placing a generous scoop of roasted sweet potatoes at the bottom of each bowl. Then, add the BBQ chicken, which you will coat with BBQ sauce. 2. Serving suggestions: Top the chicken with a handful of corn kernels, slices of avocado, and a sprinkle of chopped green onions. If you like, add crumbled feta cheese for extra flavor. Serve it warm and enjoy your tasty BBQ chicken sweet potato bowls! To roast sweet potatoes just right, you may need to adjust cooking times. If your sweet potatoes are larger, they may need a few extra minutes. Check them by piercing with a fork. If it goes in easily, they are done. Aim for a nice caramel color on the edges for that sweet flavor. For a richer BBQ chicken taste, you can make your own sauce. Combine ketchup, brown sugar, vinegar, and spices for a quick mix. If you want a kick, add hot sauce or smoked paprika. You can also use different seasonings, like chili powder or cumin, to spice things up. Garnishing makes your bowls pop. Add sliced avocado on top for creaminess and color. Chopped green onions not only add flavor but also a fresh look. If you use feta cheese, it gives a nice salty bite. Serve your bowls in clear dishes to show off the layers. {{image_2}} You can easily change the taste of your BBQ chicken sweet potato bowls. For a spicy kick, try adding hot sauce or cayenne pepper to your BBQ sauce. This gives the dish a nice heat. If you like different flavors, swap out BBQ sauce for teriyaki or honey mustard. Each sauce brings a unique taste. If you want to switch things up, there are great alternatives. Instead of sweet potatoes, you can use butternut squash or regular potatoes. Both will work well. For protein, consider turkey or a plant-based option like jackfruit. These choices keep the meal tasty and healthy. You can easily adjust this recipe for different diets. If you need it gluten-free, check your BBQ sauce. Some brands contain gluten. For a vegan version, omit the chicken and cheese. You can replace chicken with tofu or tempeh. This way, everyone can enjoy a delicious bowl! To keep your BBQ chicken sweet potato bowls fresh, store them properly. First, let the bowls cool down to room temperature. Use airtight containers for refrigeration. Separate the chicken and sweet potatoes to keep them fresh longer. If you want to freeze them, place each component in freezer bags. Remove as much air as you can before sealing. When you’re ready to eat leftovers, reheat them carefully. The best way to reheat sweet potatoes is in the oven. Preheat your oven to 350°F (175°C) and place the sweet potatoes in a baking dish. Heat for about 15-20 minutes. For the chicken, use a skillet over low heat. Add a splash of water or BBQ sauce to keep it moist. This helps maintain both texture and flavor. Store your BBQ chicken sweet potato bowls in the fridge for up to four days. If frozen, they can last up to three months. Check for signs of spoilage, such as off smells, discoloration, or any mold. If you see these signs, it's best to toss the food. Always prioritize food safety to enjoy your meals without worry. Yes, you can swap out the sweet potatoes! Try using butternut squash or regular potatoes. You can also add bell peppers, zucchini, or broccoli. These veggies add great color and taste. Just remember to cut them into equal sizes for even cooking. Roasting times may vary, so check for doneness. For the best flavor, I love making homemade BBQ sauce. You can mix ketchup, brown sugar, and vinegar for a simple recipe. If you prefer store-bought, look for sauces with natural ingredients and no high fructose corn syrup. Sweet and smoky sauces work best for this dish. Adjust the sauce amount to your taste! Yes, you can prep this dish in advance! Cook the sweet potatoes and chicken, then store them separately. Keep them in airtight containers in the fridge for up to 3 days. When ready to eat, just reheat the chicken and sweet potatoes. Assemble your bowl, and enjoy a quick and tasty meal! This post covered how to create delicious BBQ chicken bowls. We explored main ingredients like sweet potatoes, chicken, and BBQ sauce. You learned tips for perfect roasting and enhancing flavors. Variations let you customize to your taste and dietary needs. Proper storage keeps your meals fresh, and the FAQs section answered common questions. Enjoy crafting your bowls, and don't hesitate to get creative with flavors!

BBQ Chicken Sweet Potato Bowls Flavorful Meal Idea

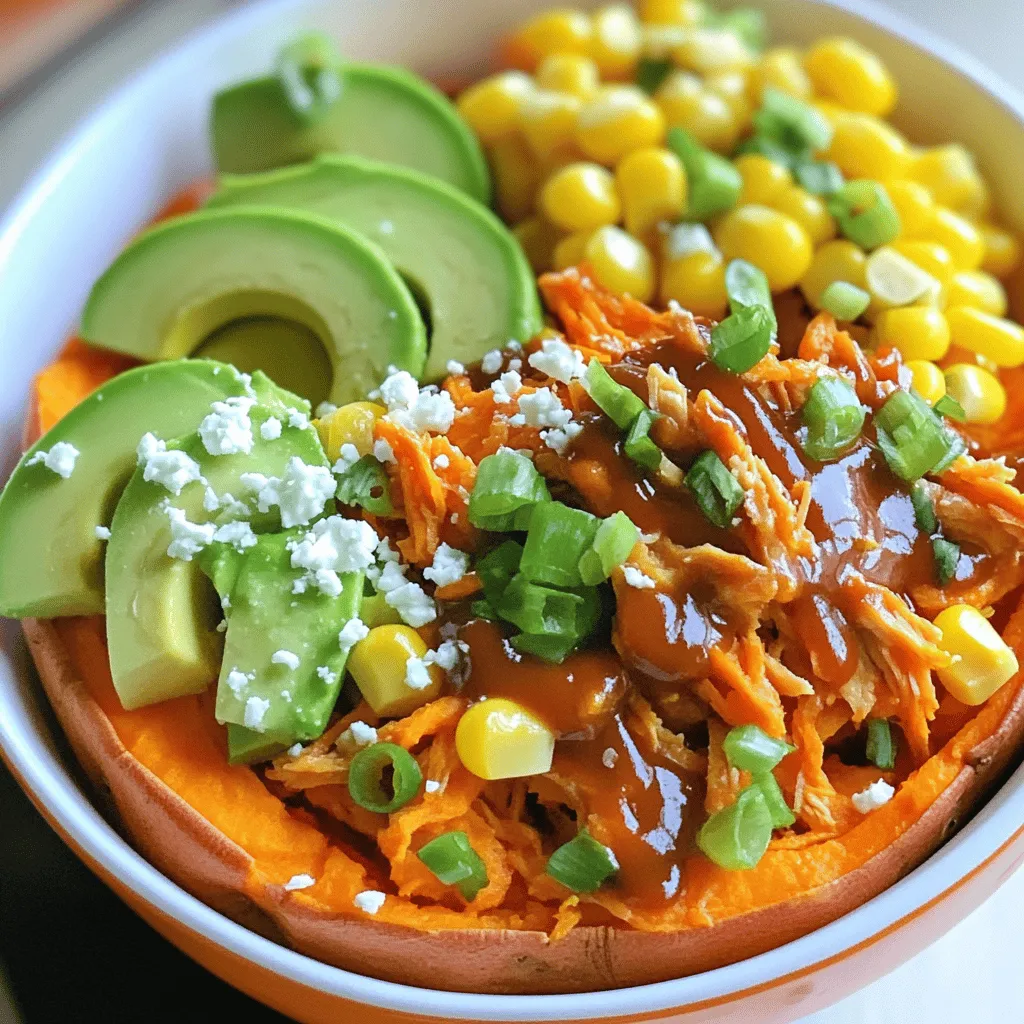
Looking for a delicious and easy meal idea? These BBQ Chicken Sweet Potato Bowls pack flavor and nutrition into one

- 2 cups elbow macaroni - 1 lb chicken breast, diced - 4 tablespoons unsalted butter - 1/4 cup honey - 4 cloves garlic, minced - 2 cups shredded sharp cheddar cheese - 1 cup milk For this dish, I use elbow macaroni. It holds sauce well and cooks quickly. The chicken breast adds protein and a nice texture. I love using honey and garlic together for a sweet and savory kick. Sharp cheddar cheese gives a rich flavor, and milk makes the sauce creamy. - 1 teaspoon Dijon mustard - 1/2 teaspoon smoked paprika - Salt and pepper to taste - Fresh parsley, chopped (for garnish) To season, I use Dijon mustard for a tangy twist. Smoked paprika adds depth and warmth. I always adjust salt and pepper for taste. Chopped parsley makes a colorful garnish on top. It adds freshness and a nice pop of green. First, fill a large pot with water. Add a generous pinch of salt. Bring the water to a rolling boil. Once boiling, add 2 cups of elbow macaroni. Cook according to the package instructions until it is al dente. This usually takes about 7 to 8 minutes. Be sure to stir occasionally so the pasta does not stick. After it's cooked, drain the macaroni and set it aside. Next, grab a large skillet and place it over medium heat. Add 2 tablespoons of unsalted butter and let it melt. Once melted, add 1 pound of diced chicken breast. Season the chicken with salt, pepper, and 1/2 teaspoon of smoked paprika. Cook the chicken for about 7 to 10 minutes. It should be browned and cooked through. Once done, remove the chicken from the skillet and set it aside. Now, in the same skillet, add the remaining 2 tablespoons of butter. Let it melt completely. After that, add 4 cloves of minced garlic and sauté for about 1 to 2 minutes. You want the garlic to be fragrant but not burned. Then, stir in 1/4 cup of honey. Cook it for about 2 more minutes until it starts to caramelize. This gives the sauce a rich, sweet flavor. With the sauce ready, add the cooked chicken back to the skillet. Toss the chicken in the honey garlic sauce until it is well coated. Remove the skillet from heat. In a large saucepan, combine 1 cup of milk and 1 teaspoon of Dijon mustard over low heat. Gradually whisk in 2 cups of shredded sharp cheddar cheese until it melts and becomes smooth. Finally, mix in the cooked macaroni and the honey garlic chicken. Stir until everything is well combined. To make a smooth cheese sauce, start with low heat. Gradually add cheese while stirring. This keeps the cheese from clumping. Use freshly shredded cheese for the best melt. Pre-packaged cheese often has additives that can make it grainy. Whisk constantly to combine milk and cheese well. If the sauce is too thick, add more milk until you reach the desired creaminess. You can add spices to boost flavor. Try a pinch of cayenne for heat or Italian herbs for depth. A dash of garlic powder adds more garlic flavor. You can also mix in some cooked bacon bits for a smoky taste. For a fresh twist, add lemon zest or a splash of hot sauce. These small changes can elevate your dish. Presentation matters! Serve the mac and cheese in rustic bowls for a cozy feel. Sprinkle extra cheddar cheese on top before serving. This adds a nice touch and a melty layer. Finish with fresh parsley for color. You can also drizzle a bit of the honey garlic sauce on top. This makes it look even more appetizing. {{image_2}} You can swap chicken for other meats or plant-based options. Try diced turkey for a leaner choice. Ground beef also adds a rich flavor. If you prefer plant-based, use chickpeas or tofu. Both options soak up the honey garlic sauce well. For a seafood twist, shrimp can also be a tasty alternative. Just cook it until it turns pink. Not a fan of cheddar? You can use different cheeses. Gouda brings a creamy texture and a smoky taste. Monterey Jack melts well and gives a mild flavor. For a sharper bite, try blue cheese. You can even mix cheeses for a unique flavor profile. Just ensure you have enough melting cheese in the mix. If you need gluten-free options, use gluten-free pasta. Many brands offer elbow macaroni made from rice or corn. For dairy-free adaptations, choose plant-based milk and cheese. Coconut milk adds a nice creaminess. Nutritional yeast can give a cheesy flavor without dairy. Always check labels to ensure they fit your needs. To store your Honey Garlic Butter Chicken Mac & Cheese, let it cool first. Use an airtight container for best results. Place the leftovers in the fridge. This helps keep the flavors fresh and tasty. To freeze, make sure it is completely cool. Transfer the mac and cheese into freezer-safe containers. Label them with the date. When ready to eat, thaw in the fridge overnight. Reheat it in the oven or on the stove. Add a splash of milk if it seems dry. In the fridge, your dish lasts about 3 to 4 days. If you freeze it, it can last up to 2 months. Always check for any off smells or changes in color before eating. Enjoy your tasty meal with confidence! Yes, you can make this dish ahead of time. Here’s how: - Cook the macaroni and chicken as per the recipe. - Prepare the honey garlic sauce and cheese sauce. - Combine everything but do not bake it. - Store in an airtight container in the fridge. - When ready to eat, bake it at 350°F for 20-25 minutes. This keeps the dish fresh and tasty. To add some heat, try these ideas: - Mix in some red pepper flakes while cooking the chicken. - Add diced jalapeños to the honey garlic sauce. - Use pepper jack cheese instead of cheddar for a spicy kick. - Try a dash of hot sauce in the cheese sauce for added flavor. These options will spice up your mac and cheese wonderfully. Pair this mac and cheese with these sides: - A fresh garden salad with a light vinaigrette. - Roasted vegetables like broccoli or Brussels sprouts. - Garlic bread for dipping into the cheese sauce. - Grilled corn on the cob for a sweet crunch. These sides will complement the rich flavors of your meal. Honey Garlic Butter Chicken Mac & Cheese is a tasty and easy dish to make. You learned about the main ingredients, cooking steps, and seasoning tips. You can try different proteins or cheeses for variety. Storing leftovers is simple, too. This dish is both fun to cook and delicious on the table. Enjoy making it your own and share it with friends and family. Cooking is about experimenting and having fun!

Savory Honey Garlic Butter Chicken Mac & Cheese Recipe

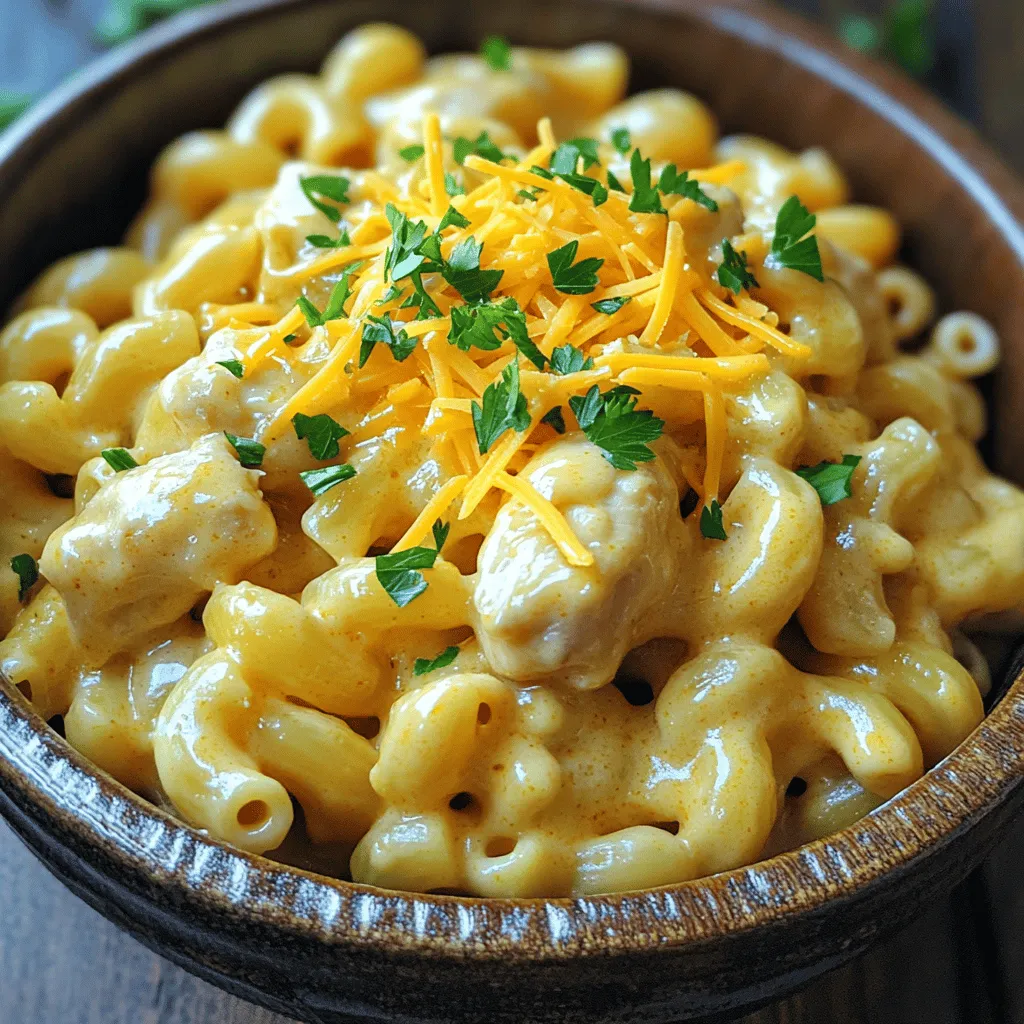
Are you ready to take mac and cheese to a whole new level? This Savory Honey Garlic Butter Chicken Mac

To make Baked Cod in Coconut Lemon Cream Sauce, gather these tasty ingredients: - 4 cod fillets (about 6 oz each) - 1 can (13.5 oz) coconut milk - 1 lemon (zested and juiced) - 2 tablespoons unsalted butter - 2 cloves garlic, minced - 1 teaspoon fresh ginger, grated - 1 tablespoon honey or maple syrup - Salt and pepper to taste - 1 tablespoon olive oil - Fresh cilantro or parsley for garnish These simple ingredients come together to create a rich, creamy sauce. Cod is mild, which makes it perfect for this dish. Coconut milk adds a tropical flair. Lemon brightens the flavors with a refreshing twist. Garlic and ginger give a warm, aromatic touch. You can use honey or maple syrup for sweetness, balancing the savory notes. I love how fresh herbs, like cilantro or parsley, finish the dish. They add color and a burst of flavor. Each bite combines creamy, tangy, and savory elements that excite your taste buds. So, let’s get cooking! 1. Preheating the oven Start by preheating your oven to 400°F (200°C). This step is important to ensure even cooking. 2. Preparing the coconut lemon cream sauce In a medium saucepan, melt 2 tablespoons of unsalted butter over medium heat. Add 2 cloves of minced garlic and 1 teaspoon of grated ginger. Sauté these for 1-2 minutes until they smell great. Next, pour in 1 can (13.5 oz) of coconut milk. Stir it well. Add the zest and juice of 1 lemon, along with 1 tablespoon of honey or maple syrup. Season this mix with salt and pepper. Bring it to a gentle simmer and cook for about 5 minutes. This sauce adds rich flavor to the cod. 1. Drizzling olive oil in the baking dish Take a baking dish and drizzle 1 tablespoon of olive oil on the bottom. This helps keep the fish from sticking. 2. Seasoning cod fillets Place 4 cod fillets, each about 6 oz, in the dish. Lightly season them with salt and pepper. This simple seasoning enhances the fish’s natural taste. 1. Pouring the sauce over cod Pour the coconut lemon cream sauce evenly over the cod fillets. Make sure each piece is well coated. This ensures every bite is flavorful. 2. Baking time and checking doneness Bake the cod in the preheated oven for 15-20 minutes. Check for doneness by seeing if the fish flakes easily with a fork. Once cooked, remove the dish from the oven and let it sit for a couple of minutes. This allows the flavors to settle. Oven temperature matters. Preheat your oven to 400°F (200°C). This heat cooks the cod just right. It keeps the fish tender and flaky. Checking for doneness is key. Cod is ready when it flakes easily with a fork. If it’s still raw, bake it a bit longer. You want that perfect texture! Want to boost the flavor? Try adding spices like paprika or cayenne. They add warmth and depth. You can also mix in fresh herbs like thyme or dill. For sweeteners, honey works great, but maple syrup is a fine choice too. Both options blend well with coconut and lemon. Garnishing makes your dish pop! Fresh cilantro or parsley adds color and freshness. Sprinkle some on right before serving. For serving, pair your cod with white rice or a green salad. This adds balance and makes your plate look great! {{image_2}} You can change the fish in this recipe. Cod is great, but you can use salmon or tilapia. They both cook well and taste delicious. Each type of fish brings a unique flavor to the dish. For the sauce, if you want a different taste, try almond milk or oat milk instead of coconut milk. This will change the flavor but still keep it creamy. If you need gluten-free options, this recipe is already safe! All the ingredients are gluten-free. For dairy-free variations, use dairy-free butter or a plant-based cream. This way, you can enjoy the same rich and tasty sauce without dairy. Want to spice things up? Add curry powder or chili flakes to the sauce for a kick. This will make the dish more exciting. You can also mix in some veggies like spinach or bell peppers. They add color and nutrition while making the meal more filling. To keep your baked cod fresh, place it in an airtight container. This helps the fish stay moist and tasty. Store it in the fridge for up to three days. If you want to keep it longer, freezing is a great option. Wrap the cod tightly in plastic wrap or foil, then place it in a freezer-safe bag. This way, it can last for up to two months. When reheating, do it slowly to keep the flavor and texture. Preheat your oven to 350°F (175°C). Place the cod in an oven-safe dish and cover it with foil. Heat for about 15 minutes or until warmed through. You can also use a microwave, but it may make the cod a bit rubbery. If you choose this method, heat it in short bursts and check often. Leftovers can stay good in the fridge for three days. If you freeze them, you should eat them within two months for the best taste. After that, the flavor may fade. Always check for any signs of spoilage before eating. Enjoy your delicious cod! The best side dish for baked cod is often rice or quinoa. Both pair well with the coconut lemon cream sauce. You can also serve it with roasted vegetables. Steamed broccoli or asparagus adds a nice crunch. A fresh salad can brighten the meal too. Try a simple cucumber salad with lime juice for extra zing. Yes, you can use frozen cod fillets. Just make sure to thaw them first. Place the frozen fillets in the fridge overnight for best results. If you're in a hurry, submerge them in cold water for about an hour. This helps them cook evenly and stay moist. Baked cod is done when it flakes easily with a fork. The fish should be opaque and have a white color. You can also use a meat thermometer. The internal temperature should reach 145°F (63°C). This ensures it's safe and delicious to eat. Yes, there are substitutes for coconut milk. You can use almond milk or soy milk for a lighter option. If you want creaminess, try heavy cream or half-and-half. This will alter the flavor but still taste good. Always check if they fit your dietary needs. Yes, you can make this recipe ahead of time. Prepare the coconut lemon cream sauce and store it in the fridge. You can also season the cod fillets in advance. Just bake them when you're ready to eat. This saves time and makes meal prep easier. This recipe for baked cod with coconut lemon cream is simple and tasty. You learned what ingredients you need and how to prepare and bake them. I shared tips for perfecting your dish and even offered variations to suit your taste. Remember, this meal is easy to store and reheat. Enjoy exploring the flavors and presentation ideas we discussed. Cooking is fun, and I hope you feel inspired to try this dish at home!

Baked Cod in Coconut Lemon Cream Sauce Delight

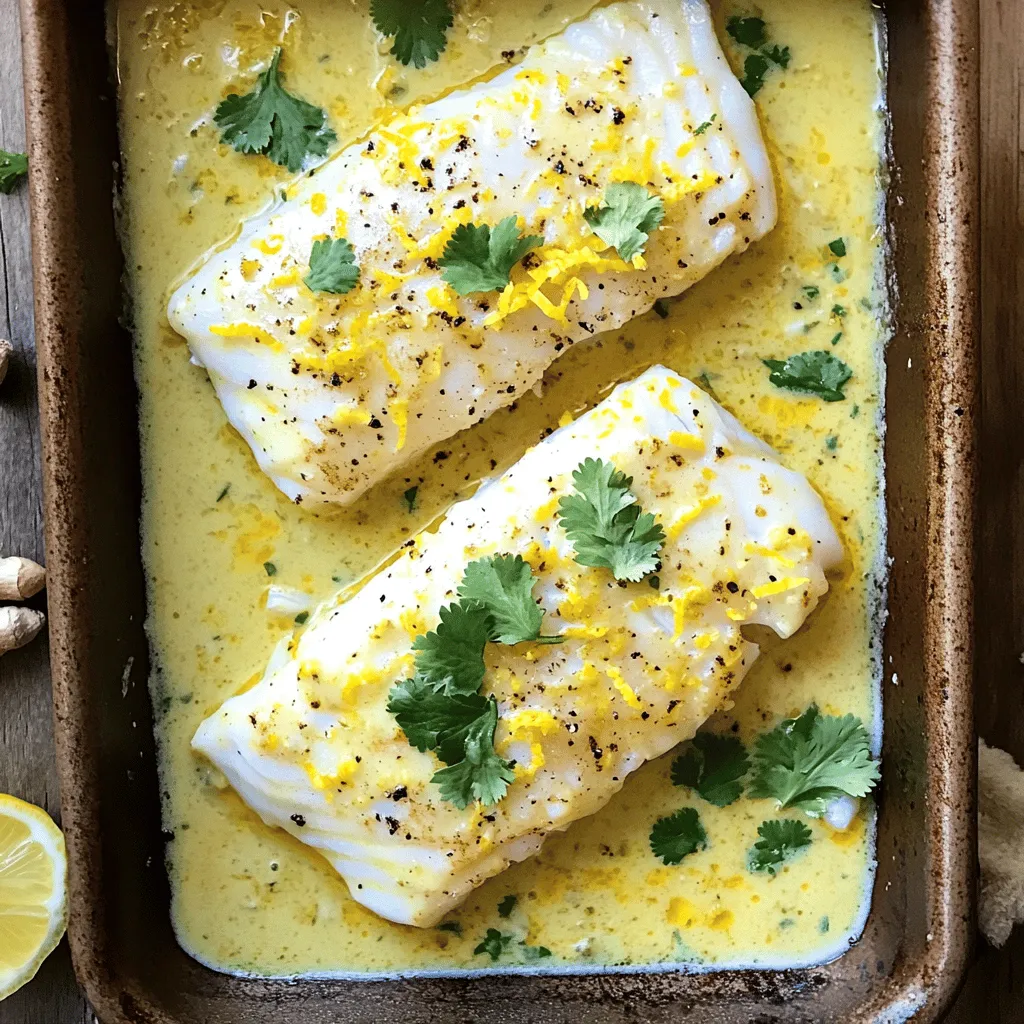
Are you ready to elevate your dinner game? My Baked Cod in Coconut Lemon Cream Sauce is a dish you’ll

To make Chicken Street Tacos, gather these main items: - 2 chicken breasts, diced - 1 tablespoon olive oil - 8 small corn tortillas Season the chicken with these spices: - 1 teaspoon chili powder - 1 teaspoon cumin - 1 teaspoon garlic powder - 1 teaspoon onion powder - Salt and pepper to taste These spices add flavor and depth to the dish. The chili powder gives a nice kick, while the cumin adds warmth. Garlic and onion powder enhance the savory notes. Top your tacos with these fresh ingredients: - 1 cup diced tomatoes - 1/2 cup red onion, finely chopped - 1/4 cup fresh cilantro, chopped - Juice of 1 lime - 1 avocado, sliced - Optional: Hot sauce for drizzling These toppings bring freshness and color to your tacos. The lime juice brightens the flavors, and the avocado adds creaminess. Feel free to customize with your favorite hot sauce for extra heat! First, take the diced chicken breasts. Place them in a mixing bowl. Add one tablespoon of olive oil. Then, sprinkle in one teaspoon each of chili powder, cumin, garlic powder, and onion powder. Season with salt and pepper to taste. Mix well to coat each piece of chicken with the spices. This step is key for flavor. Next, heat a non-stick skillet over medium-high heat. Add the seasoned chicken to the pan. Cook for about 8 to 10 minutes. Stir occasionally. You want the chicken to be cooked through and a bit crispy on the edges. While the chicken cooks, let’s make a fresh salsa. In a separate bowl, combine one cup of diced tomatoes, half a cup of finely chopped red onion, and a quarter cup of chopped fresh cilantro. Squeeze in the juice of one lime. Stir well to mix all the flavors. Season with salt to taste. Set the salsa aside until you’re ready to assemble the tacos. In the same skillet you used for the chicken, it’s time to char the tortillas. Place one tortilla in the pan and heat it for about 30 seconds. Flip it and heat the other side for another 30 seconds. The tortillas should be warm and a little pliable. Repeat this for all eight tortillas. Now, let’s put it all together. Take a warm tortilla and layer it with the cooked chicken. Top it with a generous spoonful of the fresh salsa. Add a few slices of avocado for creaminess. If you like heat, drizzle some hot sauce over the top. Your tacos are now ready to enjoy! For great chicken street tacos, use high heat. Cooking the chicken quickly helps it brown. This gives it a nice crisp on the edges. Use good spices, too! Mixing chili powder, cumin, garlic powder, and onion powder adds depth. Don't rush; let the chicken absorb these flavors. You can also marinate the chicken for an hour before cooking to boost flavor. Warm your corn tortillas well. You want them soft and pliable, not dry. Heat them in the skillet for about 30 seconds on each side. This step adds flavor and makes them easier to fold. If you like a little char, cook them a bit longer. It adds a nice smokiness. Presentation matters! Serve the tacos on a bright platter. Garnish with extra cilantro and lime wedges for color. You can add avocado slices, too. This makes the dish look fresh and inviting. Want to impress? Serve with a side of tortilla chips and fresh salsa. It makes the meal feel complete and fun! {{image_2}} You can swap chicken for other meats. Try beef, pork, or shrimp. Each option brings a new taste. For beef, use flank steak for a tender bite. For pork, shredded carnitas add great flavor. Shrimp cooks fast and tastes fresh. Just adjust your cooking time to ensure it's safe to eat. Want a meat-free taco? Use grilled veggies or beans. Try portobello mushrooms for a meaty texture. You could also use black beans or chickpeas for protein. Just season them well, like you do with chicken. This keeps the flavor bold and exciting. Change the spices to mix up the flavor. For a smoky taste, add smoked paprika. If you like heat, try cayenne pepper or chipotle powder. For a fresh twist, use herbs like oregano or thyme. You can also play with citrus; orange juice can add a sweet zing. Each change makes the dish new and fun! To store leftover tacos, place them in an airtight container. Keep the chicken, salsa, and tortillas separate. This helps maintain texture and flavor. You can store them in the fridge for up to three days. When ready to eat, just reheat them. If you have extra cooked chicken, you can freeze it. Place the chicken in a freezer-safe bag. Remove as much air as possible before sealing. Label the bag with the date. The chicken can last in the freezer for up to three months. When you want to use it, thaw it in the fridge overnight. To reheat, use a skillet on medium heat. Add a bit of oil to the pan. Heat the chicken for about five minutes or until warm. For the tortillas, warm them in the skillet for about 30 seconds on each side. This keeps them soft and tasty. You can also use a microwave if you're in a rush. But the skillet gives a better texture. To make your chicken street tacos spicy, add more chili powder. You can also use cayenne pepper or hot sauce. Mix these spices in with the chicken before cooking. Adjust the heat to your taste. A little extra spice can make your tacos pop with flavor! Yes, you can prepare the chicken ahead of time. Simply season the diced chicken and store it in the fridge for up to 24 hours. When you’re ready to cook, just heat it in a pan. This saves time and makes meal prep easier. Corn tortillas are the best for street tacos. They are soft and have great flavor. Look for smaller tortillas, about 6 inches wide. You can also lightly char them for a better taste. This adds a nice texture to your tacos. Tacos pair well with simple side dishes. You can serve tortilla chips and fresh salsa. A light salad with cilantro and lime is also tasty. Don’t forget guacamole for a creamy touch! These sides complement the flavors of the tacos. This blog post covered all you need to make great chicken street tacos. You learned about key ingredients, how to prepare the chicken, and make fresh salsa. We shared tips for charring tortillas and presented different flavors and alternatives. You can store leftovers easily and even try spicier versions. Remember to have fun with toppings and get creative. Enjoy your taco-making journey!

Chicken Street Tacos Flavorful and Easy Recipe Guide

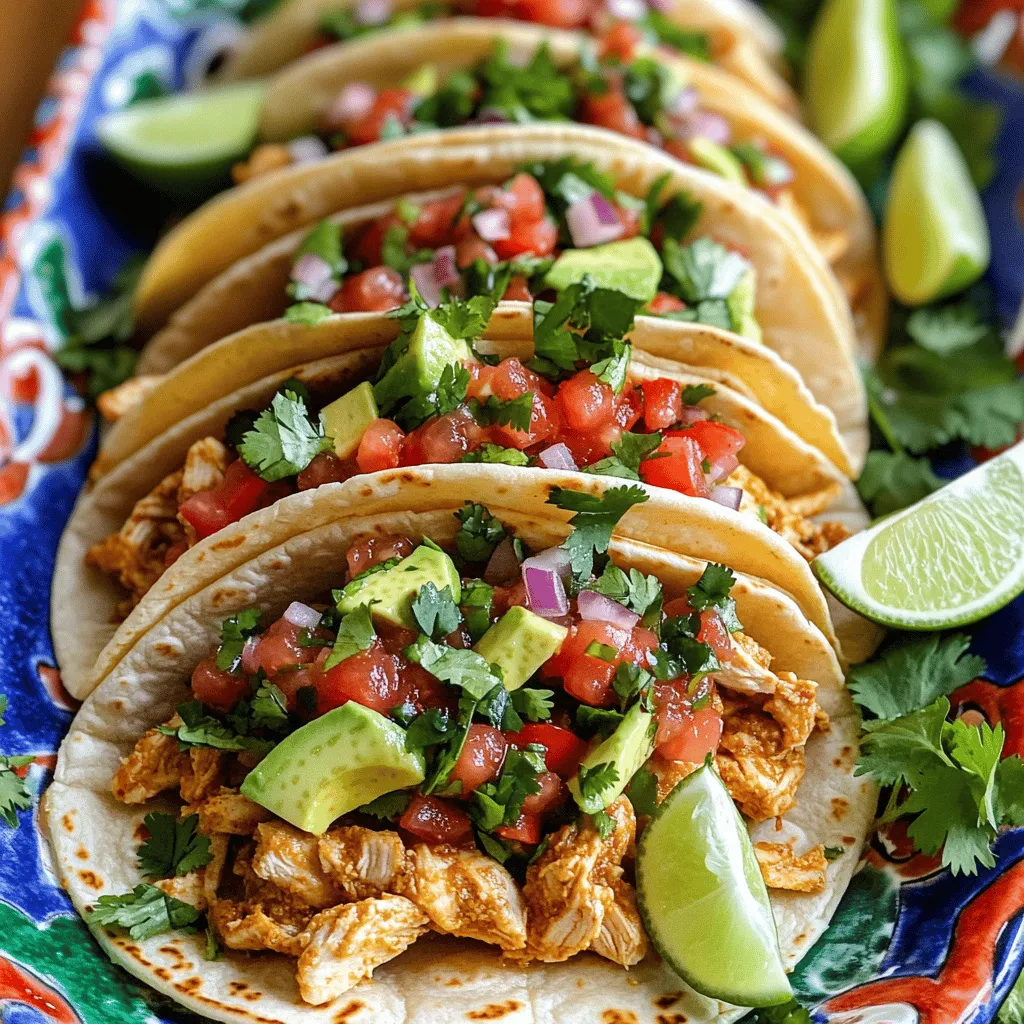
Are you ready to create tasty Chicken Street Tacos that your family will love? In this easy recipe guide, I’ll

For Greek Loaded Hummus, you need these main ingredients: - 1 can (15 oz) chickpeas, drained and rinsed - 1/4 cup tahini - 2 tablespoons olive oil - 2 tablespoons lemon juice - 1 garlic clove, minced - 1 teaspoon ground cumin - Salt and pepper to taste These ingredients form the base of your hummus. The chickpeas provide a creamy texture, while tahini adds a rich, nutty flavor. Olive oil and lemon juice bring brightness, and garlic adds a punch. Next, you’ll want these seasoning and garnishing ingredients: - 1/2 cup diced cucumber - 1/2 cup cherry tomatoes, halved - 1/4 cup kalamata olives, pitted and sliced - 1/4 cup crumbled feta cheese - Fresh parsley, chopped for garnish These toppings bring color and fresh flavor. The cucumbers add crunch, while the tomatoes are juicy and sweet. Olives lend a briny taste, and feta adds creaminess. Parsley gives a fresh finish. For serving, I suggest: - Pita chips - Fresh pita bread These options are perfect for dipping. They complement the hummus well and make it easy for everyone to enjoy. You can also serve with fresh veggies for a healthy twist. Start by bringing out your food processor. Add one can of drained and rinsed chickpeas. Then, scoop in a quarter cup of tahini. Next, pour in two tablespoons of olive oil. This will add a nice richness. Squeeze in two tablespoons of fresh lemon juice for tang. Don’t forget one minced garlic clove. Add one teaspoon of ground cumin for warmth. Sprinkle in salt and pepper to taste. Blend the mix until it is smooth and creamy. You can taste it now. If you want more zing, add a bit more lemon juice or salt. Once the hummus is ready, transfer it to a serving dish. Create a shallow well in the center. This will hold the toppings nicely. Now, it’s time for those colorful toppings! Start with half a cup of diced cucumber. Next, add half a cup of halved cherry tomatoes. Then, sprinkle a quarter cup of sliced kalamata olives. For a salty bite, add a quarter cup of crumbled feta cheese. Make sure to spread them evenly for a beautiful look. To finish, drizzle a little olive oil over the top for extra flavor. Now it’s time to serve! I like to garnish my dish with fresh chopped parsley. You can also add a light sprinkle of cumin if you wish. This dip pairs perfectly with pita chips or fresh pita bread. It is great for sharing with friends or family. Set it out and watch everyone enjoy this delicious treat! To get smooth hummus, start with drained chickpeas. Rinse them well to remove any canning liquid. When you blend, add tahini, olive oil, and lemon juice. This mix helps create a creamy texture. If it feels too thick, add a bit of cold water. Blend until it’s silky and light. For bold flavor, use fresh garlic and lemon juice. Ground cumin adds a warm touch. If you want more depth, try smoked paprika or a pinch of cayenne. Top with diced cucumbers, halved cherry tomatoes, and kalamata olives. Crumbled feta gives a salty kick. Remember to drizzle a bit of olive oil on top for a rich finish. Serving is all about the look. Use a shallow bowl for the hummus. Make a small well in the center. Layer fresh toppings like cucumbers and tomatoes in this well. Garnish with chopped parsley for color. Serve with pita chips or fresh pita bread around the edges. This makes it easy for everyone to enjoy! {{image_2}} You can change the toppings on your Greek Loaded Hummus. Try adding roasted red peppers for a sweet taste. You could also use artichoke hearts for a tangy touch. For a spicy kick, add sliced jalapeños. Each topping adds its own fun flavor and color. Want to mix it up? Use white beans instead of chickpeas. They give a smooth texture. Swap tahini for Greek yogurt to make it creamier. You can also try adding roasted garlic for a richer taste. Experimenting with these swaps can make your hummus special. Greek Loaded Hummus is already vegan if you skip the feta. If you want it gluten-free, use fresh veggies or gluten-free pita chips. For a nut-free version, skip the tahini and replace it with more olive oil. These options make this dip friendly for many diets. To store homemade Greek Loaded Hummus, place it in an airtight container. Make sure to cover the surface with olive oil to keep it fresh. This helps to seal in the flavors and moisture. Always use a clean spoon to scoop out the hummus. This prevents bacteria from growing. Homemade Greek Loaded Hummus lasts about 4 to 7 days in the fridge. Store it in the coldest part of your fridge for best results. If it develops an off smell or changes color, it is best to throw it away. You can freeze Greek Loaded Hummus for up to 3 months. Use a freezer-safe container, leaving some space at the top. This space allows for expansion as the hummus freezes. When ready to eat, thaw it in the fridge overnight. Stir well before serving to restore its creamy texture. The best pairings for Greek Loaded Hummus are pita chips and fresh pita bread. You can also serve it with veggie sticks, like carrots and cucumbers. It goes well with olives and grape leaves. You can even enjoy it with grilled meat or fish. Yes, you can make Greek Loaded Hummus ahead of time. It tastes even better when the flavors mix. Just cover it well and store it in the fridge. Make sure to add toppings just before serving for the best look and taste. Homemade hummus lasts about 4 to 7 days in the fridge. Keep it in an airtight container to keep it fresh. If you see any changes in smell or color, it is best to throw it away. Yes, you can use canned chickpeas for this recipe. They save time and are still tasty. Just drain and rinse them before using. This will help reduce any canning taste and make your hummus smooth and creamy. Creating Greek Loaded Hummus is fun and easy. We covered main ingredients, step-by-step instructions, and essential tips. You learned how to blend flavors for perfect consistency. Exploring topping variations lets you experiment with taste and make it your own. Proper storage keeps your hummus fresh longer. Enjoy making this dish for friends or family. It’s simple yet packed with flavor. Try it today to bring a taste of Greece to your table.

Greek Loaded Hummus Flavorful and Delightful Dip

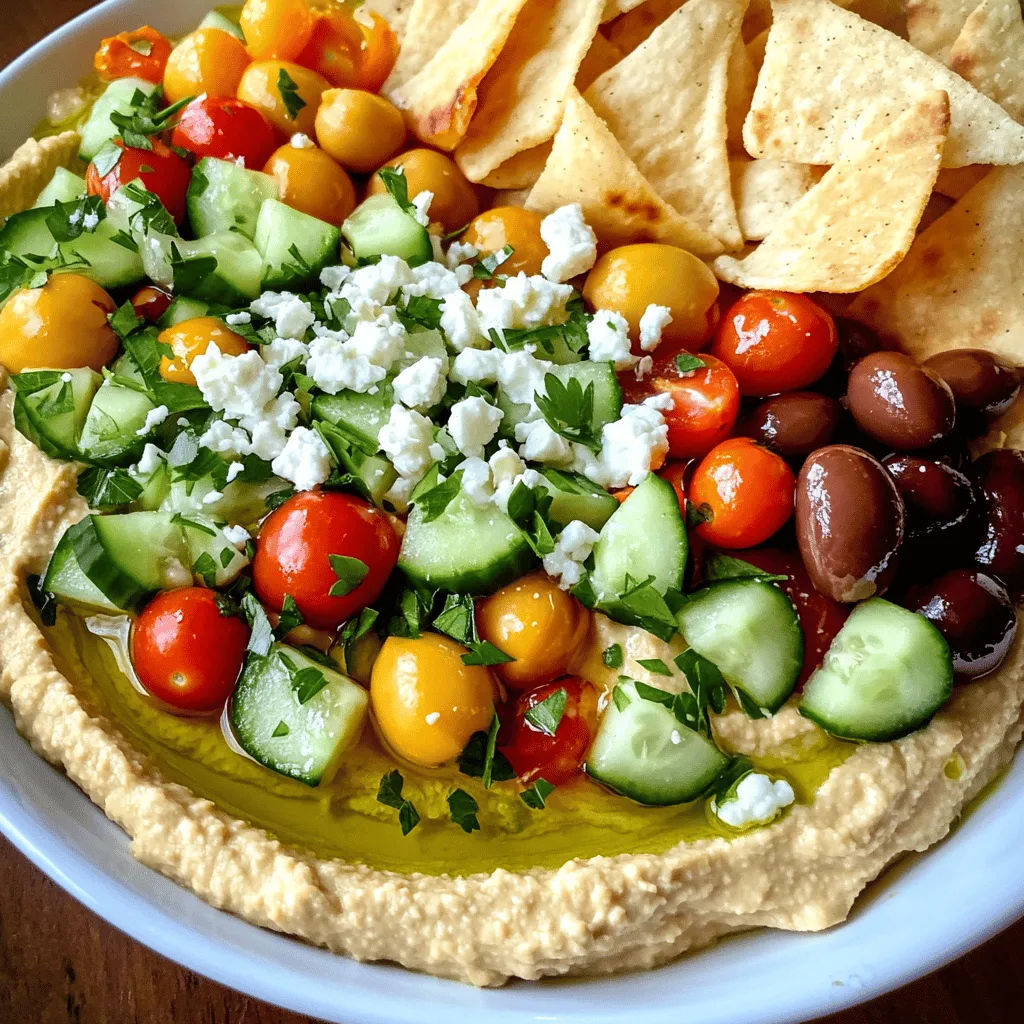
Looking for a dip that packs a punch? Greek Loaded Hummus is a vibrant, flavorful treat perfect for any gathering.

For a tasty garlic butter pasta, you will need: - 400g spaghetti or linguine - 6 tablespoons unsalted butter - 4 cloves garlic, minced - 1 teaspoon red pepper flakes (adjust to taste) - 1/4 cup freshly grated Parmesan cheese - 2 tablespoons fresh parsley, chopped - Salt and black pepper to taste - Zest of 1 lemon - Juice of 1/2 lemon These ingredients come together to create a rich, buttery sauce that wraps around the pasta perfectly. The garlic adds a nice aroma that makes your kitchen smell amazing. To enhance your garlic butter pasta, consider these optional ingredients: - Lemon zest and juice for brightness - Extra herbs like basil or thyme for depth - Toasted pine nuts for crunch - A splash of white wine for a more complex flavor Adding these extras can give your dish a unique twist and make it your own! Garlic butter pasta pairs well with many sides. Here are some ideas: - A simple green salad with lemon vinaigrette - Crusty garlic bread for a true garlic lover's feast - Grilled vegetables for a colorful plate - A light soup like minestrone or tomato basil These sides balance the richness of the pasta and make for a complete meal. Enjoy your cooking! To start, bring a large pot of water to a boil. Add salt to the water. The salt helps flavor the pasta. Once the water is boiling, add 400g of spaghetti or linguine. Cook it according to the package instructions until it is al dente. This usually takes about 8 to 10 minutes. Before you drain the pasta, save 1 cup of the water. This water is starchy and helps the sauce stick. After saving the water, drain the pasta and set it aside. Next, you will make the garlic butter sauce. In a large skillet, melt 6 tablespoons of unsalted butter over medium heat. Once the butter melts, add 4 minced garlic cloves and 1 teaspoon of red pepper flakes. Stir this mixture for about 1 to 2 minutes. The garlic should smell nice and turn a light golden color. Be careful not to burn the garlic, as it can turn bitter. Now it is time to mix the pasta and sauce. Add the drained pasta directly into the skillet with the garlic butter. Toss the pasta well so that it is fully coated in the sauce. If the sauce seems too thick, slowly add some of the reserved pasta water. Do this a little at a time until the sauce reaches the thickness you like. Finally, stir in 1/4 cup of freshly grated Parmesan cheese, 2 tablespoons of chopped fresh parsley, the zest of 1 lemon, and the juice of 1/2 lemon. Season with salt and black pepper to taste. Toss everything together until it is well mixed. Your garlic butter pasta is ready to serve! To boost the flavor of garlic butter pasta, use fresh ingredients. Fresh garlic gives a stronger taste than dried. Add fresh herbs like basil or thyme for a pop of flavor. You can also squeeze a bit of lemon juice for brightness. For extra richness, sprinkle more Parmesan cheese on top. A dash of balsamic vinegar can add depth. Finally, consider using flavored olive oil when cooking the pasta. One common mistake is overcooking the pasta. Always cook it until al dente. This keeps the pasta firm and helps it hold sauce better. Another mistake is not reserving pasta water. This starchy water helps the sauce cling to the pasta. Avoid burning the garlic; sauté it just until fragrant. Burning makes it bitter. Lastly, don't skip seasoning. Salt enhances the dish, so taste as you go. Start with a large pot of boiling salted water. Use at least 4-6 quarts for 400g of pasta. This prevents sticking. Stir the pasta occasionally while it cooks. Follow the package instructions for timing. Always taste the pasta a minute before the end time. Once done, reserve some cooking water before draining. This water is gold for adjusting sauce thickness. Rinse the pasta only if you plan to use it in a cold dish. {{image_2}} You can boost your garlic butter pasta by adding protein. Chicken works well here. Just cook diced chicken in the skillet before adding the garlic. Shrimp is another great option. Sauté shrimp until pink, then add the garlic. If you prefer a plant-based choice, use tofu. Press and cube the tofu, then fry it until golden. This gives you a hearty and filling meal. To make this dish vegetarian, simply skip the meat. You can add extra veggies like spinach or bell peppers. For a vegan version, swap the butter for plant-based butter. Use nutritional yeast instead of Parmesan for that cheesy flavor. This makes the dish creamy and rich without any animal products. Try adding fresh herbs to change the flavor. Basil or thyme can add a fresh taste. You can also sprinkle in some fresh lemon zest for brightness. If you like heat, consider more red pepper flakes or even some chili oil. Combining flavors can make your garlic butter pasta even more exciting! To keep your garlic butter pasta fresh, let it cool first. Place it in an airtight container. Make sure to cover it well. Store it in the fridge for up to three days. This helps keep the flavors intact. If you want to enjoy it later, freezing is a good option. To freeze your garlic butter pasta, first cool it completely. Portion the pasta into freezer-safe bags. Remove as much air as possible before sealing. Label the bags with the date. You can freeze it for up to three months. This way, you can enjoy a quick meal anytime. When reheating, use a skillet for best taste. Add a splash of water or broth. This helps prevent the pasta from drying out. Heat over low to medium heat. Stir gently until warmed through. You can also use the microwave. Cover it to keep moisture in. Enjoy your garlic butter pasta just as good as fresh! Yes, you can use other types of pasta. Spaghetti and linguine work well, but you can try penne, fettuccine, or even gluten-free pasta. Each type brings a different texture. Just make sure to cook it as directed on the package. This way, you keep the pasta al dente. To prevent garlic from burning, keep the heat low to medium. Garlic cooks fast, so watch it closely. Stir it often to ensure even cooking. If it turns too brown, it can taste bitter. If you notice it starting to change color, remove it from the heat. You can make garlic butter pasta gluten-free by using gluten-free pasta. Many brands offer great options like rice or corn-based pasta. Just be sure to check the package for cooking times since they may differ. The garlic butter sauce is naturally gluten-free, so you can enjoy the flavor without worry. Garlic butter pasta is simple yet full of flavor. You learned the key ingredients and how to cook them. The steps to make the sauce and combine it with pasta are easy to follow. Tips help you avoid mistakes and enhance taste. Variations let you add protein or adapt for diets. Proper storage keeps leftovers fresh and tasty. Enjoy trying this dish, knowing you can tweak it as you like. Garlic butter pasta is a fun and delicious meal for everyone.

Garlic Butter Pasta Flavorful and Easy Recipe Guide

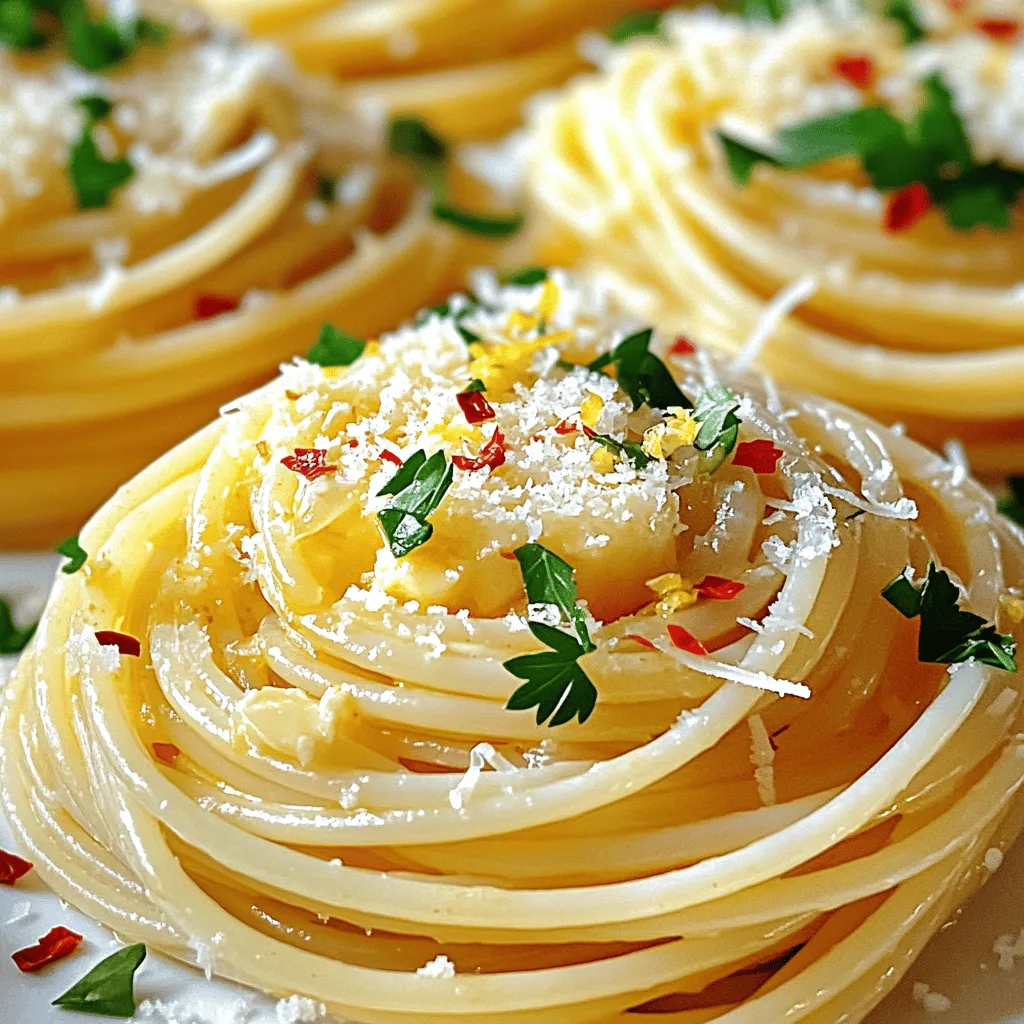
Welcome to your new favorite comfort food! In this guide, I’ll show you how to make Garlic Butter Pasta that’s

- 4 ripe pears, halved and cored - 100g blue cheese, crumbled - 50g cream cheese, softened - 2 tablespoons honey - 1 tablespoon walnuts, finely chopped - Fresh thyme leaves, for garnish - Salt and pepper to taste You can change the type of cheese if you want. Try goat cheese for a milder taste. You could also use feta for a crumbly texture. For a sweeter touch, use maple syrup instead of honey. This makes a nice change. If you don't like walnuts, try pecans or almonds. Both add a nice crunch. - Preheat your oven to 350°F (175°C). This step ensures even cooking for your pears. - In a small mixing bowl, combine the crumbled blue cheese, softened cream cheese, honey, and chopped walnuts. Mix well until creamy. This mixture will be the star of your dish! - Add a pinch of salt and pepper to taste. This will enhance the flavors of the cheese. - Take each pear half and spoon a generous amount of the cheese filling into the hollowed center. Ensure each pear is well-stuffed for maximum flavor. - Place the stuffed pears in a baking dish with the cut side facing up. This allows the cheese to melt beautifully. - Bake in the preheated oven for 20-25 minutes. Check for tenderness in the pears and bubbly cheese. - Remove the pears from the oven and let them cool slightly. This makes them safe to touch and enhances the taste. - Garnish with fresh thyme leaves on top. This adds a lovely aroma and visual appeal to your dish. Choosing the right pear type is key. I recommend using ripe Bartlett or Anjou pears. These pears are sweet and soft when cooked. They hold their shape well, giving you a perfect bite. Other pear types may be too hard or not as sweet. For the cheese filling, you want a creamy texture. Mix the blue cheese and cream cheese until smooth. Add honey for a touch of sweetness. Make sure to blend well. This makes the filling easy to scoop and stuff into the pears. Pair your stuffed pears with a sweet white wine, like Riesling. The wine’s sweetness balances the blue cheese's strong flavor. You can also serve them with a light salad for extra crunch. For presentation, place the pears on a beautiful platter. Drizzle some honey on top for shine. Add a few sprigs of fresh thyme around the pears. This makes your dish look extra special. Be careful not to overbake the pears. Keep an eye on them after 20 minutes. You want them tender, not mushy. Overbaking can ruin their texture. Also, pay attention to filling proportions. If you add too much filling, it can spill out during baking. Use just enough to fill each pear half without overflowing. This keeps your dish neat and tasty. {{image_2}} You can make blue cheese stuffed pears even more exciting. Adding spices or herbs can change the flavor. Try mixing in a pinch of nutmeg or a dash of cayenne pepper for warmth. Fresh herbs like rosemary or basil can also add a lovely aroma. You might want to sweeten the dish too. Introducing fruit preserves or compotes can give a nice twist. A dollop of fig jam or a spoonful of cranberry sauce can balance the cheese's saltiness. These additions make the dish pop with flavor. If you need a gluten-free version, this dish is easy to adapt. All the ingredients are naturally gluten-free. Just be sure to check the labels on your cheese and any preserves you use. For a vegan alternative, swap the blue cheese and cream cheese for plant-based options. Use cashew cheese or a creamy tofu blend. You can also replace honey with maple syrup or agave nectar. This way, you keep the sweet and savory mix, but in a vegan-friendly way. To store leftovers, place the stuffed pears in an airtight container. Make sure they cool first. Store them in the fridge for up to three days. After that, the pears may lose their flavor and texture. If you want to enjoy them longer, consider freezing. You can freeze blue cheese stuffed pears, but it’s best to do this before baking. Wrap each pear half in plastic wrap, then place them in a freezer bag. Remove as much air as possible. They will keep well for up to three months. When ready to cook, thaw them in the fridge overnight. Then, bake them following the original recipe instructions. Enjoy your tasty treat! You can tell the pears are done when they are soft. Stick a fork in them; if it goes in easily, they are ready. Also, look for the cheese filling to be slightly bubbly. This means the flavors meld well together. Yes, you can prepare these pears ahead of time. Stuff the pears and cover them. Place them in the fridge for up to 24 hours before baking. This saves time when you are ready to serve. Just remember to bake them when you need them. A sweet white wine works best with blue cheese and pears. Try a late-harvest Riesling or a Sauternes. These wines balance the blue cheese's strong flavor and the pear's sweetness. A light red, like Pinot Noir, can also be a good choice. Absolutely! You can use goat cheese or feta as a substitute. Both cheeses have unique flavors that still work well with pears. Cream cheese alone can also be used for a milder taste. Experiment to find your favorite version! This blog post showed how to make delicious blue cheese stuffed pears. We covered the key ingredients and their tasty alternatives. I provided step-by-step instructions to help you bake these treats. With tips on perfecting your dish, I shared ways to avoid common mistakes. Lastly, we discussed storage and answered your FAQs. Try this recipe to impress friends at your next dinner. Enjoy the flavors and get creative with your own touches!

Blue Cheese Stuffed Pears Flavorful Appetizer Delight

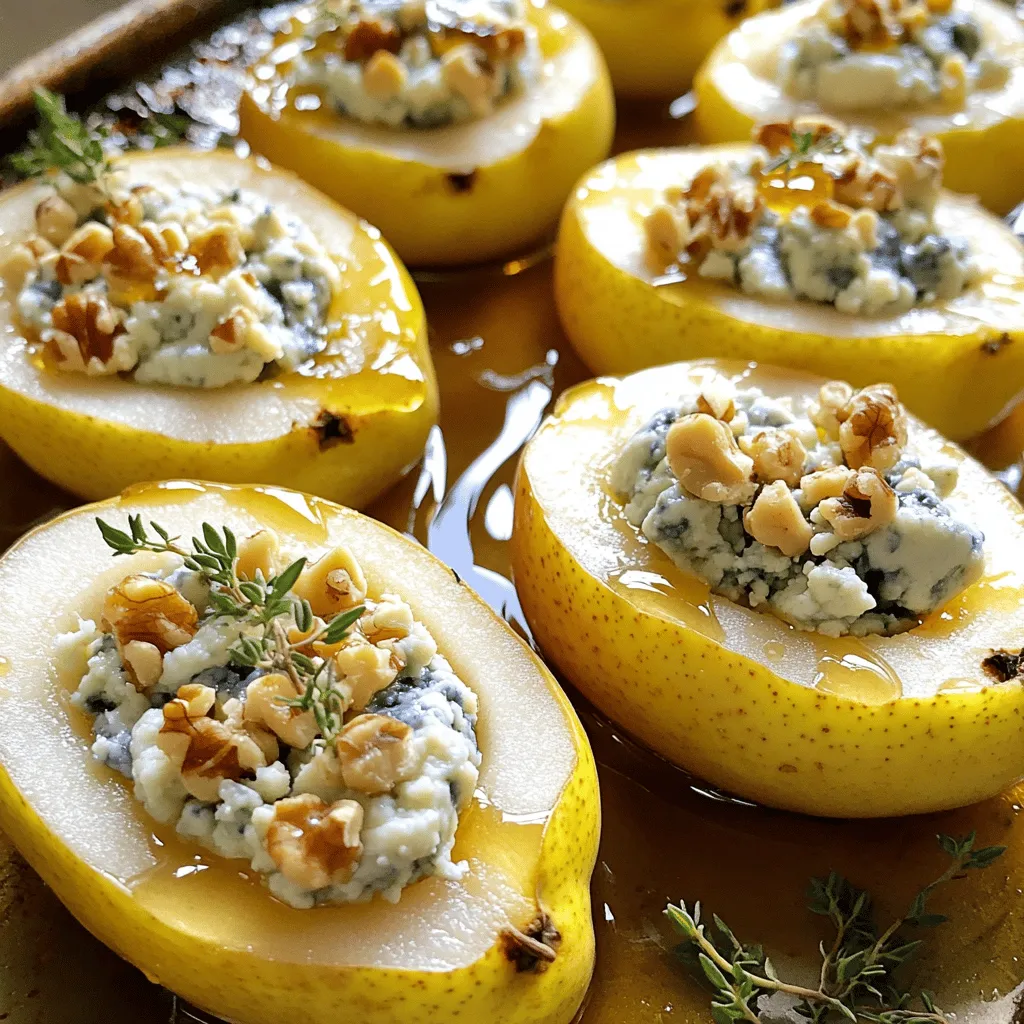
Looking for a delicious appetizer that impresses? Try my Blue Cheese Stuffed Pears! This simple recipe combines the sweet taste

To make a tasty breakfast burrito casserole, you need a few key ingredients: - 8 large flour tortillas - 6 large eggs - 1 cup milk - 1 cup shredded cheddar cheese - 1 cup cooked chorizo (or a vegetarian alternative) - 1 cup black beans, drained and rinsed - 1 red bell pepper, diced - 1 small onion, diced - 2 cloves garlic, minced - 1 teaspoon ground cumin - 1 teaspoon chili powder - Salt and pepper to taste - Fresh cilantro for garnish (optional) These ingredients blend well together. They create a filling and savory dish that the whole family will love. If you want to switch things up, try these alternatives: - Chorizo: Use any cooked sausage, like turkey sausage or chicken sausage. For a vegetarian option, use crumbled tofu or tempeh with spices. - Tortillas: Instead of flour, you can choose corn tortillas for a gluten-free version. - Cheese: Try pepper jack cheese for extra heat, or use a dairy-free cheese for a vegan option. These swaps can help you tailor the dish to your taste and dietary needs. Toppings can add flavor and fun to your casserole. Here are some great options: - Fresh cilantro, chopped - Salsa or pico de gallo - Avocado or guacamole - Sour cream or Greek yogurt - Sliced jalapeños for heat Feel free to mix and match these toppings. They will bring your breakfast burrito casserole to life! Start by dicing one small onion and one red bell pepper. Heat a large skillet over medium heat. Add the onion and bell pepper to the skillet. Sauté them for about five minutes. You want them soft and fragrant. Next, mince two cloves of garlic. Add the garlic to the skillet. Cook for one more minute. This brings out the garlic's flavor. In a mixing bowl, whisk six large eggs and one cup of milk together. Then add one teaspoon of ground cumin and one teaspoon of chili powder. Sprinkle in salt and pepper to taste. Mix it well until smooth. Pour this egg mixture into the skillet with the veggies. Cook gently while stirring for about five to seven minutes. The eggs should just set. Now, stir in one cup of cooked chorizo and one cup of rinsed black beans. Mix everything until well combined. Take eight large flour tortillas and lay them flat. Scoop about one-third of the egg mixture onto each tortilla. Sprinkle a little cheddar cheese on top of the filling. Fold the sides of the tortillas over the filling. Place them seam-side down in a greased 9x13 inch baking dish. Once all the tortillas are in the dish, pour any leftover egg mixture on top. Finish by sprinkling the rest of the cheddar cheese evenly across the casserole. Cover the dish with foil. Bake in a preheated oven at 350°F for 25 minutes. Remove the foil and bake for another 10-15 minutes. You want the cheese to be bubbly and golden brown. After baking, let the casserole cool for a few minutes before slicing. Enjoy your delicious meal! To cook the eggs just right, keep the heat low. You want them to cook slowly. This way, they stay soft and fluffy. Stir gently while cooking. This helps mix in the chorizo and beans evenly. Watch them closely, as they can overcook fast. They only need about 5-7 minutes on the stove. Remove them from heat when they are still slightly runny. They will continue to cook in the oven. Store any leftovers in an airtight container. This keeps them fresh for later. If you plan to make it ahead, cover the dish with foil or plastic wrap. You can store it in the fridge for up to three days. If you want to keep it longer, try freezing it. Just make sure to wrap it tightly. It can last for up to three months in the freezer. Label the container with the date to track freshness. You can cook your casserole in two ways: the oven or microwave. The oven gives a crisp top and warm inside. Bake it at 350°F for about 35-40 minutes. If you are short on time, use the microwave. Heat it in 2-minute intervals until warm. The microwave may not brown the cheese, but it still tastes great. Choose the method that fits your schedule! {{image_2}} You can easily make this dish vegetarian. Simply swap chorizo for a plant-based option. I like using black beans or diced mushrooms. These add great flavor and texture. Use the same spices to keep it tasty. Your friends will love it, and they won't miss the meat. Feel free to add more veggies to suit your taste. Spinach or zucchini work well. You can also mix in jalapeños for some heat. If you want more flavor, add smoked paprika or cayenne pepper. This dish is all about your preferences, so have fun with it! For a low-carb version, use cauliflower tortillas instead of flour. They hold up nicely and add a new taste. If you need it gluten-free, check the labels on your tortillas. Many brands offer gluten-free options that work great. You can enjoy this dish without worry. To store leftovers, let the casserole cool to room temperature. Then, cover it tightly with plastic wrap or aluminum foil. You can also place it in an airtight container. This keeps the casserole fresh and prevents it from drying out. Store it in the fridge for up to three days. Freezing is a great way to save your breakfast burrito casserole. To freeze, first, let it cool completely. Then, cut it into portions. Wrap each piece in plastic wrap and then in aluminum foil. This method prevents freezer burn. You can freeze it for up to three months. When ready to eat, simply thaw it in the fridge overnight. To reheat the casserole, preheat your oven to 350°F (175°C). Place the casserole in the oven for about 20-25 minutes. If you are reheating individual portions, place them on a baking sheet. You can also microwave portions on high for 2-3 minutes. Check to ensure they are heated through. Enjoy your tasty meal just as if it were fresh! Yes, you can make the casserole the night before. Prepare it fully and cover it well. Store it in the fridge overnight. This saves time in the morning. Just bake it in the oven when you are ready to eat. The casserole lasts about 3 to 4 days in the fridge. Make sure to keep it covered. This keeps it fresh and tasty. If you want to keep it longer, consider freezing it. You can serve many things with this casserole. Here are some ideas: - Fresh salsa - Avocado slices - Sour cream - Chopped green onions - A side salad These options add flavor and make the meal more fun! We covered a lot about making a delicious breakfast burrito casserole. You learned about the key ingredients, from chorizo to vegetarian choices. I shared easy steps to prep and cook this dish. Tips on storing and reheating ensure your casserole stays tasty. You can even explore fun variations. In the end, this casserole is versatile and simple. It’s perfect for busy mornings or brunch gatherings. Enjoy making it, and share it with family and friends!

Make-Ahead Breakfast Burrito Casserole Easy Recipe

Are busy mornings leaving you scrambling for breakfast? Try my easy Make-Ahead Breakfast Burrito Casserole! Packed with eggs, cheese, and

To make Garlic Sautéed Zucchini, Mushrooms, and Onions, you'll need: - 2 medium zucchinis, sliced into half-moons - 8 ounces mushrooms, sliced (any variety) - 1 large onion, thinly sliced - 4 cloves garlic, minced - 3 tablespoons olive oil - 1 teaspoon dried thyme - 1 teaspoon balsamic vinegar - Salt and pepper to taste - Fresh parsley, chopped (for garnish) You can swap some ingredients to fit your taste: - Instead of zucchini, try yellow squash for a different twist. - Use shallots in place of onions for a milder flavor. - Any mushrooms work well, but try portobello for a heartier bite. - Fresh thyme can replace dried thyme for a more vibrant taste. - Use lemon juice instead of balsamic vinegar for a zesty kick. Choose the best veggies for this dish: - Look for zucchinis that are firm and bright in color. - Pick mushrooms that are smooth and dry, not slimy or dark. - For onions, select ones that feel heavy and have dry skins. - Fresh garlic should be firm and free from sprouts or soft spots. - Always smell the produce; it should smell fresh and earthy. To start, gather your ingredients. You need zucchini, mushrooms, onion, garlic, olive oil, thyme, balsamic vinegar, salt, and pepper. First, heat the olive oil in a large skillet over medium heat. This will start the cooking process. Next, add the sliced onion to the skillet. Sauté them for 3 to 4 minutes until they are soft and translucent. After that, add the minced garlic. Cook it for about 1 minute. Stir it often to stop it from burning. Now, it’s time to add the zucchini and mushrooms. Stir them well into the mix. Sprinkle in the dried thyme, salt, and pepper. This adds great flavor. Sauté everything for 8 to 10 minutes. The zucchini should be tender but still crisp. The mushrooms will release their moisture, making the dish juicy. Finally, drizzle the balsamic vinegar over the veggies. Cook for another minute to blend the flavors. Remove the skillet from the heat. You can garnish with fresh parsley before serving. Sautéing is all about temperature control. Start with medium heat to avoid burning. Use a large skillet to give your veggies space. They need room to cook evenly. Stir often to keep them from sticking. This helps them cook nicely without burning. Always add garlic later in the process. It cooks faster than onions and zucchini. This way, it stays fragrant and tasty. Using a good-quality olive oil makes a difference as well. It adds depth to the dish. Watch for the color and texture of your veggies. The onions should be soft and see-through. Zucchini should be bright green and tender. The mushrooms will look shrunken and juicy. If your zucchini feels soft but firm when you poke it, it's done. The key is to keep them slightly crisp for the best taste. To amp up the flavor of Garlic Sautéed Zucchini, Mushrooms, and Onions, choose fresh, high-quality ingredients. They make a big difference. When you slice the garlic, do it just before cooking. This keeps its strong flavor alive. Use extra virgin olive oil for a rich taste. It adds depth to the dish. You can also add a squeeze of fresh lemon juice at the end. This brightens the flavors and adds a lovely zing. A pinch of red pepper flakes can provide a nice kick. Adjust the amount based on your spice preference. One common mistake is overcrowding the skillet. If you add too many veggies at once, they won't sauté well. This leads to steaming instead of browning. Always give each ingredient space to breathe. Another mistake is not heating the oil enough. If the oil isn’t hot before adding vegetables, they can become mushy. Wait until the oil shimmers to start cooking. Lastly, avoid stirring too often. Give the veggies time to brown. This adds flavor and texture. For the best texture, slice your zucchini and mushrooms evenly. This ensures they cook at the same rate. Zucchini should be tender but still slightly crisp. This usually takes about 8-10 minutes. Keep an eye on the onions, too. They should become translucent without burning. Use a spatula to stir gently, allowing the veggies to develop a nice golden color. Before serving, let the dish rest for a minute. This helps the flavors meld together beautifully. {{image_2}} You can swap in other veggies for this dish. Here are some tasty options: - Bell peppers: Add color and sweetness. - Spinach: Mix in fresh leaves for a nutrient boost. - Eggplant: This gives a rich, creamy texture. - Carrots: Thinly sliced carrots add crunch and natural sweetness. Feel free to use what you have on hand. Each veggie brings its own unique flavor and texture. You can change the flavor with different herbs and spices. Here are a few ideas: - Basil: This adds a fresh, sweet taste. - Oregano: A classic choice that pairs well with zucchini. - Red pepper flakes: Use these for a spicy kick. - Lemon zest: This brightens the dish and adds freshness. Mix and match these flavors to suit your taste. The goal is to make it your own! Garlic sautéed zucchini, mushrooms, and onions go well with many dishes. Here are some great pairings: - Serve over rice or quinoa for a filling meal. - Add to pasta for a tasty veggie boost. - Pair with grilled chicken or fish for protein. - Top with cheese or nuts for added crunch. These ideas help you create a full meal. Feel free to experiment with different sides! Store your leftover Garlic Sautéed Zucchini, Mushrooms, and Onions in an airtight container. This keeps the flavors fresh. Make sure to cool the dish to room temperature first. Place it in the fridge for up to three days. If you prefer, use glass containers for easy reheating. To reheat, you can use the stovetop or microwave. For the stovetop, heat a pan over medium heat. Add a splash of olive oil to prevent sticking. Add the leftovers and stir until warm, about 5-7 minutes. If using the microwave, place the dish in a microwave-safe bowl. Heat in 30-second intervals, stirring in between. This helps heat evenly. You can freeze this dish for later use. Just place it in a freezer-safe container. Make sure to leave some space at the top for expansion. It will keep well for up to three months. When ready to eat, thaw it in the fridge overnight. Reheat as mentioned above for the best taste. Sautéing vegetables takes about 10 to 15 minutes. The exact time varies by vegetable type. For zucchini, mushrooms, and onions, I suggest cooking for about 8 to 10 minutes. This keeps them tender yet crisp. Stir them occasionally for even cooking. You can check for doneness by tasting. If they are soft and flavorful, they are ready! Yes, you can easily make this recipe vegan. All the ingredients are plant-based. Use olive oil as your cooking fat. The balsamic vinegar adds a nice tang. You can enjoy this dish without any animal products. It remains just as tasty and satisfying. Feel free to try adding other veggies for more variety! This dish pairs well with many options. You can serve it alongside grilled chicken or fish for protein. It also goes great with rice or quinoa as a base. Try adding it to pasta for a hearty meal. For a lighter choice, serve it on a bed of greens. The flavors blend well with various cuisines and dishes! In this blog post, we explored the key ingredients for sautéing, from fresh produce to substitutes. I shared a step-by-step guide on cooking techniques and visual cues for doneness. You learned tips to enhance flavor and avoid common mistakes. We also looked at variations with different veggies and spices, plus serving ideas. Finally, I covered storage methods to keep your leftovers fresh and tasty. Remember, practice leads to better results, so grab those ingredients and start sautéing!

Garlic Sautéed Zucchini Mushrooms & Onions Delight

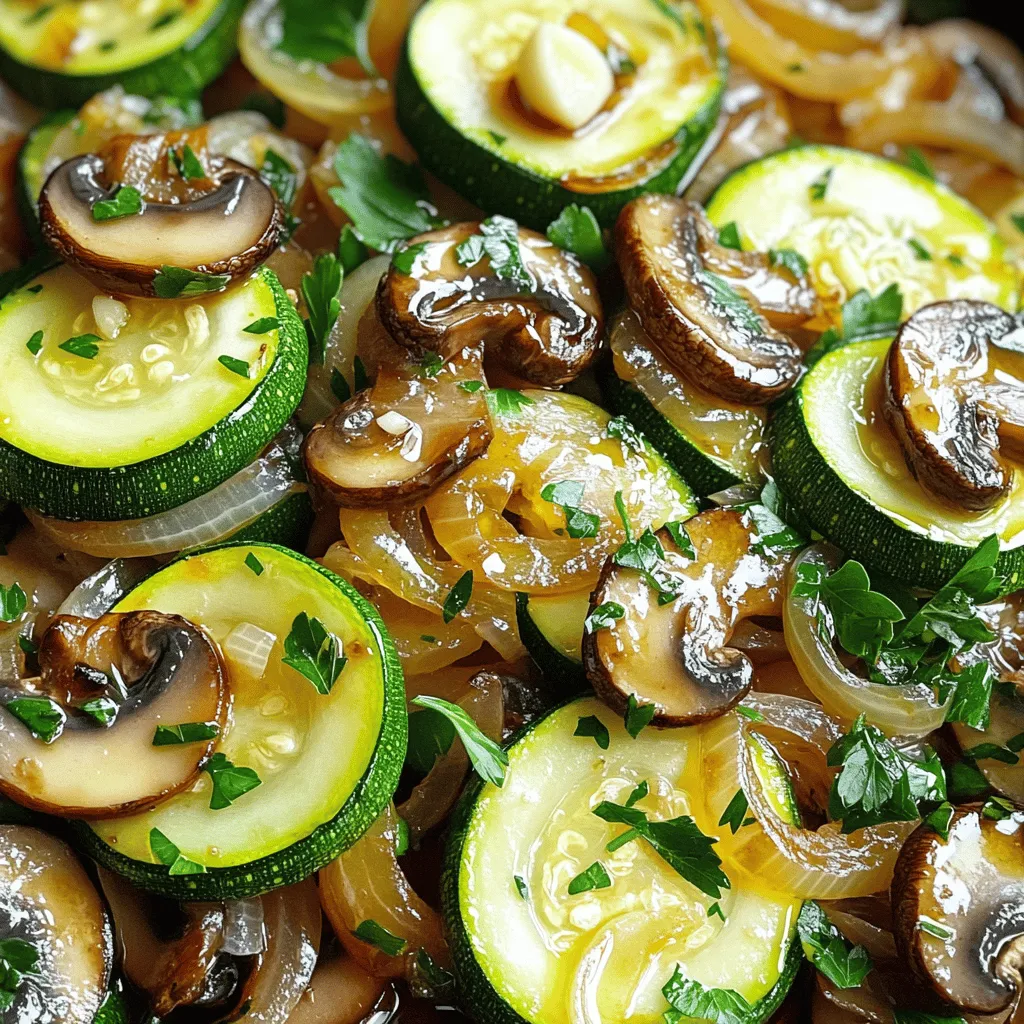
Get ready to elevate your veggie game with my Garlic Sautéed Zucchini, Mushrooms, and Onions Delight! This dish is packed

Older posts
Newer posts
← Previous Page1 … Page35 Page36 Page37 … Page84 Next →

dsad

© 2026 Foodish Talk • Built with GeneratePress

Our Policies

  • Copyright Policy
  • Cookie Policy
  • GDPR Policy
  • Privacy Policy
  • Disclaimer
  • Terms Of Use

More Information

  • Home
  • About
  • Contact
  • Appetizers
  • Dessert
  • Dinner
  • Drinks
©2026, Foodish Talk About Back To Top