Skip to content
DisclaimerTerms Of UseGDPR PolicyCookie Policy

Foodish Talk

  • Home
  • Drinks
  • Appetizers
  • Dinner
  • Dessert
  • About
  • Contact
  • Privacy Policy
DisclaimerTerms Of UseGDPR PolicyCookie Policy

NO-ING-IMG

To make garlic butter zucchini skewers, you need simple, fresh ingredients. Below is a detailed list to get you started. - 4 medium zucchinis: Slice the zucchinis into thick rounds. This helps them hold their shape on the grill. - 1/2 cup unsalted butter: Use unsalted butter for better control over the salt. - 4 cloves garlic, minced: Fresh garlic gives the best flavor. Mince it finely for even distribution. - 1 teaspoon dried thyme: This herb adds a nice earthiness to the dish. - 1 teaspoon dried oregano: Oregano brings a touch of warmth. - Salt and pepper to taste: Use these to season the garlic butter mixture. - 1 tablespoon fresh lemon juice: This adds brightness and cuts through the richness of the butter. - Fresh parsley, chopped: Use this for garnish to add color and freshness to the dish. - Skewers: If using wooden skewers, soak them in water for 30 minutes to prevent burning. These ingredients come together to create a delightful grilled dish. You can adjust the herbs and spices to match your taste. For a fun twist, consider adding chili flakes for some heat or using fresh herbs instead of dried ones. Enjoy the burst of flavors! Start by preheating your grill to medium-high heat, around 375°F to 400°F. This temperature helps to cook the zucchini evenly. If you use a gas grill, simply ignite it and adjust the knobs. For charcoal, let the coals turn gray before grilling. Both types work well, but gas offers easy control. Charcoal adds a smoky flavor. Choose what suits your taste! Melt the butter slowly over low heat in a small saucepan. This keeps it from burning. Once melted, add minced garlic, dried thyme, and dried oregano. Stir gently for about 3-5 minutes. You want the garlic soft but not brown. Remove from heat and mix in fresh lemon juice, salt, and pepper. This blend gives a bright and tasty flavor. To thread zucchini on skewers, cut them into thick rounds. Leave a little space between each piece. This helps them cook evenly. Brush the garlic butter over the skewers, saving some for basting. Grill the skewers for about 4-5 minutes on each side. Look for grill marks and tender zucchini. Baste while grilling for extra flavor. Enjoy the deliciousness of garlic butter zucchini skewers! To make your garlic butter zucchini skewers even tastier, add more herbs and spices. Consider using: - Fresh basil or dill for a garden-fresh taste. - A pinch of red pepper flakes for a little heat. - Smoked paprika for a deeper flavor. You can also try different marinades. A simple balsamic vinegar mix can add a nice tang. Just let the zucchini soak in it for about 15 minutes before grilling. Basting your skewers with garlic butter while cooking adds extra richness. If you do not have a grill, you can use your oven. Set it to broil and place the skewers on a baking sheet. Cook them for about 10 minutes, turning halfway through. This method gives you a nice char, similar to grilling. To achieve perfect grill marks, make sure your grill is hot enough. Place the skewers at an angle on the grates. After a few minutes, rotate them 90 degrees. This gives you beautiful crosshatch marks. Pair your skewers with dips like ranch or tzatziki. These cool dips contrast well with the warm, buttery zucchini. For a fun presentation, serve your skewers on a wooden board or a colorful platter. You can add lemon wedges or cherry tomatoes for extra color. Sprinkle fresh parsley on top for a fresh look and taste. {{image_2}} You can swap in other veggies for more fun. Try bell peppers or mushrooms. These add color and taste. You can also mix zucchini with cherry tomatoes for a sweet touch. If you want a vegan version, use dairy-free butter. This keeps all the flavor without any animal products. To spice things up, add chili flakes or jalapeños. This gives your skewers a nice kick. If you prefer a fresh taste, try pesto. Brush it on the zucchini before grilling. This adds a rich Italian flavor that pairs well with the garlic butter. Change up how you skewer your veggies. You can cut zucchini into small cubes or thick rounds. Each style offers a different bite. For a colorful look, mix in red and yellow bell peppers. This makes your dish pop and looks great on the table. To store leftover skewers, let them cool first. This step helps keep them fresh longer. Place the skewers in an airtight container. You can also wrap them tightly in plastic wrap or aluminum foil. This method keeps moisture out and prevents drying. For best taste, eat the leftovers within three days. After that, the zucchini may lose its crispness. Always check for any signs of spoilage before eating. When reheating, you want to keep the flavor strong. The best way is to use a grill. Heat it on medium. Place the skewers on the grill for a few minutes. Baste with the leftover garlic butter to add flavor. You can also use a microwave if you’re short on time. Place the skewers on a microwave-safe plate. Cover them with a damp paper towel. Heat in short bursts, checking often. This way, they stay moist and tasty. Choose firm zucchinis with smooth skin. Look for ones that feel heavy for their size. Avoid zucchinis with soft spots or blemishes. Thicker rounds work best for skewers. They hold up well on the grill. Yes, you can make garlic butter ahead of time. Simply melt the butter and mix in garlic and herbs. Let it cool and then store it in the fridge. Use it within a week for the best flavor. Garlic butter zucchini skewers pair well with many sides. Here are some great options: - Grilled corn on the cob - A fresh garden salad - Quinoa or rice pilaf - Garlic bread for extra flavor - A tangy yogurt dip for contrast Check for grill marks and tenderness. The zucchini should be soft and slightly charred. You can poke it with a fork to see if it’s done. It should not be mushy but tender. Absolutely! Bell peppers, mushrooms, and cherry tomatoes also grill well. Just cut them into similar sizes for even cooking. Mixing veggies adds color and flavor to your skewers. Soak wooden skewers in water for at least 30 minutes before using. This helps prevent burning while grilling. Make sure they are fully submerged for best results. Store leftover skewers in an airtight container in the fridge. They will last for up to three days. Reheat them gently to maintain flavor and texture. Yes, you can make garlic butter vegan. Use plant-based butter instead of dairy butter. The same garlic and herbs work great for flavor. In this blog post, we explored how to prepare tasty garlic butter zucchini skewers. We covered the best ingredients, grill prep, and step-by-step cooking. You learned tips for flavor and cooking methods, along with fun serving ideas. Lastly, we discussed variations and storage tips. Remember, cooking should be fun and creative. Experiment with flavors and enjoy these delicious skewers with family and friends. Happy grilling!

Garlic Butter Zucchini Skewers Deliciously Grilled Delight

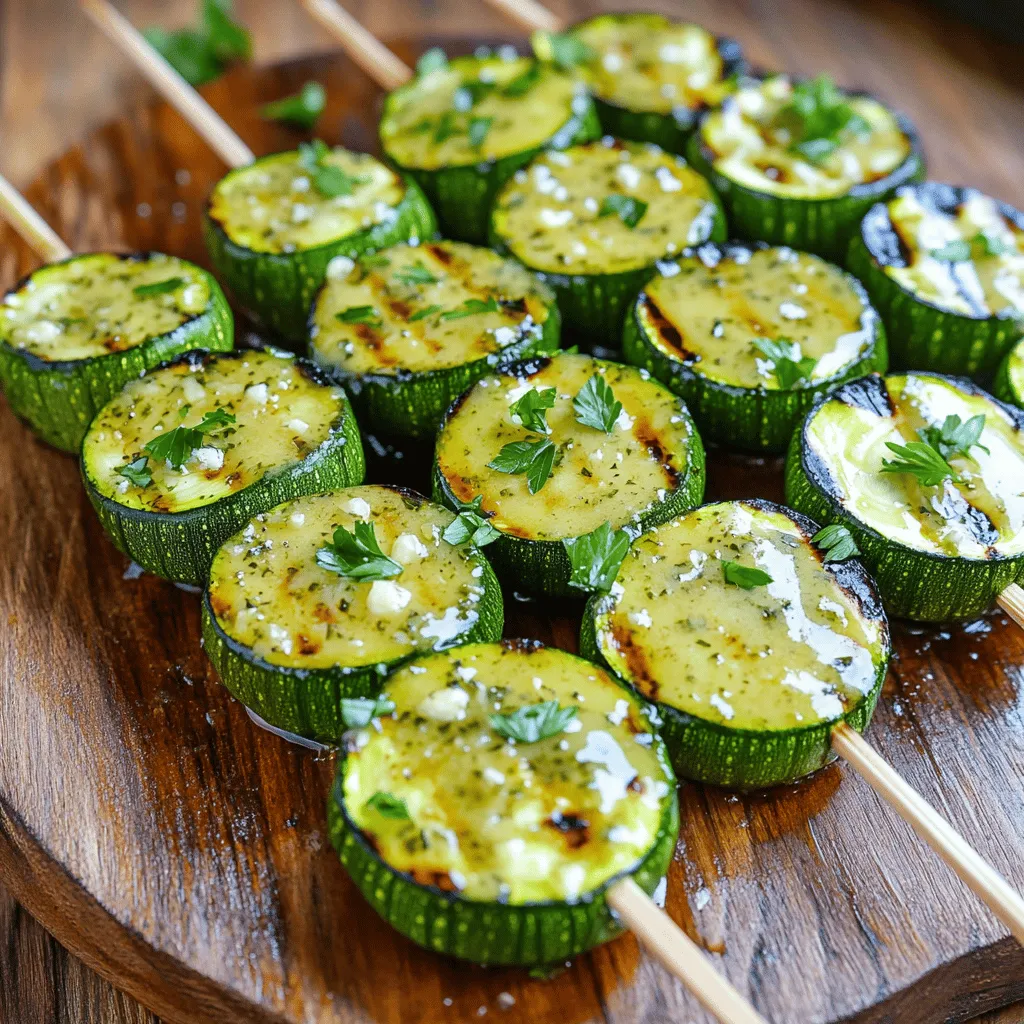
If you’re looking for a simple and tasty way to enjoy vegetables, you’re in luck! My Garlic Butter Zucchini Skewers

- 8 oz penne pasta - 1 pound spicy Italian sausage - 1 red bell pepper - 1 yellow onion - 3 cloves garlic - 1 cup canned crushed tomatoes - 1/2 cup honey - 1/4 cup BBQ sauce - Spices and seasonings When making Spicy Honey BBQ Sausage Pasta, you need a few key items. First, you will need 8 ounces of penne pasta. This pasta holds onto sauce well, making every bite flavorful. Next, grab 1 pound of spicy Italian sausage. The sausage adds a nice kick to the dish. Next, we have fresh vegetables. You should have 1 diced red bell pepper, 1 diced yellow onion, and 3 minced cloves of garlic. The onions and peppers add sweetness, while the garlic brings a strong aroma. Now, let’s talk about the sauce. You need 1 cup of canned crushed tomatoes. This forms the base of our sauce. Then, add 1/2 cup of honey for sweetness, and 1/4 cup of your favorite BBQ sauce to bring depth. Don't forget spices! You can use salt, pepper, smoked paprika, and red pepper flakes for extra heat. These ingredients combine to create a dish that is rich, spicy, and sweet. You will enjoy every bite of this delightful meal! To start, boil water in a large pot. Add salt to the water for flavor. Once it boils, add 8 oz of penne pasta. Cook it according to the package instructions until it is al dente. This usually takes about 8 to 10 minutes. When done, drain the pasta in a colander. Remember to save 1/2 cup of the pasta water for later use. Now, heat 2 tablespoons of olive oil in a large skillet over medium heat. Once the oil is hot, add 1 pound of spicy Italian sausage. Remove the casings from the sausage first. Use a wooden spoon to break it apart as it cooks. Cook it until it is browned and no longer pink, which takes about 5 to 7 minutes. Next, add the diced onion and red bell pepper to the skillet with the sausage. You want to soften these vegetables. Cook for about 5 minutes until they are tender. Then, stir in 3 cloves of minced garlic. Cook for another minute until you smell that great garlic aroma. Now it’s time to make the sauce. Pour in 1 cup of canned crushed tomatoes, 1/2 cup of honey, and 1/4 cup of BBQ sauce. Add 1 teaspoon of smoked paprika and 1/2 teaspoon of red pepper flakes for heat. Mix everything well. Let it simmer for 5 to 10 minutes. If the sauce gets too thick, add some of the reserved pasta water until it reaches your desired thickness. Taste and season with salt and pepper. Finally, add the drained penne pasta to the skillet with the sausage and sauce. Toss everything together so the pasta is well coated. Cook for an extra 2 to 3 minutes until everything is heated. Serve the pasta warm. For a nice touch, garnish with chopped parsley and sprinkle some grated Parmesan cheese on top if you like. To adjust the spice level, start with the red pepper flakes. If you love heat, add more! For a milder dish, cut back on the flakes. You can also swap spicy sausage for mild sausage. This gives you control over the flavor while keeping it delicious. Garnish the dish with fresh parsley for color and taste. Grated Parmesan cheese adds a creamy touch. For sides, try garlic bread or a fresh salad. These pair well and enhance the meal's flavors. To brown the sausage, use medium heat. This helps render the fat and gets a nice crust. Break it apart with a wooden spoon for even cooking. When sautéing vegetables, add them to the skillet in stages. Start with onions and peppers, then add garlic last. This way, the garlic stays fragrant and doesn't burn. {{image_2}} You can swap the spicy sausage for chicken. Chicken thighs work well and stay juicy. Cook them until tender and cut into bite-sized pieces. For plant-based options, try using lentils or chickpeas. They add protein and flavor while keeping it meat-free. Penne is great, but you can use other pasta types too. Fusilli or rotini holds the sauce well. You can even try spaghetti for a fun twist. Just cook it al dente, so it mixes nicely with the sauce. To boost flavor, add in spinach or kale. These greens give a nice color and nutrition. Mushrooms can add a rich taste, too. For sauces, consider adding a splash of hot sauce or a dash of Worcestershire sauce. These small changes can make a big difference in taste. After enjoying your Spicy Honey BBQ Sausage Pasta, let any leftovers cool. You can cool them in the skillet for a few minutes. Then, transfer the pasta to an airtight container. Make sure to store it in the fridge. It will stay fresh for up to three days. When you’re ready to enjoy the leftovers, use a skillet for reheating. Add a splash of water to the pasta to keep it moist. Heat it over low to medium heat, stirring occasionally. You can also use the microwave. Just cover the bowl with a microwave-safe lid. Heat in short bursts, stirring in between. To freeze your Spicy Honey BBQ Sausage Pasta, let it cool completely. Portion it into freezer-safe containers. Leave some space at the top for expansion. Label each container with the date. It can be frozen for up to three months. When ready to eat, thaw it in the fridge overnight. Reheat in a skillet or microwave until hot. Yes, you can make this pasta dish ahead of time. To prep, cook the pasta and sauce. Cool them separately. Store them in airtight containers. This way, you can reheat them later. When you’re ready, just combine them on the stove. Add a splash of water to help the sauce loosen up. This makes meal prep easy and quick. If you want to swap honey, you have a few options. Maple syrup works great for a sweet touch. Brown sugar is another choice, adding a rich flavor. Agave nectar can also replace honey. Each sweetener will change the taste a bit, but they all work well. Yes, you can make a vegetarian version. Use plant-based sausage instead of spicy Italian sausage. You can also add more veggies like zucchini or mushrooms. This keeps the dish tasty and filling. Don’t forget to check the BBQ sauce for vegetarian options. Adjusting the spice level is simple. Start with less red pepper flakes if you want less heat. You can always add more later as it cooks. For extra heat, try a dash of hot sauce. Taste as you go to find your perfect balance. We explored how to make Spicy Honey BBQ Sausage Pasta step by step. You learned about key ingredients, cooking methods, and flavorful variations. Adjusting spice and adding your favorite veggies can make this dish your own. Store leftovers correctly to enjoy later, or freeze for quick meals. This pasta is easy to make ahead and offers plenty of tasty options. Dive into this recipe, and savor every bite!

Spicy Honey BBQ Sausage Pasta Delightful Dinner Option

Looking for a dinner idea that’s both spicy and sweet? You’ve found it! My Spicy Honey BBQ Sausage Pasta packs

- 1 lb boneless, skinless chicken thighs, diced - 1 tablespoon olive oil - 1 medium onion, chopped - 2 cloves garlic, minced - 1 teaspoon fresh ginger, grated - 2 carrots, sliced - 2 celery stalks, chopped - 1 bell pepper, diced - 1 teaspoon ground turmeric - ½ teaspoon ground cumin - ½ teaspoon black pepper - 4 cups vegetable or chicken broth - 1 cup coconut milk - 2 cups fresh spinach or kale - Juice of 1 lime - Salt to taste You need boneless chicken thighs for a tender bite. The chicken absorbs the spices well. Fresh vegetables like onion, garlic, ginger, carrots, celery, and bell pepper add flavor and nutrition. Using turmeric, cumin, and black pepper gives the soup a warm kick. Broth and coconut milk make the base rich and soothing. - Fresh cilantro - Lime wedges Garnishing with fresh cilantro adds color and freshness. Lime wedges give a zesty touch that brightens every spoonful. - Salt to taste - Additional herbs and spices Salt is vital for bringing out all the flavors. You can also add herbs like thyme or parsley for extra aroma and taste. Adjust spices to suit your liking. 1. Start by heating olive oil in a large pot over medium heat. 2. Add the chopped onion and sauté it until it becomes soft and clear, about 5 minutes. 3. Next, stir in the minced garlic and grated ginger, cooking for an extra minute. The aroma will be amazing! 4. Now, it’s time to add the diced chicken thighs. Cook them until they are browned on all sides, which takes about 5 to 7 minutes. 1. Once the chicken is browned, toss in the sliced carrots, chopped celery, and diced bell pepper. Stir for another 4 to 5 minutes. 2. Sprinkle in the ground turmeric, ground cumin, and black pepper. Mix everything well so the spices coat the chicken and veggies. 3. Pour in the vegetable or chicken broth and bring it to a simmer. Reduce the heat to low and let it cook for 15 to 20 minutes. This step builds great flavor! 4. After simmering, stir in the coconut milk and fresh spinach or kale. Cook until the greens wilt, about 2 to 3 minutes. - For a great look, serve the soup in deep bowls. Top each bowl with a sprinkle of fresh cilantro and a lime wedge on the side. - Enjoy this hearty soup with crusty bread or a side of rice for a filling meal. Choosing the right chicken cut For this soup, I love using boneless, skinless chicken thighs. They stay tender and juicy. If you prefer, you can also use chicken breasts, but thighs give more flavor. Importance of fresh ingredients Always choose fresh ingredients. Fresh veggies add crunch and taste. Look for vibrant colors in your carrots and bell peppers. Fresh herbs like cilantro elevate the soup’s flavor. Anti-inflammatory properties Turmeric is known for its bright golden color. It contains curcumin, which helps reduce inflammation. This makes the soup great for soothing sore throats or colds. Boosting the immune system Turmeric can help boost your immune system too. It fights off germs and viruses. Eating this soup regularly can keep you feeling strong and healthy. How to balance spices Start with the basic spices in the recipe. If you like more heat, add crushed red pepper flakes. For a deeper flavor, add a pinch of nutmeg. Taste as you go to find your perfect balance. Customizing thickness and creaminess If you prefer a thicker soup, add more coconut milk or a bit of cornstarch mixed with water. For a lighter version, add extra broth. Adjust to your liking for the best experience. {{image_2}} You can switch the chicken with other proteins. Tofu works well for a vegetarian option. If you prefer seafood, shrimp is a tasty choice. Both options offer great flavor and texture. For vegetables, feel free to use what you have on hand. Try adding zucchini, green beans, or sweet potatoes. Seasonal veggies make the soup fresh and vibrant. Want some heat? Add chili flakes or fresh chopped chilies to spice things up. A little goes a long way, so add to your taste. For a richer taste, mix in some miso or soy sauce. These ingredients boost the umami flavor. They make the soup even more savory and delicious. If you want a vegan soup, use tofu instead of chicken. Swap the chicken broth with vegetable broth. You can still enjoy all the flavors without animal products. For gluten-free needs, check your broth and soy sauce. Make sure they are labeled gluten-free. This way, you can enjoy the soup without worry. Store your turmeric chicken soup in an airtight container. This keeps it fresh. Place it in the fridge within two hours of cooking. The soup lasts about three to four days. If you want to enjoy it later, freezing is a great option. To freeze the soup, let it cool completely first. Next, pour it into freezer-safe containers. Leave some space at the top for expansion. Label each container with the date. It can stay frozen for up to three months. When you're ready to eat, move it to the fridge overnight. Then, reheat it on the stove or microwave until hot. After storage, you might want to refresh the soup. Add a little extra coconut milk or broth for creaminess. A squeeze of lime juice brightens the flavor, too. Reheat the soup gently over low heat. Stir often to keep it smooth. Enjoy your flavorful meal with a sprinkle of fresh cilantro on top! To make this soup, follow these key steps: 1. Heat olive oil in a pot. 2. Sauté chopped onion until soft. 3. Add minced garlic and grated ginger. Cook for one minute. 4. Add diced chicken and cook until browned. 5. Stir in sliced carrots, chopped celery, and diced bell pepper. 6. Mix in turmeric, cumin, and black pepper. 7. Pour in broth and simmer for 15-20 minutes. 8. Stir in coconut milk and fresh spinach. 9. Season with salt and lime juice before serving. Yes, you can use frozen chicken. Just ensure you thaw it safely first. You can either place it in the fridge overnight or run it under cold water for a quick thaw. Adjust cooking time if needed. Frozen chicken may take a bit longer to cook through, so check it for doneness. Coconut milk adds a rich, creamy texture to the soup. It balances the spices and enhances the overall flavor. The natural sweetness from the coconut milk pairs well with turmeric's warmth. Plus, it makes the soup more filling and satisfying. This soup has a mild spice level. If you prefer more heat, consider adding red pepper flakes or diced jalapeños. You can adjust the amount of black pepper too. Taste as you go to find your perfect balance of spice. Absolutely! You can add vegetables like zucchini, green beans, or peas. These will add color and nutrition. Just remember to cut them into small pieces for even cooking. Adding more veggies makes the soup heartier and more enjoyable. This blog post covered all you need for a delicious Turmeric Chicken Soup. We discussed key ingredients like chicken, fresh veggies, and spices. You learned step-by-step instructions for preparing and cooking the soup. I shared tips for storage and ways to customize the flavors. Feel free to experiment with ingredients and enjoy a healthy meal. Keep these tips in mind to elevate your cooking. Now, get in the kitchen and create a bowl of warmth!

Turmeric Chicken Soup Nourishing and Flavorful Meal

Warm up your day with Turmeric Chicken Soup, a dish that’s both nourishing and bursting with flavor! This recipe blends

- 2 cups butternut squash, peeled and cubed - 2 cups carrots, chopped - 1 red bell pepper, diced - 1 yellow onion, quartered - 3 cloves garlic, peeled These vegetables form the heart of our roasted vegetable soup. Butternut squash brings creaminess, while carrots add sweetness. Red bell pepper offers a fresh taste, and yellow onion gives depth. Garlic adds a lovely aroma that makes this soup even more inviting. - 2 tablespoons olive oil - 4 cups vegetable broth - 1 teaspoon dried thyme - 1 teaspoon smoked paprika - Salt and pepper to taste - Fresh parsley for garnish Olive oil helps roast the veggies and adds flavor. Vegetable broth serves as the soup's base, making it rich and tasty. Dried thyme and smoked paprika enhance the overall flavor. Salt and pepper balance everything out. Finally, fresh parsley adds a pop of color and freshness when you serve it. Each serving of this roasted vegetable soup has around 150 calories. It provides good fiber and important vitamins. Butternut squash is high in vitamin A, which supports eye health. Carrots are great for skin and vision. Red bell peppers bring vitamin C, boosting your immune system. Enjoy this warm bowl of soup that is both comforting and nutritious. To make roasted vegetable soup, you first need to prep the veggies. - Butternut squash: Start by cutting off the ends. Use a sharp knife to slice it in half lengthwise. Scoop out the seeds. Next, peel the skin off with a vegetable peeler. Then, cut the squash into cubes about one inch wide. - Carrots: Wash the carrots to remove dirt. Cut off the ends, then slice them into rounds or half-moons. Aim for even pieces so they cook well. - Onions: Peel the skin off the onion. Cut it in half from top to bottom. Place the flat side down and chop into quarters. This helps them cook evenly. Now it’s time to roast the vegetables. - Oven temperature: Preheat your oven to 425°F (220°C). This high heat helps caramelize the veggies, bringing out their natural sweetness. - Duration: Roast the vegetables for 25-30 minutes. Stir halfway through to ensure even cooking and caramelization. You want them tender and slightly browned. After roasting, blending brings the soup together. - Methods: You can use an immersion blender for easy blending right in the pot. If you prefer a smooth texture, transfer the soup to a stand blender. Blend in batches if needed. - Adjusting the consistency: After blending, check the soup’s thickness. If it’s too thick, add a little vegetable broth to reach your desired texture. Blend again until smooth. Using oil and seasoning adds great flavor to your soup. Olive oil helps the veggies roast well. It makes them soft and sweet. Seasoning with salt and pepper brings out their taste. If you want more flavor, use dried thyme and smoked paprika. Stir the vegetables halfway through cooking. This helps them cook evenly and get that nice, golden color. You can make your soup even better by adding herbs or spices. Try fresh basil or rosemary for a new twist. You can also sprinkle some red pepper flakes for heat. For garnishing, fresh parsley adds a nice touch. A drizzle of olive oil on top will make it look fancy too. For making soup, I recommend a sturdy pot. A heavy pot heats evenly and helps cook the soup well. An immersion blender is perfect for pureeing the soup right in the pot. If you prefer, use a regular blender. Just blend in batches to avoid spills. Use parchment paper on your baking sheet. It makes cleanup easy and keeps the veggies from sticking. {{image_2}} You can change the vegetables in this soup to fit your taste. Think about using seasonal veggies like zucchini, sweet potatoes, or even beets. These can add unique flavors and colors. You can also add greens, like spinach or kale, for extra nutrition. Just stir them in during the last few minutes of cooking. This way, they stay bright and fresh. This soup can easily fit different diets. It is naturally vegan and gluten-free. For a low-sodium option, choose a low-sodium vegetable broth. You can also skip the salt while cooking. This keeps the soup healthy and still tasty. To make the soup richer, add cream or a non-dairy milk like coconut milk. This will give it a smooth texture. You can also explore different spices. Try adding curry for warmth or cumin for earthiness. Both make the soup more exciting. Adjust the spices to your taste for the best results. Store your roasted vegetable soup in a sealed container. This keeps it fresh. Place it in the fridge right after it cools. The soup lasts about 4 to 5 days in the fridge. Always check for signs of spoilage before eating. To freeze the soup, allow it to cool completely. Then, pour it into freezer-safe bags or containers. Make sure to leave some space for expansion. It can last in the freezer for about 3 months. When you're ready to eat, thaw the soup overnight in the fridge. Reheat your soup on the stove for best flavor. Use low heat and stir often. You can also microwave it in short bursts. Avoid high heat to keep the flavors intact. If you notice separation, stir well after reheating. Enjoy your warm, cozy soup! To enhance the flavor of your soup, try these tips: - Add fresh herbs like basil or cilantro for a lively taste. - Squeeze fresh lemon juice to brighten the flavors. - Incorporate a splash of soy sauce or balsamic vinegar for depth. - Use roasted garlic instead of raw for a sweeter flavor. - Stir in a spoonful of nut butter or cream for richness. - Experiment with spices like cumin or coriander to change the profile. Yes, you can use frozen vegetables! They work well in this soup. Here are some recommendations: - Use frozen butternut squash or carrots for easy prep. - Frozen bell peppers and onions save time, too. - Remember to thaw the vegetables first for even cooking. - Adjust the cooking time as needed; they may cook faster. There are many great side dishes to serve with your soup: - Serve with crusty bread or a warm baguette for dipping. - Pair with a fresh green salad for a light side. - Grilled cheese sandwiches complement the soup perfectly. - Consider adding protein, like grilled chicken or chickpeas, for a meal. - A cheese platter with crackers can make for a nice touch. This blog post covers how to make a delicious roasted vegetable soup. We explored key ingredients like butternut squash and garlic, and discussed the steps to prep and roast the vegetables. I shared tips for enhancing flavors and suggested variations to fit your diet. Proper storage practices were also outlined to keep leftovers fresh. In conclusion, wholesome soup can be simple and fun to make. Use the tips to craft your own tasty batch. Enjoy your cooking journey!

Roasted Vegetable Soup Comforting and Nutritious Recipe

Looking for a warm hug in a bowl? This Roasted Vegetable Soup is your answer to comfort and nutrition! Packed

- 1 tablespoon olive oil - 1 large onion, diced - 3 cloves garlic, minced - 2 medium carrots, diced - 2 celery stalks, diced - 1 medium potato, cubed - 1 cup green peas (fresh or frozen) - 6 cups vegetable broth - 1 can (14 ounces) diced tomatoes, with juices - 1 teaspoon dried oregano - 1 teaspoon dried thyme - 1 bay leaf - Salt and pepper to taste - 1 cup cooked pasta (such as ditalini or orzo) - 2 cups fresh spinach or kale, chopped - Zest of 1 lemon - Fresh parsley, chopped for garnish You can add a few ingredients to make this soup even better. Consider these: - A pinch of red pepper flakes for heat. - A squeeze of fresh lemon juice for brightness. - A handful of grated Parmesan for creaminess. - A touch of balsamic vinegar for depth. If you can't find some ingredients, here are some swaps: - Use chicken broth instead of vegetable broth for a richer taste. - Swap the potato for sweet potato for a sweeter flavor. - Zucchini can replace the celery for a different texture. - Use any leafy green if you can't find spinach or kale. These swaps let you play with flavors while keeping the soup comforting. Enjoy the process! Start by gathering all your ingredients. Having everything ready makes cooking easy and fun. Dice the onion, carrots, and celery. Mince the garlic. Cube the potato and chop the spinach or kale. This prep makes a big difference in how smooth your cooking goes. 1. Heat the olive oil: In a large pot, warm the olive oil over medium heat. 2. Add the onions: Toss in the diced onion. Sauté it for about 5 minutes until it turns translucent. 3. Mix in garlic and veggies: Add the minced garlic, diced carrots, and celery. Cook for 3-4 minutes until they soften. 4. Combine remaining ingredients: Add the cubed potato, green peas, vegetable broth, diced tomatoes (with juices), oregano, thyme, and bay leaf. Bring this mix to a boil. 5. Simmer the soup: Lower the heat and let it simmer for 25-30 minutes. Cook until the potatoes are tender. 6. Season the soup: Remove the bay leaf. Season the soup with salt, pepper, and lemon zest. Stir well to mix these flavors. 7. Add pasta and greens: Stir in the cooked pasta and chopped spinach or kale. Cook for another 5 minutes until the greens wilt. 8. Final touch: Adjust the seasoning if needed. Your soup is now ready to serve! Keep an eye on the heat level. Medium heat is best for sautéing. Once you add the broth, bring it to a boil, then lower the heat to simmer. This step keeps the flavors rich. If you find the soup too thick, add a bit more broth or water. Make sure to taste as you cook. Adjusting flavors early helps you create the best soup! To boost the taste of your Italian Penicillin Soup, add a few extra spices. A pinch of red pepper flakes gives heat. Fresh herbs, like basil or thyme, can brighten the soup. You can also use homemade broth instead of store-bought. This change adds depth and richness. A splash of balsamic vinegar at the end can bring all the flavors together. Lastly, don't skip the lemon zest. It adds brightness and freshness to each bowl. To keep your soup thick and hearty, use the right amount of broth. Start with six cups but adjust if needed. If you like it thicker, mash some potato cubes with a fork. This adds creaminess without dairy. If it’s too thick, add a bit more broth or water. Stir well to mix everything evenly. Also, add the pasta towards the end of cooking. This prevents it from getting mushy. Using the right tools makes cooking easier. A large pot is essential for this soup. It allows enough space for all the ingredients to cook evenly. A good knife is also important for dicing vegetables quickly. A wooden spoon works great for stirring. For blending or pureeing, a hand blender can save time. Lastly, measuring cups help ensure you add the right amounts of each ingredient. {{image_2}} You can easily make this soup vegetarian or vegan. The base is already plant-based. Just use vegetable broth, which I always recommend. For extra protein, add beans like white beans or chickpeas. They add texture and keep you full. You can also replace the pasta with quinoa for a hearty twist. If you need a gluten-free option, use gluten-free pasta. There are many types available now. Be sure to check the label and cook it separately. Add it to the soup right before serving. This helps keep the pasta from getting mushy. You can also add rice or lentils as a great substitute. Feel free to swap out any veggies you don’t like. Zucchini or bell peppers work well. You can also change the herbs. Basil or rosemary can add a nice flavor. If you want a bit of spice, add red pepper flakes. For a creamier soup, blend a portion before serving. This creates a rich texture without using dairy. After enjoying your Italian Penicillin Soup, let it cool down. Pour any leftovers into an airtight container. This helps keep the soup fresh and tasty. Store it in the fridge for up to three days. If you want to keep it longer, freezing is a great option. To freeze your soup, use freezer-safe containers. Leave some space at the top. This lets the soup expand when it freezes. It’s best to use the soup within three months for peak flavor. When ready to enjoy, thaw it overnight in the fridge. Reheat it gently on the stove. Stir often and heat until warm. You can also microwave it, but stir it halfway for even heating. The soup lasts up to three days in the fridge and three months in the freezer. For best quality, always check for any changes in smell or texture before eating. If it looks or smells off, it’s best to toss it. Keeping the soup in small portions helps with quick reheating. This way, you can enjoy a warm bowl anytime! Italian Penicillin Soup is full of good ingredients. The broth warms your soul. The garlic helps fight off colds. Carrots and spinach boost your vitamins. Each bite feels comforting and soothing. The soup is a warm hug on a cold day. The lemon zest brightens the flavor and adds freshness. This soup offers heartiness and warmth, making it perfect for recovery. Yes, you can make this soup in a slow cooker! Just follow these steps: - Heat the olive oil in a pan and sauté the onion and garlic. - Add the sautéed onion and garlic to the slow cooker. - Add all the other ingredients, except for the pasta and greens. - Cook on low for 6-8 hours or high for 3-4 hours. - Stir in the cooked pasta and greens for the last 15 minutes. This method will bring out all the flavors slowly and nicely. You can easily change this soup to fit your needs. Here are some ideas: - For gluten-free: Use gluten-free pasta or omit it. - For vegan: Ensure the broth is vegetable-based and skip any dairy. - For low-sodium: Use low-sodium broth and limit added salt. You can also add or swap in your favorite veggies. Adjust the herbs to suit your taste. This soup is flexible and can fit many diets! This blog post explored the key ingredients for Italian Penicillin Soup and how to prepare it step-by-step. I shared tips for enhancing flavor and achieving the right consistency. You can easily adjust the recipe based on dietary needs, such as vegetarian or gluten-free options. Remember to store leftovers properly for the best taste. Enjoy making this comforting soup, and feel free to experiment with your own twists! Your delicious journey with Italian Penicillin Soup starts now.

Italian Penicillin Soup Flavorful Comfort Bowl

Italian Penicillin Soup: Flavorful Comfort Bowl When you’re feeling under the weather, nothing warms the soul like Italian Penicillin Soup.

- 1 large head of cauliflower, cut into florets - 1 medium onion, chopped - 3 cloves of garlic, minced - 1 medium carrot, diced - 2 tablespoons olive oil - 1 teaspoon ground cumin - 1 teaspoon smoked paprika - 4 cups vegetable broth - 1 can (14 oz) diced tomatoes, drained - 1/2 cup tahini - Juice of 1 lemon - Salt and pepper, to taste - Fresh parsley, for garnish - Optional: Crusty bread for serving Gather these ingredients before you start. Each one adds flavor and nutrition to your soup. The large head of cauliflower is the star. It gives the soup its creamy base. The onion and carrot add sweetness. Garlic brings depth and aroma. Olive oil helps to sauté and blend flavors. The spices, cumin and smoked paprika, offer warmth and a hint of smokiness. Vegetable broth makes the soup hearty. Diced tomatoes add a touch of acidity. Tahini gives a creamy texture and nutty flavor. The lemon juice brightens the soup. Finish with salt and pepper to taste. Garnish with fresh parsley for a pop of color. If you like, serve the soup with warm, crusty bread. It’s perfect for dipping! 1. Start by heating the olive oil in a large pot over medium heat. 2. Add the chopped onion and diced carrot. Sauté these for about 5 minutes until they soften. 3. Next, stir in the minced garlic, ground cumin, and smoked paprika. Cook for one more minute until the spices smell great. 1. Now, add the cauliflower florets to the pot and stir well. Cook them for about 3 to 4 minutes until they lightly brown. 2. Pour in the vegetable broth and add the drained diced tomatoes. Bring the mix to a boil. Then, lower the heat and let it simmer for about 20 minutes or until the cauliflower is tender. 1. After cooking, remove the pot from heat. Mix in the tahini and lemon juice for extra creaminess. 2. Use an immersion blender to puree the soup until it’s smooth. If you don’t have one, you can transfer it to a blender in batches. 3. Season your soup with salt and pepper to taste. If it feels too thick, add a little more broth or water to reach the right consistency. To make your Mediterranean cauliflower soup stand out, spices are key. I love using ground cumin and smoked paprika. They bring warmth and depth to the dish. Fresh ingredients also play a big role. Always pick ripe tomatoes and fresh garlic. They add that vibrant flavor you want. A creamy soup is a delight. To get that smooth texture, blend the soup well. I recommend using an immersion blender. If it's too thick, just add more broth or water. This way, you can reach your perfect soup consistency. Presentation matters. A sprinkle of fresh parsley on top makes the soup pop. It adds color and freshness. Pair the soup with warm, crusty bread. This not only enhances the meal but also provides a nice crunch. Enjoy the creamy soup with a dip of bread for a perfect bite. {{image_2}} If you want to make this soup vegan, you can swap out tahini. Use sunflower seed butter or almond butter instead. These options keep the soup creamy while being plant-based. For gluten-free bread, choose options made with rice or almond flour. Many stores offer gluten-free loaves that taste great with this soup. You can enhance the soup by adding leafy greens. Spinach or kale works well. Just toss them in before you blend. Want extra protein? Add some chickpeas or lentils for a heartier meal. For flavor, try different herbs or spices. Fresh basil or dill can brighten the soup. A touch of lemon zest gives it a nice twist, too. Do you like heat? Add red pepper flakes while cooking the onions. This will bring a kick to your soup. For a briny flavor, mix in olives or capers. They add depth and a Mediterranean vibe. You can also top your soup with sliced jalapeños for more spice. Enjoy your unique creation! To keep your Mediterranean cauliflower soup fresh, store it in an airtight container. Place it in the fridge within two hours of cooking. It can stay good for about 3 to 4 days. If you want to freeze it, let the soup cool first. Use freezer-safe containers or bags. This soup can last up to three months in the freezer. For reheating, you have a few options. You can use the stove or the microwave. If using the stove, heat it on low to avoid burning. Stir it often for even warming. If using the microwave, heat in short bursts. This will help keep the texture smooth. Aim for 2 to 3 minutes per serving, stirring in between. You can prepare ingredients ahead of time. Chop the onions, garlic, and carrots a day before. Store them in the fridge to save time. For the soup, you can also make it in advance. Just cool it down, then store it in the fridge or freezer. This way, you can enjoy a quick meal later. Yes, you can make this soup ahead. It tastes even better the next day. Here are some tips for making it in advance: - Cool and Store: Let the soup cool before putting it in an airtight container. It keeps well in the fridge for up to three days. - Freeze for Later: You can also freeze the soup. Use freezer-safe containers, leaving some space for expansion. It lasts for about three months. - Reheat Gently: When ready to eat, reheat the soup on low heat. Stir often to prevent sticking and ensure even warming. This soup pairs well with several sides. Here are some great options: - Crusty Bread: A slice of warm, crusty bread is perfect for dipping. - Salad: A fresh side salad adds crunch and brightness. - Cheese: Top with crumbled feta or a sprinkle of parmesan for extra flavor. - Olives: Serve a bowl of olives on the side for a salty contrast. If you like heat, here are some easy ways to spice it up: - Red Pepper Flakes: Add a pinch of red pepper flakes while sautéing the onions. - Spicy Paprika: Swap smoked paprika for spicy paprika for a different kick. - Hot Sauce: Drizzle your favorite hot sauce in each bowl before serving. - Chili Oil: Drizzle chili oil on top for an extra layer of warmth and flavor. This blog post covered a delicious Mediterranean Cauliflower Soup recipe. You learned about essential ingredients, step-by-step cooking instructions, and tips for perfect flavor and texture. Variations let you customize the dish to your taste, while storage tips ensure leftovers stay fresh. In conclusion, making this soup is simple and rewarding. It’s versatile, healthy, and perfect for sharing. Enjoy this comforting dish any time!

Mediterranean Cauliflower Soup Flavorful and Easy Recipe

Looking for a cozy, flavorful soup that’s also easy to make? Try my Mediterranean Cauliflower Soup! Packed with vibrant spices

- 1 lb chicken thighs, boneless and skinless, cut into chunks - 3 medium potatoes, diced - 1 large onion, chopped - 2 cloves garlic, minced - 2 carrots, sliced - 1 celery stalk, chopped - 4 cups chicken broth - 1 teaspoon dried thyme - 1 teaspoon dried rosemary - Salt and pepper to taste - 2 tablespoons olive oil - Fresh parsley - Additional seasoning I love using chicken thighs in this recipe. They stay juicy and tender. You can use boneless, skinless thighs for easy prep. Diced potatoes add a creamy texture. I prefer medium potatoes, but you can try different types. Onions and garlic bring strong flavors. Chopped onion adds sweetness, while minced garlic gives a warm kick. Fresh herbs enhance taste. I use dried thyme and rosemary, but feel free to switch them out. For extra veggies, I add carrots and celery. Carrots add color and sweetness. Celery gives a nice crunch. Chicken broth is the base of the soup. It ties all the flavors together. To finish, I sprinkle fresh parsley on top. It adds a burst of color. You can also add extra seasoning to your liking. Enjoy this cozy dish! 1. Start by heating two tablespoons of olive oil in a large pot over medium heat. 2. Chop one large onion and mince two cloves of garlic. Add them to the pot. 3. Sauté the onion and garlic for about 3-4 minutes until the onion turns translucent. 4. While that cooks, cut one pound of boneless chicken thighs into chunks. 5. Season the chicken with salt and pepper. 6. Add the chicken to the pot and cook for about 5-7 minutes. Brown the chicken on all sides. 1. Dice three medium potatoes and slice two carrots. 2. Chop one celery stalk. 3. Stir the diced potatoes, sliced carrots, and chopped celery into the pot. 4. Mix everything well with the chicken and onion. 5. Pour in four cups of chicken broth, making sure all ingredients are submerged. 6. Add one teaspoon each of dried thyme and dried rosemary. Stir to combine. 1. Bring the soup to a boil over high heat. 2. Once boiling, reduce the heat to low and cover the pot. 3. Let the soup simmer for about 25-30 minutes. 4. Check if the chicken is cooked through and the potatoes are tender. 5. Taste the soup and add more salt and pepper if needed. 6. Serve hot, garnished with fresh parsley for color and flavor. - To ensure tender chicken and potatoes, cut them into similar sizes. This helps them cook evenly. - Adjust cooking times if you use larger chicken pieces or more potatoes. They may need extra time to cook through. - Adding lemon juice or zest brightens the soup. Just a splash enhances the taste. - Incorporating more herbs, like fresh thyme or parsley, deepens the flavor. Experiment with your favorites! - Best sides to pair with this soup are a fresh garden salad or roasted veggies. They complement the soup well. - Ideal bread selections include crusty sourdough or warm rolls. They soak up the soup nicely and add texture. {{image_2}} - Low sodium broth: Use low sodium chicken broth to cut back on salt. This keeps the soup tasty and heart-friendly. - Using sweet potatoes: Swap regular potatoes for sweet potatoes. This adds a sweet flavor and more nutrients. Sweet potatoes are also high in fiber and vitamins. - Gluten-free options: Ensure your broth is gluten-free. This way, everyone can enjoy the soup without worries. - Adding legumes: Mix in beans or lentils for a protein boost. This makes the soup heartier and adds new textures. - Mexican chicken soup style: Add cumin and chili powder for a spicy twist. Toss in corn and black beans for extra flavor. - Italian-inspired variations: Use basil and oregano for an Italian touch. You can also add diced tomatoes and spinach for more color and taste. To store leftovers, let the soup cool first. Place it in a container with a lid. Glass or plastic containers work great. Make sure to leave some space at the top for expansion. Store the soup in the fridge for up to four days. For freezing, use airtight containers or freezer bags. Divide the soup into portions for easy thawing. Label each container with the date. This helps you know how long it has been frozen. When ready to eat, thaw in the fridge overnight. You can also use the microwave for quick thawing. In the fridge, the soup lasts about four days. If frozen, it can stay good for up to three months. Always check for signs of spoilage. Look for off smells, unusual colors, or mold. If you see any of these signs, it’s best to throw it out. Yes, you can use chicken breast. Chicken breast cooks faster than thighs. Cut the breast into smaller pieces. Reduce the cooking time by about 5 minutes. Check that the chicken is fully cooked. It should reach an internal temperature of 165°F (75°C). Absolutely! You can make this soup a day in advance. Let it cool before storing. Place it in an airtight container. This soup stays good in the fridge for up to three days. To reheat, warm it on the stove until hot. You can also use the microwave, but stir often for even heating. You have a few options to thicken your soup. One common method is to mix flour with water to create a slurry. Stir this into the soup and let it simmer until thick. Cornstarch works well too; mix it with cold water and add it to the pot. For a heartier soup, mash some potatoes right in. This adds creaminess without extra ingredients. This blog post covered how to make a comforting chicken soup. We explored key ingredients, step-by-step cooking, and helpful tips. You learned about variations for health and flavor. Remember, choosing good broth and fresh herbs can really boost taste. Store leftovers properly to keep them fresh. You can tweak your soup based on your diet or preferences. Now, with these recipes and tips, you can create a delicious meal each time. Enjoy your cooking adventure!

Savory Chicken Soup with Potatoes Easy Recipe Guide

Looking for a warm and filling dish that’s easy to make? Let’s dive into my Savory Chicken Soup with Potatoes

- 1 cup shredded cabbage - 1 cup shredded carrots - 1/2 cup bean sprouts - 1/2 cup cooked chicken or tofu - 3 green onions - 2 cloves garlic, minced - 1 tablespoon fresh ginger - 2 tablespoons soy sauce - 1 tablespoon sesame oil - 1 teaspoon salt - 1/2 teaspoon black pepper - Egg roll wrappers - Vegetable oil for frying You can swap chicken for tofu if you want a vegetarian dish. Tofu gives a nice texture and flavor. For a gluten-free option, look for gluten-free soy sauce. This makes the dish safe for those with gluten allergies. To get the best veggies, choose bright, crisp cabbage and firm carrots. Look for bean sprouts that are crunchy, not wilted. If you use meat, pick fresh chicken or high-quality tofu. Fresh ingredients help your egg rolls taste great. 1. Sauteing garlic and ginger: Start by heating sesame oil in a large skillet. Add minced garlic and grated ginger. Sauté for about one minute. You want the garlic and ginger to smell great but not burn. 2. Stir-frying vegetables: Next, toss in your shredded cabbage, carrots, and bean sprouts. Stir-fry for about five minutes. The veggies should be tender yet crisp. This keeps them fresh and tasty. 1. Rolling techniques for perfect egg rolls: Take an egg roll wrapper and lay it flat. Position one corner facing you. Add about two tablespoons of filling in the center. Fold the bottom corner over the filling. 2. Sealing the wrappers properly: Fold in the two side corners. Roll it tightly toward the top corner. Use a drop of water to seal the top corner. This will keep your filling inside while frying. 1. Choosing the right oil: For frying, use vegetable oil. It has a high smoke point, which is great for frying. 2. Monitoring oil temperature: Heat the oil in a large pot or deep skillet over medium-high heat. Once the oil is hot, place the egg rolls in carefully. Fry them for about three to four minutes on each side. Look for that golden brown color for the best crunch. To get that perfect golden brown look, you need to fry at the right heat. Heat your oil to about 350°F (175°C). This temp helps the egg rolls cook evenly. If the oil is too hot, the outside will burn before the inside cooks. If it's too cool, they soak up too much oil. Oil management is key for a crispy texture. Use enough oil to cover the rolls fully. Fry them in small batches. This way, the temperature stays steady, and they crisp up nicely. You can make uncooked egg rolls ahead of time. Just store them in the fridge for up to a day. Wrap them in plastic wrap to keep them fresh. If you want to store them longer, freezing is a great option. To freeze, lay them in a single layer on a baking sheet. Once frozen, transfer them to a bag or container. They can last up to three months in the freezer. Pair your egg rolls with tasty dipping sauces. Sweet and sour sauce or soy sauce work well. You can also try spicy chili sauce for a kick. For side dishes, consider something light. A fresh salad or steamed veggies complements egg rolls perfectly. You can also serve rice dishes for a heartier meal. {{image_2}} You can fill your egg rolls with many proteins. Shrimp and pork add great flavor. Both cook quickly and give a nice bite. If you want a lighter option, try chicken. It mixes well with veggies. For a vegetarian or vegan choice, use tofu. Tofu absorbs flavors well and keeps the egg rolls filling. Spice up your egg rolls with chili sauce. Add it to your filling for a kick. You can also mix in unique herbs. Fresh cilantro or basil adds freshness. A sprinkle of five-spice powder will boost the flavor. Experimenting with spices keeps your egg rolls exciting. Baking egg rolls is a healthier option. It uses less oil and still tastes great. To bake, preheat your oven to 400°F. Brush the egg rolls with oil for crispiness. Place them on a baking sheet and bake for 20-25 minutes. Flip halfway through for an even golden color. Fried egg rolls have a crispy crunch. But baking gives you a lighter snack without losing flavor. To keep your egg rolls fresh, place them in an airtight container. Refrigerate them within two hours of cooking. This helps lock in flavor and prevent spoilage. For reheating, I recommend using an oven or air fryer. Preheat your oven to 375°F (190°C). Place the egg rolls on a baking sheet for 10-15 minutes. This method helps them stay crispy. You can also use an air fryer, cooking them at 350°F (175°C) for about 5 minutes. Freezing egg rolls is a great option for later. First, let them cool completely. Then, place them on a baking sheet in a single layer. Freeze them for about one hour. After that, transfer them to a freezer bag. This keeps them from sticking together. To cook from frozen, you can bake or fry them. If using an oven, set it to 375°F (190°C) and bake for 20-25 minutes. If frying, cook them in hot oil for 5-6 minutes, turning until golden brown. In the fridge, your egg rolls can last for about 3-4 days. After that, their taste and texture may decline. Watch for signs of spoilage. If they smell sour or look discolored, it’s best to toss them. Always prioritize safety when it comes to food. To get that perfect crunch, the oil must be hot. Heat your vegetable oil to 350°F (175°C). If the oil is too cool, the egg rolls will soak up oil and become greasy. Fry them in small batches. This keeps the temperature steady. Fry for 3-4 minutes on each side until they turn golden brown. Yes, store-bought fillings can save time. Look for options like pre-cooked chicken or vegetable mixes. These can make your prep quick and easy. Just remember to adjust the flavors. Add extra soy sauce or spices if needed to boost taste. If your egg rolls burst, check the sealing. Make sure you seal them tightly. Use a little water to help close the edges. If they still burst, they might be too full. Next time, use less filling. Also, avoid frying at too low a temperature. Yes, you can air-fry egg rolls for a healthier option. Preheat your air fryer to 375°F (190°C). Spray the egg rolls lightly with oil. Place them in the basket, making sure they aren’t touching. Cook for about 10-12 minutes, flipping halfway through. They will be crispy and delicious! Egg rolls and spring rolls are not the same. Egg rolls have a thicker wrapper and are usually fried. They often contain meat and vegetables. Spring rolls have a thinner wrapper and can be fresh or fried. They are mostly filled with vegetables. This article covered all you need for perfect egg rolls. You learned about key ingredients and their roles. I shared tips for selecting fresh vegetables and quality proteins. You now know how to prepare, fill, and fry egg rolls to a golden crisp. Exploring variations and storage options helps you enjoy them longer. With this knowledge and practice, you can impress anyone with your homemade egg rolls. Happy cooking!

Golden Brown Egg Rolls Crispy and Satisfying Snack

Craving a crunchy snack that packs a flavor punch? Look no further than my Golden Brown Egg Rolls! These crispy

For this dish, you will need: - 1 lb chicken breast, cut into bite-sized pieces - 2 tablespoons olive oil - 2 teaspoons dried oregano - 1 teaspoon garlic powder - 1 teaspoon paprika - Salt and pepper to taste These ingredients create a flavorful marinade. The olive oil helps the spices stick to the chicken. Oregano gives a nice, earthy taste. Garlic powder adds depth, while paprika brings a hint of warmth. The base of your gyro bowl includes: - 1 cup cooked quinoa or brown rice Quinoa is a great choice. It's packed with protein and fiber. Brown rice is filling and has a nice nutty flavor. Both options work well and provide a healthy foundation for your meal. To add crunch and nutrition, gather: - 1 cup cherry tomatoes, halved - 1 cucumber, diced - 1/2 red onion, thinly sliced - 1 cup spinach or mixed greens Fresh veggies brighten the dish. Cherry tomatoes add sweetness, while cucumber gives a refreshing crunch. Red onion brings sharpness, and spinach or greens add color and nutrients. They make your gyro bowl fresh and vibrant. First, grab a big bowl. Add the chicken pieces, olive oil, oregano, garlic powder, paprika, salt, and pepper. Mix everything well. You want the chicken to soak up the flavors. Let it marinate for at least 15 minutes. This step makes the chicken juicy and tasty. Next, heat a skillet over medium-high heat. Once hot, add the marinated chicken. Cook it for 5-7 minutes. Stir the chicken often. You want it to turn golden brown and be fully cooked. Check that it is no longer pink in the center. While the chicken cooks, make the gyro sauce. In a small bowl, mix plain Greek yogurt and lemon juice. Stir until smooth. Add a pinch of salt and pepper to taste. This sauce gives your gyro bowls a creamy and zesty kick. Now it's time to build your gyro bowls. Start with a layer of cooked quinoa or brown rice at the bottom of each bowl. Then, add the cooked chicken on top. Next, place halved cherry tomatoes, diced cucumber, sliced red onion, and a handful of spinach or mixed greens. Drizzle the gyro sauce over everything. Finish with a sprinkle of fresh parsley for a pop of color. Serve your healthy chicken gyro bowls right away and enjoy! For juicy chicken, start with good marination. Mix chicken with olive oil and spices. Let it sit for at least 15 minutes. This step adds flavor. Use medium-high heat for cooking. Stir the chicken often to avoid burning. Cook until it’s golden and fully cooked. This usually takes about 5-7 minutes. You can change the taste with different spices. Try cumin or coriander for a warm flavor. Add chili powder for a spicy kick. If you prefer a milder taste, use just oregano and garlic powder. You can also mix in fresh herbs like dill or mint. This gives a fresh twist. Meal prep helps save time. Cook a big batch of chicken and grains. Store them in separate containers. You can mix and match throughout the week. Keep chopped veggies in the fridge for easy access. Make the gyro sauce ahead of time too. This way, you always have a healthy meal ready. {{image_2}} You can swap chicken for other proteins. Try turkey, shrimp, or tofu. Each option adds a new flavor. For turkey, use the same marinating steps. If you choose shrimp, cook until they turn pink. Tofu needs pressing before marinating. This helps it absorb the flavors well. Quinoa and brown rice are great, but you can try others. Couscous or farro work well too. Both offer a chewy texture. You could also use cauliflower rice for a low-carb option. This keeps your bowls light and fresh. To make this dish vegan, replace chicken with chickpeas. Use the same spices for a tasty kick. For the sauce, mix tahini with lemon juice instead of yogurt. You can also add more veggies, like bell peppers or avocados. This keeps it colorful and nutritious. To keep your chicken gyro bowls fresh, store them in airtight containers. Let the bowls cool down before sealing them. This helps prevent moisture buildup. I recommend storing the chicken, grains, and veggies separately if you can. This keeps each part fresh longer. When reheating, use the microwave for quick results. Place the gyro bowl in a microwave-safe dish. Heat it for 1-2 minutes, stirring halfway. You can also use a skillet. Just add a splash of water and cover it. Heat on low until warm. This keeps the chicken juicy. Choose glass or BPA-free plastic containers. They should have tight lids to prevent spills. Make sure the containers are safe for the microwave and dishwasher. This makes cleanup easy. If you want to save space, use flat containers for stacking. Yes, you can make Healthy Chicken Gyro Bowls ahead of time. I often cook the chicken and prepare the sauce in advance. Store them in separate containers. This way, you keep the chicken fresh and the sauce creamy. When ready to eat, just assemble the bowls. Reheat the chicken in a skillet or microwave. If you need a substitute for Greek yogurt, consider using sour cream or a dairy-free yogurt. Plain yogurt also works well. You can use cashew or coconut yogurt for a vegan option. These alternatives still keep the sauce creamy and tasty. Adding more vegetables is easy! You can toss in bell peppers, zucchini, or carrots. Try adding roasted veggies for a different flavor. You can also use kale or arugula instead of spinach. Mix your favorites to make the bowls colorful and nutrient-rich. Yes, Healthy Chicken Gyro Bowls can be gluten-free. Just ensure you use gluten-free grains like quinoa or brown rice. Check the labels on your yogurt and any store-bought sauces. This way, you keep the meal safe for those with gluten sensitivities. Great sides for gyro bowls include pita bread, hummus, or a fresh Greek salad. Roasted vegetables or a light soup also make good pairs. These sides add extra flavor and texture to your meal. Enjoy mixing and matching to find your favorites! This article covered many ways to make delicious Healthy Chicken Gyro Bowls. You learned about key ingredients, how to marinate and cook chicken, and set up gyro bowls. Tips like replacing proteins or using other grains add more choices. Storing and reheating ensure you can enjoy leftovers easily. Follow these steps for tasty meals any time. Remember, good food brings joy, so get started on your gyro bowls today!

Healthy Chicken Gyro Bowls Fresh and Easy Recipe

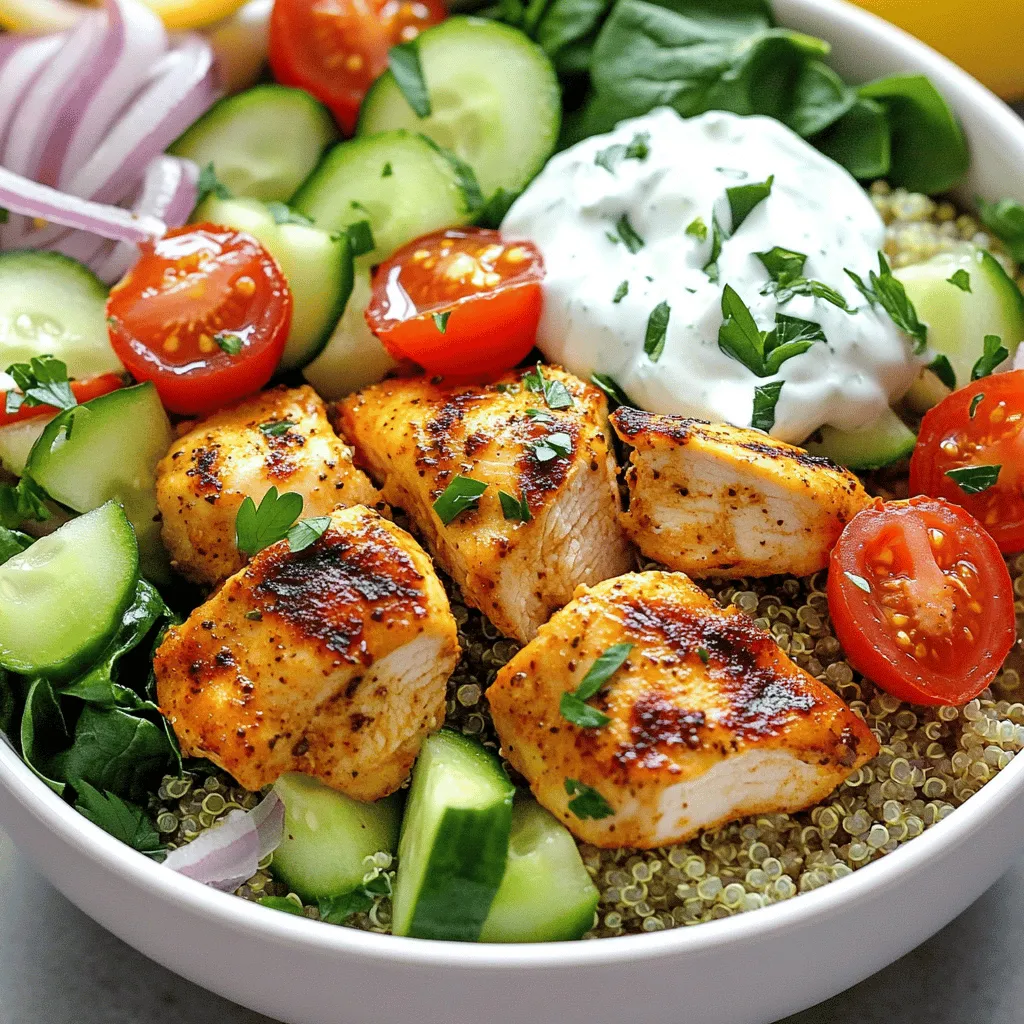
If you crave a fresh and easy weeknight meal, Healthy Chicken Gyro Bowls are for you! Packed with flavor and

- 3 cups tortilla chips - 2 cups cooked chicken, shredded - 2 cups red enchilada sauce - 1 cup salsa verde - 1 cup shredded cheddar cheese - 1/2 cup black beans, drained and rinsed - 1 jalapeño, finely sliced - Fresh cilantro - Chopped green onions When making Baked Chicken Chilaquiles Casserole, you need specific ingredients to create that rich, layered taste. First, tortilla chips form the crispy base. I like to use three cups to give a satisfying crunch. The chicken adds protein; I often shred two cups of cooked chicken. For the sauce, I use two cups of red enchilada sauce, which brings a bold flavor. Next, salsa verde adds a fresh kick. One cup works well for this dish. Cheese is key, so I include one cup of shredded cheddar cheese for its meltiness. Black beans add texture, too; half a cup is all you need. For optional garnishes, I suggest finely sliced jalapeño for some heat. Fresh cilantro brightens the dish. Finally, chopped green onions add a nice crunch. Each ingredient plays a role in this tasty casserole. - Preheat the oven to 375°F (190°C). - In a large bowl, mix shredded chicken, black beans, corn, and half of the red enchilada sauce. Season with salt and pepper to taste. This mix gives a great flavor base for the casserole. - Grease a 9x13 inch baking dish. Spread half of the tortilla chips evenly across the bottom. This creates a crunchy layer. - Spoon half of the chicken mixture over the chips. - Add half of the salsa verde and half of the cheddar cheese. This adds more flavor and creaminess. - Now, layer the rest of the tortilla chips over the cheese. - Then, add the remaining chicken mixture. - Pour the rest of the red enchilada sauce, salsa verde, and top with the last of the cheese. - Finish with crumbled queso fresco and jalapeño slices if you like some heat. - Cover the dish with aluminum foil. Bake for 20 minutes. This helps all the flavors meld together. - After 20 minutes, remove the foil. Bake for an additional 10-15 minutes, or until the cheese is bubbly and golden. This step makes the cheese melt perfectly and get that nice color. Let it cool for about 5 minutes before serving. Enjoy every cheesy bite! To make your Baked Chicken Chilaquiles Casserole shine, proper seasoning is key. Remember to add salt and pepper to your chicken mixture. This simple step ensures every bite is full of flavor. For shredding chicken quickly, try using two forks. It works like magic! You can also use a stand mixer with a paddle attachment. Just let it shred for a few seconds. It's fast and easy. Pair your casserole with a light salad. A simple green salad with lime dressing works well. You can also serve it with sliced avocados or fresh fruit. This adds color and balance to the meal. Before serving, consider garnishing with fresh cilantro and chopped green onions. These bright toppings not only look great, they also add fresh flavors. Baking times can vary based on your oven. If you know your oven runs hot, check the casserole a few minutes early. This helps avoid overcooking. To make ahead, you can assemble the casserole the night before. Just cover it and keep it in the fridge. When you're ready to bake, add a few extra minutes to the time. Reheating is simple; just warm it in the oven until heated through. This keeps the texture just right. {{image_2}} If you want to switch things up, here are some easy swaps. - Cheese Alternatives: You can use mozzarella or pepper jack instead of cheddar for a different taste. - Sauce Options: Try using green enchilada sauce for a milder flavor. Adding new vegetables can also boost nutrition and flavor. - Vegetable Ideas: Use bell peppers, spinach, or zucchini for a fresh twist. They add color and taste. Making this dish fit your diet can be simple. - Gluten-Free: Use gluten-free tortilla chips and sauces to keep it safe for all. - Vegetarian Versions: Replace chicken with black beans or lentils. This makes it hearty and filling. You won’t lose any flavor with these swaps! To make this dish pop, consider these tips. - Adding Spices: A pinch of cumin or smoked paprika can bring warmth. A bit of garlic powder adds depth too. - Different Proteins: Swap chicken for shredded beef or pulled pork if you want a richer taste. These tweaks will make Baked Chicken Chilaquiles Casserole even more delicious! To store your Baked Chicken Chilaquiles Casserole, let it cool first. Then, cover it tightly with plastic wrap or aluminum foil. You can also use an airtight container. This helps keep it fresh. In the fridge, it lasts about 3 to 4 days. Make sure to label the container with the date. If you want to store the casserole for a longer time, freezing works great. First, let the casserole cool completely. Then, wrap it tightly in plastic wrap, and cover it with aluminum foil. This will prevent freezer burn. It can stay in the freezer for up to 2 months. When you're ready to eat it, take it out and let it thaw in the fridge overnight. When reheating your casserole, the oven is the best choice. Preheat the oven to 350°F (175°C). Place the casserole in an oven-safe dish. Cover it with foil to keep it moist. Heat for about 20-30 minutes, or until it's hot all the way through. You can also use a microwave for quick reheating. However, the oven keeps the texture better. Enjoy your delicious leftovers! You can use several options instead of chicken. For meat, try shredded beef or pork. These meats add great flavor. You can also use cooked turkey for a lighter option. If you prefer non-meat, consider black beans or lentils. Both add protein and texture. Tofu is another good choice for a vegetarian option. Just ensure it’s well-seasoned to match the dish. Yes, you can easily make this casserole in advance. Prepare all the layers and assemble them in your baking dish. Cover it tightly with foil and store it in the fridge. It can stay fresh for up to two days. When ready to bake, let it sit at room temp for about 30 minutes. Then, bake it as directed, adding a few extra minutes if needed. Absolutely! To make this dish gluten-free, choose corn tortilla chips. These are a great substitute for regular chips. For sauces, look for gluten-free red enchilada sauce and salsa verde. Always check labels to be sure. With these swaps, you can enjoy a delicious gluten-free version of Baked Chicken Chilaquiles Casserole. This article covers how to make a delicious baked chicken chilaquiles casserole. We explored the main and additional ingredients, step-by-step instructions, cooking tips, and variation ideas. The casserole is easy to prepare and great for any meal. Whether you use chicken or choose other proteins, the flavors will shine. Remember to store leftovers well, so you enjoy every bite later. Overall, this dish offers a fun twist on traditional recipes, making it perfect for everyone. Enjoy cooking and sharing this tasty meal!

Baked Chicken Chilaquiles Casserole Tasty and Simple

Looking for a quick and tasty dinner? Try my Baked Chicken Chilaquiles Casserole! This dish is not only simple to

Older posts
Newer posts
← Previous Page1 … Page34 Page35 Page36 … Page84 Next →

dsad

© 2026 Foodish Talk • Built with GeneratePress

Our Policies

  • Copyright Policy
  • Cookie Policy
  • GDPR Policy
  • Privacy Policy
  • Disclaimer
  • Terms Of Use

More Information

  • Home
  • About
  • Contact
  • Appetizers
  • Dessert
  • Dinner
  • Drinks
©2026, Foodish Talk About Back To Top