Skip to content
DisclaimerTerms Of UseGDPR PolicyCookie Policy

Foodish Talk

  • Home
  • Drinks
  • Appetizers
  • Dinner
  • Dessert
  • About
  • Contact
  • Privacy Policy
DisclaimerTerms Of UseGDPR PolicyCookie Policy

NO-ING-IMG

- 1 pound chicken breast, cut into bite-sized pieces - ½ cup honey - 3 tablespoons soy sauce - 4 cloves garlic, minced - 1 tablespoon ginger, grated - 1 teaspoon sesame oil - ½ teaspoon black pepper - 2 tablespoons cornstarch - 1 tablespoon olive oil - Sesame seeds - Sliced green onions The star of this dish is chicken. I love using fresh chicken breast cut into bite-sized pieces. It cooks evenly and absorbs all the flavors well. Honey adds sweetness, while soy sauce gives it depth. Garlic and ginger bring a wonderful aroma and warmth. They add bold flavor. I always use fresh garlic and ginger for the best taste. For added flavor, I include sesame oil and black pepper. The oil adds a nutty note, and the pepper gives a little kick. Cornstarch is key for crunchiness. It makes the bites crispy. A little olive oil helps everything brown nicely in the air fryer. Finally, garnishes like sesame seeds and sliced green onions make the dish pop. They add color and texture. You can’t skip these! Whisk together honey, soy sauce, minced garlic, grated ginger, sesame oil, and black pepper. This mix creates a sweet and savory flavor. The garlic adds a nice kick, while the ginger gives warmth. Make sure it blends well. You want all the flavors to dance together. Coat chicken pieces in the marinade. Stir until every piece is covered. This step is key; it lets the chicken soak in all that goodness. Cover the bowl and refrigerate for at least 30 minutes. If you have time, let it sit longer for even more flavor. Preheat your air fryer to 400°F (200°C) for about 5 minutes. While it heats, sprinkle cornstarch over the marinated chicken. Toss it to coat evenly. This will help the chicken get crispy. Lightly brush the air fryer basket with olive oil. This step prevents sticking and helps the chicken brown nicely. Place the chicken bites in a single layer in the basket. If you crowd the basket, the chicken won’t crisp up well. Air fry the chicken for 10 to 12 minutes. Shake the basket halfway through to ensure even cooking. The chicken should be golden brown and reach an internal temperature of 165°F. This means it’s fully cooked and safe to eat. Once done, remove the chicken. Toss it in any leftover marinade that cooked down in the air fryer. This adds even more flavor. Garnish with sesame seeds and sliced green onions for a pretty finish. Enjoy your tasty air fryer honey garlic chicken bites! Marinating chicken bites is key for great taste. I recommend marinating for at least 30 minutes. This allows the honey, soy sauce, garlic, and ginger to soak into the chicken. The longer you marinate, the deeper the flavor. You can even marinate overnight for a richer taste. Just remember to keep it in the fridge. Cornstarch and oil are your best friends for crispiness. When you sprinkle cornstarch on the marinated chicken, it forms a light coating. This coating turns crispy in the air fryer. A little olive oil helps too. It adds flavor and ensures that the chicken does not stick to the basket. Together, they give you that perfect crunch. Think about what to serve with your honey garlic chicken. Rice is a great base. It soaks up the sauce well. You can also serve it with steamed veggies for a fresh crunch. If you want extra flavor, pair it with a garlic dipping sauce or a spicy sriracha. Garnish with sesame seeds and green onions for a nice touch. {{image_2}} You can switch up the protein in this recipe. Shrimp works great with honey and garlic. Just marinate the shrimp for about 20 minutes. You can also use tofu for a tasty vegetarian option. Press the tofu first to remove extra water. Cut it into cubes, then marinate. Both shrimp and tofu soak up the flavor well. Feel free to play with flavors. You can add spices like chili flakes for heat. A dash of paprika gives a nice smoky taste. Want more tang? Try adding a splash of rice vinegar. You can also swap the soy sauce with teriyaki sauce for a different twist. Each change will give you a unique taste. No air fryer? No problem! You can bake these bites in the oven. Preheat your oven to 400°F (200°C). Spread the marinated chicken in a single layer on a baking sheet. Bake for 15-20 minutes, flipping halfway through. They will be crispy and golden, just like in the air fryer. Enjoy the same great taste! To keep your chicken bites fresh, store them in an airtight container. Place a paper towel at the bottom to absorb moisture. This helps prevent sogginess. Refrigerate the container within two hours of cooking. Leftovers can last up to three days in the fridge. If you want to keep them longer, freezing is a great option. Reheating can be tricky. You want the chicken to stay crispy. The best way is to use an air fryer. Preheat it to 350°F (175°C). Place the chicken bites in the basket for about 5-7 minutes. This method helps regain that crispy texture. You can also use a skillet on medium heat. Just add a touch of oil and cook for a few minutes, turning occasionally. To freeze the chicken bites, let them cool completely. Place them in a single layer on a baking sheet. Freeze for about an hour. Once frozen, transfer them to a freezer bag. Remove as much air as possible before sealing. For best taste, eat them within three months. To thaw, place them in the fridge overnight before reheating. To ensure your chicken is safe to eat, check the internal temperature. It should reach 165°F (75°C). Use a meat thermometer for accuracy. If you slice the chicken, the juices should run clear, not pink. This step helps you avoid any foodborne illnesses. You can use regular soy sauce, but it will change the flavor. Regular soy sauce is saltier. This could make your dish taste too salty. Low sodium soy sauce lets the honey and garlic shine. It’s a healthier choice too, especially if you watch your salt intake. These bites pair well with many sides. Try serving them with steamed rice or quinoa for a filling meal. You can also add a fresh salad with a light dressing. For drinks, iced tea or lemonade complements the flavors nicely. Feel free to get creative with your sides! This blog post shared a simple recipe for honey garlic chicken bites. We covered key ingredients, step-by-step cooking, and helpful tips. You learned how marinating boosts flavor and how cornstarch achieves crispiness. We also discussed variations with proteins and cooking methods. Remember, these bites are not just easy to make; they are also fun to eat. Try customizing the recipe to match your taste. Enjoy your cooking adventure, and don't forget to share with friends!

Air Fryer Honey Garlic Chicken Bites Flavor Boost

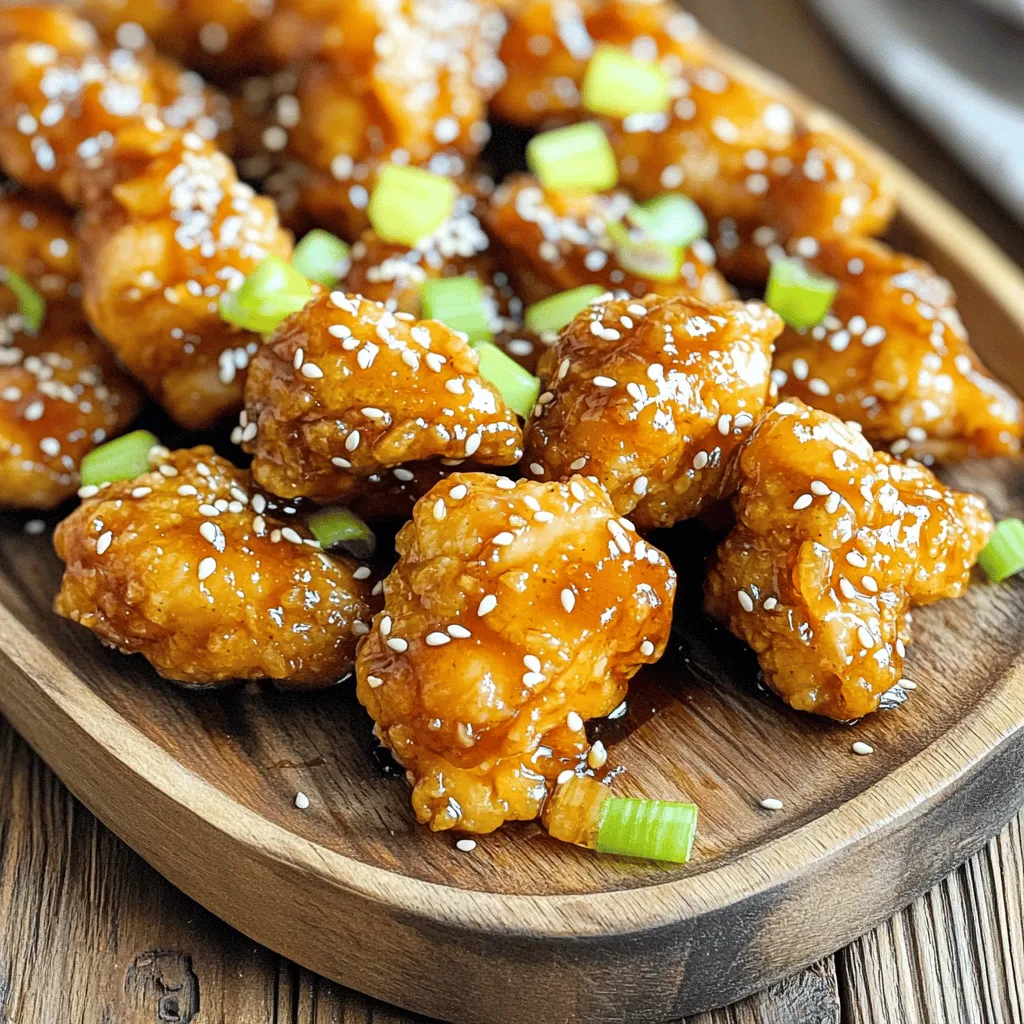
Get ready for a flavor explosion with my Air Fryer Honey Garlic Chicken Bites! These tasty bites are sweet, savory,

- Chicken - 2 boneless, skinless chicken breasts, diced - Pasta Types - 8 oz (225g) pasta (your choice: fettuccine, penne, or spaghetti) - Sauces and Seasonings - 4 tablespoons unsalted butter - 1 tablespoon olive oil - 3 cloves garlic, minced - 1 medium onion, diced - 1 teaspoon smoked paprika - 1/2 teaspoon cayenne pepper (adjust to taste) - Salt and pepper, to taste - 1 cup heavy cream - 1/2 cup chicken broth - Vegetables and Garnish - 1 cup cherry tomatoes, halved - 1/2 cup corn (fresh or frozen) - 1/2 cup grated Parmesan cheese - Fresh parsley for garnish This recipe has simple yet rich flavors. The chicken brings protein and taste. Choose your favorite pasta type. Fettuccine adds a nice touch, but penne or spaghetti work too. The butter and cream create a rich sauce. Garlic and onion enhance the flavor. You can adjust the spice with cayenne pepper. If you like it hotter, add more. The cherry tomatoes and corn add color and sweetness. Fresh parsley gives a nice finish. Gather these ingredients before you start. It makes cooking easier. Enjoy the process and get ready for a tasty meal! To start, fill a large pot with water and add salt. Bring the water to a rolling boil. Add 8 oz of your favorite pasta, like fettuccine or penne. Cook it according to the package instructions until it is al dente. This means it should be firm but not hard. Once done, drain the pasta in a colander, but save some pasta water for later. This water helps adjust sauce thickness. In a large skillet, pour in 1 tablespoon of olive oil and heat it over medium heat. Next, add 2 diced boneless, skinless chicken breasts. Season them with salt, black pepper, 1 teaspoon smoked paprika, and 1/2 teaspoon cayenne pepper. Cook the chicken for about 6 to 8 minutes. Look for a nice golden brown color. If you like more heat, add extra cayenne. Once cooked, take the chicken out and set it aside. Keep using the same skillet. Melt 4 tablespoons of unsalted butter over medium heat. Add 1 diced medium onion and 3 minced garlic cloves. Sauté these for about 3 to 4 minutes. You want the onion to look clear and soft. Then, pour in 1/2 cup of chicken broth and mix it well. Next, add 1 cup of heavy cream. Let this simmer for about 3 to 5 minutes, stirring often. This will help the sauce thicken nicely. Now, return the cooked chicken to the skillet. Toss in 1 cup of halved cherry tomatoes and 1/2 cup of corn. Stir everything together and let it cook for an extra 2 to 3 minutes. This step allows all the flavors to meld. Make sure every piece of chicken gets coated in the sauce. Finally, add the cooked pasta to the skillet. Mix in 1/2 cup of grated Parmesan cheese. Toss everything well, ensuring the pasta gets covered in the creamy sauce. If the sauce seems too thick, splash in some of that reserved pasta water. Taste and adjust the flavors with more salt or pepper if needed. Serve your creamy cowboy butter chicken pasta with a sprinkle of fresh parsley on top. Enjoy! How to prevent overcooking chicken: To keep your chicken juicy, cook it on medium heat. Use a meat thermometer if you have one. Chicken should reach 165°F. Remove it as soon as it’s done. Let it rest for a few minutes before cutting. This helps keep it moist. Secrets for creamy texture: To get a creamy sauce, use heavy cream. Add it slowly and stir well. Don’t rush this step. Let the sauce simmer gently. If it’s too thick, add a bit of pasta water. This makes it smooth and rich. Presentation ideas for serving: Serve your pasta in deep bowls. Top with extra Parmesan cheese. Add a sprinkle of parsley for color. A drizzle of olive oil adds shine and flavor. For a little heat, sprinkle red pepper flakes on top. Best additional toppings: Try adding some crispy bacon bits for crunch. Chopped scallions also work well. You can use fresh basil or parsley for added freshness. A squeeze of lemon juice can brighten the dish. Ideal side dishes: Serve with a simple green salad. A side of garlic bread goes great too. You can also serve it with roasted vegetables. They add a nice color and texture. Recommended wine pairings: A chilled Chardonnay pairs well with this dish. Its creamy notes match the sauce. If you prefer red, a light Pinot Noir is a good choice. It won’t overpower the flavors of the pasta. {{image_2}} Substitutes for chicken You can use turkey or pork instead of chicken. They add a nice flavor. For a lighter option, choose shrimp. Cook shrimp just until pink to keep them tender. Vegetarian options If you want a meatless meal, try using mushrooms or tofu. Both soak up the sauce well. For extra protein, use chickpeas. They add a hearty touch to the pasta. Best pasta types to use Fettuccine, penne, and spaghetti work great with this dish. Each type holds the sauce well. I love using fresh pasta for added flavor and texture. Gluten-free alternatives If you need gluten-free pasta, choose rice or chickpea pasta. They are tasty and cook nicely in this recipe. Just watch the cooking time, as it may differ from regular pasta. Adding spices or ingredients Boost flavor with herbs like thyme or basil. A squeeze of lemon adds brightness. You can also sprinkle in some crushed red pepper for heat. Suggestions for extra creaminess To make the sauce creamier, add more heavy cream or some cream cheese. You can also include mascarpone for a rich touch. Keep stirring until it melts into the sauce for a smooth finish. To store leftovers, let the pasta cool first. Place it in an airtight container. This keeps the dish fresh for up to three days. Make sure to cover it well to avoid drying out. For best taste, eat within two days. If you want to freeze this dish, use a freezer-safe container. Spoon the cooled pasta into the container. Leave some space at the top to let it expand. This meal stays good for up to three months. To thaw, move it to the fridge overnight. This keeps the texture nice. When reheating, the best method is on the stove. Use a skillet over low heat. Add a splash of water or broth to keep it creamy. Stir often to heat evenly. If you're in a hurry, you can use the microwave. Heat in short bursts, stirring in between, until hot. Cowboy butter is a rich and creamy sauce. It combines butter, garlic, and spices. This sauce has roots in Southern cooking. It adds a bold flavor to many dishes, like steak or pasta. The name evokes the cowboy spirit of the American West. It’s simple but full of taste. Yes, you can prepare this dish in advance. Cook the pasta and chicken separately. Store them in the fridge for up to two days. For the sauce, make it fresh for the best taste. You can mix everything together when you are ready to eat. This way, your meal stays creamy and delicious. To reduce calories, use less butter and cream. You can swap heavy cream for half-and-half or low-fat milk. Adding more veggies, like spinach or zucchini, can also help. These tips keep the flavor while making it healthier. You can still enjoy the creamy taste without the extra calories. If you want a non-dairy option, try coconut milk or almond milk. These can make your dish creamy too. Silken tofu blended until smooth is another great choice. For a lighter option, use Greek yogurt mixed with a bit of broth. Each substitute brings a different taste, so pick what you like best. In this post, we explored key ingredients and steps for a delicious chicken pasta dish. You learned how to cook pasta, sauté chicken, and make the rich Cowboy Butter sauce. I shared tips for serving, variations, and smart storage. Remember, cooking can be fun and easy. Experiment with flavors, and don’t hesitate to make it your own. Enjoy your creation, and share it with friends for a joyful meal!

Creamy Cowboy Butter Chicken Pasta Delight Recipe

Looking for a delicious dinner idea? You’ll love my Creamy Cowboy Butter Chicken Pasta! This dish combines tender chicken, al

Here are the ingredients you need for the Eggs Benedict Casserole. Each one plays a key role in making this dish delicious and hearty. - 8 large eggs - 2 cups milk - 1 teaspoon Dijon mustard - 1 teaspoon salt - ½ teaspoon black pepper - 1 teaspoon garlic powder - 8 English muffins, split and toasted - 8 slices Canadian bacon or turkey ham, chopped - 1 cup shredded cheddar cheese - 2 tablespoons chopped fresh chives (for garnish) - 1 cup hollandaise sauce (store-bought or homemade) You want to use fresh ingredients for the best taste. The eggs give structure, while milk adds creaminess. Dijon mustard adds a slight tang. The English muffins soak up the egg mixture well, making each bite flavorful. Canadian bacon or turkey ham adds protein, and cheddar cheese gives a rich, gooey layer. Chives brighten the dish and add color. Feel free to experiment with different cheeses or meats based on your taste. - Preheat your oven to 350°F (175°C) and grease a 9x13-inch baking dish. This helps keep the casserole from sticking. - In a large bowl, whisk together the eggs, milk, Dijon mustard, salt, black pepper, and garlic powder until well blended. This egg mixture is key for flavor. - Layout the toasted English muffins in a single layer in the greased baking dish. The muffins soak up the egg mixture well. - Add the chopped Canadian bacon or turkey ham over the muffins. This adds a savory touch to the dish. - Pour the egg mixture evenly over the muffins and ham, ensuring every piece gets some. Then, sprinkle the shredded cheddar cheese on top. This cheese will melt beautifully. - Cover the baking dish with aluminum foil. Bake for 25 minutes to start. This helps steam the casserole. - After 25 minutes, remove the foil and bake for an additional 10-15 minutes. The eggs should be set and the cheese golden and bubbly. - Allow the casserole to cool for a few minutes before slicing. This helps it hold together when serving. When making the egg mixture, whisk the eggs until they are light and frothy. This adds air and helps the casserole rise. Mix in the milk, Dijon mustard, salt, black pepper, and garlic powder well. This blend gives your casserole a nice flavor. For even toppings, spread the chopped Canadian bacon or turkey ham evenly over the English muffin halves. Then, pour the egg mixture slowly. Make sure each muffin is covered. This way, every bite will have that tasty flavor. Serve your casserole with fresh fruit like berries or slices of melon. A simple green salad also pairs well. This adds a nice crunch and color to the meal. For a beautiful presentation, slice the casserole into squares. Drizzle hollandaise sauce on top of each square. Add some chopped chives for a pop of green. This makes the dish look fancy and tastes great too! Be careful not to overcook the casserole. Keep an eye on it during the last few minutes of baking. You want the eggs set but still soft. Let the casserole cool for a few minutes before slicing. This helps it hold its shape better. If you cut it too soon, it may fall apart. Enjoy the perfect slice every time! {{image_2}} You can switch up the meats in this dish easily. Instead of Canadian bacon, try using crispy bacon or sausage. These options add a nice crunch and a rich flavor. For a lighter choice, turkey ham works well too. If you want a meat-free version, use sautéed mushrooms or spinach. These veggies add texture and taste while keeping the dish hearty. To boost the flavor, consider adding spices or herbs. A pinch of cayenne pepper gives a nice kick. Fresh herbs like parsley or thyme add brightness and depth. For cheese lovers, try different cheeses like mozzarella or pepper jack. These can change the taste and make it even more delicious. You can serve this casserole in different ways. For a fun twist, use individual ramekins. This makes each serving special and easy to grab. If you prefer, stick with a baking dish for family-style serving. For brunch, add a side of fresh fruit or a light salad. This adds color and freshness to your plate. To keep your Eggs Benedict Casserole fresh, follow these steps: - Allow the casserole to cool completely after baking. - Cut it into individual portions. - Place the pieces in an airtight container. - Store the container in the fridge for up to three days. This method helps maintain the taste and texture of your dish. When you're ready to enjoy your leftovers, reheating is key. Here are the best methods: - Preheat your oven to 350°F (175°C). - Place a portion on a baking sheet. - Cover it with foil to keep it moist. - Bake for about 15-20 minutes or until heated through. This way, you’ll keep the casserole's creamy texture and cheesy goodness. If you want to save some for later, freezing works well. Here’s how to do it safely: - Let the casserole cool completely. - Cut it into portions and wrap each piece in plastic wrap. - Place the wrapped portions in a freezer-safe bag. - Label the bag with the date and freeze for up to two months. To thaw, move a portion to the fridge overnight before reheating. Enjoy your dish without losing flavor! If you want to skip hollandaise sauce, try a simple cheese sauce. A mix of melted butter and cream can also work well. For a fresh touch, consider using salsa or a drizzle of pesto. These options add flavor without the fuss of making hollandaise. Yes, you can prepare this casserole ahead of time. Just follow the recipe up to the baking step. Cover the dish and place it in the fridge. You can bake it the next morning. This saves time and makes breakfast easy and quick. Absolutely! Use gluten-free English muffins instead of regular ones. Be sure to check the labels for the Canadian bacon or turkey ham you choose. Many brands offer gluten-free options, making this dish friendly for everyone. This casserole lasts about 3 to 4 days in the fridge. Store it in an airtight container to keep it fresh. Reheat it in the oven or microwave when you're ready to enjoy it again. This blog post covered making a delicious breakfast casserole with eggs and muffins. We went through the key ingredients, step-by-step instructions, and best practices to succeed. I shared tips for perfecting your dish, ideas for variations, and how to store leftovers. In conclusion, this casserole shines at breakfast or brunch. Experiment with flavors and enjoy this tasty meal with friends and family. Follow these steps for a dish everyone will love!

Eggs Benedict Casserole Tasty and Simple Breakfast Dish

Looking for a delicious start to your day? This Eggs Benedict Casserole is both tasty and simple! Packed with eggs,

To create delicious broccoli cheese patties, you need a few simple ingredients. Here is the list: - 2 cups broccoli florets, steamed and chopped - 1 cup shredded sharp cheddar cheese - 1/2 cup breadcrumbs (preferably whole wheat) - 1/2 cup grated Parmesan cheese - 1/4 cup finely chopped onion - 2 large eggs, beaten - Seasonings: garlic powder, onion powder, salt, and pepper - 2 tablespoons olive oil (for frying) Each ingredient plays a key role in the flavor and texture of the patties. The broccoli gives a healthy base, while the cheddar and Parmesan add a rich, cheesy taste. Breadcrumbs help bind everything together, ensuring your patties hold their shape. The eggs provide moisture and act as a binding agent too. When it comes to seasonings, garlic powder and onion powder enhance the flavor without overpowering the dish. Salt and pepper add just the right amount of seasoning. Finally, olive oil gives the patties a nice crisp when frying. Gather these ingredients before you start. This makes the cooking process smoother and more enjoyable. Start by steaming two cups of broccoli florets. Cook them until they are tender, which takes about 4-5 minutes. After steaming, chop the broccoli finely. Let it cool for a few minutes before using it in the recipe. This step is key. You want the broccoli to mix well with other ingredients. In a large mixing bowl, combine the chopped broccoli, one cup of shredded sharp cheddar cheese, half a cup of breadcrumbs, half a cup of grated Parmesan cheese, and a quarter cup of finely chopped onion. This blend gives the patties their rich flavor. In a small bowl, whisk together two beaten eggs, a quarter teaspoon of garlic powder, a quarter teaspoon of onion powder, and salt and pepper to taste. Pour this egg mixture over the broccoli mix. Stir everything gently until it is well combined. If the mix feels too loose, add more breadcrumbs to help it hold together. Now it’s time to shape the patties. Take small amounts of the mixture and form them into patties about two inches wide and half an inch thick. Place them on a plate or tray. Heat two tablespoons of olive oil in a large skillet over medium heat. When the oil is hot, add the patties in batches. Don’t overcrowd the pan. Fry each patty for about 4-5 minutes on each side. They should turn golden brown and crispy. Once cooked, remove them and let them drain on paper towels if needed. Serve these warm for a tasty treat! To cook these patties well, always use fresh ingredients. Fresh broccoli adds great flavor and texture. Steam the broccoli just until it is tender. This takes about 4-5 minutes. Overcooking makes it too soft. Use a large skillet to fry the patties. This helps them cook evenly. Avoid overcrowding the pan. Fry them in batches if needed. This keeps them crispy. To keep your patties from falling apart, use enough breadcrumbs. Breadcrumbs help bind the mixture. If it feels too wet, add more breadcrumbs. Make sure to mix the eggs in well. They act as a glue for the ingredients. Form the patties gently but firmly. Press them together well. This makes them sturdy for frying. These patties taste great on their own. Serve them with a side of ranch or garlic sauce. You can also pair them with a fresh salad. A light lemon vinaigrette adds a nice touch. For a heartier meal, serve them with rice or quinoa. They can be a tasty part of a larger spread too! {{image_2}} You can switch up the cheese in these patties. Try mozzarella for a gooey texture. Feta adds a tangy flavor. Goat cheese gives it a creamy twist. Each cheese will change the taste and texture. So, feel free to get creative! Want to boost the nutrition? Add cooked chicken or turkey for extra protein. You can also mix in finely chopped spinach or carrots. Other great options are corn or bell peppers. These ingredients add color and taste. They make the patties even more fun! If you prefer baking, it’s easy! Preheat your oven to 400°F (200°C). Place the patties on a lined baking sheet. Brush them lightly with olive oil. Bake for about 20-25 minutes, flipping halfway through. They will be crispy and golden without frying. This method is healthier and just as tasty! After cooking, let the patties cool down. Place them in an airtight container. You can keep them in the fridge for up to three days. If you want to save them longer, freezing is a great option. To reheat, use a skillet over low heat. Add a little oil to keep them crispy. You can also use an oven. Preheat it to 350°F (175°C) and bake for about 10-15 minutes. This will help them regain their crunch. To freeze, lay the patties on a baking sheet. Make sure they don’t touch each other. Freeze them until solid, about 1-2 hours. Once frozen, transfer them to a freezer bag. They can last up to three months in the freezer. When ready to eat, just reheat from frozen. Yes, you can make these patties ahead of time. After forming the patties, place them on a tray. Cover the tray with plastic wrap and refrigerate for up to 24 hours. This saves time when you want to enjoy them later. Just fry them right before serving for the best taste. If you need a substitute for breadcrumbs, try crushed crackers or rolled oats. These options work well and add a nice texture. You can also use almond flour or cornmeal for a different flavor. Each choice will give your patties a unique twist. These patties can be gluten-free with a simple switch. Just replace the breadcrumbs with gluten-free breadcrumbs or oats. Always check the labels to ensure all your ingredients are gluten-free. This way, everyone can enjoy the deliciousness without worry. To add spice, mix in chopped jalapeños or red pepper flakes. These will give your patties a nice kick. You can also try adding hot sauce to the egg mixture. Adjust the amount according to your taste for the perfect heat level! In this post, we explored how to make delicious broccoli cheese patties. We covered key ingredients, step-by-step instructions, and helpful tips for perfecting your patties. I offered variations to personalize your dish and storage tips to keep them fresh. These patties are easy and fun to make. You can enjoy them as a snack or a meal. I encourage you to try this recipe and make it your own!

Broccoli Cheese Patties Flavorful and Simple Recipe

Looking for a delicious and simple way to enjoy broccoli? You’re in the right place! These Broccoli Cheese Patties are

- 4 slices of thick bread (sourdough or whole grain) - 4 large eggs - 1 cup shredded cheese (cheddar, mozzarella, or a blend) - 2 tablespoons milk For this dish, I love using thick bread. Sourdough or whole grain works best. They hold up nicely and give a great texture. Next, you need eggs. I recommend large eggs for the best results. Cheese is key too. You can choose cheddar, mozzarella, or even a blend for a unique taste. - 1 teaspoon garlic powder - 1 teaspoon onion powder - Salt and pepper to taste Seasonings add flavor. Garlic powder and onion powder give a tasty kick. Don’t forget salt and pepper. They help balance the flavors and make each bite pop. - Fresh chives - Parsley Garnishes can elevate your dish. Fresh chives or parsley make it look nice and add a fresh taste. You can add them right before serving for a burst of color and flavor. First, preheat your air fryer to 350°F (175°C). This step is vital for even cooking. While the fryer heats, take your thick bread and cut out circles from the center. You can use a round cookie cutter or a cup for this. This creates a frame to hold the egg mixture. Next, grab a medium bowl. In it, whisk together the eggs, milk, garlic powder, onion powder, salt, and pepper. Mix until everything is smooth and well blended. The milk adds creaminess, while the spices bring flavor. Now, place the bread slices in the air fryer basket. Start by adding a generous amount of shredded cheese to each slice. This forms a tasty base. Then, carefully pour the egg mixture into each toast frame, filling it to the edge. Top with even more cheese for extra gooeyness. Cook the toast slices in the air fryer for 8-10 minutes. Check halfway through to ensure they cook evenly. The eggs should be set, and the cheese should be melted and bubbly. Adjust the time if needed based on your air fryer. Once cooked, use tongs to remove the toast from the air fryer. For a beautiful touch, garnish with fresh chives or parsley. This adds color and a fresh taste. Serve your delicious egg and cheese toast warm and enjoy the flavors! For the best texture, I recommend using thick bread. Sourdough and whole grain are my top picks. Sourdough gives a nice crust and tangy flavor. Whole grain offers a nutty taste and is healthy. When you choose thick slices, they hold up better to the egg mixture. To make your egg mixture more flavorful, try adding a few extras. You can mix in chopped spinach or diced tomatoes for freshness. A dash of hot sauce can add a fun kick! If you love herbs, fresh chives or parsley brighten the dish. Just whisk these add-ins into the eggs before pouring them into the bread. Air frying is fast and easy! Set your air fryer to 350°F (175°C) for perfect cooking. For a soft yolk, cook the toast for about 8 minutes. If you want firmer eggs, go for 10 minutes. Keep an eye on them, as cooking times may vary. Checking halfway ensures even cooking and prevents burning. {{image_2}} You can make a cheesy veggie version of this toast. Start by adding fresh veggies like spinach or tomatoes. They bring great flavor and color. Just chop them up and mix them in with the egg mixture. The air fryer cooks them quickly. You get a healthy twist on this classic dish. If you want more protein, add ham or bacon. These meats add a savory kick. Chop the ham or cut the bacon into small pieces. You can mix them into the egg mixture or layer them on top before cooking. This makes your toast heartier and more filling. For those who like heat, try adding jalapeños or hot sauce. Slice fresh jalapeños and sprinkle them into the egg mixture. You can also drizzle hot sauce over the finished toast. This gives your dish a fun and spicy flavor. Enjoy the kick in every bite! To store leftover air fryer egg and cheese toast, place it in an airtight container. You can keep it in the fridge for up to three days. Make sure the toast cools to room temperature before sealing it. This helps prevent moisture buildup, which can make the toast soggy. When you’re ready to eat, the best way to reheat is in the air fryer. Set it to 350°F (175°C) and heat for about 3-5 minutes. This method helps keep the toast crispy. You can also use a toaster oven for similar results. Avoid using a microwave, as it can make the bread chewy. You can freeze air fryer egg and cheese toast if you want to save some for later! Wrap each piece tightly in plastic wrap, then place them in a freezer bag. They will stay fresh for up to two months. When you want to eat them, thaw in the fridge overnight. Reheat in the air fryer as mentioned above for the best taste and texture. Yes, you can use many kinds of cheese! Try gouda for a smoky flavor. You can use swiss for a nutty taste. If you want something spicy, pepper jack works great. Each cheese adds its own unique flavor to the dish. Look for a few signs. The eggs should be firm and not runny. If they jiggle too much, they need more time. The cheese should be melted and bubbly, too. You can also stick a toothpick in the egg to check. If it comes out clean, the eggs are done. Absolutely! Preheat your oven to 375°F (190°C). Place the bread on a baking tray. Follow the same steps to pour the egg mixture into the toast frames. Bake for 15-20 minutes, or until the eggs are set and the cheese is melted. Yes, you can use gluten-free bread. Many brands offer tasty options. Look for thick slices to hold the egg mixture well. You can also use rice cakes or corn tortillas as a fun twist. These alternatives still deliver great flavor! This blog post explored making delicious egg toast with various ingredients and techniques. We discussed key components like thick bread, cheeses, and spices, plus optional garnishes. You learned how to prepare the bread, mix the egg mixture, and assemble everything. I shared tips for choosing bread, enhancing flavors, and mastering air frying. With fun variations and storage advice, you can customize your egg toast. Enjoy your cooking adventure, and don’t hesitate to experiment with flavors to make it your own!

Air Fryer Egg and Cheese Toast Delicious Quick Meal

Looking for a quick and tasty meal? Try my Air Fryer Egg and Cheese Toast! This dish uses simple ingredients

- 2 buttery croissants, sliced in half - 4 large eggs - 1/4 cup milk or cream - Salt and pepper, to taste - 1 cup fresh spinach - 1 ripe avocado, sliced - 1/2 cup shredded cheddar cheese - 2 tablespoons olive oil or butter - Optional: hot sauce or your favorite spread To make a tasty breakfast croissant sandwich, you need a few key items. First, grab two buttery croissants. They should be soft and flaky. Next, you will need eggs. Four large eggs work well. The creamy taste comes from a quarter cup of milk or cream. Don't forget salt and pepper to bring out the flavor. Fresh greens add color and taste. One cup of fresh spinach is perfect. You can also add a sliced avocado for creaminess. For the cheesy goodness, use half a cup of shredded cheddar cheese. Cooking fats matter too. Use two tablespoons of olive oil or butter to cook your eggs and spinach. If you like some heat, consider hot sauce or any spread you enjoy. This mix of fresh and creamy ingredients makes the sandwich special. To start, grab a mixing bowl. Add four large eggs to the bowl. Whisk the eggs well. Mix in 1/4 cup of milk or cream. Season with salt and pepper. This will add great flavor. Choosing milk or cream is simple. Milk makes the eggs lighter. Cream will give you a richer taste. Choose what you like best. Next, heat a non-stick skillet over medium heat. Add 1 tablespoon of olive oil or butter. Once hot, pour in the egg mixture. Stir gently as the eggs cook. You want them soft and fluffy. When the eggs are almost done, take them off the heat. Fold in 1/2 cup of shredded cheddar cheese. The cheese will melt and add flavor. In the same skillet, add another tablespoon of olive oil or butter. Toss in 1 cup of fresh spinach. Sauté for 1-2 minutes. The spinach should wilt but stay bright green. For extra flavor, you can add minced garlic or a pinch of nutmeg. This will make your sandwich even more tasty. Now it's time to put everything together. Take the bottom half of your croissant. Start with a layer of the cheesy eggs. Next, add the sautéed spinach. Top it off with slices of ripe avocado. If you like spice, drizzle hot sauce on top. You can also spread your favorite condiment. Place the top half of the croissant on next. Press down gently. For a crispy finish, return the sandwich to the skillet. Toast it for a minute on each side. This will make the croissant golden and crunchy. Enjoy your delicious breakfast croissant sandwich! - Choosing the right croissant: Look for fresh, buttery croissants. They should be flaky and golden brown. A good croissant adds rich flavor and texture to your sandwich. - Reheating for best flavor: If your croissants are not fresh, you can reheat them. Preheat your oven to 350°F. Wrap each croissant in foil and heat for 5-10 minutes. This keeps them warm and crispy. - Scrambling vs. frying: I prefer scrambling the eggs for this sandwich. Scrambled eggs mix well with cheese and other ingredients. If you want, you can fry the eggs sunny-side up instead. This adds a nice runny yolk to your sandwich. - Ingredient substitutions: You can swap out eggs for egg whites or plant-based alternatives. These options are lighter but still tasty. - Presentation techniques: To make your sandwich look great, cut it in half. Serve it on a cutting board or a colorful plate. Garnish with fresh herbs or cherry tomatoes for a pop of color. - Suggested sides for serving: Pair your sandwich with a side of fresh fruit or a light salad. This adds more nutrition and keeps your meal balanced. {{image_2}} You can add many proteins to your breakfast croissant sandwich. If you enjoy meat, bacon or sausage works well. These salty meats bring a great taste and crunch. Simply cook them until crispy, then layer them in your sandwich. For a vegetarian option, try using black beans or tofu. Tofu can soak up flavors well. Just sauté it in olive oil with spices until golden. Both options add protein and make the sandwich filling. Choosing the right cheese makes a big difference. Cheddar cheese adds sharpness and creaminess. You can also try Swiss or pepper jack for unique flavors. If you need a dairy-free option, look for vegan cheese. These can melt nicely and add creaminess too. Nutritional yeast is another great choice, giving a cheesy flavor without dairy. To make your sandwich pop, add spices and sauces. A sprinkle of smoked paprika or garlic powder gives a nice kick. For sauce, hot sauce adds heat. You may also try pesto or aioli for a fresh taste. Consider adding international twists. For a Mexican flair, include salsa and avocado. For a Mediterranean vibe, add feta cheese and olives. These small changes can take your sandwich from simple to extraordinary! To keep your leftover breakfast croissant sandwiches fresh, follow these tips: - Refrigeration: Place leftover sandwiches in an airtight container. They can stay in the fridge for up to two days. - Freezing: For longer storage, wrap the sandwiches tightly in foil or plastic wrap. Then, place them in a freezer bag. They can last up to three months in the freezer. To enjoy your croissant sandwiches again, reheat them the right way: - Keeping Croissants Crispy: Preheat your oven to 350°F (175°C). Place the sandwich on a baking sheet. This method helps keep the croissant crispy. - Recommended Times: Heat for about 10-15 minutes if frozen. If refrigerated, 5-7 minutes should be enough. Check to ensure the cheese melts and the sandwich is warm throughout. Using these storage and reheating methods ensures you enjoy your breakfast croissant sandwich just as much the second time! To make this tasty sandwich, follow these steps: 1. Whisk eggs, milk or cream, salt, and pepper in a bowl. 2. Heat olive oil or butter in a skillet on medium heat. 3. Pour in the egg mix, stirring until scrambled and set. 4. Add shredded cheddar cheese, folding it into the eggs. 5. Sauté fresh spinach in the same skillet until wilted. 6. On the croissant bottom, layer scrambled eggs, spinach, and avocado slices. 7. Add hot sauce or your favorite spread, then close the sandwich. 8. Optionally, toast the sandwich in the skillet for crispiness. Yes, you can prep this sandwich in advance. Here are some tips: - Make the egg mix and store it in the fridge for a day. - Sauté the spinach ahead and keep it in a container. - Slice the avocado just before serving to keep it fresh. - Assemble the sandwich in the morning for the best taste. You can fill your croissant with many tasty options: - Crispy bacon or sausage for meat lovers. - Feta or goat cheese for a tangy twist. - Roasted peppers for added flavor. - Fresh herbs like basil or cilantro for a fresh kick. You can find these sandwiches at local spots: - Check your nearby bakery for fresh, flaky croissants. - Cafes often offer breakfast sandwiches. - Popular chains like Starbucks or Panera have their versions. In this article, we explored how to make a delicious breakfast croissant sandwich. We covered each ingredient, the cooking steps, tips, variations, and storage info. You now have the tools to create different flavors and styles. Experiment with proteins, cheeses, and spices for unique twists. Remember, the right croissant makes all the difference. Enjoy each bite of your sandwich, and don't forget to share your tasty creations with family and friends. Happy cooking!

Breakfast Croissant Sandwich Tasty and Simple Recipe

Are you ready to elevate your mornings? The Breakfast Croissant Sandwich is a quick and tasty solution. In this article,

- 6 large buttery croissants - 8 large eggs - 2 cups whole milk - 1 cup shredded cheddar cheese - 1 cup diced cooked ham - 1 cup baby spinach, roughly chopped - 1 teaspoon garlic powder - 1 teaspoon onion powder - Salt and pepper to taste - Fresh herbs like chives or parsley The main ingredients are simple and easy to find. First, use 6 large buttery croissants. These give the casserole a rich flavor. Next, you need 8 large eggs. They bind everything together and add protein. For creaminess, grab 2 cups of whole milk. It makes the dish smooth. You will also need 1 cup of shredded cheddar cheese. It adds a nice sharp taste. For some protein, use 1 cup of diced cooked ham. You can swap this for turkey or sausage if you want. Lastly, 1 cup of baby spinach gives the dish color and nutrients. Now, let’s talk about seasonings. You will need 1 teaspoon of garlic powder and 1 teaspoon of onion powder. These spices add depth. Don’t forget to sprinkle in salt and pepper to taste. Fresh herbs, like chives or parsley, can make your dish look pretty. They also add fresh taste. Gather these ingredients and get ready to make your casserole. It is a tasty way to start the day! - Place 6 large buttery croissants in a greased 9x13 inch baking dish. - Arrange them cut-side up and overlap them slightly. - In a large bowl, whisk together 8 large eggs and 2 cups of whole milk. - Add 1 teaspoon of garlic powder, 1 teaspoon of onion powder, and salt and pepper to taste. - Pour half of the egg mixture evenly over the croissants. - Add 1 cup of diced cooked ham, 1 cup of roughly chopped baby spinach, and 1 cup of shredded cheddar cheese on top. - Pour the remaining egg mixture over the whole dish, ensuring every croissant piece is soaked. - Cover the baking dish with plastic wrap or aluminum foil and refrigerate overnight. - Preheat the oven to 350°F (175°C). - Remove the cover from the baking dish and bake for 35-40 minutes. - Check if the center is set and the top is golden brown. - Let it rest for about 10 minutes before slicing. To make your casserole great, ensure the croissants soak well in the egg mix. This helps them absorb flavors and become soft. Pour the egg mixture evenly over the croissants. Use a spoon to press them down gently. This way, every bit of croissant gets the goodness of eggs. To check if it’s done, stick a toothpick in the center. If it comes out clean, your casserole is ready. Serve your casserole warm with fresh fruit. Berries or sliced oranges work well. You can also add a light salad for a colorful plate. For extra flavor, sprinkle more cheese or fresh herbs on top before serving. Chives or parsley can add a nice touch. One big mistake is skipping the refrigeration time. Letting the casserole sit overnight is key for perfect texture. Another mistake is over-baking. Keep a close eye on it in the oven. If the top gets too dark, it may taste burnt. Aim for a golden brown color for the best results. {{image_2}} You can get creative with cheese in your casserole. Swiss cheese adds a nutty flavor. It melts well and gives a smooth texture. You can also try pepper jack for a spicy kick. Mozzarella is another great choice; it adds a mild flavor and gooeyness. If you want to change up the protein, sausage or bacon are tasty substitutes. They add a savory depth to your dish. For a vegetarian option, tofu works well. You can crumble it and mix it into the egg mixture. This keeps the dish hearty without meat. Adding vegetables makes this casserole even better. Try mushrooms for an earthy flavor. Bell peppers add sweetness and color. Zucchini brings a nice texture. If you want to switch things up, replace spinach with kale or arugula. These greens provide a peppery taste and additional nutrients. After you enjoy your Overnight Croissant Breakfast Casserole, store any leftovers in an airtight container. This keeps the casserole fresh and tasty. You can refrigerate it for up to three days. Make sure the lid is sealed tight to prevent drying out. If you want to save some for later, freeze portions of the casserole. Cut it into slices and wrap each piece in plastic wrap. Then, place them in a freezer bag. This way, you can enjoy it on a busy morning. When you’re ready to eat, just reheat in the oven or microwave. To keep the casserole’s texture nice, bake it in the oven. Set the oven to 350°F (175°C) and place the slices on a baking sheet. Bake until warmed through. Avoid sogginess by reheating it uncovered. This helps maintain that lovely, golden crust we all love. You can refrigerate the casserole overnight. It’s best, but you can do it for at least 4 hours. The longer it sits, the more the croissants soak up the egg mix. This helps enhance the flavor and texture. Yes, you can make this casserole vegetarian. Just skip the ham. You can add more veggies or use meat alternatives instead. Some great options are mushrooms, bell peppers, or even tofu. This way, you keep it hearty and delicious. If you don’t have croissants, you can use other flaky bread. Puff pastry works well too. You can even try brioche or any bread that soaks up the egg mix nicely. Just make sure it’s soft and buttery for the best taste. Yes, you can use low-fat milk in the recipe. However, this change may affect the creaminess of the casserole. Whole milk gives a richer flavor, while low-fat milk will still work but make it less creamy. This casserole brings together simple ingredients for a tasty meal. We used buttery croissants, eggs, and cheese, with ham and spinach for flavor. Follow the steps to create a rich dish that’s perfect for any occasion. Enjoy easy storage tips and fun variations to make the recipe your own. With careful preparation, your casserole will impress and satisfy your friends and family. Now, gather your ingredients and get cooking! You’re ready to serve up a delicious meal.

Overnight Croissant Breakfast Casserole Delight

Craving a warm and hearty breakfast? Look no further than my Overnight Croissant Breakfast Casserole Delight! This dish offers layers

- 2 cups cooked chicken, shredded - 1 cup red enchilada sauce - 1 cup black beans, drained and rinsed - 1 cup corn (fresh, frozen or canned) - 1 cup shredded cheese (cheddar or Mexican blend) - 8 small corn tortillas - 1 tablespoon olive oil - 1 teaspoon ground cumin - 1 teaspoon garlic powder - Salt and pepper to taste - 1 cup sour cream - 1 tablespoon lime juice - 1 teaspoon garlic powder - Salt to taste Using fresh ingredients makes a big difference. The chicken provides protein, while black beans and corn add texture. The red enchilada sauce brings a rich taste that ties it all together. For the sour cream sauce, I suggest using high-quality sour cream. The lime juice adds a nice zing, and the garlic powder boosts the flavor. You can adjust the salt to your taste. This sauce is creamy and complements the enchiladas perfectly. When you gather your ingredients, consider prepping them ahead of time. This will make cooking smoother and faster. Enjoy the process! 1. First, preheat your oven to 375°F (190°C). This step warms up the oven for baking. 2. In a large bowl, mix together the shredded chicken, black beans, corn, half of the cheese, ground cumin, garlic powder, and salt and pepper. Make sure to combine everything well. This filling packs in great flavor. 1. Next, heat olive oil in a skillet over medium heat. Lightly cook the corn tortillas for about 30 seconds on each side. This makes them soft and easy to roll. 2. Now, take about 3 tablespoons of the chicken mixture and spoon it into each tortilla. Roll each one tightly and place them seam-side down in a lightly greased 9x13 inch baking dish. This helps keep everything inside. 1. Pour the red enchilada sauce evenly over the rolled enchiladas, covering them completely. This sauce adds moisture and flavor. 2. Sprinkle the remaining cheese on top. It will melt and form a delicious layer. 3. Bake in the preheated oven for 20-25 minutes. Look for the cheese to be melted and bubbly. This means they are ready to enjoy! - Making tortillas pliable: To keep your corn tortillas from cracking, heat them in a skillet for about 30 seconds on each side. This softens them, making them easier to roll. You can also wrap them in a damp paper towel and microwave them for 20 seconds. - Adjusting spice levels: If you want to change the heat, add more or less red enchilada sauce. For a milder flavor, use less sauce or choose a mild variety. You can also add a pinch of sugar to balance out the spice. - Garnishing ideas: To make your dish pop, top the enchiladas with fresh cilantro or slices of avocado. This adds color and freshness. A squeeze of lime juice enhances the flavor. - Pairing options: Serve your enchiladas with a side of Mexican rice or a crisp salad. Black beans make a great side too. For drinks, try a cold soda or a refreshing agua fresca. - Common mistakes and fixes: A common mistake is overfilling the tortillas. This can make rolling them difficult. Stick to about 3 tablespoons of filling per tortilla. If your enchiladas are dry, you may need more sauce on top before baking. - Ensuring perfect cheese melt: To get that perfect cheesy top, use a mix of cheeses. Cheddar or a Mexican blend works best. Make sure to sprinkle cheese evenly on top before baking. Bake until bubbly and golden for the best result. {{image_2}} You can change the protein in your enchiladas for a new twist. Try shredded beef or pork. You can also use tofu for a plant-based option. These swaps keep the dish fresh and exciting. If you want to switch up the sauce, consider using green enchilada sauce instead of red. The green sauce gives a different flavor and pairs well with chicken. You can even use a homemade sauce for a personal touch. Making these enchiladas vegetarian is simple. Just skip the chicken and add more beans or vegetables like bell peppers and zucchini. This keeps the meal hearty and satisfying. For gluten-free choices, use corn tortillas, which are naturally gluten-free. Always check the ingredient labels on sauces. Some contain gluten, so look for certified gluten-free options to stay safe. To make your enchiladas even more flavorful, add spices. A pinch of chili powder or smoked paprika brightens the taste. You can also mix in fresh herbs like cilantro for added freshness. Incorporating vegetables is another great way to enhance flavor. Consider adding sautéed onions, spinach, or diced tomatoes to the filling. These additions not only boost taste but also add nutrition and color to your dish. After you enjoy your chicken enchiladas, store leftovers in an airtight container. They stay fresh for about 3 to 5 days in the fridge. Make sure to cool them down before you seal the container. This keeps them safe and tasty! You can freeze enchiladas for a later meal. Wrap each enchilada in plastic wrap or aluminum foil. Place them in a freezer-safe bag. They can last up to 3 months in the freezer. To reheat, let them thaw in the fridge overnight. Then, bake at 375°F (190°C) for 20-25 minutes until hot and bubbly. For easy meal prep, make your enchiladas in advance. You can prepare the filling ahead of time and store it in the fridge. Keep tortillas and sauces separate. This helps maintain their texture and flavor. When ready to eat, simply assemble and bake! To boost flavor, use spices like cumin and garlic powder. These spices add warmth and depth. You can also try adding chili powder for a bit of heat. Fresh herbs like cilantro or parsley brighten the dish. Use high-quality enchilada sauce for a rich taste. You might also mix in a splash of lime juice for zest. Yes, you can use flour tortillas as a substitute. Flour tortillas are softer and easier to roll. They also have a mild taste that works well with many fillings. If you want a gluten-free option, look for corn or gluten-free tortillas. Just remember, each type changes the texture and flavor slightly. Many sides complement chicken enchiladas nicely. Consider serving them with a fresh salad. A simple avocado salad adds creaminess. You could also try Mexican rice or refried beans for heartiness. For a crunchy texture, serve tortilla chips with salsa or guacamole. These sides enhance the meal and add variety to your plate. Chicken enchiladas are simple to make and packed with flavor. We covered key ingredients like shredded chicken, enchilada sauce, and black beans. I shared steps to prepare, assemble, and bake the dish perfectly. Plus, I offered tips for storing and variations to suit any diet. Enjoy creating these enchiladas for your next meal. With a little practice, you’ll impress your family or friends. Take risks, try new ingredients, and have fun in the kitchen!

Savory Chicken Enchiladas with Sour Cream Sauce

Craving a warm, cheesy dinner that packs a punch? You’re in luck! My savory chicken enchiladas with sour cream sauce

To make Mexican Street Corn Soup, gather these ingredients: - 4 ears of fresh corn, husked and kernels removed - 1 tablespoon olive oil - 1 medium onion, finely chopped - 3 cloves garlic, minced - 1 medium potato, peeled and diced - 4 cups vegetable broth - 1 cup coconut milk - 1 tablespoon lime juice - 1 teaspoon smoked paprika - 1 teaspoon cumin - Salt and pepper to taste - ½ cup crumbled feta cheese (or cotija cheese) - Fresh cilantro, for garnish - Lime wedges, for serving When picking corn, aim for plump, bright kernels. Look for husks that are green and tightly wrapped. Fresh corn should feel firm. If the silk is brown and sticky, it's a sign of age. Always check that the kernels are milky when you press them. This shows they are juicy and sweet. If you need to make swaps, here are some ideas: - For vegan options, replace coconut milk with almond or soy milk. - Use nutritional yeast instead of feta or cotija cheese for a cheesy flavor. - If you want a gluten-free option, ensure your vegetable broth is labeled gluten-free. - To avoid potatoes, you can use cauliflower or sweet potatoes for a different texture. These substitutions keep the soup delicious while catering to your needs. First, gather all your ingredients. You need corn, olive oil, onion, garlic, potato, vegetable broth, coconut milk, lime juice, smoked paprika, cumin, salt, pepper, feta cheese, cilantro, and lime wedges. Start by heating the olive oil in a large pot over medium heat. Once hot, add the chopped onion. Sauté for about five minutes until it becomes soft and clear. Next, add the minced garlic. Cook it for one more minute until you smell its wonderful aroma. Now, stir in the diced potato. Let it cook for three to four minutes. This step helps the potato start to soften. Then, add the corn kernels, vegetable broth, smoked paprika, and cumin. Bring the mixture to a boil. After it boils, turn down the heat and let it simmer for 15 to 20 minutes. You want the potatoes to be tender. Once the time is up, remove the pot from the heat. Use an immersion blender to blend the soup until it's smooth. If you like some texture, you can leave it chunky instead. Then, stir in the coconut milk and lime juice. Mix well to combine everything. Season with salt and pepper to your taste. Return the pot to low heat to warm the soup before serving. To get the perfect texture, blending the soup is key. An immersion blender makes this easy. If you don’t have one, you can carefully transfer the soup to a regular blender. Just be sure to let it cool slightly before blending. Blending creates a creamy soup without adding heavy cream. This keeps it light and bright. You can also control the texture by how long you simmer the soup. A longer cooking time can soften the corn and potatoes more, making your soup smoother. If you prefer a chunkier soup, add the corn and broth later in the cooking process. This way, they stay intact and add bite. For the best flavor, use fresh corn when possible. Fresh corn adds sweetness and depth. If fresh corn isn’t available, frozen corn works well too. Make sure to thaw it before adding to the pot. Don’t skip the lime juice! It brightens the soup and balances the flavors. Adding it at the end keeps the lime's fresh taste. Smoked paprika gives a lovely smoky flavor that enhances the soup. If you want a bolder taste, you can add more cumin or paprika. For a fun twist, consider adding a pinch of chili powder for some heat. You can also top your soup with crumbled feta cheese and fresh cilantro. This adds a burst of flavor and makes the dish look beautiful. Enjoying it with lime wedges on the side lets each person adjust the taste to their liking. To boost the flavor of your soup, focus on fresh ingredients. Use sweet corn for a vibrant taste. Fresh lime juice adds brightness. Smoked paprika gives a nice depth. If you want more heat, add jalapeños or chili powder. You can also mix in fresh herbs like cilantro during cooking. This adds a fresh and lively note. A common mistake is overcooking the garlic. It can turn bitter quickly. Another mistake is not seasoning enough. Always taste as you go. If you blend the soup too early, the potatoes might not be tender. Make sure they are soft before blending. Lastly, avoid using canned corn for this recipe. Fresh corn gives the best flavor. To make it a full meal, serve with tortilla chips. They add a fun crunch. You can also offer a side salad with lime vinaigrette. This pairs well with the soup's flavors. For a heartier meal, add grilled chicken or shrimp on top. Finish with a sprinkle of crumbled cheese and fresh cilantro. This creates a beautiful presentation. {{image_2}} You can easily adjust this soup for different diets. If you want a vegan option, swap the coconut milk for almond milk. For a nut-free version, stick with coconut milk. If you're lactose-free, use a dairy-free cheese instead of feta. If you like more protein, add beans or chicken. To change the spice level, add more smoked paprika or a pinch of cayenne. For a milder soup, reduce the smoked paprika. You can also include diced jalapeños for extra heat. If you want a sweeter taste, add a bit of sugar or honey. To enhance the flavor, try adding fresh herbs like thyme or oregano. Toppings can make your soup shine. Try adding crispy tortilla strips for crunch. A sprinkle of lime zest can brighten the flavor. You can also use sliced avocado for creaminess. A drizzle of hot sauce will give it a nice kick. Fresh cilantro adds color and freshness, while crumbled cheese makes it rich. To keep your Mexican Street Corn Soup fresh, store it in an airtight container. Make sure it cools to room temperature before sealing. You can keep it in the fridge for about 3 to 4 days. If you want to enjoy it later, freezing is a great option. To freeze the soup, pour it into freezer-safe bags or containers. Leave some space at the top for expansion. Label each container with the date. You can freeze it for up to 3 months. When you want to eat it, just thaw it in the fridge overnight. When ready to eat, reheat the soup on the stove. Use low to medium heat to avoid burning. Stir often until it's hot. If the soup seems thick, add a splash of vegetable broth or water. This keeps it creamy and delicious. Enjoy! Mexican Street Corn Soup is a creamy, flavorful dish inspired by elote, a popular Mexican street food. It uses fresh corn, onions, and spices to create a rich taste. The soup is usually topped with cheese, cilantro, and lime for extra flavor. Yes, you can make this soup in advance. I recommend preparing it and then storing it in an airtight container. It will stay fresh in the fridge for about three days. Reheat on the stove when you’re ready to eat. To make this soup vegan-friendly, simply skip the cheese or use a plant-based alternative. You can also replace the coconut milk with a non-dairy milk like almond or oat milk. This keeps the soup creamy while ensuring it’s vegan. This blog post covered everything you need to know about making Mexican Street Corn Soup. We looked at the right ingredients, how to cook it, and tips to boost the flavor. You learned about variations and how to store leftovers for later. Remember, this soup can fit many diets. Mixing it up with toppings makes it fun. Enjoy your cooking and share this tasty dish with friends and family!

Mexican Street Corn Soup Rich and Flavorful Recipe

Are you ready to savor a bowl of Mexican street corn soup? This rich and flavorful dish brings the vibrant

- 6 medium russet potatoes, peeled and diced - 1 small onion, finely chopped - 3 cloves garlic, minced - 4 cups chicken broth (or vegetable broth) - 1 cup cream cheese, softened - 1 cup shredded cheddar cheese - 1 cup sour cream The base of your soup is the potatoes. They bring a nice creamy texture when cooked. I prefer russet potatoes because they break down well. Next, we have the onion and garlic. They add sweet and savory notes. The broth ties everything together, making it rich. Cream cheese, cheddar cheese, and sour cream create the soup's creamy finish. - 1 tablespoon dried chives - 1 teaspoon garlic powder - 1 teaspoon onion powder - Salt and pepper to taste Seasonings make a big difference! Dried chives add a mild onion flavor. Garlic and onion powders boost the overall taste. Always season to your liking with salt and pepper. A pinch can elevate the soup. - Crispy bacon bits (or turkey bacon) - Sliced green onions - Additional shredded cheese Toppings are key for adding texture and flavor. Bacon bits give a nice crunch and a savory kick. Green onions add a fresh bite. Extra cheese? Yes, please! It melts perfectly on top. Start with the potatoes. I use 6 medium russet potatoes, peeled and diced. This size gives the best texture. Next, chop 1 small onion finely. The smaller, the better. It will blend well in the soup. Then, mince 3 cloves of garlic. This adds great flavor. Now, it's time to combine everything in the crock pot. Add the diced potatoes, chopped onion, minced garlic, and 4 cups of chicken broth. If you prefer, use vegetable broth instead. Stir in 1 teaspoon of garlic powder, 1 teaspoon of onion powder, and salt and pepper to taste. It's key that the potatoes are submerged in the broth. Cover the crock pot. Cook on low for 6-7 hours or on high for 3-4 hours. Check the potatoes. They should be tender when done. Once the cooking time is up, use a potato masher or an immersion blender. Mash the potatoes to your desired texture. I like mine a little chunky. Next, stir in 1 cup of softened cream cheese. Mix until it's fully melted. Then, add 1 cup of shredded cheddar cheese and 1 cup of sour cream. Stir well until everything is creamy. Taste your soup. Adjust the seasoning with more salt and pepper if needed. Serve it hot, and enjoy! To get the perfect texture, think about how you want your soup. For a smooth soup, use an immersion blender. Blend until it’s creamy. If you want a chunky soup, use a potato masher. Mash just a bit, leaving some potato pieces. This gives a nice contrast in texture. Seasoning can change everything. I suggest tasting as you go. If it needs more kick, add more garlic powder or onion powder. Fresh herbs can make the soup pop. Try adding chives or parsley for a fresh taste. Just stir them in right before serving. This soup is great with sides. Serve it with crusty bread for dipping. You can also pair it with a simple salad. For a fun twist, serve it in bread bowls. Just hollow out small loaves of bread and fill them with soup. It’s a treat that makes the meal special! {{image_2}} You can easily make this soup vegetarian. Just swap out the chicken broth for vegetable broth. This change keeps the flavor rich while making it meat-free. Additionally, if you want a dairy-free soup, use vegan cream cheese and a dairy-free sour cream. This way, even more people can enjoy this creamy delight. Feel free to get creative with your potatoes. You can use Yukon gold potatoes for a different taste. They offer a buttery flavor that pairs well with the soup. You can also add veggies like carrots or celery. This makes the soup heartier and adds more nutrition. Just chop them small so they cook evenly. If you like a little spice, add paprika or cayenne pepper. These spices can bring warmth to the soup. You can also mix in other cheeses like gouda or mozzarella for a twist. Each cheese adds a unique flavor that elevates the dish. Experiment with your favorites for a fun and tasty experience. To store your leftover soup, let it cool first. Transfer it to an airtight container. This keeps the soup fresh and stops it from absorbing odors. The soup lasts about 3 to 4 days in the fridge. Always check for signs of spoilage before eating. If it smells off or looks strange, toss it out. You can freeze this soup for up to three months. Pour the cooled soup into freezer-safe bags or containers. Leave some space at the top for expansion. When you want to eat it, thaw it in the fridge overnight. This keeps the soup creamy. Avoid thawing in the microwave, as it can change the texture. For reheating, you can use a microwave or stove. If using the microwave, heat in short bursts. Stir the soup often to heat evenly. On the stove, warm it on low heat. Stir it gently to avoid sticking. If the soup thickens too much, add a splash of broth or water. This brings back its creamy goodness. Cooking this soup takes 6-7 hours on low or 3-4 hours on high. The low setting allows the flavors to meld better, while the high setting cooks faster. Both methods yield tender potatoes and creamy soup. Yes, you can prep this soup ahead of time. Chop your potatoes, onion, and garlic. Store them in the fridge for a day or two. You can also cook the soup and keep it in the fridge for up to 3 days. Just reheat it when you're ready to serve. If you need a lighter version, try Greek yogurt or cottage cheese. For a dairy-free option, use cashew cream or tofu blended until smooth. These swaps keep your soup creamy without the cream cheese. Yes, this soup is gluten-free. Just ensure your broth is gluten-free. Most chicken and vegetable broths are safe, but always check the label. The other ingredients are naturally gluten-free too. Absolutely! You can add cooked chicken for protein. Crispy bacon bits or sausage also add great flavor. Just toss in the meat when you stir in the cheese and sour cream for a hearty meal. You now have a complete guide for making a delicious Crock Pot Crack Potato Soup. This recipe covers all key ingredients, step-by-step cooking instructions, and helpful tips. You can also explore variations and storage options to suit your needs. Remember, you can adjust flavors and toppings to make this soup your own. Cooking should be fun, so don’t hesitate to experiment. Enjoy your creamy, hearty soup with friends or family!

Crock Pot Crack Potato Soup Rich and Creamy Delight

If you crave a bowl of comfort, then Crock Pot Crack Potato Soup is your answer. This rich and creamy

Older posts
Newer posts
← Previous Page1 … Page33 Page34 Page35 … Page84 Next →

dsad

© 2026 Foodish Talk • Built with GeneratePress

Our Policies

  • Copyright Policy
  • Cookie Policy
  • GDPR Policy
  • Privacy Policy
  • Disclaimer
  • Terms Of Use

More Information

  • Home
  • About
  • Contact
  • Appetizers
  • Dessert
  • Dinner
  • Drinks
©2026, Foodish Talk About Back To Top