Skip to content
DisclaimerTerms Of UseGDPR PolicyCookie Policy

Foodish Talk

  • Home
  • Drinks
  • Appetizers
  • Dinner
  • Dessert
  • About
  • Contact
  • Privacy Policy
DisclaimerTerms Of UseGDPR PolicyCookie Policy

NO-ING-IMG

- 1 medium butternut squash, peeled, seeded, and cubed - 1 medium onion, chopped - 2 cloves garlic, minced - 2 tablespoons olive oil - 4 cups vegetable broth - 1/2 cup coconut milk (optional for creaminess) To make roasted butternut squash soup, you'll need fresh and good-quality ingredients. Butternut squash is the star of the show. It brings a sweet and nutty taste. Onions and garlic add depth and warmth. Olive oil helps with roasting and adds flavor. Vegetable broth gives the soup its body, while coconut milk can make it creamy if you wish. - 1 teaspoon ground cumin - 1/2 teaspoon nutmeg - Salt and pepper to taste The spices are crucial for flavor. Ground cumin adds a warm earthiness. Nutmeg gives a subtle sweetness. Salt and pepper help to balance all the flavors. You can adjust these to suit your taste as you cook. - 12 fresh sage leaves - 2 tablespoons unsalted butter Crispy sage leaves are a delightful garnish. They add a crisp texture and a nice herbal note. Using unsalted butter for frying sage will enhance its flavor without making it too salty. This simple touch lifts the soup and makes it feel special. With these ingredients, you set the stage for a cozy, comforting bowl of soup that warms both the body and soul. - First, preheat your oven to 400°F (200°C). This helps the squash roast nicely. - Next, peel and seed the butternut squash. Cut it into small cubes. Chop the onion and mince the garlic. This will add great flavor to the soup. - In a large bowl, toss the cubed squash, chopped onion, and minced garlic with 2 tablespoons of olive oil. - Season with salt, pepper, ground cumin, and nutmeg. Spread the mixture in a single layer on a baking sheet. - Roast in the oven for 25-30 minutes. Check for tenderness; it should be slightly caramelized for best flavor. - Once the squash is done, transfer it to a large pot. Pour in the vegetable broth and bring it to a simmer. - Use an immersion blender to blend the soup until smooth. If you want a creamier texture, mix in the coconut milk now. - Taste the soup and adjust the seasoning if needed. Heat it through for another 5 minutes. - Serve hot, garnished with crispy sage leaves for a delightful crunch. You have a few choices for creaminess in your soup. Using coconut milk adds a rich flavor. It gives a nice sweetness that pairs well with the squash. If you want a lighter option, you can use low-fat milk or almond milk. Both will still make your soup smooth and tasty. To enhance flavor, think about your spices. Adding a pinch more nutmeg can bring warmth. Try a dash of chili powder for some heat. Don't forget to taste as you go! Adjust salt and pepper to make each bite perfect. Fresh herbs also boost the taste. A sprinkle of fresh thyme or parsley can add brightness. Serving your soup nicely makes it special. Drizzle olive oil on top for shine and flavor. A sprinkle of roasted pumpkin seeds adds crunch and color. You can also use a swirl of coconut milk for a creamy design. Serve the soup in warm bowls to keep it cozy. {{image_2}} You can easily add proteins to this soup. Beans are a great choice. They add texture and nutrition. Try black beans or chickpeas for a hearty boost. If you prefer meat, chicken works well too. Just cook it separately and add it to the soup before serving. This will make your meal more filling. If you want to change the flavor, try using thyme or rosemary. These herbs bring a different taste that pairs nicely with squash. Just use the same amount as you would for sage. This small swap can change the whole dish. You can adjust the soup's texture based on your taste. For a creamy version, stir in coconut milk after blending. If you like a lighter soup, skip the milk. You can also add more broth to make it thinner. This way, you get the perfect soup just how you like it. To store leftovers, let the soup cool down first. Place it in an airtight container. It will last for about 3 to 5 days in the fridge. Make sure to label the container with the date. This way, you keep track of freshness. Freezing is a great choice for longer storage. Pour the soup into freezer-safe bags or containers. Leave some space at the top for expansion. The soup can stay frozen for up to 3 months. When you're ready to eat, thaw it in the fridge overnight. You can also use the microwave for quick thawing. Before serving, give the soup a good stir. If it seems too thick, add a splash of vegetable broth or water. Heat it on the stove until hot. For the best taste, add fresh crispy sage on top just before serving. This adds a nice touch and lifts the flavor. To make this soup vegan, you can replace the butter with olive oil. Use vegetable broth instead of chicken broth. This keeps the flavor rich without animal products. Yes, you can use frozen butternut squash. It will save you time. Just thaw it before use. Adjust the roasting time since frozen squash cooks faster. Check it often to avoid mushiness. You can serve this soup with crusty bread or a fresh salad. A simple green salad goes well. You can also pair it with grilled cheese for a cozy meal. Enjoy it warm! This blog post explored how to make a delicious roasted butternut squash soup. We covered key ingredients like squash, onion, and garlic, and spiced it up with cumin and nutmeg. I shared tips on creaminess, seasoning, and garnishing. Variations allow for proteins and herbs to customize your soup. Proper storing methods ensure leftovers stay tasty. You can easily make this soup vegan, use frozen squash, and find great sides to serve with it. Enjoy making this soup, and feel free to experiment with the flavors and ingredients!

Roasted Butternut Squash Soup with Crispy Sage Flavor

Welcome to a cozy culinary adventure! Today, I’ll show you how to make Roasted Butternut Squash Soup with Crispy Sage.

- 1 1/2 cups graham cracker crumbs - 1/4 cup brown sugar - 1/2 cup unsalted butter, melted To make the crust, you need graham cracker crumbs, brown sugar, and melted butter. The crumbs give a nice crunch. Brown sugar adds sweetness, and melted butter binds it all together. - 16 oz cream cheese, softened - 1 cup granulated sugar - 2 large eggs - 1 teaspoon vanilla extract - 2 cups finely chopped apples (Granny Smith works great) - 1 teaspoon cinnamon - 1/2 cup chopped pecans The filling needs cream cheese, sugar, eggs, and vanilla for sweetness. Chopped apples bring a fresh taste, while cinnamon adds warmth. The pecans give a nice crunch and flavor. - 1 cup caramel sauce (store-bought or homemade) - 1/4 cup chopped pecans for garnish For the topping, you can use store-bought caramel or make your own. Chopped pecans on top add texture and a nutty flavor. This sweet touch makes the bars even more delightful. To start, preheat your oven to 325°F (163°C). Grab a 9x9 inch baking pan. You can grease it or line it with parchment paper. This makes it easier to lift out the bars later. In a medium bowl, mix together 1 1/2 cups of graham cracker crumbs, 1/4 cup of brown sugar, and 1/2 cup of melted unsalted butter. Stir until it looks like wet sand. Press this mixture firmly into the bottom of your pan. Bake it for 10 minutes. This helps to set the crust. After 10 minutes, take it out and let it cool a bit. Next, we make the cheesecake filling. In a large bowl, take 16 oz of softened cream cheese and beat it with 1 cup of granulated sugar. Mix until it's smooth and creamy. Then, add 2 large eggs, one at a time. Beat well after each egg. Pour in 1 teaspoon of vanilla extract and mix again. Now it's time to add the fun part! Fold in 2 cups of finely chopped apples, 1 teaspoon of cinnamon, and 1/2 cup of chopped pecans. Make sure everything is mixed evenly. Now, pour the cheesecake filling over your cooled crust. Spread it out evenly. Place your pan back in the oven and bake for 30-35 minutes. You want the center to be slightly set with just a little jiggle. After baking, turn off the oven and crack the door open. Let the cheesecake cool in the oven for about 1 hour. This step helps to prevent cracks on the top. Once it’s cooled, put it in the fridge for at least 4 hours, but overnight is best. Before serving, drizzle 1 cup of caramel sauce on top and sprinkle with more chopped pecans. Finally, slice the bars into squares and enjoy! Baking cheesecake bars can be fun and easy. Here are some tips to get it right: - Use room-temperature cream cheese for a smooth filling. - Beat the cream cheese well to avoid lumps. - Mix ingredients gently when adding apples and pecans. - Always chill your bars before serving for the best taste and texture. A great crust makes a big difference in cheesecake bars. Here’s how to do it: - Combine graham cracker crumbs, brown sugar, and melted butter well. - Press the mixture firmly into the pan to avoid a crumbly crust. - Bake the crust for just 10 minutes to keep it soft. - Let the crust cool slightly before adding the cheesecake filling. Avoid these common mistakes for perfect cheesecake bars: - Don’t overmix the cheesecake filling, or it may crack. - Avoid opening the oven door while baking; it can cause sinking. - Don’t skip the cooling step in the oven to prevent cracks. - Make sure to chill the bars for at least four hours before serving. By following these tips, you can enjoy delicious caramel apple pecan cheesecake bars! {{image_2}} You can easily make these bars gluten-free. Use gluten-free graham cracker crumbs for the crust. Check the label to ensure they are safe. This change keeps the taste while making it friendly for those with gluten issues. You can switch up the flavors to keep things fresh. Try using pears or peaches instead of apples. These fruits add a new twist. You might also swap pecans for walnuts or almonds. Each nut brings a unique crunch and taste. Toppings can make your bars even better! Instead of just caramel, drizzle some chocolate sauce on top. You can also add whipped cream for extra creaminess. A sprinkle of sea salt enhances the sweetness too. To keep your cheesecake bars fresh, place them in an airtight container. You can store them in the fridge for up to five days. If you want to keep them longer, freezing is a great option. Just make sure they are completely cool before storing. To freeze cheesecake bars, first, slice them into squares. Wrap each piece tightly in plastic wrap. Then, put the wrapped bars in a freezer-safe bag or container. They can last in the freezer for up to three months. When you're ready to enjoy them, take out only what you want. When reheating, avoid using the microwave as it can make them soggy. Instead, preheat your oven to 350°F (175°C). Place the bars on a baking sheet and heat for about 10-15 minutes. This way, they stay firm and delicious. Always let them cool slightly before serving again. Yes, you can use different types of apples. Granny Smith apples are tart and hold their shape well. However, you can try Fuji or Honeycrisp apples for a sweeter taste. Mixing apple types can add depth to the flavor. Just make sure the apples are firm and fresh. Absolutely! You can make these cheesecake bars a day or two in advance. After baking, let them cool, then refrigerate. This time allows the flavors to meld. Just be sure to add the caramel topping before serving for the best taste and look. To check if the cheesecake bars are done, look for a slight jiggle in the center. The edges should look firm while the middle remains soft. Bake for 30-35 minutes at 325°F (163°C). Let it cool in the oven with the door cracked for about an hour. This helps prevent cracks. This blog post covered key steps to make delicious cheesecake bars. You learned about the crust, filling, and caramel topping. I shared tips to help you bake perfectly every time. Don’t forget about fun variations, like gluten-free options and tasty toppings. Lastly, proper storage keeps your bars fresh for longer. Enjoy your baking journey, and remember, practice makes perfect!

Caramel Apple Pecan Cheesecake Bars Delicious Dessert

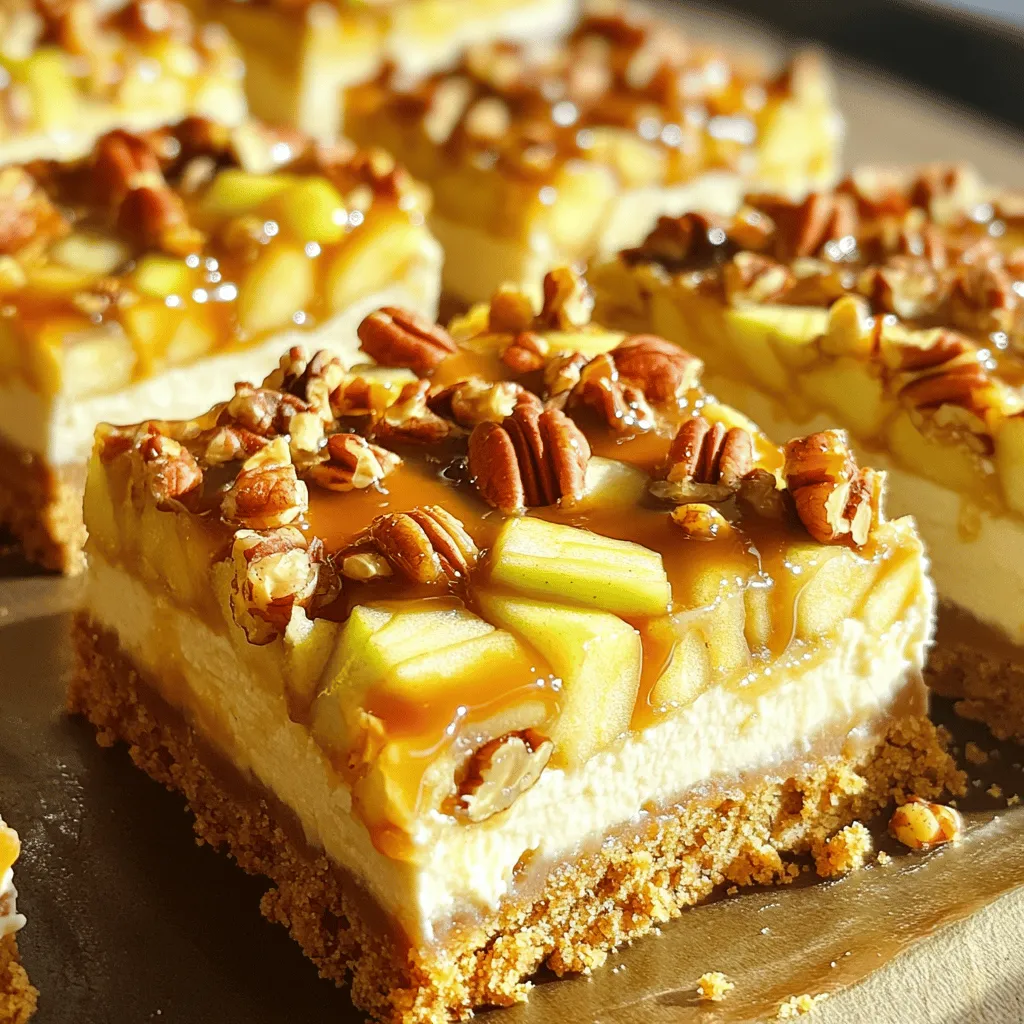
Get ready to satisfy your sweet tooth with my Caramel Apple Pecan Cheesecake Bars! These bars combine creamy cheesecake, crunchy

To make crispy coconut shrimp, gather these main items: - 1 lb large shrimp, peeled and deveined - 1 cup all-purpose flour - 2 large eggs, beaten - 1 cup shredded coconut (choose sweetened or unsweetened) - 1 cup breadcrumbs (panko is best for crunch) These ingredients create a tasty base for your shrimp. The shrimp adds protein, while the flour and breadcrumbs give texture. For flavor, use these seasonings: - 1 teaspoon garlic powder - 1 teaspoon onion powder - 1 teaspoon paprika - Salt and pepper to taste The garlic and onion powder add depth. Paprika gives a hint of warmth. Salt and pepper enhance all the flavors. You will need cooking spray to help the shrimp crisp up. A light spray helps achieve that golden brown look. Choose a neutral oil spray or one with a high smoke point, like avocado oil. This small step makes a big difference in the final crunch of your shrimp. Start by drying the shrimp with paper towels. This step is key. Removing the moisture makes the shrimp crispier. If you skip this, the shrimp might turn out soggy. Next, set up your dredging stations. You need three shallow bowls. In the first bowl, mix flour, garlic powder, onion powder, paprika, salt, and pepper. In the second bowl, place the beaten eggs. In the third bowl, combine shredded coconut and breadcrumbs. This setup makes coating the shrimp easy and fun. Now it’s time to cook. Preheat your air fryer to 400°F (200°C) for about five minutes. This helps the shrimp cook evenly. Arrange the coated shrimp in a single layer in the basket. Lightly spray the tops with cooking spray. This will help them crisp up. Cook the shrimp for 8 to 10 minutes. Flip them halfway through for even cooking. They should turn golden brown and crispy. Once done, let them cool a bit before serving. Enjoy the delicious crunch! To get that perfect crunch, start with dry shrimp. Pat them down with paper towels. Moisture can lead to soggy shrimp. Use panko breadcrumbs instead of regular ones. They add extra crispiness. Lightly spray the shrimp with cooking spray. This helps them turn golden brown. Set up three bowls for dredging. In the first bowl, mix flour with garlic powder, onion powder, paprika, salt, and pepper. This adds flavor. In the second bowl, beat the eggs. In the third bowl, combine shredded coconut and breadcrumbs. When dredging, coat the shrimp well. Press lightly to ensure the coating sticks. This makes for a better crunch. Preheat your air fryer to 400°F (200°C). This step is key. Cook the shrimp for 8-10 minutes. Flip them halfway through cooking. They should look golden and crispy when finished. If they need more time, check every minute. This way, you avoid overcooking. {{image_2}} When making crispy coconut shrimp, you can choose between sweetened and unsweetened coconut. Sweetened coconut adds a hint of sugar. This can balance well with the shrimp's saltiness. Unsweetened coconut gives a more natural coconut flavor. It lets the shrimp shine with their own taste. If you want a tropical twist, try sweetened coconut. For a classic flavor, stick with unsweetened. Both options work great, so pick what you enjoy most. You can boost the flavor of your shrimp with extra spices or herbs. Garlic powder and onion powder are great starts. You could also add a pinch of cayenne pepper for heat. Fresh herbs like cilantro or parsley can add freshness. Try a bit of lime zest for a citrus touch. Experiment with your favorite spices to make it yours. The key is to find a mix that excites your taste buds. If you want a gluten-free option, use almond flour instead of regular flour. Almond flour gives a nutty flavor and great crunch. You can also try crushed cornflakes for a fun twist. Panko breadcrumbs add extra crunch, but you can mix it up. Use crushed crackers or even seasoned breadcrumbs for variety. Each option gives a different taste and texture. Don't be afraid to get creative with your coatings! To keep your crispy coconut shrimp fresh, store them in an airtight container. Make sure they cool down to room temperature first. This helps prevent sogginess. You can keep them in the fridge for up to three days. If you have leftovers, it’s best to eat them soon for the best taste. When you want to enjoy your leftovers, reheating is key. I recommend using the air fryer again. Preheat the air fryer to 350°F (175°C). Place the shrimp in a single layer and heat for about 5-7 minutes. This method will help restore that great crunch. You can also use an oven, but the air fryer works best. If you want to save some for later, freezing is a good option. First, let the shrimp cool completely. Then, lay them flat on a baking sheet. Freeze them for about an hour. Once frozen, transfer them to a freezer bag. Remove as much air as possible. You can freeze them for up to three months. To cook, thaw in the fridge overnight and reheat in the air fryer. Yes, you can use frozen shrimp. Just make sure to thaw them first. Place the shrimp in the fridge overnight or run them under cold water. After thawing, pat the shrimp dry with paper towels. This step is key to getting crispy shrimp in the air fryer. A few tasty options include: - Sweet chili sauce - Spicy mayo - Tangy mango sauce - Pineapple salsa These sauces add a fun twist to each bite of shrimp. You can mix and match based on your taste. To make this dish gluten-free, swap the all-purpose flour and breadcrumbs. Use gluten-free flour and gluten-free panko breadcrumbs. Check the labels to ensure they meet your needs. This way, you can enjoy crispy coconut shrimp without worry! You learned how to make crispy coconut shrimp with easy steps and useful tips. First, gather the right ingredients and set up your dredging stations. Cooking in an air fryer gives it a nice crunch. Remember, you can tweak the recipe with different coconut types and spices. Store leftovers for later and enjoy reheating them. With this guide, you can now impress friends and family with your skills in the kitchen.

Air Fryer Crispy Coconut Shrimp Delightful and Easy

Craving a quick and tasty dish? You’re in the right place! My Air Fryer Crispy Coconut Shrimp is a game

- 2 cups all-purpose flour - 1 cup granulated sugar - 1 tablespoon baking powder - ½ teaspoon baking soda - ½ teaspoon salt - 1 large egg - 1 cup buttermilk (or milk with 1 tablespoon lemon juice) - ½ cup unsalted butter, melted - 1 teaspoon vanilla extract - 1 ½ cups fresh blueberries In this recipe, the main ingredients create a soft, moist muffin. The all-purpose flour gives structure. Sugar adds sweetness and helps with browning. Baking powder and baking soda work together to make the muffins rise. Salt enhances all the flavors. The egg binds everything. Buttermilk keeps the muffins tender and adds a slight tang. Melted butter gives richness, while vanilla adds warmth and depth. Fresh blueberries burst with flavor, making each bite juicy. - ½ cup all-purpose flour - ⅓ cup brown sugar - ¼ cup unsalted butter, cold and cubed - ½ teaspoon cinnamon - ¼ teaspoon salt The streusel topping adds a sweet crunch. All-purpose flour provides the base. Brown sugar gives a deep, caramel flavor. Cold, cubed butter creates a crumbly texture. Cinnamon adds warmth, while salt balances the sweetness. When you mix these ingredients, ensure the butter stays cold. This helps form the perfect crumble on top of your muffins. - Preheat to 375°F (190°C) - Line or grease muffin tin Start by setting your oven to 375°F. This heat gives the muffins a nice rise. While the oven warms, prepare your muffin tin. You can use paper liners or lightly grease the cups. This step helps the muffins come out easily. - Combine flour, sugar, baking powder, baking soda, and salt - Whisk until well blended In a large bowl, mix together two cups of flour, one cup of sugar, and a tablespoon of baking powder. Add a half teaspoon of baking soda and a half teaspoon of salt. Use a whisk to blend these dry ingredients well. - Whisk egg, buttermilk, melted butter, and vanilla - Ensure ingredients are fully combined In another bowl, whisk one large egg with one cup of buttermilk. If you don’t have buttermilk, mix one cup of milk with a tablespoon of lemon juice. Pour in half a cup of melted butter and add one teaspoon of vanilla extract. Mix until everything is combined. - Pour wet ingredients into the dry mixture - Mix gently, noting lumps are okay Now, pour the wet mixture into the bowl with the dry mix. Gently stir them together. It's fine if there are lumps. This keeps your muffins light and fluffy. - Carefully fold in blueberries Take one and a half cups of fresh blueberries and fold them into the batter. Be gentle to avoid smashing the berries. This step adds flavor and color to your muffins. - Mix flour, brown sugar, cinnamon, and salt - Blend in cubed butter until crumbly For the streusel, mix half a cup of flour, a third of a cup of brown sugar, half a teaspoon of cinnamon, and a quarter teaspoon of salt in a small bowl. Then, add a quarter cup of cold, cubed butter. Use a fork to mix until it looks crumbly. - Fill muffin cups 2/3 full with batter - Sprinkle streusel topping generously With a large spoon or scoop, fill each muffin cup about two-thirds full. Next, sprinkle the streusel topping generously over the batter. This will give your muffins a crunchy top. - Bake for 18-22 minutes - Check doneness with a toothpick Place the muffin tin in the oven and bake for 18 to 22 minutes. To check if they are done, insert a toothpick into the center of a muffin. If it comes out clean, they are ready. To make the best muffins, avoid overmixing the batter. Overmixing makes muffins dense. Mix until just combined. A few lumps in the batter are fine. You can use fresh or frozen blueberries. Fresh blueberries add a bright flavor. Frozen blueberries work well too, but they may make the batter a bit wetter. If using frozen blueberries, fold them in gently to prevent color bleeding. Set your oven temperature to 375°F (190°C). This is key for even baking. Use a reliable oven thermometer to check the heat. For the streusel topping, use cold cubed butter. It creates a crumbly texture that is perfect for topping. Mix it well with the dry ingredients until it resembles coarse crumbs. This step is essential for that bakery-style finish. Serve your muffins warm or at room temperature. This enhances their flavor and texture. For a lovely touch, dust them with powdered sugar. You can also serve them with a dollop of whipped cream. These small details make your muffins look and taste even better. Enjoy the smiles they bring at breakfast or brunch! {{image_2}} You can switch things up by using other fruits. Raspberries or blackberries work great in these muffins. Their tartness adds a nice twist to the sweet flavor. You can also add lemon zest to brighten the muffins. Just a teaspoon will bring a fresh, zesty note that pairs well with blueberries. Want to make these muffins a bit healthier? Try using whole wheat flour instead of all-purpose flour. This swap adds fiber and nutrients. For sugar, replace it with honey or maple syrup. These alternatives add sweetness without refined sugars. Adjust the amount since they are sweeter than granulated sugar. If you follow a vegan diet, you can still enjoy these muffins. Replace the egg with flaxseed meal. Mix one tablespoon of flaxseed meal with three tablespoons of water. Let it sit for five minutes to thicken. For the milk, use any plant-based milk you like, such as almond or oat milk. These changes keep the muffins moist and tasty without dairy. To keep your blueberry muffins fresh, store them in the fridge. You should place them in an airtight container. This helps keep moisture in and prevents them from drying out. If you do not have a container, wrap them tightly in plastic wrap. You can freeze muffins for up to three months. To freeze them, let the muffins cool completely. Then, wrap each muffin in plastic wrap. After that, place them in a freezer bag. When you are ready to eat, take a muffin out and thaw it at room temperature. You can also warm it in the microwave for 10-15 seconds. At room temperature, muffins last about two days. After that, they may start to lose their flavor. Watch for signs of spoilage like mold or a sour smell. If the muffins feel dry or hard, they are not good to eat. Always trust your nose and eyes! Yes, you can use frozen blueberries. They may make your muffins moister. Thaw them before adding to the batter. This helps keep the color bright. Dense muffins often come from overmixing the batter. Too much flour can also cause this. Ensure you measure flour correctly. Lastly, check if your baking powder is fresh. To boost sweetness, add more sugar. You can also try honey or maple syrup. Adjust the amount of sugar in the wet mix. Don't forget to taste the batter! You can make mini muffins easily. Fill each mini cup about halfway. Reduce the baking time to 12-15 minutes. Check for doneness with a toothpick. You'll need a muffin tin, mixing bowls, and a whisk. A measuring cup and spoons are also essential. A cooling rack helps muffins cool evenly. Lastly, use paper liners for easy serving. This post walks you through making delicious blueberry muffins from scratch. We covered the key ingredients, step-by-step instructions, and helpful tips to get perfect muffins. Remember, the secret lies in mixing gently and using fresh fruit. You can explore fun variations and make vegan options too. Store leftovers properly to enjoy them later. With these skills, baking muffins can be easy and rewarding. Enjoy your tasty creations!

Bakery-Style Blueberry Streusel Muffins Delight

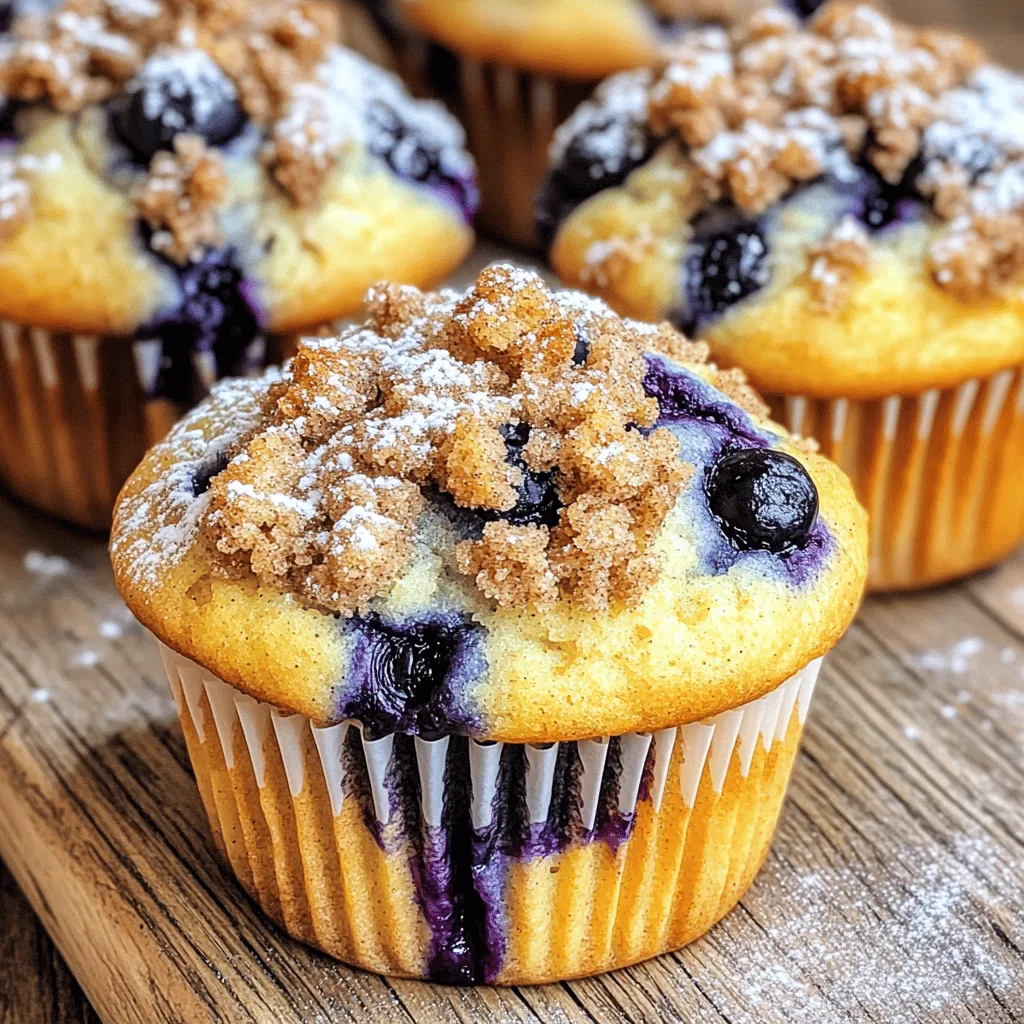
Are you ready to bake something special? These Bakery-Style Blueberry Streusel Muffins will guide you to that perfect homemade treat.

- 1 tablespoon olive oil - 1 medium onion, diced - 3 cloves garlic, minced - 1 can (28 oz) crushed tomatoes - 4 cups vegetable broth - 1 teaspoon dried basil - 1 teaspoon sugar - Salt and pepper to taste - 1 package (16 oz) gnocchi (store-bought or homemade) - 1 cup heavy cream (or coconut milk for a dairy-free version) - 1 cup fresh basil leaves, chopped - Grated Parmesan cheese for serving (optional) This creamy tomato basil gnocchi soup needs simple ingredients. You can find most in your pantry. Olive oil adds flavor and helps cook the onion. The onion gives the soup a sweet base. Garlic brings a nice aroma and taste. Crushed tomatoes provide a rich, tangy flavor. They are the heart of the soup. Vegetable broth adds depth and warmth. Dried basil enhances the tomato flavor. Sugar balances the acidity of the tomatoes. Salt and pepper are key to bringing out the flavors. Gnocchi adds a chewy texture that makes the soup filling. Heavy cream or coconut milk makes it creamy and rich. Fresh basil leaves add brightness and freshness. Grated Parmesan cheese is a tasty optional topping. Gather these ingredients, and you are ready to make a warm bowl of goodness! Start by heating the olive oil in a large pot over medium heat. Add the diced onion and sauté it until soft, about 5 minutes. This makes the base of your soup sweet and flavorful. Then, stir in the minced garlic. Cook it for 1-2 minutes until you smell its strong aroma. Be careful not to let it brown. Next, pour in the can of crushed tomatoes and the vegetable broth. These ingredients give your soup body and depth. Add the dried basil and sugar to balance the acidity of the tomatoes. Bring this mix to a simmer. Season with salt and pepper to your taste. Let the soup simmer for about 15 minutes. This helps all the flavors blend well. Now it's time to add the gnocchi. Stir them into the pot and cook for about 3-4 minutes, or follow the package instructions. You want them tender and floating on the surface. This means they are ready to enjoy. Once the gnocchi are cooked, reduce the heat to low. Stir in the heavy cream or coconut milk. This step makes your soup creamy and rich. Then add the chopped fresh basil for a burst of flavor. Heat everything through for 2-3 minutes without boiling. This helps keep the cream smooth. Finally, taste the soup again and adjust the seasoning if needed. Serve hot and enjoy your delicious creation! To keep your cream from curdling, add it slowly. Warm the cream first before adding it to the pot. This helps the cream blend in well. Stir gently to mix it without boiling. Sauté onions and garlic to build great flavor. Cook the onions until they turn clear, about five minutes. Add the garlic for just a minute or two. This way, both ingredients release their full taste. Pair your soup with crusty bread. It adds a nice crunch and soaks up the soup well. A fresh salad with light dressing also complements the flavors. For a beautiful presentation, use deep bowls. Sprinkle grated Parmesan cheese on top. Add a few whole basil leaves for a pop of color. It makes your dish look fancy and inviting. If your soup is too thick, add more vegetable broth. Stir it in slowly until you reach the right texture. For a soup that is too thin, let it simmer longer. This helps it thicken naturally. To balance flavors, taste your soup before serving. If it’s too sweet, add a pinch of salt. If it’s too salty, add a little sugar. Adjusting flavors can make a big difference. {{image_2}} You can easily make this soup dairy-free. Use coconut milk instead of heavy cream. It adds a nice, rich flavor. You can also try other plant-based creams if you prefer. For toppings, skip the Parmesan cheese. Instead, use nutritional yeast for a cheesy flavor without the dairy. Want to make your soup heartier? Add cooked chicken or white beans. Chicken gives great flavor. If you use chicken, cook it first, then add it to the soup. White beans are easy to add. Just stir them in after the gnocchi. Adjust the cooking time, so everything heats through. Adding veggies boosts nutrition and flavor. Spinach or kale works well in this soup. Toss in a handful a few minutes before serving. You can also add seasonal vegetables like zucchini or bell peppers. Just chop them small and add them with the tomatoes. This keeps your soup fresh and vibrant. To keep your creamy tomato basil gnocchi soup fresh, store it in an airtight container. Place the soup in the fridge within two hours of cooking. The soup will stay fresh for about 3 to 4 days. If you want to keep it longer, freezing is a great option. For freezing, let the soup cool first. Then, pour it into freezer-safe bags or containers. Remove as much air as possible before sealing. You can freeze it for up to 3 months. When you’re ready to enjoy it again, just thaw it overnight in the fridge. When it’s time to reheat your soup, do it gently on the stove. Heat it over low to medium heat. This method helps keep the flavors strong. Stir often to make sure it warms evenly. If you're heating from frozen, allow the soup to thaw first. You can also use a microwave if you’re in a hurry. Just be sure to stir it every minute. To reheat the gnocchi in the soup, add a splash of water or broth. This keeps the gnocchi from becoming mushy. Enjoy your soup as if it were freshly made! You can store this soup in the fridge for about three days. Keep it in an airtight container. If you want to store it longer, freeze it instead. It can last up to three months in the freezer. Yes! This soup is already vegetarian. Just use vegetable broth, which adds great flavor. You can also skip the Parmesan cheese for a fully veggie meal. If you can't find gnocchi, you can use small pasta shapes like orzo or ditalini. These will cook in the soup just like gnocchi. You can even use rice for a different texture. Absolutely! This soup tastes even better the next day. Just make it, let it cool, and store it in the fridge. Reheat it gently on the stove before serving. Yes, canned tomatoes work great in this soup. In fact, using canned crushed tomatoes saves time. They also bring a rich flavor to your soup, making it just as tasty. This blog post covered how to make creamy tomato basil gnocchi soup. We looked at essential ingredients, step-by-step instructions, and helpful tips. You can make it delicious with easy variations and smart storage practices. Remember, adjusting flavors is key to great taste. Experiment with different veggies or proteins for fun twists. Enjoy making this cozy soup anytime, and feel free to share your creations!

Creamy Tomato Basil Gnocchi Soup Simple and Tasty Recipe

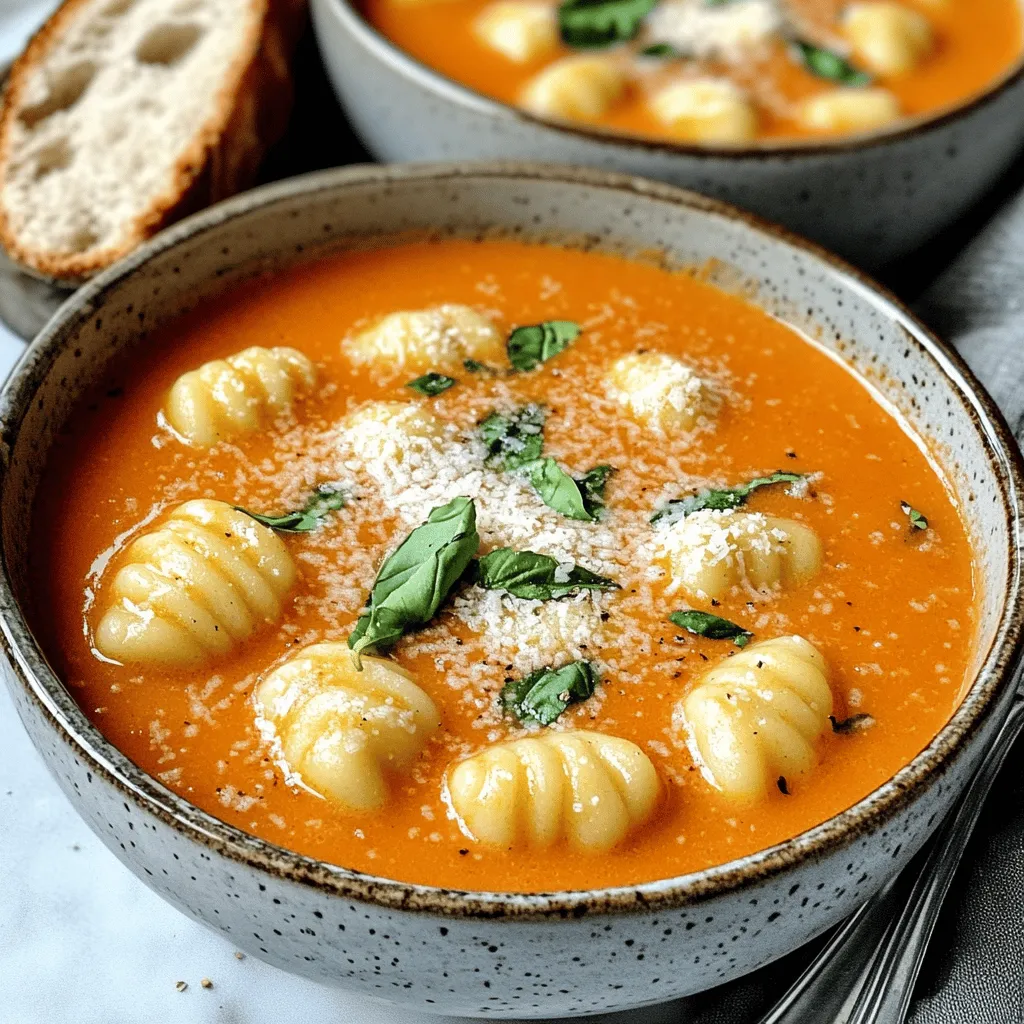
Are you craving a warm, comforting bowl of soup? Look no further! This Creamy Tomato Basil Gnocchi Soup is simple

To make No-Bake Key Lime Pie Bars, you need simple ingredients. Here’s what you'll need: - 1 ½ cups graham cracker crumbs - ¼ cup granulated sugar - ½ cup unsalted butter, melted - 1 (14 oz) can sweetened condensed milk - ½ cup fresh key lime juice (about 4-5 limes) - Zest of 2 key limes - 1 teaspoon vanilla extract - 1 cup heavy whipping cream - 2 tablespoons powdered sugar - Lime slices and whipped cream for garnish These ingredients come together to create a bright and zesty treat. The graham cracker crumbs create a lovely crust, while the key lime juice gives that fresh and tangy flavor. Sweetened condensed milk adds creaminess, making each bite smooth. Use fresh limes for the best taste. You can also add a touch of vanilla for depth. Whipping cream and powdered sugar make a light topping that balances the tartness. Feel free to get creative with the garnishes! Lime slices and whipped cream not only look great but also add extra flavor. As you gather these ingredients, think about how they will work together. Each one plays a key role in making this dessert a hit. - First, take a medium bowl. Combine 1 ½ cups of graham cracker crumbs, ¼ cup of sugar, and ½ cup of melted butter. - Mix until it looks like wet sand. - Next, grab a 9x9-inch baking dish. Press the mixture evenly into the bottom. - Use the back of a measuring cup to pack it tightly. - Chill the crust in the fridge while you make the filling. - In another bowl, whisk together one can of sweetened condensed milk, ½ cup of fresh key lime juice, the zest of 2 key limes, and 1 teaspoon of vanilla. - Whisk until smooth and well mixed. - Pour this mixture over the chilled crust. Spread it evenly. - Cover the dish with plastic wrap. Freeze it for at least 2 hours until it sets. - Once it is set, remove the dish from the freezer. Cut the bars into squares. - In a separate bowl, whip 1 cup of heavy cream with 2 tablespoons of powdered sugar until soft peaks form. - Serve the key lime pie bars with a dollop of whipped cream and a slice of lime. To make the best crust, pack the graham cracker mixture evenly. Press it down with a measuring cup until it feels firm. This helps keep the bars together. Use fresh ingredients for the filling, especially key limes. Fresh juice gives a brighter taste. When whipping cream, start with chilled tools. Use a cold bowl and beaters. This helps create soft peaks. Whip the cream until it looks fluffy but not too stiff. This gives the bars a light touch. For a lovely presentation, add lime slices on top. Fresh mint leaves also brighten the look. Place the bars on a platter and arrange the garnishes. This makes your no-bake key lime pie bars look fancy and inviting. {{image_2}} You can make these bars gluten-free with a simple swap. Use gluten-free graham crackers instead of regular ones. Just crush them like normal and mix with sugar and butter. This option allows everyone to enjoy this treat without worry. Want to mix it up? You can add coconut for a tropical twist. Grate some coconut into the filling for extra texture. You can also try using zests from other citrus fruits. Orange or lemon zests will give a new flavor. Experiment to find your favorite combination. These bars are great on their own, but you can elevate them. Serve with fresh fruits like strawberries or blueberries. They add color and a burst of flavor. You can also pair them with other desserts, like vanilla ice cream. This makes for a fun dessert platter. To keep your key lime pie bars fresh, place them in an airtight container. Store the container in the fridge. This helps maintain their creamy texture and zesty flavor. If you used whipped cream for serving, it may lose some firmness over time. For best results, add whipped cream just before serving. Freezing these bars is easy. First, cut them into squares or bars. Wrap each piece in plastic wrap. Then, place the wrapped bars in a freezer-safe container. This method keeps them fresh and prevents freezer burn. To thaw, take out the desired number of bars. Let them sit in the fridge for about an hour before serving. When stored in the fridge, the bars last up to five days. They remain tasty and safe to eat during this time. If you freeze them, they can last for about three months. Just remember, the longer they sit, the more they lose flavor. Enjoy them while they're fresh for the best taste! Yes, you can use regular limes. However, key limes have a unique taste. They are sweeter and more aromatic than regular limes. If you use regular limes, your bars will taste more tart. To keep the flavor bright, you may add a bit of extra sugar. These bars need to freeze for at least 2 hours. This time helps them set properly. If you want them super firm, freeze them longer. Just remember to cover them well to avoid ice crystals. Yes, making these bars in advance is a great idea. You can prepare them up to 2 days ahead. Just store them in the freezer. When ready to serve, simply cut them into bars and allow them to thaw a bit. Enjoy! This blog post shared how to create delicious key lime bars. You learned the key ingredients needed and step-by-step instructions to make them perfectly. I also included tips to help you make the best crust and whip the cream right. You can even explore variations and storage techniques for your bars. With fresh flavors and simple steps, you can impress anyone. Try making these bars for your next gathering. They are sure to be a hit! Enjoy your tasty creation!

No-Bake Key Lime Pie Bars Tasty and Simple Delight

If you crave a refreshing dessert that’s easy to make, you’ll love these No-Bake Key Lime Pie Bars. With a

- 1 pound shrimp, peeled and deveined - 1 cup jasmine rice - 2 ½ cups vegetable broth - 4 tablespoons unsalted butter - 4 cloves garlic, minced - 1 lemon, zested and juiced - 1 teaspoon smoked paprika - ½ teaspoon dried thyme - Salt and pepper to taste - Fresh parsley, chopped - Lemon wedges The key to this dish starts with fresh shrimp. I love using shrimp because they cook quickly and add great flavor. Jasmine rice is my choice for its lovely aroma and fluffy texture. I use vegetable broth for a rich base. The unsalted butter adds depth and creaminess. Next come the flavor enhancers. Garlic brings a warm, savory note to the dish. The zest and juice of lemon add brightness and balance. Smoked paprika gives a hint of smokiness, while thyme adds an earthy flavor. Don't forget salt and pepper to tie it all together. For garnish, fresh parsley adds a pop of color and freshness. Lemon wedges are great for an extra squeeze of juice. Together, these ingredients create a delightful one-pan meal that’s both simple and satisfying. - Melt 2 tablespoons of butter in a large skillet over medium heat. - Sauté 4 cloves of minced garlic for 1 minute until you smell its rich aroma. - Add 1 cup of jasmine rice to the pan. Stir it well for 1 minute. This helps the rice soak up the garlic flavor. - Pour in 2 ½ cups of vegetable broth. - Add the juice and zest of 1 lemon, 1 teaspoon of smoked paprika, and ½ teaspoon of dried thyme. - Stir everything together and bring it to a gentle boil. - Once it boils, reduce the heat to low. Cover the skillet and let it simmer for 15-18 minutes. You want the rice to absorb all the liquid. - While the rice cooks, take your 1 pound of shrimp. Season them with salt and pepper. - In a separate pan, melt the remaining 2 tablespoons of butter over medium heat. - Add the shrimp and cook for 2-3 minutes on each side. They should turn pink and opaque when done. - Once the rice is cooked, fluff it with a fork. - Gently mix in the cooked shrimp until everything is well combined. - Taste the dish and adjust the seasoning if needed. To make great shrimp, avoid overcooking it. Cook shrimp just until they turn pink and opaque. This usually takes about 2-3 minutes per side. Overcooked shrimp can become tough and rubbery. For seasoning, sprinkle salt and pepper directly on the shrimp. You can also add garlic powder or a pinch of smoked paprika for extra flavor. This will enhance the dish and pair well with the lemon butter sauce. To boost the flavor, consider adding spices like cayenne pepper or even a dash of cumin. These can add a nice kick to the dish, making it more exciting. Fresh herbs can also elevate the meal. Try adding fresh basil or dill along with the parsley. You can mix them in just before serving to keep their bright flavor. To prevent rice from sticking, rinse it under cold water before cooking. This removes excess starch. Use the right rice-to-liquid ratio: for jasmine rice, it’s typically 1 cup rice to 2.5 cups broth. Make sure to let the rice simmer on low heat. Cover the pan tightly to trap steam. This ensures the rice cooks evenly and absorbs all the flavors. {{image_2}} You can switch the shrimp for other seafood. Scallops work well and taste great. They cook quickly, so watch them closely. Chicken is another option. Use bite-sized pieces and cook until they are golden brown. These changes keep the dish fresh and exciting. For a vegetarian twist, try plant-based proteins. Tofu or tempeh can soak up the lemon and garlic flavors. You can also use chickpeas for a hearty touch. These swaps make the dish tasty for everyone. Want to spice things up? Add chili flakes for heat. Start with a pinch and add more if you like it spicy. You can also switch broth types. Use chicken broth for a richer taste or seafood broth for a deeper flavor. These options can change your dish’s profile. Think about what to serve on the side. A fresh salad adds crunch and brightness. Roasted veggies can bring more color to your plate. You might also serve some crusty bread. It’s great for soaking up the lemon garlic butter goodness. To make it a complete meal, add a protein or vegetable. Pair it with grilled asparagus or steamed broccoli for balance. These sides enhance the meal and keep it healthy. To store leftovers, let the dish cool first. Place it in an airtight container. This keeps your shrimp rice fresh. Use a container that fits well in your fridge. I recommend glass containers for easy reheating. You can store it for up to three days. To reheat, use a skillet over low heat. Add a splash of broth or water. This keeps the shrimp moist. Stir often to heat evenly. For rice, you may also use a microwave. Cover it with a damp paper towel. This helps keep the rice from drying out. Reheat for one to two minutes. You can freeze this dish for longer storage. Use a freezer-safe container. Make sure to leave some space for expansion. It’s best to freeze it without the garnish. For thawing, place it in the fridge overnight. You can also use the microwave on defrost mode. After thawing, reheat the dish as mentioned above. Yes, you can prepare some steps ahead of time. Cook the rice and shrimp separately, then store them in the fridge. You can mix them together when ready to serve. This saves time and keeps the shrimp fresh. Just reheat both before serving. If you cannot find jasmine rice, try basmati or long-grain white rice. Both taste good and will work well in this dish. For basmati, use the same water amount but cook for 15 minutes. For long-grain rice, use 2 cups of water and cook for about 18 minutes. Look for shrimp that turn pink and opaque. They should also curl slightly. Cook them for about 2-3 minutes on each side. If you see them starting to firm up, they are ready. Overcooking can make them tough, so keep an eye on them. This post covered the key ingredients, steps, and tips for cooking shrimp with jasmine rice. Remember to season well and avoid overcooking the shrimp. Try variations with different proteins or flavors to keep it exciting. Store leftovers properly to enjoy later. Cooking can be simple and fun! With these easy steps, you will create a delicious meal to share with others. Don’t hesitate to experiment and make it your own! Enjoy your cooking journey!

One-Pan Lemon Garlic Butter Shrimp Rice Delight

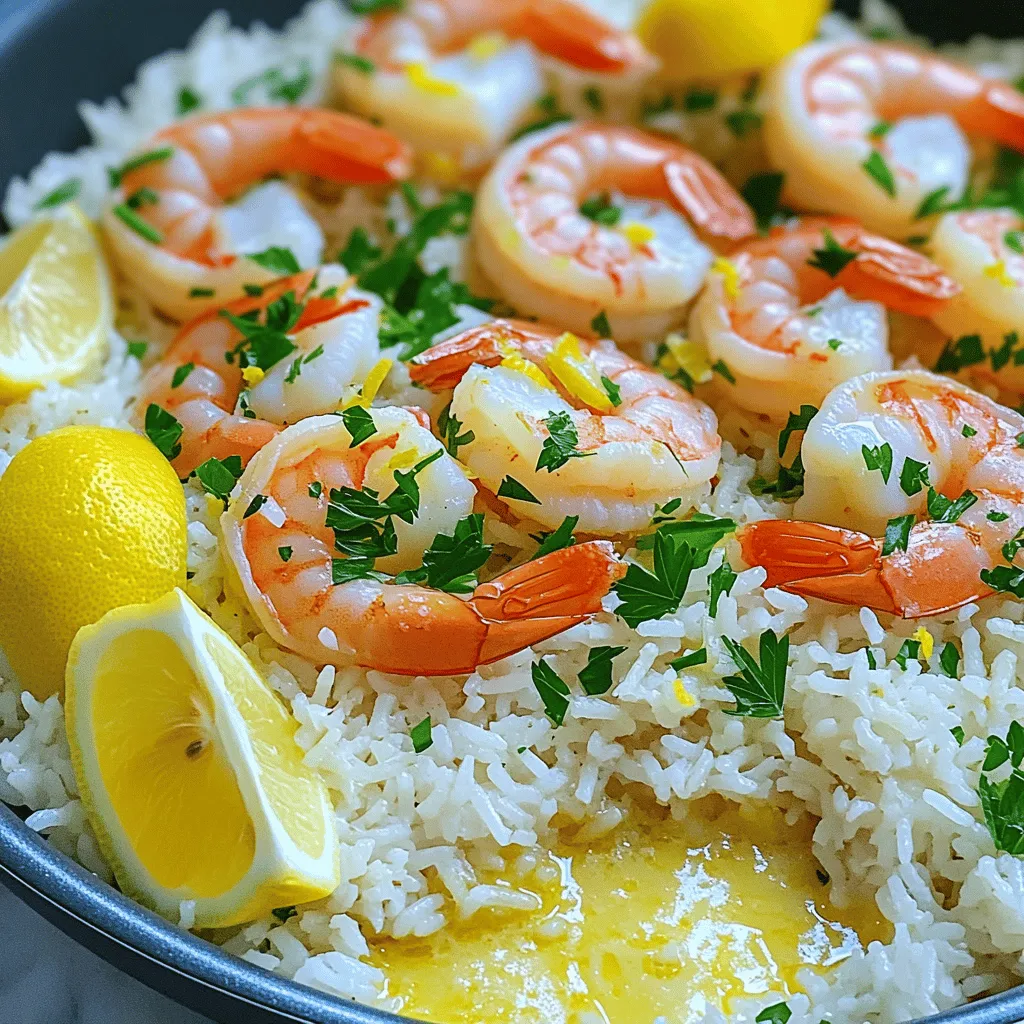
Get ready for a meal that’s both delicious and easy! My One-Pan Lemon Garlic Butter Shrimp Rice Delight is a

- 2 large eggs - 2 slices of whole-grain bread - 2 tablespoons pesto - 1 slice of fresh mozzarella cheese - 1 small avocado, sliced - Fresh arugula or spinach - Salt and pepper, to taste - Olive oil, for frying The base of the Savory Pesto Egg Breakfast Sandwich is simple yet delicious. You need just two large eggs, which add protein and creaminess. The whole-grain bread provides a hearty texture and nutrients. Pesto, with its fresh herbs and nuts, brings a burst of flavor. For a little extra, you can add a slice of fresh mozzarella cheese. It melts well and makes the sandwich even richer. Sliced avocado offers creaminess and healthy fats. Fresh arugula or spinach adds a nice crunch and color. Don’t forget the salt and pepper! They enhance every bite. A little olive oil helps fry the eggs and toast the bread just right. This combination of basic and optional ingredients makes the sandwich fun and customizable. Each bite offers a blend of flavors, and you can mix and match to find your favorite version. First, heat a non-stick skillet over medium heat. Add a drizzle of olive oil. This will help prevent the eggs from sticking. Next, crack the two large eggs into the skillet. Cook them sunny-side up until the whites are set but the yolks are still runny. Season the eggs with salt and pepper to taste. This simple step adds a lot of flavor to your sandwich. While the eggs cook, take two slices of whole-grain bread. Toast them in a toaster or on a skillet until they are golden brown. This adds a nice crunch to the sandwich. After toasting, spread one tablespoon of pesto on each slice of bread. The pesto gives the sandwich a fresh and herby taste. Once your eggs are cooked, place a slice of fresh mozzarella on top of each egg in the skillet. Let the cheese melt slightly. Now, it's time to assemble your sandwich. On one slice of bread, layer the melted egg and cheese. Then add fresh avocado slices and a handful of arugula or spinach for extra crunch. Finally, top with the second slice of pesto-covered bread. Gently press down on the sandwich. If you like, cut it in half and serve it right away. Enjoy! You can choose between store-bought and homemade pesto for your sandwich. Store-bought pesto is quick and easy. It saves time and still tastes great. However, homemade pesto can bring fresh flavors. To make your own, blend basil, garlic, nuts, cheese, and olive oil. You can also customize your pesto with different herbs or nuts. Try spinach or kale for a twist. Use walnuts or pecans for a unique taste. When cooking eggs, you can choose sunny-side up or over-easy. Sunny-side up keeps the yolk bright and runny. If you prefer a firmer yolk, go with over-easy. To cook over-easy, gently flip the egg in the skillet. Adjust the cooking time to get the yolk just how you like it. For a runny yolk, cook for about three minutes. For a firmer yolk, cook for five minutes. Whole-grain bread is the best choice for this sandwich. It adds flavor and texture. You can also try sourdough or ciabatta for a different bite. If you need gluten-free options, look for gluten-free bread. Many brands now make tasty gluten-free choices. Just check for quality and freshness to ensure a great sandwich. {{image_2}} You can make this sandwich even better with protein options. Adding crispy bacon or smoked salmon gives it a rich flavor. Both add a salty touch that pairs well with the eggs and pesto. If you want a vegetarian option, try using tofu or chickpea eggs. They mimic the texture of eggs and soak up all those tasty flavors. Cheese can change the taste of your sandwich. Fresh mozzarella is creamy and mild. However, you can also use sharp cheddar or pepper jack for a kick. If you prefer dairy-free, look for nut-based cheeses. They offer a similar creaminess and can make your sandwich just as satisfying. Add-ons can boost nutrition and flavor. Sautéed spinach or bell peppers work great. They add vitamins and color to your dish. You can also drizzle some hot sauce for a spicy kick. Spreads like hummus or avocado can give extra creaminess. Don't be afraid to mix and match your toppings for your perfect breakfast bite! To store leftovers safely, wrap the sandwich tightly in plastic wrap or foil. This keeps it fresh and prevents it from drying out. You can also place it in an airtight container. For optimal reheating, use a skillet over low heat. This warms it gently and keeps the bread from getting soggy. You want to heat it until the cheese melts and the eggs are warm. To keep pesto fresh, store it in an airtight jar or container. A thin layer of olive oil on top helps prevent browning. For eggs, keep them in their original carton in the fridge. This keeps them fresh and safe. As for bread, store it in a cool, dry place. If you won't use it soon, freeze it in a bag. This keeps it fresh for longer. You can freeze the assembled sandwich, but it's best to do it without the toppings. Wrap it tightly in foil or freezer-safe wrap. For best results, freeze individual components. You can freeze the eggs, pesto, and bread separately. This way, you can enjoy fresh flavors when you are ready to eat. Just remember to thaw them in the fridge before you reheat. Making this sandwich takes about 15 minutes total. You will spend 10 minutes prepping and cooking. This quick time means you can enjoy a tasty breakfast without a long wait. Yes, you can prepare parts of this sandwich ahead. Cook the eggs and store them in the fridge. Toast the bread when you are ready to eat. Keep pesto and avocado separate to maintain freshness. This way, you can enjoy your sandwich at its best. If you need an alternative to pesto, try using hummus or sun-dried tomato spread. These options add flavor while catering to different diets. You can also make your own pesto with nuts, herbs, and oil. This way, you control the ingredients. The Savory Pesto Egg Breakfast Sandwich is simple and tasty. You need just a few key ingredients, like eggs, whole-grain bread, and pesto. Cooking is straightforward and quick, making it perfect for busy mornings. Experiment with options like avocado or fresh mozzarella for added flavor. Remember to store your leftovers properly to enjoy them later. This sandwich is not just a meal; it's a canvas for creativity. Try different proteins or toppings to make it your own. You’ll love crafting your perfect breakfast!

Savory Pesto Egg Breakfast Sandwich Delightful Dish

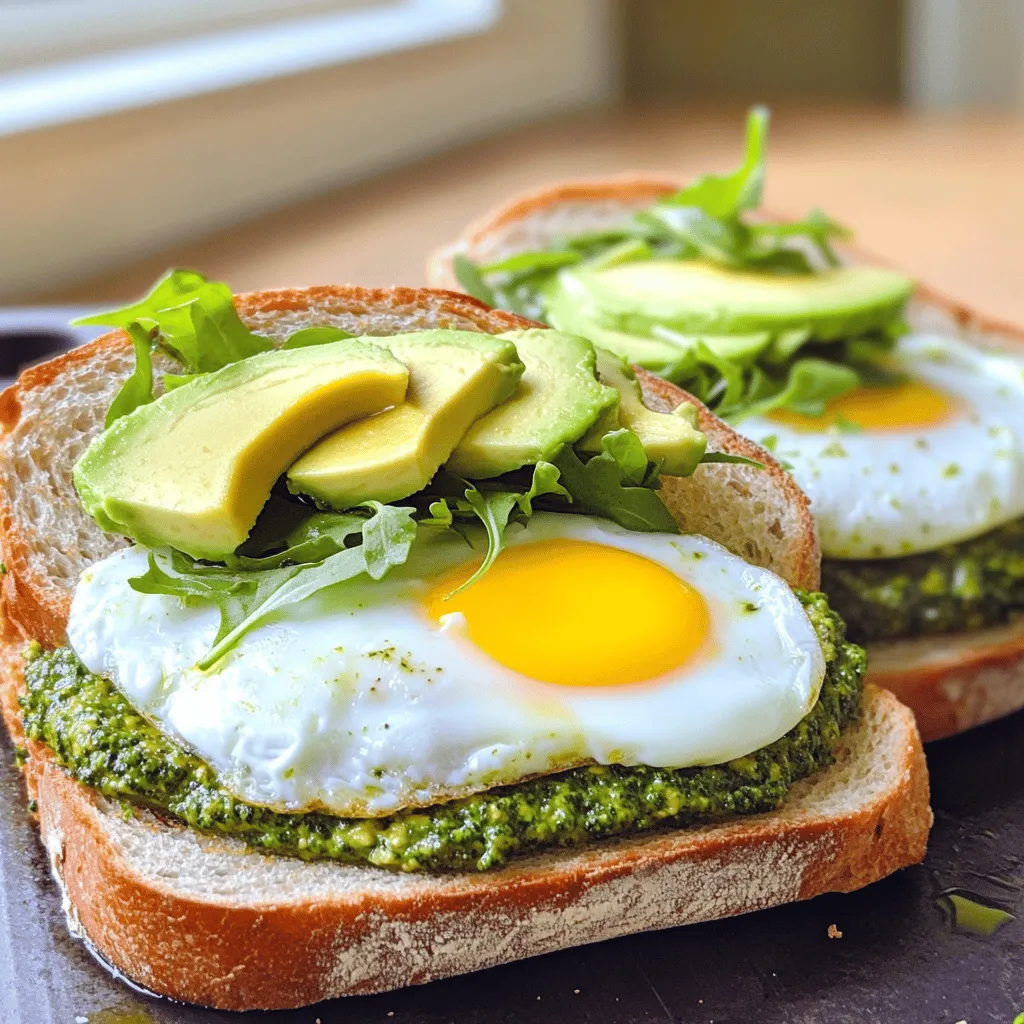
Are you ready to kick-start your day with a delicious breakfast? The Savory Pesto Egg Breakfast Sandwich is here to

To make cinnamon sugar churro donut holes, you’ll need: - 1 cup all-purpose flour - 1/2 cup granulated sugar - 1/2 teaspoon baking powder - 1/4 teaspoon baking soda - 1/4 teaspoon salt - 1/2 teaspoon ground cinnamon - 1/2 cup buttermilk - 1 large egg - 2 tablespoons unsalted butter, melted - 1/4 cup granulated sugar (for coating) - 1 tablespoon ground cinnamon (for coating) - Oil, for frying Gather these tools to help you make the donut holes: - Large mixing bowl - Small bowl - Whisk - Slotted spoon - Cookie scoop or spoon - Deep frying pot - Cooking thermometer - Paper towels You can swap ingredients if needed: - Use almond milk in place of buttermilk for a dairy-free option. - Replace all-purpose flour with gluten-free flour for a gluten-free treat. - Use brown sugar instead of granulated sugar for a richer flavor. - If you don’t have baking powder, use 1/2 teaspoon cream of tartar and 1/4 teaspoon baking soda. Start by taking a large bowl. Sift in 1 cup of all-purpose flour. Add 1/2 cup of granulated sugar. Then, mix in 1/2 teaspoon of baking powder, 1/4 teaspoon of baking soda, 1/4 teaspoon of salt, and 1/2 teaspoon of ground cinnamon. Stir these dry ingredients well to blend them. In another bowl, whisk together 1/2 cup of buttermilk, 1 large egg, and 2 tablespoons of melted unsalted butter. Make sure these ingredients mix well until they look smooth. Heat oil in a pot over medium heat. You want the oil to reach 350°F (175°C). While it heats, get a plate ready with paper towels to catch excess oil. Use a small cookie scoop or spoon to drop about one tablespoon of batter into the hot oil. Fry the donut holes for 2-3 minutes until they turn golden brown. Flip them halfway for even cooking. After frying, remove them with a slotted spoon and place them on the paper towel-lined plate. In a small bowl, mix 1/4 cup of granulated sugar with 1 tablespoon of ground cinnamon. Roll each warm donut hole in this cinnamon sugar mix until they are fully coated. Enjoy the warm, sweet, and crunchy delight! To get that crispy outside, keep the oil at 350°F. If the oil is too hot, the outside burns. If it’s too cool, the donut holes soak up too much oil. Fry only a few at a time. This helps them cook evenly. After frying, let them sit on paper towels. This drains extra oil and keeps them light. Do not overmix your batter. This can make the donut holes tough. Use a cookie scoop for even portions. This helps them fry at the same rate. Always check oil temperature with a thermometer. It’s the best way to avoid soggy treats. If they’re not golden brown, give them more time. Serve these donut holes warm for the best taste. Pair them with chocolate sauce for dipping. You can also sprinkle extra cinnamon sugar on top. A scoop of ice cream makes it a fun dessert. Try adding a bit of whipped cream on the side too. These treats are perfect for sharing! {{image_2}} You can add chocolate to these donut holes for a rich twist. To make these, simply mix in half a cup of cocoa powder with the dry ingredients. This adds a deep chocolate flavor that pairs well with the cinnamon. After frying, coat them in the classic cinnamon-sugar mix. You can also drizzle melted chocolate over the top for extra sweetness. Want to make these donut holes gluten-free? Use a gluten-free flour blend instead of all-purpose flour. This swap keeps the texture similar. The taste remains fantastic with the same cinnamon-sugar coating. Just be sure to check that your baking powder is gluten-free too. You can get creative with the coating flavors. Instead of the classic cinnamon-sugar mix, try using: - Vanilla Sugar: Mix granulated sugar with a splash of vanilla extract. - Nutmeg Sugar: Swap out the cinnamon for nutmeg for a warm, spicy flavor. - Coconut Sugar: Use coconut sugar for a more caramel-like taste. These variations let you enjoy cinnamon sugar churro donut holes in new and fun ways! After you enjoy these churro donut holes, store any leftovers. Let them cool completely first. Place them in an airtight container. Keep the container at room temperature for up to two days. If you want them to last longer, store them in the fridge for up to a week. To bring back the warm, fluffy goodness, reheat the donut holes. You can use an oven or microwave. For the oven, preheat to 350°F (175°C). Place the donut holes on a baking sheet and warm for about 5-7 minutes. For the microwave, heat them for about 10-15 seconds. Always keep an eye on them to avoid drying out. Choose a container that seals well. A glass or plastic container with a lid works great. This keeps the donut holes fresh and prevents them from getting stale. If you have a zip-top bag, that can also work well for short-term storage. Just make sure to remove as much air as possible before sealing. Yes, you can bake them. Baking gives a different texture. Use a preheated oven at 350°F (175°C). Shape the donut holes and place them on a baking sheet. Bake for about 10-12 minutes or until golden. This method is healthier but will lack the crispiness of frying. These donut holes stay fresh for about 1-2 days at room temperature. Store them in a sealed container. They may become less soft over time. For longer storage, place them in the fridge. You can also freeze them for up to a month. Just reheat in the oven before serving. You can use whole milk, but it will change the flavor. Buttermilk adds a nice tang and helps the donut holes rise better. If you don’t have buttermilk, add a teaspoon of lemon juice or vinegar to whole milk. Let it sit for a few minutes before using. This will mimic buttermilk’s effects in your recipe. You now know how to make delicious churro donut holes. We covered all the key ingredients, tools, and tips needed for success. Remember, frying gives the best texture, and cinnamon sugar is a must. Explore variations like chocolate or gluten-free options to keep things fun. For storing, always choose the right container to keep them fresh. Enjoy your tasty treats!

Cinnamon Sugar Churro Donut Holes Delightful Treat

Are you ready to indulge in a sweet treat? These Cinnamon Sugar Churro Donut Holes are a delicious twist on

For this recipe, you will need: - 1 medium zucchini, sliced into half-moons - 1 red bell pepper, diced - 1 yellow bell pepper, diced - 1 red onion, cut into wedges - 1 cup cherry tomatoes, halved - 3 cups broccoli florets These veggies bring color and taste. The zucchini adds a soft touch. Bell peppers give sweetness. Red onion adds a sharp bite. Cherry tomatoes burst with juice, and broccoli adds crunch. To enhance these veggies, gather: - 3 tablespoons balsamic vinegar - 2 tablespoons olive oil - 1 teaspoon garlic powder - 1 teaspoon dried oregano - Salt and pepper to taste Balsamic vinegar adds depth. Olive oil helps with roasting. Garlic powder gives a warm, rich flavor. Dried oregano adds a hint of earthiness. Salt and pepper round out the taste. For the finishing touch, you will need: - ½ cup feta cheese, crumbled - Fresh basil leaves for garnish Feta cheese brings creaminess and a tangy kick. Fresh basil leaves add a burst of freshness. These elements make the dish pop with flavor and color. First, set your oven to 425°F (220°C). This high heat will help our veggies roast perfectly. While the oven warms up, prepare your veggies. Slice the zucchini into half-moons. Dice the red and yellow bell peppers. Cut the red onion into wedges. Halve the cherry tomatoes and measure out the broccoli florets. It all should look colorful and fresh. Now, grab a large bowl. Add all your chopped veggies inside. Pour in 3 tablespoons of balsamic vinegar and 2 tablespoons of olive oil. These will give the veggies a rich flavor. Next, sprinkle 1 teaspoon of garlic powder and 1 teaspoon of dried oregano over the mix. Add salt and pepper to taste. Use your hands or a spoon to toss everything until the veggies are well coated. This step is key for even flavor. Spread the veggies on a large baking sheet. Make sure they stay in a single layer. This helps them roast evenly. Place the baking sheet in the preheated oven. Roast for 20 to 25 minutes. Stir halfway through to ensure even cooking. You want the vegetables tender and a bit caramelized. After roasting, take the pan out and sprinkle ½ cup of crumbled feta cheese on top. Place it back in the oven for 5 more minutes. This warms the cheese and makes it soft. Once done, garnish with fresh basil leaves and add a final sprinkle of salt and pepper if you like. Enjoy your delicious creation! To get the best roast, use fresh veggies. Fresh veggies taste better and have more vitamins. Cut them into equal sizes. This helps them cook evenly. Spread them in a single layer on the baking sheet. Crowding the pan makes them steam instead of roast. Bake at 425°F (220°C) for about 20 to 25 minutes. Stir halfway through for even cooking. Look for a nice caramelized color. This adds flavor and texture. You can change the flavors based on your taste. Add more garlic powder for a stronger taste. If you like it spicy, sprinkle in some red pepper flakes. For a sweeter taste, drizzle a bit more balsamic vinegar. Always taste before serving. If it needs more flavor, add salt and pepper. Remember, balance is key. The feta cheese adds saltiness, so adjust wisely. Make your dish look great! Use a large, white platter or bowl for serving. This makes the colors pop. Sprinkle fresh basil leaves on top for a nice touch. Crumbled feta can also be added at the end for a fresh look. Serve it warm to make it inviting. A drizzle of balsamic glaze can add shine and extra flavor. Don't forget to take a photo; it’s Instagram-worthy! {{image_2}} You can swap veggies based on what you have. For instance, use eggplant instead of zucchini. Instead of cherry tomatoes, try grape tomatoes or even diced carrots. If you like, substitute the red onion with shallots for a milder taste. You can also use fresh herbs like thyme or rosemary instead of dried oregano. Each change can give a new twist to your dish! If you want to make this dish a full meal, add some protein. Chicken breast, cut into bite-sized pieces, works great. For a vegetarian option, try chickpeas or white beans. Simply toss the proteins with the veggies before roasting. This will cook everything together, blending the flavors nicely. Want to change the taste? You can! Add soy sauce or honey for a sweet and savory mix. Try using lemon juice instead of balsamic vinegar for a zesty kick. If you like heat, sprinkle some red pepper flakes or add jalapeños. These small changes can create a whole new flavor experience! You should store leftovers in an airtight container. Keep the veggies in the fridge. They stay fresh for up to four days. Make sure to let them cool before sealing. This keeps them from getting soggy. To reheat, you can use the oven or a microwave. For the oven, set it to 350°F (175°C). Spread the veggies on a baking sheet. Heat for about 10-15 minutes until warm. If you use a microwave, place them in a safe dish. Heat in short bursts, checking often. This will keep them from becoming mushy. You can freeze these roasted veggies, but they may change in texture. Let them cool fully first. Place them in a freezer-safe bag or container. Remove as much air as you can. They can last up to three months in the freezer. When you're ready to eat, thaw them in the fridge overnight. Reheat as mentioned before. Yes, you can use other veggies. Try carrots, asparagus, or sweet potatoes. You can mix and match based on what you have. Just cut them to similar sizes for even cooking. Each veggie brings its own flavor and texture. This recipe is flexible, so feel free to get creative! Leftovers will last about three to four days in the fridge. Store them in an airtight container. Reheat in the microwave or oven. The taste will still be great, even after a few days. Enjoy them in wraps, salads, or as a side dish. Feta cheese adds a salty and creamy touch. However, it’s not required. You can leave it out for a vegan option. You might try nutritional yeast for a cheesy flavor without dairy. Or simply enjoy the roasted veggies on their own! This blog post shared various tips for a flavorful roasted vegetable dish. We covered ingredients, including veggies and seasonings, along with step-by-step cooking methods. Tips for better roasting and serving add value to your meal. You learned about recipe variations and storage info to keep leftovers fresh. Try these ideas for tasty, healthy meals that fit your taste. Cooking can be fun and rewarding! Enjoy your delicious creations and share them with others.

Sheet-Pan Balsamic Roasted Veggies With Feta Delight

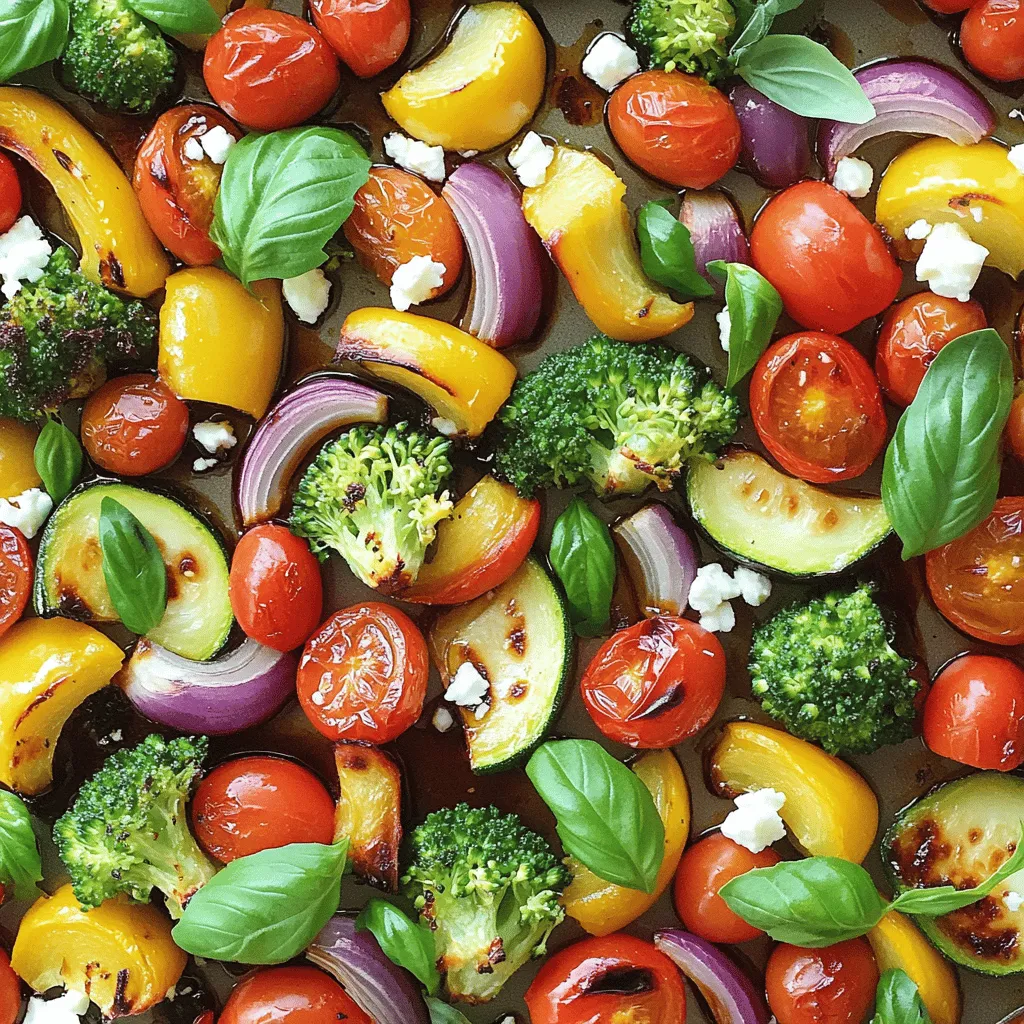
Ready to brighten your dinner table? My Sheet-Pan Balsamic Roasted Veggies With Feta Delight is here to help! This simple,

Older posts
Newer posts
← Previous Page1 … Page29 Page30 Page31 … Page84 Next →

dsad

© 2026 Foodish Talk • Built with GeneratePress

Our Policies

  • Copyright Policy
  • Cookie Policy
  • GDPR Policy
  • Privacy Policy
  • Disclaimer
  • Terms Of Use

More Information

  • Home
  • About
  • Contact
  • Appetizers
  • Dessert
  • Dinner
  • Drinks
©2026, Foodish Talk About Back To Top