Skip to content
DisclaimerTerms Of UseGDPR PolicyCookie Policy

Foodish Talk

  • Home
  • Drinks
  • Appetizers
  • Dinner
  • Dessert
  • About
  • Contact
  • Privacy Policy
DisclaimerTerms Of UseGDPR PolicyCookie Policy

NO-ING-IMG

- Zucchini and Coating Ingredients - 2 medium zucchinis, cut into long strips - 1 cup breadcrumbs (panko recommended for extra crunch) - 1/2 cup grated Parmesan cheese - Seasonings and Dairy - 1 teaspoon garlic powder - 1 teaspoon onion powder - 1 teaspoon dried oregano - 1/2 teaspoon salt - 1/2 teaspoon black pepper - Egg and Oil Requirements - 2 eggs, beaten - Olive oil spray These ingredients come together to make a delicious and crispy snack. The zucchini shines through the crunchy coating. I love using panko breadcrumbs for that extra crunch. The Parmesan cheese adds a savory touch. The spices give it a wonderful flavor. Make sure to have everything ready before you start cooking. This will help keep the process smooth and fun. Setting the Temperature Set your air fryer to 400°F (200°C). This high heat helps create a crispy texture. Importance of Preheating Preheating ensures even cooking. When the air fryer is hot, your fries cook faster and turn golden brown. Cutting the Zucchini Take two medium zucchinis. Cut them into long strips about the size of fries. This shape helps them cook evenly. Dipping in Egg Beat two eggs in a bowl. Dip each zucchini strip into the egg, letting the extra drip off. This step helps the coating stick well. Mixing the Breadcrumb Mixture In a mixing bowl, combine one cup of breadcrumbs, half a cup of grated Parmesan cheese, one teaspoon of garlic powder, one teaspoon of onion powder, one teaspoon of dried oregano, half a teaspoon of salt, and half a teaspoon of black pepper. Mix until everything is well combined. Coating the Zucchini Strips Take each egg-dipped zucchini strip and coat it in the breadcrumb mixture. Press gently to help the crumbs stick. This coating gives the fries their lovely crunch. Arranging in the Basket Place the coated zucchini strips in a single layer in the air fryer basket. Make sure not to overcrowd them for the best results. Cooking Time and Temperature Air fry the zucchini fries at 400°F (200°C) for about 10 to 13 minutes. Keep an eye on them to avoid burning. Shaking for Even Cooking At the halfway mark, shake the basket gently. This helps the fries cook evenly on all sides, ensuring each bite is crispy. - Importance of Olive Oil Spray Olive oil spray is key for crispiness. It helps the coating brown evenly. Spray lightly on the zucchini fries before cooking. This small step makes a big difference in crunch. - Adjusting Cooking Time Cooking time can vary by air fryer. Start with 10 minutes and check for browning. If they need more time, add a few extra minutes. Always shake the basket halfway for even cooking. - Additional Seasoning Options You can mix in more spices to boost flavor. Try smoked paprika or cayenne for heat. A dash of lemon zest adds brightness too. Get creative with your favorite flavors. - Fresh Herbs for Garnish Fresh basil or parsley enhances the dish. Sprinkle herbs on top after cooking. This adds color and fresh taste to your zucchini fries. - Managing Portion Sizes It's better to cook in small batches. This helps the fries cook evenly and get crisp. Overcrowding the basket can lead to soggy fries. - Storing Leftovers If you have leftovers, store them in an air-tight container. Keep them in the fridge for up to three days. Reheat them in the air fryer for best results. This keeps them crispy! {{image_2}} You can change up the texture of your Air Fryer Parmesan Zucchini Fries by using different breadcrumbs. Regular breadcrumbs work fine, but I recommend panko breadcrumbs. Panko gives your fries a crunchier bite. If you want to get creative, you can even try crushed cornflakes or crushed nuts. These alternatives add a fun twist to the classic style. Want to spice things up? You can add spices to the breadcrumb mix. Try paprika, cayenne, or Italian seasoning for extra flavor. You can also change the cheese. Instead of just Parmesan, consider mixing in cheddar or mozzarella. These cheeses melt well and add a creamy taste. For dipping, marinara sauce is a classic choice. It pairs perfectly with the cheesy, crispy fries. Garlic aioli is another great option if you want something creamy. If you're serving these fries as a side, they go well with grilled chicken or fish. You can also serve them with a fresh salad for a light meal. To keep your air fryer parmesan zucchini fries fresh, use air-tight containers. Store them in the fridge. This helps keep them from getting soggy. Try to eat them within 2-3 days for the best taste. When it’s time to eat your leftovers, use the air fryer again. Heat it to 350°F (175°C). This method helps keep them crispy. Avoid using the microwave as it can make them soggy. You can also reheat them in the oven. Place them on a baking sheet and warm them up for about 10 minutes. This method also helps maintain that delicious crunch. Yes, you can! Some great options are eggplant, carrots, or sweet potatoes. Each vegetable brings its own flavor and texture. - Recommended Alternatives: - Eggplant: Cut into strips like zucchini. - Carrots: Slice thinner for quicker cooking. - Sweet Potatoes: Cut into fries for a sweeter taste. - Cooking Adjustments: - Cooking times may vary. Eggplant and sweet potatoes often need a few extra minutes. Always check for crispiness. Making zucchini fries gluten-free is easy. You just need to swap out some ingredients. - Gluten-Free Breadcrumb Options: - Use gluten-free breadcrumbs made from rice or corn. These work great for crunch. - Other Substitutions: - You can use ground almonds or crushed nuts. These add a nice flavor and texture too. Dipping sauces add fun to your meal. A few popular options can really enhance your zucchini fries. - Popular Dipping Options: - Marinara sauce: Classic and tasty. - Garlic aioli: Creamy and rich. - Ranch dressing: A cool and tangy choice. - Homemade Dipping Sauce Ideas: - Mix yogurt with herbs for a fresh dip. - Blend avocado with lime for a creamy option. Explore these ideas and make your Air Fryer Parmesan Zucchini Fries even more delightful! This post shared the full process of making tasty air-fried zucchini fries. We covered ingredients, preparation steps, and how to achieve perfect crispiness. I provided tips, variations, and storage info to help you enjoy these fries longer. Remember, experimenting with flavors and coatings can make these fries even better. Try different dips to elevate your meal. Enjoy your cooking adventure and savor every bite of your delicious zucchini fries!

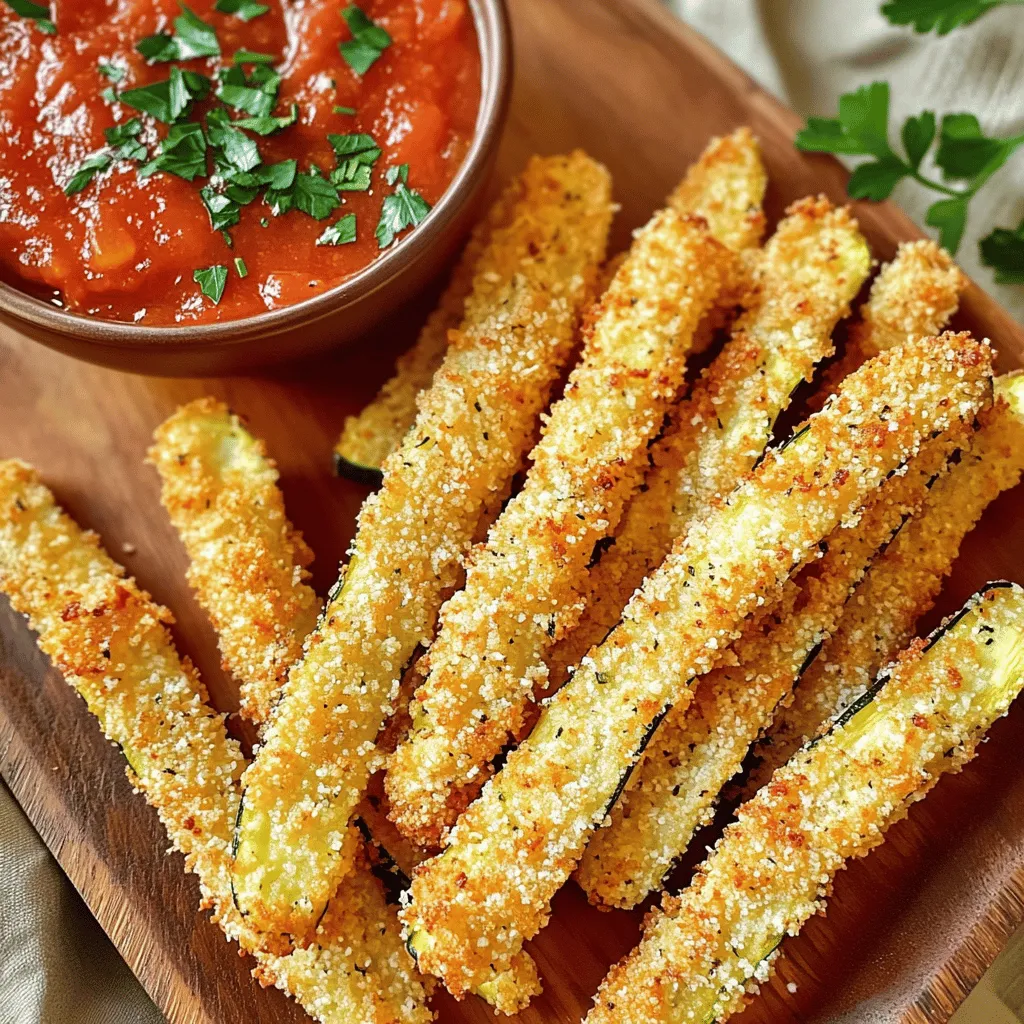
Air Fryer Parmesan Zucchini Fries Crispy Delight

Ready for a tasty snack that won’t ruin your healthy eating goals? Air Fryer Parmesan Zucchini Fries are the answer!

- 1 package (16 oz) gnocchi - 2 tablespoons olive oil - 3 cloves garlic, minced - 1 cup cherry tomatoes, halved - 1/2 cup heavy cream - 1/2 cup basil pesto - 1/2 teaspoon salt - 1/4 teaspoon black pepper - Grated Parmesan cheese for serving - Fresh basil leaves for garnish In this recipe, gnocchi is the star. Gnocchi are soft little dumplings made from potatoes. They soak up flavors well. You can find them in many stores. Olive oil adds richness, while garlic gives a nice kick. I love using fresh garlic. It smells great and tastes even better. Cherry tomatoes are optional, but they add a burst of color and sweetness. If you want creaminess, heavy cream is your friend. It makes the sauce rich and velvety. Basil pesto adds a fresh, herb flavor. You can use store-bought or homemade. For seasoning, a little salt and black pepper are key. These simple spices enhance all the flavors. Grated Parmesan cheese on top? Yes, please! It adds a salty, nutty finish. Fresh basil leaves as a garnish add a lovely touch. They also give a hint of freshness. This dish is bright, creamy, and full of flavor. The mix of ingredients makes a perfect meal in one pan. Cooking Gnocchi First, bring a large pot of salted water to a boil. Add the gnocchi and cook them for 2-3 minutes. You will know they are done when they float to the top. Drain them and set aside. This keeps the gnocchi light and fluffy. Sautéing Vegetables In a large skillet, heat 2 tablespoons of olive oil over medium heat. Add 3 cloves of minced garlic and sauté for about 1 minute until it smells great. Next, toss in 1 cup of halved cherry tomatoes. Cook for 2-3 minutes until they soften. Finally, stir in 1 cup of fresh spinach and cook until it wilts. This adds color and flavor to your dish. Mixing Cream and Pesto Lower the heat and add 1/2 cup of heavy cream and 1/2 cup of basil pesto to the skillet. Stir well to combine. Cook this mixture for 1-2 minutes until it warms up. The cream and pesto create a rich, creamy sauce that coats the gnocchi. Incorporating Gnocchi Now, gently fold in the cooked gnocchi. Season the mixture with 1/2 teaspoon of salt and 1/4 teaspoon of black pepper. Stir until everything is well coated in the sauce. This step combines all the flavors into one delicious dish. Allowing Flavors to Develop Let the skillet cook for another 2-3 minutes. This time allows the gnocchi to soak up the flavors from the sauce. It makes every bite tasty. Serving Suggestions Serve the gnocchi hot in warm bowls. Top with grated Parmesan cheese and fresh basil leaves for a lovely finish. This makes your dish look as good as it tastes! Cooking Gnocchi Properly To cook gnocchi, bring a pot of salted water to a boil. Add the gnocchi gently. They usually take 2-3 minutes to cook. Watch for them to float; that means they are ready! Drain them well and set aside. Achieving Creamy Consistency When adding heavy cream and pesto, keep the heat low. This helps the cream blend well with the pesto. Stir slowly to mix everything. If your sauce is too thick, add a splash of pasta water or cream. This keeps the sauce smooth and creamy. Adding Protein Options For a heartier dish, add protein. Grilled chicken, shrimp, or cooked sausage work great. Just add them to the skillet after cooking the garlic and tomatoes. They will soak up the flavors of the sauce. Spice Variations Want a little kick? Add red pepper flakes or black pepper while cooking. You can also mix in fresh herbs like thyme or oregano for a new taste. Experimenting with spices makes the dish your own. Serving in Warm Bowls For a nice touch, serve the gnocchi in warm bowls. This keeps the dish hot longer. Plus, it looks great! It makes your meal feel special. Garnishing Options Top your dish with grated Parmesan cheese and fresh basil leaves. A sprinkle of black pepper adds a nice finish too. These simple garnishes make the dish pop visually and add more flavor. {{image_2}} You can switch things up with gluten-free gnocchi. Many brands now offer this option. It tastes great and keeps the dish light. If you prefer plant-based options, use coconut cream instead of heavy cream. This change gives a rich taste while keeping it vegan. Adding seasonal vegetables makes this dish fresh and vibrant. In spring, try fresh asparagus or peas. In summer, zucchini works well. Modify the sauce too! Different herbs can create new flavors. Swap basil for parsley or add a hint of dill. These small changes can make a big difference. You can bake or roast the gnocchi for a crisp texture. Simply cook it as usual, then spread it on a baking sheet and roast it until golden. Skillet cooking keeps things quick and easy. Both methods create tasty results. Choose what fits your style! - Refrigeration Guidelines: Store leftover creamy pesto gnocchi in an airtight container. It keeps well in the fridge for up to three days. Make sure it cools down first. This helps keep it fresh and safe to eat later. - Freezing Instructions: If you want to freeze it, use a freezer-safe container. This dish can last up to three months in the freezer. When ready to eat, thaw it overnight in the fridge. - Methods for Reheating: You can reheat the gnocchi in the microwave or on the stove. If using the microwave, place it in a bowl and cover. Heat in short bursts to avoid overcooking. For the stove, add a splash of cream while heating to keep it moist. - Maintaining Creaminess: To keep the creamy texture, stir in a bit of extra cream or olive oil while reheating. This step ensures the sauce stays rich and smooth. - Duration in the Fridge: In the fridge, the creamy pesto gnocchi lasts three days. Keep it in an airtight container to prevent drying out. - Duration in the Freezer: In the freezer, it stays good for about three months. Just remember to label your container with the date. To make gnocchi from scratch, you need just a few simple ingredients. - Basic gnocchi recipe - 2 cups of mashed potatoes - 1 cup of all-purpose flour - 1 egg - Pinch of salt Start by boiling potatoes until tender. Mash them and let them cool. Mix in flour, egg, and salt. Knead the dough gently until smooth. Roll it out and cut it into small pieces. Press each piece with a fork to shape them. - Tips for achieving the right texture - Use starchy potatoes like Russet for the best texture. - Don’t over-knead the dough; it should be soft and tender. - Keep flour handy to dust your work surface and dough to prevent sticking. Yes, you can use store-bought pesto. It saves time and effort. - Comparison of homemade vs store-bought - Homemade pesto tastes fresh and vibrant but takes time to make. - Store-bought pesto is quick and easy; however, it might lack some freshness. - Best types of store-bought pesto - Look for brands that use fresh basil and quality olive oil. - Avoid those with too many preservatives or artificial flavors. Absolutely, this dish is great for meal prep. - Meal prep guidelines - Cook the gnocchi and mix it with the sauce. - Store it in individual portions for easy access. - Recommended storage containers - Use airtight glass containers to keep it fresh. - Label each container with the date to track freshness. In this post, we explored key ingredients like gnocchi, olive oil, and garlic. We also looked at optional additions, seasonings, and tips for perfecting your dish. You can vary the recipe with different cooking methods or seasonal ingredients. Remember, proper storage helps retain flavors and freshness. As you cook, feel free to experiment and find your favorite version. Enjoy this tasty, comforting dish with family and friends!

Creamy Pesto Gnocchi Skillet Flavorful One-Pan Dish

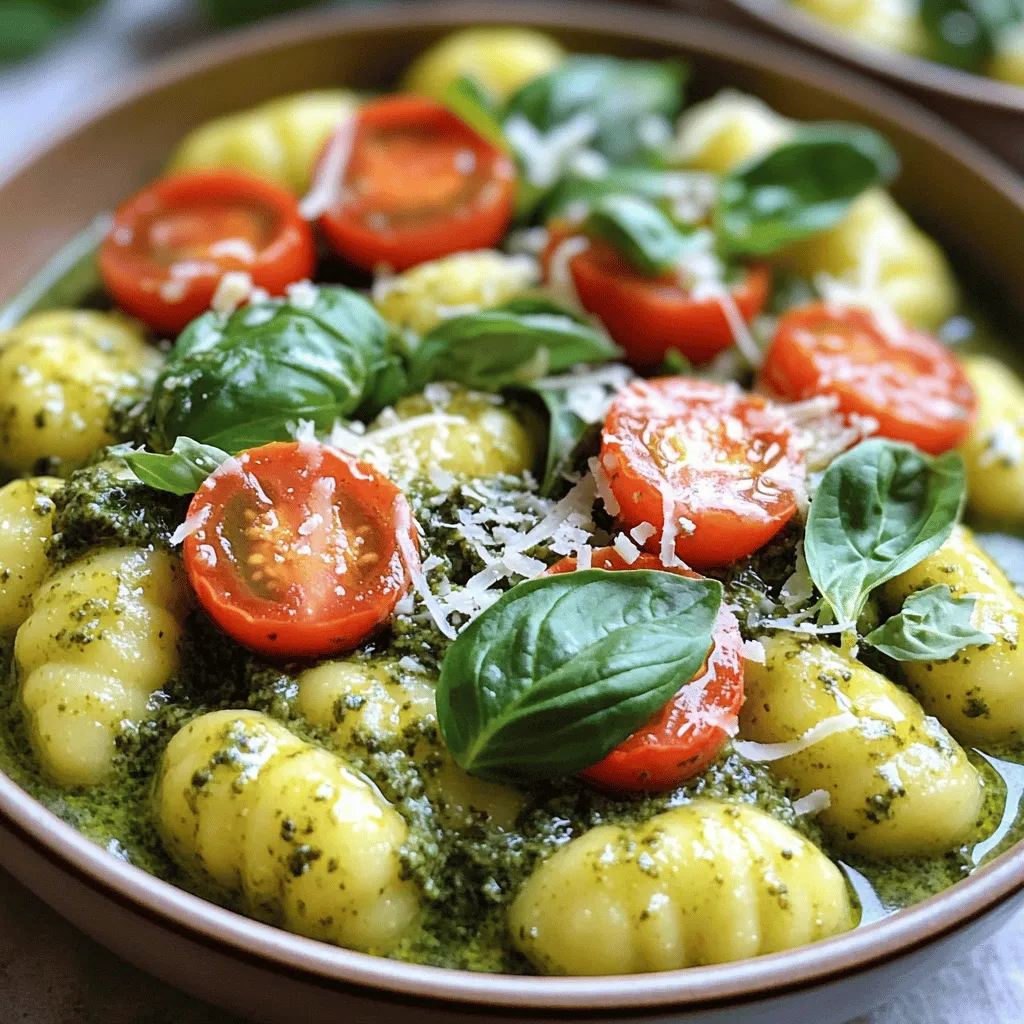
Are you ready to whip up a delicious meal without the mess? My Creamy Pesto Gnocchi Skillet is a one-pan

- 1 lb boneless, skinless chicken thighs, cut into bite-sized pieces - 2 tablespoons sesame oil - 2 tablespoons fresh ginger, minced - 3 cloves garlic, minced - 2 cups mixed bell peppers, sliced (red, yellow, and green) - 1 cup broccoli florets - 1 cup snap peas - 3 green onions, sliced - 3 tablespoons soy sauce (low sodium) - 1 tablespoon rice vinegar - 1 tablespoon honey - 2 teaspoons cornstarch mixed with 2 tablespoons water (for thickening) - Sesame seeds for garnish - Fresh cilantro for garnish (optional) Chicken thighs give this dish a rich flavor. They stay moist and tender. Sesame oil brings a nutty taste. It adds depth to the stir fry. Fresh ginger and garlic make it fragrant. They also provide a nice kick. Mixed bell peppers and broccoli add color and crunch. Snap peas bring a sweet, crisp bite. Soy sauce adds umami. Rice vinegar gives a hint of tang. Honey balances the flavors with sweetness. For a lighter option, use chicken breast instead of thighs. You can swap sesame oil for olive oil if needed. If you are gluten-free, use tamari instead of soy sauce. For a vegan version, replace chicken with tofu or tempeh. Always check for allergens in soy sauce and other store-bought items. If you have a soy allergy, consider coconut aminos. 1. Heat 1 tablespoon of sesame oil in a large skillet or wok over medium-high heat. 2. Add 1 pound of bite-sized chicken thighs. Stir-fry for 5-7 minutes. Cook until the chicken browns and is fully cooked. 3. Remove the chicken from the skillet and set it aside. 4. In the same skillet, add the remaining tablespoon of sesame oil. Add 2 tablespoons of minced ginger and 3 cloves of minced garlic. Sauté for about 30 seconds until you smell the aroma. 5. Add 2 cups of sliced bell peppers, 1 cup of broccoli florets, and 1 cup of snap peas. Stir-fry these veggies for 3-4 minutes. You want them soft but still crunchy. 6. Return the chicken to the skillet. Pour in 3 tablespoons of low-sodium soy sauce, 1 tablespoon of rice vinegar, and 1 tablespoon of honey. Stir well to mix everything together. 7. Combine 2 teaspoons of cornstarch with 2 tablespoons of water. Pour this into the skillet while stirring. Keep stirring until the sauce thickens, which takes about 1-2 minutes. 8. Add 3 sliced green onions. Toss everything well and then remove from heat. 9. Serve your stir fry hot. Garnish with sesame seeds and fresh cilantro if you like. - Prep Time: 15 minutes - Cook Time: 15 minutes - Total Time: 30 minutes - Servings: 4 - Make sure your skillet is hot before adding the chicken. - Cut chicken and veggies into even pieces for even cooking. - Don't overcrowd the skillet. Cook in batches if needed. - Add ingredients in the order listed for the best flavor. - Adjust the soy sauce for more or less saltiness. - Garnish right before serving for a fresh look. To make a great sesame ginger chicken stir fry, always use fresh ingredients. Fresh ginger and garlic give the best flavor. Cut your chicken into small pieces. Smaller pieces cook faster and stay juicy. Use a hot skillet or wok to get that nice sear on the chicken. This adds great flavor. Stir-fry quickly to keep the veggies crunchy. You want them bright and colorful! Don’t overcrowd the skillet. If you do, the chicken won’t brown well. Cook in batches if needed. Also, avoid overcooking the vegetables. They should be tender but still crisp. Watch the heat; too high can burn your garlic. Lastly, don’t skip the cornstarch mix. It makes the sauce thick and tasty. A good skillet or wok is key for stir-frying. Look for one with a non-stick surface. A wooden spoon or spatula helps stir without scratching the pan. For measuring, have a set of spoons and cups handy. A sharp knife is great for cutting the chicken and veggies. Use a cutting board to keep things tidy. Lastly, a small bowl for the cornstarch mix makes it easier to add to the sauce. {{image_2}} You can make this stir fry even better by adding more veggies. Try carrots, zucchini, or mushrooms. Each adds a unique taste and texture. You can also use frozen vegetables for quick cooking. Just remember to adjust the cooking time. Fresh vegetables give a crunch, while frozen ones are softer. Both options work well with the sesame ginger sauce. If you want to switch up the protein, you have choices. Use shrimp or tofu for a different flavor. Both cook quickly and soak up the sauce. If you prefer beef, flank steak or chicken breast are great options. Each will change the taste but still keep it tasty. Just be mindful of the cooking times for each protein. This recipe works for different diets with a few tweaks. For a gluten-free version, use tamari instead of soy sauce. You can also make it low-carb by skipping the honey. Instead, try a sugar substitute if you want that sweetness. Vegans can replace chicken with chickpeas or tofu and use maple syrup for a sweet touch. Making these changes keeps the dish fun and delicious. After enjoying your sesame ginger chicken stir fry, let it cool to room temperature. Place the leftovers in an airtight container. This helps keep the flavors fresh. Store the container in the fridge. Your stir fry will last for about 3 to 4 days. If you want to keep it longer, consider freezing. When you’re ready to eat the leftovers, take them out of the fridge. You can reheat your stir fry in a skillet over medium heat. Add a splash of water or broth to keep it moist. Stir gently until heated through. Alternatively, you can use the microwave. Heat it in short bursts, stirring in between to avoid hot spots. To freeze your sesame ginger chicken stir fry, pack it in a freezer-safe container. Leave some space at the top for expansion. It can be frozen for up to 3 months. When you’re ready to eat, thaw it in the fridge overnight. Reheat it as mentioned above. Enjoy your tasty meal again! The best way to tenderize chicken is to use a marinade. A mix of soy sauce and ginger works well. You can also use a meat mallet to pound the chicken. This breaks down the fibers. If you have time, marinate the chicken for at least 30 minutes. This way, it absorbs flavors and stays juicy. Yes, you can make this dish ahead of time. Cook the stir fry and let it cool. Place it in an airtight container. You can store it in the fridge for up to three days. When ready to eat, reheat it on the stove or in the microwave. Freshly cooked rice or noodles pair well with it. To adjust the spiciness, you can add more or less ginger. If you like heat, add some red pepper flakes. For a milder taste, skip them altogether. You can also use less soy sauce for a softer flavor. Taste as you go to find your perfect balance. This blog post shared the essential ingredients, tips, and steps for your dish. We explored key highlights for each main ingredient and provided safe substitutions. You learned the cooking process, along with timing and expert tips for best results. We also covered how to add variety and make this dish your own. Finally, we discussed proper storage and reheating methods for leftovers. Use these guidelines to cook with confidence and enjoy great meals.

Savory Sesame Ginger Chicken Stir Fry Recipe

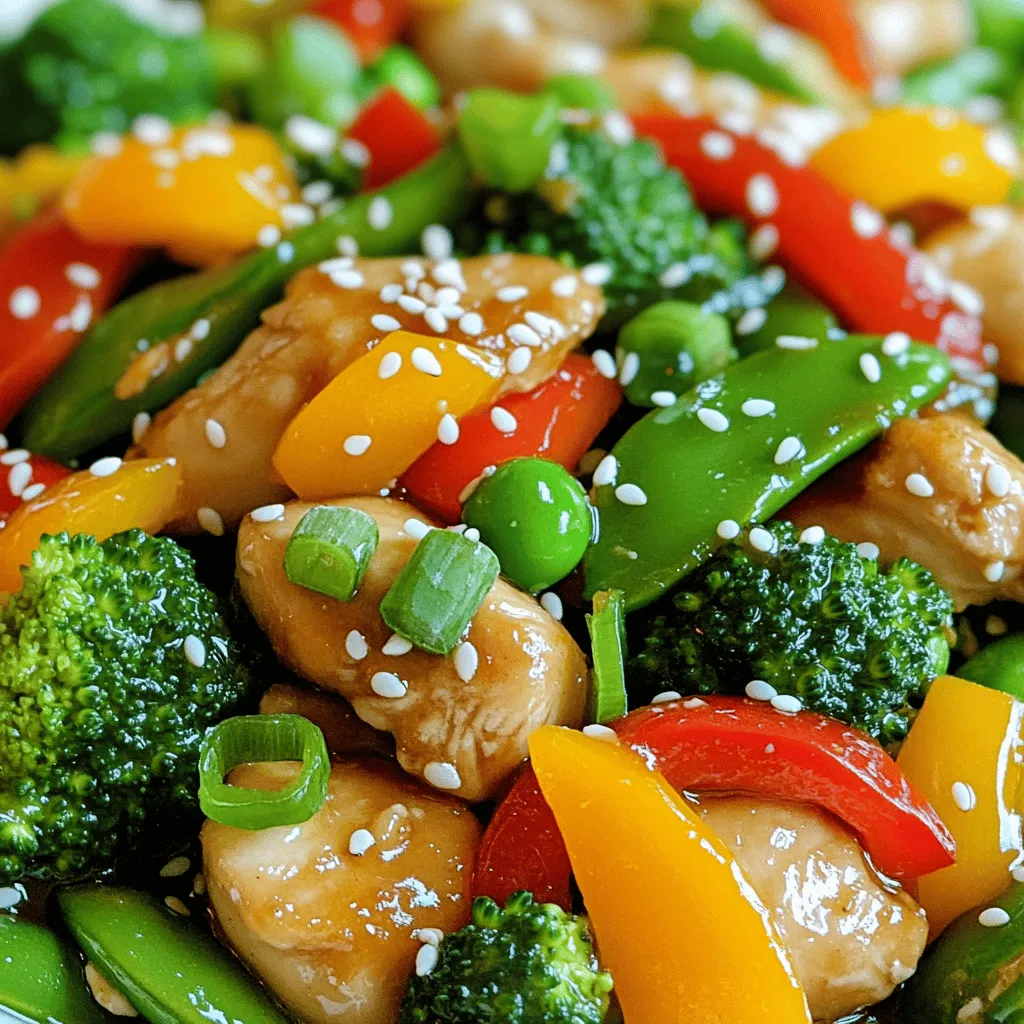
Do you crave a quick and tasty meal? This Savory Sesame Ginger Chicken Stir Fry is your answer! With fresh

- 2 cups apple cider - 2 1/2 cups all-purpose flour - 3 large eggs - 1 teaspoon ground cinnamon - 1/2 teaspoon ground nutmeg - 1/2 teaspoon allspice - 1 teaspoon vanilla extract - 1 cup granulated sugar - 1/2 cup packed brown sugar - 3/4 cup unsalted butter Gathering these ingredients is key. Start with apple cider. It gives this cake its moistness and rich flavor. I use two cups to make it just right. Next, you'll need flour. Two and a half cups provide the cake's structure. The eggs help bind everything. Three large eggs work best for a fluffy texture. Now, let’s spice things up! Ground cinnamon, nutmeg, and allspice add warmth. One teaspoon of cinnamon brings out the apple flavor. A half teaspoon of nutmeg and allspice adds depth. Don’t forget the vanilla extract! It gives a lovely aroma and taste. For sweetness, we use a mix of sugars. One cup of granulated sugar makes it sweet. Half a cup of brown sugar adds moisture and a hint of caramel. Finally, the unsalted butter brings it all together. Three-quarters of a cup of softened butter makes the batter rich and creamy. With these ingredients, you'll create a cake that is soft, spiced, and full of flavor. Remember, fresh ingredients make a big difference! 1. Preheat your oven to 350°F (175°C). This is key for a great bake. 2. Grease a 10-cup Bundt pan well with cooking spray or butter. This helps the cake release easily. 3. In a small saucepan over medium heat, bring 2 cups of apple cider to a boil. 4. After boiling, reduce the heat and let it simmer. Cook until it reduces to about 1 cup. This takes about 20 minutes. 5. Once done, take it off the heat and let it cool slightly. 1. In a bowl, mix the ground cinnamon, nutmeg, and allspice. Set this spice mix aside. 2. In another bowl, whisk together 2 1/2 cups of flour, 2 teaspoons of baking powder, 1/2 teaspoon of baking soda, and 1/2 teaspoon of salt. Add in half of the spice mix and combine well. 3. In a large mixing bowl, cream together 3/4 cup of softened butter, 1 cup of granulated sugar, and 1/2 cup of brown sugar. Mix until it looks light and fluffy. 4. Add in 3 large eggs one at a time, mixing well after each addition. Then stir in 1 teaspoon of vanilla extract and the cooled, reduced apple cider. 5. Gradually mix the dry ingredients into the wet ingredients until just combined. Be careful not to overmix. 6. Gently fold in 1 cup of finely chopped apples, preferably Granny Smith. Make sure they are evenly mixed in. 1. Pour the batter into your prepared Bundt pan. Use a spatula to smooth the top. 2. Bake in your preheated oven for 45-50 minutes. Check if a toothpick inserted in the center comes out clean. 3. Once baked, let the cake cool in the pan for about 10 minutes. This helps it set before moving. 4. Carefully invert the cake onto a cooling rack to cool completely. 5. Once cool, roll the Bundt cake in 1/2 cup of granulated sugar. This gives it that special donut finish. To get the best texture, avoid overmixing. Mix just until you see no dry flour. This helps keep your cake soft. Overmixing adds air and can make the cake tough. Using room temperature ingredients is key. This includes butter, eggs, and even the apple cider. Room temperature items mix better and help the batter rise nicely. You can boost flavor with extra spices. Try adding ginger or cloves for a warm kick. Experiment with these spices to find your favorite blend. When choosing apples, go for Granny Smith. They are tart and hold their shape well in the cake. You can also mix in some sweet apples for a nice contrast. For a lovely presentation, slice the cake and serve it on a rustic wooden platter. Add a side of warm apple cider for a cozy touch. Pair the cake with coffee or tea for a delightful treat. You can also sprinkle powdered sugar on top for a sweet finish. {{image_2}} You can easily change the flavor of this cake. Adding nuts or raisins can give it a nice crunch. I like to use toasted walnuts or pecans. They add a rich taste that pairs well with the sweet spices. If you prefer a different fruit, try swapping apples for pears. Pears have a soft texture and sweet flavor that enhance the cake. If you need gluten-free options, use a gluten-free flour blend. Make sure it has xanthan gum for texture. You can also make this cake vegan. Replace the eggs with flax eggs and use plant-based butter. This way, everyone can enjoy a slice. To keep things fresh, incorporate seasonal spices. You can add ginger or cloves for a warm touch. Using different types of apple cider changes the flavor too. Try a spiced cider or a honey cider for a unique twist. Each type of cider adds a new layer of taste to your cake. To keep your Apple Cider Donut Bundt Cake fresh, wrap it well. Use plastic wrap or aluminum foil. You can also place it in an airtight container. This helps to keep moisture in and air out. Store the cake in the fridge if you plan to eat it later. It will stay fresh and tasty for several days. You can freeze the Bundt cake for later. First, let it cool completely. Then, wrap it tightly in plastic wrap. After that, place it in a freezer bag. Be sure to push out as much air as you can. To thaw, just take it out of the freezer and leave it in the fridge overnight. This way, it remains moist and delicious. At room temperature, the cake lasts about three days. Make sure to store it in a cool, dry place. If you notice signs of spoilage, like a strange smell or mold, it’s best to toss it. Always trust your senses when checking if food is still good! To keep your cake from sticking, you must grease the Bundt pan well. Use cooking spray or softened butter. Make sure to cover every nook and cranny. For extra safety, sprinkle flour in the pan after greasing. This step creates a barrier. When you invert the pan, the cake should come out easily. If it does stick, gently run a knife around the edges. Yes, you can use fresh apple cider! Fresh cider offers a brighter flavor. It may also have a thicker texture, adding moisture to the cake. Store-bought cider often has preservatives, which can affect taste. Always taste your cider before using. Fresh cider can make your cake even more special. Serve the cake warm for the best experience. You can slice it and place it on a rustic wooden platter. A sprinkle of powdered sugar adds sweetness and charm. Pair it with warm apple cider for a cozy touch. For an extra treat, add a scoop of vanilla ice cream on the side. Enjoy the delightful blend of flavors! In this blog post, we explored how to make a tasty Apple Cider Donut Bundt Cake. We covered the main ingredients, spices, and sugars needed for the batter. We also detailed step-by-step instructions for baking and cooling the cake. By following our tips, you can enhance its flavor and avoid common mistakes. Don't forget, you can try different variations and store leftovers correctly. Experimenting with flavors and serving ideas can make this cake your own. Enjoy every bite and share this delightful treat with others!

Apple Cider Donut Bundt Cake Soft and Spiced Delight

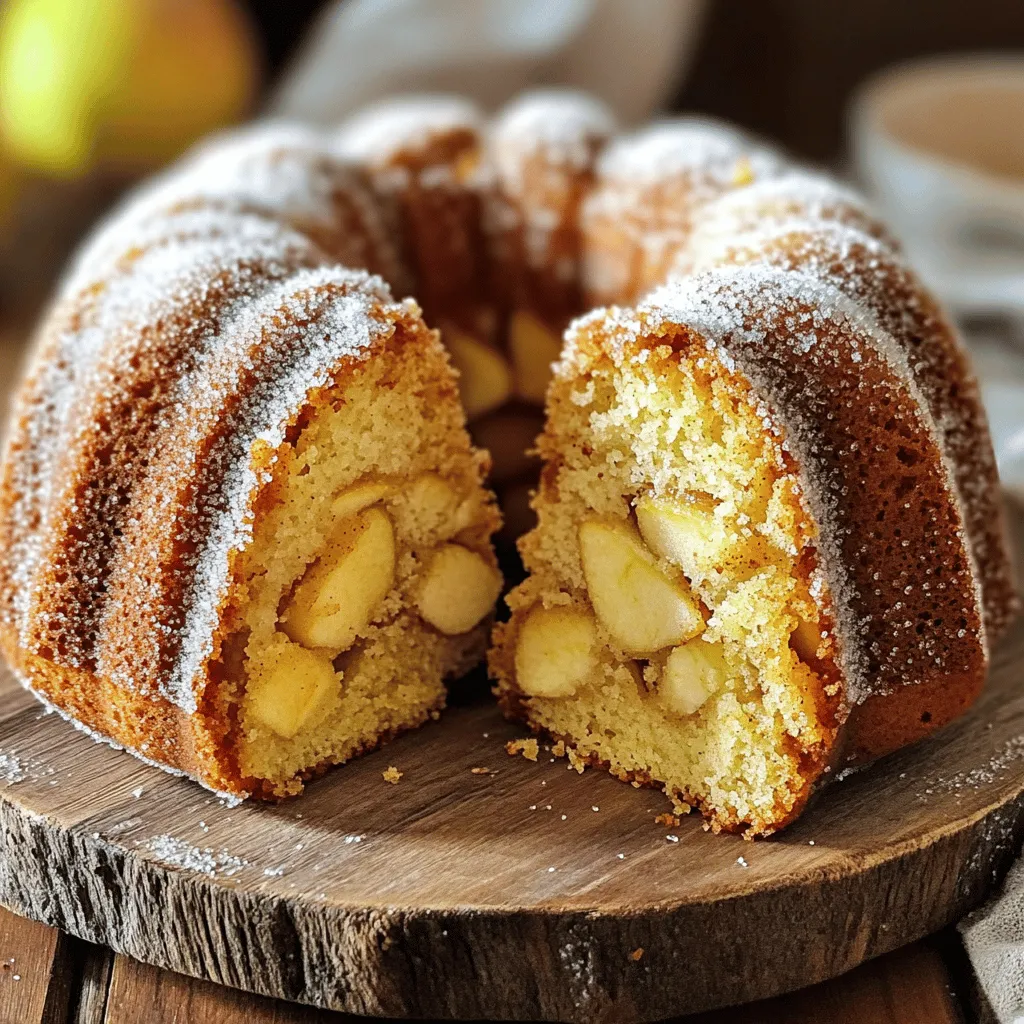
Dive into the warm world of fall with my Apple Cider Donut Bundt Cake. This soft, spiced delight brings you

To make gochujang roasted sweet potatoes, you need: - 4 medium sweet potatoes, peeled and cut into 1-inch cubes - 2 tablespoons gochujang (Korean chili paste) - 3 tablespoons olive oil - 2 tablespoons honey or maple syrup - 2 tablespoons sesame oil - 1 tablespoon soy sauce - 1 teaspoon garlic powder - 1 teaspoon ginger powder - Salt and pepper to taste These ingredients bring together a perfect mix of sweet and spicy. The sweet potatoes give a creamy texture, while gochujang adds depth. You can make your dish pop with these garnishes: - 2 green onions, thinly sliced - Sesame seeds These add a crunch and a fresh taste. The green onions bring color and flavor. The sesame seeds add a nutty finish. You can swap ingredients if needed: - Use another chili paste if you can't find gochujang. - Olive oil can be replaced with avocado oil for a different flavor. - Maple syrup can take the place of honey if you want a vegan option. These changes let you customize your dish. Feel free to play around based on what you have at home! First, set your oven to 425°F (220°C). This high heat helps the sweet potatoes roast well. The goal is a nice, crispy outside and a soft inside. Preheating is key for even cooking. In a large bowl, mix the gochujang, olive oil, honey or maple syrup, sesame oil, soy sauce, garlic powder, ginger powder, salt, and pepper. Use a whisk to blend it until smooth. This glaze packs a punch and adds depth to the sweet potatoes. Add the sweet potato cubes to the bowl. Toss them until each piece is coated in the glaze. This step ensures that every bite bursts with flavor. Spread the sweet potatoes in a single layer on a large baking sheet lined with parchment paper. This helps them roast evenly. Place the tray in the oven and roast for 25-30 minutes. Stir halfway through for even cooking. The sweet potatoes are done when they are tender and caramelized. - Cut the sweet potatoes into 1-inch cubes for even cooking. - Avoid crowding the baking sheet. This helps them crisp up nicely. - Keep an eye on them to prevent burning. Use a fork to check if they are tender. When selecting sweet potatoes, look for medium-sized ones. They should feel firm and smooth. Avoid any with soft spots or blemishes. Different types can add unique flavors. You can use orange or purple sweet potatoes for a twist. Orange sweet potatoes are sweeter, while purple ones are earthier. Gochujang has a bold, spicy kick. If you want less heat, use less gochujang. Mix in more honey or maple syrup to balance the spice. You can also add more garlic or ginger for extra flavor without too much heat. Taste the sauce before coating the sweet potatoes. Adjust it to fit your liking. To get that beautiful caramelization, spread the sweet potatoes in a single layer. Crowding them causes steaming, not roasting. Stir them halfway through cooking to promote even browning. Keep an eye on the time. If they start to brown too fast, lower the oven temperature slightly. The goal is a crispy outside and a tender inside. {{image_2}} You can make your sweet potatoes hotter by adding more gochujang. Just increase the amount to three tablespoons. This will give you a nice, spicy kick. Pair it with a cool yogurt sauce to balance the heat. It adds creaminess and flavor. For a sweet and savory twist, add maple syrup or honey. Use three tablespoons instead of two. This makes the sweet potatoes caramelize more. You can also sprinkle a bit of cinnamon for extra warmth. It brings a nice flavor contrast. Want to make it a full meal? You can add other veggies. Try bell peppers, broccoli, or carrots. Chop them into bite-sized pieces and toss them with the sweet potatoes. For protein, add chickpeas or cooked chicken. This makes your dish more filling and healthy. To keep your Gochujang roasted sweet potatoes fresh, place them in an airtight container. They stay good for about 3 to 5 days in the fridge. Make sure to let them cool before sealing the container. This helps prevent moisture build-up and keeps the texture nice. If you want to save them longer, you can freeze the sweet potatoes. Let them cool completely, then spread them in a single layer on a baking sheet. Freeze them for about 1 hour. Once frozen, transfer them to a freezer bag or airtight container. They can last up to 3 months in the freezer. When you’re ready to eat the leftovers, reheat them in the oven for the best taste. Preheat your oven to 350°F (175°C) and spread the sweet potatoes on a baking sheet. Heat them for about 10 to 15 minutes until they are warm and slightly crisp. You can also use a microwave if you’re in a hurry, but they may lose some crunch. Enjoy your tasty dish! Yes, you can use other potatoes like Yukon Gold or red potatoes. They will taste different, but they will still roast well. Sweet potatoes have a unique flavor that shines with gochujang. If you swap for other types, adjust cooking time as needed. Store leftovers in an airtight container in the fridge. They last about 3 to 5 days. For longer storage, you can freeze them. Just make sure they cool completely before freezing. Label the container with the date. Gochujang roasted sweet potatoes pair well with many dishes. You can serve them with grilled chicken, tofu, or fish. They also go great with rice or a fresh salad. - Health Benefits of Sweet Potatoes Sweet potatoes are packed with nutrients. They have lots of fiber, vitamins, and minerals. They help with digestion and keep you full longer. They also support healthy skin and vision. - Is Gochujang suitable for a vegan diet? Yes, gochujang is vegan! It is made from chili powder, glutinous rice, fermented soybeans, and salt. Just check labels for any added ingredients. Most brands are plant-based. You learned about making Gochujang Roasted Sweet Potatoes. We covered key ingredients, step-by-step instructions, and cooking tips. I shared fun variations and how to store your delicious dish. Now, it's your turn to try this recipe. Don't hesitate to adapt the flavors and ingredients. Enjoy the taste and health benefits of sweet potatoes and Gochujang. Happy cooking!

Gochujang Roasted Sweet Potatoes Flavorful and Simple

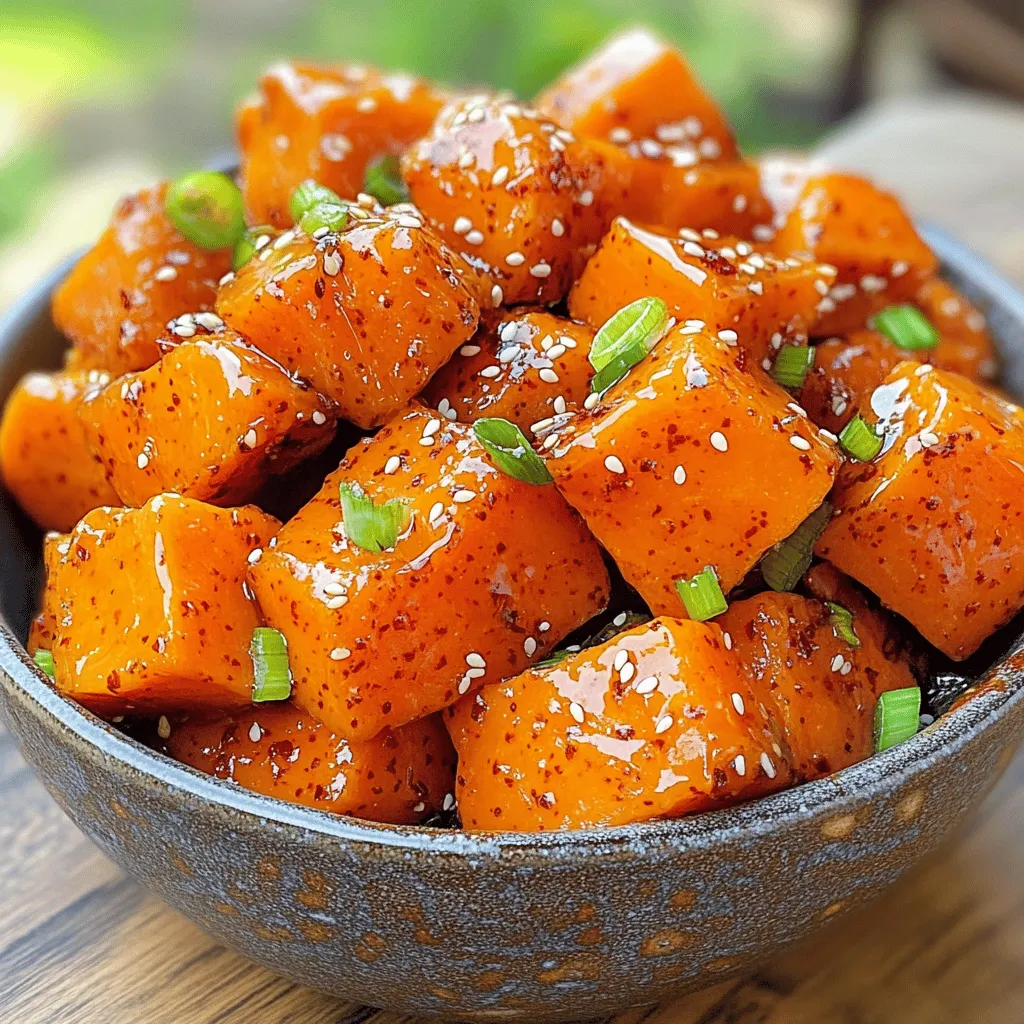
Are you ready to spice up your dinner table? Gochujang roasted sweet potatoes are a flavorful and simple dish that

- 1 ½ cups all-purpose flour - 1 teaspoon baking powder - ½ teaspoon baking soda - ¼ teaspoon salt - ½ cup unsalted butter, softened - 1 cup granulated sugar - 2 large eggs - 2 tablespoons lemon zest (about 2 lemons) - 1 tablespoon lemon juice - ½ cup plain Greek yogurt - ½ teaspoon vanilla extract - 2 tablespoons poppy seeds - Powdered sugar (for dusting, optional) In this delicious Bakery Style Lemon Poppy Seed Loaf, each ingredient plays a key role. The all-purpose flour gives the loaf structure. Baking powder and baking soda help it rise nicely. A touch of salt brings out the flavors. For the wet ingredients, I use unsalted butter to keep the loaf rich and moist. Granulated sugar adds sweetness and helps create that lovely golden crust. The eggs bind everything together and add moisture. Fresh lemon zest and juice are essential for that bright, tangy flavor. Greek yogurt keeps the loaf tender and adds a bit of creaminess. Finally, a splash of vanilla extract rounds out the taste. Don't forget the poppy seeds! They add a nice crunch and a burst of flavor. If you like, you can dust the finished loaf with powdered sugar for a sweet finish. Each ingredient works together to create a loaf you will love. 1. Preheat your oven to 350°F (175°C). This temperature helps the loaf rise well. 2. Prepare the loaf pan by greasing it with butter and dusting it with flour. You can also use parchment paper for easy removal later. 1. In a medium bowl, combine the dry ingredients. Whisk together 1 ½ cups of all-purpose flour, 1 teaspoon of baking powder, ½ teaspoon of baking soda, and ¼ teaspoon of salt. Set this aside. 2. In a large mixing bowl, cream ½ cup of softened unsalted butter and 1 cup of granulated sugar. Use an electric mixer on medium speed until the mix is light and fluffy. This takes about 3-4 minutes. 3. Add 2 large eggs to the mix, one at a time. Mix well after each addition. Then add 2 tablespoons of lemon zest, 1 tablespoon of lemon juice, ½ cup of plain Greek yogurt, and ½ teaspoon of vanilla extract. Mix until fully combined. 1. Gradually add the dry mixture to the wet ingredients. Mix on low speed until just combined. Be careful not to overmix. Gently fold in 2 tablespoons of poppy seeds. 2. Pour the batter into the prepared loaf pan. Smooth the top with a spatula for an even bake. 3. Bake in the oven for 50-55 minutes. Check if it's done by inserting a toothpick into the center. It should come out clean. If the top browns too quickly, loosely cover it with foil for the last 15 minutes. 4. Once baked, remove the loaf from the oven. Let it cool in the pan for about 10 minutes. Then, transfer it to a wire rack to cool completely. To get a great loaf, avoid overmixing. When you mix the batter, do it just enough to blend the ingredients. Overmixing can lead to a dense loaf. Use room temperature ingredients for the best results. Let your butter, eggs, and yogurt sit out for about 30 minutes before you start. This helps them mix more easily. For bright flavor, choose fresh lemons. Meyer lemons are sweet and fragrant. They work well for baking and add a lovely taste. Regular lemons are great too, just make sure they are juicy. If you want to switch it up, try different extracts. Almond or coconut extracts can add unique flavors. Just use a smaller amount, so the lemon shines through. Presentation matters! Slice the loaf and place it on a nice platter. Garnish with fresh lemon slices and a sprinkle of poppy seeds. This makes your loaf look fresh and inviting. For serving, consider pairing it with tea or coffee. The bright flavors complement warm drinks perfectly. Dust the loaf with powdered sugar for an extra touch of sweetness. {{image_2}} You can swap ingredients to change the flavor. For Greek yogurt, try sour cream or buttermilk. Both will keep your loaf moist and tasty. You can also use coconut yogurt for a dairy-free option. Different citrus zests can add unique flavors. Try orange or lime zest for a fresh twist. They change the taste while keeping the loaf bright and zesty. Incorporating other seeds or nuts can enhance the texture. Chia seeds or sunflower seeds work well. They add a crunchy bite that contrasts with the soft loaf. You can also add chopped walnuts or almonds for a nutty flavor. Adding fruit components brings more sweetness. Blueberries or raspberries mix nicely with lemon. They add a burst of color and flavor to each slice. For gluten-free options, use a gluten-free flour blend. Make sure it has xanthan gum for better texture. This keeps the loaf from crumbling and helps it rise. Vegan substitutes are easy to find. Replace the eggs with flaxseed meal mixed with water. Use a plant-based butter and yogurt to keep it creamy. This way, everyone can enjoy your lemon poppy seed loaf. To store your lemon poppy seed loaf at room temperature, first let it cool completely. Once cooled, wrap it tightly in plastic wrap. This keeps the loaf moist and fresh. Place the wrapped loaf in an airtight container or a resealable bag. Store it in a cool, dry place away from sunlight. It will stay fresh for about three days. If you want to keep your loaf fresh longer, refrigeration is a good option. Wrap the cooled loaf in plastic wrap, then place it in an airtight container. This will help it stay moist. It can last for up to a week in the fridge. Just remember, refrigerating may slightly change the texture, making it a bit denser. Freezing is the best way to store the loaf for a longer time. Start by slicing the loaf into individual pieces. Wrap each slice tightly in plastic wrap. Place the wrapped slices in a freezer bag or airtight container. Label the bag with the date. You can freeze the loaf for up to three months. When ready to enjoy, thaw the slices in the fridge overnight or at room temperature. To make a gluten-free lemon poppy seed loaf, use gluten-free flour. I recommend a blend that includes rice flour and tapioca flour. This blend can mimic the texture of all-purpose flour. Replace the all-purpose flour in the recipe with an equal amount of gluten-free flour. You may also want to add a teaspoon of xanthan gum to help bind the ingredients. This will give you a nice, fluffy loaf. Yes, you can use alternative sweeteners. Options like honey, maple syrup, or coconut sugar work well. If you choose a liquid sweetener, reduce the amount of yogurt slightly to keep the batter thick. When using a sugar substitute, follow the package instructions for the right amount. Just remember to consider the sweetness level. Some sweeteners are sweeter than sugar. If you need a substitute for Greek yogurt, try using sour cream. It has a similar texture and tangy flavor. You can also use plain yogurt or buttermilk, but adjust the liquid content in your batter. Silken tofu blended until smooth is another great dairy-free option. This keeps the loaf moist and adds protein. This blog post covered all you need to know to make a lemon poppy seed loaf. We discussed key ingredients, step-by-step baking instructions, and helpful tips for the perfect texture. You learned about variations to suit your taste and how to store your loaf. Remember, baking is fun and allows for creativity. Try different flavors and adjustments to make it your own. Follow these guidelines, and you'll enjoy a tasty treat. Enjoy your baking journey!

Bakery Style Lemon Poppy Seed Loaf Flavorful Treat

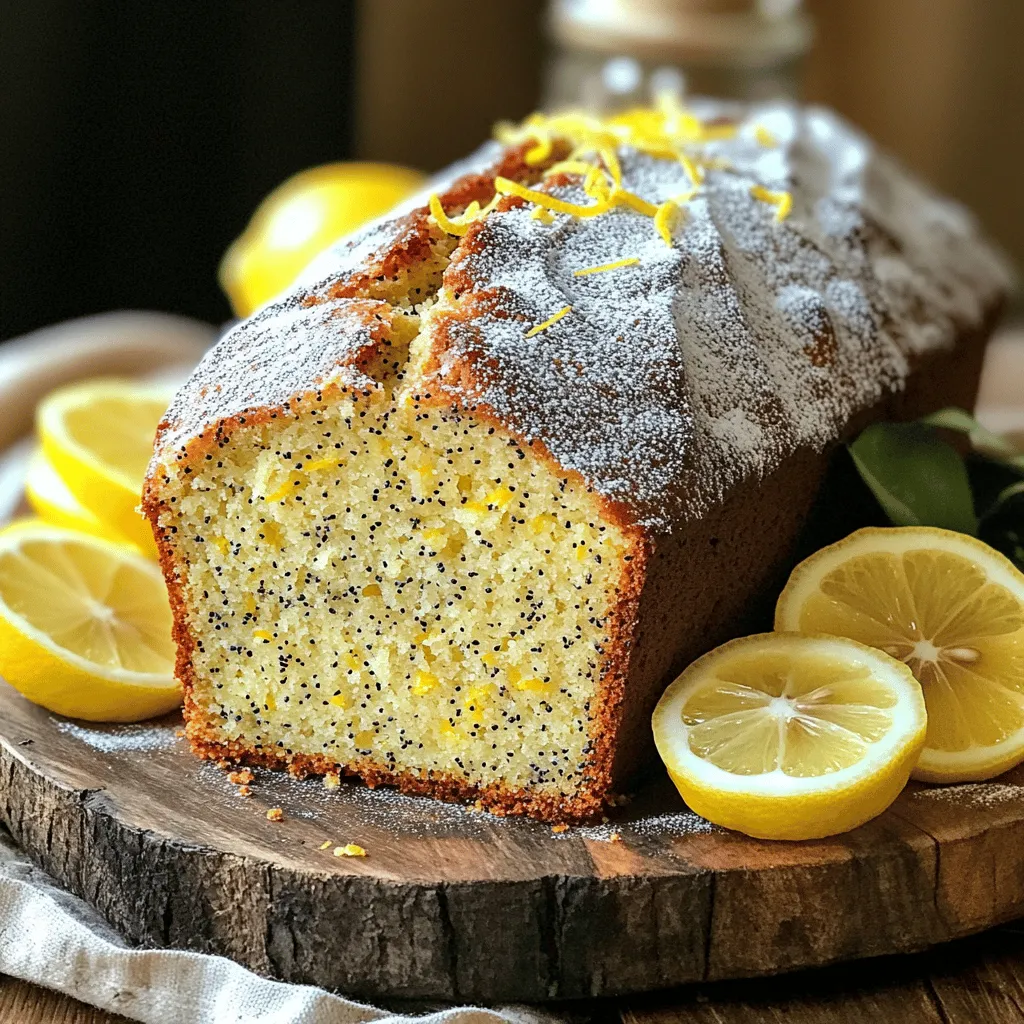
Welcome to a zesty adventure in baking! If you love the fresh taste of lemon and the crunch of poppy

- 1 cup brewed coffee, cooled - 1 ripe banana - 1 scoop chocolate protein powder - 1 tablespoon unsweetened cocoa powder - 1 tablespoon almond butter - 1/2 cup unsweetened almond milk (or any milk of choice) - 1 tablespoon chia seeds (optional) - Ice cubes - Sweetener to taste (like honey or agave syrup) To make a tasty Protein Mocha Coffee Smoothie, you need some key ingredients. First, brew one cup of your favorite coffee and let it cool. This step is important. It keeps the banana from warming up too much when you blend. Next, grab a ripe banana. A perfect banana adds natural sweetness. Then, you’ll need one scoop of chocolate protein powder. This boosts the smoothie with protein. Follow this with one tablespoon of unsweetened cocoa powder for a rich chocolate flavor. Add one tablespoon of almond butter for creaminess and healthy fats. You can use almond milk or any milk you prefer; just use half a cup. If you want more fiber, consider adding one tablespoon of chia seeds. Lastly, toss in some ice cubes for thickness and a sweetener like honey or agave syrup if you’d like it sweeter. This mix of ingredients creates a delicious and nutritious smoothie that is easy to make. - Start with your favorite coffee. Brew one cup using your chosen method. - Let the coffee cool to room temperature. Cooling it helps keep the banana from heating up. - In a blender, add the cooled coffee. Include one ripe banana for natural sweetness. - Next, scoop in one scoop of chocolate protein powder. Follow this with one tablespoon of unsweetened cocoa powder. - Then, add one tablespoon of almond butter for creaminess. Pour in half a cup of unsweetened almond milk. If you want extra fiber, include one tablespoon of chia seeds. - Now, toss in a handful of ice cubes. Adjust the amount based on how thick you want your smoothie. - Blend on high for 30 to 45 seconds. You want it smooth and creamy. - After blending, taste your smoothie. If it needs some sweetness, add your choice of sweetener. - Blend again briefly to mix in the sweetener. - Pour your smoothie into a tall glass or a protein shaker. - For a nice finish, sprinkle cocoa powder or chia seeds on top before serving. For the protein powder, I suggest using a chocolate-flavored option. It adds rich taste and pairs well with the cocoa. Brands like Optimum Nutrition and Orgain are great choices. If you prefer a plant-based option, try pea or hemp protein. These options offer good nutrition without dairy. If you don’t have almond butter, you can use peanut butter or sunflower seed butter. Both give a nice creamy texture and flavor. For a milk substitute, oat milk is a good choice if you want a creamier feel. Also, coconut milk can add a delightful taste. To get the right thickness, adjust your ice and liquid. If you want a thicker smoothie, use more ice. If it's too thick, add a splash more almond milk. Start with half a cup of almond milk and add more as needed. When blending, start on a low speed. This helps all the ingredients mix well. After a few seconds, switch to high speed for a smooth finish. Blend for about 30 to 45 seconds. You want it creamy, not lumpy. Protein powders pack a punch of nutrition. They help build muscle and keep you full longer. Chocolate protein powder also has antioxidants, which are great for your health. Almond milk has fewer calories than dairy milk. It’s also lactose-free, making it easier to digest. Almond milk is rich in vitamin E, which is good for your skin and heart. If you choose dairy, look for low-fat options to keep it healthy. {{image_2}} You can change the flavor of your Protein Mocha Coffee Smoothie easily. Try adding different fruits. Some great choices are strawberries, blueberries, or even mango. These fruits add a sweet twist and extra nutrients. You can also sprinkle some nutmeg or cinnamon on top. This small change gives a warm and cozy taste. Both spices enhance the chocolate flavor and make your drink feel special. If you want a vegan option, swap the chocolate protein powder for a plant-based one. Look for pea or hemp protein. These options still give you protein without animal products. You can also change the milk. Use coconut milk for a rich, creamy texture or oat milk for a mild flavor. Both options work great and make your smoothie tasty. You can create fun, seasonal smoothies too. In the fall, try a pumpkin mocha smoothie. Add half a cup of pumpkin puree and a pinch of pumpkin spice. This gives you that warm, autumn feel. In the summer, make a berry mocha smoothie. Blend in some fresh berries like raspberries and blueberries. They add brightness and freshness, perfect for hot days. These seasonal twists keep your smoothie interesting all year round! After making your Protein Mocha Coffee Smoothie, store any leftovers in the fridge. Use an airtight container to keep it fresh. Glass jars work great for this. They help keep the flavor and prevent spills. You can keep your smoothie in the fridge for up to 24 hours. After that, the taste and texture may change. Look for signs of spoilage, like a sour smell or separation. If it smells off or looks weird, it’s better to toss it. If you have extra smoothie, think about fun ways to use it. You can pour it into molds and freeze it to make smoothie pops. These are great for hot days! You can also add the leftover smoothie to yogurt or oatmeal for a tasty treat. Yes, you can use decaf coffee. It will change the taste slightly, but it works well. Decaf coffee still gives you that rich coffee flavor without the caffeine jitters. Many enjoy decaf for its smooth taste. It’s a great option for late-night snacks or if you are sensitive to caffeine. To make this smoothie lower in sugar, use less sweetener. You can skip the sweetener entirely if you like. Try adding a dash of vanilla extract for flavor instead. You can also use unsweetened cocoa powder, as it adds depth without extra sugar. Another option is to use a sugar substitute like stevia or monk fruit. Yes! This smoothie is perfect for breakfast. It has protein from the powder and almond butter. The banana adds natural sweetness and fiber. This combo keeps you full and energized. A protein-packed breakfast helps with muscle repair and keeps your energy levels steady throughout the morning. You can prep this smoothie in advance! Blend all the ingredients and store it in the fridge for up to 24 hours. If you want to keep it fresh, pour it into an airtight container. Just give it a quick shake before you drink it. If you want to freeze it, pour it into ice cube trays for later. This smoothie combines flavor and health. We covered the key ingredients and steps needed to make it. You can switch the flavors to match your taste. Remember to store leftovers right for the best taste. With these tips, you can enjoy a tasty drink anytime. Make this smoothie part of your healthy routine, and enjoy its benefits each day. You’ll find new favorite ways to mix it up!

Protein Mocha Coffee Smoothie Quick and Easy Recipe

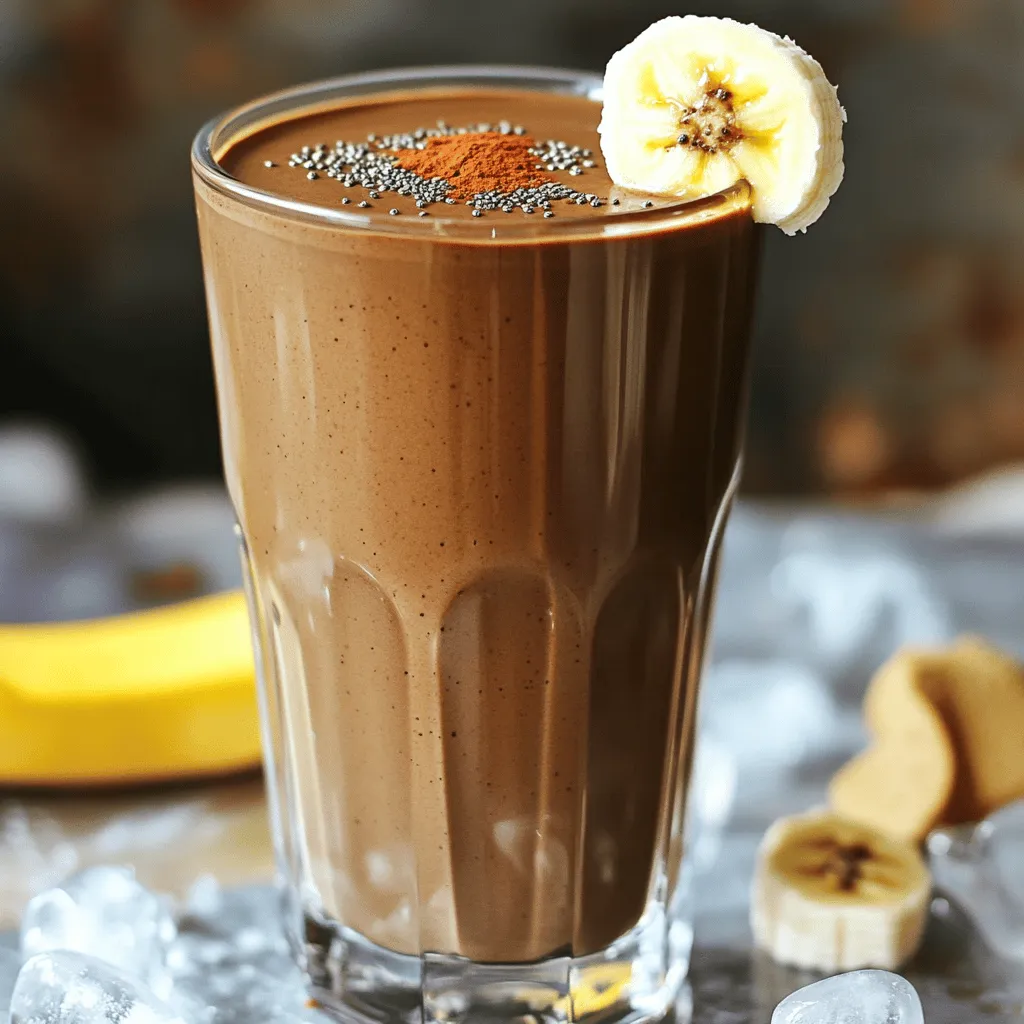
Looking for a quick and tasty way to kickstart your day? Try my Protein Mocha Coffee Smoothie! This simple recipe

- 2 pounds boneless, skinless chicken thighs - 1 can (15 oz) black beans, drained and rinsed - 1 cup corn (fresh, frozen, or canned) - 2 tablespoons chipotle peppers in adobo sauce, minced - 1 teaspoon cumin - 1 teaspoon smoked paprika - 2 cups cooked brown rice or quinoa - 1 cup shredded cheese (cheddar or Mexican blend) - Fresh cilantro, chopped, for garnish - Avocado slices, for topping - Lime wedges, for serving You need these simple ingredients to make Slow Cooker Chipotle Chicken Burrito Bowls. The main stars are the chicken thighs, black beans, and corn. Chicken thighs keep the dish juicy and full of flavor. Black beans add protein and fiber. Corn brings a sweet crunch that balances everything. For spices, chipotle peppers give that smoky heat. Cumin and smoked paprika add depth to your dish. They make every bite feel special. Now let’s talk toppings. Serve your burrito bowls over cooked brown rice or quinoa. They are both healthy and filling. Shredded cheese adds creaminess. Fresh cilantro brightens the dish. Slices of avocado add richness, and lime wedges bring a zesty kick. These toppings make your meal look and taste amazing! First, take your chicken thighs and lay them in the slow cooker. Make sure they are flat and even. This helps them cook well. Using boneless, skinless thighs gives the best taste and texture. They stay juicy and tender. Next, grab a large bowl. In this bowl, mix together the black beans, corn, chopped onion, and minced garlic. Then, add the salsa and chipotle peppers. Sprinkle in the cumin and smoked paprika. Finally, add salt and pepper to taste. Stir everything until it blends nicely. This mix will add great flavor to your chicken. Now, pour the bean and corn mixture over the chicken in the slow cooker. Ensure the chicken is fully covered. Cover the slow cooker lid. Set it to low for 6-8 hours or high for 3-4 hours. The chicken is ready when it is tender and fully cooked. When the cooking time is up, use two forks to shred the chicken right in the slow cooker. Mix it well with the sauce. This makes sure every bite is packed with flavor. Now you can serve it over cooked brown rice or quinoa, topped with cheese, cilantro, and avocado slices. Enjoy your delicious meal! To get the best flavor in your Slow Cooker Chipotle Chicken Burrito Bowls, choose the right salsa. I like to use a salsa that matches your spice level. A mild salsa works well for kids, while a spicy salsa adds a nice kick for adults. You can also mix salsas for a balanced taste. Adjusting spice levels is easy, too. If you want more heat, add extra chipotle peppers. If you prefer less heat, cut back on them. Cooking time really matters for this dish. If you use the high setting, cook for about 3-4 hours. This gives the chicken a firmer texture. If you use the low setting, cook for 6-8 hours. The chicken will turn out super tender and flavorful. I prefer the low setting for a deep flavor. Just remember, check the chicken at the end of cooking. It should shred easily when done. Serving your burrito bowls can be fun and creative. Start with a base of cooked brown rice or quinoa. Top with the chipotle chicken mixture. Then sprinkle on some shredded cheese. Fresh cilantro adds a pop of color and flavor. For a creamy touch, add avocado slices. You can also serve with lime wedges. A squeeze of lime brightens all the flavors. This dish looks great and tastes even better! {{image_2}} You can switch out proteins easily in this dish. Try turkey or tofu for a twist. Both give great flavor and texture. You can also use lentils or chickpeas instead of black beans. Feel free to add other veggies too. Bell peppers, zucchini, or spinach mix well with the chicken. If you want a gluten-free meal, use certified gluten-free salsa and rice. For a dairy-free option, skip the cheese or use a dairy-free alternative. You can still enjoy the dish without these ingredients. Just make sure to check labels on all products. Boost the flavor by adding more spices. Cumin and smoked paprika work well. You can also try chili powder for extra heat. For a tangy touch, add lime juice or a splash of hot sauce. These small changes can make a big difference. Store your leftover Chipotle Chicken Burrito Bowls in an airtight container. This keeps them fresh. Make sure to cool the dish to room temperature before sealing. You can refrigerate the leftovers for up to four days. When you want to eat them again, just pull them out and enjoy! To freeze your burrito bowls, portion them into freezer-safe bags. Remove as much air as possible. Label the bags with the date and contents. You can freeze these meals for up to three months. This is perfect for quick meals later! Reheat your burrito bowls in the microwave for quick results. Use a microwave-safe dish and cover it to keep moisture in. Heat in short bursts, stirring in between. If you want to use the stove, heat on low in a pot. Add a splash of water to keep it moist. Always check that it is hot throughout before serving. Enjoy the same great taste! Yes, you can use frozen chicken. Just remember to adjust the cooking time. Cooking frozen chicken takes longer. If using frozen thighs, cook on high for about 5-6 hours or low for 8-10 hours. Ensure the chicken reaches 165°F for safety. These burrito bowls pair well with many sides. Try these options: - Fresh guacamole for creaminess - Tortilla chips for crunch - A simple green salad for freshness - Additional toppings like sour cream or jalapeños These sides enhance the meal and add fun flavors. To adapt this for an Instant Pot, use these steps: 1. Set your Instant Pot to the sauté mode and brown the chicken briefly. 2. Add the mixed ingredients straight to the pot with the chicken. 3. Seal the lid and cook on high pressure for about 15 minutes. 4. Let the pressure release naturally for 10 minutes, then quick release the rest. This method gives you tender chicken and a flavorful dish in less time. This blog post covered how to make tasty Chipotle Chicken Burrito Bowls. We discussed the main ingredients like chicken, black beans, and corn. I shared spices that boost flavor, like chipotle peppers and cumin. You learned how to prepare, cook, and serve the dish, plus tips for delicious variation. Remember, you can adjust ingredients to fit your diet too. Enjoy these bowls with friends and family. You’ll love how easy and flavorful they are!

Slow Cooker Chipotle Chicken Burrito Bowls Delight

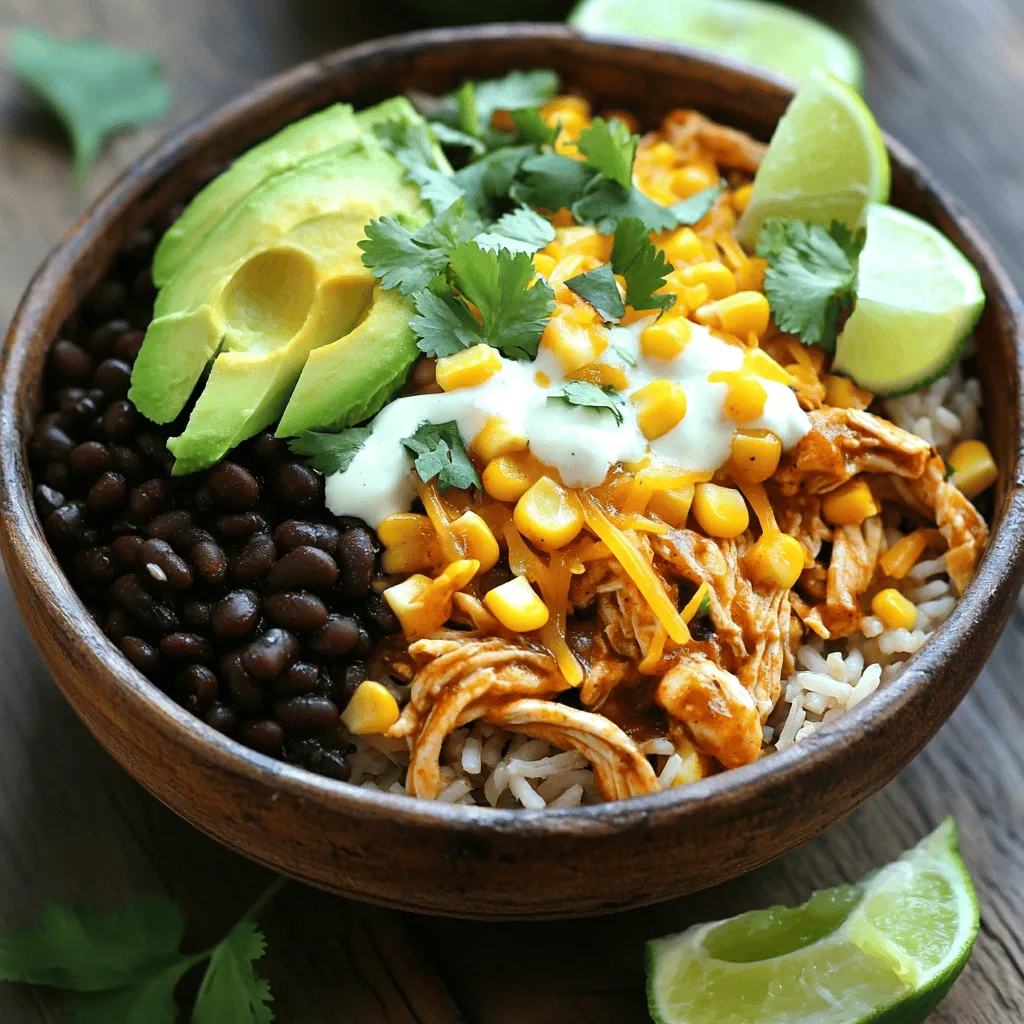
Get ready to enjoy a flavorful adventure with my Slow Cooker Chipotle Chicken Burrito Bowls! This easy recipe combines tender

- 10 oz of pasta (fusilli or penne) - 2 cups broccoli florets - 4 cups vegetable broth - 1 cup heavy cream or full-fat coconut milk - 1 ½ cups sharp cheddar cheese, grated - 1 tablespoon olive oil - 3 cloves garlic, minced - Onion powder, garlic powder, salt, and pepper Gathering the right ingredients is key to a great dish. Here, you need just a few simple items to make this creamy pasta. You’ll start with 10 oz of pasta. Fusilli or penne works best for this recipe. Next, grab 2 cups of fresh broccoli florets. They add a nice crunch and nutrition. Then, you need 4 cups of vegetable broth. This broth gives flavor and moisture to the pasta. For the creamy aspect, use 1 cup of heavy cream or full-fat coconut milk. Both options will work well. You also want 1 ½ cups of sharp cheddar cheese. Grate it yourself for the best melt. Now, let’s talk seasonings. You will need 1 tablespoon of olive oil to sauté. Then, add 3 cloves of minced garlic for a fragrant base. For extra flavor, use onion powder, garlic powder, salt, and pepper. These spices will enhance the dish. These ingredients come together to create a rich and tasty meal. Make sure to have everything prepped before you start cooking. Enjoy the process! First, grab a large pot and add one tablespoon of olive oil. Heat it over medium heat. Once hot, toss in three cloves of minced garlic. Sauté the garlic for about one to two minutes. You want it to smell great but not turn brown. Next, add the dry pasta and two cups of broccoli florets to the pot. Stir everything together well. Now, pour in four cups of vegetable broth. Season with half a teaspoon of onion powder, half a teaspoon of garlic powder, and salt and pepper to taste. Stir once more to mix all the flavors. Bring the mixture to a boil. Once it bubbles, lower the heat to a simmer. Cover the pot and let it cook for about ten to twelve minutes. Stir occasionally. You want the pasta to be al dente and the broccoli to be tender. After the pasta is cooked, reduce the heat to low. Pour in one cup of heavy cream or full-fat coconut milk. Stir until it blends smoothly. Gradually add one and a half cups of grated sharp cheddar cheese. Keep stirring until the cheese melts fully and the sauce becomes creamy. Taste and adjust seasoning if needed. Your dish is nearly ready! To get a creamy sauce, stir continuously while adding cheese. This keeps the cheese from clumping. Start with a low heat as you add the cheese. Mix it in slowly. This helps the cheese melt evenly, making a smooth sauce. If you notice clumps forming, use a whisk. Whisking breaks them apart quickly. You can also add a splash of cream to help. This will keep your sauce silky and rich. Timing is key for perfect pasta and broccoli. Cook the pasta until it's al dente, which takes about 10-12 minutes. The broccoli should be tender but not mushy. Stir it every few minutes to prevent sticking. To enhance flavor, use fresh garlic. Fresh garlic gives a stronger taste than powdered. Adding a pinch of red pepper flakes can add a nice kick, too. Garnishing can make your dish look even better. Top your pasta with extra cheddar cheese for richness. Fresh parsley adds color and freshness. A sprinkle of black pepper gives a nice finish. Try adding toasted breadcrumbs for crunch. They add texture and flavor. Enjoy getting creative with your toppings! {{image_2}} You can boost your One Pot Creamy Broccoli Cheddar Pasta with proteins like chicken, shrimp, or tofu. - Chicken: Use cooked, shredded chicken. Add it in the last few minutes to warm through. - Shrimp: Add raw shrimp during the last 5 minutes of cooking. They cook quickly and add a nice flavor. - Tofu: Use firm tofu, cubed. Sauté it first for a crispy texture before adding it to the pot. Adjust cooking times to ensure your protein is fully cooked and safe to eat. Feel free to mix in other veggies for added nutrition and flavor. - Spinach: Add fresh spinach at the end for a pop of color and nutrients. - Carrots: Shredded carrots cook quickly and add sweetness. - Cauliflower: Substitute cauliflower for broccoli if you prefer. You can use seasonal vegetables to keep your dish fresh and exciting. This dish is easy to modify for different diets. - Vegan: Replace heavy cream with coconut milk and use vegan cheese. - Gluten-Free: Use gluten-free pasta. Ensure all other ingredients are gluten-free too. - Nut-Free: Most cheese options are nut-free, but check labels to be sure. These changes let anyone enjoy this creamy pasta dish! To store leftovers, let the pasta cool first. Place it in an airtight container. This keeps the dish fresh and tasty. You can keep it in the fridge for up to three days. If you want to enjoy it later, make sure to check for any signs of spoilage before eating. If you want to freeze the pasta, use a freezer-safe container. It’s best to freeze it without any garnishes. The pasta will stay good for about two months in the freezer. When you're ready to eat, thaw it overnight in the fridge. To reheat, warm it in a pot over low heat. Add a splash of broth or water to bring back its creaminess. You can prep this dish ahead of time. Cook the pasta and broccoli, then cool them separately. Store them in airtight containers. This way, you can combine them with the sauce fresh when you're ready to eat. It saves time on busy days and keeps the flavors bright. Yes, you can easily make this dish vegan. For the cheese, use a plant-based cheese. Choose a brand that melts well. For the cream, replace heavy cream with full-fat coconut milk or cashew cream. Both provide creaminess without dairy. Cooking pasta in this dish takes about 10-12 minutes. You will cook it until it's al dente. Stir occasionally to keep it from sticking. Make sure to check the pasta for doneness as cooking times can vary. This pasta pairs well with a simple side salad. A light green salad with vinaigrette works great. You can also serve it with garlic bread for a comforting meal. Roasted vegetables add color and nutrition, too. This blog post shared a simple recipe for One Pot Creamy Broccoli Cheddar Pasta. You learned how to combine pasta, broccoli, and creamy cheese for a delicious dish. I provided tips for making the sauce extra creamy and offered variations to fit different diets. Remember, you can store leftovers for future meals or prep ingredients ahead of time. Enjoy this tasty meal that you can easily customize. Cooking this dish will impress both yourself and your family!

One Pot Creamy Broccoli Cheddar Pasta Delight

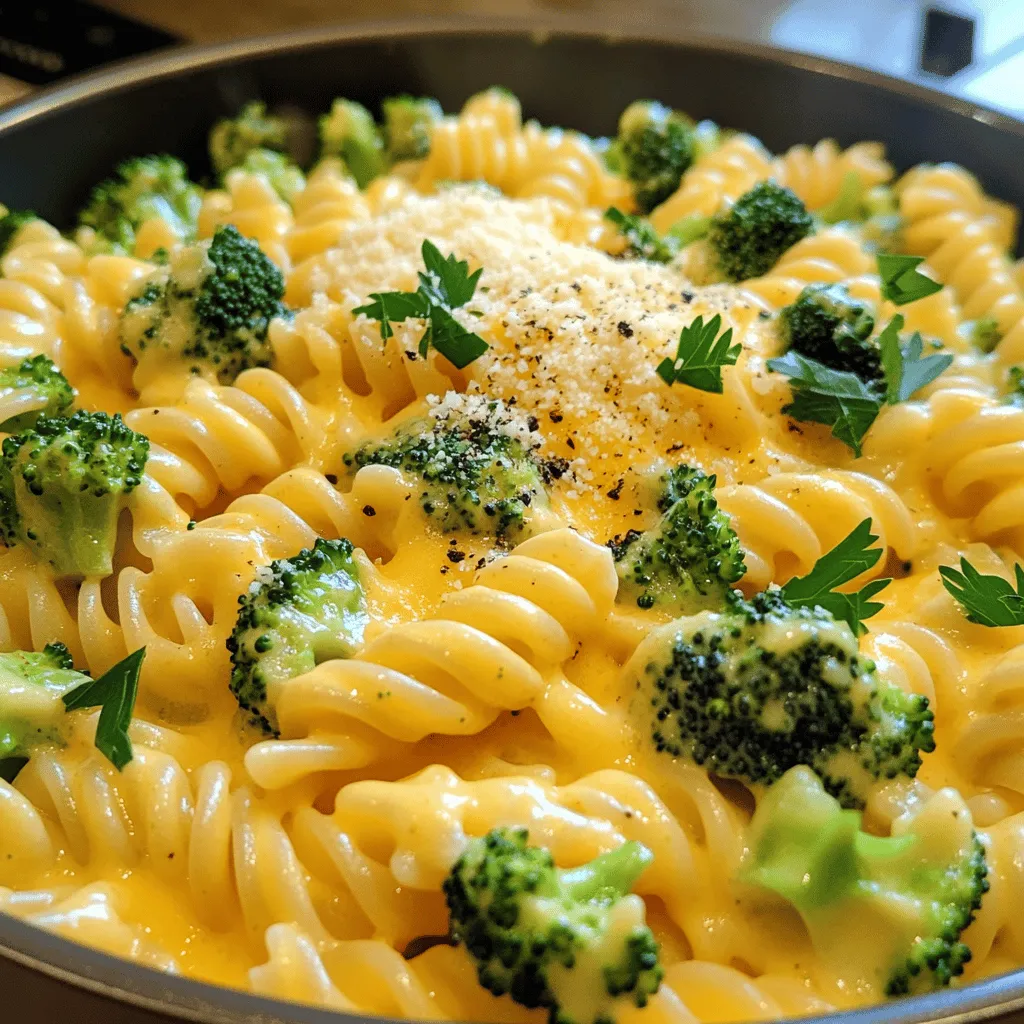
Looking for a quick and tasty meal? You’ve got to try my One Pot Creamy Broccoli Cheddar Pasta Delight! This

- 1 cup Oreo cookie crumbs - 2 tablespoons unsalted butter, melted - 8 oz cream cheese, softened - 1/2 cup Nutella - 1/2 cup powdered sugar - 1 teaspoon vanilla extract - 1 cup heavy cream - Additional Oreo cookies - Shaved chocolate The ingredients are simple and can be found easily. First, you need Oreo cookie crumbs for the crust. You can crush whole cookies in a food processor or put them in a bag and smash them with a rolling pin. Mix these crumbs with melted butter to make a tasty base. Next, the filling needs cream cheese, which should be softened. This helps it blend smoothly with other ingredients. You will also need Nutella, which gives the cheesecake its rich, chocolatey flavor. Don't forget the powdered sugar for sweetness and vanilla extract for a hint of flavor. Finally, whip the heavy cream to add lightness to the filling. This creates a fluffy texture that balances the richness of the cream cheese and Nutella. For optional toppings, you can use more crushed Oreo cookies or shaved chocolate. These make the dessert look pretty and add extra flavor. Enjoying these cheesecake cups is an easy delight! - In a bowl, combine 1 cup of Oreo cookie crumbs and 2 tablespoons of melted butter. - Mix until the crumbs are well-coated. - Divide this mixture into serving cups. - Press the mixture down firmly to form a crust at the bottom. - In another bowl, beat 8 oz of softened cream cheese, 1/2 cup of Nutella, 1/2 cup of powdered sugar, and 1 teaspoon of vanilla extract. - Mix until the filling is smooth and creamy. - In a third bowl, whip 1 cup of heavy cream until stiff peaks form. - Gently fold the whipped cream into the Nutella mixture. - Be careful not to deflate the whipped cream. - Spoon or pipe this mixture over the Oreo crust in the cups. - Fill them almost to the top. - Crumble additional Oreo cookies and sprinkle them on top. - Chill the cheesecake cups in the refrigerator for at least 4 hours. - For best results, chill overnight. - Before serving, you can garnish with shaved chocolate if you like. To get the best texture, start with softened cream cheese. This helps it blend smoothly with Nutella. If it’s too cold, lumps form and ruin the mix. Leave cream cheese out for about 30 minutes before using it. When you whip the heavy cream, aim for stiff peaks. This means it holds its shape well. After whipping, gently fold the cream into the Nutella mix. Use a spatula and lift the cream from the bottom. This keeps the air in and makes your cheesecake light and fluffy. To make your cheesecake cups look great, use clear cups. This shows off the pretty layers of cookies and cheesecake. Serve them on a colorful platter to catch the eye. For a pop of color, add a mint sprig on top. You can also sprinkle some extra Oreo crumbs for a fun touch. Chilling is key for great flavor and texture. I suggest chilling the cheesecake cups for at least 4 hours. For best results, chill them overnight. This lets the flavors mix well. Plus, it firms up the cheesecake, making it easier to eat. {{image_2}} You can change the flavor of these cheesecake cups easily. Swap Nutella for other spreads, like peanut butter or almond butter. This swap gives each cup a new twist. You can also add different extracts. For example, almond extract adds a nice nutty flavor. Coconut extract gives a tropical vibe. These small changes can make a big difference in taste. If you want to try something new, switch up the crust. Instead of Oreo cookie crumbs, you can use graham crackers or shortbread cookies. Both options work well and taste great. For those who need gluten-free options, use gluten-free cookies. This keeps the cheesecake cups friendly for everyone. You can make these cheesecake cups fit different diets. For dairy-free options, use vegan cream cheese and coconut cream instead of heavy cream. This way, everyone can enjoy the treat. If you want a vegan version, replace all dairy with plant-based alternatives. It’s fun to adapt recipes to fit your needs while still keeping them tasty. To keep your cheesecake cups fresh, store them in the fridge. Use an airtight container. This helps prevent them from drying out or absorbing other smells. If you have leftovers, cover each cup with plastic wrap. This keeps them safe and tasty. If you want to freeze these cups, it’s a bit tricky. The cream can change texture when thawed. However, if you must freeze them, make sure they are well-wrapped. Use freezer-safe containers or bags. Just remember to eat them within a month for the best taste. These cheesecake cups will last in the fridge for about 3 to 5 days. Keep an eye on them! If they start to look or smell off, it's best to toss them. Signs of spoilage include a sour smell or a change in texture. Always trust your senses to keep things safe. Enjoy your sweet treat while it’s fresh! Yes, you can use different types of cream cheese. Try flavored cream cheese for a twist. Brands like whipped or light cream cheese work well too. They may change the texture slightly. However, the taste will still be yummy. Just make sure it’s softened for easy mixing. Making these cheesecake cups ahead is simple. Prepare the crust and filling as usual. After filling the cups, cover them tightly with plastic wrap. Store in the fridge. They can sit for one to two days before serving. This makes them perfect for parties or gatherings. Chilling is crucial for these cups. It helps the filling set properly. Chilling also improves the flavors. The cheesecake will taste richer and creamier after chilling. Aim for at least four hours in the fridge. Overnight chilling is even better for the best texture. These Nutella cheesecake cups are quick and easy to make. Start with an Oreo crust and blend cream cheese with Nutella. Fold in whipped cream for lightness, then chill before serving. You can add toppings like extra Oreo crumbles or shaved chocolate. Keep these variations in mind for fun twists. Remember to store the leftovers properly for the best taste. Enjoy these delicious treats fresh or share them at your next gathering. They’re sure to impress!

No Bake Nutella Oreo Cheesecake Cups Easy Delight

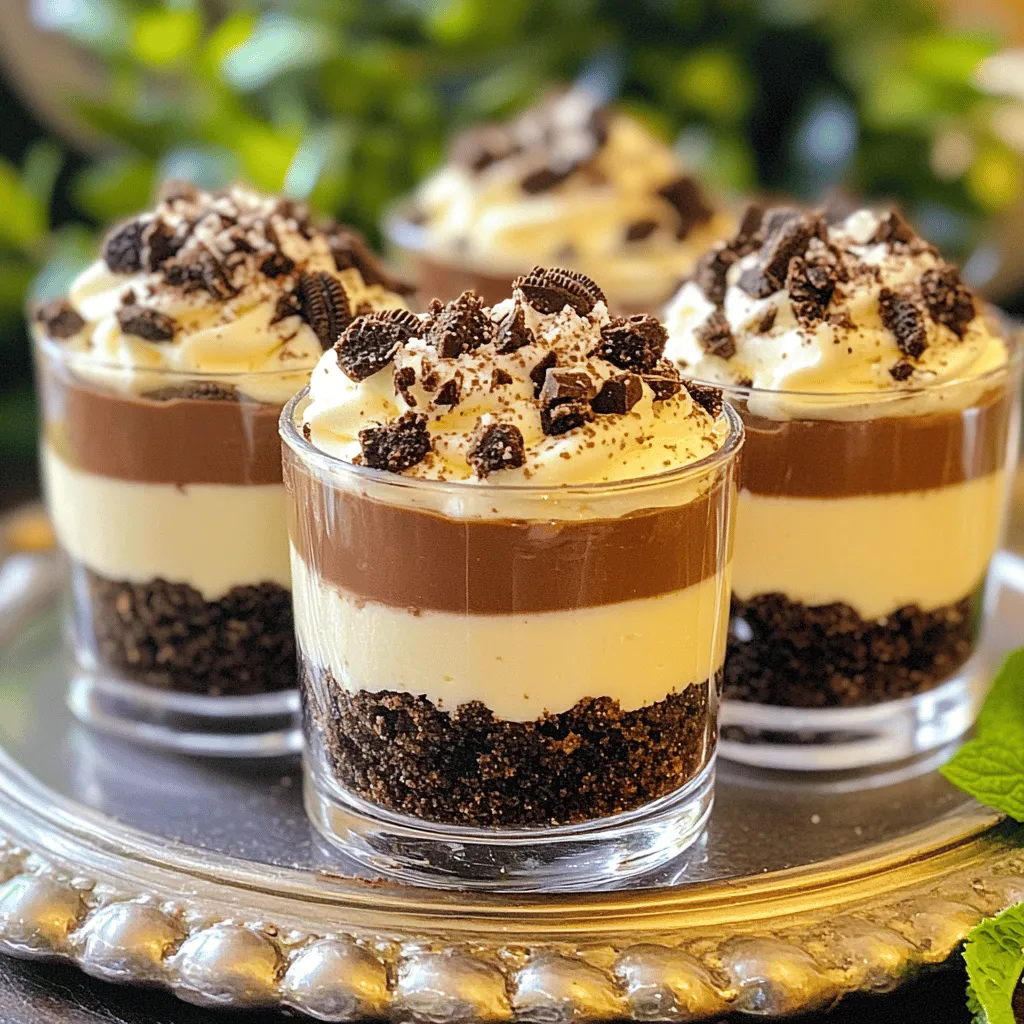
Craving a sweet treat that’s easy to make? Try my No Bake Nutella Oreo Cheesecake Cups! With just a few

Older posts
Newer posts
← Previous Page1 … Page22 Page23 Page24 … Page84 Next →

dsad

© 2026 Foodish Talk • Built with GeneratePress

Our Policies

  • Copyright Policy
  • Cookie Policy
  • GDPR Policy
  • Privacy Policy
  • Disclaimer
  • Terms Of Use

More Information

  • Home
  • About
  • Contact
  • Appetizers
  • Dessert
  • Dinner
  • Drinks
©2026, Foodish Talk About Back To Top