Skip to content
DisclaimerTerms Of UseGDPR PolicyCookie Policy

Foodish Talk

  • Home
  • Drinks
  • Appetizers
  • Dinner
  • Dessert
  • About
  • Contact
  • Privacy Policy
DisclaimerTerms Of UseGDPR PolicyCookie Policy

NO-ING-IMG

To make these tasty truffles, you need a few key items: - 1 cup white chocolate chips - 1/2 cup heavy cream - 1 cup fresh strawberries, pureed (about 4-5 strawberries) - 1 teaspoon vanilla extract - 1/2 cup graham cracker crumbs - 1/4 cup shredded coconut (sweetened or unsweetened) - Pinch of salt These main ingredients create a rich and creamy treat. The white chocolate is sweet, while the strawberries add a fresh flavor. The heavy cream gives the truffles a smooth texture, making them melt in your mouth. If you want to add more flavor, try these options: - A splash of almond extract - A sprinkle of sea salt for balance - Chopped nuts for crunch These extras can take your truffles to the next level. A bit of almond extract can add a nice twist. The sea salt balances the sweetness and makes each bite pop. When making truffles, use high-quality ingredients. Choose good white chocolate chips. They should be creamy and smooth. Fresh strawberries are best for pureeing. They add the most flavor and brightness. If you use coconut, pick the type based on your taste. Sweetened coconut adds a sugary touch. Unsweetened is great if you want a more natural taste. Using quality ingredients makes your truffles taste amazing. Trust me; it’s worth it! {{ingredient_image_1}} First, grab a small saucepan. Heat the heavy cream over medium heat. Watch it closely until it simmers. Do not let it boil; this can ruin the mix. Remove the saucepan from heat. Add the white chocolate chips right away. Stir until they melt and blend into a smooth texture. This step is key to a creamy truffle. Now, it's time to add fruit! Pour in the pureed strawberries and vanilla extract. Mix well to combine all the flavors. The pinch of salt is important too; it makes the sweet taste pop. Let the mixture cool to room temperature. Cover it, then place it in the fridge for 1-2 hours. This will help it firm up for easy scooping. Once the mixture is firm, take it out of the fridge. Use a melon baller or small cookie scoop to create 1-inch balls. Roll each ball gently in your hands to smooth them out. Next, roll them in graham cracker crumbs for a crunchy coat. If you like, add shredded coconut for extra flavor. Place the truffles on a tray lined with parchment paper. Refrigerate for another 30 minutes to set before serving. Enjoy these delightful treats! To get a smooth truffle texture, use quality white chocolate chips. Heat the heavy cream slowly. Keep an eye on it to avoid boiling. Once it simmers, take it off the heat. Add the white chocolate chips and stir until melted. The mixture should be creamy and glossy. Mixing in pureed strawberries adds flavor, but make sure they are well blended. This keeps the texture smooth and uniform. Store truffles in an airtight container. This keeps them fresh and moist. Place parchment paper between layers to avoid sticking. Keep them in the fridge for best results. This helps maintain their shape and flavor. If you want to store them longer, freeze them. Just make sure they are well wrapped to prevent freezer burn. If your truffles are too soft, they might need more chilling time. Place them back in the fridge for a while. If they are too firm, let them sit at room temperature for a few minutes. For truffles that fall apart, ensure you mix the chocolate and cream well. A smooth blend is key. If the coating doesn’t stick, try rolling them in the crumbs quickly after forming. Pro Tips Use Quality Chocolate: Select high-quality white chocolate for a richer flavor and smoother texture in your truffles. Chill Before Scooping: Ensure the mixture is firm enough to scoop by chilling it thoroughly; this will make shaping the truffles easier. Experiment with Coatings: Try different coatings like crushed nuts or cocoa powder for a unique twist on the classic truffle. Storage Tips: Keep the truffles refrigerated in an airtight container for up to a week to maintain freshness and flavor. {{image_2}} You can easily change the flavor of your truffles. Try adding orange zest for a bright twist. You can also use raspberry puree instead of strawberries for a bold taste. If you want a nutty touch, mix in some almond extract. Spice it up with a hint of cinnamon or cardamom for warmth. You can even add a splash of your favorite liqueur for a fun kick. While graham cracker crumbs give a great crunch, other coatings work too. Try rolling your truffles in crushed nuts, like almonds or hazelnuts, for added texture. For a chocolate lover's dream, coat them in melted dark or milk chocolate. You could even use colored candy melts for a festive look. Coconut flakes can add a tropical vibe if you want something different. You can make these truffles vegan-friendly too! Use dairy-free white chocolate chips and coconut cream instead of heavy cream. The pureed strawberries will still bring in that fresh taste. For a gluten-free version, just ensure your graham crackers are gluten-free. With these changes, you can enjoy these treats without worry! To keep your white chocolate strawberry truffles fresh, store them in an airtight container. Place a layer of parchment paper between each truffle. This helps prevent them from sticking together. Keep the container in the fridge. The cool temperature will help maintain their creamy texture and rich flavor. When stored properly, these truffles can last about one week in the fridge. After that, their texture and taste might change. If you notice any signs of spoilage, like off smells or unusual colors, it’s best to discard them. Fresh truffles are always a delight, so enjoy them within that week for the best experience. You can freeze these truffles for longer storage. First, place them on a tray in a single layer. Freeze them for about two hours. Once they are firm, transfer them to a freezer-safe bag or container. Make sure to remove as much air as possible. They can last up to three months in the freezer. When ready to eat, thaw them in the fridge overnight. Enjoy the delicious taste without losing quality! For truffles, I recommend using high-quality white chocolate chips. Look for brands with few ingredients. This choice helps ensure a smooth texture and rich flavor. Avoid chocolate with fillers or additives. The better the chocolate, the better your truffles will taste. Yes, you can use frozen strawberries! Just remember to thaw them first. Then, puree them to extract the flavor. Fresh strawberries give a brighter taste, but frozen ones work well too. They still provide sweetness and moisture for your truffles. You can easily customize truffles for any event. Here are some ideas: - Flavors: Add flavor extracts like almond or mint. - Coatings: Try dipping them in dark chocolate instead of rolling them. - Garnishes: Use different nuts or sprinkles for a festive look. - Shapes: Use molds for fun shapes during holidays or special events. Each option adds a unique touch to your truffles, making them perfect for any occasion. You learned about making white chocolate strawberry truffles. We covered key ingredients, followed by simple steps to create them. I shared useful tips to ensure smooth texture and freshness. You can also explore fun variations and storage methods. Truffles are fun to make and share. Enjoy the process and get creative! Each truffle can be unique. Let your taste guide you as you experiment. Happy truffle-making!

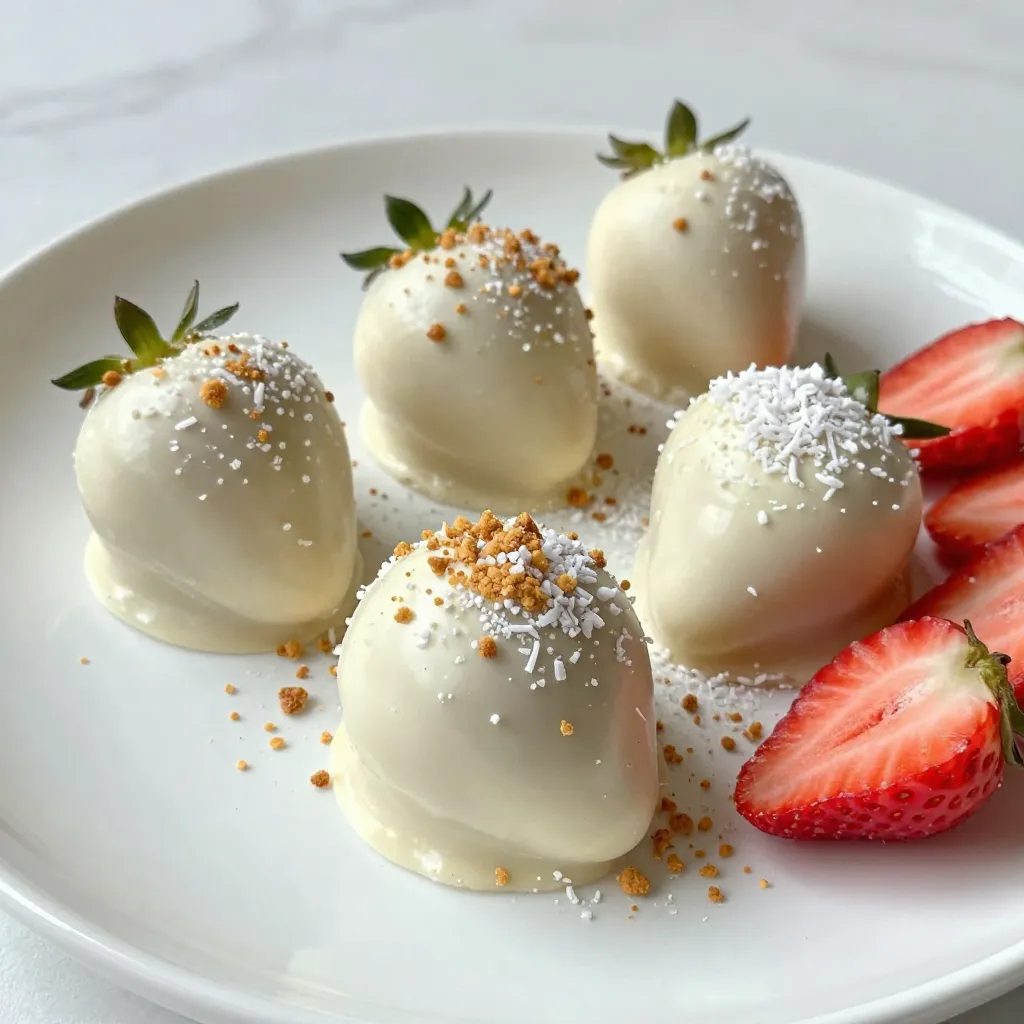
White Chocolate Strawberry Truffles Irresistible Treat

If you love sweet treats, then you’ve come to the right place! White chocolate strawberry truffles are not only delicious

To make Honey Feta Baked Pears, you will need: - 4 ripe pears, halved and cored - 1 cup feta cheese, crumbled - 1/2 cup walnuts, roughly chopped - 1/4 cup honey - 1 teaspoon cinnamon - 1/2 teaspoon vanilla extract - 2 tablespoons olive oil You can add fresh thyme leaves on top for a nice touch. They add color and flavor. These baked pears pair well with vanilla ice cream or Greek yogurt. You can also serve them with a scoop of whipped cream for added sweetness. {{ingredient_image_1}} Start by preheating your oven to 375°F (190°C). This step is key for even baking. While the oven heats, prepare your pears. Cut them in half and remove the core. This creates a nice space for the filling. Place the pear halves cut-side up in a baking dish. In a small bowl, combine the crumbled feta cheese, chopped walnuts, honey, cinnamon, and vanilla extract. Mix well until all the ingredients come together. The blend should be creamy and flavorful. This mixture will give the pears their sweet and salty taste. Drizzle olive oil over the pear halves. Make sure each half gets a light coat. This keeps the pears moist while baking. Next, spoon the honey-feta mixture into the cavity of each pear half. Don't be shy—load them up! Place the baking dish in the oven. Bake for 25-30 minutes. The pears should be tender, and the feta mixture should bubble and turn golden. Once baked, take them out and let them cool slightly. If you like, garnish with fresh thyme leaves for a touch of color. Pick ripe pears for this recipe. Look for pears that yield slightly when pressed. Bartlett, Anjou, or Bosc pears work well. Their sweetness balances the salty feta. Avoid hard or overripe pears, as they may not bake well. Use quality feta cheese for the best flavor. Crumble it well for smooth mixing. Combine it with walnuts for crunch, honey for sweetness, cinnamon for warmth, and vanilla for depth. Adjust the honey to your taste. You may want it sweeter or less sweet. Preheat your oven to 375°F (190°C) before baking. This ensures even cooking. Arrange the pears cut-side up in a dish. Drizzle olive oil on them to keep them moist. Bake for 25-30 minutes. Check for tenderness, and look for a golden top on the feta mixture. Enjoy the warm, sweet aroma as they bake! Pro Tips Choose the Right Pears: Opt for ripe but firm pears like Bosc or Anjou for the best texture and sweetness. Feta Cheese Variations: Experiment with different types of feta, such as herbed or smoked, to add unique flavors to your dish. Add a Crunch: For extra texture, consider adding some granola or crushed crackers on top of the feta mixture before baking. Serve Warm: These baked pears are best enjoyed warm, so serve them immediately after baking for the ultimate experience. {{image_2}} You can use different nuts in this dish. Almonds add a nice crunch. Pecans offer a sweeter taste. Cashews bring a creamy texture. Try mixing nuts for more flavor. Each nut changes the dish a bit. Experiment to find your favorite combination. Feta is tasty, but other cheeses work too. Goat cheese is creamy and tangy. Cream cheese gives a rich flavor. Ricotta is light and airy. Each cheese adds a unique twist. Feel free to swap cheeses based on your taste. You can add more flavors to the filling. A pinch of nutmeg gives warmth. Dried fruits like cranberries or raisins add sweetness. A splash of lemon juice brightens the taste. You could even use maple syrup instead of honey. These simple swaps can make your dish special. To keep your Honey Feta Baked Pears fresh, let them cool completely. Place the pears in an airtight container. Store them in the fridge for up to three days. Make sure to cover them well to avoid drying out. When you're ready to enjoy your leftovers, preheat your oven to 350°F (175°C). Place the pears on a baking sheet. Heat them for about 10-15 minutes until warm. You can also microwave them on low for about 1-2 minutes. Just be careful not to overheat, so the pears don't get mushy. If you want to freeze the baked pears, let them cool first. Wrap each pear half in plastic wrap. Then place them in a freezer-safe bag or container. They can last up to two months in the freezer. When you're ready to eat, thaw them overnight in the fridge before reheating. Yes, you can prepare Honey Feta Baked Pears ahead of time. You can mix the feta, walnuts, honey, cinnamon, and vanilla. Store this mixture in the fridge. Halve and core the pears just before baking to keep them fresh. When ready, assemble and bake as directed. These baked pears shine with many pairings. You can serve them with vanilla ice cream or whipped cream for sweetness. A dollop of yogurt adds creaminess. Add some fresh berries on the side for a pop of color and flavor. You can also pair them with a glass of dessert wine. Yes, you can make vegan Honey Feta Baked Pears. Swap feta cheese for a plant-based cheese. Use maple syrup instead of honey for a sweet touch. For the filling, try using chopped nuts and spices to add flavor. This keeps the dish delicious while meeting vegan needs. You now have all the tools to make Honey Feta Baked Pears. We covered the key ingredients and optional garnishes to elevate your dish. You learned how to mix and bake for the best flavor. I shared tips for choosing pears and perfecting your feta blend. Plus, you explored variations for different tastes and storage methods. Remember, this recipe is flexible. Feel free to get creative and make it your own. Enjoy your baking journey!

Honey Feta Baked Pears Delightful Dessert Recipe

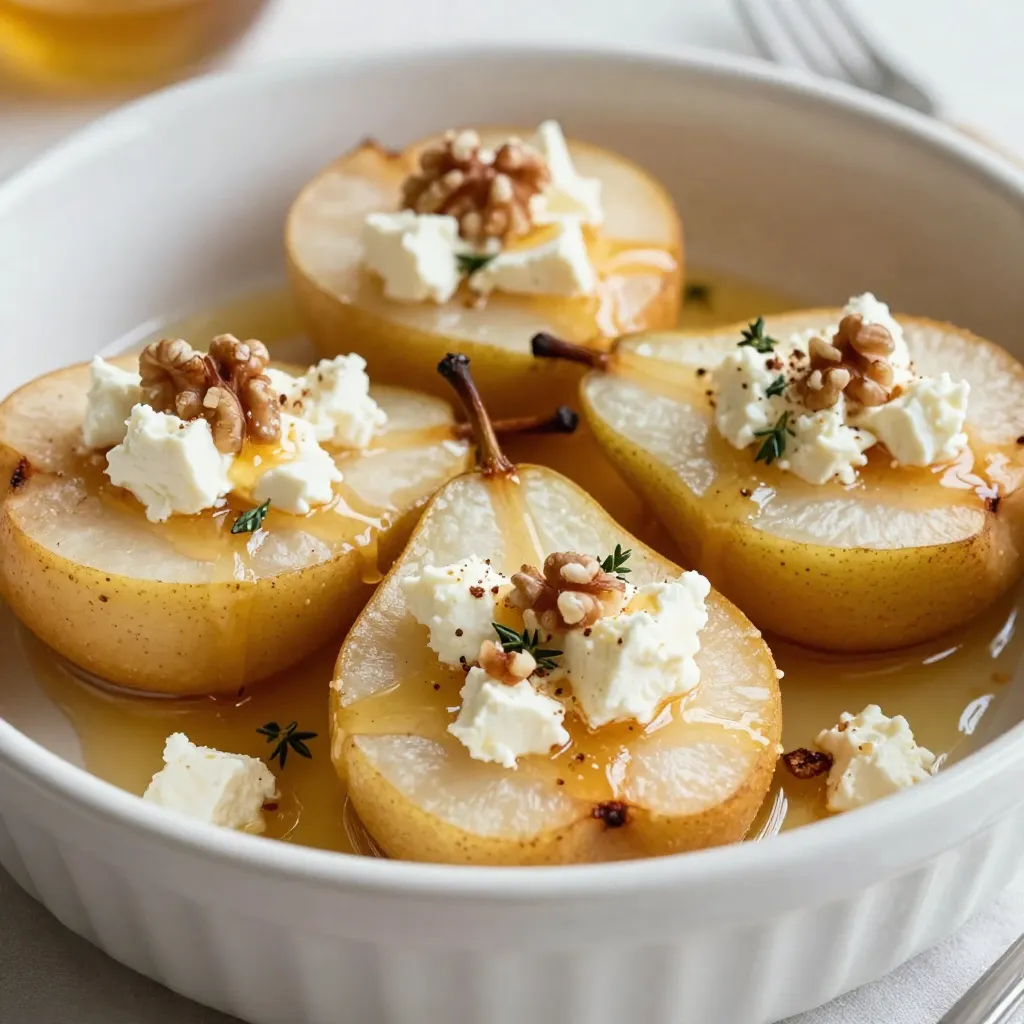
Are you ready to impress your friends and family with a simple yet elegant dessert? Honey Feta Baked Pears are

- 1 cup unsalted butter, softened - 1 cup granulated sugar - 1 cup brown sugar, packed - 2 large eggs - 1 teaspoon vanilla extract - 3 cups all-purpose flour - 1 teaspoon baking powder - 1/2 teaspoon baking soda - 1/4 teaspoon salt - 1 cup white chocolate chips - 1 cup semi-sweet chocolate chips - 1/2 cup crushed peppermint candies These ingredients come together to create a cookie that sings of the holiday spirit. The butter gives rich flavor, while the sugars add sweetness. Eggs help bind the dough, making it soft and chewy. Vanilla extract brings warmth, and the flour provides structure. Baking powder and baking soda help the cookies rise. The chocolate chips and crushed peppermint create a festive touch. If you need to make swaps, here are some ideas: - Use coconut oil instead of butter for a dairy-free option. - Swap granulated sugar with coconut sugar for a lower glycemic index. - Replace eggs with flaxseed meal mixed with water for a vegan option. - Almond flour can work instead of all-purpose flour for gluten-free cookies. These substitutions keep the spirit of the recipe while meeting different dietary needs. For an extra festive flair, consider these toppings: - Drizzle melted chocolate on top. - Add more crushed peppermint for crunch. - Sprinkle sea salt to balance the sweetness. - Use colored sprinkles for a pop of color. These toppings make the cookies even more fun and appealing. You can mix and match to suit your taste! {{ingredient_image_1}} Start by setting your oven to 350°F (175°C). This temperature helps the cookies bake evenly. Next, get two baking sheets and line them with parchment paper. This step keeps cookies from sticking and makes cleanup easy. In a large bowl, add 1 cup of softened unsalted butter, 1 cup of granulated sugar, and 1 cup of brown sugar. Cream these together until the mix is light and fluffy. Then, add 2 large eggs one at a time. Don't forget to mix in 1 teaspoon of vanilla extract. Now, in a separate bowl, mix 3 cups of all-purpose flour, 1 teaspoon of baking powder, 1/2 teaspoon of baking soda, and 1/4 teaspoon of salt. Gradually add this dry mix to the wet ingredients. Stir until just combined. Finally, fold in 1 cup of white chocolate chips, 1 cup of semi-sweet chocolate chips, and 1/2 cup of crushed peppermint candies. This blend gives the cookies a festive crunch. Scoop tablespoon-sized portions of the dough and drop them onto the prepared baking sheets. Make sure to space them about 2 inches apart. Bake in your preheated oven for 10-12 minutes. You want the edges to be lightly golden. Once baked, let the cookies sit on the sheets for 5 minutes. After that, transfer them to a wire rack to cool completely. Once cool, melt some extra white and semi-sweet chocolate in separate bowls. Drizzle the melted chocolate over the cookies and sprinkle extra crushed peppermint on top. This adds a beautiful touch and extra flavor. When baking peppermint bark cookies, avoid overmixing the dough. This can make cookies tough. Also, do not skip chilling the dough if it feels too soft. Chilling helps shape the cookies better. Another mistake is not spacing the cookies enough on the baking sheet. If too close, they can merge while baking. To get soft and chewy cookies, watch the baking time closely. Remove them when the edges are golden but the centers seem soft. This gives you a nice texture. Make sure the butter is softened but not melted. This helps the cookies rise well. Adding the right amount of white and semi-sweet chocolate chips also brings great flavor and texture. These festive cookies shine on a holiday platter. Pair them with hot cocoa or coffee for a lovely treat. You can also pack them in a jar for a sweet gift. For a fun twist, serve them with a scoop of vanilla ice cream. The mix of warm and cold adds a delightful contrast. Pro Tips Chill the Dough: Refrigerate the cookie dough for at least 30 minutes before baking to enhance the flavor and prevent spreading. Quality Chocolate Matters: Use high-quality chocolate chips for a richer taste and better melting consistency. Crushed Peppermint: For a more intense peppermint flavor, use candy canes instead of store-bought crushed peppermint candies. Storing Cookies: Keep the cookies in an airtight container to maintain their freshness, and consider layering them with parchment paper to prevent sticking. {{image_2}} You can switch up the flavors in these cookies. Try adding orange zest for a bright touch. Almond extract works well, too. It gives a nice nutty flavor. You might even mix in some crushed gingerbread cookies for a holiday twist. Each flavor brings its own fun to this treat. If you love dark chocolate, use it instead of semi-sweet. Dark chocolate adds a richer taste that pairs well with peppermint. The balance of flavors shines through with each bite. Just keep the same amount as the semi-sweet chocolate chips. It’s an easy swap that makes a big difference. Get creative with mix-ins in your cookie dough. You can use chopped walnuts or pecans for a crunchy bite. Dried cranberries add a chewy texture and a pop of color. If you want more chocolate, try adding milk chocolate chips. The options are endless. Mix it up to find your favorite version! To keep your peppermint bark Christmas cookies fresh, store them in an airtight container. I recommend placing a layer of parchment paper between the cookies. This helps prevent them from sticking together. You can keep them at room temperature for about a week. If you want to keep them longer, the fridge can work too. Just make sure they stay in that airtight container. If you want to save some cookies for later, freezing is a great option. Allow the cookies to cool completely first. Then, place them in a single layer on a baking sheet. Freeze them for about two hours. After that, transfer them to a freezer-safe container. You can freeze them for up to three months. When you’re ready to enjoy, let them thaw at room temperature. For the best flavor and texture, serve your cookies within the first few days. This way, they stay soft and tasty. If you wait too long, they may become dry. If you freeze them, enjoy them within two weeks of thawing for optimal taste. Yes, you can make these cookies ahead of time. You can prepare the dough and chill it in the fridge for up to two days. This helps the flavors mix well. When you are ready to bake, just scoop the dough onto the baking sheets and bake as directed. You can also bake the cookies and store them in an airtight container. They stay fresh for about a week. You can tell the cookies are done when the edges turn a light golden color. They should still look soft in the center. Baking them for around 10-12 minutes usually works well. Remember, the cookies will continue to cook a bit after you take them out. This gives them a nice chewy texture. If you don’t have peppermint candies, you can use crushed candy canes. They give a similar taste and look. You could also try other flavors like toffee bits or nuts. Just remember, the cookies will not have that peppermint flavor, but they will still be tasty! We covered the key steps to make delicious cookies, from choosing your ingredients to baking. You learned about ingredient swaps and how to get the best texture. Remember to avoid common mistakes and follow storage tips for freshness. Experiment with flavors and mix-ins for fun twists. With these insights, you can bake cookies that impress. Enjoy your baking journey and the tasty rewards that come with it!

Peppermint Bark Christmas Cookies Festive Holiday Treat

Get ready to bake a festive treat with my Peppermint Bark Christmas Cookies! This fun recipe combines rich chocolate and

- 1 cup quinoa, rinsed - 2 cups vegetable broth or water - 1 medium sweet potato, peeled and cubed - 1 cup Brussels sprouts, halved - 1 cup kale, chopped - 1/2 cup dried cranberries - 1/4 cup pecans, roughly chopped Quinoa is the star here. It is full of protein and fiber. The sweet potato adds a touch of sweetness and color. Brussels sprouts give a nice crunch. Kale packs in nutrients and a vibrant green look. The dried cranberries provide a lovely tartness, while pecans add a rich, nutty flavor. - 1 tablespoon olive oil - 1 tablespoon maple syrup - 1 teaspoon cinnamon - Salt and pepper to taste Using olive oil helps the veggies roast perfectly. Maple syrup brings out the natural sweetness. Cinnamon adds warmth and depth. A little salt and pepper enhance all the flavors. - Feta cheese for topping Feta cheese is a great choice for topping. It adds creaminess and a salty bite. You can skip it for a dairy-free dish. {{ingredient_image_1}} First, measure 1 cup of quinoa and rinse it well under cold water. This step helps remove the bitter coating called saponin. In a medium saucepan, combine the rinsed quinoa with 2 cups of vegetable broth or water. Bring it to a boil over medium heat. Once boiling, reduce the heat to low. Cover the pot and let it simmer for about 15 minutes. You want the quinoa to absorb all the liquid and become fluffy. After 15 minutes, remove it from the heat and let it sit, covered, for 5 more minutes. Fluff the quinoa with a fork when you’re ready. While the quinoa cooks, turn your attention to the vegetables. Start by peeling the sweet potato and cutting it into cubes. Halve the Brussels sprouts. In a large bowl, toss the sweet potato and Brussels sprouts with 1 tablespoon of olive oil, 1 tablespoon of maple syrup, 1 teaspoon of cinnamon, salt, and pepper. Make sure each piece is well coated. Preheat your oven to 425°F (220°C). Spread the coated sweet potato and Brussels sprouts on a baking sheet lined with parchment paper. Roast them for 25-30 minutes. Stir the veggies halfway through to ensure even cooking. In the last 5 minutes, add 1 cup of chopped kale to the baking sheet. It will wilt nicely without losing its vibrant color. Once the quinoa and vegetables are ready, it’s time to assemble your bowls. Start by dividing the fluffy quinoa evenly into four deep bowls. Top each bowl with the roasted sweet potato, Brussels sprouts, and kale. For a sweet touch, sprinkle ½ cup of dried cranberries and ¼ cup of roughly chopped pecans on top. If you want to elevate the dish further, feel free to add crumbled feta cheese as a topping. This extra step adds a creamy texture and a tangy flavor that pairs well with the sweet veggies. Enjoy your colorful and nutritious Winter Harvest Bowl! To get sweet potatoes and Brussels sprouts just right, focus on caramelization. Roasting at high heat helps create that sweet, golden crust. Aim for 425°F (220°C). Spread the veggies evenly on the baking sheet. This ensures they roast, not steam. Stir halfway through to promote even cooking. You want to keep a nice texture in your veggies. Do not overcook them. Sweet potatoes should be tender but not mushy. Brussels sprouts should have a slight crunch. This contrast makes every bite exciting. Start by rinsing the quinoa. This removes the bitter coating called saponin. Use a fine mesh strainer to make this easy. Measure one cup of quinoa to two cups of broth or water. Cook on low heat after boiling. This keeps the quinoa fluffy. If you see water left, keep cooking until it’s absorbed. Fluff with a fork to separate the grains. This avoids mushy quinoa and enhances the final dish. Presentation matters! Serve the Winter Harvest Bowl in deep bowls. This helps show off the colorful layers. Drizzle with a little extra olive oil for shine. A balsamic reduction adds a nice touch, too. Don’t forget dressings or sauces. A simple lemon vinaigrette can brighten the flavors. It adds a fresh twist. You can even sprinkle feta cheese on top for a creamy finish. Pro Tips Perfect Quinoa: To achieve perfectly fluffy quinoa, rinse it thoroughly before cooking to remove the bitter saponins. Even Roasting: Ensure even cooking by cutting your sweet potatoes and Brussels sprouts into similar-sized pieces. Add Texture: For extra crunch, lightly toast the pecans in a dry skillet before adding them to your bowl. Season to Taste: Taste and adjust the seasoning of the vegetables before roasting for a more flavorful dish. {{image_2}} You can add different proteins to your Winter Harvest Bowl. If you like meat, try diced chicken or turkey. Cook them simply with salt and pepper. For a plant-based option, consider chickpeas or black beans. These add great flavor and protein. You can also use tofu. Just press it to remove water, then sauté it until golden. This way, you get a tasty, protein-packed meal. Quinoa is a fantastic base, but you have options. Farro offers a chewy texture and nutty taste. Barley is also a good choice, bringing a hearty feel to your bowl. Brown rice can work too, for a milder flavor. Each grain adds its own twist, so feel free to swap out quinoa for something new. While sweet potatoes and Brussels sprouts shine in winter, other veggies work well too. Carrots add sweetness and color. Butternut squash offers a creamy texture. You can also use parsnips for a slight peppery taste. Adding different veggies keeps the bowl exciting and full of nutrients. Choose what you enjoy most! To store leftovers, let the bowl cool down first. Place the cold bowl in an airtight container. You can keep it in the fridge for up to four days. This keeps the dish fresh and tasty. When it's time to eat again, you have a few options. The best way to reheat is in the oven. Preheat the oven to 350°F (175°C). Spread the bowl on a baking sheet and heat for about 15 minutes. You can also use the microwave. Just heat it in short bursts. Stir in between to keep it even. To prep for the week, cook a big batch. Make extra quinoa and roast more veggies. Divide them into containers for easy meals. You can mix and match toppings each day. This keeps your meals fun and fresh. To make this bowl vegan, swap out the feta cheese with a plant-based option. You can also use maple syrup for added sweetness. Ensure your vegetable broth is vegan too. This way, you keep all the flavors while making it plant-friendly. Yes, you can use frozen vegetables. They are quick and easy. Just note that they may cook faster than fresh ones. Adjust your roasting time to avoid mushy veggies. You can add roasted chickpeas for protein. Sliced avocado brings creaminess. A sprinkle of sunflower seeds adds crunch. Fresh herbs like parsley or cilantro can brighten the dish. Try different nuts too, like walnuts or almonds for variety. This recipe combines nutritious ingredients like quinoa, root veggies, and greens. It guides you through cooking quinoa, roasting vegetables, and blending all elements for a satisfying meal. Use tips to perfect flavors and textures. You can store leftovers and meal prep with ease. Explore variations for proteins and grains to suit your taste. Now, you can create delicious, healthy meals that fit your needs and make cooking easier. Enjoy your culinary journey!

Winter Harvest Bowl Energizing and Nutritious Delight

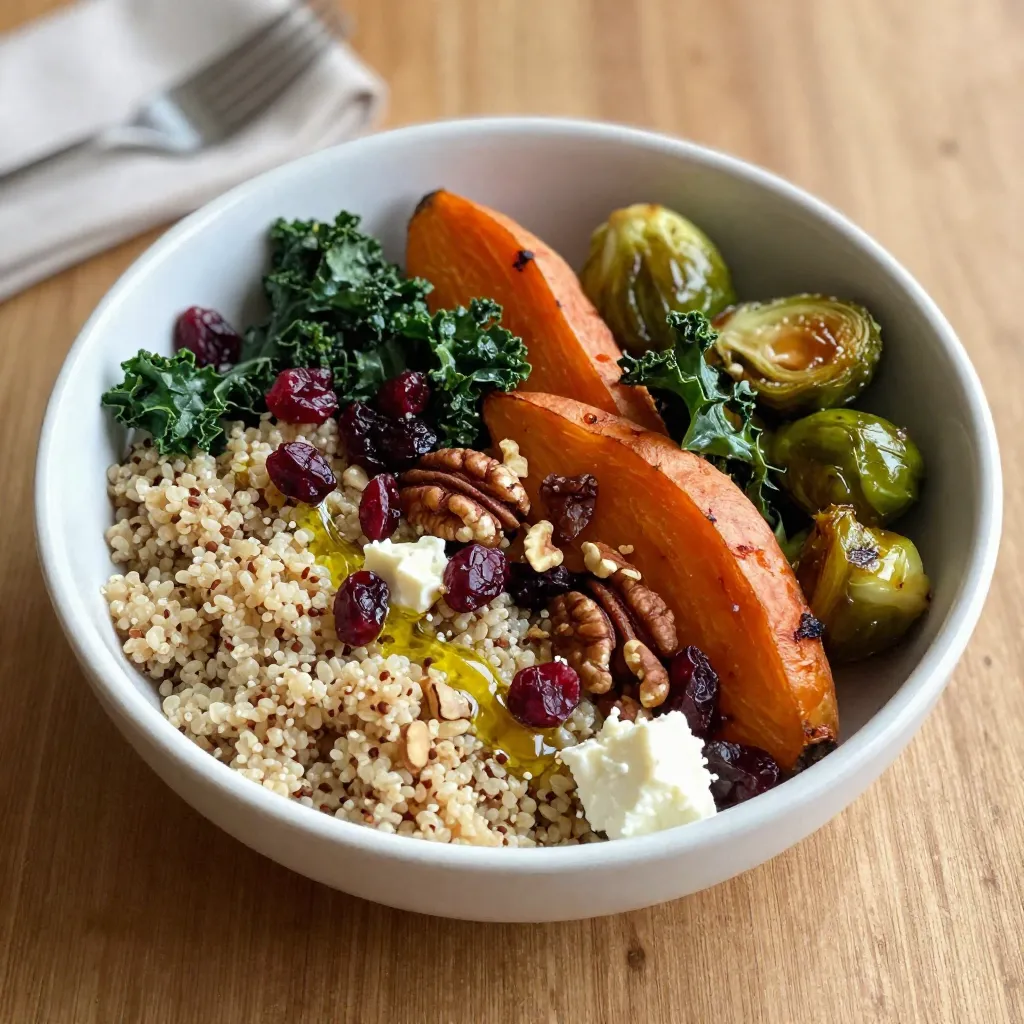
Winter is here, and it’s the perfect time for a warm, nourishing dish! The Winter Harvest Bowl is a mix

To make these salted caramel fudge truffles, gather the following: - 1 cup heavy cream - 1 cup dark chocolate chips (60-70% cacao) - 1/2 cup granulated sugar - 1/4 cup unsalted butter - 1 teaspoon sea salt (plus extra for topping) - 1 teaspoon vanilla extract - 1/2 cup cocoa powder (for rolling) - 1/2 cup crushed nuts or sprinkles (optional, for rolling) You can change up the truffles with these options: - Use milk chocolate chips instead of dark chocolate. - Add a splash of flavored extract, like almond or orange. - Roll in crushed peppermint or toasted coconut for a unique touch. - Heavy cream: You can use coconut cream for a dairy-free option. - Dark chocolate chips: If you need a sweeter taste, choose semi-sweet chocolate chips. - Granulated sugar: Brown sugar can add a richer flavor to the caramel. - Unsalted butter: Use vegan butter for a plant-based version. - Sea salt: Flaky salt can enhance texture and flavor on top of the truffles. These ingredients will help create rich, creamy truffles that melt in your mouth. Feel free to mix and match based on your taste and dietary needs! {{ingredient_image_1}} 1. Start by combining the granulated sugar and 1/4 cup of water in a medium saucepan. Use medium heat. Stir gently until the sugar dissolves. 2. Stop stirring and let it boil. Watch it carefully. It takes about 8-10 minutes to reach a deep amber color. 3. Once it reaches that color, add the heavy cream slowly. The mixture will bubble. Stir constantly until it combines well. 4. Add the unsalted butter and sea salt, mixing until the mixture is smooth. Remove it from heat. 5. In a large bowl, place the dark chocolate chips. Pour the hot caramel mixture over the chocolate. Let it sit for 1-2 minutes. This softens the chocolate. 6. Use a spatula to stir gently until all the chocolate melts and the mix is smooth. Add the vanilla extract and stir it in. 7. Cover the bowl with plastic wrap. Refrigerate for about 2 hours or until the fudge is firm enough to handle. 8. After chilling, scoop out small balls using a melon baller or your hands. Aim for about 1 inch in diameter. 9. Roll each truffle in cocoa powder, crushed nuts, or sprinkles to coat them well. 10. Place the truffles on a parchment-lined tray. Sprinkle a pinch of sea salt on top of each truffle to enhance the flavor. 11. Refrigerate the truffles for at least 30 minutes. This helps firm up the coating before serving. - Use a clean, dry pan. Any moisture can make the sugar seize. - Watch the color closely. It can go from perfect to burnt quickly. - If you need to, swirl the pan gently to help the caramel cook evenly. - Use good-quality dark chocolate chips. They melt better. - Make sure the caramel is hot when you pour it over the chocolate. It helps melt the chips faster. - Stir gently to avoid air bubbles. You want a smooth mixture. To make smooth caramel, keep a few tips in mind. First, always use a clean pan. Any leftover bits can cause graininess. Second, stir the sugar and water gently until dissolved. Once it boils, stop stirring. Let it bubble until it turns a deep amber color. If you stir after this point, it can crystalize. Finally, when adding cream, do it slowly. The mixture will bubble, so be careful. This method ensures a silky caramel that works great in your truffles. If you have leftover truffles, store them correctly. Place them in an airtight container. Keep them in the fridge to maintain freshness. They will last for about a week. Make sure to separate layers with parchment paper. This prevents sticking. If you want to store them longer, consider freezing. Just remember to thaw them in the fridge before serving. This keeps their texture perfect. These truffles shine at any gathering. Serve them on a pretty platter. Add some fresh fruit or nuts for color. You can also pair them with coffee or dessert wine. For a fun twist, try a chocolate fountain. Let guests dip the truffles for an interactive treat. They will love the combination of flavors. Each bite of salted caramel fudge will delight everyone! Pro Tips Use Quality Chocolate: Opt for high-quality dark chocolate with at least 60% cacao for a richer flavor and smoother texture in your truffles. Watch the Caramel Color: Keep a close eye on the caramel as it cooks; once it reaches a deep amber, it can quickly go from perfect to burnt. Chill Thoroughly: Make sure to refrigerate the fudge mixture long enough for it to firm up; this will make rolling the truffles much easier. Experiment with Coatings: Feel free to try different coatings such as crushed cookies, coconut flakes, or flavored sprinkles for a unique twist on your truffles. {{image_2}} You can add fun flavors to your salted caramel fudge truffles. A few drops of mint or almond extract will give them a fresh twist. You can also try orange zest for a bright taste. Just remember, a little goes a long way. Add these flavors after you mix in the chocolate for the best results. If you want to make vegan truffles, swap the heavy cream for coconut cream. Use dairy-free chocolate chips instead of dark chocolate. You can also use vegan butter for a rich taste. These changes keep the truffles creamy while meeting vegan needs. They taste just as good! Coating your truffles can change their look and taste. Instead of cocoa powder, try using flavored cocoa, like dark chocolate or coffee. You could also roll them in shredded coconut for a tropical vibe. Crushed nuts add a nice crunch and flavor. Get creative with your coatings to find your favorite! Store your salted caramel fudge truffles in an airtight container. Use parchment paper between layers. This prevents sticking and keeps them fresh. Keep the truffles in the fridge. They stay cool and maintain their texture. If you want to keep them longer, use a freezer-safe container. When stored properly, these truffles last about one week in the fridge. You can also freeze them for up to three months. Just remember to wrap them well to avoid freezer burn. Always check for any off smells or textures before eating. To freeze, first chill the truffles in the fridge. Once firm, place them in a single layer on a tray. Freeze for about an hour. After they harden, transfer them to an airtight container. Label the container with the date. This helps you track freshness. When ready to eat, let them thaw in the fridge for a few hours. Enjoy your sweet treat! The best chocolate for truffles is dark chocolate. I recommend using chocolate chips with 60-70% cacao. This range gives a nice balance of rich flavor and sweetness. Higher cacao chocolates can be too bitter, while lower cacao may not be rich enough. When you melt the chocolate, it will blend perfectly with the caramel, creating a smooth texture. Yes, you can make these truffles in advance! They store well in the fridge for about one week. If you want to keep them longer, freeze them. Place the truffles in an airtight container. They can last for up to three months in the freezer. Just remember to let them thaw in the fridge before serving. If your caramel is grainy, it may have crystallized. To fix this, you can add a bit of water and gently heat it until it melts again. If your caramel is too hard, it may have cooked too long. To avoid this, use a candy thermometer and aim for 340°F. If it still hardens, you can melt it again by adding cream or butter over low heat. This guide covered ingredients, steps, tips, and variations for making truffles. We explored how to make smooth caramel and melt chocolate perfectly. I shared tricks to avoid grainy textures and how to store leftovers well. Whether trying new flavors or dietary needs, your options are vast. Remember, practice makes perfect. Each attempt brings improvement and tasty outcomes. Don’t hesitate to experiment and enjoy the process. Creating these treats should be just as delightful as eating them. Happy truffle-making!

Salted Caramel Fudge Truffles Irresistible Treat Recipe

If you crave a sweet treat that hits all the right notes, you’ve come to the right place! My Salted

- 1 pound boneless, skinless chicken breasts - 1 cup orzo pasta - 1 cup heavy cream - 1 cup grated Parmesan cheese For the Cajun Chicken Alfredo Orzo, the main players are chicken, orzo, cream, and cheese. The chicken provides protein, while orzo adds a fun shape and texture. Heavy cream makes the dish rich and creamy. Parmesan cheese adds a nice, cheesy depth of flavor. - 2 tablespoons Cajun seasoning - 2 cloves garlic, minced - Fresh parsley for garnish Cajun seasoning gives this dish its kick. It blends spices that bring heat and flavor. Garlic adds an aromatic touch, enhancing the overall taste. Fresh parsley brightens the dish, making it look appealing. - 1 cup spinach, chopped - Additional proteins like shrimp or sausage You can boost the nutrition by adding vegetables. Spinach not only adds color but also nutrients. If you want more protein, try adding shrimp or sausage. These options make the dish even heartier and more satisfying. {{ingredient_image_1}} Seasoning Start by seasoning your chicken breasts with Cajun seasoning. Make sure to coat all sides well. This step is key for flavor. You want each bite to burst with spice. Use about 2 tablespoons for one pound of chicken. Cooking Method Next, heat 1 tablespoon of olive oil in a large skillet over medium-high heat. Once the oil is hot, add the chicken. Cook for 5-7 minutes on each side. You want the chicken to be browned and fully cooked. After cooking, let it rest for 5 minutes. Then slice it into strips. This makes it easier to mix later. Incorporating Broth In the same skillet, add 2 cloves of minced garlic. Sauté for about 1 minute until it smells great. Then, pour in 2 cups of chicken broth. Bring it to a simmer. This broth will add depth to the dish. Timing for Perfect Texture Stir in 1 cup of orzo pasta. Cook it according to the package instructions. This usually takes about 8-10 minutes. You want the orzo to be al dente, not mushy. Stir occasionally to prevent sticking. Mixing Sauce and Chicken Once the orzo is ready, lower the heat. Add 1 cup of heavy cream and 1 cup of grated Parmesan cheese. Mix until the cheese melts and the sauce is smooth. Then, return the sliced chicken to the skillet. Final Cooking Tips Now, add 1 cup of chopped spinach. Mix everything well. Season with salt and pepper to taste. Cook for an additional 2-3 minutes. This will wilt the spinach and blend the flavors. Remove from heat and let it sit for a minute. This dish is now ready to serve! To get the best flavor, aim for a good spice mix. Cajun seasoning should add heat and depth. If you want it spicier, add a pinch of cayenne. For a milder dish, use less Cajun seasoning. Always taste as you go. This helps you find the right balance. When adding cheese, lower the heat first. This prevents the cheese from clumping. Stir slowly as the cheese melts. Use grated Parmesan for the best results. Freshly grated cheese melts better than pre-packaged. Start with a hot skillet. This helps the chicken brown well. Sear for about 5-7 minutes on each side. Don’t rush the cooking; let it form a nice crust. This adds flavor and texture to your dish. When you add cream, keep the heat low. This helps the sauce thicken without burning. Stir often to keep it smooth. Let it cook for a few minutes until it's creamy. Don’t forget to taste and adjust seasoning! Serve the orzo in shallow bowls. This gives a nice look and makes it easier to eat. Add the sliced chicken on top, and pour sauce over everything. Garnish with fresh parsley for a pop of color. A sprinkle of extra Parmesan adds a nice touch too. These small details make your meal look gourmet and inviting. Pro Tips Perfectly Cooked Chicken: Use a meat thermometer to ensure your chicken reaches an internal temperature of 165°F (75°C) for safe consumption. Flavor Boost: For an extra layer of flavor, marinate the chicken in Cajun seasoning and a bit of olive oil for at least 30 minutes before cooking. Creamy Consistency: If the sauce becomes too thick, add a splash of chicken broth or pasta water to achieve your desired creaminess. Fresh Spinach Alternatives: Swap out spinach for other leafy greens like kale or Swiss chard for a different taste and texture. {{image_2}} You can swap chicken for shrimp or sausage. Shrimp cooks fast and adds a nice touch. Just sauté it until it turns pink. Sausage brings a bold flavor. Slice it, brown it, and add it to the dish. Both options work well with the creamy sauce. If you need gluten-free options, use gluten-free orzo. It cooks just like regular orzo. This change keeps the dish tasty and safe for those with gluten issues. For a vegan twist, replace chicken with tofu or tempeh. Use coconut milk instead of cream for a rich texture. Nutritional yeast can mimic the cheesy flavor of Parmesan. Different spice blends can change the taste. Try smoked paprika or chili powder for a new kick. You can also add more vegetables. Bell peppers, zucchini, or mushrooms work great in this dish. They add color and nutrients, making the meal even better. Cajun Chicken Alfredo Orzo stays fresh in the fridge for about 3-4 days. To store it, place the dish in an airtight container. This keeps moisture in and prevents odors from other foods. Make sure it cools down before sealing it up. You can reheat this dish in two ways: microwave or stovetop. - Microwave: Place a portion in a microwave-safe bowl. Cover it with a damp paper towel. Heat for 1-2 minutes, stirring halfway. Check if it’s warm enough. - Stovetop: Heat a pan over medium heat. Add a splash of water or broth to keep it moist. Stir often until it's heated through. This method helps keep the dish creamy. Freezing Cajun Chicken Alfredo Orzo is easy. Follow these steps: 1. Let the dish cool completely. 2. Transfer it to a freezer-safe container or bag. Remove as much air as possible. 3. Label the container with the date. To thaw, place the container in the fridge overnight. For a quick option, use the microwave on defrost mode. This ensures your dish is ready to enjoy again! To add spice, use more Cajun seasoning. You can also add diced jalapeños or crushed red pepper flakes. Start with a small amount and taste as you go. This way, you control the heat. If you want more depth, try adding a dash of hot sauce. Remember, balance is key. Too much spice can overpower the dish. Yes, you can. Pasta shapes like penne or fusilli work well. These shapes hold sauce nicely. Just remember, cooking times may vary. Always check the package for timing. You want it to be al dente. If you use rice, it will change the texture, but it can still taste great. The best way to reheat Cajun Chicken Alfredo Orzo is on the stovetop. Use a skillet over low heat. Add a splash of chicken broth or cream to keep it moist. Stir often to heat evenly. If you use the microwave, cover it to avoid drying out. Heat in short bursts, stirring in between. This keeps your meal creamy and tasty. This blog post covered a delicious Cajun Chicken Alfredo Orzo recipe. We explored the main ingredients like chicken, orzo, cream, and cheese. You learned about using Cajun seasoning, garlic, and fresh herbs for flavor. I shared step-by-step cooking instructions and tips for perfecting taste and texture. In my final thoughts, remember you can easily tweak this dish. Try different proteins or vegetables for variety. Enjoy your cooking adventure and impress others with your awesome Cajun dish!

Cajun Chicken Alfredo Orzo Flavorful and Simple Meal

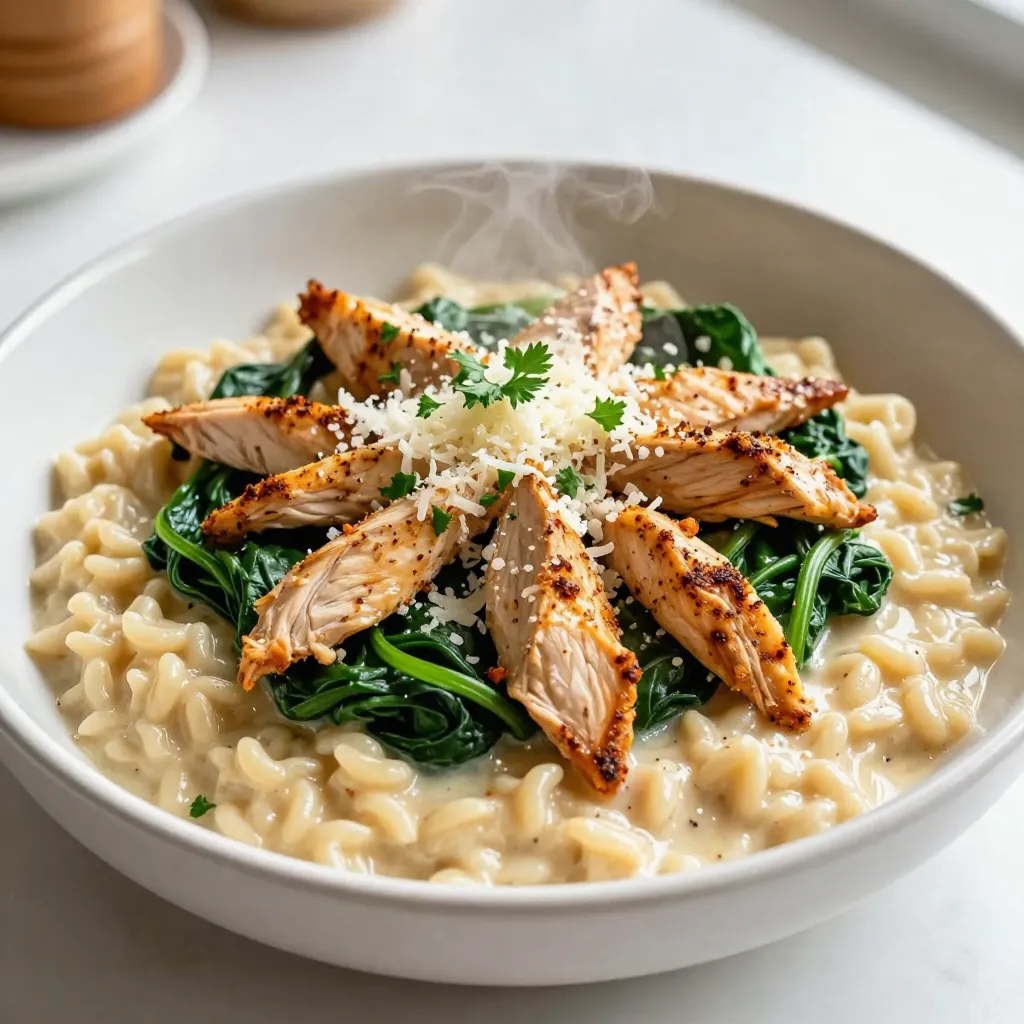
Looking for a dish that packs a punch of flavor without the fuss? Cajun Chicken Alfredo Orzo is your answer!

For the perfect One-Pan Honey Lemon Salmon, gather these main ingredients: - 4 salmon fillets - 3 tablespoons honey - 2 tablespoons fresh lemon juice - 1 tablespoon olive oil - 2 cloves garlic, minced - Salt and pepper, to taste - 1 teaspoon dried thyme - 1 zucchini, sliced into rounds - 1 bell pepper, sliced - 1 cup cherry tomatoes These ingredients blend together to create a tasty dish. The salmon provides healthy fats and protein. The honey and lemon add sweetness and brightness. Fresh veggies bring color and crunch. The flavor comes from a few key seasonings. You will use: - Salt and pepper: These basic seasonings enhance the taste of all ingredients. - Dried thyme: This herb pairs well with salmon and adds depth. - Olive oil: It helps the honey lemon mixture stick and adds richness. Mix these seasonings with the honey and lemon juice. This mixture becomes a glaze for your salmon, making it shine. Garnishing your dish makes it look beautiful. Here are some ideas: - Fresh parsley, chopped: This adds a pop of green and freshness. - Lemon slices: They add color and a zesty touch. When you serve the dish, sprinkle the parsley on top. Place lemon slices on the side for extra flair. This makes your One-Pan Honey Lemon Salmon not just tasty, but also pretty! {{ingredient_image_1}} 1. Preheat the oven: Start by setting your oven to 400°F (200°C). This helps cook the salmon and veggies evenly. 2. Mix the sauce: In a small bowl, whisk together 3 tablespoons of honey, 2 tablespoons of lemon juice, 1 tablespoon of olive oil, 2 minced garlic cloves, a pinch of salt and pepper, and 1 teaspoon of dried thyme. This mix gives the salmon a sweet and tangy flavor. 3. Prep the veggies: Take a large baking sheet. Lay out sliced zucchini, bell pepper, and cherry tomatoes. Drizzle with olive oil and sprinkle with salt and pepper. This adds great taste to the dish. 1. Arrange the salmon: Place the salmon fillets in the center of the baking sheet among the veggies. 2. Pour the sauce: Drizzle the honey lemon mixture over the salmon. Make sure to cover each fillet well. This will keep the fish moist and flavorful. 3. Roast: Put the baking sheet in the preheated oven. Roast for 15-20 minutes. You know it’s done when the salmon flakes easily with a fork and the veggies are tender. 4. Rest the dish: After cooking, take it out and let it rest for 2 minutes. This helps the flavors settle. 5. Garnish: Finally, sprinkle fresh chopped parsley on top before serving. This adds color and freshness. - Check for doneness: If the salmon is not flaking nicely, it needs more time. Keep an eye on it to avoid overcooking. - Use fresh ingredients: Fresh veggies and herbs make a big difference in flavor. Always choose what looks best. - Stir veggies halfway: If you want even cooking, stir the veggies halfway through roasting. This helps them brown nicely. - Serve on a platter: For a great presentation, serve everything on a large platter. Drizzle any leftover sauce on top for added flavor. To cook salmon just right, keep a few things in mind. First, choose fresh salmon fillets. Look for a bright color and no strong fishy smell. Preheat your oven to 400°F (200°C) before you start cooking. This helps the salmon cook evenly. When you bake it, check the salmon after 15 minutes. It should flake easily with a fork. If it does, it's done! If not, give it a few more minutes. Always let it rest for 2 minutes after baking. This helps keep it juicy. If you want to switch up the flavors, there are great options. For honey, try maple syrup or agave nectar. Both offer a sweet taste without losing too much flavor. For lemon juice, lime juice is a tasty substitute. It gives a nice twist. You can also use orange juice for a sweeter taste. Just remember, these swaps may change the taste a little, but they can still be delicious. Meal prep can save you time during busy weeks. Start by cutting your veggies ahead of time. Slice zucchini, bell peppers, and cherry tomatoes. Store them in a container in the fridge. You can also mix the honey, lemon juice, and spices ahead. Just keep it in a small jar. When it's time to cook, everything is ready to go. This way, you can whip up your One-Pan Honey Lemon Salmon in no time! Pro Tips Fresh Ingredients: Always opt for fresh salmon and seasonal vegetables to enhance the flavor and nutrition of your dish. Marinate for Flavor: If time allows, let the salmon marinate in the honey lemon mixture for 30 minutes before cooking to infuse more flavor. Check for Doneness: Salmon is perfectly cooked when it flakes easily with a fork and has an internal temperature of 145°F (63°C). Leftover Ideas: Use leftover salmon in salads, sandwiches, or pasta dishes for a quick and healthy meal option. {{image_2}} You can easily add more vegetables to this dish. Try using asparagus, broccoli, or carrots. Each veggie brings its own taste and nutrients. Just slice them up and mix them with the zucchini and bell pepper. The cooking time may change a bit, so check for doneness. Look for vibrant colors and tenderness. Not a fan of salmon? No problem! You can use chicken breasts or shrimp instead. If you choose chicken, cook it longer until it reaches 165°F (75°C). For shrimp, they only need about 8-10 minutes. Both options soak up the honey lemon mix well, making your meal delicious. Change the flavor by using different herbs and spices. Basil, oregano, or dill can add fresh notes. For a spicy kick, try red pepper flakes or cayenne pepper. Mix and match to find your favorite flavors. Each tweak gives a whole new taste to your one-pan meal. Store any leftover One-Pan Honey Lemon Salmon in an airtight container. Keep it in the fridge for up to three days. Make sure to separate the salmon from the veggies if you want to keep them fresh. This helps avoid sogginess. To reheat, place the salmon and veggies in the oven at 350°F (175°C). Heat for about 10 minutes. You can also use a microwave. Just cover the food to keep it moist. Heat in short bursts, checking every minute. This keeps the salmon tender and juicy. You can freeze leftover salmon and veggies for up to three months. Wrap them tightly in plastic wrap and then place in a freezer bag. When ready to eat, thaw in the fridge overnight. Reheat as mentioned above. This way, you can enjoy a quick meal later! Yes, you can use frozen salmon. Just make sure to thaw it first. Place the salmon in the fridge overnight or run it under cold water. This helps the salmon cook evenly. If you start with frozen salmon, add a few extra minutes to the cooking time. Check that it flakes easily with a fork before serving. I love to serve this dish with simple sides. Here are some great options: - Steamed broccoli - Quinoa or rice - Mixed green salad - Roasted asparagus These sides balance the flavors of the salmon. They also add color to your plate. To make it low-carb or keto, focus on the veggies. Replace starchy sides like rice with non-starchy options. Use zucchini, bell peppers, and leafy greens. You can also skip the honey or use a low-carb sweetener. This keeps the dish tasty without added carbs. This blog post outlined how to make a delicious one-pan honey lemon salmon. I shared the key ingredients and flavor tips. You learned step-by-step instructions for prepping and cooking your dish, along with useful tips for perfect results. We also explored variations to suit your taste and storage options for leftovers. In summary, this recipe is simple and adaptable. Enjoy the ease of cooking and the great taste. Try new twists to keep things exciting!

One-Pan Honey Lemon Salmon Quick and Tasty Meal

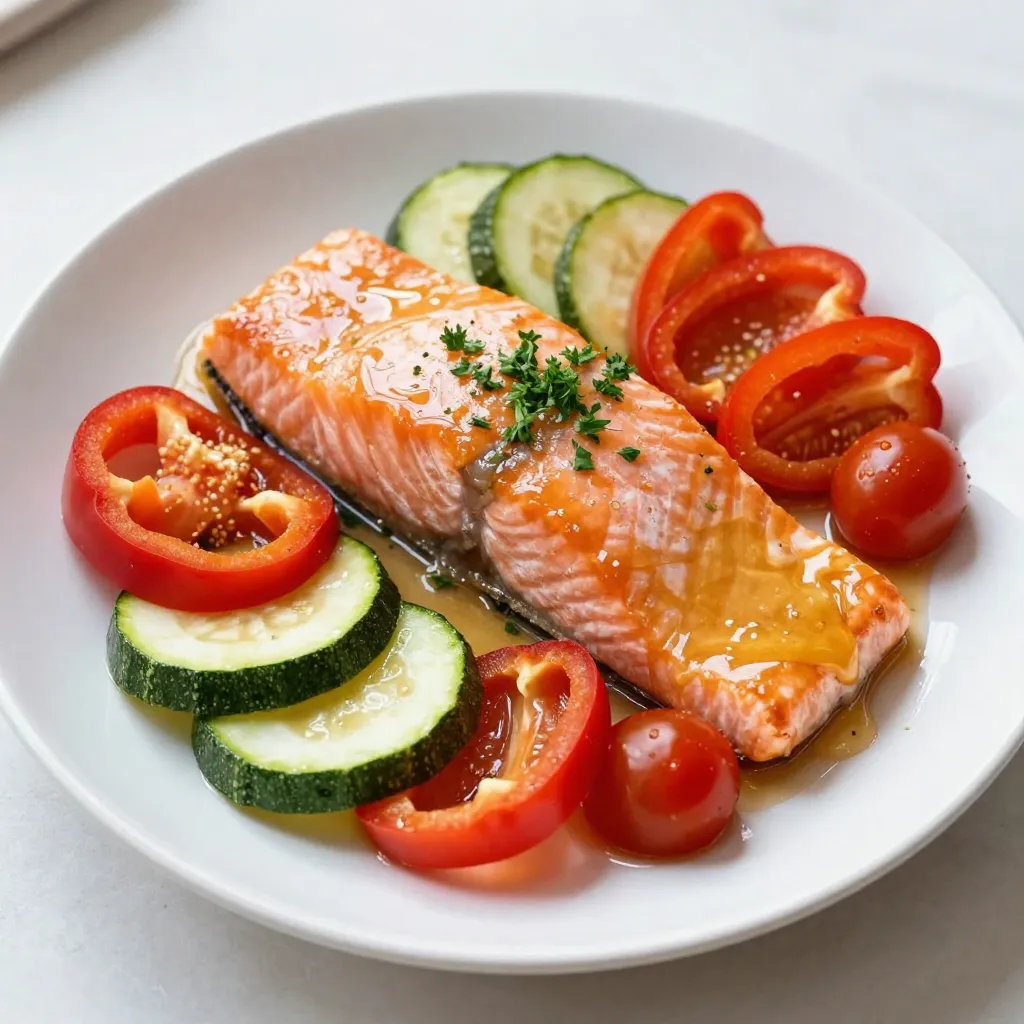
Looking for a quick meal that dazzles with taste? Try my One-Pan Honey Lemon Salmon! This easy recipe combines juicy

- 2 cups all-purpose flour - 1 ½ cups granulated sugar - ½ cup unsalted butter, softened - 1 cup whole milk - 3 large eggs - 2 teaspoons baking powder - 1 teaspoon vanilla extract - 1 teaspoon almond extract - ½ teaspoon salt - Green food coloring (approx. 1-2 teaspoons, to desired color) - 1 cup unsalted butter, softened - 4 cups powdered sugar - 2-4 tablespoons heavy cream or whole milk - 1 teaspoon vanilla extract - Green food coloring (as needed) - Edible decorations (sprinkles, mini ornaments, star toppers) To make this Christmas Tree Sheet Cake, gather these ingredients first. I find it helps to lay everything out. The main cake uses simple items you likely already have. Flour, sugar, butter, and eggs create a soft base. The milk adds moisture, while baking powder helps it rise. Extracts bring rich flavor. The buttercream frosting is just as easy. Softened butter and powdered sugar mix well. You can add heavy cream to adjust the texture. The green food coloring makes it festive. Lastly, gather your decorations. Edible sprinkles and mini ornaments add fun. A star topper completes the tree look. With these ingredients, you'll create a beautiful and tasty treat for the holidays! {{ingredient_image_1}} 1. Start by preheating your oven to 350°F (175°C). Grease a 13x18-inch baking sheet or line it with parchment paper. This makes cake removal easy. 2. In a large bowl, add ½ cup of softened butter and 1 ½ cups of granulated sugar. Using an electric mixer, beat them together until light and fluffy. This should take about 3-4 minutes. 3. Next, crack 3 large eggs into the bowl. Mix well after adding each egg. Then, add 1 teaspoon of vanilla extract and 1 teaspoon of almond extract. This adds great flavor. 1. In another bowl, whisk together 2 cups of all-purpose flour, 2 teaspoons of baking powder, and ½ teaspoon of salt. This helps to blend the dry ingredients evenly. 2. Gradually add the dry mix to the wet batter. Alternate with 1 cup of whole milk. Start and end with the flour mix. This helps keep the batter smooth. 1. Now it’s time to add color! Mix in 1-2 teaspoons of green food coloring until you reach your desired shade. 2. Pour the batter into the prepared baking sheet. Smooth it out evenly across the pan. Bake for 25-30 minutes. Check doneness by inserting a toothpick into the center. It should come out clean. 1. While the cake bakes, prepare the buttercream frosting. In a large bowl, beat 1 cup of softened butter until creamy. 2. Gradually add 4 cups of powdered sugar while mixing on low speed. This helps prevent a sugary cloud. 3. Then, add 2 tablespoons of heavy cream (or milk) and 1 teaspoon of vanilla extract. Add more green food coloring if needed. Beat on high until fluffy. 1. Once the cake has cooled completely, use an offset spatula to spread the green buttercream frosting evenly over the top. 2. Get creative! Add edible decorations like sprinkles, mini candy ornaments, and a star on top. This makes your cake festive and fun. - Ensuring the cake rises perfectly Use fresh baking powder. Old baking powder can cause flat cakes. Make sure to beat the butter and sugar well until light and fluffy. This adds air for a better rise. - Avoiding overmixing the batter Mix just until the dry ingredients are combined. Overmixing can lead to a tough cake. Use a spatula to fold in the flour and milk gently. - Achieving the perfect frosting consistency Start with softened butter. Gradually add powdered sugar. If the frosting is too thick, add a little cream or milk. Aim for a creamy, spreadable texture. - How to create a smooth finish Use an offset spatula to spread the frosting. Dip it in warm water to help smooth out the surface. This gives your cake a polished look. - Creative ways to decorate the cake for a festive look Slice the cake into triangles to mimic Christmas trees. Use green frosting to cover them. Add sprinkles or mini ornaments for a fun touch. - Suggestions for arranging decorations effectively Place larger decorations first, then fill in with smaller items. Create a scene with a star topper on the largest cake piece. This adds charm and interest. Pro Tips Use Room Temperature Ingredients: Ensure your butter and eggs are at room temperature for better emulsification and a fluffier cake texture. Don’t Overmix the Batter: Mix until just combined to keep the cake light and airy. Overmixing can lead to a dense texture. Check for Doneness Early: Oven temperatures can vary, so check your cake a few minutes before the recommended baking time to prevent overbaking. Customize Your Decorations: Get creative with edible decorations! Use various sprinkles, candies, or even fresh fruits to make your cake festive and unique. {{image_2}} You can easily change the flavor of your Christmas Tree Sheet Cake. Start by switching your extracts. Instead of vanilla, try using peppermint extract for a minty twist. You can also add lemon zest for a bright, fresh taste. To mix it up, add some cocoa powder to the batter. It gives a fun chocolate layer to your cake. For a spice kick, consider adding cinnamon or nutmeg. These flavors pair well with the holiday spirit. Want a gluten-free option? Substitute the all-purpose flour with a gluten-free blend. This works well and keeps the cake moist. If you need a vegan cake, you can replace eggs with unsweetened applesauce. Use coconut oil instead of butter, and almond milk for the dairy. Both options keep your cake tasty and fluffy. This cake is not just for Christmas. Make it fit any holiday! For Valentine’s Day, use pink and red frosting with heart sprinkles. For Halloween, use orange frosting and add candy pumpkins. You can also create a birthday cake by using bright colors and fun decorations. Use colored frosting to match the party theme. This cake's shape makes it a fun base for any celebration! To keep your Christmas Tree Sheet Cake fresh, follow these steps: - Wrap the cake: Use plastic wrap or aluminum foil to cover the cake well. This keeps it moist. - Use an airtight container: If you have one, place the wrapped cake in an airtight container for extra protection. - Store in the fridge: This cake lasts up to 4 days in the fridge. - Freezing the cake: If you want to keep it longer, freeze it. It can last for up to 3 months in the freezer. If you want to enjoy the cake warm, here’s how to reheat it: - Oven method: Preheat your oven to 350°F (175°C). Place slices on a baking sheet and heat for 10-15 minutes. - Microwave method: For a quick option, microwave a slice for 10-15 seconds. This keeps it soft and moist. - Serving suggestion: Serve with a scoop of vanilla ice cream or a drizzle of chocolate sauce for extra yum! You can prepare the cake and frosting ahead of time: - Bake the cake: Make the cake up to 2 days in advance. Wrap it tightly and store it in the fridge. - Frost later: Prepare the frosting the day you want to serve it. This keeps it fresh and fluffy. - Freezing options: If you want to freeze, bake the cake and wrap it well. Frost it after thawing for best results. You can use natural foods to color your cake. Spinach puree gives a nice green hue. You can also try matcha powder for a vibrant color. If you want a sweeter option, use pureed avocado. Each option adds a unique flavor to your cake. The decorated cake lasts up to three days at room temperature. If you store it in the fridge, it stays fresh for about one week. An undecorated cake can last up to five days at room temperature if wrapped well. Yes, you can adjust the recipe for different sizes. For smaller cakes, use a 9-inch round pan. Just reduce the baking time to about 20-25 minutes. You can also make this as a chocolate cake by adding cocoa powder to the flour mix. To stop sticking, grease the pan well with butter. You can also dust it with flour after greasing. Using parchment paper makes it easy to lift the cake out. Just cut a piece to fit the pan before pouring in the batter. For decorations, sprinkles are fun and colorful. Mini candy ornaments add a festive touch. You can also use chocolate stars for a classic look. Edible glitter makes your cake sparkle. Don’t forget to check for links to great decoration ideas online! In this post, we explored how to make a delicious cake. You learned about the main ingredients, detailed steps, and helpful tips. We also discussed fun variations, storage options, and FAQs. Remember, baking is fun! You can experiment with flavors and decorations. Keep practicing your skills and enjoy the sweet results. With these tips, you'll impress friends and family with your cake-making expertise. Happy baking!

Christmas Tree Sheet Cake Delightfully Festive Recipe

Get ready to impress this holiday season with a festive Christmas Tree Sheet Cake! This easy recipe combines simple ingredients

To create Pine Cone Chocolate Truffles, gather the following ingredients: - 8 ounces dark chocolate (70% cocoa), chopped - 1/2 cup heavy cream - 1 teaspoon vanilla extract - 1/4 teaspoon sea salt - 1/2 cup finely crushed almonds or walnuts (for pine cone texture) - 1/4 cup unsweetened cocoa powder (for dusting) - Edible gold or silver dust (optional, for decoration) These ingredients come together to make rich and delicious truffles. The dark chocolate gives a deep flavor, while the heavy cream adds creaminess. Vanilla and sea salt enhance the taste. The crushed nuts create that fun pine cone look. Finally, cocoa powder and optional edible dust add flair. Make sure to use high-quality chocolate for the best taste. Feel free to adjust the nuts based on your preference. This recipe is simple yet rewarding. You will impress everyone with your homemade treats! {{ingredient_image_1}} To melt the chocolate, use a double boiler method. Place a heatproof bowl over a pot of simmering water. Make sure the bowl does not touch the water. Add chopped dark chocolate and heavy cream to the bowl. Stir slowly until the chocolate melts and becomes smooth. This step is crucial. It ensures a creamy texture that binds the truffles. Once the chocolate is melted, take it off the heat. Add one teaspoon of vanilla extract and a quarter teaspoon of sea salt. Stir well to mix everything together. This will give your truffles a rich flavor that people will love. Next, let the chocolate mixture cool to room temperature. Once it cools, cover the bowl with plastic wrap. Place it in the refrigerator for about two hours. This chilling will help firm the mixture, making it easier to scoop and shape later. After chilling, use a small scoop or your hands to take about a tablespoon of the mixture. Roll it into a ball. Aim for a rustic look, similar to a pine cone. The uneven shape adds to the charm of each truffle. Next, roll each chocolate ball in finely crushed nuts. You can use almonds or walnuts for this step. The crushed nuts will create a great texture, mimicking the look of pine cones. Make sure each truffle is well-coated. For extra flavor and a nice finish, dust each truffle with unsweetened cocoa powder. Use a light hand to get an even coat. If you want to make it special, you can add edible gold or silver dust. This will give your truffles an elegant shine. Finally, place the truffles on a parchment-lined tray. Refrigerate them for another 30 minutes. This final chilling is important. It helps the truffles hold their shape and makes them perfect for serving. To mimic a pine cone look, shape the truffles by rolling them into a rustic form. Use your hands for a more organic shape. If you want extra help, a small scoop can make the process easier. Aim for uneven edges to add to the pine cone vibe. For a twist, try adding a teaspoon of espresso powder. It gives a nice coffee flavor to the truffles. You can also play with different types of chocolate. Dark chocolate gives a rich taste, while milk chocolate offers a sweeter note. Each choice changes the flavor profile. Present the truffles on a festive plate to impress your guests. Set them in a pine cone shape for a fun touch. You can also add fresh pine needles or a sprinkle of powdered sugar to mimic snow. For drinks, pair the truffles with a nice red wine or hot cocoa. It creates a cozy treat for any gathering. Pro Tips Quality Chocolate Matters: Use high-quality dark chocolate to enhance the flavor of your truffles. The better the chocolate, the richer the taste! Chill Time is Key: Allow the chocolate mixture to chill thoroughly to make shaping the truffles easier. If the mixture is too soft, it will not hold its shape. Experiment with Coatings: Try using different nuts or even crushed cookies for a unique texture. You can also roll the truffles in shredded coconut for a tropical twist. Presentation Matters: Arrange the truffles creatively on a platter. Use decorative elements like fresh pine needles or festive ribbons to enhance the visual appeal. {{image_2}} You can change the look and taste of your pine cone chocolate truffles by using different nuts. Try pecans, hazelnuts, or even pistachios for unique flavors. You can also add colorful sprinkles for fun. For a twist, use flavor-infused coatings like matcha powder or shredded coconut. Both options give your truffles a new taste and fun texture. If you want to make these truffles vegan, swap the heavy cream for coconut cream. Use dairy-free chocolate too. For a gluten-free version, ensure your nuts and cocoa powder are certified gluten-free. These changes let everyone enjoy your delicious truffles without worry. To make your truffles feel festive, add spices for winter flavors. A pinch of cinnamon or nutmeg gives a warm taste. For other holidays, decorate with colored icing or seasonal sprinkles. You can even shape them like small hearts or stars for Valentine's Day or Christmas. These small changes make your truffles perfect for any occasion. To keep your pine cone chocolate truffles fresh, store them in the fridge. Place them in an airtight container. This helps prevent them from drying out or absorbing odors. If you want to freeze them, use a freezer-safe container. They can last up to three months in the freezer. Just remember to let them thaw in the fridge before enjoying! Homemade truffles can last about one week in the fridge. If you store them properly, they maintain their great taste and texture. However, for the best flavor, enjoy them within the first few days. The longer they sit, the more they lose their charm. If you prefer to buy pre-made pine cone chocolate truffles, check local gourmet stores or bakeries. Many shops offer seasonal treats, especially around the holidays. You can also search online for specialty shops that deliver. To keep your truffles firm, start with cold hands. Warm hands melt chocolate. Chill the chocolate mixture well before shaping. After rolling, place them back in the fridge. This helps them firm up. Avoid leaving them out too long. Serve them chilled for the best shape. Yes, you can make these truffles ahead of time. Prepare the truffles and chill them. Store them in an airtight container in the fridge. They stay fresh for up to two weeks. Just remember to dust with cocoa right before serving for the best look. You can try many flavors! Here are some ideas: - Add espresso powder for a coffee kick. - Mix in orange zest for a citrus twist. - Use peppermint extract for a minty flavor. - Try almond or hazelnut liqueur for a nutty touch. Experimenting can lead to fun new tastes! Yes, kids can definitely help! They can scoop the chocolate and roll the truffles. Make sure they wash their hands first. Keep sharp tools and hot surfaces away from them. Supervise closely during the process. It makes a great family activity! You’ve learned the key steps to make delicious chocolate truffles. From selecting the right ingredients to perfecting your technique, every detail counts. Experiment with flavors and coatings to express your creativity. Remember to chill your truffles well for the best texture. With these tips, you can impress friends or treat yourself. So, gather your ingredients and start crafting your sweet creations. Enjoy the process as much as the tasty results!

Pine Cone Chocolate Truffles Delightful Treat Recipe

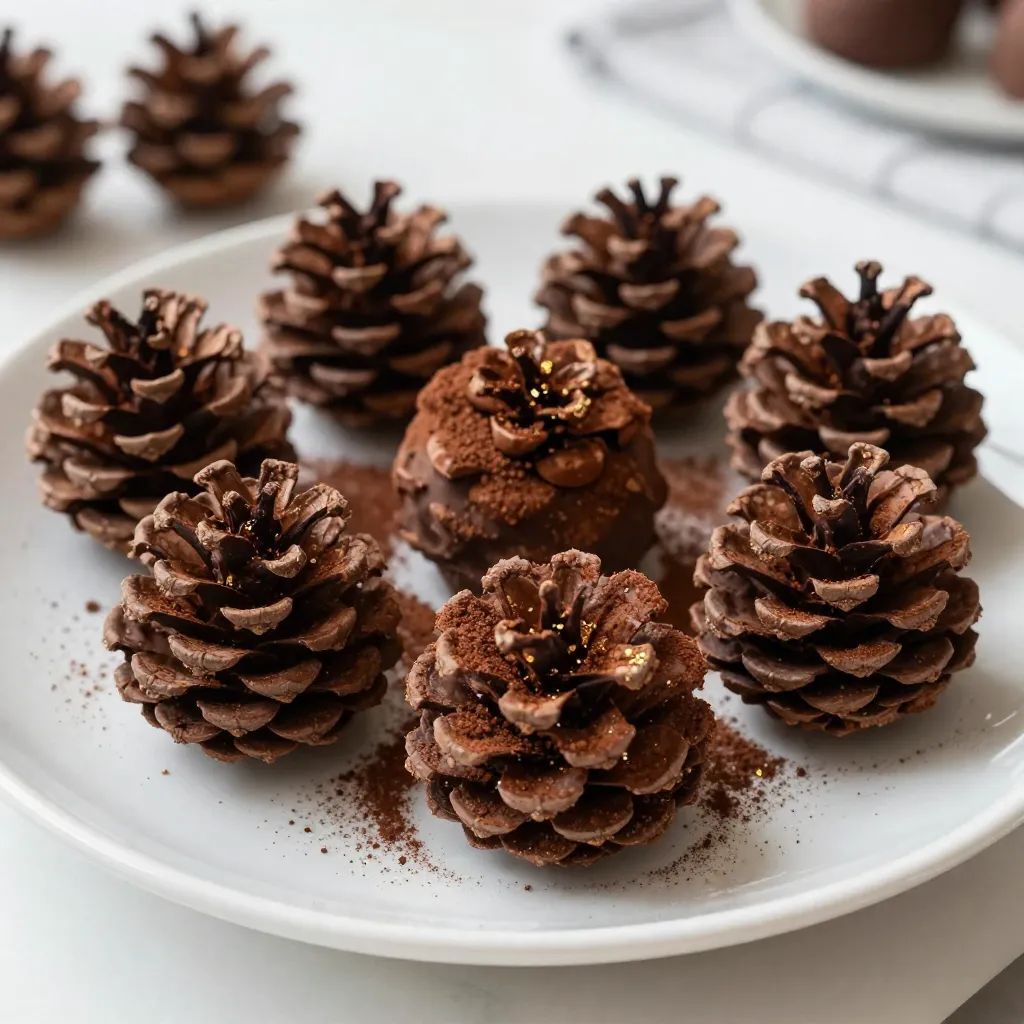
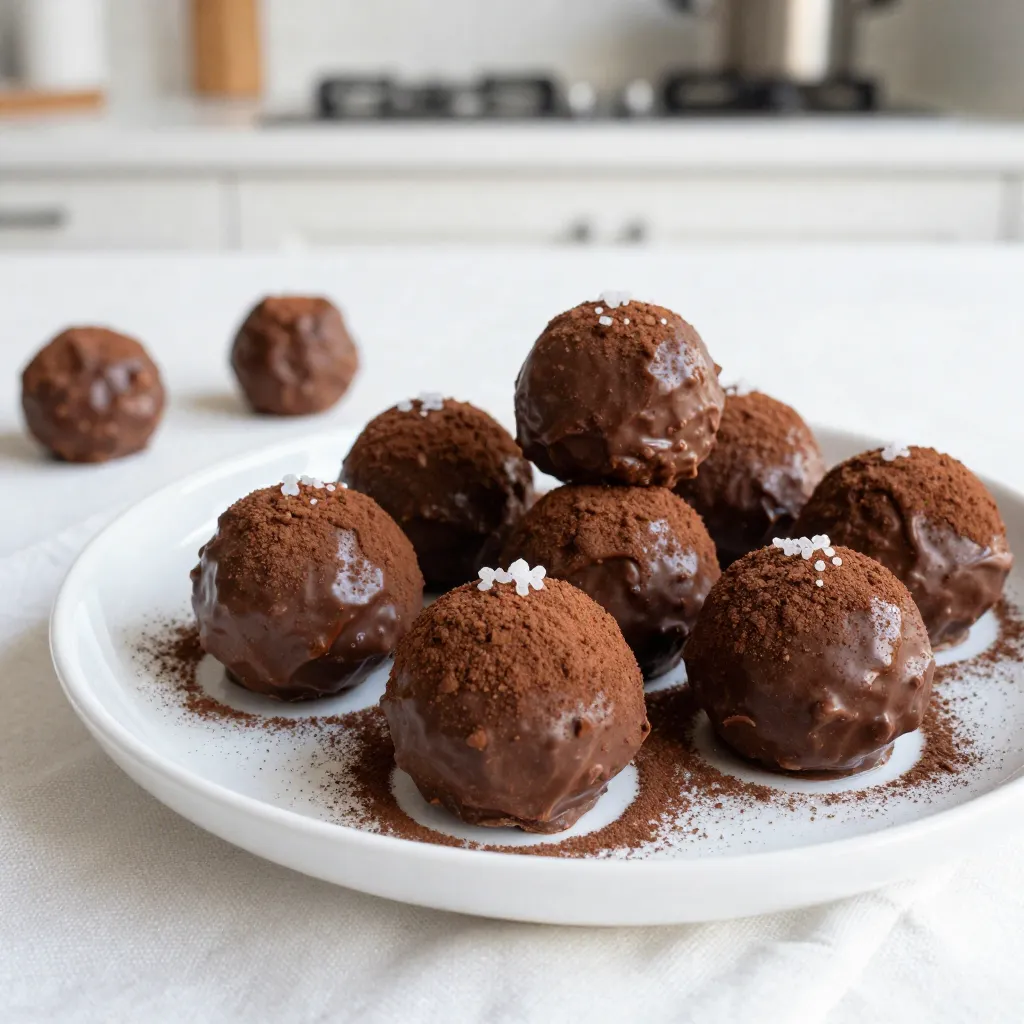
Do you love chocolate? If so, you’ll want to try my Pine Cone Chocolate Truffles! This fun, easy recipe combines

- 1 box of brownie mix - 1 cup cherry pie filling - 1 cup whipped cream cheese - ¼ cup chopped pecans or walnuts - Fresh cherries and mint leaves for garnish - ½ cup dark chocolate chips - Baking dish - Mixing bowls - Tray for freezing I love using a box of brownie mix for this recipe. It saves time and still gives great flavor. You can find cherry pie filling in most grocery stores. This adds that classic Black Forest taste. Whipped cream cheese is key for a rich and creamy filling. I sometimes add chopped nuts for crunch. They give a nice texture contrast. Fresh cherries and mint leaves make for beautiful garnishes. You can also use dark chocolate chips for extra chocolatey goodness. To make these brownie bombs, you need some simple tools. A baking dish helps you prepare the brownies. Mixing bowls are great for combining ingredients. A tray for freezing helps shape the brownie bombs perfectly. Gather all these ingredients and tools. You will be on your way to making a delightful dessert treat! {{ingredient_image_1}} 1. Preheat your oven as the brownie mix box says. Prepare your baking dish by greasing it or using parchment paper. 2. In a large bowl, mix the brownie mix with the required ingredients. This usually includes eggs, oil, and water. Stir until just combined. 3. Pour the brownie batter into your baking dish. Bake it according to the package instructions. A toothpick should come out with moist crumbs when done. Let the brownies cool completely. 1. While the brownies cool, grab another bowl. Mix the whipped cream cheese, vanilla extract, and powdered sugar together until smooth. 2. Once the brownies are cool, crumble them into small pieces in a large bowl. 3. Gently mix in the cherry pie filling. Be careful not to mash the cherries. 1. With your hands, shape the brownie mixture into small balls. Aim for about 1 inch in diameter. Press them firmly to keep them together. 2. Place the shaped brownie balls on a lined tray. Freeze them for about 30 minutes until they are firm. 3. While they freeze, melt the dark chocolate chips. You can use a microwave or a double boiler. Stir until smooth. 4. Take the brownie balls out of the freezer. Dip each ball into the melted chocolate, coating them fully. Return them to the tray. 5. For extra crunch, sprinkle some chopped nuts over the chocolate before it sets. 6. Refrigerate the dipped brownie bombs until the chocolate hardens, which takes about 15-20 minutes. 7. Serve chilled. Top each one with a dollop of whipped cream and a fresh cherry or mint leaf for a lovely touch. - Ensuring brownie consistency: Use the right amount of eggs and oil as stated on the box. This keeps the brownies moist and fudgy. Check for doneness with a toothpick. It should have some moist crumbs but not wet batter. - Proper mixing techniques: Mix the brownie batter just until combined. Overmixing can lead to tough brownies. Gently fold the ingredients to keep a light texture. - Achieving smooth chocolate coating: Melt dark chocolate slowly to avoid burning. Use a microwave or double boiler. Stir it well until it's creamy and glossy. This makes for a beautiful finish. - Adding toppings: After dipping, sprinkle chopped nuts on the chocolate before it sets. This adds a crunchy layer to your brownie bombs. You can also use sprinkles or coconut for fun variations. - Best practices for presentation: Place the brownie bombs on a decorative plate. Add a dollop of whipped cream and a fresh cherry on top. A mint leaf adds a nice touch of color. - Ideal serving temperature: Serve the brownie bombs chilled. This keeps the chocolate firm and the filling cool. Enjoy them straight from the fridge for the best flavor experience. Pro Tips Use Quality Ingredients: The better the chocolate and cherries, the richer and more flavorful your brownie bombs will be. Opt for high-quality dark chocolate and fresh or premium cherry pie filling for the best results. Chill the Mixture: After mixing the brownie and cherry filling, chilling the mixture before forming balls makes it easier to handle and helps them maintain their shape. Double Dip for Extra Decadence: For a thicker chocolate coating, dip the brownie bombs twice in melted chocolate, allowing them to set between dips for an indulgent treat. Customize Your Toppings: Feel free to get creative with toppings! Consider adding crushed Oreos, sprinkles, or even a drizzle of white chocolate for a unique twist. {{image_2}} You can change the flavor of your Black Forest Brownie Bombs easily. Try using different fruit fillings. For example, raspberry or strawberry pie filling works well. These fruits add a fresh twist to the classic taste. You can also mix in nuts. Instead of pecans or walnuts, use almonds or hazelnuts. Each nut gives a unique crunch and flavor. If you need gluten-free options, look for a gluten-free brownie mix. Many brands offer tasty choices that work great. You can also make this recipe dairy-free. Use non-dairy cream cheese for the filling. Brands like Tofutti or Kite Hill provide great alternatives. This way, everyone can enjoy these treats! How you present your brownie bombs can make a big difference. For special occasions, drizzle melted chocolate over them. This adds a nice touch and makes them look fancy. You can also sprinkle some colorful sprinkles on top. For garnishes, fresh cherries and mint leaves work well. They add a pop of color and freshness to each bite. To keep your Black Forest Brownie Bombs fresh, store them in an airtight container. This helps to keep moisture out and flavor in. You can place a layer of parchment paper between layers to avoid sticking. For best results, refrigerate them if you plan to eat them within a week. If you want to store them longer, freezing is a great option. Place the brownie bombs on a tray and freeze them for about 30 minutes until they are firm. Then, transfer them to a freezer-safe container. This way, they won’t stick together. In the fridge, your brownie bombs will last about 5 to 7 days. If you freeze them, they can last up to 3 months. To check for spoilage, look for any changes in color or texture. If they smell off or have mold, it’s best to discard them. To serve leftovers, let them sit at room temperature for about 10 minutes. This helps to bring back some of their soft texture. If you want them warm, you can microwave each bomb for about 10-15 seconds. Just be careful not to overheat them, or they might get too soft. Black Forest Brownie Bombs are a fun twist on the classic Black Forest cake. They blend rich brownie with sweet cherry filling and creamy cheese. I love how these bites capture the same great flavors in a small, easy-to-eat form. The chocolate coating and cherry on top make them look fancy too. They are perfect for parties or just a sweet treat at home. Yes, you can make these bombs ahead of time. I suggest making them up to two days in advance. After you coat them in chocolate, store them in the fridge. This keeps them fresh and tasty. If you want to make them even earlier, freeze them before coating in chocolate. Just thaw them in the fridge before you dip them. You can find Black Forest Brownie Bombs at some local bakeries or dessert shops. If you prefer online shopping, check out sites like Etsy or specialty dessert shops. Many places offer delivery for these tasty treats. You could also ask your favorite bakery to make them for you. In this post, we explored how to make Black Forest Brownie Bombs. You learned the key ingredients, including brownie mix and cherry pie filling. We walked through easy steps for preparation and tips for perfecting your dessert. Remember, you can customize these treats with different flavors or dietary options. Store them properly to enjoy later. These brownie bombs are not only fun to make but also perfect for sharing. Now you're ready to impress with this tasty treat!

Black Forest Brownie Bombs Delightful Dessert Treat

If you’re seeking a treat that combines rich chocolate with fruity delight, I’m excited to share my Black Forest Brownie

Older posts
Newer posts
← Previous Page1 Page2 Page3 … Page84 Next →

dsad

© 2026 Foodish Talk • Built with GeneratePress

Our Policies

  • Copyright Policy
  • Cookie Policy
  • GDPR Policy
  • Privacy Policy
  • Disclaimer
  • Terms Of Use

More Information

  • Home
  • About
  • Contact
  • Appetizers
  • Dessert
  • Dinner
  • Drinks
©2026, Foodish Talk About Back To Top