Skip to content
DisclaimerTerms Of UseGDPR PolicyCookie Policy

Foodish Talk

  • Home
  • Drinks
  • Appetizers
  • Dinner
  • Dessert
  • About
  • Contact
  • Privacy Policy
DisclaimerTerms Of UseGDPR PolicyCookie Policy

NO-ING-IMG

- 1 lb Brussels sprouts, trimmed and halved - 2 tablespoons sweet chili sauce - 1 tablespoon olive oil - 1 teaspoon garlic powder - 1 teaspoon onion powder - Salt and pepper to taste - 1 tablespoon sesame seeds (optional) - Fresh cilantro, for garnish You can swap sweet chili sauce for other sauces. Try sriracha or hoisin sauce. If you need a different oil, avocado oil works well. For garlic and onion powder, use fresh garlic and onion if you prefer. Just chop finely and add more to taste. When choosing Brussels sprouts, look for bright green color. They should feel firm, not soft. Bigger sprouts can be sweeter, but smaller ones are often more tender. Always avoid any yellow or wilted leaves. Fresh Brussels sprouts make a big difference in taste. 1. Preheat the air fryer Start by preheating your air fryer to 375°F (190°C). This takes about 5 minutes. The hot air helps to make the Brussels sprouts crispy. 2. Mixing the ingredients correctly In a mixing bowl, add 1 lb of halved Brussels sprouts. Pour in 1 tablespoon of olive oil and 2 tablespoons of sweet chili sauce. Add 1 teaspoon of garlic powder, 1 teaspoon of onion powder, and salt and pepper to taste. Toss everything well. Make sure the sprouts are coated nicely. 1. Arranging Brussels sprouts in the air fryer basket Place the seasoned Brussels sprouts in the air fryer basket. Spread them out in a single layer. Avoid stacking them. This helps them cook evenly. 2. Cooking time and temperature settings Cook the Brussels sprouts for 12-15 minutes. Shake the basket halfway through. This way, they will turn golden brown and crispy on all sides. 1. How to achieve the perfect crispiness When the sprouts are golden and crispy, remove them from the air fryer. If you want extra crunch, you can cook them for a few more minutes. Just watch closely to avoid burning. 2. Serving suggestions for presentation Serve the Brussels sprouts in a shallow dish. Drizzle some sweet chili sauce on top. Sprinkle sesame seeds for added flavor and crunch. Garnish with fresh cilantro for a nice pop of color. This makes the dish look as good as it tastes! To get the best flavor, use fresh Brussels sprouts. Look for bright green veggies. Trim the ends and halve them. This helps them cook evenly. The sweet chili sauce adds a nice kick. Balance it with garlic and onion powder for depth. Adjust salt and pepper to your taste. To prevent sogginess, make sure to coat the Brussels sprouts lightly in olive oil. Too much oil can make them wet. You want each piece to be coated but not swimming in oil. Avoid overcrowding in the air fryer. If you stack the Brussels sprouts, they won’t cook well. They need space for hot air to circulate. Cook in batches if needed to keep them crispy. Shaking the basket halfway through cooking is crucial. This ensures even cooking and crispiness. When you shake, the sprouts flip and brown nicely on all sides. You can prepare Brussels sprouts in advance. Trim and halve them a day before. Store in a sealed bag in the fridge. This saves time when cooking day arrives. For quick clean-up, line the air fryer basket with parchment paper. It catches drips and makes washing easy. Just toss the paper when you’re done. {{image_2}} You can spice up your Air Fryer Sweet Chili Brussels Sprouts. Add some red pepper flakes for heat. You could also mix in a bit of sriracha. This gives a nice kick to your dish. If you want something sweeter, try adding pineapple or mango chunks. These fruits bring out the sweetness in the chili sauce. They make the dish bright and fresh. If you're vegan, use a plant-based sweet chili sauce. This keeps the dish tasty and friendly. For gluten-free options, check the sauce label carefully. Many sweet chili sauces are gluten-free. If you want a low-carb version, skip the sweet chili sauce. Instead, use a mix of olive oil and lemon juice. This keeps your sprouts flavorful without added sugars. Air Fryer Sweet Chili Brussels Sprouts pair well with many main dishes. Serve them alongside grilled chicken or fish. They also fit nicely with rice or quinoa for a complete meal. Want to make a salad? Toss the cooked Brussels sprouts with mixed greens. Add a light vinaigrette for a fresh, crunchy salad. This way, you have a perfect dish for any table! To store cooked Brussels sprouts, let them cool first. Place them in an airtight container. This helps keep them fresh. You can store them in the fridge for up to three days. Make sure to label your container with the date. This way, you know how long they have been in there. To freeze Brussels sprouts, start with fresh ones. Trim and halve them as you did for cooking. Blanch them in boiling water for two minutes. Then, quickly cool them in ice water. Drain and dry them well. Place them in freezer bags, removing as much air as possible. They can stay frozen for about three months. For reheating, cook them straight from frozen. This keeps their flavor and texture intact. You can reheat your Brussels sprouts in the air fryer or microwave. The air fryer gives the best results. Heat them at 350°F (175°C) for about five to seven minutes. This helps them stay crispy. In the microwave, use a microwave-safe dish. Heat in short bursts of 30 seconds. Stir in between to keep them even. This method may soften them a bit, but they will still taste good. How long to cook Brussels sprouts in the air fryer? I cook Brussels sprouts in the air fryer for 12-15 minutes at 375°F (190°C). This time gives them a nice crisp. Remember to shake the basket halfway through to cook them evenly. Can I use frozen Brussels sprouts for this recipe? Yes, you can use frozen Brussels sprouts. Just note they may need a few extra minutes to cook. Thaw them first for best results. Why are my Brussels sprouts not getting crispy? If your Brussels sprouts are not crispy, check the oil amount. Too little oil can cause them to steam instead of crisp. Make sure they are in a single layer in the air fryer, too. What to do if the sweet chili sauce burns? If the sweet chili sauce burns, lower the temperature next time. You can add the sauce later in the cooking process. This keeps it from burning and helps it stick better. What are the health benefits of Brussels sprouts? Brussels sprouts are packed with vitamins C and K. They also have fiber, which helps digestion. These little veggies are great for your health and can support your immune system. Caloric content and nutritional breakdown per serving Each serving of Air Fryer Sweet Chili Brussels Sprouts has about 150 calories. They provide protein, healthy fats, and carbs, making them a balanced side dish. We explored how to make tasty air fryer sweet chili Brussels sprouts. You learned about the key ingredients, clever substitutions, and tips for picking the freshest sprouts. I provided step-by-step cooking instructions and helpful tricks to perfect your dish. Try these variations for additional flavors and learn best practices for storage. With this recipe, you can enjoy a delicious dish that’s easy and fun to make. Your next meal will be a winner with these crispy, flavor-packed Brussels sprouts!

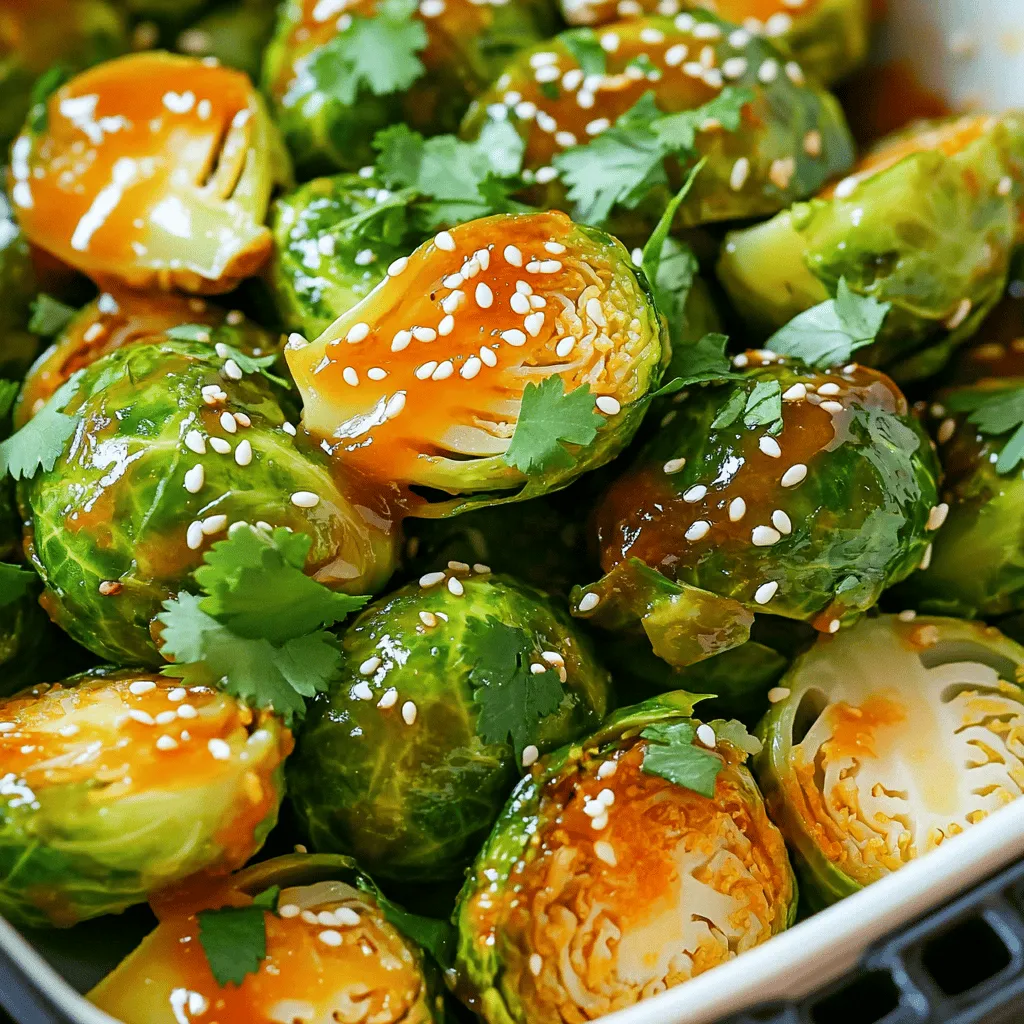
Air Fryer Sweet Chili Brussels Sprouts Flavorful Treat

Are you ready to elevate your snacking game? Air Fryer Sweet Chili Brussels Sprouts are a flavorful treat that will

- 1 pound potato gnocchi - 2 cups cherry tomatoes, halved - 1 cup heavy cream - 1 tablespoon olive oil - 3 cloves garlic, minced - 1 teaspoon sugar - Salt and pepper to taste - 1 teaspoon dried Italian herbs - 1 cup fresh basil leaves, chopped - Grated Parmesan cheese for serving To create this creamy tomato basil gnocchi, you need a mix of simple, fresh ingredients. Start with potato gnocchi. They provide a soft, chewy base that pairs well with the sauce. Cherry tomatoes add sweetness and color. Heavy cream gives the dish its rich, smooth texture. Garlic adds a punch of flavor, while the sugar balances the acidity of the tomatoes. You should also consider salt and pepper to enhance the taste. Dried Italian herbs bring a classic flavor to the dish. Fresh basil gives it a bright, aromatic finish. Finally, grated Parmesan cheese adds a salty, nutty touch when serving. - Calories per serving: Approximately 450 - Macronutrient breakdown: - Carbohydrates: 45g - Fats: 25g - Proteins: 10g This meal offers a satisfying balance of carbs, fats, and proteins. The potato gnocchi and cream contribute to the carb and fat content. Meanwhile, the sauce and cheese add protein to keep you full. This dish not only tastes great, but it also provides good energy for the day. To boil potato gnocchi, fill a large pot with salted water. Bring it to a rolling boil. Add the gnocchi gently. Keep an eye on them as they cook. They will float to the top when done, which takes about 2-3 minutes. Once they float, drain and set them aside. For perfect doneness, do not overcrowd the pot. If you have a lot of gnocchi, cook them in batches. This helps each piece cook evenly and avoids sticking. Start by heating olive oil in a large skillet over medium heat. Add minced garlic and sauté for about 1 minute. You want the garlic to smell nice but not burn. Next, add halved cherry tomatoes to the skillet. Stir them gently. Sprinkle with sugar, salt, pepper, and dried Italian herbs. Cook for about 5-7 minutes. You’ll notice the tomatoes soften and release their juices, creating a lovely base for your sauce. To enhance the flavors, consider adding a splash of balsamic vinegar or a pinch of red pepper flakes. These small details can elevate the dish. Pour in the heavy cream and stir to combine. Let the sauce simmer for 3-4 minutes until it thickens slightly. Once your sauce is ready, it’s time to add the cooked gnocchi. Gently toss the gnocchi in the sauce until they are well coated. Use a spatula or tongs for even mixing. If the sauce seems too thick, add a splash of pasta water to loosen it up. This water contains starch and helps the sauce cling to the gnocchi. Finally, stir in the fresh basil and cook everything for 2 more minutes. This step lets the basil release its flavor into the dish. Serve hot, topped with grated Parmesan cheese and a sprinkle of fresh basil for a beautiful finish. To keep your sauce from burning, watch the heat closely. Medium heat is ideal for cooking garlic and tomatoes. Stir often to help the ingredients blend well. If the garlic starts to brown, it can make the sauce taste bitter. Balancing flavors with herbs is key to this dish. Fresh basil adds a bright taste. Dried Italian herbs give depth. Mix them in at the right time. Add the fresh basil at the end for a vibrant kick. Pair this dish with a simple green salad. A light salad with lemon dressing adds freshness. Garlic bread also works well. It’s great for soaking up any leftover sauce. For garnish, sprinkle grated Parmesan cheese on top. Add extra basil leaves for color. This makes the dish look inviting and delicious. Use a large pot for boiling the gnocchi. A sturdy skillet is great for making the sauce. A wooden spoon helps to mix the ingredients gently. You’ll need a sharp knife for chopping tomatoes and basil. A cutting board is essential too. These tools make cooking smooth and easy. {{image_2}} You can make this dish heartier by adding protein. Chicken or shrimp both work well. For chicken, cut it into bite-sized pieces. Sauté the chicken in olive oil until it’s golden and cooked through. Then add the garlic and follow the recipe. For shrimp, add them after the tomatoes soften. Cook until they turn pink. If you prefer vegetarian options, try adding chickpeas or lentils. They add protein and a nice texture. To make the dish vegan or lactose-free, swap out the heavy cream. You can use coconut cream or cashew cream instead. Both options keep the dish creamy without dairy. For a lighter option, you could also use almond milk with a bit of cornstarch to thicken it. It will still taste great while meeting dietary needs. Let your creativity shine by adding spices or veggies. A pinch of red pepper flakes adds heat. Fresh spinach or kale can boost nutrition and color. You might also try adding mushrooms for an earthy flavor. Herbs like oregano or thyme will enhance the taste as well. Don’t be afraid to experiment with what you love! To keep your creamy tomato basil gnocchi fresh, store it in an airtight container. Make sure it cools to room temperature first. Place it in the fridge. This way, it will last for up to three days. When you're ready to eat, just reheat it on the stove or in the microwave. If you want to save some gnocchi for later, freezing is a great option. First, let the dish cool completely. Next, divide it into portions. Use freezer-safe bags or containers. Squeeze out any air before sealing. This helps prevent freezer burn. It can last up to three months in the freezer. To reheat, thaw it overnight in the fridge. Then, warm it slowly in a skillet over low heat. Add a splash of cream or water to keep it creamy and prevent sticking. Leftover gnocchi is versatile! You can create a new dish with it. Try making a gnocchi bake. Just layer it with cheese and sauce in a baking dish, then bake until bubbly. Another idea is to sauté it with veggies and a bit of pesto for a quick meal. You can also toss it into a soup for added texture and flavor. Gnocchi cooks quickly. You will only need about 2-3 minutes in boiling water. They are done when they float to the top. This indicates they are ready to drain and mix with your sauce. Yes, you can use store-bought gnocchi. It saves time and effort. Many brands offer tasty options. Just follow the cooking instructions on the package for best results. You can try many sauces with gnocchi. Here are some ideas: - Marinara sauce for a classic taste. - Pesto sauce for a fresh, herbal flavor. - Alfredo sauce for a rich and creamy option. Experiment with your favorites to change the dish! Yes, you can make this dish gluten-free! Look for gluten-free gnocchi made from potatoes or rice flour. They taste great and work well with the creamy tomato sauce. This blog post covered a fun and tasty recipe for potato gnocchi in creamy tomato sauce. You learned about the ingredients, step-by-step instructions, and tips for great flavors. We also explored ways to customize the dish and handle leftovers. With easy steps and versatile options, you can enjoy this meal any time. Get creative with your ingredients and share this recipe with others. Your kitchen adventures will be enjoyable, satisfying, and delicious!

Creamy Tomato Basil Gnocchi Flavorful Comfort Meal

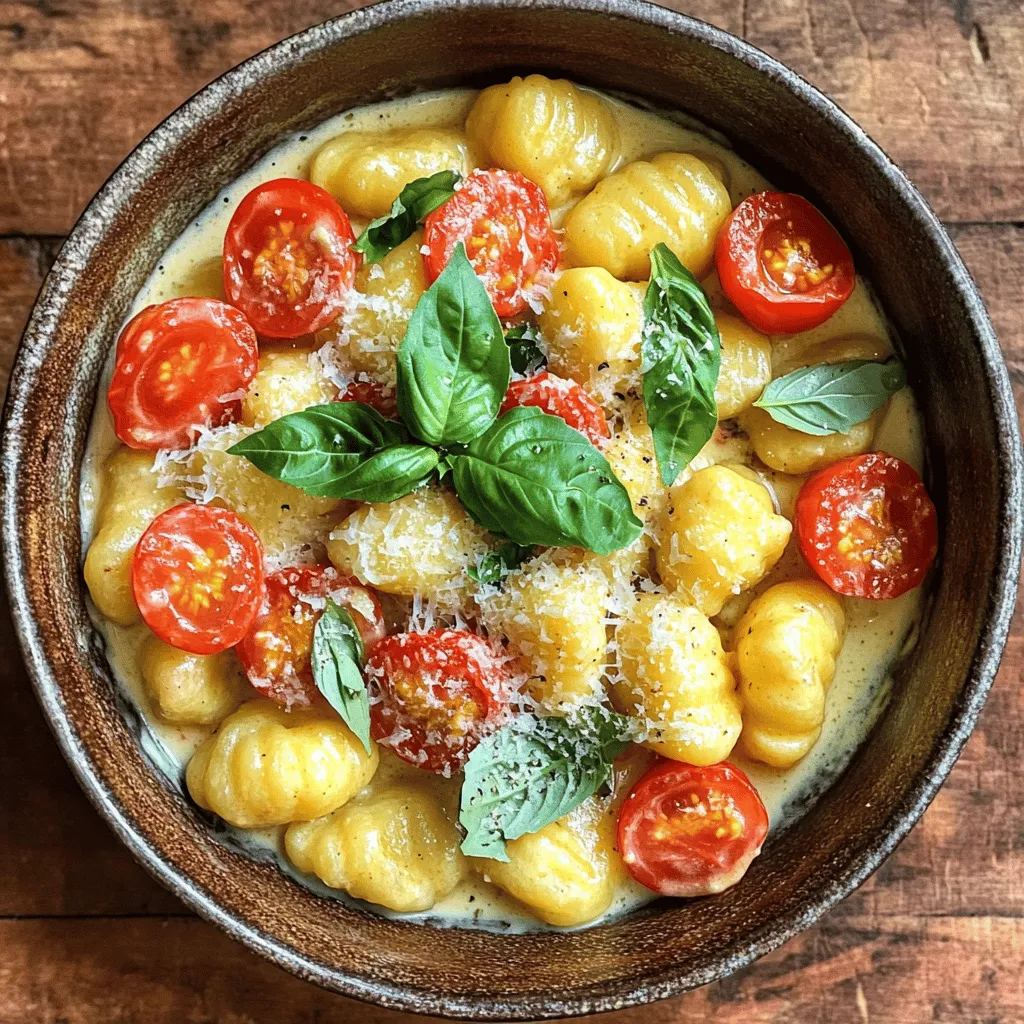
Are you ready for a cozy meal that warms the heart? My Creamy Tomato Basil Gnocchi is the answer! This

To make Pumpkin Cheesecake Truffles, you need a few key ingredients. These items create a rich and flavorful treat. Here’s what you’ll need: - 8 oz cream cheese, softened - 1 cup pumpkin puree - 1/2 cup powdered sugar - 1 teaspoon vanilla extract - 1 teaspoon pumpkin pie spice - 1 cup graham cracker crumbs - 1 cup white chocolate chips - 1 tablespoon coconut oil - Pinch of sea salt These ingredients work together to give the truffles their creamy texture and warm fall flavor. The cream cheese adds richness, while the pumpkin brings moisture and taste. The powdered sugar sweetens the mixture, and vanilla extract adds depth. Pumpkin pie spice brings that classic fall flavor we all love. Graham cracker crumbs provide the perfect crunch, making each bite interesting. The white chocolate coating adds sweetness and a lovely finish. Coconut oil helps the chocolate melt smoothly and harden nicely. Finally, a pinch of sea salt balances all the flavors. With these ingredients, you’re ready to create a delicious fall treat that everyone will love! To start, gather your ingredients. In a large bowl, combine these items: - 8 oz cream cheese, softened - 1 cup pumpkin puree - 1/2 cup powdered sugar - 1 teaspoon vanilla extract - 1 teaspoon pumpkin pie spice - Pinch of sea salt Mix these together until the mixture is smooth and creamy. This step is key for a rich flavor. Once mixed, add in the graham cracker crumbs. Stir until everything is well combined. Next, cover the bowl with plastic wrap and chill the mixture in the fridge for about 1 to 2 hours. This helps it firm up, making it easier to handle. Once it’s chilled, use a small cookie scoop or your hands to scoop out the mixture. Roll each scoop into balls, about 1 inch in size. Place these on a parchment-lined baking sheet. For extra firmness, freeze the truffles for 30 minutes. This step is important for easy coating later on. While the truffles chill, melt your white chocolate and coconut oil. Use a microwave-safe bowl and heat in 30-second intervals. Stir after each interval until it’s smooth. When ready, take the truffles from the freezer. Using a fork, dip each truffle into the melted chocolate. Make sure each truffle is coated evenly. Let any excess chocolate drip off before placing them back on the parchment paper. If you want, sprinkle extra graham cracker crumbs or pumpkin pie spice on top of the truffles. This adds a nice touch. Allow the truffles to sit at room temperature until the chocolate hardens. You can also speed this up by placing them in the fridge for about 15 minutes. Enjoy your delightful Pumpkin Cheesecake Truffles! To get the right texture for your truffles, the cheesecake mixture should be smooth and creamy. It needs to be thick enough to hold its shape when scooped. If it’s too runny, add a bit more graham cracker crumbs. Chill the mixture for 1 to 2 hours before shaping. This time allows it to firm up, making it easier to roll into balls. You can make your truffles even more special with fun toppings. Consider using crushed graham crackers, cinnamon, or mini chocolate chips. Each topping adds a unique twist. For flavor, try adding a pinch of nutmeg or even a splash of maple syrup to the mixture. This can give your truffles a different taste that might surprise your friends. Serve the truffles on a nice plate or in cupcake liners for a fun touch. They look great and make for easy serving. Pair these treats with hot cider, coffee, or even a sweet dessert wine. The flavors complement each other well and make your treat time even more enjoyable. {{image_2}} You can easily add your twist to these truffles. Try different spices like cinnamon or nutmeg. These spices can enhance the warm flavors. You can also use dark chocolate instead of white. Dark chocolate gives a richer taste that pairs well with pumpkin. If you want a gluten-free treat, simply use gluten-free graham crackers. They work just as well in this recipe. For a vegan option, swap the cream cheese for a vegan cream cheese. You can also use maple syrup instead of powdered sugar for sweetness. How you present these truffles can make them extra special. You can package them in small boxes tied with ribbons for gifts. This adds a nice touch for friends or family. For serving, arrange them on a festive platter. You can also use cupcake liners for an attractive display. To keep your Pumpkin Cheesecake Truffles fresh, store them properly. Place them in an airtight container. This keeps moisture out and flavor in. In the fridge, they stay tasty for up to a week. Be sure to layer them with parchment paper to avoid sticking. If you want to save some for later, freezing is a great option. Freeze the truffles on a baking sheet first. After they’re firm, transfer them to a freezer-safe bag. They can last up to three months in the freezer. Just remember to label the bag with the date! To enjoy your truffles at their best, follow some best practices. Keep them in the fridge for no more than a week. If you see any moisture on the surface, it's time to toss them. Signs of spoilage include a change in color or a sour smell. If you notice these signs, don’t eat them. It's better to be safe than sorry! Yes, you can use fresh pumpkin! Fresh pumpkin adds bright flavor and a lovely texture. It is fun to roast and puree your own pumpkin. The fresh kind can feel more natural without added preservatives. However, it can be more work than using canned pumpkin. Canned pumpkin is often more convenient and consistent. It gives you a smooth base for your truffles. If you choose fresh, make sure to cook it well and drain any excess water. These truffles are tasty for up to one week when stored correctly. Keep them in an airtight container in the fridge. This helps keep them fresh and firm. If you want to save them for longer, you can freeze the truffles. They last up to three months in the freezer. To thaw, just place them in the fridge overnight. Enjoy them chilled for the best flavor! You can use dark chocolate! It will change the taste and texture a bit. Dark chocolate adds a rich, deep flavor that contrasts nicely with the sweet pumpkin. The texture may be less creamy than white chocolate. For a smoother finish, you can add a bit of coconut oil to the dark chocolate. This helps it melt well and coat the truffles nicely. Experiment with different types of chocolate for fun flavors! You learned how to make tasty pumpkin cheesecake truffles today. We covered the key ingredients and how to mix them smoothly. I shared step-by-step instructions for forming and coating your truffles. Tips helped you get the best texture and ideas for decorating. We explored flavor and dietary variations to fit your needs. Lastly, I shared storage advice and answered common questions. Get ready to impress your friends and family with these delightful treats! Enjoy making them.

Pumpkin Cheesecake Truffles Delicious Fall Treat

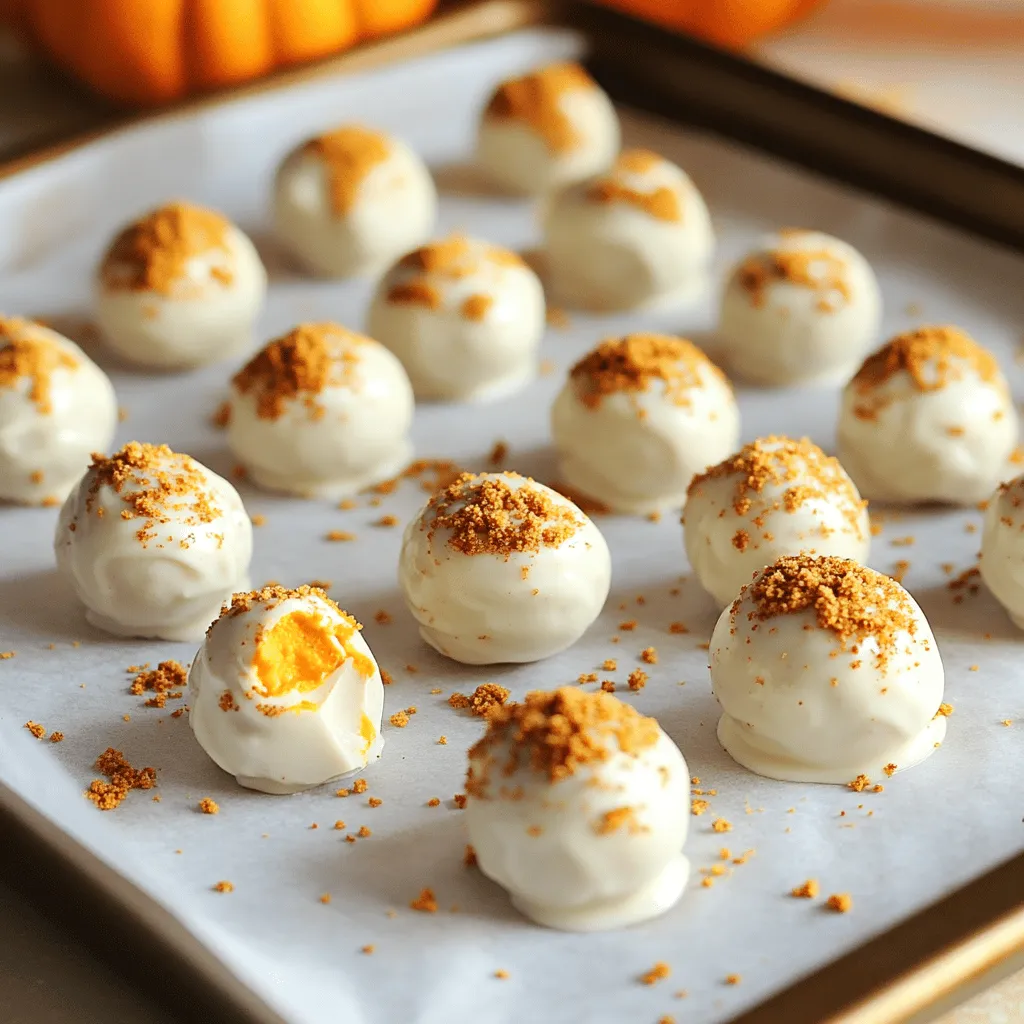
Looking for a cozy fall treat? These Pumpkin Cheesecake Truffles are the perfect mix of creamy and sweet. With just

- 1 loaf of fresh sourdough bread - 1/2 cup unsalted butter, melted - 4 cloves garlic, minced To start, I always choose a fresh loaf of sourdough bread. Its crusty outside and soft inside give the best pull-apart texture. Next, I use unsalted butter. This lets me control the salt in my dish. Garlic is key. I use four cloves, finely minced, to pack in that strong flavor. - 1 tablespoon fresh parsley, finely chopped - 1 teaspoon dried oregano - 1 teaspoon salt - 1/2 teaspoon black pepper For extra flavor, I add fresh parsley and dried oregano. The parsley adds a nice color and fresh taste. The oregano brings warmth and a hint of earthiness. A teaspoon of salt enhances all the flavors. Black pepper adds a subtle kick, making the bread even more delicious. - 1 cup grated Parmesan cheese - 1/2 cup shredded mozzarella cheese Cheese is where the magic happens! I use one cup of grated Parmesan. It has a sharp flavor that melts beautifully. Then, I add half a cup of shredded mozzarella. This cheese gives a lovely stretch when you pull apart the bread. Together, they create a cheesy, gooey center that is hard to resist! - Preheat the oven to 350°F (175°C). - Take your sourdough loaf and use a sharp serrated knife. Cut it into a grid pattern. Make sure to leave the bottom intact. Space your cuts about 1 inch apart both ways. This will help the bread pull apart easily later. - In a small bowl, combine 1/2 cup of melted unsalted butter with 4 minced garlic cloves. - Add 1 tablespoon of finely chopped fresh parsley, 1 teaspoon of dried oregano, 1 teaspoon of salt, and 1/2 teaspoon of black pepper. - Mix it well until the garlic and herbs blend into the butter. This is your garlic herb butter. - Carefully drizzle the garlic butter all over the cuts in the bread. Make sure it seeps into every crack for great flavor. - Stuff 1 cup of grated Parmesan cheese into the cuts. Follow this with 1/2 cup of shredded mozzarella cheese. Spread the cheese evenly so every bite is cheesy. - Wrap the stuffed bread tightly in aluminum foil. Place it on a baking sheet to catch any drips. - Bake in the preheated oven for 15 minutes. Then, unwrap the top of the bread. Bake it for another 10-15 minutes until the cheese is melted, bubbly, and the bread is golden brown. - Once done, take it out of the oven and let it cool slightly. Enjoy pulling apart the cheesy goodness! To get the best pull-apart texture, start with fresh sourdough bread. Sourdough has the right crust and chewiness. It holds up well when you cut it. Cut the loaf into a grid pattern, about one inch apart. This allows the garlic butter and cheese to seep in. Bake the bread for about 15 minutes wrapped in foil. This keeps it soft. Then, unwrap it and bake for 10-15 more minutes. This step makes the cheese melt and the top golden. You can boost the flavor easily. Adding herbs like basil or rosemary gives it a fresh twist. Use garlic chives instead of regular garlic for a milder taste. Feel free to mix different cheeses to make it your own. Try adding cheddar for a sharp taste or gouda for a smoky flavor. Each cheese adds a new layer of taste. For serving, place the bread on a large platter. This makes it easy for guests to pull apart pieces. You can also use a wooden cutting board for a rustic look. Pair the bread with dips like marinara or a creamy ranch. These dips complement the flavors and add extra fun to the meal. {{image_2}} You can change up the cheese in this recipe. Use your favorite kinds! Try cheddar, gouda, or even a spicy pepper jack. Each cheese brings its own taste. Mixing different cheeses gives a fun twist. You can make it a true cheese lover's dream. Stuff the bread with a blend of cheeses for extra flavor. Just remember to keep the texture in mind. You want it to melt well and pull apart easily. Herbs can really change the game for this bread. Fresh garlic chives add a nice touch. You can also use basil for a sweet, fragrant flavor. Rosemary gives a woodsy taste that works great too. Feel free to mix and match herbs. Just think about what you love. Adding a pinch of red pepper flakes can spice things up. This is a fun way to make the bread your own. If you need gluten-free options, use gluten-free bread. Many stores sell great gluten-free loaves now. For dairy-free, there are many cheese substitutes. Look for brands made from nuts or soy. These can melt and taste great in your pull-apart bread. Adjusting the recipe for your diet makes it more enjoyable. You can still have all the flavor while meeting your needs. To keep your Garlic Parmesan Pull-Apart Bread fresh, wrap it tightly in plastic wrap. This helps to lock in moisture and flavor. You can also store it in an airtight container. Place it at room temperature for up to two days. Avoid the fridge, as it can dry out the bread. If you want to save some for later, freezing is a great option. First, let the bread cool completely. Then, wrap it tightly in plastic wrap and aluminum foil. This double layer protects it from freezer burn. You can freeze it for up to three months. When ready to eat, just thaw it in the fridge overnight. To enjoy your bread again, preheat your oven to 350°F (175°C). Unwrap the bread and place it on a baking sheet. Heat for about 10-15 minutes. This method keeps the crust crispy and warms the cheese. You can also microwave individual pieces for about 20-30 seconds, but they won’t be as crispy. Yes, you can use store-bought bread. Look for a hearty loaf. Good options are Italian or French bread. These breads have a nice texture and can hold the garlic butter well. Just make sure it is fresh. Stale bread may not pull apart as well. To keep your bread from getting soggy, follow these tips: - Use fresh bread: Stale bread absorbs too much moisture. - Don't overdo the butter: Use just enough garlic butter to coat. - Bake properly: Make sure to let the bread bake until golden brown. This helps create a crust that keeps the inside fluffy. This bread tastes great with many dips. Here are some ideas: - Marinara sauce: The tangy flavor of marinara pairs perfectly. - Ranch dressing: Creamy ranch adds a nice touch. - Garlic aioli: A rich garlic aioli complements the bread's flavors. - Cheese sauces: A warm cheese dip is also a hit. These dips make for a fun and tasty experience! This blog post shared a tasty recipe for Garlic Parmesan Pull-Apart Bread. We covered the main ingredients, like sourdough, butter, and cheese. Step-by-step instructions ensured you can follow easily. Tips helped enhance flavors and presentation, while variations catered to different diets. Remember, your bread choice and baking time matter for texture. Enjoy this dish with your favorite dips. I hope you make this fun treat soon!

Garlic Parmesan Pull-Apart Bread Easy and Delicious Recipe

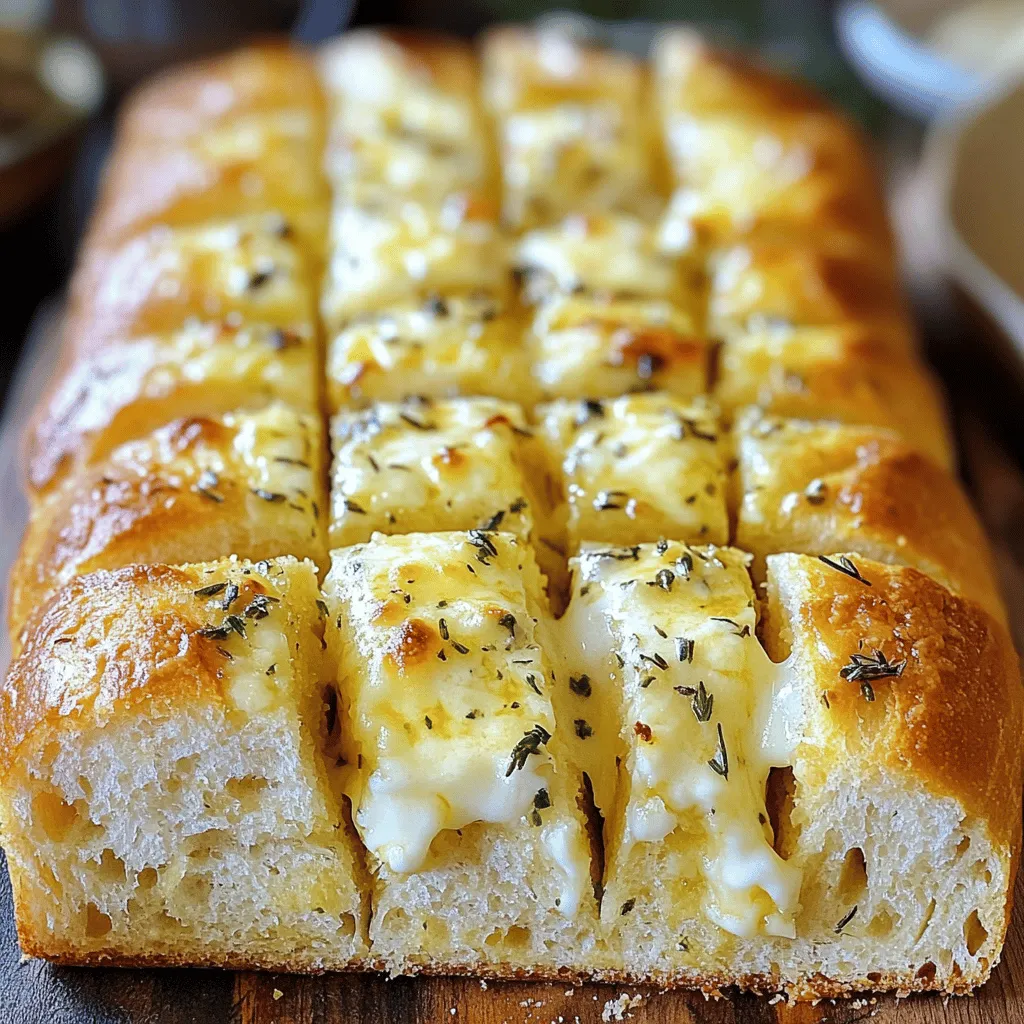
Are you ready to indulge in a warm, cheesy treat? My Garlic Parmesan Pull-Apart Bread is both simple and delicious!

- 1 lb sirloin steak, cut into bite-sized pieces - 8 oz cremini mushrooms, halved - 4 tablespoons unsalted butter - 4 cloves garlic, minced - 1 teaspoon fresh thyme leaves - 1 teaspoon fresh rosemary, minced - Salt and pepper to taste - 1 tablespoon olive oil - Fresh parsley, chopped (for garnish) When making Garlic Butter Steak Bites with Mushrooms, I focus on quality ingredients. Each one plays a key role in the dish's flavor. Sirloin steak is my go-to for steak bites. It is tender and has great flavor. Cut it into bite-sized pieces for quick cooking. This ensures each piece gets that nice sear. Cremini mushrooms add earthiness. They are firmer than regular mushrooms, so they hold up well in the dish. Halving them helps them cook evenly. Unsalted butter is best for this recipe. It allows me to control the salt level. The butter adds richness that complements the steak and mushrooms. Fresh garlic brings a punch of flavor. I use four cloves for a strong garlic taste. Mince it finely to release its oils and aroma. Fresh thyme and rosemary give depth to the dish. I prefer one teaspoon of each. Their herbal notes balance the richness of the butter. Salt and pepper are essential for seasoning. I add them to taste. They enhance the natural flavors of the steak and mushrooms. Olive oil is crucial for searing the steak. I use one tablespoon to help achieve a golden crust. It also adds a light fruitiness. Fresh parsley brightens the dish. I chop it finely for a pop of color and freshness. It makes the dish look inviting and adds a nice flavor contrast. With these ingredients, you can create a dish that is both simple and full of flavor. Each component adds to the overall experience, making your meal memorable. - Preparing the skillet: Start by heating 1 tablespoon of olive oil in a large skillet over medium-high heat. Make sure the oil is hot before adding the steak. This step helps achieve a nice sear on the meat. - Searing technique: Add the steak bites to the skillet in a single layer. Avoid overcrowding the pan. Season them with salt and pepper. Cook for about 3-4 minutes until they are browned on all sides. This creates a delicious crust. - Proper seasoning: After searing, remove the steak bites from the skillet. Set them aside on a plate. This keeps them warm while you prepare the garlic butter sauce. - Melting the butter: In the same skillet, lower the heat to medium. Add 4 tablespoons of unsalted butter. Let it melt slowly. This allows the butter to develop flavor without burning. - Sautéing garlic and herbs: Once the butter has melted, add 4 cloves of minced garlic, 1 teaspoon of fresh thyme leaves, and 1 teaspoon of minced rosemary. Sauté for about 1 minute until fragrant. The aroma will fill your kitchen! - Cooking the mushrooms: Next, add 8 ounces of halved cremini mushrooms to the skillet. Stir them gently. Cook for another 3-4 minutes until they soften and brown. This step adds depth to the sauce. - Returning steak to skillet: Now it’s time to bring back the steak bites. Return them to the skillet with the mushrooms and garlic butter. - Tossing with sauce: Gently toss the steak bites with the sauce. Make sure every piece is coated well. This infuses the meat with rich flavors. - Final cooking adjustments: Cook for an additional 1-2 minutes. This ensures the steak is warmed through and reaches your desired doneness. Taste and adjust seasoning with more salt and pepper if needed. To get a great sear, start with the right steak temperature. Let your sirloin sit at room temperature for about 30 minutes before cooking. This helps it cook evenly. Preheat your skillet to medium-high heat. A hot skillet ensures a nice brown crust. Add a little olive oil before the steak. This helps it not stick and adds flavor. You can boost the flavor of your garlic butter steak bites with more herbs. Try adding oregano or basil for a twist. Fresh herbs work best, but dried ones are fine too. Keep an eye on cooking times for doneness. For medium-rare, aim for about 3-4 minutes per side. Use a meat thermometer for best results. The internal temperature should be 130°F. To make your dish look great, think about garnishing. Chopped fresh parsley adds a pop of color. You can also sprinkle some extra thyme on top. For plate pairing, serve with a side of mashed potatoes or a fresh salad. It gives a nice balance to the rich steak bites. {{image_2}} You can swap sirloin steak for chicken or shrimp. Chicken cooks quickly and tastes great with garlic butter. For shrimp, just sauté until they turn pink. Both options keep the dish light and tasty. If you want a vegetarian dish, use hearty vegetables or tofu. Mushrooms can take center stage, or add zucchini and bell peppers for a colorful plate. Different mushrooms can change the dish’s taste. Try shiitake or portobello for a unique flavor. You can also mix in some oyster mushrooms for a fun twist. Adding sauces or marinades can enhance the taste. A splash of soy sauce or balsamic vinegar can add depth. Experiment with your favorite flavors to make it your own! Pair garlic butter steak bites with mashed potatoes or rice. They also go well with roasted veggies or a fresh salad. For a fun twist, serve them on skewers. This makes for easy sharing at parties. You can also serve them in small bowls with toothpicks for a delightful appetizer. Store your garlic butter steak bites in an airtight container. This helps keep them fresh. They will last up to three days in the fridge. When you want to eat them, check for any off smells. That’s a sign to toss them. To freeze your steak bites, place them in a single layer on a baking sheet. Make sure they do not touch each other. Freeze them for about an hour. Once they are firm, move them to a freezer bag. Seal it tightly, and label it with the date. They can stay good for up to three months. To reheat, thaw them overnight in the fridge. Then, warm them in a skillet over low heat until heated through. You can get creative with leftover steak bites. Chop them up and mix them into a salad for lunch. They also taste great in a wrap with fresh veggies. You can even stir them into a pasta dish for a quick dinner. The flavors will blend nicely, making a tasty meal. Cook the steak bites for about 3-4 minutes on high heat for medium-rare. If you prefer medium, cook them for an extra minute. For well-done steak, aim for 6-7 minutes total. Always check the internal temperature. It should be 130°F for medium-rare and 160°F for well-done. Yes, you can use frozen steak. First, thaw it completely in the fridge overnight. If you're in a hurry, you can use the microwave's defrost setting. Once thawed, you can follow the same steps as fresh steak. Just remember that frozen steak may need a minute or two longer to cook through. If you don't have fresh herbs, dried herbs work well too. Use about one-third of the amount of dried herbs compared to fresh. For thyme and rosemary, 1/3 teaspoon of dried herbs should add nice flavor. Dried herbs can be more potent, so start small and taste as you go. In this blog post, we explored how to make delicious steak bites with garlic butter. We covered everything from selecting the right ingredients to precise cooking techniques. You learned tricks for perfect searing and enhancing flavors. Plus, I shared tips for presentation and storage. In your kitchen, these steak bites can shine at dinner. Don’t shy away from trying variations or using leftovers creatively. Enjoy your cooking journey, and savor every bite!

Garlic Butter Steak Bites with Mushrooms Delight

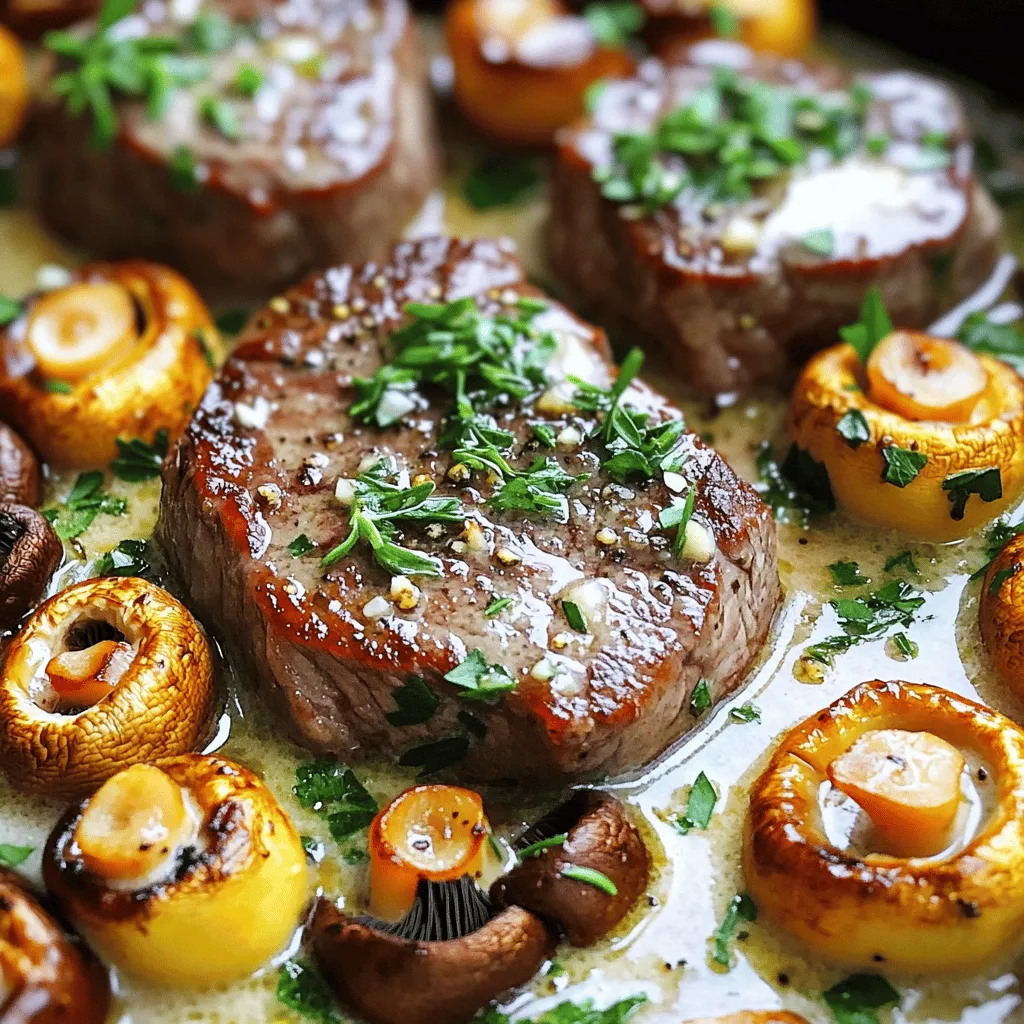
Welcome to the mouthwatering world of Garlic Butter Steak Bites with Mushrooms! This dish combines tender sirloin steak and earthy

- 4 boneless, skinless chicken breasts - 2 cups cherry tomatoes, halved - 1 cup spinach, roughly chopped - 1 can (15 oz) cannellini beans, drained and rinsed - 1 cup low-sodium chicken broth - ½ cup sun-dried tomatoes in oil, chopped - 4 cloves garlic, minced - ½ teaspoon red pepper flakes (optional for heat) - Salt and pepper to taste - 12 oz fettuccine or your choice of pasta - ½ cup heavy cream - 1 cup grated Parmesan cheese - Fresh basil leaves for garnish The main ingredients create a rich base for my Slow Cooker Tuscan Chicken Pasta. The chicken breasts are tender, juicy, and soak up all the flavors. Cherry tomatoes add sweetness, while spinach gives a fresh touch. Cannellini beans bring protein and creaminess. The sun-dried tomatoes add a tangy depth. - 1 teaspoon dried basil - 1 teaspoon dried oregano I love using dried herbs like basil and oregano. They fill the dish with Italian charm. Garlic adds a strong flavor that pairs well with chicken and veggies. A pinch of red pepper flakes offers a touch of heat. Salt and pepper round out the taste. Parmesan cheese is a must. It brings a salty, nutty flavor that makes everything better. I sprinkle it on top for a cheesy finish. - Best pasta choices: fettuccine, penne, or rotini - Gluten-free alternatives: gluten-free pasta or zoodles - Cooking techniques for pasta: boil until al dente, then drain Choosing the right pasta is key. Fettuccine works great, but penne or rotini are also good choices. If gluten-free is your goal, try gluten-free pasta or even zoodles made from zucchini. Cook the pasta until it is al dente. This means it should still have a slight bite. Drain it and save some pasta water. This water can help adjust the sauce's thickness later. Start by placing the chicken breasts at the bottom of the slow cooker. This helps them cook evenly. Next, add the halved cherry tomatoes on top. The tomatoes will add moisture and flavor. Then, sprinkle in the roughly chopped spinach and the drained cannellini beans. Finally, add the sun-dried tomatoes. Layering is key for great taste. Now, season the chicken. Use salt and pepper to taste. Add one teaspoon of dried basil and one teaspoon of dried oregano. For a little heat, add the red pepper flakes. This mix will enhance the chicken's flavor. Cover the slow cooker with its lid. Cook on low for 6 to 7 hours. If you’re short on time, you can cook it on high for 3 to 4 hours. The chicken should become tender and juicy. This slow cooking makes all the flavors meld together. Once the chicken is cooked, remove it from the slow cooker. Use two forks to shred the chicken into bite-sized pieces. This makes it easy to mix back into the dish. Return the shredded chicken to the slow cooker and stir it with the other ingredients. While the chicken cooks, prepare the pasta. Boil water in a pot and add the pasta. Follow the package instructions until the pasta is al dente. Don't forget to reserve half a cup of pasta water before draining. This water will help adjust the sauce later. Now, it's time to finish the dish. Add half a cup of heavy cream to the slow cooker. Stir it all together until combined. If the sauce is too thick, add some reserved pasta water. Finally, fold in the cooked pasta and half of the grated Parmesan cheese. Mix well so the pasta is coated. Serve hot, and sprinkle with the remaining cheese and fresh basil leaves. Use fresh, high-quality ingredients for the best taste. Select juicy cherry tomatoes and vibrant spinach. Fresh herbs add great aroma and flavor. For the chicken, choose organic or free-range if possible. Quality ingredients really make a difference in flavor. Taste your dish as you cook. This helps you adjust the seasonings as needed. If you want more heat, add more red pepper flakes. If it needs more depth, try extra basil or oregano. Don't be afraid to experiment until it feels just right. If your sauce is too thick, reserve some pasta water before draining. Add a little at a time until you reach your desired consistency. This water contains starch, which helps thicken the sauce while keeping it creamy. For a richer sauce, feel free to add more cream. This will give you a luscious, smooth texture. Just remember to balance it out with extra seasoning if you add more cream. Prep your ingredients ahead of time. Chop the vegetables and store them in the fridge. You can also season the chicken the night before. This makes it easy to throw everything in the slow cooker on busy days. To save time, you can use pre-cooked chicken. Shred it and add it to the slow cooker along with the other ingredients. This cuts down on cooking time and still gives you a tasty meal. {{image_2}} You can easily change the protein in this dish. - Using Turkey or Pork: Swap the chicken for turkey or pork. Use skinless turkey breasts or pork tenderloin. Both options cook well in the slow cooker. They add a new taste while keeping the meal hearty. - Vegetarian Option with Tofu: For a vegetarian meal, use firm tofu. Cut the tofu into cubes. Sear it in a pan for extra flavor. Then, follow the same slow cooking steps. The tofu absorbs the sauce and offers great texture. Adding or changing some ingredients can enhance your dish. - Additional Vegetables: You can toss in other veggies. Try zucchini, bell peppers, or mushrooms. They add color and nutrients. Just chop them and layer them in with the other ingredients. - Different Bean Varieties: Instead of cannellini beans, use chickpeas or black beans. They change the flavor and add protein. Rinse and drain them before adding to the slow cooker. You can adjust this recipe to fit different diets. - Low-Carb Versions: For a low-carb meal, skip the pasta. Serve the chicken and sauce over cauliflower rice or zucchini noodles. This keeps it filling without carbs. - Dairy-Free Options: If you need dairy-free, use coconut cream instead of heavy cream. It adds creaminess and a hint of sweetness. Also, skip the Parmesan or choose a dairy-free cheese. To keep your Slow Cooker Tuscan Chicken Pasta fresh, use a good container. Glass or BPA-free plastic containers work well. Make sure the container seals tightly. This helps keep air out. Before sealing, let the pasta cool down. Place it on the counter for about 30 minutes. Once cool, put the lid on. Store it in the fridge for up to three days. If you want it to last longer, consider freezing. When you are ready to enjoy your leftovers, reheating is key. The best way to keep flavor is to use the stovetop. Heat a skillet over medium heat. Add the pasta and a splash of water. Stir it well until it warms up. You can also use a microwave. Place the pasta in a microwave-safe bowl. Add a splash of water and cover it. Heat for 1-2 minutes, stirring halfway through. Check that it's hot before serving. If you want to freeze your Tuscan Chicken Pasta, it's easy! Let the pasta cool completely. Then, portion it into freezer bags or containers. Press out any air before sealing. Label with the date. To thaw, move the pasta from the freezer to the fridge. Let it sit overnight. If you need it faster, submerge the bag in cold water. This will help it thaw quickly. You can use several alternatives if you lack chicken broth. - Alternative Broth Options: Beef broth or turkey broth work well. They add a rich flavor. You can also use low-sodium options to control salt levels. - Vegetable Broth Use: Vegetable broth is a great choice for a lighter taste. It complements the other ingredients nicely. Just make sure it is low-sodium to keep the dish balanced. Knowing when chicken is ready is key for a safe meal. - Internal Temperature Guide: Use a meat thermometer to check. The chicken should reach an internal temperature of 165°F (75°C). This ensures it is safe to eat. - Signs of Doneness: Look for the chicken to be white and no longer pink inside. Juices should run clear when you cut into it. If the chicken shreds easily, it's also a good sign. You can prepare this dish in advance, which saves time on busy days. - Meal Prep and Time Management Tips: You can prep the ingredients the night before. Store them in the fridge, ready to cook in the morning. This makes it easy to enjoy a delicious meal later. - Reheating After Preparation: When ready to eat, simply reheat the pasta in the microwave or on the stove. Add a splash of water or cream to keep it moist. Enjoy your flavorful comfort meal! This article covered how to make Slow Cooker Tuscan Chicken Pasta. We discussed key ingredients, cooking methods, and flavor tips. You learned about pasta options and substitutions for dietary needs. Remember, quality ingredients and smart techniques make a big difference in taste. I hope you feel confident to try this dish. Cooking can be fun and rewarding. Enjoy making this meal your own!

Slow Cooker Tuscan Chicken Pasta Flavorful Comfort Meal

Are you craving a warm, hearty meal that’s simple to make? Look no further than Slow Cooker Tuscan Chicken Pasta!

Making pumpkin spice latte cupcakes is easy and fun. You need simple items from your kitchen. Each ingredient plays a role in taste and texture. Together, they create a warm, cozy flavor that shouts fall. - 1 ½ cups all-purpose flour - 1 teaspoon baking powder - ½ teaspoon baking soda - ½ teaspoon salt - 2 teaspoons pumpkin pie spice - ½ cup unsalted butter, softened - 1 cup granulated sugar - 2 large eggs - 1 cup canned pumpkin puree - ½ cup brewed coffee, cooled - 1 teaspoon vanilla extract The flour gives structure. Baking powder and baking soda help the cupcakes rise. The salt enhances flavors. Pumpkin pie spice brings that warm fall taste. Butter adds richness, while sugar sweetens. Eggs help bind everything. Pumpkin puree keeps them moist, and coffee gives a lovely depth. Vanilla adds a nice finish. - 1 cup unsalted butter, softened - 4 cups powdered sugar - 2 tablespoons brewed coffee, cooled - 1 teaspoon vanilla extract - 1 teaspoon pumpkin pie spice For the frosting, butter gives a creamy base. Powdered sugar sweetens and thickens it. Coffee adds flavor and richness, while vanilla and pumpkin pie spice round it out. Together, these ingredients create a frosting that's both sweet and flavorful. Start by preheating your oven to 350°F (175°C). This step is key for even baking. While your oven warms up, grab a cupcake pan and line it with cupcake liners. In a medium bowl, whisk together the dry ingredients. You will need 1 ½ cups all-purpose flour, 1 teaspoon baking powder, ½ teaspoon baking soda, ½ teaspoon salt, and 2 teaspoons pumpkin pie spice. This mix brings out the warm flavors of fall. Next, take a large bowl and beat ½ cup of softened unsalted butter with 1 cup of granulated sugar. Mix until it’s light and fluffy, which should take about 3-4 minutes. This step adds air to your batter for a soft texture. Add 2 large eggs to the bowl, one at a time. Beat well after each addition. Then, mix in 1 cup of canned pumpkin puree, ½ cup of cooled brewed coffee, and 1 teaspoon of vanilla extract. Ensure everything blends well for a rich flavor. Now, gradually add your dry mixture to the wet one. Mix until just combined. Be careful not to overmix the batter; this helps keep your cupcakes light and airy. Spoon the batter into your cupcake liners. Fill each about 2/3 full. This allows space for the cupcakes to rise without overflowing. Place your filled cupcake pan in the preheated oven. Bake for 18-20 minutes. To check for doneness, insert a toothpick into the center. If it comes out clean, they are ready. Let them cool in the pan for 5 minutes, then transfer them to a wire rack. For the frosting, beat 1 cup of softened unsalted butter in a large bowl until creamy. Gradually add 4 cups of powdered sugar. Alternate with 2 tablespoons of cooled brewed coffee. Mix until smooth. Stir in 1 teaspoon of vanilla extract and 1 teaspoon of pumpkin pie spice for flavor. Once the cupcakes are completely cool, it's time to frost them. Use a piping bag or a spatula to add the frosting on top of each cupcake. Get creative with your designs! For a fun touch, sprinkle some extra pumpkin pie spice or freshly ground coffee on top of the frosting. This adds flavor and makes your cupcakes look even more delightful. Enjoy your fall treat! To bake the best pumpkin spice latte cupcakes, keep these tips in mind: - Always preheat your oven to 350°F (175°C) before baking. This helps your cupcakes rise evenly. - Use room temperature butter and eggs for a smoother batter. Cold ingredients can make mixing harder. - Measure your flour correctly. Spoon it into the measuring cup and level it off with a knife. Too much flour can make the cupcakes dense. - Don’t overmix the batter. Mix until just combined for a light texture. Here are some common mistakes that can ruin your cupcakes: - Forgetting to line the cupcake pan. This can lead to sticking and messy cupcakes. - Opening the oven door too soon. Wait at least 15 minutes before checking for doneness. - Skipping the cooling step. Frosting warm cupcakes can cause the frosting to melt and slide off. - Not letting the coffee cool before adding it to the batter. Hot coffee can change the texture of your batter. The right frosting can make your cupcakes shine. Follow these steps for smooth frosting: - Start with softened butter. Beat it until creamy before adding sugar. This makes mixing easier. - Add powdered sugar slowly. Mix on low speed to avoid a sugar cloud. - Use brewed coffee at room temperature to help thin out the frosting. Add just enough until you reach your desired consistency. - Beat the frosting well until it’s light and fluffy. This will give it a nice texture for spreading or piping. {{image_2}} You can change the frosting to fit your taste. Try cream cheese frosting for a tangy twist. It pairs well with pumpkin spice. You can also use whipped cream for a lighter touch. For a chocolatey flavor, mix in cocoa powder. This gives a nice balance to the spices. You can make these cupcakes gluten-free. Use a gluten-free flour blend instead of all-purpose flour. For a dairy-free option, swap the butter for coconut oil. You can also use almond milk in place of regular milk. This keeps the cupcakes moist and tasty while catering to dietary needs. For a fun twist, add chocolate chips to the batter. They melt and create a rich flavor. You can also fold in chopped nuts like walnuts or pecans. This adds a nice crunch. If you want more spice, throw in some chopped candied ginger. It gives an unexpected kick to the cupcakes. To store leftover cupcakes, wait until they cool completely. Place them in an airtight container. You can keep them at room temperature for up to three days. If you want them to last longer, move them to the fridge. Just remember to wrap them tightly to avoid drying out. You can freeze these cupcakes for later enjoyment. First, cool the cupcakes completely. Then, wrap each cupcake in plastic wrap. Place them in a freezer-safe bag or container. They can last up to three months in the freezer. You can also freeze the frosting! Store it in a separate container, but make sure it's tightly sealed. These cupcakes are best enjoyed fresh. However, they can last up to three days at room temperature. In the fridge, they can last about a week. If frozen, they will maintain good quality for three months. Just let them thaw at room temperature before serving. This way, you can enjoy their rich flavors any time you crave a fall treat! Yes, you can use fresh pumpkin. Start with a small pumpkin. Cook it by baking or steaming until soft. Then, mash it until smooth. Measure out the same amount as canned pumpkin. This adds a fresh taste! To keep cupcakes moist, use canned pumpkin. It holds moisture well. Also, do not overmix the batter. Mix just until combined. Lastly, avoid overbaking. Check them a minute early to prevent dryness. If your cupcakes sink, it may be due to underbaking. Always check for doneness with a toothpick. If they sink after cooling, they might have too much liquid. Next time, ensure you measure carefully. Yes, you can make these cupcakes ahead of time. Bake and cool them completely. Then, store them in an airtight container. They stay fresh for up to three days. Frost them just before serving for best results. You know cupcakes are done when a toothpick comes out clean. Insert it in the center of a cupcake. If it has batter on it, bake for another minute. Keep an eye on them as they bake! In this post, we covered all you need for perfect pumpkin spice cupcakes. We explored essential ingredients for both the cupcakes and the frosting. You'll find step-by-step instructions to guide you at every stage. I shared tips to help you avoid common mistakes and ideas for fun variations. Remember to store your cupcakes properly for the best taste. With these insights, your baking adventure will be a success. Enjoy your tasty treats!

Pumpkin Spice Latte Cupcakes Delightful Fall Treat

Fall is here, and nothing captures its essence like my Pumpkin Spice Latte Cupcakes. Imagine cozy flavors of pumpkin, rich

To make this chocolate peanut butter mug cake, gather these ingredients: - 4 tablespoons all-purpose flour - 4 tablespoons granulated sugar - 2 tablespoons unsweetened cocoa powder - 1/8 teaspoon baking powder - 1/8 teaspoon salt - 3 tablespoons milk (or your preferred non-dairy milk) - 2 tablespoons peanut butter - 1 tablespoon vegetable oil (or melted coconut oil) - 1/2 teaspoon vanilla extract - Optional: chocolate chips for added richness You can swap some ingredients if needed: - Use almond flour instead of all-purpose flour for a gluten-free option. - Replace granulated sugar with coconut sugar or a sugar substitute. - Use almond milk or oat milk instead of regular milk. - Swap peanut butter with almond butter if you prefer. Make your mug cake even better with these add-ins: - Stir in chocolate chips for more chocolate flavor. - Add a pinch of cinnamon for a warm spice touch. - Top with whipped cream or ice cream after cooking. - Mix in some crushed nuts for extra crunch. First, grab a microwave-safe mug. Make sure it is big enough for the cake to rise. In that mug, combine these dry ingredients: - 4 tablespoons all-purpose flour - 4 tablespoons granulated sugar - 2 tablespoons unsweetened cocoa powder - 1/8 teaspoon baking powder - 1/8 teaspoon salt Mix these well. You want to break up any lumps. Next, add the wet ingredients: - 3 tablespoons milk (or your favorite non-dairy milk) - 2 tablespoons peanut butter - 1 tablespoon vegetable oil (or melted coconut oil) - 1/2 teaspoon vanilla extract Stir until your batter is smooth. If you want extra chocolate flavor, add some chocolate chips now. Place the mug in the microwave. Cook it on high for about 1 minute and 30 seconds. Keep an eye on it while it cooks. Every microwave is different, so it may take longer or shorter. You want the cake to rise and be set but a bit soft in the center. If it is not done, microwave it in 15-second bursts until ready. To check if your mug cake is done, gently touch the center. It should feel set but slightly soft. If it feels too wet, give it more time in the microwave. Once it's ready, let it cool for a minute. Enjoy it plain, or add whipped cream or ice cream on top for a treat! To make the best chocolate peanut butter mug cake, follow these tips: - Use the right mug: Choose a large, microwave-safe mug. This helps the cake rise without spilling. - Mix well: Stir the dry ingredients first. This avoids lumps and helps the cake bake evenly. - Watch the time: Microwave power can vary. Start with 1 minute and 30 seconds. Check after that. - Let it cool: Wait a minute before eating. This helps the cake set and cool down. You can make this mug cake your own with fun add-ins: - Add chocolate chips: Fold in a handful for extra chocolate flavor. - Try nuts: Chopped walnuts or almonds add a nice crunch. - Use flavored milk: Swap regular milk for vanilla or almond milk for a new twist. - Mix in fruit: Try banana slices or berries for added taste and texture. Sometimes mug cakes don’t turn out as planned. Here’s how to fix common problems: - Cake is too dense: Mix the batter more. Make sure no dry spots remain. - Cake overflows: Use a larger mug or reduce the batter amount slightly. - Cake is raw in the center: Microwave in 15-second bursts until it cooks through. - Cake is too dry: Add a splash more milk to the batter next time. This keeps it moist. {{image_2}} You can mix things up with your chocolate peanut butter mug cake. Try adding a pinch of cinnamon for warmth. Want some fruit? Toss in some mashed bananas or a few berries. You can even switch the peanut butter for almond or cashew butter. Each nut butter gives a new twist to the flavor. For a minty kick, add a drop of peppermint extract. The options are endless! If you want a gluten-free mug cake, use almond flour or coconut flour instead of regular flour. Almond flour gives a nutty taste, while coconut flour makes it light. Just remember, coconut flour absorbs more liquid, so you might need to add an extra tablespoon of milk. This way, you can still enjoy a rich, chocolatey treat without gluten. To make this mug cake vegan, swap out the milk for a non-dairy option. Almond milk, soy milk, or oat milk all work great. Replace the peanut butter with a nut-free option like sunflower seed butter for allergies. You can use maple syrup instead of sugar for sweetness, too. These changes let everyone enjoy this delicious treat, no matter their diet. If you have leftover mug cake, let it cool first. Transfer it to an airtight container. You can store it in the fridge for up to two days. If you want to keep it longer, freeze it. Wrap the mug cake tightly in plastic wrap or foil. It can last in the freezer for up to a month. To reheat your mug cake, take it out of the fridge or freezer. If frozen, let it thaw in the fridge overnight. For reheating, place it in the microwave for about 15 to 30 seconds. Check if it's warm enough. If not, heat in 10-second intervals until it's the right temperature. For the best taste, enjoy your mug cake fresh. If you store it, keep it covered. The air can dry it out. Feel free to add a splash of milk when reheating. This adds moisture back to the cake. You can also top it with whipped cream or peanut butter for extra flavor. Yes, you can make this mug cake without an egg. The egg acts as a binder. You can replace it with 1 tablespoon of applesauce or mashed banana. This makes the cake moist and helps it rise too. To stop your mug cake from overflowing, use a larger mug. Leave some space at the top for it to rise. Keep an eye on it while it cooks. If you see it rising too fast, pause the microwave for a few seconds. Yes, you can use alternative sweeteners in this recipe. If you prefer to use honey or maple syrup, use about 2 tablespoons. Just remember to reduce the milk a little to balance the extra liquid. You can enjoy a mug cake right from the mug! For a treat, add a dollop of whipped cream or a scoop of ice cream on top. You can also sprinkle some chopped nuts or extra chocolate chips for added flavor. To make an easy mug cake, you should gather all ingredients and follow each step. From substitutions to fun add-ins, the options are endless. Remember to check for doneness and store leftovers properly. Feel free to explore different flavors, gluten-free, or vegan versions. With these tips and tricks, you will make a perfect mug cake every time. Enjoy your creation and share your results! Your delicious dessert is only a few minutes away.

Chocolate Peanut Butter Mug Cake Quick and Easy Recipe

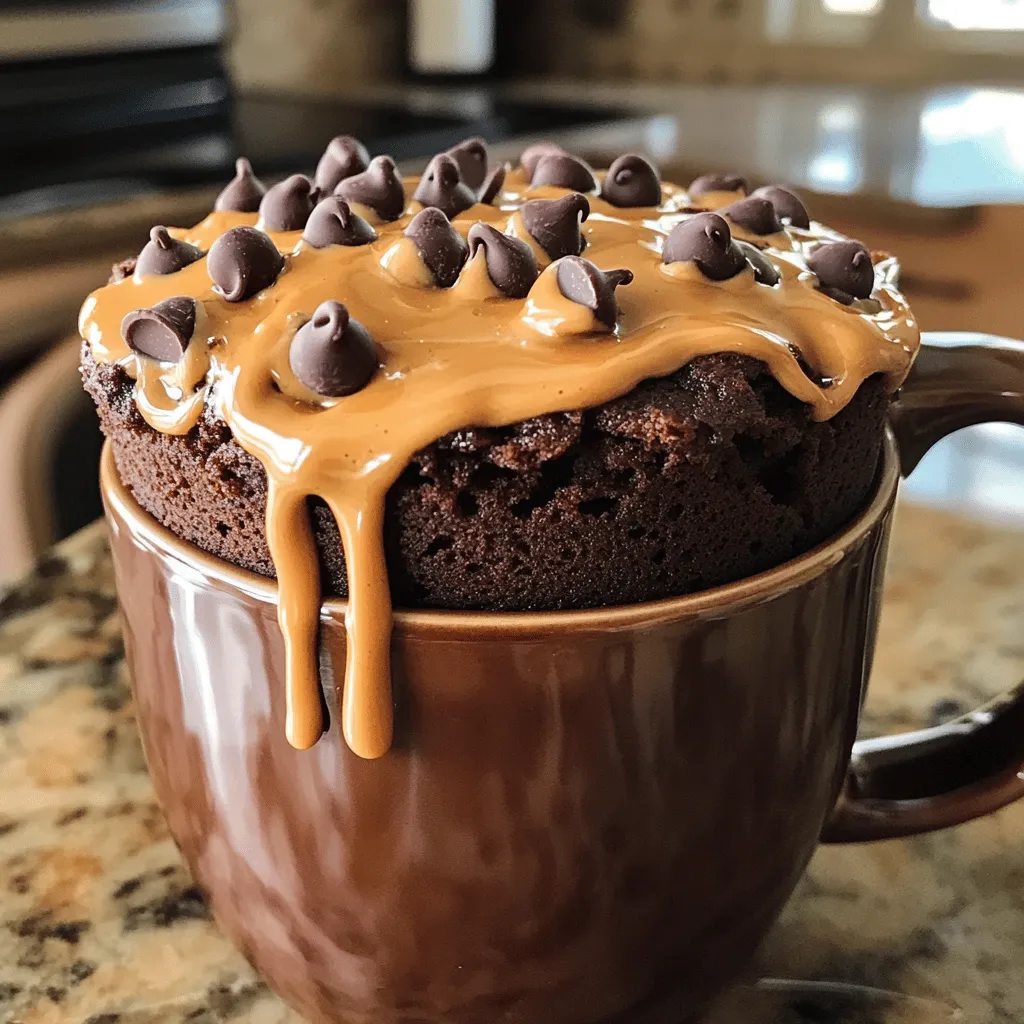
Craving a sweet treat but short on time? You’re in the right place! This Chocolate Peanut Butter Mug Cake recipe

- 1 lb Brussels sprouts, trimmed and halved - 3 tablespoons balsamic vinegar - 2 tablespoons pure maple syrup - 3 tablespoons olive oil - 2 cloves garlic, minced - Salt and pepper - 1 teaspoon Dijon mustard - 1/4 cup pecans, roughly chopped (optional) - Fresh parsley for garnish Brussels sprouts are small green veggies packed with flavor and nutrients. They are rich in vitamins C and K. The balsamic vinegar adds a tangy taste. Maple syrup gives them a sweet twist. Olive oil helps them roast perfectly. Garlic adds a lovely aroma. - Calories per serving: about 150 - Macros: - Fat: 10g - Carbs: 14g - Protein: 3g Brussels sprouts have many health benefits. They are high in fiber, which helps digestion. They also contain antioxidants, which are good for your body. Eating Brussels sprouts can support heart health and boost your immune system. Enjoy this dish knowing it’s tasty and good for you! Start by trimming the ends of the Brussels sprouts. Remove any yellow or wilted leaves. After that, cut each sprout in half. This helps them cook evenly and caramelize nicely. Preheat your oven to 400°F (200°C). This hot oven will give your sprouts that perfect crispy texture. In a large bowl, mix together the balsamic vinegar, maple syrup, olive oil, minced garlic, Dijon mustard, salt, and pepper. Whisk everything well. This step ensures that all the flavors blend together. A good mix gives your Brussels sprouts a rich, tasty glaze. Next, take your halved sprouts and toss them in the balsamic mixture. Make sure they are fully coated. Then, spread the Brussels sprouts on a lined baking sheet, cut side down. This helps with caramelization. If you like, sprinkle chopped pecans on top for added crunch. Roast the sprouts in your preheated oven for 20-25 minutes. Stir them halfway through to ensure even cooking. You want them tender and golden brown when done. To get the best caramelization, spread the Brussels sprouts cut side down on the baking sheet. This allows them to brown nicely. Use a hot oven at 400°F (200°C). It helps them cook evenly. Stir the sprouts halfway through roasting. This step ensures they brown on all sides. You can add spices to boost flavor. Try a pinch of red pepper flakes for heat. Fresh herbs like thyme or rosemary also work well. If you want more sweetness, drizzle a bit more maple syrup. This adds depth to the dish. Garnishing makes your dish look appealing. Fresh parsley adds a touch of color. You can also sprinkle chopped pecans on top for crunch. Serve the Brussels sprouts in a nice bowl or on a platter. A beautiful presentation makes the meal feel special. {{image_2}} You can easily make Balsamic Roasted Brussels Sprouts fit your diet. For a vegan version, just skip the Dijon mustard. It adds flavor but is not essential. You can still enjoy the dish with the balsamic vinegar and maple syrup. If you need a gluten-free option, this recipe is already safe. The ingredients do not include gluten. Just be sure your Dijon mustard is gluten-free. Want to spice things up? Try adding cheese or bacon. A sprinkle of feta or goat cheese will add creaminess. If you prefer bacon, chop it up and add it before roasting. The saltiness of bacon pairs well with the sweet glaze. You can also mix in fruits like cranberries or apples. Dried cranberries add a sweet and tart flavor. Chopped apples give a nice crunch and freshness. Both options make the dish more colorful and tasty. If you want to cook your Brussels sprouts faster, use an air fryer. Set it to 375°F (190°C) and cook for about 15 minutes. Shake the basket halfway through for even cooking. You can also sauté the Brussels sprouts on the stovetop. Heat olive oil in a pan over medium heat. Add the sprouts and cook for about 10-12 minutes. Stir often until they are tender and golden. This method gives them a nice crisp without using the oven. To keep your Balsamic Roasted Brussels Sprouts fresh, refrigerate them in a sealed container. They will last for about 3 to 5 days. Make sure they cool down to room temperature before you seal them. If you want to freeze them, place the cooled sprouts in a freezer bag. Remove as much air as possible. They can stay good for 2 to 3 months in the freezer. Just label the bag with the date for easy tracking. To reheat your Brussels sprouts, the oven method works best. Preheat your oven to 375°F (190°C). Spread the sprouts on a baking sheet. Heat them for about 10 to 15 minutes or until they are warm. This method keeps them crispy and tasty. If you need a quicker way, use the microwave. Place the sprouts in a microwave-safe dish. Cover them with a damp paper towel. Heat them in 30-second bursts, stirring in between, until they are warm. This method is fast but may make them a bit softer. Balsamic roasted Brussels sprouts last about 3 to 5 days in the fridge. To store them, let them cool down first. Then, place them in an airtight container. This keeps them fresh and tasty for your next meal. If you want to keep them longer, you can freeze them. Just make sure to use a freezer-safe bag or container. They may lose some texture, but they will still taste good. Yes, you can prepare Brussels sprouts ahead of time! A great way is to trim and halve them the day before. Store them in a bowl of cold water in the fridge. This keeps them fresh. You can also mix the balsamic glaze in advance and keep it in the fridge until you're ready to cook. When you're ready, just toss the sprouts in the glaze and roast them. This saves time and makes dinner easier. Balsamic roasted Brussels sprouts pair well with many dishes. Here are some tasty options: - Grilled chicken or steak for protein - Quinoa or rice for a hearty base - A fresh salad for added crunch - Mashed potatoes for comfort food lovers You can also serve them with roasted meats or as part of a veggie platter. Don’t forget to check out my other recipes for more ideas! Balsamic roasted Brussels sprouts offer great flavor and health benefits. You learned about the key ingredients, from fresh Brussels sprouts to balsamic vinegar and maple syrup. I shared steps for prepping, roasting, and perfecting the dish. You also found tips for variations and storage. Enjoy this delicious vegetable side with your favorite meals. Try new flavors or cooking methods to make it your own. The right blend will impress everyone at your table.

Balsamic Roasted Brussels Sprouts Irresistible Side Dish

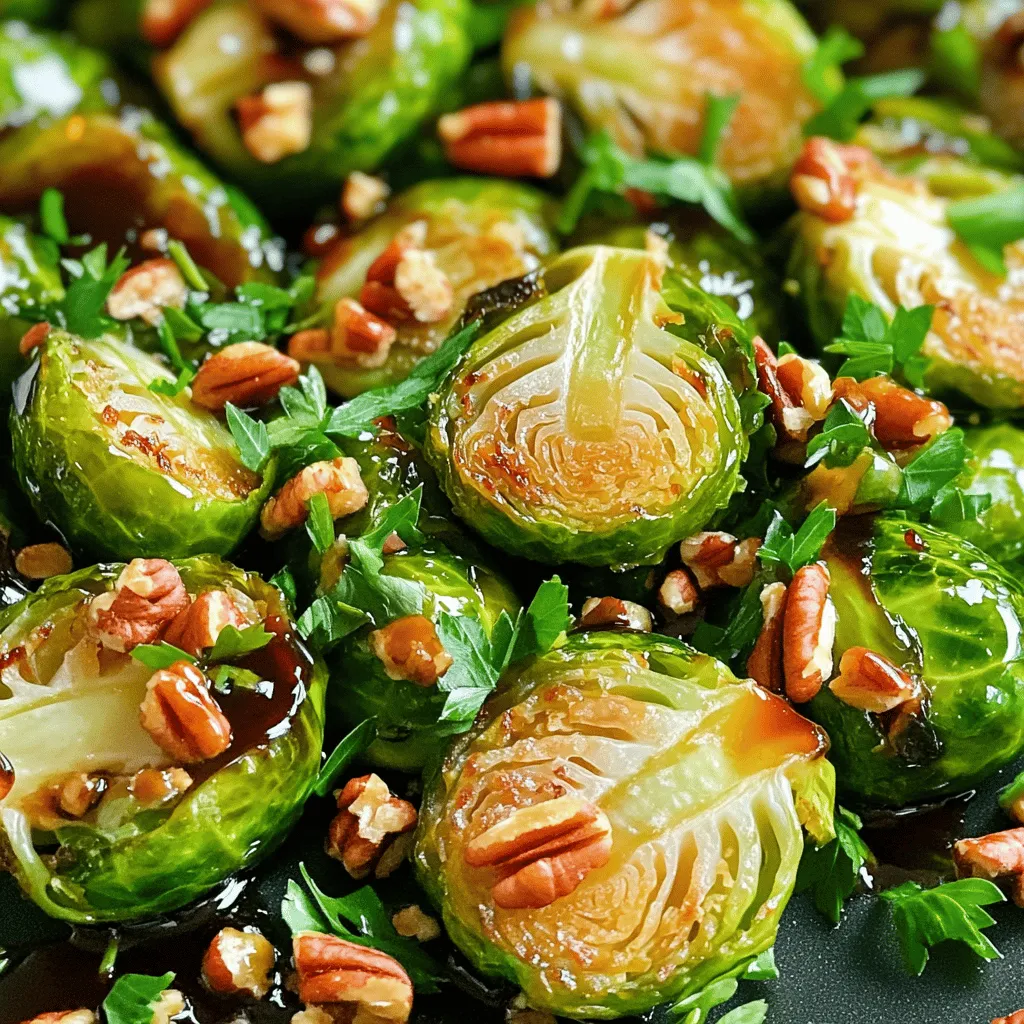
Looking for an easy side dish that packs a flavor punch? Balsamic roasted Brussels sprouts are your answer! These little

- 2 cups penne pasta - 2 chicken breasts, diced - 1 tablespoon Cajun seasoning You will need penne pasta for a firm bite. Chicken breasts add protein and flavor. Cajun seasoning gives the dish its spicy kick. - 1 red bell pepper, diced - 1 green bell pepper, diced - 1 small onion, chopped Red and green bell peppers add color and crunch. Onions bring sweetness to balance the spice. These veggies help create a hearty texture. - 1 cup heavy cream - 1 cup grated Parmesan cheese - 1 cup shredded mozzarella cheese - Salt and pepper to taste Heavy cream makes the dish rich and smooth. Parmesan and mozzarella add creaminess and depth. Salt and pepper enhance all the flavors. - Preheat your oven to 375°F (190°C). - Cook 2 cups of penne pasta according to the package. Drain and set it aside. - In a large skillet, heat 1 tablespoon of olive oil over medium heat. - Add 2 diced chicken breasts to the skillet. Sprinkle 1 tablespoon of Cajun seasoning over the chicken. - Cook until the chicken is golden brown, about 5-7 minutes. - Remove the chicken from the skillet and set it aside. - In the same skillet, add 1 chopped onion, 1 diced red bell pepper, and 1 diced green bell pepper. - Sauté until the vegetables are tender, for about 5 minutes. - Stir in 3 minced garlic cloves and cook for an additional minute. - Return the cooked chicken to the skillet. Pour in 1 cup of heavy cream. - Stir to mix everything well. Let it simmer for about 3-4 minutes until it slightly thickens. - Add the cooked pasta and half of the 1 cup of grated Parmesan cheese. Season with salt and pepper to taste. Mix well. - Transfer the creamy pasta mixture to a greased 9x13 inch baking dish. - Sprinkle the remaining Parmesan cheese and 1 cup of shredded mozzarella cheese evenly over the top. - Bake in the preheated oven for 20-25 minutes until the cheese is bubbly and golden brown. - Remove from the oven and let it cool for a few minutes. Garnish with fresh parsley before serving. To achieve the perfect al dente pasta, cook it for one or two minutes less than the package says. This way, the pasta stays firm and holds its shape in the bake. Stir the pasta while cooking to prevent sticking. Choosing the right Cajun seasoning is key. Look for a blend that has a good mix of spices. You want a balance of heat and flavor. If you want a spicier dish, choose a seasoning with more cayenne pepper. Garnishing with fresh parsley adds a nice pop of color. Chop the parsley finely and sprinkle it over the top. This adds freshness and makes the dish look great. For serving suggestions, pair this dish with a simple green salad. A crisp salad with a light vinaigrette complements the creamy pasta well. You can also serve it with garlic bread for a hearty meal. One common mistake is overcooking the chicken. Cook it just until it’s golden and no longer pink. This helps keep it juicy and tender in the bake. Another mistake is skipping the resting time after baking. Let the dish sit for about five minutes before serving. This helps the sauce thicken and makes it easier to serve. {{image_2}} You can change the protein in this dish. Try using shrimp or sausage instead of chicken. Both options will add great flavor. If you want a gluten-free meal, use gluten-free pasta. Many brands make tasty options that work well. To make your pasta bake more exciting, add extra spices. Consider using paprika or cayenne for more heat. You can also mix in vegetables like spinach or zucchini. These add color and nutrition while keeping the dish light. If you want to make this dish lighter, use low-fat cream instead of heavy cream. This swap keeps the creamy texture while cutting calories. For a vegetarian version, replace the chicken with cooked lentils or chickpeas. You’ll still get a great taste and a filling dish. To store your Creamy Cajun Chicken Pasta Bake, let it cool first. Place it in an airtight container. It stays fresh in the fridge for up to three days. If you want it to last longer, freezing is a good option. For reheating in the oven, preheat it to 350°F (175°C). Place the pasta bake in a baking dish. Cover it with foil to keep it moist. Heat for about 20 minutes or until warm. If using the microwave, scoop a portion into a microwave-safe bowl. Heat for one minute, then stir. Continue heating in 30-second intervals until hot. To freeze the pasta bake, let it cool completely. Wrap it tightly in plastic wrap and then foil. This prevents freezer burn. It can stay frozen for up to three months. When you’re ready to eat, thaw it in the fridge overnight. Then, reheat it in the oven or microwave as noted above. Enjoy your meal later! Yes, you can make this dish early. Start by cooking the pasta and chicken as usual. Once you mix them with the sauce and veggies, let it cool. Then, store it in the fridge for up to two days. Before baking, add cheese on top. Bake it fresh for a cozy family meal! If you want a lighter dish, use half-and-half or Greek yogurt. For a dairy-free option, try coconut milk or almond milk. These options still keep the creaminess while changing the flavor a bit. Adjust the spices to match your choice. To kick up the heat, add more Cajun seasoning. You can also toss in red pepper flakes or sliced jalapeños. If you love heat, add fresh chopped chili peppers too. Taste as you go, and find the right balance for your family. Yes, you can switch up the pasta! While penne works great, feel free to use rotini, fusilli, or even macaroni. Just make sure to cook it al dente. Each shape holds the sauce differently, so pick what you like best! This blog post shared how to make a delicious Creamy Cajun Chicken Pasta Bake. You learned about the main ingredients like penne pasta, chicken, and Cajun seasoning. I provided step-by-step instructions and cooking tips to help you succeed. You can also explore variations to suit your taste. Store extras safely and reheat them easily. Enjoy cooking, and let your creativity shine in the kitchen!

Creamy Cajun Chicken Pasta Bake Easy Family Dish

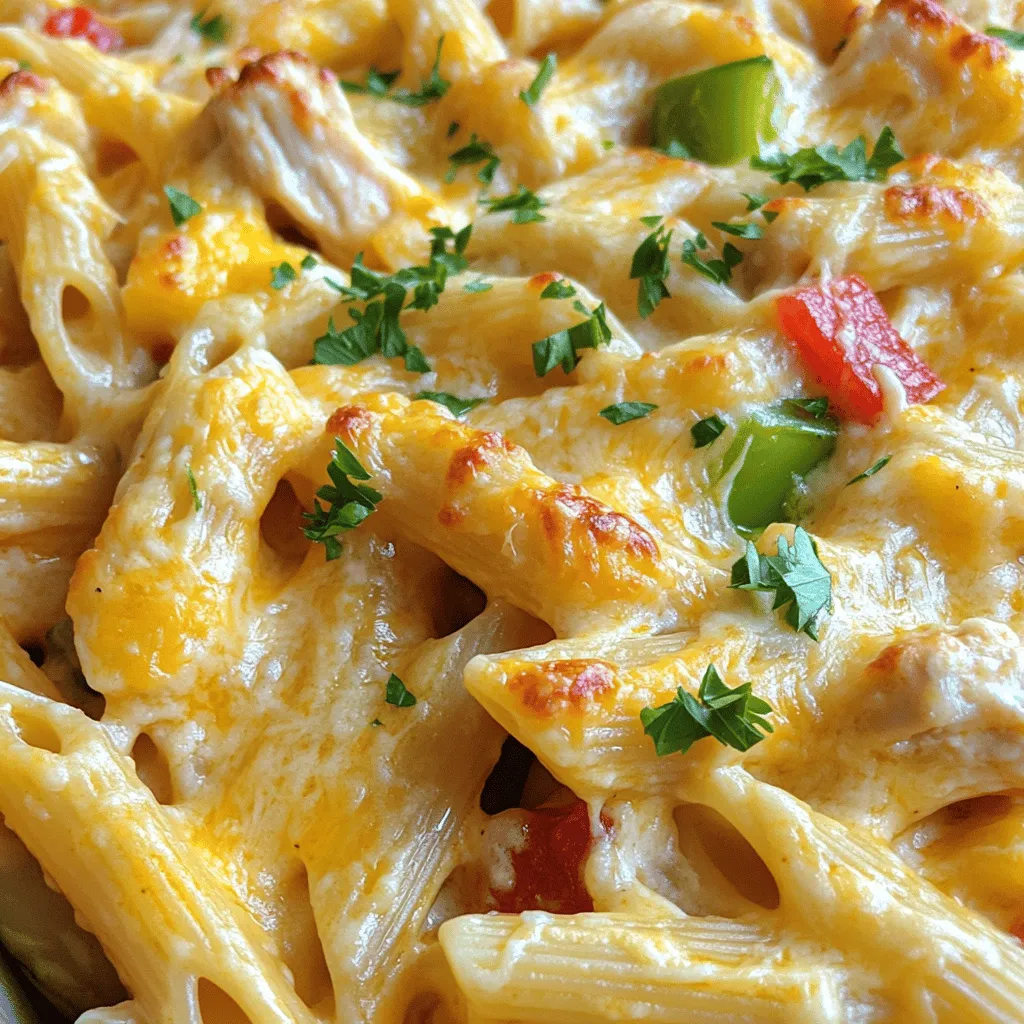
Looking for a dish that’s easy, creamy, and packed with flavor? Look no further than my Creamy Cajun Chicken Pasta

Older posts
Newer posts
← Previous Page1 … Page18 Page19 Page20 … Page84 Next →

dsad

© 2026 Foodish Talk • Built with GeneratePress

Our Policies

  • Copyright Policy
  • Cookie Policy
  • GDPR Policy
  • Privacy Policy
  • Disclaimer
  • Terms Of Use

More Information

  • Home
  • About
  • Contact
  • Appetizers
  • Dessert
  • Dinner
  • Drinks
©2026, Foodish Talk About Back To Top