Skip to content
DisclaimerTerms Of UseGDPR PolicyCookie Policy

Foodish Talk

  • Home
  • Drinks
  • Appetizers
  • Dinner
  • Dessert
  • About
  • Contact
  • Privacy Policy
DisclaimerTerms Of UseGDPR PolicyCookie Policy

NO-ING-IMG

- 2 pounds boneless, skinless chicken breasts - 1 cup chicken broth - 1/2 cup BBQ sauce - 1 tablespoon apple cider vinegar - 1 tablespoon brown sugar For my slow cooker pulled chicken sliders, I start with the chicken. I use two pounds of boneless, skinless chicken breasts. This cut is lean and cooks well. I add one cup of chicken broth to keep the chicken moist. Next, I choose my favorite BBQ sauce. A half cup gives the chicken a sweet and tangy flavor. To balance the sauce, I add one tablespoon of apple cider vinegar and one tablespoon of brown sugar. The sugar adds a nice touch of sweetness. - 1 teaspoon garlic powder - 1 teaspoon onion powder - 1/2 teaspoon smoked paprika - Salt and pepper to taste To enhance the flavor, I include simple spices. I use one teaspoon of garlic powder and one teaspoon of onion powder. These spices add depth to the dish. I also add half a teaspoon of smoked paprika for a hint of smokiness. Finally, I season with salt and pepper to taste. This mix of seasonings brings everything together. - 12 slider buns - Optional toppings: coleslaw, pickles For serving, I prepare 12 slider buns. These buns are perfect for holding the juicy chicken. I also suggest optional toppings like coleslaw and pickles. Coleslaw adds crunch, while pickles give a nice zing. You can customize each slider to your taste. These additions make the meal even more fun! - Place chicken in the slow cooker. - Pour chicken broth over the chicken. This step is easy. You want to ensure that the chicken stays moist. The broth helps with that. It also adds flavor as it cooks. - Combine BBQ sauce and seasonings in a bowl. - Coat the chicken with the sauce mixture. In a bowl, mix the BBQ sauce, apple cider vinegar, brown sugar, garlic powder, onion powder, smoked paprika, salt, and pepper. This mix makes the chicken tasty. Make sure every piece is covered well. This adds a great flavor. - Cook on low for 6-7 hours. - Shred chicken and mix with sauce. Set your slow cooker to low. Let it cook for 6 to 7 hours. The chicken will be tender. When done, use two forks to shred it in the slow cooker. Stir it well with the sauce. This makes every bite delicious. - Spoon pulled chicken onto slider buns. - Add optional toppings and serve. Now, it's time to build the sliders! Take slider buns and spoon in the pulled chicken. You can add coleslaw for crunch. Place the top bun on it. Serve them warm, and don’t forget the pickles on the side! To make your pulled chicken shine, adjust the spice levels. Start with a little heat. You can add more if you like. A pinch of cayenne pepper can give a nice kick. When it comes to BBQ sauce, pick your favorite. Sweet, smoky, or tangy sauces all work well. I like a blend of sweet and smoky. It balances well with the chicken. Try experimenting until you find your best flavor. How do you know when the chicken is done? The chicken should easily shred with a fork. It should feel tender, not tough. If you want to be sure, use a meat thermometer. The safe internal temperature is 165°F. For slow cooker settings, I recommend using low heat for 6-7 hours. This allows the flavors to blend. If you're short on time, you can cook on high for 3-4 hours. Just keep an eye on it. What are the best side dishes to pair with sliders? Coleslaw is a classic choice. It adds crunch and freshness. Sweet potato fries or a simple salad work great too. Got leftover pulled chicken? You can make quesadillas or tacos. Just add cheese and your favorite toppings. It's a fun way to change up the meal. You can also freeze the chicken for later use. {{image_2}} You can easily switch up the flavor of your pulled chicken sliders. Try honey garlic pulled chicken sliders. Just mix honey with your BBQ sauce. The sweetness will shine through. For a kick, go for spicy BBQ pulled chicken sliders. Add hot sauce or cayenne pepper to the BBQ mix. These options keep your meals exciting! If you need a gluten-free meal, use gluten-free slider buns. Many brands make tasty options today. For your sauce, check your BBQ sauce for gluten. You can also swap out regular vinegar for apple cider vinegar if needed. Ensure all your ingredients fit your needs. Want a meat-free option? Pulled jackfruit sliders are a great choice! Jackfruit has a similar texture to pulled chicken. Use the same sauce for a tasty twist. For toppings, add creamy coleslaw or fresh herbs. These will enhance the flavor and look of your sliders. To keep your pulled chicken fresh, store it in an airtight container. Make sure it cools down first. Proper storage helps keep out bacteria. The shelf life of cooked pulled chicken is about 3 to 4 days in the fridge. Always label your container with the date to keep track. To freeze, let the chicken cool completely. Place the chicken in a freezer bag, removing as much air as possible. This helps prevent freezer burn. When you want to eat it, thaw the chicken overnight in the fridge. For reheating, place it in a pot on low heat or microwave it. Add a splash of water or broth for moisture. If you have leftover assembled sliders, wrap them tightly in plastic wrap. This keeps the buns from drying out. Store them in the fridge for up to 2 days. To keep the buns fresh, you can also store them separately from the chicken. This helps maintain their texture and flavor. It takes about 6 to 7 hours on low heat. This slow cooking makes the chicken very tender. You can shred it easily with a fork after cooking. If you are short on time, you can cook it on high for about 3 to 4 hours. Yes, you can make this recipe ahead of time. You can cook the chicken and store it in the fridge. Just reheat it before serving. This makes it a great option for parties or meal prep. If you want a change, you can use teriyaki sauce or a spicy mustard sauce. You could also try a homemade sauce with ketchup, honey, and vinegar. Each option gives a different twist to the pulled chicken. To spice up the sliders, you can add hot sauce to the BBQ mix. You could also mix in jalapeños or crushed red pepper flakes. Another option is to use a spicy BBQ sauce for more heat. Yes, you can use frozen chicken breasts. Just keep in mind it may take longer to cook. Make sure to check the chicken for doneness before shredding. You want it to be fully cooked and tender. This blog post covered all you need for delicious pulled chicken sliders. You learned about the key ingredients, step-by-step cooking, and ways to make it your own. I shared tips for perfect flavor and various options for storage. Remember, you can mix flavors by trying spicy or honey garlic styles. These sliders are easy to make and great for any occasion. Enjoy making and sharing this meal with friends and family. Your pulled chicken sliders will surely impress!

Slow Cooker Pulled Chicken Sliders Delightful Meal

If you’re looking for a tasty, easy meal, slow cooker pulled chicken sliders are a winner! This recipe combines tender,

- 1 medium butternut squash, peeled and cubed (about 4 cups) - 1 medium onion, diced - 2 cloves garlic, minced - 3 cups vegetable broth - 1 cup coconut milk The main star here is the butternut squash. It brings a sweet, nutty flavor. The onion and garlic add depth and warmth. Using vegetable broth gives the soup a rich base. The coconut milk adds creaminess and a hint of tropical flavor. - 1 teaspoon ground cumin - 1 teaspoon ground nutmeg - Salt and pepper to taste - 2 tablespoons pure maple syrup To enhance the flavors, cumin gives an earthy note. Nutmeg adds a warm spice that pairs nicely with the squash. Salt and pepper are essential for balance. The maple syrup ties everything together with a sweet touch. - Fresh parsley for garnish - Other herb alternatives Fresh parsley adds a pop of color. It also brightens the flavors. You can try other herbs like thyme or chives to mix things up. This adds a fresh element to your bowl of soup. First, we heat the olive oil in a large pot over medium heat. Next, we add the diced onion. Sauté it until it turns translucent, about 5 minutes. This step builds a sweet base for our soup. After the onion, we add the minced garlic. Cook it for an extra minute, just enough for the garlic to release its amazing aroma. Now, let’s cube the butternut squash. Peel it carefully and cut it into small cubes. Aim for about 1-inch pieces. This size helps it cook evenly and quickly. With our veggies ready, we stir in the cubed butternut squash, ground cumin, and nutmeg. Season it with salt and pepper. Cook for another 5 minutes. This allows the spices to bloom and flavor the squash. Next, we pour in the vegetable broth. Bring this mixture to a boil. Once it bubbles, reduce the heat and let it simmer. Keep it on the stove for about 20 minutes, or until the squash feels tender when poked with a fork. Once the squash is soft, we remove the pot from the heat. Now it’s time to blend! If you have an immersion blender, use it to blend the soup until it is smooth. If not, carefully transfer it to a regular blender in batches. After blending, return the pot to low heat. Stir in the coconut milk for a creamy finish. Taste and adjust the seasoning with more salt or pepper if needed. Now, the magic happens! Ladle the soup into bowls and drizzle each serving with pure maple syrup. This adds a sweet touch that balances the savory flavors. Finally, sprinkle fresh parsley on top for a pop of color. Enjoy your rich and creamy butternut squash soup! To blend the soup until smooth, use an immersion blender. This tool makes it easy. Just place it in the pot and blend. If you don’t have one, use a regular blender. Carefully transfer the soup in batches. Fill the blender halfway to avoid spills. Blend until it’s creamy and smooth. Adjusting the seasonings can elevate your soup. You might want to add a bit more salt or pepper. For heat, add a pinch of cayenne pepper. This spice pairs well with the sweet squash. It adds a gentle kick that surprises the taste buds. When serving, ladle the soup into pretty bowls. A nice touch is to drizzle maple syrup on top. This adds a sweet contrast to the savory taste. For garnish, sprinkle fresh parsley over the soup. It adds color and freshness. Choose bowls that are wide and shallow. This makes your soup look inviting and beautiful. {{image_2}} You can make your butternut squash soup more colorful and nutritious by adding other veggies. Carrots add a nice sweetness and bright color. They cook well with the squash. You can also use sweet potatoes. They have a creamy texture that blends nicely. Other fall veggies work great too. Try adding parsnips for a hint of spice. You can also use pumpkin for a rich flavor. Be creative! Mix and match to suit your taste. If you want a creamy soup but need a dairy-free option, coconut milk is perfect. It gives the soup a rich flavor. You can also try almond milk or oat milk. These options keep the soup light and tasty. For a nut-free version, stick with coconut milk or use rice milk. Both are great for keeping the soup smooth. They won’t change the flavor much, so you can enjoy every bite. To make your soup even more delicious, you can add flavorings. Infusing the soup with ginger gives it a warm kick. You can also add chopped apple for a sweet twist. It pairs well with the squash. If you want to change the sweetness, try different sweeteners. Instead of maple syrup, you can use honey or agave. Each sweetener brings a unique taste that can change the soup's profile. Play around with these options to find your favorite flavor! To keep your butternut squash soup fresh, store it in an airtight container. Let it cool first to avoid steam buildup. In the fridge, it lasts about 3 to 5 days. Always check for any off smells or changes in texture before eating. You can freeze butternut squash soup for up to three months. To freeze, let it cool completely. Then, pour the soup into freezer-safe bags or containers. Leave some space at the top for expansion. When you're ready to enjoy it, thaw the soup overnight in the fridge. For reheating, use the stovetop or microwave. If using the stovetop, gently heat over low heat. Stir often to prevent sticking. In the microwave, heat in short bursts, stirring in between. This keeps the soup creamy. If it thickens too much, add a bit of water or broth to restore its texture. Butternut squash soup lasts about 5 days in the fridge. Store it in an airtight container. Always check for a sour smell or any changes in color before you eat it. Yes, you can make butternut squash soup ahead of time. It actually tastes better after it sits. Just cool it down before you store it. Reheat it gently when you're ready to serve. You can use almond milk or oat milk as a substitute for coconut milk. Both options will still give your soup a nice creaminess. If you want a richer flavor, try using heavy cream or cashew cream. Yes, butternut squash soup is healthy. It is low in calories and high in vitamins A and C. The soup also has fiber, which helps with digestion. Adding coconut milk gives it healthy fats too. To make your soup thicker, blend it longer. You can also add more butternut squash or a potato. If you want it thinner, add more vegetable broth or water. Adjust until you reach your desired consistency. In this post, we explored making butternut squash soup. We covered key ingredients like squash, onion, garlic, and essential seasonings to boost flavor. I shared simple steps for preparation, cooking, and blending the soup to creamy perfection. You learned tips for texture and flavor variations, plus how to store and reheat well. Keep experimenting with ingredients and flavors. You can easily make this dish your own. Enjoy the warmth and comfort of homemade soup!

Butternut Squash Soup with Maple Drizzle Delight

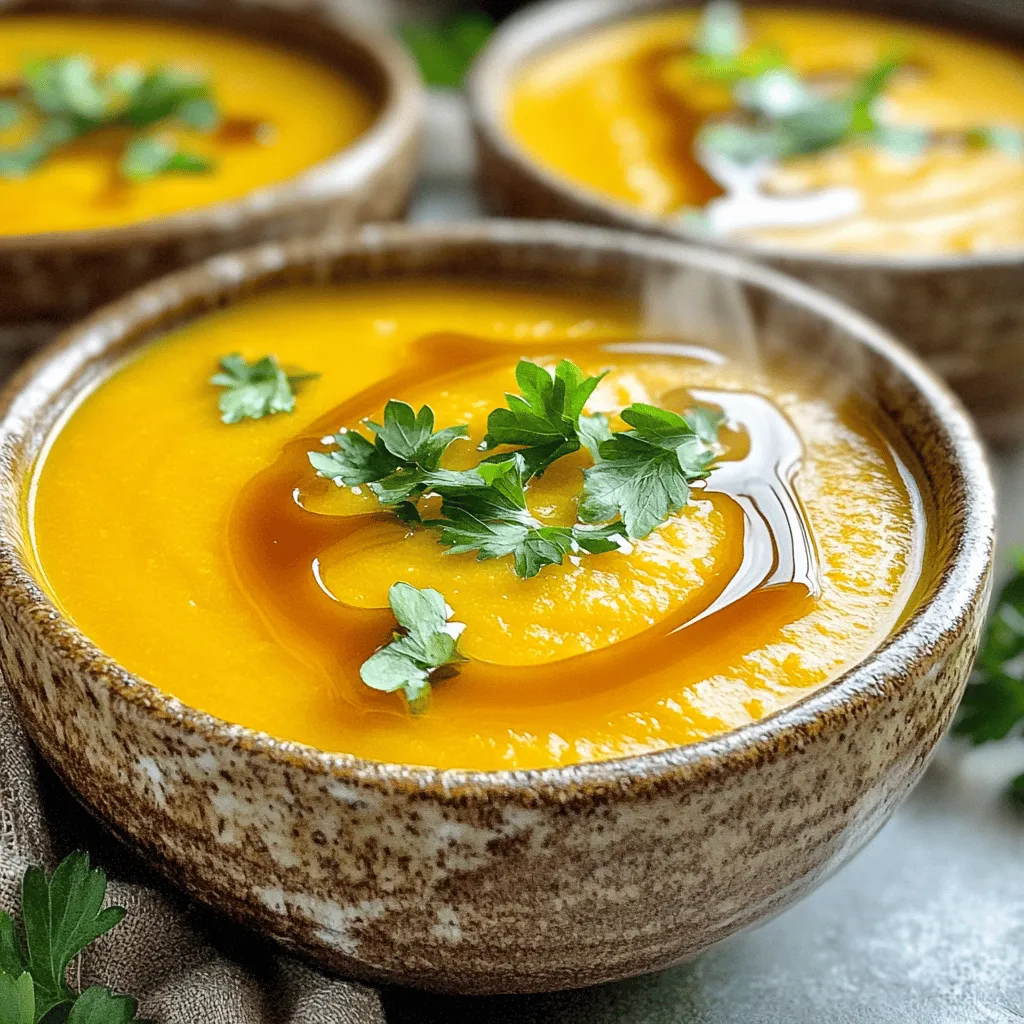
If you’re craving a warm, comforting bowl of Butternut Squash Soup, I’ve got just the recipe for you! This creamy

- 8 oz rice noodles - 1 cup snap peas, trimmed - 1 red bell pepper, thinly sliced - 1 carrot, julienned - 3 green onions, chopped - 1/4 cup creamy peanut butter - 2 tablespoons soy sauce (or tamari for gluten-free) - 1 tablespoon fresh lime juice - 1 tablespoon sriracha (adjust to taste) - 1 teaspoon sesame oil - 1 tablespoon honey or maple syrup - Crushed peanuts and cilantro, for garnish Gather these ingredients for a tasty dish. Rice noodles are the base. They soak up all the flavors. Snap peas add crunch, while red bell pepper and carrot bring color. Green onions give a fresh bite. The peanut sauce is the star here. Creamy peanut butter pairs with soy sauce for saltiness. Fresh lime juice adds brightness, and sriracha brings heat. Sesame oil adds depth, and honey or maple syrup balances the spice. These ingredients let you create a flavorful meal. Each item plays a role. You can also adjust flavors to fit your taste. Start by boiling a large pot of water. Add the rice noodles when the water is rolling. Cook them for about 6-8 minutes, or until they are al dente. When done, drain the noodles and rinse them under cold water. This stops the cooking and keeps them from sticking. Set your noodles aside for later. While the noodles cook, heat a large skillet over medium-high heat. Add a splash of water to the skillet. Toss in the snap peas, red bell pepper, and carrot. Sauté these colorful veggies for around 3-4 minutes. You want them bright and just tender. Next, add the chopped green onions and cook for one more minute. This adds a nice crunch to your dish. In a medium bowl, combine the creamy peanut butter, soy sauce, fresh lime juice, sriracha, sesame oil, and honey. Whisk these ingredients together until smooth. If the sauce feels too thick, add a little water. Keep whisking until you achieve your desired consistency. This sauce makes the dish flavorful and rich. Now it’s time to bring everything together. Add the cooked noodles to the skillet with the sautéed vegetables. Pour the peanut sauce over the top. Mix everything gently to coat the noodles and veggies well. Heat the dish for another 2-3 minutes. This warms everything nicely and allows the flavors to blend. When ready, serve the noodles warm. Top each plate with crushed peanuts and fresh cilantro. This adds a nice crunch and fresh flavor to the dish. Enjoy your meal at a warm temperature for the best taste! To make perfect rice noodles, start with boiling water. Follow the package instructions for cooking time. It usually takes about 5-7 minutes. You want them to be al dente, or firm to the bite. After cooking, drain the noodles and rinse them under cold water. This stops the cooking process and keeps them from sticking. Make sure to rinse well; it helps remove extra starch. You can adjust the spice in the peanut sauce to fit your taste. If you like it mild, use less sriracha. For more heat, add a bit more. Taste the sauce as you mix it to find your perfect balance. Feel free to substitute ingredients in the peanut sauce. If you don’t have honey, use maple syrup. You can also swap soy sauce with tamari for a gluten-free option. To boost the flavor of your dish, add extra seasonings. A pinch of garlic powder or ginger can work wonders. You could also sprinkle some crushed red pepper flakes for added heat. Don’t forget about garnishes! Fresh cilantro adds bright flavor, while crushed peanuts give a nice crunch. You could also add lime wedges for an extra zing when serving. {{image_2}} You can easily change the protein in your spicy Thai peanut noodles. Adding cooked chicken gives the dish a hearty touch. Grilled shrimp adds a fresh twist, while tofu makes it a great vegan option. If you want a vegetarian dish, just stick with tofu or add more veggies. Feel free to swap vegetables based on what you have. If snap peas are out of season, try using broccoli or bell peppers. Zucchini works well, too! Carrots can be replaced with thinly sliced radishes for a different crunch. The goal is to keep it colorful and fresh. For gluten-free options, use rice noodles and tamari instead of soy sauce. Rice noodles are naturally gluten-free and easy to cook. Tamari adds the same great flavor without gluten. Check the labels to ensure everything fits your dietary needs. To store your spicy Thai peanut noodles, place them in an airtight container. This keeps them fresh and tasty. They last in the fridge for about 3 to 4 days. If you notice any unusual smell or mold, it’s best to throw them out. Yes, you can freeze spicy Thai peanut noodles! To freeze, place them in a freezer-safe container. Use it within 1 to 2 months for the best flavor. When you're ready to eat, thaw them overnight in the fridge. This helps maintain taste and texture. To reheat without drying out, add a splash of water or broth. Heat in a pan over medium-low heat. Stir often to mix in the moisture. You can also use a microwave. Cover with a damp paper towel to keep them moist. Enjoy your leftovers just as much as the first time! Spicy Thai Peanut Noodles are a delightful dish made with rice noodles. Fresh vegetables like snap peas, red bell peppers, and carrots add color and crunch. The creamy peanut sauce ties everything together. This sauce mixes peanut butter, soy sauce, lime juice, and sriracha for a spicy kick. It’s a quick and tasty meal that pleases many palates. Yes, you can make this dish in advance. Cook the noodles and vegetables, then store them separately. Keep the peanut sauce in a jar. When you're ready to eat, combine everything and heat it up. This way, you save time and still enjoy fresh flavors. Meal prep makes busy days easier. To adjust the spice level, start with less sriracha. You can always add more later. For mild noodles, use one teaspoon. For medium, two teaspoons work well. If you love heat, go for three or four teaspoons. Taste as you go to find your perfect match. Look for Thai restaurants or Asian bistros to find Spicy Thai Peanut Noodles. Many places offer this dish on their menu. You can also check noodle shops or cafes that serve Asian fusion food. Ask your server for spicy noodle options to explore similar flavors. You learned how to make Spicy Thai Peanut Noodles, starting with the right ingredients. We covered cooking perfect rice noodles, sautéing fresh veggies, and mixing a creamy peanut sauce. You can customize this dish with proteins and seasonal veggies. Remember to store leftovers properly and reheat them to keep them tasty. Enjoy exploring different flavors and making this dish your own. The joy of cooking is all about creativity and fun. Happy cooking!

Spicy Thai Peanut Noodles Flavorful and Simple Recipe

Get ready to savor the bold flavors of Spicy Thai Peanut Noodles! This simple recipe combines creamy peanut butter, crunchy

- 1 can refrigerated cinnamon roll dough - 2 medium apples, peeled and diced - 1/4 cup brown sugar - 1 teaspoon cinnamon - 1 tablespoon lemon juice - 1 tablespoon butter, melted - 1/4 cup raisins or chopped walnuts (optional) These ingredients create a warm, sweet treat. The cinnamon roll dough gives a flaky base. The apples bring a fresh taste. Brown sugar and cinnamon add sweetness and warmth. Lemon juice brightens the apple flavor. Melted butter makes everything rich. Optional raisins or walnuts add a nice crunch. - Additional spices (e.g., nutmeg, allspice) - Substitutions for sweeteners You can change the flavor with spices like nutmeg or allspice. These add depth to the filling. If you want less sugar, use honey or maple syrup. Each option gives a unique twist. Experiment to find your favorite mix! 1. Preheat the oven to 350°F (175°C). This ensures your treats bake evenly and turn golden brown. 2. Prepare the apple filling. In a bowl, mix the diced apples, brown sugar, cinnamon, lemon juice, and melted butter. If you want, add raisins or walnuts. Toss until all the apples are coated well. 1. Flatten the cinnamon roll dough. Open the can and take out each roll. Use your hands to flatten them slightly. This helps them fit into the muffin tin. 2. Form the muffin cups. Grease your muffin tin with non-stick spray or butter. Place each flattened roll into the cups. Press the dough into the bottom and up the sides to create a nice cup shape. 1. Fill the cups with the apple mixture. Spoon the apple filling into each cinnamon roll cup. Pack it in gently but firmly to get an even amount in each. 2. Bake and check for doneness. Place the muffin tin in the oven. Bake for 15-18 minutes. Watch for the cinnamon rolls to turn golden brown and for the apples to soften. 3. Cool and glaze the cups. Once done, take the muffin tin out of the oven. Let it cool for a few minutes. Use a knife to loosen the edges of each cup. Drizzle the included glaze over them while they’re still warm. Enjoy the sweet and warm flavors! To ensure even cooking and texture in your cinnamon roll apple pie cups, follow these steps: - Preheat your oven properly. Always set your oven to 350°F (175°C) before you start. This helps the dough cook evenly. - Use room temperature ingredients. Let your cinnamon roll dough sit out a bit. This makes it easier to work with. Avoid soggy bottoms by: - Pressing the dough firmly into the muffin tin. This helps create a strong base. - Baking until golden brown. Watch for that lovely golden color. It means the dough is done. For a fun twist on the glaze, try these ideas: - Add vanilla extract to the glaze for extra flavor. Just a dash can make a big difference. - Mix in some maple syrup for a sweet twist. It pairs perfectly with the apple filling. - Top with caramel sauce instead of glaze. It adds a rich sweetness that many will love. These cinnamon roll apple pie cups shine with the right sides: - Serve warm with vanilla ice cream. The cold ice cream contrasts with the warm cups. - Pair with whipped cream for a light touch. It adds creaminess that complements the apples. - Enjoy with a sprinkle of cinnamon on top. It enhances the apple flavor beautifully. {{image_2}} You can add spices to make these cups even tastier. Try using nutmeg or allspice with the cinnamon. These spices give a warm taste. You can also swap apples for other fruits. Pears or peaches work well too. Each fruit brings its own special flavor. If you need gluten-free options, look for gluten-free cinnamon roll dough. Many brands offer this now. You can also make these cups vegan. Use plant-based butter and a dairy-free glaze. These changes keep the flavor while meeting your diet. Want to make this recipe healthier? You can reduce sugar by cutting back on brown sugar. Use just two tablespoons instead of a quarter cup. You can also use less butter. Swap melted butter for applesauce. This keeps moisture while lowering fat. To keep your cinnamon roll apple pie cups fresh, you have a few options. First, let them cool completely before storing. Use an airtight container to prevent drying out. If you want to refrigerate, they will stay good for up to three days. For longer storage, freeze them in a single layer. Wrap each cup in plastic wrap before putting them in a freezer bag. This method keeps them safe for up to three months. To enjoy your cups later, choose the right method. For the best results, heat them in the oven. Preheat your oven to 350°F (175°C). Place the cups on a baking sheet and cover with foil. Heat for about 10-15 minutes. This keeps the crust crisp. If you’re in a hurry, you can use the microwave. Heat them for 20-30 seconds. Just know that the crust may not be as crisp. When stored properly, these delicious treats can last a while. In the fridge, they stay tasty for around three days. If frozen, they maintain quality for up to three months. After that, they may lose some flavor or texture. Always check for any signs of freezer burn if you freeze them for a long time. Enjoy your cinnamon roll apple pie cups while they are fresh! What can I use instead of apples? You can use pears, peaches, or berries. These fruits add a nice twist. Each brings its own flavor. You can also mix fruits for more fun! Can I make these ahead of time? Yes, you can prep the cups ahead. Just store the filling and dough separately. Assemble them before baking. This saves time on busy days. Why are my cups not rising? If the cups don’t rise, the dough may be too cold. Try warming it slightly before using. Also, check the expiration date on the dough. Fresh dough works best! What do I do if the cinnamon rolls burn? If they burn, watch your oven’s temperature. Ovens can vary in heat. Cover the cups with foil if they brown too fast. This can help them cook evenly. How many servings does this recipe make? This recipe makes eight cups. Each cup is a perfect serving size. They are great for sharing or for a small treat. What if I need to scale the recipe up or down? Adjust the number of apples and cinnamon rolls. Keep the ratio the same. This way, you can easily make more or fewer cups as needed. This blog post covered the delicious recipe for cinnamon roll cups with apples. We explored key ingredients, like cinnamon roll dough and diced apples, to create a tasty treat. You learned step-by-step how to prepare, bake, and customize these cups. Remember to try different flavors and healthy options. With proper storage, you can enjoy these cups even later. Now, get baking and enjoy your homemade treats!

Cinnamon Roll Apple Pie Cups Delightful and Easy Treat

Looking for a fun and easy dessert? Let me introduce you to Cinnamon Roll Apple Pie Cups! This delightful treat

- 1 lb Brussels sprouts, halved - 3 tablespoons olive oil - 4 cloves garlic, minced - 1/2 cup grated Parmesan cheese - 1 teaspoon garlic powder - 1 teaspoon onion powder - 1/2 teaspoon red pepper flakes (optional) - Salt and pepper to taste - Fresh parsley, chopped, for garnish When measuring ingredients, use a kitchen scale for precision. A pound of Brussels sprouts gives you about four cups when halved. For olive oil, use a tablespoon for accuracy. Mince the garlic finely to release its strong flavor. Make sure to measure the cheese using a cup, packed lightly for the best results. Choose Brussels sprouts that are firm and bright green. Look for small, tight heads with no yellowing. Avoid any that feel soft or have brown spots. Smaller sprouts tend to taste sweeter and cook faster. If you can, buy them on the stalk for freshness. Fresh Brussels sprouts will make your dish shine! First, set your air fryer to 375°F (190°C). Preheating helps the Brussels sprouts cook evenly. It takes about 5 minutes for the air fryer to reach this temperature. While it heats, you can prepare the Brussels sprouts mixture. Take 1 pound of Brussels sprouts and cut them in half. In a large bowl, add the halved sprouts. Pour in 3 tablespoons of olive oil. Mince 4 cloves of garlic and add them to the bowl. Then, sprinkle in 1 teaspoon of garlic powder and 1 teaspoon of onion powder. If you like a bit of spice, add 1/2 teaspoon of red pepper flakes. Season with salt and pepper to taste. Toss everything together until the sprouts are well coated. This step is key for flavor! Now, add 1/2 cup of grated Parmesan cheese to the mixture. Toss again to make sure the cheese sticks to the sprouts. The cheese will melt and create a lovely crust when cooked. Next, place the coated Brussels sprouts in the air fryer basket. Make sure to arrange them in a single layer. If your air fryer is small, you might need to cook in batches. Cook the sprouts for 15-18 minutes. Halfway through, shake the basket to ensure even cooking. When they are golden brown and crispy, they are ready! Carefully remove the Brussels sprouts and transfer them to a serving dish. For a garnish, sprinkle fresh chopped parsley and more Parmesan cheese if you want. Enjoy your crispy treat! To get the crispiest Brussels sprouts, start with fresh ones. Look for bright green, firm sprouts. Cut them in half to ensure even cooking. The key is to coat them well with olive oil and spices. This makes them crispy. Avoid overcrowding the air fryer basket; this lets hot air flow. Shake the basket halfway through cooking. This helps get all sides brown and crispy. Air fryers can vary in cooking power. Most cook at about 375°F (190°C). For most air fryers, cook the Brussels sprouts for 15 to 18 minutes. Check them at 15 minutes. If they are not golden brown, cook for 2 to 3 more minutes. Some air fryers may cook faster. Always monitor your sprouts closely. You can prepare Brussels sprouts ahead of time. Mix the sprouts with olive oil and spices, and store in the fridge. This works well for up to 24 hours. When ready to cook, just air fry as usual. This saves time and makes meal prep easy. Enjoy your deliciously crispy sprouts anytime! {{image_2}} You can change the cheese in this recipe. If you want a sharper taste, try cheddar. For something creamier, use mozzarella. Goat cheese gives a tangy flavor, while feta adds a salty kick. Each cheese brings a unique twist to your dish. Mix and match to find your favorite! Want to spice things up? Add smoked paprika for a hint of smokiness. Cumin adds warmth, while lemon zest brightens the dish. You can even try curry powder for an exotic flair. If you like heat, toss in more red pepper flakes. These small changes can make a big difference! No air fryer? No problem! You can roast Brussels sprouts in the oven. Preheat it to 425°F (220°C). Spread the sprouts on a baking sheet and cook for 20-25 minutes. They will still get nice and crispy. You can also steam them for a softer texture. Just remember, the cheese will not get as crispy! Store your leftover Brussels sprouts in an airtight container. Keep them in the fridge. They stay fresh for up to three days. Make sure they cool down before you seal them. This helps keep them crispy. To reheat, use your air fryer at 350°F (175°C). This makes them crispy again. Heat for about 5-7 minutes. You can also use a microwave, but they may lose their crunch. If you use the microwave, heat in short bursts. You can freeze Brussels sprouts for longer storage. First, blanch them in boiling water for two minutes. Then, cool them in ice water to stop cooking. Drain well and pack in freezer bags. They can last up to three months in the freezer. When ready to eat, cook from frozen in your air fryer for best results. To make Air Fryer Garlic Parmesan Brussels sprouts vegan, swap the Parmesan cheese for a plant-based alternative. Nutritional yeast also works well for a cheesy taste. You can use a bit of cashew cheese for creaminess too. Just make sure to check the labels for any dairy ingredients. Yes, you can use frozen Brussels sprouts. However, thaw them first and pat them dry. This helps remove excess moisture. Cook them for a few extra minutes to ensure they get crispy. The texture may differ slightly from fresh sprouts, but they will still be tasty. These Brussels sprouts pair well with many dishes. Serve them alongside roasted chicken or grilled fish for a complete meal. They also make a great side for pasta or grain bowls. For a vegetarian option, try them with quinoa or lentils. You can even toss them into salads for added crunch! Now you have all you need to make great air fryer garlic Parmesan Brussels sprouts. We covered the fresh ingredients, cooking steps, and tips for the best crispy sprouts. You learned different cheese options and how to store leftovers. Don't forget you can easily adapt this recipe to suit your taste! I hope you feel ready to create a delicious dish that impresses everyone. Enjoy your cooking and happy eating!

Air Fryer Garlic Parmesan Brussels Sprouts Crispy Treat

Looking for a tasty way to enjoy Brussels sprouts? You’ll love these Air Fryer Garlic Parmesan Brussels Sprouts! They’re crispy,

To make these tasty muffins, you need fresh ingredients that bring out the pumpkin flavor. Here’s what you’ll need: - 1 cup canned pumpkin puree - 3/4 cup granulated sugar - 1/2 cup brown sugar, packed - 1/2 cup vegetable oil - 2 large eggs - 1 teaspoon vanilla extract - 1 1/2 cups all-purpose flour - 1 teaspoon baking powder - 1 teaspoon baking soda - 1 teaspoon ground cinnamon - 1/2 teaspoon ground nutmeg - 1/4 teaspoon ground ginger - 1/2 teaspoon salt These ingredients blend perfectly to create moist and flavorful muffins. The streusel adds a delightful crunch to the soft muffins. For this topping, gather: - 1/2 cup all-purpose flour - 1/3 cup rolled oats - 1/4 cup brown sugar, packed - 1 teaspoon ground cinnamon - 1/4 cup unsalted butter, softened Mix these together to get a crumbly topping that contrasts nicely with the muffins. If you’re missing an ingredient or want to swap for a healthier choice, consider these options: - Use coconut oil instead of vegetable oil for a richer flavor. - Replace granulated sugar with honey or maple syrup for a natural sweetener. - Substitute whole wheat flour for all-purpose flour for added fiber. - Try using applesauce in place of some oil for a lower-fat version. These swaps can keep the muffins moist while adding new flavors. First, set your oven to 350°F (175°C). This heat helps the muffins bake evenly. Next, line a muffin tin with paper liners. If you don't have liners, lightly grease the cups. This step keeps muffins from sticking. In a large bowl, add 1 cup of canned pumpkin puree. Then, mix in 3/4 cup of granulated sugar and 1/2 cup of brown sugar. Pour in 1/2 cup of vegetable oil, then add 2 large eggs and 1 teaspoon of vanilla extract. Whisk these ingredients until smooth. This mix gives the muffins a moist texture. In another bowl, combine 1 1/2 cups of all-purpose flour, 1 teaspoon of baking powder, and 1 teaspoon of baking soda. Add 1 teaspoon of ground cinnamon, 1/2 teaspoon of ground nutmeg, 1/4 teaspoon of ground ginger, and 1/2 teaspoon of salt. Stir these dry ingredients well. This mix adds flavor and helps the muffins rise. For the streusel, use a small bowl. Add 1/2 cup of all-purpose flour, 1/3 cup of rolled oats, and 1/4 cup of brown sugar. Then, mix in 1 teaspoon of ground cinnamon. Use your fingers or a fork to incorporate 1/4 cup of softened unsalted butter. You want the mix to look like coarse crumbs. This topping adds a sweet, crunchy layer. Spoon the muffin batter into the prepared muffin tin. Fill each cup about 2/3 full. Now, sprinkle the streusel topping generously over the batter. Bake for 18-22 minutes. Check if they are done by inserting a toothpick into the center. If it comes out clean, the muffins are ready. Let them cool in the pan for 5 minutes before moving them to a wire rack. Enjoy the warm, flavorful muffins! To get soft and moist muffins, use canned pumpkin puree. It adds great flavor and moisture. Mix wet and dry ingredients separately. Add the dry mix to the wet mix gently. Overmixing makes muffins tough. Stop mixing when you see a few flour streaks. This keeps them fluffy. For a crunchy streusel, use cold butter. Mix it in with your fingers. This creates small clumps. Use oats for extra texture. Sprinkle the streusel topping evenly over the batter. This ensures every muffin gets a sweet crunch. One common mistake is using too much flour. Always measure flour correctly by spooning it into the cup. Don’t pack it down. Another mistake is not testing for doneness. Always use a toothpick to check. If it comes out clean, they’re ready! {{image_2}} You can make pumpkin muffins more fun with tasty add-ins. Here are some great options: - Chocolate Chips: Add 1 cup of semi-sweet chocolate chips. They bring a rich sweetness. - Nuts: Chopped walnuts or pecans give a nice crunch. Use about 1/2 cup for flavor. - Dried Fruit: Try 1/2 cup of raisins or cranberries. They add a chewy texture. - Seeds: A handful of sunflower or pumpkin seeds adds a nutty taste and extra nutrition. Mix these in gently when you combine the wet and dry ingredients. If you want to change the streusel topping, consider these ideas: - Nut Topping: Use crushed nuts mixed with sugar and spices for a crunchy twist. - Glaze: Drizzle a simple glaze made of powdered sugar and milk on top. It adds sweetness and style. - Coconut: Sprinkle shredded coconut on top before baking. It gives a tropical flair. - Spiced Sugar: Mix cinnamon and sugar and sprinkle it on the muffins for a sweet finish. These toppings can transform your muffins from good to great! You can play with seasonal flavors to keep things fresh. Here are some ideas: - Apple: Add chopped apples for a fall-inspired taste. About 1 cup works well. - Maple: Swap some sugar for maple syrup to add depth. Use 1/4 cup of syrup. - Gingerbread: Mix in ground ginger and molasses for a winter vibe. A teaspoon of ginger and 1/4 cup of molasses do the trick. - Cranberry Orange: Combine 1 cup of fresh cranberries with orange zest for a bright, tart flavor. These variations let you enjoy pumpkin muffins all year long! To keep your Pumpkin Streusel Muffins fresh, store them in an airtight container. This will keep them soft and moist. Place the container at room temperature for up to three days. If you want them to last longer, refrigeration helps, but it may change the texture a bit. Freezing these muffins is easy! First, let them cool completely. Then, wrap each muffin tightly in plastic wrap. Place the wrapped muffins in a freezer bag or container. They can stay frozen for up to three months. When you're ready to enjoy them, simply thaw at room temperature or heat in the microwave. To reheat your muffins, use a microwave or oven. For the microwave, heat for about 15-20 seconds. If using the oven, preheat to 350°F (175°C) and warm for about 5-10 minutes. This will help restore their fluffy texture and warmth. Enjoy them fresh like they just came out of the oven! Yes, you can use fresh pumpkin. First, cook and mash the pumpkin. This gives a fresh taste. Make sure to drain any extra water. Canned pumpkin is very smooth and easy to use. Fresh pumpkin may need more work, but it can be just as tasty. Check the muffins after 18 minutes. Insert a toothpick into the center of a muffin. If it comes out clean, the muffins are done. They should look golden brown on top. If they are not done, bake for a few more minutes. Keep checking until they are ready. Pumpkin muffins taste great on their own. You can add a dollop of whipped cream. A sprinkle of chopped pecans adds crunch too. Serve them warm for the best flavor. Pair them with a hot drink, like coffee or tea. Pumpkin muffins can last for about 3 days at room temperature. Keep them in an airtight container. If you want to store them longer, refrigerate them for up to a week. You can also freeze muffins for up to three months. Just thaw them when you're ready to enjoy. In this blog, we covered making delicious pumpkin streusel muffins. You learned the key ingredients and how to prepare the batter and topping. We shared tips for perfect muffins and common mistakes to avoid. Plus, we explored fun variations and storage options. In the end, these muffins are tasty and easy to make. Enjoy them fresh or try different flavors. I hope you feel ready to bake and share these treats. You’ll impress everyone with your skills!

Pumpkin Streusel Muffins Moist and Flavorful Treat

If you crave a warm, comforting treat, these Pumpkin Streusel Muffins are for you. With their moist texture and rich

For the shrimp, you need: - 1 lb shrimp, peeled and deveined - 4 tablespoons unsalted butter I like using fresh shrimp for the best taste. The butter adds a rich flavor that makes the dish shine. To add flavor, gather these ingredients: - 4 cloves garlic, minced - 1 teaspoon chili powder - 1 teaspoon paprika - Salt and black pepper to taste The garlic gives a nice aroma. Chili powder and paprika add warmth and color. Adjust salt and pepper based on your taste. For the tacos, you will need: - 8 small corn or flour tortillas - 1 cup shredded green cabbage - 1 avocado, sliced - ½ cup fresh cilantro, chopped - Lime wedges for serving - Hot sauce (optional) The tortillas hold everything together. Cabbage adds crunch, while avocado gives creaminess. Fresh cilantro brightens the dish. Lime juice enhances the flavors, and hot sauce adds a kick if you like it spicy. Start by placing a large skillet over medium heat. Add 4 tablespoons of unsalted butter. Watch it closely as it begins to melt. You want it to bubble gently, not brown. Once melted, you’re ready to move on. Next, add 4 cloves of minced garlic to the skillet. Stir it for about 1 minute. The garlic should smell great but not burn. Burning garlic can ruin the taste. So keep stirring and enjoy the aroma. Now, it’s time for the shrimp. Add 1 pound of peeled and deveined shrimp to the skillet. Sprinkle in 1 teaspoon of chili powder, 1 teaspoon of paprika, salt, and black pepper. Cook the shrimp for 2-3 minutes on each side. They should turn pink and opaque when done. This step adds great flavor. While the shrimp cooks, grab 8 small corn or flour tortillas. Heat a separate pan over low heat. Warm each tortilla for about 30 seconds on each side. This makes them soft and easy to fold. Once the shrimp and tortillas are ready, it’s assembly time! Place some shredded green cabbage on each tortilla. Top it with the garlic butter shrimp. Add slices of avocado and a sprinkle of fresh cilantro. Squeeze fresh lime juice over the top. For a kick, drizzle hot sauce if you like. Enjoy your tasty tacos! When picking shrimp, look for fresh or frozen shrimp that is peeled and deveined. Fresh shrimp should smell like the ocean, not fishy. If using frozen shrimp, thaw it overnight in the fridge. This helps keep the shrimp juicy. Choose shrimp that are large for better texture and taste. I like using 21/25 count shrimp for this recipe. Garlic is key in this recipe. Use fresh garlic for the best taste. Mince the garlic finely to spread its flavor. Sauté it in butter until it smells great, but don’t burn it. If the garlic burns, it turns bitter. You want a soft, rich garlic flavor that pairs well with shrimp. Warm tortillas before adding the shrimp. It makes them soft and tasty. You can warm them in a dry skillet over low heat for about 30 seconds on each side. Alternatively, wrap them in foil and heat in the oven at 350°F for 10 minutes. This keeps them warm and easy to fold. These tacos shine with fresh toppings. I love adding shredded cabbage for crunch. Sliced avocado adds creaminess, and fresh cilantro gives a burst of flavor. Squeeze lime juice on top for a zesty kick. If you like heat, drizzle some hot sauce over the tacos. Serve these with a side of chips or a light salad for a complete meal. {{image_2}} If you want a kick, add more heat. Use extra chili powder or add cayenne. You can also mix in some finely chopped jalapeños for freshness. I like to drench the shrimp in your favorite hot sauce before cooking them. This gives a nice spicy layer to the dish. Not in the mood for shrimp? You can easily swap them for mushrooms or zucchini. Just slice them into small pieces. Sauté them in the garlic butter mix just like the shrimp. This way, you keep that rich flavor while making it meat-free. Add black beans for texture and protein. Toppings can change the flavor of your tacos. Try adding pickled red onions for a tangy crunch. You can also use mango salsa for sweetness. If you want a creamy touch, drizzle some chipotle sauce on top. Serve your tacos with a side of rice or a fresh salad for a complete meal. When you have leftover shrimp, store it in an airtight container. This keeps it fresh. Place the shrimp in the fridge. Use it within two days for the best taste. If you want to keep it longer, consider freezing. To reheat tacos, use a skillet. Heat it on low. Add the tacos and warm them for a few minutes. This keeps them crispy. You can also microwave them. Just use a damp paper towel to cover them. This helps them stay moist. If you freeze the cooked shrimp, place it in a freezer-safe bag. Remove as much air as you can. When ready to eat, move the shrimp to the fridge overnight. This allows for safe thawing. You can also thaw shrimp in cold water for quicker results. Just make sure to cook it right after thawing. You can tell shrimp is cooked when it turns pink and opaque. The shrimp should curl slightly. This usually takes about 2-3 minutes on each side. If you see a clear or gray color, it is not done. Always check that shrimp is firm to the touch. Yes, you can use frozen shrimp. Just remember to thaw them first. To thaw, place them in cold water for about 15 minutes. Once thawed, peel and devein the shrimp if needed. They will cook just as well as fresh shrimp. You can serve shrimp tacos with many sides. Some great options are: - Rice and beans - Grilled vegetables - A fresh salad - Chips with salsa - Corn on the cob Each of these pairs well with the flavors of the tacos. To make this dish dairy-free, replace the butter with olive oil or coconut oil. Both options will give you a lovely flavor without dairy. You can also use a dairy-free margarine if preferred. The tacos will still be tasty and rich! You’ve learned how to make delicious shrimp tacos. We covered ingredients, step-by-step instructions, and useful tips. I shared variations to cater to different tastes and provided storage info for leftovers. These tacos are simple and fun to make. Enjoy them fresh or try new twists. Keep experimenting to find your perfect flavor. Trust me, your skills will shine with practice.

Minute Garlic Butter Shrimp Tacos Quick and Easy Meal

Get ready for a tasty treat! These Minute Garlic Butter Shrimp Tacos are quick and easy, perfect for busy nights.

To make Protein Greek Yogurt Pancake Bites, gather these key items: - 1 cup rolled oats - 1 cup Greek yogurt (plain, low-fat or full-fat) - 2 large eggs - 1 tablespoon honey or maple syrup - 1 teaspoon baking powder - 1 teaspoon vanilla extract - 1/2 teaspoon cinnamon - 1/4 cup milk (dairy or non-dairy) These ingredients work together to create a tasty, protein-packed snack. You can add extra flavors to your pancake bites. Here are some fun mix-ins to try: - Chocolate chips - Blueberries - Nuts (like walnuts or almonds) These options can give your bites a unique twist and make them more exciting. Need to adjust the recipe? Here are some easy swaps: - For a dairy-free option, use almond milk or coconut yogurt. - If you don’t have honey, try agave syrup or a sugar substitute. - Use egg replacers like applesauce if you want a vegan version. These substitutions keep the flavor while meeting your dietary needs. 1. First, preheat your oven to 350°F (175°C). This step helps the pancake bites cook evenly. 2. Grab a mini muffin tin and grease it with non-stick spray. This prevents sticking. 3. In a large bowl, mix together the rolled oats, Greek yogurt, and eggs. 4. Add honey or maple syrup, baking powder, vanilla extract, cinnamon, and milk to the mix. 5. Stir everything until it forms a smooth batter. Make sure there are no big clumps of oats. 6. If you want extra flavor, fold in chocolate chips, blueberries, or nuts. This adds fun texture. 1. Spoon the batter into the greased mini muffin tin. Fill each cup about 2/3 full. 2. Place the tin in the preheated oven. Bake for about 15 to 18 minutes. 3. Keep an eye on them as they bake. The tops should look lightly golden when done. 1. To check if they are ready, insert a toothpick into the center of a pancake bite. 2. If it comes out clean, the pancake bites are done. If it has batter on it, cook a little longer. 3. Once baked, let the bites cool for a few minutes. This makes them easier to remove from the tin. 4. After cooling, gently take them out and place them on a plate. Enjoy your tasty, protein-packed bites! To get the best pancake bites, use fresh ingredients. Fresh eggs and yogurt make a big difference. Mix the batter until it is smooth. This helps the oats blend in well. If you like, add chocolate chips or blueberries for fun flavors. Just fold them in gently. Avoid overmixing; it can make the bites tough. Fill each muffin cup about two-thirds full. This allows room for rising and prevents spills while baking. These pancake bites are great on their own, but you can make them even better. Drizzle some honey or maple syrup on top. Fresh fruit like strawberries or bananas can add color and taste. For a crunchy touch, sprinkle some nuts on top. You can also serve them with yogurt for a protein boost. Arrange them nicely on a platter for a special breakfast or snack. If you have leftovers, storing them is easy. Place the pancake bites in an airtight container. You can keep them in the fridge for up to five days. If you want to save them longer, freeze them. Lay them out on a tray first, then transfer them to a freezer bag. When you want to eat them, just reheat in the microwave or oven. This way, you can enjoy tasty pancake bites anytime! {{image_2}} Protein Greek yogurt pancake bites are a tasty way to fuel your day. They are packed with protein, which helps build muscles and keeps you full. The oats provide fiber, aiding digestion and keeping your energy steady. Greek yogurt adds calcium, great for strong bones. Plus, honey or maple syrup gives a touch of sweetness without too much sugar. Each pancake bite offers a balanced mix of nutrients. Here’s a simple breakdown: - Calories: About 50-60 per bite - Protein: Around 4-5 grams - Carbohydrates: Approximately 8-9 grams - Fats: Roughly 2 grams - Fiber: 1-2 grams These numbers can change based on your mix-ins. Adding nuts or chocolate chips boosts healthy fats and flavor. These pancake bites are versatile for many diets. They are naturally high in protein, thanks to Greek yogurt and eggs. You can make them gluten-free by using certified gluten-free oats. If you need a dairy-free option, use non-dairy yogurt instead. This recipe is great for breakfast, snacks, or post-workout fuel. They fit into many meal plans while still being fun and delicious! You can make your Protein Greek Yogurt Pancake Bites fun by adding flavors. Try chocolate by mixing in chocolate chips. For a fruity twist, add blueberries or mashed bananas. You can also use spices like nutmeg or ginger to change the taste. Each mix-in gives a new flavor and keeps it exciting. If you want to make these bites even healthier, swap honey for mashed ripe bananas. You can also use almond or coconut milk instead of regular milk. For a lower-calorie option, replace Greek yogurt with a non-fat version. These changes help keep the taste while making them lighter. Seasonal fruits can bring a fresh taste to your pancake bites. In spring, use strawberries or raspberries. In summer, try peaches or cherries. Fall is great for pumpkin puree and spices like cinnamon. In winter, add cranberries or citrus zest. Each season offers new tastes for your bites. Yes, you can make these pancake bites ahead of time. They store well in the fridge. After baking, let them cool. Place them in an airtight container. They stay fresh for up to five days. You can also freeze them for longer storage. Just place them in freezer bags. They will last for about three months. When you want to eat them, thaw overnight in the fridge. To make these pancake bites vegan, swap the eggs for flax eggs. Mix one tablespoon of flaxseed meal with three tablespoons of water. Let it sit for five minutes to thicken. Use plant-based yogurt instead of Greek yogurt. Almond or coconut yogurt works great. For the milk, choose any non-dairy option, like almond, soy, or oat milk. The recipe will still taste amazing! Reheating these pancake bites is easy. You can use the microwave or oven. For the microwave, place a few bites on a plate. Heat them for about 20-30 seconds. For the oven, preheat it to 350°F (175°C). Place the bites on a baking sheet and warm them for about 10 minutes. This keeps them soft and tasty. Enjoy them warm with a drizzle of honey or syrup! We explored key ingredients for tasty pancake bites, from basics to fun mix-ins. I shared step-by-step instructions for prep, baking, and checking doneness. Helpful tips helped you perfect your bites and store them well. Nutritional facts and variations showed you many options. By using these tips, you can create yummy, adaptable pancakes. Enjoy your cooking, and don’t hesitate to try new flavors!

Protein Greek Yogurt Pancake Bites Simple and Tasty

Looking for a healthy snack that tastes great? Try my Protein Greek Yogurt Pancake Bites! These bite-sized treats are easy

To make your Cinnamon Apple Crisp Parfaits, gather these items: - 3 medium apples (like Granny Smith or Honeycrisp) - 2 tablespoons sugar - 1 teaspoon ground cinnamon - 1 tablespoon lemon juice - 1 cup rolled oats - 1 cup all-purpose flour - 1/2 cup brown sugar, packed - 1/2 teaspoon salt - 1/2 cup unsalted butter, melted - 1 cup vanilla yogurt You can add extra flavors or textures with these items: - 1/2 cup chopped walnuts - Fresh mint leaves for garnish I recommend using tart apples for a great balance. Granny Smith apples work well. Honeycrisp apples add sweetness and crunch. You can mix different types for more flavor. To start, take three medium apples. I like using Granny Smith or Honeycrisp. Peel, core, and dice the apples into small pieces. In a large bowl, mix the diced apples with two tablespoons of sugar, one teaspoon of ground cinnamon, and one tablespoon of lemon juice. Toss everything well so the apples get coated evenly. Let this sit for about 15 minutes. This step helps the apples soften and soak up the flavors. Next, grab another bowl for the crisp topping. Combine one cup of rolled oats, one cup of all-purpose flour, half a cup of packed brown sugar, and half a teaspoon of salt. Pour in half a cup of melted unsalted butter. Mix it all together until it looks like coarse crumbs. This will give your topping that nice, crunchy texture. Now, preheat your oven to 350°F (175°C). Spread the crumble mixture evenly on a baking sheet lined with parchment paper. Bake it for 15 to 20 minutes, stirring halfway through. You want the topping to turn golden and crisp. Once done, take it out and let it cool. It's time to build the parfaits! Use clear parfait glasses for a beautiful look. Start by adding a layer of the baked apple mixture at the bottom. Then, add a generous dollop of vanilla yogurt. Sprinkle some of the crisp topping over the yogurt. Repeat these layers until the glasses are full. Finish with a layer of yogurt on top. For a lovely finish, sprinkle chopped walnuts on top if you like. They add a nice crunch. You can also place a few fresh mint leaves on top for color and a pop of freshness. This small touch makes your parfaits look even more appealing! Layering is key to a great parfait. Start with apples at the bottom. The apples add flavor and moisture. Then, spoon in the yogurt. This creamy layer balances the tart apples. Next, sprinkle the crisp topping to add crunch. Repeat these layers until you reach the top. End with yogurt and a sprinkle of topping. This gives a beautiful look and great taste. Clear glasses show off those lovely layers. A great crisp topping makes your parfait shine. Mix oats, flour, brown sugar, and salt. Then, pour in the melted butter. Use your hands to mix until it looks like coarse crumbs. Bake until golden brown and crispy. Stir halfway through to ensure even cooking. Let it cool completely. This keeps it crunchy when you layer it. You can also add nuts for extra flavor and texture. Serve your parfaits chilled for the best taste. They are great for breakfast or dessert. For a fun twist, try adding fresh fruits like berries or bananas. Pair your parfaits with coffee or tea for a cozy treat. You can also make mini parfaits for a party. Just use smaller glasses. This way, everyone can enjoy a tasty bite! {{image_2}} To make this parfait gluten-free, swap the all-purpose flour. Use gluten-free flour blends instead. They work well in the crisp topping. Make sure your oats are certified gluten-free. This keeps your dessert safe for those with gluten allergies. Enjoy the same great taste without worry! For a vegan version, replace the butter with coconut oil. It adds a nice flavor. Use plant-based yogurt instead of vanilla yogurt. Almond or coconut yogurt works great. You can also skip the walnuts for a nut-free option. These changes keep the dessert creamy and delicious! Add new flavors for a fun twist. Mix in some nutmeg with the cinnamon for warmth. Try adding a splash of vanilla extract to the apple mixture. You can even top with a drizzle of caramel sauce for extra sweetness. These small tweaks make your parfaits unique and exciting! To keep your leftover parfaits fresh, cover them with plastic wrap. You can also use airtight containers. Store them in the fridge for up to three days. The layers may soften a bit, but the flavors will still shine. If you want to enjoy them later, avoid adding the crisp topping until you serve. You can freeze the apple mixture and the crisp topping, but not the yogurt. Place the apple mixture in a freezer-safe bag. Squeeze out the air and seal it tightly. For the crisp topping, spread it on a baking sheet, freeze until solid, then transfer to a bag. Use both within three months for the best taste. To enjoy later, thaw them in the fridge overnight. To reheat the apple mixture, place it in a pot over low heat. Stir until warm, about 5 minutes. For the crisp topping, bake it for a few minutes at 350°F (175°C) until it becomes crispy again. Avoid reheating yogurt. Instead, add fresh yogurt when you're ready to serve. This keeps the parfaits delicious and fresh. For the best flavor, I recommend using Granny Smith or Honeycrisp apples. These apples balance sweetness and tartness well. They hold their shape during cooking, giving you a nice texture in your parfaits. You can also try Fuji or Braeburn apples for a sweeter twist. Yes, you can make this dessert ahead of time. To save time, prepare the apple mixture and the crisp topping a day in advance. You can layer the parfaits just before serving. This way, the flavors have time to blend, and you still enjoy a fresh dessert. You can store the parfaits in the refrigerator for up to two days. However, the crisp topping may lose some crunch over time. If you prefer a crunchy topping, add it just before serving. Keep the parfaits covered to maintain freshness. Absolutely! If you want a dairy-free option, try using coconut yogurt or almond yogurt. Both options work well in this recipe. You can also use whipped cream for a richer taste. Just remember, the flavor will change slightly, but it will still be delicious. If you want to skip walnuts, try using pecans or almonds. Both add a nice crunch and flavor. You can also use sunflower seeds for a nut-free option. Each choice brings a unique taste while still enhancing the parfait's texture. You learned how to create delicious Cinnamon Apple Crisp Parfaits. We covered the needed ingredients, helpful tips, and steps for perfecting your dish. This dessert offers great ways to add your flair. Remember, you can easily store or freeze leftovers for later enjoyment. Experiment with the variations for a unique twist. With this guide, you have all you need to impress. Enjoy making these parfaits and sharing them with others!

Cinnamon Apple Crisp Parfaits Rich and Flavorful Treat

If you love warm apple treats, you’ll enjoy my Cinnamon Apple Crisp Parfaits! This dessert layers sweet baked apples with

- 2 pounds beef chuck, cut into 1-inch pieces - 1 medium onion, finely chopped - 8 ounces mushrooms, sliced - 4 cups beef broth For the beef stroganoff, you need good meat. Beef chuck works best because it becomes tender when cooked slowly. The onion adds sweetness, while mushrooms bring an earthy flavor. Low-sodium beef broth helps keep the dish rich without being too salty. - 2 tablespoons Worcestershire sauce - 2 tablespoons soy sauce - 1 teaspoon dried thyme The Worcestershire sauce gives it depth. Soy sauce adds umami, making every bite savory. Dried thyme brings a hint of freshness that balances the rich flavors. - Fresh parsley, chopped - Egg noodles for serving When serving, sprinkle fresh parsley on top. It adds a pop of color and freshness. Serve it over soft egg noodles, which soak up the tasty sauce perfectly. This dish is all about comfort, and those noodles do just that. Start by seasoning the beef chunks with salt and pepper. This step adds flavor right from the start. Next, heat a large skillet over medium-high heat. Sear the beef in batches until it turns brown on all sides. This should take about 4-5 minutes per batch. Once browned, transfer the beef to the slow cooker. This helps lock in the juices and flavor. In the same skillet, add the chopped onion. Cook it for about 2-3 minutes until it looks clear. Then, add the minced garlic and sliced mushrooms. Sauté these for another 5 minutes. This step makes the mushrooms tender and brings out their rich flavor. Now, transfer the onion and mushroom mix to the slow cooker with the beef. Next, pour in the beef broth, Worcestershire sauce, soy sauce, dried thyme, and paprika. Stir everything well to combine. This mix creates a deep, savory sauce that will soak into the beef. Cover the slow cooker with its lid. Cook on low for 7-8 hours or on high for 4-5 hours. The low and slow method helps the beef become tender and flavorful. If you’re short on time, the high setting works too, but the low method is best for taste. About 30 minutes before serving, prepare a cornstarch slurry. Mix 2 tablespoons of cornstarch with 2 tablespoons of water in a small bowl. Stir this slurry into the slow cooker. Then, mix in the sour cream until everything is well combined. Cook for an additional 30 minutes on high. This thickens the sauce nicely. As the dish nears completion, boil the egg noodles according to the package instructions. This usually takes about 7-9 minutes. Once cooked, drain the noodles and set them aside. They will soak up the delicious sauce when you serve the beef stroganoff. The best cut for slow cooking is beef chuck. It has a good amount of fat and connective tissue. This makes it tender and flavorful after long cooking. When choosing beef chuck, look for bright red meat. Avoid cuts that have a lot of gristle or are too lean. To select the right beef chuck, feel the meat. It should be firm but yield slightly when pressed. Fat is key for flavor and moisture in the dish. Seasoning is very important. Use salt and pepper to enhance the beef's natural taste. You can also add garlic powder or onion powder for depth. Fresh herbs like thyme and parsley work great too. Adding veggies can boost flavor and nutrition. Consider adding carrots or celery to the mix. You can also try a splash of red wine for extra richness. For sides, egg noodles are classic. They soak up the sauce well. You could also serve it with rice or mashed potatoes. A light salad pairs nicely too. When it comes to wine, a medium-bodied red is a good choice. Try a Merlot or a Pinot Noir. These wines complement the beef and sauce flavors beautifully. {{image_2}} For a rich and earthy flavor, add more mushrooms. Use 12 ounces instead of 8. This change gives you a creamier texture and a stronger taste. You can mix different types of mushrooms, like shiitake or portobello. This twist enhances the dish while keeping it simple. Want to lighten the dish? Swap sour cream for Greek yogurt. It adds creaminess without the extra fat. You can also use low-fat beef broth. For noodles, choose whole wheat or zucchini noodles for a gluten-free option. These swaps keep the taste while making it healthier. Boost nutrition by adding veggies. Try carrots, peas, or bell peppers. Chop them into small pieces, so they cook well. Add these veggies in the last hour of cooking to keep them tender. This will give your stroganoff more color and flavor. After enjoying your beef stroganoff, you may have some left. Store it in the fridge. Use an airtight container for best results. Your leftovers will stay fresh for about three to four days. If you want to keep it longer, consider freezing it. Place the stroganoff in freezer-safe bags or containers. It can last up to three months in the freezer. Reheating beef stroganoff is easy. The best way is to use the stovetop. Pour the desired amount into a pan. Heat it slowly over medium heat, stirring often. This keeps the meat tender. You can also use the microwave. Place the stroganoff in a microwave-safe bowl. Cover it with a lid or microwave-safe wrap. Heat it in 30-second intervals, stirring in between. In the fridge, beef stroganoff lasts three to four days. In the freezer, it can last up to three months. Always check for signs of spoilage before eating. Look for a sour smell, discoloration, or mold. If you see any, throw it away. Keeping your food safe is important for enjoying tasty meals! Yes, you can use other cuts for this dish. Beef chuck is great, but try these: - Brisket - Round roast - Flank steak These cuts also work well in slow cooking. They become tender and tasty over time. To keep beef tender, follow these tips: - Sear the beef before slow cooking. - Cook on low heat for longer periods. - Avoid opening the lid too often. These steps help lock in moisture and flavor, making the beef soft and juicy. Yes, you can adapt it for the stovetop. Here’s how: 1. Sear the beef in a large pot. 2. Add the onions, garlic, and mushrooms as usual. 3. Pour in the broth and sauces, then simmer on low for about 1.5 hours. Stir occasionally and check for tenderness. If you need a substitute for sour cream, try these options: - Greek yogurt - Cream cheese - Crème fraîche Each adds creaminess and flavor. Adjust the amount to taste. Yes, you can use beef broth. Here’s the difference: - Broth is lighter and more flavorful. - Stock is richer and thicker due to bones. Either option works, but stock gives a deeper flavor. This blog covered how to make a tasty beef stroganoff. We went through the main ingredients, tips for cooking, and tasty variations. You now know how to pick good beef, enhance flavors, and store leftovers. Remember, the slow cooker makes this dish easy and delicious. With simple adjustments, you can make it healthier or customize it to your taste. Enjoy making this meal and sharing it with family and friends!

Slow Cooker Beef Stroganoff Tasty and Simple Recipe

If you’re craving a hearty meal that cooks itself while you go about your day, look no further. This Slow

Older posts
Newer posts
← Previous Page1 … Page17 Page18 Page19 … Page84 Next →

dsad

© 2026 Foodish Talk • Built with GeneratePress

Our Policies

  • Copyright Policy
  • Cookie Policy
  • GDPR Policy
  • Privacy Policy
  • Disclaimer
  • Terms Of Use

More Information

  • Home
  • About
  • Contact
  • Appetizers
  • Dessert
  • Dinner
  • Drinks
©2026, Foodish Talk About Back To Top