Skip to content
DisclaimerTerms Of UseGDPR PolicyCookie Policy

Foodish Talk

  • Home
  • Drinks
  • Appetizers
  • Dinner
  • Dessert
  • About
  • Contact
  • Privacy Policy
DisclaimerTerms Of UseGDPR PolicyCookie Policy

NO-ING-IMG

To create a delicious Apple Cider Donut Cake, you'll need: - 2 cups apple cider - 1 cup all-purpose flour - 1 cup whole wheat flour - 1 teaspoon baking powder - 1 teaspoon baking soda - 1 teaspoon ground cinnamon - ½ teaspoon ground nutmeg - ½ teaspoon salt - ¾ cup granulated sugar - ½ cup brown sugar, packed - ¾ cup unsweetened applesauce - ½ cup vegetable oil - 2 large eggs - 1 teaspoon vanilla extract These ingredients work together to give the cake its unique taste. The apple cider adds a rich flavor, while the spices bring warmth to each bite. You can make your cake even better with these optional items: - ½ cup granulated sugar (for topping) - 1 tablespoon ground cinnamon (for topping) These toppings give the cake a sweet and crunchy finish. You can also add nuts or chocolate chips if you want extra texture or sweetness. To make this cake, gather these essential tools: - 9-inch Bundt pan or tube pan - Saucepan - Mixing bowls - Whisk - Spatula - Wire rack Having the right equipment helps ensure your cake bakes evenly and comes out beautifully. First, you need to bring the apple cider to a boil. Use a saucepan and heat it over medium heat. Stir it gently. Once it's boiling, lower the heat to a simmer. Let it cook for about 15-20 minutes. You want it to reduce down to about 1 cup. This step adds a deep apple flavor to your cake. After that, remove it from the heat and let it cool slightly. While the cider cools, grab a mixing bowl. In it, whisk together the all-purpose flour and whole wheat flour. Add the baking powder, baking soda, ground cinnamon, ground nutmeg, and salt. Mix them well. This blend gives your cake the right texture and taste. In another large bowl, combine the granulated sugar and brown sugar. Add the unsweetened applesauce. Stir in the vegetable oil, eggs, and vanilla extract. Mix until the mixture is smooth and well combined. This step adds moisture and flavor to your cake. Once the apple cider has cooled, slowly pour it into the wet mixture. Stir continuously while you mix. Next, gradually fold in the dry ingredients. Be careful not to overmix. You want a smooth batter, but a few lumps are okay. This ensures your cake stays light and fluffy. Now, pour the batter into your prepared Bundt pan. Smooth the top with a spatula. Place it in the oven and bake at 350°F (175°C) for 30-35 minutes. To check if it's done, insert a toothpick into the center. If it comes out clean, your cake is ready. While the cake bakes, mix the remaining granulated sugar with the ground cinnamon in a small bowl. After the cake bakes, let it cool in the pan for 10 minutes. Carefully invert it onto a wire rack. Once cool, brush the top with melted butter. Sprinkle the cinnamon-sugar mix generously on top. This adds a sweet, crunchy finish to your cake. To keep your Apple Cider Donut Cake moist, start with the apple cider. Boil it down to concentrate the flavor. This step brings out the apple's natural sweetness and adds depth. Mix in unsweetened applesauce for added moisture. It helps to balance flavors and creates a tender crumb. Avoid overmixing your batter; mix just until combined. This keeps air bubbles intact, leading to a fluffy texture. To make the topping shine, mix granulated sugar with ground cinnamon in a bowl. Use a ratio of ½ cup sugar to 1 tablespoon cinnamon for the right balance. Brush the warm cake with melted butter before sprinkling the topping. This helps it stick well and adds richness. Apply the topping generously for that iconic donut-style crust. One common mistake is not reducing the apple cider enough. If it's too watery, the cake may end up dense. Also, check oven temperature before baking. An oven thermometer can help you avoid under or over-baking. Lastly, don't skip cooling the cake in the pan. This allows it to set and makes it easier to invert. {{image_2}} You can give your Apple Cider Donut Cake a new twist. Try adding nuts or chocolate chips. Chopped walnuts or pecans add crunch and flavor. Just fold in about half a cup before baking. If you prefer chocolate, use semi-sweet or dark chocolate chips. They will melt and create rich pockets of chocolate throughout the cake. Both options enhance taste and texture. If you need a gluten-free option, it's simple to adapt this recipe. Replace the all-purpose and whole wheat flours with a gluten-free flour blend. Look for a blend that includes xanthan gum. This helps with the texture. You may also need to adjust the baking time slightly. Keep an eye on the cake and check for doneness with a toothpick. Get creative with flavors to make your cake unique. Add caramel for a sweet twist. Drizzle it on top after baking or mix in chunks before baking. You can also experiment with spices. Try adding a pinch of ginger or cardamom for warmth. Each change brings a new taste, making your cake a special treat every time you bake. To keep your apple cider donut cake fresh, wrap it well. Use plastic wrap or aluminum foil. Place it in an airtight container. This keeps moisture in and air out. Store it at room temperature for up to three days. If you want to keep it longer, refrigerate it. Just make sure it is wrapped well to avoid drying out. You can freeze the apple cider donut cake if you have extra slices. First, let the cake cool completely. Then, cut it into slices. Wrap each slice tightly in plastic wrap. After that, place the slices in a freezer-safe bag or container. This way, you can enjoy your cake for up to three months. When you're ready to eat it, thaw the slices in the fridge overnight. When you serve this cake later, it’s best to warm it slightly. You can do this in the microwave for about 10-15 seconds per slice. Or, you can place it in a warm oven for a few minutes. This brings back the cake's lovely warmth and flavor. Also, consider adding a sprinkle of fresh cinnamon-sugar on top before serving. This adds a nice touch and makes it feel special! Yes, you can use fresh apple juice. However, apple cider has a richer flavor. It adds depth to the cake. If you choose juice, consider adding a bit of lemon juice for acidity. This cake lasts about 3 to 5 days at room temperature. Keep it in an airtight container to maintain its moisture. You can also store it in the fridge for a longer shelf life. I love serving this cake with whipped cream or vanilla ice cream. You can also pair it with a hot cup of cider or coffee. The warm spices make great flavors together. Yes, you can make the cake a day ahead. Just store it properly to keep it fresh. It tastes even better after sitting for a day as the flavors meld. Absolutely! Replace the eggs with flaxseed meal or applesauce. Use a plant-based oil in place of vegetable oil. Make sure to choose a vegan-friendly sugar for best results. This blog post covered how to make a delicious Apple Cider Donut Cake from scratch. You learned about the main ingredients, optional toppings, and key equipment needed. I shared step-by-step instructions to guide you through the baking process. Tips on keeping the cake moist and common mistakes to avoid can help you succeed. Remember, you can customize the cake with fun variations. Enjoy every slice and share it with others. Happy baking!

Apple Cider Donut Cake Irresistible Fall Treat

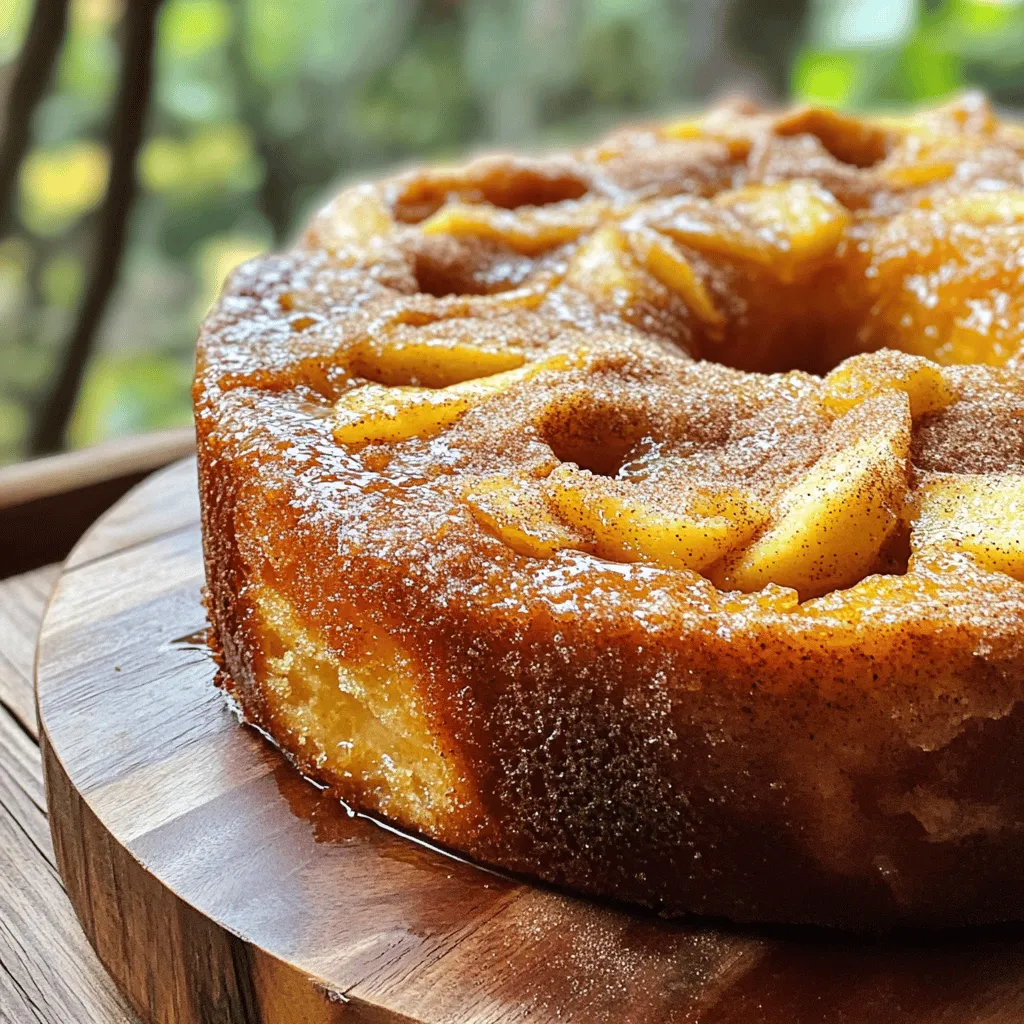
Fall is here, and there’s nothing better than a warm slice of Apple Cider Donut Cake. This cake combines the

- 2 cups all-purpose flour - 1 cup rolled oats - 3/4 cup brown sugar - 1/2 cup granulated sugar - 1 teaspoon baking soda - 1/2 teaspoon salt - 1 cup unsalted butter, softened - 3 medium apples, peeled, cored, and diced (preferably tart apples like Granny Smith) - 1 teaspoon cinnamon - 1/2 teaspoon nutmeg - 1 cup caramel sauce If you need gluten-free options, you can use a gluten-free flour blend. This works well in most recipes. For those who want a dairy-free version, you can swap unsalted butter for coconut oil or vegan butter. If you are looking for sweetener alternatives, consider using honey or maple syrup instead of granulated sugar. These options can change the flavor a bit but will still taste great. 1. Preheat the oven and prepare the baking dish: Start by preheating your oven to 350°F (175°C). Grease a 9x13 inch baking dish or line it with parchment paper. This helps with easy removal later. 2. Make the crust mixture and press it into the baking dish: In a large bowl, mix together 2 cups of all-purpose flour, 1 cup of rolled oats, 3/4 cup of brown sugar, 1/2 cup of granulated sugar, 1 teaspoon of baking soda, and 1/2 teaspoon of salt. Blend these well. Next, add 1 cup of softened unsalted butter. Use your hands or a pastry cutter to mix until it looks like coarse crumbs. Set aside 1 ½ cups of this mixture for the topping. Press the rest firmly into the bottom of your baking dish. Bake for 15 minutes. While the crust bakes, prepare the apple filling. In a medium bowl, take 3 medium apples, peeled, cored, and diced. Toss these apples with 1 teaspoon of cinnamon, 1/2 teaspoon of nutmeg, and a splash of lemon juice. The lemon juice keeps the apples fresh and tasty. 1. Assemble the bars and bake according to directions: Once the crust is done, remove it from the oven. Spread the apple mixture evenly over the crust. Drizzle about 1/2 cup of caramel sauce over the apples. Sprinkle the reserved crumble mixture on top, then drizzle with more caramel sauce. 2. Cooling and cutting instructions: Return the dish to the oven and bake for 30-35 minutes. Look for a golden brown topping and tender apples. Once baked, let the bars cool in the pan for at least 30 minutes. This helps them set. Finally, lift the bars out and cut them into squares. Serve warm or at room temperature, with extra caramel if you like. To know when your caramel apple crumble bars are done, look for a golden top. The apples should feel soft when you poke them with a fork. This shows they are cooked well. For the best texture, let the bars cool for at least 30 minutes in the pan. This helps the layers set and makes cutting easier. If you cut them too soon, they might fall apart. These bars shine when served warm. Pair them with a scoop of vanilla ice cream or a dollop of whipped cream. The cold cream balances the warm bars perfectly. You can also drizzle extra caramel sauce on top. This adds sweetness and makes the bars look fancy. A sprinkle of sea salt can enhance the flavors too. You can prepare these bars ahead of time. Make the crust and apple filling a day before. Just assemble and bake when you're ready. If you want to freeze them, let the bars cool completely first. Wrap them tightly in plastic wrap and store in an airtight container. They can last up to three months in the freezer. Just thaw them in the fridge before serving. {{image_2}} You can change the taste of your caramel apple crumble bars by adding nuts or dried fruits. Chopped walnuts or pecans give a nice crunch. If you prefer something sweeter, try adding raisins or dried cranberries. These additions boost flavor and texture. You might also swap out spices for a new twist. Ginger and clove can bring warmth to your bars. Use a teaspoon of ground ginger or a pinch of ground clove for a unique taste. These spices work well with apples and caramel. If you follow a vegan diet, you can easily adapt this recipe. Swap unsalted butter for vegan butter. For caramel, use a plant-based version, or make your own with coconut milk and sugar. This way, you can enjoy the bars without dairy. If you are watching your sugar intake, try low-sugar options. Use sugar substitutes like monk fruit or stevia. You can also choose apples that are naturally sweeter to cut down on added sugar. For a keto-friendly version, use almond flour instead of all-purpose flour. This keeps the bars low in carbs while still being tasty. To keep your caramel apple crumble bars fresh: - Refrigeration: Place the bars in an airtight container. This keeps them moist. Store in the fridge for up to five days. If you want to keep your bars longer, consider freezing them. - Freezing: Wrap the bars tightly in plastic wrap. Then, place them in a freezer-safe bag. They can last for up to three months in the freezer. When you're ready to eat them, just thaw them in the fridge overnight. If you want to enjoy your bars warm: - Softening Bars: Microwave the bars for about 10 to 15 seconds. This will warm them without drying them out. - Re-crisping Topping: To make the topping crispy again, place the bars in a preheated oven at 350°F (175°C) for about 5 to 10 minutes. This gives them a nice crunch, just like when they first came out of the oven. Can I use different types of apples? Yes, you can use any apple you like. However, tart apples like Granny Smith work best. They balance the sweetness of the caramel and sugar. Using a mix of sweet and tart apples can add great flavor, too. What is the best way to cut the bars? To cut the bars easily, let them cool completely. Use a sharp knife to slice through them. For clean cuts, warm the knife under hot water before cutting. Wipe the knife clean after each slice for neat edges. How long will these bars last and how should I store them? These bars can last about five days at room temperature. Store them in an airtight container to keep them fresh. If you need to keep them longer, you can refrigerate them for up to a week. Why did my bars crumble when cutting? Your bars may crumble if they are too warm when you cut them. Make sure to let them cool for at least 30 minutes in the pan. If they are still warm, they might not hold together well. How to fix super dry crumble topping? If your crumble topping is too dry, mix in a little melted butter. Start with one tablespoon at a time until it reaches a crumbly texture. Adding a splash of water or milk can also help soften the mixture. You can create delicious apple dessert bars with simple steps and easy ingredients. We covered everything from the list of ingredients to baking tips. Making swaps or trying variations can make this recipe fit your needs. Remember to store leftovers right and reheat them well. These bars are perfect for any occasion. Enjoy baking and sharing these tasty treats!

Caramel Apple Crumble Bars Tasty Fall Dessert Recipe

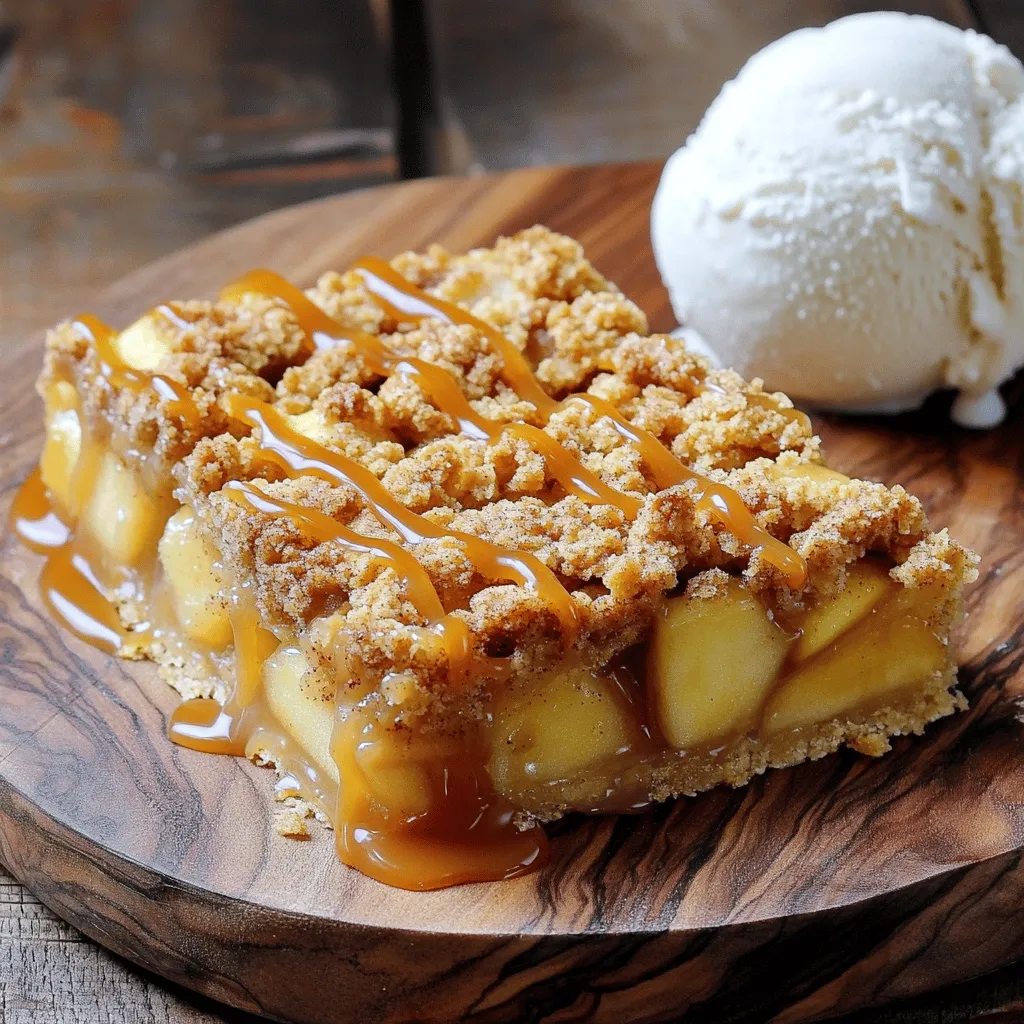
Are you ready to embrace fall with a delicious treat? These Caramel Apple Crumble Bars combine sweet, tart apples and

- 4 salmon fillets - 1 bunch asparagus, trimmed - 4 tablespoons unsalted butter, melted - 2 lemons (1 sliced thinly and 1 juiced) The main ingredients create the heart of this dish. Salmon fillets are rich and tender, giving a nice base for flavor. Fresh asparagus adds a crisp texture and bright color. Butter brings richness, while lemons add zest and brightness. - 3 cloves garlic, minced - 1 teaspoon dried oregano - 1 teaspoon paprika - Salt and pepper to taste Seasonings and aromatics elevate the dish. Garlic gives a warm aroma and depth. Dried oregano adds earthiness, while paprika brings a hint of smokiness. Salt and pepper enhance all the flavors. - Fresh parsley Fresh parsley adds a pop of color and freshness. It also enhances the dish's look when you serve it. A sprinkle right before serving makes your meal shine. To start, preheat your oven to 400°F (200°C). This step is crucial for even cooking. Next, take a large baking sheet and line it with parchment paper. This makes cleanup easy and helps prevent sticking. Now, let’s get the salmon and asparagus ready. Place the salmon fillets in the center of the baking sheet, skin-side down. Arrange the trimmed asparagus around the salmon. This setup allows flavors to mingle. In a small bowl, mix the melted butter, minced garlic, lemon juice, dried oregano, paprika, salt, and pepper. Stir until everything blends well. This butter sauce adds great flavor to both the salmon and asparagus. Drizzle the butter mixture generously over the salmon and asparagus. Top each salmon fillet with thin lemon slices for extra zing. Now, it’s time to bake. Transfer the tray to your preheated oven and bake for 15-20 minutes. Check for doneness by looking for flaky salmon. It should flake easily with a fork. The asparagus should be tender yet crisp. When it’s done, take the tray out and let it sit for a few minutes. Finally, garnish with fresh parsley before serving. Enjoy your flavorful meal! To check for flakiness, use a fork. Gently poke the salmon. If it flakes easily, it's done. The recommended internal temperature for salmon is 145°F (63°C). This ensures the fish is safe and moist. You can add herbs or spices to boost the taste. Fresh dill or thyme works well. If you want a spicy kick, try adding red pepper flakes. For side dishes, roasted potatoes or a fresh salad pairs nicely. They balance the rich flavors of the salmon. Using parchment paper makes cleanup quick. Just remove the paper and toss it away. For storing leftovers, place salmon and asparagus in an airtight container. They will stay fresh for up to three days in the fridge. {{image_2}} If you want to change things up, you can use chicken or tofu. Chicken breasts work well here. Simply cook them like the salmon. Tofu is a great plant-based option. Press it to remove extra moisture and cut it into thick slices. You can flavor it just like the salmon with the butter sauce. Both options add nice variety to your meal. You can also add seasonal vegetables to your tray. Bell peppers and zucchini are great choices. Slice them into bite-sized pieces. They roast well and add color to your dish. Toss them with the butter sauce too, for more flavor. You can mix and match with your favorite veggies. To change the flavor profile, try using different citrus fruits. Oranges and limes can add a fun twist. Squeeze their juice into the butter sauce. You can also use lime slices on the fish. This will brighten up the dish and make it exciting. Experimenting with flavors keeps things fresh and fun! After you enjoy your lemon butter salmon and asparagus, it’s smart to store leftovers properly. Let the dish cool down to room temperature. Then, place it in an airtight container. This keeps the salmon and asparagus fresh. Store it in the fridge. It will last for up to three days. You can also freeze leftovers if you want to save them longer. First, let the dish cool completely. Then, wrap it tightly in plastic wrap. After that, place it in a freezer-safe bag or container. This helps prevent freezer burn. When stored this way, it can last for up to three months. When you’re ready to enjoy your leftovers, reheating them the right way is key. The best method is to use an oven. Preheat it to 350°F (175°C). Place the salmon and asparagus on a baking sheet. Cover them loosely with foil. Heat for about 10-15 minutes or until warmed through. You can also use a microwave. Just heat in short bursts of 30 seconds. Check often to avoid overcooking. This keeps your salmon flaky and your asparagus crisp. Yes, you can use frozen salmon. Just thaw it first. Place the salmon in the fridge overnight. If you are short on time, put it in cold water for about an hour. This recipe works well with thawed salmon. The cooking time may change slightly, so watch for doneness. To check if the salmon is done, use a fork. Gently flake the fish in the thickest part. If it flakes easily, it is done. The inside should look opaque and not shiny. You can also use a meat thermometer. The safe temperature is 145°F (63°C). This dish pairs well with many sides. Here are some ideas: - Rice: Lemon or garlic rice adds a nice touch. - Potatoes: Try roasted or mashed potatoes for comfort. - Salad: A fresh green salad balances the meal. - Bread: Crusty bread or garlic bread works well too. For drinks, consider: - White wine: A crisp Sauvignon Blanc complements the dish. - Sparkling water: Add fresh lemon for a refreshing drink. This blog post covered how to make a tasty lemon butter salmon and asparagus tray. You learned about the main ingredients, including salmon, asparagus, and seasonings. I shared easy steps for preparation and cooking, along with tips for perfecting the dish. We explored fun variations and how to store leftovers safely. Cooking should be simple and fun. With these steps, you can impress family and friends. Enjoy your cooking journey and relish the flavors!

Lemon Butter Salmon Asparagus Tray Flavorful Delight

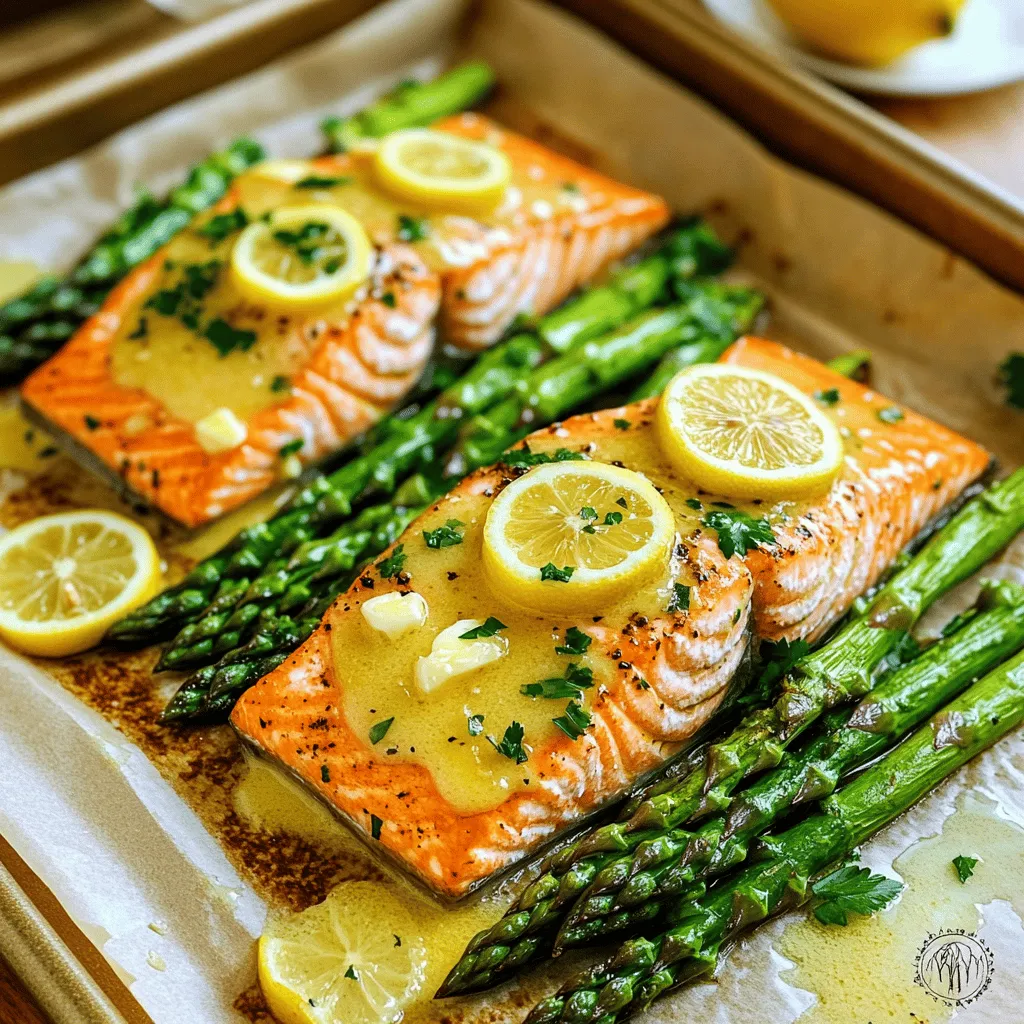
Looking for a tasty, easy meal? You’ve come to the right place! My Lemon Butter Salmon Asparagus Tray brings vibrant

- 2 cups all-purpose flour - 1 teaspoon baking powder - 1 teaspoon baking soda - 1 teaspoon ground cinnamon - ½ teaspoon ground nutmeg - ¼ teaspoon ground ginger - ½ teaspoon salt - ½ cup unsalted butter, softened - 1 cup granulated sugar - ½ cup brown sugar, packed - 1 cup pumpkin puree (not pumpkin pie filling) - 1 large egg - 1 teaspoon vanilla extract - ½ cup granulated sugar (for rolling) - 2 teaspoons ground cinnamon (for rolling) - ¼ teaspoon ground nutmeg (for rolling) To make these Pumpkin Snickerdoodle Cookies, you need the right ingredients. Start with the dry ingredients, which create the cookie's structure. The flour, baking powder, baking soda, spices, and salt work together to give the cookie its soft texture and warm flavors. Next, gather the wet ingredients. The butter and sugars add sweetness and richness. Pumpkin puree is the star here. It gives the cookies moisture and a lovely pumpkin flavor. The egg and vanilla extract bind everything together and add more depth. Finally, the rolling mixture adds a sweet spice crust. This mixture is what makes these cookies truly snickerdoodles. It gives them a sweet crunch on the outside while keeping them soft inside. - Preheat the oven to 350°F (175°C) and line a baking sheet with parchment paper. - In a medium bowl, whisk together the flour, baking powder, baking soda, cinnamon, nutmeg, ginger, and salt. Set aside. - In a large mixing bowl, cream together the softened butter, granulated sugar, and brown sugar until light and fluffy. This should take about 2-3 minutes. - Next, mix in the pumpkin puree, egg, and vanilla extract until everything is well combined. - Gradually incorporate the dry ingredients into the wet mixture. Mix until just combined; avoid overmixing. - Using a cookie scoop or your hands, form small balls of dough about 1 inch in diameter. - Roll each ball in a mix of sugar and spices until fully coated. Place them on the prepared baking sheet about 2 inches apart. - Gently flatten each ball with the bottom of a glass or your fingertips. This creates a slightly thicker cookie. - Bake in the preheated oven for 10-12 minutes. Look for set edges and a slightly cracked top while keeping the center soft. - Once done, remove the cookies from the oven. Let them cool on the baking sheet for 5 minutes before transferring them to a wire rack to cool completely. - Use softened butter for easier creaming. - Mix just enough to combine. Overmixing makes tough cookies. - Cool cookies on the sheet for 5 minutes before moving them. - A wire rack helps cookies cool completely and evenly. - Serve cookies on a festive platter, lightly dusted with cinnamon. - Pair these cookies with warm spiced cider or fresh coffee for a cozy treat. {{image_2}} You can change the flour for your cookies. - Use whole wheat flour for a healthier option. It adds a nutty taste and more fiber. - Try gluten-free flour blends if you want to make these cookies gluten-free. Look for blends with rice flour or almond flour. Want to make your cookies even better? Consider some fun add-ins! - Chocolate chips add sweetness and a lovely texture. Use dark, milk, or white chocolate. - Nuts, like walnuts or pecans, give a nice crunch. Chop them up before adding. - Dried fruits, like cranberries or raisins, can add a fruity twist. They pair well with pumpkin. Let’s spice things up! A few small changes can add great flavor. - Add a pinch of cloves or allspice. These spices give a warm, cozy taste. - For a fun twist, use sweet potato puree instead of pumpkin. It offers a similar texture and a new flavor profile. Store your Pumpkin Snickerdoodle Cookies in an airtight container. Keep them at room temperature for up to 5 days. This keeps them fresh and tasty. If you want to keep cookies for longer, freeze them! Place cookies in a freezer-safe bag. They can last up to 3 months. Just make sure to squeeze out as much air as possible. To enjoy warm cookies, heat them in the microwave for a few seconds. This brings back their soft texture. You can also revive them in the oven. Bake at 350°F for a few minutes. This makes them taste freshly baked again! No, using plain pumpkin puree ensures the right texture and flavor. Pumpkin pie filling has added spices and sugars. This can change the taste and texture of your cookies. Stick to pure pumpkin for the best results. Make sure your butter is softened, not melted, and chill the dough if necessary. If the dough is too warm, the cookies will spread too much during baking. Chilling helps keep their shape. Yes, you can prepare the dough and refrigerate it for up to 24 hours before baking. This is a great time-saver. Just scoop and roll the cookies when you are ready to bake. Look for set edges and slightly cracked tops while keeping the center soft. This means they are done but still chewy inside. Let them cool a bit on the sheet for perfect texture. This blog post shared everything you need for making delicious pumpkin cookies. You learned about the right dry and wet ingredients, plus tips for perfect texture and flavor. Remember to store cookies properly to enjoy them longer. Baking can be fun and rewarding, especially with variations and add-ins that make your treats special. Now, get baking and enjoy these tasty cookies with friends and family!

Pumpkin Snickerdoodle Cookies Delightful Fall Treat

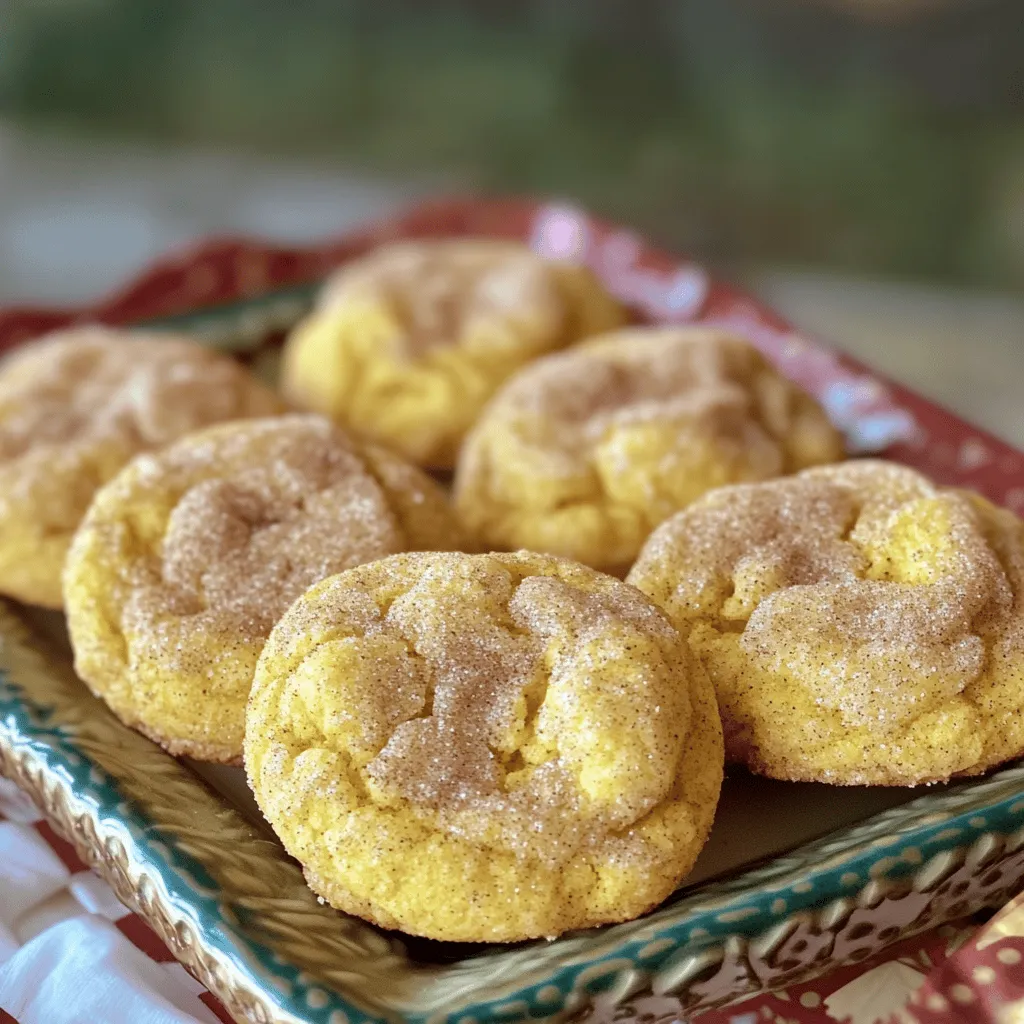
Get ready to indulge in the most delightful fall treat: Pumpkin Snickerdoodle Cookies! These soft, spiced cookies blend the cozy

- 1 block (14 oz) firm tofu, drained and pressed - 3 tablespoons honey (or agave syrup for a vegan option) - 3 tablespoons soy sauce - 1 tablespoon sesame oil The main ingredients form the heart of the dish. Firm tofu is the base. It adds protein and absorbs flavors well. Honey or agave syrup brings sweetness and richness. Soy sauce adds a salty, umami touch. Sesame oil enhances the overall flavor with its nutty scent. - 1 cup cooked quinoa (or rice) - 1 cup broccoli florets - 1 carrot, julienned - 1 red bell pepper, sliced Next, we add vegetables. Quinoa or rice serves as a filling base. Broccoli adds crunch and nutrients. Carrots bring color and sweetness. Red bell pepper adds a nice bite and vibrant hue. These vegetables make the bowl balanced and nutritious. - 2 green onions, chopped - Sesame seeds, for garnish Finally, we have garnishes. Chopped green onions add freshness and a mild onion taste. Sesame seeds give a slight crunch and nutty flavor. These simple touches elevate the dish's look and taste. They make your Air Fryer Honey Garlic Tofu Bowls even more appealing! To start, you need to cut the tofu and press it. First, drain the block of firm tofu. Then, wrap it in a clean kitchen towel. Place something heavy on top, like a cast-iron skillet. Let it sit for about 15 minutes. This removes extra moisture, which helps the tofu crisp up. Next, cut the pressed tofu into bite-sized cubes. Try to make them even for cooking. Place the cubes in a bowl. Now, it's time to marinate. In another bowl, whisk together honey, soy sauce, minced garlic, and sesame oil. Pour this mixture over the tofu. Gently toss it to coat every piece. Let the tofu marinate for at least 15 minutes. This step adds great flavor! Once your tofu is marinated, it's time to cook. Start by coating the tofu with cornstarch. Sprinkle the cornstarch over the marinated tofu. Toss gently to ensure an even coat. This will give it a crispy texture when cooked. Now, preheat your air fryer to 375°F (190°C). Place the tofu cubes in a single layer in the basket. Cook for 15-20 minutes. Shake the basket halfway through to ensure even cooking. The tofu should turn golden brown and crispy. While the tofu cooks, focus on the veggies. Steam or sauté broccoli, carrots, and bell pepper in a non-stick pan. Use medium heat for about 5-7 minutes. You want them tender, but not mushy. With everything cooked, it's time to assemble your bowls. Start by dividing the cooked quinoa or rice among bowls. Then, layer the sautéed veggies on top. Don’t forget the crispy tofu! For garnish, sprinkle chopped green onions and sesame seeds over the top. This adds a nice crunch and flavor. You can arrange the ingredients in a colorful rainbow pattern for a fun look. Enjoy your vibrant and delicious Air Fryer Honey Garlic Tofu Bowls! To get the best tofu, cornstarch is a must. It gives the tofu a nice, crispy crust. First, cut the tofu into small cubes. Then, after marinating, sprinkle the cornstarch over it. Toss the tofu gently to coat it evenly. This step ensures that every piece gets crispy in the air fryer. For air frying, set the temperature to 375°F (190°C). This heat works perfectly for getting that golden color. Cook the tofu for 15 to 20 minutes. Don’t forget to shake the basket halfway through. This helps the tofu cook evenly and get crispy on all sides. You can customize the marinade to match your taste. Want it spicier? Add some red pepper flakes. Prefer a citrusy twist? Squeeze in some lime juice. If you want a vegan option, you can swap honey for agave syrup. It gives a similar sweetness without using honey. Other sweeteners, like maple syrup, can also work well. When it comes to sides, consider adding a fresh salad or steamed greens. These can add a nice crunch and balance the bowl. You can also serve it with a side of pickled vegetables for extra flavor. For meal prep, you can store each component separately. This keeps the tofu crispy and the veggies fresh. Pack your quinoa, tofu, and vegetables in different containers. When you're ready to eat, just assemble your bowl. This way, you’ll have a fresh meal ready to go! {{image_2}} If you want to make this dish vegan, you can swap honey for agave syrup. Agave syrup gives a similar sweetness without using animal products. For protein, try chickpeas or tempeh instead of tofu. Both options add great flavor and texture. When it comes to grains, brown rice and quinoa are excellent choices. They are healthy and filling. You can also use cauliflower rice for a low-carb option. It adds a nice crunch and keeps the meal light. You can use many vegetables in your bowls. Year-round favorites include broccoli, bell peppers, and carrots. For seasonal produce, try zucchini in summer or Brussels sprouts in fall. Adding seasonal veggies boosts freshness and flavor. Mix and match to keep your bowls exciting. Store leftovers in an airtight container. Keep them in the fridge for up to four days. You can freeze the tofu, but the texture may change. If freezing, cut the tofu into cubes first. Place them in single layers in a freezer-safe bag. Use within three months for the best taste. The best way to reheat tofu is in the air fryer. Set it to 350°F (175°C) for about five minutes. This keeps the tofu crispy. You can also use a skillet on medium heat. Add a splash of water to avoid dryness. For bowls, reheat quinoa and veggies in the microwave for one to two minutes. Keep quinoa and vegetables in separate containers. This helps maintain their texture and taste. Store quinoa in the fridge for up to five days. For veggies, use them within three days for freshness. When meal prepping, pack each component in its own container. This makes it easy to mix and match throughout the week. You can marinate tofu for at least 15 minutes. This time allows the tofu to soak in the flavors. If you have more time, try marinating it for up to 2 hours. The longer it sits, the more flavor it absorbs. Just keep it in the fridge while it marinates to stay safe. Yes, you can use many sauces to change the flavor. Try teriyaki sauce for a sweet twist. You can also use spicy chili sauce for a kick. If you want a tangy taste, mix in some lime juice. Each sauce will give your tofu a unique twist. The best temperature for air frying tofu is 375°F (190°C). This heat crisps the outside while keeping the inside soft. Make sure to shake the basket halfway through cooking. This step ensures even cooking and a nice golden color on all sides. In this post, we explored a delicious tofu bowl recipe, focusing on key ingredients like firm tofu, honey or agave syrup, and tasty veggies. We covered how to prepare and cook tofu, along with tips for perfecting its texture and flavor. You can also customize your dish with grains and seasonal veggies. Finally, I shared storage tips to keep leftovers fresh. Enjoy crafting your own unique tofu bowls. They are healthy, fun, and easy to make, perfect for any meal!

Air Fryer Honey Garlic Tofu Bowls Flavorful Meal Prep

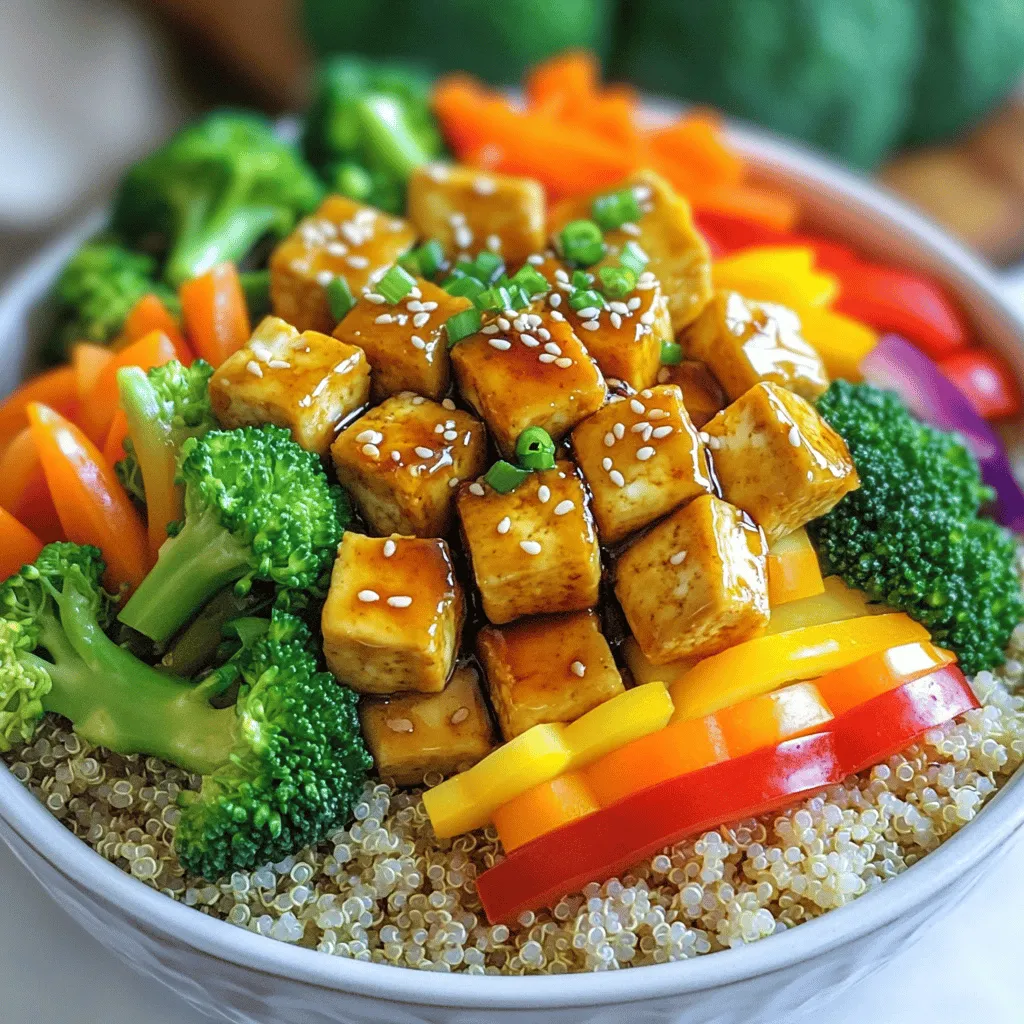
Are you ready to make a delicious, healthy meal? Air Fryer Honey Garlic Tofu Bowls are the perfect choice for

- 2 packs of instant ramen noodles (discard the seasoning packets) - 4 cups vegetable broth - 3 tablespoons soy sauce - 1 tablespoon sesame oil - 5 cloves garlic, minced - 1 tablespoon fresh ginger, grated - 1-2 red chilies, sliced (adjust for spice level) - 1 cup baby spinach - 1 cup mushrooms, sliced (shiitake or cremini recommended) - 1 green onion, sliced (for garnish) - 1 soft-boiled egg (optional) - Sesame seeds for garnish To make Min Spicy Garlic Ramen, gather these fresh ingredients. Instant ramen noodles make this dish quick and easy. The vegetable broth adds a rich base. Soy sauce brings in umami flavor, while sesame oil adds depth. Garlic and ginger give it a warm, fragrant kick. Red chilies let you control the heat. Use one for mild spice; add two for more heat. Baby spinach and mushrooms add texture and nutrients. You can top it all with a soft-boiled egg for creaminess and sliced green onions for color. Don't forget sesame seeds for that perfect crunch. This dish is versatile. You can adjust ingredients based on what you love. With these ingredients, you build a bowl of comfort. Each bite warms you from the inside out. 1. Heating sesame oil and sautéing garlic and ginger: Start by pouring the sesame oil into a large pot. Turn the heat to medium. Add minced garlic and grated ginger. Stir them for about 1-2 minutes until they smell great. 2. Adding chilies to enhance flavor: Next, slice the red chilies. Add them to the pot. Stir for another minute. This step brings out their heat and flavor. 3. Incorporating vegetable broth and soy sauce: Pour in 4 cups of vegetable broth and 3 tablespoons of soy sauce. Stir well. Bring the mixture to a gentle simmer. 1. Cooking noodles according to package instructions: While the broth simmers, cook the instant ramen noodles. Follow the package’s directions. Usually, it takes about 3-4 minutes. Drain the noodles and set them aside. 2. Simmering the broth with mushrooms and spinach: Slice the mushrooms and add them to the pot. Cook for about 5-7 minutes until they soften. Then, add 1 cup of baby spinach. Let it simmer for 2 more minutes until it wilts. 1. Ladling broth and toppings into bowls: In deep bowls, divide the cooked ramen noodles. Then, ladle the spicy garlic broth over the noodles. Make sure to include mushrooms and spinach. 2. Recommended presentation tips: If you like, top each bowl with a soft-boiled egg, sliced green onions, and a sprinkle of sesame seeds. This adds color and makes the dish look great! To make Min Spicy Garlic Ramen shine, adjust the spice with red chilies. Start with one chili for mild heat. If you like more spice, add a second. Fresh ingredients play a huge role in flavor. Use garlic and ginger for a rich base. Fresh spinach brings color and nutrients. Mushrooms add texture and depth. Sautéing is key for maximum flavor. Heat sesame oil first, then add garlic and ginger. Cook until fragrant, about 1-2 minutes. This step wakes up the flavors. Simmering is important for broth depth. After adding the broth, let it simmer. This helps blend all the flavors together. A good simmer also softens the mushrooms and spinach. {{image_2}} You can switch up the noodles in your Min Spicy Garlic Ramen. Instead of instant ramen, try udon or soba noodles. Udon gives a thick and chewy bite, while soba adds a nutty flavor. Both are tasty options. Adding proteins boosts the meal's heartiness. Tofu is a great choice for a vegetarian dish. Firm tofu holds up well in the broth. If you prefer meat, grilled chicken works nicely. It brings a savory depth to your soup. For a vegan option, simply omit the soft-boiled egg. The dish still tastes great without it. Use vegetable broth to keep it plant-based. If you need a gluten-free option, look for gluten-free noodles. Rice noodles or gluten-free ramen work well. They provide the same comforting feel without gluten. Enjoy the spicy garlic flavor without worry. To store leftover ramen, let it cool first. Place the noodles, broth, and toppings in separate containers. This keeps everything fresh and tasty. Use airtight containers to avoid any air exposure. Glass or BPA-free plastic containers are great choices. They help keep the flavors intact and prevent spills. To reheat your ramen, use a pot on low heat. Add a splash of water or broth to keep it moist. This helps maintain the rich broth flavor. For the noodles, try reheating them in water for just a minute. This avoids overcooking. Stir gently to keep them from clumping. Enjoy your ramen warm and delicious! Can I make this recipe in advance? Yes, you can make this ramen ahead of time. Cook the broth and noodles separately. Store them in different containers in the fridge. When ready to eat, heat them up and combine. This way, the noodles stay firm. What if I don't have vegetable broth? If you lack vegetable broth, use water or chicken broth. You can add more soy sauce and garlic for flavor. This will still give you a tasty ramen bowl. How can I adjust the spice level? To change the spice level, adjust the number of red chilies. Use fewer chilies for a milder dish. You can also add a dash of chili oil for more heat. Health benefits of the ingredients This ramen is packed with good stuff. Garlic and ginger boost your immune system. Spinach adds vitamins A and C. Mushrooms provide protein and fiber. This dish supports overall health. Caloric content and serving size information Each serving contains about 400 calories. This includes ramen, broth, and veggies. If you add a soft-boiled egg, it will increase the calories. Enjoy this dish as a satisfying meal. Min Spicy Garlic Ramen is easy and tasty. You need simple ingredients like noodles, broth, and garlic. First, sauté garlic and ginger in oil. Then, add chilies, broth, and soy sauce. Cook your noodles and combine everything. Don't forget to adjust spice levels to suit your taste. You can try different noodles or add protein like tofu. Store leftovers properly and reheat them just right. Enjoy your ramen, knowing it packs flavor and nutrition. Experiment, and make it your own. Your cooking journey starts here!

Min Spicy Garlic Ramen Delightful Comfort in a Bowl

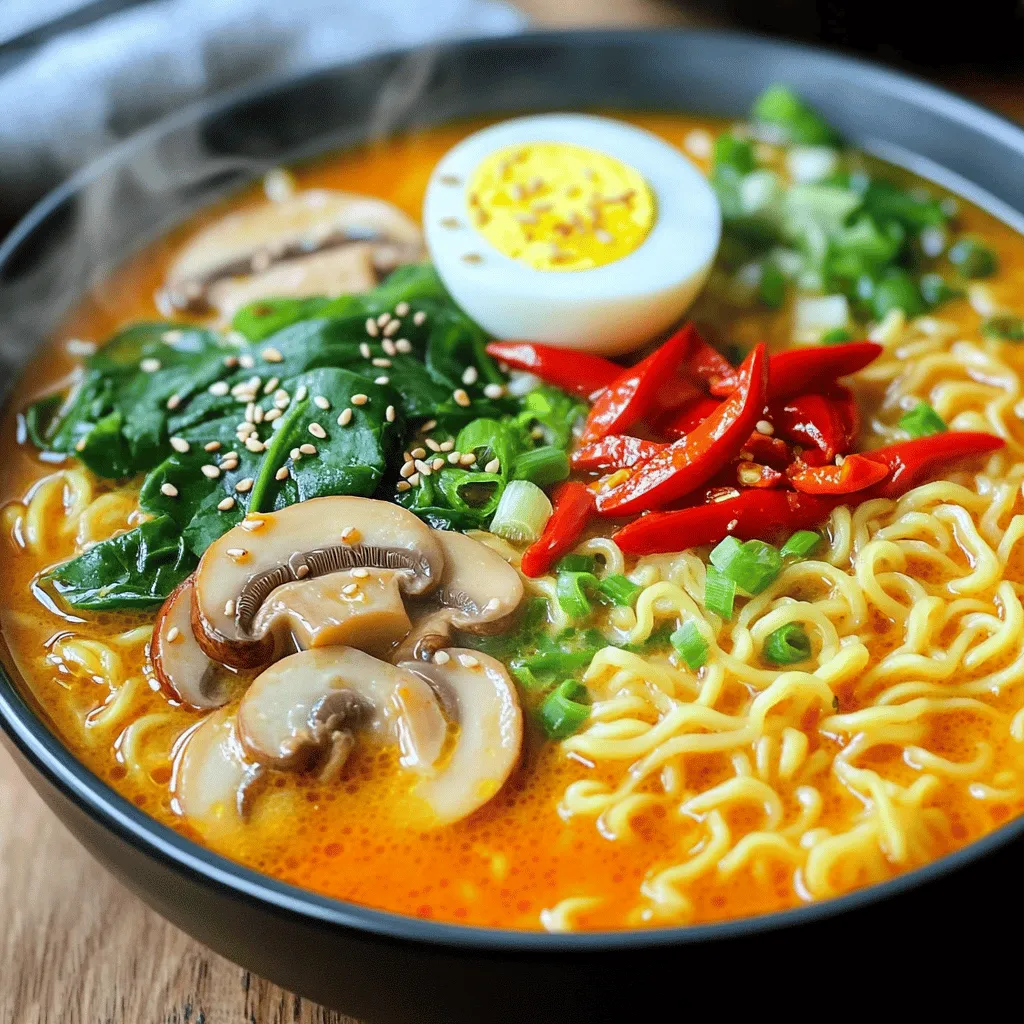
When chilly days call for comfort, nothing beats a warm bowl of Min Spicy Garlic Ramen. Imagine slurping up instant

For the scone base, you'll need: - 2 cups all-purpose flour - 1/4 cup granulated sugar - 2 teaspoons baking powder - 1/2 teaspoon baking soda - 1/4 teaspoon salt These dry ingredients form the backbone of your scones. The flour gives structure. Sugar adds sweetness. Baking powder and soda help them rise, while salt enhances flavor. Next, gather your wet ingredients: - 1/2 cup cold unsalted butter, cubed - 1 cup fresh or dried cranberries - Zest of 1 orange - 1/2 cup buttermilk - 1 large egg - 1 teaspoon vanilla extract The butter makes the scones rich. Cranberries add tartness and color. Orange zest brings brightness. Buttermilk, egg, and vanilla keep everything moist and flavorful. To make the glaze, use: - 1 cup powdered sugar - 2 tablespoons fresh orange juice - Zest of 1/2 orange This glaze adds a sweet and tangy finish. The powdered sugar gives it a smooth texture, while orange juice and zest enhance the scone's flavor. Start by gathering your tools and ingredients. You need a mixing bowl and a whisk. First, preheat your oven to 400°F (200°C). Line a baking sheet with parchment paper for easy cleanup. In a large bowl, mix 2 cups of flour, 1/4 cup of sugar, 2 teaspoons of baking powder, 1/2 teaspoon of baking soda, and 1/4 teaspoon of salt. This combo gives your scones a nice rise. Next, add 1/2 cup of cold, cubed butter. Use your fingers or a pastry cutter to mix the butter into the dry mixture. You want to create coarse crumbs. This step is key for a flaky texture. Then, stir in 1 cup of cranberries and the zest of 1 orange. This adds flavor and color. In a separate bowl, whisk together 1/2 cup of buttermilk, 1 large egg, and 1 teaspoon of vanilla extract. Pour this mixture into the dry ingredients. Stir gently until just combined. Be careful not to overmix, or your scones may become tough. Turn the dough out onto a lightly floured surface. Knead it gently a few times until it holds together. Pat it into a circle about 1 inch thick. Cut the dough into 8 wedges and place them on the prepared baking sheet. Now it’s time to bake the scones. Place your baking sheet in the preheated oven. Bake for 15 to 18 minutes or until they turn lightly golden. You’ll know they’re ready when you see a nice golden color on top. Remove them from the oven and let them cool slightly on the sheet. While the scones cool, let’s make the glaze. In a small bowl, combine 1 cup of powdered sugar, 2 tablespoons of fresh orange juice, and the zest of 1/2 orange. Whisk until smooth. This glaze adds a sweet and tangy layer to your scones. Once the scones have cooled for a bit, drizzle the glaze over them. This step makes them look beautiful and adds extra flavor. Enjoy your delightful cranberry orange scones! If you run out of an ingredient, don’t worry! Here are some easy swaps: - Flour: Use whole wheat flour for a healthier option. - Sugar: Try brown sugar for a richer flavor. - Buttermilk: Mix 1 cup of milk with 1 tablespoon of vinegar or lemon juice. Let it sit for 5 minutes. - Butter: Coconut oil works well as a dairy-free option. To bake perfect scones, follow these key tips: - Keep your butter cold. This helps the scones rise nicely. - Don’t overmix your dough. Mix just until it comes together. - Use a light touch when kneading. Too much force makes scones tough. - Cut the scones into even wedges. This helps them bake evenly. Presentation adds joy to your scone experience: - Serve scones on a pretty platter. A colorful plate makes them pop. - Dust with extra powdered sugar for a sweet finish. - Garnish with fresh cranberries and orange slices. This adds a festive touch. - Pair with tea or coffee for a delightful treat. Enjoy every bite! {{image_2}} You can change the flavor of your scones by adding nuts or spices. I love using chopped walnuts or pecans. These nuts add a nice crunch and a rich taste. If you want some warmth, add spices like cinnamon or nutmeg. Just a pinch goes a long way. Mix in about 1/2 cup of nuts or 1 teaspoon of spices with the dry ingredients. If you need gluten-free scones, you can still enjoy this recipe. Use a gluten-free all-purpose flour blend instead of regular flour. Make sure it has xanthan gum to help with texture. The rest of the steps stay the same. You may need to add a bit more buttermilk to get the right dough consistency. Check it as you mix. You can swap cranberries for other fruits in this recipe. Think about using blueberries or raspberries for a summer twist. Apples or pears work well in fall. Just be sure to chop them into small pieces. This keeps the dough from getting too wet. Adjust the orange zest to match the fruit you choose, and enjoy new flavors! To keep your cranberry orange scones fresh, store them in an airtight container. This helps keep them moist. Place parchment paper between layers if you stack them. It prevents sticking and keeps the glaze nice. Store them at room temperature for up to three days. If you need to store them for longer, consider freezing. Freezing scones is a great way to save them for later. Allow the scones to cool completely. Wrap each scone tightly in plastic wrap. Then, place them in a freezer-safe bag. Label the bag with the date. You can freeze them for up to three months. When you want to enjoy them, just thaw them overnight in the fridge. To reheat scones, preheat your oven to 350°F (175°C). Place the scones on a baking sheet. Heat them for about 5 to 10 minutes. This warms them up and restores their lovely texture. You can also use a microwave. Heat for about 15 to 20 seconds, but they may not be as crisp. Enjoy your delicious scones warm! Yes, you can use frozen cranberries. Just make sure to thaw them first. Pat them dry with a paper towel. This helps to reduce excess moisture in your scone dough. Frozen cranberries will work just as well as fresh ones in this recipe. To cut back on sweetness, reduce the sugar in the dough. You can use only 2 tablespoons of sugar instead of 1/4 cup. This change still allows for a delicious flavor. You can also skip the glaze or use less powdered sugar in the glaze. Other glazes can bring fun flavors. A lemon glaze works well; just mix powdered sugar with lemon juice. A simple milk glaze is another option; mix powdered sugar with a little milk until smooth. You can also try a maple glaze for a sweet twist. We covered all steps to make delicious scones. You learned about ingredients, like dry and wet elements. You also found tips for baking and storing your scones. Consider adding nuts or fruits for fun flavors. Remember, fresh scones taste best, but freezing works too. Use our answers to common questions for extra help. Now you can bake perfect scones anytime. Enjoy your baking journey!

Cranberry Orange Scones Glaze Delightful Recipe

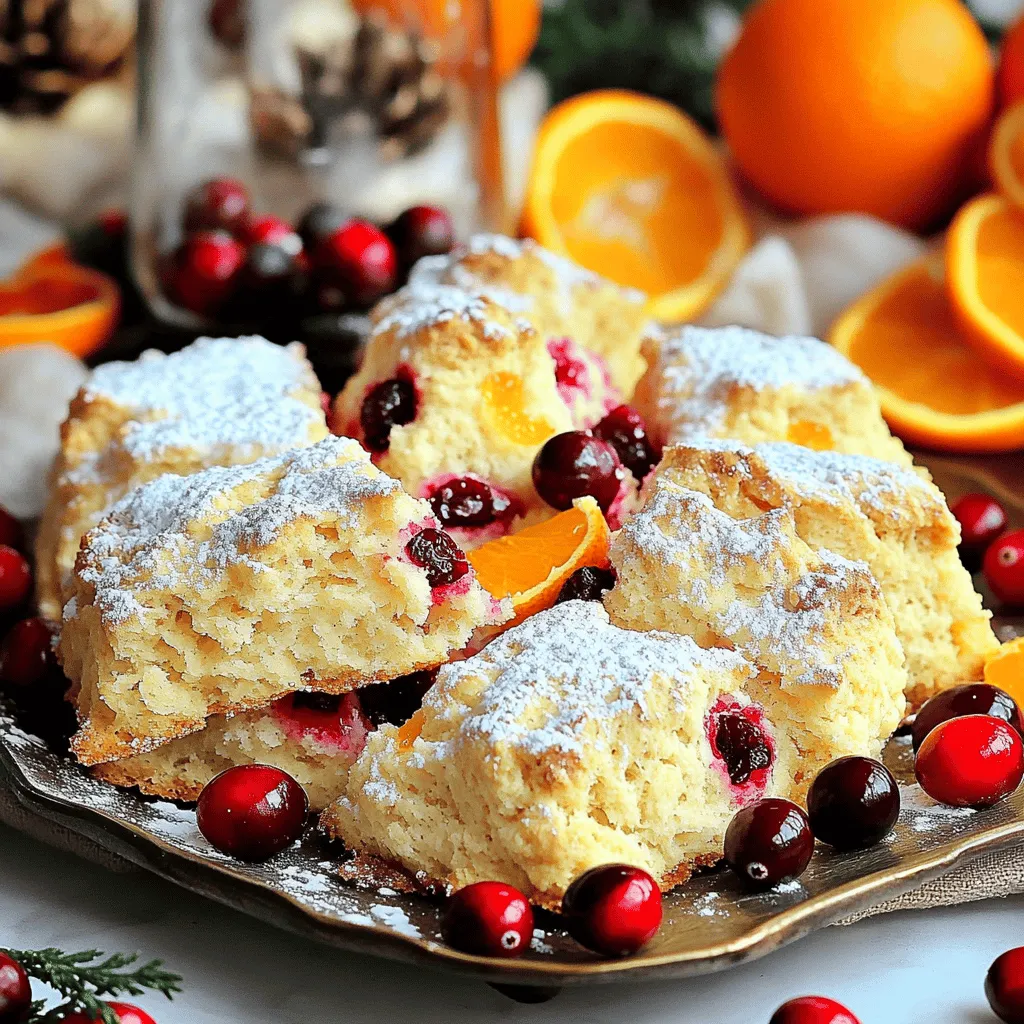
Get ready to indulge in a delightful treat! My Cranberry Orange Scones with a zesty glaze are perfect for any

To make this tasty dish, you will need: - 4 boneless, skinless chicken breasts - 4 cups low-sodium chicken broth - 2 medium carrots, sliced - 2 stalks celery, diced - 1 small onion, finely chopped - 2 cloves garlic, minced - 1 cup frozen peas - 1 can (10.5 oz) cream of chicken soup These key ingredients provide a rich base and flavor for your meal. The chicken adds protein, while the broth keeps everything moist. Carrots and celery bring in a nice crunch, and onion and garlic add depth. You will also need some simple spices to enhance the taste: - 1 teaspoon dried thyme - 1 teaspoon dried rosemary - 1 teaspoon black pepper - ½ teaspoon salt These spices work together to create a comforting aroma. Thyme and rosemary are classic herbs that pair well with chicken. Black pepper adds a gentle heat, and salt brings out all the natural flavors. Feel free to customize your dish with some fun extras: - Fresh herbs like parsley or dill - Chopped mushrooms for an earthy taste - Corn for a sweet pop These add-ins can change the dish’s flavor and texture. Fresh herbs add brightness, while mushrooms bring umami. Corn adds sweetness and color, making your meal even more appealing. Start by placing the four chicken breasts in the slow cooker. This is the base of our dish. Next, add four cups of low-sodium chicken broth. This broth adds great flavor. Now, slice the two medium carrots and dice the two stalks of celery. Add these to the pot. Chop one small onion and mince two cloves of garlic. Toss them in as well. For herbs, sprinkle in one teaspoon of dried thyme and one teaspoon of dried rosemary. Lastly, add one teaspoon of black pepper. Stir everything gently to mix the flavors. Cover the slow cooker and set it on low for six hours. You can also cook it on high for three hours. The chicken should be cooked through and tender at this point. After cooking, take the chicken breasts out. Use two forks to shred them into bite-sized pieces. Once shredded, return the chicken to the slow cooker. Now, stir in one cup of frozen peas and one can of cream of chicken soup. Mix well until everything is evenly combined. In a separate bowl, combine one cup of all-purpose flour, one tablespoon of baking powder, and half a teaspoon of salt. This is the base for our dumplings. Next, pour in three-quarters of a cup of milk and three tablespoons of melted butter. Stir until just combined. Be careful not to overmix. Now, drop spoonfuls of the dumpling batter on top of the chicken mixture in the slow cooker. Cover with the lid and cook on high for an additional 30 minutes. The dumplings should be fluffy and cooked through when they are done. Enjoy your cozy meal! To make your chicken and dumplings pop with flavor, use fresh herbs. Dried thyme and rosemary work well, but fresh herbs add a bright taste. You can also add a splash of lemon juice at the end for zest. Sautéing the onions, garlic, and veggies before adding them to the slow cooker brings out their sweetness. This step is simple but makes a big difference. For fluffy dumplings, don’t overmix the batter. Mix just until combined; lumps are okay. This keeps the dumplings light and airy. When you drop the batter on top of the chicken, make sure to leave space between each spoonful. This allows them to expand while cooking. Cooking them on high heat at the end is key. It helps them rise and become fluffy. Cooking times can change based on your slow cooker. If you cook on low, expect about six hours. For high, three hours works well. Always check the chicken for doneness. It should shred easily with forks. If you want dumplings sooner, start them right after shredding the chicken. They only need about 30 minutes on high. This way, you’ll have a warm meal faster. {{image_2}} You can easily change the protein in this dish. Instead of chicken, try turkey or pork. Both meats work well with the flavors. If you want a vegetarian option, use chickpeas or tofu. These choices add a nice twist to the recipe. Just remember to adjust cooking times if needed. Feel free to mix up the veggies in your chicken and dumplings. You can add green beans or corn for a pop of color. Sweet potatoes also make a great addition. They bring a slight sweetness that balances nicely with the savory broth. You can even add spinach or kale for extra nutrition. Just chop them small, so they cook well. If you want a different dumpling, try using biscuit dough instead. Store-bought biscuits work well and save time. Just drop them on top of the chicken mix like you would with homemade dough. For a gluten-free option, use almond flour or gluten-free baking mix. Adjust the liquid to get the right dough consistency. These options keep the dish fun and fresh! After you finish your chicken and dumplings, let them cool down. Place them in an airtight container. This helps keep the flavors fresh. Store them in the fridge for up to three days. When you want to enjoy them again, just take them out. If you want to save some for later, you can freeze leftovers. Just make sure they are cool first. Use a freezer-safe container or bag. This will keep them safe for up to three months. When you’re ready to eat, thaw them in the fridge overnight. To reheat your chicken and dumplings, you have a few options. You can use the microwave for quick heating. Just place a bowl in and heat for a few minutes. Stir halfway through. If you want to reheat on the stove, pour them in a pot. Heat over medium until warm. Add a splash of broth if it seems dry. Enjoy your meal! Yes, you can make this dish without cream of chicken soup. You can use a homemade white sauce. Just combine butter, flour, and milk. This will give you a creamy texture without the canned soup. You can also use sour cream for a tangy twist. You can tell the chicken is done when it reaches 165°F. Use a meat thermometer to check the thickest part. The chicken should be tender and easy to shred. If it falls apart with a fork, it’s perfect! Yes, frozen chicken breasts work great! Just add an extra hour to the cooking time. The slow cooker will safely cook them through. Always ensure the chicken is fully cooked before serving. This recipe for Chicken and Dumplings gives you simple steps and tasty ideas. You learned about key ingredients, spices, and optional add-ins. Follow my tips for flavors and fluffy dumplings. Don’t forget to explore fun variations using different proteins or veggies. Lastly, check storage info to keep leftovers fresh. Enjoy this comforting meal that you can easily adapt and share!

Savory Slow Cooker Chicken And Dumplings Recipe

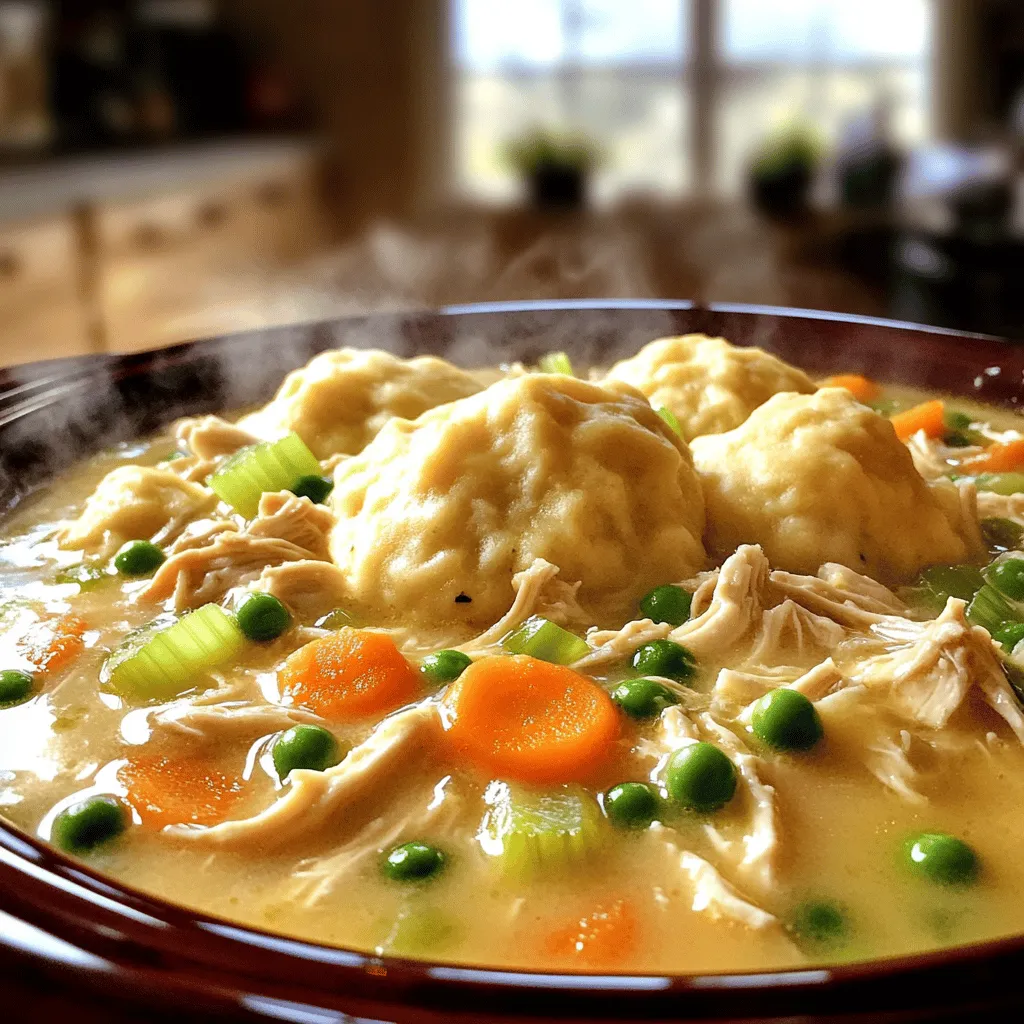
Are you ready to whip up a warm, comforting dish that everyone will love? This savory slow cooker chicken and

- Large shrimp (1 lb, peeled and deveined) - Unsalted butter (4 tablespoons, melted) - Garlic (3 cloves, minced) - Lemon (zested and juiced) - Smoked paprika (1 teaspoon) - Dried oregano (1 teaspoon) - Salt (1 teaspoon) - Black pepper (½ teaspoon) - Cherry tomatoes (1 cup, halved) - Asparagus (1 cup, trimmed and cut into 2-inch pieces) - Fresh parsley (chopped for garnish) - Lemon wedges (for serving) The main ingredients are simple yet full of flavor. I love using large shrimp because they cook quickly and stay juicy. Melted butter adds richness, while garlic brings a punch. The lemon zest and juice brighten the dish. For seasonings, I use smoked paprika for depth and dried oregano for an herbal note. Salt and black pepper are key for balance. The vegetables add color and texture. Cherry tomatoes burst with juice, while asparagus offers crunch. Fresh parsley gives a pop of green. Lemon wedges are perfect for squeezing on top before you dig in! - Preheat the oven to 400°F (200°C). - In a small bowl, mix melted butter, minced garlic, lemon zest, lemon juice, smoked paprika, dried oregano, salt, and black pepper. - Place the shrimp in a single layer on a large sheet pan. - Add the halved cherry tomatoes and cut asparagus to the pan. - Bake for 12-15 minutes until the shrimp are pink and cooked through. - Remove from the oven and let it cool for a bit. - Garnish with fresh parsley and serve with lemon wedges. To tell when shrimp are cooked, look for a bright pink color. They also curl into a C shape. If they stay straight, they might be overcooked. Avoiding overcooking is key. Bake shrimp for just 12 to 15 minutes. Remove them from the oven as soon as they turn pink. To boost flavor, try adding fresh herbs like basil or thyme. A pinch of red pepper flakes can add heat. Adjust acidity with lemon juice. A little more lemon juice can brighten your dish. Experiment with different amounts to find your perfect balance. For a beautiful plate, arrange shrimp on one side and veggies on the other. Use a large platter for serving, or individual plates for guests. Fresh parsley adds color and zest. Pair this dish with a crisp white wine or a light salad for a complete meal. {{image_2}} You can change the shrimp to other seafood like scallops or fish. I love using firm fish like cod or salmon. They cook well and soak up the lemon garlic sauce. If you want to use chicken, choose boneless, skinless chicken breasts. Cut them into bite-sized pieces. Cook them for about 20 minutes, as they need more time than shrimp. Feel free to mix in other veggies. Bell peppers, zucchini, or broccoli work great! You can use frozen vegetables too. In spring, try fresh peas or asparagus. In summer, use fresh corn. In fall, sweet potatoes or Brussels sprouts add a nice touch. The goal is to use what you have and enjoy the flavors. If you want to grill, preheat your grill to medium-high. Skewer the shrimp and veggies or use a grilling basket. Cook them for 5-7 minutes, turning often. For an air fryer, set it to 400°F (200°C). Cook the shrimp and veggies for about 8-10 minutes. Both methods give a nice char and keep the dish tasty. To store shrimp and veggies, let them cool first. Place the leftovers in an airtight container. This helps keep them fresh. You can use glass or plastic containers. Make sure they seal well to prevent air from getting in. The best way to reheat shrimp is in the oven. Preheat your oven to 350°F (175°C). Place the shrimp and veggies on a baking sheet. Heat for about 10 minutes. You can also use a microwave. Just heat in short bursts to avoid overcooking. Always check the temperature to ensure it is warm throughout. If you want to freeze the dish, let it cool completely. Place it in a freezer-safe container. Use it within three months for the best taste. Make sure to label the container with the date. This way, you remember when you made it. I recommend using large shrimp for this dish. They cook evenly and stay juicy. Look for shrimp that are peeled and deveined. Fresh shrimp gives the best flavor, but frozen works well too. Yes, you can use frozen shrimp. Just thaw them before cooking. To thaw, place them in cold water for about 15 minutes. This helps them cook evenly and taste better. To make this dish low-carb, skip the asparagus or replace it with low-carb veggies. You can use zucchini or bell peppers instead. This way, you keep the flavors and cut the carbs. This dish pairs well with rice or quinoa. You can also serve it with a fresh salad. Garlic bread is a great side, soaking up all the yummy butter sauce. Yes, you can prep the ingredients ahead. Mix the garlic butter, and store it in the fridge. You can also clean the shrimp and cut the veggies early. Just keep them in the fridge until you're ready to cook. This blog post covered a simple and tasty shrimp dish. We discussed key ingredients like shrimp, garlic, and veggies. I provided step-by-step instructions to help you bake the dish perfectly. You learned tips for enhancing flavor and presentation. I also shared variations and storage methods for leftovers. Cooking can be easy and fun. Try this recipe with your favorite mix of veggies. Don’t hesitate to adjust the flavors to suit your taste. Enjoy sharing this dish with family and friends!

Lemon Garlic Butter Shrimp Sheet Pan Delight

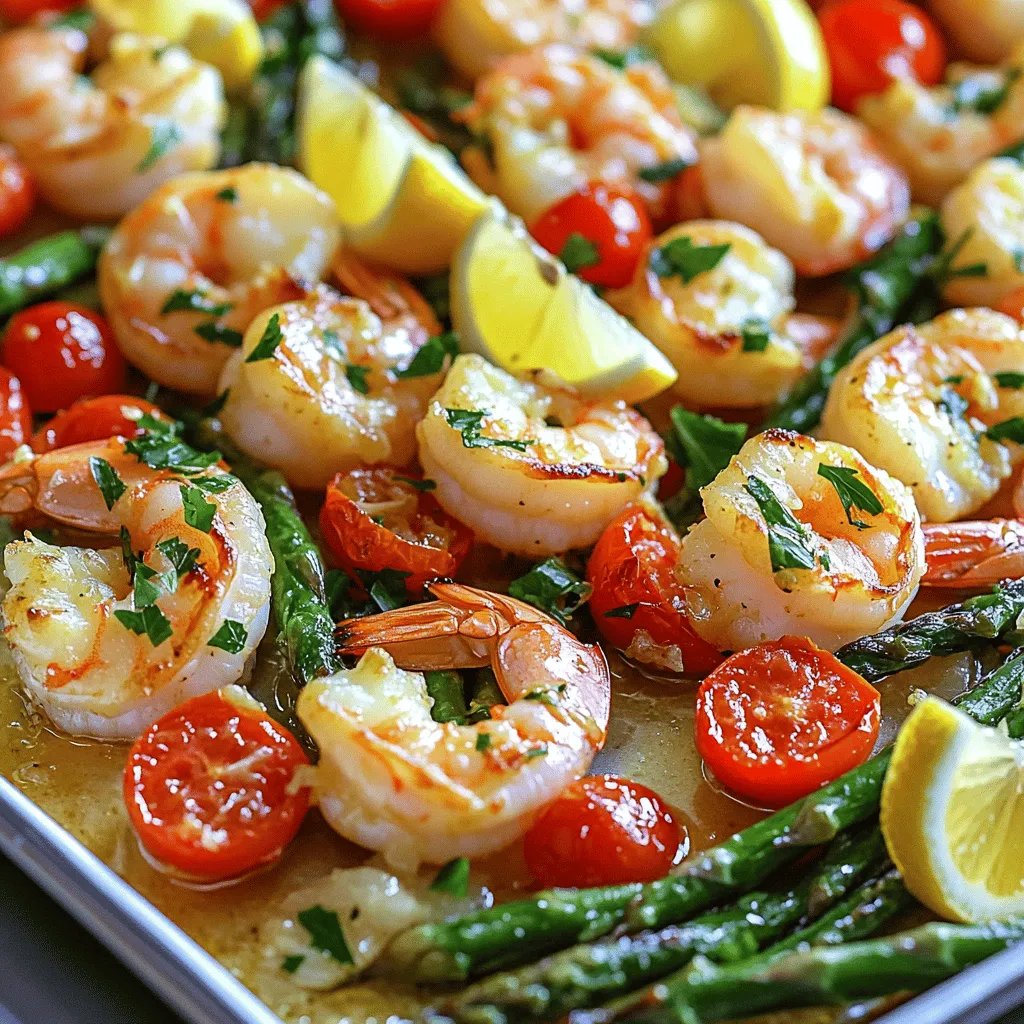
Welcome to my kitchen, where I’m excited to share my Lemon Garlic Butter Shrimp Sheet Pan Delight! This dish combines

To make the best bakery-style chocolate chunk muffins, you need the right ingredients. Here’s the list: - 2 cups all-purpose flour - 1 cup granulated sugar - ½ cup packed brown sugar - 1 tablespoon baking powder - ½ teaspoon baking soda - ½ teaspoon salt - 1 cup whole milk - ½ cup unsalted butter, melted and cooled - 2 large eggs - 1 teaspoon vanilla extract - 1 ½ cups semi-sweet chocolate chunks - Optional: Coarse sugar for topping Each ingredient plays a key role. The all-purpose flour gives structure, while sugars add sweetness and moisture. Baking powder and baking soda help the muffins rise. The milk keeps them tender, and eggs bind everything together. The chocolate chunks provide rich flavor and texture. If you want a bakery feel, sprinkle coarse sugar on top before baking. This gives a nice crunch and shine. First, heat your oven to 425°F (220°C). This high heat gets the muffins to rise. Next, prepare your muffin tin. You can use paper liners for easy cleanup or grease the cups with a bit of butter. In a large bowl, mix 2 cups of flour, 1 cup of granulated sugar, and ½ cup of packed brown sugar. Add 1 tablespoon of baking powder, ½ teaspoon of baking soda, and ½ teaspoon of salt. Whisk these together until they blend well. In another bowl, combine 1 cup of whole milk, ½ cup of melted butter, 2 large eggs, and 1 teaspoon of vanilla extract. Mix these until they are smooth and well blended. Pour the wet mix into the dry mix. Stir gently with a spatula until they just combine. Remember, it’s okay if the batter is lumpy. Next, fold in 1 ½ cups of semi-sweet chocolate chunks. Make sure the chunks spread out evenly in the batter. Now, divide the batter evenly among the 12 muffin cups. Fill each about ¾ full. For a lovely finish, sprinkle some coarse sugar on top of each muffin. Bake for 5 minutes at 425°F (220°C), then lower the oven to 350°F (175°C). Bake for another 15-18 minutes. Check with a toothpick. It should come out clean when done. Let the muffins cool in the tin for about 5 minutes, then move them to a wire rack to cool completely. To make bakery-style muffins, focus on mixing well but not too much. Mix the dry ingredients first. Combine flour, sugars, baking powder, baking soda, and salt. This step ensures an even rise. Next, mix the wet ingredients in a separate bowl. Blend milk, melted butter, eggs, and vanilla extract. When you combine wet and dry, stir gently. The batter should be slightly lumpy. This texture helps your muffins rise tall and stay fluffy. To check if your muffins are done, use a toothpick. Insert it into the center of a muffin. If it comes out clean, they are ready. If there's batter on the toothpick, bake a little longer. After baking, let the muffins cool in the tin for five minutes. Then, transfer them to a wire rack. This helps them cool evenly. For storage, keep them in an airtight container. They stay fresh for about three days at room temperature. Serve your muffins warm for the best taste. Dust them lightly with powdered sugar for a sweet touch. You can arrange them on a platter for a lovely display. For a creative twist, use individual paper muffin cases. This adds a fun look. You can even serve them with fresh fruit or a scoop of ice cream for an extra treat! {{image_2}} You can add nuts or fruits to change the taste. Try chopped walnuts or pecans for a nice crunch. Diced strawberries or blueberries also work great. For the chocolate chunks, mix it up! Use dark chocolate, white chocolate, or even mint chocolate. Each type brings a unique flavor to your muffins. If you need gluten-free muffins, use gluten-free flour blends. They work well as a substitute. You can also make your muffins dairy-free. Replace whole milk with almond milk or oat milk. Use coconut oil instead of butter for a dairy-free option. These swaps keep your muffins tasty and help meet dietary needs. Add gourmet toppings for a special touch. A drizzle of chocolate glaze gives a rich finish. You can also sprinkle sea salt for a sweet and salty mix. For unique flavors, try adding a touch of cinnamon or a bit of orange zest. These small changes can make your muffins stand out and impress your friends! Let your muffins cool completely on a wire rack. This step keeps them from getting soggy. Once cool, store them in an airtight container. You can use a plastic or glass container with a lid. This keeps them fresh for about three days. If you want to enjoy them later, you can wrap them in plastic wrap first. To save muffins for later, freezing is a great option. Place cooled muffins in a freezer bag. Be sure to press out all the air before sealing. They can last up to three months in the freezer. When you want to enjoy one, take it out and let it thaw at room temperature. To reheat, place the muffin in the microwave for about 15 seconds. You can also warm it in an oven at 350°F (175°C) for 5-10 minutes. Enjoy that fresh-baked taste again! To make your muffins fluffy, use these tips: - Use fresh baking powder for lift. - Don’t overmix your batter; mix until just combined. - Make sure your ingredients are at room temperature. - Fill muffin cups about three-quarters full for a good rise. By following these steps, you can create light and airy muffins. Yes, you can use chocolate chips. However, here are the differences: - Chocolate chunks are thicker and give a nice gooey texture. - Chips hold their shape better when baked. If you prefer a melty interior, go for chunks. If you want a more consistent texture, chips work well. These muffins pair well with many drinks and toppings: - Coffee or tea enhances the chocolate flavor. - Milk balances the sweetness. - Toppings like whipped cream or ice cream can make a treat. You can also add fresh fruit like strawberries for a fresh twist. To keep your muffins moist, try these storage tips: - Cool muffins completely before storing. - Use an airtight container to keep them fresh. - For longer storage, freeze muffins in a freezer bag. When ready to eat, thaw and reheat in the oven or microwave. These methods help maintain their moisture and taste. This blog post covered how to make delicious chocolate chunk muffins. We explored each ingredient, from flour to chocolate, and learned the best steps for mixing and baking. I shared tips for a bakery-style finish, plus creative variations to try. Remember, the key lies in proper mixing and storage. Enjoy your muffins fresh or stored for later. I hope you feel inspired to bake your own and experiment with flavors!

Bakery Style Chocolate Chunk Muffins Delightful Treat

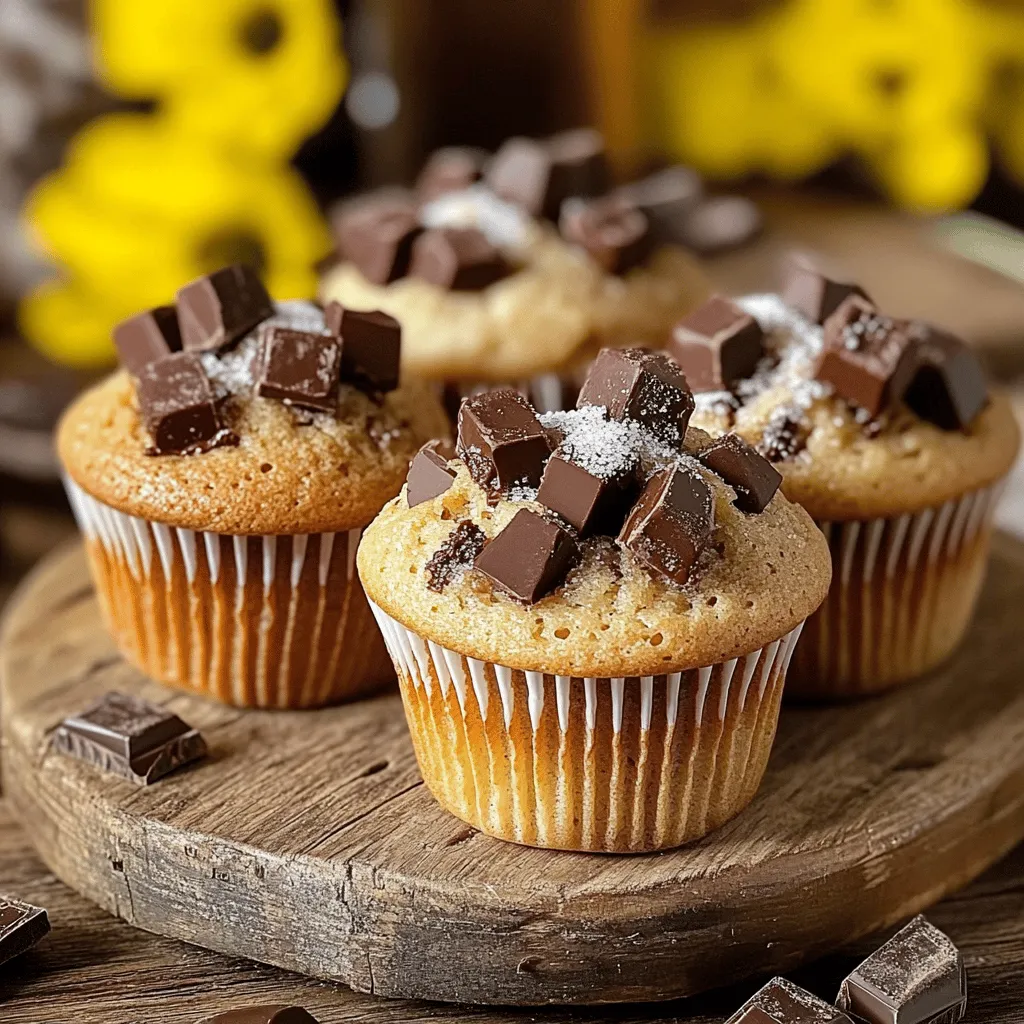
If you crave muffins that taste like they just came from a bakery, you’re in for a treat! I’ll show

Older posts
Newer posts
← Previous Page1 … Page16 Page17 Page18 … Page84 Next →

dsad

© 2026 Foodish Talk • Built with GeneratePress

Our Policies

  • Copyright Policy
  • Cookie Policy
  • GDPR Policy
  • Privacy Policy
  • Disclaimer
  • Terms Of Use

More Information

  • Home
  • About
  • Contact
  • Appetizers
  • Dessert
  • Dinner
  • Drinks
©2026, Foodish Talk About Back To Top